

Ginger Electronic ZXmore, ZXmaster User Manual
ZXmore & ZXmaster
User manual
designed by ginger-electronic.com
V1.9 - 06/2016 ZXmore & ZXmaster – user manual page 1 from 29

Contents
ZXmore & ZXmaster.......................................................................................................1
User manual..........................................................................................................1
Description:...................................................................................................................3
Connectors:...........................................................................................................4
Keyboard:.............................................................................................................5
First steps with ZXmore:.................................................................................................6
ROM Switch...........................................................................................................6
Reset switch..........................................................................................................6
Handling with double-shift (DS)...............................................................................7
Switch to instance (DS-0 to DS-7)............................................................................7
Reset, warm boot, cold boot (DS-R).........................................................................8
Power Mode (DS-P)................................................................................................8
Compatibility mode (DS-C)......................................................................................8
LOAD via USB (DS-L)..............................................................................................9
Debug functions:..........................................................................................................10
Test mode (DS-T).................................................................................................10
USB load test (DS-L).............................................................................................10
Update function:..........................................................................................................11
Update USB firmware............................................................................................11
Update ZXmaster through external update utility......................................................12
Recover of broken ZXmaster instance (emergency update)........................................13
Changes in release 1.7:.................................................................................................14
Speed optimization...............................................................................................14
ASCII mode / 128 char display mode......................................................................14
Load utility (load via USB).....................................................................................15
Debug monitor (DS-D)..........................................................................................16
Changes in release 1.8:.................................................................................................17
Configuration of instances......................................................................................17
Tools (load, save, debug)......................................................................................18
Changes in release 1.9:.................................................................................................19
Multitasking Mode.................................................................................................19
Extended SAVE.....................................................................................................20
System backup and restore....................................................................................20
VDRIVE interface..................................................................................................20
Appendix.....................................................................................................................22
Technical data ZXmore (hardware).........................................................................22
Features ZXmaster firmware..................................................................................22
Hardware concept of ZXmore.................................................................................23
Hints for programming the latches..........................................................................27
Legal notices........................................................................................................29
Disclaimer...........................................................................................................29
V1.9 - 06/2016 ZXmore & ZXmaster – user manual page 2 from 29

Description:
This manual describes the operation of ZXmore with the supplied firmware ZXmaster.
ZXmore is an 8 bit computer system which is compatible to many systems based on the Z80
processor, especially to the Sinclair systems ZX80, ZX81 and ZX Spectrum plus the CP/M
system developed Digital Research (*). Programs and data can be stored on and read from a
simple USB flash medium (USB drive).
It is possible to use a serial terminal via an optional USB/RS232 adapter or just use the inbuild
keyboard and connected monitor or TV to the video connector in 40 char mode. An USB flash
medium will also be used as disk drive to store and read data via CP/M.
The ZXmore is equipped with an inbuild keyboard with 40 keys, a video (RCA) connector for
use with monitors or a TV (composite video monochrome) and 2 USB host ports for connection
of USB mass storage devices and other peripherals. Original hardware modules for ZX80 or
ZX81 can be used via the build-in expansion port (slot edge connector).
The ZXmore has 512k flash ROM and 512k RAM which is divided into eight separate instances
with 64k ROM and 64k RAM which overlaps in the 64k address room. The border between ROM
and RAM can be moved in steps of 4k in any direction. The first instance (0) maintains all
other instances and deals with additional hardware like USB peripherals, video output and
keyboard input.
The other seven instances can be configured with different options and different operating
systems (firmware ROMs) which can be operated in parallel changed by keypress or even in
multitasking mode. Several systems or firmware ROMs can be used concurrently without
starting them new when they are switched. The memory layout can be configured individually
per instance and any additional driver can be loaded during startup.
The firmware ZXmaster handles the configuration and operation of all instances or operating
systems. The available ROM images to be used with the ZXmore are published under GPL or
CC (creative commons) and may be used freely by the user. These additional firmware ROMs
are not part of ZXmaster and ZXmaster is not based on these ROMs. ZXmaster can clone any
Z80 system and is not fixed on some special ROM as long as hardware drivers for dealing with
video display and keyboard are available or adapted.
More technical information on ZXmore, ZXmaster and available firmware ROMs to use or
supported are available in the appendix.
The manual refers to the first release 0.9 of ZXmaster with basic functionality which will be
improved with newer versions from time to time.
(*) The current available release 0.9 of ZXmaster supports only programs for the systems ZX81 and ZX80 and loading
programs from a USB flash medium. Further releases support saving program and data on USB as well as support of
ZX Spectrum with monochrome display and use of CP/M.
V1.9 - 06/2016 ZXmore & ZXmaster – user manual page 3 from 29
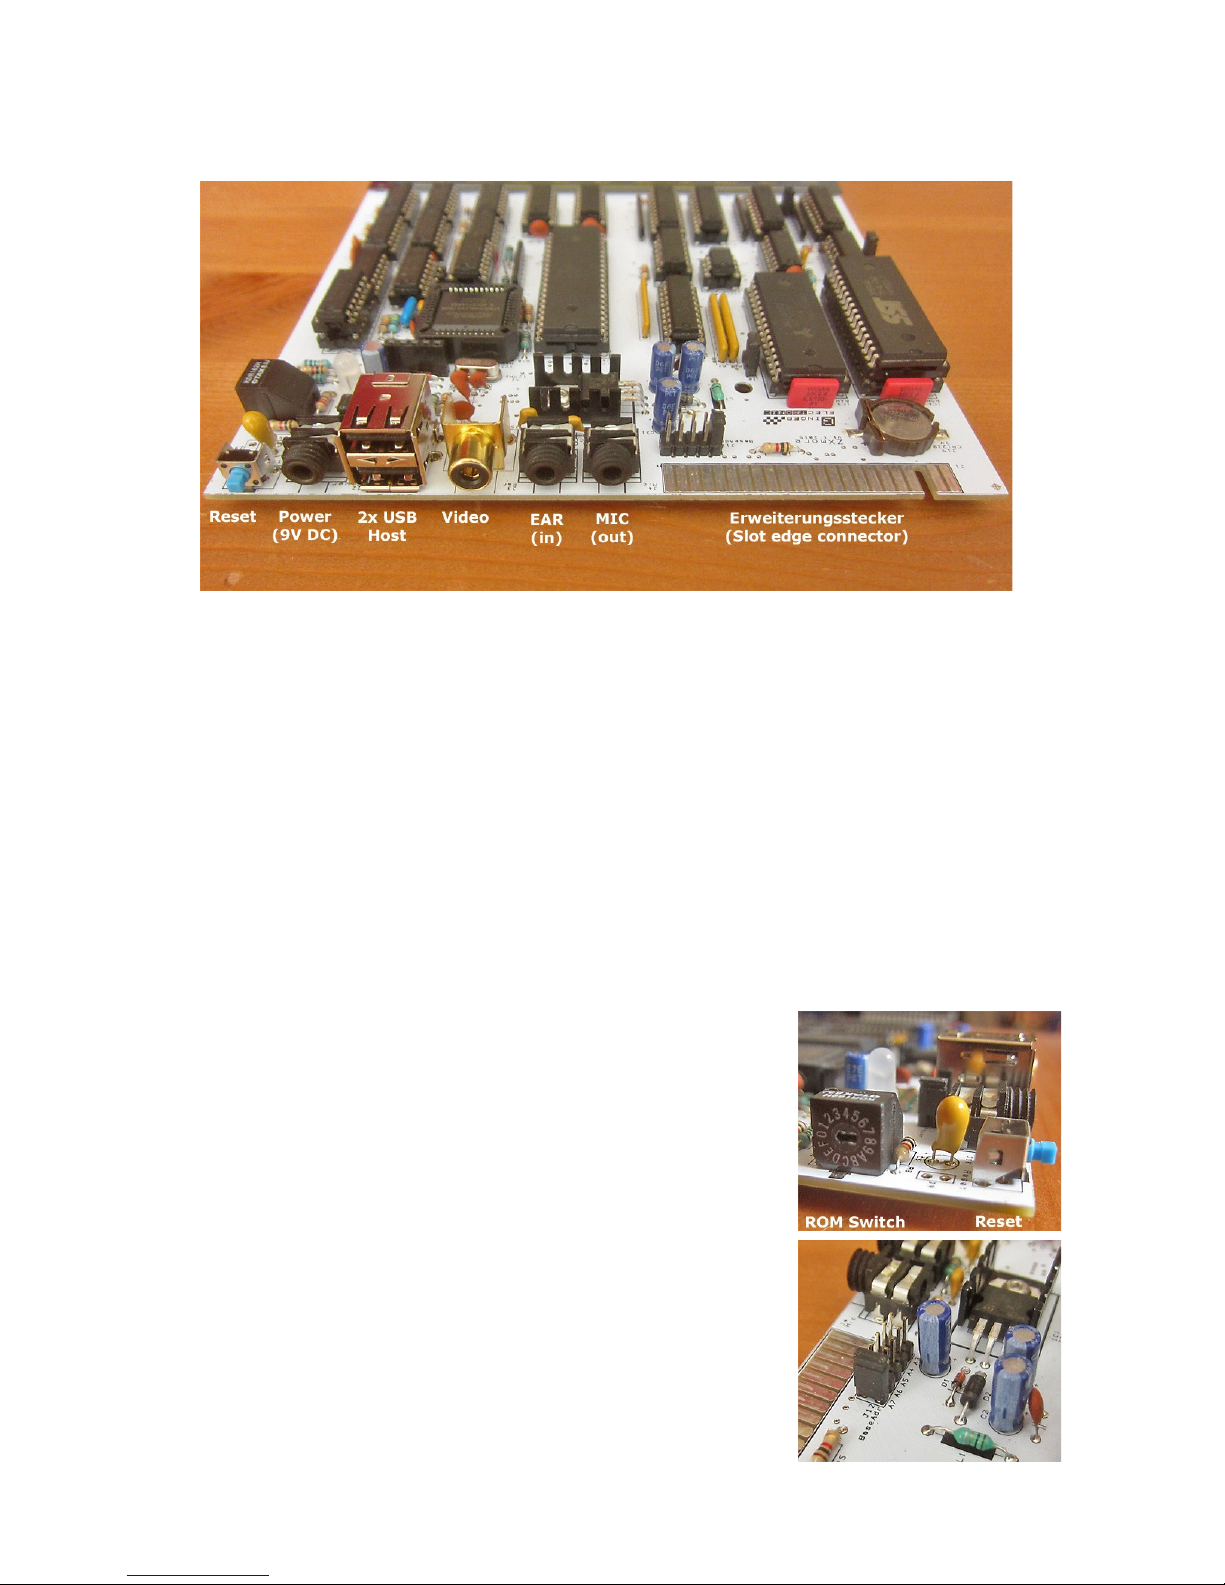
Connectors:
In the picture below you will find all connectors of ZXmore:
Reset allows reset of the current instance and return to the ZXmaster control software.
Power is a 3.5mm audio jack for connection of a power supply with 9V DC, 250mA.
Polarity is plus at the tip and minus at the ring of the plug. Alternatively the ZXmore can be
supplied with power with a USB power supply (5V).
USB represents two host ports and can be used to connect flash drives or other peripherals
Video is a RCA jack for connecting a monitor or TV as display with corresponding input.
The signal is of type composite video monochrome.
EAR is used to connect an audio cassette recorder to load a program from an original ZX80 or
ZX81 cassette (for compatibility). Optional for ZXmore V2.
MIC is used to save programs or data to an audio cassette with audio signals instead of USB.
Optional for ZXmore V2.
Slot edge connector is the expansion port for using ZX80 oder ZX81 hardware add-on's.
ROM Switch can be used to switch the instances manually in
position 1-7 or by control of the ZXmaster software in position 0.
Positions 1-7 can be used with ZX80 or ZX81 only (corresponding
firmware ROM programmed in flash ROM assumed) due to a
suitable default configuration.
ZXmaster can configure the ZXmore for some more firmware
ROMs like for ZX Spectrum or CP/M.
Optional for ZXmore V2.
J12 can be used to choose a base i/o address for the additional
hardware features provided. Default address to be used should be
0x7C up to 0x7F but may be changed by the user when additional
hardware requires this address. More information on usage of i/o
addresses can be found in the appendix of this manual.
V1.9 - 06/2016 ZXmore & ZXmaster – user manual page 4 from 29
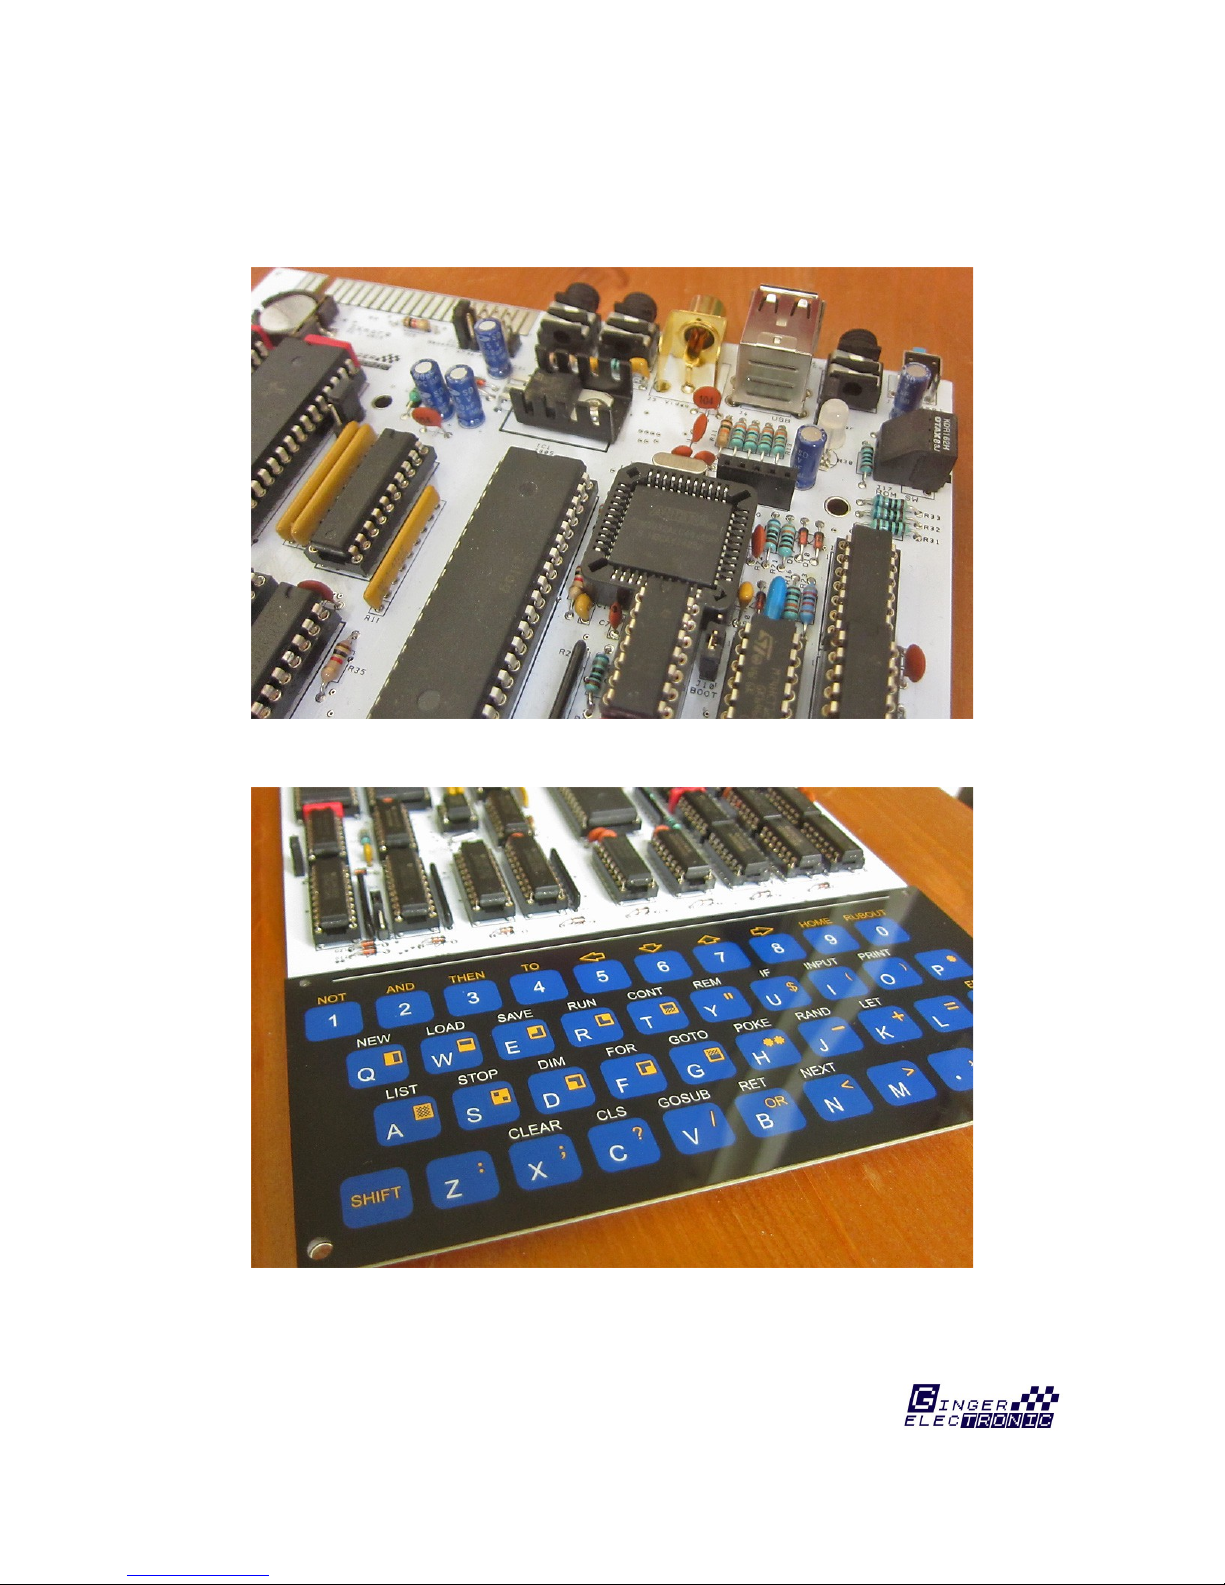
Keyboard:
The ZXmore is equipped with a keyboard with 40 keys in a matrix of 4 x 10 keys.
The allocation with keywords and functions differs from the chosen ROM in the instance (for
example ZX80 or ZX81) und is only for the letters, numbers and some special chars identical.
During construction of ZXmore you have to decide whether to use the ZX80 or ZX81 keyboard
layout.
The firmware ZXmaster allows translation of one keyboard layout into another to use the same
layout for different ROMs. Loading and starting programs do not require special keywords.
LOAD and RUN are identical for both layouts. Different layout is a matter only during active
programming.
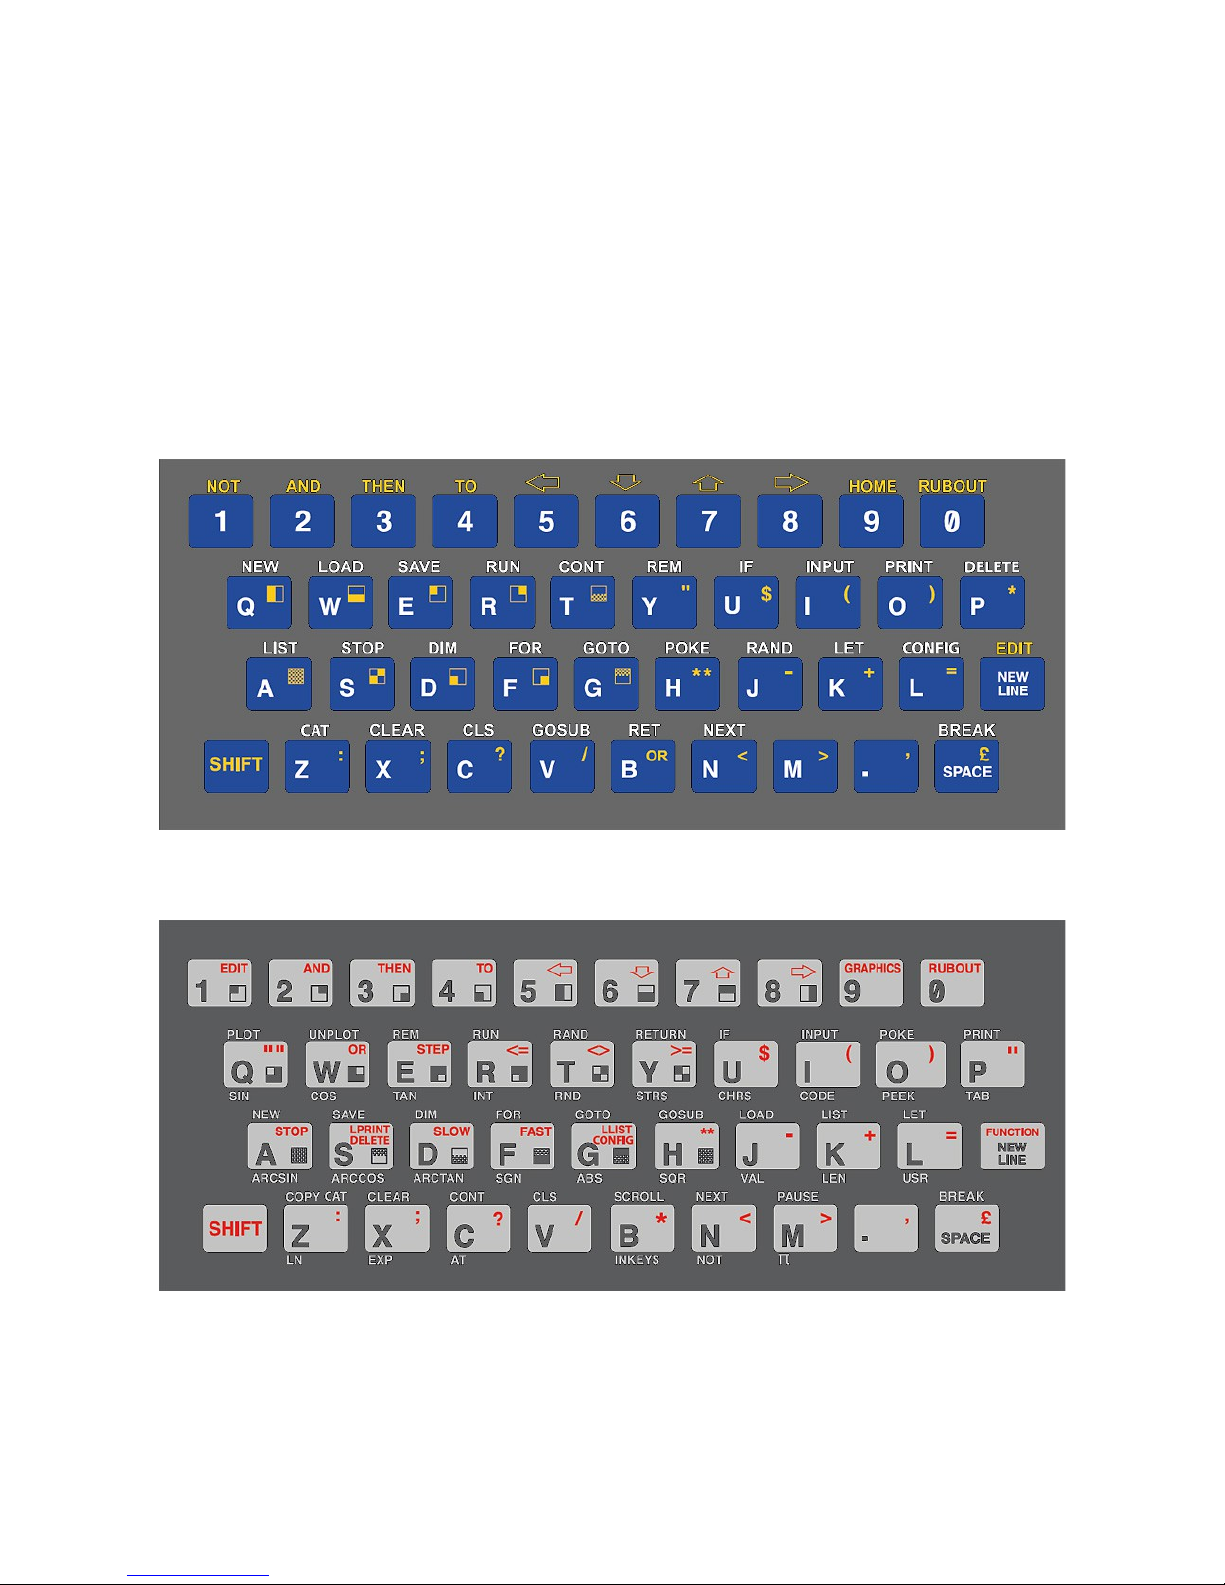
Layout ZX80:
Layout ZX81:
V1.9 - 06/2016 ZXmore & ZXmaster – user manual page 5 from 29
First steps with ZXmore:
The ZXmore can be operated as desired with manual switching of the ROMs or alternatively
with soft switching via the keyboard with ZXmaster.
ROM Switch
Position 1-7 choose a specific ROM firmware which
must have been programmed before in the flash
ROM.
Only 8 positions are used from that switch, 8-F have
the same function as 0-7. Position 0 selects the
ZXmaster control software which allows soft switching
and even multitasking on request.
Position 1-7 are useful only for ZX80 and ZX81
compatible ROMs because of a default setup after
switch on for RAM and ROM size and position and
some other control signals. Manual programming of
the internal registers is described in the appendix.
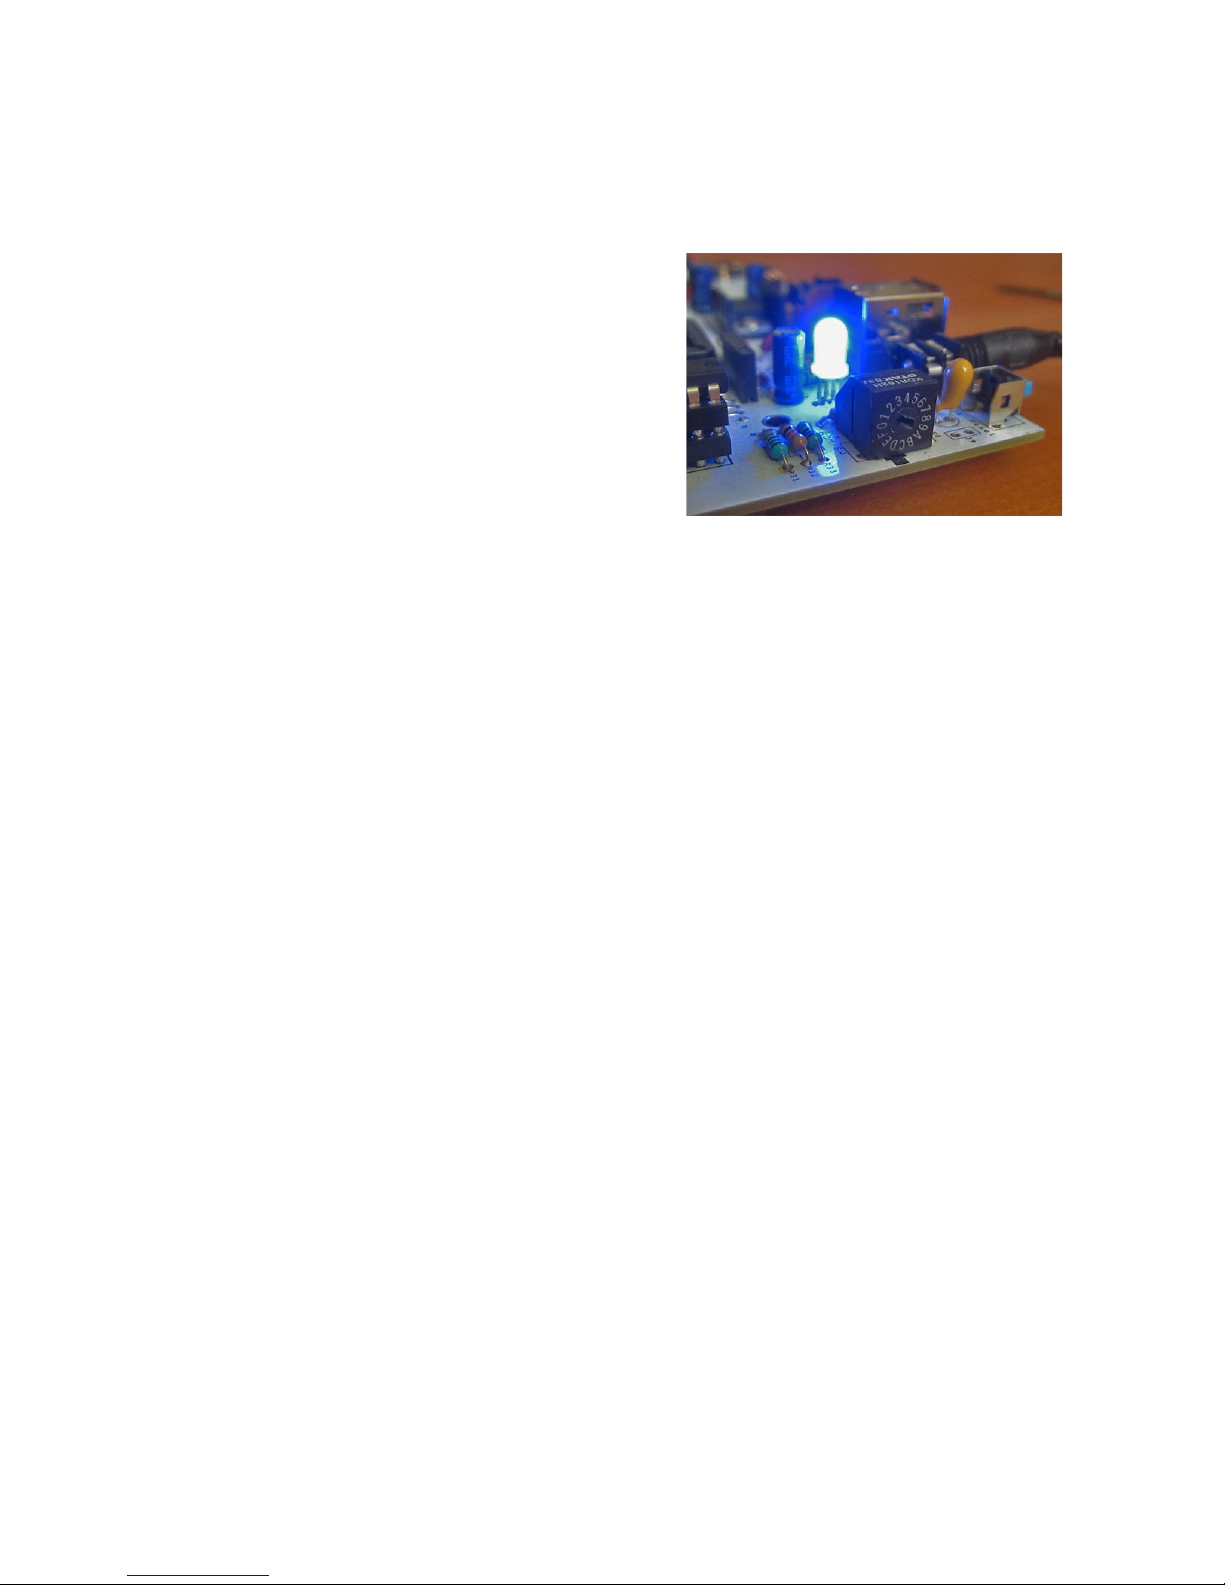
A colored LED (rgb) shows the active instance with a different color regardless if the instance
is running from the manual switch or from ZXmaster control software:
0 = dark/off
1 = blue
2 = green
3 = cyan
4 = red
5 = violet
6 = yellow
7 = white
Manual switching has the highest compatibility because the ZXmaster control routines are not
used and can not disturb any unknown program with some maybe hidden feature / hardware
control. But some functions are not available in manual operation liek change of keyboard,
switching of instances, USB drivers for loading/saving data and some special display modes are
maybe not available.
Additionally the parallel operation of several instances is not available and after every switch
the system is reset and does a new power-up (clear of RAM, etc.).
Reset switch
The reset switch functions different depending on the context used. In manual operation
(position 1-7) the switch does a cold start of the running instance. When pressing in position 0
the ZXmaster switches back to instance 0 and does a warm start only. In this context the
instance information, status, RAM contents, etc. are not destroyed and can be continued when
switching back to these instances later. The last running program will be continued.
It is possible and likely that the last running instance where reset was pressed is lost or
crashed as the last status could not be catched by the ZXmaster firmware and a restart may
fail. But all other instances are „frozen“ and can be continued after switch back safely. Due to
the concept with own and dedicated RAM areas the other instances can not be disturbed under
normal circumstances.
V1.9 - 06/2016 ZXmore & ZXmaster – user manual page 6 from 29
Handling with double-shift (DS)
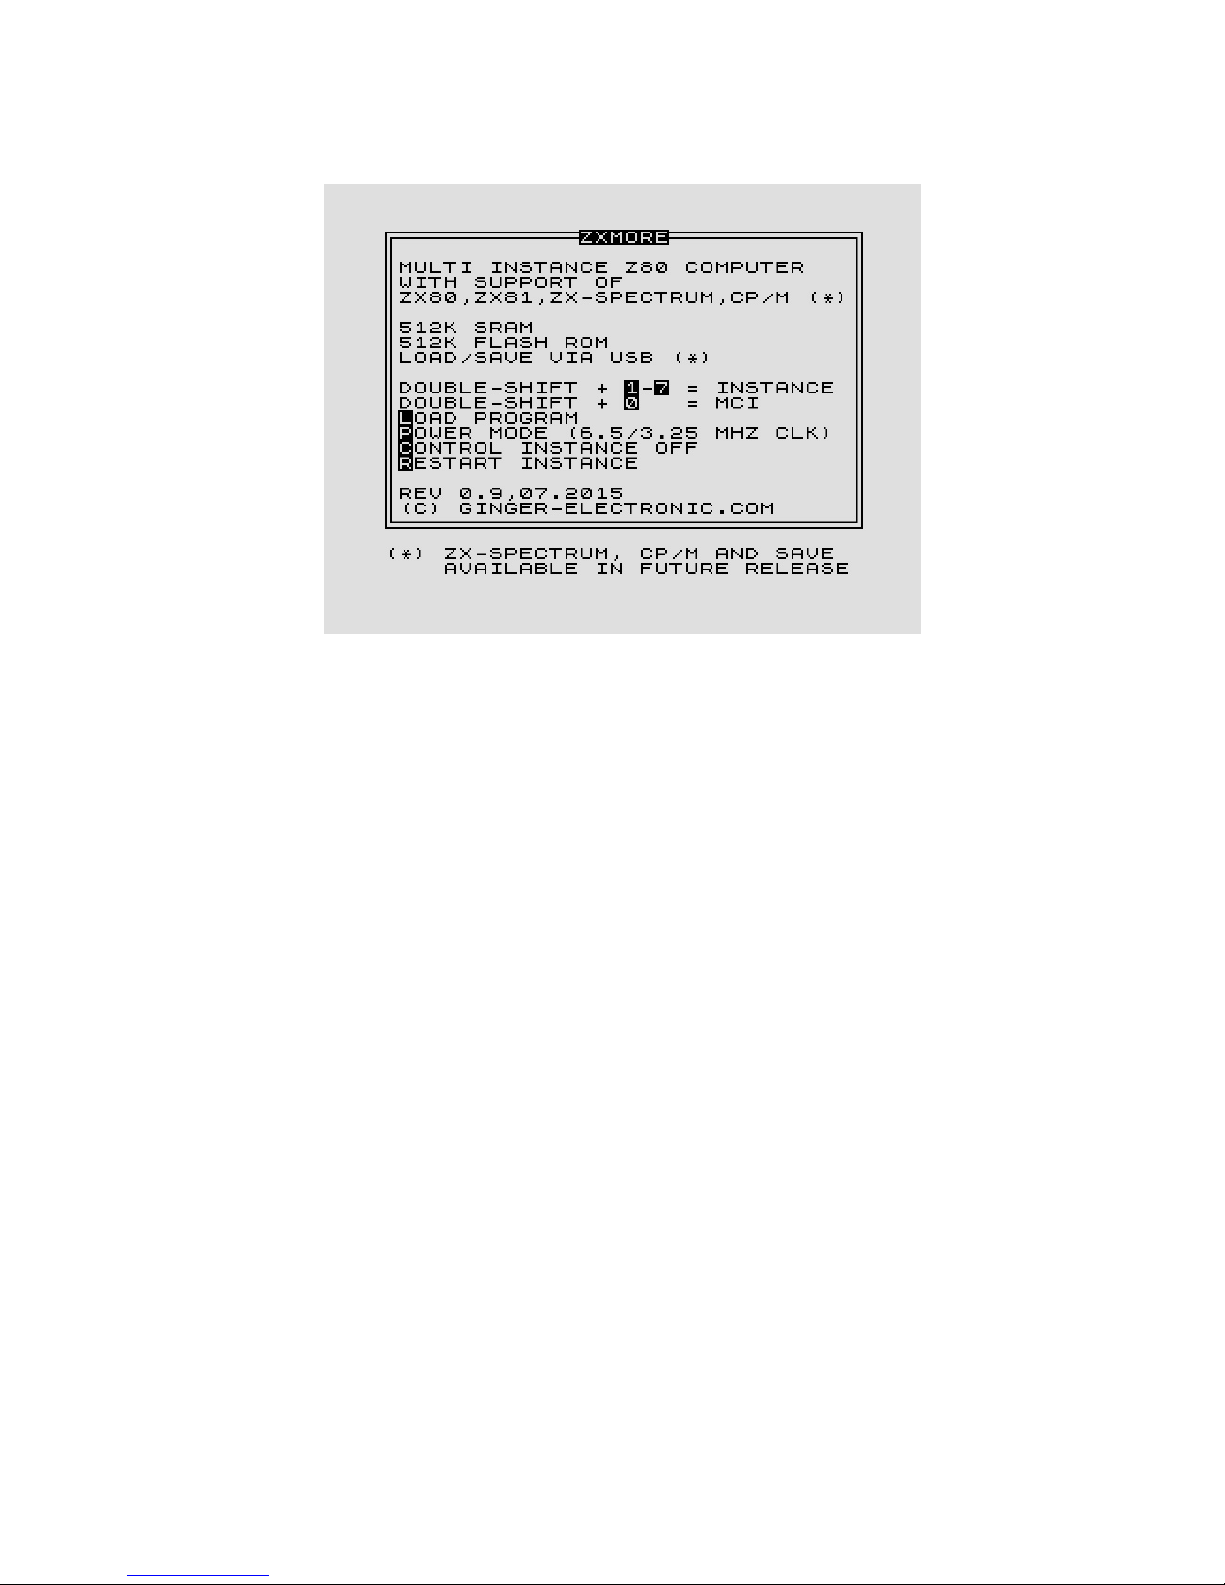
After switching on you should be welcomed with the start screen:
All control commands of ZXmaster function with a double-shift key (DS shortened in the
manual) by shortly pressing the shift key twice consecutively and a second key after (showed
invers in the start screen.
The key have to be pressed short and fast – the maximum timeout between two keys may not
exceed 1 second for save detection. The reason for this control keys is that the normal ROMs
like ZX80 or ZX81 wouldn't influenced with this key combination (double-shift has no special
meaning).
All double-shift keys are processed from the ZXmaster only and not detected by the
running instance.
Switch to instance (DS-0 to DS-7)
With DS and 0 to 7 you can switch to the desired instance. If the instance is first used it will be
automatically initialized and a second call will just continue the program in the instance. The
firmware ZXmaster saves the information for all instances and stores all registers in memory
and the instruction pointer.
Instances can be interrupted any time by switching to another instance and are continued after
switching back. Technical the switching is based on NMI which are catched automatically from
instance 0 which handels all necessary action. Even the keyboard processing is done by
instance 0 only and will be injected to the current instance.
V1.9 - 06/2016 ZXmore & ZXmaster – user manual page 7 from 29
Reset, warm boot, cold boot (DS-R)
Additionally to the reset switch it is possible to perform a reset by software through pressing
DS-R key combination. Used in instance 1-7 the current instance will be restarted. Pressing the
reset switch will do a change to instance 0 but only with a warm boot. There are circumstances
where a cold start is required which can be forced by pressing DS-R in instance 0 which will
reset all other instances as well.
A short interrupt of the power supply results in a warm start only. There maybe situations
where an instance may hang or crashed and pressing DS-R for a single instance won't work
because the display file is corrupt for example. In this case the instance 0 doesn't get control
back and all double-shift commands won't work anymore. It is recommended to press the
reset key followed by a DS-R combination in instance 0 to solve this.
Power Mode (DS-P)
The default clock speed is 3.25 MHz for ZX80 or ZX81 hardware.
The effective clock speed is
much lower with approx. 0.81
MHz because the display
routines require much time of
the cpu and the user program
is interrupted many times.
The ZXmore can compensate
this disadvantage by doubling
the clock speed outside the
video routines to 6.5 MHz. The
resulting speed increases a bit
more than double due to some
more hardware optimizations.
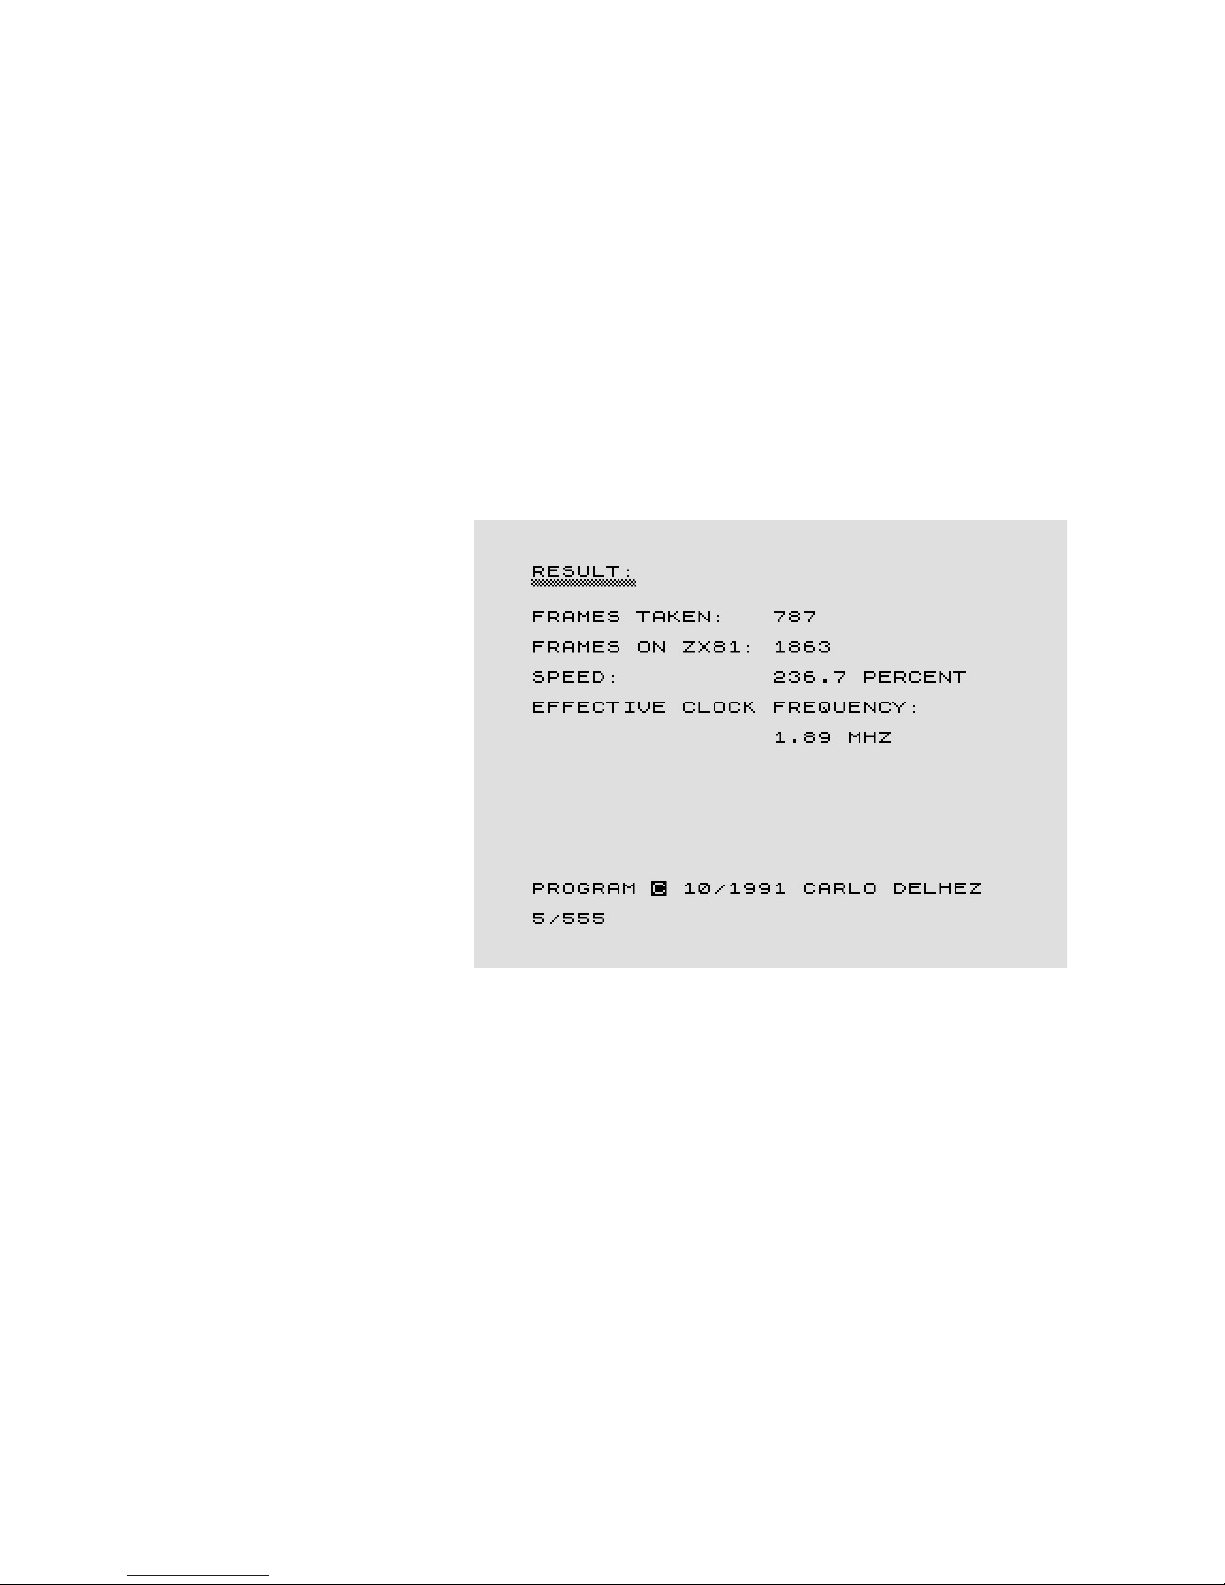
The imaged screenshot shows
the unofficial benchmark for
ZX81 systems and the speed
increase with ZXmaster in
version 0.9
Sometimes a program may not work correctly or maybe too fast. If this annoying the speed
can be changed to 3.25 MHz only which is handled per instance. It is possible to active a fast
and a slow instance for example. Every DS-P key combination changes speed in current
instance from low to fast or fast to low consecutively.
Compatibility mode (DS-C)
The firmware ZXmaster supports the smooth operation of ZX81 instances. There may be
situations where a program used with ZX81 does not behave in the same way as on real
hardware. The compatibility mode may be chosen by the user in these cases to get a most
compatible environment by the price of losing control through ZXmaster which can be
reactivated by pressing the reset switch when needed. Especially HRG programs executed in
version 0.9 may not display an image as the video handling is different.
Whenever programs do crash or not behave in the same way as expected there may be a good
choice for the compatibility mode for these programs to run better. If the speed should be
decreased or a program loaded via USB flash disk this can be done first and then pressing
DS-C after.
V1.9 - 06/2016 ZXmore & ZXmaster – user manual page 8 from 29
LOAD via USB (DS-L)
The USB loader can be started with DS-L from any instance (in version 0.9 only for ZX81).
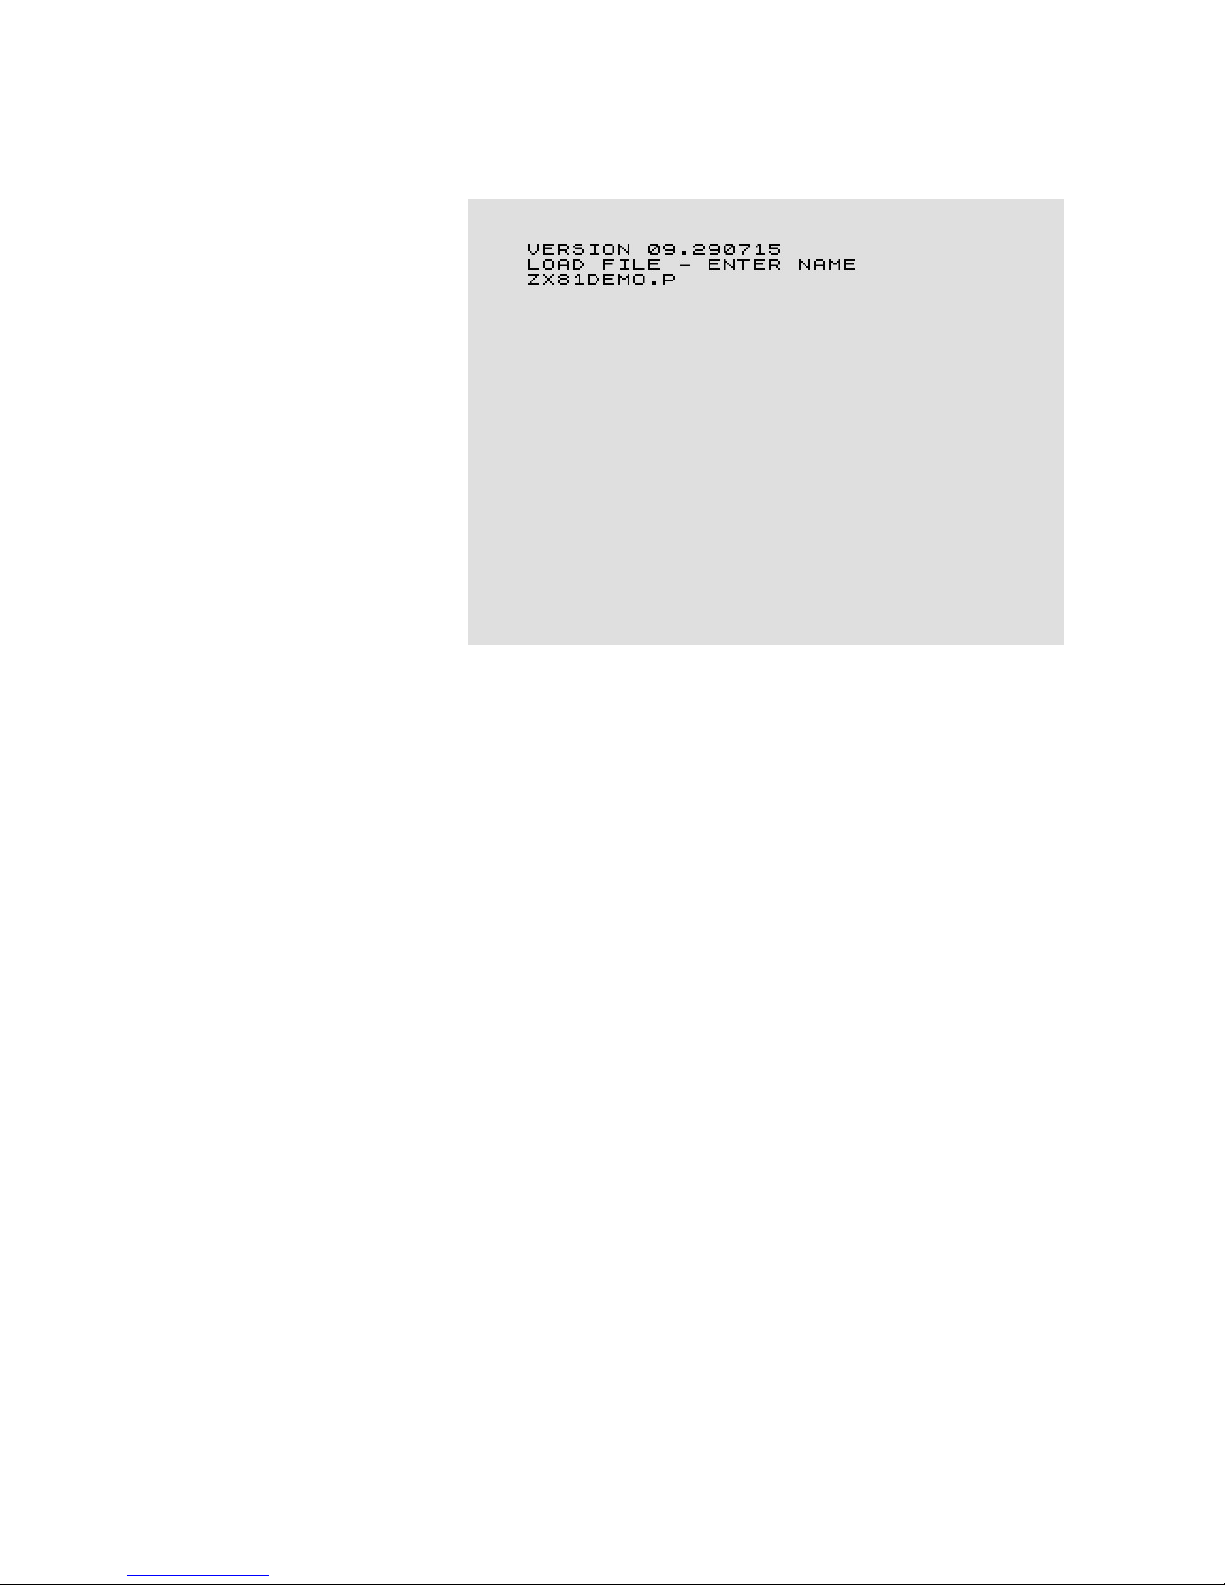
The loader message appears
with its version and the name
of the desired program can be
typed in. In the current release
the loader works only for files
in the root system and 8.3
format file names (no LFN
support in this release).
The loading speed is about
150kByte / second and due to
technical reasons in FAST
mode only. So the screen may
flicker shortly when loading
data or programs. The USB
flash medium should be
formatted with FAT32 and file
names my entered with chars,
digits and the point separator
for file names only.
Even long programs should be loaded instantly or at least with a delay of a few hundred
milliseconds only because programs normally should be smaller than 16kByte. So loading will
be finished in pretty less than a second. The very first acces on a new inserted USB flash
medium/drive may have a bit more latency.
If the requested file could not be found the error code 65535 will appear (maybe just a typo).
If the USB medium/drive is not inserted or maybe wrong formatted, the error code 65534 is
displayed. The loading can be aborted by pressing DS-L again in the enter mode. The
displayed error has to be confirmed by pressing any key.
If the instance 0 is called after loading data in another instance there may be displayed some
status information like the loaded filesize.
V1.9 - 06/2016 ZXmore & ZXmaster – user manual page 9 from 29
 Loading...