

Page 1

GIN Rescue Parachute Owner’s Manual
Applicable models: One-G rescue, Yeti rescue
Please read this manual prior to installing the
GIN rescue parachute into your harness
Page 2

Thank You...
Thank you for choosing the GIN ONE G or YETI rescue parachute. This manual
contains all the information you need to know to re-pack, deploy, and maintain
your rescue parachute. A thorough knowledge of your equipment will keep you
safe and enable you to maximize your potential.
Please pass on this manual to the new owner if you do resell your GIN rescue
parachute.
Happy Flights and Safe Landings,
The GIN Team
SAFETY NOTICE
By purchasing our equipment, you take full responsibility for being a certified
paraglider pilot and you accept all risks inherent with paragliding, Motor
paragliding or Speed gliding activities including injury and death. Improper
use or misuse of GIN equipment greatly increases these risks. Neither Gin
Gliders Inc nor the seller of GIN equipment shall be held liable for personal or
third party injuries or damages under any circumstances. If any aspect of the
use of our equipment remains unclear, please contact to your local GIN reseller
or importer in your country.
1
Page 3

Introducing the GIN rescue parachute
The GIN Rescue was developed by the R&D team of Gin Gliders to meet the highest
safety standards and light weight of the most demanding pilots - the GIN Rescue
is the rescue used by GIN test pilots during development of new paragliders and
speed gliders.
The GIN ONE G and YETI rescues are pulled down apex Parabolic type reserve
parachutes, certified EN-12491 and LTF. This design offers the optimal combination
of fast opening time, low descent rate, stability, compact size and light weight.
The GIN Rescues are designed only for use in an emergency situation on a paraglider,
Motor paraglider and speedglider; they are unsuitable for free fall parachuting.
Pull Down Apex Parabolic type Rescue Parachute
Model YETI ONE-G
Size #27 #35 #40 #50 #60 #38 #42
2
Area (m
) 26.9 34.2 40 50.2 60.96 38 42
No. of Gores 16 18 20 20 24 18 20
Line Length (m) 4.71 5.3 5.7 8.04 8.85 5.3 5.9
Centre line(m) 5.24 5.89 6.34 7.08 7.78 5.93 6.6
Weight(Kg) 1.25 1.5 1.75 2.6 3.1 2.3 2.6
2
Sink Rate (m/sec.)
(at Max. Load)
Maximum Load (Kg) 80 100 120 180 220 100 130
5.07 5.03 5.13 5.4 5.17 4.3 4.8
Page 4

Packing Instructions
Gin Gliders GIN rescue parachutes are inspected and packed at the factory. It is
recommend that the reserve is repacked by a suitably qualified and experienced
paragliding professional or parachute rigger prior to installation into your
harness. The efficacy of the rescue, and your life, depend on the correct packing
procedure. If in any doubt whatsoever, please seek professional advice from your
instructor, GIN dealer or importer.
Airing
Before packing, the canopy should be aired. Ideally, the canopy should be hung by
its apex from the ceiling for between 6 and 24 hours hours in a cool, dry room.
Preparation
The packing area must be spacious, clean, smooth and dry.
Preliminary Materials
Before starting the packing procedure, make sure you have the following
materials:
2 lengths of thin cord to aid closing the inner deployment bag
(Don’t use Kevlar line, and the end of lines should not be cut by heat.)
2 solid weights or sandbags, which should be smooth and clean (2-2.5kg)
2 pins
Carabiners are useful, but not necessary, to attach the APEX and lines to an
attachment point.
Layout
Check the serial number that is written on the top centre panel and on the repacking card first (re-packing card is attached at the end of this manual).
Fix the risers to a solid point using carabiners.
3
Page 5

Packing Instructions...
4
Line Check
Stretch the rescue out
to its full length. Check
the suspension lines
for damage and tangles
by the “4 lines check”
method.
All lines should be
located inside the 4
lines – first and last
lines at both sides
from the bridles as
illustrated below.
Folding the
Panels
Check that all the apex
lines are the same
length.
APEX /
CENTER LINE
18
1
17
2
SUSPENSION LINE
BRIDLE
16
15
14
13
11
10
4
5
6
7
8
9
Page 6

Packing Instructions...
Put the suspension
lines on the line
separator such that
half of them are on the
left, and half are on
the right. Put a weight
on the skirt to fix the
canopy.
And follow the outer
suspension line to find
the centre panels to
start folding with.
5
Page 7

Packing Instructions...
Dividing the
Panels
First fold all the panels
one by one to the right
side of the suspension
lines, to prepare for the
careful folding. While
doing this, check for
any signs of damage
or deterioration of the
canopy fabric.
6
Page 8

Packing Instructions...
By folding each panel to the left side of the suspension lines again one by one,
check carefully that each panel is laid evenly and without creases. Check the
centre seams and inside the panels, too.
7
Make sure that all the skirts are even and all the loops lie in the same direction.
Page 9
Packing Instructions...
After you finish the left half, do the same for the right half of the canopy. Move the
rest of the right half to the left, and fold each panel one by one to the right side of
the suspension lines. Check the same carefully that each panel is laid evenly and
without creases. Check the centre seams and inside the panels, too.
8
After folding all the panels, check again that the centre seams and the inside of
the panels are even and lie in the same direction.
If you have a ONE G rescue parachute, go directly to page 12. If you have a Yeti
rescue parachute, you have a choice of the following 2 packing methods.
Page 10

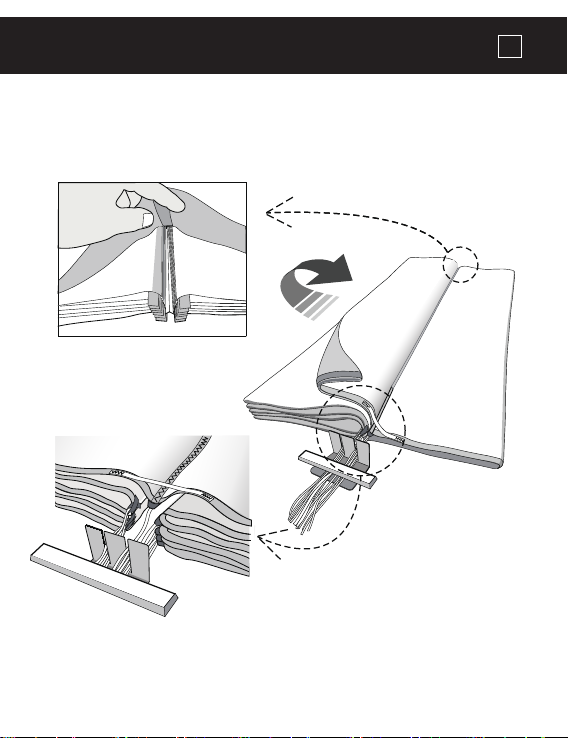
Packing Instructions...
Method 1 for the YETI: Make a wind channel
Take one of the panels (either left or right) and open it in the middle to create a
wind channel, as shown in the illustration.
Fold the corners
Fold the two corners at 45 degrees. The hem of the skirt should be aligned to the
wind channel created above, but should not overlap it.
9
Page 11

Packing Instructions...
Fold the outside edges onto the wind channel as shown below, but don’t overlap
them.
Fold the canopy in half along the central axis and open the skirt of the wind
channel to make a mouth.
10
Page 12

Packing Instructions...
Fold over the top of the canopy as shown in the picture. Carefully fold it again so
that the fabric remains evenly arranged inside the fold as shown in the picture.
Fold the remaining part of the canopy in an accordion or “S” shaped fold. The GIN
rescue fits well if there are 8 folds.
11
Page 13

Packing Instructions...
Z
12
Method 2 for the YETI or ONE G: "S" folding
Fold 1/3 of the canopy from the left, and fold another 1/3 from the right side. Then,
fold the right half of the canopy onto the left. Fold so that the width of the canopy
is the same from the top of the canopy to the skirt (bottom).
X
Y
Fold the canopy in an
accordion or “S” shaped
fold, so that it fits into the
inner deployment bag. If
possible, adjust the folds so
that those at the skirt are
slightly shorter and those
at the top of the canopy are
slightly longer.
The GIN rescue fits well if
there are 8 folds.
Z
Page 14

Packing Instructions...
Z
[
1
3
2
2
3
4
Page 12
1
2
4
5
3
1
3
1
2
2
3
4
4
Page 12
Packing into Inner Deployment Bag
Stow the canopy so that the skirt is on top of the folds in the inner bag.
13
YETI Rescue ONE G, YETI 50 & 60
2
3
5
2
3
3
4
1
1
2
4
2
4
Stowing the lines
Start to stow the suspension lines making sure you keep the equal tension on all
lines. Lay the upper suspension lines between the canopy and the inner bag, and
close the two flaps, numbers 1 and 2, with a bight (3cm loop) of lines through the
elastic closuring loop.
YETI Rescue ONE G, YETI 50 & 60
Now, stow the lower suspension lines in a ‘figure of 8’ pattern, fixing pairs of ‘8’s
with rubber bands at each end of the ‘8’. NB! SUSPENSION LINES SHOULD ALWAYS
HAVE EQUAL TENSION!!
[
3
1
3
1
Z
X
Page 15

1
2
3
3
1
2
3
3
Packing Instructions...
Packing Instructions...
Closing the deployment bag
Closing the deployment bag
Thread the closing loop attached to the deployment bag through the eyelets of the
Thread the closing loop attached to the deployment bag through the eyelets of the
last two flaps, numbers 3 and 4, and place a bight (3cm loop) of suspension lines
last two flaps, numbers 3 and 4, and place a bight (3cm loop) of suspension lines
through the elastic closing loop. The last 30-50cm of the lines is left free. Make
through the elastic closing loop. The last 30-50cm of the lines is left free. Make
sure that each bite (loop) of lines is clear and that nothing can interfere with or
sure that each bite (loop) of lines is clear and that nothing can interfere with or
obstruct the loops.
obstruct the loops.
YETI Rescue
YETI Rescue
5
5
ONE G, YETI 50 & 60
ONE G, YETI 50 & 60
4
4
4
4
3
3
14
14
Test
Test
Lifting the bridle, check the force required to allow the lines to free themselves
Lifting the bridle, check the force required to allow the lines to free themselves
from the closing loop of the deployment bag. This force should be around 200g.
from the closing loop of the deployment bag. This force should be around 200g.
This force may be verified with a spring balance, if available.
This force may be verified with a spring balance, if available.
Page 16

Installation into the harness
The GIN rescue is compatible with GIN harnesses. It may also be compatible with
most other manufacturer’s harnesses, but there is no guarantee of this and you
should check with your instructor or dealer.
15
Attaching the rescue using outer container
The GIN rescue can be attached as well on harnesses, which do not have an
integrated rescue container, like the Basis harness or speed glider harnesses. You
must use the outer container for GIN rescues, which Gin gliders supplies as an
option. If in doubt, consult with a professional.
Attaching the rescue bridle to the harness webbing
A suitable screw gate connector should be used, for example;
a 7mm, square, Stainless Steel maillon, but in any case, the
connector must have a minimum strength of at least 9 times of
the total suspended weight.
The maillon should be held in place with rubber bands, tape or
plastic heat sealed tube.
Webbing to webbing connections are not recommended, due to the danger of
getting the knot the wrong way round, which significantly weakens it.
Gin gliders supply the “Y” bridle in optional lengths.
The tandem rescue riser must first be connected
with the additionally supplied exclusive TANDEM
”Y” bridle. Then connect the “Y” bridle with the
main hook point or exclusive rescue hook point of
the spreader bar. The auxiliary bridle must then
be connected to the B and C riser of the glider
after routing it through the main carabiner. The
Tandem glider will make a combined B- C-line stall
in case of a rescue deployment.
Page 17

Installation into the harness...
16
Attaching the rescue deployment bag to the harness
deployment handle
Most harnesses come with their own deployment handle. This handle and its strap
must be connected to the inner deployment bag of the parachute. If your harness
does not have the proper handle, please contact your harness dealer.
The GIN rescue has a choice of 2 loops by which to attach the harness deployment handle. The
choice of one or the other depends on the position of the rescue container in your harness.
Front or back mounted rescue systems or when you use the outer container rescue are
generally attached by the centre loop, whereas side mounted systems are attached by the loop
at the top. Under seat mounted systems are attached by the loop at the side. THE CORRECT
ATTACHMENT POINT DEPENDS ON THE HARNESS!! If in doubt, consult with a professional.
Pre-flight checks
For maximum safety, use a complete and consistent system of pre-flight checks of
your equipment and repeat the same mental sequence at every flight.
Specifically for the rescue, check that:
- There is no visible damage that could affect its airworthiness.
- The rescue parachute container is closed correctly with the pin(s) in place.
- The deployment handle is secured correctly and all parts are in good condition.
If any part of the harness/reserve/handle system include Velcro, then this must
be separated and re-attached regularly to prevent Velcro ‘bedding in’ over time
which can make rescue deployment much more difficult.
Rescue Deployment
It is vital to periodically feel the position of the rescue handle in normal flight, so
that the action of reaching for the rescue is instinctive in an emergency.
In the event of an emergency, the pilot must quickly evaluate his or her height and the
seriousness of the incident. On that basis, an instantaneous decision to deploy the rescue
or not must be taken. Deploying the rescue when the glider is recoverable may increase the
danger of injury. If you have sufficient height and the glider is in a flat spin, it is preferable to
first try to stop the spin (e.g. full stall), due to the risk of entanglement. On the other hand, a
second's hesitation in deploying the reserve could prove costly if there is insufficient height.
Page 18

Deployment Procedure
If the rescue is to be deployed, the procedure is as follows:
- Look for the rescue handle and grasp it firmly with one
hand.
- Pull firmly upwards/side wards on the handle. This
action undoes the Velcro or handles closure and allows
the release pins to be pulled out of the release loops,
so that the inner container can be released from the
harness’ rescue compartment.
- Look for a clear area, and in a continuous motion, throw
(and RELEASE!) the rescue as quickly and forcefully as
possible away from yourself and the glider. Throwing
the rescue in the direction of the air stream will speed
opening, and throwing it against the direction of spin
will help prevent tangling with the glider.
- After deployment, avoid entanglement and pendulum
motions by pulling in the glider as symmetrically as
possible with the B, C, D or brake lines
- On landing, be sure to do a PLF (Parachute Landing Fall)
to minimize the risk of injury
- Once on the ground, deflate the canopy by pulling one
of the rescue lines to avoid the possibility of being
dragged.
17
Page 19

Care, Maintenance and Repairs
The Gin rescue parachute should be repacked at least every 6 months, as detailed
in the packing instructions. We always recommend that this rescue parachute is
inspected and repacked by a trained professional repacker. Additional inspections
should be performed if there is any suspicion of damage or undue wear.
After a deployment, the rescue should be checked by the distributor or
manufacturer. Always seek professional advice whenever in doubt.
The materials used in the GIN rescue have been carefully selected for maximum
durability. Nevertheless, maintaining your rescue following the guidelines below
will extend its lifetime.
It is recommended that a rescue is replaced after 10 years, even if it has never
been used.
18
Care and Maintenance
Unnecessary exposure to UV rays, heat and humidity should always be avoided.
Keep your harness and rescue in your rucksack when not in use.
Store all your paragliding equipment in a cool, dry place, and away from solvents
such as grease, acid, oil and paint.
Never put your rescue away while damp or wet.
If your rescue parachute does ever get wet (i.e. water landings or snow) you must
remove it from the harness, dry it naturally in the air, and repack it before putting
it back into the container.
A dirty rescue canopy or container can be cleaned with lukewarm water. Mild, neutral
soap may be used if necessary, but do not rub the fabric. Rinse the canopy thoroughly and
allow it to dry naturally. If the canopy shows signs of mildew or mould, it must be sent to
the distributor or manufacturer for repairs, as the strength could be compromised.
If the rescue is to be stored for an extended period, the canopy should be opened
and loosely rolled.
Repairs
Any repairs should only be carried out by the manufacturer or by an approved
agent. This will ensure that the correct materials and repair techniques are used.
Page 20

Re-packing History
Pilot Name:
Serial No. of the Rescue:
First Installation date:
Repacking Date By Signature
Every effort has been made to ensure that the information in this
manual is correct, but please remember that it has been produced for
guidance only.
This owner's manual is subject to changes without prior notice. Please
check www.gingliders.com for the latest information regarding the GIN
rescue parachute and other GIN products.
 Loading...