

Page 1

Page 2

pilot manual
v1.1, 10/2014
Page 3
Tandem Pilot
Page 4

Contents
Thank you... 5
Warning 6
About Gin Gliders 7
Introducing the Fuse Pilot 8
Before you fly 13
Flying with the Fuse Pilot 25
Maintenance and repairs 28
Final words... 31
Technical data 32
Materials 33
4
Page 5

Thank you...
...for choosing Gin Gliders. We are confident you’ll enjoy many rewarding experiences in the air
with your GIN harness.
This manual contains important safety, performance and maintenance information. Read it
before your first flight, keep it for reference, and please pass it on to the new owner if you ever
re-sell your harness.
Any updates to this manual, or relevant safety information, will be published on our website:
www.gingliders.com. You can also register for e-mail updates via our website.
GIN team
Happy flying and safe landings,
5
Page 6

Warning
Like any extreme sport, paragliding involves unpredictable risks which may lead to injury or
death. By choosing to fly, you assume the sole responsibility for those risks. You can minimize the
risks by having the appropriate attitude, training and experience and by properly understanding,
using and maintaining your equipment. Always seek to expand your knowledge and to develop
self-reliance. If there is anything you do not understand, consult with your local dealer as a first
point of contact, with the GIN importer in your country or with Gin Gliders directly.
Because it is impossible to anticipate every situation or condition that can occur while
paragliding, this manual makes no representation about the safe use of the paragliding equipment
under all conditions. Neither Gin Gliders nor the seller of GIN equipment can guarantee, or be held
responsible for, the safety of yourself or anyone else.
Many countries have specific regulations or laws regarding paragliding activity. It’s your
responsibility to know and observe the regulations of the region where you fly.
6
Page 7

About Gin Gliders
Dream
In forming Gin Gliders, designer and competition pilot Gin Seok Song had one simple dream:
to make the best possible paragliding equipment that pilots all over the world would love to fly—
whatever their ambitions.
At Gin Gliders, we bring together consultant aerodynamists, world cup pilots, engineers and
paragliding school instructors, all dedicated to fulfilling this dream.
Touch
We’re a “hands-on” company that puts continuous innovation and development at the centre of
everything we do.
At our purpose-built R&D workshop at head office in Korea, we are able to design, manufacture,
test-fly and modify prototypes all in a matter of hours. Our international R&D team is on hand both
in Korea and at locations worldwide. This guarantees that your equipment has been thoroughly
tested to cope with the toughest flying conditions.
Our own production facilities in East Asia ensure the quality of the finished product and also
the well-being of our production staff.
Believe
We believe that the product should speak for itself. Only by flying can the pilots understand
their equipment and develop trust and confidence in it. From this feeling comes safety, comfort,
performance and fun. The grin when you land should say it all!
7
Page 8

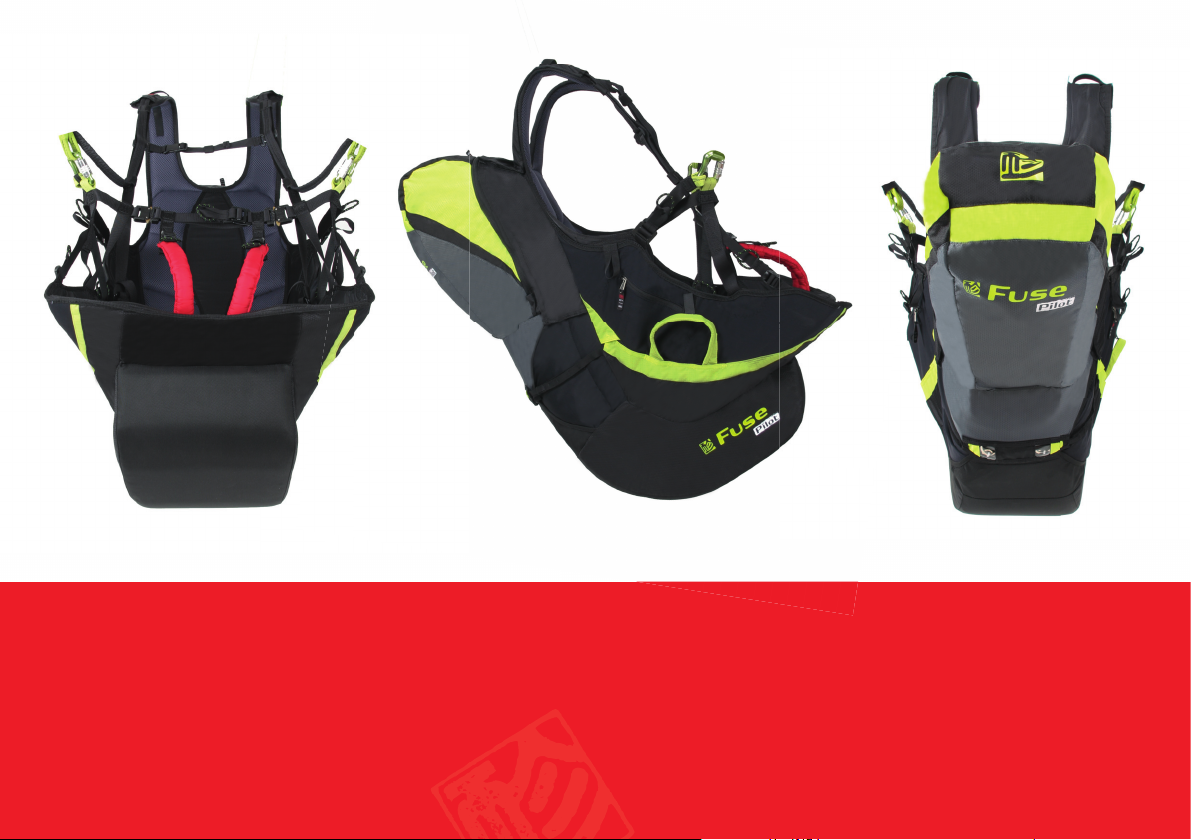
Introducing the Fuse Pilot
The Fuse Pilot has been developed to meet the needs of both professional and leisure pilots.
We have redesigned several key features of the harness to provide a more comfortable and safer
flying experience with the addition of a wooden seat-plate and a newly designed back support
and back pocket.
We have integrated the Getup System for a safer and easier buckle system. This reduces the
buckles and prevents the pilot from forgetting to close the leg straps before launch. The Gin soft
fuse foam back protector has been reshaped for increased safety and a new foam insert was
created for the rescue system. After installing your reserve parachute into the harness you can
place an engineered foam pad on the opposite side to maintain the optimum shape of the
harness in flight.
A larger back pocket has been added to the Fuse Pilot harness for greater convenience. Now
the pilot can store more items out of the way while in flight. Moving storage from the Passenger
harness pocket to the pilot harness will provide for a more comfortable flight. In the event of a
hard landing it is safer for both the pilot and passenger to have these items stored in the rear.
Features like the bilateral rescue option have become staples of our tandem line and have
been carried into the new Fuse Pilot harness. This allows the pilot the choice of the most
convenient side for rescue deployment and the handle is positioned for easy access and rapid
deployment.
8
Page 9

Specifications
Specifications
The Fuse Pilot has EN and LTF certification.
Size
Size
Harness size one size fits all
Weight (kg)*
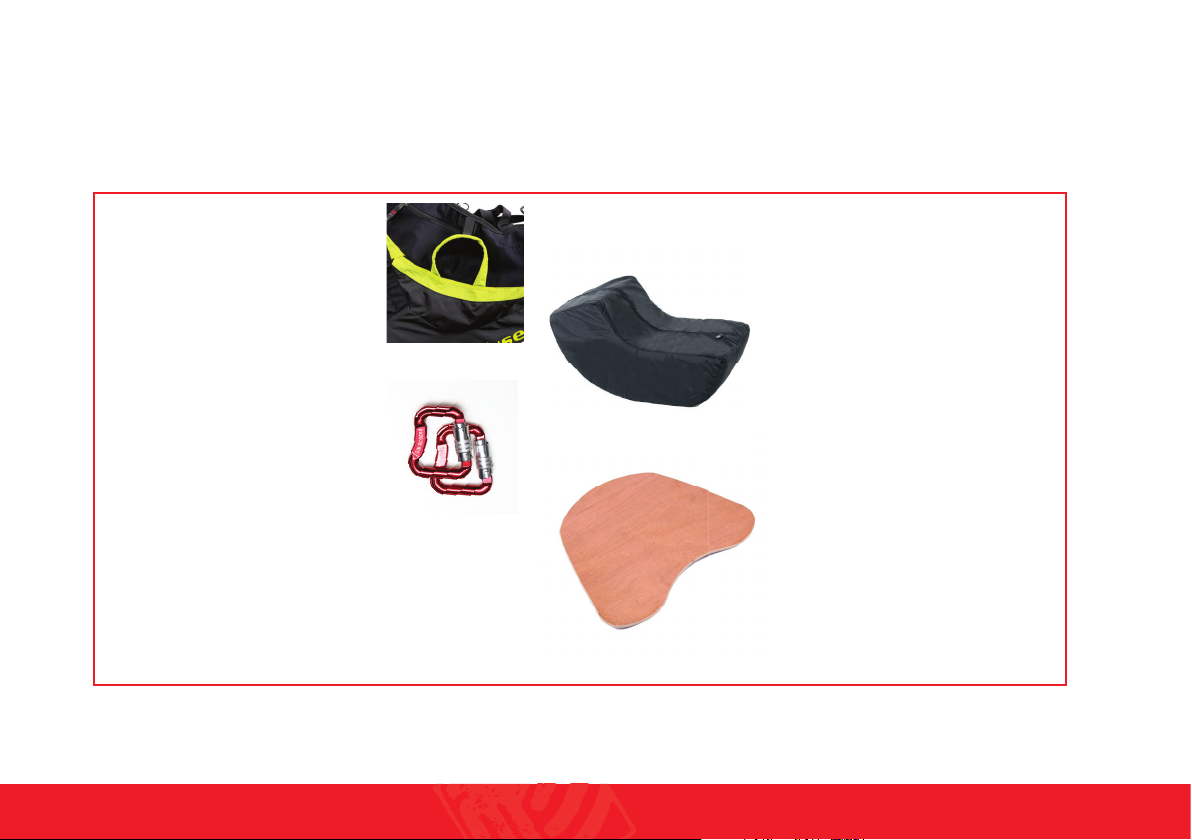
Delivery package
Delivery package
- Gin soft fuse foam mousse bag protector
- 2 carabiners
- 1 Rescue handle
- Wooden seat plate
- Foam rescue insert
3.0
9
Page 10

Optional Extras
Yeti rescue #50 or #60
Tandem rescue bridle
Fuse Passenger harness
Spreader bar
For up-to-date information on additional accessories, visit www.gingliders.com.
10
Page 11
Components of the Fuse Pilot
Optional left and right side rescue
deployment handle
14cm Gin Soft Fuse foam back protector
(p.12)
GIN carabiners
Wooden seat plate
11
Page 12

Rescue handle
The Rescue parachute handle supplied with the Fuse Pilot is designed for easy and rapid
deployment of your rescue. This harness must only be used with the supplied rescue handle.
Using other designs of rescue handle may make it impossible to deploy the rescue parachute.
Back protection
The Fuse Pilot is equipped with the Gin soft fuse foam mousse bag. This effectively offers
protection equivalent to a 17cm mousse bag in a more compact package. Like the GINSOFT14T in
the Safari, the Gin soft fuse has multiple compartments and a dual layer structure. This offers
better shock absorption by preventing air escaping from the foam in case of impact.
The Gin soft fuse provides protection which will reduce the energy of the impact as much as
possible, but it cannot completely eliminate the risk of injury.
Wooden seat plate
To add comfort and stability to the Fuse Pilot harness we incorporated a custom shaped
wooden seat plate. The seat plate is moulded to the shape of the passenger harness to maximize
the passengers comfort.
Storage
Back Pocket
The Fuse Pilot contains a new even larger back pocket to allow the pilot to store more items in
flight. The back pocket contains a compartment for a small radio and there is a hole that can be
used for a hydration tube and/or radio cable, with access to attachments points on the pilots
shoulder straps.
Accessory Pockets
Located on sides of the harness are two zippered pockets to keep your belongings safe while
allowing easy access in flight. These pockets are ideal for quick access to small items.
12
Page 13

Before you fly
Make sure your dealer has checked the harness for completeness and basic settings. Your
harness must be assembled by a suitably qualified paragliding professional, for example, your
instructor.
Rescue Installation and compatibility check
Gin Gliders recommend that rescue installation is performed properly by a competent person.
The Fuse pilot is compatible with the GIN Yeti tandem rescue. Other manufacturer’s rescues
may be used as well but must be checked for compatibility by a professional.
Every first installation of a rescue system into the harness (that means every new combination
of harness and rescue system) must be checked by a qualified paragliding professional for
compatibility. To verify the installation, you must perform a test deployment by sitting in a
simulator.
Rescue parachutes should be repacked at least every 150 days; so installing your rescue in a
new harness may also provide a good opportunity for a repack. After every repack of the rescue
parachute you should also do a compatibility check. Make sure that the rescue parachute can be
released from the rescue container in the harness—it must be done by you, the pilot, sitting in the
harness hanging from a simulator.
WARNING: If you are in any doubt
about any aspect of rescue
installation, seek professional
advice.
IMPORTANT: You must perform a
test deployment from a simulator
to verify the installation.
13
Page 14

Rescue Installation and compatibility check
Attaching the rescue deployment bag to the harness deployment handle
The rescue container of the Fuse Pilot comes with its own deployment handle. This handle and
its strap must be connected to the deployment bag of the parachute. In particular, check the
length of the strap connecting the rescue deployment handle to the rescue inner container. It
should be long enough that the reserve can be extracted without the danger of the pins not being
pulled before the strap tightens on the reserve, but not so long that there is excessive slack that
extends the movement required for deployment.
The deployment bag of other manufacturers’ rescue systems (i.e. non-GIN rescue systems)
may have different loop positions which may cause a deployment failure. Be sure to contact
your parachute dealer or a qualified professional to check the connection, position and secure
deployment, and refer to the rescue manual for details.
Rescue container volume
The rescue should fit comfortably in the container. The rescue should be held so that it can’t
move around, but not too tightly that extraction becomes difficult. If necessary, place a piece of
foam behind the rescue to reduce the depth of the container.
14
Page 15

Attaching the rescue deployment bag to the harness deployment handle
1 2 3 4
Handle attachment Pass the handle through
the center loop
Pass the handle through
itself
Pull to make a clean
knot
15
Page 16

Bridle to rescue attachment
Maillon connection
A Maillon Rapide type connector is recommended. The connector should be rated at least 9 times
the maximum weight, for example, a correctly fitted 8mm Stainless Steel square Maillon.
1 2 3 4
e
u
c
s
e
R
Y
b
r
i
d
l
e
Bridle attachment Attach the rescue to the maillon
CAUTION: The bridle webbing
must be held securely in place to
avoid excess friction during
rescue deployment. The bridle
must be held firmly in place with
rubber bands, tape or plastic
heat shrink tube.
Attach the Y bridle to the maillon
and secure it with a rubber band
and secure with a rubber band
Check your connection and close
the maillon firmly
16
Page 17

Rescue Installation Guide
The Fuse Pilot rescue is located behind the pilots seat. The handle can be placed on the left or
right side with a velcro bridle tunnel running along both sides of the harness to allow the pilot to
customize the harness to their needs. It is very important to properly install the rescue
parachute. If the parachute is not folded correctly or the lines are not placed properly then a
serious if not fatal accident could result. If you have any doubts speak with your instructor or GIN
dealer.
Using the extra para line provided with your harness, pull the built in loops through the
grommets of the rescue container flaps. Close the rescue container flaps in the order shown in the
photos below. Secure the rescue container flaps by placing the metal release pins through the
loops as shown. Insert each side of the rescue handle into its neoprene sleeve and secure with the
attached Velcro.
1 2 3
WARNING: When installing the
reserve make sure the reserve
handle attachment is facing out
away from the harness and the
reserve lines are facing in.
Place the rescue attachment line in a
“zig-zag” pattern at the bottom of the
pouch
Place the rescue into the pouch with the
rescue handle facing out
17
Page 18

4 5
6
Insert the string through the flap
eyelets
Pass the string through the bottom flap
grommets
7 8
Insert the rescue handle hooks into the
eyelets
Close the velcro cover to protect the
rescue hooks
Pass the string through the top flap
grommets
9
Connect the rescue handle and close the
velcro cover
18
Page 19

Rescue bridle installation
Bridle tunnel
After installing the rescue into your harness run the rescue bridle along the bridle
tunnel in the following order.
Run the bridle from the
rescue container to the
velcro bridle tunnel
Connect the bridle to the
harness using the built-in
velcro loops
Run the bridle along the
shoulder strap, then cover
Use the velcro on the bridle
to secure it to the shoulder
strap
19
Page 20

Spreader bar
)
)
The tandem spreader bars have been designed with a safety feature that prevents the
main canopy from re-inflating after the reserve parachute has been deployed. By
connecting the rescue bridle to the “B” and “C” risers the main canopy will be stalled into
a more stable position for decent.
5
Rescue bridle
1
Pilot attachment
2
(RED LOOP)
Small passenger
3
attachment (LYME LOOP)
LOOP
2
1
3
Large passenger
4
attachment (LYME LOOP)
“B” & “C” attachment points
5
Rescue carabiner
6
(RED LOOP)
LOOP
ent points
1
6
2 4
Rescue carabiner (RED LOOP)
1
Main carabiner (Small passenger)
2
3
Main carabiner (Larger passenger)
3
20
Page 21

Bridle to spreader bar connection
Connect the rescue bridle in the following order. If you are not certain of the proper
connection procedure then see your GIN dealer. If not connected properly then the bridle
may fail, causing serious injury or death.
B
C
D
A
A
Connect the rescue bridle to
the rescue carabiner
Fold the extra bridle
webbing neatly and secure
with the velcro cover
followed by the main line
velcro
Pass the riser connections
through the main carabiner
Attach bridle to the B & C
riser carabiners and secure
with the velcro straps
21
Page 22

Adjustments
Adjust your harness to suit your physique and flying style. It is important to adjust it correctly
to ensure you can easily slide into the sitting position after take off. A poorly adjusted harness
can adversely affect the flying characteristics of your paraglider.
Perform adjustments before your first flight by hanging in a simulator and fine-tune the
settings if necessary during your first few flights.
Shoulder Straps
The optimum setting for the shoulder straps depends on the height of the pilot. Stand upright
with the chest/leg straps closed, and symmetrically adjust the shoulder straps until they are a
snug fit, but not tight. To tighten, pull up on the black and green rope loop (red dotted line). To
loosen, pull down on the black webbing loop at the bottom of the shoulder strap (white dotted
line).
NOTE: Make sure that the rescue
system has been installed before
making adjustments.
WARNING: Always maintain chest
strap adjustments within the
paraglider manufacturer’s
recommended range
22
Page 23

Chest Strap
The adjustment of the chest strap controls the distance between the carabiners and affects the
handling and stability of the glider. Widening the distance between the carabiners increases
feedback from the wing and allows for easier weight shifting. Closing the strap gives you a more
stable feeling in turbulence but increases the risk of stable spiral and also the risk of twisting!
The chest strap may also be adjusted in flight according to the conditions; for example, it may be
tightened in turbulent air and flown at a looser setting in less turbulent or weak conditions.
To tighten, pull the black and green rope loop to the right. To loosen, pull the smaller black
webbing loop to the left.
Leg Straps
The correct adjustment of the leg straps allows the pilot to easily reach the sitting position
after take-off without using his hands. In the standing position, use the buckles under the chest
strap to adjust the leg straps so that they fit comfortably without being tight; make sure you do it
symmetrically. If you need to lengthen the leg straps, first check that the shoulder straps are not
too tight. It is not normally necessary to make large adjustments from the default leg strap
setting.
To tighten, pull down on the black and green rope loop. To loosen pull up on the double buckle.
23
Page 24

Lateral Straps (1)
The lateral straps adjust the angle between the thighs and the back. This angle can be set
between 100° and 130°. Lengthening the straps increases the angle and vice-versa. The easiest
way to adjust them correctly is during a flight in calm air. Remember that flying in the supine
position (i.e. leaning back), reduces the stability of the harness and increases the risk of riser
twists after a deflation.
Seat Straps (2)
The seat straps change the depth of the seat. Adjust to find a comfortable position. To decrease
the depth of the seat pull up on the black and green seat strap loop Lengthening the straps helps
you to slide easily into the harness at take off, while shortening the straps helps you to be in the
standing position for landing.
Adjustments should be made while handing in a simulator or while flying in calm air.
Side Straps (control angle of seat) (3)
The seat adjustment straps allow you to adjust the angle of the front of the seat. You can
control the angle of the seat and the seat position with the straps beside the seat. To get the
optimum setting you can loosen these straps to the maximum in the sitting position and start
pulling the straps until you get the comfort from the leg support depending on the flying style of
the pilot.
3
1
2
3
1
2
Lateral strap
Seat strap
Side strap
24
Page 25

Flying with the Fuse Pilot
General warnings and advice
Before every flight, check the following:
Are you in good physical and mental condition?
Are you familiar and compliant with all applicable laws and regulations in your area?
Are you within the certified weight range of your paraglider?
Do you have the necessary valid insurance cover (e.g. liability, medical, life)?
Are you briefed thoroughly about the site, airspace and expected weather conditions of the
day?
Is your equipment and choice of site suitable for your level of experience?
Do you have a suitable helmet, gloves, boots, eye-wear and adequate clothing?
Are you carrying some form of identification, so that people know who you are in case of an
accident? Take along a radio and mobile phone if possible.
Do you fully understand how to safely use your new equipment? If not, have your instructor
or dealer explain anything you are not sure about.
When you go for your first flight on your new harness, be sure to pick a day and site that does
not present you with any unfamiliar challenges. During your first flight, familiarize yourself with
the in-flight characteristics of your new harness.
Pre-flight checks
As part of your normal pre-flight check routine, check that:
Is there any damage to the harness or carabiners that could affect its airworthiness?
Is the rescue parachute container closed correctly with the pins in the right position?
IMPORTANT: Use a complete and
consistent system of pre-flight
checks and repeat the same
sequence every flight.
25
Page 26

Is the deployment handle correctly inserted or attached?
Are all buckles, belts, zips securely fastened? Buckles should click into place as you close
them, and a gentle pull on the fastened buckle verifies this. Secure any zips after fastening the
buckles. Take extra care in snowy or sandy environments.
Is the paraglider connected correctly to the harness with both carabiners secured by
their locking mechanisms?
Are all pockets closed properly and any loose items tied down safely?
Have you closed your leg and chest straps? Double check before you take off!
Rescue Deployment
In the event of an emergency, you must quickly evaluate your height and the seriousness of the
incident. A seconds hesitation in deploying the reserve could prove fatal if there is insufficient
height. On the other hand, deploying the rescue when the glider is recoverable may result in
needless injury.
If you decide to deploy the rescue:
Look for the rescue handle and grasp it firmly with one hand
Pull sidewards and upwards on the handle to release the deployment bag from the harness
container
Look for a clear area, and in a continuous motion, throw (and RELEASE!) the rescue away
from yourself and the glider, preferably into the air stream or against the direction of spin. After
deployment, avoid entanglement and pendulum motions by promptly pulling in the glider as
symmetrically as possible with the B, C, D or brake lines.
IMPORTANT: In normal flight,
periodically feel the position of the
rescue handle so that the action of
reaching for the rescue handle is
instinctive in an emergency.
WARNING: During any incident in
flight, always monitor your
altitude. If you have any doubt that
you have sufficient height for
recovery, deploy your reserve
without hesitation. “If low, then
throw”.
26
Page 27

Landing with the Fuse Pilot
Before landing, slide your legs forward in the harness so that you adopt the standing position.
NEVER land in the seated position—it is very dangerous even if you have back protection.
Standing up before landing is an active effective safety precaution.
Miscellaneous
Towing
Th Fuse Pilot is not recommended for towing.
Tandem Flying
The Fuse Pilot is designed for tandem flying. We recommend flying with the Fuse Passenger
harness. See www.gingliders.com for details of our harnesses specifically designed for tandem
flying.
Flying over water
The Fuse Pilot is not recommended for the extreme manoeuvres. Flying over water is not
recommended with the Fuse Pilot because exiting a tandem harness with a passenger has an
increased possibility of drowning after a water landing.
27
Page 28

Maintenance and repairs
The materials used in this harness have been carefully selected for maximum durability.
Nevertheless, keep your harness clean and airworthy to ensure the longest possible period of safe
operation.
Care and maintenance
Don’t drag your harness over rough or rocky ground. Avoid unnecessary exposure to UV rays,
heat and humidity. Keep the folded harness in your rucksack when not in use.
Store all your equipment in a cool, dry place, and never put it away while damp or wet.
Regularly clean off dirt with a plastic bristled brush and/or a damp cloth. If the harness gets
exceptionally dirty, wash it with water and a mild soap. Make sure you first remove the entire
sub-components for example, rescue parachute etc. Allow the harness to dry naturally in a well
ventilated area away from direct sunlight. If your rescue parachute ever gets wet (e.g. in a water
landing) you must separate it from the harness, dry it and repack it before putting it back in its
separate outer container. Occasionally lubricate the zips and buckles with silicone spray, no more
than once a year.
After a hard landing you must check your harness for damage, pay close attention to the rescue
container and verify all of the attachments are secure.
28
Page 29

Inspection checklist
In addition to regular pre-flight checks, your harness should be inspected thoroughly on every
rescue repack of 150 days. Additional inspections should be performed after any crash, bad
landing or take off, or if there are any signs of damage or undue wear. Always seek professional
advice whenever in doubt.
The following checks should be carried out
Check all webbing, straps and buckles for wear and damage, especially the areas that are not
easily seen, such as the inside of the carabiner hook-in points.
All sewing must be intact and any anomalies attended to immediately to avoid exacerbation of
the problem.
Special attention should be paid to the rescue installation, particularly the elastic and Velcro
parts.
The seat and back plates must be free from cracks.
The main aluminium carabiners must be replaced at least every 5 years or after 500 hours,
whatever comes first. Impacts may create undetectable cracks that could result in structural
failure under continuous load.
Repairs
The manufacturer or an approved specialist should carry out any repair that involves critical
parts of the harness. This will ensure that the correct materials and repair techniques are used.
29
Page 30

GIN quality and service
We take pride in the quality of our products and are committed to putting right any problems
affecting the safety or function of your equipment and which are attributable to manufacturing
faults. Your GIN dealer is your first point of contact if you have any problems with your
equipment. If you are unable to contact your dealer or GIN importer, contact Gin Gliders directly
via our website.
Care of the environment
We are privileged to fly in areas of outstanding natural beauty. Respect and preserve nature
by minimizing your impact on the environment. When visiting an area, contact the local club for
details of environmentally sensitive areas and local restrictions.
When your paraglider eventually reaches the end of its useful life, dispose of it with
consideration and follow any local regulations.
30
Page 31

Final words...
Most of us today live in a dependent society where we are regulated and protected. There are
few opportunities for individuals to develop the self-responsibility that is the foundation of
safety in extreme sports such as paragliding.
Most accidents are caused by getting into situations that are too demanding for your level of
experience. This happens if you lack fundamental understanding, are incapable of assessing the
risk or simply do not pay sufficient attention to your surroundings or your own state of mind.
To stay safe, the best you can do is to increase your understanding, skill and experience at a
rate you can manage safely. There is no substitute for self-responsibility and good judgement.
In the end, paragliding offers a unique opportunity to learn to take control of your own destiny.
Memento mori, carpe diem!
Fly safely, and...E N J O Y!
GIN team
31
Page 32

Technical data
Size
Pilot height (cm) One size fits all
Height of attachment points (cm) 41 42 43
Carabiner distance (cm) 42
Weight (kg)* 3.0
Certification
The Fuse Pilot has EN and LTF certification, max load 120kg
Fuse Pilot harness: [EN] PH 096.2013, [LTF] GZ 096.2013
Parachute container
Integrated container behind the seat
Back protection
14cm Mousse bag
* - weight does not include carabiners or seat plate
32
Page 33

Materials
Harness fabric
Outer 210D Oxford PU 60" N100D JR honeycome PU 58” black, grey
Inner Oxford 210D PU 60”
Webbing
Nylon 66 25mm / 30mm
Buckles
FC24B Cobra fix -28mm, 3mm Slider buckle /3mm loop
Thread
P/F 630 D/9 Bonded, P/F 280 D/3 & 420 D /3 Bonded 100% POLYESTER
33
Page 34

www.gingliders.com
Dream. Touch. Believe.
 Loading...