

Page 1

Page 2

manual
v1.1, 10/2014
Page 3
Tandem Passenger
Page 4

Contents
Thank you... 5
Warning 6
About Gin Gliders 7
Introducing the Fuse Passenger 8
Before you fly 12
Flying with the Fuse Passenger 20
Maintenance and repairs 22
Final words... 25
Technical data 26
Materials 27
4
Page 5

Thank you...
...for choosing Gin Gliders. We are confident you’ll enjoy many rewarding experiences in the air
with your GIN harness.
This manual contains important safety, performance and maintenance information. Read it
before your first flight, keep it for reference, and please pass it on to the new owner if you ever
re-sell your harness.
Any updates to this manual, or relevant safety information, will be published on our website:
www.gingliders.com. You can also register for e-mail updates via our website.
GIN team
Happy flying and safe landings,
5
Page 6

Warning
Like any extreme sport, paragliding involves unpredictable risks which may lead to injury or
death. By choosing to fly, you assume the sole responsibility for those risks. You can minimize the
risks by having the appropriate attitude, training and experience and by properly understanding,
using and maintaining your equipment. Always seek to expand your knowledge and to develop
self-reliance. If there is anything you do not understand, consult with your local dealer as a first
point of contact, with the GIN importer in your country or with Gin Gliders directly.
Because it is impossible to anticipate every situation or condition that can occur while
paragliding, this manual makes no representation about the safe use of the paragliding equipment
under all conditions. Neither Gin Gliders nor the seller of GIN equipment can guarantee, or be held
responsible for, the safety of yourself or anyone else.
Many countries have specific regulations or laws regarding paragliding activity. It’s your
responsibility to know and observe the regulations of the region where you fly.
6
Page 7

About Gin Gliders
Dream
In forming Gin Gliders, designer and competition pilot Gin Seok Song had one simple dream:
to make the best possible paragliding equipment that pilots all over the world would love to fly—
whatever their ambitions.
At Gin Gliders, we bring together consultant aerodynamists, world cup pilots, engineers and
paragliding school instructors, all dedicated to fulfilling this dream.
Touch
We’re a “hands-on” company that puts continuous innovation and development at the centre of
everything we do.
At our purpose-built R&D workshop at head office in Korea, we are able to design, manufacture,
test-fly and modify prototypes all in a matter of hours. Our international R&D team is on hand both
in Korea and at locations worldwide. This guarantees that your equipment has been thoroughly
tested to cope with the toughest flying conditions.
Our own production facilities in East Asia ensure the quality of the finished product and also
the well-being of our production staff.
Believe
We believe that the product should speak for itself. Only by flying can the pilots understand
their equipment and develop trust and confidence in it. From this feeling comes safety, comfort,
performance and fun. The grin when you land should say it all!
7
Page 8

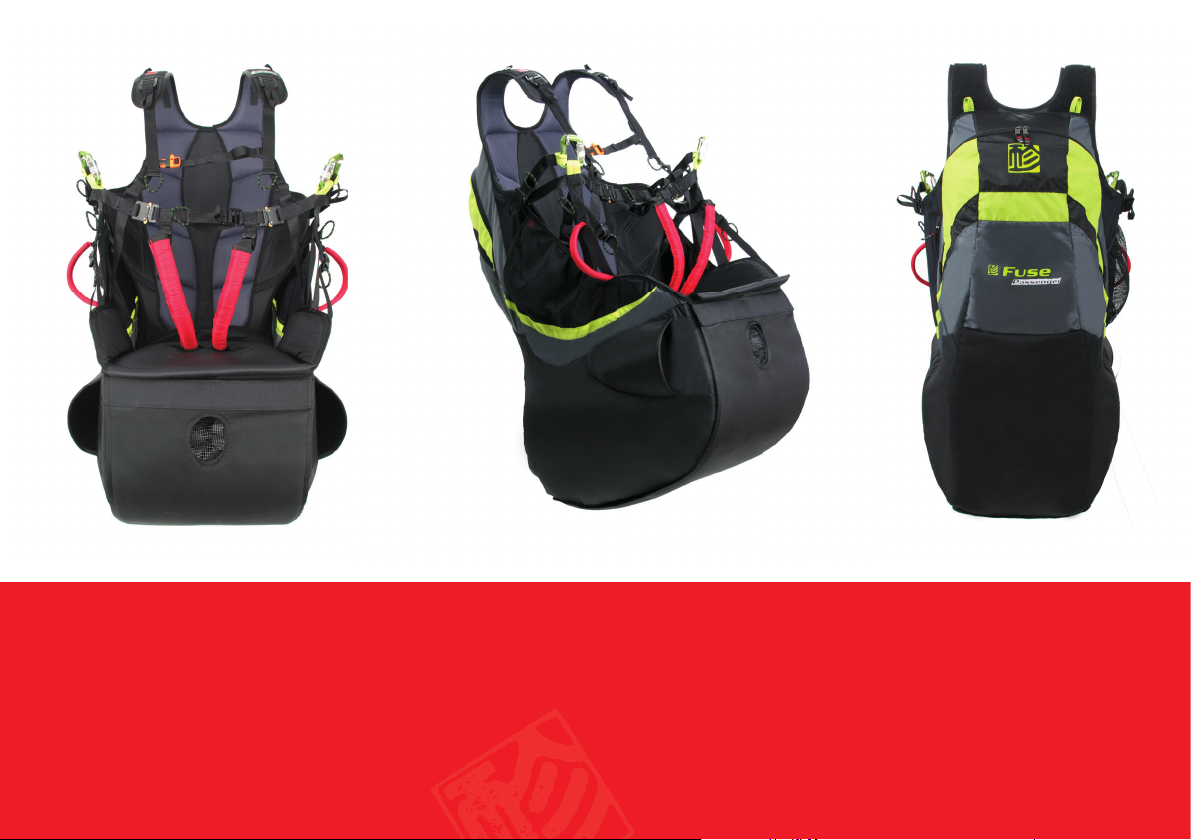
Introducing the Fuse Passenger
The Fuse passenger harness has been designed with several new features to improve safety, comfort
and increase the life of the product while keeping all of the features you’ve grown to love in the Safari.
For safety we made the airbag 20% larger to decrease the force of rough landings and increase the safety
margin for accidents on launch. We incorporated the GIN Get-up-system for the leg and chest straps to
prevent passengers from falling out of the harness by simplifying the 3 buckle system into 2 easy quick
connects.
With the newly added seat plate you will gain better handling, increased comfort and better spine
protection. We added a small foam pad in the rear of the harness to increase comfort and protect the
passenger’s spine from the pilots seat plate in the event of a hard landing. The rear pocket on the
passenger harness has been reduced in size to improve the pilot’s comfort during flight. Extra storage
space has been added to the pilot harness for convenience.
8
Page 9

Specifications
Specifications
The Fuse Passenger has EN and LTF certification.
Size
Size
Pilot height (cm)
Pilot height (cm) One size fits all
Weight (kg)*
Weight (kg)*
Delivery package
Delivery package
- Airbag
- Seatplate
- 2 carabiners
* weight does not include carabiners and seatplate
3.1
9
Page 10

Components of the Fuse Passenger
- Airbag
- Foam insert
- Skid guard
- Wooden seat plate
- Air inlet
- Velcro shoulder straps
10
Page 11

Airbag
The Fuse features a 20% bigger airbag over its predecessor, the Safari. We redesigned the air
intake by placing an extra port in the front of the seat, now the airbag will inflate in all flying
conditions.
The airbag protection will recude the impact force but it cannot completely eliminate the risk
of injury.
Foam insert
We incorporated a new foam protector in the leading edge of the seat to improve inflation and
add protection in the event of a hard landing.
Skid Guard
On the bottom of the aribag we have added an improved skid guard to protect the harness in
the event of a rough landing or repeated landings on a rough surface. This extra, heavy duty
fabric can be easily removed and replaced if ever worn or damaged.
Wooden seat plate
To add comfort and stability to the Fuse Passenger harness we incorporated a wooden seat
plate that can easily be removed or replaced.
11
Page 12

Air inlet
The air inlets of the Fuse Passenger harness are an important part of the airbag safety system.
We have improved the side air inlets and added a new center air inlet to maximize the entry of
air both before and during flight. The new center air inlet helps ensure the proper inflation of
the airbag independant of the passenger possition.
Velcro shoulder straps
The Fuse Passenger has been designed with Velcro along the top surface of the shoulder straps
to offer the pilot an ideal location for a variometer, GPS, or even hand phone to be mounted. At
the top of the shoulders there two small yellow webbing loops that allow the pilot to secure any
instruments while in flight.
12
Page 13

Before you fly
Make sure your dealer has checked the harness for completeness and basic settings. The foam
inserts and seat plate have been pre-installed in your harness but should be verified for proper
installation. Your harness must be assembled by a suitably qualified paragliding professional,
for example, your instructor.
13
Page 14

Spreader bar
P)
)
s
The tandem spreader bars have been designed with a safety feature that prevents the
main canopy from re-inflating after the reserve parachute has been deployed. By
connecting the rescue bridle to the “B” and “C” risers the main canopy will be stalled into
a more stable position for decent.
5
Rescue bridle
1
Pilot attachment
2
(RED LOOP)
Small passenger
3
attachment (LYME LOOP)
LOO
2
1
3
Large passenger
4
attachment (LYME LOOP)
“B” & “C” attachment points
5
Rescue carabiner
6
(RED LOOP)
LOOP
ent point
1
6
2 4
Rescue carabiner (RED LOOP)
1
Main carabiner (Small passenger)
2
3
Main carabiner (Larger passenger)
3
14
Page 15

Bridle to spreader bar connection
Connect the rescue bridle in the following order. If you are not certain of the proper
connection procedure then see your GIN dealer. If not connected properly then the bridle
may fail, causing serious injury or death.
1 2 3 4
B
C
D
A
A
Connect the rescue bridle to
the rescue carabiner
Fold the extra bridle
webbing neatly and secure
with the velcro cover
followed by the main line
velcro
Pass the riser connections
through the main carabiner
Attach bridle to the B & C
riser carabiners and secure
with the velcro straps
15
Page 16

Storage
Back pocket
The Fuse Passenger has a large rear pocket to store the passengers belongings in flight. The
size of this pocket has been designed to better fit the pilot and pilot harness.
Accessory Pockets
Located on the right side of the harness is a mesh pocket that is ideal for easy access items like
a camera or snack. On the left side of the harness there is a zippered neoprene pocket to store
more valuable items like a phone or wallet.
16
Page 17

Adjustments
Adjust your harness to suit your physique and flying style. It is important to adjust it correctly
to ensure you can easily slide into the sitting position after take off. A poorly adjusted harness
can adversely affect the flying characteristics of your paraglider.
Perform adjustments before your first flight by hanging in a simulator and fine-tune the
settings if necessary during your first few flights.
Shoulder Straps
The optimum setting for the shoulder straps depends on the height of the pilot. Stand upright
with the chest/leg straps closed, and symmetrically adjust the shoulder straps until they are a
snug fit, but not tight. To tighten, pull on the black and green loop forward and down. To loosen,
pull the black webbing loop at the top of the shoulders up and backwards.
17
Page 18

Chest Strap
The adjustment of the chest strap controls the distance between the carabiners and affects the
handling and stability of the glider. Widening the distance between the carabiners increases
feedback from the wing and allows for easier weight shifting. Closing the strap gives you a more
stable feeling in turbulence but increases the risk of stable spiral and also the risk of twisting!
The chest strap may also be adjusted in flight according to the conditions; for example, it may be
tightened in turbulent air and flown at a looser setting in less turbulent or weak conditions.
To tighten, pull the large black and green loop to the right. To loosen, pull the black webbing
strap to the left.
Leg Straps
The correct adjustment of the leg straps allows the pilot to easily reach the sitting position
after take-off without using his hands. In the standing position, use the buckles under the chest
strap to adjust the leg straps so that they fit comfortably without being tight; make sure you do it
symmetrically. If you need to lengthen the leg straps, first check that the shoulder straps are not
too tight. It is not normally necessary to make large adjustments from the default leg strap
setting.
To tighten, pull down on the black webbing. To loosen pull up on the double buckckle.
WARNING: Always maintain chest
strap adjustments within the
paraglider manufacturer’s
recommended range
18
Page 19

Lateral Straps
The lateral straps adjust the angle between the thighs and the back. This angle can be set
between 100° and 130°. Lengthening the straps increases the angle and vice-versa. The easiest
way to adjust them correctly is during a flight in calm air. Remember that flying in the supine
position (i.e. leaning back), reduces the stability of the harness and increases the risk of riser
twists after a deflation.
Seat Straps
The seat straps change the depth of the seat. Adjust to find a comfortable position. In the sitting
position, lengthen the straps to their maximum at first and then use the plastic buckles to shorten
the straps to find a comfortable position with good back support. Lengthening the straps also
helps you to slide easily into the harness at take off, while shortening the straps helps you to be
in the standing position for landing.
Side Straps (control angle of seat)
The seat adjustment straps allow you to adjust the angle of the front of the seat. You can
control the angle of the seat and the seat position with the straps beside the seat. To get the
optimum setting you can loosen these straps to the maximum in the sitting position and start
pulling the straps until you get the comfort from the leg support depending on the flying style of
the pilot.
1
1
2
3
2
Lateral strap
Seat strap
Side strap
3
19
Page 20

Flying with the Fuse Passenger
General warnings and advice
Before every flight, check the following:
Is your passenger in good physical and mental condition?
Are you within the certified weight range of your paraglider?
Does your passenger have the necessary valid insurance coverage (e.g. liability, medical,
life)?
Is your equipment and choice of site suitable for your level of experience?
Does your passenger have a suitable helmet, gloves, boots, eye-wear and adequate clothing?
Is your passenger carrying some form of identification, so that people know who they are in
case of an accident? Take along a radio and mobile phone if possible.
Pre-flight checks
As part of your normal pre-flight check routine, check:
Is there any damage to the harness or carabiners that could affect its airworthiness?
Are all buckles, belts, zips securely fastened? Buckles should click into place as you close
them, and a gentle pull on the fastened buckle verifies this. Secure any zips after fastening the
buckles. Take extra care in snowy or sandy environments.
Is the paraglider connected correctly to the harness and spreader bars with all carabiners
secured by their locking mechanisms?
Are all pockets closed properly and any loose items tied down safely?
Is the air chamber intake open and clear?
Are your passengers leg and chest straps closed? Double check before you take off!
IMPORTANT: Use a complete and
consistent system of pre-flight
checks and repeat the same
sequence every flight.
20
Page 21

Landing with the Fuse Passenger
Before landing, slide your legs forward in the harness so that you adopt the standing position.
NEVER land in the seated position—it is very dangerous even if you have back protection.
Standing up before landing is an active effective safety precaution.
Miscellaneous
Towing
The Fuse Passenger can be used for towing with the propper accessories. Ask your dealer.
Tandem Flying
The Fuse Passenger is designed for tandem flying. See www.gingliders.com for details of our
harnesses specifically designed for tandem flying.
Flying over water
The Fuse Passenger harness should not be flown over water. The Airbag will push the passenger
under water and increases the risk of drowning in a water landing.
21
Page 22

Maintenance and repairs
The materials used in this harness have been carefully selected for maximum durability.
Nevertheless, keep your harness clean and airworthy to ensure the longest possible period of safe
operation.
Care and maintenance
Don’t drag your harness over rough or rocky ground. Avoid unnecessary exposure to UV rays,
heat and humidity. Keep the folded harness in your rucksack when not in use.
Store all your equipment in a cool, dry place, and never put it away while damp or wet.
Regularly clean off dirt with a plastic bristled brush and/or a damp cloth. If the harness gets
exceptionally dirty, wash it with water and a mild soap. Make sure you first remove the entire
sub-components. Allow the harness to dry naturally in a well ventilated area away from direct
sunlight. Occasionally lubricate the zips and buckles with silicone spray, no more than once a
year.
After a hard landing you must check your harness for damage.
24
Page 23

Inspection checklist
In addition to regular pre-flight checks, your harness should be inspected thoroughly on every
rescue repack of 150 days. Additional inspections should be performed after any crash, bad
landing or take off, or if there are any signs of damage or undue wear. Always seek professional
advice whenever in doubt.
The following checks should be carried out
Check all webbing, straps and buckles for wear and damage, especially the areas that are not
easily seen, such as the inside of the carabiner hook-in points.
All sewing must be intact and any anomalies attended to immediately to avoid exacerbation of
the problem.
The seat and back plates must be free from cracks.
The main aluminium carabiners must be replaced at least every 5 years or after 500 hours,
whatever comes first. Impacts may create undetectable cracks that could result in structural
failure under continuous load.
Repairs
The manufacturer or an approved specialist should carry out any repair that involves critical
parts of the harness. This will ensure that the correct materials and repair techniques are used.
25
Page 24

GIN quality and service
We take pride in the quality of our products and are committed to putting right any problems
affecting the safety or function of your equipment and which are attributable to manufacturing
faults. Your GIN dealer is your first point of contact if you have any problems with your
equipment. If you are unable to contact your dealer or GIN importer, contact Gin Gliders directly
via our website.
Care of the environment
We are privileged to fly in areas of outstanding natural beauty. Respect and preserve nature
by minimizing your impact on the environment. When visiting an area, contact the local club for
details of environmentally sensitive areas and local restrictions.
When your paraglider eventually reaches the end of its useful life, dispose of it with
consideration and follow any local regulations.
26
Page 25

Final words...
Most of us today live in a dependent society where we are regulated and protected. There are
few opportunities for individuals to develop the self-responsibility that is the foundation of
safety in extreme sports such as paragliding.
Most accidents are caused by getting into situations that are too demanding for your level of
experience. This happens if you lack fundamental understanding, are incapable of assessing the
risk or simply do not pay sufficient attention to your surroundings or your own state of mind.
To stay safe, the best you can do is to increase your understanding, skill and experience at a
rate you can manage safely. There is no substitute for self-responsibility and good judgement.
In the end, paragliding offers a unique opportunity to learn to take control of your own destiny.
Memento mori, carpe diem!
Fly safely, and...E N J O Y!
GIN team
27
Page 26

Technical data
Size One Size
Pilot height (cm) One size fits all
Height of attachment points (cm) 42
Carabiner distance (cm) 38-53cm
Weight (kg)* 3.1
Certification
The Fuse Passenger has EN and LTF certification, max load 120kg
Fuse Passenger harness: [EN] PH 097.2013, [LTF] GZ 097.2013
Back protection
Airbag
* - weight does not include carabiners and seat plate
28
Page 27

Materials
Harness fabric
Inner Inside: OXFORD 210D PU
Webbing
NYLON-66 25mm / 30mm
Buckles
FC24B COBRA FIX -28MM, 3MM SLIDER BUCKLE / 3MM LOOP
Thread
P/F 630 D/9 Bonded, P/F 280 D/3 & 420 D/3 Bonded POLYESTER
29
Page 28

Fuse passenger harness
Shoulder straps
Back pocket
Breast strap
Chest strap
Main carabiners
Side pockets
Leg straps
Seat plate
Take-off handles
Air inlet
Skid guard (removable)
29
Page 29

www.gingliders.com
Dream. Touch. Believe.
 Loading...