

Page 1
Bolero 4 Owner’s Manual
Including Bolero 4 paramotor operating manual
Please read this manual prior to your first flight with the Bolero 4
Rev.1.2, 07/07/2012
Page 2

Thank You…
Thank you for choosing the Bolero 4. We are confident that this paraglider will provide you with
countless happy experiences as you progress in your flying career. This manual contains all the
information you need to fly and maintain your paraglider. A thorough knowledge of your equipment
will keep you safe and enable you to maximize your full potential.
Please pass on this manual to the new owner if you do resell your glider.
Happy Flights and Safe Landings,
The GIN Team
Safety Notice
By the purchase of our equipment, you are responsible for being a certified
paraglider pilot and you accept all risks inherent with paragliding activities
including injury and death. Improper use or misuse of GIN equipment greatly
increases these risks. Neither Gin Gliders Inc nor the seller of GIN equipment shall
be held liable for personal or third party injuries or damages under any
circumstances. If any aspect of the use of our equipment remains unclear, please
contact your local paragliding instructor, GIN reseller or the importer in your
country.
2
Page 3

Contents
Thank You… .............................................................................................................................................. 2
Safety Notice ........................................................................................................................................... 2
1. Gin Gliders ............................................................................................................................... 4
2. Introducing the Bolero 4 .......................................................................................................... 5
For Pilots Who… ...................................................................................................................................... 5
Cutting-edge Design ................................................................................................................................ 5
Manufacturing .......................................................................................................................................... 6
3. Before you Fly .......................................................................................................................... 7
Pre-delivery Inspection ........................................................................................................................... 7
Speed System ........................................................................................................................................... 7
Flying with motor ..................................................................................................................................... 8
Rucksack .................................................................................................................................................. 8
Your harness .......................................................................................................................................... 10
Certified Weight Range .......................................................................................................................... 10
Pre-flight safety .................................................................................................................................... 11
4. Flying the Bolero 4 ................................................................................................................. 12
Preparation for launch ........................................................................................................................... 12
Take off without motor .......................................................................................................................... 13
Line knots or tangles ............................................................................................................................. 14
Min Sink / best glide ............................................................................................................................... 14
Accelerated flight .................................................................................................................................. 14
Active Flying .......................................................................................................................................... 14
In turbulence .......................................................................................................................................... 14
Losing altitude ....................................................................................................................................... 16
Steering without brakes ........................................................................................................................ 17
Aerobatics .............................................................................................................................................. 17
Landing with the Bolero 4 ...................................................................................................................... 17
Tow launch ............................................................................................................................................. 18
Motorized flight ..................................................................................................................................... 18
5. Care, Maintenance and Repairs ............................................................................................... 24
Ground handling ..................................................................................................................................... 24
UV damage ............................................................................................................................................. 24
Packing instructions .............................................................................................................................. 24
Transport and Storage ........................................................................................................................... 24
Cleaning ................................................................................................................................................. 25
Inspections ............................................................................................................................................ 25
Repairs ................................................................................................................................................... 25
6. Reference ............................................................................................................................... 26
Testing and Certification........................................................................................................................ 26
Technical Specifications ......................................................................................................................... 28
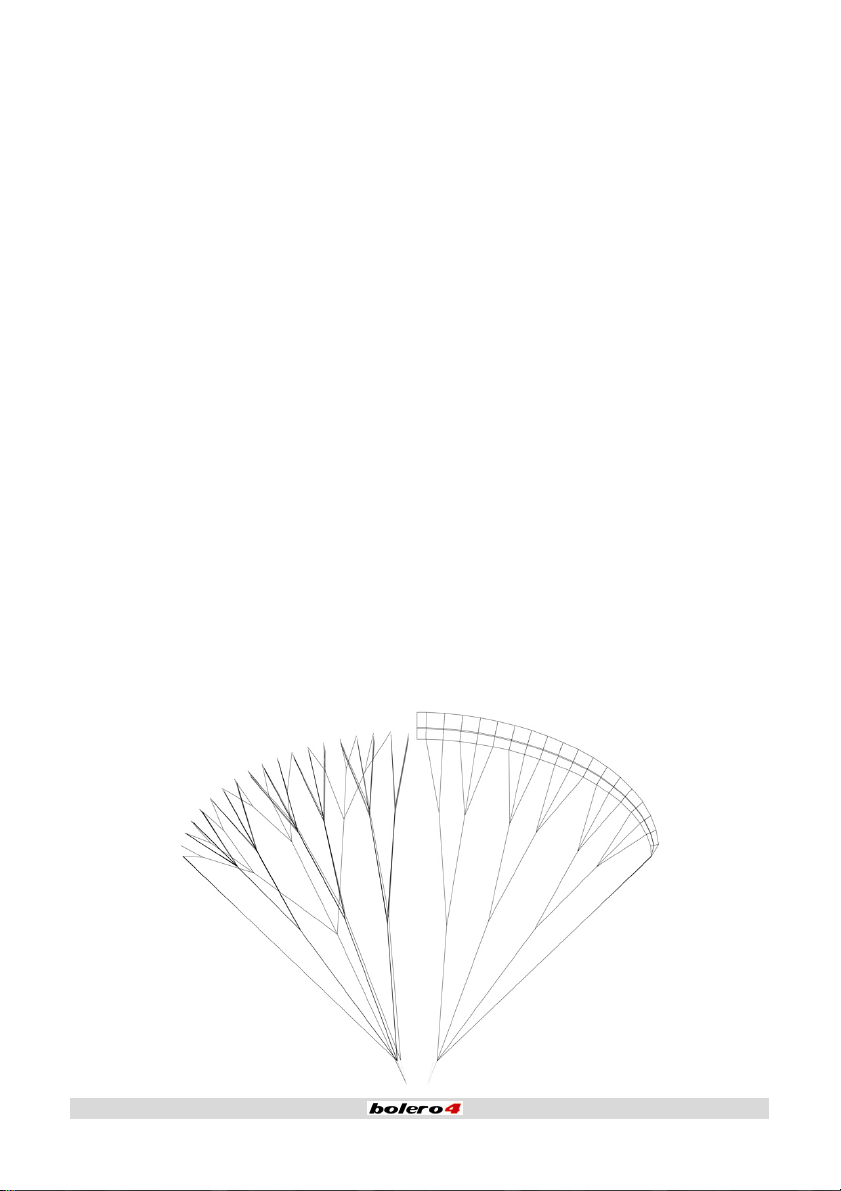
Line Plan ................................................................................................................................................ 29
3
Page 4

1. Gin G
g
B
a
e
n
y
c
s
x
h
u
a
n
e
n
c
e
u
e
t
e
e
e
r
h
o
r
Gin Gliders
team of en
Gin’s philos
applies equ
glider, the
Gin is prob
started wh
within the c
Team pilots
competitio
provided b
sales servi
liders
was formed in 1998 by
ineers and test pilots.
ophy is simple: to desi
ally for an entry-level
oomerang. No glider i
bly the world’s most e
n the sport of paraglid
ompany in Korea and t
have won the Paraglid
successes in World C
dedicated profession
e.
paraglider designer a
gn gliders that he, and
wing such as the Boler
released to the mark
perienced designer a
ing was born. He is ba
roughout a worldwid
ing World Cup numero
ps, World and Nationa
ls ensures that you g
d competition pilot Gi
any other pilot, loves
4, as for the world-b
t without Gin’s compl
d manufacturer of par
ked by an equally exp
network of distributo
s times and have had
l Championships. This
t the best possible pr
n Seok Song and his
o fly. This philosophy
ating competition
te satisfaction.
agliders, having
rienced team, both
s and dealers. GIN
countless other
igh level of expertise
duct support and afte
4
Page 5
2. Introducing the Bolero 4
The Bolero 4 is a new concept in an entry-level wing. Designer Gin Seok Song has drawn on all his
years of experience to produce a wing that is uniquely in tune with the needs of today’s pilots. The
Bolero 4 offers outstanding security, with precise but forgiving handling. This allows the pilot to
accurately feel the sensations of flight, and thus develop an active flying style. Rapid progression up
the learning curve is enabled, as the pilot becomes well acquainted with the myriad of different
movements and moods of the air. The Bolero 4 will allow you to experience the full pleasure of free
flight, without ever compromising your safety.
For Pilots Who…
The Bolero 4 is an ideal first glider, and is also suitable for the more experienced club pilot who flies
infrequently and wants a good performing glider with the highest safety margin. The Bolero 4 is
designed for all kinds of flying, from the first steps at the paragliding school training slope via ridge
soaring to thermalling and cross country.
The Bolero 4 is suitable as a paramotor trainer glider as well as for more experienced paramotor
pilots who don’t fly very often and therefore require a paramotor glider with a high level of safety.
The Bolero 4 is suitable for all kinds of paramotor flights from training flights to precision flying near
the ground (kicking sticks) up to big cross country flights.
Cutting-edge Design
Gin has made extensive improvements in the Bolero 4 compared to its predecessor, the Bolero 3.
Performance, take-off and handling characteristics have been improved without sacrificing security.
Rigifoil reinforcements at the leading edge have been introduced. This improves take-off
characteristics, performance and increases the lifetime of the canopy.
The brake line layout features an extra upper line that gives the wing an even more precise feel.
5
Page 6

Weight and drag have been reduced by using thinner yet very strong line materials and by the
introduction of a new, hi-tech, light fabric.
These and other innovations ensure that by purchasing the Bolero4, you are getting the best possible
glider in its class.
Manufacturing
All GIN gliders are produced in the company’s own facilities using the most modern techniques. Highly
skilled staff take extreme care during the entire manufacturing process. Stringent quality control is
made after each step, and all materials that go into each wing can be traced. These measures
guarantee that pilots fly with the assurance that their wing meets the most exacting safety standards.
6
Page 7
3. Before you Fly
Pre-delivery Inspection
The Bolero 4 is delivered with speed system, rucksack, inner bag, riser cover, compression strap,
repair tape and this manual. Your instructor or dealer should have made a test inflation followed by a
test flight before delivery. Each Bolero 4 is checked for conformity with the EN and LTF tested
specimen before it leaves the factory.
Speed System
The speed system increases the maximum speed by lowering the angle of attack with a pulley-guided,
foot-operated system. Approx. 10 km/h gain in speed can be realized with the accelerator at full travel.
It is important to have your accelerator system correctly routed through your harness and attached to
the risers with the supplied Brummel hooks. The length of the speed bar should be initially adjusted
while on the ground, sitting in the harness so that the legs are fully extended at the point of full
accelerator travel. It is helpful to have an assistant hold the risers taut while making this adjustment.
Subsequent fine tuning can be done on the ground following the first flight with the speed system. If
in doubt about this procedure, consult your instructor or dealer.
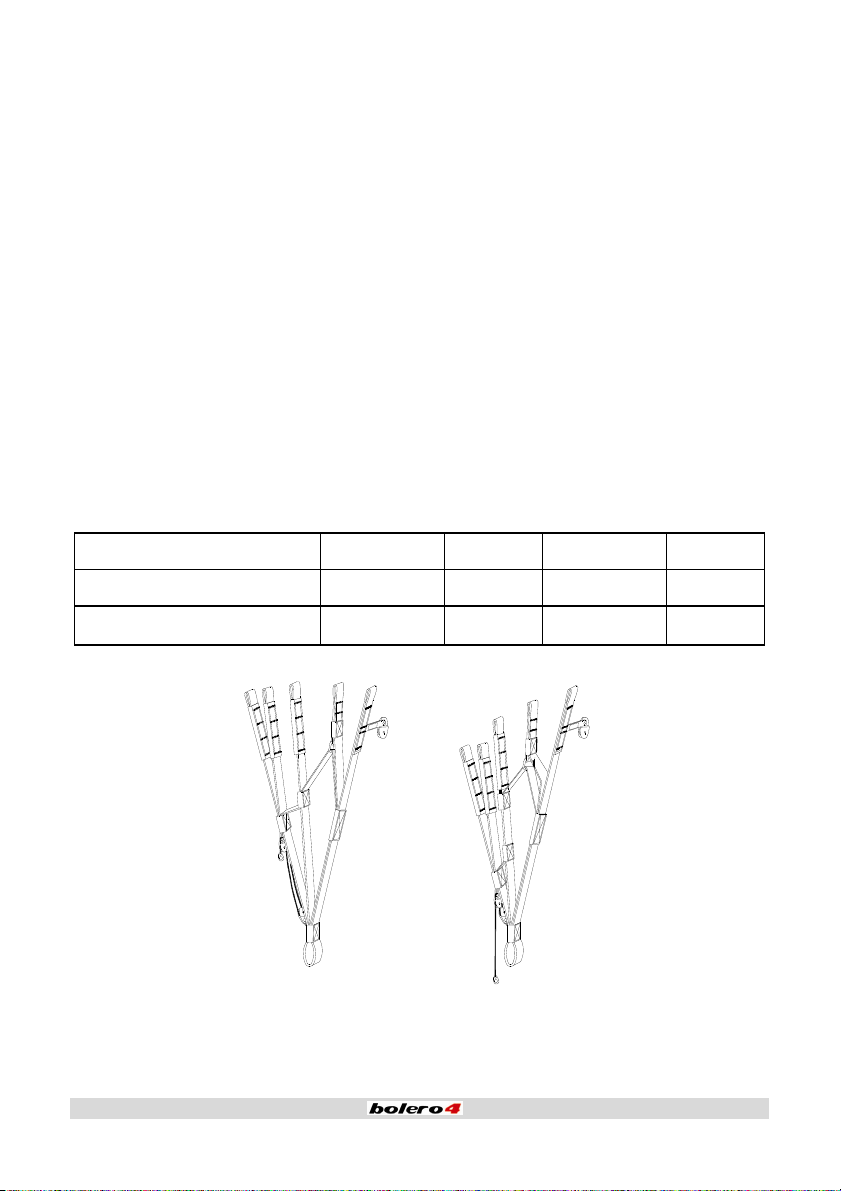
Riser A B C D
length at trim speed 48cm 48cm 48cm 48cm
length at full speed 37cm 39cm 43.5cm 48cm
7
Page 8
Flying with motor
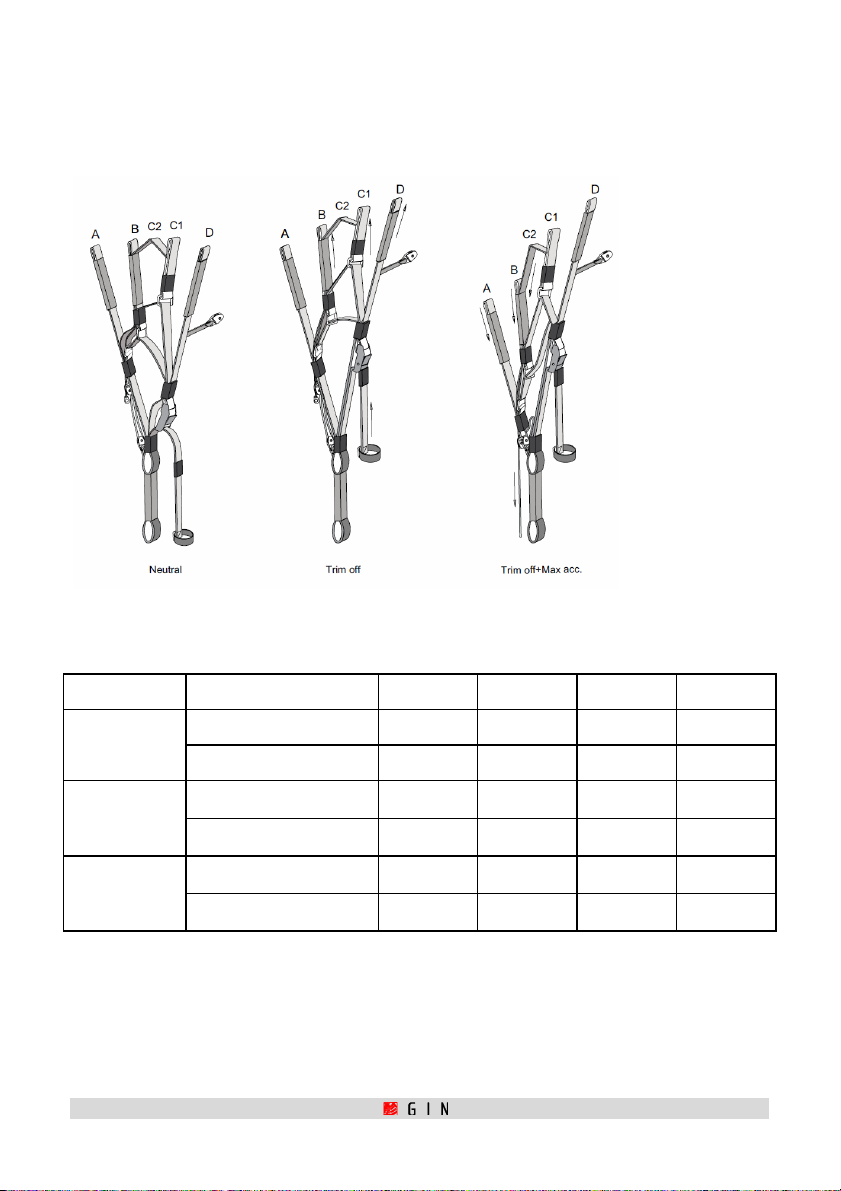
The Bolero 4 can be equipped with risers which have trimmers in addition to the accelerator system.
The Trimmers are not certified for flying without a motor. For free flight, the trimmers should
be deactivated and hooked into the carabiners
Length neutral
Risers A B C D
(lower hang point) 52cm 52cm 52cm 52cm
.
(upper hang point) 44cm 44cm 44cm 44cm
Length
accelerated
Length
accelerated
trimmers open
IMPORTANT NOTICE: Accelerator and trimmers should not be used near the ground or in
turbulent conditions. The use of accelerator and trimmers reduces the angle of attack which can
lead to a more aggressive post-collapse behaviour.
8
(lower hang point) 39cm 41cm 46.5cm 52cm
(upper hang point) 31cm 33cm 38.5cm 44cm
(lower hang point) 39cm 41cm 49cm 57cm
(upper hang point) 31cm 33cm 41cm 49cm
Page 9
Brake lin
e
r
e
f
e
o
f
s
b
p
o
f
S
g
e
m
s
n
e
s
t
f
s
t
l
h
a
i
g
o
a
a
r
o
r
e
o
t
m
m
d
s
E
a
e
a
t
w
The main b
These line l
them.
In soaring
release the
If you do n
recommend
every 2cm
minimum o
the glider i
the brakes
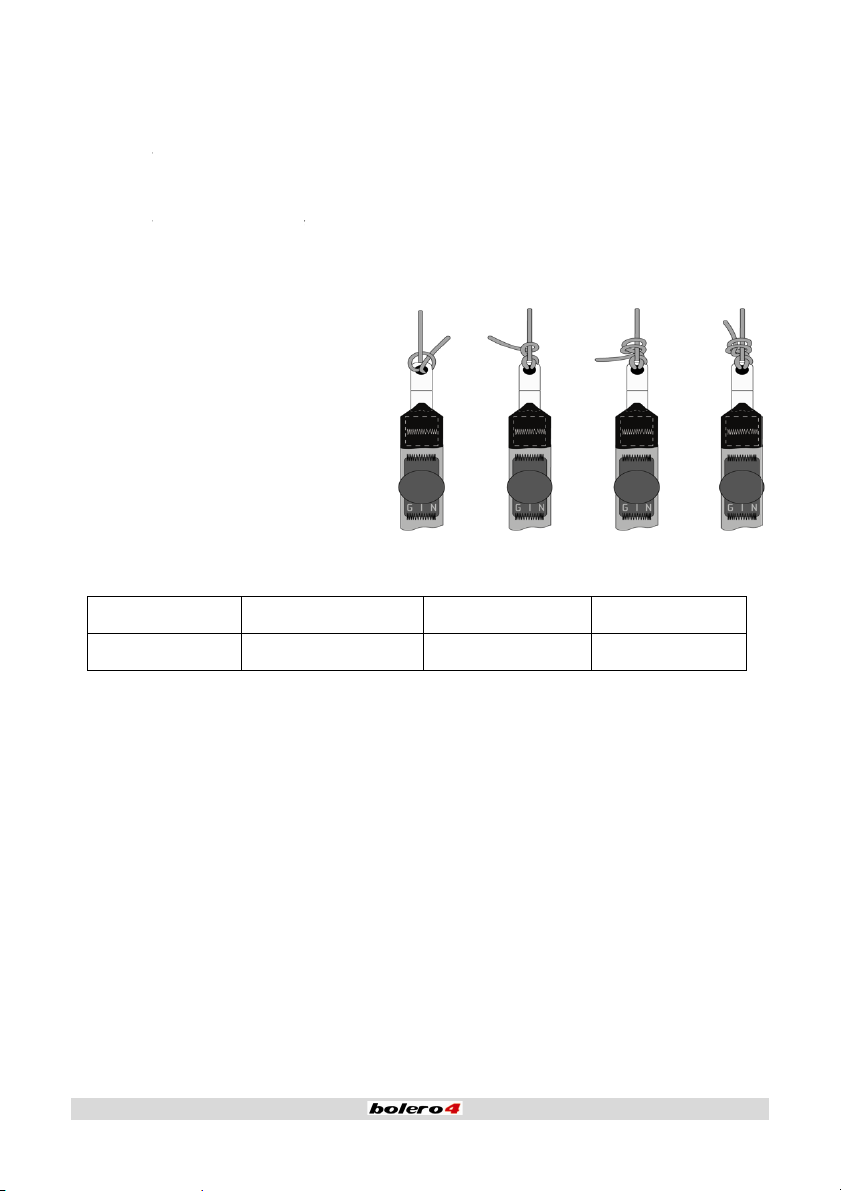
when the s
recommend
bowline kn
attachment
adjustment
ake line lengths of the
ngths have been fine
light, it is common to
wraps in any extreme
ed to make adjustmen
that you test fly the g
f adjustment. There s
10cm of free brake tr
flown hands-off. This
eing applied unintent
eed system is fully en
a double sheepshank
t for the brake handle
as shown in the diagr
Bolero4 correspond t
uned by GIN test pilot
ly with half a wrap on
ituation.
s to suit your harness
ider after
ould be a
vel when
prevents
onally
aged. We
r a
m.
the ones used in the
s, and it should not be
he brakes. However, c
, body and flying style,
N and LTF test flights.
necessary to adjust
re should be taken to
we strongly
Length o
Len
Rucksack
All Gin glid
carrying co
The rucksac
the harnes
the back of
shoulder a
two storag
An XXL ruck
the main brake li
ize
th / cm
rs are delivered with
fort and ease of use.
k should be packed ca
and then put the top
the rucksack. Finally, t
d waist straps to ensu
pockets for accessori
ack (200L capacity) is
ne of Bolero 4
22
239
durable ripstop KODU
efully to achieve maxi
f harness in the botto
ighten the internal an
e the equipment stay
s.
available as an option
24
255
RA® rucksack, design
um comfort. First, pl
of the rucksack with
external compression
firmly in place when
al extra for pilots that
27
270
d for ergonomic
ce the glider inside
he glider side next to
straps and adjust the
alking. There are also
require it.
9
Page 10
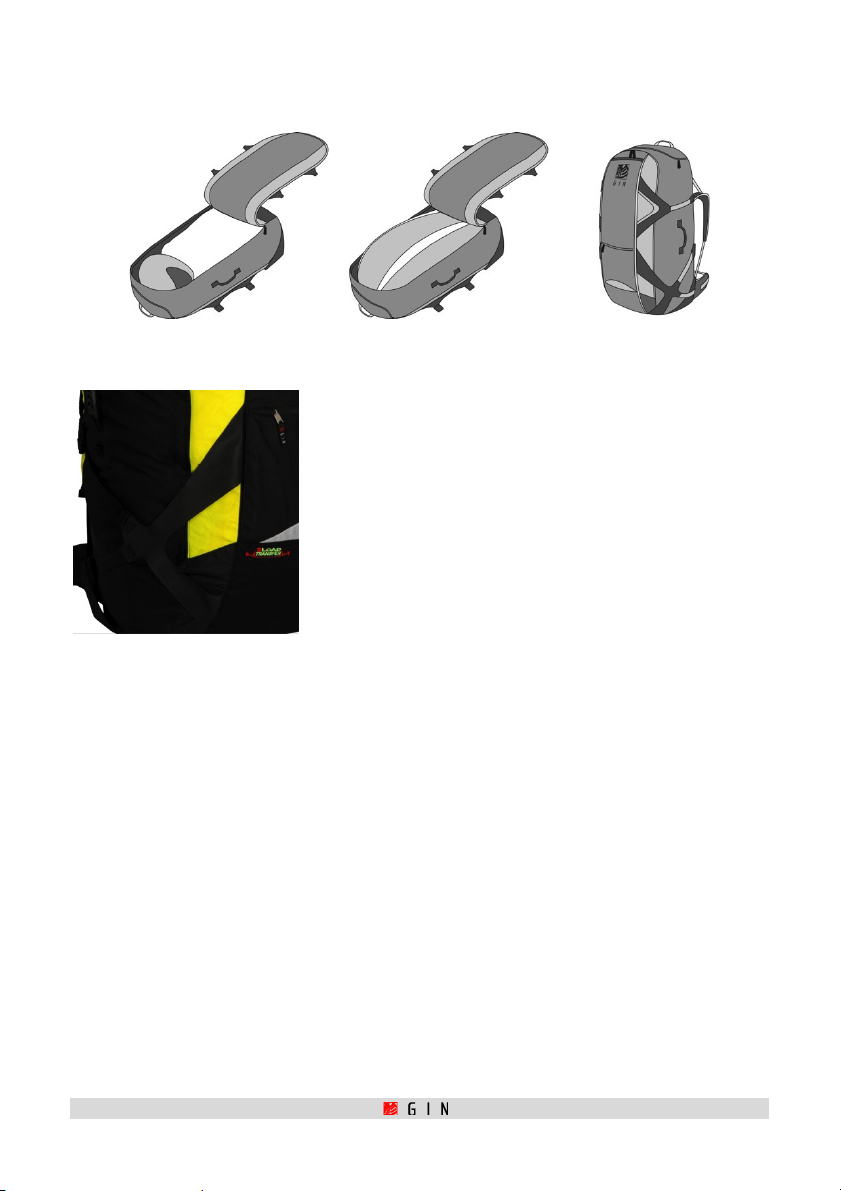
"X Load System" is a new compression system created by the GIN R&D team, using Hypalon material.
Its concept is based on a 4 point cross bracing at the bottom of the rucksack to obtain an optimum
distribution of weight."
Your harness
The Bolero 4 has been tested with a harness with a variable chest strap and without fixed crossbracing. Ancient harnesses with fixed cross-bracing are not suitable for flying with the Bolero 4 and
should not be used. Check with the manufacturer of the harness or your paragliding instructor if in
doubt.
The adjustment of the harness chest strap controls the distance between carabiners and affects the
handling and stability of the glider. Tightening the chest strap increases stability, lengthening it
gives more feedback from the glider decreases stability.
Gin calculates and draws the plan of the glider with a distance between the carabiners of 44cm. We
recommend a setting a distance of 42cm to 50cm between the carabiners, depending on the size and
design of the harness. There is no need to fly with a tight chest strap setting with the Bolero 4, as
there is no tendency for it to feel unstable.
Certified Weight Range
The Bolero 4 must be flown within the certified weight range given in the reference section at the back
of this manual. The weight range is quoted as the total weight in flight, i.e. the weight of the pilot,
glider, harness and accessories. The easiest way to check your total weight is to stand on weighing
scales with all your equipment packed into your rucksack. In most cases, the difference between your
10
Page 11

body weight and your total flying weight will be around 20 kg. For paramotor flight the additional
weight of the engine and fuel must also be taken into account.
Pre-flight safety
To fly this equipment you should:
9 Have appropriate practical and theoretical training and experience for this class of
glider.
9 Have the necessary insurance and licences.
9 Be in your right mind, unaffected by extreme stress, recreational or prescribed drugs.
9 Only fly in conditions suitable for your level of paragliding.
9 Wear suitable head protection, use a certified harness and emergency parachute.
9 Make a thorough pre-flight check.
11
Page 12

4. Flying the Bolero 4
We recommend that you first practice inflating your glider on a small training hill, or flat ground.
Make your first flights with your new paraglider in gentle conditions on a familiar flying site.
Preparation for launch
Following a consistent method of preparation and pre-flight checks is vital for safe flying. We
recommend the following:
9 On arrival at the flying site, assess the suitability of the conditions: wind speed and direction,
airspace, turbulence and thermal cycles.
9 Inspect your glider, harness, reserve handle and pin, helmet and any other equipment.
9 Choose a sufficiently large take-off area with even ground and no obstacles.
9 Secure yourself in your harness and don’t forget the leg loops! Put your helmet on.
9 Lay the glider out according to the plan form, and get the lines and risers sorted out.
9 Connect the risers to your harness carabiners, ensuring there are no twists or loops around the
lines.
9 Connect the speed system to the risers with the Brummel hooks.
9 Do a final line check by pulling gently on the risers or lines to ensure there are no new knots,
tangles or interfering branches or rocks. Take extra care in nil or light winds.
Pre-flight check list
9 Reserve parachute: pin in and handle secure
9 Helmet and harness buckles closed
9 Lines free
9 Canopy open and into wind
9 Airspace clear
Additional Checks for flying with paramotor:
9 Engine warm and delivering full power?
9 Karabiners and shackles closed and secure?
9 Trimmer setting correct and symmetric?
9 Propeller free – nothing can get caught by the propeller?
9 Speed system functioning – enough clearance from the motor?
9 All lines free? Throttle handle and break lines not twisted?
9 Pilot ready to go, no lose parts on the clothing or harness?
9 Visibility ok?
12
Page 13

First flights with paramotor
First try to get accustomed to the Bolero 4. You should make your first flights with trimmers set to the
neutral position. When you fly the Bolero 4 in this trimmer position it feels like a normal paraglider.
Apply normal brake pressure and try to find the point where the pressure becomes heavier. This point
will be at around 25% of the total brake travel range.
When you are used to flying with the Bolero 4 in this trimmer position try to fly with the trimmers set
to faster and slower positions, use weight shift for flying turns and use the accelerator. Enjoy the
additional speed and safety of the Bolero 4 (also see the riser drawings on page 8 of this manual for
additional, more detailed information).
Important advice: Make sure that the clamp of the trimmers has a tight grip by pulling the trim
adjuster strap in the opposite direction. This helps, that the teeth of the trimmer clamp get a
good grip in the webbing material and stay locked in this position.
Double check the lengths of the brake line
As already mentioned earlier it is better to use the advice and help of a paramotor instructor or a
experienced paramotor pilot. Chose a day with steady wind of around 15-20 km/h and check the brake
line length with your motor on the back.
Take off without motor
The key to a successful launch technique is to practice ground handling on flat ground whenever you
can.
Light or Nil Wind Launch
The Bolero 4 inflates steadily in nil-wind conditions. Simply guide the glider with the A-risers,
keeping your arms bent and hands at the level of the shoulders. Allow your arms to rise in an arc and
wait for the glider to inflate and come above your head – do not push the risers. There is no need to
pull the risers hard. Run positively as the glider comes above your head. Be sure to look up and
check that the canopy is fully inflated before you take-off, and that there are no tangles in the
lines. If any irregularity should occur and you’re not yet airborne, abort the launch immediately by
stalling the glider. On steep launches, stall one side of the glider and run parallel to the hill.
If the glider should come up sideways, and the situation is recoverable, run towards the lower side
rather than trying to struggle against the force.
An impulse launch where you start running with slack lines close to the glider is not needed.
Strong Wind Launch
The reverse launch technique is recommended. Holding the brakes, turn around to face the wing
passing one set of risers over your head as you turn. We suggest building a "wall" by partially
inflating your glider on the ground, thus sorting lines out thoroughly. Check the airspace is clear and
gently pull the glider up with the A risers. When the glider is overhead, check it gently with the brakes,
13
Page 14

turn and launch. In stronger winds, be prepared to take a couple of steps towards the glider as it
inflates and rises.
Line knots or tangles
If you do take off with a line knot or tangle, try to get clear of the ground and any traffic before taking
corrective action. Weight shift and/or counter brake to the opposite side and pump the knotted side
with your brake. Be careful not to fly too slowly to avoid a stall or spin. If the knot or tangle is too
tight to pump out, immediately fly to the landing zone and land safely.
Min Sink / best glide
The minimum sink speed is achieved by pulling approximately 30 cm of brake. The theoretical best
glide speed in calm air is realized at the hands-off position.
Accelerated flight
Once you have become accustomed to flying the Bolero 4, you can practice using the speed system,
which allows improved glide in headwinds and greater penetration in strong winds.
Apply the speed system by pushing the speed bar progressively with your feet. Be prepared to control
roll by using weightshift and pitch by varying the amount of bar. Keep a very light pressure on the
brakes in order to feel the canopy.
Avoid flying accelerated near the ground, and don’t use more than half the maximum travel in
turbulence.
If you do encounter a collapse while using the accelerator, step off the bar first before taking any
other corrective actions.
Active Flying
The Bolero 4 has a high internal pressure, resistance to tucking and a very high degree of passive
safety. However, it is recommended that at this stage you already start practising an active flying
style. This will help you avoid deflations in all but the most turbulent conditions. The key to active
piloting is keeping the glider above your head at all times. If it falls back behind you, let up the brakes.
If it surges in front of you, counter brake until the surge is controlled. If you sense a loss of pressure
on one side of the canopy, smoothly apply brake and/or weightshift on the appropriate side until you
feel pressure return. In all cases, maintain adequate airspeed and avoid overreaction.
In turbulence
Deflations of the canopy can occur in strong turbulence. The Bolero 4 will recover without pilot input
in almost all situations, so whenever in doubt, let up the brakes and let the glider fly. However, it is
recommended that you follow the advice below in order to help the wing recover more rapidly.
Asymmetric deflation
In the event of encountering strong turbulence and suffering an asymmetric deflation (collapse on
one side), the Bolero 4 will promptly and easily re-inflate without interference from the pilot, but the
course might alter slightly. This might be unwanted close to the ground or other gliders. Maintain
your course by weightshifting away from the collapsed side. This action can be aided by applying a
little force on the brake opposite to the deflation. This will normally be sufficient. However, if the
14
Page 15

deflation fa
c
c
t
l
c
u
s
o
v
c
h
x
s
e
u
t
r
l
t
n
e
a
a
e
e
t
a
d
t
a
u
p
s
m
a
v
m
r
p
e
n
p
g
h
a
k
o
e
s
s
o
glider regai
ils to come out, pump
n its flying speed afte
he deflated side with
it has re-inflated.
firm and smooth pum
ing motion. Let the
Symmetri
A symmetri
airspeed wi
Cravat / g
A cravat oc
extremely
procedure f
On all Gin g
B riser. Thi
tight and th
Cascade
Many reser
over-corre
deflation
(frontal) deflation wi
h a small surge. If cou
ider wrapped arou
urs after a severe defl
nlikely to occur on the
or correcting it. Count
liders, there is a separ
line usually comes sl
e cravat normally com
f events
e deployments are a r
tions are often worse
l come out promptly w
nter braking, be caref
d lines
ation when the wingti
Bolero 4. Nevertheles
rbrake and/or weights
te stabilizer/winglet
ck in the event of a cr
s out.
sult of a cascade of o
han no input at all.
ithout pilot input. The
l not to over-correct.
becomes trapped in t
, the pilot should be f
hift and pump the bra
ain line. On the Boler
vat. Pull it down comp
er-corrections by the
lider will regain
e glider lines. It is
miliar with the
e on the tangled side.
4 it goes down to the
letely until it comes
pilot. Please note that
Flat spin
In normal t
occur, just l
Full stall,
This is an e
Do not take
during the
canopy will
fill the glid
excessive s
ermalling flight, you
et up the brakes and w
dynamic stall
treme manoeuvre and
wraps with your brake
tall, and lock them un
oscillate back and for
r with air. If possible,
rge. The Bolero 4 will
re very far from the li
ait for the glider to su
there should never be
s before entering a ful
er your harness seat
h. Before releasing th
let the brakes up when
slow down the surge o
its of a flat spin. Nev
ge forward.
any need to perform o
l stall. Keep your hand
late if necessary. In a
stall, raise your hand
the glider is in front o
its own, but you may
rtheless, should this
ne.
close to your body
stable full stall, the
slightly and evenly t
f you to avoid
counter brake the dive
15
Page 16

briefly for comfort if needed and then let up the brakes to regain airspeed. Be careful to not stall the
glider again when damping the surge.
Never attempt a stall and then change your mind and release the brakes, as the glider will surge
radically.
Deep stall (parachuting, stable stall)
The Bolero 4 does not have a tendency to get into nor stay in a deep stall. Should this nevertheless
occur, put your hands on the A risers and push forward to gain speed. On some modern
harness/accelerator setups, you can reach the speedbar without using your hands. If so, push the
speedbar. Never try to steer out of a deep stall.
You can recognise a deep stall by the glider getting "mushy" and the airflow around your ears
decreasing. This situation is usually achieved by flying in turbulence or exiting a deflation with
too much brakes applied.
Losing altitude
Extremely strong and widespread lift is found, for example, in storm conditions. The best place to be
in this situation is on the ground. Nevertheless, if you’ve been caught out by the weather and find
yourself needing to descend rapidly, there are several ways to do so. The best way is, of course, to
find sink. Failing that, try one of the techniques below. They are presented in order, from the least to
the most extreme. Most of these techniques place undue stress on your glider, and should be avoided
if your wish to extend its lifetime. We recommend you initially practice these manoeuvres under
qualified supervision during a safety training course.
Big ears
Big ears is a safe method of moderately losing altitude while maintaining some forward speed. To
make big ears, pull the outer “A” riser which is connected to the outer line of each side. Simply pull
this separated “A” riser outwards and downwards as shown.
16
Page 17

Although the noise of the wind around your ears may indicate the airspeed improves, the airspeed
does not improve with big ears. You may use the speedbar in combination with big ears to maintain
your forward speed but increase the sink.
The glider can be steered while in big ears using weightshift alone.
When releasing the lines, the Bolero 4’s ears will come out on their own. Release the big ears at least
100m above the ground. If this is not possible, keep the big ears in until you flare for landing rather
than letting them out on the approach. This is a safer method because of a possible wind gradient
close to the ground and your low airspeed/high wing loading with big ears in.
Spiral dive
The spiral dive should be considered an extreme manoeuvre. Practice spiralling with caution and
lesser sink rates to get a feel for the Bolero 4’s behaviour. Weightshift and pull the brake on one side
gradually. Let it accelerate for two turns and you will enter the spiral dive. Once in the spiral, you can
control your descent rate and bank angle with weight shift and the outer brake.
WARNING! A pilot who is dehydrated and/or not accustomed to spiralling can lose consciousness in a
steep spiral dive! As with all types of aircraft, we advise you to assist the glider to exit from the spiral
dive in a controlled manner. Let the glider decelerate for one or two turns by applying outer brake
and/or weight shift.
B-stall
To quickly lose altitude without straining your body with G-force you can use the B-stall. Reach up to
the B-risers just below the maillons and twist your hands while gently pulling. It will be difficult at
first, but become lighter the more you break the aerofoil. Once pulled, do not release immediately.
The glider needs to settle into a stable B-stall before releasing. On exiting the B-stall the Bolero 4
has a very gentle dive without deep stall tendencies. We advise you to release the B-stall
symmetrically with both hands in a decided manner.
Steering without brakes
If a brake is not operational for some reason, you can steer the Bolero 4 with the D-risers. Add
steering input by weight-shifting in your harness. Be careful not to steer too much with the riser to
avoid any possibility of a spin.
Aerobatics
The Bolero 4 is not designed for aerobatics. Besides the inherent risks, extreme manoeuvres of any
kind place unnecessary stress on the glider and effectively shorten its lifespan.
Landing with the Bolero 4
Select a familiar landing area free of obstacles and carefully note the wind speed and direction in the
landing area. The low minimum flying speed of the Bolero4 will help you to make a soft landing in all
conditions. Approach the landing with sufficient airspeed and don’t leave your last turn too late or too
steep.
Before landing, slide your legs forward in the harness so that you adopt the standing position. NEVER
land in the seated position; it is very dangerous for your back even if you have back protection, which
17
Page 18

is only a passive safety system. Standing up before landing is an active safety system, and is much
more effective.
Tow launch
The Bolero 4 is suitable for towing by pilots who have the relevant towing certification. The Bolero 4
has no tendencies towards deep stall/parachuting. There is sufficient margin to counter steer the
glider in a normal towing situation. Make sure you use proper equipment, experienced personnel, the
recommended techniques and all relevant safety precautions for towing.
Flying under Power
NOTE: Thorough pre-flight checks of the glider, harness and engine are essential prior to any launch.
For powered flight, many of the flying characteristics of the Bolero 4 are the same as in the previous
section; however, there is a certain amount of additional information, particularly where the addition
of the thrust of the power unit and correct matching of the wing to the motor unit is concerned. Gin
Gliders cannot be held responsible for ensuring full compatibility with the multitude of motor units
that could be used.
Forward Launching in Nil Wind
While there may appear to be no wind, this is rarely the case and it is essential for aircraft of this
type to take off and make the initial climb out to a safe height (depending on the surrounding terrain)
into wind. This makes maximum use of the wind and avoids the danger of losing airspeed when
climbing out steeply through wind gradient. Particular attention must be paid to trees, power lines
and other large obstacles and any rotor that they may generate.
Preparing the wing:
Lay the glider out, downwind of the motor, so that the lines are fully extended and as if attracted to
the central focal point of the motor. Then lay the risers down ready to clip in. Set the trimmers to the
take off position (Faster settings may be desirable in stronger conditions, see the diagrams on page
8). Make sure that when warming up the engine you do so upwind of the wing and then stop it whilst
clipping in.
Attach the glider and proceed with the launch (as in section Launching).
From now on you should try to control the glider whilst facing forwards. If the wing is low behind you
and you turn around, the lines will trail over the propeller. However, falling backwards onto the motor
is both dangerous and expensive and must be avoided at all costs, even if that means a few damaged
lines!
During the launch, if the pressures on each of your hands feels even, open the throttle to full take off
power, leaning backwards against the thrust so that the engine is pushing you along the ground
rather than into it.
It is best to try and leave the brakes alone and just let the canopy come up. If it starts to go off to one
side, increase the pressure on the riser on the lower side, whilst moving sideways towards it and the
centre of the wing. Where possible maintain the direction of your launch.
18
Page 19

If the wing starts to drop backwards, increase the pressure on both “A” risers to help it up, and as you
increase power, try to keep a constant angle with the motor and maintain smooth power control. Any
sudden changes will alter your course because of the powerful gyroscopic and torque effects.
If the canopy is so far off to the side or behind that it cannot be recovered, kill the engine, abort the
take-off and reassess the launch conditions.
As the canopy comes up, the drag reduces and it should stabilize over your head without overshooting
you. This is a good time to check that your wing is nicely inflated and that there are no tangles or
lines fouled, but this must be done whilst on the move andwithout turning. When you feel the
resistance reduce, accelerate your run. Feel for pressure on the brakes, coming down on them as
required to steer or to increase lift for taking off.
Points to note:
* If your propeller protection cage is flimsy enough, the pressure of the lines on it during launch may
distort it to the point where itfouls the prop. If this is the case make sure the lines have cleared the
cage before you open the throttle.
* All control inputs should be smooth and progressive.
* Don’t attempt to take off if the canopy isn’t roughly level overhead. Dangerous oscillations may
result if you apply full power with it too far off to one side.
* Keep your undercarriage down until you are definitely flying!
* The faster the trim setting, the more brake the glider will need to get off the ground.
Reverse Launching in Stronger Winds
Because the Bolero 4 launches so easily it is possible to perform a reverse launch with both front
risers and one brake in one hand and the throttle and opposite brake in the other. If the wind is
appreciable this is the easiest method of launching, but if the wind is light the difficulty of running
backwards safely with a motor on makes a forward launch preferable.
Having started and warmed up your motor upwind of the canopy, attach yourself to the power unit,
face the canopy, approach the risers and clip them on to the appropriate mallions. Build a wall first
using front and rear risers simultaneously. We recommendthat you momentarily raise the glider off
the ground to check for tangles and line snags.
Holding risers, brakes and throttle control as outlined above, pull the front risers up to lift the glider
over your head.
When the glider is steady above you turn round, apply power and take off.
As with forward launching, the trim/power/brake relationship must be established for the best rate of
climb and forward speed.
Points to Note:
*This is a cross-hands reverse launch. You must master this technique before attempting it under
power.
Your local paragliding school can assist you here.
19
Page 20

* All control inputs should be smooth and progressive.
* Don’t attempt to take off if the canopy isn’t roughly level overhead.
Dangerous oscillations may result if you apply full power with the canopy off to one side.
* Keep your undercarriage down until you are definitely flying!
* The faster the trim setting, the more brake the glider will need to get off the ground.
Speed systems may cause problems when clipping in. Don’t get your lines crossed!
The Climb Out
Once off the ground and flying safely, continue into wind using the brakes to achieve the desired
climb rate. Don’t attempt to climb at too steep an angle. Attempting to use too much brake to force a
higher climb rate will only degrade the climb by creating extra drag and with the addition of lots of
thrust this could result in a stall or a spin.
Under power the Bolero 4 behaves more like a powered fixed wing airplane than a paraglider, and it
helps to think of it as such.
Provided there are no obstacles in your path, it is often safer to fly level with the ground after takeoff gaining more speed before converting it into height using the brakes and then easing off into the
climb out.
The other reasons for not climbing out too steeply are the risks involved when having engine failure,
i.e. a stall and diving recovery.
Although the Bolero 4 will not sit back behind you a slow forward speed and high angle of attack is
still likely to put you into a near stalled attitude if your power source suddenly fails. In this situation
you should always be able to set up a reasonable approach, so maintain sufficient airspeed at all
times, and keep your angle of attack under control at low altitude.
Depending on the geometry of the set-up of your power unit, the propeller’s torque effect may make
itself felt as you leave theground. Expect it to turn you and, if necessary, steer against it in order to
maintain your direction. However, when countering the torque effect during a steep climb on slower
trim settings under a lot of power, care must be taken to avoid the risk of stalling.
Because of the large vertical distance between the thrust line of the prop and the wing common to all
paramotors, the extent of the power management required is critically dependent on your set up and
flying ability.
Power induced Oscillations
Certain combinations of weight, power, and propeller size can cause oscillation where the torque and
gyro effects lift the pilot to one side; you then drop back only to swing up again. To counter this you
can do one or more of the following:
* Alter the throttle setting
* Adjust the torque strap if fitted
* Shift your weight in the harness
20
Page 21

* Adjust the trimmers to dampen it out
Weight shift is the best counter. Oscillation usually occurs on high power settings - more power and a
larger propeller cause more oscillation. It could be that your control inputs are amplifying the
oscillation. In this case, throttling back a little and flying hands-off should take care of the problem.
Having said all this, it is quite common for inexperienced pilots to be too busy on the controls, this is
referred to as pilot induced oscillation, and the simple answer is stop moving your hands
Level Flight
On reaching a safe height after takeoff, and if you wish to go cruising, turn on to your chosen heading,
reach up and release thetrimmers if on a slow setting and if you like, and you have sufficient height,
let go of the brakes completely. If conditions are very rough you may wish to keep hold of them,
however the Bolero 4 is even more stable at higher speeds, so we suggest you let go and enjoy the
flight.
Note – all motor units should have adequate netting to prevent toggles entering propellers whilst in
flight – check yours!
If you have one, keep an eye on your alti/vario. In level flight - it is easy to creep into a climb without
noticing. Use the information from your instruments to optimize your forward speed and reduce drag
and fuel consumption. This will be specific to your own set-up. With its hands-off flight capability, the
Bolero 4 is good at letting you do this.
With a sound understanding of the current wind conditions at different altitudes and intelligent use
of any thermal activity, wave, convergence, ridge or frontal lift it is possible to conserve your fuel and
greatly extend your operating range. The engine of course makes it easy to put you in the right place
at the right time to exploit the conditions. Don’t be afraid to throw the Bolero 4 into a tight thermal to
gain height and save fuel - you will find it is particularly good at coring thermals. Using slower trim
settings willallow you to climb faster in thermals.
Using the Trimmers and Speed Bar
The Bolero 4 has a wide range oftrim and speed bar settings for you to explore. We recommend that
you explore the full flight envelope at a safe height and with adequate training and experience.
The Bolero 4 has a wide and relatively safe speed range compared with most aircraft.
On faster trim or speed bar settings, brake pressures generally increase and weight-shift becomes
more effective. On the slower settings, sink rate improves and handling becomes lighter, enabling you
to make best use of thermal cores whilst giving you an improved climb rate and shorter slower takeoffs and landings. For correct usage, first study the diagrams on page 8, showing trim and speed bar
movement as well as speed bar hook-ups. The diagrams also show you the effect on the wing shape
relative to the different settings.
At all speed settings the differential application of both brakes while banking allows you to make very
effective turns by increasing the lift to assist the turn when the lift axis is canted over in the bank.
Likewise engine thrust and speed bar can be applied at certain times to increase turn rate etc. These
techniques come with more experience allowing you to get the most fromyour wing you to achieve
21
Page 22

fully coordinated, smooth turns, much like those possible on a three axis aircraft.
Points to Note:-
* Remember, the trimmers and speed bar controls are extra items for your pre-flight checks!
Landing
There generally seems to be two philosophies about landing a paramotor - either with or without
power.
Power-off Landings
Cut all power at about 50m and glide in like a paraglider.
This minimizes the risk of propeller damage but you only get one go at it - you have to get it right!
With or without power the Bolero 4 rides out turbulence much better on a fast trim setting, so if it is
rough come in fast, allow yourself plenty of room and bleed off speed before you touch down. The
Bolero 4 stores energy quite well and it may be necessary to round out and ‘float’ level with the
ground, converting your excess speed into lift while you slow down, before flaring to touchdown.
If you aim at a precision or tight landing, or in nil-wind conditions, it is advisable to use half or even
full trim (maximum lift configuration).
This will hardly alter your glide angle but will decrease your sink rate; these decisions become more
critical at higher wing loadings.
Power-on Landings
At a steady tick over, lose height at a shallow angle, then, as you near the ground, level out and bleed
off speed before flaring to touch down. Kill the motor as your feet touch the ground. The advantage of
this method is that if you get it wrong you can power up and go round again at any time. The
disadvantages are the increased risk of (expensive) prop damage if you get it wrong and the dangers
involved in falling over with the engine running and getting your lines in the propeller if you forget to
switch off before the wing deflates.
Points to note:
* If possible, know all about your landing area before you take off.
* Check the wind direction before you set up your approach.
* Power-off landings probably need less space.
* If in doubt, practice your approach until you are sure you can land safely.
Advanced manoeuvres
It is essential that pilots take proper training before attempting certain manoeuvres.
We also suggest that you seek advice from instructors or experienced pilots before conducting ANY of
these manoeuvres or go flying in extreme conditions, and that you carry a reserve parachute.
22
Page 23

During take-off
ALWAYS ensure that your wing is definitely flying with enough air speed, before opening the throttle
or pulling on any brakes during any launch. If it does happen that you have managed to leave the
ground but are not fully flying, DO NOT add more power and more brakes but smoothly come off them,
If the wing does not accelerate, just land. Re-assess the conditions as it may well be you are trying to
climb out through a wind gradient.
Remember: stalling is common to all aircraft that take off with insufficient air speed and then try to
climb. The thrust line on a paramotor is well below the wing, so adding power adds to the problem.
GOLDEN RULES!!!
* Never place your engine downwind of your wing.
* Check, check and re-check the fuel system for leaks.
* Have you enough fuel to get you there? Better too much than too little!
* Check for any loose articles that could trail or fall into the propeller while flying and fasten them
securely.
* If you spot a problem, no matter how small, deal with it immediately!
* Always put on and fasten your helmet before clipping in to the harness.
* Always carry out full pre-flight checks before launching.
* Try to control the glider on the ground facing forwards so asto keep the lines out of the prop. You
should only turn to face the glider to avoid falling backwards onto the motor.
* Don’t fly into danger - over water, trees, power lines etc. where an engine failure will leave you in
trouble.
* Try not to fly into the turbulence of your own wake or that of others, especially at low altitude.
* It is unwise to fly hands-off below about 100m. AGL. As an engine failure below this height may
require you to make immediate control inputs to set up a landing approach.
* Never rely on the engine: it may cut out at any moment. Always fly as if it will, so fly the wing – NOT
the motor
* Except for collision avoidance, making a sharp turn against the torque effect during steep climbs
can be dangerous: you may rapidly stall and enter a spin.
* Avoid downwind low flying: it drastically reduces your options!
* Be sensitive to mechanical problems early. A noticeable change in engine tone or a new vibration
may spell trouble. Land and check it out.
* Make sure your navigation is up to the job.
* Remember, not everyone enjoys your engine noise.
* Care must be taken when flying near livestock.
23
Page 24

5. Care,
a
h
y
a
n
c
n
b
u
g
n
n
y
t
e
t
e
p
n
4
u
h
d
s
a
h
o
u
n
e
c
y
e
w
n
g
f
r
b
u
n
d
u
r
t
s
a
k
e
s
a
The materi
following t
continuous
unnecessar
Maintenance a
ls used in the Bolero
e guidelines below wil
safe operation. Excess
exposure to UV light,
d Repairs
have been carefully s
l keep your paraglider
ive wear is caused by
chemicals, heat and m
lected for maximum d
airworthy and will ens
areless ground handli
oisture.
urability. Nevertheles
re a long period of
g and packing,
,
Ground h
The followi
Violent sho
whilst grou
Dragging th
Stepping on
stretching,
Opening yo
UV dama
Avoid leavi
Packing i
We advise
takes sligh
reinforcem
ndling
g should be avoided:
ks to the upper surfac
d handling).
e glider along the gro
the lines or canopy. T
ut is sensitive to ben
r wing in strong wind
e
g the glider out in the
structions
ou to pack the glider ‘
ly longer and requires
nts.
e (e.g. when the canop
nd.
e Kevlar inside the sh
ing with small radius.
without first untangli
sun unnecessarily. UV
ccordion wise’ as sho
an assistant, but it co
crashes to the groun
ath can take lots of p
ng the lines.
rays from the sun deg
n in the diagram. This
serves the rigidity in
leading edge first
lling force without
ade paraglider cloth.
packing procedure
he profile
Since foldin
Transpor
Moisture is
reinforcem
prolonged
24
g the glider weakens t
and Storage
the worst enemy for y
nts. The Bolero 4 sho
eriod if it is damp, sa
e materials, pack the
ur glider, adversely a
ld therefore be kept d
dy, salty, or if other o
lider as loosely as po
fecting the ageing of f
y and cool. Do not pac
jects have entered th
sible.
bric, lines and
the glider away for a
cells. Always allow it
Page 25

to dry naturally before storage in a dry room. Leave the rucksack zip open whenever possible to allow
residual moisture to evaporate, and do not transport or store the glider in the proximity of chemicals
such as gasoline, paints or other solvents.
Cleaning
Use only lukewarm water and a soft cloth to clean your wing. Never use any abrasive materials or
detergents. Only clean the wing if it is absolutely necessary e.g. after a landing in salt water.
Maintenance Inspections
The Bolero 4 must be fully inspected by an authorized Gin agent not later than 30 months after the
first flight or after 200 flying hours, whichever is sooner. Subsequent full inspections should be done
every 2 years or 200 flying hours, whichever is sooner.
The maintenance inspection instructions can be found in the manuals section on www.gingliders.com
A full inspection will give you peace of mind and extend your glider's lifetime. Additional inspections
should be performed by a qualified person following a crash or violent landing on the leading edge, or
if you note a deterioration of performance or behaviour.
You should also check for any damage to your lines, sail, and carabiners before each flight.
Repairs
Very small holes in the sail can be repaired with the sticky back tape provided with your glider.
Damaged lines should ideally be replaced by your GIN dealer. Before fitting a replacement line, check
it for length against its counterpart on the other side of the wing. When a line has been replaced,
always inflate the glider on flat ground to check that everything is in order before flying.
Major repairs, such as replacement panels, should only be carried out by the distributor or
manufacturer.
Environmentally friendly disposal of the paraglider
GIN paragliders are manufactured with non-toxic materials that have been assessed for their
environmental impact. When your Vantage has reached the end of its life after a number of years,
please take care to dispose of it in an environmentally friendly manner. Please check with local
authorities regarding the current regulations and disposal facilities in your area.
25
Page 26

6. Reference
Testing and Certification
The Gin Glider Bolero 4 has passed EN standard A and LTF A. This is the safest class of paraglider. The
Bolero 4 has also passed load tests and shock tests with a load exceeding 8G of the maximum weight
in flight.
26
Page 27

27
Page 28

Technical Specifications
SIZE XS S M L XL
AREA 24.2m² 25.8m² 28m² 30.28m² 32.66m²
FLAT
PROJECTED
CHORD
TOTAL HEIGHT 6.60m 6.81m 7.1m 7.38m 7.66m
CELL NUMBER 37 37 37 37 37
GLIDER WEIGHT 4.5kg 4.9kg 5.4kg 5.9kg 6.4kg
WEIGHT IN FLIGHT 55-75kg 70-85kg 80~105kg 95-120kg 115~140kg
EN / LTF A A A A A
WEIGHT IN FLIGHT
WITH PARAMOTOR
SPAN 10.89m 11.24m 11.71m 12.17m 12.65m
A.R 4.9 4.9 4.9 4.9 4.9
AREA 22.14m² 23.59m² 25.6m² 27.68m² 29.85m²
SPAN 9.17m 9.46m 9.86m 10.25m 10.65m
A.R 3.8 3.8 3.8 3.8 3.8
ROOT 2.80m 2.89m 3.02m 3.14m 3.26m
TIP 0.59m 0.61m 0.64m 0.66m 0.69m
--- 92-112kg 105-130kg 112-140kg ---
LTF (PARAMOTOR) --- 23-05 23-05 23-05 ---
28
Page 29

Line Plan
20
19
18
17
AO6
NO3
NO2
AO3
AO2
NO1
A01
AO4
AO5
6
5
4
1 2 3
16
15
14
13
12
11
10
9
8
7
B10
B09
B08
B07
C13
NO8
C14
C15
NO9
C16
NO7
F33
B12
F32
NO6
F31
B11
N15
F30
F29
N14
NO5
F28
N13
F27
F26
F25
NO4
BK MAIN LINE
D19
N11
D20
D21
N12
D22
D23
C17
N10
C18
D24
29
Page 30

DESCRIPTION
Model Bolero 4
Top Skytex 45/ Skytex 40
Bottom Skytex40
Fabric of Canopy
Suspension Line
Riser Guth& Wolf - Polyester 20mm
Maillons Stainless Steel 4.3mm
Thread HT Polyester Yarn 150D/3, 225D/3
Profile Dokdo 30D FM
Reinforcement W420
Bridle Nylon 12mm
Upper : LIROS DSL70
Middle : LIROSPPSL120, PPSL160
Main : GIN TGL280, TGL220
"Designing paragliders is a personal journey of challenge and discovery,
an ongoing search for perfection."
- Gin Seok Song
30
Page 31

Every effort has been made to ensure that the information in this manual is correct,
but please remember that it has been produced for guidance only. It should not be
used as a "how to fly" manual.
This owner's manual is subject to changes without prior notice. Please check
www.gingliders.com for the latest information regarding the Bolero and other GIN
products.
31
 Loading...