

Page 1
PROFESSIONAL MEDICAL PRODUCTS
OFTALMOSCOPIO F.O. XENON VISIO 2000 - 3,5V
VISIO 2000 F.O.XENON OPHTHALMOSCOPE - 3.5V
OPHTALMOSCOPE F.O. XÉNON VISIO 2000 - 3,5V
OFTALMOSCOPIO F.O. XENON VISIO 2000 - 3,5V
È necessario segnalare qualsiasi incidente grave vericatosi in relazione al dispositivo medico da noi fornito
al fabbricante e all’autorità competente dello Stato membro in cui si ha sede.
All serious accidents concerning the medical device supplied by us must be reported to the manufacturer and
competent authority of the member state where your registered ofce is located.
Il est nécessaire de signaler tout accident grave survenu et lié au dispositif médical que nous avons livré au
fabricant et à l’autorité compétente de l’état membre où on a le siège social.
Es necesario informar al fabricante y a la autoridad competente del Estado miembro en el que se encuentra
la sede sobre cualquier incidente grave que haya ocurrido en relación con el producto sanitario que le hemos
suministrado.
31536
Gima S.p.A.
Via Marconi, 1 - 20060 Gessate (MI) Italy
gima@gimaitaly.com - export@gimaitaly.com
www.gimaitaly.com
M31536-M-Rev.2-03.20
Made in Pakistan
Page 2

F
2
B
C
D
E
Fig.1
G
H
A
Fig.2
Page 3
3
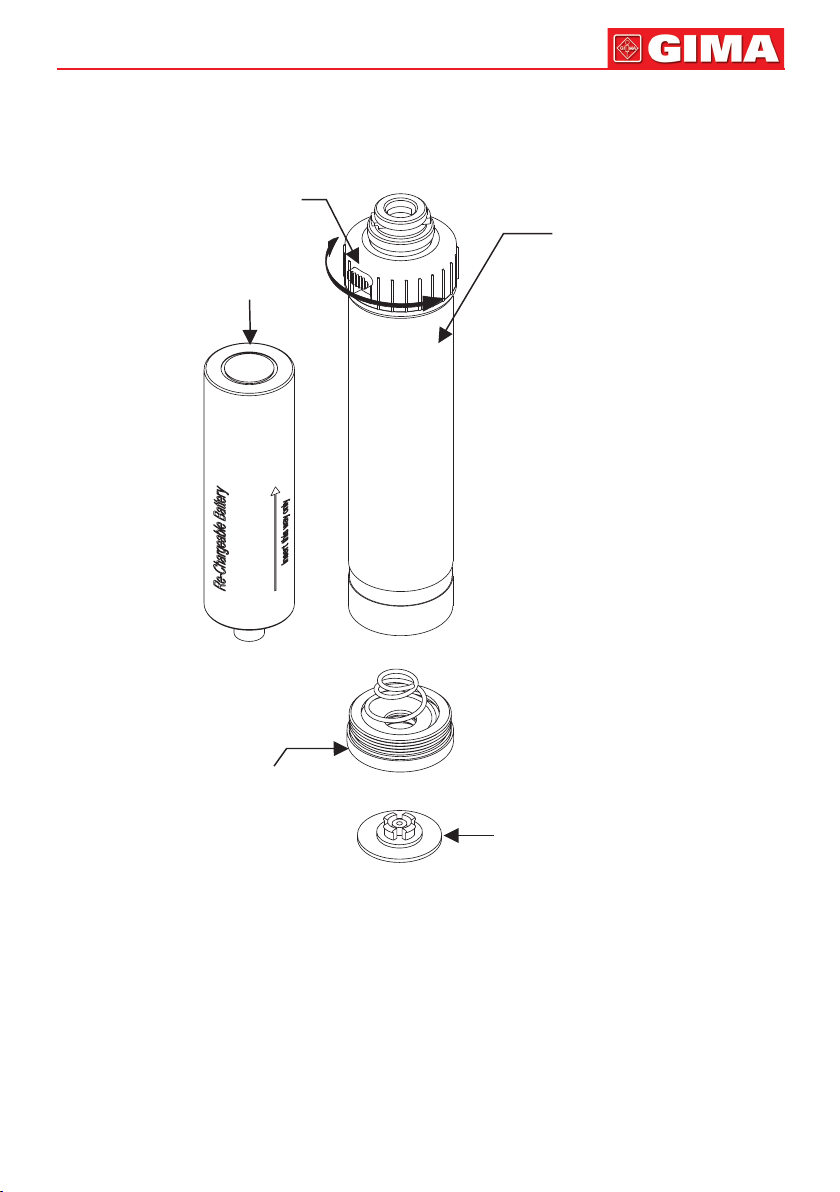
rechargeable
li-ion battery 3.5V
A
Barrel
End-cap
Fig.3
(E)
Locking cap
Page 4

ENGLISH
OPTHALMOSCOPE
The Opthalmoscope is designed for all general opthalmic examination.
FEATURES
- Made from Impact Resistant re-enforced plastic.
- Enhanced Xenon/Halogen super bright light.
- Easy replacement of lamp.
- Dust proof housing.
- 6 apertures to select from, micro spot, small spot, large spot, xation, slit and red-free lter. This selection
of apertures covers all the physician’s needs in an ophthalmologic examination.
- Color coded 28 lenses for perfect examination (Green for +, Red for - )
0 1 2 3 4 5 6 7 8 9 10 12 15 20 40
1 2 3 4 5 6 7 8 9 10 15 20 25
OPERATING INSTRUCTION
Attach the ophthalmoscope head to the handle by bayonet locking system, it is necessary to hold the battery
handle and head in each hand and match the bayonet grooves on both the head and handle, push the head
down and turn the head clock wise as in Fig.1.
1. Check that the connection between the head and handle is perfect and that the rheostat works properly.
2. Push the button (A) on the handle and twist the black knob towards the left hand side. The unit is now in
operating position. The intensity of the light can be adjusted by turning the knob clock wise or counter clock
wise.
3. Gently place the rubber eye brow (B) near your eye. Viewing through window (C) point the light beam at
the center of the eye lens.
4. With your index nger turn the wheel (D) clockwise or counterclockwise to select the desired lens. The
power of the selected lens is visible through window (E).
5. The ophthalmoscope is equipped with a set of 6 different aperture, which can be selected by turning the
wheel (F).
6. Switch off the unit after use to preserve batteries. Twist the black knob towards right until an audible click
sound is heard once the button (A) comes to its off position.
6
CHANGING THE LAMP
Unmount the ophthalmoscope head from the handle and pull the lamp (G) downwards as in Fig.2.Wipe the
new lamp glass clean and insert it so that the locating pin (H) ts into the slit.
CLEANING
The housing can be wiped/clean with a cloth moistened with alcohol. Glass Surfaces can be cleaned with a
cotton wool bud in the same way.
OPERATING THE HANDLE
Push button (A) in Fig.3 inward and rotate the knob clock wise which will turn the power on and the lamp will
light up. This position is indicated by a RED indicator comes into view.
To switch off the instrument rotate the knob counter clock wise till an audible sound is heard.
CHANGING THE BATTERIES
Unscrew the end-cap (E) and shake out the old batteries.
Insert new batteries as Shown in Fig.3. Take care that the poles point in the right direction.
Page 5

7
ENGLISH
CLEANING
The handle can be cleaned with a cloth soaked with disinfectant however it Cannot be dipped into liquids.
Caution:
- Do not use the equipment in case it is damaged. Apply to your Retailer.
- Periodically check the battery conditions, making sure that no sign of corrosion or oxidation is present.
In case of necessity replace them with new ones.
- Carefully handle the batteries as the liquids can irritate skin and eyes.
- Before being used, thoroughly check the product. The same Operation shall be carried out after
cleaning.
- Check that the connection between the head and the handle is perfect and that the On/Off Button
works correctly.
- If the light is intermittent or in case it does not turn on, check the bulb, the batteries and the electrical
contacts.
Caution: read instructions (warnings) carefully Follow instructions for use
Keep in a cool, dry place Keep away from sunlight
Manufacturer Date of manufacture
Product code Lot number
Medical Device compliant with Regulation
(EU) 2017/745
WEEE disposal Medical Device
Type B applied part
Disposal: The product must not be disposed of along with other domestic waste. The users
must dispose of this equipment by bringing it to a specic recycling point for electric and electronic equipment.
GIMA WARRANTY TERMS
The Gima 12-month standard B2B warranty applies.
 Loading...