

Page 1

Gima S.p.A. - Via Marconi, 1 - 20060 Gessate (MI) Italy
Italia: tel. 199 400 401 - fax 199 400 403
Export: tel. +39 02 953854209/221/225 - fax +39 02 95380056
gima@gimaitaly.com - export@gimaitaly.com
PROFESSIONAL MEDICAL PRODUCTS
www.gimaitaly.com
STURDY, FOLDING CANE
WITH BUILT-IN LIGHTS
User manual
ATTENTION: The operators must carefully read and completely
understand the present manual before using the product.
43044 - silver
43045 - black
Ningbo Gaobo Sports Co., Ltd.
No.1, Dali, Shenzen Town, Ninghai County Ningbo City 315614, China
Made in China
M43044-43045-GB-Rev.1.01.23
Importatore/Importer: Gima S.p.A.
Via Marconi, 1 - 20060 Gessate (Mi) - Italy
gima@gimaitaly.com - export@gim aitaly.com
www.gimaitaly.com
MIN
0°C
MAX
40°C
Page 2
Dear Customer,
thank you for your choice.
Before using the cane it is necessary to read this manual, please carefully follow
the instructions about use and maintenance. Consult a physician before use.
The manufacturer/supplier cannot be held responsible for any damage caused
by improper use of the product.
This cane includes some breakable components and must be handled with care.
CONTRAINDICATIONS
Not intended for persons over 250 lbs (113 kg).
Not intended for icy or slippery conditions.
Not intended for persons with latex allergies.
Please read instructions carefully.
Keep out of reach of children.
This device is not designed for use by children or people with reduced
physical, sensory or mental ability, unless they are not under the supervision
of an adult responsible for their safety.
Keep out of reach of children.
2
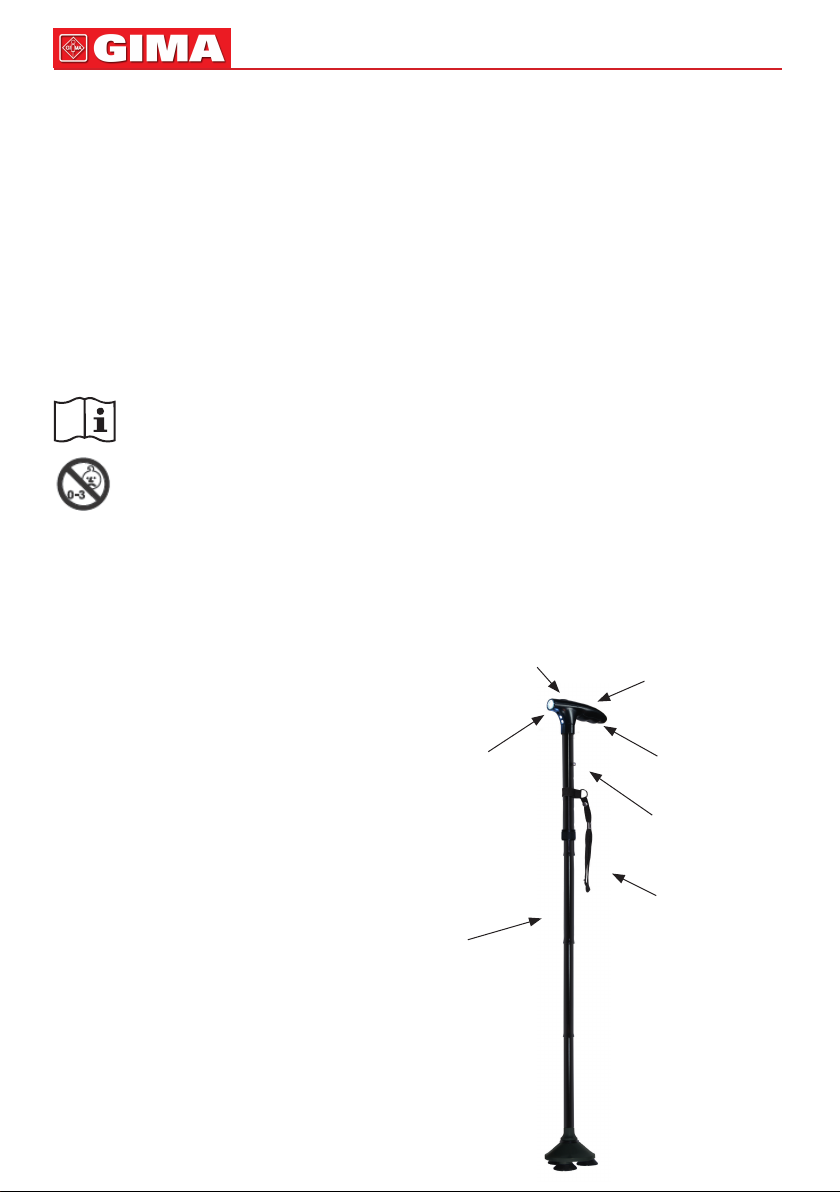
1 Pole of the cane
2 Handle of the cane
3 LED lights
4 Push button to lock cane
5 ON/OFF key for LED lights
6 Battery compartment
7 String to fasten cane on wrist
5
3
2
6
4
7
1
Page 3

3
To unfold your Cane
Simply hold on to the handle and let the foldable
shaft segments unfold towards the oor.
To prevent falls, you should always check to make
sure that the individual shaft segments (Fig. 1)
are securely locked into place.
Warning: Do Not disassemble the body of the
cane. The cane contains an elastic cord inside.
Fig. 1
Uncontrolled release of the elastic cord inside
can cause severe injury to unprotect body parts,
particularly eyes, if the elastic cord is cut, frayed or demaged discontinue
use. DO NOT stretch the cord more than is needed to disassemble
or assemble the segments.
To adjust the height of your cane
Loosen the twist lock (Fig. 2) by rotating it clockwise
several turns. Depress the locking button (Fig. 3)
and pull up on the handle to lengthen, or push down on
the handle to shorten. Remember to retighten the twist
lock after adjusting the cane to your desider height.
Warning: To prevent falls, always ensure
Fig. 2
individual shaft segment are securely locked
into place and locking button is fully engaged.
To collapse the cane
Your cane is easily foldable into a convenient travel size
by separating the 4 individual shaft segments from each
other. Hold each set of shaft segments near the joint
and pull them apart (Fig. 4). The individual shaft
segments will neatly fold together (Fig. 5).
Fig. 3
Fig. 4 Fig. 5
Page 4

To use the lights on your cane
The button on the top of the cane handle (Fig. 6)
activates the lights. Pressing the button once
will activate the lights, and pressing it again
will turn them off.
The lights will go off automatically after 20 minutes.
4
Maintaining your cane
To replace batteries, use a head screwdriver
to unscrew the battery compartment under
the cane handle (Fig. 7). Remove any dead
batteries and properly dispose of them.
Using 3 AAA batteries, align + and - indicated,
otherwise light not operate. Replace and tighten
the screw on the battery door. Regularly inspect
cane for sign of wear, including any fraying
to the elastic cord of wear to the rubber feet.
If you see signs of wear, discontinue use immediately.
Do not mix old and new batteries.
Do not mix alkaline, standard (carbon zinc)
or rechargeable (nickel-cadminum) batteries.
Batteries and electronic devices must be disposed according to appliable national
regulations and not with household waste.
Fig. 6
Fig. 7
Warranty
This device is covered by a warranty of two years starting from the date of purchase.
Warranty is only valid with a proof of purchase. The original receipt must accompany all warranty
claims.Disassembling or tampering the cane will void the warranty.
The warranty does not cover damage caused by improper handling, discharged batteries, accidents
or non-compliance with instructions for use. The batteries and/or the wearable parts are not covered
by the warranty.
 Loading...