


Lactate Scout 4
Instruction manual


Copyright © 2018 SensLab GmbH
This document is protected by copyright.
Any duplication, copying or distribution
is prohibited without the prior written
consent of SensLab GmbH
Part-No.: 7023-9014-0256
Version 1.1-11/2018
Lactate Scout 4 instruction manual
Manufacturer:
SensLab GmbH
Bautzner Str. 67, 04347 Leipzig
Germany
Sales and service:
EKF-diagnostic GmbH
Ebendorfer Chaussee 3, 39179 Barleben
Germany
Service: +49 (0) 39 203 511 141
Email: support@ekf-diagnostic.de
www.ekfdiagnostics.com

Contents
0 Intended use, safety instructions and required accessories 4
1 First steps 6
1.1 Lactate Scout 4 measuring device 6
1.2 Lactate Scout sensor 6
1.3 Inserting the batteries 7
1.4 Switching the device on and o 8
1.5 Display 8
1.6 Code setting for the sensors 9
2 Performing a test 10
2.1 Preparing for a test 10
2.2 Blood collection and test 11
2.3 Checking the code setting 13
2.4 Checking the ambient temperature 13
3 Settings, functions and displays 14
3.1 Device settings 15
3.1.1 Volume control 15
3.1.2 Date and time settings 17
3.1.3 Switching the Bluetooth® wireless technology function on and o 18

3.1.4 Connecting to a heart rate monitor 19
3.1.5 Displaying information about the device 20
3.2 Heart rate 21
3.3 Functionality test 23
3.4 Stopwatch 26
3.5 Displaying stored values 27
3.6 Battery level indicator 28
4 Performing a step test 29
4.1 Step test mode 29
4.2 Heart rate during step tests 31
4.3 Displaying the post-exertion period 31
5 Data transfer 32
6 Storage, cleaning and disposal 33
7 Error messages and warning indicators 34
8 Technical specifications 40
9 Symbols 42
10 Consumables and accessories 44

0 Intended use, safety instructions and required accessories
Intended use
• The Lactate Scout 4 measuring system is
designed to measure lactate concentration
in capillary blood in order to assess physical
performance and conditioning in the
field of sport.
• The Lactate Scout 4 measuring system is
not designed for taking quantitative lactate
measurements to support clinical diagnoses
in medical applications.
• The Lactate Scout 4 measuring system is
designed to be used exclusively outside of
the body (in vitro diagnostic medical device).
• The Lactate Scout 4 measuring system is
designed for self-testing.
• The Lactate Scout 4 measuring device can
only be used with Lactate Scout sensors.
• Lactate Scout sensors are designed for
single use.
4
Safety instructions
PLEASE READ THE INSTRUCTION MANUAL
BEFORE USE AND KEEP IT IN ASAFE PLACE!
Failure to comply with any text marked as
a “WARNING” can result in serious damage
to health.
Failure to comply with any text marked
“ATTENTION” can lead to incorrect tests or
damage to the device.
Please ensure you observe the separate warning and safety instructions specified on the
labels of the batteries and lancets that you
are using.
WARNING
There is a risk of small parts being ingested,
such as batteries, sensors, screw caps or drop
dispensers on test solution bottles.
The Lactate Scout 4 measuring device and all
related accessories must be kept out of the
reach of children.

WARNING
The method for obtaining blood samples
for lactate tests involves a risk of infection.
Sensors, lancets, cellulose cloths and
measuring devices contaminated with blood
carry a risk of infection.
Safety gloves must be worn when performing
tests for third parties.
Please make sure that lancets and sensors are
intact and unused before use.
Make sure you dispose of any used sensors,
lancets and cellulose cloths safely in the
household waste.
Make sure you only use the Lactate Scout 4
measuring system for the purpose specified in
the instruction manual.
ATTENTION
Make sure you only use accessories that
have been provided or recommended by the
manufacturer.
The measuring device must not be used
if it is not functioning correctly or has
been damaged.
Your guarantee will be voided and all liability
claims will be excluded if the housing of the
device is forcefully opened.
Required accessories
To carry out lactate measuring the following
accessories are needed:
- Lactate Scout 4 measuring device
- Lactate Scout Sensors
- Sterile lancets
- Cellulose cloths (paper tissues)
- Clean water
Please note that sterile lancets (we recommend safety lancets), cellulose cloth, and
water are not included in the scope of delivery
and need to be provided separately.
To carry out functionality tests Lactate Scout
test solutions are needed additionally, which
are available in dierent concentrations (see
section 10).
5

1 First steps
1.1 Lactate Scout 4 measuring device 1
Opening (1A) for inserting the sensor
Display
(1B) for displaying when the device
is ready to take a measurement, blood lactate
levels, warning messages, configuration options
and status information
Keypad for operating the measuring device
• Arrow keys (1C):
- for moving between menus, sub-menus and
menu items
- for adjusting values
• OK button
- for enabling menus, sub-menus and
menu items
- for confirming choices
- for activating and deactivating
configuration mode
• Back button (1E):
for undoing the last step/cancelling
• Temperature sensor (1F):
for reading the ambient temperature
6
(1D):
1.2 Lactate Scout sensor
2
The sensor has an opening for the blood
sample (2A). This opening is connected to
the measuring chamber. The contacts (2B)
connect the sensor to the measuring device.
1A
1F
1B
2A
1E 1C 1D
2B
21

1.3 Inserting the batteries
The Lactate Scout 4 requires two CR2450 (3V
lithium button cell) batteries.
The device is supplied with batteries included.
Firstly, remove both of the battery insulating
strips
The measuring device must be turned o to
replace the batteries. Gently push the battery
cover on the back outwards. Remove the
discharged batteries. When inserting the new
batteries, ensure that the polarity is correct.
Push the battery cover back in until it
completely locks into place
If the time to replace the batteries exceeds
30seconds, the date and time setting will be
lost and must be re-entered. However, any
stored data and settings will be retained.
.
3
.
4
3
4
PLEASE NOTE
Used batteries must not be disposed of
with household waste. End users have
a statutory obligation to ensure used batteries
are returned for recycling. Used batteries can be
returned free of charge to retailers or collection
points.
7

1.4 Switching the device on and o
The Lactate Scout 4 has a configuration/
display mode and a measuring mode,
both of which can be switched on and o
independently.
The configuration and display mode can be
switched on or o by holding down the OK
button for two seconds.
The measuring mode is switched on or o
when the sensor is inserted into the measuring
device, even if the measuring device was
previously switched o or is in configuration
and display mode. Removing the sensor
from the device will switch the measuring
device o.
The measuring device can be switched o by
holding down the OK button for two seconds.
The device will switch itself o if it is not used
for two minutes in configuration and display
mode or if the device is not used for two
minutes while the sensor is inserted in the
measuring device.
8
1.5 Display
An information line will be displayed in both
modes at the top of the display when the device
is switched on. This line provides information
about the battery level, the current time and the
active functions of the measuring device (5A).
In configuration and display mode, a symbol line
will also be displayed beneath the info line (5B).
This line uses corresponding symbols to indicate
the configuration and display mode menu/submenu that the measuring device is in.
5
If symbols or numbers have a black background,
this means they can be selected and confirmed.
If symbols or numbers have a grey background,
this means they cannot be selected and
confirmed. The associated function needs to be
activated in the main menu (Chap. 3).
5A
5B

1.6 Code setting for the sensors
A two-digit code must be entered when
setting up the measuring device or when
using sensors from a new sensor container;
this code is printed on the label of the sensor
container.
Firstly, switch the configuration and display
mode on. You can do this by holding down
the OK button for two seconds
the OK button again. The code setting menu
will open. The symbol line will display the
“Code” symbol 7.
Enter the two digits of the code, starting from
the left. Enter the digits of the code using
the two arrow keys and confirm by pressing
the OK button
signal tone to confirm that the code has been
set. The measuring device is now ready to
take measurements using sensors with this
code 10 - 11.
You can now either insert a sensor or switch
o the device.
- 9. You will then hear a
7
. Then press
6
6
8
7
9
10
11
9

2 Performing a test
2.1 Preparing for a test
Remove a sensor from the container. Make
sure you do not touch the opening for the
blood sample 1. As soon as you have taken
it out, insert the sensor into the measuring
device opening in the direction of the arrow
until you can feel resistance 2. The contacts
must be facing up.
1
2
10
The display will briefly show the code which
is currently configured. A blinking drop
symbol will then be displayed to indicate
that the measuring device is ready to take a
measurement. The ambient temperature of the
measuring device will be displayed beneath
the info line 3.
3
ATTENTION
Before you use a sensor from a new sensor
container, you must check that the code on the
label is the same as the code currently configured
in the device. If the code does not match, then it
must be configured again in the device.

ATTENTION
The sensor and the measuring device must
be at the same temperature when performing
a test. If you take the sensor container out
of the fridge, you must wait for at least
20minutes until the sensor container has
reached the ambient temperature before you
open the container. If you take the sensor
container out of the freezer, you must wait
for at least 2 hours until the sensor container
has reached the ambient temperature. Only
remove sensors to be used immediately
for testing purposes. Reseal the container
immediately after removing the sensor. Never
leave the container open.
2.2 Blood collection and test
Wash your fingers or earlobes with clean
water at the puncture site. You can use the
spray bottle supplied with the accessories for
this purpose. Dry the puncture site. In order
to take a capillary blood sample, puncture the
site using a suitable lancet.
Wipe away the first droplet of blood. Apply
gentle pressure to the puncture site. The
second droplet must be large enough to fill
the measurement chamber of the sensor
in one go.
WARNING
Avoid pressing on the puncture site too
heavily as sweat and/or tissue fluid can merge
with the droplet of blood and falsify the test
result.
The droplet of blood must not run. Bring the
fingertip with the droplet of blood close to
thetip of the sensor that has been inserted in
the measuring device. The sensor now draws
blood into the measuring chamber
.
4
4
11

ATTENTION
The sensor must draw the blood in one go.
The puncture site must therefore be kept
steady when taking the sample. Failure to do
so results in the risk of insucient filling of
the sensor.
If performing lactate tests on third parties,
move the measuring device with its inserted
sensor to the droplet of blood on the
fingertip or earlobe of the subject. Once
themeasurement chamber on the sensor tip is
completely filled, an acoustic signal will sound
and the test will begin. A circular symbol with
a progress bar will be displayed
. After ten
5
seconds, a second acoustic signal will sound
and the test result will be displayed in the
measurement unit “mmol/L”. The allocated
memory space number will be displayed
next to the memory symbol. The test result is
stored along with the date and time of the test
and the memory space number 6. Information
regarding interpretation of the lactate value
can be found at:
www.lactatescout.com
12
5 6
WARNING
Lancets and sensors may only be used once.
Used lancets and sensors carry a risk
of infection. Ensure any used lancets
and sensors are disposed of safely
in the domestic waste along with
contaminated cellulose/paper wipes.

2.3 Checking the code setting
The code is displayed briefly when you
switch measuring mode on 7. If more than
25 tests are performed with the same code, a
reminder to check the code will be displayed
for three seconds 8. Pressing the OK button
within three seconds will take you to the code
configuration menu.
7
8
2.4 Checking the ambient temperature
To ensure that equally reliable test results are
achieved under dierent climatic conditions,
the measuring device is equipped with a
temperature sensor. The temperature sensor
is located underneath the opening for the
sensors 9.
9
WARNING
Make sure you do not touch or cover the
temperature sensor with your hand. Failure to
do so results in the risk that the temperature
sensor will read the ambient temperature
incorrectly and the measuring device may
record incorrect test results.
13

3 Settings, functions and displays
Settings can be changed in configuration and
display mode. In order to go to configuration
and display mode, there must not be a
sensor inserted in the measuring device.
The configuration and display mode can be
switched on or o by holding down the OK
button for two seconds. An acoustic signal will
sound, and the main menu will be displayed
along with its symbols. The symbols display
the sub-menus 1:
• Stored test results (1A)
• Device settings (1B)
• Functionality test (1C)
• Sensor code configuration (1D)
• Stopwatch function (1E)
• Heart rate (1F)
Choose a symbol to move to the associated
sub-menu.
14
Briefly press one of the two arrows to select
a symbol. The selected symbol is displayed
with a black background. Pressing the OK
button takes you to the sub-menu. Once you
have completed your configuration in the submenu and confirmed your selection with the
OK button, you will be taken back to the main
menu. Pressing the Back button will also take
you back to the main menu. The last stage will
be cancelled and you will be returned to the
previous status.
1D
1A
1B
1C
1E
1F
1

3.1 Device settings
3.1.1 Volume control
If you choose the “Device settings” symbol 1B
in the main menu and confirm your selection
by pressing the OK button, you will be taken
to the device settings 2. The following settings are available:
• Date and time settings (2A)
• Search for heart rate monitor and
connect (2B)
• Activating/deactivating the Bluetooth®
function (2C)
• Volume control for acoustic signals (2D)
• Device information (2E)
2A
2B
2C
1B
2
If you choose the “Loudspeaker” symbol 2D in
the “Device settings” menu and confirm your
selection by pressing the OK button, you will
be taken to the volume control settings 3.
The following settings are available:
• mute (3A)
• medium volume (3B)
• loud (3C)
Set the volume using one of the two arrow
keys and confirm your selection by pressing
the OK button. Once you have confirmed your
selection, you will be taken directly back to
the “Device settings” menu.
2D
2E
2D
3
3A
3B
3C
15

3.1.2 Date and time settings
If you choose the “Date and time settings”
symbol in the “Device settings” menu 2A
and confirm your selection by pressing the
OK button, you will then have the option to
set the year. A calendar will appear in the
symbol line 4. Set the year using one of
thetwo arrow keys and confirm your selection
by pressing the OK button. Once you have
confirmed your selection, you will then have
the option to set the day and month. Two
calendar symbols for the day and month will
appear in the symbol line 5 - 6. Set the day
and month using one of the two arrow keys
and confirm your selection by pressing the
OK button. Once you have confirmed your
selection, you will then have the option to set
the time. A clock will appear in the symbol
line. Firstly, choose a time display format.
Thefollowing settings are available 7:
• 24-hour clock
• 12-hour clock
16
Once you have confirmed your selection, you
will then have the option to set the time. Set
the hours and minutes using one of the two
arrow keys
and confirm your selection
8
by pressing the OK button. Once you have
confirmed your selection, you will be taken
back to the “Device settings” menu.
If the date and time are not (re)set when
the device is configured or reset, the time
will be displayed in the info line with a black
background.

2A
7 8
4 5 6
17

3.1.3 Activating and deactivating the
Bluetooth
You need to activate the Bluetooth® wireless
technology function if you want to connect
the Lactate Scout 4 to a heart rate monitor
or if you want to transfer data to a PC, a
tablet ora smartphone. When in the “Device
settings” menu, select the symbol for
activating and deactivating the Bluetooth®
function
pressing the OK button. The sub-menu will
then open
function, use one of the two arrow keys to
select the “Activation” symbol (check box with
vertical stroke) and confirm your selection
by pressing the OK button. The Bluetooth®
symbol will now be displayed in the info line.
The function requires additional power and
should therefore only be activated when it is
needed
To deactivate the Bluetooth® function, use
one of the two arrow keys to select the
“Deactivation” symbol (check box with circle)
and confirm your selection by pressing the
OK button.
18
® function
2C
. Confirm your selection by
. To activate the Bluetooth®
9
.
10
2C
9 10

3.1.4 Connecting to a heart rate monitor
Activate the Bluetooth® wireless technology
function. Each heart rate monitor (chest strap,
armband, ear clip) must be registered in the
measuring device:
You will be taken to the sub-menu if you select
the heart symbol
menu by using one of the two arrow keys and
confirm your selection by pressing the OK
button. To search for the heart rate monitor,
use the arrow keys to select the “Search”
symbol
11
pressing the OK button. The measuring device
will now search for all Bluetooth® Low Energy
(LE) compatible heart rate monitors in the
immediate vicinity
a list of all of the heart rate monitors found will
be displayed
using one of the two arrow keys and confirm
your selection by pressing the OK button.
The heart rate monitor is now registered in the
measuring device. The measuring device is
automatically connected to the selected heart
rate monitor. The heart symbol which is filled in
will appear in the info line
to establish a connection, then the heart
symbol will remain empty
2B
in the “Device settings”
and confirm your selection by
. If the search is successful,
12
. Select the heart rate monitor
13
. If it is not possible
14
.
15
13
11 122B
14
15
19

If the measuring device fails to find a heart
rate monitor after a period of 10 seconds, an
error message will appear 16.
Each time the Lactate Scout 4 is switched
on, the measuring device will attempt to
automatically connect to the registered
heart rate monitor. A brief acoustic warning
will be emitted if the existing connection
is temporarily interrupted. The measuring
device will then make three further attempts
to restore the connection. If the connection
fails due to the fact the heart rate monitor is
too far away, the measuring device will not
attempt to reconnect until the next time that it
is activated.
If you want to delete a registered heart rate
monitor, simply select the “Heart” symbol
again in the “Device settings” menu
Confirm your selection by pressing the OK
button. To delete the heart rate monitor,
use one of the two arrow keys to select the
“Delete” symbol and confirm your selection by
pressing the OK button 17.
20
2B
.
16
17
3.1.5 Displaying information about
the device
If you choose the “Info” symbol in the “Device
settings” menu 2E by using one of the two
arrow keys and confirm your selection by
pressing the OK button, you will be shown
the following information about the device,
firmware and device components. If you use
the arrow keys to browse through the pages in
this menu item, then the following information
will be displayed:
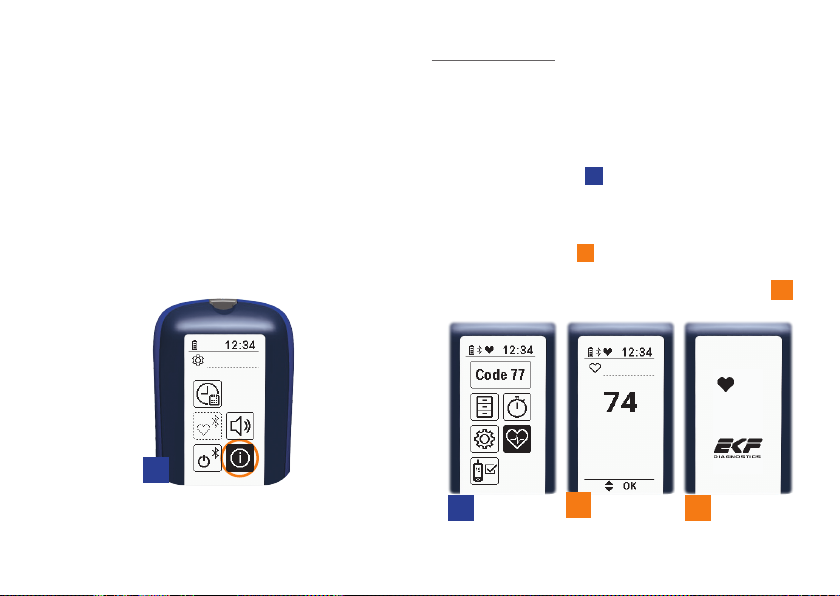
• Serial number of the measuring device
• Firmware version of the measuring device
• MAC address of the Bluetooth® LE module
• FCC ID and IC of the Bluetooth® LE module
• QR link to the Lactate Scout website
• Licensing information on the font used
Once you have pressed the OK button again,
you will be taken directly back to the “Device
settings” menu.
2E
3.2 Heart rate
If the measuring device is connected to a
heart rate monitor, the heart rate monitoring
system automatically records the measured
rate and saves it at five second intervals
together with the date and time. If you select
the “Heart” symbol
using one of the two arrow keys and confirm
your selection by pressing the OK button,
you will then be shown the heart rate in beats
per minute (bpm) 18. The heart rate display
will remain active for two minutes before
switching to standby mode to save energy 19.
in the main menu by
1F
1F
18
19
21

If you press any button, the heart rate display
will be activated for another 10 seconds 20.
If the connection (temporarily) fails, then
theheart symbol will remain empty 21.
Heart rate values can be recorded for a
maximum of approximately 30 hours. After
this point, the earliest recorded values will be
overwritten.
The heart rate will no longer be measured if
the measuring device fails to connect to the
heart rate monitor after three automated
attempts.
20 21
Heart rate data can be accessed from the
Lactate Scout Assistant software when
transferred with lactate values.
22
If an individual lactate test is performed while
the heart rate is being recorded, or a lactate
test is performed during a step test, then the
heart rate recorded in the minute prior to
the lactate test will be stored along with the
lactate value.
If the sensor is removed in measurement
mode or while the heart rate is being
measured, the measuring device will switch to
standby mode to save energy.

3.3 Functionality test
The functionality test is used to check the
correct functioning of the Lactate Scout 4
measuring system. If there are any doubts
regarding the accuracy of the test result or
the correct functioning of the measuring
device, you must perform a functionality test.
Please use the Lactate Scout test solution for
the functionality test. The label on the test
solution bottle states the range of the test
solution.
The test solution is available in the following
concentrations:
8.9 - 1 1.1 mmol/L (display: 10 mmol/L)
4.5 – 5.6 mmol/L (display: 5 mmol/L)
1.8 - 2.2 mmol/L (display: 2 mmol/L)
The test solution can be used for a period
of three months after opening for the first
time. Once opened, ensure thetest solution is
stored tightly closed between 15 – 25°C.
ATTENTION
Never bring the opening of the test
solution bottle directly into contact
withthe sensor. Failure to do so will
contaminate thecontents of the bottle
and render it unusable.
Test solution, sensor and measuring device
must be at the same temperature when
performing the functionality test.
WARNING
Do not swallow the test solution.
Avoid contact with mucous membranes.
Risk of small parts being ingested:
keep the test solution out of the reach
of children.
23

Select the “Functionality test” 1C sub-menu in
configuration and display mode.
Then select the concentration of your test
solution 22. The measuring device will then
ask you to insert a sensor 23. For testing
purposes, the target value will be displayed
with the measurement unit (mmol/L) in the
symbol line.
The configured code will be displayed briefly
after you have inserted the sensor. This code
must also match the code printed on the
sensor container for the functionality test as
well. The measuring device will then ask you
tofill the sensor with test solution 24. Open
the test solution bottle.
Wipe the opening to make sure it is clean.
Press out a droplet onto a clean nonabsorbent surface. You can use your
thumbnail for this purpose 25.
Discard the first droplet.
1C
23
22
24
24
25

Press out another droplet. Then move the
measuring device with its inserted sensor
to the droplet. Allow the droplet to fill the
measurement chamber until the opening for
the blood sample is immersed in the droplet.
An acoustic signal will sound when this is
successfully filled and the test will begin.
You can track the progress of the test
26
on the display
. The measured lactate
concentration will be displayed immediately
afterwards. If the result is within the
permissible tolerance range, a tick will be
shown in the centre of the display. It also
means the measuring device and sensor are
27
functioning properly
. If the result is outside
of the tolerance range, an error message will
be displayed
28
(see chapter 7 on page 39,
“Functionality test not successful”).
The device will turn o when the sensor
is removed.
26
27
28
25

3.4 Stopwatch
If you choose the “Stopwatch” symbol in the
main menu by using one of the two arrow keys
and confirm your selection by pressing the OK
button 1E, you will be taken to the stopwatch
function 29. Press the OK button again to
start the stopwatch. An acoustic signal will
sound after every minute that passes. The
stopwatch displays the minutes on the left
and the seconds on the right. A quarter of
the circle will be filled in after every twoand-a-half minutes 30. After 10 minutes, the
stopwatch function will automatically stop and
the measuring device will switch back to the
main menu.
If you want to stop the stopwatch during the
10 minute interval, you can do so by briefly
pressing the OK button. An acoustic signal will
sound several times. You can reset the timer
by pressing the OK button again. Pressing the
Back button will take you back to the main
menu. If you use the stopwatch during a step
test to record the time for a step test phase,
the measured time is stored together with the
next measured lactate value. The measured
time can be used to evaluate the step test at a
later stage using an app.
The stopwatch function can be used in a
similar manner for individual tests.
26
1E
29 30

3.5 Displaying stored values
If you choose the “Memory” symbol 1A in the
main menu by using one of the two arrow keys
and confirm your selection by pressing the OK
button, you will be taken to the stored values.
The display will show the most recent lactate
value (31A) 31. The memory symbol and the
memory space number will appear in the
symbol line. (31B). The date and time (31C) of
this measurement will be shown in the bottom
section of the display.
If the measurement was taken as part of a
step or endurance test and the heart rate
was also recorded, where applicable, the
display will also show the following additional
information
phase (32B), number assigned to the test in
that step test phase (32C).
If you want to see all of the test results, you
can do so by pressing one of the two arrow
keys. You can move through the items quickly
by holding an arrow key down.
: heart rate (32A), step test
32
1A
31C
31B
31
31A
32A 32B
32
32C
27

3.6 Battery level indicator
The battery level is monitored by the
measuring device. The battery level is shown
in the info line. There are three dierent
display options available:
- Batteries are full (33A)
- Batteries are partially discharged (33B)
- Batteries are almost fully discharged –
the Bluetooth® function has been
automatically deactivated. The batteries
need to be changed (33C)
33A
33B
If the batteries are fully discharged, the
measuring device will no longer turn on.
Anerror message will be displayed
.
34
34
28
33
33C

4 Performing a step test
4.1 Step test mode
In addition to individual tests, the measuring
device can also be used to perform step
tests. In order to do so, all of the test results
recorded during a step test will be stored in
memory by the measuring device along with
the relevant configured parameters.
The general procedure for test preparation,
sampling and measurement is the same as the
individual test.
Insert the sensor into the measuring device.
You are then in measuring mode. Now use one
of the two arrow keys to select the respective
step test phase which the subject is in before
the measurement. You can choose between
the following step test phases:
- pre-load (for resting levels)
- load (for exertion values)
- after-load (for post-exertion values)
The black bar in the step test symbol indicates
the respective step test phase.
1
2
3
1
2
3
29

You can begin with any of the step test
phases. However, you cannot change the
order of the test step phases. As an example,
pre-exertion cannot be selected after the
exertion phase.
The number of lactate values taken per step
test phase corresponds to the number of
measurements in that phase. The test results
are counted separately for each step test
phase. The number to the right of the step test
symbol indicates the number assigned to the
measurement/exertion level
Lactate levels are measured at each exertion
level during the “exertion” step test phase.
Themost recently selected step test phase
will always be used if you insert a new sensor.
The number of the next test is also displayed.
If you stay in step test mode, you can proceed
with this test or switch to later phases by
pressing the top arrow key. Alternatively you
can exit step test mode.
If you want to exit step test mode, hold down
an arrow key when the test result is displayed.
The “Exit” symbol for the step test will then
appear 7.
30
4
- 6.
4
6
5
7

4.2 Heart rate during step tests
If a device is connected to an active heart
rate monitor, the heart rate for each exertion
level is displayed along with the lactate
value 4 - 6.
The heart rate displayed is the maximum
rate detected during the minute leading up
to the lactate measurement. For this reason,
it is important to measure the lactate level
immediately after each exertion level.
4.3 Displaying the post-exertion phase
During the post-exertion phase, the amount of
time since the last test in the exertion phase
is also displayed by the measuring device in
measuring mode 8.
The time display is updated every 10 seconds.
The post-exertion time display is limited to
20 minutes.
8
31

5 Data transfer
The Lactate Scout 4 comes with a
Bluetooth® LE module which can be used
to wirelessly transfer the data stored on the
measuring device.
In order to retrieve the transferred data on
your PC, you must have the “Lactate Scout
Assistant” software installed. This software is
available for Windows and Android.
Additional information is available at:
www.lactatescout.com
ATTENTION
The Bluetooth® LE module has a range of
approximately 3 m. The recipient device must
be within this range to ensure secure data
transmission.
32

6 Storage, cleaning and disposal
The Lactate Scout 4 is an electronic
measuring device and must be handled and
stored with care.
You must ensure the measuring device is
protected against liquids, moisture, prolonged
solar radiation and excessive cold or heat
(below -20° C and above +50°C).
Heavy mechanical loads, improper
handling and contamination may impair
the functionality of the device or render it
completely inoperable.
Ensure that no liquid or dirt enters the inside
of the device through the openings (opening
for sensor and battery housing).
Any blood, test solution, dust or other
contaminants on the housing must be cleaned
using a soft, lint-free cloth or tear-resistant
cellulose cloth (e.g. paper towel). To do this,
moisten the cloth with a mild cleaning agent.
You can use water with a small amount of
washing-up liquid, for example. Clean the
measuring device before wiping it dry.
WARNING
Used measuring devices carry a risk
ofinfection.
Make sure you wear gloves when cleaning/
disinfecting a used measuring device.
We recommend using Pursept® A Xpress as
a disinfectant. Carefully spray the measuring
device with disinfectant. After waiting the
specified time for it to take eect, wipe the
measuring device with a soft, lint-free cloth
or paper towel. Please ensure you read the
instructions for the disinfectant.
For disposal of the measuring device, firstly
remove the batteries. Because of the risk of
infection stated in ‘Warnings’ above and on
page 8 of this manual, the device should not
be disposed of as electrical and electronic
waste but should be disposed of carefully in
household waste.
33

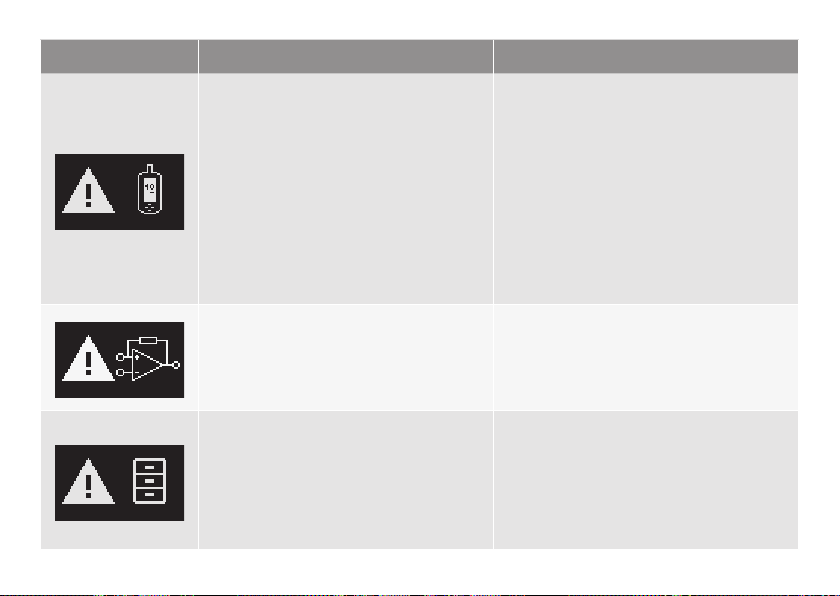
7 Error messages and warning indicators
Display Description and potential causes Solution
Sensor error
Sensor damaged, improperly stored
(outside of the container/in an open
container, exposed to sunlight), or
already used.
Use a new sensor from a correctly stored
container.
34
Error when filling the sensor
Blood droplet too small or has
run, contact time of sensor with
blood droplet too short, interrupted
sample absorption or sensor pressed
against skin.
Temperature error
The temperature is outside of the
operating range.
Repeat the test with a new sensor;
if the droplet is relatively large, attempt
to improve capillary circulation (by gently
massaging the puncture site).
Ensure that the ambient temperature is
within the specified operating range of the
measuring device.

Errors/warnings Description and potential causes Solution
Battery error
The batteries are discharged or expired
or there is possible corrosion of the
battery contacts.
Change the batteries.
If the battery contacts are corroded,
please contact the Lactate Scout 4
service team.
Test result too low
The test result is below the test range of
the Lactate Scout 4;
Water used for washing may have
diluted the droplet at the puncture site.
Test result too high
The test result is above the test range
ofthe Lactate Scout 4
Perspiration on the skin containing a
significant proportion of lactate may
have been included in the blood droplet.
Repeat the test with a new sensor.
Check the code configuration. Follow
theinstructions for performing the test.
Dry your hands well before collecting
the blood.
Use the test solution to perform a functionality test. Please contact the Lactate Scout 4 service team if there isan
error message.
Repeat the test with a new sensor.
Check the code configuration. Follow
theinstructions for performing the test.
Carefully wash perspiration away from
the intended puncture site and dry your
hands well.
35
Errors/warnings Description and potential causes Solution
Functionality test not successful
Test solution has been used more than
three months after the bottle was
opened or is past its expiry date.
Test solutions not stored correctly.
Sensors were not stored correctly or
have exceeded their expiry date.
Repeat the functionality test with new
materials after checking the code. Follow
the instructions for performing the
functionality test.
Make sure that the target concentration
you have selected in the menu matches
the concentration of the test solution.
If the problem persists, please contact
theLactate Scout 4 service team.
36
Electronic error
inside the device.
Storage error Please contact the Lactate Scout
Turn the device o and on again.
If the problem persists, please contact
theLactate Scout 4 service team.
4service team.

Errors/warnings Description and potential causes Solution
Code check Brief code “reminder”
The “Code” symbol with a sensor
container and a question mark behind it
is displayed for three seconds when you
insert a sensor.
You need to confirm or change the code
after 25 tests.
Confirm the code if it remains the same.
Alternatively enter the code for the new
sensor container.
Time display Time displayed with black background
The date and time were not set when
the device was configured/reset.
Device fails
to turn on
Measurement
mode cannot be
configured
Device fails to turn on
Device fails to turn on, either in
configuration and display mode or in
standby mode.
No droplet symbol displayed
Device is not switched on as sensor not
inserted properly.
Set the date and time.
Change the batteries.
If the problem persists, please contact the
Lactate Scout 4 service team.
Insert sensor with the black contacts
facing up until it clearly locks in place
(see Item 2.1).
37

Errors/warnings Description and potential causes Solution
No acoustic signal No acoustic signal in any mode
Volume was muted in the
“Configuration” menu.
Device turns
itself o
Device turns itself o
The display shows a bright EKF logo on
a black background.
This happens automatically after two
minutes of inactivity.
Ambient temperature is too low or
batteries are empty.
Display malfunctioning.
Defective electronics or
mechanical damage.
Open the “Volume” menu and change
the settings.
Restart the measuring device.
Make sure that the ambient temperature
is within the operating range of the
measuring device.
Change the batteries.
Please contact the Lactate Scout
4service team.
Defective
test results
38
Values seem too high/too low
Perspiration, intended puncture site
not washed correctly or perspiration
occurred due to a delay between
washing and collecting the blood.
Intended puncture site was still wet
after washing.
Repeat the test with a new sensor. Check
the code configuration. Precisely follow
theinstructions for performing the test.
Carefully wash perspiration away from
the intended puncture site and dry your
hands well.
Use the test solution to perform a
functionality test. Please contact the
Lactate Scout 4 service team if there is
anerror message.

Errors/warnings Description and potential causes Solution
Slow update of the
screen content
Slow update of the screen content
The Lactate Scout 4 uses an e-paper display.
Please note that it may take some time
for the display to update, depending on
the ambient temperature. This is normal
for e-paper displays.
39

8 Technical specifications
Parameter Specification
Type of device Lactate Scout 4 - hand-held device for measuring blood lactate
Sample material Fresh capillary whole blood
Sample volume 0.2 μL
Measuring range 0.5 mmol/L - 25.0 mmol/L
Hematocrit range (Hct) 20 - 70%
Precision Hct range 35 – 50%: 0.5 – 6.7 mmol/L blood lactate≤0.2 mmol/L,
Measuring principle Enzymatic amperometric determination of lactate using
Test duration 10 seconds
Measurement temperature range
Humidity 10 - 85% relative humidity (max. 2 minutes for sensors)
Storage temperature -18 °C - +8 °C (sensors in container) and/or
40
6.8 – 25.0 mmol/L blood lactate ≤3 %
Hct ranges 20 – <35%, >50 – 70%: 0.5 – 7.5 mmol/L blood lactate
≤
0.3 mmol/L, 7.6 – 25.0 mmol/L blood lactate ≤4 %
lactate oxidase
+10 °C-+45°C
-20 °C - +50 °C (device)

Parameter Specification
Max. elevation for use up to 4,000 metres
Data storage 500 lactate test values with date, time, heart rate and step test
allocations, heart rate memory over 30 hours
Data transfer via Bluetooth® LE v4.1
Power supply 2 x 3 V CR2450 (3V, lithium batteries, button cell batteries)
Device dimensions 91 mm (L) x 46 mm (W) x 21 mm (H)
Service life 5 years
Weight 60 g (including batteries)
Radio system Bluetooth®
Band 2.402 to 2.480 GHz
Transmission power 10 mW
SensLab GmbH hereby declares that the Bluetooth® radio system type conforms with Directive 2014/53/EU. The full EU
declaration of conformity text can be obtained via the following email address: support@ekf-diagnostic.de
The Bluetooth® brand and logos are registered trade marks of Bluetooth SIG, Inc., any use of these brands by SensLab GmbH
shall be under licence. Other brands and trading names are the property of their respective owners.
This product contains the “Roboto 2014” font, which is licensed by Christian Robertson in accordance with the Apache 2.0
License http://www.apache.org/licenses/LICENSE-2.0.
41

9 Symbols
Labels on sensor containers, device labels, in accompanying documentation
and on packaging
Symbol Meaning
In vitro diagnostic medical device
Product meets the requirements of the applicable Directives
Manufacturer
Serial number
Attention, consult accompanying documentation, observe safety instructions
Biological risks
Follow instructions for use
Designed to be used once only
Expiry date YYYY-MM
Batch no.
Storage temperature range
42

Symbol Meaning
Sensor number
Do not expose to direct solar radiation
Protect against liquid
Wireless data transfer with Bluetooth® wireless technology
Device includes RF transmitter
Direct current
Used batteries must not be disposed of with household waste
43

10 Consumables and accessories
The following accessories are available at EKF-diagnostic GmbH, at specialist retailers or online at
www.ekfdiagnostics.com:
Item Order No.
BigPack 72+: 3 x 24 Lactate Scout Sensors in sensor containers 7023-3405-0846
BigPack 48+: 2 x 24 Lactate Scout Sensors in sensor containers 7023-3405-0727
BigPack 24+: 24 Lactate Scout Sensors in sensor container 7023-3405-1008
Lactate Scout test solution: Pack of 5 x 2.5 ml bottles
with 1.8 - 2.2 mmol/L lactate
Lactate Scout test solution: CombiPack of 2.5 ml bottles
(2 x 5 units) with 4.5 - 5.6 mmol/L and 8.9 - 11.1 mmol/L lactate
Lactate Scout test solution: DuoPack of 2.5 ml bottles
(2 x 1 units) with 4.5 - 5.6 mmol/L and 8.9 - 11.1 mmol/L lactate
Lactate Scout test solution: Pack of 10 x 2.5 ml bottles with
8.9 - 11.1 mmol/L lactate
Additional product information, literature and references can be found online at www.ekfdiagnostics.com
44
7023-6151-0257
7023-6131-0235
7023-6161-0412
7023-6141-0246

Item Order No.
Lactate Scout 4 USB Dongle 7023-7541-0195
PC Pack consists of:
7023-7542-0217
Dongle for PC for data transfer between Lactate Scout 4 and PC via
Bluetooth® Low Energy functionality
USB stick with “Lactate Scout Assistant” software for evaluation of
lactate performance diagnostics (Windows 7 – 10)
45

7023-9014-0256 EN.1.1_LS4_Manual
 Loading...