

e-scope
Gebrauchsanweisung
Diagnostische Instrumente
Instructions
Diagnostic Instruments
Mode d’ emploi
Instruments diagnostiques
Instrucciones para el uso
Instrumentos diagnósticos
Инструкция по эксплуатации
Диагностические приборы
Istruzioni per I’ uso
Strumenti diagnostici
®
01

ENGLISH
Contents
1. Important information to take note of before taking the product into operation
2. Battery handles and start-up
3. Otoscope and accessories
4. Ophthalmoscope and accessories
5. Maintenance
6. Notes
7. EMC requirements
1. Important information to take note of before taking the product into operation
You have acquired a valuable Riester diagnostic set manufactured in compliance with
Directive 93/42/EEC for medical products and subject to continuous stringent quality control, whose excellent quality will ensure reliable diagnoses. Please read these
Operating Instructions carefully prior to startup and keep in a safe place. Should you
have any queries, please contact the Company or your Riester Agent who will be pleased to assist you. For addresses see last page of these Operating Instructions. The
address of your authorised Riester Agent will be supplied to you on request. Please
note that any instruments described in these Operating Instructions are only suited
for application by trained operators. Please also note that correct and safe operation
of instruments will only be guaranteed when Riester instruments and accessories
are used throughout.
Classification
Type-B applied part - otoscope head with speculum
2. Battery handles and start-up
2.1. Purpose
Riester battery handles described in these Instructions for Use supply the instru-
ment heads with power (the lamps are included in appropriate instrument heads),
also serving as a bracket.
2.2. Readiness for operation (insertion and removal of batteries)
Turn off instrument head from handle in counter-clockwise direction. Insert two commercial type ”AA” Mignon alkaline batteries of 1.5 V (IEC standard reference LR6) into
the case of the handle with the plus poles towards the upper section of the handle.
Warning:
• Should the unit not be used for an extended period of time or whilst travelling,
remove batteries from handle.
• Insert new batteries when light intensity of the unit is reduced, thus affecting exa mination.
•
For maximum light yield it is recommended to always insert new high-quality batteries
on replacement.
•
Ensure that no fluid or condensation penetrates into the handle.
Disposal:
Please note that batteries are subject to separate disposal. For details ask your local authority and/or your environmental officer.
2.3. Attachment of instrument heads
Turn instrument head in clockwise direction on to the handle.
2.4. Starting and stopping
When pushing the slide up, the unit is switched on, when pushing it down, the unit
is off.
2.5 Instructions for care
General information
Cleaning and disinfection of the medical devices serves to protect the patient, the
user and third parties and to preserve the value of the medical devices. Due to the
product design and the materials used, no defined limit can be specified for the maximum number of reprocessing cycles that can be carried out. The life span of the
medical devices is determined by their function and by gentle handling of the devices.
Defective products must undergo the reprocessing procedure described before being
returned for repair.
Cleaning and disinfection
The battery handles can be cleaned externally with a moist cloth until visually clean.
09

Wipe-disinfection as specified by the disinfectant manufacturer. Only disinfectants
with proven efficacy should be used, taking into account the national requirements.
After disinfection, wipe the instrument down with a moist cloth to remove possible
disinfectant residues.
PLEASE NOTE! Never immerse the handles in liquids! Take care to ensure that no
liquids get inside the casing! This item is not approved for automated reprocessing
and sterilization. These procedures cause irreparable damage!
3. Otoscope and accessories
3.1. Purpose
Riester otoscopes described in these Instructions for Use have been produced for
lighting and examination of the auditory canal, combined with a Riester ear speculum.
3.2. Insertion and removal of ear speculum
Position the selected speculum on the chromium plated metal socket of the otoscope. Turn speculum to the right until a resistance is felt. The size of the speculum is
marked on the reverse.
3.3. Swivel lens for magnification
The swivel lens is fixed to the device and can be swivelled 360°.
3.4. Insertion of external instruments into the ear
If you wish to insert external instruments into the ear (e.g. tweezers), you have to rotate the swivel lens (approx. 3-fold magnification) located on the otoscope head by 180°.
3.5. Pneumatic test
In order to perform a pneumatic test (= examination of the ear drum), you will require
a bulb which is not included in the normal scope of supply but may be ordered separately (see Spare parts and accessories). Take metal connector which is not included
in the normal scope of supply but may be ordered separately (see Spare parts and
accessories) and insert in recess provided on the side of the otoscope head. Attach
hose of bulb to connector. Carefully introduce the required air volume into the auditory canal.
3.6. Replacement of lamp
®
e-scope
otoscope with direct illumination Remove the speculum socket by turning
it to the left with your thumb and index finger until it stops. Pull the speculum socket forward to remove it. Unscrew the bulb counterclockwise. Screw the new bulb in
clockwise and reattach the speculum socket.
®
e-scope
otoscope with fiber optics
Unscrew the instrument head from the battery handle. The LED/bulb is located in the
lower part of the instrument head. Pull the bulb out of the instrument head using your
thumb and index finger or a suitable tool. When replacing an LED with a bulb, the optionally available adapter is additionally required; when replacing a bulb with an LED,
the adapter must first be removed from the bulb unit. Firmly insert the new LED/bulb.
3.7 Instructions for care
General information
Cleaning and disinfection of the medical devices serves to protect the patient, the
user and third parties and to preserve the value of the medical devices. Due to the
product design and the materials used, no defined limit can be specified for the maximum number of reprocessing cycles that can be carried out. The life span of the
medical devices is determined by their function and by gentle handling of the devices.
Defective products must undergo the reprocessing procedure described before being
returned for repair.
Cleaning and disinfection
The otoscope can be cleaned externally with a moist cloth until visually clean. Wipe-disinfection as specified by the disinfectant manufacturer. Only disinfectants with
proven efficacy should be used, taking into account the national requirements. After
disinfection, wipe the instrument down with a moist cloth to remove possible disinfectant residues.
PLEASE NOTE! Never immerse the otoscope in liquids! Take care to ensure that no
liquids get inside the casing! This item is not approved for automated reprocessing
and sterilization. These procedures cause irreparable damage!
Sterilization
a) Reusable ear specula
10

The ear specula can be sterilized in the steam sterilizer at 134°C with 10 minutes
hold time.
Single use
ATTENTION: Repeated use could cause infection
3.8. Spare parts and accessories
Reusable ear specula
• 2mm Pack of 10 St. No.: 10775
• 2,5mm Pack of 10 St. No.: 10779
• 3mm Pack of 10 St. No.: 10783
• 4mm Pack of 10 St. No.: 10789
• 5mm Pack of 10 St. No.: 10795
Reusable ear specula
• 2mm Pack of 100 St. No.: 14061-532
Pack of 500 St. No.: 14062-532
Pack of 1000 St. No.: 14063-532
• 2,5mm Pack of 100 St. No.: 14061-531
Pack of 500 St. No.: 14062-531
Pack of 1000 St. No.: 14063-531
• 3mm Pack of 100 St. No.: 14061-533
Pack of 500 St. No.: 14062-533
Pack of 1000 St. No.: 14063-533
• 4mm Pack of 100 St. No.: 14061-534
Pack of 500 St. No.: 14062-534
Pack of 1000 St. No.: 14063-534
• 5mm Pack of 100 St. No.: 14061-535
Pack of 500 St. No.: 14062-535
Pack of 1000 St. No.: 14063-535
Replacement lamps
for e-scope
Vacuum, 2.7 V, pack of 6 No.: 10488
XL, 2.5 V, pack of 6 No.: 10489
for e-scope
XL 2,5 V, Packung à 6 Stück No.: 10600
LED 3,7 V No.: 14041
Technical data of the lamp
for e-scope
Vacuum, 2.5 V 300 mA mean life span 15h
XL, 2.5 V 750 mA mean life span 16.5h
for e-scope
XL 2,5 V 750 mA mean life span 15h
LED 3,7 V 52 mA mean life span 20,000h
Other spare parts
No.: 10960 Bulb for pneumatic test
No.: 10961 Connector for pneumatic test
4. Ophthalmoscope and accessories
4.1. Purpose
Riester ophthalmoscopes described in these Instructions for Use have been designed
for the examination of the eye and its background.
4.2. Lens wheel and correcting lenses
The correcting lenses may be adjusted on the lens wheel. The following correcting
lenses are available:
D+ 1 | 2 | 3 | 4 | 6 | 8 | 10 | 15 | 20
D- 1 | 2 | 3 | 4 | 6 | 8 | 10 | 15 | 20
Readings will be displayed on a lit panel. Plus values are displayed in black digits,
minus values in red digits.
®
otoscope with direct illumination
®
F.O. Otoscope
®
otoscope with direct illumination
®
F.O. Otoscope
11

4.3. Diaphragms and filters
The following apertures and/or filters may be selected by the aperture and filter
wheel:
Aperture Function
Semi circle: For examinations with turbid lenses.
Small circle For reduction of reflexes of small pupils.
Large circle: For standard fundus examination.
Fixation star: For definition of central and eccentric fixation.
Red-free filter: To increase contrast for assessment of (green filter)
changes in fine vessels, i.e. retinal haemorrhages.
Blue filter: for improved recognition of vascular abnormalities or
bleeding, for fluorescence ophthalmology.
4.4. Replacement of lamp
®
e-scope
ophthalmoscope
Remove the instrument head from the battery handle. The LED/bulb is located in the
lower part of the instrument head. Remove the bulb from the instrument head using
your thumb and index finger or a suitable tool. When replacing an LED with a bulb,
the optionally available adapter is additionally required; when replacing a bulb with
an LED, the adapter must first be removed from the bulb unit. Firmly insert the new
LED/bulb.
CAUTION: The pin of the bulb has to be inserted into the guide slot on the adapter and
the adapter into the guide slot on the instrument head.
4.5 Technical data of the lamp
Vacuum, 2.5 V 300 mA mean life span 15h
XL, 2.5 V 750 mA mean life span 16.5h
LED, 3.7 V 38 mA mean life span 20000h
4.6 Instructions for care
General information
Cleaning and disinfection of the medical devices serves to protect the patient, the
user and third parties and to preserve the value of the medical devices. Due to the
product design and the materials used, no defined limit can be specified for the maximum number of reprocessing cycles that can be carried out. The life span of the
medical devices is determined by their function and by gentle handling of the devices.
Defective products must undergo the reprocessing procedure described before being
returned for repair.
Cleaning and disinfection
The ophthalmoscope can be cleaned externally with a moist cloth until visually clean.
Wipe-disinfection as specified by the disinfectant manufacturer. Only disinfectants
with proven efficacy should be used, taking into account the national requirements.
After disinfection, wipe the instrument down with a moist cloth to remove possible
disinfectant residues.
PLEASE NOTE! Never immerse the ophthalmoscope in liquids! Take care to ensure
that no liquids get inside the casing! This item is not approved for automated reprocessing and sterilization. These procedures cause irreparable damage!
4.7 Spare parts and accessories
Spare lamps for e-scope
Vacuum, 2.7 V, pack of 6 No.: 14050
XL, 2.5 V, pack of 6 No.: 10605
LED, 3.7 V No.: 14051
5. Maintenance
These instruments and their accessories do not require any specific maintenance.
Should an instrument have to be examined for any specific reason whatsoever, please
return it to the Company or an authorised Riester dealer in your area. Addresses to
be supplied on request.
6. Notes
Ambient temperature: 0 ° to +40 ° C
Relative Humidity: 30% to 70% noncondensing
Storage location: -10° to +55°
Relative Humidity: 10% to 95%
®
ophthalmoscope
CAUTION: There is possibly a risk of ignition if the equipment is operated in the pre-
12
sence of flammable mixtures of substances with air or with oxygen, nitrous oxide and
anesthetic gases. Safety information according to the international safety standard
IEC 60601-1 Electrical safety of medical devices: Opening of the handle in patient
vicinity and simultaneously touching the batteries and patient is not allowed.
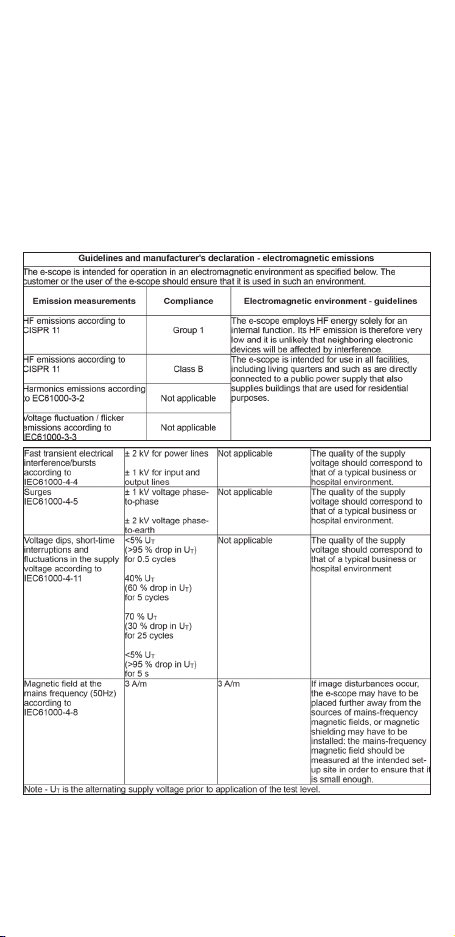
7. Electromagnetic compatibility
Medical electrical equipment is subject to special precautionary measures with regard to electromagnetic compatibility (EMC). Portable and mobile high-frequency
communication equipment can influence medical electrical equipment. This ME device is intended for operation in an electromagnetic environment as specified below.
The user of the device should ensure that it is operated in such an environment. The
ME device must not be used directly next to or arranged in a stack with other devices. If the device has to be operated near to or in a stacked arrangement with other
devices, then the ME device should be monitored in order to verify that it operates
as intended in this arrangement. This ME device is intended exclusively for use by
professional medical staff. This device can cause radio interference and can disrupt
the operation of equipment nearby. Suitable remedial measures, such as for instance
re-alignment, re-arrangement of the ME device or shielding, can become necessary.
13

14

4445464748


Rudolf Riester GmbH
P.O. Box 35 | Bruckstraße 31 | DE - 72417Jungingen | Germany
Tel.: (+49) +7477-9270-0 | Fax.: (+49) +7477-9270-70
E-Mail: info@riester.de | www.riester.de
99231 Rev. A 2013-08 • Änderungen vorbehalten • Subject to alterations • Sous réserve de modifications • Sujeto a modificaciones • Возможны изменения • Con riserva di apportare modifiche
 Loading...