

PT/I
ACON
NR Control Solution
Package Insert
REF C122-4011 English
The Mission® PT/INR Control Solutions are intended for use with the Mission® PT/INR Monitoring System as a quality control check to
confirm the test strips and meter are working together properly, and to ensure the test is being performed correctly. For self testing
and professional use.
Mission® PT/INR Control Solutions, Level 1 (Normal INR) and Level 2 (High INR), should be tested when:
You use your Mission
A new shipment of test strips is received or a new lot of test strips is opened.
Improper storage or handling of the test strips is suspected.
Your INR results are unusually low or high.
Your doctor requires you to perform QC.
If you suspect the meter is damaged.
The Mission
control solution to a test strip, as you would apply a blood specimen, using the dropper built into the vial. If your system is working
properly, the INR value that you get from your meter will be within the range of accepted values printed on the individual foil pouch. If
the INR value is not in the range associated with the specific control level, see the “Troubleshooting” section of this insert.
Each control vial contains non-human plasma (Level 1 contains 26.7% bovine plasma and 13.3% rabbit plasma, Level 2 contains
14.4% bovine plasma) with coagulation levels equivalent to normal or high INRs, stabilizers, and preservatives.
For in vitro diagnostic use only. Do not take internally.
Do not add additional test specimen material after the initial specimen volume has been applied to the test strip.
Do not use strips or controls beyond the expiration date printed on their foil pouch.
Liquid control solutions are made from animal plasma. Although they are relatively safe to use, exercise the normal precautions
required for handling all laboratory reagents. Wash your hands after use.
Excessive squeezing or bending of the vial and crushed ampoule may force the glass through the walls of the control vial possibly
resulting in injury or damage.
The liquid control solutions are only good for 30 minutes after mixing the components and should not be used at a later time.
Controls should be stored in their original, unopened foil pouches and box.
Controls may be stored at or below room temperature, 2
Do not freeze the controls.
If the controls and/or test strips are stored in the refrigerator, they must come to room temperature by sitting at room temperature in
their unopened foil packaging for at least 15 minutes prior to use.
Once the control has been prepared, it should be used immediately.
Level 1 Control Solution Level 2 Control Solution Plastic Clamp Package Insert
®
PT/INR Meter for the first time.
®
PT/INR Control Solutions contain non-human plasma specimens wi th predetermined INR values. Apply the liquid
Materials Required But Not Provided
PT/INR Meter Test Strips Latex Gloves
Refer to the User’s Manual for detailed test procedures.
Tes ti n g:
You should complete the following steps for both levels of control solution to ensure proper operation.
1.
Remove a liquid control pouch from a box of control solutions.
2. Check the expiration date on the foil pouch or the box before use. Verify that the product is within
the expiration date.
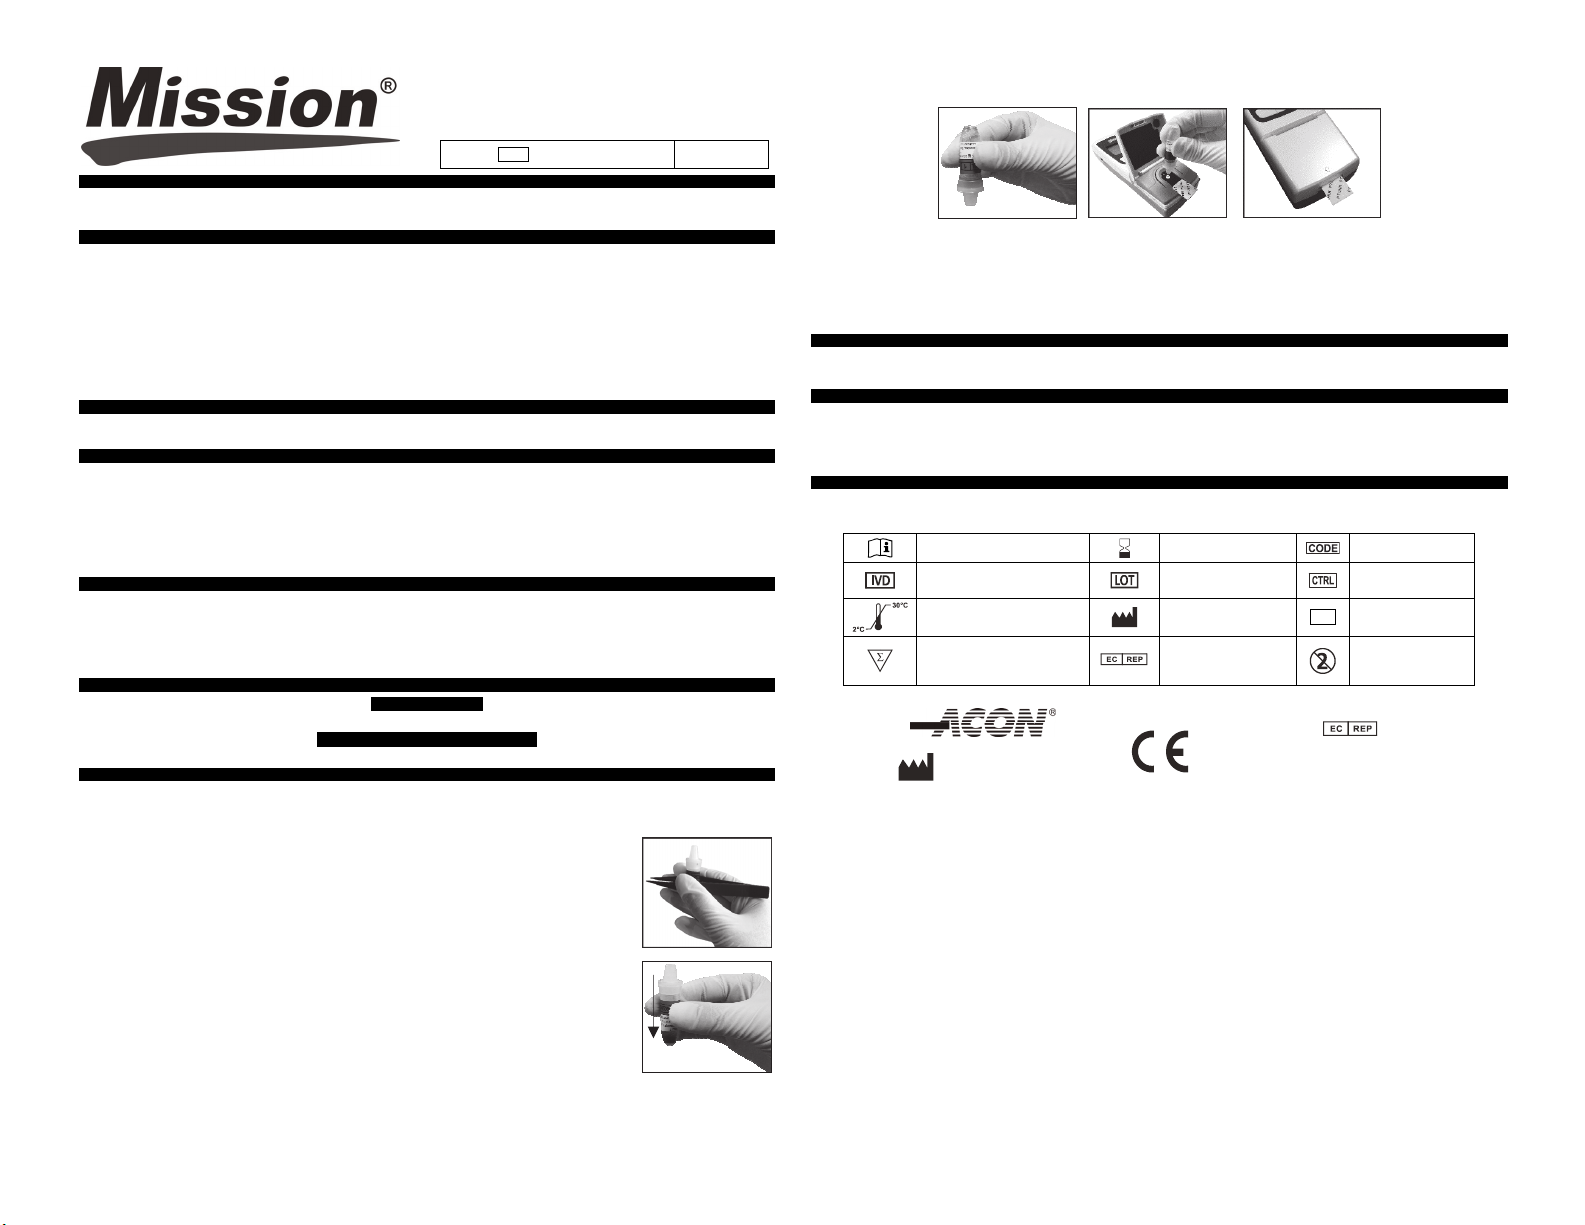
3. Open the foil pouch to remove the liquid control solution vial. The vial contains powder (dry animal
plasma) and a small glass ampoule that contains water
4.
Hold the vial upright (tip pointing up) and squeeze the vial firmly using the plastic clamp packaged
with the control solution until the glass ampoule inside the plastic vial breaks to release the water.
5. Tap the water down to the bottom of the vial by firmly tapping the bottom of t he vial 5 to 10 times,
so that the water dissolves the powder.
6. Set the control solution vial aside until the meter is ready to apply the specimen.
7. Take a test strip foil pouch out from the strip box. Each time before opening a test strip foil pouch,
check the expiration date on the foil pouch. Do not use if the expiration date has passe
Open the test strip foil pouch, take the test strip out. Insert the test strip into the meter, which will
8.
turn the meter on, then close the Optics Cover
Check that the Code # shown on the display is the same as the Code # on the test strip packaging.
9.
If the Code # is correct, press CSTst to run a liquid control test.
10. When t he “ADD SPECIMEN” icon displays, turn the vial upside down and tap down contents to
the dropper portion of the vial as shown
11
. Add one large, hanging drop of control solution until the specimen well in the center of the target is filled completely and an
audible beep occurs if the sound is enabled. Do not add additional specimen during test
INTENDED USE
SUMMARY
COMPOSITION
PRECAUTIONS
STORAGE AND STABILITY
o
C to 30o C (36o F to 86o F).
MATERIALS
Materials Provided
DIRECTIONS FOR USE
.
.
.
d.
ing.
2. Gently close the Optics Cover af ter adding the specimen. The meter will continue to display the “CLOSE COVER” icon for a
1
few seconds after the Optics Cover has been closed. The test strip should protrude slightly from the Optics Cover as shown
below.
13. The meter will then start testing the control solution, and displays the result in about 2 minut
4. If the result is within the range printed on the control foil pouch label, the meter and test strips are performing properly.
1
15. If the INR value is outside of the range printed on the foil pouch, repeat the test. If the meter displays an error message, read
Section 7 of the User’s Manual for appropriate steps.
16. The meter will also store the results in memory labeled as a control test, along with date, time, and its test number.
17. To perform another test, repeat steps 1 through 14.
18. Discard the vial of liquid control solution and used test strip after the control test.
The Missio n® PT/INR Monitoring System displays the results in the International Normalized Ratio (INR) and the Prothrombin Time
(PT) value in seconds if INR+PT is selected. Compare the test results to the range listed on the control pouch labeling. If the results
are within the range printed on the pouch, the meter and test strips are performing properly.
To resolve results that are not within the ranges listed on the foil pouch label, use the following suggestions:
The control solution may not have been mixed properly. Repeat the test and be sure to thoroughly mix the contents of the vial.
Controls or test strips may have been stored improperly or expired. Check the expiration date on the foil pouch or the box. Repeat
the test if the controls ar e not expired.
Verify the meter batteries are sufficiently charged.
Henry, J. B. Clinical Diagnosis and Management by Laboratory Methods. 15-290, 2001.
1.
EXPECTED RESULTS
TROUBLESHOOTING
BIBLIOGRAPHY
es.
Index of Symbols
nsult instructions for use
Co
vitro diagnostic medical
In
device
emperature limit
T
ntains sufficient for <n> tests
Co
Laboratories, Inc.
5850 Oberlin Drive, #340
San Diego, CA 92121, USA
Use by Code Number
Lot Number Control Range
Manufacturer
Authorized
representative in the
European Community
0123
30175 Hannover, Germany
Catalogue number
REF
Do not reuse
MD
SS GmbH
Schiffgraben 41
Number: 1151122302
Effective date: 2020-09-01
 Loading...