

Page 1
OPERATING MANUAL
Gilson Aqua-Check Moisture Tester
MA-26X
PHONE: 800-444-1508 P.O. Box 200, Lewis Center, Ohio 43035-0200
740-548-7298 E-mail: customerservice@gilsonco.com Product Web Page: www.globalgilson.com
Rev: 01/2019
FAX: 800-255-5314
740-548-5314
Page 2

Gilson Company, Inc. Gilson Aqua-Check Moisture Tester: MA-26X
SAFETY INSTRUCTIONS
Review and completely understand the operating and safety instructions before using this unit.
WARNING!
The calcium carbide reagent used with this test must be handled with great care. When
exposed to water, calcium carbide produces highly ammable or explosive acetylene gas.
• Users must understand and follow local regulations and calcium carbide Material Safety Data Sheet
(MSDS) guidelines and procedures regarding transportation, storage, handling and disposal.
• Users of this apparatus must read and understand the operating instructions in this manual.
• Testing must not be performed in confined spaces or in the vicinity of an open flame, lighted
cigarettes, embers or any other potential source of ignition.
• When releasing the gas from the apparatus, take care to direct it away from the face and body.
• Care should be taken not to store, dispose of, or place the calcium carbide reagent where it may
come into contact with water, because it will produce explosive acetylene gas.
• Any application not specically covered in this manual will be considered improper use and will
void the warranty.
• Testing excessively wet material, adding water to the testing chamber, or improper use of the
equipment could cause pressures to exceed the safe level for the apparatus. This may damage
the device and create an unsafe condition for the operator.
• Long sleeves, gloves, eye protection and dust masks should be worn when performing this test.
Page 2
Page 3

Gilson Company, Inc. Gilson Aqua-Check Moisture Tester: MA-26X
TABLE OF CONTENTS
Page
Safety Instructions ..................................... 2
Table of Contents....................................... 3
1.0 Unpacking & Set-Up .................................... 4
2.0 Introduction ........................................... 4
3.0 Operating Instructions.................................. 5
4.0 Accuracy............................................... 8
5.0 Troubleshooting ....................................... 9
6.0 Accessories ............................................ 9
Page 3
Page 4

Gilson Company, Inc. Gilson Aqua-Check Moisture Tester: MA-26X
1.0 UNPACKING & SETUP
NOTE: Each Gilson Aqua-Check is carefully inspected
prior to packaging and shipment. Upon receipt of the
shipment, immediately unpack and inspect the apparatus for signs of damage. Report damage immediately to the shipping company. Retain all shipping
records and packing materials until proper operation
is conrmed.
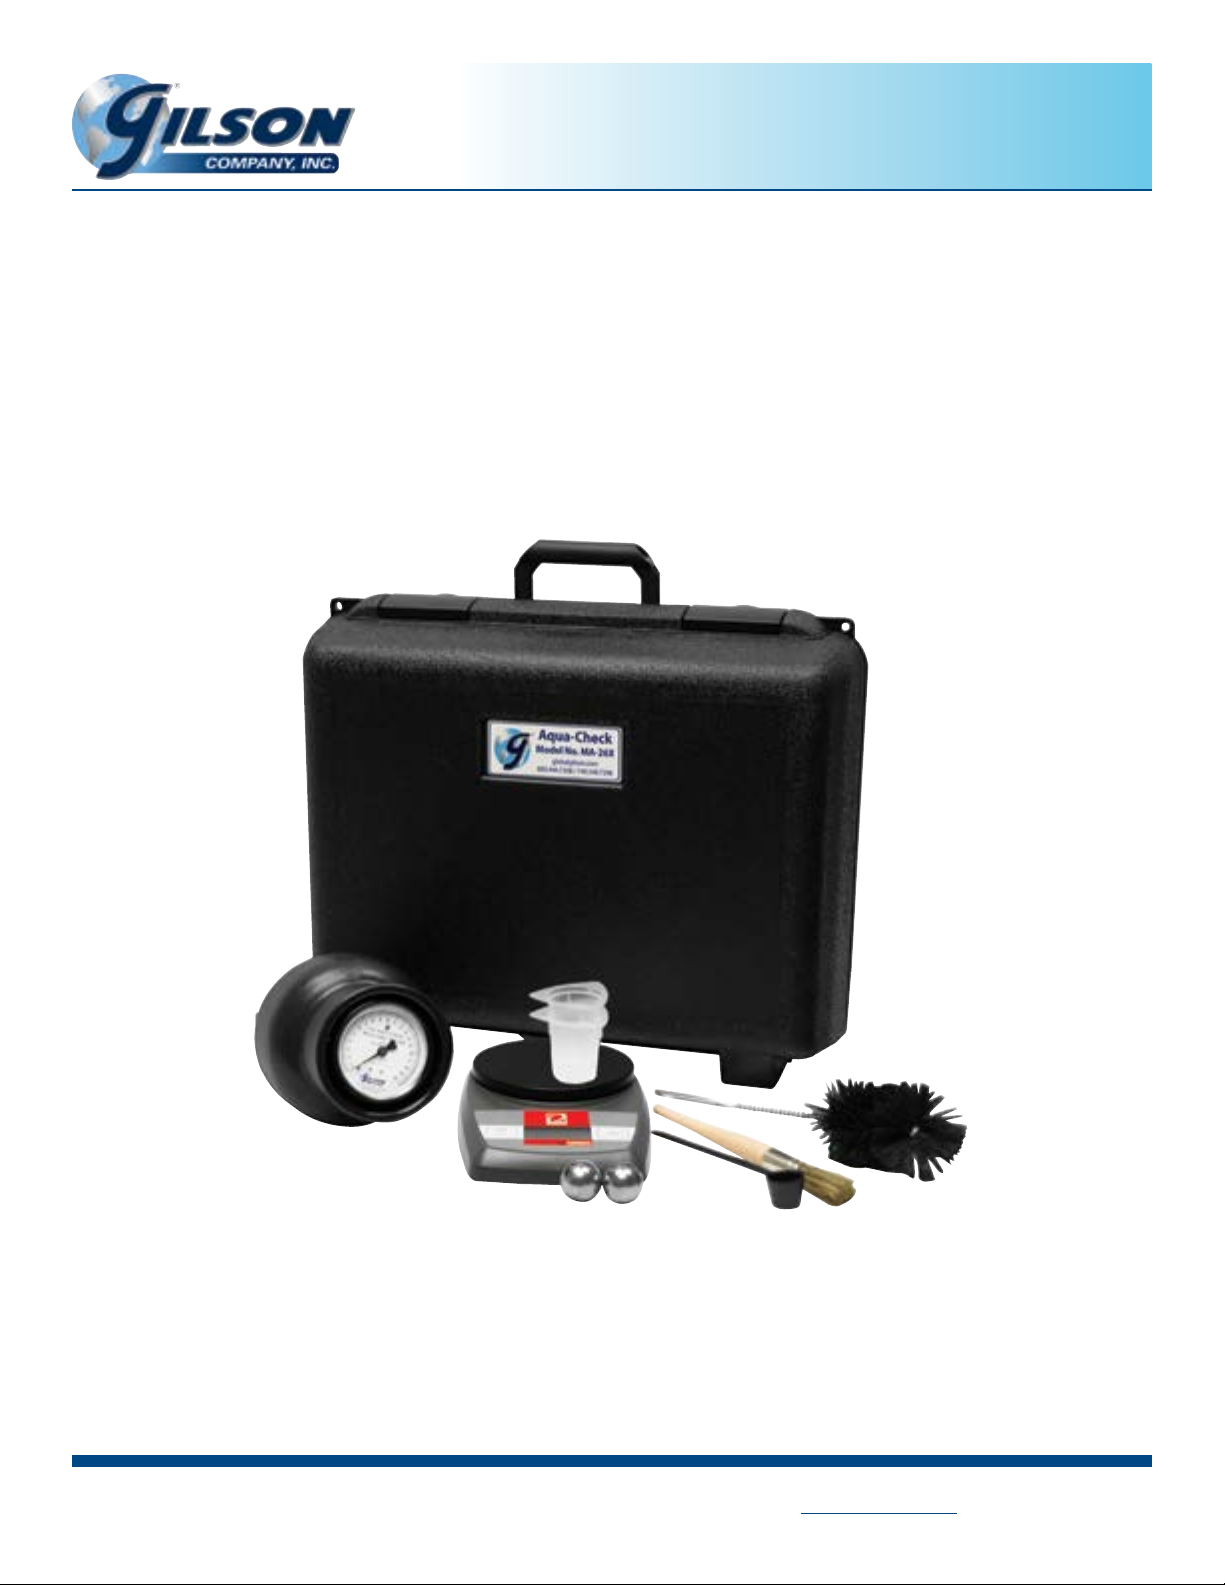
The complete MA-26 Aqua-Check Kit consists of the following components:
• Cast aluminum Sample Chamber Vessel with integral
0—20% Pressure Gauge
• 200 x 0.1g Electronic Balance for weighing of test speci-
mens
• (2) 1.25in (32mm) Steel Pulverizing Balls
• Long-handled Reagent Scoop
• Large, coarse clean-out Brush
• Small, ne-bristle Brush
• Sample Cup
• Heavy-duty plastic Case
2.0 INTRODUCTION
The Gilson Aqua-Check Moisture Tester is designed to measure the water (moisture) content of soils, aggregates, and
other non-reactive materials. The Aqua-Check apparatus
consists of an aluminum sample chamber vessel with integral pressure gauge, electronic balance for sample weighing, two steel pulverizing balls, and assorted brushes and
containers as required for proper completion of the test.
Pulverized calcium carbide is used as a reagent, and reacts
when combined with available water in the sample material
to form acetylene gas. The increase of gas pressure in the
sealed sample chamber is proportional to the water content, and is shown on the pressure gauge. The most accurate results are obtained when pressure gauge readings are
correlated with data from oven-dry methods. When testing
soils for example, ASTM Standard Test Method D 4944 provides a procedure to correlate Aqua-Check results directly
with laboratory oven drying methods.
The MA-26X inlcudes all of the components listed, except
the Calcium Carbide Reagent*. Any components or accessories are available individually from Gilson. Model numbers
to order are listed separately in this manual.
*Calcium Carbide Reagent is available separately from Gilson as MAA-44 in
a 10lb can.
MA-26X
Page 4
Page 5

Gilson Company, Inc. Gilson Aqua-Check Moisture Tester: MA-26X
3.0 OPERATING INSTRUCTIONS
NOTE: Following these procedures closely and consistently will increase the accuracy and repeatability of your test
results.
Step 1.
Use the dry, coarse-bristle brush to thoroughly clean all residue from the Aqua-Check vessel and chamber cap.
Step 1: Cleaning residue from Vessel
Step 1: Cleaning residue from Chamber Cap
Step 2. Select a representative sample of the test material. Cohesive materials that do not readily separate into individual
particles, such as clay or silt soils, should be reduced by hand into small clumps.
Step 3. Referring to separate instructions for the electron-
ic balance, set-up and zero the balance. Place the
plastic sample cup on the balance and zero again.
Carefully add small amounts of sample material to
the cup until the balance shows the required 20g.
NOTE: If the moisture content of the material is
expected to exceed 20%, a 10g sample should be
used, but the value read on the gauge must then be
doubled. It is also possible to obtain better resolution of drier materials (<10%) by doubling the sample size and halving the gauge reading.
Step 3: Sample material at 20g
Page 5
Page 6

Gilson Company, Inc. Gilson Aqua-Check Moisture Tester: MA-26X
Step 4. Place the prepared and weighed sample into the Aqua-Check vessel. For cohesive samples as described above,
also place the two steel pulverizing balls into the vessel.
Step 4: Placing sample into vessel
Step 4: Placing steel Pulverizing Balls into vessel
Step 5. Using the Long-Handled reagent Scoop, add at
least two full scoops of calcium carbide reagent to
the Chamber Cap.
NOTE: Make sure you have read and understand the
Material Safety Data Sheet (MSDS) included with each
container of calcium carbide reagent.
Step 5: Adding calcium carbide reagent to Chamber Cap
Step 6. Holding the Aqua-Check vessel horizontally, place the chamber cap on the end of the chamber. Position the black
dot on the cap so that it will be facing away from your body when the pressure is released. Move the stirrup into
place over the cap and tighten the top screw to seal the chamber. Use care during this step not to mix the reagent
and sample before the chamber is sealed.
Step 6: Placing Chamber Cap on the end of the chamber
Step 6: Tightening the top screw to seal the chamber
Page 6
Page 7

Gilson Company, Inc. Gilson Aqua-Check Moisture Tester: MA-26X
Step 7. Agitating the sample:
a.
Without Pulverizing Balls: Hold the Aqua-Check vertically with the gauge facing down and agitate vigorously for
5—10 seconds. Turn the Aqua-Check around, and with the gauge facing up agitate again for 5—10 seconds. Tap the
sides so that the sample falls into the chamber cap. This process should be repeated for 1—3 minutes, or until the
gauge reading in Step 8 has stabilized.
b. With Pulverizing Balls: Hold the Aqua-Check horizontally and use an orbital motion to spin the balls around
inside the chamber, pulverizing the sample. Agitate for 20 seconds and rest for 20 seconds, repeating the process
at least three times. Periodically check the position of the gauge indicator. Continue the agitation cycle until the
indicator has stabilized. Some highly plastic clays may require 3 minutes or more of agitation.
Step 7b: Using an orbital motion to spin the balls
around inside the chamber
Step 8. Read the pressure gauge at eye level while hold-
ing the vessel horizontally. Wait for the indicator
needle to stop moving. The gauge reads directly
in percent water content of wet weight. Accuracy
Step 9. Taking great care that the black dot on the chamber
cap is facing away from your face and body, slowly
loosen the top screw to vent pressurized gas from
the vessel.
may be improved by establishing a correction
chart as shown in ASTM D 4944.
Step 8: Reading the pressure gauge at eye level
Step 9: Loosening top screw to vent pressurized gas
Step 10. Place the used sample/reagent mixture and residue in an open dry container and dispose of in accordance with
local regulations or Section 13 of the MSDS. Use the coarse bristle brush to clean the vessel and prepare for the
next test.
Page 7
Page 8

Gilson Company, Inc. Gilson Aqua-Check Moisture Tester: MA-26X
4.0 ACCURACY
When testing soils, it is recommended that the procedures in ASTM D 4944, Standard Test Method for Field Determination
of Water (Moisture) Content of Soil by the Calcium Carbide Gas Pressure Tester Method be followed. This will insure accurate
and reliable results. For optimum accuracy with most materials, the Aqua-Check results should be correlated with oven-dry
tests for each material as shown in this summary. This simple procedure is outlined in detail in D 4944.
1. Select several samples of the material to be tested having a wide range of water content.
2. Carefully Divide each sample into two representative specimens.
3. Taking care to not lose moisture during handling, run a test on one specimen in the Aqua-Check, and record the gauge
reading. Oven dry the other specimen according to the procedure and calculate the percent moisture.
4. Plot the oven-dry moistures on a graph vs. the gauge readings and draw a best-t curve through the points. A wide
scatter in the points may indicate operation errors or that the material is not suitable for this comparison.
5. When testing, nd the point on the graph where the gauge reading intersects the correlation curve and record that
value as the corrected percent.
Water Content in Percent of Dry Mass
Typical Calibration Curve
Calcium Carbide Tester
by D 2216 (Oven Dry)
Gauge Reading, Calcium Carbide Tester
Exceptionally cool or warm ambient temperatures may cause uctuations in test results. Repeated testing or hot weather
may heat up the vessel body, and show test results that are articially high. Allow the vessel to cool down before further
testing. In cold weather, it may help to run two or three tests in rapid succession to warm up the vessel.
The maximum recommended particle size is 3/4in (20mm). Some test methods may have a smaller size limit.
Page 8
Page 9

Gilson Company, Inc. Gilson Aqua-Check Moisture Tester: MA-26X
5.0 TROUBLESHOOTING
GILSON AQUACHECK TROUBLESHOOTING
Low High Possible
X X Testing procedure errors Review instructions and procedures.
X X Incorrect sample weights Check balance operation and re-zero.
X X Errors in corrected values Change in material type. Repeat correlation procedure with new material.
X Insucient agitation Some cohesive materials may require 3 minutes or more. Use steel pulverizing balls.
X Insucient quantity of reagent Add an additional scoop of reagent.
X Ineective reagent Replace with fresh MAA-44 reagent.
Premature contact between reagent
X
and specimen
X Insucient sample preparation Break cohesive material into ner sizes and use pulverizing balls.
X
X X Defective gauge Gauge needle should rest at zero and move smoothly. Replace if defective.
X Low temperature Run two or three test cycles to warm up vessel.
X High temperature Allow vessel to cool o.
X Moisture inside vessel prior to testing Insure vessel and cap are completely dry before testing.
X X Gauge reading error Hold vessel horizontally at eye level when reading gauge.
X Residue from previous tests Use included coarse-bristle brush to clean vessel thoroughly between tests.
Inadequate pressure seal
Insure vessel is held horizontal when mating with cap.
Check and clean chamber cap gasket. Inspect vessel, cap and stirrup for damage or
cracks. Replace gasket if necessary.
For help with operation or technical issues, E-mail: techsupport@gilsonco.com or Call: 800.444.1508!
6.0 ACCESSORIES
GILSON AQUA-CHECK ACCESSORIES
Description Model
Calcium Carbide Reagent, 10lb can¹ MAA-44
Aqua-Check 0—20% Pressure Gauge MAA-45
Electronic Balance, 200 x 0.1g AD-25
1.25in (32mm) Steel Balls, pkg. 2 MAA-47
Long-Handle Reagent Scoop MAA-48
Large, Coarse-Bristle Clean-Out Brush MAA-51
Small, Fine-Bristle Brush MAA-50
Sample Cup MAA-52
Heavy-Duty Waterproof Plastic Case MAA-46
¹ Due to shipping restrictions, additional reagent is sold in 10lb (4.5kg) cans. Material
from these larger cans can be used to replenish smaller containers for eld use.
MAA-47
Page 9
MAA-48
 Loading...