

Page 1
Running
Status
External power for Switches
Battery
Left
Switch ‘a’
A
Inputs
B
Switch ‘b’
Sd-10
Br-MiniBrick4
Gilderfluke & Co.
Burbank, California
012
3
RecordGoData
Trigger
9-24
vdc
Outputs
Outputs
Triggering from a
Control System
A
Inputs
B
Sd-10
Gilderfluke & Co.• 205 South Flower Street • Burbank, California 91502 • 818/840-9484 • 800/776-5972 • fax 818/840-9485
Audio
Amplifier
Audio
Amplifier
Audio
Repeater
Sd-10
Gilderfluke & Co.
Burbank, California
9–24 vdc
Line Out
Left Right
Inputs Power
BA
9–24
vdc
Switch
Switch
Power Supply
(9–24 vdc)
Sd-10 Configuration & Installation
Before the Sd-10 can be used, you will need to load your SoundFiles onto a
MMC/Sd flash card, attach a power supply, an amplifier and speakers (or amplified speakers), and (optionally) a switch to start the Sd-10. Selecting the operating mode will tell the Sd-10 how you would like your SoundFiles to be played.
MMC/Sd Card:
Any 3.3 volt Multi Media Card (MMC) or Secure
Digital (Sd) flash memory card can be used with the
Sd-10. Starting with version 1.16 of the Sd-10 firm-
ware, Sd HC cards are also supported. These will
be available with capacities up to 2048 GBytes. As
of this writing, Sd cards are available in sizes
up to eight GBytes. These hold about 2000
typical Mp3 songs for about four days of
continuous audio playback. The Sd-10
supports up to 255 SoundFiles in most operating modes. Some modes support up to
32,767 SoundFiles.
The flash card should be formatted ʻFATʼ or
ʻFAT32ʼ (it will probably come that way).
The order in which the SoundFiles are
placed onto the card is the order in which
the Sd-10 will play them. You can load
Mp3 and .wav files onto the card using a
flash card writer attached to a PC or Mac.
For the Sd-10s to recognize a SoundFile,
its FileName must start with an alphanumeric character, and it must have the extension of either ʻ.wavʼ or ʻ.Mp3ʼ. If a
SoundFile meets these criteria, the Sd-10
will attempt to play it. If the Sd-10 canʼt play
a SoundFile for any reason, it will give up after about three seconds.
The Sd-10 will play just about all Mp3 or .wav
file formats. Mp3 bit rates up through 320 Kb/
second are supported. .wav files of
up to 48 Kbytes/second and six-
teen bit are supported. If a file
does not play, it is most often caused
by which has a large (more
than 2 MBytes) ʻid3ʼ tag at its
front. These typically hold the
album cover artwork for files
downloaded from iTunes and
similar sources. Since a Sd-
10 canʼt use album artwork, it simply
takes up additional storage space, delays the time it takes a sound to start
playing, and (in the worst case), will
keep a sound from playing at all. Most
audio programs (including
iTunes) have an option to
eliminate ʻid3ʼ tags.
Line Level Outputs:
The Sd-10 features line level
outputs. To use the line level
outputs, just run a pair of RCA cables to
your amplifier (or amplified speakers), just
as you would if you were connecting a CD
player. The line level outputs are robust
enough to drive headphones and small
speakers directly.
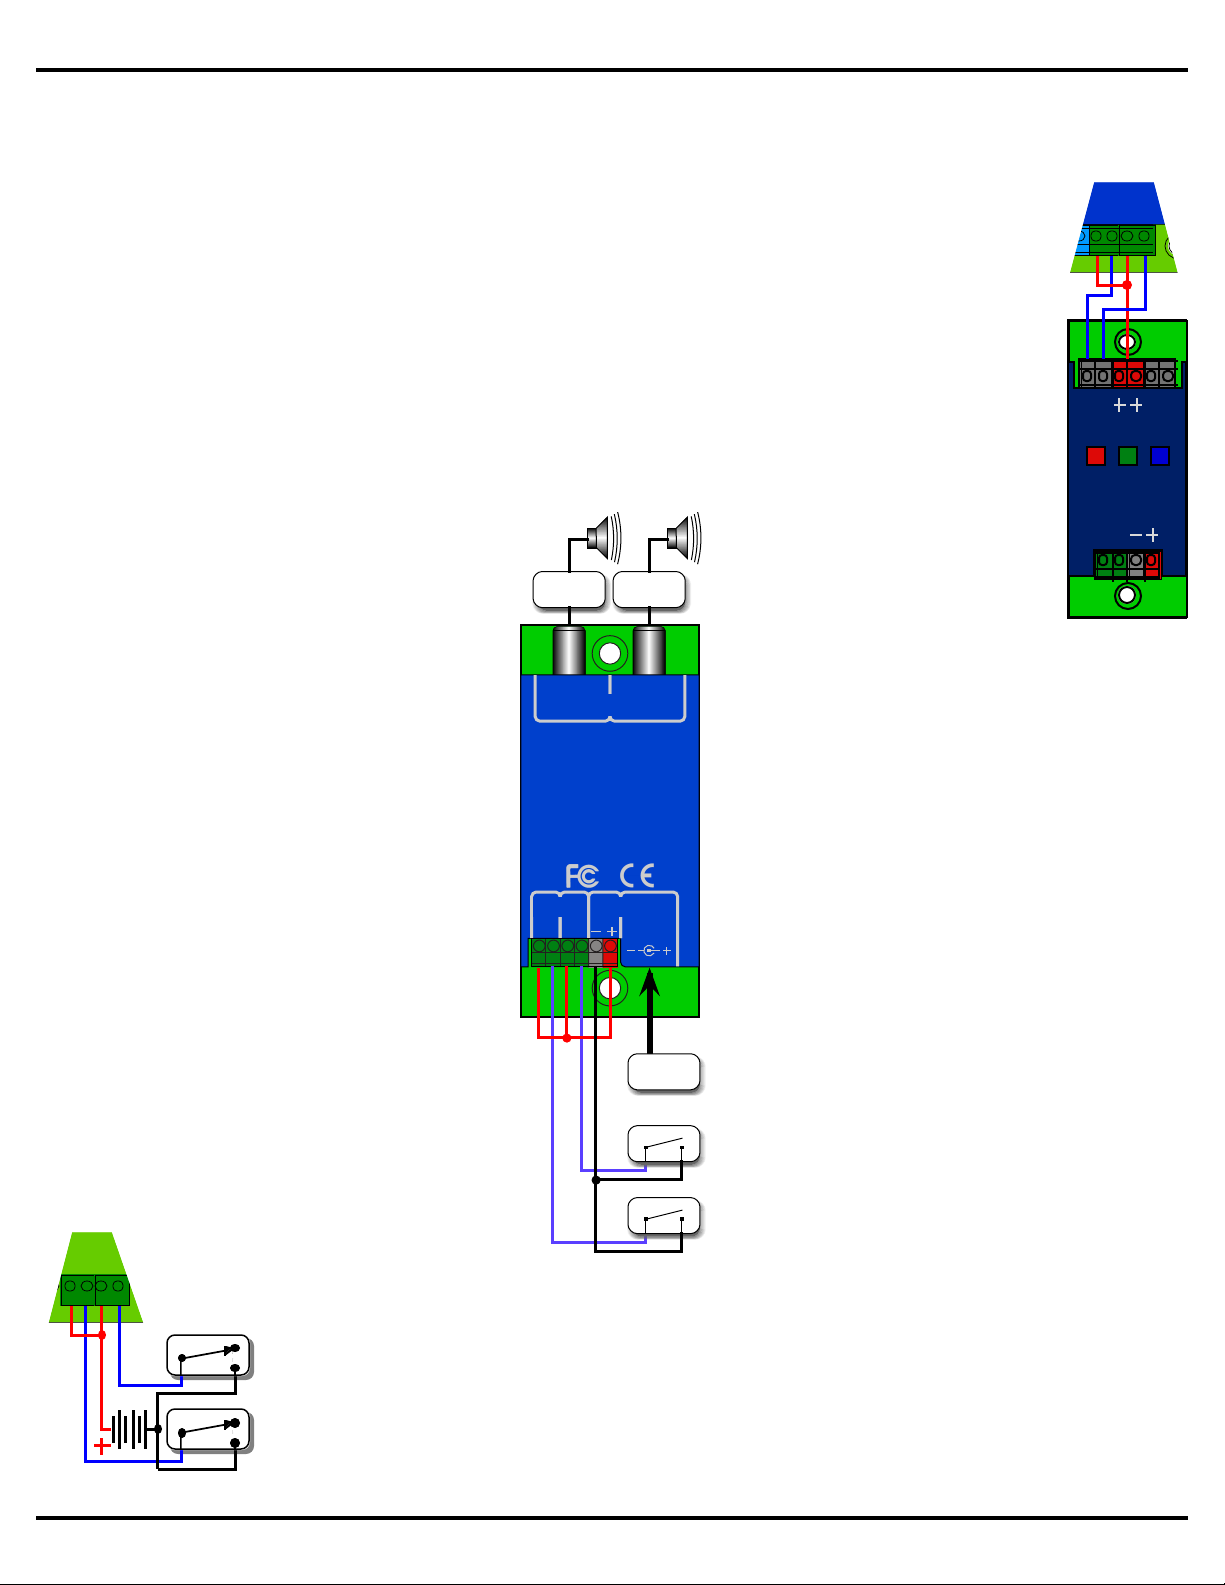
Trigger Inputs:
The trigger inputs can be used with any
switch. This can be a pushbutton, motion
detector, IR beam, step mat, a digital signal
from a control system, or anything else that
will give you a ʻpowered switch closureʼ.
The trigger inputs are non-polarized (they
donʼt care which terminal is positive or
negative) and opto-isolated. You must feed
a DC voltage into them. Just touching a
pair of leads from a nine volt transistor ra-
dio battery is a good test of the inputs. As
shown at the middle of the page, you can
ʻborrowʼ some of the power that is running
the Sd-10 using the adjacent screw termi-
nals, or use a separate isolated supply (as shown at
left). The power supply is shown as a battery, but
can be any power supply from 9 to 24 vdc.
Not surprisingly, all Gilderfluke & Co. control systems are easy to attach to a Sd-10. A Br-
miniBrick4 is shown, but all of our systems are
wired in exactly the same way. The common posi-
page 1 of 5 • © August 17, 2012 Gilderfluke & Co. DCM
Page 2
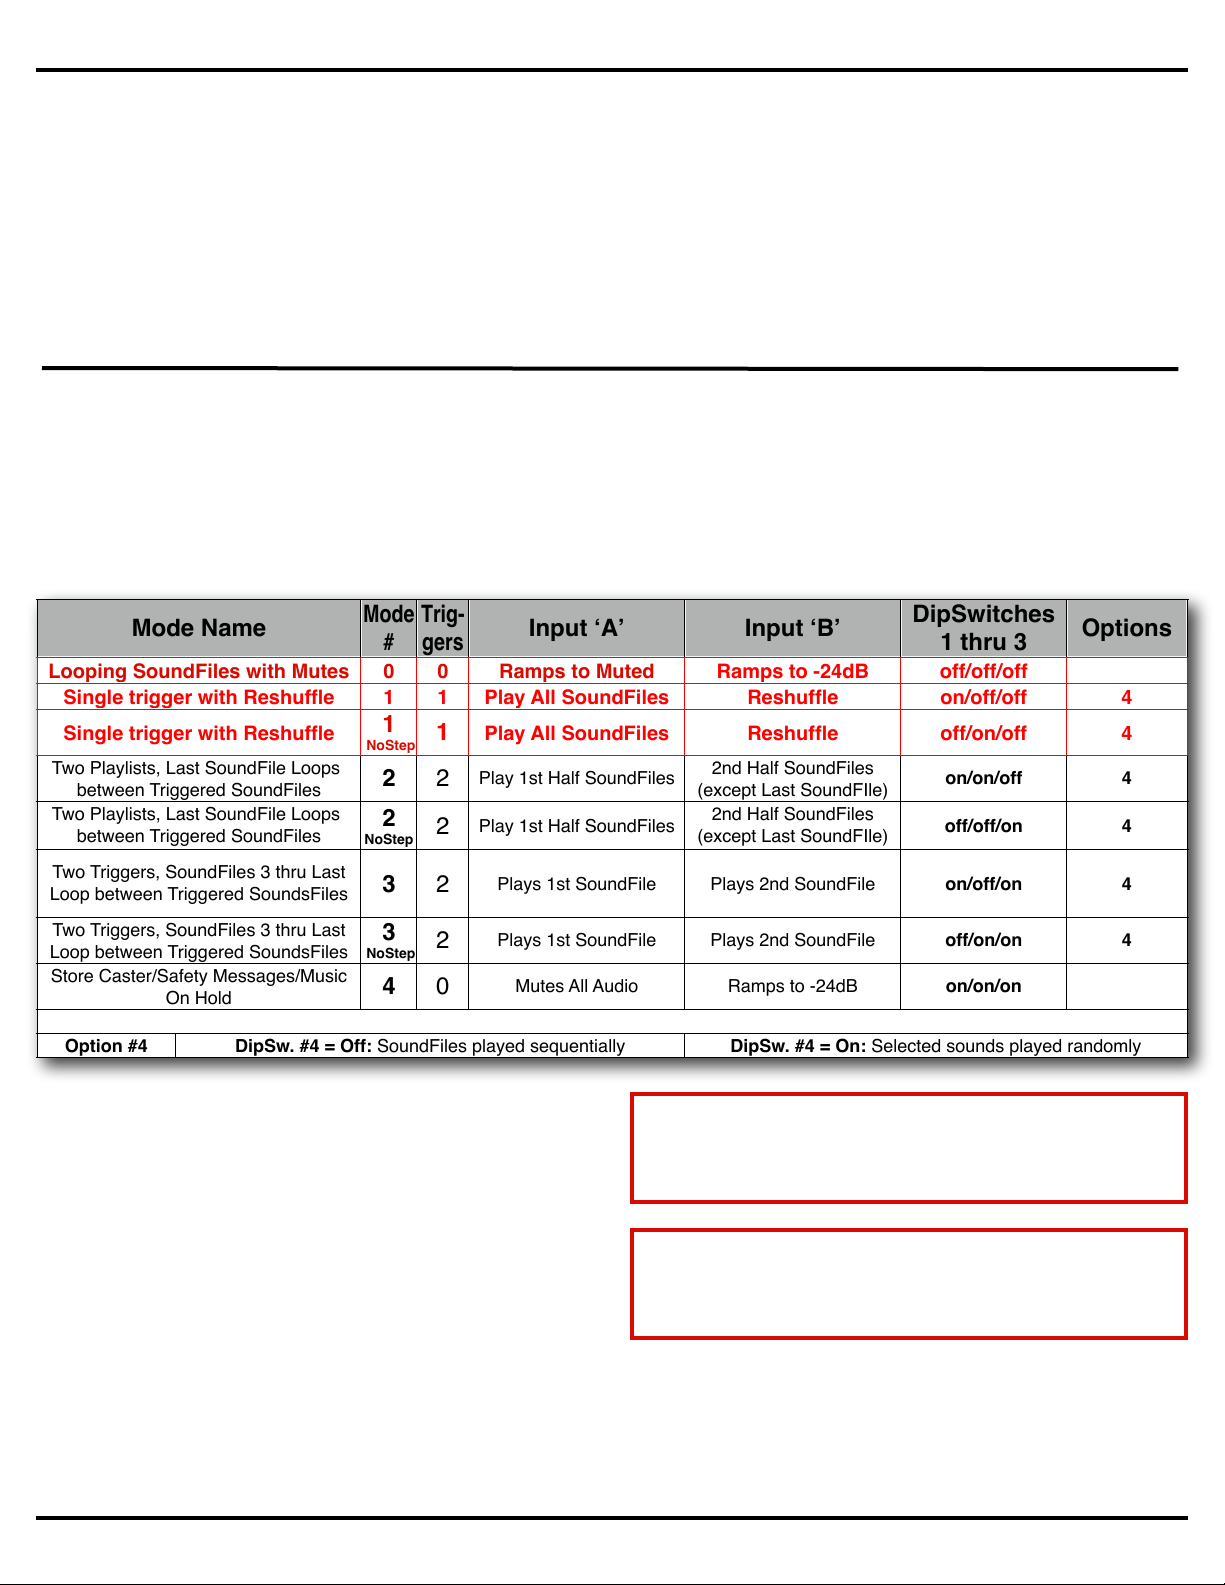
Mode Name
Mode
#
Trig-
gers
Input ʻAʼ
Input ʻBʼ
DipSwitches
1 thru 3
Options
Looping SoundFiles with Mutes
00Ramps to Muted
Ramps to -24dB
off/off/off
Single trigger with Reshuffle
11Play All SoundFiles
Reshuffle
on/off/off
4
Single trigger with Reshuffle
1
NoStep
1
Play All SoundFiles
Reshuffle
off/on/off
4
Two Playlists, Last SoundFile Loops
between Triggered SoundFiles
2
2
Play 1st Half SoundFiles
2nd Half SoundFiles
(except Last SoundFIle)
on/on/off
4
Two Playlists, Last SoundFile Loops
between Triggered SoundFiles
2
NoStep
2
Play 1st Half SoundFiles
2nd Half SoundFiles
(except Last SoundFIle)
off/off/on
4
Two Triggers, SoundFiles 3 thru Last
Loop between Triggered SoundsFiles
3
2
Plays 1st SoundFile
Plays 2nd SoundFile
on/off/on
4
Two Triggers, SoundFiles 3 thru Last
Loop between Triggered SoundsFiles
3
NoStep
2
Plays 1st SoundFile
Plays 2nd SoundFile
off/on/on
4
Store Caster/Safety Messages/Music
On Hold
4
0
Mutes All Audio
Ramps to -24dB
on/on/on
Option #4
DipSw. #4 = Off: SoundFiles played sequentially
DipSw. #4 = On: Selected sounds played randomly
Gilderfluke & Co.• 205 South Flower Street • Burbank, California 91502 • 818/840-9484 • 800/776-5972 • fax 818/840-9485
tive is run to one side of both Sd-10 inputs, and the
control system outputs are wired right to the Sd-10
inputs.
The ʻInputʼ LEDs that are next to the two Sd-10 inputs will light when each input is active.
vdc. The Sd-10 draws about 50 milliamperes when
playing (no load on the outputs).
The power supply can be attached through the 2.1
mm power jack, or the screw terminals. They are
connected. Power Supply voltages higher than 24
vdc can cause the Sd-10 to run hotter than in-
Power Supply:
tended, and may eventually lead to failure.
The Sd-10 will run on any voltage from 9 through 24
Sd-10 Configuration
The Sd-10 is configured using a four position dipswitch. The cover of the Sd-10 must be
snapped off to reach this dipswitch. A ball point pen or any other pointy object can be used to
flip the switches once the cover has been removed. Do not use a knife or other sharp object,
as it might damage the switch.
Operating Modes:
The first three DipSwitches are used to set the
mode of operation for the Sd-10. The ʻonʼ/ʼoffʼ after
each ʻmodeʼ show which of the first three
dipswitches need to be turned ʻonʼ or ʻoffʼ to select
that mode. As an example; to select ʻmode 3ʼ, you
would turn ʻonʼ switches one and three. Switch two
would be turned ʻoffʼ.
In some cases when the operating mode is
switched, you may need to cycle power to the Sd-10
to assure it operates as expected.
page 2 of 5 • © August 17, 2012 Gilderfluke & Co. DCM
If you need your SoundFiles(s) to just loop:
use mode 0.
DipSwitches one though three = off/off/off
If you just need to trigger one or more Sound-
Files: use mode 1 or 1 (NoStep).
DipSwitches 1 through 3 = on/off/off or off/on/off
Page 3

Gilderfluke & Co.• 205 South Flower Street • Burbank, California 91502 • 818/840-9484 • 800/776-5972 • fax 818/840-9485
Mode 0 / off/off/off Loops with Mutes: Loop all of
the SoundFiles on the Sd-10, starting at PowerUp.
Input ʻaʼ will ramp the audio to a fully muted level
when activated. The ʻbʼ input ramps the audio to a
ʻhalf mutedʼ (lower) volume which is -24 dB from the
normal volume level. The Sd-10 will support up to
32,768 SoundFiles while in this mode.
Mode 1 / on/off/off Single trigger with reshuffle: Input ʻaʼ plays ALL of the SoundFiles on the Sd-10
(SoundFiles 1 through ??). Input ʻbʼ reshuffles the
ʻPlayListʼ triggered by the ʻaʼ input.
Mode 1 (NoStep) / off/on/off As above, but once a
sound is triggered, another sound canʼt be triggered
until the first has stopped. It canʼt be ʻStepped Onʼ.
Mode 2 / on/on/off Two PlayLists, with looping
background SoundFile: This mode divides all of the
SoundFiles into two evenly sized ʻPlayListsʼ. Input
ʻaʼ triggers SoundFiles from the first half, and input
ʻbʼ triggers SoundFiles from the second half. The
Sd-10 will loop the last SoundFile on the card
whenever it isnʼt playing a triggered SoundFile. The
first ʻPlayListʼ starts at the first SoundFile. The background looping SoundFile will start playing as soon
as the Sd-10 is powered up. There must be at least
three SoundFiles on the Sd-10 for this mode. If
there is an even number of SoundFiles on the Sd-
10, then the second PlayList (triggered by the ʻbʼ in-
put) will have one less SoundFile than the first
PlayList (triggered by ʻaʼ input).
If you need the two PlayLists that this mode provides, but donʼt need the background looping file:
Just make sure that the last SoundFile on the flash
card is complexly silent. In this way, it will loop away
in the background without disturbing anyone.
Mode 2 (NoStep) / off/off/on As above, but once a
sound is triggered, another sound canʼt be started
until the first has ended. While the triggered sounds
are protected from another SoundFile starting, the
background SoundFile can be stepped on by any
trigger to play a SoundFile from the ʻaʼ or ʻbʼ inputs.
Mode 3 / on/off/on Trigger SoundFiles one or two,
with a background SoundFile PlayList. Input ʻaʼ
plays the first SoundFile. Input ʻbʼ plays the second
SoundFile. If not playing either of these SoundFiles,
then SoundFiles 3 through ?? will be played. If the
ʻRandomʼ switch (DipSwitch #4) is ʻonʼ, the back-
ground SoundFiles will be played in a Random order. There must be at least three SoundFiles on the
Sd-10 for this mode. This mode is ʻSteppableʼ.
Mode 3 (NoStep) / off/on/on As above, but once a
sound is triggered, another sound canʼt be triggered
until the first has stopped. While the triggered
sounds are protected from another SoundFile starting, the background SoundFile can be stepped on
by any trigger to play a SoundFile from the ʻaʼ or ʻbʼ
inputs.
Mode 4 / on/on/on ʻStoreCasterʼ and ʻMusic-On-
Holdʼ mode. From PowerUp, all but the first SoundFile will play in a loop. Between each of these
SoundFiles, it will play the first SoundFile. This allows the first SoundFile to be used as an advertisement or safety announcement. There must be at
least two SoundFiles on the Sd-10 for this mode.
Input ʻaʼ ramps the audio down to full mute when activated. Input ʻbʼ ramps the audio down -24 dB from
full volume when activated.
Sequential/Random:
DipSwitch #4 tells the Sd-10 to play in sequential
order (order in which the SoundFiles were loaded
onto the flash card) when DipSwitch #4 is ʻoffʼ, or in
random order when DipSwitch #4 is ʻonʼ. When playing in random order, a flag is set for each SoundFile.
It will randomly pick the next SoundFile to play, and
reset this flag until it runs out of SoundFiles which
havenʼt yet been played. It will then reshuffle the
SoundFiles. This means that the same SoundFile
wonʼt be played a second time until after the next
reshuffle happens. The only time the same SoundFile can play two times in a row is if a reshuffle happens and the next file which is chosen at random
happens to be the same SoundFile. It can happen,
but probably wonʼt often. Any of the command
modes which ʻreshuffleʼ the SoundFiles will reset all
the SoundFile flags. If playing ʻrandomlyʼ, then any
SoundFile in the PlayList can be played after a reshuffle. If playing sequentially, it will start playing
with the first SoundFile in the PlayList after a reshuffle.
page 3 of 5 • © August 17, 2012 Gilderfluke & Co. DCM
Page 4

Rxd
Txd
gnd
IBM AT
Serial
1
2
3
4
5
6
7
8
9
1
3
2
3.5mm Stereo
(ring)
(tip)
(sleeve)
Gilderfluke & Co.• 205 South Flower Street • Burbank, California 91502 • 818/840-9484 • 800/776-5972 • fax 818/840-9485
Sd-10 Installation:
The Sd-10 can be mounted using two screws on 2-
1/4” centers; 2-3/4” Augat ʻSnap-Trackʼ (which itself
can be DIN rail mounted); using DIN rail adapters;
or just Velcroʼd down. In many applications, the Sd-
10 can be attached on (or in) the amplified speakers
it is feeding or attached right to the back of the amplifier. The Sd-10 must not be mounted where it
might get wet, or suffer from extremes of temperature.
Advanced Users:
If an input which triggers a SoundFile to start playing
is held ʻactiveʼ, then the SoundFile will loop on itself
as long as the input remains active. When the input
ʻopensʼ, the SoundFile will complete playing normally.
It can also be controlled from a Gilderfluke & Co. Br-
SDC/09 (a null modem cable must be used to flip
pins #2 and #3 when used with a Br-SDC/09).
When the Sd-10 boots or a new MMC/Sd card is
inserted, the Sd-10 will list all the SoundFiles that
are found. When any SoundFile is played, the name
and info about the file are displayed through the serial port (there is approximately one second delay
after a SoundFile starts before this info is displayed). As a SoundFile plays, the Sd-10 reports the
number of seconds (in ASCII Hex) into the SoundFile it is.
Seamless Looping:
For ʻseamlessʼ looping, use .wav encoding. Mp3 encoded SoundFiles need a fraction of a second to get
the audio rolling, and so will not loop as seamlessly.
Using Two Inputs to Randomly Access
SoundFiles:
With only two trigger inputs, random access to individual SoundFiles canʼt be done with the Sd-10
alone. If being run from a control system (PLC, fire
system, or any Gilderfluke Control system), SoundFiles can be randomly accessed by giving multiple
pulses to the Sd-10. You would typically choose a
mode that allows the SoundFiles to be ʻreshuffledʼ
and leave the ʻrandomʼ switch ʻoffʼ. An example of
this is mode ʻ1ʼ. The ʻbʼ trigger input reshuffles the
PlayList. Additional pulses (typically at 15 Hz) to the
ʻaʼ input step the Sd-10 forward to select and play
the desired SoundFile.
Hardware options:
1.Sd-RS/232 RS-232 serial port (user installable)
2.Sd-IR/Rx Internal IR receiver for use with IR-Tx.
The Sd-10 must be ordered with ʻIRʼ firmware to
support this option.
Optional RS-232 Serial Ports:
An optional RS-232 serial port is available on the
Sd-10 (revision 1.3 or later). It runs at a fixed rate of
9600 baud, n, 8, 1.
Adapters to attach this port to a PC or Mac are
available from Gilderfluke & Company.
page 4 of 5 • © August 17, 2012 Gilderfluke & Co. DCM
Using the Optional Serial Port to Select
and Play SoundFiles:
To select and play a SoundFile through the serial
port, send the Sd-10 an ASCII ʻpʼ character, followed
by a two digit ASCII Hex number of the SoundFile
you want to be played. Example: to play SoundFile
1, send ʻp01ʼ. For SoundFile 25, send ʻp19ʼ.
Using the Optional Serial Port to Adjust
Audio Playback Levels:
This command requires Sd-10 Firmware v1.21 or
later. To set the ʻnormalʼ audio playback level
through the serial port, send the Sd-10 an ASCII
<Control>+ʼVʼ character (0x16), followed by a two
digit ASCII Hex number of the level you want to use.
Valid levels are ʼ00ʼ to ʻFFʼ. Example: to set playback level to 80h, send ʻ<0x16>ʼ80ʼ.
The volume control through the serial port is highly
logarithmic. Once set, the Sd-10 will scale all the
ʻmuteʼ and ʻduckʼ functions to the value you have set
as the ʻnormalʼ playback level.
Special Orders:
If none of the standard operating modes available
on the Sd-10 meet your needs, we can modify the
existing modes, or put in a new mode to suit your
special needs. You can also use an Sd-25, which
has more operating modes. A no-charge factory option includes a line level output if you donʼt need the
Sd-25ʼs powerful Class-D amplifier.
Page 5

Gilderfluke & Co.• 205 South Flower Street • Burbank, California 91502 • 818/840-9484 • 800/776-5972 • fax 818/840-9485
Connect the equipment into an outlet on a circuit different
FCC and CE Compliance:
Sd-10s which are revision 1.3 or later have been tested to
comply with FCC and CE requirements. Revisions earlier than
this may have passed testing, but were not certified at the time
of manufacture.
Because Sd-10s are low voltage DC devices, neither UL or CE
require safety testing.
For fireproofing or additional radio frequency interference
shielding, Sd-10s can be mounted in a fire rated metallic case.
Typically, this would be a NEMA-rated electrical enclosure or
19” electrical rack.
•
from that to which the receiver is connected.
Consult the dealer or an experienced radio/TV technician for
•
help.
This equipment has been verified to comply with the limits for a
class B computing device, pursuant to FCC Rules. In order to
maintain compliance with FCC regulations, shielded cables
must be used with this equipment. Operation with nonapproved equipment or unshielded cables is likely to result in
interference to radio and TV reception. The user is cautioned
that changes and modifications made to the equipment without
the approval of manufacturer could void the user's authority to
operate this equipment.
FCC Instruction to User:
This equipment has been tested and found to comply with the
limits for a class B digital device, pursuant to part 15 of the
FCC Rules. These limits are designed to provide reasonable
protection against harmful interference in a residential installation. This equipment generates, uses and can radiate radio
frequency energy and if not installed and used in accordance
with the instructions, may cause harmful interference to radio
communications. However, there is no guarantee that interference will not occur in a particular installation. If this equipment
does cause harmful interference to radio or television reception, which can be determined by turning the equipment off and
on, the user is encouraged to try to correct the interference by
one or more of the following measures:
Reorient or relocate the receiving antenna.
•
Increase the separation between the equipment and re-
•
ceiver.
This device complies with Part 15 of the FCC
Rules. Operation is subject to the following two
conditions: (1) This device may not cause harmful
interference and (2) this device must accept any
interference received, including interference that
may cause undesired operation.
This Class B digital apparatus meets all requirements of the Canadian Interference-Causing
Equipment Regulations.
Cet appareil numerique de la classe B respecte
toutes les exigences du Reglement sur le
materiel brouilleur du Canada.
EC DECLARATION OF CONFORMITY
Friday, August 17, 2012
Application of Council Directives:# # # # EMC Directive, 89/336/EEC
Manufacturer's Name:# # # # # Gilderfluke & Co., Inc.
Manufacturerʼs Address:# # # # # 205 South Flower St., Burbank, California 91502 USA
Importerʼs Name:# # # # # # #######
Importerʼs Address:# # # # # # #######
Type of Equipment:# # # # # # Professional Audio
Equipment Class:# # # # # # Commercial and Light Industrial
Model:# # # # # # # Sd-10
Conforms to the following Standards:# # # EN 55103-1: 1996 and EN 55103-2: 1996
Year of Manufacture:# # # # # 2006
I the undersigned, hereby declare that the equipment specified above conforms to the above directive(s)
and standard(s).
Place:#Burbank, California# # # # # Signature:# (signed)# # # #
Date: August 1, 2006# # # # # Full Name:# Doug Mobley
# # # # # # # # Position:# CEO
page 5 of 5 • © August 17, 2012 Gilderfluke & Co. DCM
 Loading...