

Page 1

Installation & Operation Guide
ProDVX F100
Page 2

Page 3
COPYRIGHT:
This publication, including all photographs, illustrations & software, is protected under
international copyright laws, with all rights reserved. Neither this manual, nor any of the
material contained here in, may be reproduced without the express written consent of
the copyright holders.
DISCLAIMER:
The information in this document is subject to change without notice. The
manufacturer makes no representations or warranties with respect to the contents
hereof & specifically disclaims any implied warranties of merchantability or fitness for
any particular purpose.
Any brand or products names are used for identification purposes only & may be trade
marks or registered trademarks of their respective companies.
Document Version: 1.0
I
Page 4

CONTENTS
Introduction 01
Features 01
Package Contents 01
Main Unit
Front View 02
Rear View 02
Install 2.5” Hard Disk Drive 03
Add-on Accessory 03
Remote Control
Features & Functions 05
Making Connections
Connect to PC 06
Connect to Pen Drive 06
Unzip Software to Pen Drive 07
Create Folder in Pen Drive 07
Duplication of Audio, Video & Photo Files 07
What to do when error occurs during files duplication 07
Connect to Display Unit 08
Operate the Player with RC & OSD Menu 09
Device Settings
Slideshow Setup 11
Slideshow Mode 11
Folder Repeat 12
Interval Time 12
Transition 13
Main Page 13
Photo Setup 14
Digest Style 14
Movie Setup 15
Repeat Mode 15
Digest Style 16
II
Page 5

Preferences 16
TV Display 17
TV Type 17
OSD Message 18
Screen Saver 18
Setup Values 19
File Library & Device Library 20
III
Page 6

INTRODUCTION:
We have included this Installation & Operation Guide to show you basic functions &
techniques that will help you quickly master your new multi media player. This guide
explains how to install & operate the ProDVX F100, please read this guide first before
operating it.
FEATURES:
- Plug-and-Play & auto loop playback
- Playback of JPEG, MPEG1, MPEG2, MPEG4, WAV & MP3
- Support CF card, IBM Microdrive, & 2.5” H.D.D.
- USB2.0 OTG (On-The-Go) to download files from a Pen Drive
- USB2.0 high speed data transfer interface
- Support add-on key pad (not currently available)
- Support NTSC / PAL video systems
PACKAGE CONTENTS:
- Multi Media Player x 1
- Remote control x 1
- A/V cable x 1
- S-video cable x 1
- 100 ~ 240V AC Adaptor x 1
- USB cable (type A to Mini USB 5P) x 1
- Mounting Bracket x 2
- CD encryption software x 1
- Installation & Operation Guide x 1
1
Page 7
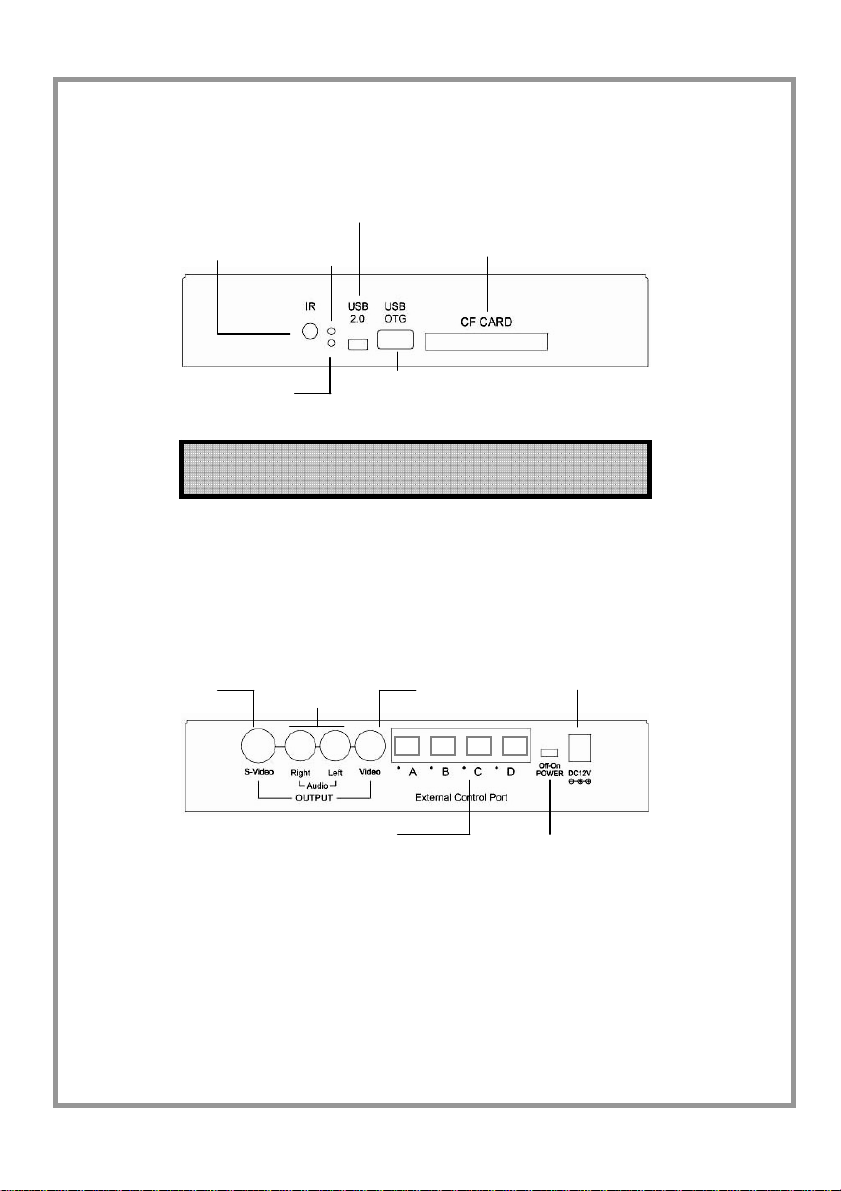
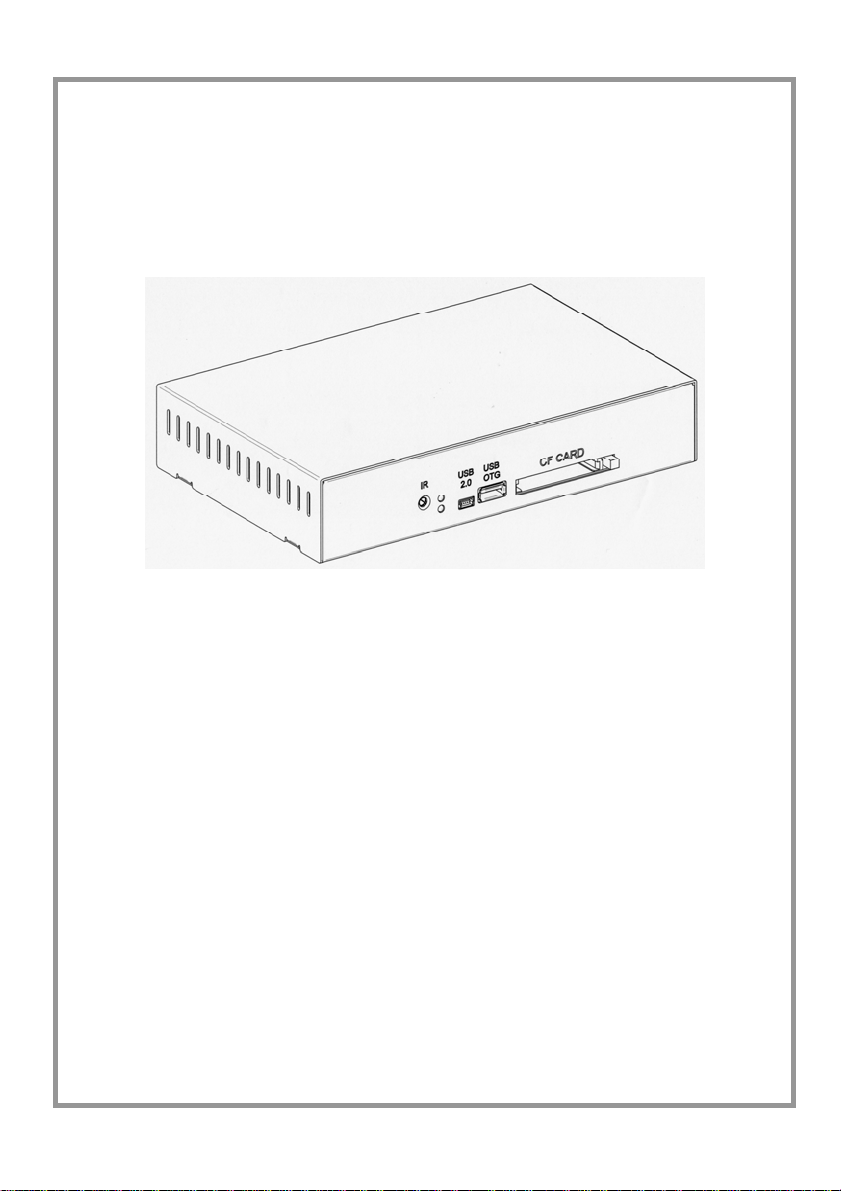
MAIN UNIT:
Remote Control
IR Receiver
.
Power Indicator
S-Video
Connector
Mini USB
Access
Indicator
Onl
y pen drive can be inserted into USB OTG connector
Audio
Connector
RJ45 Connectors
IMPORTANT:
CF Card Type I/II Slot
USB Type A
Video
Connector
Power
Switch
Power
Jack
Front View
Rear View
2
Page 8
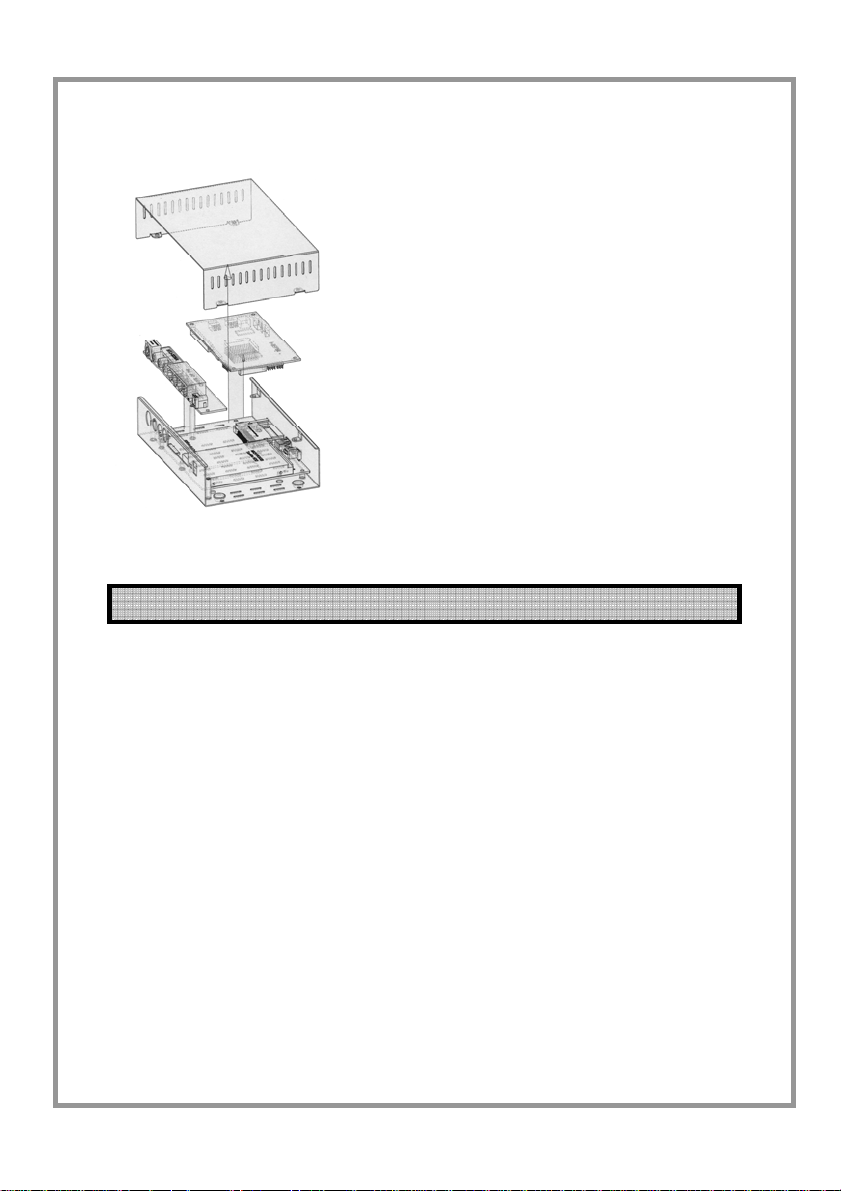
INSTALL 2.5” HARD DISK DRIVE:
- Hard disk drive can only be partitioned in
FAT32 format
- Dismount 4 screws on button of the case
- Remove upper housing & you will see a
main board
- Dismount 3 screws on main board & put
main board aside, you will see USB
board
- Put a 2.5” HDD onto USB board
- Secure 2.5” HDD with 4 pcs of M3x6mm
screws
- Put main board back to where it was &
mount its screws
- Close upper housing and mount its screws
Please note all Western Digital’s 2.5” H.D.D. are not compatible with our player
ADD-ON ACCESSORIES:
A keypad (not currently available from maker) can be connected to four External Control
Ports (RJ45 connectors) on the back of player. This keypad is to perform as function
key; when a digit on the keypad is pressed, the player will play the file which is
corresponded to same order number of play list. Key pad can be custom made by
users; the followings are the pin assignment, pin definition, photo of RJ45 connectors &
simple drawing of key pad:
3
Page 9
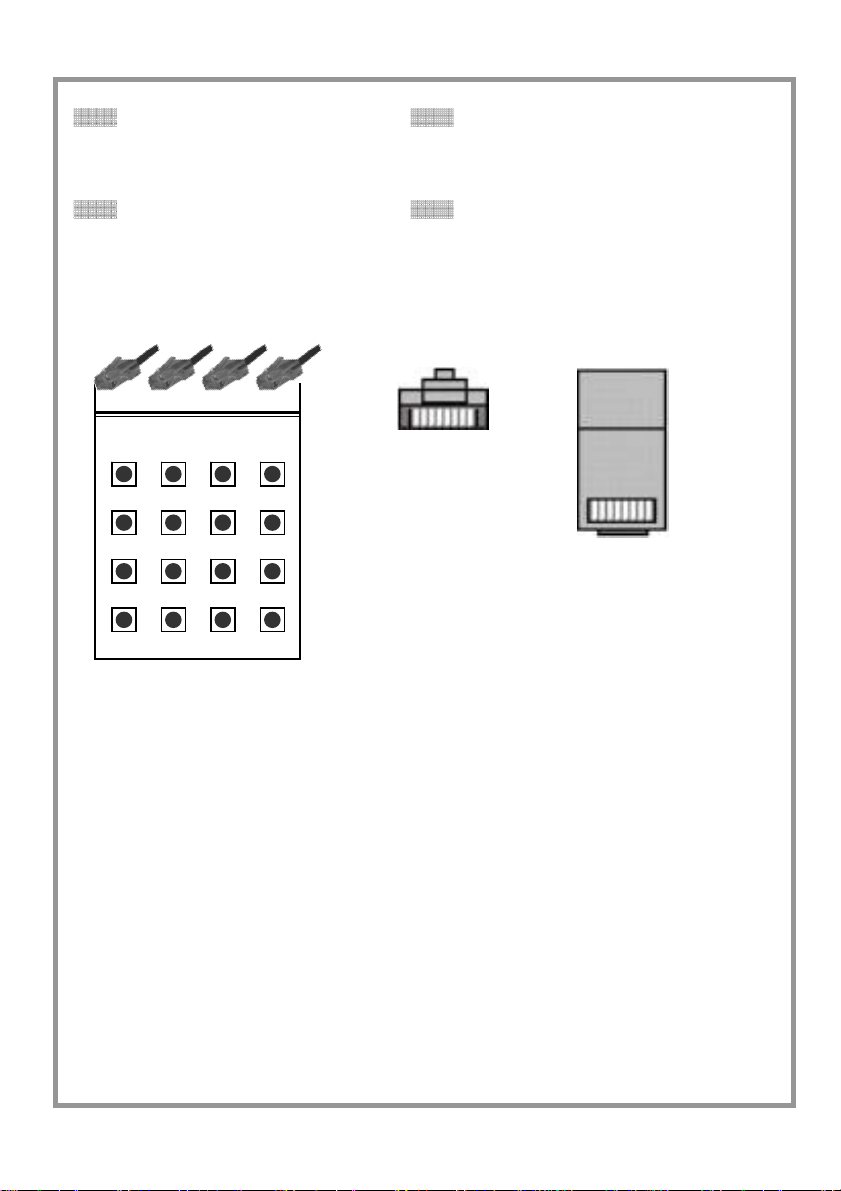
Port A Pin 1 connected to Pin 3: STOP Port C Pin 1 connected to Pin 3: 8
Pin 2 connected to Pin 4: 2 Pin 2 connected to Pin 4: THUMBNAIL
Pin 5 connected to Pin 7: 1 Pin 5 connected to Pin 7: 9
Pin 6 connected to Pin 8: 3 Pin 6 connected to Pin 8: MOVIE
Port B Pin 1 connected to Pin 3: 4 Port D Pin 1 connected to Pin 3: PLAY
Pin 2 connected to Pin 4: 6 Pin 2 connected to Pin 4: NEXT
Pin 5 connected to Pin 7: 5 Pin 5 connected to Pin 7: GOTO
Pin 6 connected to Pin 8: 7 Pin 6 connected to Pin 8: PREV.
A B C D
1 2 3 4
STOP THUMB MOVIE
9
PREV NEXT GOTO PLAY
This is merely a reference drawing
of key pad, not a drawing from
any actual product.
87 6 5
18
Front view of
RJ45
connector &
its pin
definition
18
Top view of
RJ45
connector &
its pin
definition
4
Page 10

REMOTE CONTROL FEATURES & FUNCTION LIST
CLEAR
DISPLAY
TARGET
GOTO
Press to activate FILE LIBRARY
PREV.
Back to previous multi-media file
NEXT
Go to next multi-media file
REV.
Fast rewind
FWD.
Fast forward
POWER PAUSE
Power On/Off selection Temporarily stop a file being played
NTSC/PAL STOP/QUIT
Switch among Multi, NTSC & PAL Stop displaying or playing file
video systems PLAY
AUDIO File playback
Switch among available audio ENTER
channels Confirm the selection being made
SETUP REPEAT
Activate setup menu Select between Repeat On / Off
ZOOM ON/OFF MUTE
Activate or deactivate the zooming Turn volume on or off
function
MUSIC S. SHOW Move selection bar up
This function allows user to display
photo images with JPEG format during Move selection bar down
playback of MP3 files.
SLIDE SHOW Move selection bar to the left
Display Jpeg files with 14
transitional effects Move selection bar to the right
THUMBNAIL VOL.+
Display pictures in either Volume increase
2 x 2 matrix or VOL.-
3 x 3 matrix Volume decrease
Erase typos when key in new folder’s name
z Display meta datum of the file that is currently
played
z Press to show the functions of COPY, DELETE,
RENAME, NEW FOLDER, PROPERTIES &
CANCEL in STOP mode while FILE LIBRARY
activated
Press to change the interval time of pictures during
slide show
5
Page 11

MAKING CONNECTION
1. CONNECT TO PC
USB Cable
Recommended PC operating systems
include NT/2000/XP SP1 & SP2
When connected to PC, this player can act as two external memory storage devices; the
stored contents can be easily updated by taking the following steps:
- Connect player with built-in H.D.D. to PC through USB cable, Windows Explorer will
show two new devices
- Through USB 2.0 interface, files can be downloaded from PC to CF card or built-in
2.5” H.D.D.
- Duplicate your desired files from PC to CF card &/or 2.5” H.D.D.
2. CONNECT TO PEN DRIVE
A/V files can be easily duplicated to player by using pen drive, before doing so, it is
required to have a small computer program (OTG-Smart) resided in it. Below are
complete step-by-step instructions to set up pen drive for files duplication:
6
Page 12

Unzip software to pen drive
A1. Insert pen drive into computer’s USB port
A2. Place CD into CD-ROM drive; unzip & extract the file (OTG-SMART) from
CD-ROM to pen drive
A3. Two files, OTGDOS & OTGENG are extracted to pen drive
Create folder in pen drive
B1. Execute OTGDOS by double-click its icon to enter DOS mode
B2. In DOS mode, a folder can be created in pen drive by key in
“otgenc idi_otg.sys xxxxxxxx” & press [ENTER]. xxxxxxxx can be any name
given to this newly created folder. Name of this folder can be any combination of
digits & alphabets; & make sure it doesn’t exceed 8 characters.
B3. New folder with the name just given can be seen in pen drive.
Duplication of audio, video & photo files
C1. Duplicate selected audio, video & photo files from computer to pen drive.
C2. Remove pen drive from computer’s USB port & insert it into USB OTG port of the
player, contents (meaning files not folders) in pen drive will be automatically
duplicated to H.D.D., or to CF card in case H.D.D. is not installed. In case
multiple virtual hard disk drives are existed, contents for sure will be downloaded
into the first virtual drive partitioned.
C3. During duplication of files, red LED is rapidly flashing. When duplication job is
done, both red & green LEDs light up to indicate that pen drive can be removed
from player for reboot. New contents are now played after reboot. Please note,
before duplication taken place, previous contents in CF card will be totally erased
first, but previous contents in HDD will be kept.
What to do when error occurs during files duplication
D1. Slowly-flashing green LED indicates error occurred during duplication. In this
case, turn off the power, remove pen drive, check the presence of H.D.D. & CF
card, & turn power back on to reboot the player.
D2. After reboot, only previous contents of H.D.D. will be played automatically.
Contents (meaning files not folders) in CF card might be totally erased already.
D3. Starting from C1 to redo files duplication.
7
Page 13

3. CONNECT TO DISPLAY UNIT
- This device performs as multi media player when connected to display through A/V
cables &/or S-Video cable.
- This player can simultaneously output two video signals to two displays through
S-Video & video connectors, however only one set of audio output connector is
available; in case of need, audio splitter (not included in package contents) can be
used to improve the connectivity.
- This player won’t play any audio, video & photo contents while PC &/or pen drive
are connected.
- The player will automatically play audio, video & photo files in numerical &/or
alphabetical order of play list when power is on.
8
Page 14

OPERATE THE PLAYER WITH RC & OSD MENU
OSD operation procedures are as below; remote control is required when this device is
used as a player instead of USB storage device:
- Create new folder
With FILE LIBRARY activated & in STOP mode, press [DISPLAY] key on remote
to activate sub menu with COPY, DELETE, RENAME, NEW FOLDER,
PROPERTIES & CANCEL functions; select NEW FOLDER & press [ENTER] key
to activate virtual keyboard. Use [], [], [], [] & [ENTER] keys to input the
name of new folder; press [CLEAR] key on remote or move cursor to ERASE
option on OSD & press [ENTER] key to erase typos. After finish naming job;
press [ENTER] key or move cursor to OK on OSD & press [ENTER] key to
complete this naming procedures. In case user decides not to create new folder
during the new-folder-creating process, simply move cursor to CANCEL & press
[ENTER] key, all process are stopped & return to FILE LIBRARY.
- Slide show with one particular folder
A. In SETUP MENU, select SLIDESHOW SETUP, press [ENTER] key to go into
sub menu; move cursor to FOLDER REPEAT, press [ENTER] key after cursor
has been moved onto OFF
option, & exit SETUP MENU.
B. In FILE LIBRARY, move cursor to particular folder that is to be played
repeatedly & press [ENTER] key, in the selected folder, move cursor to any
photo file, press [ENTER] key to start playback; press [REPEAT] key on
remote until “FOLDER REPEAT ON” shown on screen.
- Music slide show
Press [THUMBNAIL] key on remote & move cursor to any pic. Press [ENTER]
key to start playback of all photos both in CF card & H.D.D. During playback,
press [MUSIC SLIDESHOW] key on remote, all music files stored in CF card & in
H.D.D. are played.
- Rotate photos
In SETUP MENU; moves cursor to SLIDESHOW SETUP & press [ENTER] key to
go into sub menu. Move cursor to SLIDESHOW MODE & press [ENTER] key on
MANUAL
, then exit SETUP MENU. Press [THUMBNAIL] key on remote to start
playback of photo files, use [], [], [] & [] keys to rotate preferred photo.
After reboot the player, all rotated photos will resume their original positions.
- Zoom photos
Press [ZOOM ON/OFF] key to activate this function during slide show, use [] &
[] keys to select zoom ratio among 50%, 100%, 200%, 300% & 400%. Use [],
[], [] & [] keys to adjust the position of photo for detailed viewing.
9
Page 15

- Copy file
Press [DISPLAY] key to activate sub menu while FILE LIBRARY is on, move
cursor to COPY & press [ENTER] key to go into COPY MODE.
A. On right side of OSD, move cursor to destined folder & press [ENTER]
key.
B. On left side of OSD, move cursor to the file that is to be copied & press
[ENTER] key, file now is automatically copied to destined folder.
“FINISH” appears on upper left corner of screen to indicate copy job is
done. Press [STOP] key to exit COPY MODE. Please note that only
one file can be copied every time.
- Delete file
Press [GOTO] key to enter FILE LIBRARY, move cursor to the file that is to be
deleted, press [DISPLAY] key to activate sub menu, move cursor to DELETE
press [ENTER] key, a dialogue appears asking YES
press [ENTER] key to delete the file. Please note that folder can not be deleted
this way.
- Rename file
Press [GOTO] key to enter FILE LIBRARY, move cursor to the file that is to be
renamed, press [DISPLAY] key to activate sub menu, move cursor to RENAME
press [ENTER] key on remote to activate virtual keyboard, use [], [], [], [] &
[ENTER] keys to key in name of file; use [CLEAR] key on remote or ERASE on
OSD to erase typos. When file renaming is completed, move cursor to OK
OSD & press [ENTER] key to complete this process.
- Volume adjustment
Use [Vol. +] or [Vol. –] key to increase or decrease the volume.
or NO, move cursor to YES &
&
&
on
10
Page 16

DEVICE SETTINGS
Functions of player can be adjusted thru the use of OSD menu, press [SETUP] key on
remote to activate SETUP MENU; five major functions are available in main page that
include SLIDESHOW SETUP, PHOTO SETUP, MOVIE SETUP, PREFERENCES &
EXIT.
SLIDESHOW SETUP
SETUP MENU – MAIN PAGE
SLIDESHOW SETUP
PHOTO SETUP
MOVIE SETUP
PREFERENCES
Move cursor to SLIDESHOW
SETUP, press [ENTER] key on
remote, sub menu appears for
selection.
VERSION A4060614C
EXIT
1. SLIDESHOW MODE
SETUP MENU – PHOTO SLIDESHOW
SLIDESHOW MODE
FOLDER REPEAT
INTERVAL TIME
TRANSITION
MANUAL
AUTO
Move cursor to SLIDESHOW
MODE, press [ENTER] key on
remote, sub menu appears for
selection.
MAIN PAGE
SETUP MENU – PHOTO SLIDESHOW
MANUAL: Photo can be rotated during slide show when MANUAL is selected; but slide
show stops at the photo that is rotated.
AUTO: Photo can be rotated during slide show when AUTO is selected; & slide
show continues after rotating photo.
11
Page 17

2. FOLDER REPEAT
SETUP MENU – PHOTO SLIDE SHOW
SLIDESHOW MODE
FOLDER REPEAT
INTERVAL TIME
TRANSITION
ON
OFF
Move cursor to FOLDER
REPEAT, press [ENTER] key on
remote, sub menu appears for
selection.
MAIN PAGE
FOLDER REPEAT
ON: When selected, all files (regardless of which folder they are in) will be played
repeatedly.
OFF: When selected, all files will be played only one time.
3. INTERVAL TIME
SETUP MENU – PHOTO SLIDE SHOW
SLIDESHOW MODE
FOLDER REPEAT
INTERVAL TIME
TRANSITION
MAIN PAGE
ONE SECOND
THREE SECONDS
FIVE SECONDS
TEN SECONDS
Move cursor to INTERVAL
TIME, press [ENTER] key on
remote, sub menu appears for
selection.
INTERVAL TIME
During slide show, each photo will appear for 1, 3, 5 or 10 seconds depends on the
selection made.
12
Page 18

4. TRANSITION
SETUP MENU – PHOTO SLIDE SHOW
SLIDESHOW MODE
FOLDER REPEAT
INTERVAL TIME
TRANSITION
MAIN PAGE
TRANSITION
FULL SCREEN
TOP → BOTTOM
BOTTOM → TOP
T/B → CENTER
CENTER → T/B
BLIND: T → B
LEFT → RIGHT
RIGHT → LEFT
Move cursor to TRANSITION,
press [ENTER] key on remote,
sub menu appears with 14
transitional effects to choose
from.
14 transitional visual effects are available; the selected visual effect will appear between
photos during slide show.
5. MAIN PAGE
SETUP MENU – PHOTO SLIDE SHOW
SLIDESHOW MODE
FOLDER REPEAT
INTERVAL TIME
TRANSITION
Move cursor to MAIN PAGE,
press [ENTER] key on remote &
return to main page.
MAIN PAGE
BACK TO MAIN PAGE
Select this item to go back to Main Page.
13
Page 19

PHOTO SETUP
SETUP MENU – MAIN PAGE
SLIDESHOW SETUP
PHOTO SETUP
MOVIE SETUP
PREFERENCES
Move cursor to PHOTO SETUP,
press [ENTER] key on remote,
sub menu appears for selection.
VERSION A4060614C
EXIT
1. DIGEST STYLE
SETUP MENU – PHOTO
DIGEST STYLE
MAIN PAGE
2 X 2 MATRIX
3 X 3 MATRIX
Move cursor to PHOTO SETUP,
press [ENTER] key on remote,
sub menu appears for selection.
SETUP MENU – PHOTO
2 x 2 MATRIX: 4 pictures will appear simultaneously on screen.
3 x 3 MATRIX: 9 pictures will appear simultaneously on screen.
14
Page 20

MOVIE SETUP
SETUP MENU – MAIN PAGE
SLIDESHOW SETUP
PHOTO SETUP
MOVIE SETUP
PREFERENCES
VERSION A4060614C
EXIT
1. REPEAT MODE
SETUP MENU – MOVIE
REPEAT MODE
DIGEST STYLE
MAIN PAGE
SINGLE
ONE LOOP
CONTINUOUS
SETUP MENU – MOVIE
SINGLE: Play one movie file & stop
ONE LOOP: Play all movie files once & stop
CONTINUOUS: Play all movie files repeatedly
15
Move cursor to MOVIE SETUP,
press [ENTER] key on remote,
sub menu appears for selection.
Move cursor to REPEAT MODE,
press [ENTER] key on remote,
sub menu appears for selection.
Page 21

2. DIGEST STYLE
SETUP MENU – MOVIE
REPEAT MODE
DIGEST STYLE
MAIN PAGE
Move cursor to DIGEST STYLE,
press [ENTER] key on remote,
sub menu appears for selection.
2 X 2 MATRIX
3 X 3 MATRIX
SETUP MENU – MOVIE
2 x 2 MATRIX: 4 preview windows are shown simultaneously, but only one of them
can be in motion.
3 x 3 MATRIX: 9 preview windows are shown simultaneously, but only one of them
can be in motion.
PREFERENCES
SETUP MENU – MAIN PAGE
SLIDESHOW SETUP
PHOTO SETUP
MOVIE SETUP
PREFERENCES
Move cursor to PREFERENCES,
press [ENTER] key on remote,
sub menu appears for selection.
GOTO PREFERENCE PAGE
EXIT
16
Page 22

1. TV DISPLAY
-- PREFERENCES PAGE --
TV DISPLAY
TV TYPE
OSD MESSAGE
SCREEN SAVER
SETUP VALUES
NORMAL / PS
NORMAL / LB
WIDE
Move cursor to TV DISPLAY,
press [ENTER] key on remote,
sub menu appears for selection.
MAIN PAGE
SET PREFERENCES
NORMAL / PS: With wide screen film, select this option to crops off the edges.
NORMAL / LB: With wide screen film, black bars appear on both top & bottom of
screen while entire image is preserved.
WIDE : When selected, full screen image is shown with wide screen film.
2. TV TYPE
-- PREFERENCES PAGE --
TV DISPLAY
TV TYPE
OSD MESSAGE
SCREEN SAVER
SETUP VALUES
Move cursor to TV TYPE, press
[ENTER] key on remote, sub
menu appears for selection.
MULTI. SYSTEM
NTSC
PAL
MAIN PAGE
SET TV STANDARD
Video output can be switched among Multi, NTSC and PAL video systems, if incorrect
video system is selected, the display will either flicker or show no image. In this case,
go through the other choices until you have selected the correct video system.
17
Page 23

3. OSD MESSAGE
-- PREFERENCES PAGE --
TV DISPLAY
TV TYPE
OSD MESSAGE
SCREEN SAVER
SETUP VALUES
Move cursor to OSD MESSAGE,
press [ENTER] key on remote,
sub menu appears for selection.
ON
OFF
MAIN PAGE
OSD MESSAGE
To show or to hide the OSD message on screen.
4. SCREEN SAVER
-- PREFERENCES PAGE --
TV DISPLAY
TV TYPE
OSD MESSAGE
SCREEN SAVER
SETUP VALUES
Move cursor to SCREEN
SAVER, press [ENTER] key on
remote, sub menu appears for
selection.
ON
OFF
MAIN PAGE
SCREEN SAVER SETTING
ON: DVD Video logo scrolls on screen when player is in STOP mode for more
than one minute.
OFF: Turn this function off.
18
Page 24

4. SETUP VALUES
-- PREFERENCES PAGE --
TV DISPLAY
TV TYPE
OSD MESSAGE
SCREEN SAVER
SETUP VALUES
Move cursor to SET VALUES,
press [ENTER] key on remote,
sub menu appears for selection.
DEFAULT
MAIN PAGE
SET VALUES
DEFAULT: Reset the player back to its original factory settings.
19
Page 25

FILE LIBRARY & DEVICE LIBRARY
DEVICE
MPEG2
MPEG4
MUSIC
PHOTO
SPRING BREAK
SUMMER VOCATION
MERRY X’MAS
Folder: ROOT HD1 000 / 007
All folders and files
in both CF card and
H.D.D. are shown in
this area.
FILE LIBRARY
Meta Datum of the
file being played is
shown in this area.
File preview window
This FILE LIBRARY can be activated by pressing [GOTO] key on remote, & it must be
accessed for the following purposes:
1. To select a file to start playback.
2. Gain access to the sub menu of COPY, DELETE, RENAME, NEW FOLDER,
PROPERTIES & CANCEL functions.
3. On left hand side of OSD, move cursor to DEVICE & press [ENTER], DEVICE
LIBRARY appears as below.
CF
HD1
HD2
HD3
HD4
DEVICE LIBRARY
SELECT DEVICE AND
PRESS ENTER KEY TO
CONFIRM
Even though only one physical
H.D.D. can be installed into the
player, but device library will
show as many drives as the
physical H.D.D. has been
partitioned to.
20
Page 26

21
Page 27

Page 28

AUM-0014-XX-27370721
 Loading...