

Page 1
FT 053
Spruce Peak
18’x12’ 96’’(H)
IMPORTANT
We strongly suggest setting up your new tent before going camping to insure
that all parts are present and to familiarize yourself with the tents assembly.
This will have a great effect on how well you enjoy your camping trip.
Manufactured in our state of the art factory in China
Page 2
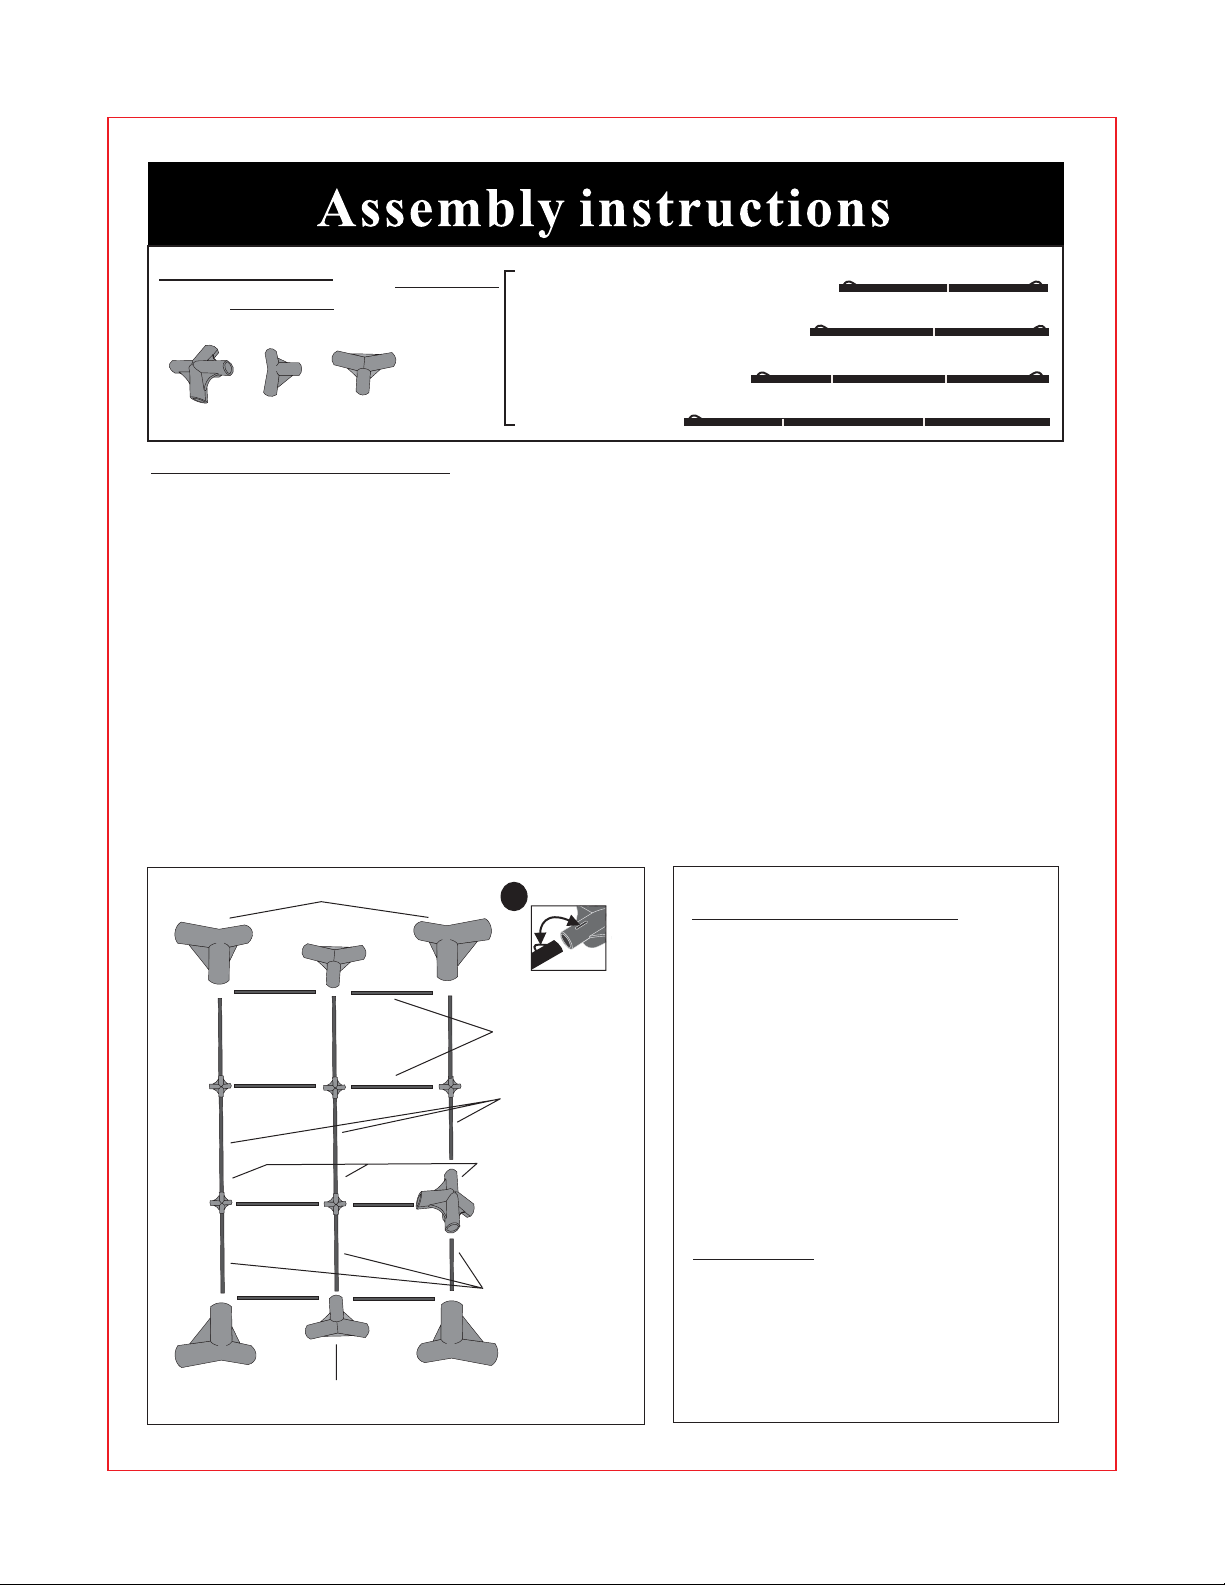
Frame Parts
Pole Hubs
Center
Eave
Gable
Steel Poles
Gable Pole (X 8)
Short Ridge Pole (X 6)
Long Ridge Pole (X 3)
X6
X4 X2
Leg Pole (X 8)
Step 1- TENT SET UP
1) Lay out the tent body and rain fly.
2) Fully open all of the poles and sort them according to length.
3) Remove the hubs from the tent bag and separate the different styles.
4) Assemble the top of the frame according to the diagram below. Pay special attention to
the EAVE hubs and be sure to insert the poles in the correct place.
locking springs snap into the slots on the hubs (Figure A).
5) The poles go in the center of the frame according to the diagram below.
6) Join the ridge sections using the poles.
LONG RIDGE
GABLE
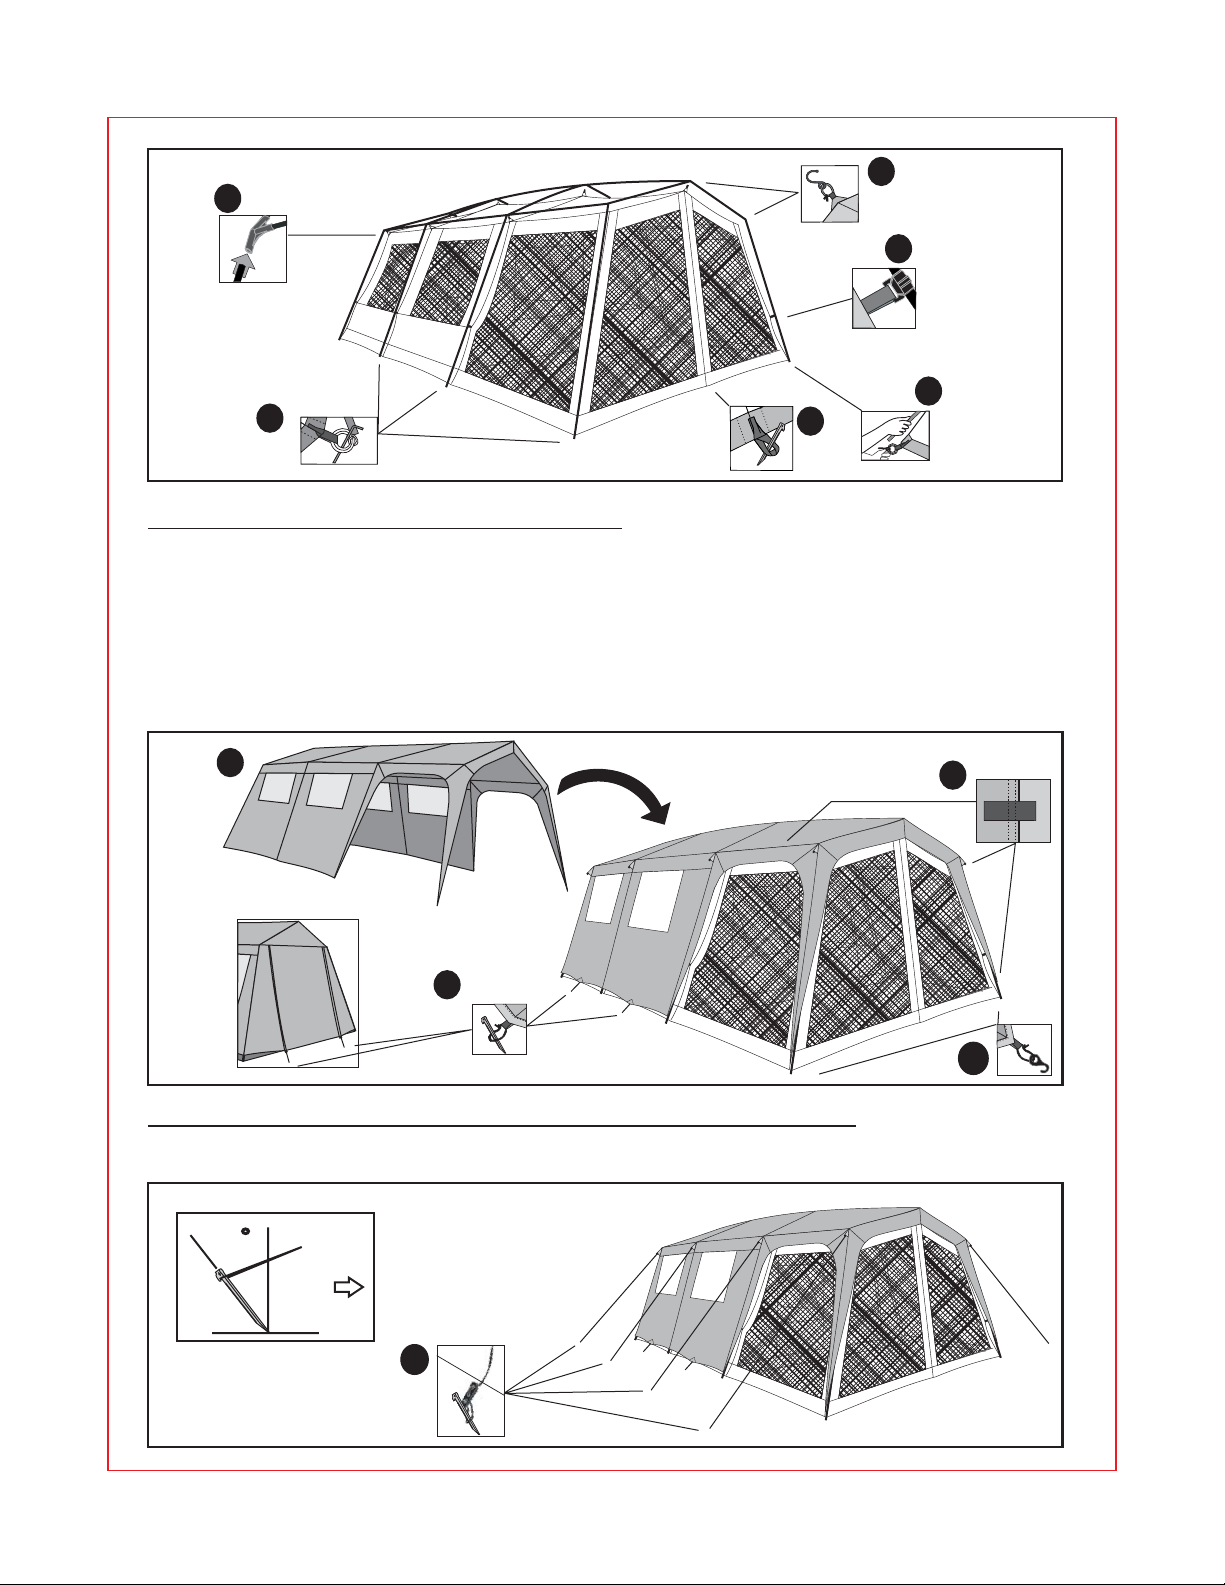
7) Attach the tent body to the inside of the hubs using the hooks attached to the tent roof
(Figure B)
8) Starting with one side insert the end of the pole with the locking spring into the hubs
(Figure C)
.
LEG
. Repeat for the opposite side.
9) Insert the pins located on a metal ring at the bottom of the tent into the ends of the
poles .
(Figure D)
10) Attach the pole clips along the sides of the tent to the poles .
LEG (Figure E)
11) Stake down the tent by staking through the metal rings at the bottom of the poles
(Figure F)
making sure the tent floor is tight.
Eave Hubs
Gable Hubs
A
Gable Poles
Long
Ridge
Poles
Center Hubs
Short Ridge
Poles
IMPORTANT TIPS
The Spruce Peak Rainfly and
Poles may be set up without
using the tent body. Follow the
instructions above but ignore
steps 7 and 9-11. Instead from
step 8 you will follow the steps
on the next page for ATTACHING
the RAINFLY only you will not be
attaching the hooks on the rain fly
to the metal rings you ll be hooking
the fly directly to the end of the LEG
POLE. You will then stake DIRECTLY
through the elastic holding the fly
to the tent.
IMPORTANT
method will ONLY work on dirt or
grass DO NOT set up on concrete
or asphalt as damage will occur to
the hooks. It is also important to
follow the instructions on staking
in WINDY CONDITIONS.
NOTE make sure that the
LEG
LEG
this set up
Page 3
B
C
E
D
F
F
Step 2- ATTACHING the RAIN FLY
1)
Drape the rain fly over the frame making sure that the cutout section is over the screen
(Figure G) NOTE this will be easier with 2 people.
room .
2) (Figure H)
Attach the Velcro located on the inside of the rain fly to the tent poles .
3) (Figure I)
Attach the rain fly to the metal rings using the hook and bungee supplied .
4) (Figure J) NOTE avoid
Stake out the bungee loops on the sides and the rear of the tent .
putting too much stress on the zipper opening in the rear of the tent. IMPORTANT TIP
the rear zipper opening in the fly can be rolled up for more ventilation or used as an
awning.
G
REAR of tent
H
INSIDE
J
I
Step 3- EXTRA STABILITY in WINDY CONDITIONS
15) (FIGURE K)In windy conditions use the extra stakes and guylines to add extra stability .
Stake placement
40
Tent
K
Page 4

Frame Parts
ModelFT053
Pole Hubs
Center
Eave
Gable
Steel Poles
Gable Pole
Short Ridge Pole
Long Ridge Pole
Leg Pole
Misc. Parts
Tent Body
Qty
6
4
2
Qty
8
6
3
8
Qty
1
Rain Fly
Tent Bag
Pole Bag
Stake Bag
Fly Bungee w/ hook
Pin & Ring
Guylines
Bungee Loops for Fly
1
1
1
1
8
8
16
Rain Fly
8
Page 5

Tips and Tricks
There are many different ways to set up your Spruce Peak tent,
experiment with several different methods and stick to the one that is
easiest for you.
While the rain fly and poles can be set up without the tent body you
can also take the tent body down and fold it up while leaving rain fly
and poles set up. This will keep the tent body dry if it is raining out.
The sides and rear of the tent can be rolled up for additional
ventilation use spring clips found in most home centers to hold the
sides up. Be sure to roll the sides down at night and before any rain or
winds.
To speed set up you might consider marking the different poles with
colored tape or paint to better distinguish the different pole types.
Care
Ultra Violet (UV) Exposure
Your tent is made of UV resistant polyester fabric
which is resistant but NOT impervious to the
damaging effects of long term sun exposure. We DO
NOT suggest long term set up of ANY of our
products as this will severely damage the tent
fabric.
Seam Sealing
Gigatent suggests that at a MINIMUM the seams
at the bottom of the windows should be sealed
using a product like McNetts Seam Sure to prevent
moisture from coming through the needle holes.
Follow the manufacturer's instructions when
applying seam sealer.
Storage
DO NOT under any circumstances store your tent
wet or damp. Mildew will quickly destroy a tents
waterproof coating.
Allow your tent to dry and then store in a cool dry
place.
Structural Integrity
Although the tent was constructed to rigid
specifications periods of wind and soaking rain
may loosen the stakes and guylines to the point of
allowing the rainfly to flap. This can in turn cause
the poles to loosen weakening the overall
structure. Loosening of the rainfly can also create
pockets that can collect water which can lead to
pole failure. To insure that this does not occur take
care during windy or rainy conditions that all of
the stakes and guylines are secure and tight.
WashingYour Tent
NEVER machine wash a tent as this can cause
damage to the waterproof coating. Hand wash with
a mild soap and rinse with clean water and allow to
COMPLETELY dry before storing. An extremely
dirty tent can be set up and washed like a car or it
can be washed in a bathtub using your hands to
agitate the water or a soft brush.
Page 6

Thank you for purchasing a quality product from GIGATENT.
This troubleshooting guide is designed to help you sort out some of the possible
problems you might encounter with your new tent.
If you are still having problems with your purchase please contact us at
973-709-1111 or email us at info@gigatent.com
Condensation is caused by lower temperatures outside the tent which
causes moisture vapor from humidity inside the tent and sleepers respiration
Condensation
Mildew
to form water droplets on the walls and is mostly is visible in the corners. To
prevent this from happening keep all objects away from the walls and open up
windows to allow the moisture to escape
To avoid mildew which can damage a tents waterproofing be sure to never
store your tent damp or worse wet. If mildew occurs you can use a product
such as McNett Mirazyme to clean your tent or you can use a simple 50/50
solution of Lemon Juice Concentrate and water to wash the area. After this
you will want to wash the area with soap and water and then let it dry
COMPLETELY before storing.
Tears or small
holes
Zipper
Problems
Seam
Leakage
Tears and small holes can be fixed temporarily by using an adhesive patch kit
found in most Camping Stores. For long term patches it is best to bring your
tent to a repair facility or for minor repairs you can use Seam Grip sold by the
McNett company. Simply follow the instructions on the package and this will
provide a durable permanent patch.
Zippers have 2 parts, the slider which is the part that opens and closes the
zipper, and the zipper teeth. What normally happens is the zipper separates
behind the slider if this occurs carefully move the slider back past the
separation and rezip. If this fails to fix the problem you may require a new
zipper slider or a new complete zipper. Please call us and we can recommend a
shop that will be able to fix it for you.
Seams can leak through the needle holes so applying a product such as McNett
Seamsure to your tent before going camping is the best thing to do. We have
seam sealed the rainfly for you but as a minimum we suggest sealing the seam
along the base of all of the windows as this is the most likely place for leakage.
Page 7

Warning
Page 8

 Loading...