

GIGASONIC SMART User Manual
Your Ultimate Partner
With Innovative Design &
Long Communication Range
GIGASONIC
LLoonngg RRaannggee CCoorrddlleessss PPhhoonne
e
User Manual
SMART

TABLE OF CONTENTS
Introduction
Welcome……………………………………………………………………………………………………..4
Important Safety Information………………………………………………………………………………4
Unpacking Your System…………………………………………………………………………………...5
Optional Accessories……………………………………………………………………………………….6
Component Names and Functions
Base Unit…………………………………………………………………………………………………….7
Portable Handset……………………………………………………………………………………………8
Portable Handset Charger Stand ……………………….…….……………………………………… .…9
Installation
Base Unit……………………………………………………………………………………………………10
Portable Handset…………………………………………………………………………………………..11
Charger Stand ………………………...…………………………………………………………….…11-12
Batteries…………………………………………………………………….…………………………...12-13
Registering The Base Unit With The Portable Handset…………………………….………………….13
Basic Operation
Turning Your Phone On/Off………………………………………………………………………… ……14
Tone or Pulse Dialing……………………………………………………………………………… ….14-16
Tone
Pulse
Placing A Call………………………………………………………………………………………………16
Cellular Dial Mode
Normal Dial Mode
Answering A Call………………………………………………………………………… …………….16-17
Redialing Numbers………………………………………………………………………………………...17
Cellular Dial Mode
Normal Dial Mode
Advanced Operations & Features
Answering Options……………………………………………………………………………………...18-19
Auto Answer
Press “OK” Key Or Press Any Key To Answer A Call
Vibration
Audio Volume ……………………………………………………………………………………………...20
Speaker
Battery Low Alert ………………………………………………………………………………………20-21
Button Confirmation Tone………………………………………………………………………………...21
Call Transfer …………………………………………………………………………………………...21-22
Direct Transfer
Transfer After Talking to One Party
2

Caller ID – Data Bank……………………………………………………………………………….…22-24
Call Display
Visual Call Waiting
Viewing Caller ID Information
Dialing A Phone Number From The Caller ID Memory
Channels………………………………………………………………………………………………..25-26
Grouping
Set Number of Available Channels
Channel Scan (Scanning For A Free Channel) ……………………….……………………………...26
Dialing Options…………………………………………………………………….…………………...26-28
Call Restriction (Call Barr)
Flash Time
Pause Time
Energy Saving Feature………………………………………………………………………………… …28
Group Paging ……………………………………………………….…………………………………28-29
ID Exchange…………………………………………………………………….………………………….29
Intercom…………………………………………………………………………………………………29-30
Keypad Backlight………………………………………………………….……………………………30-31
Out of Range Alert………………………………………………………….………………………………31
Phone Book……………………………………………………………………..………………… …….32-35
Storing Names And Phone Numbers
Looking In The Phone Book
Deleting An Entry From The Phone Book
Making A Call While In The Phone Book Mode
Speed Dial
Power Output Level ………………………………………………………………………..…………. 35-36
Ringer……………………………………………………………………..……………………………...36-37
Ringer Melody
Volume Setting
Security……………………………………………………………………………………………..…..37-39
Set Password Feature On/Off
Set Password
Set Security Code
Key Lock
Talk Time Control………………………………………………………………………………………39-40
Voice Scramble…………………………………………………………………………………………40-41
Multiple Systems
Numbering Handsets………………………………………………………………………………………42
Set Line Number (CO#)…………………………………………………………………………… …..42-43
Placing A Phone Call…………………………………………………………………………………..43-44
Intercom……………………………………………………………………………………………………..44
Specifications…………………………………………………………………………………..45
Trouble shooting…………………………………………..…………………………………..46
3

INTRODUCTION
INTRODUCTION - Welcome
Thank you for purchasing our unique Long-Range wireless phone sy stem. To ensure that you optimize the full
capabilities of this product, please read this user’s manual before proceeding. Be sure to keep this manual for future
reference in case any problems or questions should arise. We hope you enjoy your new wireless phone system.
INTRODUCTION - Important Safety Information
When using your telephone equipment, basic safety precautions should always be followed to reduce the risk of fire,
electric shock and personal injury. Please read the following before using your equipment:
1. Read and follow all instructions carefully.
2. Follow all warnings and instructions o n the product.
3. Unplug the product from the host telephone equipment before cleaning. Do not use liquid cleaners or aerosol
cleaners. Use a damp cloth for cleaning.
4. Do not use this product near water.
5. Do not place this product on top of a metal surface. Do not place this product on an unstable cart, stand or
table.
6. Do not allow anything to rest on the power cords. Do not place this product in a location where the cords can
be stepped on or where someone can trip over them.
7. Do not use this product near an area where there is a potential of gas leaks or near any fumes that can be
explosive. If you notice that the equipment is being used in such a hazardous area, report this condition on a
telephone that is located in a safe location.
8. Do not place this equipment near or over a radiator or any other heat so urce.
9. Use ONLY the power adapter supplied with the system.
10. Do not overload the wall outlet or power cord where the power adapter is installed. This can result in fire or
electric shock.
11. This equipment is to be opened by ONLY a qualified serviceperson. There are no user serviceable parts
inside. Opening this equipment may expose you to dangerous voltage and other risks. Incorrect reassembly of
this equipment may result in electric shock.
12. Avoid spilling liquid on this equipment and do not insert any objects through the ventilation slots.
13. Avoid using this equipment during an electrical storm. There is a remote risk of electrical sh ock from lightning.
14. Do not use this equipment other than for its purpose intended by the manufacturer. Use ONLY the equipment
provided by the manufacturer.
15. Do not break open the batteries and do not dispose of them in fire. Dispose of batteries safely or contact your
local recycling center. Batteries contain corrosive materials that are dangerous to you and to the environment.
4
p
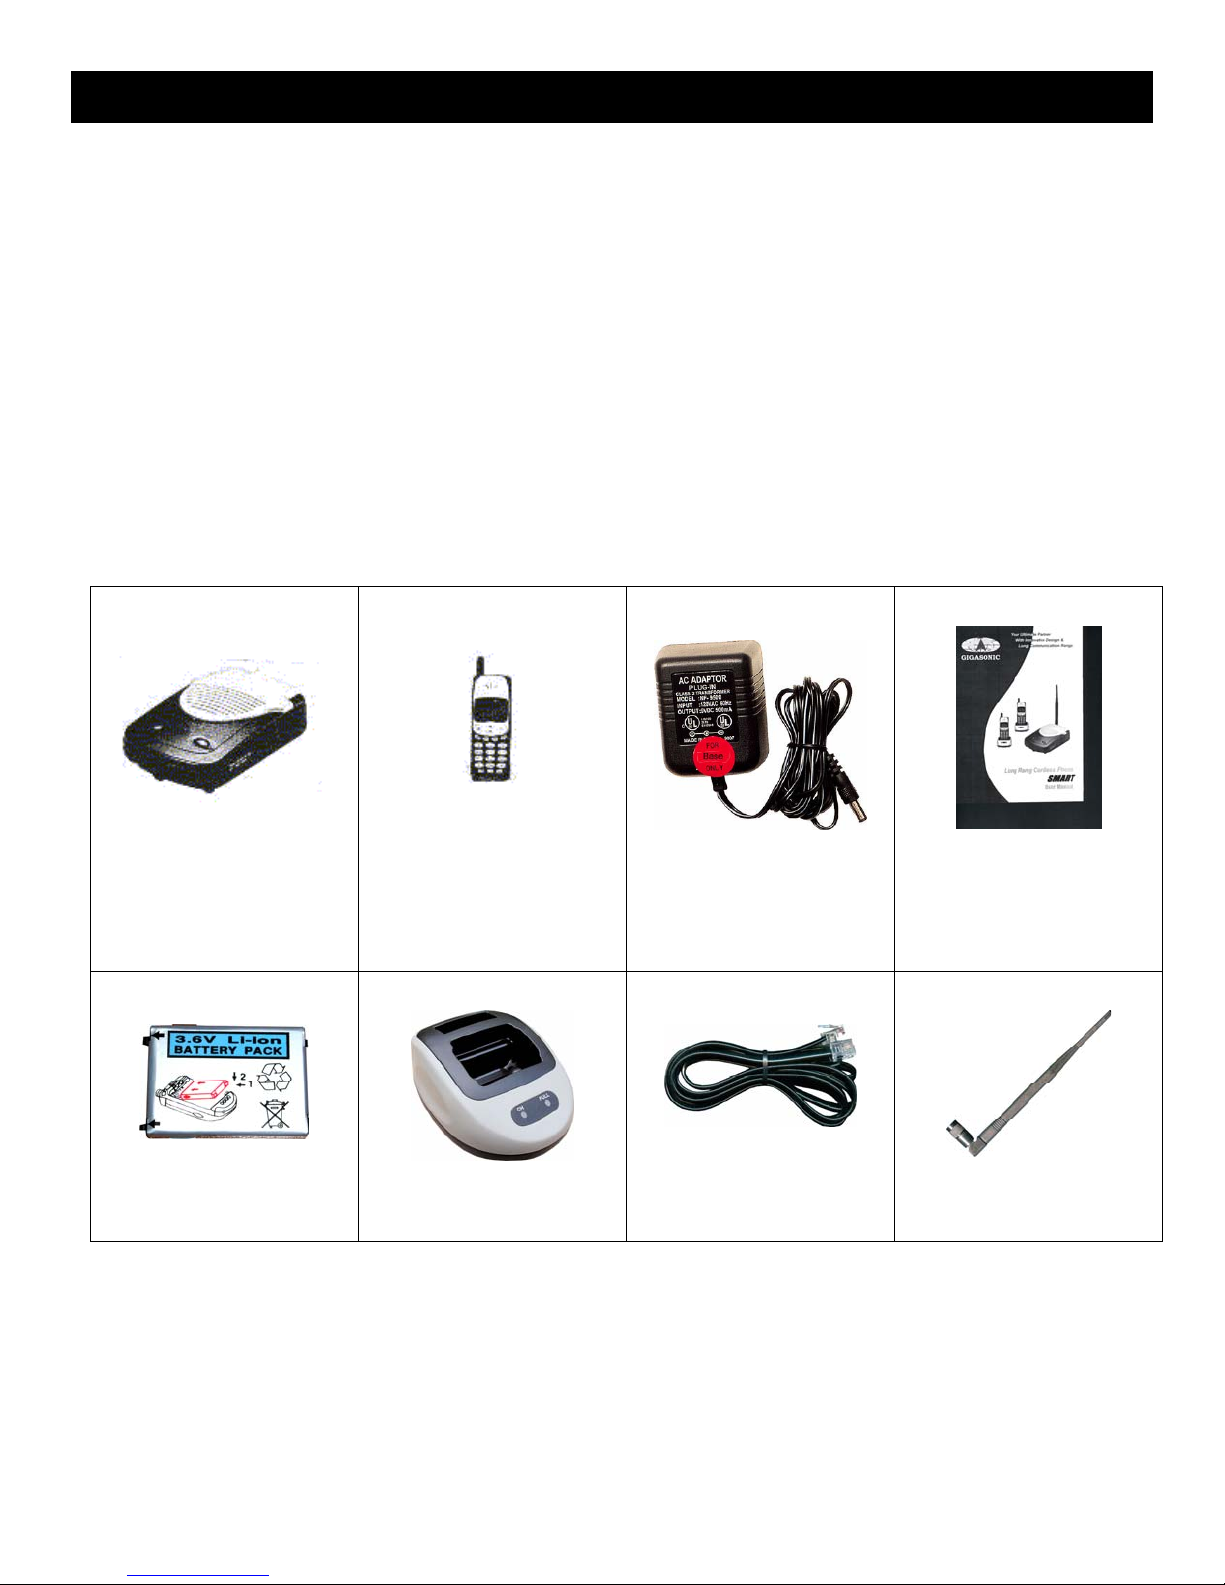
INTRODUCTION - Unpacking Your System
Your system will include the following equipment:
• 1 base unit
• 1 portable handset
• 1 power adapter for the base unit
• 1 desktop charger with power adapter
• 1 Li-ion battery pack
• 1 antenna for the base unit
• 1 telephone line
• 1 user’s manual
Base Unit
Portable
Handset
Battery Pack
Charger Stand
Power Adapter
for the Base Unit
User Manual
Tele
hone Line
Base Unit
Antenna
5
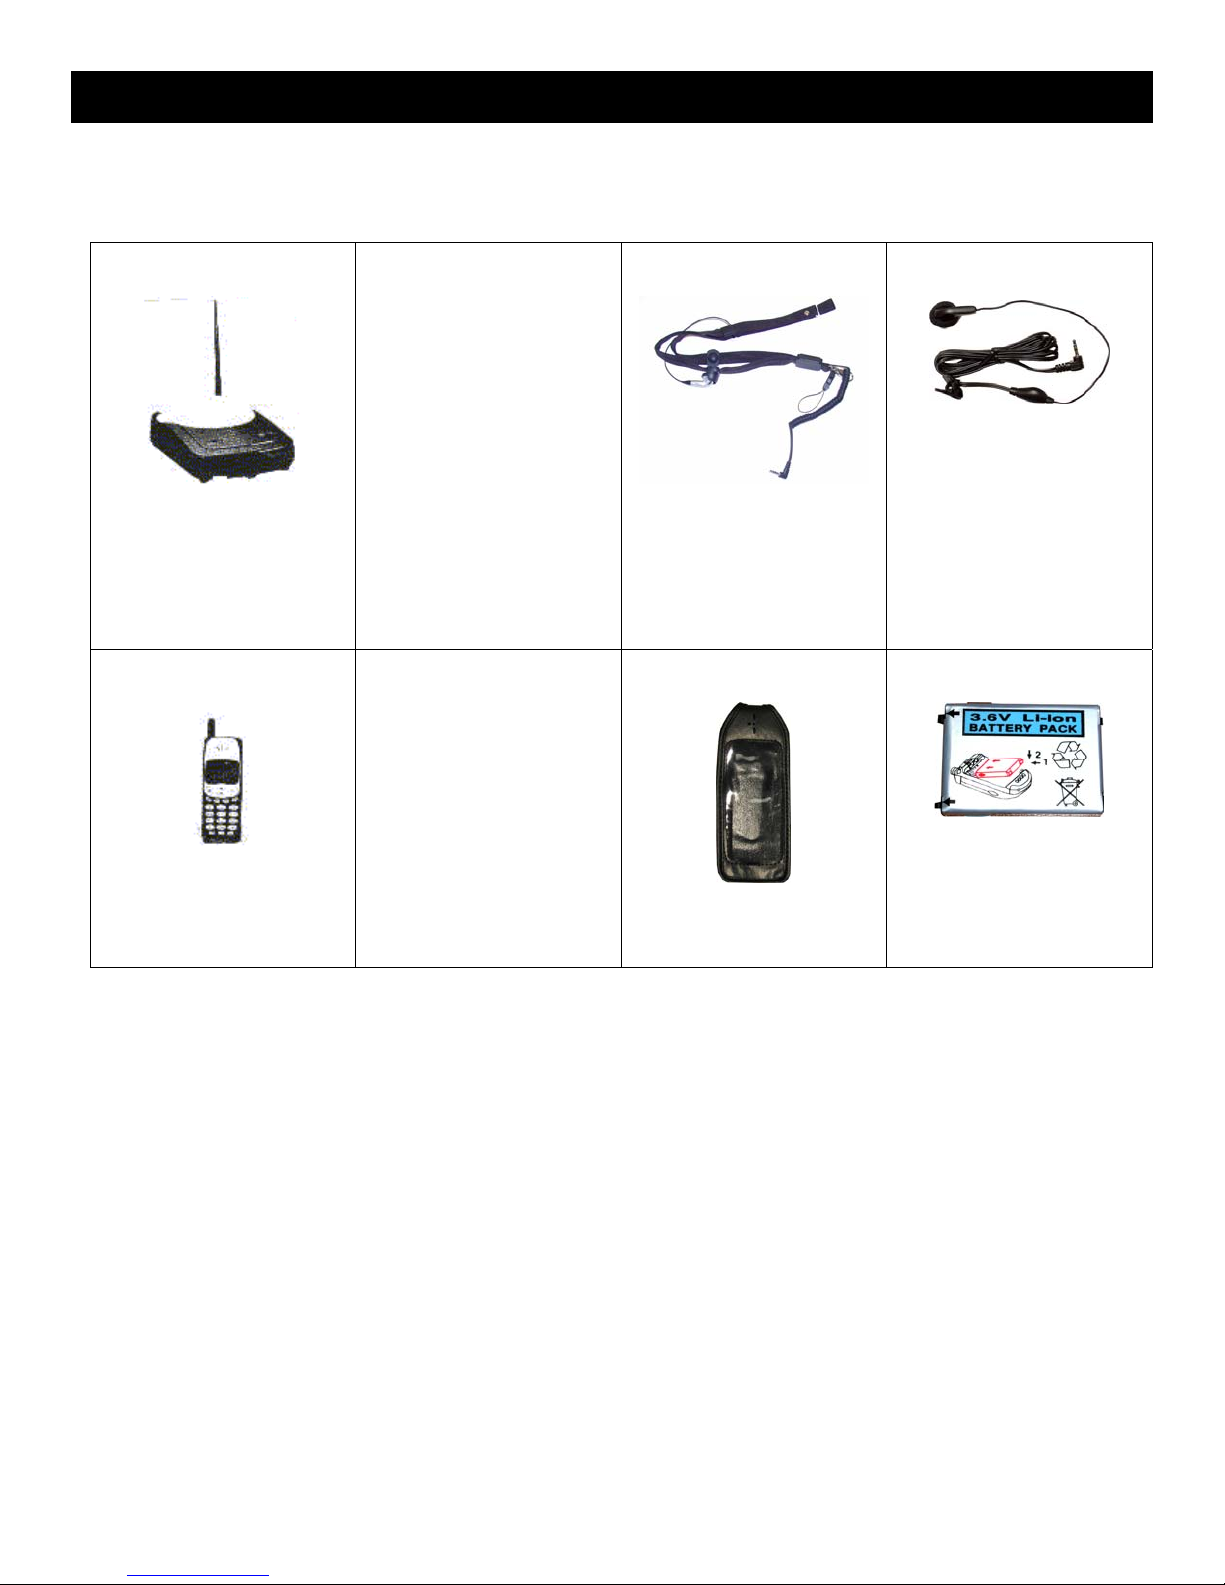
INTRODUCTION – Optional Accessories
The following are optional accessories available from Voyager to help you expand your syste m, improve your system’s
performance and to give you more flexibility.
Hands Free
Headset
Base Unit
Extra
Neck Carrying Strap
With Built-In Hands-
Free Headset
Extra
Handset
Handset
Leather Case
Extra Battery
Pack
6

COMPONENT NAMES AND FUNCTIONS
COMPONENT NAMES & FUNCTIONS - Base Unit
Base Unit
1. CO line jack
2. Telephone jack
3. DC power jack
4. Antenna jack
5. Microphone
6. P.I.V (Program/Intercom/Volume)
button
Program
Can be used to program the Base
Unit by pressing this button within
5 seconds after plugging in the
power adapter. (see Page 13)
Intercom
Can be used to page the Portable
Handset when the Base Unit is in
Stand-By condition. (see Page 29)
Volume
Can be used to increase or
decrease the volume when the
Base Unit is in In-Use condition.
(see Page 20)
7. “Power” /“In-Use” indicator
8. Speaker
7
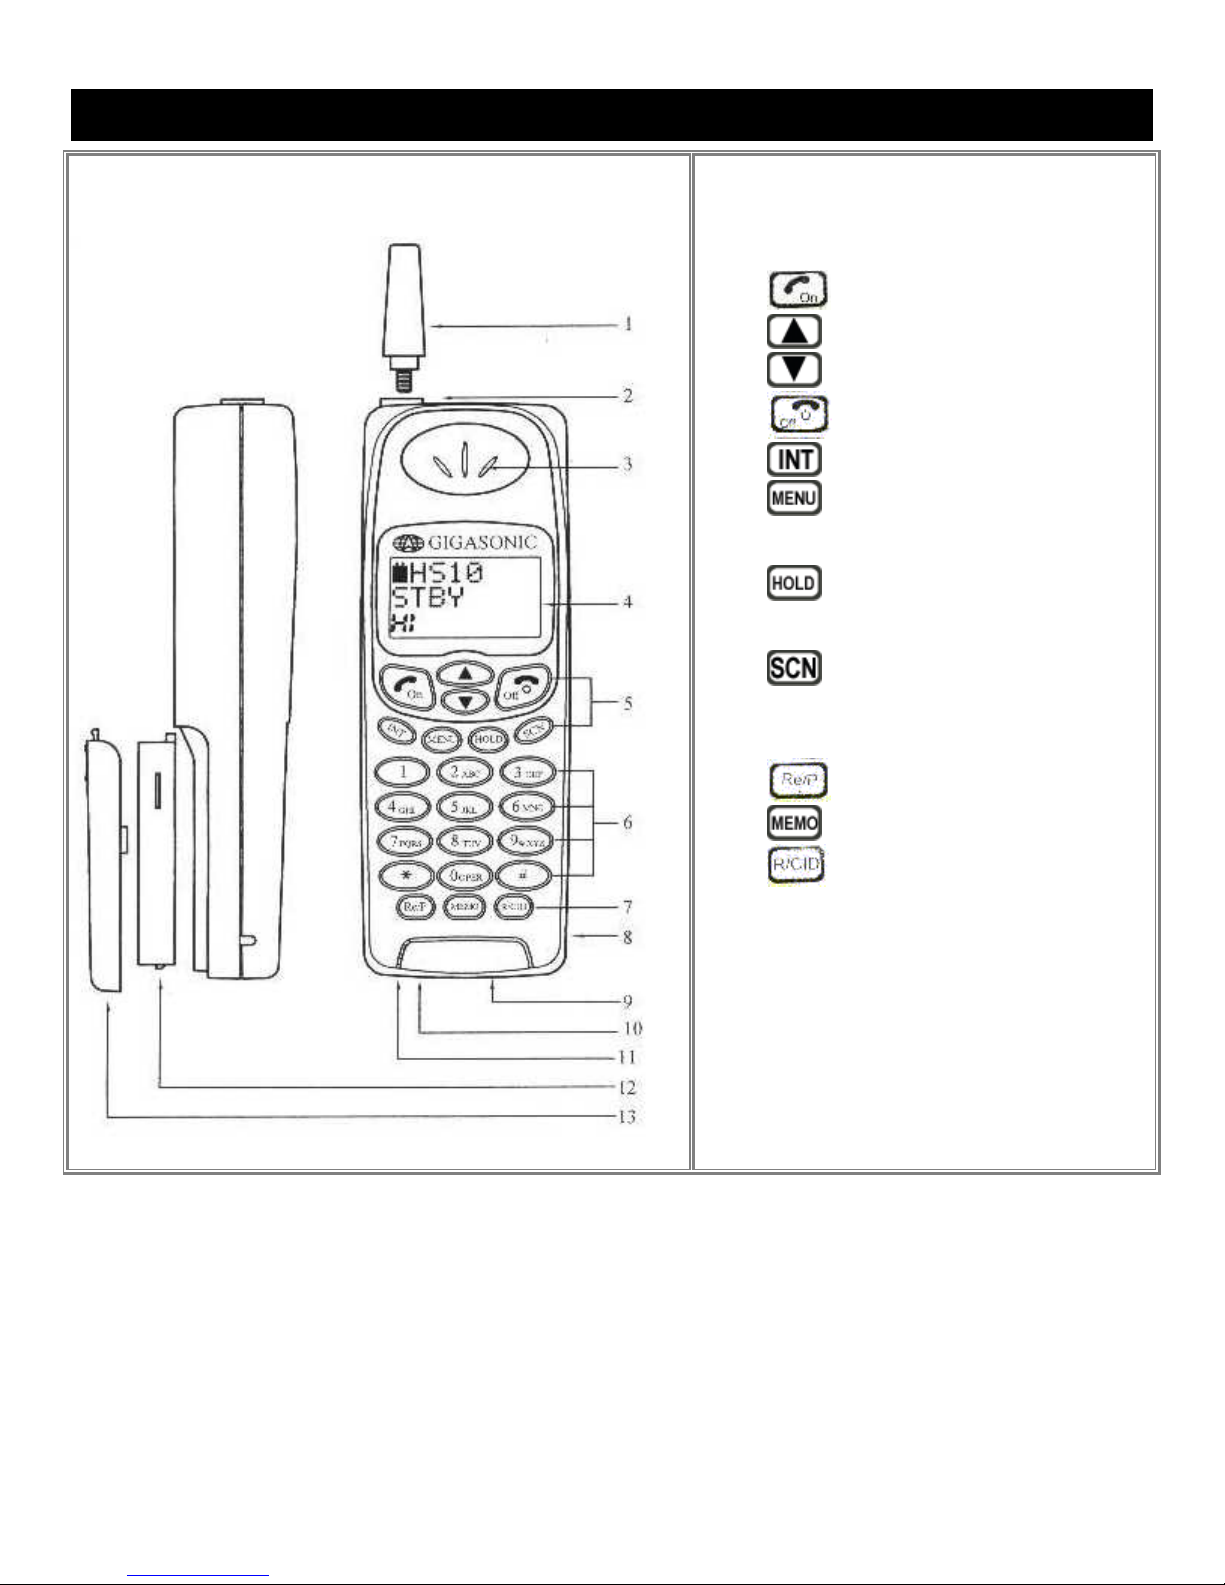
COMPONENT NAMES & FUNCTIONS - Portable Handset
Handset
1. Antenna
2. Antenna jack
3. Speaker
4. LCD display
5. Function buttons:
- Confirm / Send
Function key (while in Stand-By
adjust microphone sensitivity (while in
Standby mode)
talking) or select CO line # (while in
Stand-By mode)
6. Dialing keys
7.
(while talking) or back-space key
(while in Stand-By mode) or the
Emergency Key when using the Wireless
Door Phone System
8. Earphone jack
9. Charger jack (4.5V only)
10. Microphone
11. Buzzer
12. Battery (3.6V/900mA)
13. Battery cover
- Volume & Up button
- Volume & Down button
- Clear/End
- Intercom or transfer the call
- Voice Scramble (while talking) or
mode)
- Hold button (while talking) or
- Scan for free channel (while
- Redial/Pause key
– Store key
– Functions as the Flash key
8
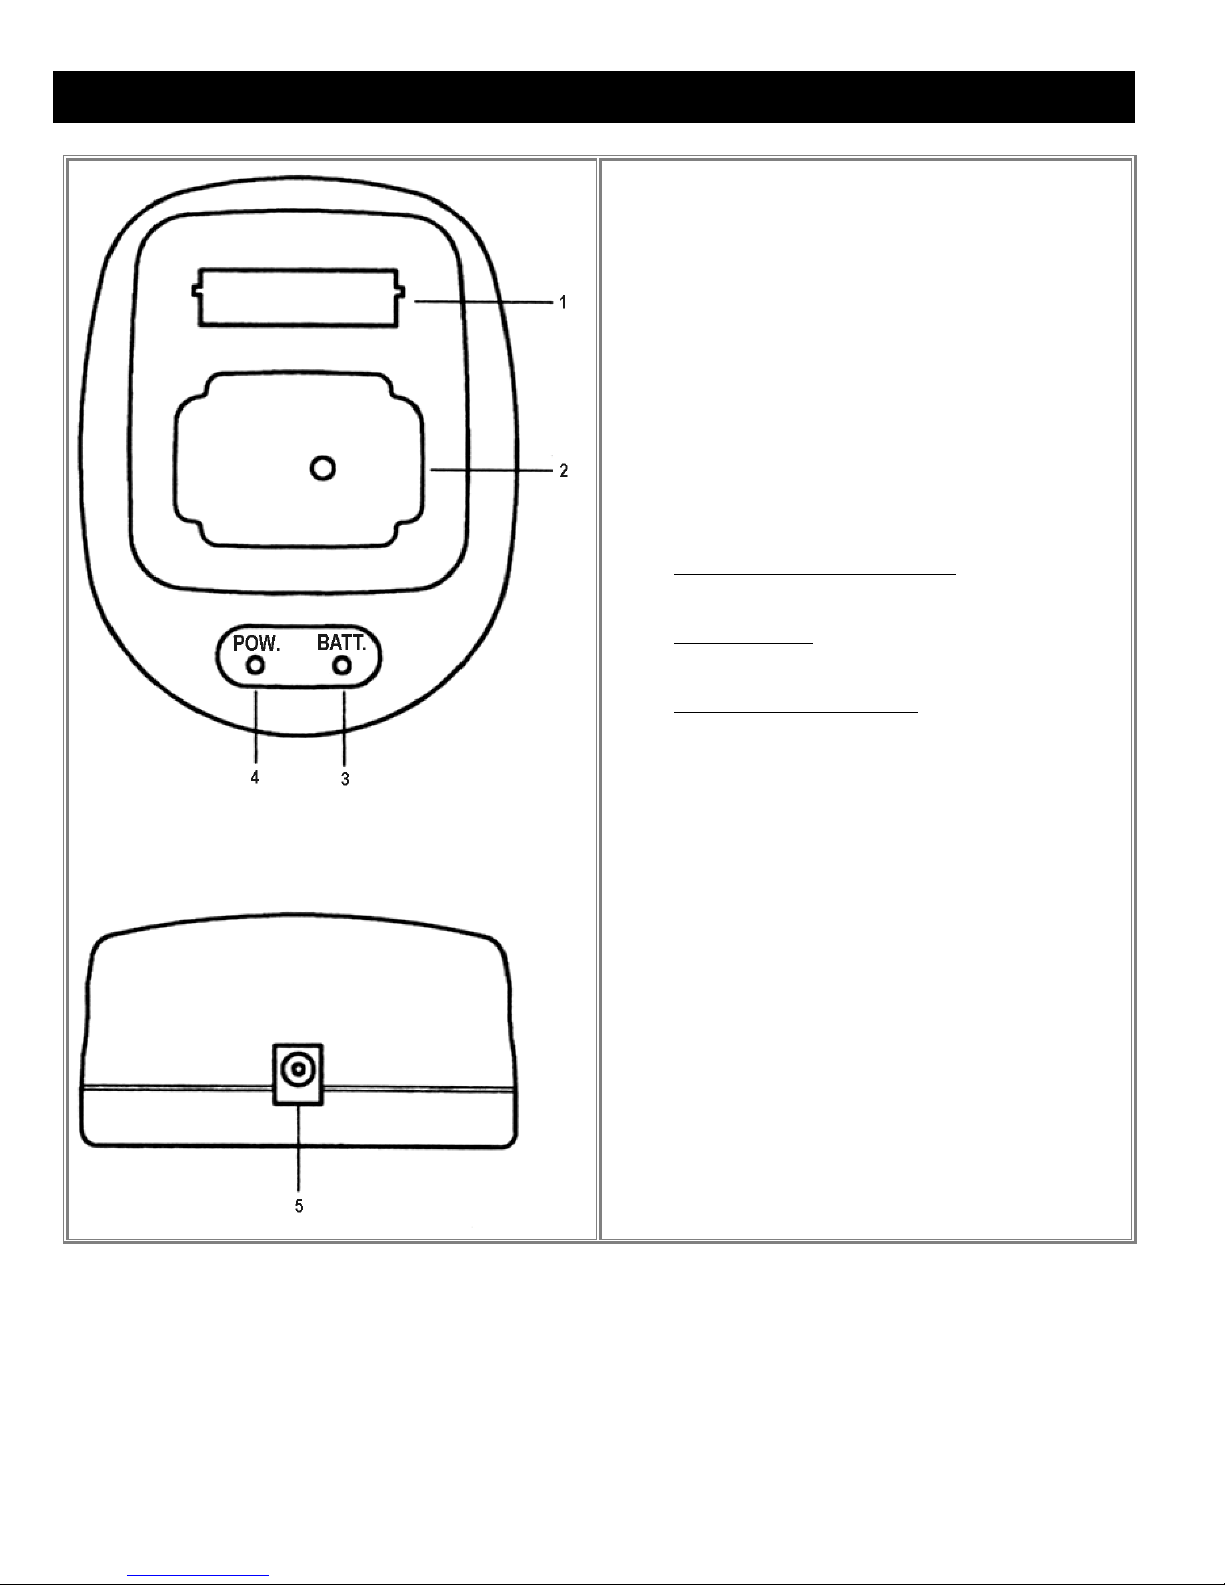
COMPONENT NAMES & FUNCTIONS - Portable Handset Charger Stand
1. Charger slot of spare battery
2. Charging cradle for Portable Handset
3. Spare Battery Charger Indicator
Red = charging
Green = fully charged
4. Power Indicator
Green = power on
Handset Charging Indicator
Red = charging
Green = fully charged
5. DC power jack
9
INSTALLATION
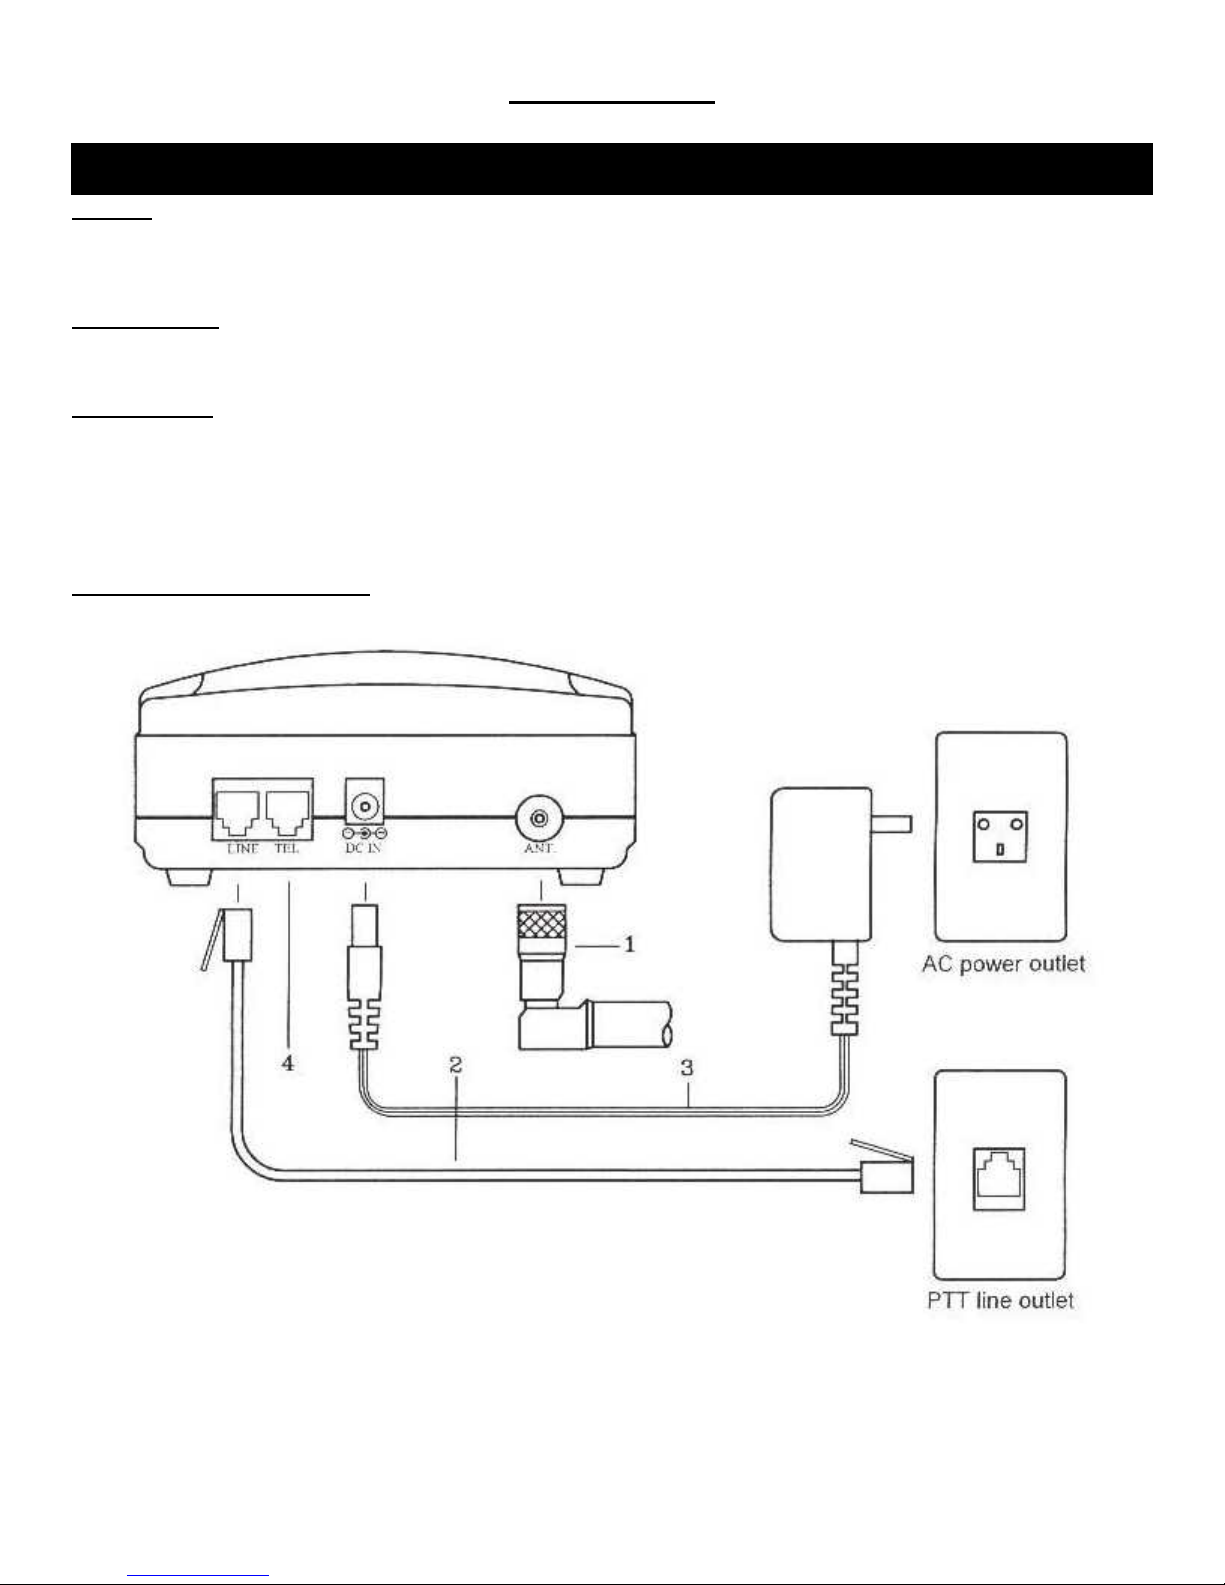
INSTALLATION - Base Unit
Antenna
Screw the L-type antenna firmly into the antenna socket. Adjust the antenna so it is pointing up.
Note: Incorrect installation of the antenna will affect the communication range and you can damage the base unit.
Telephone Line
Connect one end of the telephone line into the RJ 11 jack labeled “LINE” and the back of the base unit. Connect the
other end of the telephone line into your wall outlet.
Power Adapter
Insert the mini-plug of the power adapter into the DC power socket at the back of the base unit and the other end into
your AC power outlet on your wall. The “Power” light will turn on, which indicates it is in Standby Mode, when the powe r is
connected.
Warning! Use only the power adapter supplied. Using any other power adapter could cause serious damage to the
Base Unit.
Connecting Another Telephone
You can connect another telephone into this Base Unit by connection its line cord into the jack labeled “TEL”.
10
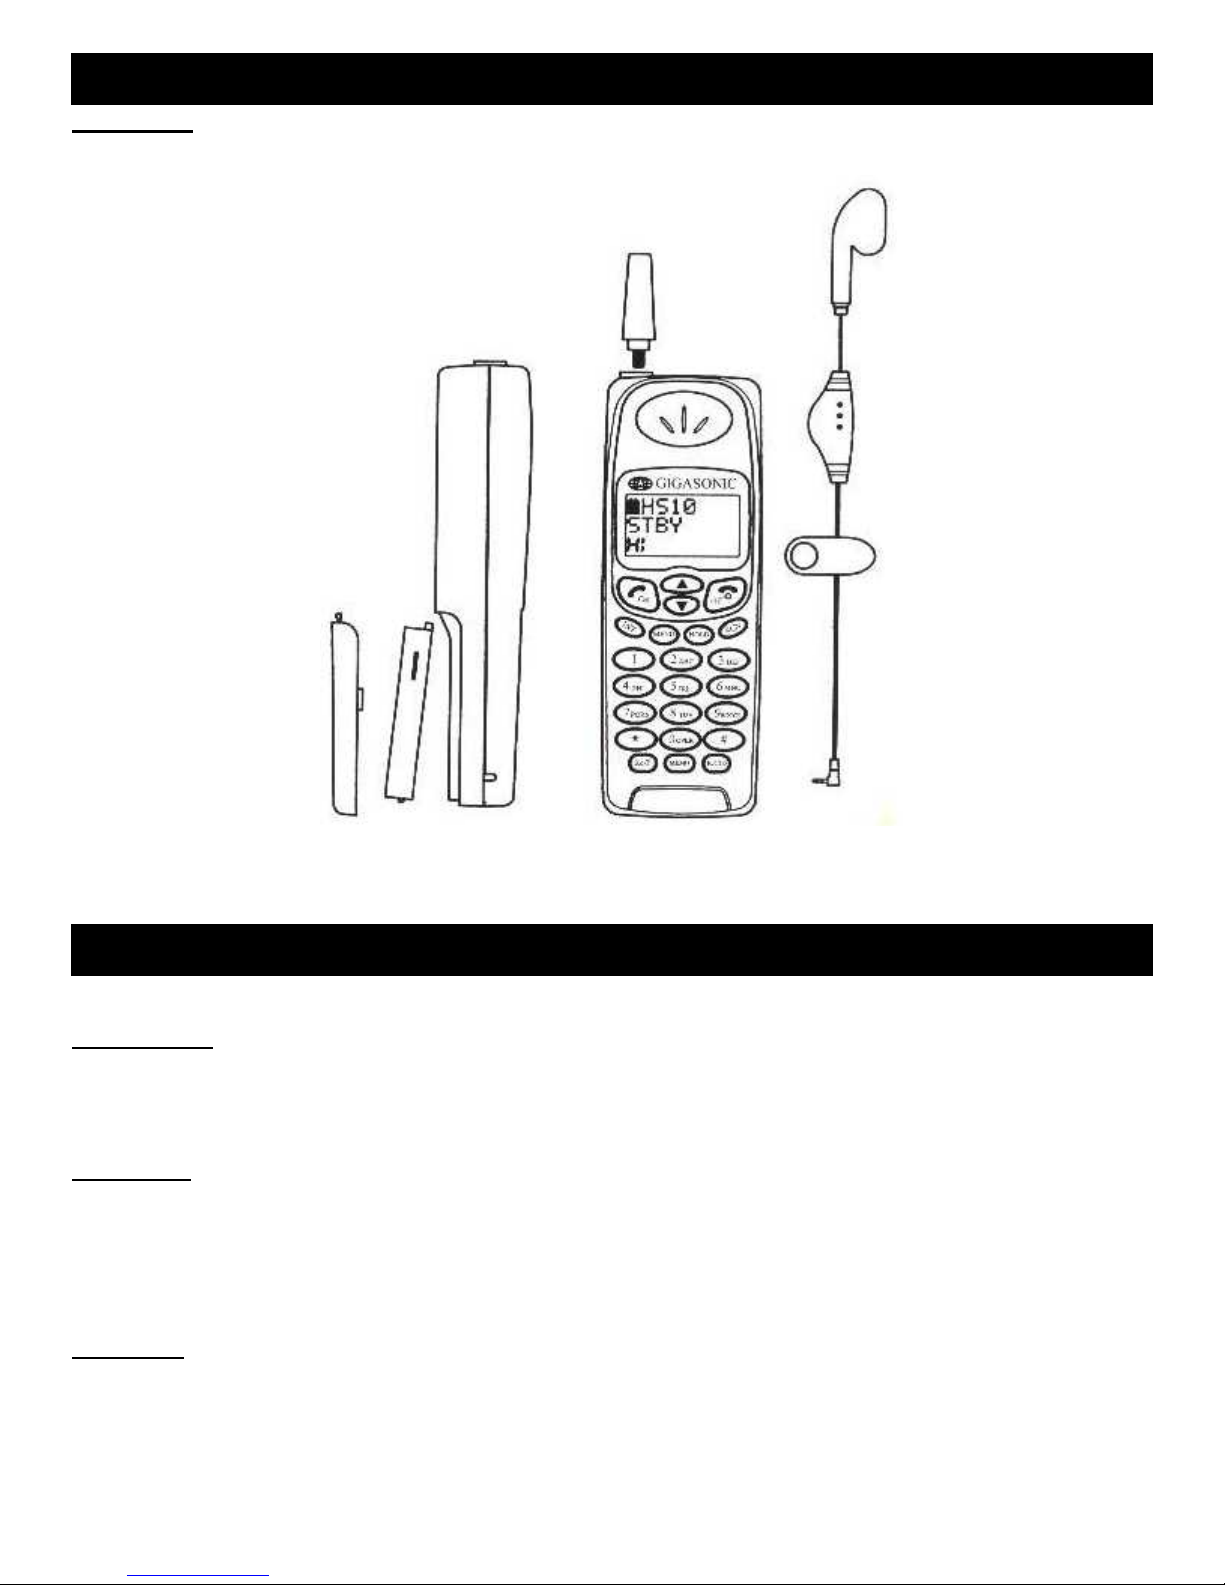
INSTALLATION - Portable Handset
Battery Pack
Insert the battery pack into the back of the Portable Handset and reinstall the back cover.
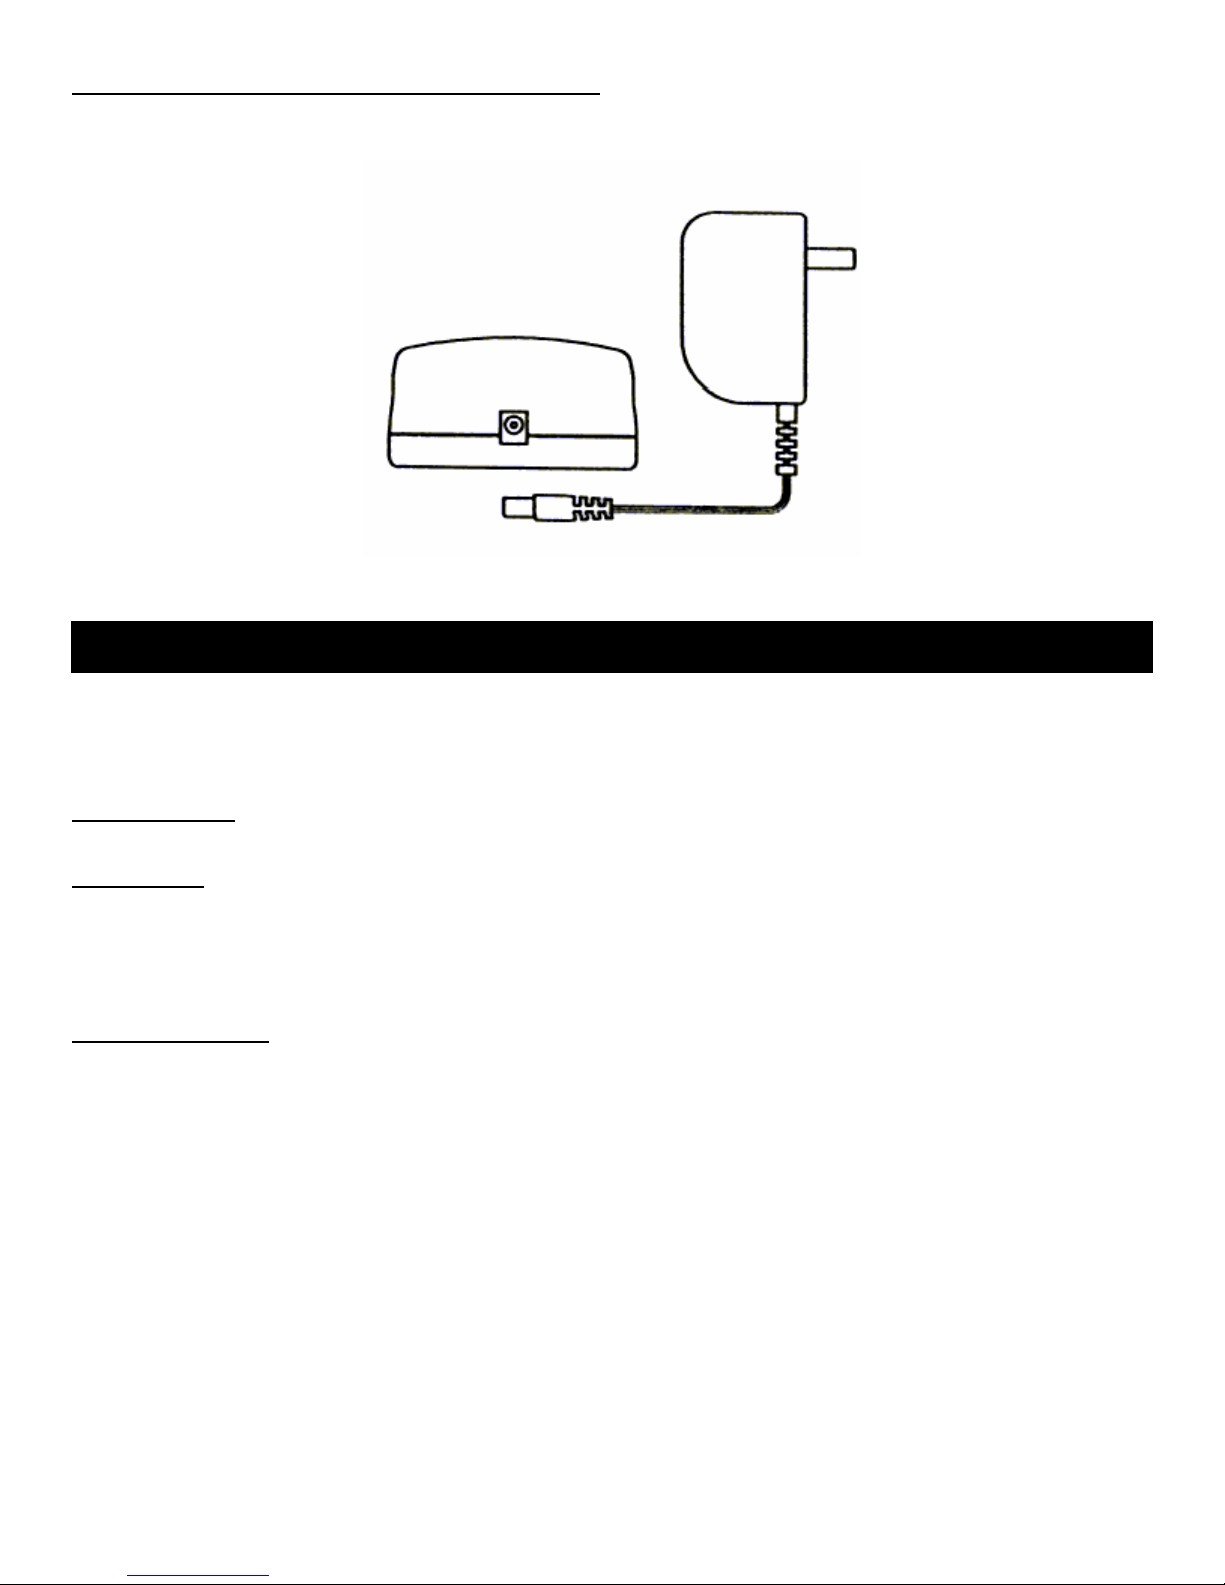
INSTALLATION - Charger Stand
Power Adapter
Insert the mini-plug of the power adapter into the DC power jack at the back of the charger stand and the other end
into your AC power outlet on your wall.
Front Cradle
The front cradle is intended to charge a battery that is already attached to a Portable Handset.
When a Portable Handset (with the battery) is placed in the front slot of the charger stand, the CPU of the Portable
Handset will automatically start monitoring charging status of the battery. The “POW.” indictor will light to verify it is
charging. When the battery is fully charged, the light will turn solid green.
Rear Cradle
A spare battery can be charged in the rear cradle for added convenience. The “BATT.” indictor will lig ht to verify it is
charging. When the battery is fully charged, the light will turn solid green.
11
Incoming Calls While The Portable Handset Is Charging
If there is an incoming call while the Portable Handset is being charged, the handset will ring n ormally and you can
answer the call. If the battery does not have enough power to answer the call, the handset will turn itself off.
INSTALLATION - Batteries
WARNING: If the battery is new or if it is completely discharged, do not charge it while it is attached to the Portable
Handset. Remove the battery from the Portable Handset and charge the battery in the rear cradle of the charger stand.
Charging a fully discharged battery while attached to the Portable Handset creates extra stress to the components of the
Portable Handset and it can erase all the internal settings.
Before Initial Use
Always charge the batteries for 2.5 hours with the standard travel charger before using it for the first time.
Charge Times
Charging with standard travel charger 2.5 hours
Charging on the front cradle of the charger stand (with the Portable Handset) 4.5 hours
Charging on the rear cradle of the charger stand 3.5 hours
Note: The Charger Stand is an optional accessory.
Battery Performance
Standby time 45 hours
Continuous talk time 2 hours to 2.5 hours
Note: We recommend that you keep the Portable Handset in the charger stand (optional accessory) when not in use to
keep it fully charged. If the phone will not be used for long period, remove the battery from the portable handset to
prevent the battery from discharging.
12
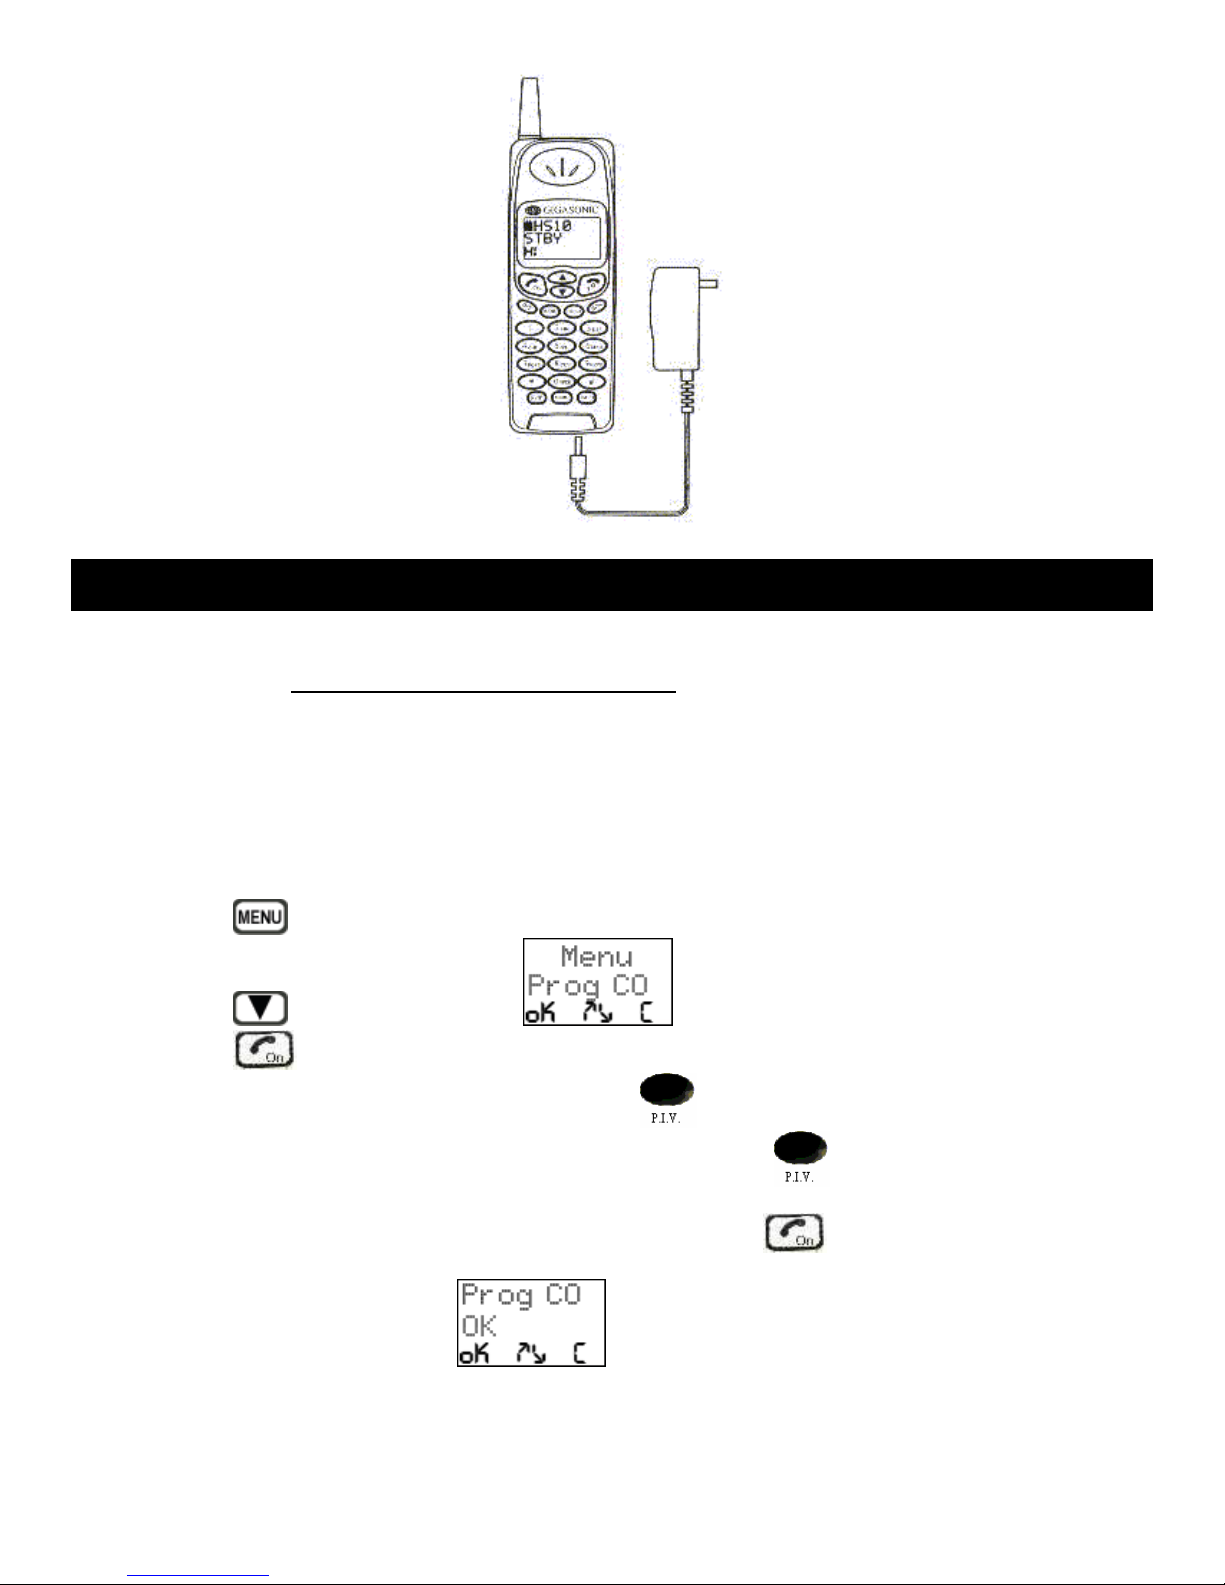
INSTALLATION - Registering The Base Unit With The Portable Handset
The Base Unit and the Portable Handset are pre-programmed at the factory to have all the same settings. Do not reprogram the Base Unit unless you change the setting for the Dial Type, Channel Grou p or the Security Code (see
appropriate topics in the ADVANCED OPERATIONS & FEATURES
Note: The factory has incorporated an efficient way of using the Portable Handset to program the Base Unit. If Dial
Type, Channel Group or the Security Code has been changed on the Portable Handset, the same change(s) have to be
made on the Base Unit or the two will no longer be able to communicate with each other. To avoid any mistakes in reprogramming the Base Unit (if it is done manually), it can only be done through the Portable Handset. The Portable
Handset broadcasts all it’s internal settings to the Base Unit and the Base Unit re-programs itself with these new settings.
You can re-program the Base Unit by:
section) on the Portable Handset.
1. Press the
2. Press the
3. Press the
4. Unplug the power adapter on the Base Unit. Press the “
it down, plug the power adapter on the Base Unit back in. Release the
Note: You must perform step #4 within 30 seconds after pressing the
longer than 30 seconds, repeat step #3.
5. When the Portable Handset shows
Once the re-programming is complete, the system will go into Stand-By mode and you can start using the phone.
button on the Portable Handset.
button until you reach the screen.
button. The Portable Handset will send a signal to the Base Unit to look for a connection.
” button on the Base Unit and while you are holding
program button after one second.
button (in step #3). If you take
on the display, the Base Unit will emit a confirmation sound.
13

BASIC OPERATION
BASIC OPERATION - Turning The Power On / Off
Turning The Base Unit On / Off
Insert the mini-plug of the power adapter into the DC power jack at the back of the base unit and the other end into
your AC power outlet on your wall. The “Power” light will turn on, which indicates it is in Standby Mode, when the power is
connected.
Warning! Use only the power adapter supplied. Using any other power adapter could cause serious damage to the
Base Unit.
Turn the Base Unit off by unplugging the power adapter from the AC power outlet.
Turning The Portable Handset On / Off
Insert the battery pack into the back of the Portable Handset and reinstall the cover. will be displayed on
the LCD screen and then the Portable Handset will go into standby mode.
Turn the Portable Handset off by pressing the
screen will say “Power Off” and the Portable Handset will turn off. Press the
back on.
button and holding it down for approximately 3 seconds. The
button to turn the Portable Handset
BASIC OPERATION - Placing A Call
Making A Cellular-Type Dial Call
Make a cellular-type dial call by:
1. Key in the phone number. If you make a mistake, press the
button and it will delete one number at a time.
Pressing
2. Press
3. Press the button to end the call after your conversation.
Making A Normal Dial-Mode Call
Make a normal dial-mode call by:
1. Press the
2. Key in the phone number.
3. Press the
will delete all your numbers at once.
button and the Portable Handset will dial the number.
button and listen for a dial tone.
button to end the call after your conversation.
14
 Loading...