

Gigaset Communications V500AM Users manual
Verizon V500 / USA EN / A31008-M1931-R301-1-6019 / kombi_overview.fm / 30.4.08
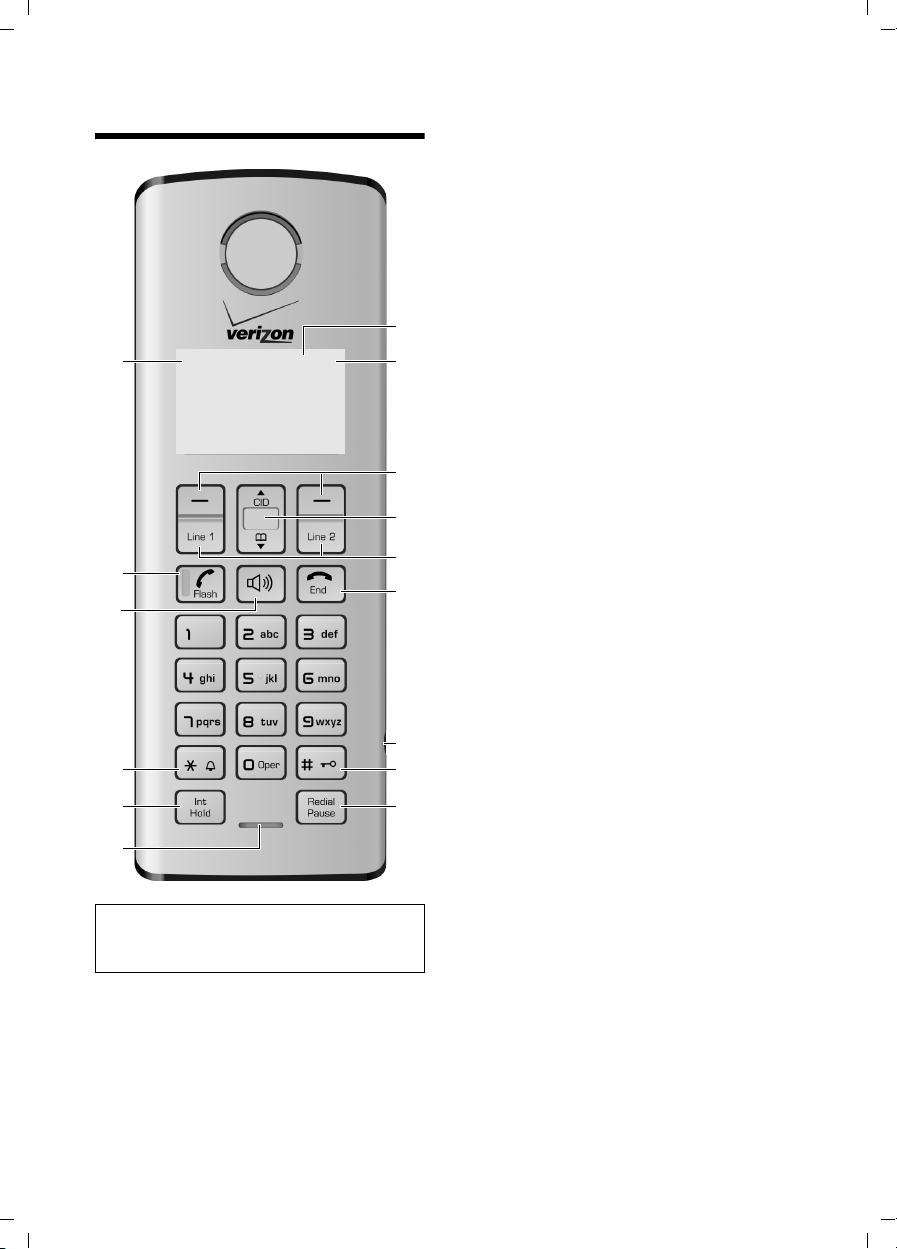
The handset at a glance
The handset at a glance
15
01/31 9:45 AM
14
13
12
10
Note:
Pictures in this user manual may differ from
the actual product.
Ê
ÄÕ e
Ë
INT 1
§§§§Menu§§§§
1 Display in idle status
2 Charge status of the batteries
= e U (empty to full)
= flashes: batteries almost empty
= U flashes: batteries charging
3 Display keys (page 13)
4 Control key
t Access to Call Log list.
s Access to directory.
5 Line keys
Answer an incoming call for Line 1/Line 2.
1
2
3
4
5
6
7
8
911
Make a call from Line 1/Line 2.
Start a second call from Line 2 while telephoning from Line 1 (see page 24).
6 End Call key, On/Off key
End call, cancel function, return to idle status, activate/deactivate handset (press and
hold in idle status).
7 2.5-mm socket (mono) for headset
8 Pound (#) key
Enter # symbol.
Keypad lock on/off (press and hold in idle
status).
Switch between uppercase and lowercase
letters for text entry.
9 Redial/Pause key
Open redial list (in idle status) or insert a
dialing pause (when editing a number).
10 Microphone
11 Intercom/Hold/Conference key
Set up an internal call.
Switch between an external call and internal
party (handset/base station), or transfer a
call during an external call.
Set up a conference call between an external line and an internal party (handset/base
station). Press and hold the key in holdintercom mode.
12 Star (*) key
Ring tone on/off (press and hold).
Switch temporarily to tone dialing (DTMF).
Switch between AM and PM during time setting.
Change Call list display format.
13 Handsfree key
Answer or place a call in speaker mode.
Switch between speaker on and speaker off
(in off-the-hook mode).
14 Talk/Flash key
Answer or start a call.
Key flashes: incoming call.
Add a flash (in the directory).
Send FLASH (when off the hook).
15 Signal strength
ÄHandset is linked with the base station.
Ä
flashes: out of range.
1
Verizon V500 / USA EN / A31008-M1931-R301-1-6019 / kombi_overview.fm / 30.4.08
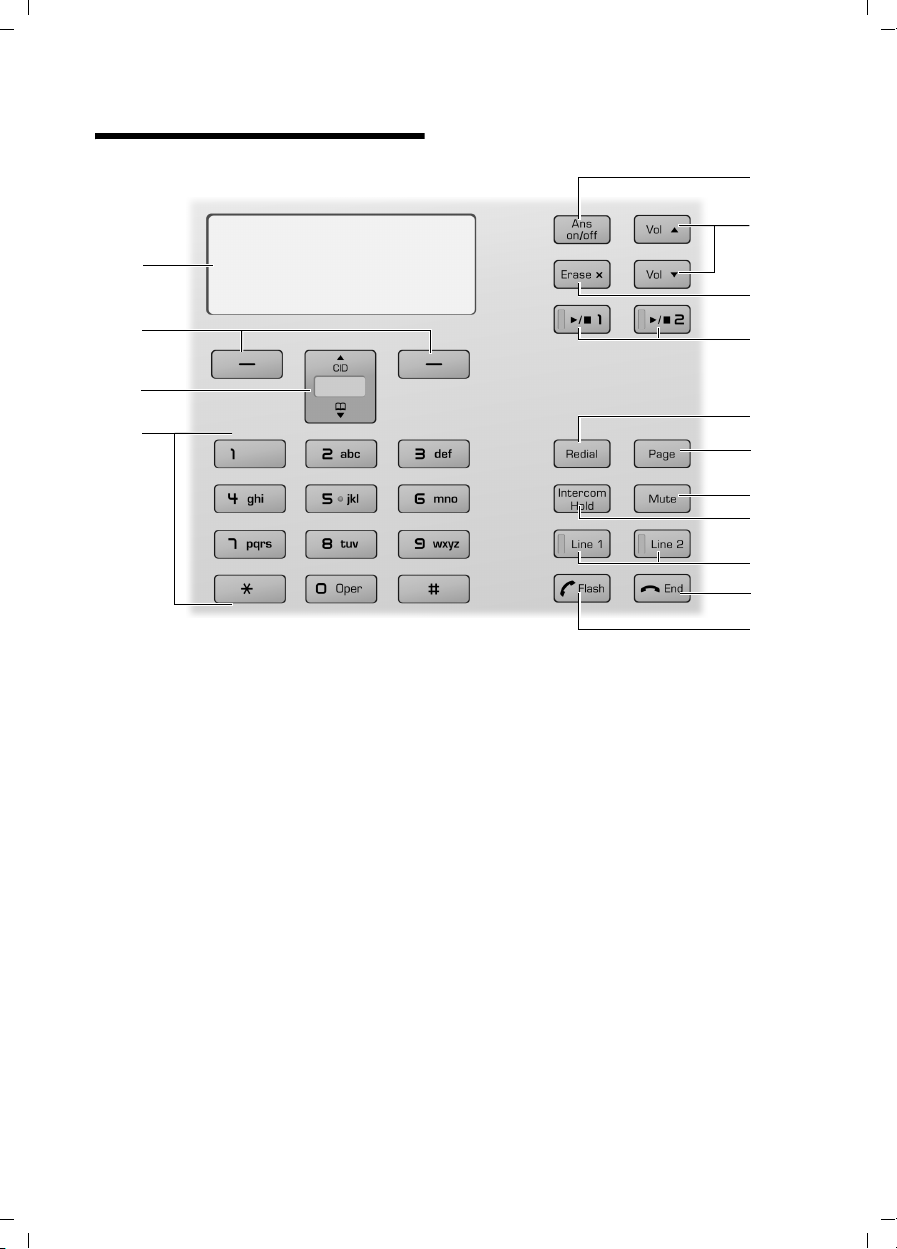
The base station at a glance
The base station at a glance
5
КХЙЧЕЛХЙЧЕ
4
SUN 09:23 AM 01/31
3
2
1
1 Numeric key pad
2 Control key
t Access to Call Log list.
s Access to directory.
3 Display keys (page 13)
4 Display in idle status
Ê ,Ë – Flashes when the respective line
Õ Flashes when the answer machine
is receiving an incoming call.
– Is on when the respective line is
–Off the hook
– In external talk mode
– On hold or in use mode
– Is displayed in the Call list to
show the line on which the call
came in.
is on.
É Flashes when the answer machine’s
message memory is full.
× Flashes when the answer machine
is controlled by a handset.
Is on when the ring tone volume of
Å
the base station is set to zero
(see page 28).
§§§§§§§§§Menu§§§§§§§§§
10
11
12
13
14
15
5 Answering machine On/Off key
Activate/deactivate answering machine.
6 Volume keys
– In idle mode: change the ring tone vol-
ume of the base station.
– During message playback: change the
volume of playback.
– During call: change the volume of the
loudspeaker.
– During call screening: change the vol-
ume of call screening.
7 Erase key
Erase the current message during playback.
Erase all old messages (press and hold in idle
mode).
8 Start/Stop key with integrated LED for
Line 1/Line 2
Start/stop playback.
LED status indicator:
– Is on when playing messages on the
respective line.
– Flashes slowly when there is at least one
new message on the answering machine
for the respective line.
– Flashes rapidly when the message mem-
ory for the respective line is full.
6
7
8
9
2

Verizon V500 / USA EN / A31008-M1931-R301-1-6019 / kombi_overview.fm / 30.4.08
The base station at a glance
9 Redial/Pause key
Open redial list (in idle status) or insert a
dialing pause (when editing a number).
10 Page key
Page handsets (press briefly).
Start the registration procedure (press and
hold in idle mode). You will hear a beep.
11 Mute key
Mute/unmute microphone.
12 Intercom/Hold/Conference key
Set up an internal call.
Switch between an external call and internal
party (handset/base station), or transfer a
call during an external call.
Set up a conference call between an external line and an internal party (handset/base
station). Press and hold the key in holdintercom mode.
13 Line keys
Answer an incoming call for Line 1/Line 2.
Make a call from Line 1/Line 2.
Start a second call from Line 2 while telephoning from Line 1 (see page 24ff.).
LED status indicator:
– Flashes rapidly when the respective line
is receiving an incoming call.
– Flashes slowly when a handset is off the
hook on the respective line.
– Flashes very slowly when the respective
line is on hold on the base station.
– Is on when the base station is in talk
mode.
14 End Call key
End call, cancel function, return to idle status.
15 Talk /Flash key
Answer or start a call.
Add a flash (in the directory)
Send FLASH (when off the hook).
Please remember:
u If the answer machine is being oper-
ated from a handset, or if it is recording
a message, you cannot operate it from
the base station.
u If the start/stop key flashes although
the answer machine is switched off, it
means that there is still at least one
new message that has not been played
back.
3

Verizon V500 / USA EN / A31008-M1931-R301-1-6019 / V500_kombi_IVZ.fm / 30.4.08
Contents
Contents
The handset at a glance . . . . . . . . 1
The base station at a glance . . . . 2
Safety precautions . . . . . . . . . . . 5
Notes on the operating
instructions . . . . . . . . . . . . . . . . . . 6
Symbols used . . . . . . . . . . . . . . . . . . . . 6
Example: menu input . . . . . . . . . . . . . . 6
Verizon V500AM –
more than just a telephone . . . . . 7
First Steps . . . . . . . . . . . . . . . . . . . 7
Pack contents . . . . . . . . . . . . . . . . . . . . 7
Installing the base station . . . . . . . . . . 7
Setting up the handset for use . . . . . . . 8
Area codes . . . . . . . . . . . . . . . . . . . . . 10
Making calls . . . . . . . . . . . . . . . . 11
Making an external call . . . . . . . . . . . 11
Ending a call . . . . . . . . . . . . . . . . . . . . 11
Answering a call . . . . . . . . . . . . . . . . . 11
Caller ID . . . . . . . . . . . . . . . . . . . . . . . 11
Handsfree operation . . . . . . . . . . . . . 12
Operating the telephone . . . . . . 12
Control key . . . . . . . . . . . . . . . . . . . . . 12
Display keys . . . . . . . . . . . . . . . . . . . . 13
Returning to idle status . . . . . . . . . . . 13
Menu guidance . . . . . . . . . . . . . . . . . 13
Writing, editing, and correcting
entries . . . . . . . . . . . . . . . . . . . . . . . . 14
Using the directory and lists . . . 15
Directory . . . . . . . . . . . . . . . . . . . . . . . 15
Last number redial list . . . . . . . . . . . . 16
Calls list . . . . . . . . . . . . . . . . . . . . . . . 16
Operating the answer
machine . . . . . . . . . . . . . . . . . . . . 18
Operation using the base station
keys . . . . . . . . . . . . . . . . . . . . . . . . . . . 18
Operation using the handset . . . . . . . 18
Setting up the answer machine . . . . . 21
Operating when on the move
(remote operation) . . . . . . . . . . . . . . . 22
Using the network mailbox . . . . 23
Configuring the network mailbox
for fast access . . . . . . . . . . . . . . . . . . . 23
Using several handsets . . . . . . . 24
Registering and de-registering
handsets . . . . . . . . . . . . . . . . . . . . . . . 24
Locating a handset ("paging") . . . . . . 24
Changing the base station . . . . . . . . . 24
Making internal calls . . . . . . . . . . . . . . 24
Accepting/rejecting call waiting . . . . . 25
Linking internal callers to
an external call . . . . . . . . . . . . . . . . . . 26
Making two external calls
simultaneously . . . . . . . . . . . . . . . . . . 26
Handset settings . . . . . . . . . . . . . 27
Changing the name of a handset . . . . 27
Changing the display language . . . . . 27
Setting the display contrast . . . . . . . . 27
Activating/deactivating auto answer . 27
Adjusting the loudspeaker and
earpiece volume . . . . . . . . . . . . . . . . . 27
Changing ring tones . . . . . . . . . . . . . . 28
Activating/deactivating the
key-touch tone . . . . . . . . . . . . . . . . . . 28
Base station settings . . . . . . . . . 28
System settings . . . . . . . . . . . . . . 29
Restoring the default settings . . 30
Appendix . . . . . . . . . . . . . . . . . . . 31
Care . . . . . . . . . . . . . . . . . . . . . . . . . . . 31
Contact with liquid . . . . . . . . . . . . . . . 31
Questions and answers . . . . . . . . . . . . 31
Specifications . . . . . . . . . . . . . . . . . . . 32
FCC / ACTA Information . . . . . . . . . . . . 33
Safety precautions . . . . . . . . . . . . . . . 34
Service (Customer Care) . . . . . . . . . . . 36
End-user limited warranty . . . . . . . . . 36
Index . . . . . . . . . . . . . . . . . . . . . . 40
4
Verizon V500 / USA EN / A31008-M1931-R301-1-6019 / security.fm / 30.4.08
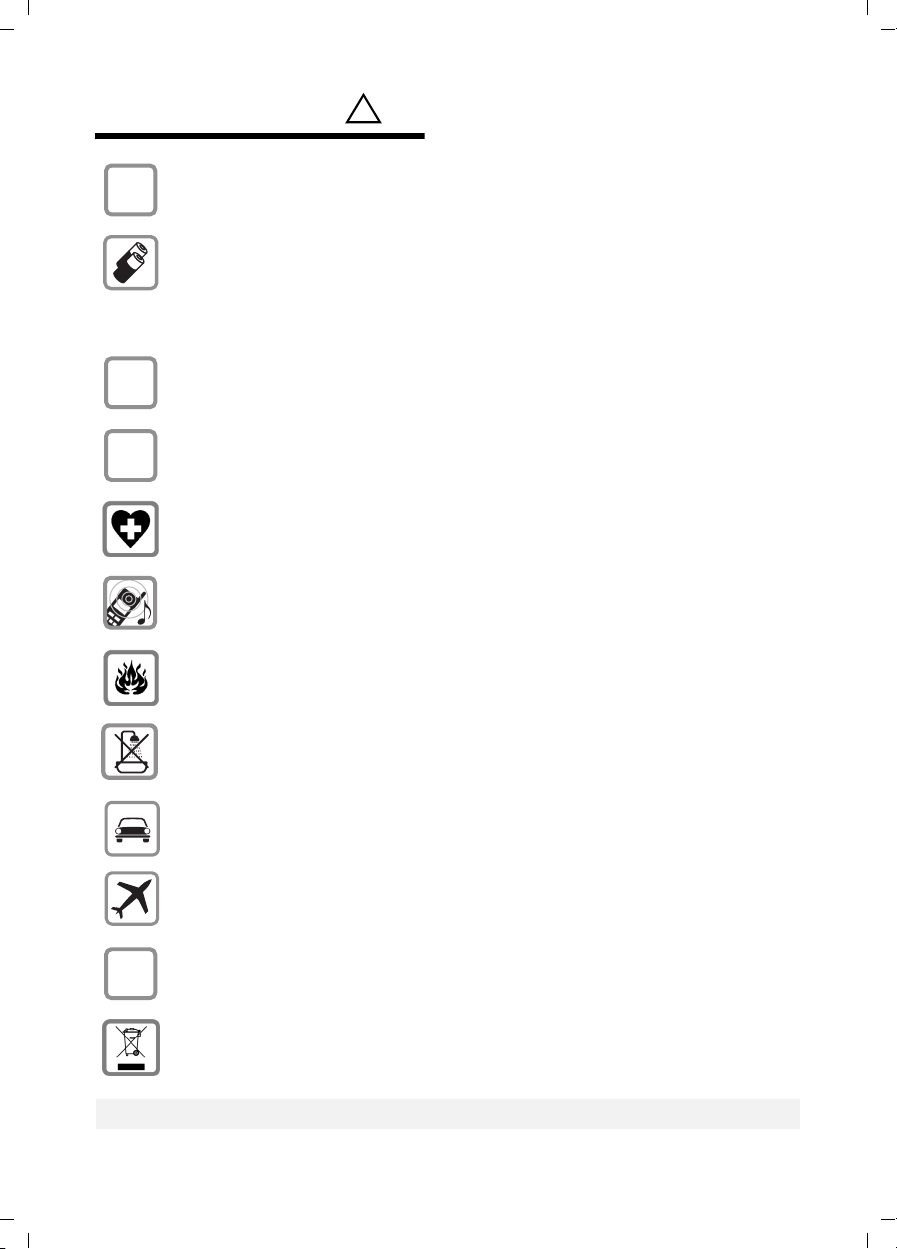
Safety precautions
Safety precautions*)
$
‹
Œ
Only use the power supply unit supplied as indicated on the bottom of the
device.
Only insert approved rechargeable batteries of the same type.
Never use ordinary (non-rechargeable) batteries, as they may pose a health
hazard or cause injury.
Do not charge the handset in the charging unit or base station while the headset
is connected.
Make sure the rechargeable battery is inserted in the correct direction.
Use the battery specified in these operating instructions.
The phone may affect medical equipment, so always turn your phone off before
entering a hospital or doctor's office.
Do not operate the phone in places where there is a risk of explosion
(such as paint workshops).
!
Do not install the base station in the bathroom. The handset and base station
are not splash-proof (see page 31).
Drivers must not use the phone while driving.
The phone must be turned off at all times in aircraft. Make sure the phone can-
ƒ
not be switched on accidentally.
If you give your telephone to someone else, you should also provide the operating instructions.
Dispose of batteries and the phone carefully. Do not pollute the environment.
Emergency numbers cannot be dialed if the keypad lock is activated!
*) also see page 34
5

Verizon V500 / USA EN / A31008-M1931-R301-1-6019 / notes-on-instructions.fm / 30.4.08
Notes on the operating instructions
Notes on the operating
instructions
This section explains the meaning of certain symbols and typographical conventions used in this user guide.
Symbols used
On/Off (example)
Select one of the two menu
functions specified.
~ Enter digits or letters.
§Back§ The display keys' current func-
tions are shown in reverse and
are highlighted in the lower
display line. Press the display
key below to launch the function.
q Press the top or the bottom of
the control key: scroll up or
down.
c / Q / * etc.
Press the corresponding key of
the handset.
Example: menu input
In the user guides, the steps you need to
perform are shown in abbreviated form.
This is illustrated below using "Changing
the display language" as an example.
What you need to do is explained in the
box.
§Menu§ ¢ Settings ¢ Handset ¢ Language
¢ English/ Español/ Français
¤ With the handset in idle status, press
the right display key to open the main
menu.
¤ Select Settings using the control key q
– press the control key at the top or
bottom.
¤ Press the §OK§ display key to confirm the
function Settings.
The Settings submenu is displayed.
¤ Press the bottom of the control key s
repeatedly until Handset is selected.
¤ Press the §OK§ display key to confirm the
function.
The Handset submenu is displayed.
¤ Press the bottom of the control key s
repeatedly until Language is selected.
¤ Press the §OK§ display key to confirm the
function.
The Language submenu is displayed.
¤ Select the language you want using
the control key q – press the control
key at the top or bottom.
¤ Press the §OK§ display key to confirm the
selected language.
The language is now changed for all text.
6
Verizon V500 / USA EN / A31008-M1931-R301-1-6019 / starting.fm / 30.4.08
Verizon V500AM – more than just a telephone
Verizon V500AM –
more than just a telephone
Your phone not only lets you store up to
50 phone numbers (page 15), it can do a
whole lot more:
u Phone directly using the base station:
Your base station has the same keys as
your handset. So nearly all functions
you usually use on the handset are also
available directly on the base station.
u Use two telephone lines with only one
telephone.
u Make conference calls with two exter-
nal parties (page 27).
u View missed calls on your phone
(page 16).
u ECO DECT uses a power supply with
low power consumption. Your handset
reduces the transmission power
depending on its distance from the
base station (close-up range).
Note:
The transmission power of the base station is
lowered to its minimum level when the handset is placed in the base station and only one
handset is registered on the base station.
Headset socket
Which headsets are compatible?
Please call Verizon Service at
1-866 374 3864 for more information, or
contact
www.verizon.com
tions about the use of your telephone.
Caution:
Do not charge the handset in the charging unit
or base station while the headset is connected.
Have fun using your new phone!
if you have any ques-
First Steps
Pack contents
u One base station Verizon V500AM
u One telephone line cord
u One AC adapter for the base station
u One User Guide
For Verizon V500AM-1
u One Verizon V500H handset with bat-
tery cover
u Two batter ies
u One belt clip
For Verizon V500AM-2
u Two Verizon V500H handsets with bat-
tery cover
u One Verizon V100C charging cradle
u One AC adapter for the charging cradle
u Four batteries
u Two belt clips
Installing the base station
The base station is designed for use in
closed, dry rooms in a temperature range
of +41°F to +113°F.
Set up the base station at a central point
on the premises.
Please note:
u Never expose the phone to heat
sources, direct sunlight, or other electrical appliances.
u Protect your phone from moisture,
dust, corrosive liquids, and vapors.
Range and reception strength
Range:
u Up to 984 feet in the open
u Up to 165 feet in buildings
7
Verizon V500 / USA EN / A31008-M1931-R301-1-6019 / starting.fm / 30.4.08
First Steps
Reception strength:
The display shows if the handset is linked
to the base station:
u Ä is on: handset is linked to the base
station.
u Ä flashes: no reception; handset is out
of range or not registered.
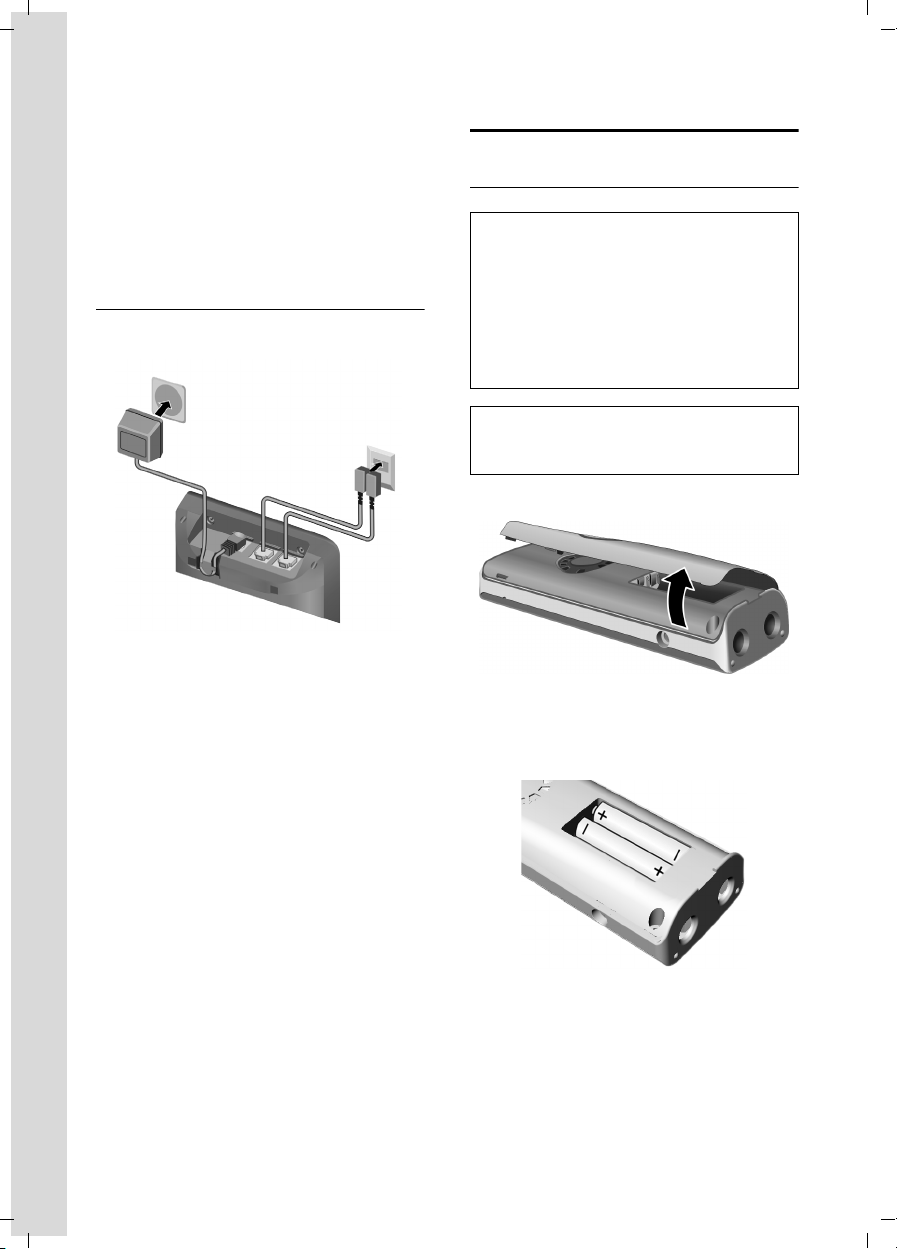
Connecting the base station
¤ First connect the power adapter and
then the phone jack as shown below.
1
3
2
1 110-V power adapter
2 Back of the base station
3 Phone jack with phone cords
Please note:
u The power adapter must always be
connected, as the phone will not oper-
ate without an electrical supply.
u Your answer machine is set to give a
standard announcement.
Setting up the handset for use
Inserting the batteries
Caution:
Use only rechargeable UL-approved AAA batteries. Never use a conventional (nonrechargeable) battery or other battery types as
this could result in significant health risks and
personal injury. For example, the batteries
could explode. The phone could also malfunction or be damaged as a result of using batteries that are not of the recommended type.
Note:
If attached, remove the belt clip before opening the battery cover.
¤ Open the battery cover.
¤ Insert the batteries according to the
correct polarity (see diagram).
The polarity is indicated in/on the battery
compartment.
¤ Close the cover, and press the top so
that it clicks into place.
Attaching the belt clip
There are notches for attaching the belt
clip on the side of the handset at the same
height as the display.
8

Verizon V500 / USA EN / A31008-M1931-R301-1-6019 / starting.fm / 30.4.08
First Steps
¤ Press the belt clip onto the back of the
handset so that the protrusions on the
belt clip engage the notches.
Placing the handset in the base station
¤ Place the handset in the base station
with the handset's display facing outwards.
Charging the batteries for the first time
¤ To charge the batteries, leave the hand-
set in the base station or charging cradle continuously for ten hours.
The alternately flashing battery icons =
on the upper right side of the display
U
screen indicate that the batteries are
being charged.
Note:
– If the handset has turned itself off because
its batteries are empty, and you then place
the handset into the base station, it will
turn on automatically.
– Only place the handset into the base sta-
tion or charging cradle specifically
intended for it.
– During handset operation, the battery icon
e indicates the charge status of the bat-
teries (page 1).
– The batteries may feel warm when they are
charging. This is not dangerous.
For questions and troubleshooting,
see page 31.
Setting the date and time
You should set the date and time, for
example, to ensure the correct time of
incoming calls is recorded.
To change the time and date, open the
input field using:
§Menu§ ¢ s ¢ Settings ¢ Date/Time
¢ Set Date/Time
~ Enter the time and date using
10 digits, for example, Q
M 1 5 Q 1 1
5 Q N for January 15,
2008, 07:15 AM. If the 12hour time format is set, use
the * key to switch between
am and pm.
To correct an incorrect entry,
overwrite the character by typing the correct one.
§OK§ Press the display key to save
You can change the date and time format:
§Menu§ ¢ s ¢ Settings ¢ Date/Time
changes.
¢ Set Format
¤ Choose between day/month and
month/day date formats:
¢ Date Format ¢ DD/MM/MM/DD
s
¤ Choose between 12- and 24-hour time
formats:
¢ Time Format ¢ 12 Hours/24 Hours
s
Selecting the line settings
For each handset and the base station,
you can set how your telephone will use
the two telephone lines:
Auto All incoming calls will ring. For
outgoing calls, your phone
will use whichever line is currently free.
Line 1/Line 2
Only incoming calls on the
respective line can be
answered with the c key.
For outgoing calls, your phone
will always use the selected
line.
If you have selected Line 1 or Line 2, you
can still answer or make a call on the free
line by using the C or h keys.
9

Verizon V500 / USA EN / A31008-M1931-R301-1-6019 / starting.fm / 30.4.08
First Steps
Selecting line settings for a handset
§Menu§ ¢ s ¢ Settings ¢ Handset
¢ Line Setting ¢ Auto/Line 1/Line 2
q Select entry and press §OK§.
Selecting line settings for the base station
§Menu§ ¢ s ¢ Settings ¢ Base
¢ Line Setting ¢ Auto/Line 1/Line 2
q Select entry and press §OK§.
Area codes
To make a call using the Incoming Calls list
(page 16), your phone's area code must
be stored. If you reside in a service area
where Line 1 and Line 2 have been assigned different area codes by your network
provider, you are able to store area codes
for Line 1 and Line 2 independently of
each other.
§Menu§ ¢ s ¢ Settings ¢ System
¢ Area Code
Line 1/Line 2
Select the line for which you
want to set the area code and
§OK§.
press
~ Enter your area code and press
§OK§.
Display in idle status
Once the phone is registered and the time
set, the idle display looks as shown here
(example). If the answer machine is activated, the header will also display the answer machine symbol
ÄÕ e
01/31 9:45
Your phone is now ready to use.
10
Õ.
Ê
Ë
INT 1
§§§§Menu§§§§
Verizon V500 / USA EN / A31008-M1931-R301-1-6019 / telefony.fm / 30.4.08
Making calls
Making calls
Making an external call
External calls are calls using the outside
telephone network.
~c Enter the number and press
the Talk key c or Handsfree
key d.
Or:
c~ Briefly press the Talk key c
or Handsfree key d, and
then enter the number.
To cancel the dialing operation, press the
End Call key a.
Depending on the line settings of the used
handset/base station (see page 9), the
telephone selects the line. You can use the
line keys C or h instead of the c or
d key to select the line for this call.
You are shown the duration of the call
while the call is in progress.
Note:
Dialing using the directory (page 15) or Calls
list (page 16) saves time re-entering numbers.
Ending a call
Depending on the line settings of the used
handset/base station (see page 9), the
telephone reacts differently:
u If you have selected Auto, you can use
the Talk key c or Handsfree key d
for calls on both lines.
u If you have selected Line 1 or Line 2, you
can only answer calls on the selected
line with the Talk key c or Handsfree
key d. For calls on the other line, you
must use the C key or h key to
answer the call.
If the handset is in the base station or
charger and the Auto Answer function is
activated (page 27), the call will be
answered automatically when you lift the
handset from the base station or charger.
Lifting the handset from the base station
or charger in this case has the same effect
as pressing the Talk key c.
You can press the
the ring tone without answering the call.
You can answer the call as long the call is
displayed on the screen.
§Quiet§ display key to mute
Note:
If two calls are ringing simultaneously on the
two lines, your telephone display will switch
from one line to the other every 3 seconds.
¥ Use the C key or h key to answer the
call.
a Press the End Call key.
Answering a call
The handset indicates an incoming call in
three ways: by ringing, by a display on the
screen, and by the flashing Talk key c.
The base station indicates an incoming
call in three ways: by ringing, by a display
on the screen, and by the flashing line key
C or h.
You can accept the call by:
¤ Pressing the Talk key c.
¤ Pressing the line key C or h.
¤ Pressing the Handsfree key d.
Caller ID
Caller ID (CID) is an optional subscription
service provided by your telephone service provider. This feature supplies incoming caller identification information that
will be displayed on your handset.
11

Verizon V500 / USA EN / A31008-M1931-R301-1-6019 / telefony.fm / 30.4.08
Operating the telephone
Call display with Caller ID/Name
If the number of the caller is stored in your
directory, you will see the caller's name.
The following is displayed in place of the
number:
u External, if no number is transmitted,
or the caller has not subscribed to
Caller ID.
u Withheld, if the caller has withheld
Caller ID.
Handsfree operation
You can activate the speakerphone at any
time to provide handsfree operation during a call.
Activating/deactivating handsfree
Activating while dialing
~d Enter the number and press
the Handsfree key.
¤ You should inform your caller before
you use the handsfree function so that
the caller knows someone else is listening.
Operating the telephone
Most of the keys are the same on the
handset and on the base station, so that,
with few exceptions, you can operate the
base station the same way as the handset.
Activating/deactivating the handset
a Press and hold the End Call
key.
Activating/deactivating the keypad lock of the handset
# Press and hold the pound key.
Keypad Locked appears in the display when
the keypad lock is activated.
The keypad lock is deactivated automati-
cally if someone calls you. It is re-activated
when the call is finished.
Control key
Switching between the earpiece and the
handsfree mode
d Press the Handsfree key.
During a call and when listening to the
answer machine, turn handsfree on or off.
For how to adjust the volume,
see page 27.
12
1
1 Control key
In the description below, the side of the
Control key (up, down), which you must
press depending on the operating
situation, is marked in black, for example,
t for "press up on the Control key".
The Control key has different functions:
When the handset is in idle status
s Open the directory
t Open call log list (page 16)
In input fields
You can use the Control key to move the
cursor backwards
t or s forwards.
Verizon V500 / USA EN / A31008-M1931-R301-1-6019 / telefony.fm / 30.4.08
Operating the telephone
In the main menu, lists and submenus
t / s Scroll up/down line by line.
When the handset is off the hook or when
the answer machine is playing
t / s Increase/decrease volume
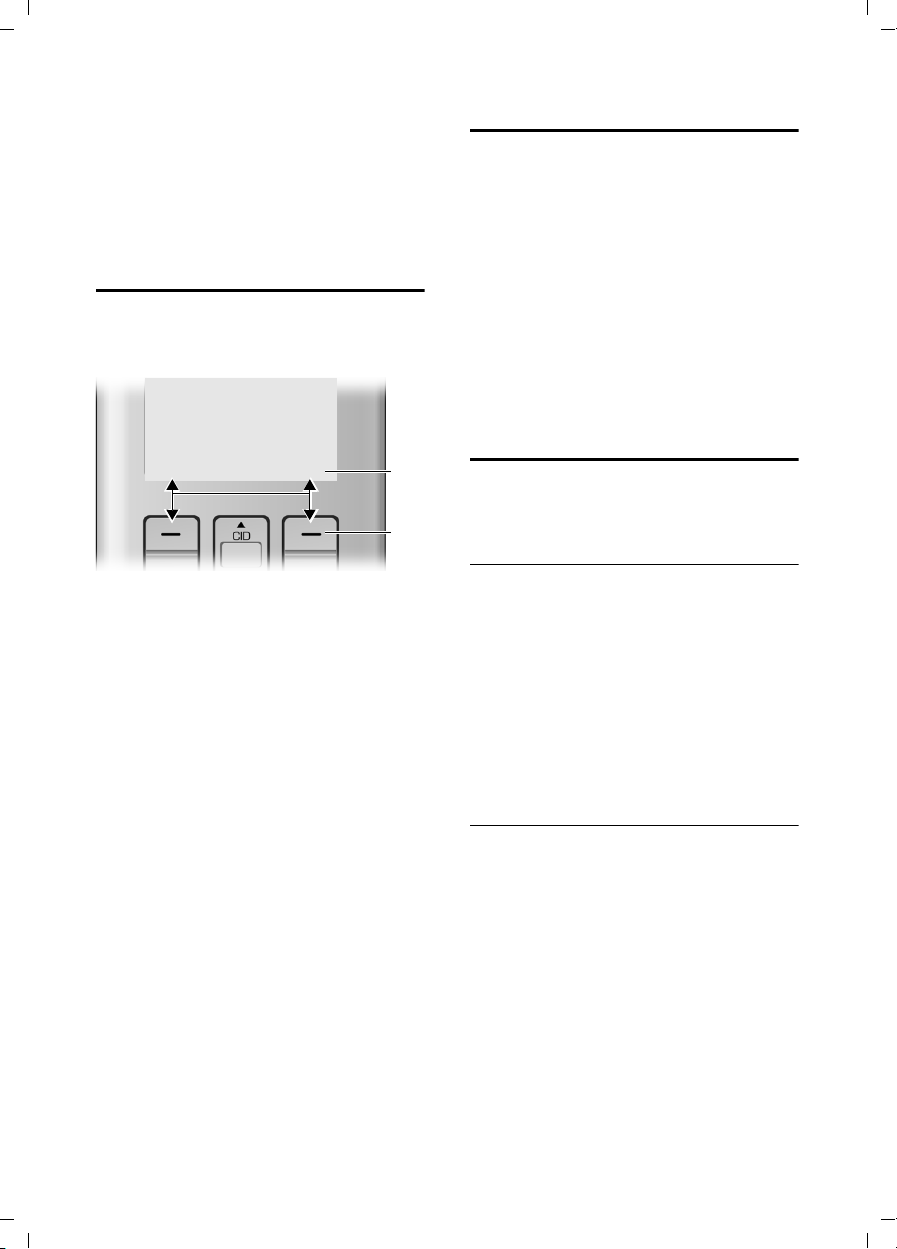
Display keys
The function of the display keys changes
depending on the particular operating situation. Example:
§§§§§Back§§§§§ † §§§§Menu§§§§§
1 The display keys' current functions are
shown on the bottom display line.
2Display:keys
The most important display symbols are:
§§§§§Menu§§§§ Open the main menu (in idle
mode) or the context-dependent menu.
§§§§§Back§§§§ Go back one menu level.
§§§§§§§OK§§§§§§§ Confirm your choice or save
edited characters.
§§§§Clear§§§§§ Clear key: deletes one charac-
ter at a time from right to left
(press briefly), or deletes all
characters (hold).
1
2
Returning to idle status
You can return to idle status from anywhere in the menu as follows:
¤ Press the End Call key a.
Or:
¤ Do not press any key: after 2 minutes,
the display will automatically return to
idle status.
Changes that you have not confirmed or
saved by pressing
An example of the display in idle status is
shown on page 10.
§OK§ will not be saved.
Menu guidance
Your phone's functions are accessed using
a menu that has a number of levels.
Main menu (first menu level)
¤ Press the display key §Menu§ with the
handset in idle status to open the main
menu.
The main menu functions are shown on
the screen in a list.
To access a function, open the corresponding submenu (next menu level):
¤ Navigate to the function using the con-
trol key q. Pressing the display key
Submenus
The functions in the submenus are displayed as lists.
To access a function:
§OK§.
¤ Scroll to the function with the control
key q and press
Pressing the §Back§ display key returns you
to the previous menu level. a cancels
the operation.
§OK§.
13
 Loading...