

Gigaset Communications V310AM, V310H User Manual

C385 V310AM / USA / A31008-M2026-R351-1-6019 / overview.fm / 04.11.2008
The handset at a glance
The handset at a glance
17
16
15
14
13
12
11
10
9
8
Ð×V
10.01.08 07:15
Þ
Menu
1 Display in idle status (example)
2 Charge status of the batteries
(
¢ page 13)
3 Display keys (
4 Message key (
Access to calls and message lists;
Flashes: new message or new call
5 End Call key, On/Off key
End call, cancel function, go back one menu
level (press briefly), back to idle status (press
and hold), activate/deactivate handset
(press and hold in idle status)
1
2
3
4
5
6
7
6 Pound key
Keypad lock on/off (press and hold in
idle status);
toggle between uppercase/lowercase
and digits
7 Internal key
Make an internal call (
8 Microphone
9 Flash key (
- Recall (flash)
- Insert a dialing pause (press and hold)
10 Asterisk key
Ringer melodies on/off (press and hold);
With an existing connection:
Switch between pulse dialing/touch-tone
dialing (press briefly)
11 Key 1 (
Dial answer machine/network mailbox
(press and hold)
12 Connection socket for headset
(
¢ page 18)
13 Tal k key
Answer a call, open last number redial list
(press briefly), start dialing (press and hold)
14 Handsfree key
Switch between earpiece and
handsfree mode;
Lights up: Handsfree activated
Flashes: Incoming call
15 Control key (
16 Answer machine icon
Answer machine switched on;
Flashes: Answer machine is recording a
message or is being operated by another
internal party
17 Signal strength (
¢ page 20)
¢ page 30)
¢ page 40)
¢ page 45)
¢ page 37)
¢ page 20)
¢ page 13)
Version 4, 29.10.2007
1
C385 V310AM / USA / A31008-M2026-R351-1-6019 / overview.fm / 04.11.2008
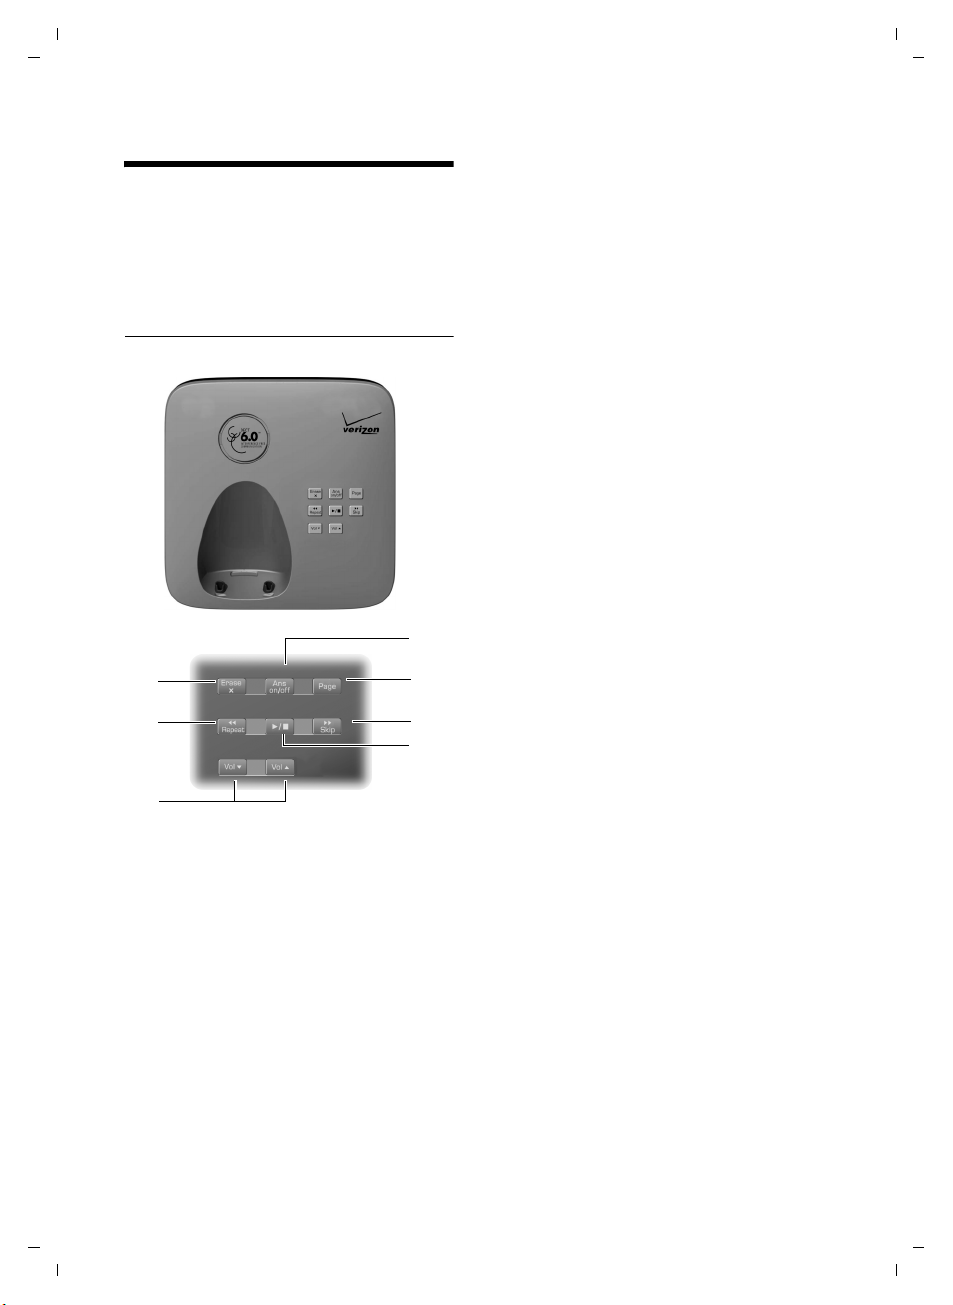
The base station at a glance
The base station at a glance
You can use the keys on the base station to
register handsets to the base station,
search for handsets (paging)
and operate the integrated answer
machine.
Verizon 310AM base station
6
¢ page 39
2
1
During message playback:
3Play/Stop key:
Play back new messages from answer
machine or cancel the playback
(press briefly).
Play back new and old messages
(press and hold).
LED flashes: At least one new message is
present.
LED flickers: Memory is full.
4 Skip to next message (press once) or mes-
sage after next (press twice).
5 Skip back to beginning of the message
(press once) or to the previous message
(press twice).
6 Delete current message.
7 Adjust volume during message playback:
ð = quieter; ñ = louder.
While an external call is being signaled:
Adjust ringer melody volume.
Please note:
u If the answer machine is being oper-
ated from a hands et, or if it is re cordi ng
a message, you cannot operate it from
the base station.
u If the LED flashes although the answer
machine is switched off, it means there
is still at least one new message that
has not been played back yet.
Version 4, 29.10.2007
5
7
1 Registration/Paging key:
Press briefly: Search for handsets (paging),
¢ page 39.
Press and hold: Register handsets and DECT
devices,
2 On/Off key: Activate/deactivate answer ma-
chine.
LED lights up: Answer machine is activated.
LED flashes: The answer machine is record-
ing a new message.
2
¢ page 39.
4
3

C385 V310AM / USA / A31008-M2026-R351-1-6019 / C385IVZ.fm / 04.11.2008
Contents
The handset at a glance . . . . . . . . . . . . . . . . . . . . . . . . . . . . . . . . . . 1
The base station at a glance . . . . . . . . . . . . . . . . . . . . . . . . . . . . . . 2
Safety precautions . . . . . . . . . . . . . . . . . . . . . . . . . . . . . . . . . . . . . 6
First steps . . . . . . . . . . . . . . . . . . . . . . . . . . . . . . . . . . . . . . . . . . . . . 7
Check the package contents . . . . . . . . . . . . . . . . . . . . . . . . . . . . . . . . . . . . . . 7
Setting up the base station and charging cradle (if included) . . . . . . . . . . . 10
Connecting the base station . . . . . . . . . . . . . . . . . . . . . . . . . . . . . . . . . . . . . 10
Connecting the charging cradle (if included) . . . . . . . . . . . . . . . . . . . . . . . 11
Setting up the handset for use . . . . . . . . . . . . . . . . . . . . . . . . . . . . . . . . . . . 12
Area codes . . . . . . . . . . . . . . . . . . . . . . . . . . . . . . . . . . . . . . . . . . . . . . . . . . . 17
Connecting the headset . . . . . . . . . . . . . . . . . . . . . . . . . . . . . . . . . . . . . . . . 18
What would you like to do next? . . . . . . . . . . . . . . . . . . . . . . . . . . . . . . . . . . 19
Using the phone . . . . . . . . . . . . . . . . . . . . . . . . . . . . . . . . . . . . . . . 20
Control key . . . . . . . . . . . . . . . . . . . . . . . . . . . . . . . . . . . . . . . . . . . . . . . . . . . 20
Display keys . . . . . . . . . . . . . . . . . . . . . . . . . . . . . . . . . . . . . . . . . . . . . . . . . . 20
Keys on the keypad . . . . . . . . . . . . . . . . . . . . . . . . . . . . . . . . . . . . . . . . . . . . 21
Correcting incorrect entries . . . . . . . . . . . . . . . . . . . . . . . . . . . . . . . . . . . . . . 21
Menu guidance . . . . . . . . . . . . . . . . . . . . . . . . . . . . . . . . . . . . . . . . . . . . . . . 21
Activating/deactivating the handset . . . . . . . . . . . . . . . . . . . . . . . . . . . . . . . 22
Activating/deactivating the keypad lock . . . . . . . . . . . . . . . . . . . . . . . . . . . . 22
Illustration of operating steps in the user guide . . . . . . . . . . . . . . . . . . . . . . 23
Menu tree . . . . . . . . . . . . . . . . . . . . . . . . . . . . . . . . . . . . . . . . . . . . 24
Making calls . . . . . . . . . . . . . . . . . . . . . . . . . . . . . . . . . . . . . . . . . . 26
Making an external call . . . . . . . . . . . . . . . . . . . . . . . . . . . . . . . . . . . . . . . . . 26
Ending a call . . . . . . . . . . . . . . . . . . . . . . . . . . . . . . . . . . . . . . . . . . . . . . . . . 26
Answering a call . . . . . . . . . . . . . . . . . . . . . . . . . . . . . . . . . . . . . . . . . . . . . . 26
Caller ID . . . . . . . . . . . . . . . . . . . . . . . . . . . . . . . . . . . . . . . . . . . . . . . . . . . . . 26
Handsfree talking . . . . . . . . . . . . . . . . . . . . . . . . . . . . . . . . . . . . . . . . . . . . . 27
Muting . . . . . . . . . . . . . . . . . . . . . . . . . . . . . . . . . . . . . . . . . . . . . . . . . . . . . . 27
CID 2.5 services (network services) . . . . . . . . . . . . . . . . . . . . . . . . . . . . . . . 27
Using the directory and lists . . . . . . . . . . . . . . . . . . . . . . . . . . . . . 28
Directory . . . . . . . . . . . . . . . . . . . . . . . . . . . . . . . . . . . . . . . . . . . . . . . . . . . . 28
Last number redial list . . . . . . . . . . . . . . . . . . . . . . . . . . . . . . . . . . . . . . . . . . 30
Opening lists with the Message key . . . . . . . . . . . . . . . . . . . . . . . . . . . . . . . 30
Making cost-effective calls . . . . . . . . . . . . . . . . . . . . . . . . . . . . . . 32
Displaying the call duration . . . . . . . . . . . . . . . . . . . . . . . . . . . . . . . . . . . . . . 32
Contents
Version 4, 29.10.2007
3

C385 V310AM / USA / A31008-M2026-R351-1-6019 / C385IVZ.fm / 04.11.2008
Contents
Operating the answer machine of the
Verizon 310AM base station . . . . . . . . . . . . . . . . . . . . . . . . . . . . . 33
Operation using the handset . . . . . . . . . . . . . . . . . . . . . . . . . . . . . . . . . . . . . 33
Activating/deactivating call screening . . . . . . . . . . . . . . . . . . . . . . . . . . . . . . 35
Setting up the answer machine . . . . . . . . . . . . . . . . . . . . . . . . . . . . . . . . . . 35
Resetting fast access for the answer machine using Key 1 . . . . . . . . . . . . . . 35
Operating when on the move (remote operation) . . . . . . . . . . . . . . . . . . . . 36
Using the network mailbox . . . . . . . . . . . . . . . . . . . . . . . . . . . . . . 37
Configuring fast access for the network mailbox . . . . . . . . . . . . . . . . . . . . . 37
Viewing the network mailbox report . . . . . . . . . . . . . . . . . . . . . . . . . . . . . . 37
ECO DECT . . . . . . . . . . . . . . . . . . . . . . . . . . . . . . . . . . . . . . . . . . . . . 38
Setting the alarm clock . . . . . . . . . . . . . . . . . . . . . . . . . . . . . . . . . 38
Using several handsets . . . . . . . . . . . . . . . . . . . . . . . . . . . . . . . . . 39
Registering handsets . . . . . . . . . . . . . . . . . . . . . . . . . . . . . . . . . . . . . . . . . . . 39
De-registering handsets . . . . . . . . . . . . . . . . . . . . . . . . . . . . . . . . . . . . . . . . 39
Locating a handset ("paging") . . . . . . . . . . . . . . . . . . . . . . . . . . . . . . . . . . . . 39
Making internal calls . . . . . . . . . . . . . . . . . . . . . . . . . . . . . . . . . . . . . . . . . . . 40
Listening in to an external call (conference) . . . . . . . . . . . . . . . . . . . . . . . . . 40
Handset settings . . . . . . . . . . . . . . . . . . . . . . . . . . . . . . . . . . . . . . 41
Changing date and time . . . . . . . . . . . . . . . . . . . . . . . . . . . . . . . . . . . . . . . . 41
Changing the display language . . . . . . . . . . . . . . . . . . . . . . . . . . . . . . . . . . . 41
Setting the display . . . . . . . . . . . . . . . . . . . . . . . . . . . . . . . . . . . . . . . . . . . . . 41
Activating/deactivating auto answer . . . . . . . . . . . . . . . . . . . . . . . . . . . . . . . 41
Changing the handsfree/earpiece volume . . . . . . . . . . . . . . . . . . . . . . . . . . 41
Changing ringer melodies . . . . . . . . . . . . . . . . . . . . . . . . . . . . . . . . . . . . . . . 42
Activating/deactivating muting for the first ringer tone . . . . . . . . . . . . . . . . 42
Advisory tones . . . . . . . . . . . . . . . . . . . . . . . . . . . . . . . . . . . . . . . . . . . . . . . . 43
Restoring the handset to the factory settings . . . . . . . . . . . . . . . . . . . . . . . . 43
Base station settings . . . . . . . . . . . . . . . . . . . . . . . . . . . . . . . . . . . 43
Protecting against unauthorized access . . . . . . . . . . . . . . . . . . . . . . . . . . . . 43
Changing ringer melodies . . . . . . . . . . . . . . . . . . . . . . . . . . . . . . . . . . . . . . . 44
Repeater support . . . . . . . . . . . . . . . . . . . . . . . . . . . . . . . . . . . . . . . . . . . . . . 44
Restoring the base station to the factory settings . . . . . . . . . . . . . . . . . . . . 44
Connecting the phone to a PABX . . . . . . . . . . . . . . . . . . . . . . . . . 45
Dialing modes and recall . . . . . . . . . . . . . . . . . . . . . . . . . . . . . . . . . . . . . . . . 45
Setting pauses . . . . . . . . . . . . . . . . . . . . . . . . . . . . . . . . . . . . . . . . . . . . . . . . 45
Switching temporarily to touch-tone dialing (DTMF) . . . . . . . . . . . . . . . . . . 45
Troubleshooting . . . . . . . . . . . . . . . . . . . . . . . . . . . . . . . . . . . . . . . 46
Version 4, 29.10.2007
4

C385 V310AM / USA / A31008-M2026-R351-1-6019 / C385IVZ.fm / 04.11.2008
Appendix . . . . . . . . . . . . . . . . . . . . . . . . . . . . . . . . . . . . . . . . . . . . . 47
Care . . . . . . . . . . . . . . . . . . . . . . . . . . . . . . . . . . . . . . . . . . . . . . . . . . . . . . . . 47
Contact with liquid . . . . . . . . . . . . . . . . . . . . . . . . . . . . . . . . . . . . . . . . . . . . 47
Specifications . . . . . . . . . . . . . . . . . . . . . . . . . . . . . . . . . . . . . . . . . . . . . . . . . 47
Writing and editing text . . . . . . . . . . . . . . . . . . . . . . . . . . . . . . . . . . . . . . . . . 48
FCC / ACTA Information . . . . . . . . . . . . . . . . . . . . . . . . . . . . . . . . . . . . . . . . . 49
Safety precautions . . . . . . . . . . . . . . . . . . . . . . . . . . . . . . . . . . . . . . . . . . . . . 50
Service (Customer Care) . . . . . . . . . . . . . . . . . . . . . . . . . . . . . . . . . . . . . . . . 52
End-user limited warranty . . . . . . . . . . . . . . . . . . . . . . . . . . . . . . . . . . . . . . . 52
Accessories . . . . . . . . . . . . . . . . . . . . . . . . . . . . . . . . . . . . . . . . . . . 56
Mounting the base station on the wall . . . . . . . . . . . . . . . . . . . . 57
Mounting the charging cradle on the wall . . . . . . . . . . . . . . . . . 57
Index . . . . . . . . . . . . . . . . . . . . . . . . . . . . . . . . . . . . . . . . . . . . . . . . . 58
Contents
Version 4, 29.10.2007
5

C385 V310AM / USA / A31008-M2026-R351-1-6019 / security.fm / 04.11.2008
Safety precautions
Safety precautions *
!
Warning
Read the safety precautions and the user guide before use.
Explain them and the potential hazards associated with using the telephone to your
children.
Only use the power adapter supplied, as indicated on the underside of the base
$
station or charging cradle..
Only insert approved rechargeable batteries of the same type.
Never use ordinary (non-rechargeable) batteries as they may pose a health
hazard or cause injury.
Do not charge the handset in charging cradle or base station while the headset
is connected.
The operation of medical appliances may be affected. Be aware of the technical
conditions in your particular environment, such as a doctor's office.
Notice to Hearing Aid Wearers:
This phone system is compatible with inductively coupled hearing aids.
Do not install the base station or charging cradle in bathrooms or shower rooms.
The base station and charging cradle are not splash proof (
¢ page 47).
Version 4, 29.10.2007
Do not use your phone in environments with a potential explosion hazard
(e.g. paint shops).
ƒ
If you give your telephone to someone else, make sure you include the user
guide.
Please remove faulty base stations from use or have them repaired by Verizon
Service, as they could interfere with other wireless services.
Dispose of batteries and the phone carefully. Do not pollute the environment.
Emergency numbers cannot be dialed if the keypad lock is activated!
*also see page50
6
C385 V310AM / USA / A31008-M2026-R351-1-6019 / starting.fm / 04.11.2008
First steps
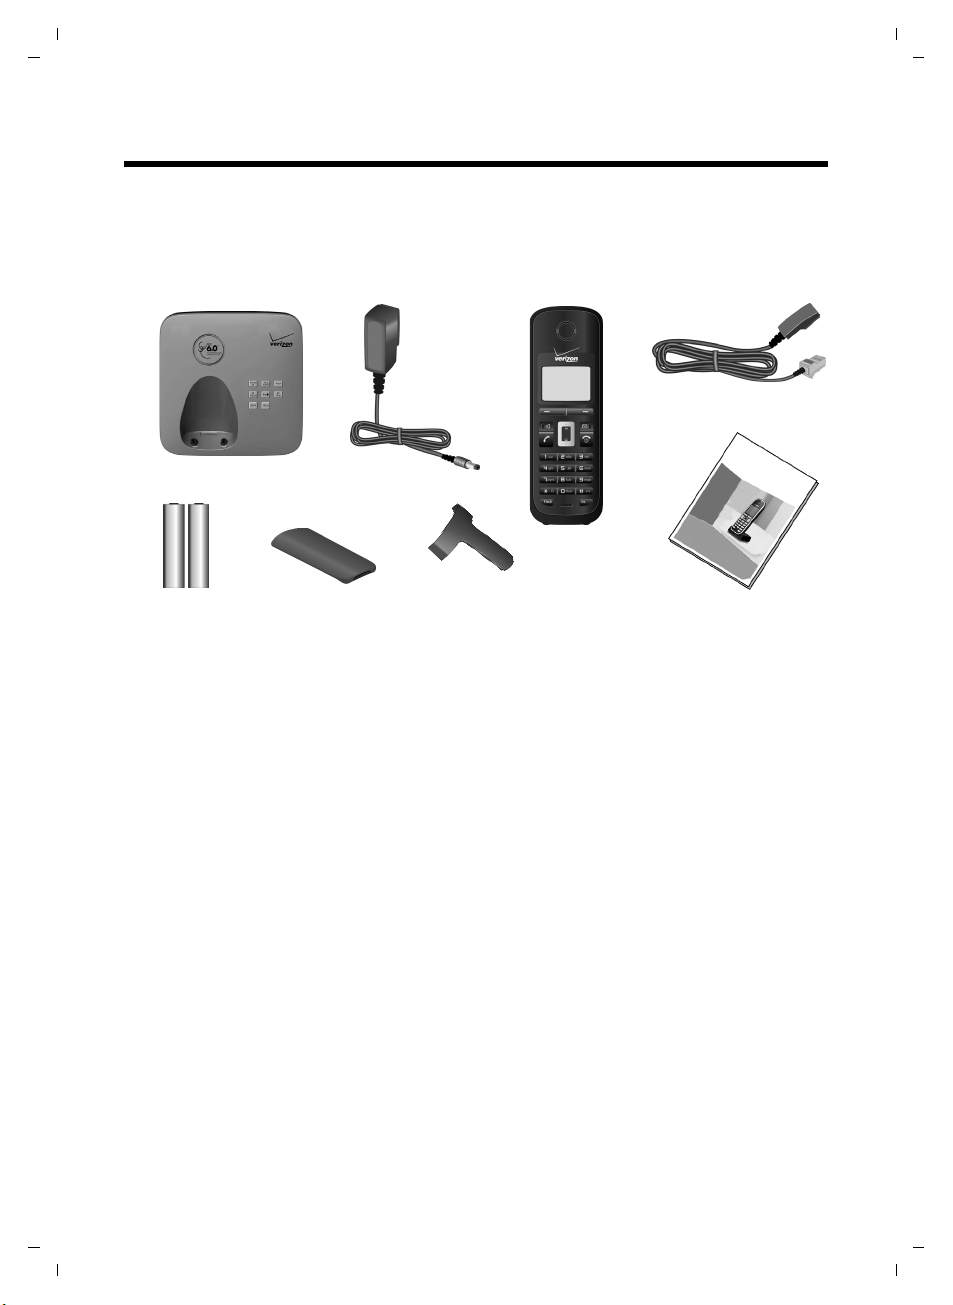
Check the package contents
Verizon 310AM-1
First steps
5
21
6
1 One Verizon 310AM-1 base station
2 One power adapter for the base station
3 One handset
4 One phone cord
5 Two b a t teries
6 One battery cover
7 One belt clips
8 One user guide
7
34
8
Version 4, 29.10.2007
7

C385 V310AM / USA / A31008-M2026-R351-1-6019 / starting.fm / 04.11.2008
First steps
Verizon 310AM-2
5
21
34
6
8
9
1 One Verizon 310AM-2 base station
2 One power adapter for the base station
3 One charging cradle
4 One power adapter for charging cradles
5 Two h a n d sets
6 One phone cord
7 Four batteries
8 Two b a t ter y c overs
9 Two belt clips
10 One user guide
7
10
Version 4, 29.10.2007
8

C385 V310AM / USA / A31008-M2026-R351-1-6019 / starting.fm / 04.11.2008
Verizon 310AM-3
First steps
5
8
9
21
3 4
6
7
10
Version 4, 29.10.2007
1 One Verizon 310AM-3 base station
2 One power adapter for the base station
3 Two charging cradles
4 Two power adapters for charging cradles
5 Three handsets
6 One phone cord
7 Six batteries
8 Three battery covers
9 Three belt clips
10 One user guide
9
C385 V310AM / USA / A31008-M2026-R351-1-6019 / starting.fm / 04.11.2008
First steps
Setting up the base station and charging cradle (if included)
The base station and charging cradle are designed for use in enclosed dry
rooms within a temperature range of +41°F to +113°F.
¤ Set up the base station and charging cradles at a central location, on a flat,
nonslip surface in your house or apartment.
Please note
Keep in mind the range of the base station.
It is up to 984 feet in unobstructed outdoor areas and up to 165 feet inside
buildings. The range is reduced when Eco Mode (
The phone's feet do not usually leave any marks on surfaces. However, due to
the multitude of different varnishes and polishes used on today's furniture, the
occurrence of marks on the surfaces cannot be completely ruled out.
For instructions on how to mount the base station and charging cradle on a
¢ page 57.
wall,
Please note:
u Never expose the telephone to heat sources, direct sunlight, or other elec-
trical devices.
u Protect your telephone from moisture, dust, and corrosive liquids and
vapors.
¢ page 38) is activated.
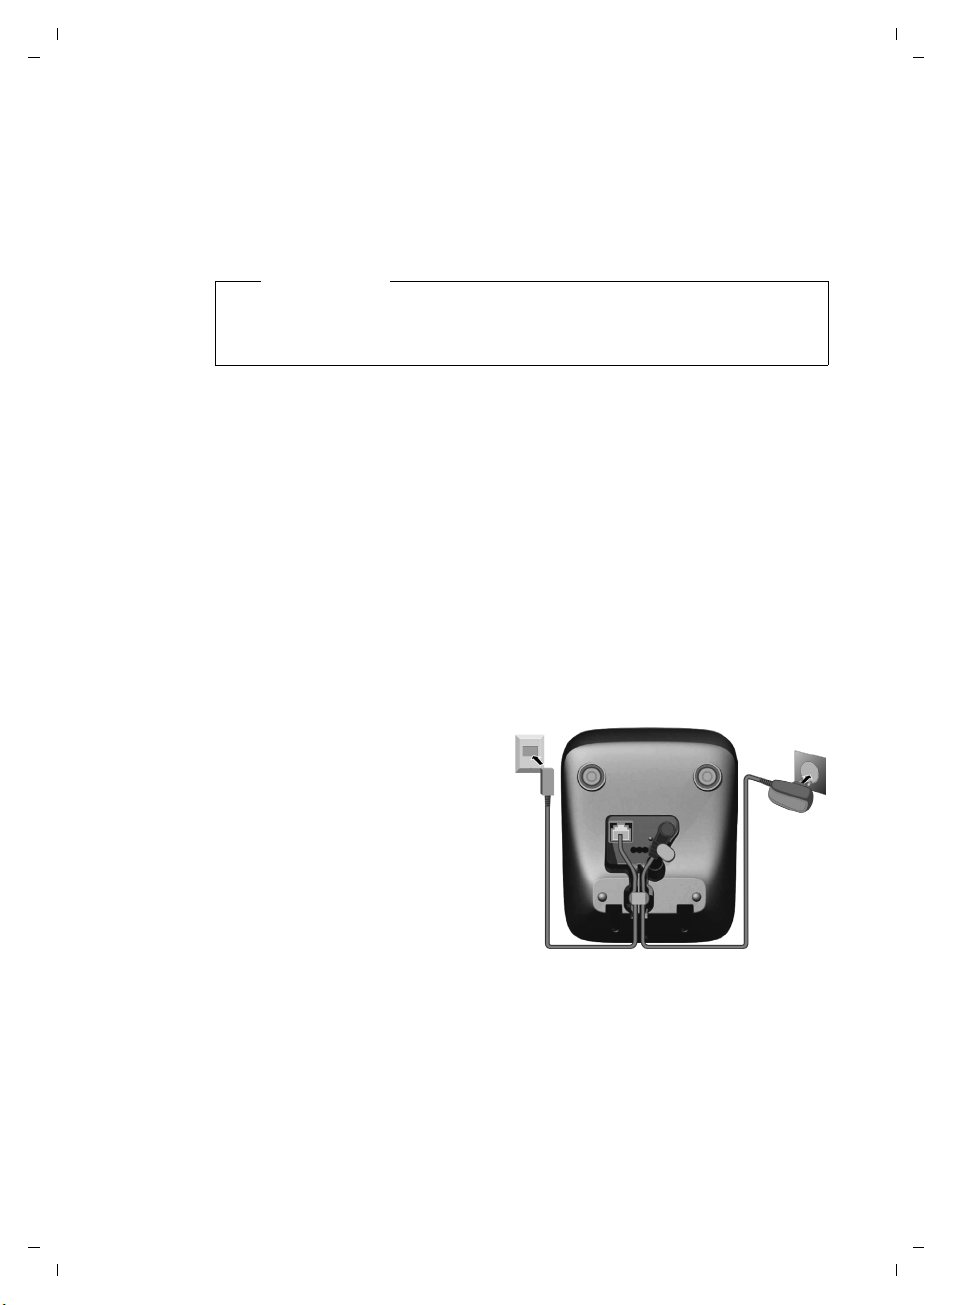
Connecting the base station
¤ First connect the
power adapter 1.
¤ Then connect the
telephone jack 2,
and insert the cables
into the cableducts.
Please note:
u The power adapter
must always be connected, as the phone
will not operate without a power connection.
u Only use the power adapter and phone cord supplied. Pin connections on
telephone cables can vary (pin connections
10
2
1
1
1
1
1
¢ page 48).
Version 4, 29.10.2007
C385 V310AM / USA / A31008-M2026-R351-1-6019 / starting.fm / 04.11.2008
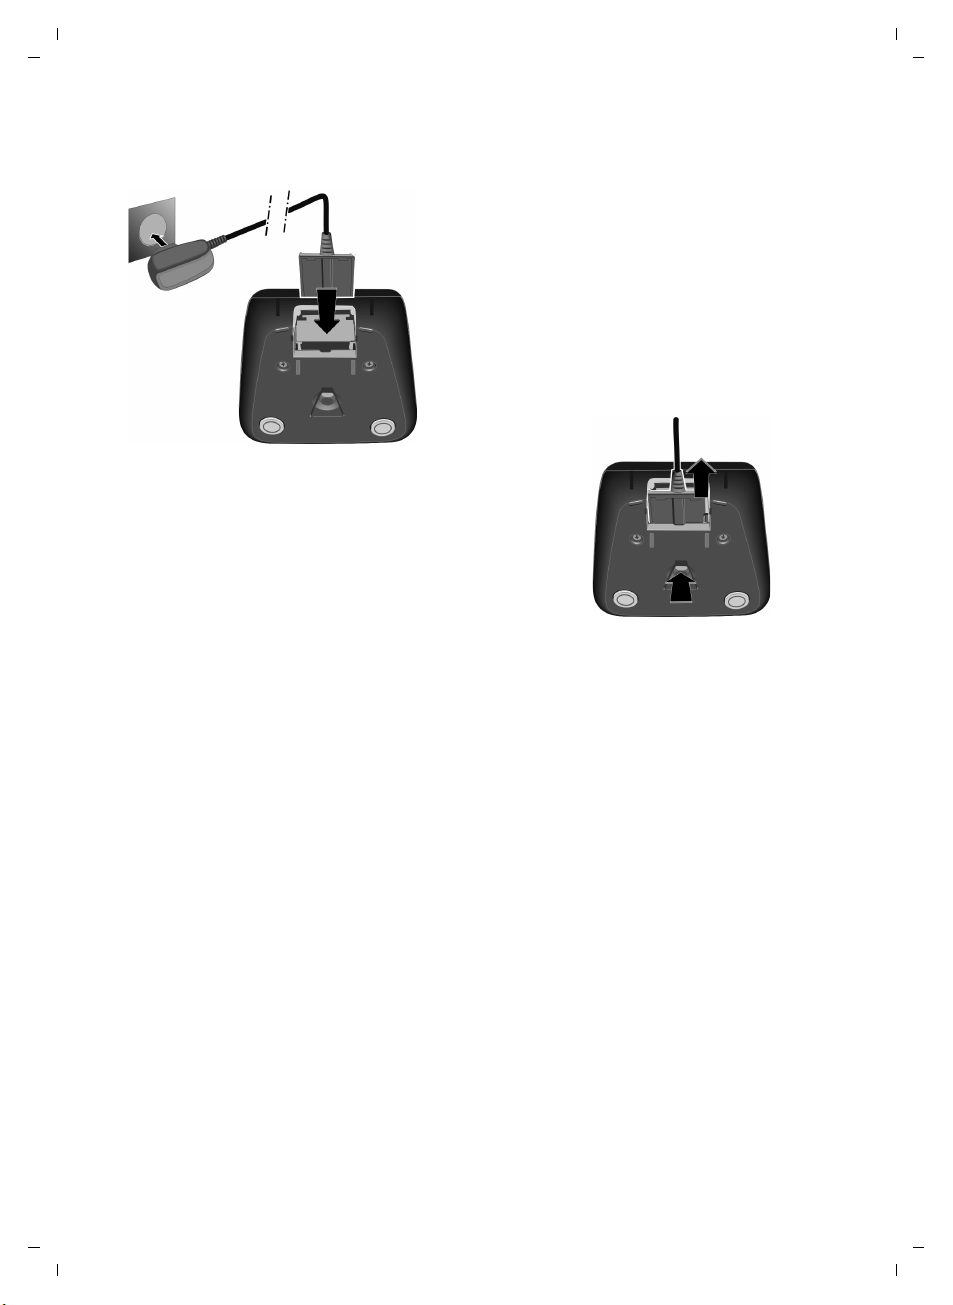
Connecting the charging cradle (if included)
2
1
¤ Connect the flat plug of the power
adapter 1.
¤ Plug the power adapter into the plug
socket 2.
If you need to disconnect the plug from the
charging cradle, press the release button 1
and disconnect the plug 2.
First steps
2
1
Version 4, 29.10.2007
11

C385 V310AM / USA / A31008-M2026-R351-1-6019 / starting.fm / 04.11.2008
First steps
Setting up the handset for use
The display is protected by a plastic film. Please remove the
protective film!
Inserting the batteries and closing the battery cover
Warning
Use only rechargeable UL approved AAA batteries. Never use a conventional
(non-rechargeable) battery or other battery types, as this could result in significant health risks and personal injury. For example, the batteries could
explode. The phone could also malfunction or be damaged as a result of
using batteries that are not of the recommended type.
¤ Insert the batteries in the cor-
rect orientation.
The polarity is indicated in/on
the battery compartment.
12
a
If you need to open the battery
cover, for example, to replace the
batteries, place your fingertip into
the cavity on the casing and pull
the battery cover upwards.
¤ First insert the battery cover
b
at the top a.
¤ Then press the cover b until
it clicks into place.
Version 4, 29.10.2007
C385 V310AM / USA / A31008-M2026-R351-1-6019 / starting.fm / 04.11.2008
Attaching the belt clip
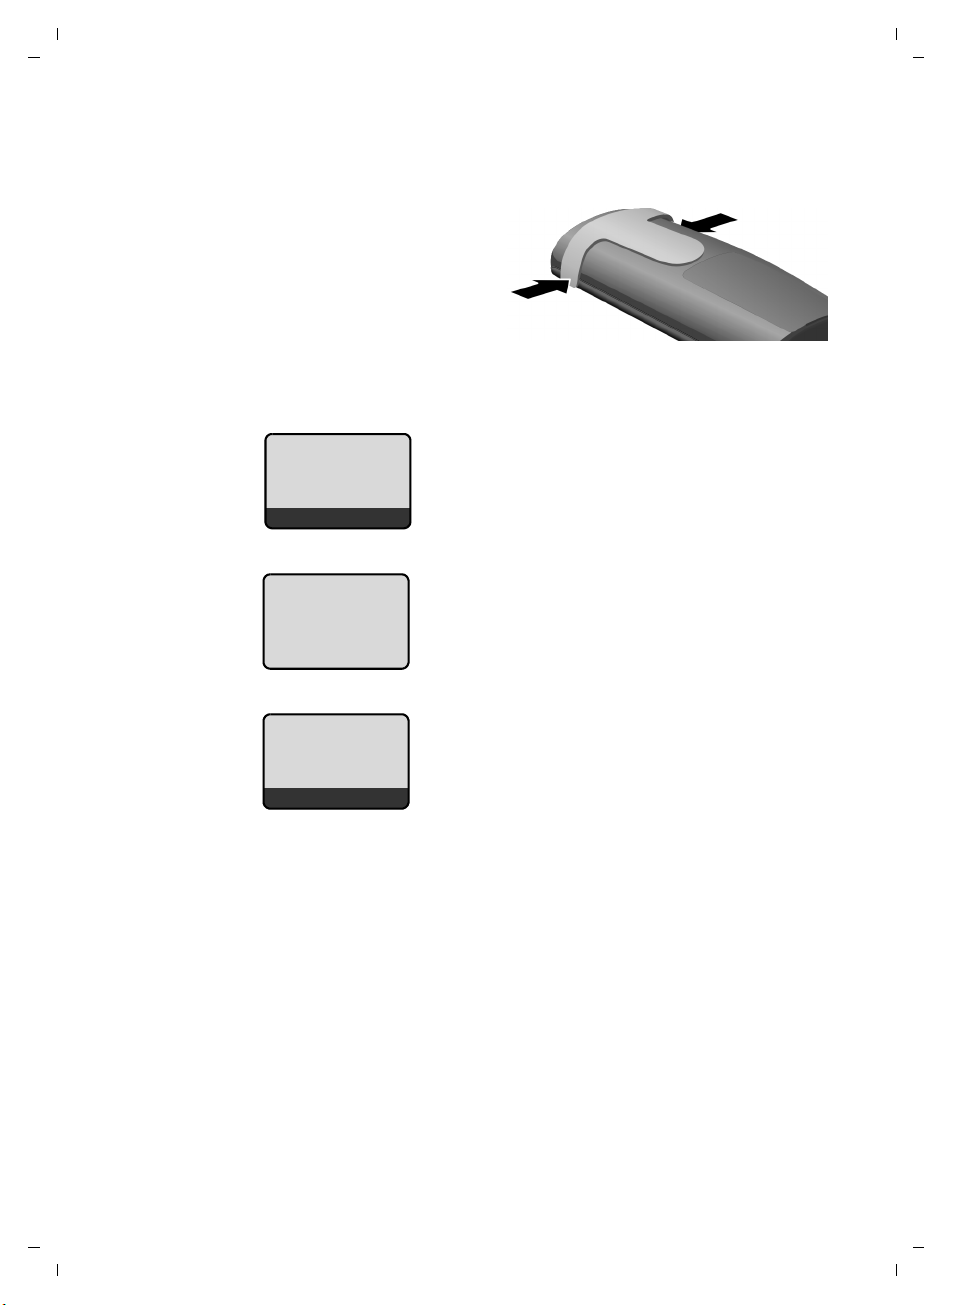
The handset has notches on each side to accommodate the belt clip.
¤ Press the belt clip onto the back
of the handset so that the
notches on the belt clip click
into position.
Placing the handset into the base station and registering
Before you can use the phone, you must
Place handset
on base
Menu
Handset is
registering
ë
first register the handset to the base station.
¤ Place the handset with the display
facing up in the base station.
The handset registers automatically.
Registration can take up to 5 minutes.
Do not remove the handset from the base
station during this time.
First steps
Version 4, 29.10.2007
ÐV
Þ
If you purchased a model with multiple handsets, repeat the registration
process for each handset. Handsets are assigned the lowest available internal
number (1–4). If more than one handset is registered to the base station, the
internal handset number appears on the display (e.g. INT 2). If the internal numbers 1–4 are already assigned to other devices, the number 4 will be overwritten.
Menu
The following is displayed after successful
registration:
u The strength of the reception signal
between base station and handset:
– Good to poor: ÐiÑÒ
–No reception: | flashes
u Battery charge status:
– = e V U (flat to full)
– = flashes: batteries almost flat
– e V U flashes: charging proce-
dure
13

C385 V310AM / USA / A31008-M2026-R351-1-6019 / starting.fm / 04.11.2008
First steps
Please note
u Each key press interrupts the automatic registration.
u If automatic registration does not work, you must register the handset
manually (
To charge the batteries, leave the handset in the charging cradle.
¢ page 39).
Please note
Only place the handset in the base station or charging cradle that is
intended for it.
Should you have any questions and problems
¢ page 46.
Initial charging and discharging of batteries
The correct charge level can only be displayed if the batteries are first fully
charged and discharged.
¤ Place the handset in the base station or
charging cradle for eleven hours.
¤ Then remove the handset
11 h
Please note
u After the first battery charge and discharge, you may replace your hand-
set in its base station or charging cradle after every call.
u Always repeat the charging and discharging procedure if you remove the
batteries from the handset and reinsert them.
u The batteries may warm up during charging. This is not dangerous.
u After a while, the charge capacity of the batteries will decrease for
technical reasons.
from the base station or
charging cradle, and do not
replace it until the batteries
are completely discharged.
Version 4, 29.10.2007
14
C385 V310AM / USA / A31008-M2026-R351-1-6019 / starting.fm / 04.11.2008
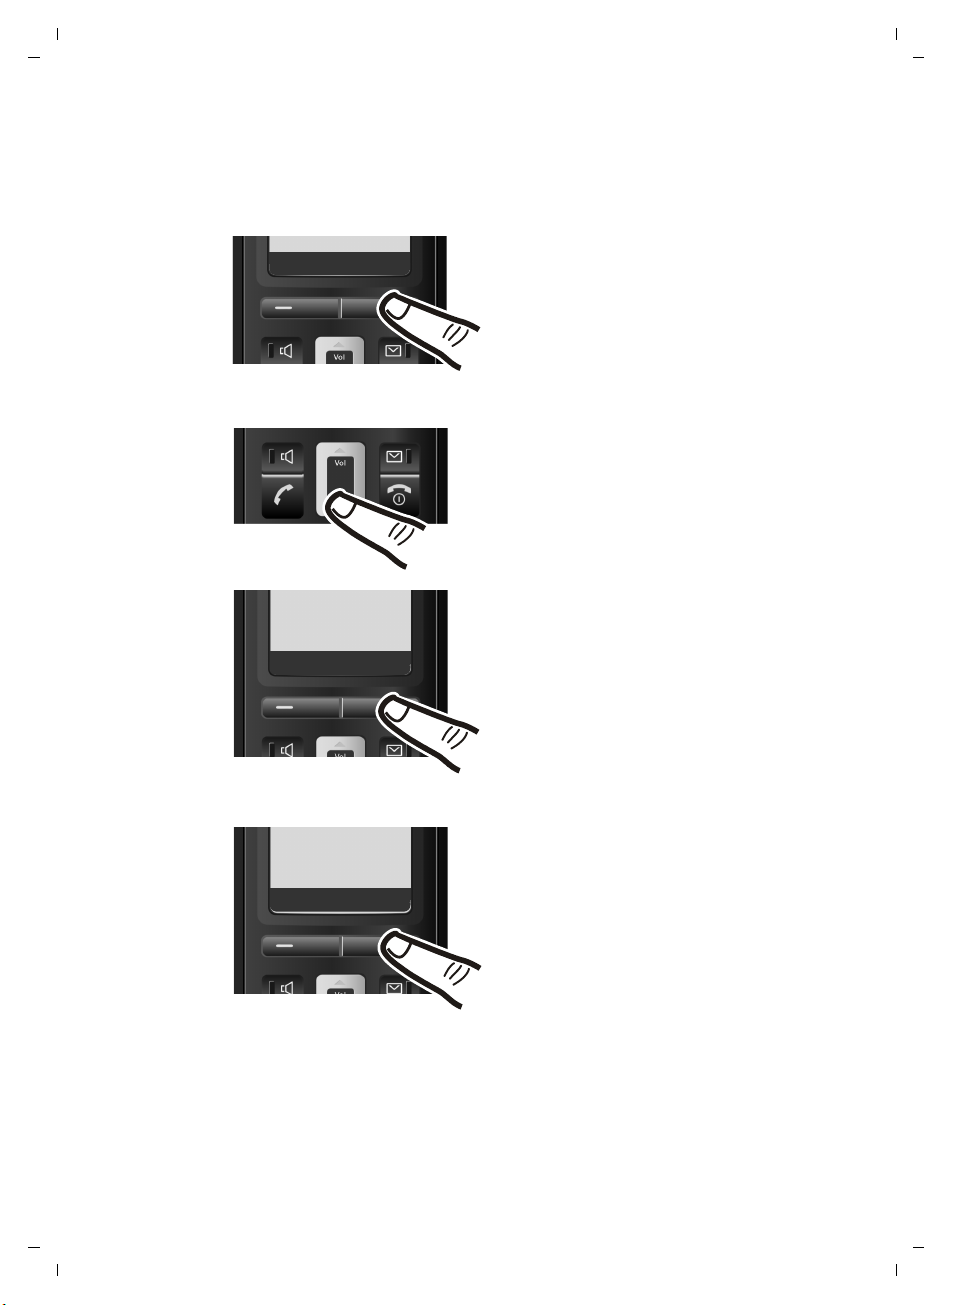
Setting the date and time
Set the date and time so that the correct date and time can be assigned to
incoming calls, and so that the alarm can be used.
First steps
Þ
Ç
Settings
U OK
Menu
¤ Press the key below §Menu§ on the
display screen to open the main
menu.
¤ Press the bottom of the
Control key ...
... until the Settings menu item
appears.
¤ Press the key below §OK§ on the
display screen to confirm your
selection.
Version 4, 29.10.2007
Date/Time
Ç
The Date/Time menu item appears
on the display.
U OK
¤ Press the key below §OK§ on the
display screen to open the input
field.
15
C385 V310AM / USA / A31008-M2026-R351-1-6019 / starting.fm / 04.11.2008
First steps
Enter Date:
[10.01.2008]
Ç
T OK
Ç
T OK
Enter time:
[07:15]
Ç
T OK
¤ The active line is marked [...].
Enter month, day and year as an
8-digit number using the handset
QQ 2QQN
(e.g.
for 10/1/08).
If you want to correct an entry, press
the top or bottom of the Control key
to toggle between fields.
¤ Press the key below §OK§ on the display
screen to confirm your selection.
¤ Enter the hours and minutes as four
digits using the handset
QM 5for 07:15 AM).
(e.g.
If necessary, use the Control key to
toggle between fields.
Version 4, 29.10.2007
16
Saved
¤ Press the key below §OK§ on the display
screen to confirm your selection.
The display shows Saved. You will
hear a confirmation tone.
¤ Press and hold the End Call key a to
return to the idle status.

C385 V310AM / USA / A31008-M2026-R351-1-6019 / starting.fm / 04.11.2008
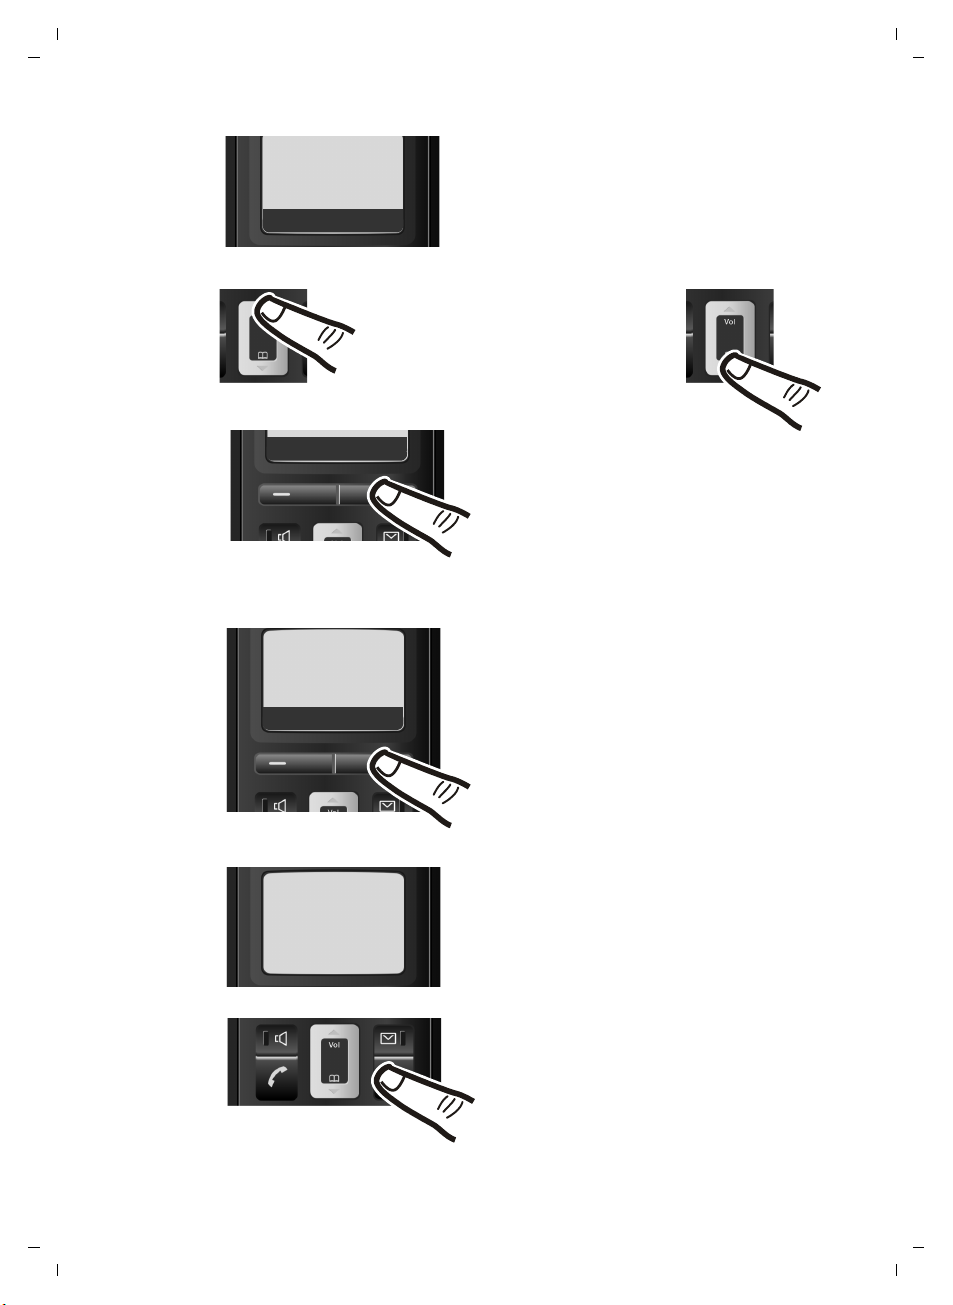
Area codes
In order to call back a caller using the incoming caller ID list (¢ page 22), your
phone's area code ("local area code" ) must b e stored. If your phone is in a "multiple area code" area, the extra codes for this area must also be stored.
Local Area Code
§Menu§ ¢ Settings ¢ Base
Local Area Code
Select and press
~ Enter local area code.
§OK§ Press the display key.
a Press and hold (idle status).
Extra Codes
§Menu§ ¢ Settings ¢ Base
Extra Codes
Select and press
~ Enter extra code.
§OK§ Press the display key.
a Press and hold (idle status).
Repeat the above steps until all extra codes for your area have been entered.
A maximum of 5 extra codes can be stored.
§OK§.
§OK§.
First steps
Version 4, 29.10.2007
Display in idle status
Once the phone is registered and the time
set, the idle display is shown, as in this example. If the answer machine is activated, the
answer machine icon × will also be displayed in the header.
Your answer machine is set with a prerecorded announcement.
Your phone is now ready to use.
ÐV
10.01.08 07:15
Þ
Menu
17
C385 V310AM / USA / A31008-M2026-R351-1-6019 / starting.fm / 04.11.2008
First steps
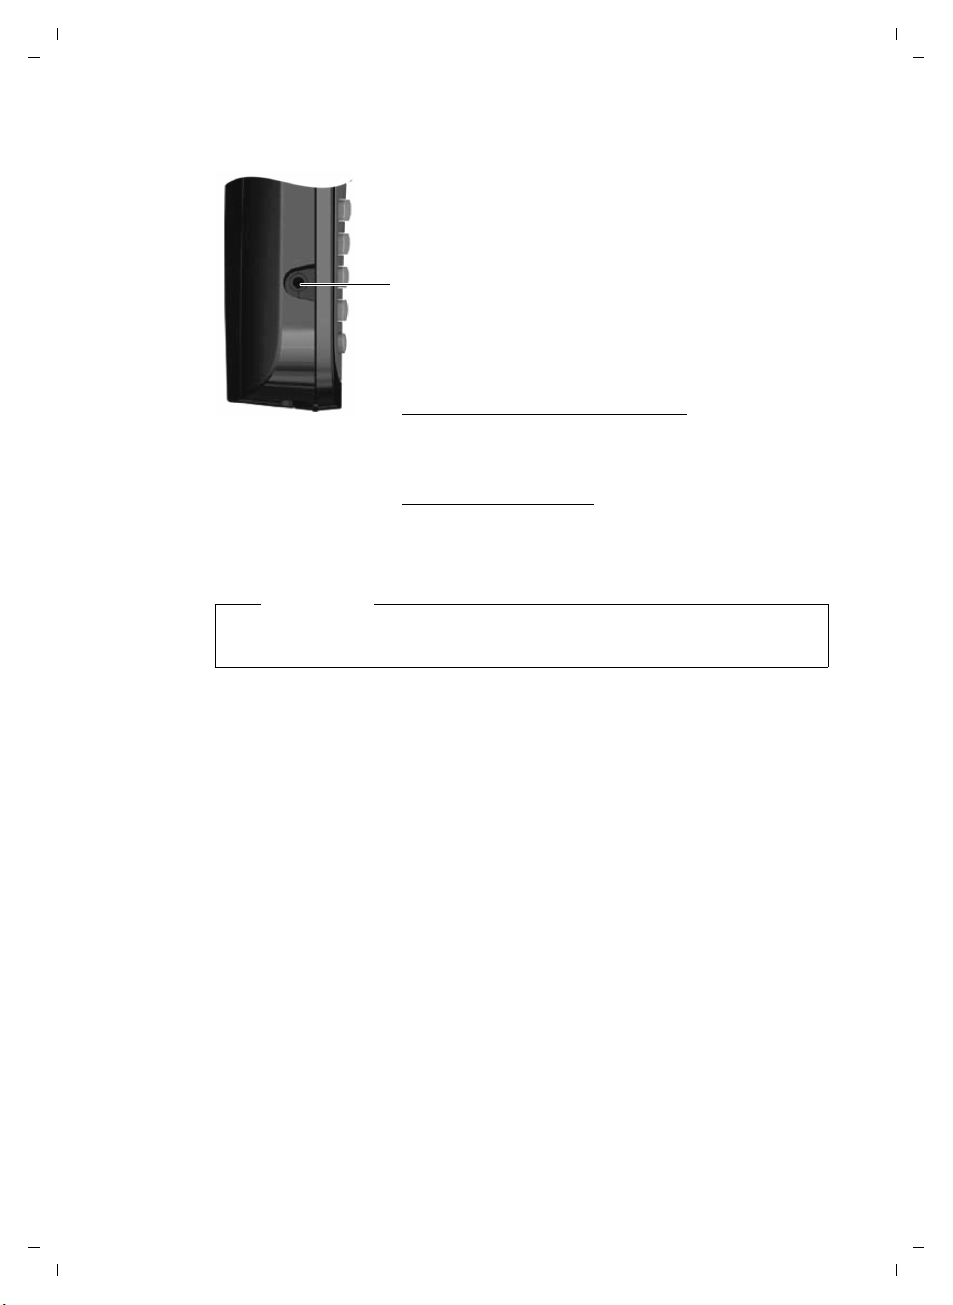
Connecting the headset
You can connect various headset types (with 2.5-mm
jack connector), including HAMA Plantronics M40,
MX100, and MX150.
A compatibility list of tested headsets can be found on
the Internet at:
www.plantronics.com/productfinder
Please call the Verizon Service number
1-866 374 3864 or contact us at
http://www.verizon.com
for information.
.
Warning
Do not charge the handset in the charging cradle or base station while the
headset is connected.
Version 4, 29.10.2007
18

C385 V310AM / USA / A31008-M2026-R351-1-6019 / starting.fm / 04.11.2008
What would you like to do next?
Now that you have successfully started your Verizon 310AM, you will probably
want to adapt it to your personal requirements. Use the following guide to
quickly locate the most important topics.
If you are unfamiliar with menu-driven devices, such as other Verizon telephones, you should first read the section titled "Using the phone"
Information on ... ... is located here.
First steps
¢ page 20.
Setting the ringer melody and volume page 42
Setting the handset volume page 41
Recording a personal message for the answer machine page 33
Setting Eco Mode page 38
Operating the telephone on a PABX page 45
Registering existing handsets to a base station page 39
Transferring directory entries from existing handsets to
the new handset(s)
If you have any questions about using your phone, please read the tips on
troubleshooting (
¢ page 46) or contact our Customer Care team (¢ page 52).
g
g
g
g
g
g
g
page 29
Version 4, 29.10.2007
19
 Loading...