

Gigaset Communications V300, V300AM User Manual
V300AM / USA EN / A31008-xxxxx-xxxx-x-6019 / AM_overview.fm / 3.1.08
Setting up the handset for use - automatic handset registration
Setting up the handset for
use - automatic handset
registration
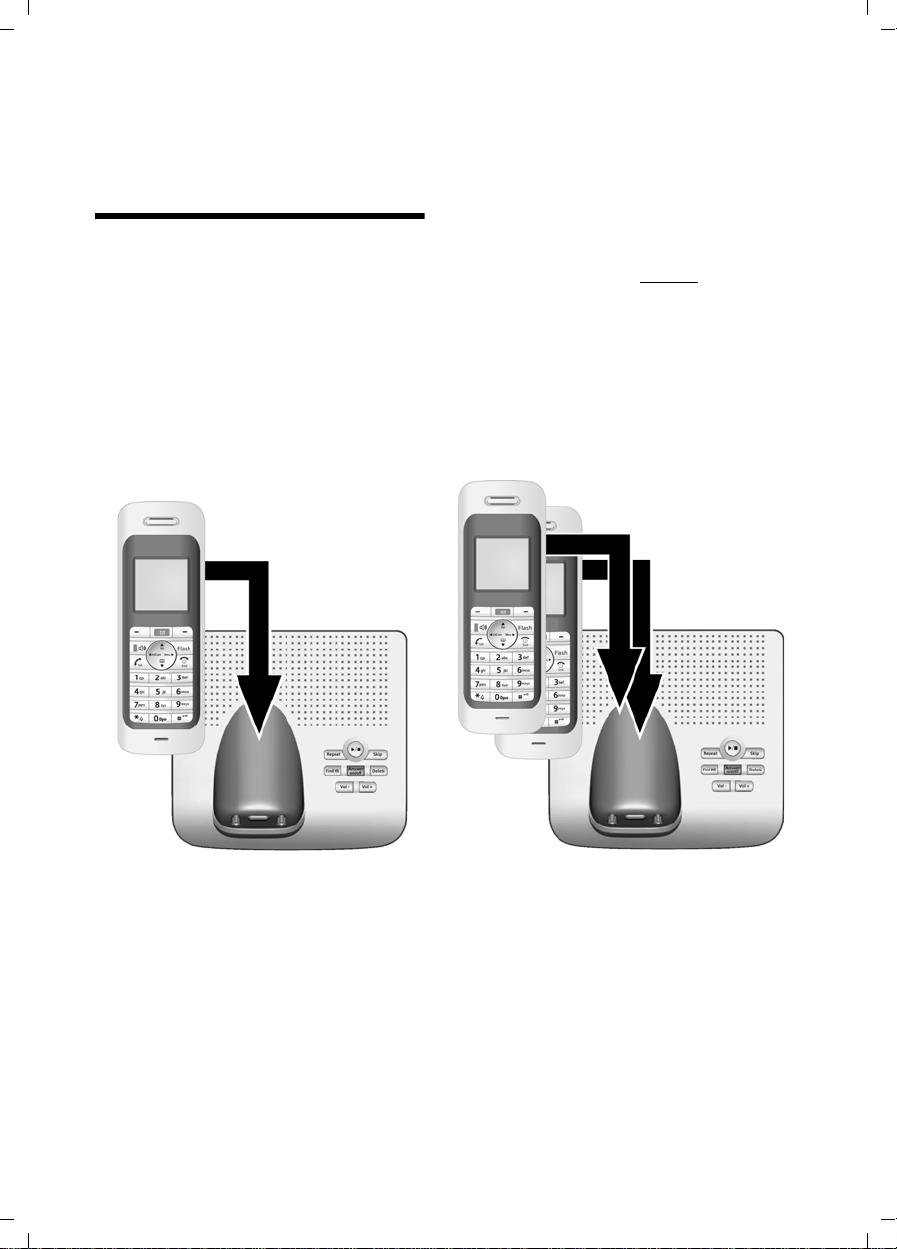
To start the automatic registration of your
handset, please place the handset in the
base with the display facing outwards.
The registration can take up to 5 minutes!
Please do NOT remove your headset from
the base station during the registration
procedure.
During this time Regstr.Procedure will
appear on the display and the name of the
base station will flash, e.g.
Base 1.
The registration is complete when you
see "INT 1" on the display.
Now please continue directly
storage of the local area code (see also
chapter "Area codes" on page 10). This
step is not essential.
However, if you skip the step, the complete functions of the local area codes will
not be available.
with the
1

V300AM / USA EN / A31008-xxxxx-xxxx-x-6019 / AM_overview.fm / 3.1.08
The handset at a glance
The handset at a glance
16
15
14
13
12
11
10
9
Ð × V
INT 1
01.31.08 9:45am
• Menu
1 Display in idle status
2 Charge status of the batteries
= e V U (empty to full)
= flashes: batteries almost empty
e V U flashes: batteries charging
3 Display keys (page 13)
4 Message key
Access to calls and message lists;
Flashes: new message
1
2
3
4
5
6
7
8
5Flash key
- Confer (Flash)
- Insert a dialing pause (press and hold)
6 End call key, On/Off key
End call, cancel function, go back one menu
level (press briefly), back to idle status
(press and hold), activate/deactivate handset (press and hold in idle status)
7 2.5 mm plug for headset
8 Pound (#) key
Key lock on/off (press and hold in idle status)
Toggle between upper/lower case and digits
9 Microphone
10 Star key
Ringtones on/off (press and hold)
Open table of special characters
11 Key 1
Select answer machine/network mailbox
(press and hold)
12 Tal k key
Answer a call, start dialing
13 Handsfree key
Switch between earpiece and handsfree
mode;
Lights up: handsfree activated;
Key flashes: incoming call
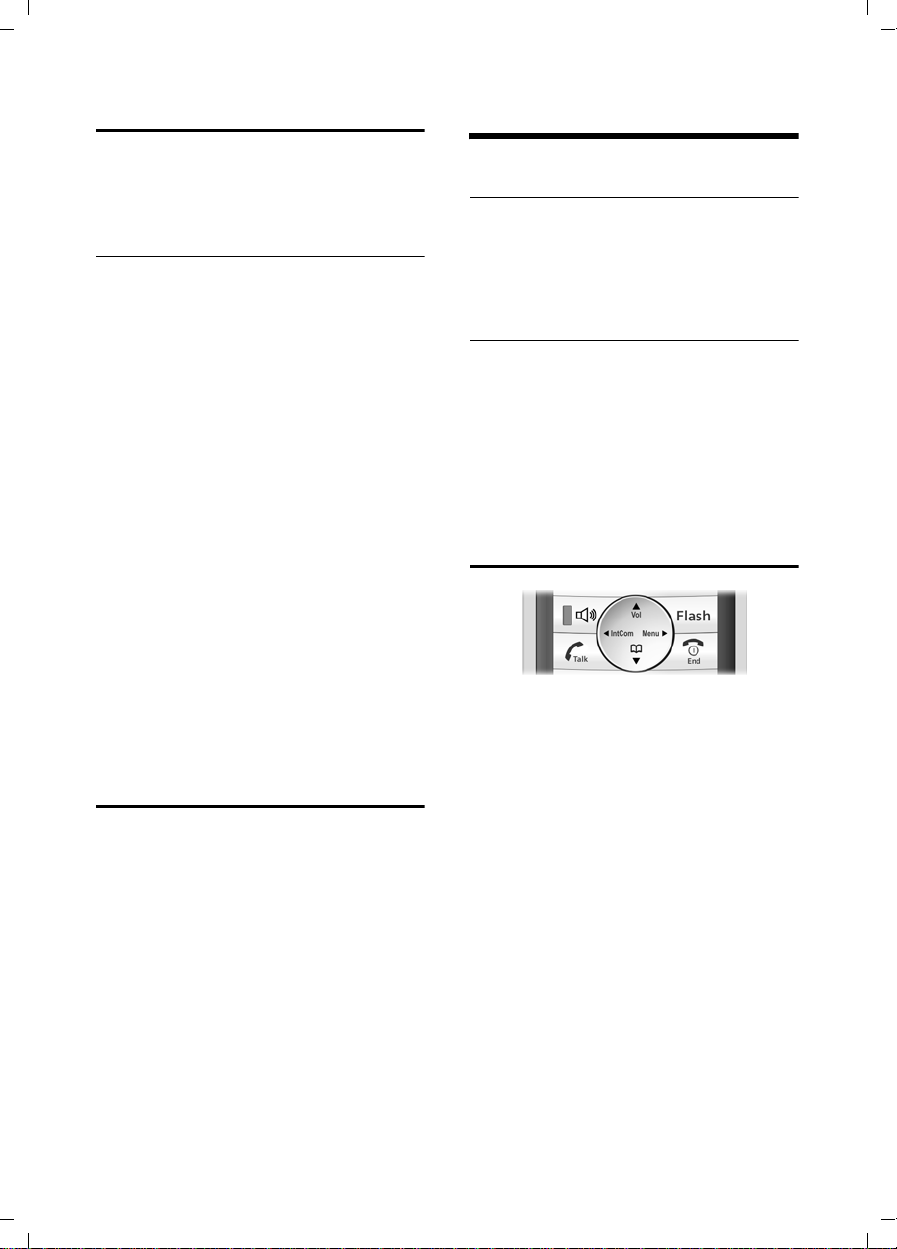
14 Control key (page 12)
15 Answer machine symbol
Answer machine switched on.
Flashes: answer machine is recording a message or is being operated by another caller.
16 Signal strength
Ð i Ñ Ò (high to low)
| flashes: Out of Range
2
V300AM / USA EN / A31008-xxxxx-xxxx-x-6019 / AM_overview.fm / 3.1.08
Base station at a glance
Base station at a glance
3
4
5
2
1
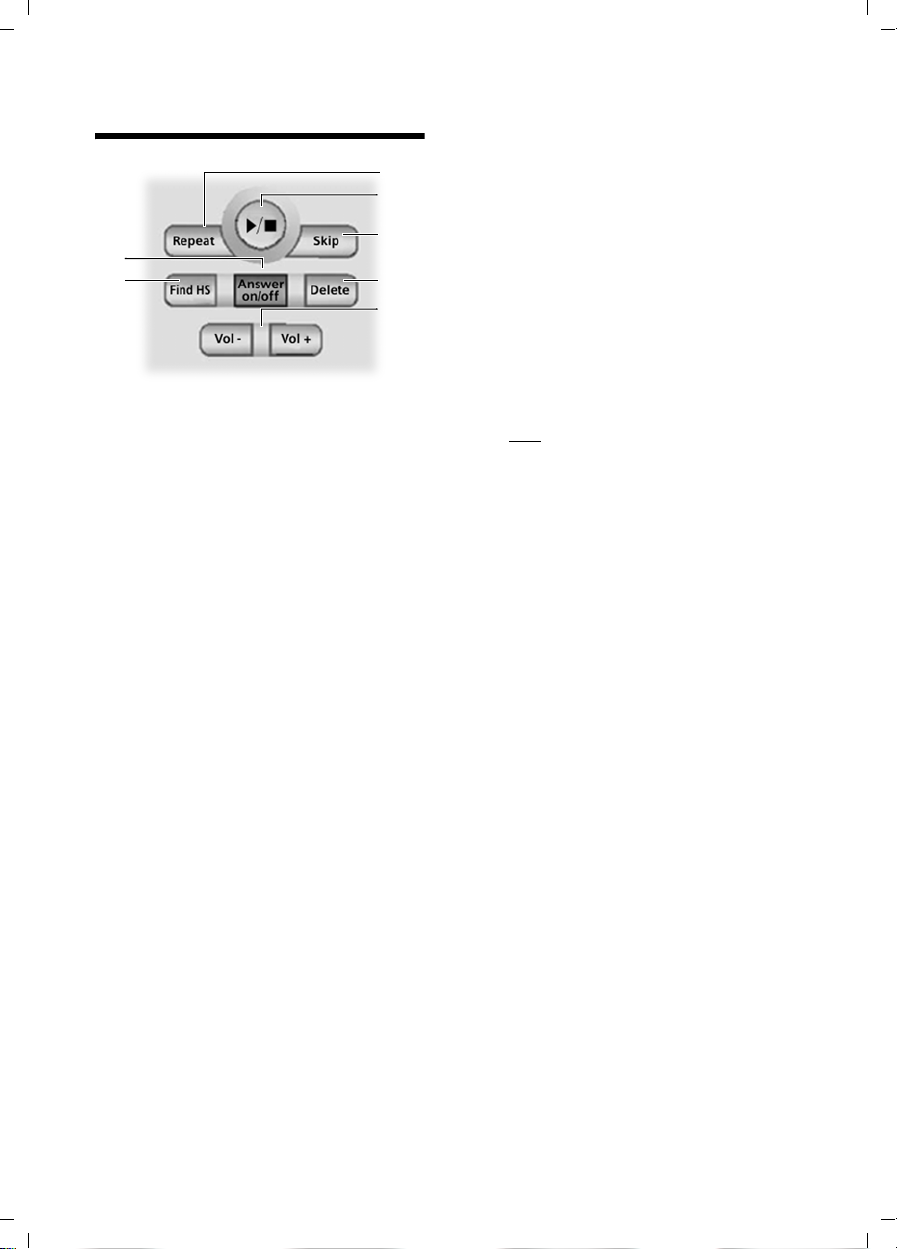
You can use the keys on the base station
to operate the integrated answer machine
and register the handset to the base station.
1 Registration/paging key
Press briefly: search for handsets "Paging",
see page 27.
Register handsets and DECT devices (press
and hold), see page 26.
2 On/Off key: activate/deactivate answer ma-
chine.
Lights up: answer machine is activated.
Flashes: at least one new message is
present.
6
7
Please remember:
u If the answer machine is being oper-
ated from a handset or if it is recording
a message, it cannot be operated from
the base station.
u If the On/Off key flashes although the
answer machine is switched off, it
means that there is still at least one
new message that has not been played
back yet.
During message playback:
3 Skip back to beginning of message (press
once) or to previous message (press twice).
4 Play/stop key:
Play back new messages from the answer
machine (see also page 19) or cancel the
playback (press briefly).
Play back new and old messages (press and
hold).
5 Skip to next message (press once) or next
message but one (press twice).
6 Delete current message.
7 Adjust volume during message playback:
ð = quieter; ñ = louder.
While an external call is being signaled:
adjust ringtone volume.
3

V300AM / USA EN / A31008-xxxxx-xxxx-x-6019 / V300AMIVZ.fm / 3.1.08
Contents
Contents
Setting up the handset for use - automatic handset registration . . . 1
The handset at a glance . . . . . . . 2
Base station at a glance . . . . . . . 3
Safety precautions . . . . . . . . . . . 6
Verizon V300AM –
more than just a telephone . . . . . 7
First Steps . . . . . . . . . . . . . . . . . . . 7
Pack contents . . . . . . . . . . . . . . . . . . . . 7
Installing the base station . . . . . . . . . . 7
Setting up the handset for use . . . . . . . 8
Area codes . . . . . . . . . . . . . . . . . . . . . 10
Making calls . . . . . . . . . . . . . . . . 11
Making an external call . . . . . . . . . . . 11
Ending a call . . . . . . . . . . . . . . . . . . . . 11
Answering a call . . . . . . . . . . . . . . . . . 11
Caller ID . . . . . . . . . . . . . . . . . . . . . . . 11
Handsfree operation . . . . . . . . . . . . . 12
Muting . . . . . . . . . . . . . . . . . . . . . . . . 12
Operating the handset . . . . . . . . 12
Control key . . . . . . . . . . . . . . . . . . . . . 12
Display keys . . . . . . . . . . . . . . . . . . . . 13
Returning to idle status . . . . . . . . . . . 13
Menu guidance . . . . . . . . . . . . . . . . . 13
Correcting incorrect entries . . . . . . . . 14
CID 2.5 services (network services) . . 14
Using the directory and lists . . . 15
Directory . . . . . . . . . . . . . . . . . . . . . . . 15
Last number redial list . . . . . . . . . . . . 17
Opening lists with the
message key . . . . . . . . . . . . . . . . . . . . 17
Operating the answering
machine . . . . . . . . . . . . . . . . . . . . 19
Operation via the handset . . . . . . . . . 19
Activating/deactivating listen in . . . . . 22
Setting up the answer machine . . . . . 22
Resetting fast access on the answer ma-
chine to Network Voice Mail . . . . . . . 23
Operating when on the move
(remote operation) . . . . . . . . . . . . . . . 23
Using the network mailbox . . . . 25
Configuring the network mailbox
for fast access . . . . . . . . . . . . . . . . . . . 25
Viewing the network mailbox
message . . . . . . . . . . . . . . . . . . . . . . . 25
Using several handsets . . . . . . . 26
Registering handsets . . . . . . . . . . . . . . 26
De-registering handsets . . . . . . . . . . . 27
Locating a handset ("paging") . . . . . . 27
Changing the base station . . . . . . . . . 27
Making internal calls . . . . . . . . . . . . . . 27
Linking internal callers to
an external call . . . . . . . . . . . . . . . . . . 28
Changing the name of a handset . . . . 29
Changing a handset's internal
number . . . . . . . . . . . . . . . . . . . . . . . . 29
Using a handset as a room
monitor . . . . . . . . . . . . . . . . . . . . . . . . 29
Handset settings . . . . . . . . . . . . . 31
Changing the display language . . . . . 31
Setting the display . . . . . . . . . . . . . . . 31
Setting the screen picture . . . . . . . . . . 31
Setting lighting . . . . . . . . . . . . . . . . . . 32
Activating/deactivating
auto answer . . . . . . . . . . . . . . . . . . . . 32
Adjusting the loudspeaker volume . . . 32
Changing ringtones . . . . . . . . . . . . . . 32
Activating/deactivating
advisory tones . . . . . . . . . . . . . . . . . . . 33
Setting the alarm clock . . . . . . . . . . . . 34
Restoring the handset
default settings . . . . . . . . . . . . . . . . . . 34
Base station settings . . . . . . . . . 35
Protecting against unauthorized
access . . . . . . . . . . . . . . . . . . . . . . . . . 35
Changing ringtones . . . . . . . . . . . . . . 35
Activating/deactivating the
hold melody . . . . . . . . . . . . . . . . . . . . 35
Restoring default settings to
base station . . . . . . . . . . . . . . . . . . . . . 35
Shortcuts . . . . . . . . . . . . . . . . . . . 36
Connecting the base station
to the PABX . . . . . . . . . . . . . . . . . 38
Dialing modes and flash time . . . . . . . 38
Setting pauses . . . . . . . . . . . . . . . . . . . 38
4

V300AM / USA EN / A31008-xxxxx-xxxx-x-6019 / V300AMIVZ.fm / 3.1.08
Switching temporarily to
tone dialing (DTMF) . . . . . . . . . . . . . . 38
Appendix . . . . . . . . . . . . . . . . . . . 39
Care . . . . . . . . . . . . . . . . . . . . . . . . . . 39
Contact with liquid . . . . . . . . . . . . . . 39
Questions and answers . . . . . . . . . . . 39
Troubleshooting . . . . . . . . . . . . . . . . . 39
Specifications . . . . . . . . . . . . . . . . . . . 40
FCC / ACTA Information . . . . . . . . . . . 41
Industry Canada Certification . . . . . . 42
Safety precautions . . . . . . . . . . . . . . . 43
Service (Customer Care) . . . . . . . . . . 45
End-user limited Warranty . . . . . . . . . 45
Notes on the
operating instructions . . . . . . . . 48
Symbols used . . . . . . . . . . . . . . . . . . . 48
Example: menu input . . . . . . . . . . . . . 48
Example: multiple line input . . . . . . . 49
Writing and editing names . . . . . . . . . 49
Index . . . . . . . . . . . . . . . . . . . . . . 51
Contents
5
V300AM / USA EN / A31008-xxxxx-xxxx-x-6019 / security.fm / 3.1.08
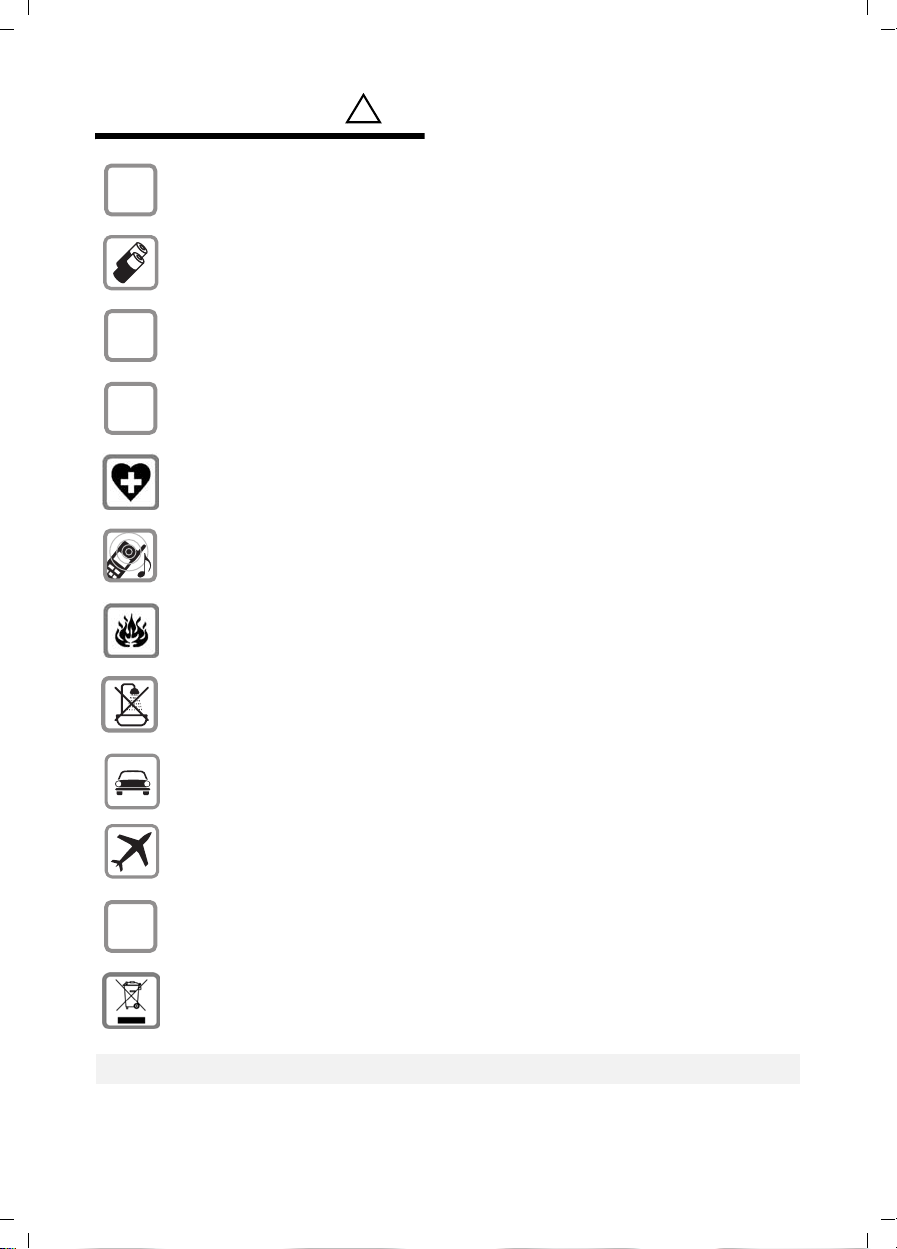
Safety precautions
Safety precautions*)
$
‹
Œ
Only use the power supply unit supplied as indicated on the underside of the
device.
Only insert approved rechargeable batteries of the same type.
Never use ordinary (non-rechargeable) batteries as they may pose a health
hazard or cause injury.
Make sure the rechargeable battery is inserted the right way round.
Use the battery specified in these operating instructions.
The phone may affect medical equipment so always switch your phone off
before entering hospitals or doctors’ practices.
The handset may cause an unpleasant humming noise in hearing aids.
Do not operate the phone in places where there is a risk of explosion
(such as paint workshops).
!
Do not install the base station in bathrooms or shower rooms. The handset and
base station are not splash-proof (see page 39).
Drivers must not use the phone while driving.
The phone must be switched off at all times in an aircraft. Make sure it cannot
ƒ
be switched on accidentally.
If you give your Verizon V300AM to someone else you should also give them the
operating instructions.
Dispose of batteries and the phone carefully. Do not pollute the environment.
Emergency numbers cannot be dialed if the keypad lock is activated!
*) see also page 43
6
V300AM / USA EN / A31008-xxxxx-xxxx-x-6019 / starting.fm / 3.1.08
VerizonV300AM – more than just a telephone
Verizon V300AM –
more than just a telephone
Your phone not only enables you to store
up to 150 telephone numbers (page 15) –
it can do a whole lot more:
u You can designate important people as
VIPs so you can identify important calls
from the ringtone (page 15).
u You can store anniversary dates
(page 16) in your phone and it will
remind you of them in advance.
u Select frequently used phone numbers
at the press of a single key (page 15).
u View missed calls on your phone
(page 18).
u Select 12 or 24-hour format for dis-
playing the time (page 10).
u ECO DECT reduces power consumption
by using a power supply with low
power consumption. Your handset
reduces the transmitting power
depending on the distance to the base
station (close-up range).
Note:
The transmitting power of the base station is
reduced to almost zero when the handset is
docked and only one handset is registered on
the base station (not applicable for
Verizon V300AM-2).
Have fun using your new telephone!
First Steps
Pack contents
u one Verizon V300AM base station,
u one handset (Verizon V300AM-1),
u two handsets and one charger
(Verizon V300AM-2)
u one AC adapter,
u one telephone line cord,
u two batteries,
u one battery cover,
u one belt clip,
u one user guide.
Installing the base station
The base is designed for use in closed, dry
rooms with a temperature range of +41°F
to +113°F.
Set up the base station at a central point in
the apartment or house away from any
appliance that may cause electrical interference to the phone.
Please note:
u Never expose the telephone to heat
sources, direct sunlight, other electrical
appliances.
u Protect your phone from moisture,
dust, corrosive liquids and vapors.
Range and reception strength
Range:
u Up to 328 yards in the open
u Up to 55 yards in buildings
Reception strength:
The display shows the quality of the radio
contact between the base station and
handset:
u Good to poor: ÐiÑÒ
u No reception: | flashes
7
V300AM / USA EN / A31008-xxxxx-xxxx-x-6019 / starting.fm / 3.1.08
First Steps
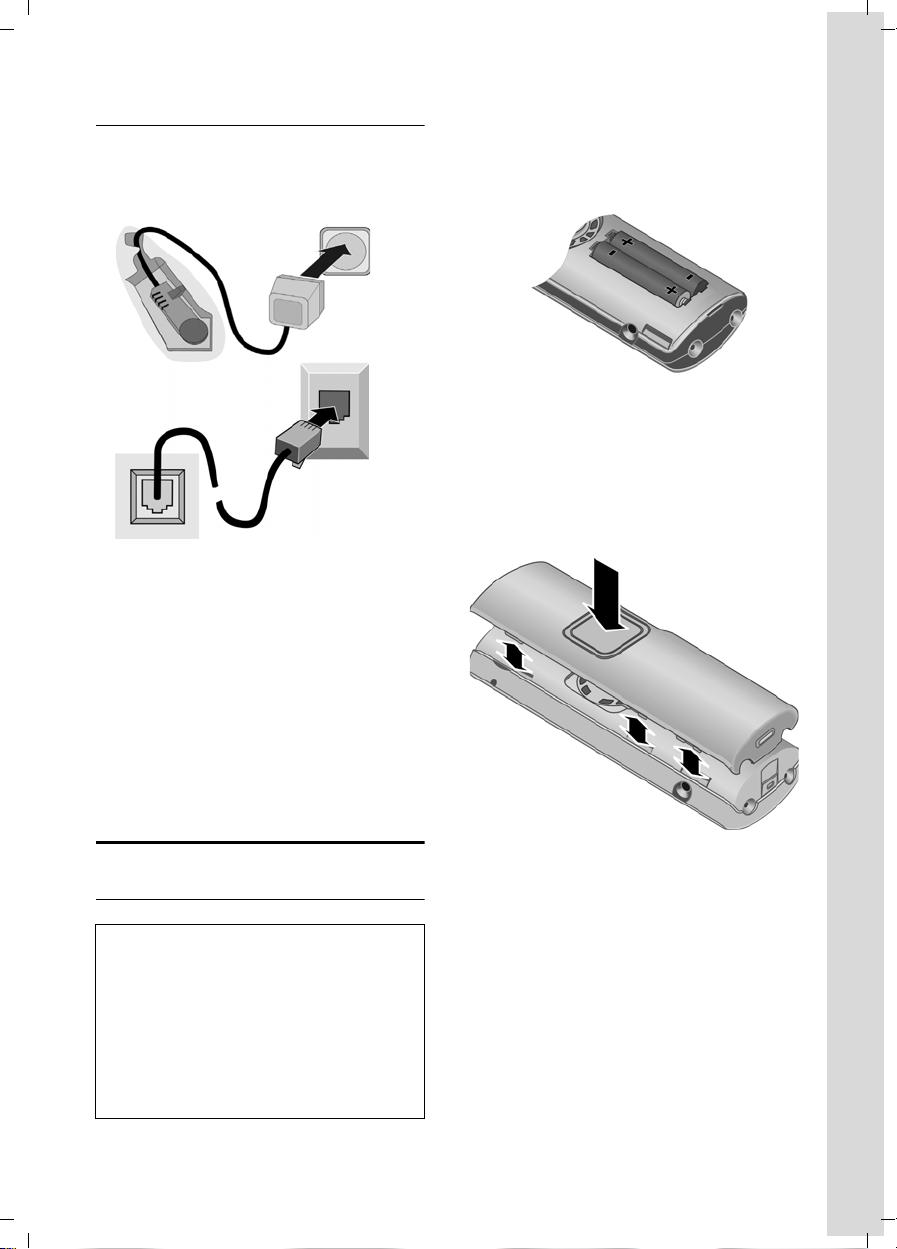
Connecting the base station
¤ First connect the power adapter and
then the phone jack as shown below
and place the cables in the cable
recesses.
2
1
1
3
1
1
1 Underside of the base station (detailed
view)
2 Power adapter 110 V
3 Phone jack with phone cord
Please note:
u Minimum No. 26 AWG telecommunica-
tion line cord must be used with this
phone.
u The power adapter must be always
connected, as the phone will not oper-
ate without an electrical connection.
¤ Fit the batteries with the correct polar-
ity (see diagram).
The polarity is indicated in/on the battery
compartment.
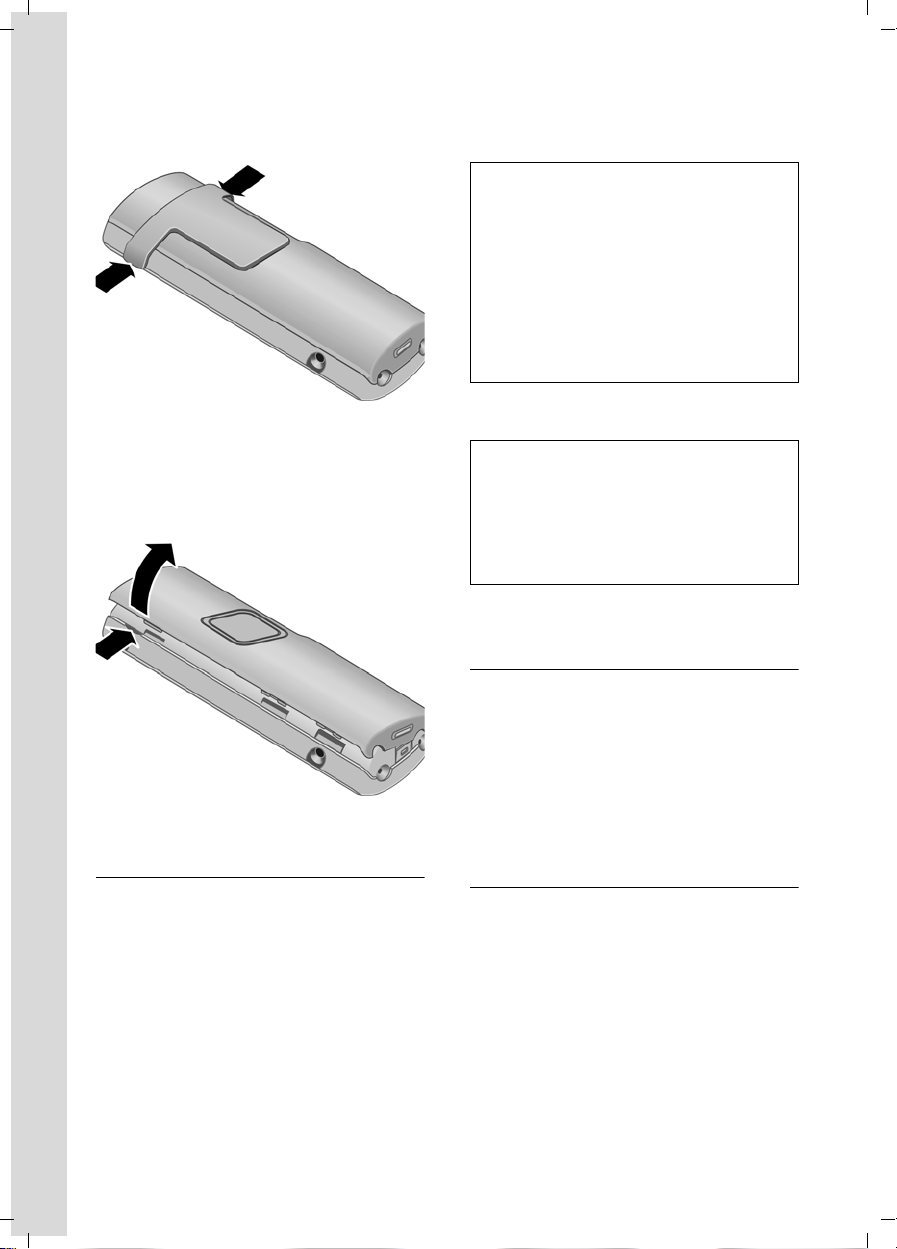
Closing the battery cover
¤ First align the notches on the side of
the battery cover with the clips on the
inside of the casing.
¤ Then close the cover, press on the top
so that it clicks into place.
Setting up the handset for use
Inserting the batteries
Caution:
Use only rechargeable UL approved AAA batteries. Never use conventional (non-rechargeable) batteries or other battery types as this
may cause significant damage to health and
property. For example, the outer casing of the
batteries could be destroyed or the batteries
could explode. The phone could also malfunction or be damaged as a result of using batteries that are not of the recommended type.
Attaching the belt clip
There are notches for attaching the belt
clip on the side of the handset at the same
height as the display.
8
V300AM / USA EN / A31008-xxxxx-xxxx-x-6019 / starting.fm / 3.1.08
First Steps
¤ Press the belt clip onto the back of the
handset so that the protrusions on the
belt clip engage with the notches.
Opening the battery cover
¤ If fitted, remove belt clip.
¤ Insert your hand into the headset
socket cavity and pull the battery cover
upwards.
assigned. If the internal numbers 1–6 are
already assigned to other units, the
number 6 is overwritten.
Note:
– Automatic registration is only possible if
no-one is making calls using the base station.
– Each key press interrupts the automatic
registration.
– If automatic registration does not work the
handset will need to be registered manually (page 26).
– You can change the name of the handset
(page 29).
To charge the batteries, leave the handset
in the base station.
Note:
– If the handset has switched itself off
because the batteries have no charge and is
then placed in the base station, it will
switch itself on automatically.
– Only place the handset in the base or
charging cradle that is intended for it.
For questions and problems see page 39.
Headset socket
Which headsets are compatible?
The following headsets have been tested
with the Verizon V300AM:
u Plantronics M40
u Plantronics MX100
u Plantronics MX150
Placing the handset in the base station and registering
¤ Place the handset in the base with its
display facing outwards.
The handset registers automatically. Registration takes around 1 minute. During
this time Regstr.Procedure appears in the
display and the name of the base station
flashes, e.g. Base 1. The handset will be
assigned the lowest unassigned internal
intercom number (1–6).
This will appear in the display when registration is complete, for example INT 1. This
means that the number 1 has been
9
Initial charging and discharging of batteries
If the handset is activated, the flashing
battery icon e in the top right of the display indicates that the batteries are being
charged.
During handset operation, the battery
icon indicates the charge status of the batteries (page 2). The correct charge level
can only be displayed if the batteries are
first fully charged and discharged.
¤ To do this, leave the handset in the
base or charging cradle continuously
V300AM / USA EN / A31008-xxxxx-xxxx-x-6019 / starting.fm / 3.1.08
First Steps
for ten hours. Your handset need not
be switched on for it to charge.
¤ Afterwards, remove the handset from
the base station and do not put it back
again until the batteries are fully dis-
charged.
Note:
After the first battery charge and discharge you may replace your handset
in its base after every call.
Please remember:
u Always repeat the charging and dis-
charging procedure if you remove the
batteries from the handset and re-
insert them.
u The batteries may feel warm as they
are charging. This is normal.
Your answer machine is set with a standard announcement.
¤ Set the date and the time, for example
to ensure the correct time of incoming
calls is recorded.
Setting the date and time
¤ To set the date and time, press the dis-
play key
To change the time, open the input field
via:
¢ Ð ¢ Date/Time
v
§Time§ to open the input menu.
¤ Change multiple line input:
Date:
Enter month, day and year in 6-digit
format.
Time:
Enter hours and minutes with 4 digits,
e.g. Q M 1 5 for 7:15 am.
§Save§ Press the display key.
Area codes
tiple area code" area, the extra codes for
this area must also be stored.
Local Area Code
v ¢ Ð ¢ Base
Local Area Code
Select and press
~ Enter local area code.
§Save§ Press the display key.
a Press and hold (idle status).
§OK§.
Extra Codes
v ¢ Ð ¢ Base
Extra Codes
Select and press
~ Enter extra code.
§Save§ Press the display key.
a Press and hold (idle status).
Repeat the above steps until all extra
codes for your area have been entered. A
maximum of 5 extra codes can be stored.
§OK§.
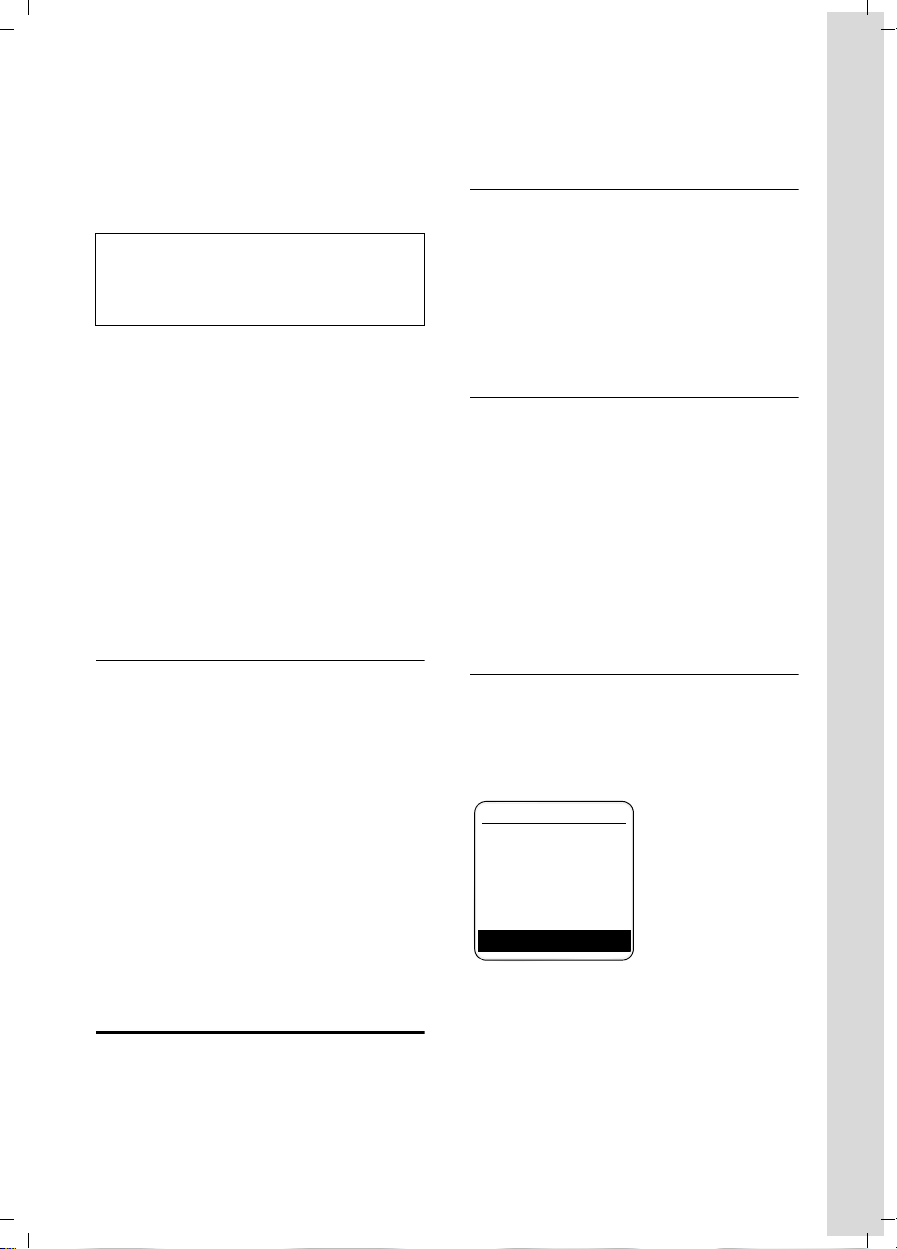
Display in idle status
Once the phone is registered and the time
set, the idle display looks as shown here
(example). If the answer machine is activated, the answer machine symbol × will
also be displayed in the header.
ÐV
INT 1
01.31.08 07:15
• Menu
Your phone is now ready to use.
In order to call back a caller using the
incoming caller ID list (page 18), your
phone's area code ("local area code")
must be stored. If your phone is in a "mul-
10
V300AM / USA EN / A31008-xxxxx-xxxx-x-6019 / telefony.fm / 3.1.08
Making calls
Making calls
Making an external call
External calls are calls using the public telephone network.
~c Enter the number and press
the talk key.
Or:
c~ Press briefly the talk key c
and then enter the number.
To cancel the dialing operation, press the
end call key a.
You are shown the duration of the call
while the call is in progress.
Note:
– Dialing using the directory (page 15) or
calls list (page 18) saves time re-entering
numbers and network provider prefixes
("call-by-call numbers").
Ending a call
a Press the end call key.
Answering a call
The handset indicates an incoming call in
three ways: by ringing, by a display on the
screen and by the flashing handsfree
key d.
You can accept the call by:
¤ Pressing the talk key c.
¤ Pressing the handsfree key d.
¤ Pressing the display key Ÿ to
divert the call to the answer machine
(page 21).
If the handset is in the base or charger and
the Auto Answer function is activated
(page 32), the call will be answered automatically when you lift the handset from
the base or charger.
Press the display key
ringer without answering the call. You can
§Silence§ to mute the
answer the call as long the call is displayed
on the screen.
Caller ID
Caller ID (CID) and Caller Name ID (CNID)
are optional subscription services provided by your telephone service provider.
These features supply incoming caller
identification information that will be displayed on your handset
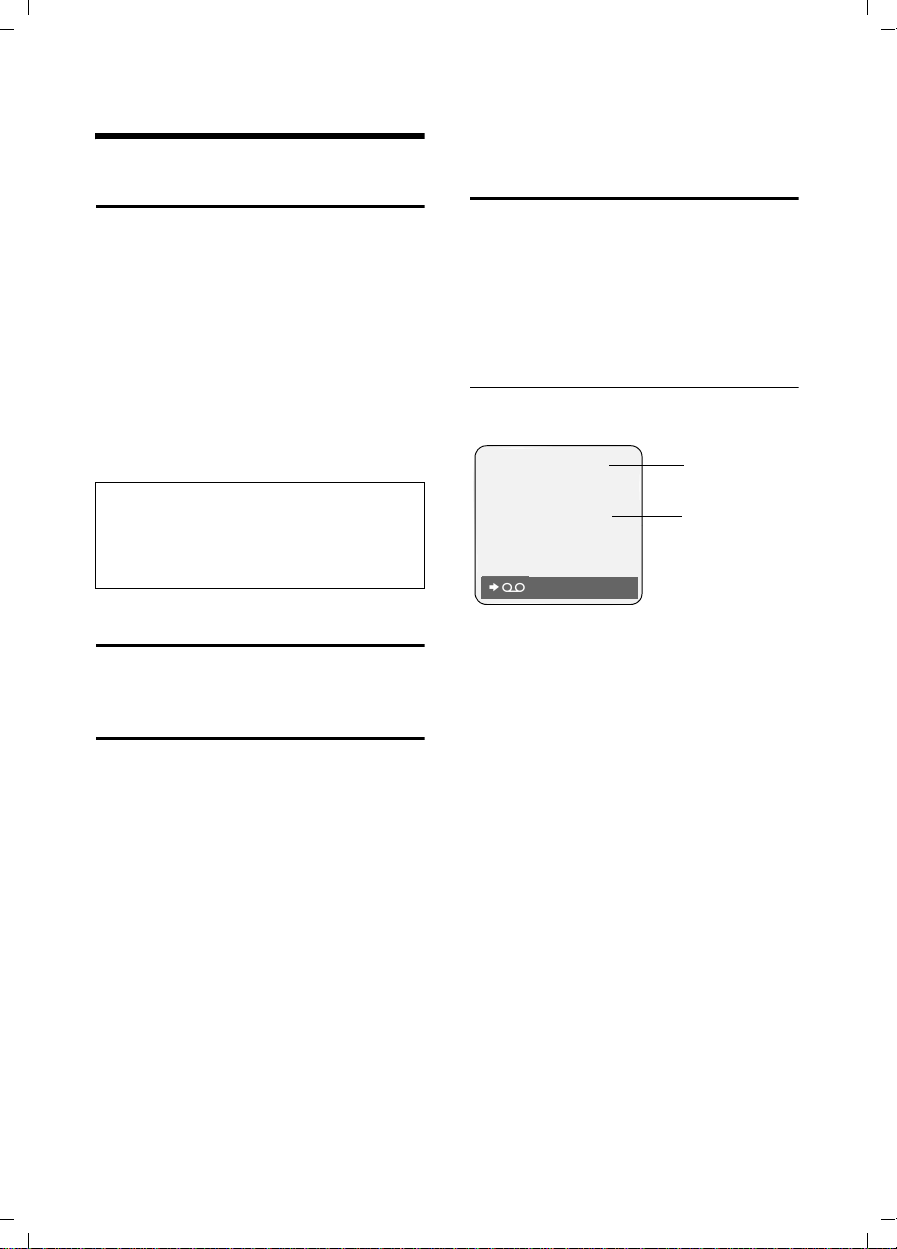
Call display with Caller ID/ Name
If the number of the caller is stored in your
directory, you will see their name.
Å
1234567890
Silence
1Ring symbol
2 Number or name of caller
The following is displayed in place of the
number:
u External, if no number is transmitted.
u Unavailable, if the caller has not
arranged Caller ID.
1
2
11
V300AM / USA EN / A31008-xxxxx-xxxx-x-6019 / telefony.fm / 3.1.08
Operating the handset
Handsfree operation
You can activate the speakerphone at any
time to provide handsfree operation during a call.
Activating/deactivating handsfree
Activating while dialing
~d Enter the number and press
the handsfree key.
¤ You should inform your caller before
you use the handsfree function so that
they know someone else is listening.
Switching between earpiece and
handsfree mode
d Press the handsfree key.
During a call and when listening to the
answer machine, switch handsfree on or
off.
If you wish to place the handset in the
charging cradle during a call:
¤ Press and hold the handsfree key d
while placing the handset in the base
station. If the handsfree key d does
not light up, press the key again.
For how to adjust the volume, see
page 32.
Muting
You can deactivate the microphone in
your handset during an external call:
Mute Press the display key on the
left to mute the handset.
Unmute Press the display key to reacti-
vate the microphone.
Operating the handset
Activating/deactivating the handset
a Press and hold the end call
key. You will hear the confirmation beep.
Activating/deactivating the keypad lock
# Press and hold the pound key.
You will hear the confirmation beep. The
icon Ø appears in the display when the
keypad lock is activated.
The keypad lock is deactivated automatically if someone calls you. It is re-activated
when the call is finished.
Control key
In the description below, the side of the
control key (up, down, right, left) which
you have to press in the different operating situations is marked in black, for
example v for "press right on the control
key".
The control key has a number of different
functions:
When the handset is in idle status
s Open the directory.
v Open main menu.
u Open list of handsets.
t Set the ringtones on the hand-
set (page 32).
12
In the main menu and in input fields
You can use the control key to move the
cursor up t, down s, right v or
left u.
V300AM / USA EN / A31008-xxxxx-xxxx-x-6019 / telefony.fm / 3.1.08
Operating the handset
In lists and submenus
t / s Scroll up/down line by line.
v Open submenu or confirm
selection.
u Go back one menu level, or
cancel.
During an external call
s Open the directory.
u Hold with simultaneous inter-
nal call.
t Adjust loudspeaker volume for
earpiece and handsfree mode.
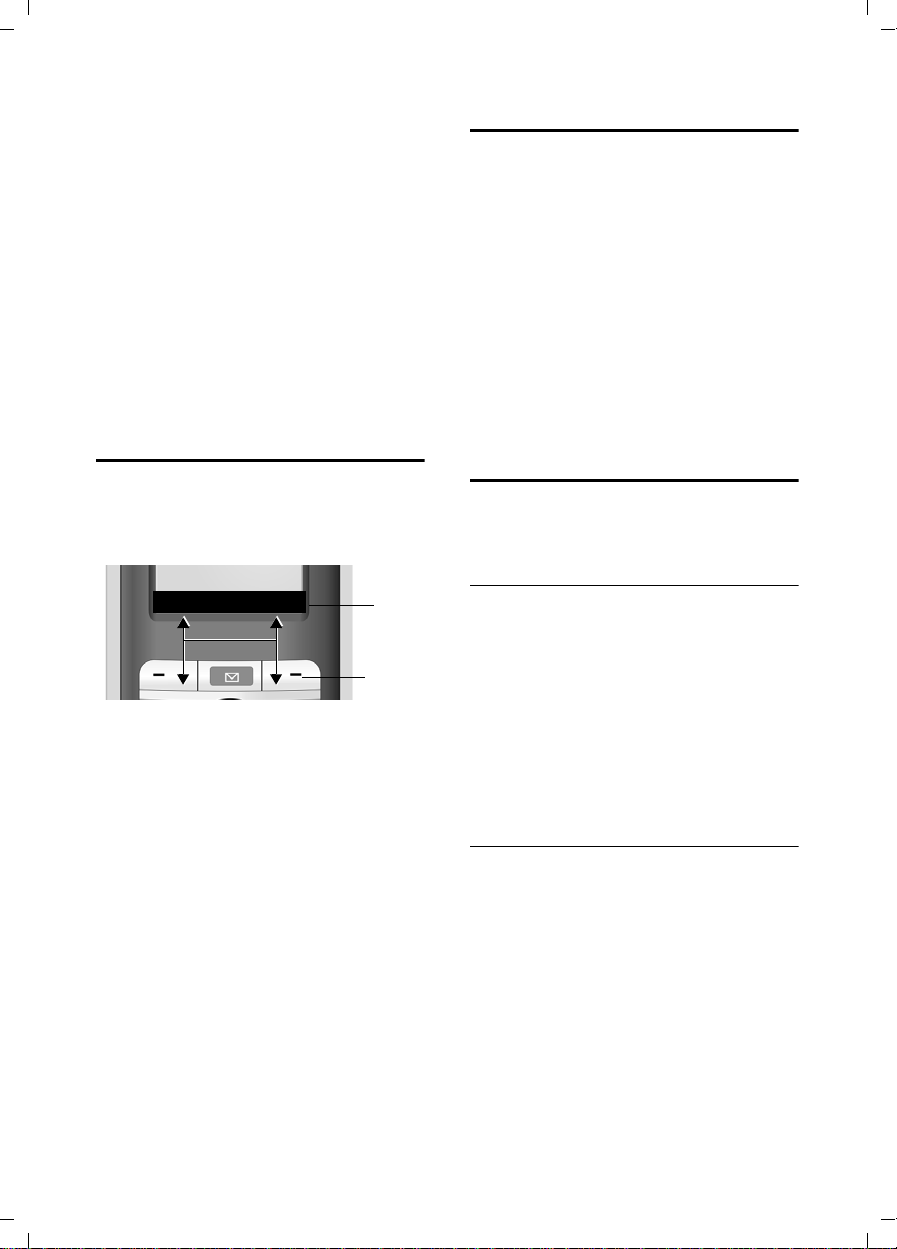
Display keys
The function of the display keys changes
depending on the particular operating situation. Example:
• Menu
1 The display keys' current functions are
shown in the bottom display line.
2Display keys
The most important display symbols are:
§§§§§Menu§§§§ Open the main menu.
§Options§ Open a context-dependent
menu.
W Delete key: deletes one char-
acter at a time from right to
left.
u Go back one menu level, or
cancel.
Ó Copy number into directory.
Ÿ Divert external call to answer
machine.
• Open the last number redial
list.
1
2
Returning to idle status
You can go back to idle status from anywhere in the menu as follows:
¤ Press and hold the end call key a.
Or:
¤ Do not press any key: after 2 minutes
the display will automatically revert to
idle status.
Changes that you have not confirmed or
saved by pressing
Save Entry
An example of the display in idle status is
shown on page 10.
§OK§ will be lost.
§OK§, §Yes§, §Save§, §Send§ or
Menu guidance
Your telephone's functions are accessed
using a menu that has a number of levels.
Main menu (first menu level)
¤ Press v with the handset in idle status
to open the main menu.
The main menu functions are shown in
the display as a list with icon and name.
To access a function, so that you open the
corresponding submenu (next menu
level):
¤ Navigate to the function using the con-
trol key q. Press the display key
Submenus
The functions in the submenus are displayed as lists.
To access a function:
§OK§.
¤ Scroll to the function with the control
key q and press
Or:
§OK§.
¤ Enter the corresponding digit combina-
tion (page 36).
Pressing briefly on the end call key a
returns you to the previous menu level /
cancels the operation.
13

V300AM / USA EN / A31008-xxxxx-xxxx-x-6019 / telefony.fm / 3.1.08
Operating the handset
Correcting incorrect entries
You can correct incorrect characters in the
text by navigating to the incorrect entry
using the control key. You can then:
u press X to delete the character to the
left of the cursor,
u insert characters to the left of the cur-
sor,
u overwrite the (flashing) character
when entering the time and date etc.
You will find examples of symbols used,
menu entries and multiple line input in the
appendix to this user guide, page 48.
CID 2.5 services (network services)
If CID is activated and a waiting call is displayed, 4 different CID 2.5 services (network services) are selected.
During a call:
§Options§ Press the display key
Select with q:
TAKE MSG
The waiting caller is forwarded to the
central office mailbox.
HOLD MSG
The waiting caller is put on hold and
hears a message to this effect from the
central office.
CALL BACK
The waiting caller is prompted by the
central office to call again at a later
time.
ADD 2ND
The central office is prompted to initi-
ate a conference call.
Note:
– When the handset is muted and ADD 2ND
selected, the microphone will be automatically reactivated.
14

V300AM / USA EN / A31008-xxxxx-xxxx-x-6019 / direct_charges.fm / 3.1.08
Using the directory and lists
Using the directory and lists
The options are:
u Directory,
u Last number redial list,
u Calls list,
u Answer machine list.
You can store a maximum of 150 entries
in the directory (the actual number
depends on the size of the individual
entries).
You create the directory for your own individual handset. You can also send lists/
entries to other handsets (page 16).
Directory
In the directory, you can store numbers
and names associated with them.
¤ With the handset in idle status, open
the directory by pressing the s key.
Length of entries
Number: max. 32 digits
Name: max. 16 characters
Note:
For one-touch quick access to a number from
the directory, you can assign the number to a
key.
Storing a number in the directory
s ¢ New Entry
¤ Change multiple line input:
Number:
Enter number.
Name:
Enter name.
Annivers.:
Enter anniversary if required (page 16).
Speed Dial:
Select key for quick dial.
¤ Save changes.
Selecting entries in the directory
s Open directory.
You have the following options:
u Use s to scroll through the entries
until the required name is selected.
u Enter the first character of the name, or
scroll to the entry with s if required.
Dialing with the directory
s ¢ s (select entry)
c Press the talk key. The number
is dialed.
Managing entries in the directory
s ¢ s (select entry)
Viewing an entry
§View§ Press the display key.
The entry is displayed.
Back with
§OK§.
Editing entries
§View§ §Edit§ Press display keys one after
the other.
¤ Carry out changes and save.
Using other functions
s ¢ s (select entry)
¢ §Options§ (open menu)
The following functions can be selected
with q:
Display Number
Edit or complete a stored number.
Then dial or copy the number to the
directoy by pressing Ó.
Edit Entry
Edit selected entry.
Delete Entry
Delete selected entry.
15

V300AM / USA EN / A31008-xxxxx-xxxx-x-6019 / direct_charges.fm / 3.1.08
Using the directory and lists
VIP Entry (directory only)
Mark a directory entry as VIP
(Very Important Person) and assign it
a particular ringtone. You can then
identify VIP calls by their ringtones.
Requirement: Caller ID (page 11).
Copy Entry
Send a single entry to a handset
(page 16).
Delete List
Delete all entries in the directory.
Copy List
Send complete list to a handset
(page 16).
Available Memory
Display the available entries in the
directory (page 15).
Using quick dial keys
¤ Press and hold the required quick dial
key (page 15).
Sending the directory to another handset
Requirements:
u The sending and receiving handsets
must both be registered to the same
base station.
u The other handset and base station can
send and receive directory entries.
¢ s (select entry)
s
¢ §Options§ (open menu)
¢ Copy Entry / Copy List
~ Enter the internal number of
the receiver handset. You see
Copying entry.
§Yes§ / §No§ Press the display key.
A successful transfer is confirmed by a
message and confirmation tone on the
receiver handset.
Please remember:
u Entries with identical numbers are not
overwritten on the receiver handset.
u The transfer is canceled if the phone
rings or if the memory of the receiver
handset is full.
Adding a displayed number to the directory
Numbers that appear in a list such as the
calls list or the last number redial list, or
displayed during a call can be added to the
directory.
If you have Caller ID/Name, the first
16 characters of the transmitted name are
copied to the Name line.
A number is displayed:
§Options§ ¢ Copy to Directory
¤ Complete the entry, see page 15.
While the number is being transferred
from the answer machine list, message
playback is interrupted.
Copying a number from the directory
There are many operating situations in
which you can open the directory, such as
copying a number. Your handset need not
be in idle status.
¤ Depending on the operating situation,
open the directory with s or Ó.
q Select an entry (page 15).
Storing anniversaries in the directory
You can store an anniversary for every
number in the directory and specify a time
when you will receive a reminder call on
the anniversary.
¢ s (Select entry; page 15)
s
§View§ §Edit§ Press display keys one after
the other.
s Scroll to the Annivers.: line.
§Edit§ Press the display key.
¤ Change multiple line input:
Date:
Enter the month/day in 4-digit format.
16

V300AM / USA EN / A31008-xxxxx-xxxx-x-6019 / direct_charges.fm / 3.1.08
Using the directory and lists
Time:
Enter the hour/minute for the reminder
call in 4-digit format.
Prompt:
Select the type of signal for the
reminder and press
§OK§.
¤ Save changes (page 49).
Note:
Reminder calls require a time stamp. If you
select a visual signal, then a time stamp is not
required and is automatically set to 12.00am.
Deleting anniversaries
s ¢ s (Select entry; page 15)
§View§ §Edit§ Press display keys one after
the other.
s Scroll to the Annivers.: line.
§Edit§ §Delete§ §Save§
§§ §§ Press display keys one
after the other.
Reminder call on an anniversary
A reminder call is signaled on the handset
using the selected ring tone.
§Silence§ Press the display key to stop
the reminder call.
Last number redial list
The last number redial list contains the ten
numbers last dialed with the handset
(max. 32 digits). If one of the numbers is
in the directory, then the corresponding
name will be displayed.
Manual last number redial
C Press the key.
s Select entry.
c Press the talk key.
The number is dialed.
When displaying a name, you can have
the respective phone number displayed
by using the display key
§View§.
Managing entries in the last number redial list
C Press the key.
s Select entry.
§Options§§ Open menu.
The following functions can be selected
with q:
Display Number (as in the directory,
page 15)
Copy to Directory
Copy an entry to the directory
(page 16)
Delete Entry (as in the directory, page 15)
Delete List (as in the directory, page 16)
Opening lists with the message key
The message key will flash if a caller left a
voice mail message. You can use the message key f to open the following lists:
u Answer machine list
u Network mailbox
If your network provider supports this
function and the network mailbox is
configured for fast access (page 25).
u Calls list
An advisory tone sounds as soon as a new
entry appears on a list. The f key
flashes (it will go off when the key is
pressed). In idle status, the display shows
an icon for the new entry.
Icon New entry...
Ã
Á
The number of new entries is shown
beneath the corresponding icon.
Only the lists that contain messages are
shown (exception: network mailbox).
Lists with new messages are shown first
and identified in bold. The number of new
or old messages contained are each
shown in brackets.
... in answer machine list or network mailbox
... in calls list
17
 Loading...