

Gigaset Communications V100AM Users manual

© 2008 Verizon. All rights reserved.
UCZZ01951ZZ(0)
Verizon and the Verizon logos are trademarks of Verizon Trademark Services LLC.
All other trademarks are the trademarks of their respective owners.
Product photo may differ from actual product, however functionality remains
as stated above.
Specifi cations are subject to change without notice.
© 2008 Verizon
User Guide
V100 DIGITAL CORDLESS PHONE
V100AM DIGITAL CORDLESS PHONE with DIGITAL ANSWERING MACHINE
DECT 6.0 DIGITAL TECHNOLOGY
V100_V100AM / USA EN / A31008-M1908-R301-1-6019 / kombi_overview.fm / 12.3.08
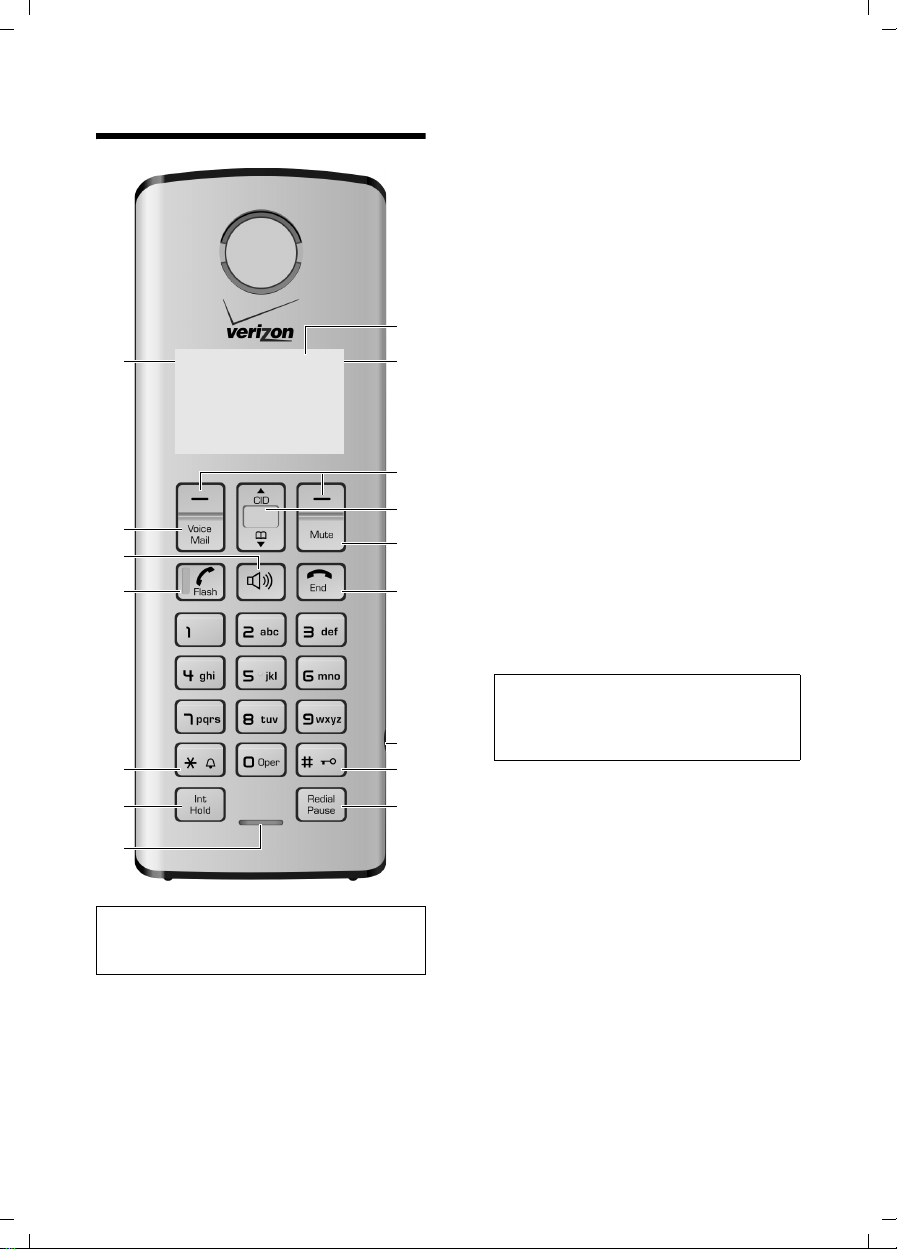
The handset at a glance
The handset at a glance
4Control key
t Access to Call Log list.
s Access to directory.
5 Mute key
Mute/unmute microphone.
6 End Call key, On/Off key
End call, cancel function, go back to idle status, activate/deactivate handset (press and
hold in idle status)
7 2.5 mm socket (mono) for headset
8 Pound (#) key
Enter symbol #
Keypad lock on/off (press and hold in idle
status)
Switch between uppercase/lowercase letters for text entry.
9 Redial/Pause key
Open redial list (in idle status) or insert a
dialing pause (when editing a number).
10 Microphone
11 Intercom/Hold/Conference key
Set up an internal call
Switch between external call and internal
handset, or transfer a call during external
call.
Set up a conference call with an external line
and an internal handset (press and hold in
hold-intercom mode).
Note:
When only one handset is registered to the
base station, the key is redundant and
therefore has no function.
12 Star (*) key
Ring tone on/off (press and hold)
Switch temporarily to tone dialing (DTMF).
Switch between AM and PM during time setting.
Switch call list display format.
13 Talk/Flash key
Answer or start a call.
Key flashes: incoming call.
Add a flash (in the directory)
Send FLASH (when off hook).
14 Handsfree key
Answer or place a call in speaker mode.
Switch between speaker on and speaker off
(in off hook mode).
15 Voice mail
Connect to your voice mailbox.
16 Signal strength
ÄHandset is linked with the base station.
flashes: out of range
Ä
16
ÄÕ e
INT 1
01/31 9:45AM
§§§§Menu§§§§
15
14
13
12
10
Note:
Pictures in this user manual may differ from
the actual product.
1 Display in idle status
2 Charge status of the batteries
= e U (empty to full)
= flashes: batteries almost empty
= U flashes: batteries charging
3 Display keys (page 11)
1
2
3
4
5
6
7
8
911
1
Verizon V100 / USA EN / A31008-M1908-R301-1-6019 / kombi_overview.fm / 12.3.08
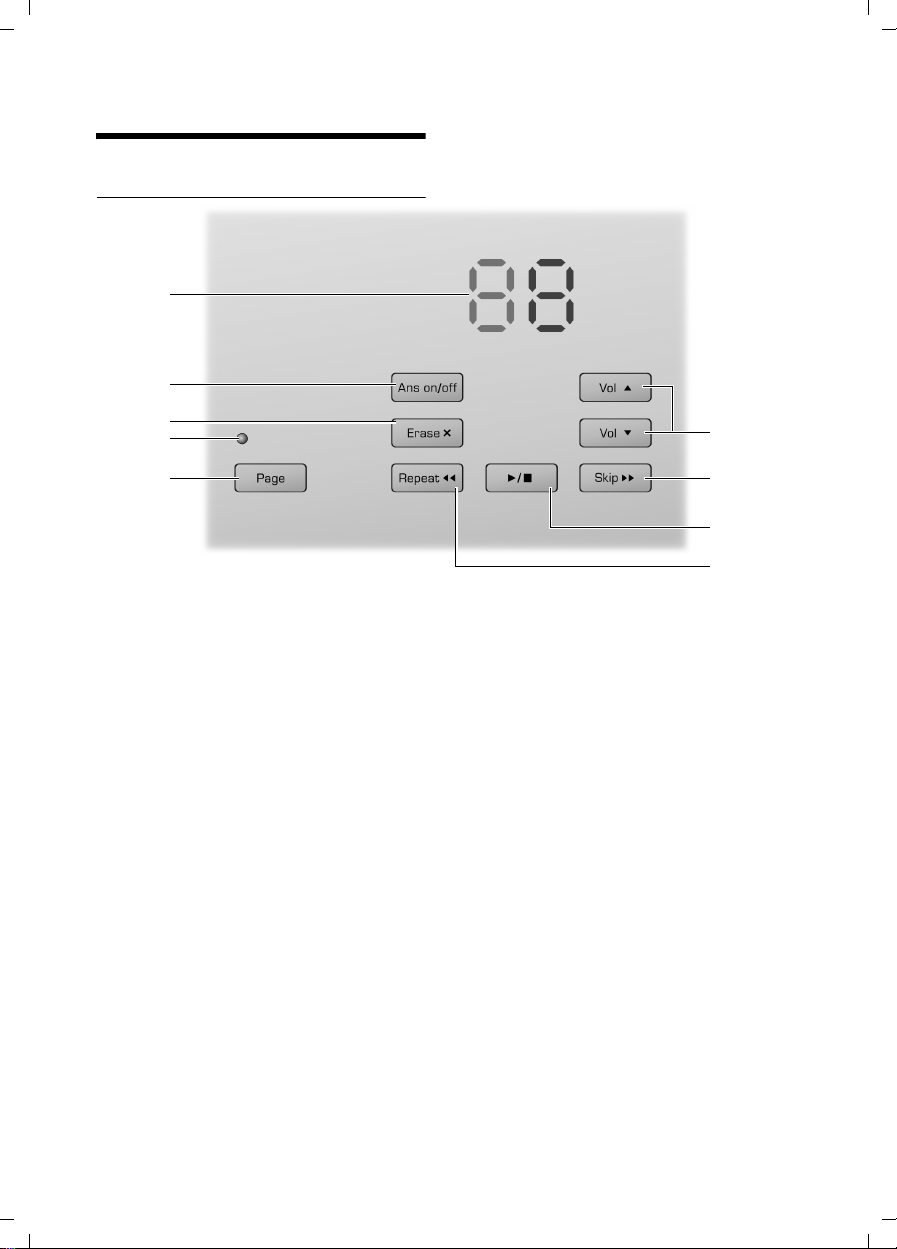
The base station at a glance
The base station at a glance
Base station with answer machine
5
4
3
2
1
You can use the keys on the base station to
operate the integrated answer machine and
register the handset to the base station.
1Page key
Paging handsets (press briefly)
Start the registration procedure (press and
hold in idle mode). You will hear a beep.
2LED
– Is off when the line is free
– Is on when any handset links to the base
– Flashes when paging handsets and dur-
ing registration mode
3Erase key
Erase current message during playback
Erase all old messages (press and hold in idle
mode)
4On/Off key
Activate/deactivate answer machine.
5 Message counter (page 16)
Status information for answer machine
6Volume keys
Change ring tone volume (in idle mode or
during incoming calls)
Change volume of message playback or call
screening.
6
7
8
9
During message playback:
7Skip key
Skip to next message.
ó key
8
Start/stop playback.
9 Repeat key
Skip back to beginning of the current message (press once) or to the previous message (press twice).
10 Skip to beginning of the next message.
Please remember:
If the answer machine is being operated from a
handset, or if it is recording a message, you cannot operate it from the base station.
2

V100_V100AM / USA EN / A31008-M1908-R301-1-6019 / kombi_overview.fm / 12.3.08
The base station at a glance
Base station without answer machine
1
1 Registration/Paging key (see page 22)
3

V100_V100AM / USA EN / A31008-M1908-R301-1-6019 / V100_kombi_IVZ.fm / 12.3.08
Contents
Contents
The handset at a glance . . . . . . . . 1
The base station at a glance . . . . 2
Safety precautions . . . . . . . . . . . 5
Notes on the operating
instructions . . . . . . . . . . . . . . . . . . 6
Symbols used . . . . . . . . . . . . . . . . . . . . 6
Example: menu input . . . . . . . . . . . . . . 6
Verizon V100 and Verizon V100AM–
more than just a telephone . . . . . 7
First Steps . . . . . . . . . . . . . . . . . . . 7
Pack contents . . . . . . . . . . . . . . . . . . . . 7
Installing the base station . . . . . . . . . . 7
Setting up the handset for use . . . . . . . 8
Making calls . . . . . . . . . . . . . . . . 10
Making an external call . . . . . . . . . . . 10
Putting an external call on hold . . . . . 10
Ending a call . . . . . . . . . . . . . . . . . . . . 10
Answering a call . . . . . . . . . . . . . . . . . 10
Caller ID . . . . . . . . . . . . . . . . . . . . . . . 10
Handsfree operation . . . . . . . . . . . . . 10
Operating the handset . . . . . . . . 11
Control key . . . . . . . . . . . . . . . . . . . . . 11
Display keys . . . . . . . . . . . . . . . . . . . . 11
Returning to idle status . . . . . . . . . . . 11
Menu guidance . . . . . . . . . . . . . . . . . 12
Correcting incorrect entries . . . . . . . . 12
Using the directory and lists . . . 13
Directory . . . . . . . . . . . . . . . . . . . . . . . 13
Last number redial list . . . . . . . . . . . . 14
Calls list . . . . . . . . . . . . . . . . . . . . . . . 14
Writing and editing names . . . . . . . . . 15
Operating the answer
machine . . . . . . . . . . . . . . . . . . . . 16
Operation using the base station keys 16
Operation using the handset . . . . . . . 16
Setting up the answer machine . . . . . 19
Operating when on the move
(remote operation) . . . . . . . . . . . . . . . 20
Using the network mailbox . . . . 21
Configuring the network mailbox
for fast access . . . . . . . . . . . . . . . . . . . 21
Using several handsets . . . . . . . 22
Registering handsets . . . . . . . . . . . . . . 22
De-registering handsets . . . . . . . . . . . 22
Locating a handset ("paging") . . . . . . 22
Changing the base station . . . . . . . . . 22
Making internal calls . . . . . . . . . . . . . . 22
Accepting/rejecting call waiting . . . . . 23
Linking internal callers to
an external call . . . . . . . . . . . . . . . . . . 23
Handset settings . . . . . . . . . . . . . 24
Changing the name of a handset . . . . 24
Changing the display language . . . . . 24
Setting the display contrast . . . . . . . . 24
Activating/deactivating auto answer . 24
Adjusting the loudspeaker and earpiece
volume . . . . . . . . . . . . . . . . . . . . . . . . 25
Changing ring tones . . . . . . . . . . . . . . 25
Activating/deactivating the
key-touch tone . . . . . . . . . . . . . . . . . . 25
Base station settings . . . . . . . . . 25
Changing ring tones . . . . . . . . . . . . . . 25
System settings . . . . . . . . . . . . . . 26
Restoring the default settings . . 26
Appendix . . . . . . . . . . . . . . . . . . . 27
Care . . . . . . . . . . . . . . . . . . . . . . . . . . . 27
Contact with liquid . . . . . . . . . . . . . . . 27
Questions and answers . . . . . . . . . . . . 27
Troubleshooting . . . . . . . . . . . . . . . . . 27
Specifications . . . . . . . . . . . . . . . . . . . 28
FCC / ACTA Information . . . . . . . . . . . . 29
Safety precautions . . . . . . . . . . . . . . . 30
Service (Customer Care) . . . . . . . . . . . 32
End-user limited Warranty . . . . . . . . . 32
Index . . . . . . . . . . . . . . . . . . . . . . 36
4
V100_V100AM / USA EN / A31008-M1908-R301-1-6019 / security.fm / 12.3.08
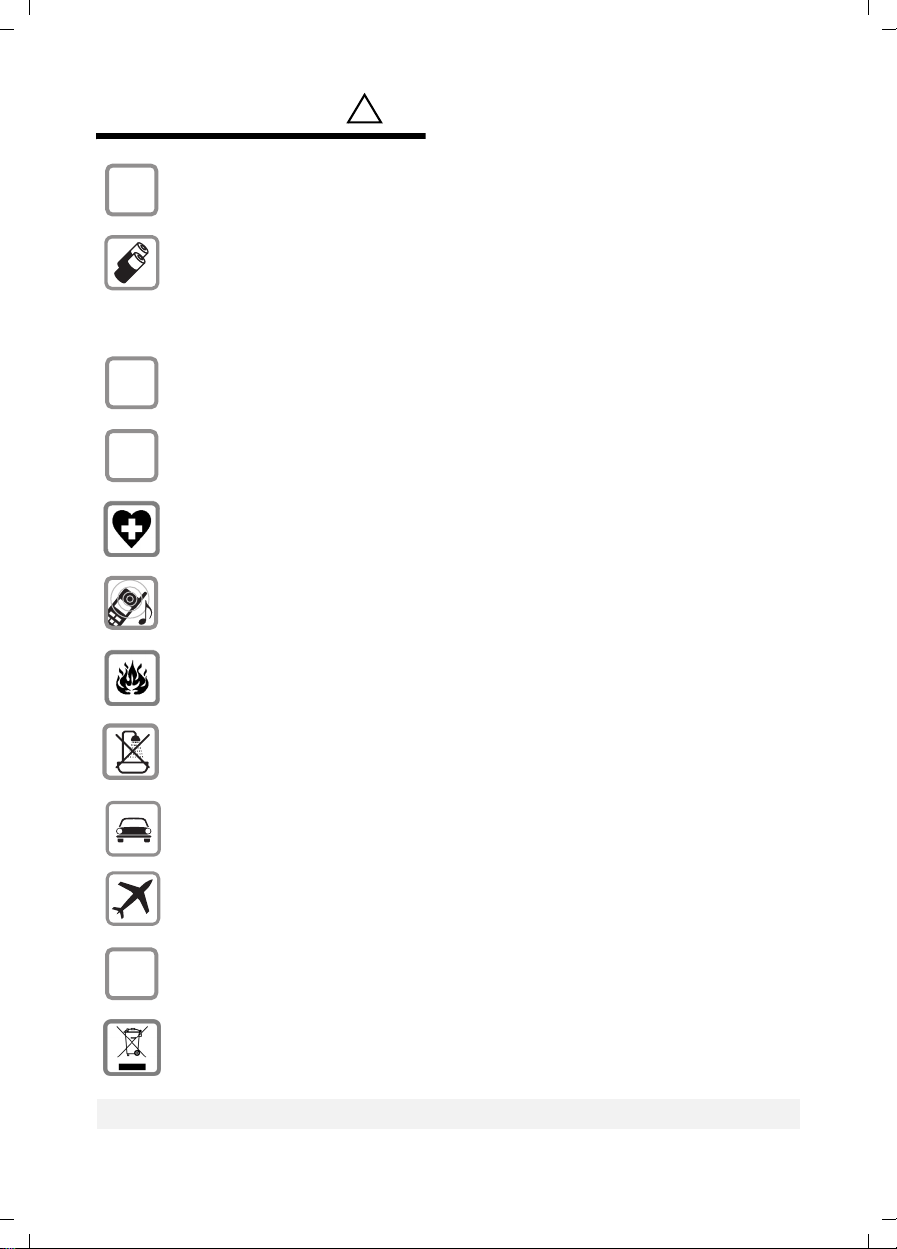
Safety precautions
Safety precautions*)
$
‹
Œ
Only use the power supply unit supplied as indicated on the underside of the
device.
Only insert approved rechargeable batteries of the same type.
Never use ordinary (non-rechargeable) batteries as they may pose a health
hazard or cause injury.
Do not charge the handset in charging unit or base station while the headset is
connected.
Make sure the rechargeable battery is inserted the right way round.
Use the battery specified in these operating instructions.
The phone may affect medical equipment so always switch your phone off
before entering hospitals or doctors’ practices.
Notice to Hearing Aid Wearers:
This phone system is compatible with inductively coupled hearing aids.
Do not operate the phone in places where there is a risk of explosion
(such as paint workshops).
!
Do not install the base station in bathrooms or shower rooms. The handset and
base station are not splash-proof (see page 42).
Drivers must not use the phone while driving.
The phone must be switched off at all times in an aircraft. Make sure it cannot
ƒ
be switched on accidentally.
If you give your telephone to someone else you should also give them the operating instructions.
Dispose of batteries and the phone carefully. Do not pollute the environment.
Emergency numbers cannot be dialed if the keypad lock is activated!
*) also see page 30
5

V100_V100AM / USA EN / A31008-M1908-R301-1-6019 / notes-on-instructions.fm / 12.3.08
Notes on the operating instructions
Notes on the operating
instructions
This section explains the meaning of certain symbols and typographical conventions used in this user guide.
Symbols used
On/Off (example)
Select one of the two menu
functions specified.
~ Enter digits or letters.
§Back§ The display keys' current func-
tions are shown reverse highlighted in the bottom display
line. Press the display key
below to launch the function.
q Press the top or the bottom of
the control key: scroll up or
down.
c / Q / * etc.
Press the corresponding key of
the handset.
Example: menu input
In the user guides, the steps you need to
perform are shown in abbreviated form.
This is illustrated below using "Changing
the display language" as an example.
Please proceed as described in the box
below.
§Menu§ ¢ Settings ¢ Handset ¢ Language
¢ English/ Español/ Français
¤ With the handset in idle status, press
the right display key to open the main
menu.
¤ Select Settings using the control key q
– press the control key at the top or
bottom.
¤ Press the §OK§ display key to confirm the
function Settings.
The Settings submenu is displayed.
¤ Press the bottom of the control key s
repeatedly until Handset is selected.
¤ Press the §OK§ display key to confirm the
function.
The Handset submenu is displayed.
¤ Press the bottom of the control key s
repeatedly until Language is selected.
¤ Press the §OK§ display key to confirm the
function.
The Language submenu is displayed.
¤ Select the language you want using
the control key q – press the control
key at the top or bottom.
¤ Press the §OK§ display key to confirm the
selected language.
The language is now changed for all text.
6
V100_V100AM / USA EN / A31008-M1908-R301-1-6019 / starting.fm / 12.3.08
Verizon V100 and Verizon V100AM– more than just a telephone
Verizon V100 and Verizon
V100AM–
more than just a telephone
Your phone not only lets you store up to
50 phone numbers (page 13), it can do a
whole lot more:
u View missed calls on your phone
(page 14).
u Select the 12- or 24-hour format for dis-
playing the time (page 9).
u ECO DECT uses a power supply with
low power consumption. Your handset
reduces the transmission power
depending on its distance from the
base station (close-up range).
Note:
The transmission power of the base station is
nearly turned off when the handset is placed
in the base station and only one handset is registered on the base station.
Headset socket
Which headsets are compatible?
Please call the Verizon Service number
1-866 374 3864 or contact us at
http://www.verizon.com
Caution:
Do not charge the handset in charging unit or
base station while the headset is connected.
Have fun using your new phone!
for information.
First Steps
Pack contents
u One Verizon V100 or Verizon V100AM
base station
u One telephone line cord
u One AC adapter for base station
u One User Guide
For Verizon V100-1 or Verizon V100AM-1
u One Verizon V100H handset with bat-
tery cover
u Two batteries
u One belt clip
For Verizon V100-2 or Verizon V100AM-2
u Two Verizon V100H handsets with bat-
tery cover
u One Verizon V100C charging cradle
u One AC adapter for charging cradle
u Four batteries
u Two belt clips
For Verizon V100-3 or Verizon V100AM-3
u Three Verizon V100H handsets with
battery cover
u Two Verizon V100C charging cradles
u Two AC adapters for charging cradle
u Six batteries
u Three belt clips
Installing the base station
The base station is designed for use in
closed, dry rooms in a temperature range
of +41°F to +113°F.
Set up the base station at a central point
on the premises.
Please note:
u Never expose the phone to heat
sources, direct sunlight, or other electrical appliances.
u Protect your phone from moisture,
dust, corrosive liquids, and vapors.
7
Verizon V100 / USA EN / A31008-M1908-R301-1-6019 / starting.fm / 12.3.08
First Steps
Range and reception strength
Range:
u Up to 984 feet in the open
u Up to 165 feet in buildings
Reception strength:
The display shows if the handset is linked
to the base station:
u Ä is on: handset is linked to the base
station.
u Ä flashes: no reception, handset is out
of range or not registered.
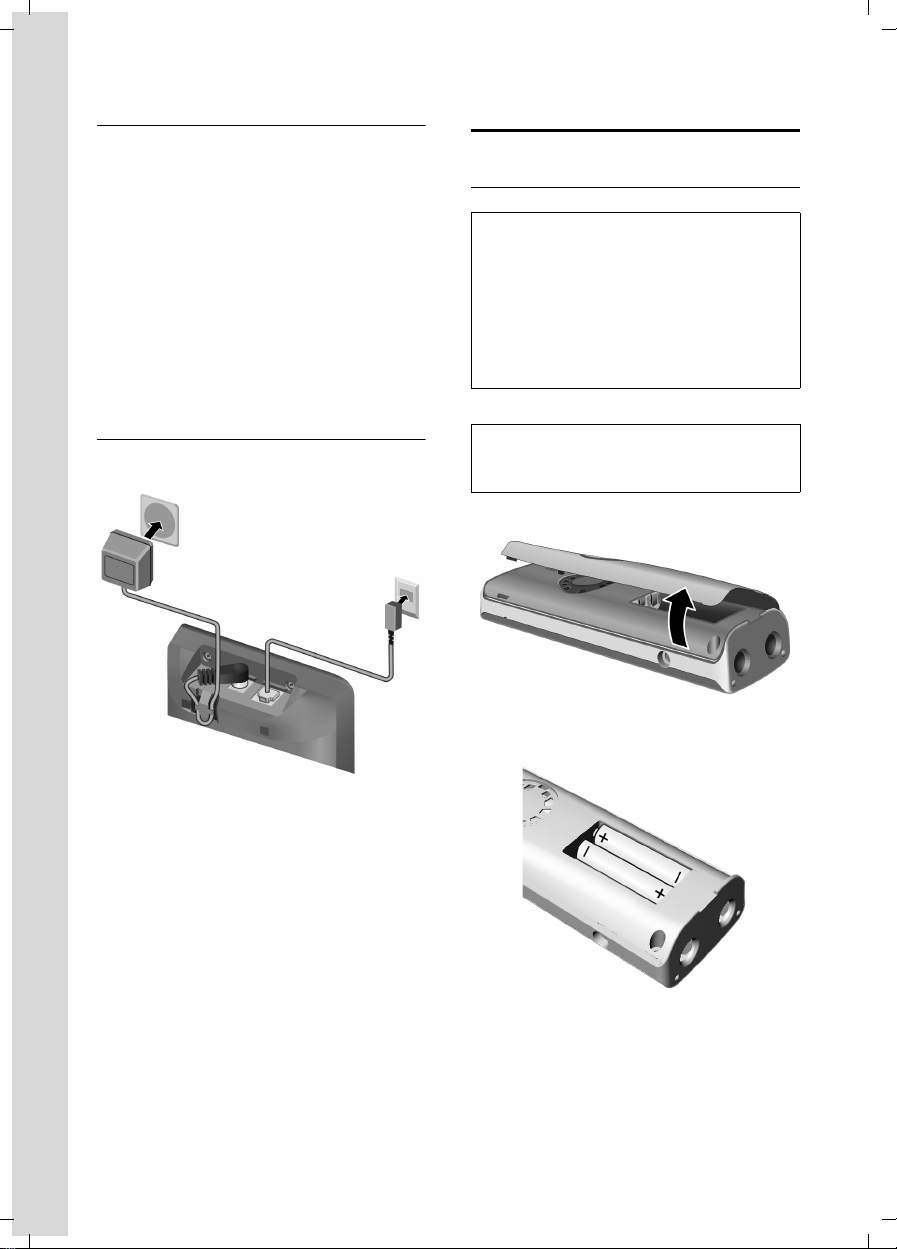
Connecting the base station
¤ First connect the power adapter and
then the phone jack as shown below.
1
3
2
Setting up the handset for use
Inserting the batteries
Caution:
Use only rechargeable UL-approved AAA batteries. Never use a conventional (nonrechargeable) battery or other battery types as
this could result in significant health risks and
personal injury. For example, the batteries
could explode. The phone could also malfunction or be damaged as a result of using batteries that are not of the recommended type.
Note:
If attached, remove the belt clip before opening the battery cover.
¤ Open the battery cover.
1 110-V power adapter
2 Back of the base station
3 Phone jack with phone cord
Please note:
u The power adapter must be always
connected, as the phone will not oper-
ate without an electrical supply.
u Your answer machine is set to give a
standard announcement.
8
¤ Insert the batteries according to the
correct polarity (see diagram).
¤ Close the cover, and press the top so
that it clicks into place.

V100_V100AM / USA EN / A31008-M1908-R301-1-6019 / starting.fm / 12.3.08
First Steps
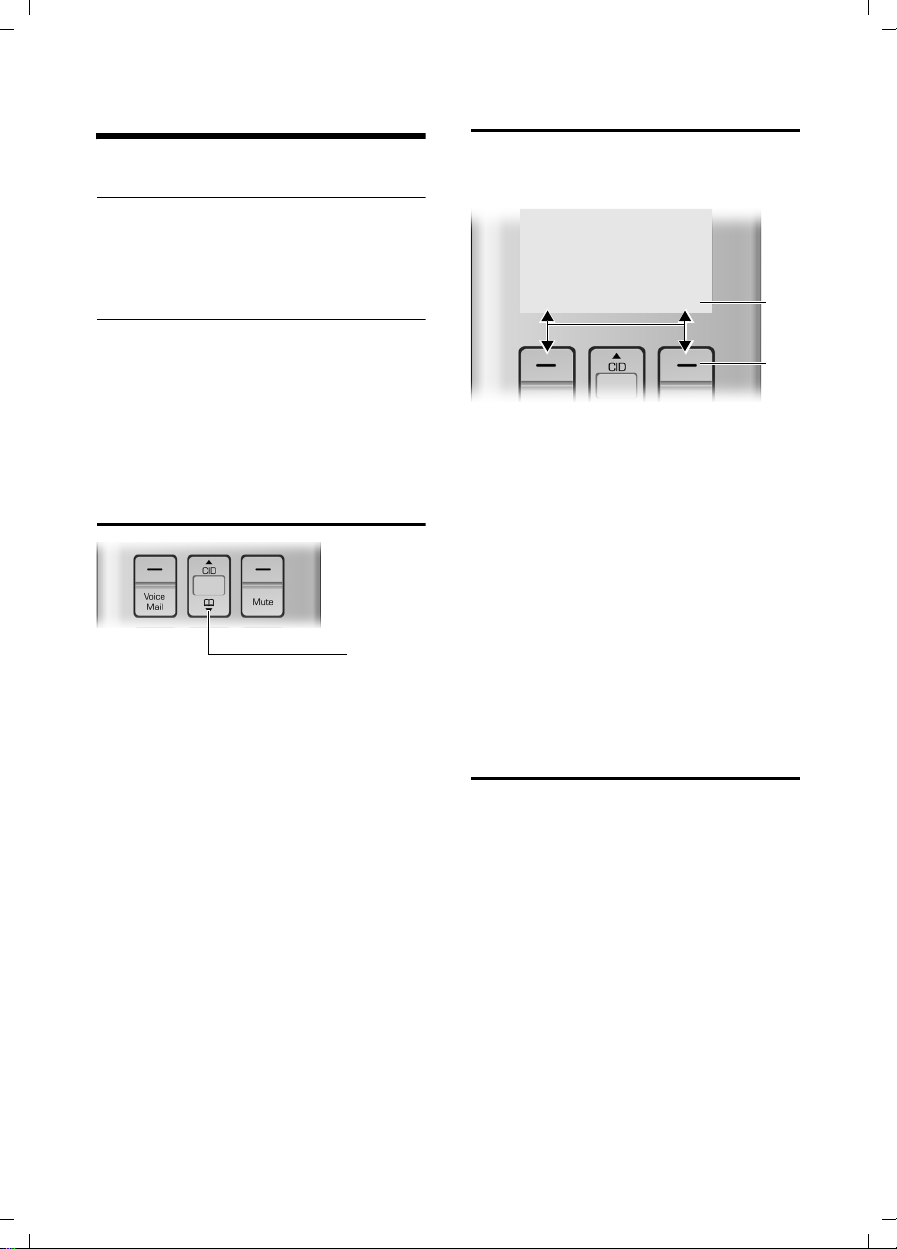
Attaching the belt clip
There are notches for attaching the belt
clip on the side of the handset at the same
height as the display.
¤ Press the belt clip onto the back of the
handset so that the protrusions on the
belt clip engage with the notches.
Placing the handset in the base station
¤ Place the handset in the base station
with the handset's display facing outwards.
Charging the batteries for the first time
¤ To charge the batteries, leave the hand-
set in the base station or charging cradle continuously for ten hours.
The alternately flashing battery icons =
at the upper right of the display screen
U
indicate that the batteries are being
charged.
Note:
– If the handset has turned itself off because
its batteries are empty, and you then place
the handset into the base station, it will
turn on automatically.
– Only place the handset into the base sta-
tion or charging cradle specifically
intended for it.
– During handset operation, the battery icon
e indicates the charge status of the bat-
teries (page 1).
– The batteries may feel warm as they are
charging. This is not dangerous.
For questions and troubleshooting, see
page 27.
Setting the date and time
You should set the date and time, for
example, to ensure the correct time of
incoming calls is recorded.
To change the time and date, open the
input field using:
§Menu§ ¢ s ¢ Settings ¢ Date/Time
¢ Set Date/Time
~ Enter the time and date with
10 digits, for example, Q
M 1 5Q11
5QN for January 15,
2008, 07:15 am. If the 12hour time format is set, use
the * key to switch between
am and pm.
§OK§ Press the display key to save
changes.
You can change the date and time format:
§Menu§ ¢ s ¢ Settings ¢ Date/Time
¢ Set Format
¤ Choose between day/month and
month/day date formats:
¢ Date Format ¢ DD/MM/MM/DD
s
¤ Choose between 12- and 24-hour time
formats:
¢ Time Format ¢ 12 Hours/24 Hours
s
Area codes
To make a call using the incoming calls list
(page 14), your phone's area code must
be stored.
§Menu§ ¢ s ¢ Settings ¢ System ¢ Area
Code
~ Enter your area code and press
§OK§.
Display in idle status
Once the phone is registered and the time
set, the idle display looks as shown here
(example). If the answer machine is activated, the header will also display the answer machine symbol
ÄÕ e
01/31 9:45AM
Your phone is now ready to use.
Õ.
INT 1
§§§§Menu§§§§
9

V100_V100AM / USA EN / A31008-M1908-R301-1-6019 / telefony.fm / 12.3.08
Making calls
Making calls
Making an external call
External calls are calls using the outside
telephone network.
~c Enter the number and press
the Talk key cor Handsfree
key d.
To cancel the dialing operation, press the
End Call key a.
You are shown the duration of the call
while the call is in progress.
Note:
Dialing using the directory (page 13) or Calls
list (page 14) saves time re-entering numbers.
Putting an external call on hold
j Press the Int/Hold key.
The external call is put on hold..
Note:
If you have registered only one handset to
your base station, the
i key, if you want to talk to somebody
Use
else without being heard by the external party.
Ending a call
a Press the End Call key.
Answering a call
The handset indicates an incoming call in
three ways: by ringing, by a display on the
screen, and by the flashing Talk key c.
You can accept the call by:
¤ Pressing the Talk key c.
¤ Pressing the Handsfree key d.
If the handset is in the base station or
charger and the Auto Answer function is
activated (page 24), the call will be
answered automatically when you lift the
handset from the base station or charger.
j has no function.
You can press the display key
the ring tone without answering the call.
You can answer the call as long the call is
shown on the display.
§Quiet§ to mute
Caller ID
Caller ID (CID) is an optional subscription
service provided by your telephone service provider. This feature supplies incoming caller identification information that
will be displayed on your handset.
Call display with Caller ID/Name
If the number of the caller is stored in your
directory, you will see the caller's name.
The following is displayed in place of the
number:
u External, if no number is transmitted or
the caller has not subscribed Caller ID.
u Withheld, if the caller has withheld
Caller ID.
Handsfree operation
You can activate the speakerphone at any
time to provide handsfree operation during a call.
Activating/deactivating handsfree
Activating while dialing
~d Enter the number and press
the Handsfree key.
¤ You should inform your caller before
you use the handsfree function so that
the caller knows someone else is listening.
Switching between earpiece and
handsfree mode
d Press the Handsfree key.
During a call and when listening to the
answer machine, turn handsfree on or off.
For how to adjust the volume, see
page 25.
10
V100_V100AM / USA EN / A31008-M1908-R301-1-6019 / telefony.fm / 12.3.08
Operating the handset
Operating the handset
Activating/deactivating the handset
a Press and hold the End Call
key.
Activating/deactivating the keypad
lock
# Press and hold the pound key.
Keypad Locked appears in the display when
the keypad lock is activated.
The keypad lock is deactivated automati-
cally if someone calls you. It is re-activated
when the call is finished.
Control key
1
1Control key
In the description below, the side of the
Control key (up, down), which you must
press depending on the operating situation , is marked in black, for example,
for "press up on the Control key".
The Control key has different functions:
When the handset is in idle status
s Open the directory
t Open call log list (page 14)
In input fields
You can use the Control key to move the
cursor backwards
t or s forwards.
In the main menu, lists and submenus
t / s Scroll up/down line by line.
t
Display keys
The function of the display keys changes
depending on the particular operating situation. Example:
§§§§§Back§§§§§ † §§§§Menu§§§§§
1 The display keys' current functions are
shown on the bottom display line.
2 Display keys
The most important display symbols are:
§§§§§Menu§§§§ Open the main menu (in idle
mode) or the context-dependant menu.
§§§§§Back§§§§ Go back one menu level.
§§§§§§§OK§§§§§§§ Confirm your choice or save
edited characters.
§§§§Clear§§§§§ Clear key: deletes one charac-
ter at a time from right to left
(press briefly) or all characters
(hold).
1
2
Returning to idle status
You can return to idle status from anywhere in the menu as follows:
¤ Press the End Call key a.
Or:
¤ Do not press any key: after 2 minutes,
the display will automatically return to
idle status.
Changes that you have not confirmed or
saved by pressing
An example of the display in idle status is
shown on page 9.
§OK§ will not be saved.
When the handset is off the hook or when
the answer machine plays
t / s Increase/decrease volume
11
 Loading...