

Gigaset Communications S45-E45 User Manual

Gigaset E45 / USA EN / A31008-M1751-R101-2-6Z19 / Congratulations_En.fm / 30.3.06
Congratulations
Congratulations
Congratulations on your purchase of the Siemens Gigaset E45 telephone system! This
phone´s DECT6.0 frequency standard and high-speed digital voice encoding provide reception and voice clarity that is superior to other cordless phones. And, its digital spread
spectrum technology will provide you with secure, private conversations.
DO NOT RETURN
THIS PRODUCT TO THE
STORE!
Please read the following important information.
For Siemens Customer Care, product operation
information, or for problem resolution, call toll-free
1-888-777-0211
9 a.m. to 8 p.m. Central Standard Time Monday-Saturday
s
www.my-siemens.com
Register now!
It’s fast progress in the world of communication. Register today for the world of
Siemens Communications on "my-siemens.com" and stay current with customized information
on Siemens latest products and applications.
Please go to: www.icm.siemens.com/register
1
Gigaset E45 / USA EN / A31008-M1751-R101-2-6Z19 / OVERVIEW.fm / 28.3.06
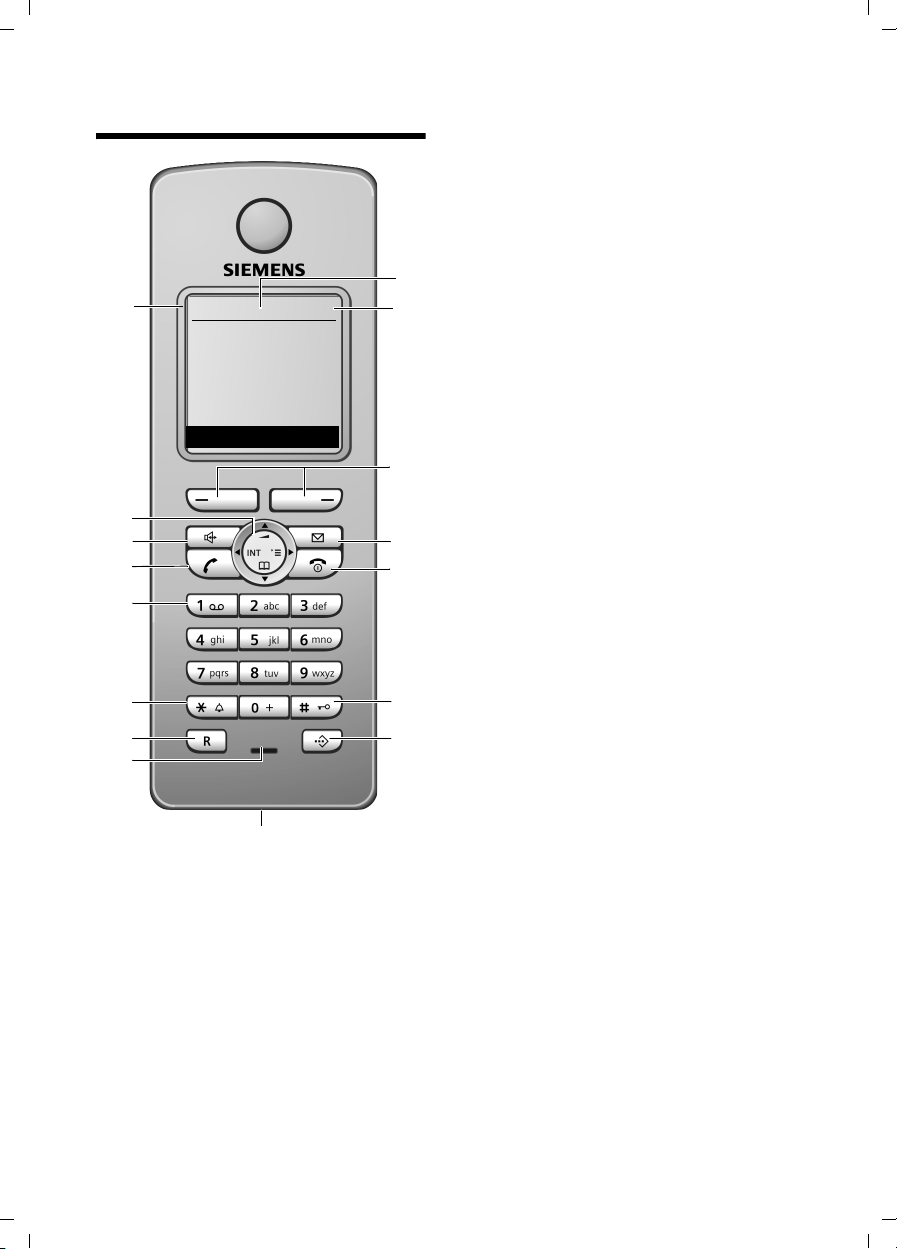
Handset at a glance
Handset at a glance
16
15
14
13
12
11
10
9
Ð
INT 1
06.03.06 09:45
INT Menu
8
1 Display in idle status
2 Charge status of the battery pack
= e V U (empty to full)
= flashes: battery pack almost empty
e V U flashes: battery pack charging
3 Display keys (page 10)
4 Message key
Access to calls and message lists
(depending on the base station)
1
2
3
4
5
6
7
Flashes: new message or new call;
Will illuminate after each missed call
whether the caller left a voice mail message
or not
5 End call key, On/Off key
End call, cancel function, go back one menu
level (press briefly), back to idle status
(press and hold), activate/deactivate
handset (press and hold in idle status)
6 Pound (#) key
Key lock on/off (press and hold in idle
status),
Toggle between upper/lower case and digits
7 Call-by-call list key
Open call-by-call list
8 2.5 mm plug for headset
9 Microphone
10 Flash key
- Confer (Flash)
- Insert a dialing pause (press and hold)
11 Star key
Ringtones on/off (press and hold),
Open table of special characters
12 Key 1
Select network mailbox (press and hold)
13 Tal k key
Answer a call, open last number redial list
(press briefly), start dialing (press and hold)
14 Handsfree key
Switch between earpiece and handsfree
mode
Lights up: handsfree activated
Key flashes: incoming call
15 Control key (page 10)
16 Signal strength
Ð i Ñ Ò (high to low)
| flashes: Out of Range
2

Gigaset E45 / USA EN / A31008-M1751-R101-2-6Z19 / E45_IVZ.FM / 28.3.06
Contents
Contents
Congratulations . . . . . . . . . . . . . . 1
Handset at a glance . . . . . . . . . . . 2
Safety precautions . . . . . . . . . . . 4
Gigaset E45 –
a handset with many extras . . . . 5
First Steps . . . . . . . . . . . . . . . . . . . 5
Pack contents . . . . . . . . . . . . . . . . . . . . 5
Setting up the handset for use . . . . . . . 5
Making calls . . . . . . . . . . . . . . . . . 8
Making an external call . . . . . . . . . . . . 8
Ending a call . . . . . . . . . . . . . . . . . . . . . 8
Answering a call . . . . . . . . . . . . . . . . . . 8
Handsfree operation . . . . . . . . . . . . . . 9
Muting . . . . . . . . . . . . . . . . . . . . . . . . . 9
Making internal calls . . . . . . . . . . . . . . 9
Operating the handset . . . . . . . . . 9
Switching the handset on/off . . . . . . . 9
Activating/deactivating the
keypad lock . . . . . . . . . . . . . . . . . . . . . . 9
Control key . . . . . . . . . . . . . . . . . . . . . 10
Display keys . . . . . . . . . . . . . . . . . . . . 10
Returning to idle status . . . . . . . . . . . 11
Menu guidance . . . . . . . . . . . . . . . . . 11
Correcting incorrect entries . . . . . . . . 11
Using the directory and lists . . . 11
Directory and call-by-call list . . . . . . . 11
Last number redial list . . . . . . . . . . . . 14
Opening lists with the
message key . . . . . . . . . . . . . . . . . . . . 14
Using a handset as a room
monitor . . . . . . . . . . . . . . . . . . . . 14
Activating the room monitor and
entering the number to be called . . . 15
Handset settings . . . . . . . . . . . . . 16
Changing the display language . . . . . 16
Setting the display . . . . . . . . . . . . . . . 16
Setting the screen picture . . . . . . . . . 16
Setting display illumination . . . . . . . . 17
Activating/deactivating auto answer . 17
Adjusting the loudspeaker volume . . 17
Changing ringtones . . . . . . . . . . . . . . 17
Activating/deactivating
advisory tones . . . . . . . . . . . . . . . . . . . 18
Setting the alarm clock . . . . . . . . . . . . 19
Restoring the handset default
settings . . . . . . . . . . . . . . . . . . . . . . . . 19
Appendix . . . . . . . . . . . . . . . . . . . 20
Care . . . . . . . . . . . . . . . . . . . . . . . . . . . 20
Contact with liquid . . . . . . . . . . . . . . . 20
Questions and answers . . . . . . . . . . . . 20
Troubleshooting . . . . . . . . . . . . . . . . . 20
Specifications . . . . . . . . . . . . . . . . . . . 21
FCC . . . . . . . . . . . . . . . . . . . . . . . . . . . 22
Industry Canada Certification . . . . . . . 22
Safety precautions . . . . . . . . . . . 23
Notes on the operating
instructions . . . . . . . . . . . . . . . . . 26
Symbols used . . . . . . . . . . . . . . . . . . . 26
Example: menu input . . . . . . . . . . . . . 26
Example: multiple line input . . . . . . . . 27
Writing and editing names . . . . . . . . . 27
Accessories . . . . . . . . . . . . . . . . . 28
Index . . . . . . . . . . . . . . . . . . . . . . 29
3
Gigaset E45 / USA EN / A31008-M1751-R101-2-6Z19 / start_guide_time.fm / 30.3.06
Safety precautions
Safety precautions*)
$
‹
Œ
Only use the power supply unit supplied as indicated on the underside of the
device.
Only insert approved rechargeable batteries of the same type.
Never use ordinary (non-rechargeable) batteries as they may pose a health
hazard or cause injury.
Make sure the rechargeable battery is inserted the right way round.
Use the battery specified in these operating instructions.
The phone may affect medical equipment so always switch your phone off
before entering hospitals or doctors’ practices.
The handset may cause an unpleasant humming noise in hearing aids.
Do not operate the phone in places where there is a risk of explosion
(such as paint workshops).
!
The handset is not splash-proof (see page 20).
Drivers must not use the phone while driving.
The phone must be switched off at all times in an aircraft. Make sure it cannot
ƒ
Emergency numbers cannot be dialed if the keypad lock is activated!
4
be switched on accidentally.
If you give your Gigaset to someone else you should also give them the operating instructions.
Dispose of batteries and the phone carefully. Do not pollute the environment.
*) see also page 23
Gigaset E45 / USA EN / A31008-M1751-R101-2-6Z19 / start_guide_time.fm / 30.3.06
Gigaset E45 – a handset with many extras
Gigaset E45 –
a handset with many extras
Your Gigaset E45 not only lets you store up
to 150 telephone numbers (page 11) –
your Gigaset E45 can do much, much
more:
u You can designate important people as
VIPs so you can identify important calls
from the ringtone (page 12).
u You can store anniversary dates
(page 13) in your phone and it will
remind you of them in advance.
u Select frequently used phone numbers
at the press of a single key (page 13).
u Select 12 or 24-hour format for display-
ing the time (page 8).
Have fun using your new Gigaset E45!
First Steps
Pack contents
u one Gigaset E45 handset,
u one charging cradle
(incl. power adapter),
u one battery pack,
u one battery cover,
u one lock ring,
u one belt clip,
u one headset socket cover,
u one user guide.
Setting up the handset for use
Connecting up the charging cradle and
mounting it on the wall (if required) is
described at the end of these instructions.
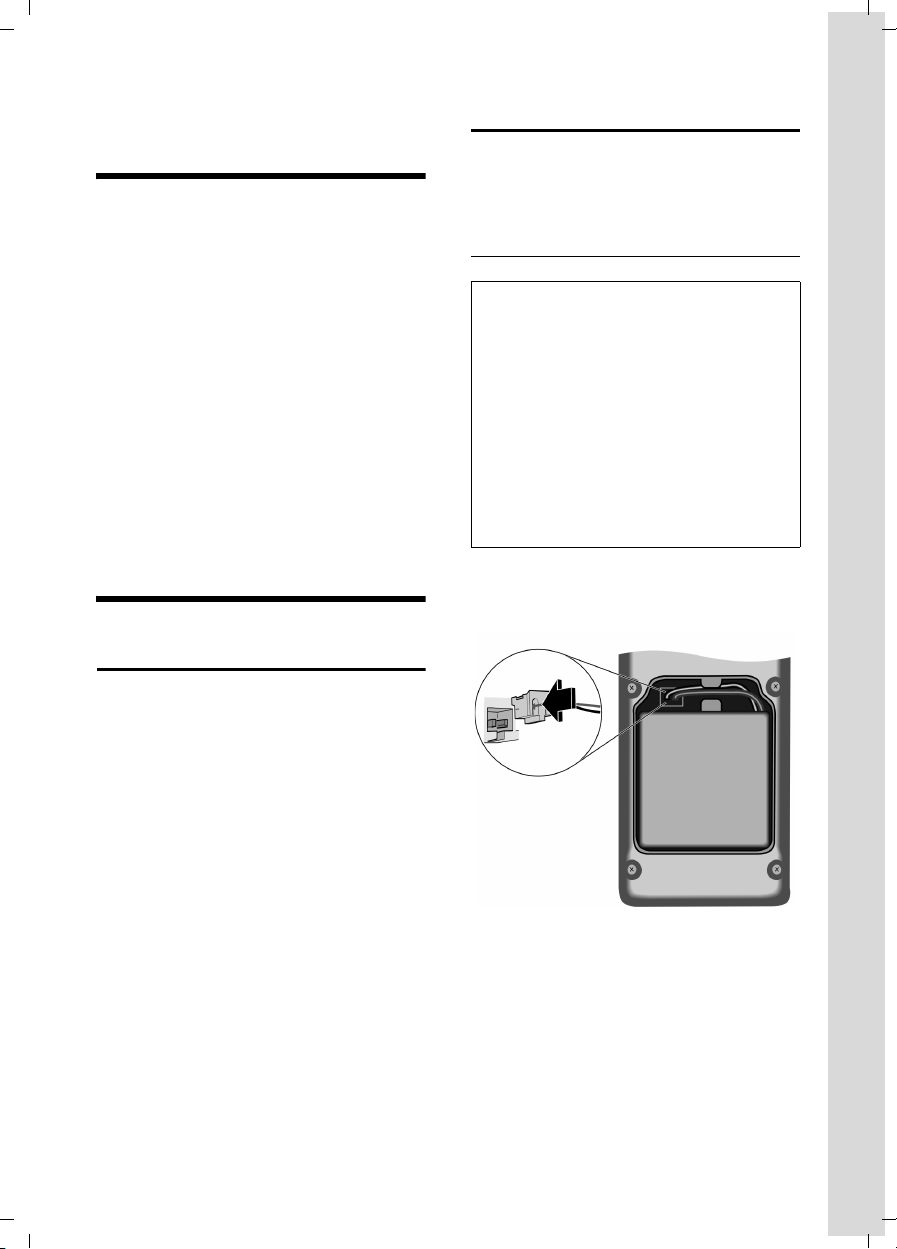
Fitting the battery pack
Caution:
Use only the rechargeable battery pack recommended by Siemens (page 21). On no account
may a conventional (non-rechargeable) battery pack or other type of battery be used, as
this may cause significant damage to health
and property – the outer casing of the battery
or battery pack could be destroyed or the battery pack could explode. The phone could also
malfunction or be damaged as a result of using
batteries that are not of the recommended
type. Use of battery packs not authorized by
Siemens may void the warranty on this product.
¤ Fit the plug into the socket.
¤ Insert the battery pack.
¤ Place the cords in the cord routing.
5
Gigaset E45 / USA EN / A31008-M1751-R101-2-6Z19 / start_guide_time.fm / 30.3.06
First Steps
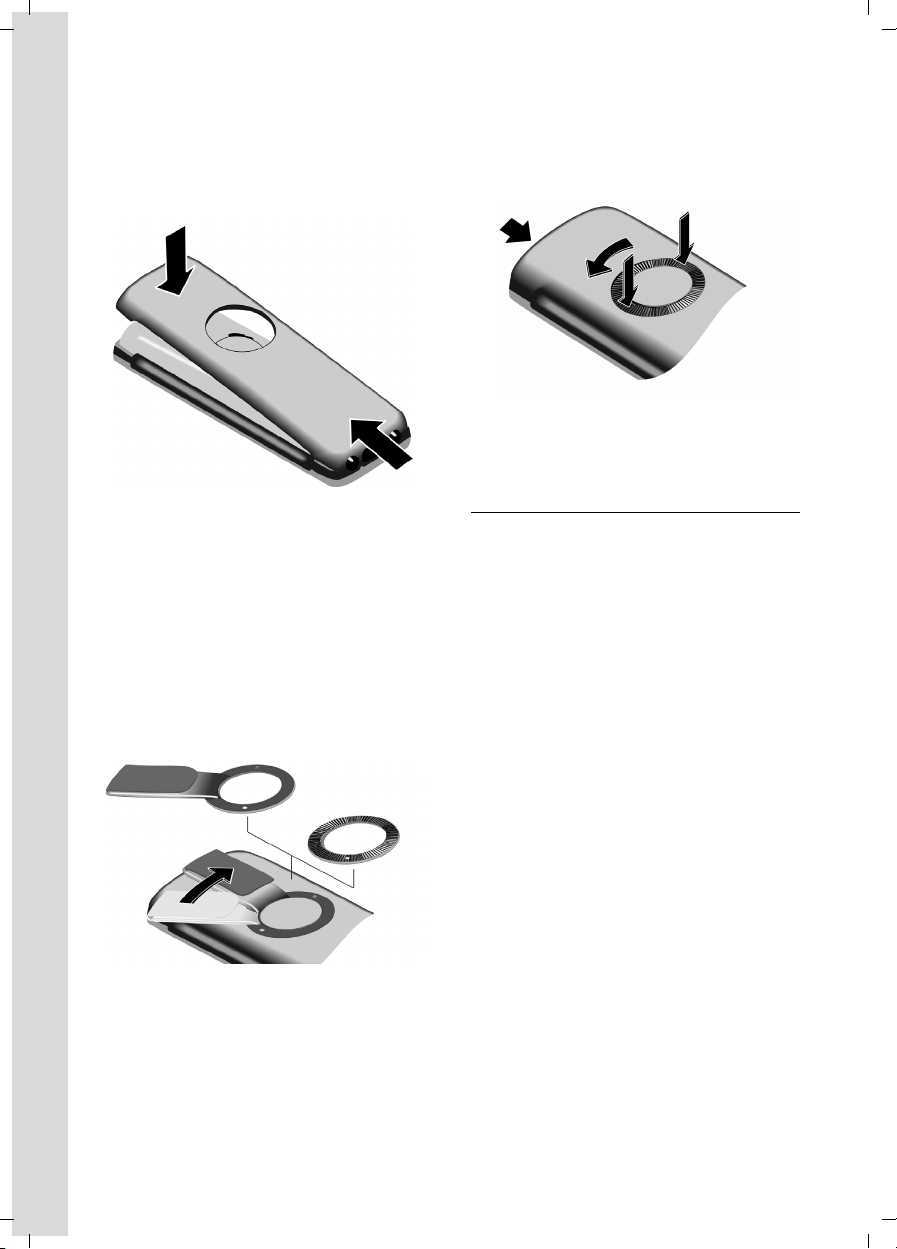
Closing the battery cover
¤ Hold the battery cover at a slight angle
and install the two lower clips into the
casing first. Then close the cover, press
on the top so that it clicks into place.
Locking the battery cover
Insert the catches on the lock ring or belt
clip into the notches in the casing and
make sure that the arrow markings on the
casing are aligned with those on the bottom of the ring. Turn the lock ring or belt
clip clockwise to the end stop. When both
holes are horizontally aligned with the
upper edge of the handset the lock ring is
closed.
Opening the battery cover
Position both thumbs on the lock ring and
simultaneously turn the lock ring or belt
clip anticlockwise and remove.
¤ Insert a coin into the cavity at the top of
the battery cover and twist it until the
cover opens.
Registering your phone
Before you can use your Gigaset E45 you
must register it to a base station. It can be
registered to a maximum of four base stations. The actual registration procedure
will depend on the type of base station.
Automatic registration Gigaset E45 to
Gigaset E450
Important: The handset must not yet be
registered to any base station.
Registering the handset to the
Gigaset E450 base station occurs automatically. (For the E455 base station you
need to register your handset manually,
see page 7.)
¤ Place the handset in the base with its
display facing outwards.
Registration takes around 1 minute. During this process, Regstr.Procedure appears
in the display and the name of the base
station flashes, for example Base 1. When
the handset has been registered, its
screen displays its internal number, for
example INT 2 for internal number 2. The
handset is assigned the lowest available
internal intercom number (1-6). If all
internal numbers 1-6 have been assigned,
number 6 is overwritten, provided the
6

Gigaset E45 / USA EN / A31008-M1751-R101-2-6Z19 / start_guide_time.fm / 30.3.06
First Steps
handset with the internal number 6 is in
idle status.
Notes:
– Automatic registration is not possible when
the base station on which you wish to
register the handset is being used to make
a call.
– Each key press interrupts the automatic
registration.
– If automatic registration does not work,
you will have to register the handset
manually.
Manual registration of the Gigaset E45
If the handset does not activate automatically when the battery pack is fitted, you
must first charge the battery pack.
You must activate manual registration of
the handset at both the handset and the
base station.
After it has been registered, the handset
returns to idle status. The handset's internal number is shown in the display, for
example INT 1. If it is not, repeat the
procedure.
1. On the handset
v ¢ Ð ¢ Handset ¢ Register H/Set
s Select base station, for exam-
ple Base 1, and press
~ Enter the system PIN of the
base station (the default is
0000) and press
screen will display the number, for example Base 1.
§OK§.
§OK§. The
2. On the base station
Within 60 secs. press and hold the registration/paging key on the base station
(page 2) (approx. 3 secs.).
Headset socket
Most headsets with standard 2.5mm mini
plugs are compatible with this handset.
If you do not connect a headset, please
insert the cover supplied for the headset
socket to support the splash proof feature.
Charging the battery pack
¤ Plug the power adapter of the charging
cradle into an electrical outlet.
¤ Place the handset in the base with its
display facing forward.
To charge the battery pack, leave the
handset in the charging cradle. If the
handset is activated, the flashing battery
icon e in the top right of the display
indicates that the battery pack is being
charged. During handset operation, the
battery icon indicates the charge status of
the battery pack (page 2).
Initial charging and discharging of the
battery pack
The correct charge status can only be
displayed if the battery pack is first fully
charged and discharged.
¤ To do this, leave the handset in the
charging cradle continuously for ten
hours. Your handset need not be
switched on for it to charge.
¤ Afterwards, remove the handset from
the charging cradle and do not put it
back again until the battery pack is fully
discharged.
Notes:
– The handset should only be placed in a
base station or charging cradle that is
designed for it.
– When the handset is in the cradle, it
charges even if it is switched off.
– If the handset has switched itself off
because the battery has no charge, and it is
then placed in the cradle, it will switch itself
on automatically.
– After the first battery charge and discharge
you may replace your handset in the charging cradle after every call.
7

Gigaset E45 / USA EN / A31008-M1751-R101-2-6Z19 / start_guide_time.fm / 30.3.06
Making calls
Please remember:
u Always repeat the charging and dis-
charging procedure if you remove the
battery pack from the handset and
insert it again.
u The battery pack may feel warm as it is
charging. This is normal.
Setting the date and time
To set the date and time, press the display
§Time§ to open the input menu.
key
To change the time, open the input field
via:
¢ Ð ¢ Date/Time
v
¤ Change multiple line input:
Date:
Enter month, day and year in 6-digit
format.
Time:
Enter hours and minutes with 4 digits,
for example Q M 1 5
for 07:15 AM a.m.
Time mode:
Choose between 12 and 24-hour time
format.
If you have selected the 12-hour time format, use the display key
between am and pm.
§Save§ Press the display key.
Changing the base station
If your handset is registered to more than
one base station, you can set it to a particular base station or to the base station
that has the best reception (Best Base).
¢ Ð ¢ Handset ¢ Select Base
v
s Select one of the registered
base stations or Best Base and
press
§am/pm§ to switch
§OK§.
Making calls
Making an external call
External calls are calls using the public
telephone network.
~c Enter the number and press
the talk key.
Or:
c~ Press and hold the talk
key c and then enter
the number.
To cancel the dialing operation, press the
end call key a.
You are shown the duration of the call
while the call is in progress.
Notes:
– Dialing using the directory, call-by-call list
(page 2, page 11) or last number redial list
(page 14) saves time re-entering numbers
and network provider access codes ("callby-call numbers").
Ending a call
a Press the end call key.
Answering a call
The handset indicates an incoming call in
three ways: by ringing, by a display on the
screen and by the flashing handsfree
key d.
You can accept the call by:
¤ Pressing the talk key c.
¤ Pressing the handsfree key d.
If the handset is in the charging cradle and
the Auto Answer function is activated
(page 17), the call will be answered automatically when you lift the handset from
the cradle.
Press the display key
ringer without answering the call. You can
answer the call as long the call is displayed
on the screen.
§Silence§ to mute the
8

Gigaset E45 / USA EN / A31008-M1751-R101-2-6Z19 / start_guide_time.fm / 30.3.06
Operating the handset
Handsfree operation
You can activate the speakerphone at any
time to provide handsfree operation during a call.
Activating/deactivating handsfree
Activating while dialing
~c Enter the number and press
the talk key.
¤ You should inform your caller before
you use the handsfree function so that
they know someone else is listening.
Switching between earpiece and
handsfree mode
d Press the handsfree key.
During a call switch handsfree on or off.
If you wish to place the handset in the
charging cradle during a call:
¤ Press and hold the handsfree key d
while placing the handset in the base
station. If the handsfree key d does
not light up, press the key again.
For how to adjust the volume, see
page 17.
Making internal calls
Internal calls to other handsets registered
on the same base station are free.
Calling a specific handset
u Initiate internal call.
~ Enter the number of the
handset.
Or:
u Initiate internal call.
s Select handset.
c Press the talk key.
Calling all handsets ("group call")
u Initiate internal call.
* Press the star key. All handsets
are called.
Ending a call
a Press the end call key.
Operating the handset
Switching the handset on/off
Muting
You can deactivate the microphone in
your handset during an external call.
The other party hears a wait melody.
u Press the control key on the
left to mute the handset.
” Press the display key to reacti-
vate the microphone.
a Press and hold the end call
key. You will hear the confirmation beep.
Activating/deactivating the
keypad lock
# Press and hold the pound key.
You will hear the confirmation beep. The
icon Ø appears in the display when the
keypad lock is activated.
The keypad lock is deactivated automatically if someone calls you. It is re-activated
when the call is finished.
9

Gigaset E45 / USA EN / A31008-M1751-R101-2-6Z19 / start_guide_time.fm / 30.3.06
Operating the handset
Control key
In the following information the side of
the control key (top, bottom, right, left)
you have to press in each operating situation is shown in black (e.g. v for "press
the right of the control key").
The control key has a number of different
functions:
When the handset is in idle status
s Open the directory.
v Open main menu.
u Open list of handsets.
t Set the ringtones on the hand-
set (page 17).
In the main menu and in input fields
You can use the control key to move the
cursor up t, down s, right v or left
u.
In lists and submenus
t / s Scroll up/down line by line.
v Open submenu or confirm
selection.
u Go back one menu level, or
cancel.
During an external call
s Open the directory.
u Initiate an internal consulta-
tion call.
t Adjust loudspeaker volume for
earpiece and handsfree mode.
Display keys
The function of the display keys changes
depending on the particular operating situation. Example:
INT Menu
1 Current display key functions are shown in
the bottom display line.
2 Display keys
Press the display key below to launch the
function.
The most important display symbols are:
§§§§§§Menu§§§§§ Open the main menu.
§Options§ Open a context-dependent
menu.
W Delete key: backspace deletes
one character at a time.
u Go back one menu level, or
cancel.
Ó Copy number into directory.
Ÿ On bases with built-in answer-
ing machines: forward external call to the answering
machine.
• Open the last number redial
list (depending on the base
station).
1
2
10

Gigaset E45 / USA EN / A31008-M1751-R101-2-6Z19 / start_guide_time.fm / 30.3.06
Using the directory and lists
Returning to idle status
You can go back to idle status from anywhere in the menu as follows:
¤ Press and hold the end call key a.
Or:
¤ Do not press any key: after 2 minutes
the display will automatically revert to
idle status.
Changes that you have not confirmed or
saved by pressing
Save Entry
An example of the display in idle status is
shown on page 2.
§OK§ will be lost.
§OK§, §Yes§, §Save§, §Send§ or
Menu guidance
Your telephone's functions are accessed
using a menu that has a number of levels.
Main menu (first menu level)
¤ Press v with the handset in idle status
to open the main menu.
The main menu functions are shown in
the display as a list with icon and name.
Accessing a function, i.e. opening the corresponding submenu (next menu level):
¤ Navigate to the function using the con-
trol key q. Press the display key
Submenus
The functions in the submenus are displayed as lists.
To access a function:
§OK§.
¤ Scroll to the function with the control
key q and press
Or:
§OK§.
¤ Enter the corresponding digit combina-
tion.
A short press on the end call key a
returns you to the previous menu level /
cancels the operation.
Correcting incorrect entries
You can correct incorrect characters in the
text by navigating to the incorrect input
using the control key. You can then:
u press X to delete the character to the
left of the cursor,
u insert characters to the left of the cur-
sor,
u overwrite the (flashing) character
when entering the time and date etc.
u You will find examples of symbols
used, menu entries and multiple line
input in the appendix to this user guide,
page 26.
Using the directory and lists
You can store a maximum of 150 entries in
the directory and call-by-call list (the
actual number depends on the size of the
individual entries).
You create the directory and call-by-call
list for your own individual handset. You
can, however, send lists/entries to other
handsets or the base station (page 13).
Directory and call-by-call list
In the directory, you can store numbers
and names associated with them.
¤ With the handset in idle status, open
the directory by pressing the s key.
The call-by-call list is used to store
the access codes for network providers
(so-called "call-by-call numbers").
¤ Open the call-by-call list in idle status
by pressing the C key.
Length of entries
Number: max. 32 digits
Name: max. 16 characters
Note:
For quick access to a number from the directory or the call-by-call list (quick dial), you can
assign the number to a key.
11
 Loading...