

Gigaset Communications A580IP, A58H User Manual
Gigaset A580 IP / US English / A31008-xxxx-xxxx-x-xxxx / overview.fm / 24.04.2009
The handset at a glance
The handset at a glance
15
14
13
12
11
10
9
8
ÐV
INT 1
10.10.08 07:15
Þ Menu
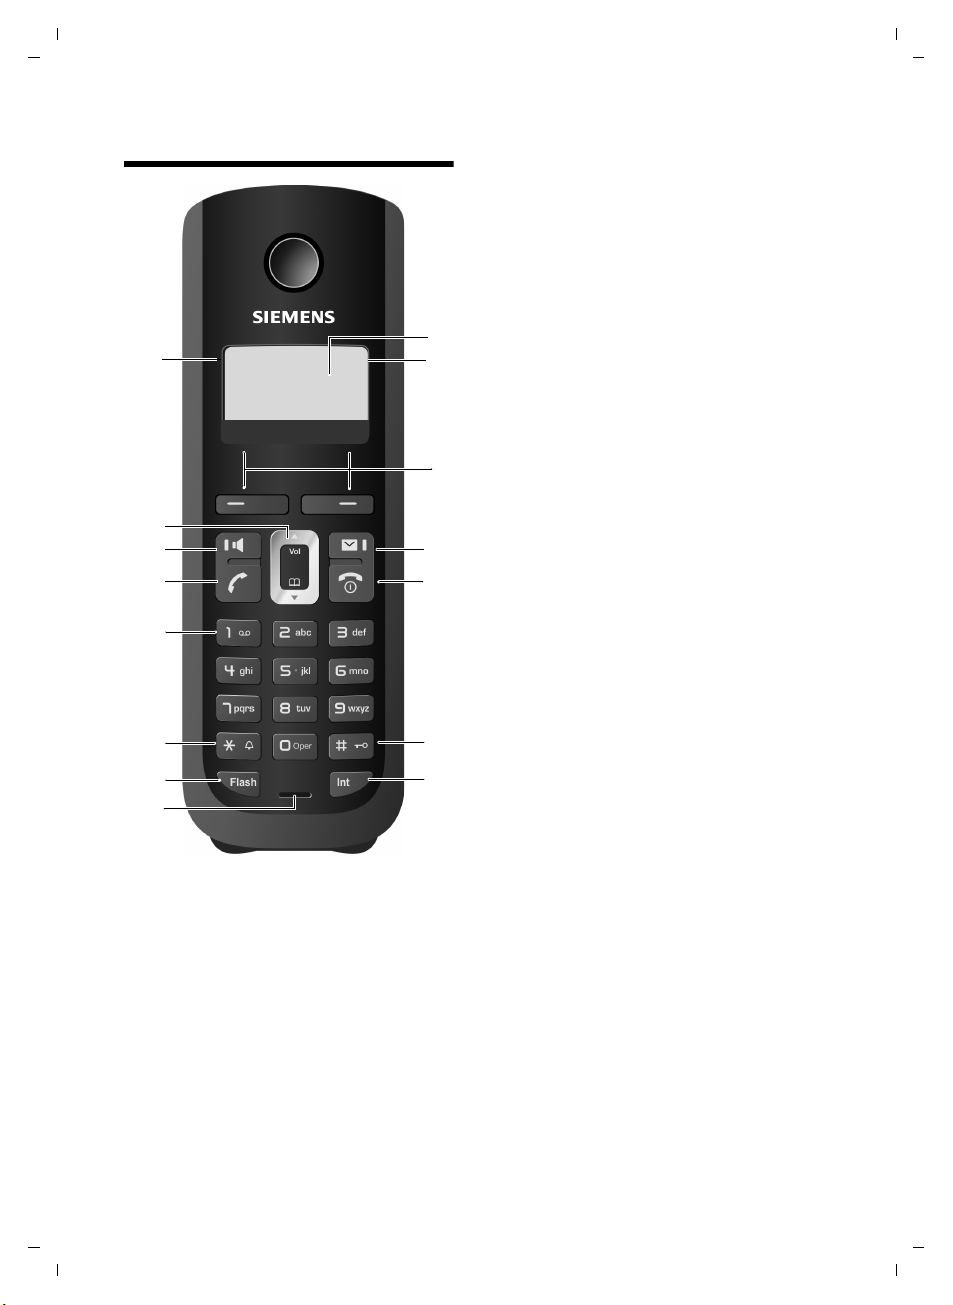
Handset keys
1 Display in idle status (example)
2 Charge status of the batteries
(
£ Page 27)
3 Display keys (
4 Message key (
Access to Calls and Message lists;
Flashes: new message, new call or
new firmware or new provider profile available
1
2
3
4
5
6
7
5 End Call key, On/Off key
End call, cancel function, go back one menu
level (press briefly), back to idle status (press
and hold), activate/deactivate handset
(press and hold in idle status)
6 Pound key (#)
Keypad lock on/off (press and hold)
(
£ Page 32)
Switch between upper/lower case letters
and digits for text input (
7 Internal key
Make an internal call (
8 Microphone
9 Flash key
Enter flash "F" (press briefly;
Fixed line network only:
Insert a dialing pause "P" (press and hold)
10 Asterisk key (*)
Idle status:
Ringer melody on/off (press and hold)
Fixed line network: switch between dial
pulsing/touch tone dialing
11 Key 1 (press and hold)
Call a network mailbox (if applicable)
12 Tal k key
Answer call, open Last Number Redial list
(press briefly in idle status), select connec-
tion type and start dialing (press briefly/
press and hold after entering the number,
£ Page 30)
£ Page 58)
£ Page 153)
£ Page 74)
£ Page 127)
£ Page 38)
13 Speaker key
Switch between earpiece and handsfree
mode
Lights up: handsfree talking activated
Flashes: incoming call
14 Control key (
15 Signal strength (
£ Page 30)
£ Page 27)
1
Version 8, 03.09.2008

Gigaset A580 IP / US English / A31008-xxxx-xxxx-x-xxxx / overview.fm / 24.04.2009
Overview of display icons
Overview of display icons
=eVU
Charge status of the batteries (empty to fully charged)
= (flashes)
Batteries almost empty
e V U (flashes)
Charging
ÒÑiÐ Reception strength icon
Reception signal strength between the base station and the handset (low to
high)
| (flashes)No reception signal between the base station and the handset
Shortly after activating Eco , the ¼ symbol replaces the reception strength icon
in the top left of the handset's idle display.
Ø
Ú Ringer deactivated
Å Incoming calls on the fixed line network connection (ringer icon)
M
¼ Alarm clock set
z Open Last Number Redial list
Keypad lock activated
Incoming call on a VoIP connection
The base station at a glance
1
2
Base station key
1 Paging key
Lights up:
LAN connection active (phone is connected to
router)
Flashes:
data transfer to LAN connection
Press briefly:
Initiate paging (
Display the IP address on the handset
Press and hold:
Set base station to registration mode
(
£ Page 71)
£ Page 73),
Version 8, 03.09.2008

Gigaset A580 IP / US English / A31008-xxxx-xxxx-x-xxxx / Gigaset_A580_IPIVZ.fm / 24.04.2009
Contents
The handset at a glance . . . . . . . . . . . . . . . . . . . . . . . . . . . . . . . . . . 1
Overview of display icons . . . . . . . . . . . . . . . . . . . . . . . . . . . . . . . . 2
The base station at a glance . . . . . . . . . . . . . . . . . . . . . . . . . . . . . . 2
Safety precautions . . . . . . . . . . . . . . . . . . . . . . . . . . . . . . . . . . . . . . 7
Gigaset A580 IP – more than just making calls . . . . . . . . . . . . . . . 8
VoIP – making calls via the Internet . . . . . . . . . . . . . . . . . . . . . . . . 9
Gigaset HDSP – telephony with brilliant sound quality . . . . . . . . 9
First steps . . . . . . . . . . . . . . . . . . . . . . . . . . . . . . . . . . . . . . . . . . . . 10
Checking the package contents . . . . . . . . . . . . . . . . . . . . . . . . . . . . . . . . . . 10
Setting up the handset for use . . . . . . . . . . . . . . . . . . . . . . . . . . . . . . . . . . . 11
Installing the base station . . . . . . . . . . . . . . . . . . . . . . . . . . . . . . . . . . . . . . . 17
Connecting the base station . . . . . . . . . . . . . . . . . . . . . . . . . . . . . . . . . . . . . 18
Making settings for VoIP telephony . . . . . . . . . . . . . . . . . . . . . . . . . . . . . . . . 21
What would you like to do next? . . . . . . . . . . . . . . . . . . . . . . . . . . . . . . . . . . 29
Operating the handset . . . . . . . . . . . . . . . . . . . . . . . . . . . . . . . . . 30
Using the Control key . . . . . . . . . . . . . . . . . . . . . . . . . . . . . . . . . . . . . . . . . . 30
Using the Display keys . . . . . . . . . . . . . . . . . . . . . . . . . . . . . . . . . . . . . . . . . . 30
Using the keys on the keypad . . . . . . . . . . . . . . . . . . . . . . . . . . . . . . . . . . . . 31
Correcting text entry errors . . . . . . . . . . . . . . . . . . . . . . . . . . . . . . . . . . . . . . 31
Using the menus . . . . . . . . . . . . . . . . . . . . . . . . . . . . . . . . . . . . . . . . . . . . . . 31
Activating/deactivating the handset . . . . . . . . . . . . . . . . . . . . . . . . . . . . . . . 32
Activating/deactivating the keypad lock . . . . . . . . . . . . . . . . . . . . . . . . . . . . 32
Using this guide . . . . . . . . . . . . . . . . . . . . . . . . . . . . . . . . . . . . . . . . . . . . . . . 33
Menu trees . . . . . . . . . . . . . . . . . . . . . . . . . . . . . . . . . . . . . . . . . . . 34
Phone menu . . . . . . . . . . . . . . . . . . . . . . . . . . . . . . . . . . . . . . . . . . . . . . . . . 34
Web configurator menu . . . . . . . . . . . . . . . . . . . . . . . . . . . . . . . . . . . . . . . . 37
Making calls with VoIP and the fixed line network . . . . . . . . . . 38
Making an external call . . . . . . . . . . . . . . . . . . . . . . . . . . . . . . . . . . . . . . . . . 38
Ending a call . . . . . . . . . . . . . . . . . . . . . . . . . . . . . . . . . . . . . . . . . . . . . . . . . 41
Accepting a call . . . . . . . . . . . . . . . . . . . . . . . . . . . . . . . . . . . . . . . . . . . . . . . 41
Caller ID . . . . . . . . . . . . . . . . . . . . . . . . . . . . . . . . . . . . . . . . . . . . . . . . . . . . . 42
Using speaker mode . . . . . . . . . . . . . . . . . . . . . . . . . . . . . . . . . . . . . . . . . . . 44
Muting the handset . . . . . . . . . . . . . . . . . . . . . . . . . . . . . . . . . . . . . . . . . . . . 45
Deactivating your handset's microphone . . . . . . . . . . . . . . . . . . . . . . . . . . . 45
Making cost-effective calls . . . . . . . . . . . . . . . . . . . . . . . . . . . . . . . . . . . . . . 45
Contents
3
Version 8, 03.09.2008

Gigaset A580 IP / US English / A31008-xxxx-xxxx-x-xxxx / Gigaset_A580_IPIVZ.fm / 24.04.2009
Contents
VoIP telephony via Gigaset.net . . . . . . . . . . . . . . . . . . . . . . . . . . . 46
Opening the Gigaset.net directory . . . . . . . . . . . . . . . . . . . . . . . . . . . . . . . . 47
Searching for subscribers in the Gigaset.net directory . . . . . . . . . . . . . . . . . 48
Using other functions . . . . . . . . . . . . . . . . . . . . . . . . . . . . . . . . . . . . . . . . . . 50
Managing your own entry . . . . . . . . . . . . . . . . . . . . . . . . . . . . . . . . . . . . . . . 50
Calling a Gigaset.net subscriber . . . . . . . . . . . . . . . . . . . . . . . . . . . . . . . . . . 51
Network services . . . . . . . . . . . . . . . . . . . . . . . . . . . . . . . . . . . . . . 52
Blocking your Caller ID – Anonymous calling . . . . . . . . . . . . . . . . . . . . . . . . 52
Further network services for fixed line networks . . . . . . . . . . . . . . . . . . . . . 52
Further network services for VoIP . . . . . . . . . . . . . . . . . . . . . . . . . . . . . . . . . 53
Using lists . . . . . . . . . . . . . . . . . . . . . . . . . . . . . . . . . . . . . . . . . . . . 57
using the Last Number Redial list . . . . . . . . . . . . . . . . . . . . . . . . . . . . . . . . . 57
Opening lists with the Message key . . . . . . . . . . . . . . . . . . . . . . . . . . . . . . . 58
Using the directory . . . . . . . . . . . . . . . . . . . . . . . . . . . . . . . . . . . . 62
Using the network mailbox . . . . . . . . . . . . . . . . . . . . . . . . . . . . . . 66
Configuring the network mailbox for fast access . . . . . . . . . . . . . . . . . . . . . 66
Listening to messages on the network mailbox . . . . . . . . . . . . . . . . . . . . . . 67
ECO DECT: Conserving energy . . . . . . . . . . . . . . . . . . . . . . . . . . . 69
Setting the alarm clock . . . . . . . . . . . . . . . . . . . . . . . . . . . . . . . . . 70
Activating/deactivating the alarm clock . . . . . . . . . . . . . . . . . . . . . . . . . . . . 70
Changing the wake-up time . . . . . . . . . . . . . . . . . . . . . . . . . . . . . . . . . . . . . 70
When the alarm clock rings… . . . . . . . . . . . . . . . . . . . . . . . . . . . . . . . . . . . . 70
Using multiples handsets . . . . . . . . . . . . . . . . . . . . . . . . . . . . . . . 71
Registering handsets . . . . . . . . . . . . . . . . . . . . . . . . . . . . . . . . . . . . . . . . . . . 71
De-registering handsets . . . . . . . . . . . . . . . . . . . . . . . . . . . . . . . . . . . . . . . . 72
Locating a handset ("paging") . . . . . . . . . . . . . . . . . . . . . . . . . . . . . . . . . . . . 73
Changing a handset's internal number . . . . . . . . . . . . . . . . . . . . . . . . . . . . . 73
Changing the name of a handset . . . . . . . . . . . . . . . . . . . . . . . . . . . . . . . . . 74
Making internal calls . . . . . . . . . . . . . . . . . . . . . . . . . . . . . . . . . . . . . . . . . . . 74
Handset settings . . . . . . . . . . . . . . . . . . . . . . . . . . . . . . . . . . . . . . 77
Changing the date and time . . . . . . . . . . . . . . . . . . . . . . . . . . . . . . . . . . . . . 77
Changing the display language . . . . . . . . . . . . . . . . . . . . . . . . . . . . . . . . . . . 77
Activating/deactivating the screensaver . . . . . . . . . . . . . . . . . . . . . . . . . . . . 78
Quickly accessing functions . . . . . . . . . . . . . . . . . . . . . . . . . . . . . . . . . . . . . 79
Activating/deactivating auto answer . . . . . . . . . . . . . . . . . . . . . . . . . . . . . . . 80
Changing the handsfree/earpiece volume . . . . . . . . . . . . . . . . . . . . . . . . . . 80
Setting ringers . . . . . . . . . . . . . . . . . . . . . . . . . . . . . . . . . . . . . . . . . . . . . . . . 81
Activating/deactivating advisory tones . . . . . . . . . . . . . . . . . . . . . . . . . . . . . 82
Setting the battery low tone . . . . . . . . . . . . . . . . . . . . . . . . . . . . . . . . . . . . . 83
Restoring the handset default settings . . . . . . . . . . . . . . . . . . . . . . . . . . . . . 83
4
Version 8, 03.09.2008

Gigaset A580 IP / US English / A31008-xxxx-xxxx-x-xxxx / Gigaset_A580_IPIVZ.fm / 24.04.2009
Setting the base station via the handset . . . . . . . . . . . . . . . . . . . 84
Protecting against unauthorized access . . . . . . . . . . . . . . . . . . . . . . . . . . . . 84
Restoring the base station to the factory settings . . . . . . . . . . . . . . . . . . . . 85
Activating/deactivating music on hold . . . . . . . . . . . . . . . . . . . . . . . . . . . . . 86
Setting default connection . . . . . . . . . . . . . . . . . . . . . . . . . . . . . . . . . . . . . . 86
Entering local and extra area codes . . . . . . . . . . . . . . . . . . . . . . . . . . . . . . . 87
Updating the base station firmware . . . . . . . . . . . . . . . . . . . . . . . . . . . . . . . 87
Making VoIP settings on the handset . . . . . . . . . . . . . . . . . . . . . 89
Using the connection wizard . . . . . . . . . . . . . . . . . . . . . . . . . . . . . . . . . . . . . 89
Changing settings without the connection wizard . . . . . . . . . . . . . . . . . . . . 89
Setting the phone's IP address in LAN . . . . . . . . . . . . . . . . . . . . . . . . . . . . . . 91
Activating/deactivating the display of VoIP status messages . . . . . . . . . . . . 93
Checking the base station MAC address . . . . . . . . . . . . . . . . . . . . . . . . . . . . 93
Operating the base station on the PABX . . . . . . . . . . . . . . . . . . . 94
Changing the dialing mode . . . . . . . . . . . . . . . . . . . . . . . . . . . . . . . . . . . . . . 94
Setting recall . . . . . . . . . . . . . . . . . . . . . . . . . . . . . . . . . . . . . . . . . . . . . . . . . 94
Setting access codes (external line prefixes) . . . . . . . . . . . . . . . . . . . . . . . . 94
Setting pauses . . . . . . . . . . . . . . . . . . . . . . . . . . . . . . . . . . . . . . . . . . . . . . . . 95
Switching temporarily to touch tone dialing (DTMF) . . . . . . . . . . . . . . . . . . 95
Setting the phone with the PC . . . . . . . . . . . . . . . . . . . . . . . . . . . 96
Connecting the PC with the telephone's Web configurator . . . . . . . . . . . . . 96
Logging in, setting the Web configurator language . . . . . . . . . . . . . . . . . . . 98
Logging off . . . . . . . . . . . . . . . . . . . . . . . . . . . . . . . . . . . . . . . . . . . . . . . . . . 98
Using the Web pages . . . . . . . . . . . . . . . . . . . . . . . . . . . . . . . . . . . . . . . . . . . 99
Menu bar . . . . . . . . . . . . . . . . . . . . . . . . . . . . . . . . . . . . . . . . . . . . . . . . . . . . 99
Navigation area . . . . . . . . . . . . . . . . . . . . . . . . . . . . . . . . . . . . . . . . . . . . . . 100
Working area . . . . . . . . . . . . . . . . . . . . . . . . . . . . . . . . . . . . . . . . . . . . . . . . 100
Buttons . . . . . . . . . . . . . . . . . . . . . . . . . . . . . . . . . . . . . . . . . . . . . . . . . . . . . 101
Opening Web pages . . . . . . . . . . . . . . . . . . . . . . . . . . . . . . . . . . . . . . . . . . 101
Setting the phone with the Web configurator . . . . . . . . . . . . . . . . . . . . . . 102
Configuring the IP . . . . . . . . . . . . . . . . . . . . . . . . . . . . . . . . . . . . . . . . . . . . 103
Configuring telephone connections . . . . . . . . . . . . . . . . . . . . . . . . . . . . . . 106
Optimizing voice quality for VoIP connections . . . . . . . . . . . . . . . . . . . . . . 115
Setting the telephone's default connection . . . . . . . . . . . . . . . . . . . . . . . . 119
Activating the fixed line network connection as an alternate connection . 119
Assigning send and receive numbers to handsets . . . . . . . . . . . . . . . . . . . 120
Activating Call Forwarding for VoIP connections . . . . . . . . . . . . . . . . . . . . 121
Entering your own area code, activating/deactivating an automatic
area code for VoIP . . . . . . . . . . . . . . . . . . . . . . . . . . . . . . . . . . . . . . . . . . . . 122
Activating/deactivating network mailbox, entering numbers . . . . . . . . . . 125
Setting DTMF signaling for VoIP . . . . . . . . . . . . . . . . . . . . . . . . . . . . . . . . . 126
Defining Flash key functions for VoIP (hook flash) . . . . . . . . . . . . . . . . . . . 127
Configuring call forwarding via VoIP . . . . . . . . . . . . . . . . . . . . . . . . . . . . . . 127
Defining local communication ports for VoIP . . . . . . . . . . . . . . . . . . . . . . . 128
Messaging . . . . . . . . . . . . . . . . . . . . . . . . . . . . . . . . . . . . . . . . . . . . . . . . . . 130
Configuring info services/activating idle display . . . . . . . . . . . . . . . . . . . . . 133
Contents
5
Version 8, 03.09.2008

Gigaset A580 IP / US English / A31008-xxxx-xxxx-x-xxxx / Gigaset_A580_IPIVZ.fm / 24.04.2009
Contents
Changing internal handset numbers and names . . . . . . . . . . . . . . . . . . . . 133
Transferring handset directories to/from the PC . . . . . . . . . . . . . . . . . . . . . 134
Activating VoIP status message display . . . . . . . . . . . . . . . . . . . . . . . . . . . . 136
Starting a firmware update . . . . . . . . . . . . . . . . . . . . . . . . . . . . . . . . . . . . . 137
Activating/deactivating the automatic version check . . . . . . . . . . . . . . . . . 138
Copying the date/time from time server . . . . . . . . . . . . . . . . . . . . . . . . . . . 139
Querying the phone status . . . . . . . . . . . . . . . . . . . . . . . . . . . . . . . . . . . . . 140
Getting help with your phone . . . . . . . . . . . . . . . . . . . . . . . . . . 141
Questions and answers . . . . . . . . . . . . . . . . . . . . . . . . . . . . . . . . . . . . . . . . 141
Using VoIP status codes . . . . . . . . . . . . . . . . . . . . . . . . . . . . . . . . . . . . . . . . 145
Checking service information . . . . . . . . . . . . . . . . . . . . . . . . . . . . . . . . . . . 148
Protecting our environment . . . . . . . . . . . . . . . . . . . . . . . . . . . . 149
Our environmental mission statement . . . . . . . . . . . . . . . . . . . . . . . . . . . . 149
Appendix . . . . . . . . . . . . . . . . . . . . . . . . . . . . . . . . . . . . . . . . . . . . 150
Care . . . . . . . . . . . . . . . . . . . . . . . . . . . . . . . . . . . . . . . . . . . . . . . . . . . . . . . 150
Contact with liquid . . . . . . . . . . . . . . . . . . . . . . . . . . . . . . . . . . . . . . . . . . . 150
Specifications . . . . . . . . . . . . . . . . . . . . . . . . . . . . . . . . . . . . . . . . . . . . . . . . 150
Writing and editing text . . . . . . . . . . . . . . . . . . . . . . . . . . . . . . . . . . . . . . . . 152
Industry Canada Certification . . . . . . . . . . . . . . . . . . . . . . . . . . . . . . . . . . . 154
FCC / ACTA Information . . . . . . . . . . . . . . . . . . . . . . . . . . . . . . . . 155
Safety precautions . . . . . . . . . . . . . . . . . . . . . . . . . . . . . . . . . . . . . . . . . . . . 157
End-user limited warranty . . . . . . . . . . . . . . . . . . . . . . . . . . . . . . . . . . . . . . 159
Gigaset A580 IP – free software . . . . . . . . . . . . . . . . . . . . . . . . . 163
Accessories . . . . . . . . . . . . . . . . . . . . . . . . . . . . . . . . . . . . . . . . . . 171
Glossary . . . . . . . . . . . . . . . . . . . . . . . . . . . . . . . . . . . . . . . . . . . . . 172
Index . . . . . . . . . . . . . . . . . . . . . . . . . . . . . . . . . . . . . . . . . . . . . . . 185
Mounting the charging cradle to the wall . . . . . . . . . . . . . . . . . 196
Mounting the base station to the wall . . . . . . . . . . . . . . . . . . . 196
6
Version 8, 03.09.2008
Gigaset A580 IP / US English / A31008-xxxx-xxxx-x-xxxx / security.fm / 24.04.2009
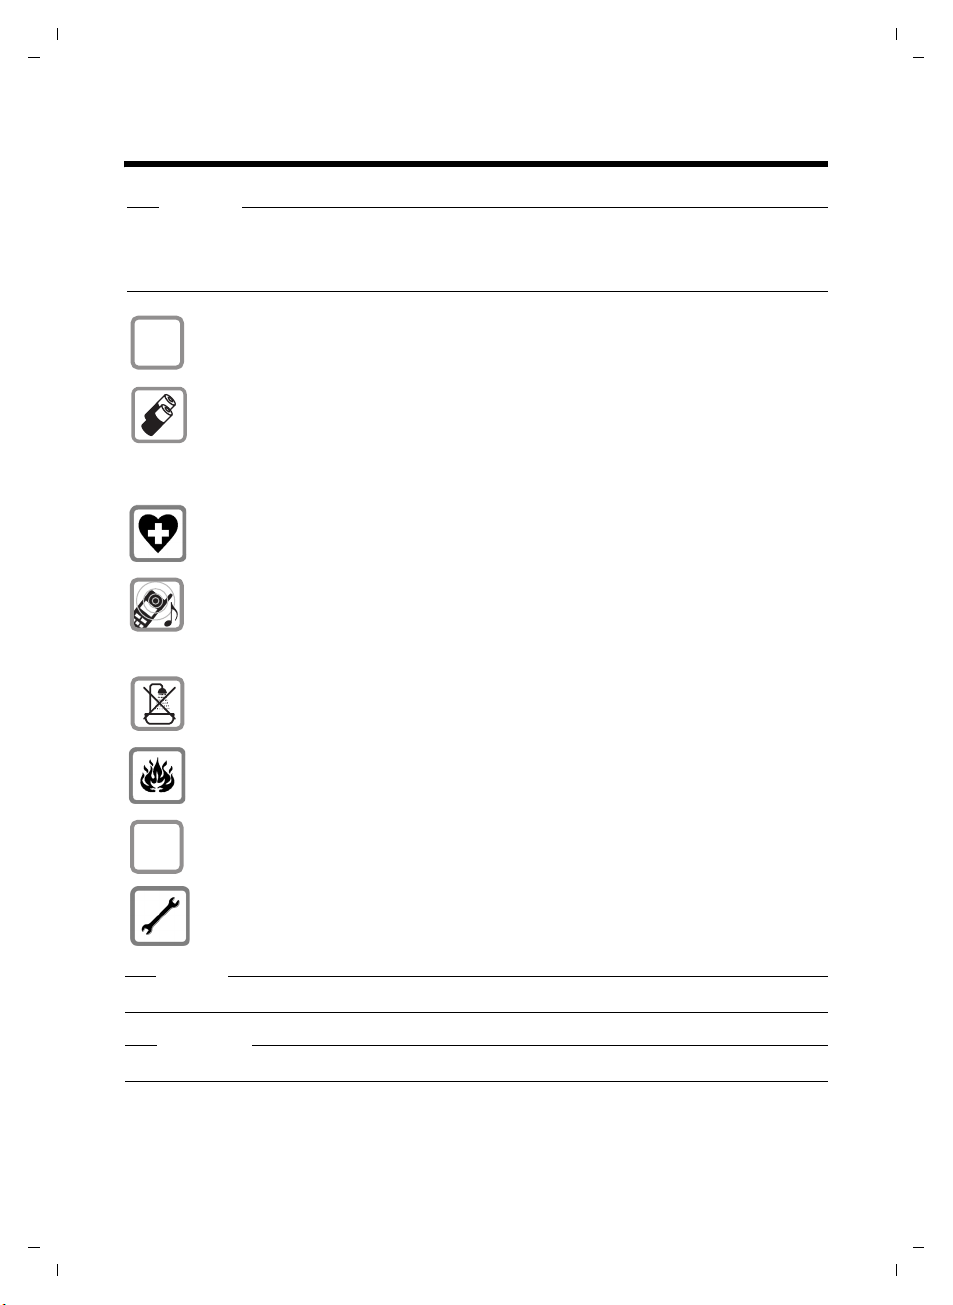
Safety precautions
Warning
Be sure to read this user guide and the safety precautions before using your telephone.
Explain their content and the potential hazards associated with using the telephone to
your children.
Use only the power adapter supplied, as indicated on the underside of the base
$
station or charging cradle.
Safety precautions
ƒ
Use only the recommended, rechargeable batteries (
conventional (non-rechargeable) batteries or other types of batteries could
result in significant health risks and personal injury.
Do not charge the handset in the charging un it or ba se stat ion whi le the hea dset
is connected.
Using your telephone may affect nearby medical equipment. Be aware of the
technical conditions in your particular environment, e.g. doctor's surgery.
Do not hold the rear of the handset to your ear when it is ringing or when the
handsfree function is activated. Otherwise you risk serious and permanent damage to your hearing.
The handset may cause an unpleasant humming noise in hearing aids.
Do not install the base station or charging cradle in bathrooms or shower rooms.
The handset, base station and charging cradle are not waterproof
£ Page 150).
(
Do not use the phone in environments with a potential explosion hazard,
e.g. paint shops.
If you give your phone to a third party, make sure you also give them the user
guide.
Remove f aulty base s tations fro m use as they could interfere with other w ireless
services.
£ Page 150). Using
Warning
When the keypad lock is active, you cannot call emergency numbers!
Please note
Not all of the functions described in this user guide are available in all countries.
7
Version 8, 03.09.2008

Gigaset A580 IP / US English / A31008-xxxx-xxxx-x-xxxx / starting.fm / 24.04.2009
Gigaset A580 IP – more than just making calls
Gigaset A580 IP – more than just making calls
You can use your phone to make calls via the fixed line network and also (cost
effectively) via the Internet (VoIP) without a PC. – Your phone can do much
more:
u Make calls with brilliant sound quality using High Definition Sound
Performance (HDSP) for either internal calls or calls made via VoIP
£ Page 9) – for internal calls or calls via VoIP.
(
u A simple press of a button each time you make a call indicates whether you
want to call via the fixed line network or the Internet (
u Register up to six handset s on yo ur b ase station. With your base s tat ion , yo u
can simultaneously conduct two calls via VoIP and one call via the fixed line
network.
u Multiline: Create up to six VoIP accounts with different VoIP providers.
Together with your fixed line number and the Gigaset.net number, your
phone can then be reached via up to eight different phone numbers.
u Assign each handset its own VoIP number as a send and receive number. If a
member of your family is called on their VoIP number, only their handset will
ring (£ Page 120).
u You can also use the VoIP accounts with different providers for cost control
purposes. When dialing, specify the VoIP connection/the VoIP account you
want to use for its lower rates (
u Setting dialing plans for phone numbers or area codes enables you to auto-
mate the selection of the most cost-effective VoIP connection
£ Page 123).
(
u Use Gigaset.net for VoIP calls. Connect your phone to the electrical power
supply and the Internet and enjoy free phone calls on Gigaset.net – without
making any further settings (
u Configure the phone connection for VoIP without a PC. Your phone's con-
nection wizard downloads general data about your VoIP provider from the
Internet and guides you through entering your personal data (VoIP/SIP
account). This makes it easy for you to start using VoIP (
u If necessary, make any further VoIP settings on a PC. The phone features a
Web interface (Web configurator) that can be accessed via your PC's Web
browser (
u Make sure your phone is always up-to-date. Keep yourself informed about
firmware updates on the Internet and download them onto your phone
£ Page 87).
(
u Reduce the transmission power by activating Eco mode / Eco mode+
£ Page 69).
(
£ Page 96).
£ Page 38).
£ Page 46).
£ Page 38).
£ Page 21).
Your Gigaset A580 IP has a protected operating system that offers increased
security against viruses from the Internet.
Have fun using your new phone!
8
Version 8, 03.09.2008

Gigaset A580 IP / US English / A31008-xxxx-xxxx-x-xxxx / starting.fm / 24.04.2009
VoIP – making calls via the Internet
VoIP – making calls via the Internet
With VoIP (Voice over Internet Protocol), your calls are not made via a fixed con-
nection as with the telephone network, but rather they are transmitted via the
Internet in the form of data packets.
You can take advantage of all the benefits of VoIP with your phone:
u You can make cost-effective calls in high voice quality with callers on the
Internet, the fixed line network or the cell phone network.
u VoIP providers will give you personal numbers, with which you can be
reached from the Internet, the fixed line network and any cell phone network.
To use VoIP, you need:
u A broadband Internet connection (e.g. DSL) with flat rate (recommended)
or volume-based price.
u Internet access, i.e. you need a router that will connect your phone to the
Internet.
You can find a list of recommended routers on the Internet at:
www.gigaset.com/customercare
From here, go to the FAQ page and select "Gigaset A580 IP". Search for
"Router", for example.
u Access the services of a VoIP provider. You can open up to six accounts with
different VoIP providers.
Gigaset HDSP – telephony with brilliant sound quality
Your Gigaset IP phone supports the Broadband codec
G.722. With your base station and the corresponding hand-
set, you can make calls via VoIP with brilliant sound quality
(High Definition Sound Performance).
If you register further broadband-capable handsets
(e.g. Gigaset S67H, S68H or SL37H) with your base station, internal calls
between these handsets will also be conducted via broadband.
Prerequisites for broadband connections to your base station are:
u For internal calls:
Both handsets are broadband-capable, i.e. both support the codec G.722.
u For external calls via VoIP:
– You make the call from a broadband-capable handset.
– You have selected codec G.722 for outgoing calls, £ Page 115.
– Your VoIP provider supports broadband connections.
– The recipient's phone supports codec G.722 and accepts broadband con-
nections.
Please note
The VoIP service Gigaset.net (£ Page 46) supports broadband connections.
9
Version 8, 03.09.2008
Gigaset A580 IP / US English / A31008-xxxx-xxxx-x-xxxx / starting.fm / 24.04.2009
First steps
First steps
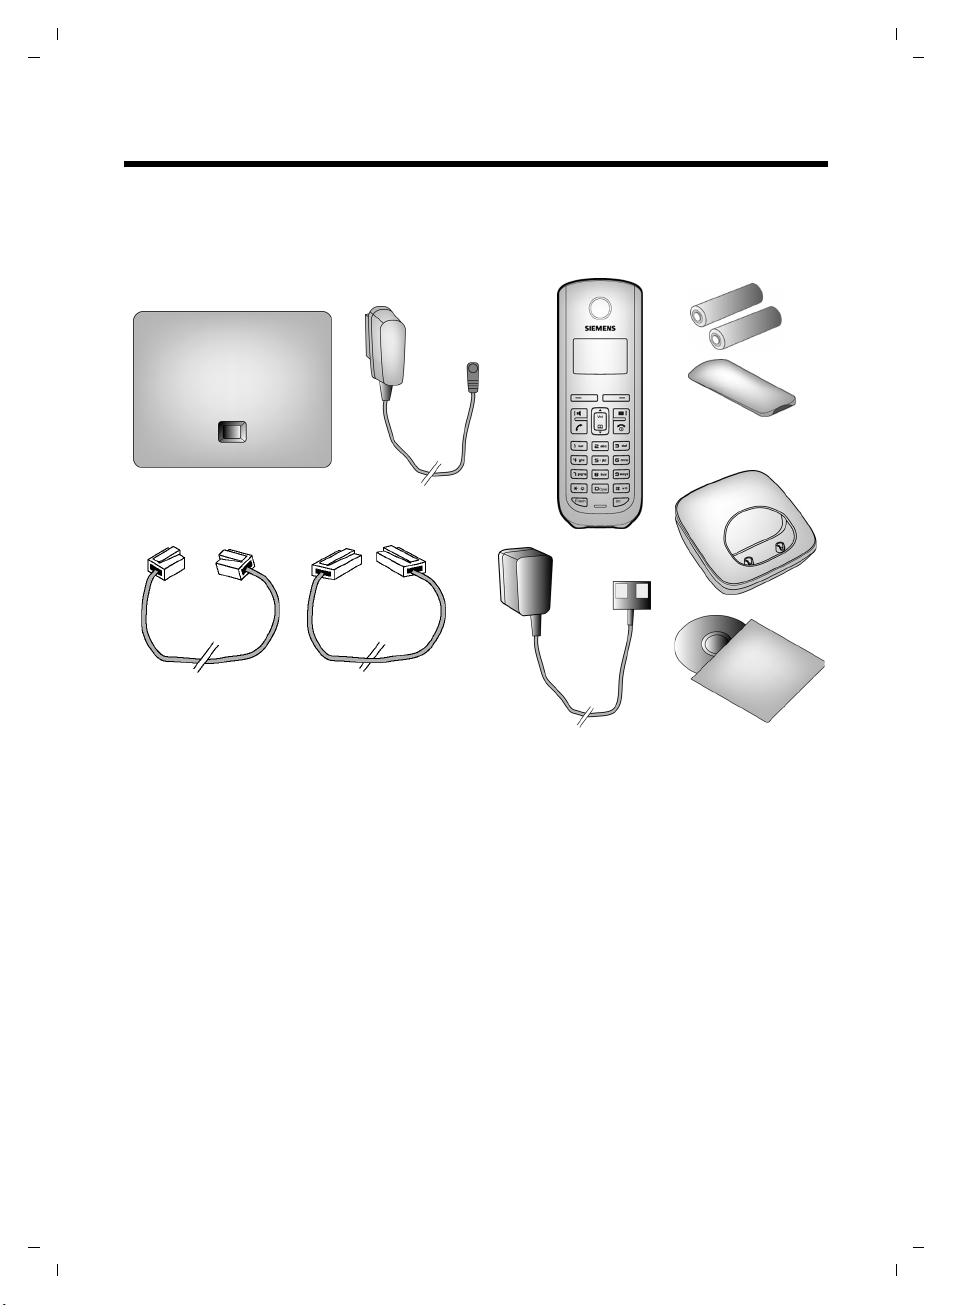
Checking the package contents
5
6
7
1
2
8
3
4
9
§§1§§ one Gigaset A580 IP base station
§§2§§ one power adapter for connecting the base station to the electrical power supply
§§3§§ one phone cord for connecting the base station to the fixed line network
§§4§§ one Ethernet (LAN) cable for connecting the base station to the router (LAN/Internet)
§§5§§ one Gigaset A58H handset
§§6§§ two batteries for the handset (uncharged)
§§7§§ one battery compartment cover for the handset
§§8§§ one handset charging cradle
§§9§§ one power adapter for connecting the charging cradle to the electrical power supply
§§10§§ one quick guide and a CD containing this user guide
10
10
Version 8, 03.09.2008

Gigaset A580 IP / US English / A31008-xxxx-xxxx-x-xxxx / starting.fm / 24.04.2009
Firmware updates
This user guide describes the basic functions from firmware version 179.
Whenever there are new or improved functions for your Gigaset A580 IP, base station
firmware updates will be made available for you to download to your telephone
£ Page 87). If this results in operational changes to your phone, a new version of this
(
user guide or the necessary amendments will be published on the Internet at
www.gigaset.co
Select "Gigaset A580 IP" in the product field to open the relevant product page where you
will find a link to the user guide.
For information on finding the current firmware version of your base station,
(using the Web configurator) or
m
£ Page 148 (during an external call).
Setting up the handset for use
The display is protected by a plastic film.
Please remove the protective film!
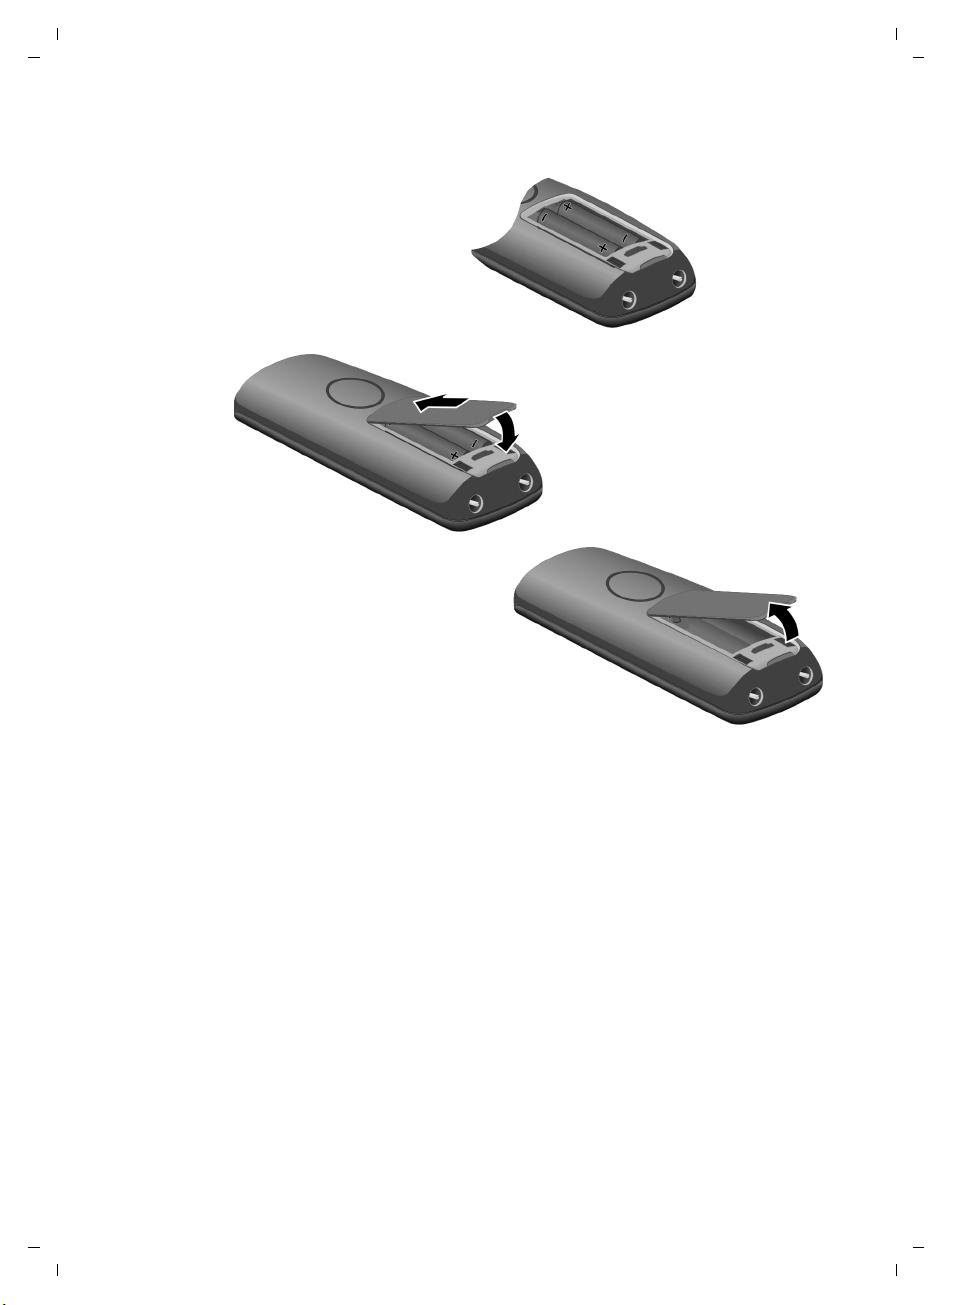
Inserting the batteries and closing the battery cover
First steps
£ Page 140
Warning
Use only the recommended, rechargeable batteries (£Page 150). Using conventional (non-rechargeable) batteries or other types of batteries could result
in significant health risks and personal injury. For example, the outer casing of
the batteries could be destroyed or the batteries could explode. The phone
could also malfunction or be damaged as a result of using batteries that are not
of the recommended type.
11
Version 8, 03.09.2008
Gigaset A580 IP / US English / A31008-xxxx-xxxx-x-xxxx / starting.fm / 24.04.2009
First steps
¤ Insert the batteries
with the polarity in the
correct direction.
The polarity is indicated in/on the battery
compartment.
1
¤ First insert the battery cover
2
at the top 1.
¤ Then press the cover 2 until
it clicks into place.
¤ To open the battery cover, for
instance to replace the batteries,
remove the belt clip (if
attached). Insert a coin into the
cavity on the casing, then pull
the battery cover in an upward
direction.
12
Version 8, 03.09.2008
Gigaset A580 IP / US English / A31008-xxxx-xxxx-x-xxxx / starting.fm / 24.04.2009
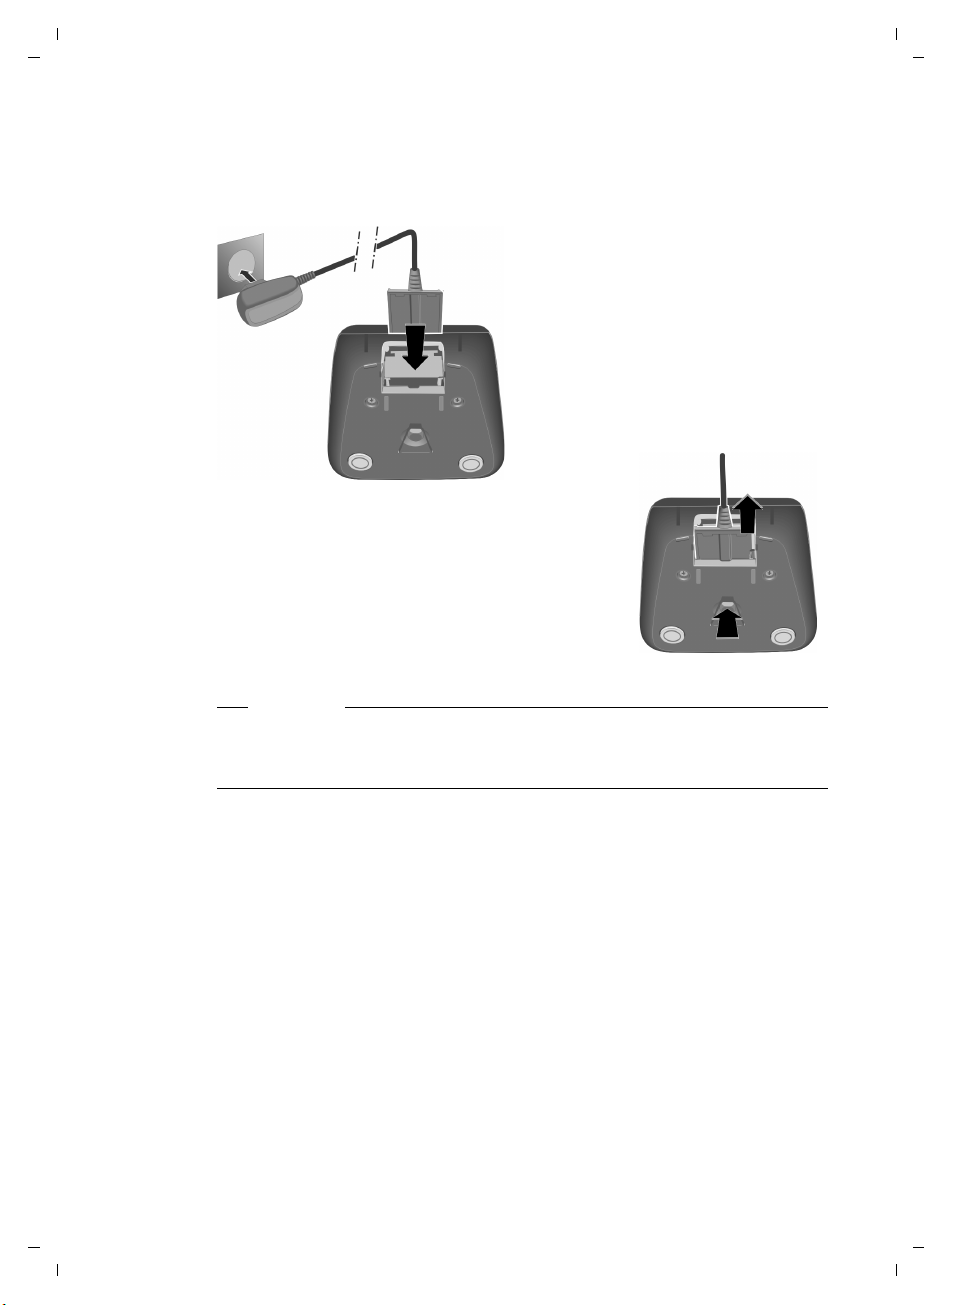
Connecting the charging cradle
The charging cradle is designed to be operated in enclosed, dry areas at temperatures ranging from +41°F to +113°F.
2
1
¤ Connect the empty plug from the
power adapter 1.
¤ Plug the electrical adapter into
the plug socket 2.
To disconnect the plug from the charging
cradle, press the release button 1 and disconnect the plug 2.
First steps
2
1
Please note
u Only place the handset in the charging cradle for which it is intended.
u If the handset has turned itself off because the batteries are empty and is
then placed in the charging cradle, it will turn itself on automatically.
If you have any questions and problems
For information on attaching the charging cradle to the wall, £ Page 195.
£ Page 141.
13
Version 8, 03.09.2008

Gigaset A580 IP / US English / A31008-xxxx-xxxx-x-xxxx / starting.fm / 24.04.2009
First steps
Initial charging and discharging of the batteries
¤ Place the handset in the charging cradle and wait until the
batteries are fully charged (approx. 10 hours).
Battery charging is indicated in the top right of the display
by the flashing battery icon e.
¤ Then remove the handset from the charging cradle and do not replace it
until the batteries are fully discharged.
The charge status is displayed in the idle display.
= e V U (empty to full) = flashes, the batteries are almost empty.
After the first battery charge and discharge, you may place your handset in the
charging cradle after every call.
Warning
u Always repeat the charging and discharging procedure if you remove the
batteries from the handset and reinsert them.
u The batteries may warm up during charging.
This is not dangerous.
u After a while, the charge capacity of the batteries will decrease for technical
reasons.
10 h
14
Setting the date and time
The date and time must be set to have the correct time for incoming calls and
to use the alarm clock.
Please note
The address of a time server on the Internet is stored on your telephone. The
date and time are taken from this time server, provided that the base station
is connected to the Internet and synchronization with the time server is acti-
£ Page 139). Manual settings are overwritten in this case.
vated (
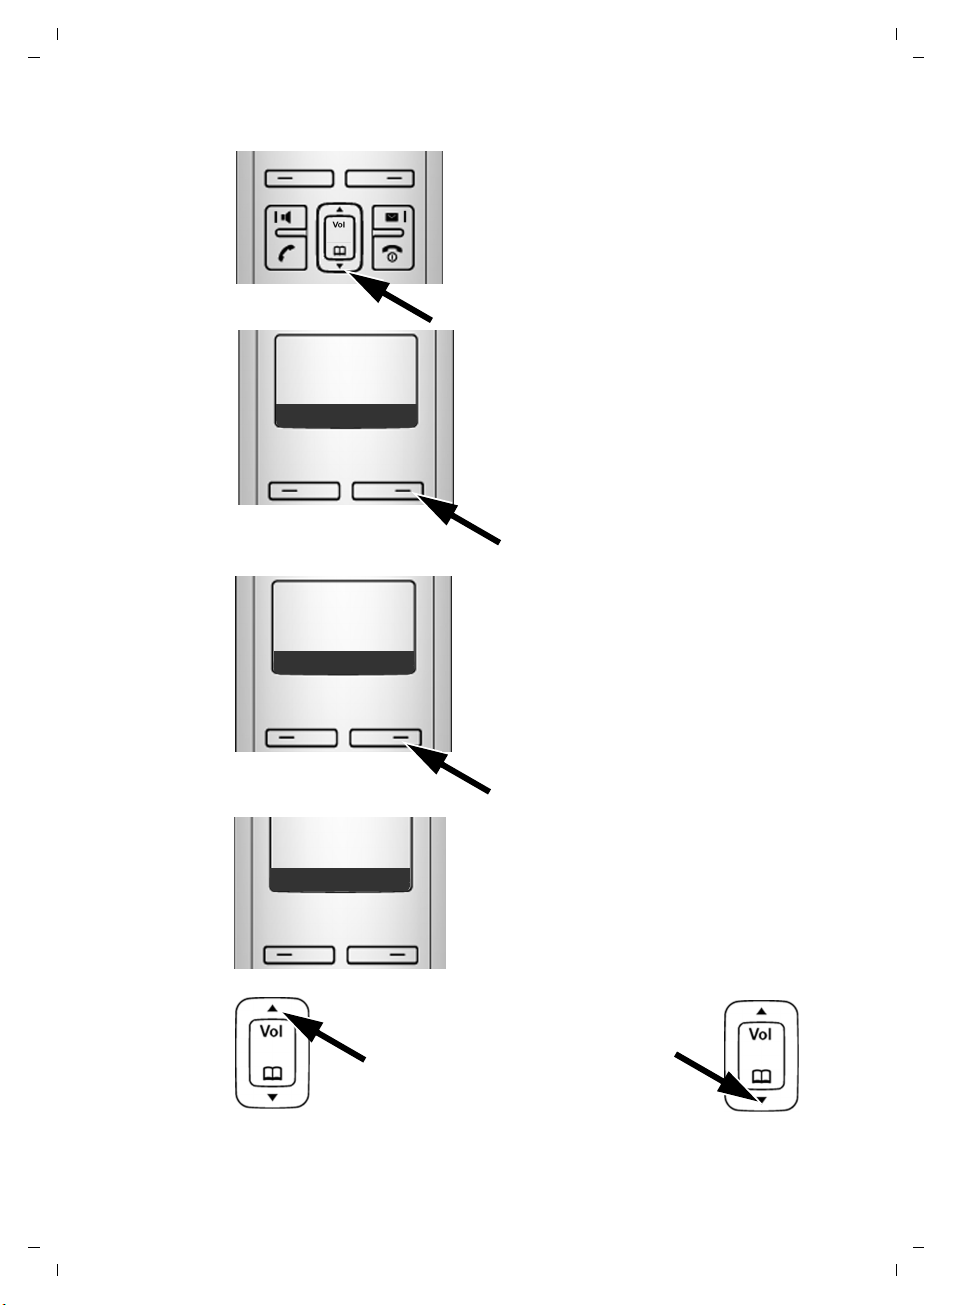
Setting up manually:
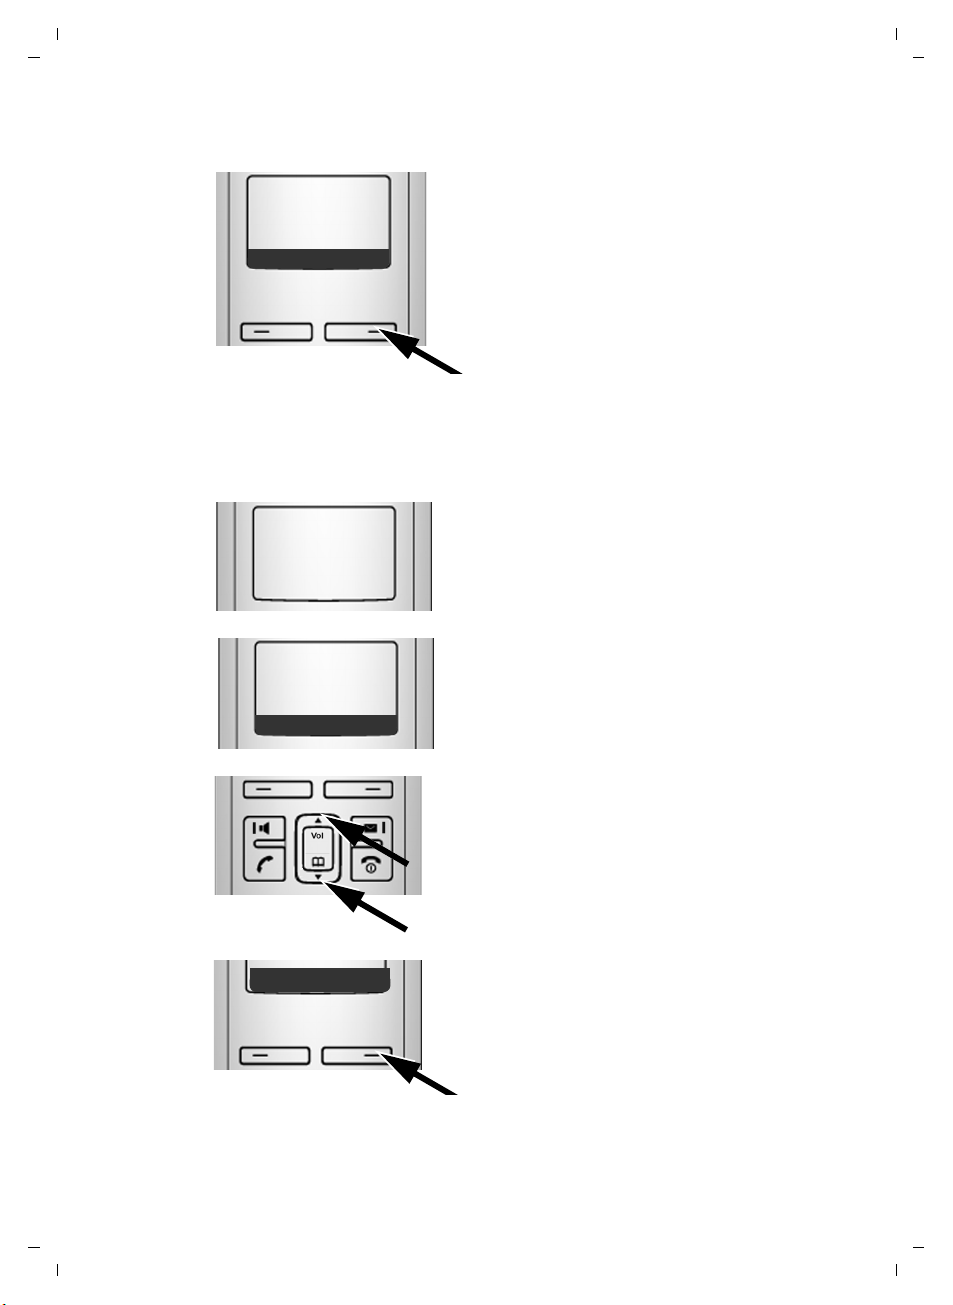
Þ
Menu
¤ Press the key below §Menu§ on the
display screen to open the main
menu.
Version 8, 03.09.2008
Gigaset A580 IP / US English / A31008-xxxx-xxxx-x-xxxx / starting.fm / 24.04.2009
¤ Press the Control key down
repeatedly ...
First steps
m
Settings
Ç
U OK
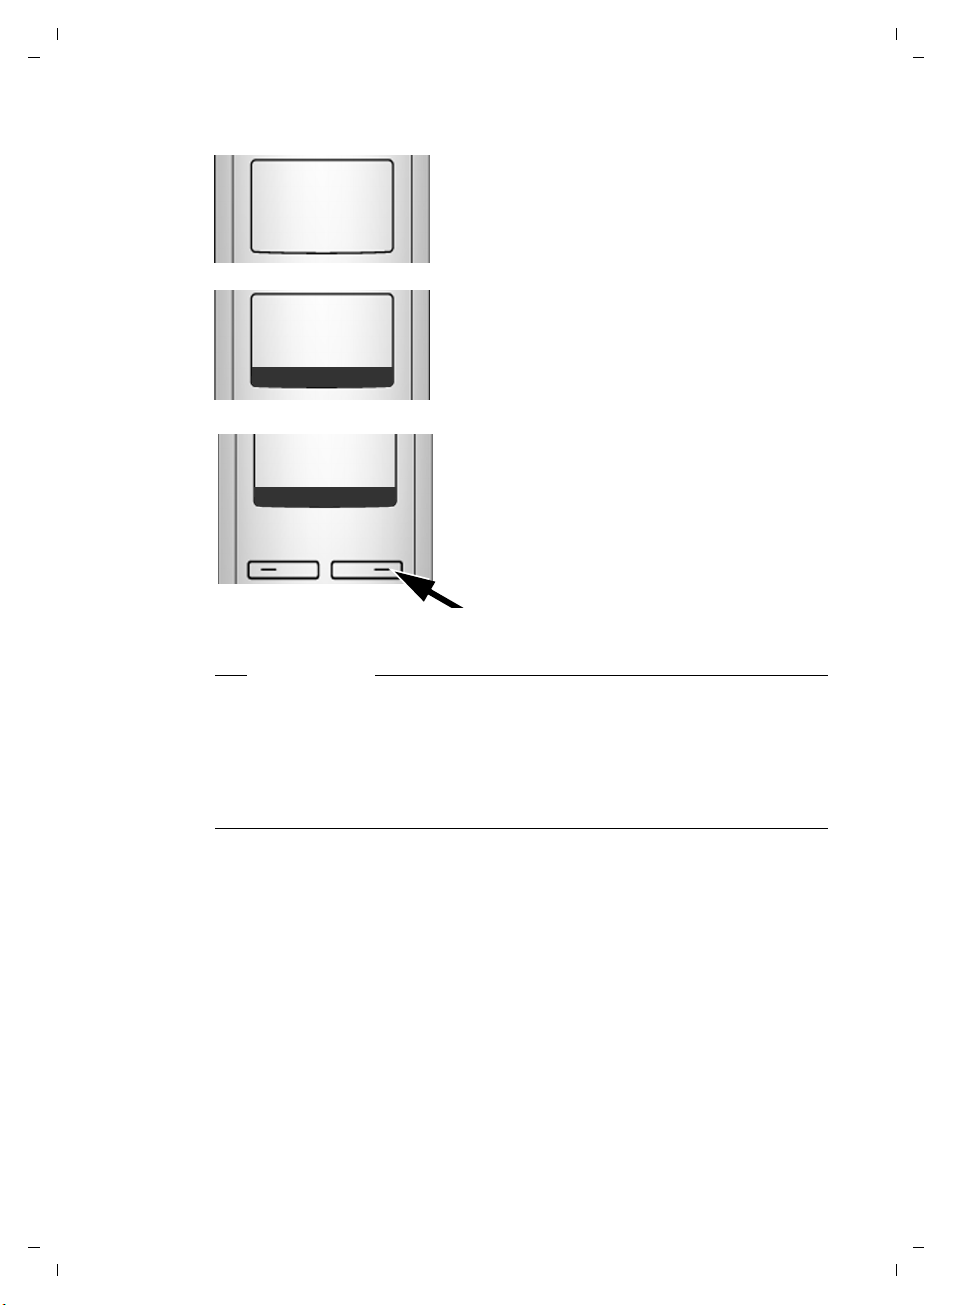
Date/Time
Ç
U OK
Enter Date:
10.10.2008]
Ç
U OK
… until the Settings menu item
appears.
¤ Press the key below §OK§ on the
display screen to confirm your
selection.
The Date/Time menu item appears
on the display.
¤ Press the key below §OK§ on the
display screen to open the input
field.
¤ The active line is marked [...].
Enter month, day and year as an 8-digit
number (MMDDYYYY) via the keypad,
e.g. Q Q2QQN
for 10/10/2008.
To correct an entry, press up or down
on the Control key to toggle between
fields.
15
Version 8, 03.09.2008
Gigaset A580 IP / US English / A31008-xxxx-xxxx-x-xxxx / starting.fm / 24.04.2009
First steps
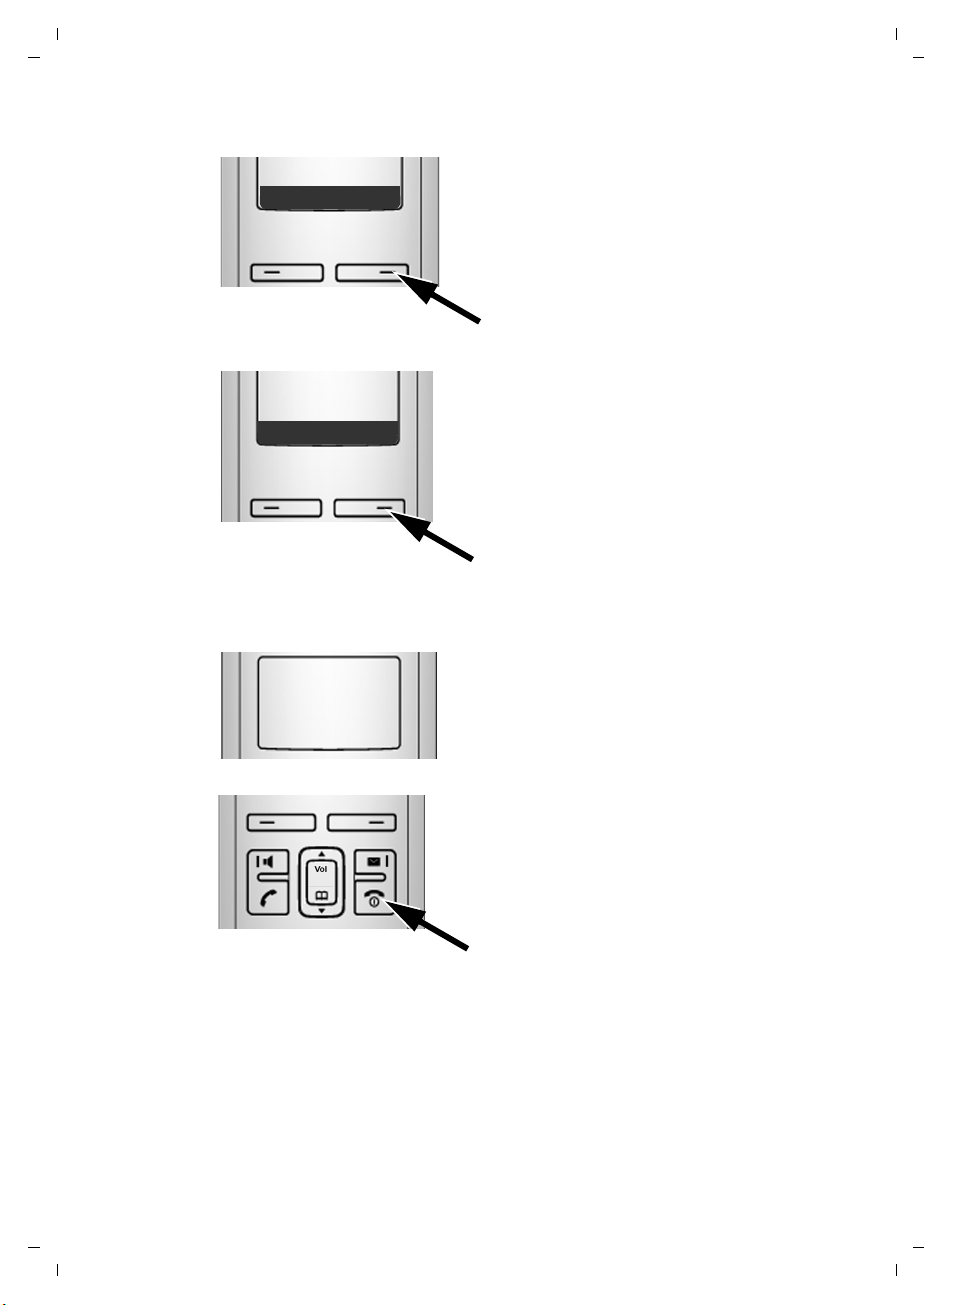
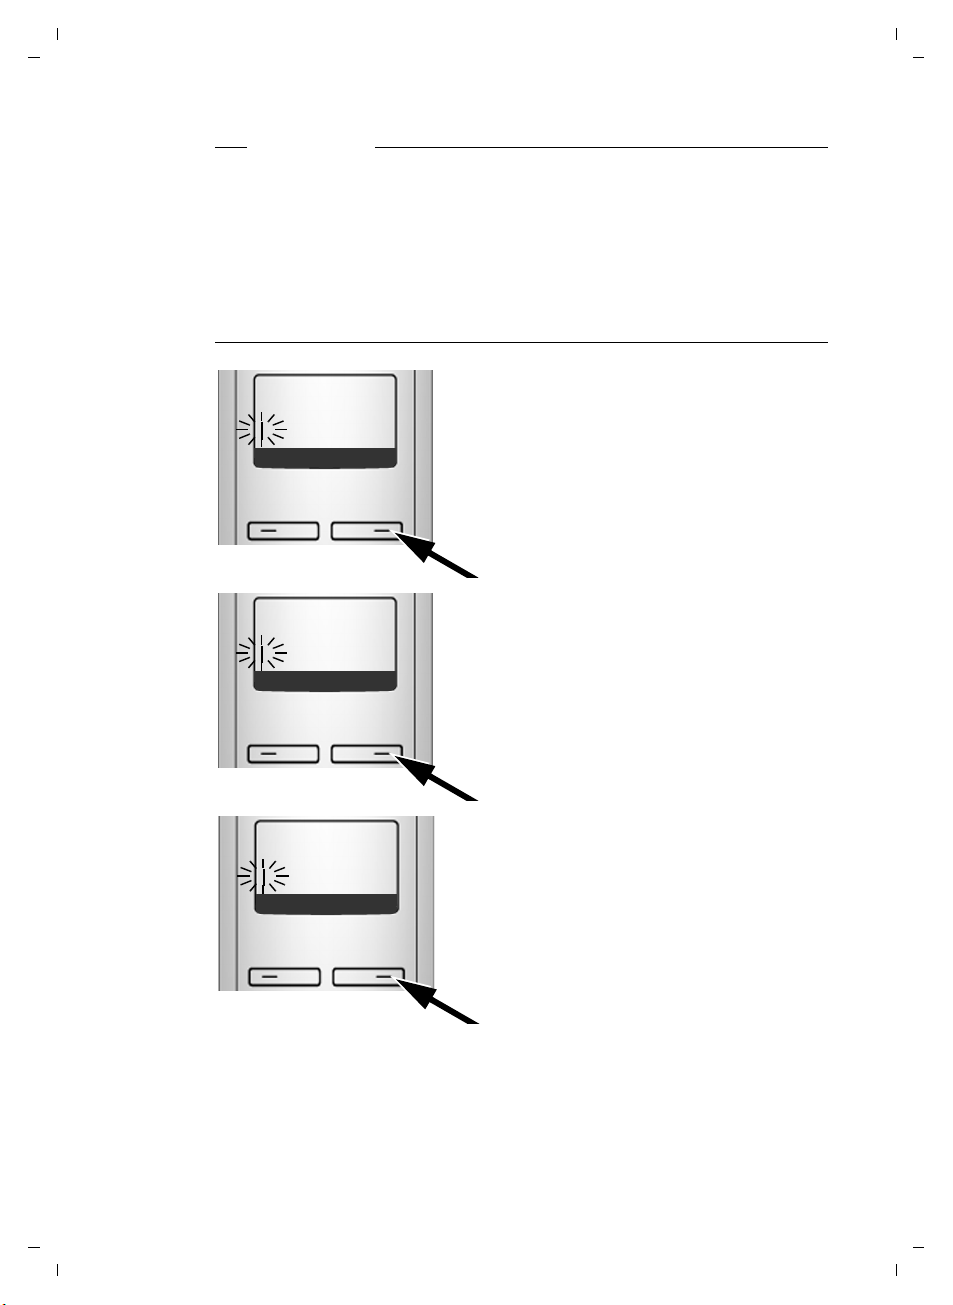
Ç
U OK
¤ Press the key below §OK§ on the display
screen to confirm your selection.
Enter time:
[07:15] pm
U OK
am/pm
Saved
¤ Enter the hours and minutes as 4-digit
numbers via the keypad,
e.g. QM5for 07:15 am.
If necessary, use the Control key to
toggle between fields.
¤ Press the key below §am/pm§ on the
display screen
and pm.
to choose between am
¤ Press the key below §OK§ on the display
screen to confirm your selection.
The display shows Saved.
You will hear a confirmation tone.
¤ Press and hold the End Call key a to
return to the idle status.
Registering the handset to the base station
Your handset is registered to the base station by default.
For information on registering additional handsets with the base station and
make free internal calls,
16
Version 8, 03.09.2008
£ Page 71.

Gigaset A580 IP / US English / A31008-xxxx-xxxx-x-xxxx / starting.fm / 24.04.2009
Installing the base station
The base station is designed for use in closed, dry rooms with a temperature
range of +41°F to +113°F.
¤ Set up the base station at a central location on a flat, non-slip surface in your
house or apartment.
Please note
Consider the range of the base station.
This is up to 328 yards in unobstructed outdoor areas and up to 54 yards inside
buildings. The range is reduced when eco mode is activated (
The phone's feet do not usually leave any marks on surfaces. However, due to
the multitude of different varnishes and polishes used on today's furnishings,
the occurrence of marks on the surfaces cannot be completely ruled out.
For information on mounting the base station on the wall,
Warning
u Never expose the telephone to any of the following: heat sources, direct
sunlight or other electrical appliances.
u Protect your Gigaset from moisture, dust, corrosive liquids and fumes.
First steps
£ Page 69).
£ Page 195.
17
Version 8, 03.09.2008
Gigaset A580 IP / US English / A31008-xxxx-xxxx-x-xxxx / starting.fm / 24.04.2009
First steps
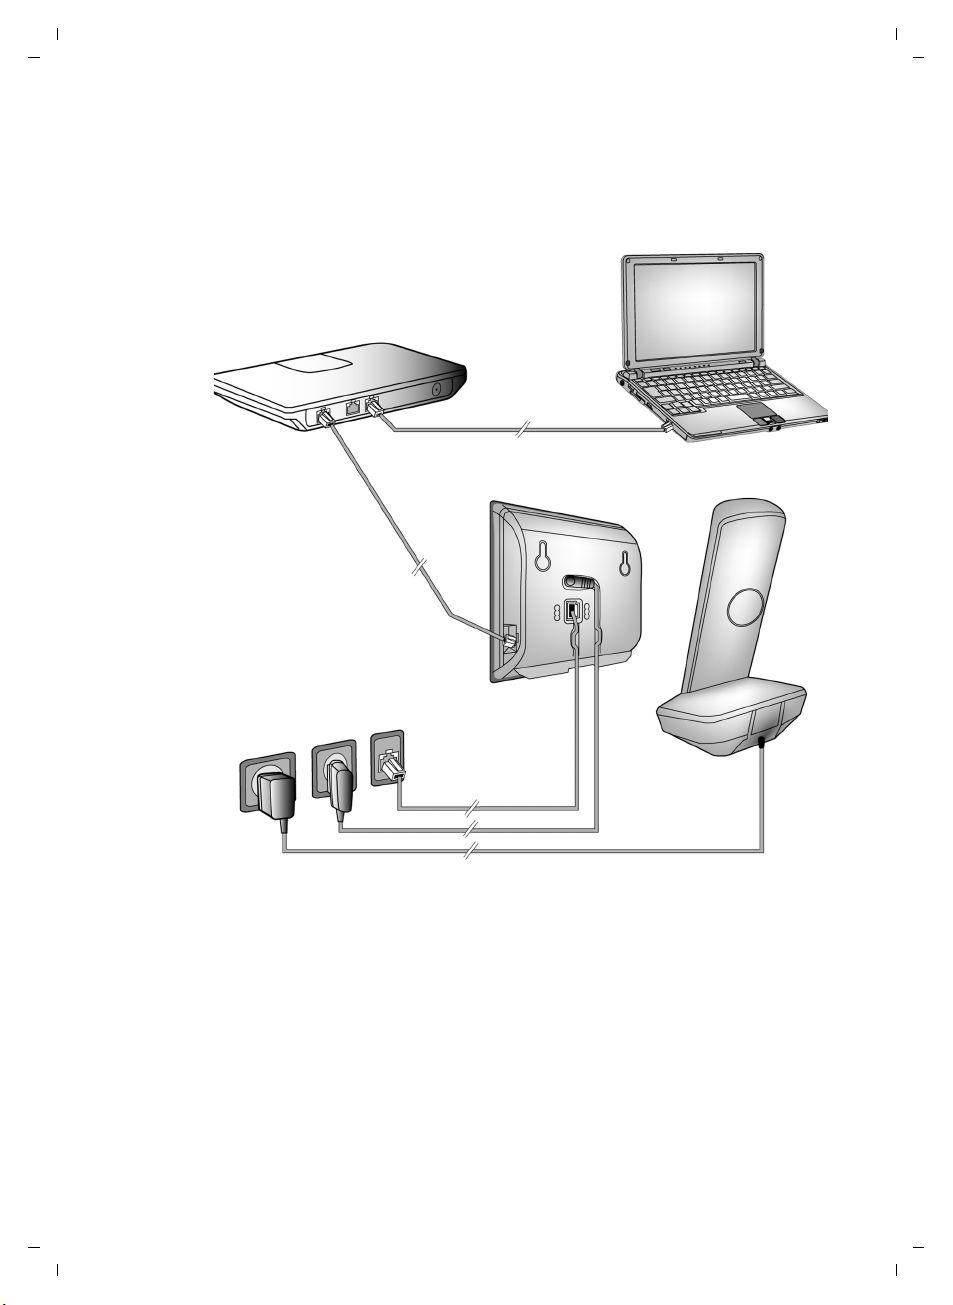
Connecting the base station
To make calls with your phone via the fixed line network and via VoIP, you
must connect the base station to the fixed line network and the Internet,
£ Figure 1.
§§4§§
§§1§§
§§3§§
§§2§§
Figure 1 Connecting the phone to the fixed line network and the Internet
Follow the steps in the order given below (£Figure 1):
§§1§§ Connect the phone cord and power lead to the base station.
§§2§§ Connect the base station to the fixed line network and the electrical power
supply.
§§3§§ To connect the base station to the Internet, first connect the base station to
the router
(connection via router and modem or via router with integrated modem).
§§4§§ Connect the PC and router (optional) – for advanced configuration of the
base station (
£ Page 96).
18
Version 8, 03.09.2008
Gigaset A580 IP / US English / A31008-xxxx-xxxx-x-xxxx / starting.fm / 24.04.2009
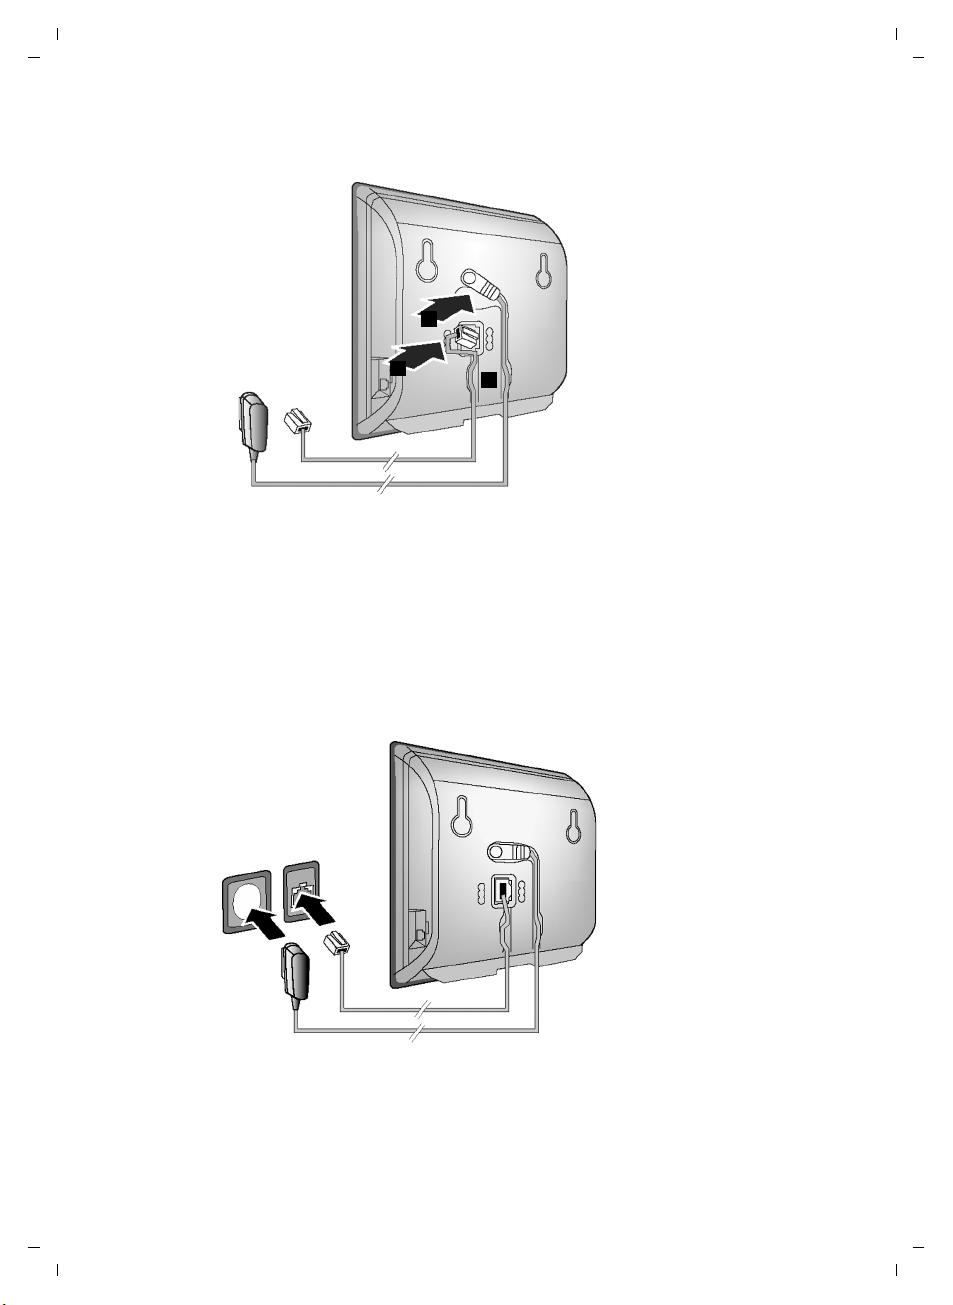
1. Connect the phone cord and power lead to the base station
2
First steps
1
§§1§§ Insert the phone cord into the lower connection socket at the rear of the
base station.
§§2§§ Insert the power lead of the power adapter into the upper connection socket
at the rear of the base station.
§§3§§ Push both cables into the appropriate cable channels.
3
2. Connect the base station to the fixed line network and the electrical power supply
§§1§§
§§2§§
§§1§§ Insert the phone cord into the fixed line network connection socket.
§§2§§ Then insert the power adapter into the electrical socket.
19
Version 8, 03.09.2008
Gigaset A580 IP / US English / A31008-xxxx-xxxx-x-xxxx / starting.fm / 24.04.2009
First steps
Warning
u Keep the power adapter plugged in at all times for operation, as the phone
does not work without an electrical power connection.
u Use only the power adapter and phone cord supplied. Pin connections on
telephone cords can vary (pin connections
£ Page 152).
You can now use your phone to make calls via the fixed line network and can be
reached on your fixed line number.
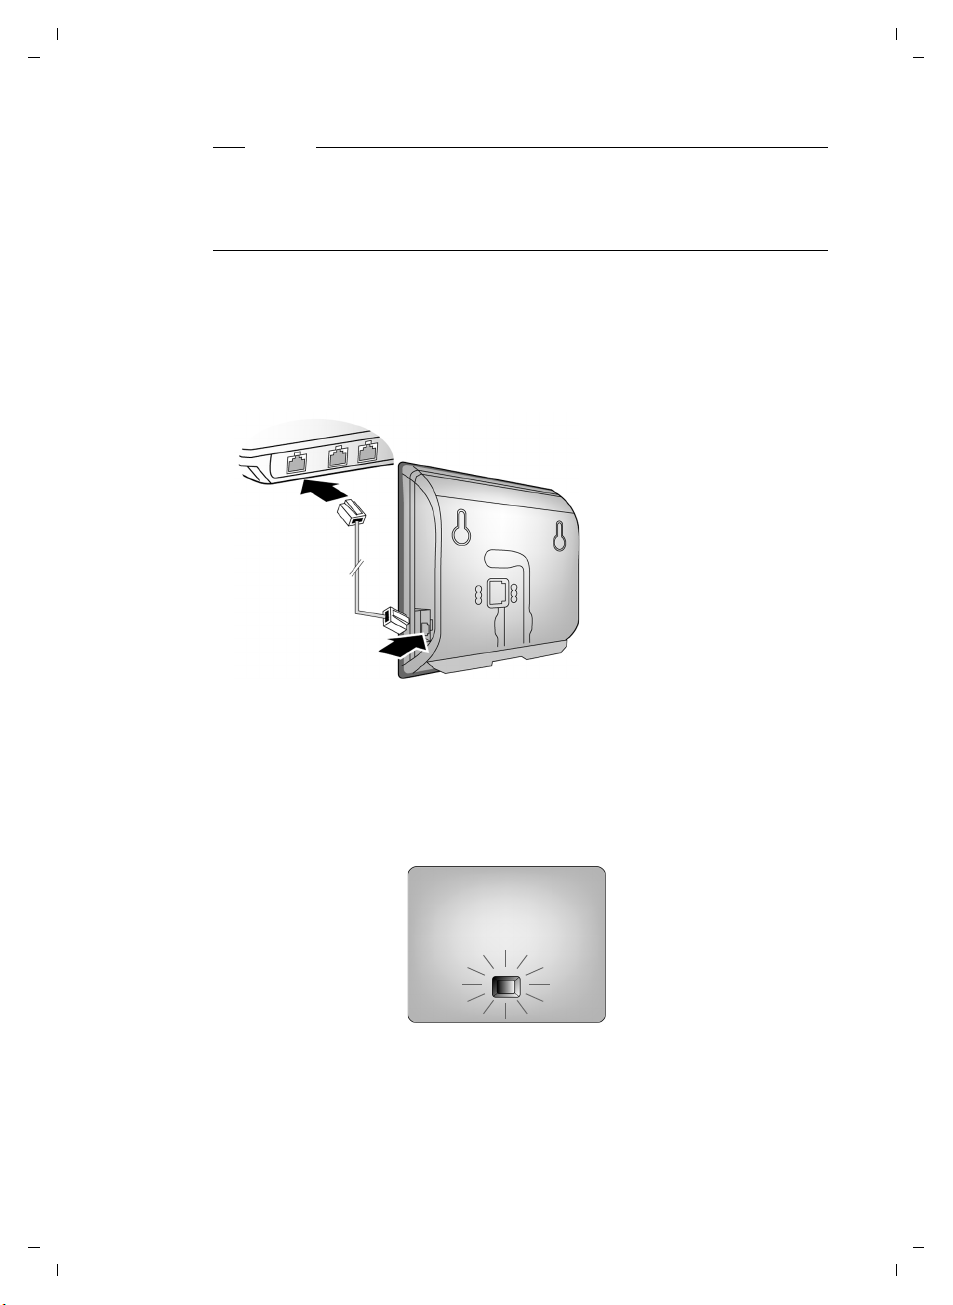
3. Connect the base station with the router (Internet)
For Internet access you need a router connected to the Internet via a modem
(this may be integrated in the router).
§§2§§
20
§§1§§
§§1§§ Connect an Ethernet cable plug into the LAN port at the side of the base sta-
tion.
§§2§§ Then insert the other end of the Ethernet cable plug into a LAN port on the
router.
As soon as the cable connecting the phone and router is plugged in and the
router is activated, the key lights up on the front of the base station
(Paging key).
You are now ready to establish VoIP connections within Gigaset.net
£ Page 46).
(
Version 8, 03.09.2008
Gigaset A580 IP / US English / A31008-xxxx-xxxx-x-xxxx / starting.fm / 24.04.2009
Making settings for VoIP telephony
Before you can use the Internet (VoIP) to phone any other numbers on the
Internet, the fixed line network or the cellular phone network, you need the
services of a VoIP provider who supports the VoIP SIP standard.
Prerequisite: You have registered with such a VoIP provider (e.g. via your PC)
and set up at least one VoIP account.
To use VoIP, you need to enter the access data for your VoIP account. You will
receive all the necessary data from your VoIP provider. This will include:
u Your user name (if requested by the VoIP provider) is the user identification
(Caller ID) for your account, which is often identical to your phone number
u Your authentication name or login ID
u The (login) password registered with the VoIP provider
u General settings for your VoIP provider (server addresses, etc.)
Your phone connection wizard can help you make these entries.
Starting the connection wizard
Prerequisite:
The base station is connected to the electrical power supply and a router. Your
router is connected to the Internet (
£ Page 20).
First steps
Please note
Your phone is preconfigured for dynamic assignment of the IP address. In
order for your router to "recognize" the phone, dynamic IP address assignment
must also be activated on the router, i.e. the router's DHCP server must be activated.
If the DHCP server cannot or should not be activated, you must first assign a
fixed IP address to the phone. For further information, see Page 91.
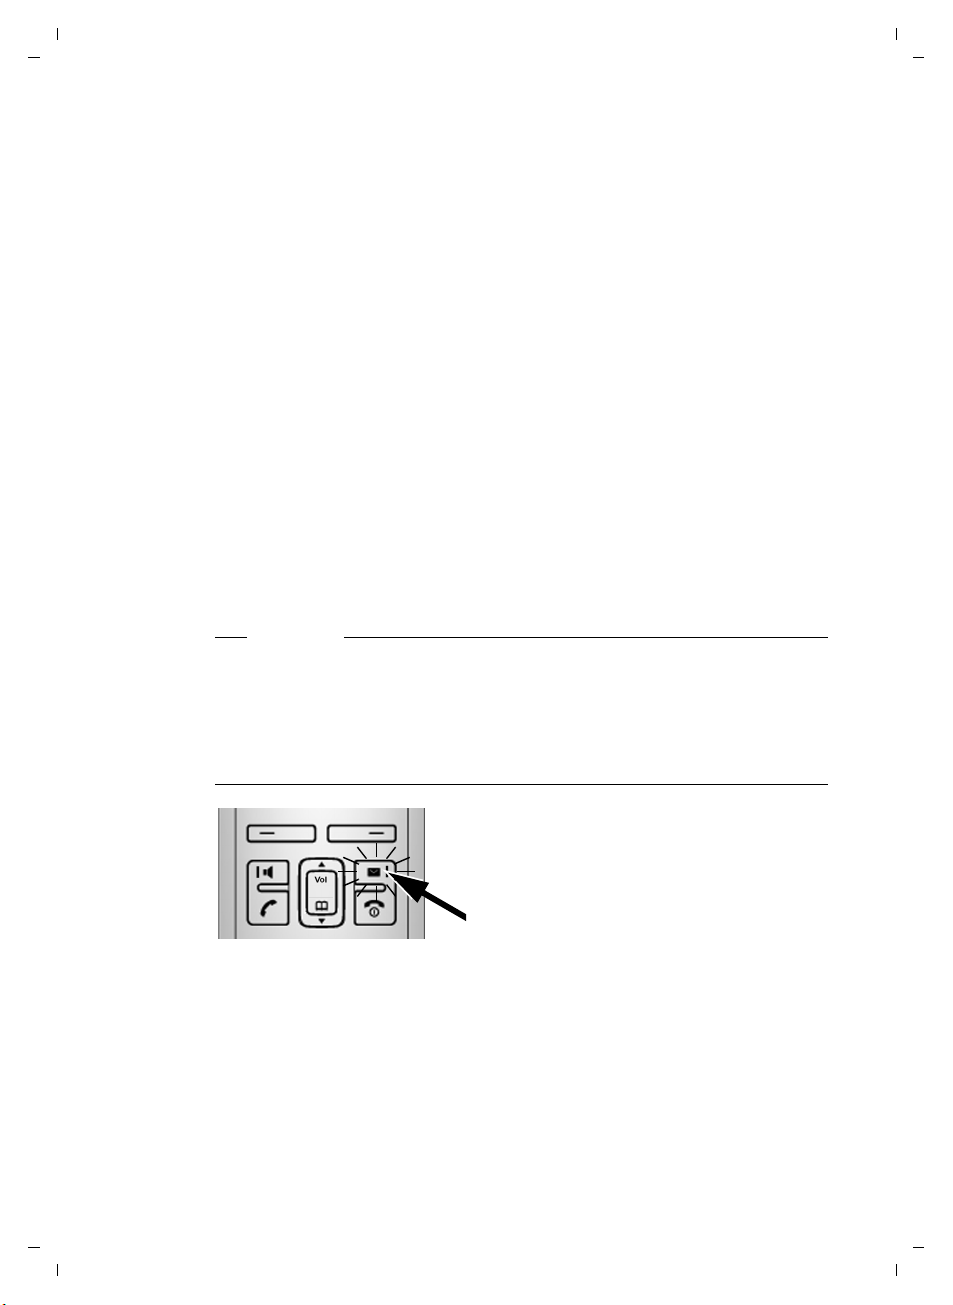
As soon as the handset battery is sufficiently
charged, the Message keyf on the handset
will flash (approx. 20 minutes after you have
put the handset in the charging cradle).
¤ Press the Message key f.
21
Version 8, 03.09.2008
Gigaset A580 IP / US English / A31008-xxxx-xxxx-x-xxxx / starting.fm / 24.04.2009
First steps
Start VoIP
connection
wizard?
No Yes
New firmware available appears in the display.
New/improved firmware is available for your phone on the Internet. First perform an automatic update of the firmware (
been completed (after approx. 3 minutes) the handset's idle display appears
again and the Message key f flashes. If you press f, the display shown in
the picture above appears and you can start the connection wizard.
Please note
To protect your phone and its system settings from unauthorized access,
please define a 4-digit number code (system PIN) known only to yourself. This
code must be entered before you can register/de-register handsets or alter
your phone's VoIP or LAN settings.
The default system PIN is 0000 (4 x zero). For further information, see
Page 84.
System PIN:
[ _ _ _ _ ]
Ç
OK
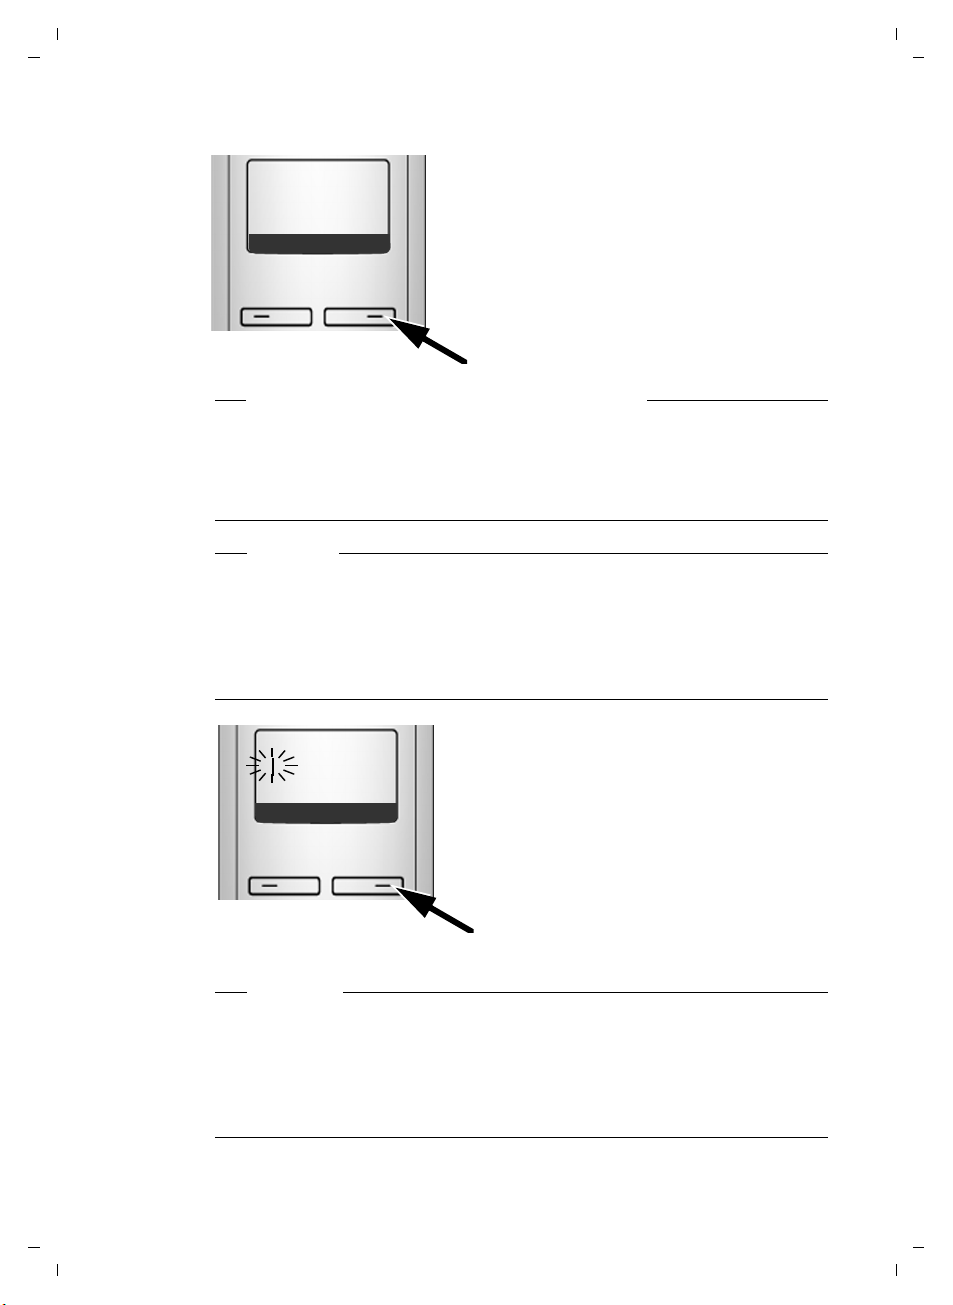
You will see the following display.
¤ Press the key below §Yes§ on the display
screen.
You will be prompted to enter your phone's
system PIN.
£ Page 88). Once the update has
The active line is marked [----].
¤ Enter your phone's current system PIN
using the keypad.
¤ Press the key below §OK§ on the display
screen.
The connection wizard is launched.
Please note
u You can also call up the connection wizard at any time via the menu
£ Page 89).
(
u The connection wizard will also start automatically if you try to establish a
connection via the Internet before you have made the necessary settings.
Prerequisite: You have not activated the fixed line network connection as
a replacement connection (
22
Version 8, 03.09.2008
£ Page 119):
Gigaset A580 IP / US English / A31008-xxxx-xxxx-x-xxxx / starting.fm / 24.04.2009
Downloading VoIP provider data
Select VoIP
provider?
First steps
No
Yes
¤ Press the key below §Yes§ on the display
screen.
The connection wizard establishes a connection with the Gigaset configuration
server on the Internet. Various profiles with general access data for different
VoIP providers can be downloaded here.
After a brief period you will see the following display:
A list of countries is loaded.
The first country in the list appears in the
display.
Ç
Select
country
Germany
V OK
¤ Press up or down on the Control key
repeatedly ...
... until the country in which you are
using the phone appears on the display.
Ç
U OK
¤ Press the key below §OK§ on the display
screen to confirm your selection.
23
Version 8, 03.09.2008
Gigaset A580 IP / US English / A31008-xxxx-xxxx-x-xxxx / starting.fm / 24.04.2009
First steps
A list of VoIP providers whose data you can
download is loaded.
The first VoIP provider in the list appears in
the display.
¤ Press up or down on the Control key
repeatedly q ...
... until your VoIP provider appears on
the display.
provider
Provider 1
Ç
Provider x
Ç
Select
V OK
U OK
¤ Press the key below §OK§ on the display
screen to confirm your selection.
24
The general access data for your VoIP provider is downloaded.
Please note
If the data for your VoIP provider is not available for downloading, press the ”
display key twice. You can then carry out the following steps with the connection wizard.
You must then make the settings needed for the VoIP provider using the Web
configurator (
Your VoIP provider will supply you with this data.
£ Page 107).
Entering user data for your first VoIP account
You will now be prompted to enter your personal access data for your VoIP
accounts.
The following are provider-dependent:
u Username, Authentication Name, Authentication Password
Or:
u Authentication Name, Authentication Password
Version 8, 03.09.2008
Gigaset A580 IP / US English / A31008-xxxx-xxxx-x-xxxx / starting.fm / 24.04.2009
Please note
When entering case sensitive access data:
u To switch between upper and lower case and digits, press the # key
(several times if necessary). You can see briefly in the display whether
upper case, lower case or digits is selected.
u Characters entered incorrectly can be deleted using the left Display key
X. The character to the left of the cursor will be deleted.
below
u You can navigate within the input field using the Control key p (press up/
down).
First steps
Username:
ÛT
Authentication
Name:
ÛT
Authentication
Password:
ÛT
OK
OK
OK
If your VoIP provider does not require a
user name, skip this step.
¤ Using the keypad, enter the user name
that you received from your VoIP provider.
¤ Press the key below §OK§ on the display
screen.
¤ Using the keypad, enter the authentica-
tion name that you received from your
VoIP provider.
¤ Press the key below §OK§ on the display
screen.
¤ Use the keypad to enter your password.
¤ Press the key below §OK§ on the display
screen.
25
Version 8, 03.09.2008

Gigaset A580 IP / US English / A31008-xxxx-xxxx-x-xxxx / starting.fm / 24.04.2009
First steps
Completing the VoIP settings
After the entries have been completed, the handset reverts to idle status.
ÐV
INT 1
Þ
Menu
¤ Test whether your VoIP data is complete and has been stored in the phone
correctly.
Calling via VoIP:
Enter a number using the handset keypad and press and hold the Talk
key c.
If a VoIP connection cannot be established, a corresponding message is shown
in the display.
You can now use your phone to make calls via the fixed line network and the
Internet! Callers can reach you on your fixed line number and your VoIP number.
Please note
u To ensure that you can always be reached via the Internet, the router must
be permanently connected to the Internet.
u If you have started the connection wizard via the menu, once the entries
are completed, press and hold the End Call key
idle status.
u If you try to make a call via a VoIP connection that is not configured cor-
rectly, the following VoIP status message will appear in the display:
VoIP config. error: xxx (xxx = VoIP status code). The various status codes and
their respective meanings are listed on Page 145.
a to return the handset to
Please note
You can enter five additional VoIP accounts (VoIP phone numbers) via the Web
configurator later (
number and the Gigaset.net number, your phone can then be reached via up
to eight different phone numbers. You can assign the phone numbers to the
individual handsets that are registered with the base station as send and
receive numbers (
26
Version 8, 03.09.2008
£ Page 106). Together with your fixed line network
£ Page 120).

Gigaset A580 IP / US English / A31008-xxxx-xxxx-x-xxxx / starting.fm / 24.04.2009
Icons on the idle display
The following is displayed:
u the internal number, e.g. INT 1.
u the quality of the reception signal between base station and handset (signal
strength):
–poor to good:ÒÑ iÐ
–no reception: | flashes
u battery charge status:
– = e V U (empty to full)
– = flashes: batteries almost empty
– e V U flashes: charging procedure
No connection to the Internet/VoIP server
If one of the following messages is displayed instead of the internal name after
the connection wizard is closed, errors have occurred:
u Server not accessible!
u SIP registration failed
Below you will find possible causes and measures you can take.
First steps
Server not accessible!
The phone has no connection to the Internet.
¤ Check the cable connections between the base station and the router (the
LED on the base station must light up) and the connection between the
router and the Internet connection.
¤ Verify that the phone is connected to the LAN.
– It may not have been possible to dynamically assign an IP address to the
phone
or
– You have assigned a static IP address to the phone that has either already
been assigned to another LAN subscriber or does not belong to the
router's address block.
¤ Press the Paging key on the base station. The IP address appears on the
handset display.
¤ Press the Talk key on the handset to end paging call.
¤ Start the Web configurator with the IP address.
¤ If no connection can be established, change the settings on the router
(activate DHCP server) or the phone's IP address.
27
Version 8, 03.09.2008

Gigaset A580 IP / US English / A31008-xxxx-xxxx-x-xxxx / starting.fm / 24.04.2009
First steps
SIP registration failed
u Your personal data for registering with the VoIP provider may have been
entered incompletely or incorrectly.
¤ Check your entries for Username, Authentication Name and Authentication
Password. Particularly check your use of upper and lower case.
To do this, open the following menu on your handset:
§Menu§ ¢ Settings ¢ Base ¢ Telephony ¢ VoIP (enter system PIN)
£ Page 90)
(
u The server address for the VoIP server has not yet been entered, or has been
entered incorrectly.
¤ Start the Web configurator.
¤ Open the following Web page: Settings ¢Telephony ¢ Connections.
¤ Click the Edit button next to the first VoIP connection.
¤ Edit the server address where necessary.
Please note
If port forwarding is activated on your router for the ports (
have been registered as the SIP and RTP ports, we recommend to deactivate
DHCP and assign the phone a static IP address (otherwise you may not be able
to hear the other party during VoIP calls):
u Assign an IP address via the handset menu:
§Menu§ £ Settings £ Base £ Local Network
Or
u Assign an IP address via the Web configurator:
¤ Open the following Web page: Settings £ IP Configuration.
¤ Select IP address type.
Please note that the IP address and subnet mask depend on the router's
address block.
You must also enter the default gateway and DNS server. The IP address for the
router is generally entered here.
£ Page 128) that
28
Version 8, 03.09.2008

Gigaset A580 IP / US English / A31008-xxxx-xxxx-x-xxxx / starting.fm / 24.04.2009
What would you like to do next?
Now you have successfully started your phone, you will probably want to adapt
it to your personal requirements. Use the following guide to quickly locate the
most important subjects.
If you are unfamiliar with menu-driven devices such as other Gigaset telephones first read the section "Operating the handset"
Information on ... ... is located here.
First steps
£ Page 30.
Making calls via VoIP or the fixed line network Page 38
Setting the ringer melody and volume Page 81
Setting the handset volume Page 80
Entering local area code/extra codes Page 87
Eco mode Page 69
Operating the telephone on a PABX Page 94
Registering existing handsets to a base station Page 71
Transferring directory entries from existing Gigaset
handsets to the new handset(s)
Entering additional VoIP accounts Page 106
g
g
g
g
g
g
g
g
g
Page 65
If you have any questions about using your phone, please read the
troubleshooting tips in the section "Questions and answers" (
contact our Customer Care team (
Version 8, 03.09.2008
£ Page 141).
£ Page 141), or
29
Gigaset A580 IP / US English / A31008-xxxx-xxxx-x-xxxx / starting.fm / 24.04.2009
Operating the handset
Operating the handset
Using the Control key
In the following description, the side of the Control key you need to
press for each operation is indicated accordingly, e.g.tfor "press
up on the Control key".
The Control key has a number of different functions:
With the handset in idle status (without a screensaver)
s Press briefly to open the handset directory.
Press and hold: open Gigaset.net directory.
t Call up the menu to set the ringer volume (
In the main menu, in submenus and lists
t / s Scroll up/down line by line.
In input fields
Use the Control key to move the cursor to the left t or right s.
During an external call
s Press briefly to open the handset directory.
t Adjust the loudspeaker volume for earpiece and handsfree mode.
£ Page 81).
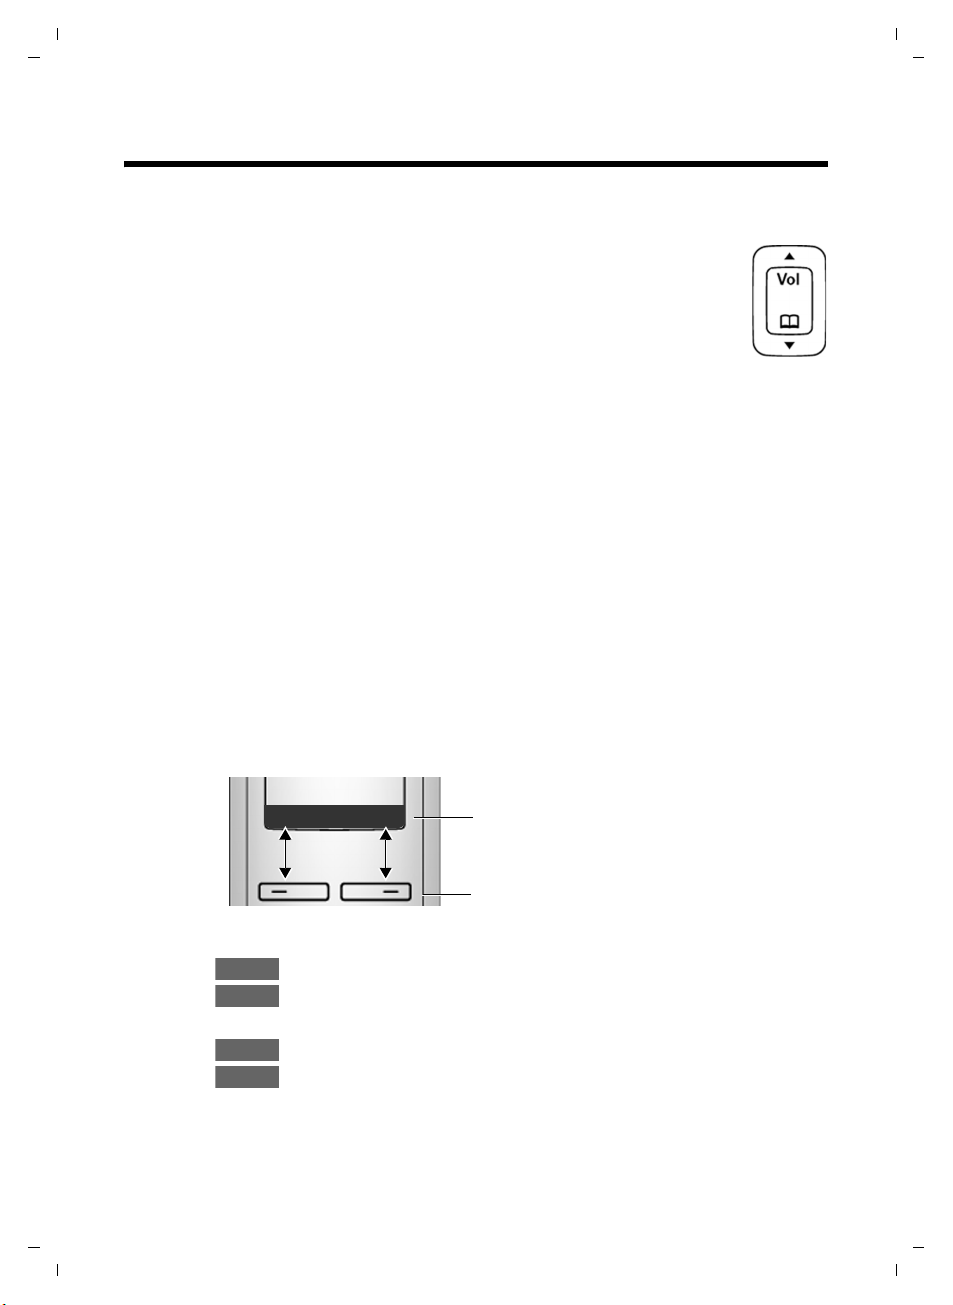
Using the Display keys
The function of the display keys changes depending on the particular operating
situation. Example:
Ç
U OK
Important Display keys:
Menu
OK
W Delete key: deletes one character at a time from right to left.
Ç
Þ
30
Version 8, 03.09.2008
Open a context-dependent menu.
Confirm selection.
Go back one menu level or cancel operation.
Open the Last Number Redial list.
Current Display key functions are shown in
the bottom display line.
Display keys
 Loading...