

Gigaset Communications A510H User Manual

Gigaset A510-A510A / USA en / A31008-M2202-R301-1-3S19 / introduction.fm / 25.08.2011
Gigaset A510/A510A – your high-quality accessory
Gigaset A510/A510A – your high-quality accessory
Congratulations on your purchase of this latest generation Gigaset.
Your Gigaset can do a lot more than just make calls:
Directory for 150 entries
Save phone numbers and names to the directory (¢ page 30). You can designate important
entries as VIPs (Very Important Persons). VIP calls are then recognised by their ringtone and
their background colour (¢ page 31).
If you don't (always) want it to ring
Use time control for calls (¢ page 45) or ensure that all calls from a withheld number are not
signalled (¢ page 46).
Other practical information
Transfer the directory from an existing Gigaset handset (¢ page 31), use the shortcut function (¢ page 31) and adjust the background colour and contrast of the display to your
requirements (¢ page 44).
Environment
Gigaset Green Home – be environmentally aware when using your phone. For details of our
ECO DECT products, visit www.gigaset.com/service.
For more information about your phone, visit www.gigaset.com/gigasetA510
After purchasing your Gigaset phone, please register it at www.gigaset.com/service –
this will ensure that any questions you may have or warranty services you request are dealt
with even faster!
.
Have fun using your new phone!
1
Version 4, 16.09.2005
Gigaset A510-A510A / USA en / A31008-M2202-R301-1-3S19 / overview.fm / 25.08.2011
13
11
9
10
8
2
7
3
1
4
5
6
12
Ð
Ã
U
INT 1
04.23.
10:53am
Redial Menu
14
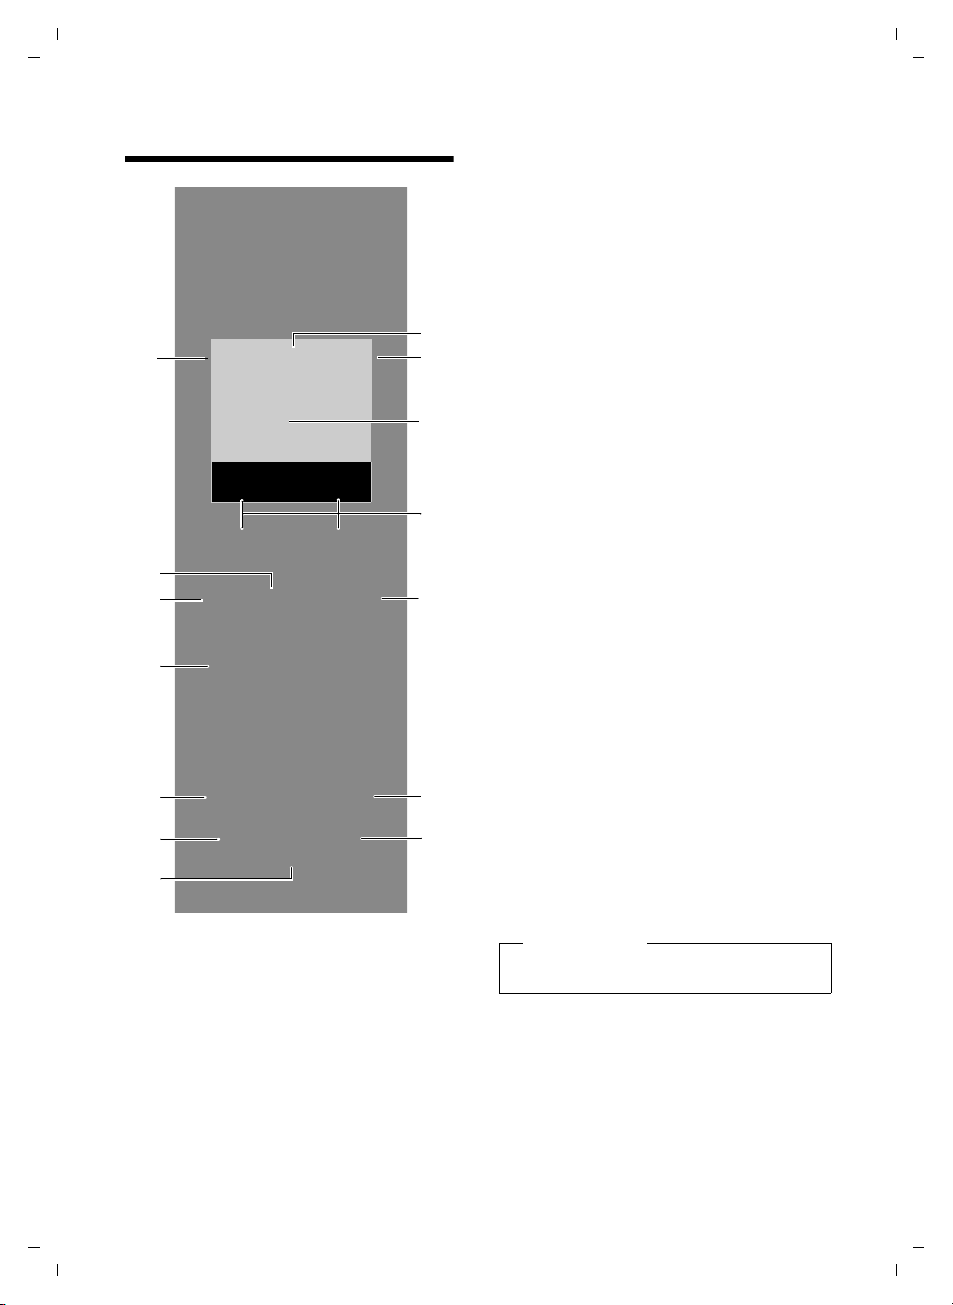
Overview
Overview
1 Signal strength (¢ page 18)
2 Control key (¢ page 20)
Mute microphone (¢ page 29)
3 Talk /Handsfree key
Flashing: incoming call;
Lights up: handsfree mode activated;
accept call; open redial list (press briefly);
start dialling (press and hold);
During a call: switch between earpiece and
handsfree mode (¢ page 29)
4 Key 1
Open answering machine (A510A only)/
network mailbox (press and hold)
5 Star key
Activate/deactivate ringtones
(press and hold);
With an open connection: switch from pulse
dialling to tone dialling (press briefly)
6 Message key (¢ page 32)
Access to call and message lists;
Flashing: new message or new call
7 Microphone
8 Flash key
- Consultation call (flash)
- Insert a dialling pause (press and hold)
9 Hash key
Keypad lock on/off (press and hold in
idle status);
toggles between upper/lower case and digits
10 End call key, On/Off key
End call; cancel function; go back one menu
level (press briefly); back to idle status
(press and hold); activate/deactivate handset
(press and hold in idle status)
11 Display keys (¢ page 4)
12 Display in idle status
13 Charge status of the batteries (¢ page 18)
14 Answering machine icon (A510A only)
Answering machine switched on;
Flashing: answering machine is recording
a message or is being operated by another
internal party
Version 4, 16.09.2005
Please note
To c han ge t he display language, proceed as
described on page 15/page 44.
2
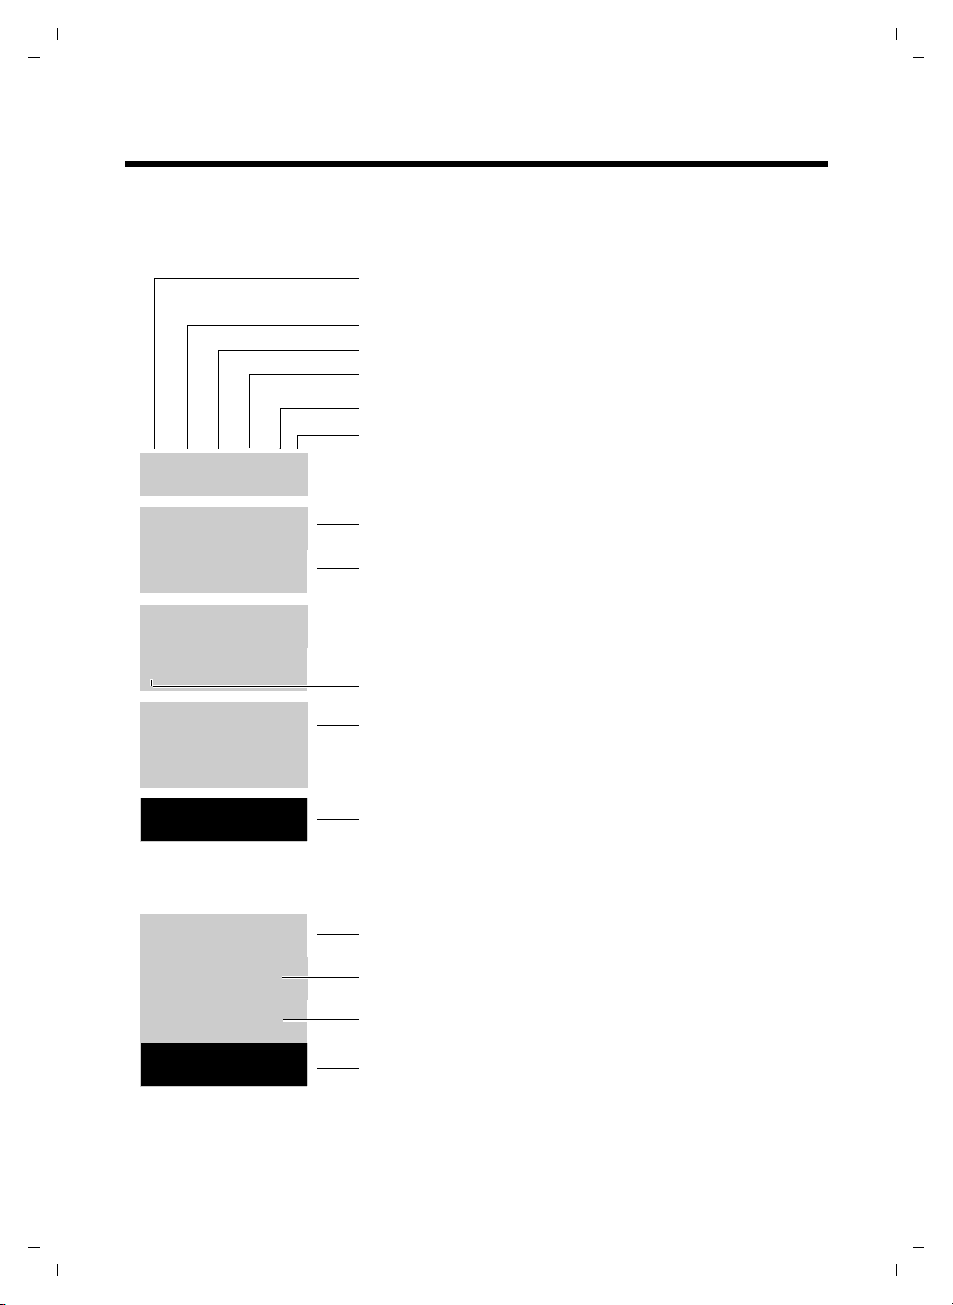
Gigaset A510-A510A / USA en / A31008-M2202-R301-1-3S19 / overview.fm / 25.08.2011
—
1234567890
00:00:53
Menu
Ð
Ø
ó
Ã
U
INT 1
04.23.
10:53am
Redial
U
Menu
à ™
03 01
INT 1
ë
12:00
10:53am
Batteries are charged (¢ page 18)
Charge status of the batteries (¢ page 18)
Name of the handset (¢ page 44)
Current day/current time (¢ page 16)
Alarm clock switched on and wake-up time set (¢ page 41)
Number of new messages:
u
à on the answering machine (A510A only)/network
mailbox (¢ page 32)
u ™ in the missed calls list (¢ page 32)
Display keys (¢ page 4)
Signal strength
¨ (¢ page 18)
Keypad locked (¢ page 22)
Ringtone switched off (¢ page 46)
Answering machine activated (A510A only)
Connection established
Number (or name) of caller (¢ page 27)
Call duration
Display key (¢ page 4)
u Set call volume (¢ page 44)
u Access service information
Display during external call:
Display icons
The following icons are displayed depending on the settings and the operating status of your
telephone:
Overview
Version 4, 16.09.2005
3

Gigaset A510-A510A / USA en / A31008-M2202-R301-1-3S19 / overview.fm / 25.08.2011
¶
Û
À
μ
Ð
Ø
Ü
Ú
ØìÚ
z —
˜
Ø
þ
Ú
Ø
å
Ú
Information
Query
Please wait...
Action failed
Action complete
Establishing a connection
External call (¢ page 27) Alarm call (¢ page 41)
Answering machine
is recording (¢ page 35)
Connection established
Connection cannot be established or connection interrupted
Internal call (¢ page 42)
Redial Menu
1
Current display key function
2
Display keys
1
2
1
2
Redial
MenuOKDelete
Back
ì
Alarm Clock
Back
V
OK
Display keys
Other display icons:
Display keys
The functions of the display keys change
depending on the particular operating situation. Examples:
Important display keys:
Version 4, 16.09.2005
4
Open redial list.
Open a menu for further func-
tions.
Confirm selection.
Delete key: Delete character by
character from right to left.
Go back one menu level or can-
cel operation.
Main menu icons
Ì
Ï
Voice Mail
Settings
Alarm Clock
ì
Information on using the menus ¢ page 21
Menu overview ¢ page 25

Gigaset A510-A510A / USA en / A31008-M2202-R301-1-3S19 / overview.fm / 25.08.2011
5
2
4
3
1
6
7
Base overview
Base overview
You can use the keys on the base to operate
the integrated answering machine
(Gigaset A510A only), search for handsets
("paging"
to the base
Gigaset A510A base
¢ page 42) and register handsets
(¢ page 42).
4 Play/stop key
Play back new message from answering
machine (press briefly), play back all messages
(press and hold) or cancel playback.
Flashes: at least one new message is present.
Flashes very quickly: memory is full.
During message playback:
5 Go to the next message.
6 Skip to the start of the current message (press
once) or go to the previous message (press
twice).
7 Delete current message.
Please note:
If the answering machine is being operated
from a handset or if it is recording a message
(On/Off key flashes), it cannot be operated
from the base at the same time.
Gigaset A510 base
Version 4, 16.09.2005
1 Registration/paging key
Search for handsets (press briefly, paging
¢ page 42).
Register handsets (press and hold ¢ page 42).
2 On/Off key
Activating/deactivating the answering machine.
Lights up: answering machine is activated.
Flashes: message is being played back
or recorded.
3 Volume keys (÷ = quieter; ø = louder)
During message playback: adjust the speaking
volume.
While phone is ringing: adjust ringer volume.
Registration/paging key
– Press briefly: search for handsets
("paging") ¢ page 42.
– Press and hold: register handsets and
DECT devices ¢ page 42.
5

Gigaset A510-A510A / USA en / A31008-M2202-R301-1-3S19 / A510AIVZ.fm / 25.08.2011
Contents
Contents
Gigaset A510/A510A – your high-quality accessory . . . . . . . . . . . . . . . . . . 1
Overview . . . . . . . . . . . . . . . . . . . . . . . . . . . . . . . . . . . . . . . . . . . . . . . . . . . . . . . . . 2
Display icons . . . . . . . . . . . . . . . . . . . . . . . . . . . . . . . . . . . . . . . . . . . . . . . . . . . . . . 3
Display keys . . . . . . . . . . . . . . . . . . . . . . . . . . . . . . . . . . . . . . . . . . . . . . . . . . . . . . . 4
Main menu icons . . . . . . . . . . . . . . . . . . . . . . . . . . . . . . . . . . . . . . . . . . . . . . . . . . 4
Base overview . . . . . . . . . . . . . . . . . . . . . . . . . . . . . . . . . . . . . . . . . . . . . . . . . . . . . 5
Safety precautions . . . . . . . . . . . . . . . . . . . . . . . . . . . . . . . . . . . . . . . . . . . . . . . . . 9
First steps . . . . . . . . . . . . . . . . . . . . . . . . . . . . . . . . . . . . . . . . . . . . . . . . . . . . . . . . 10
Checking the package contents . . . . . . . . . . . . . . . . . . . . . . . . . . . . . . . . . . . . . . . . . . . . . . 10
Setting up the base and charging cradle (if included) . . . . . . . . . . . . . . . . . . . . . . . . . 11
Connecting the base . . . . . . . . . . . . . . . . . . . . . . . . . . . . . . . . . . . . . . . . . . . . . . . . . . . . . . . . . 11
Connecting the charging cradle (if included) . . . . . . . . . . . . . . . . . . . . . . . . . . . . . . . . . . 12
Setting up the handset for use . . . . . . . . . . . . . . . . . . . . . . . . . . . . . . . . . . . . . . . . . . . . . . . 13
Changing the display language . . . . . . . . . . . . . . . . . . . . . . . . . . . . . . . . . . . . . . . . . . . . . . 15
Setting the date/time . . . . . . . . . . . . . . . . . . . . . . . . . . . . . . . . . . . . . . . . . . . . . . . . . . . . . . . . 16
What would you like to do next? . . . . . . . . . . . . . . . . . . . . . . . . . . . . . . . . . . . . . . . . . . . . . . 19
Using the phone . . . . . . . . . . . . . . . . . . . . . . . . . . . . . . . . . . . . . . . . . . . . . . . . . . 20
Control key . . . . . . . . . . . . . . . . . . . . . . . . . . . . . . . . . . . . . . . . . . . . . . . . . . . . . . . . . . . . . . . . . . 20
Keys on the keypad . . . . . . . . . . . . . . . . . . . . . . . . . . . . . . . . . . . . . . . . . . . . . . . . . . . . . . . . . . 20
Correcting incorrect entries . . . . . . . . . . . . . . . . . . . . . . . . . . . . . . . . . . . . . . . . . . . . . . . . . . 20
Menu guidance . . . . . . . . . . . . . . . . . . . . . . . . . . . . . . . . . . . . . . . . . . . . . . . . . . . . . . . . . . . . . . 21
Activating/deactivating the handset . . . . . . . . . . . . . . . . . . . . . . . . . . . . . . . . . . . . . . . . . . 22
Activating/deactivating the keypad lock . . . . . . . . . . . . . . . . . . . . . . . . . . . . . . . . . . . . . . 22
Understanding the operating steps . . . . . . . . . . . . . . . . . . . . . . . . . . . . . . . . . . . . . . . . . . . 23
Menu tree . . . . . . . . . . . . . . . . . . . . . . . . . . . . . . . . . . . . . . . . . . . . . . . . . . . . . . . . 25
Making calls . . . . . . . . . . . . . . . . . . . . . . . . . . . . . . . . . . . . . . . . . . . . . . . . . . . . . . 27
Making an external call . . . . . . . . . . . . . . . . . . . . . . . . . . . . . . . . . . . . . . . . . . . . . . . . . . . . . . 27
Ending a call . . . . . . . . . . . . . . . . . . . . . . . . . . . . . . . . . . . . . . . . . . . . . . . . . . . . . . . . . . . . . . . . . 27
Accepting a call . . . . . . . . . . . . . . . . . . . . . . . . . . . . . . . . . . . . . . . . . . . . . . . . . . . . . . . . . . . . . . 27
Caller ID (CID) . . . . . . . . . . . . . . . . . . . . . . . . . . . . . . . . . . . . . . . . . . . . . . . . . . . . . . . . . . . . . . . . 27
Notes on phone number display (Caller ID) . . . . . . . . . . . . . . . . . . . . . . . . . . . . . . . . . . . 28
Handsfree operation . . . . . . . . . . . . . . . . . . . . . . . . . . . . . . . . . . . . . . . . . . . . . . . . . . . . . . . . . 29
Switching to mute . . . . . . . . . . . . . . . . . . . . . . . . . . . . . . . . . . . . . . . . . . . . . . . . . . . . . . . . . . . 29
Using the directory and lists . . . . . . . . . . . . . . . . . . . . . . . . . . . . . . . . . . . . . . . 30
Directory . . . . . . . . . . . . . . . . . . . . . . . . . . . . . . . . . . . . . . . . . . . . . . . . . . . . . . . . . . . . . . . . . . . . 30
Redial list . . . . . . . . . . . . . . . . . . . . . . . . . . . . . . . . . . . . . . . . . . . . . . . . . . . . . . . . . . . . . . . . . . . . 32
Function of the message key . . . . . . . . . . . . . . . . . . . . . . . . . . . . . . . . . . . . . . . . . . . . . . . . . 32
Answering machine list (Gigaset A510A only) . . . . . . . . . . . . . . . . . . . . . . . . . . . . . . . . . 33
Calls list . . . . . . . . . . . . . . . . . . . . . . . . . . . . . . . . . . . . . . . . . . . . . . . . . . . . . . . . . . . . . . . . . . . . . 33
Setting up area codes . . . . . . . . . . . . . . . . . . . . . . . . . . . . . . . . . . . . . . . . . . . . . . . . . . . . . . . . 34
6
Version 4, 16.09.2005

Gigaset A510-A510A / USA en / A31008-M2202-R301-1-3S19 / A510AIVZ.fm / 25.08.2011
Operating the Gigaset A510A base answering machine . . . . . . . . . . . . . 35
Operation via the handset . . . . . . . . . . . . . . . . . . . . . . . . . . . . . . . . . . . . . . . . . . . . . . . . . . . . 35
Activating/deactivating call screening . . . . . . . . . . . . . . . . . . . . . . . . . . . . . . . . . . . . . . . . 37
Setting the recording parameters . . . . . . . . . . . . . . . . . . . . . . . . . . . . . . . . . . . . . . . . . . . . 38
Changing the language for the voice prompt and pre-recorded
announcement . . . . . . . . . . . . . . . . . . . . . . . . . . . . . . . . . . . . . . . . . . . . . . . . . . . . . . . . . . . . . . 38
Resetting fast access for the answering machine using key 1 . . . . . . . . . . . . . . . . . . 38
Operating when on the move (remote operation) . . . . . . . . . . . . . . . . . . . . . . . . . . . . . 39
Using the network mailbox . . . . . . . . . . . . . . . . . . . . . . . . . . . . . . . . . . . . . . . 40
Using fast access for the network mailbox . . . . . . . . . . . . . . . . . . . . . . . . . . . . . . . . . . . . 40
Viewing the network mailbox message . . . . . . . . . . . . . . . . . . . . . . . . . . . . . . . . . . . . . . . 40
ECO DECT . . . . . . . . . . . . . . . . . . . . . . . . . . . . . . . . . . . . . . . . . . . . . . . . . . . . . . . . 41
Using the handset as an alarm clock . . . . . . . . . . . . . . . . . . . . . . . . . . . . . . . 41
Using multiple handsets . . . . . . . . . . . . . . . . . . . . . . . . . . . . . . . . . . . . . . . . . . 42
Registering handsets . . . . . . . . . . . . . . . . . . . . . . . . . . . . . . . . . . . . . . . . . . . . . . . . . . . . . . . . . 42
De-registering handsets . . . . . . . . . . . . . . . . . . . . . . . . . . . . . . . . . . . . . . . . . . . . . . . . . . . . . . 42
Locating a handset (paging) . . . . . . . . . . . . . . . . . . . . . . . . . . . . . . . . . . . . . . . . . . . . . . . . . . 42
Making internal calls . . . . . . . . . . . . . . . . . . . . . . . . . . . . . . . . . . . . . . . . . . . . . . . . . . . . . . . . . 42
Listening in to an external call (conference) . . . . . . . . . . . . . . . . . . . . . . . . . . . . . . . . . . . 43
Changing the name of a handset . . . . . . . . . . . . . . . . . . . . . . . . . . . . . . . . . . . . . . . . . . . . . 44
Handset settings . . . . . . . . . . . . . . . . . . . . . . . . . . . . . . . . . . . . . . . . . . . . . . . . . 44
Changing the display language . . . . . . . . . . . . . . . . . . . . . . . . . . . . . . . . . . . . . . . . . . . . . . 44
Setting the display/screensaver . . . . . . . . . . . . . . . . . . . . . . . . . . . . . . . . . . . . . . . . . . . . . . 44
Activating/deactivating auto answer . . . . . . . . . . . . . . . . . . . . . . . . . . . . . . . . . . . . . . . . . 44
Changing the handsfree/earpiece volume . . . . . . . . . . . . . . . . . . . . . . . . . . . . . . . . . . . . 44
Changing ringtones . . . . . . . . . . . . . . . . . . . . . . . . . . . . . . . . . . . . . . . . . . . . . . . . . . . . . . . . . . 45
Restoring the handset default settings . . . . . . . . . . . . . . . . . . . . . . . . . . . . . . . . . . . . . . . . 46
Base settings . . . . . . . . . . . . . . . . . . . . . . . . . . . . . . . . . . . . . . . . . . . . . . . . . . . . . 46
Changing the ringtones for the Gigaset A510A base . . . . . . . . . . . . . . . . . . . . . . . . . . 46
Activating/deactivating music on hold . . . . . . . . . . . . . . . . . . . . . . . . . . . . . . . . . . . . . . . 47
Protecting against unauthorised access . . . . . . . . . . . . . . . . . . . . . . . . . . . . . . . . . . . . . . . 47
Resetting the base to the default settings . . . . . . . . . . . . . . . . . . . . . . . . . . . . . . . . . . . . . 47
Connecting the base to the PABX . . . . . . . . . . . . . . . . . . . . . . . . . . . . . . . . . . 48
Dialling mode and Flash time . . . . . . . . . . . . . . . . . . . . . . . . . . . . . . . . . . . . . . . . . . . . . . . . 48
Setting pauses . . . . . . . . . . . . . . . . . . . . . . . . . . . . . . . . . . . . . . . . . . . . . . . . . . . . . . . . . . . . . . . 48
Switching temporarily to tone dialling (DTMF) . . . . . . . . . . . . . . . . . . . . . . . . . . . . . . . . 48
Industry Canada Certification . . . . . . . . . . . . . . . . . . . . . . . . . . . . . . . . . . . . . 49
FCC / ACTA Information . . . . . . . . . . . . . . . . . . . . . . . . . . . . . . . . . . . . . . . . . . . 49
Safety precautions . . . . . . . . . . . . . . . . . . . . . . . . . . . . . . . . . . . . . . . . . . . . . . . . . . . . . . . . . . . 50
Service (Customer Care) . . . . . . . . . . . . . . . . . . . . . . . . . . . . . . . . . . . . . . . . . . . 52
End-user limited warranty . . . . . . . . . . . . . . . . . . . . . . . . . . . . . . . . . . . . . . . . . . . . . . . . . . . . 52
Questions and answers . . . . . . . . . . . . . . . . . . . . . . . . . . . . . . . . . . . . . . . . . . . . . . . . . . . . . . 55
Contents
Version 4, 16.09.2005
7

Gigaset A510-A510A / USA en / A31008-M2202-R301-1-3S19 / A510AIVZ.fm / 25.08.2011
Contents
Environment . . . . . . . . . . . . . . . . . . . . . . . . . . . . . . . . . . . . . . . . . . . . . . . . . . . . . 56
Appendix . . . . . . . . . . . . . . . . . . . . . . . . . . . . . . . . . . . . . . . . . . . . . . . . . . . . . . . . 57
Caring for your phone . . . . . . . . . . . . . . . . . . . . . . . . . . . . . . . . . . . . . . . . . . . . . . . . . . . . . . . . 57
Contact with liquid . . . . . . . . . . . . . . . . . . . . . . . . . . . . . . . . . . . . . . . . . . . . . . . . . . . . . . . . . . 57
Specifications . . . . . . . . . . . . . . . . . . . . . . . . . . . . . . . . . . . . . . . . . . . . . . . . . . . . . . . . . . . . . . . . 57
Writing and editing text . . . . . . . . . . . . . . . . . . . . . . . . . . . . . . . . . . . . . . . . . . . . . . . . . . . . . . 59
Accessories . . . . . . . . . . . . . . . . . . . . . . . . . . . . . . . . . . . . . . . . . . . . . . . . . . . . . . . 60
Mounting the base on the wall . . . . . . . . . . . . . . . . . . . . . . . . . . . . . . . . . . . . 63
Mounting the charger on the wall . . . . . . . . . . . . . . . . . . . . . . . . . . . . . . . . . 63
Index . . . . . . . . . . . . . . . . . . . . . . . . . . . . . . . . . . . . . . . . . . . . . . . . . . . . . . . . . . . . 64
Version 4, 16.09.2005
8
Gigaset A510-A510A / USA en / A31008-M2202-R301-1-3S19 / security.fm / 25.08.2011
$
ƒ
Safety precautions
Warning
Read the safety precautions and the user manual before use.
Explain their content and the potential hazards associated with using the telephone to your
children.
Use only the power adapter supplied, as indicated on the underside of the base.
Use only rechargeable batteries that correspond to the specification provided on
page 57, as this could otherwise result in significant health risks and personal injury.
Do not charge the handset in charging unit or base station while the headset is
connected.
Using your telephone may affect nearby medical equipment. Be aware of the
technical conditions in your particular environment, e.g., doctor's surgery.
If you use a medical device (e.g., a pacemaker), please contact the device manufacturer. They will be able to advise you regarding the susceptibility of the device to
external sources of high frequency energy. Please refer to the "Appendix" chapter for
the specifications of this Gigaset product.
Do not hold the rear of the handset to your ear when it is ringing or when speaker
mode is activated. Otherwise you risk serious and permanent damage to your
hearing.
Your Gigaset is compatible with the majority of digital hearing aids on the market.
However, perfect function with all hearing aids cannot be guaranteed.
The handset may cause interference in analogue hearing aids. If you require assistance, please contact the hearing aid supplier.
Do not install the base or charger in bathrooms or shower rooms. The base and
charger are not splashproof (¢ page 57).
Safety precautions
Version 4, 16.09.2005
Do not use your phone in environments with a potential explosion hazard (e.g., paint
shops).
If you give your phone to a third party, make sure you also give them the user
manual.
Remove faulty bases from use or have them repaired by our Service team, as these
could interfere with other wireless services.
Please note
u Not all of the functions described in this user guide are available in all countries.
u The device cannot be used in the event of a power failure. It is also not possible to trans-
mit emergency calls.
9

Gigaset A510-A510A / USA en / A31008-M2202-R301-1-3S19 / starting.fm / 25.08.2011
3
1
4
5
6
2
7
Or
89
First steps
First steps
Checking the package contents
1 One Gigaset A510/A510A base
10
Version 4, 16.09.2005
2 One power adapter for the base
3 One Gigaset handset
4 Two batteries
5 One battery cover
6 One phone cord
7 One user guide
If you have purchased a
model with multiple handsets, the package should
contain two batteries, a battery cover and a charging
8 with power
cradle
adapter
tional handset.
9 for each addi-

Gigaset A510-A510A / USA en / A31008-M2202-R301-1-3S19 / starting.fm / 25.08.2011
2
1
Setting up the base and charging cradle (if included)
The base and charging cradle are designed for use in dry rooms in a temperature
range of +5°C to +45°C.
¤ Set up the base at a central point in the building on a level, non-slip surface or
mount the base or charger on the wall ¢ page 63.
Please note
Pay attention to the range of the base.
This is up to 300 m in unobstructed outdoor areas and up to 50 m inside buildings. The range is reduced when Eco Mode is activated (¢ page 41).
The phone's feet do not usually leave any marks on surfaces. However, due to the
multitude of different varnishes and polishes used on today's furnishings, the
occurrence of marks on the surfaces cannot be completely ruled out.
Please note:
u Never expose the telephone to the effects of heat sources, direct sunlight or
other electrical devices.
u Protect your Gigaset from moisture, dust, corrosive liquids and fumes.
First steps
Connecting the base
¤ First connect the telephone jack 1
and insert the cables into the cable
ducts.
¤ Then connect the power adapter 2.
Please note:
u The power adapter must always be
connected, as the phone will not
operate without a mains connection.
u Use only the power adapter and
phone cord supplied. Pin connections on telephone cables can vary
(pin connections ¢ page 58).
u The answering machine is ready for
use approx. 15 seconds after the
base has been connected or reset.
Version 4, 16.09.2005
11

Gigaset A510-A510A / USA en / A31008-M2202-R301-1-3S19 / starting.fm / 25.08.2011
¤ Plug the power adapter into the
plug socket 2.
¤ Connect the flat plug from the
power adapter 1.
To disconnect the plug from the charger,
press the release button 3 and disconnect
the plug 4.
1
2
3
4
First steps
Connecting the charging cradle (if included)
12
Version 4, 16.09.2005
Gigaset A510-A510A / USA en / A31008-M2202-R301-1-3S19 / starting.fm / 25.08.2011
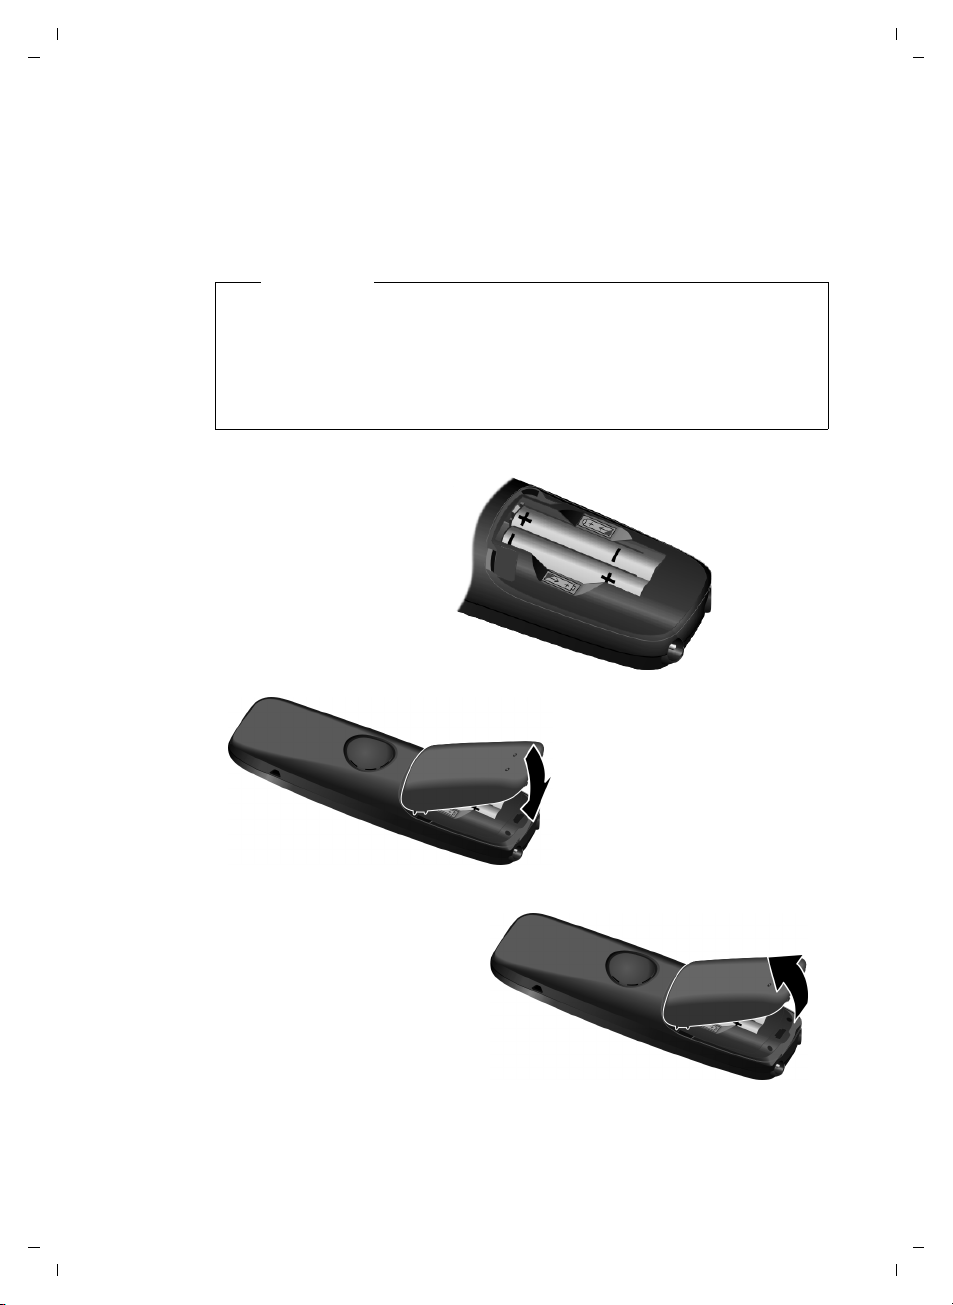
¤ Insert the batteries with
the polarity in the correct direction.
The polarity is indicated
in the battery compartment.
¤ First insert the battery
cover at the top a.
¤ Then press the cover b
until it clicks into place.
To open the battery cover, for
instance to replace the batteries,
insert a coin into the cavity on the
casing, then pull the battery cover
in an upward direction.
a
b
Setting up the handset for use
The display is protected by a plastic film.
Please remove the protective film!
Inserting the battery and closing the battery cover
Warning
Use only rechargeable batteries (¢ page 57) recommended by Gigaset Communications GmbH, as this could otherwise result in significant health risks and
personal injury. For example, the outer casing of the batteries could be
destroyed or the batteries could explode. The phone could also malfunction or
be damaged as a result of using batteries that are not of the recommended
type.
First steps
Version 4, 16.09.2005
13
Gigaset A510-A510A / USA en / A31008-M2202-R301-1-3S19 / starting.fm / 25.08.2011
6h
First steps
Initial charging and discharging of the batteries
The correct charge status can only be displayed if the batteries are first fully
charged and discharged.
¤ Charge the handset in the base for 6 hours.
Please note
The handset must only be placed in the designated Gigaset A510/A510A base
or charger.
14
¤ After charging, remove the handset from the base and only replace it when the
batteries are fully discharged.
Please note
u The handset is pre-registered with the base. If you have purchased a model
with multiple handsets, all handsets will already be registered with the
base. You do not need to register the handset again.
However, if a handset is not registered with the base (Register handset or
Place handset in base flashes on the display), please register the handset
manually ¢ page 42.
u After the first battery charge and discharge, you may place your handset in
the charger after every call.
u Always repeat the charging and discharging procedure if you remove the
batteries from the handset and reinsert them.
u The batteries may warm up during charging. This is not dangerous.
u After a while, the charge capacity of the batteries will decrease for technical
reasons.
If you have any questions about using your phone, please read the tips
on troubleshooting (¢ page 55) or contact our Customer Care team
(¢ page 52).
Version 4, 16.09.2005
Gigaset A510-A510A / USA en / A31008-M2202-R301-1-3S19 / starting.fm / 25.08.2011
Francais
Back
U
OK
´
L4
English
³
English
³
Francais
³
¤ Press right on the control key.
¤ Press the keys L and4 slowly one
after the other.
The display for setting languages appears
and the current language (e.g., English) is
selected.
¤ Press down on the control key s ...
... until the language you wish to use is
displayed e.g., French.
¤ Press the key below
§OK§ to select this
language.
The selection is marked with ³.
Changing the display language
Change the display language if you do not understand the language currently set.
First steps
¤ Press and hold the end call key a to return to idle status.
Version 4, 16.09.2005
15
Gigaset A510-A510A / USA en / A31008-M2202-R301-1-3S19 / starting.fm / 25.08.2011
Enter Date:
[04.04.2011]
Redial Time
Back OK
Enter time:
[07:15 am]
Back OK
¤ Press the key below §Time§ on the display
screen to open the input field.
(If you have already set the date/time,
open the input field via the menu
¢ page 26.)
The Date/Time submenu is shown on the
display.
¤ The active input position flashes.
Enter the month,day and year as an
8-digit number via the keypad,
e.g., Q4Q42Q11
for 4 April 2011.
To change the input position,
e.g., to correct an entry, press
right or left on the control key.
¤ Enter the hours and minutes in 4-digit
format via the keypad, e.g., QM15
for 07:15 am.
Change the input position with the
control key if necessary.
¤ Confirm with
§OK§.
¤ Press the key below
§OK§ on the display
screen to save your entry.
First steps
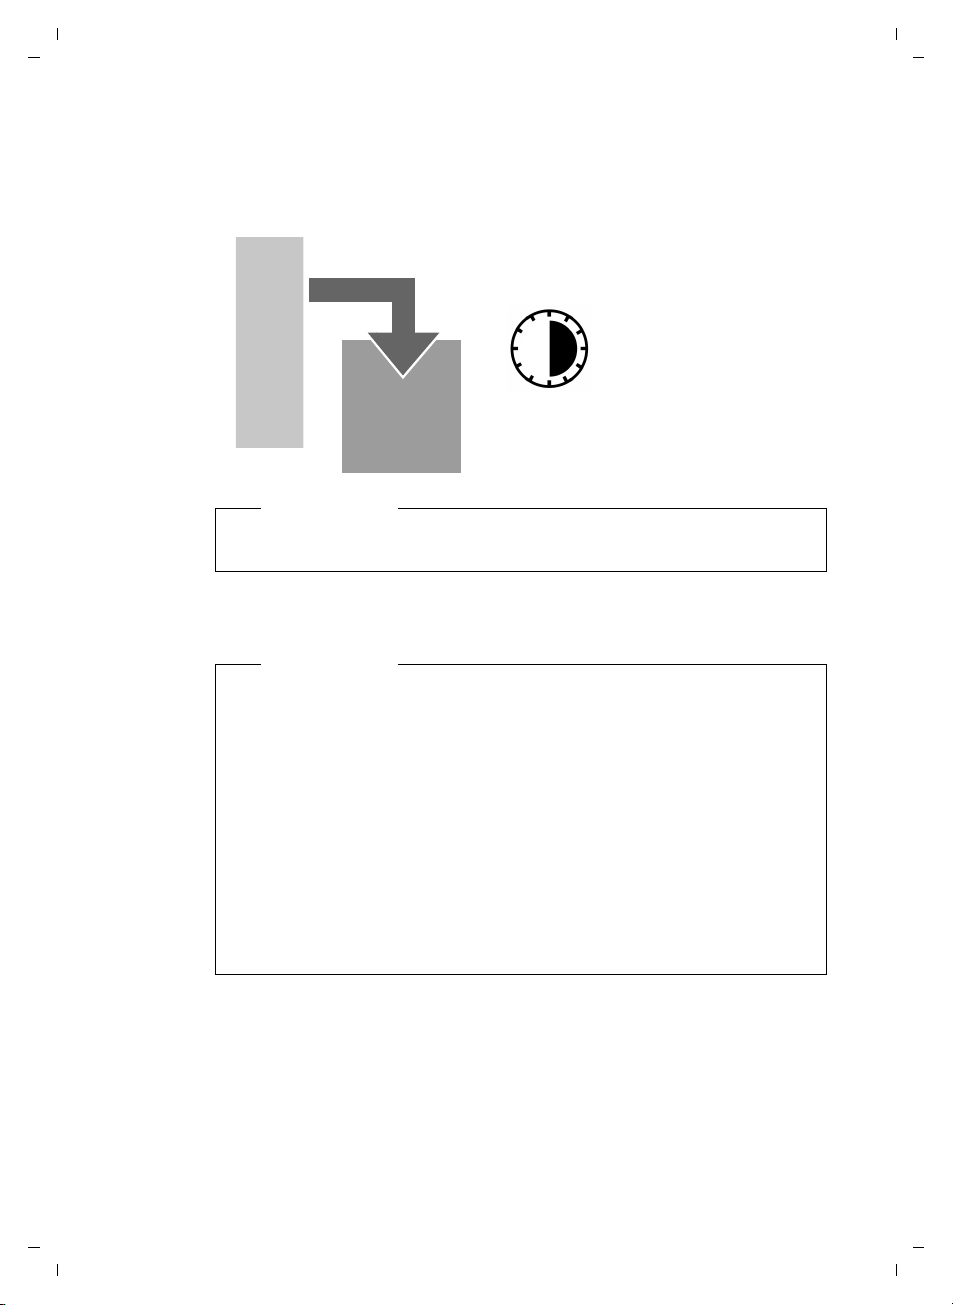
Setting the date/time
Set the date and time so that the correct date and time can be assigned to incoming
calls, and so that the alarm clock can be used.
Please note
Depending on your network provider, the date and time may be displayed automatically.
16
Version 4, 16.09.2005
Gigaset A510-A510A / USA en / A31008-M2202-R301-1-3S19 / starting.fm / 25.08.2011
μ
Saved
The display shows Saved. You will hear a
confirmation tone and the handset automatically reverts to idle status, or returns
to the "Settings" menu if the setting was
made via the menu.
973 SET: [0
]
973 SET: [2
]
Please note
If your phone receives the date and time during calling line display (e.g., via your
network provider, a router or PABXs), you can specify whether this data should
be copied to your phone:
¤ Press the following keys in sequence:
v ¤ P#Q5#MI
You will see the following display and the current setting will flash:
First steps
Version 4, 16.09.2005
¤ Press one of the following keys to determine when the date should be
copied across:
Q Never
Or 1 Once, in case the date/time is not set on your phone
Or 2 Always
Your selection is displayed (e.g., 2 for Always):
¤ Press the display key
§OK§.
17

Gigaset A510-A510A / USA en / A31008-M2202-R301-1-3S19 / starting.fm / 25.08.2011
Ð
Ã
U
INT 1
04.23. 10:53am
Redial Menu
First steps
Display in idle status
Once the phone is registered and the time set, the screen display is as follows
(example).
Screen display
u Reception between the base and the handset:
– Good to poor:
–No reception: ¥
u Activating the answering machine:
Ã
Your answering machine is set with
a prerecorded announcement.
u Charge status of the batteries:
– U charged over 66%
– Vcharged between 34% and 66%
– e charged between 11% and 33%
– = charged to below 11%
– = flashes: battery almost empty (less than 10 minutes talktime)
– = e V Vlit up: batteries charging
u INT 1
Internal name of the handset (¢ page 44)
Ш§¦
18
Your phone is now ready for use.
Version 4, 16.09.2005

Gigaset A510-A510A / USA en / A31008-M2202-R301-1-3S19 / starting.fm / 25.08.2011
g
g
g
g
g
g
g
g
What would you like to do next?
Now that you have successfully set up your Gigaset, you can immediately start calling – or you can adapt it to your personal requirements. Use the following guide to
quickly locate the most important functions.
Information on ... ... is located here.
First steps
Using the phone
Setting ringtones
Recording your own announcement for the
answering machine
Registering existing Gigaset handsets to a base
Transferring directory entries from existing Gigaset
handsets to new handset(s)
Setting Eco Mode
Operating the telephone on a PABX
Setting the earpiece volume
page 20
page 45
page 35
page 42
page 31
page 41
page 48
page 44
Version 4, 16.09.2005
19

Gigaset A510-A510A / USA en / A31008-M2202-R301-1-3S19 / starting.fm / 25.08.2011
Using the phone
Using the phone
Control key
In the description below, the side of the control key (up, down,
right, left) which you have to press in the different operating situations is marked in black e.g., v for "press the right edge of the
control key".
The control key has a number of different functions:
When the handset is in idle status
v Open the main menu.
s Open the directory.
u Open the list of handsets.
t Call up the menu for setting the handset's call volume (¢ page 44).
In menus and lists
t/s Scroll up/down line by line.
In input fields
You can use the control key to move the cursor up t, down s, right v or left u.
During an external call
v Mute the microphone.
s Open the directory.
u Initiate an internal consultation call.
t Adjust the loudspeaker volume for earpiece and handsfree mode.
Keys on the keypad
c/Q/P etc.
Press the matching key on the handset.
~ Enter digits or letters.
Correcting incorrect entries
You can correct incorrect characters in the input fields by navigating to the incorrect entry using the control key. You can then:
u Use the display key
u Insert characters at the cursor position
u Overwrite the highlighted (flashing) character e.g., when entering time and
date.
20
§Delete§ to delete the character to the left of the cursor
Version 4, 16.09.2005

Gigaset A510-A510A / USA en / A31008-M2202-R301-1-3S19 / starting.fm / 25.08.2011
Ï
Settings
Back
W
OK
Menu guidance
Your telephone's functions are accessed via a menu consisting of several levels
(menu overview ¢ page 25).
Main menu (first menu level)
¤ With the handset in idle status, press the display key §Menu§ or right on the control
key v to open the main menu.
The functions in the main menu are displayed in the
form of a list with names and icons (example on the
right).
Selecting a function
¤ You can scroll between functions using the control
key q. The selectable function is shown in the display.
¤ Press the display key
key v to select the displayed function. This opens
the corresponding submenu and the first entry is
displayed.
If you press the display key
returns to idle status.
§OK§ or right on the control
§Back§ or briefly press the end call key a, the display
Using the phone
Submenus
The functions in the submenu are displayed with the corresponding names.
Selecting a function
¤ You can scroll between functions using the control key q. The relevant function
is shown in the display.
¤ Press the display key
sponding submenu and the first entry is displayed.
If you press the display key
the previous menu level or cancel the operation.
Any settings you have not confirmed by pressing
§OK§ to select the displayed function. This opens the corre-
§Back§ or briefly press the end call key a, you return to
§OK§ will be discarded.
Reverting to idle status
From any point in the menu:
¤ Press and hold the end call key a or
¤ Do not press any key: after 2 minutes, the display will automatically revert to
idle status.
An example of the display in idle status is shown on page 18.
21
Version 4, 16.09.2005

Gigaset A510-A510A / USA en / A31008-M2202-R301-1-3S19 / starting.fm / 25.08.2011
Using the phone
Activating/deactivating the handset
a In idle status, press and hold the end call key (confirmation tone).
Activating/deactivating the keypad lock
The keypad lock prevents any unwanted use of the phone.
# In idle status, press and hold the hash key (confirmation tone).
The keypad lock is activated or deactivated. When it is switched on,
Ø icon appears in the display.
the
If the keypad lock is activated, a corresponding message is displayed when you
press a key.
The keypad lock deactivates automatically when you receive a call. It is reactivated
when the call is finished.
Please note
When the keypad lock is active, you cannot call emergency numbers.
Version 4, 16.09.2005
22
Gigaset A510-A510A / USA en / A31008-M2202-R301-1-3S19 / starting.fm / 25.08.2011
Ï
Settings
Back
W
OK
Redial Menu
¤ Press the key below §Menu§ on the dis-
play screen to open the main menu.
¤ Press down on the control key s ...
¤ Press the key below
§OK§ on the display
screen to confirm your selection.
... until the Settings menu item
appears.
¤ Press down on the control key s ...
Understanding the operating steps
The operating steps are shown in abbreviated form, for example:
§Menu§ ¤ Settings ¤ Eco Mode (³ =on)
¤ This means you should proceed as follows:
Using the phone
23
Version 4, 16.09.2005

Gigaset A510-A510A / USA en / A31008-M2202-R301-1-3S19 / starting.fm / 25.08.2011
Eco Mode
Back
W
OK
³
... until the Eco Mode menu item
appears.
¤ Press the key below
§OK§ on the display
screen to switch the function on or off
(³ =on).
Using the phone
¤ Press the key below §Back§ on the display screen to jump back to the previous
menu level.
Or
Press and hold the end call key a to return to idle status.
Version 4, 16.09.2005
24
Gigaset A510-A510A / USA en / A31008-M2202-R301-1-3S19 / menuetree.fm / 25.08.2011
Menu tree
The menu entries are partially subdivided. The page numbers refer to the relevant description in the user guide.
To open the main menu: press the display key §Menu§ when the phone is in idle mode.
Alarm Clock
ì
Activation ¢ page 41
Wake up time ¢ page 41
Voice Mail
Ì
Play Messages Network Mailbox ** ¢ page 40
Answering Machine ** ¢ page 35
Answering Machine * ¢ page 35
Call Screening * Handset ¢ page 37
Base
Announcements * Record Announcement ¢page 35
Play Announcement ¢ page 35
Delete Announcement ¢ page 36
Menu tree
Message Length * Unlimited ¢ page 38
1 Minute
2 Minutes
3 Minutes
Ring Delay * Immediately ¢ page 38
10 sec
18 sec
30 sec
Auto
Network Mailbox ¢ page 40
Set Key 1 * Network Mailbox ¢ page 40
Answering Machine ¢ page 40
*Base with answering machine only
** Base with answering machine and number of network mailbox is already entered
25
Version 4, 16.09.2005
Gigaset A510-A510A / USA en / A31008-M2202-R301-1-3S19 / menuetree.fm / 25.08.2011
Menu tree
Settings
Ï
Date/Time ¢ page 16
Audio Settings Call Volume ¢ page 44
Ringer Volume ¢ page 45
Advisory Tones ¢ page 46
Battery Low ¢ page 46
Ringtones (Handset) ¢ page 45
Ringtones (Base) ¢ page 47
Display Screensaver ¢ page 44
Color Schemes ¢ page 44
Contrast ¢ page 44
Language ¢ page 44
Registration Register Handset ¢ page 42
De-register Handset ¢ page 42
Telephony Auto Answer ¢ page 44
Listening in ¢ page 43
Calls List Type ¢ page 34
Local Area Code ¢ page 34
Extra Codes ¢ page 34
Music on Hold ¢ page 47
Version 4, 16.09.2005
System Reset Handset ¢ page 46
Base Reset ¢ page 47
System PIN ¢ page 47
Eco Mode ¢ page 41
26

Gigaset A510-A510A / USA en / A31008-M2202-R301-1-3S19 / telefony.fm / 25.08.2011
Ø
Ü
Ú
1234567890
Menu
1
2
Making calls
Making calls
Making an external call
External calls are calls using the public
telephone network.
~c Enter the number and press the
talk key.
Or:
c~ Press and hold the talk key c
and then enter the number.
You can cancel the dialling process with the
end call key a.
You are shown the duration of the call while
the call is in progress.
Please note
Dialling with the directory (¢ page 30),
calls list (¢ page 33) and redial list
(¢ page 32) saves you from repeatedly
keying in phone numbers.
Ending a call
You can accept the call as long as it is displayed on the screen.
Caller ID (CID)
When you receive a call, the caller's number
and/or name is displayed on the screen if the
following prerequisites are met:
u Your network provider supports Caller ID.
– CID number only: The caller's number
is displayed.
– CID name and number: The caller's
name is displayed.
u You have requested Caller ID from your
network provider.
u The caller has requested Caller ID from
the network provider.
Call display with Caller ID
If the caller's number is saved in your directory, the caller's name will be displayed.
Version 4, 16.09.2005
a Press the end call key.
Accepting a call
The handset indicates an incoming call in
three ways: by ringing, by a display on the
screen and by the flashing talk key c.
To accept the call, press the talk key c.
Gigaset A510A: Instead of accepting the call,
you can also redirect it to the answering
machine:
§Menu§ ¤ Divert to AM ¤ §OK§
If the handset is in the charger and the Auto
Answer function is activated (¢ page 44),
the handset automatically answers calls
when you remove it from the base/charger.
If the ringer is intrusive, you can deactivate
it:
§Menu§ ¤ Silent ¤ §OK§
1Ringer icon
2Number or name of caller
The following is displayed instead of the
number:
u External Call, if no number is transmitted.
u Withheld, if the caller has withheld
Caller ID.
u Unavailable, if the caller has not
arranged Caller ID.
27
Gigaset A510-A510A / USA en / A31008-M2202-R301-1-3S19 / telefony.fm / 25.08.2011
1234567890
Anna Lechner,
London
Menu
1
2
Making calls
Display with CID name and number
If you have CID name and number, then the
name (town/city) that is registered with your
network provider for the caller's number will
also be dis playe d. If the nu mber of the calle r
is stored in your directory, the CID name and
number display is replaced by the corresponding directory entry.
1Caller's number
2 Name and location
The display shows:
u External Call, if no number is transmitted.
u Withheld, if the caller has withheld
Caller ID.
u Unavailable, if the caller has not
arranged Caller ID.
Please note
The ringer can be switched off for
unknown calls (calls with Caller ID withheld) (¢ page 46).
Notes on phone number display (Caller ID)
By default, the number of the caller is shown
in the display of your Gigaset telephone. You
do not have to make any other settings on
your Gigaset telephone.
However, if the caller's number is not
displayed, this can be due to the
following:
u You have not ordered Caller ID from your
network provider
u Your telephone is connected via a PABX
or a router with an integrated PABX (gateway) that does not transmit all information.
Is your telephone connected via a
PABX/gateway?
You can establish this by checking for an
additional device connected between your
telephone and home connection, e.g., a
PABX, gateway etc. In most cases, simply
resetting this device will remedy the situation:
¤ Briefly disconnect the PABX power plug.
Re-insert the plug and wait for the device
to restart.
If the caller number is still not
displayed:
¤ Check the phone number display set-
tings of your PABX and activate this function if necessary. In the user manual for
the device, search for the term "CID" (or
an alternative term such as "calling line
identification", "phone number transmission", "caller ID" etc.). If necessary, contact
the device manufacturer.
If this does not resolve the problem, it is possible that your network provider does not
provide the Caller ID service for this number.
28
Version 4, 16.09.2005

Gigaset A510-A510A / USA en / A31008-M2202-R301-1-3S19 / telefony.fm / 25.08.2011
Making calls
Have you requested the phone
number display service from your
network provider?
¤ Check whether your provider supports
phone number display and that the function has been activated for you. If necessary, contact your provider.
Additional information on this subject can
be found on the Gigaset website at:
www.gigaset.com/service
Handsfree operation
In handsfree mode, you activate the loudspeaker so that you can hear the caller without having to hold the handset to your ear.
You therefore have both hands free and
other people can listen in on the conversation.
Please note
Inform your caller before you use the
handsfree function so that the caller
knows a third party may be listening.
Activating/deactivating handsfree mode
During a call and when listening to the
answering machine (Gigaset A510A only),
activate or deactivate handsfree mode.
d Press the handsfree key.
Each key press switches
between earpiece and handsfree mode. If handsfree mode is
activated, the key is lit up.
If you wish to place the handset in the
charger during a call:
¤ Press and hold handsfree key d while
placing the handset in the base/charger
and for a further 2 seconds.
For instructions on adjusting the handsfree
volume, see page 44.
Switching to mute
You can deactivate your handset's microphone during a call.
v Press right on the control key to
mute the handset. The display
shows Microphone is turned
off.
Press the key again to unmute
the microphone.
Version 4, 16.09.2005
29

Gigaset A510-A510A / USA en / A31008-M2202-R301-1-3S19 / direct_charges.fm / 25.08.2011
Using the directory and lists
Using the directory and
lists
The options are:
u Directory
u Redial list
u Calls lists
u Answering machine list
(Gigaset A510A only)
You can create a personalised directory for
your own individual handset. You can also
send lists/entries to other handsets
(¢ page 31).
Directory
You can save a total of 150 entries in the
directory.
Please note
To quickly access a number from the
directory (shortcut), you can assign the
number to a key (¢ Using speed dial
keys, page 31).
In the directory, you can save
u Numbers and corresponding names
u VIP ringtones and colours.
You open the directory in idle status using
the s key.
Length of the entries
Number: max. 32 digits
Name: max. 16 characters
Storing a number in the directory
s ¤ §Menu§ ¤ New Entry
~ Enter the number and press §OK§.
~ Enter the name and press §OK§.
Order of directory entries
Directory entries are generally sorted alphabetically by surname. Spaces and digits take
first priority.
The sort order is as follows:
1. Space
2. Digits (0–9)
3. Letters (alphabetical)
4. Other characters
To work round the alphabetical order of
entries, insert a space or a digit before the
first letter of the name. These entries will
then move to the beginning of the directory.
Selecting directory entries
s Open the directory.
You have the following options:
u Use s to scroll through the entries until
the required name is selected.
u Enter the first character of the name,
if necessary scroll to the entry with the
s key.
Dialling with the directory
s ¤ s (Select entry)
c Press the talk key.
Version 4, 16.09.2005
Saving the first number in the directory
s ¤ Dir. empty New entry?
~ Enter the number and press §OK§.
~ Enter the name and press §OK§.
30
 Loading...