

Gigaset SX682 WiMAX User Manual
Gigaset SX682 WiMAX
User Guide – User
This device works in a frequency band for which no general licence has been obtained
from your National Authority for Frequency Management. Please contact your service
provider or your National Authority for Frequency Management about licensing before
putting this device into service.


Contents
Contents
For your safety . . . . . . . . . . . . . . . . . . . . . . . . . . . . . . 6
Safety precautions . . . . . . . . . . . . . . . . . . . . . . . . . . . . . . . . . . . . . . . . . . . . . . . . . . . . . 6
Cleaning and care . . . . . . . . . . . . . . . . . . . . . . . . . . . . . . . . . . . . . . . . . . . . . . . . . . 6
Trademarks . . . . . . . . . . . . . . . . . . . . . . . . . . . . . . . . . . . . . . . . . . . . . . . . . . . . . . . . 6
Information on Specific Absorption Rate (SAR) . . . . . . . . . . . . . . . . . . . . . . . . . . . . . . . 7
Information about the optional outdoor antenna . . . . . . . . . . . . . . . . . . . . . . . . . . . . 7
Gigaset SX682 WiMAX . . . . . . . . . . . . . . . . . . . . . . 10
What is WiMAX? . . . . . . . . . . . . . . . . . . . . . . . . . . . . . . . . . . . . . . . . . . . . . . . . . . . . . . 10
Gigaset SX682 WiMAX . . . . . . . . . . . . . . . . . . . . . . . . . . . . . . . . . . . . . . . . . . . . . . . . . 10
Product features . . . . . . . . . . . . . . . . . . . . . . . . . . . . . . . . . . . . . . . . . . . . . . . . . . . . . . 11
Product overview . . . . . . . . . . . . . . . . . . . . . . . . . . . . . . . . . . . . . . . . . . . . . . . . . . . . . 11
Connectors and LEDs . . . . . . . . . . . . . . . . . . . . . . . . . . . . . . . . . . . . . . . . . . . . . . . 11
Installing the Gigaset SX682 WiMAX . . . . . . . . . . . 14
Choosing your location . . . . . . . . . . . . . . . . . . . . . . . . . . . . . . . . . . . . . . . . . . . . . . . . 14
System requirements . . . . . . . . . . . . . . . . . . . . . . . . . . . . . . . . . . . . . . . . . . . . . . . . . . 16
Connecting the Gigaset SX682 WiMAX . . . . . . . . . . . . . . . . . . . . . . . . . . . . . . . . . . . . 16
Connecting the outdoor antenna . . . . . . . . . . . . . . . . . . . . . . . . . . . . . . . . . . . . . 17
Connecting the PC . . . . . . . . . . . . . . . . . . . . . . . . . . . . . . . . . . . . . . . . . . . . . . . . . 17
Connecting a telephone, fax machine or answer machine . . . . . . . . . . . . . . . . . . 18
Switching on the devices . . . . . . . . . . . . . . . . . . . . . . . . . . . . . . . . . . . . . . . . . . . . 19
Restarting and resetting the Gigaset SX682 WiMAX . . . . . . . . . . . . . . . . . . . . . . . . . . 20
Rebooting the Gigaset SX682 WiMAX . . . . . . . . . . . . . . . . . . . . . . . . . . . . . . . . . . 20
Returning the Gigaset SX682 WiMAX to factory settings . . . . . . . . . . . . . . . . . . . 20
Configuration with the Web browser . . . . . . . . . . 22
User interface . . . . . . . . . . . . . . . . . . . . . . . . . . . . . . . . . . . . . . . . . . . . . . . . . . . . . . . . 22
Launching the user interface . . . . . . . . . . . . . . . . . . . . . . . . . . . . . . . . . . . . . . . . . 22
UI elements . . . . . . . . . . . . . . . . . . . . . . . . . . . . . . . . . . . . . . . . . . . . . . . . . . . . . . 23
Setting the language . . . . . . . . . . . . . . . . . . . . . . . . . . . . . . . . . . . . . . . . . . . . . . . 25
Opening online Help . . . . . . . . . . . . . . . . . . . . . . . . . . . . . . . . . . . . . . . . . . . . . . . 25
Menu structure . . . . . . . . . . . . . . . . . . . . . . . . . . . . . . . . . . . . . . . . . . . . . . . . . . . . 25
The Home page . . . . . . . . . . . . . . . . . . . . . . . . . . . . . . . . . . . . . . . . . . . . . . . . . . . . . . 26
Basic Setup Wizard . . . . . . . . . . . . . . . . . . . . . . . . . . 27
Starting the Basic Setup Wizard . . . . . . . . . . . . . . . . . . . . . . . . . . . . . . . . . . . . . . . 27
Entering access data for the WiMAX network . . . . . . . . . . . . . . . . . . . . . . . . . . . . 27
Setting up Internet access . . . . . . . . . . . . . . . . . . . . . . . . . . . . . . . . . . . . . . . . . . . 27
Selecting the antenna . . . . . . . . . . . . . . . . . . . . . . . . . . . . . . . . . . . . . . . . . . . . . . 28
Adjusting the antenna . . . . . . . . . . . . . . . . . . . . . . . . . . . . . . . . . . . . . . . . . . . . . . 28
Establishing a radio connection to a WiMAX network . . . . . . . . . . . . . . . . . . . . . 28
Precisely aligning the antenna . . . . . . . . . . . . . . . . . . . . . . . . . . . . . . . . . . . . . . . . 30
Setting up VoIP access . . . . . . . . . . . . . . . . . . . . . . . . . . . . . . . . . . . . . . . . . . . . . . 31
3

Contents
Advanced Settings . . . . . . . . . . . . . . . . . . . . . . . . . . 33
Setting the operating mode . . . . . . . . . . . . . . . . . . . . . . . . . . . . . . . . . . . . . . . . . . . . 34
Configuring Internet access . . . . . . . . . . . . . . . . . . . . . . . . . . . . . . . . . . . . . . . . . . . . . 35
Setting up the Internet Connection . . . . . . . . . . . . . . . . . . . . . . . . . . . . . . . . . . . . 35
Setting up DNS servers . . . . . . . . . . . . . . . . . . . . . . . . . . . . . . . . . . . . . . . . . . . . . 36
Enabling or disabling the firewall . . . . . . . . . . . . . . . . . . . . . . . . . . . . . . . . . . . . . 36
Port Forwarding . . . . . . . . . . . . . . . . . . . . . . . . . . . . . . . . . . . . . . . . . . . . . . . . . . . 37
Opening the firewall for a selected PC (Exposed Host) . . . . . . . . . . . . . . . . . . . . . 38
LAN configuration . . . . . . . . . . . . . . . . . . . . . . . . . . . . . . . . . . . . . . . . . . . . . . . . . . . . 39
Setting up Internet telephony (VoIP) . . . . . . . . . . . . . . . . . . . . . . . . . . . . . . . . . . . . . . 40
WiMAX configuration . . . . . . . . . . . . . . . . . . . . . . . . . . . . . . . . . . . . . . . . . . . . . . . . . 41
Antenna selection . . . . . . . . . . . . . . . . . . . . . . . . . . . . . . . . . . . . . . . . . . . . . . . . . . . . 41
Administration . . . . . . . . . . . . . . . . . . . . . . . . . . . . . 42
System password . . . . . . . . . . . . . . . . . . . . . . . . . . . . . . . . . . . . . . . . . . . . . . . . . . . . . 42
Restoring factory settings . . . . . . . . . . . . . . . . . . . . . . . . . . . . . . . . . . . . . . . . . . . . . . 43
Restart . . . . . . . . . . . . . . . . . . . . . . . . . . . . . . . . . . . . . . . . . . . . . . . . . . . . . . . . . . . . .44
Updating the firmware . . . . . . . . . . . . . . . . . . . . . . . . . . . . . . . . . . . . . . . . . . . . . . . . 44
Status . . . . . . . . . . . . . . . . . . . . . . . . . . . . . . . . . . . . 45
Internet . . . . . . . . . . . . . . . . . . . . . . . . . . . . . . . . . . . . . . . . . . . . . . . . . . . . . . . . . . . .46
Local network LAN . . . . . . . . . . . . . . . . . . . . . . . . . . . . . . . . . . . . . . . . . . . . . . . . . . . . 47
Telephony . . . . . . . . . . . . . . . . . . . . . . . . . . . . . . . . . . . . . . . . . . . . . . . . . . . . . . . . . . . 47
Device status . . . . . . . . . . . . . . . . . . . . . . . . . . . . . . . . . . . . . . . . . . . . . . . . . . . . . . . . 48
Radio status . . . . . . . . . . . . . . . . . . . . . . . . . . . . . . . . . . . . . . . . . . . . . . . . . . . . . . . . . 48
Preparing to use the Gigaset SX682 WiMAX . . . . . 50
Making a phone call or faxing with the Gigaset SX682 WiMAX . . . . . . . . . . . . . . . . . 50
Making calls via VoIP . . . . . . . . . . . . . . . . . . . . . . . . . . . . . . . . . . . . . . . . . . . . . . . 51
Receiving VoIP phone calls . . . . . . . . . . . . . . . . . . . . . . . . . . . . . . . . . . . . . . . . . . . 51
Telephone functions . . . . . . . . . . . . . . . . . . . . . . . . . . . . . . . . . . . . . . . . . . . . . . . 51
Appendix . . . . . . . . . . . . . . . . . . . . . . . . . . . . . . . . . . 55
Troubleshooting . . . . . . . . . . . . . . . . . . . . . . . . . . . . . . . . . . . . . . . . . . . . . . . . . . . . . . 55
Other faults and problems . . . . . . . . . . . . . . . . . . . . . . . . . . . . . . . . . . . . . . . . . . . 56
Before contacting customer service or your provider . . . . . . . . . . . . . . . . . . . . . . 57
Checking the connection to the Gigaset SX682 WiMAX . . . . . . . . . . . . . . . . . . . . . . . 58
Configuring the Web browser . . . . . . . . . . . . . . . . . . . . . . . . . . . . . . . . . . . . . . . . . . . 59
Setting up an HTTP proxy . . . . . . . . . . . . . . . . . . . . . . . . . . . . . . . . . . . . . . . . . . . 59
Allowing JavaScript and Java . . . . . . . . . . . . . . . . . . . . . . . . . . . . . . . . . . . . . . . . . 60
Allowing pop-up windows . . . . . . . . . . . . . . . . . . . . . . . . . . . . . . . . . . . . . . . . . . . 61
Specifications . . . . . . . . . . . . . . . . . . . . . . . . . . . . . . . . . . . . . . . . . . . . . . . . . . . . . . . . 62
Outdoor antenna specifications (optional) . . . . . . . . . . . . . . . . . . . . . . . . . . . . . . 62
Putting into service . . . . . . . . . . . . . . . . . . . . . . . . . . . . . . . . . . . . . . . . . . . . . . . . . . . 63
CE declaration . . . . . . . . . . . . . . . . . . . . . . . . . . . . . . . . . . . . . . . . . . . . . . . . . . . . . . . 63
4

Contents
Open Source Software used in the product . . . . . . . . . . . . . . . . . . . . . . . . . . . . . . . . 63
Warranty regarding further use of the Open Source Software . . . . . . . . . . . . . . . 64
Open Source Software used . . . . . . . . . . . . . . . . . . . . . . . . . . . . . . . . . . . . . . . . . 64
Acknowledgements . . . . . . . . . . . . . . . . . . . . . . . . . . . . . . . . . . . . . . . . . . . . . . . . 64
Open Source Software Licenses . . . . . . . . . . . . . . . . . . . . . . . . . . . . . . . . . . . . . . 65
Glossary . . . . . . . . . . . . . . . . . . . . . . . . . . . . . . . . . . 70
Index . . . . . . . . . . . . . . . . . . . . . . . . . . . . . . . . . . . . . 78
5

For your safety
For your safety
ì Please read the safety instructions carefully before putting into service.
Safety precautions
General safety instructions
u If you give the Gigaset SX682 WiMAX to someone else, make sure you also give
them its documentation.
u The Gigaset SX682 WiMAX must only be used as described in these installation
instructions.
Safety instructions for connection
u Only use the mains adapter supplied, as indicated on the underside of the Gigaset
SX682 WiMAX.
Safety precautions for the Gigaset SX682 WiMAX
u The operation of medical appliances may be affected. Be aware of the technical con-
ditions in your particular environment, e.g. doctor's surgery.
u The Gigaset SX682 WiMAX and the antenna can interfere with the functioning of
medical devices such as pacemakers. Keep at least 20 cm between the devices and
the pacemaker. For more information, consult your doctor.
u The device may cause an unpleasant humming noise in hearing aids.
u Do not use the devices in environments with a potential explosion hazard, e.g. car
paint shops, or in a humid environment (bathroom etc.).
u The Ethernet function (LAN socket, LAN) and the FXS function (analogue phone
port, Phone) are designed exclusively for connection inside a building.
Cleaning and care
Wipe the Gigaset SX682 WiMAX with a damp cloth (do not use solvent) or an antistatic
cloth.
Never use a dry cloth. This can cause static.
Trademarks
u Microsoft Windows 2000, Windows XP, Windows Vista and Internet Explorer are reg-
istered trademarks of the Microsoft Corporation.
u Mozilla Firefox is a registered trademark of the Mozilla Organization.
6

Information about the optional outdoor antenna
Information on Specific Absorption Rate (SAR)
This device meets the limits for protecting the health of the public from the effecs of
exposure to electromagnetic fields when it is operated in connection with the designated antenna(s) like described in the user manual.
Your device is a radio transmitter and receiver. It is designed and manufactured not to
exceed the limits for exposure to emission from electromagnetic fields recommended
by international guidelines from the International Commission on Non-Ionizing Radiation Protection (ICNIRP). These limits are part of comprehensive guidelines for the protection of the public and establish permitted levels of exposure to electromagnetic radiation for the population. The guidelines were confirmed by independent scientific
organisations through periodic and thorough evaluation of scientific studies. The limits
include a substantial safety margin designed to assure the safety of all persons, regardless of age and health.
The exposure limit employs a unit of measurement known as the Specific Absorption
Rate, or SAR. The SAR limit stated in the international guidelines is 2.0 W/kg. Tests for
SAR are conducted in all frequency bands with the device transmitting at its highest
power level with minimum possibledistance to the body. The actual SAR level of the
device during operation with the designated antenna(s) is below the maximum value
and is additonally decreased by a distance to the device. This is because the device is
designed to operate at multiple power levels so as to use only the power required to
enable seamless network connection.
Information about the optional outdoor antenna
Only one of the antennas listed on page 14 must be used.
The outdoor antenna must be installed and put into service by a qualified
W
electrician.
ì Only commence the outdoor work once you have taken all the neces-
sary steps to make the location safe.
Be sure to observe the safety instructions.
Wall duct:
To connect the Gigaset SX682 WiMAX to the outdoor antenna, the antenna cable must
be fed through the wall to the outside of the building. It must be possible to make a suitable wall or window duct at or near the location of the Gigaset SX682 WiMAX.
Setting up the antenna mast:
There should not be any obstructions (walls, trees etc.) in front of the antenna.
7
Information about the optional outdoor antenna
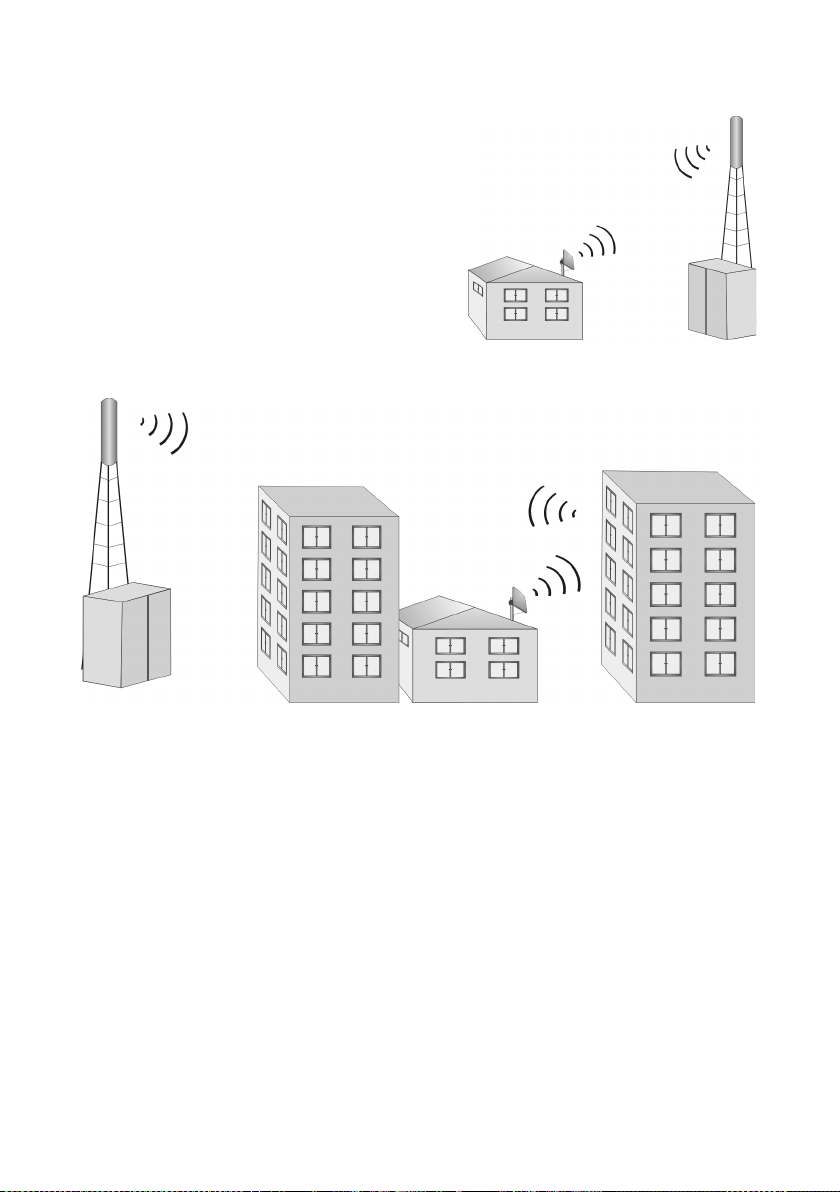
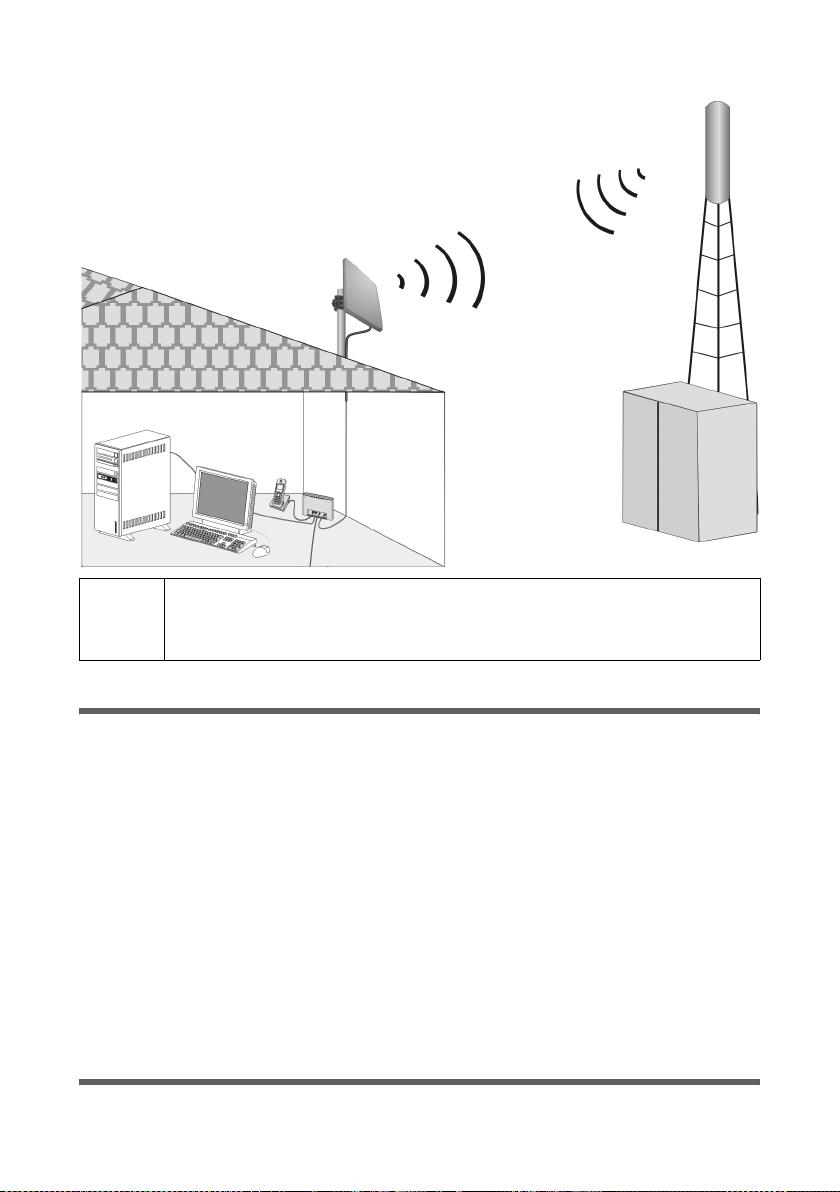
The best results will be obtained if the outdoor
antenna is in sight of the WiMAX base station (cf.
Fig. 1).
If a line of sight is not possible, you can reflect the
radio waves off neighbouring buildings. To do
this, direct the antenna at the building it is to
reflect off and not at the base station (cf. Fig. 2).
Fig. 2
Fig. 1
The antenna mast must be structurally secure. Check how secure the various attachments are.
The antenna mast must be within reach of the cable. Ideally, the antenna cable should
be protected outside (from frost, sun, unauthorised and mechanical influences etc.).
In particular, make sure the antenna mast has sufficient load capacity. If you are mounting the mast on the roof, make sure the roof is fully sealed again afterwards.
Lightning protection
The antenna mast should be positioned near a lightning conductor. A suitable lightning
conductor must be installed where necessary.
The outdoor antenna is not designed to be struck directly by lightning and must be protected accordingly. The antenna must therefore be mounted in areas that are protected
against lightning (Lightning Protection Zone 0B). The corresponding separation distance (IEC 62305) must be complied with.
Earthing and lightning protection work may only be carried out by electricians specifically qualified for such work.
8

Information about the optional outdoor antenna
The appropriate earthing clamps must be used to create an equipotential bonding
between a cable shield and an equipotential bonding bar that complies with regulations.
Please observe the standard DIN VDE 0855-300 and find out more on the Internet at
http://www.dehn.de/design07_frame/frameset_d_bp.html
Or
http://www.dehn-usa.com/dehn-Application-Guides-pubcid1.html
Antenna cable and antenna connection:
It must be possible to connect the outdoor antenna to the Gigaset SX682 WiMAX by
means of an antenna cable.
Please note that the antenna connection must be protected from the impact of rain and
other weather effects.
Use cable clamps to attach the cable to the mast. Please note that the cable must be
long enough to turn the antenna at a later stage.
Antenna alignment:
When aligning the antenna, we recommend asking a second person to run the Basic
Setup Wizard on the PC and to check the reception quality on the screen; see Chapter
"Basic Setup Wizard" on page 27.
Aligning the antenna using acoustic signals
If neither you nor the assistant are able to check the signal strength on
screen while the antenna is being aligned, you can monitor it via a radio
system. To do this you will need, for example, two cordless phones,
mobile phones or radio devices:
(German)
(English)
ì Activate Tone on on the configuration PC.
i
ì Establish an internal connection between the two handsets and
switch on the loudspeaker on both devices.
ì Leave one handset next to the configuration PC and carry the other
with you (belt clip).
You will now be informed of the signal strength by means of beeps. The
closer together the sequence of beeps, the better the connection quality.
After installation:
Tighten all screw connections to the torques listed in the installation instructions.
Secure the antenna cable with cable clamps and cable ties. The cable must be protected
from exposure to pressure and tension.
9

Gigaset SX682 WiMAX
Gigaset SX682 WiMAX
What is WiMAX?
WiMAX stands for "Worldwide Interoperability for Microwave Access", a modern wire-
less network technology that enables fast Internet connection even in remote areas.
With WiMAX technology you are no longer dependent on a DSL infrastructure in your
home or place of work. Instead, you connect your PC or network wirelessly to radio
stations operated in your region by your provider. As a result, WiMAX gives you fast,
economical broadband Internet access, even in places that are not connected to the DSL
cable network.
The WiMAX standard IEEE 802.16 generally defines WiMAX technology. Your Gigaset
SX682 WiMAX already meets the latest IEEE 802.16e-2005 standard, a mobile WiMAX
standard that offers many extra possibilities.
Gigaset SX682 WiMAX
With your Gigaset SX682 WiMAX, you can make use of everything the Internet has to
offer:
u Downloads
– Even large files download quickly to your PC.
– Complex Website designs are no longer characterised by the time they take to
download – you can enjoy flash animation and high-resolution graphics immediately after clicking a link.
u Audio
– Play back audio files straight from the Internet.
– Listen to the radio via the Internet in superb digital quality.
u Video
– View short or longer films you find on the Internet without tedious waiting times.
– Watch television via the Internet (IPTV).
– Use "Video on Demand" and order films that are transmitted to you via the
Internet.
u Real time
– Take part in video conferences and feel as if you are sitting in the same room as
the people you are talking to.
– Speak to and see your chat partners.
u VoIP
– Benefit from the economical telephone rates for Internet telephony (Voice over
IP, VoIP). Your PC does not even need to be switched on.
10

Product overview
Product features
u Wireless high-speed Internet access with a transmission rate of up to 20 Mbps
(14 Mbps downlink, 6 Mbps uplink)
u Standard compatibility: IEEE 802.16e-2005
u Compatible with all current operating systems
u Suitable for home and business facilities
u Multi-protocol support: TCP/IP, FTP, HTTP and other Internet related protocols
u Easy to set up without installing software
u Internet and VoIP connection without the hassle of entering access data
u DHCP server and routing functions
u High performance and quality of service
u Optional: outdoor antenna for improved connection quality
Product overview
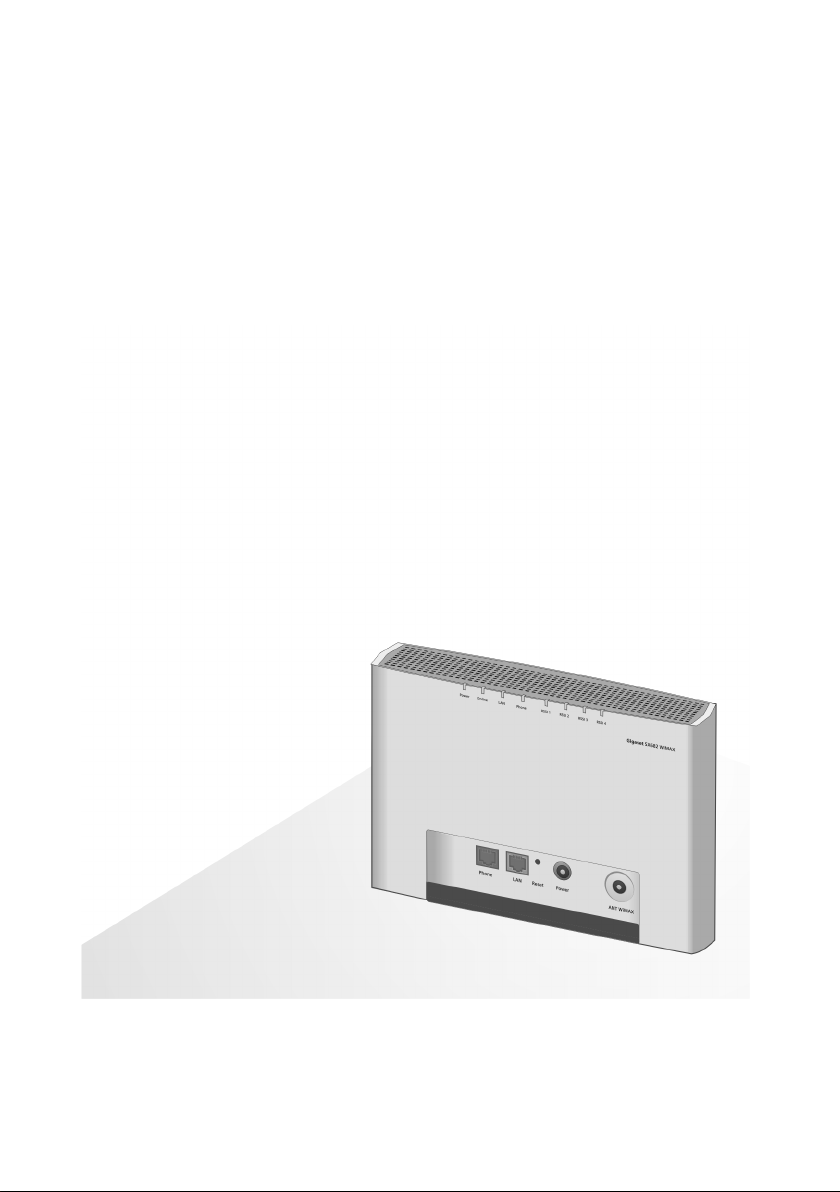
Connectors and LEDs
Connectors
FXS port for telephone,
fax machine or answer
machine
Ethernet port
Antenna connection for external
antenna
Mains adapter connector
Reset button
11
Product overview
u For information about the optional outdoor antenna, please refer to "Connecting the
outdoor antenna" on page 17.
u For information on connecting the mains adapter, please refer to "Switching on the
devices" on page 19.
u For information on the reset button, please refer to "Restarting and resetting the
Gigaset SX682 WiMAX" on page 20.
u For information on the Ethernet port, please refer to "Connecting the PC" on
page 17.
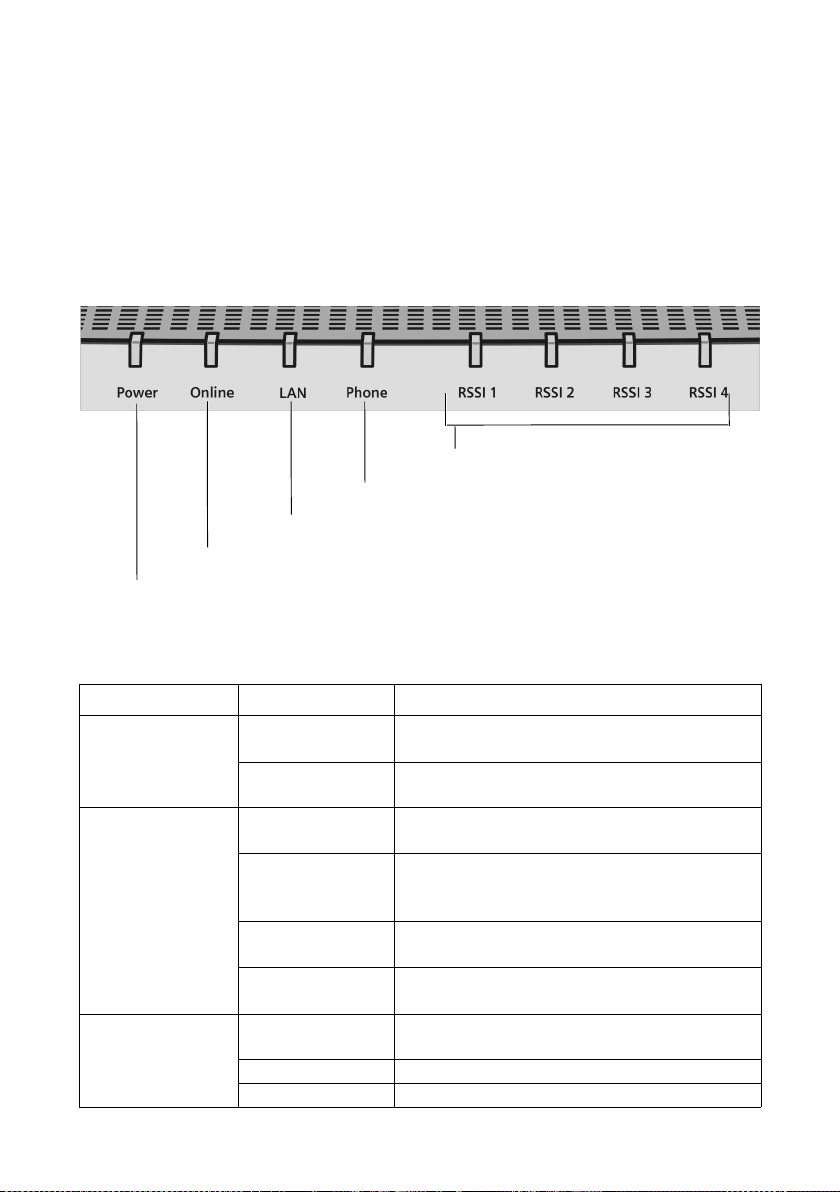
LEDs
RSSI: signal strength
Phone: telephone (VoIP)
LAN: Ethernet port
Online: active connection
Power: power supply
The LEDs indicate the status of the Gigaset SX682 WiMAX and the current signal
strength.
Name LED Meaning
Power: power
supply
Lights up green The Gigaset SX682 WiMAX is powered cor-
rectly.
Does not light up The Gigaset SX682 WiMAX is not powered
correctly or the power supply has failed.
Online: active
connection
Lights up green The Gigaset SX682 WiMAX is registered with
a WiMAX network and ready for use.
Does not light up The Gigaset SX682 WiMAX is not registered
with a WiMAX network; it is not possible to
establish an Internet connection.
Flashes green The Gigaset SX682 WiMAX is establishing a
connection with a WiMAX network.
Lights up red The Gigaset SX682 WiMAX is not ready. Pos-
sible cause: device is overheating or faulty.
LAN: Ethernet
port
Lights up green Correct cable connection with a powered
connection partner.
Does not light up No or incorrect cable connection.
Flashes green Data transfer via the Ethernet port.
12

Product overview
Name LED Meaning
Phone: telephone Lights up green The phone connection is active and regis-
tered with a VoIP provider. You can make calls
via the Internet.
Does not light up The telephone connection is not active or not
registered with a VoIP provider. You cannot
make calls via the Internet.
Flashes green The connected telephone is active: it is being
used to make a call or there is an incoming
call.
RSSI: signal
strength
0 to 4 LEDs light
up green
All 4 LEDs flash
green
The LEDs on the Gigaset SX682 WiMAX help
you to position the antenna more easily. The
LEDs indicate the signal strength; the more
LEDs that light up, the better the signal
reception.
The Gigaset SX682 WiMAX is being reset to
the factory settings; see "Returning the
Gigaset SX682 WiMAX to factory settings" on
page 20.
13

Installing the Gigaset SX682 WiMAX
Installing the Gigaset SX682 WiMAX
If you use the separate outdoor antenna (optional, not included in the scope of
delivery):
The Gigaset SX682 WiMAX can only be used with the device's integrated antenna or
with one of the following outdoor antennas.
3.5 GHz 18 dBi WiMAX Antenna Outdoor "Antenna cable 3 m"
2.6 GHz 15 dBi WiMAX Antenna Outdoor "Antenna cable 3 m"
3.5 GHz versions should be used for the European Economic Area.
The following requirements apply:
All the external antennas used for this product must undergo a conformity assessment procedure.
The 3.5 GHz antennas listed here meet the European requirements and
W
guarantee the functionality of the complete system.
During the conformity assessment procedure it was ensured that the SAR
limits set down in directive 99/519/EC are observed. Verification was performed using EN 50385.
The outdoor antenna must be installed and put into service by a qualified
electrician.
The notes in the enclosed installation instructions must be followed
This user guide assumes that installation of the outdoor antenna has been completed.
Choosing your location
u Choose a location that enables you to simply set up the following connections with-
out any further work.
– Connect the Ethernet cable for connection to a PC or network.
– Connect the power lead to the mains socket.
u Stand the Gigaset SX682 WiMAX upright on an even, non-slip surface.
u Lay the cables in such a way that nobody can tread on or trip over them.
u Position the Gigaset SX682 WiMAX so that you can see the LEDs.
u Do not cover the openings in the Gigaset SX682 WiMAX housing to ensure the heat
can circulate; otherwise, the duty cycle of the device will be reduced or the Gigaset
SX682 WiMAX switched off to avoid overheating.
u Do not operate the Gigaset SX682 WiMAX under the influence of direct heat sources
(e.g. directly in the sun).
14
Choosing your location
If you use the integrated antenna:
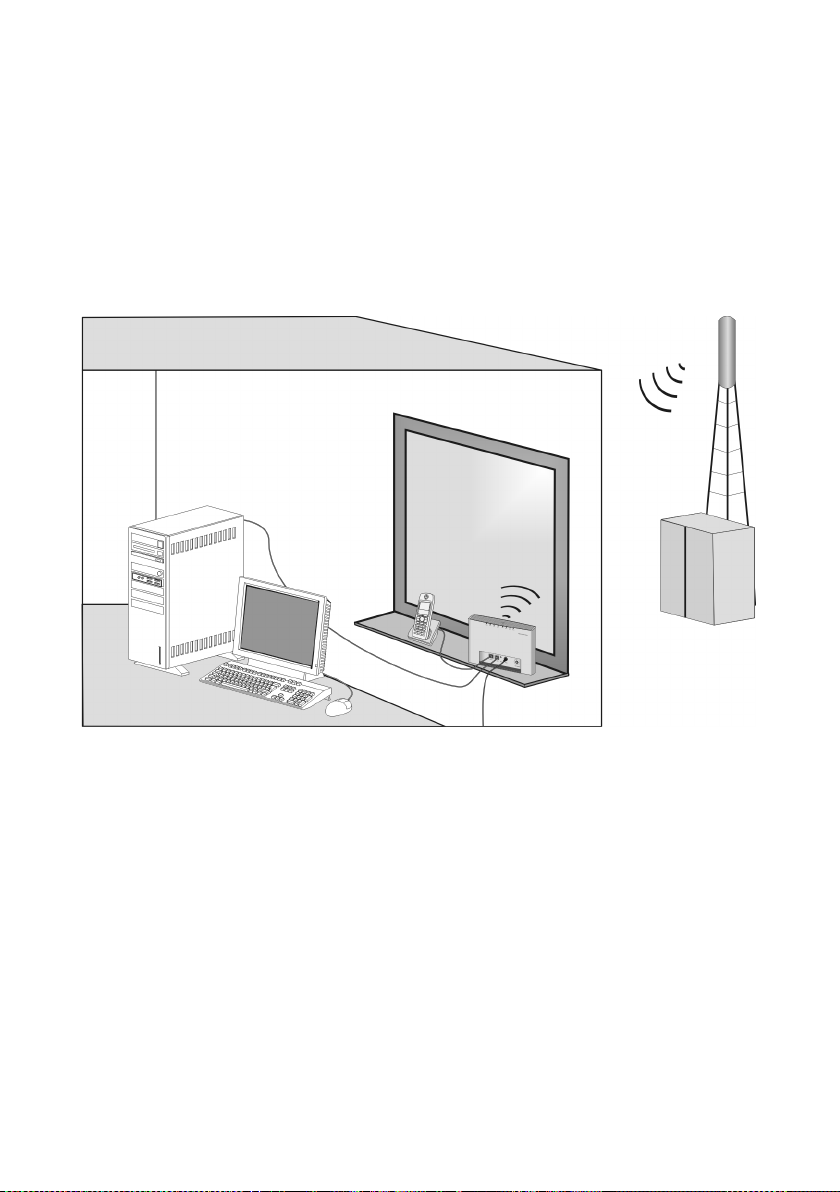
u Position the Gigaset SX682 WiMAX directly in a window, so that the side with the
LEDs and connectors is pointing into the room, towards you. Wherever possible,
position the Gigaset SX682 WiMAX on one of the upper storeys. Note that obstructions, particularly doors and wall coverings containing metal can affect data transmission.
u Position the Gigaset SX682 WiMAX as far away as possible from metallic objects and
coated foils.
Gigaset SX682 WiMAX with integrated antenna
WiMAX network
base station
PC with
Gigaset SX682
WiMAX
15
System requirements
Gigaset SX682 WiMAX with outdoor antenna
PC with Gigaset SX682 WiMAX
When used with the integrated antenna or the outdoor antenna, the
i
Gigaset SX682 WiMAX complies with the regulations on limiting the
effect of electromagnetic fields on the general population.
WiMAX network base
station
System requirements
To use the Gigaset SX682 WiMAX, the following requirements have to be fulfilled.
u You will need a PC that meets the following requirements:
– PC with a free LAN interface 10/100BaseT (network adapter). The network
adapter on the configuration PC must support one of the following modes:
10BaseT Full Duplex, 100BaseT Half Duplex, 100BaseT Full Duplex. The TCP/IP
protocol has to be set up on the PC (standard installation for Windows XP and
Windows Vista; if you are using a different Windows operating system, read the
separate instructions on network configuration, if necessary).
– A Web browser is installed on the configuration PC (e.g. Internet Explorer or
Mozilla Firefox).
u To access the Internet you will need to register your Gigaset SX682 WiMAX with a
WiMAX Internet provider. To use Internet telephony, your provider will need to register a VoIP account for your Gigaset SX682 WiMAX.
Connecting the Gigaset SX682 WiMAX
Connect the Gigaset SX682 WiMAX in the following order:
16
Connecting the Gigaset SX682 WiMAX
1. If you use the outdoor antenna, have it installed by a qualified electrician. Connect
the antenna cable from outside to the Gigaset SX682 WiMAX.
2. Connect the PC to the Gigaset SX682 WiMAX.
3. Connect an analogue terminal (telephone, fax machine, answer machine).
4. Connect the Gigaset SX682 WiMAX to the mains power supply and switch all the
devices on.
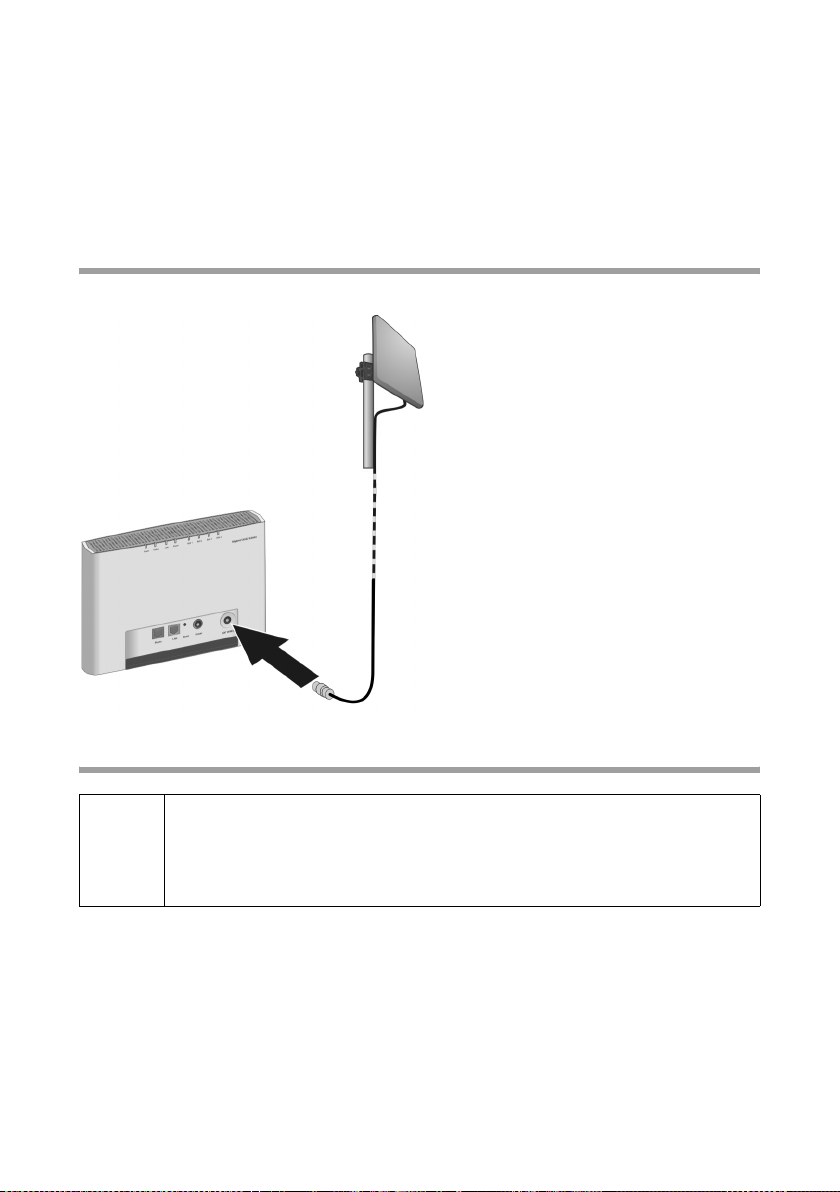
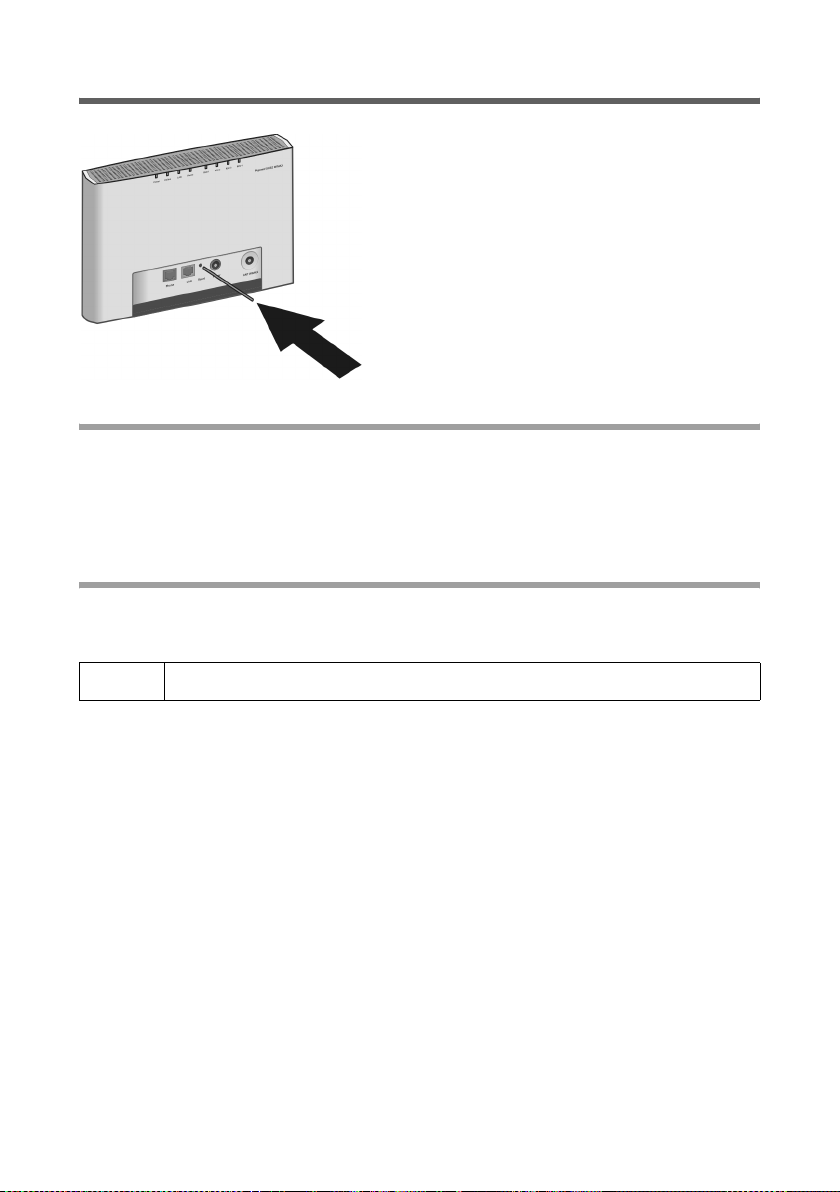
Connecting the outdoor antenna
ì Screw the connector of the antenna
cable into th e ANT WiMAX connector
on your Gigaset SX682 WiMAX. In
order to disconnect the antenna cable
from the connector, open the screw
connection.
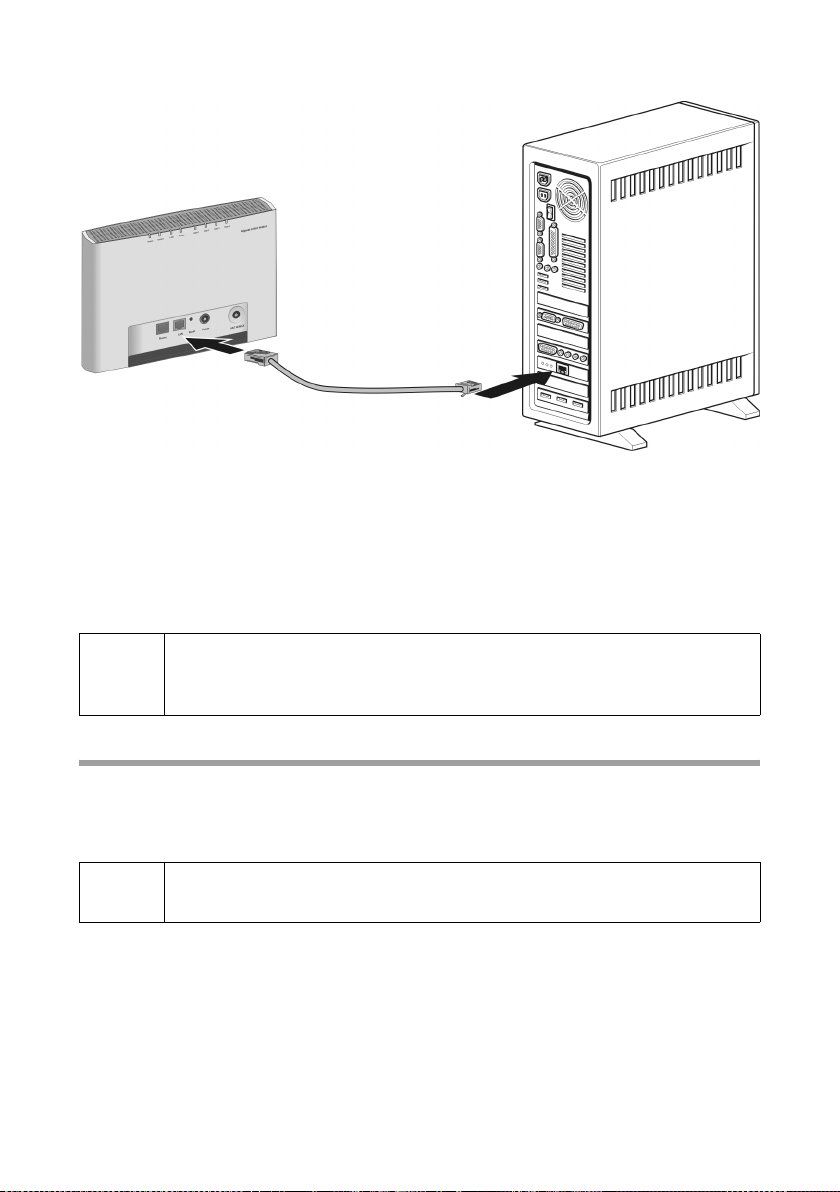
Connecting the PC
Use either the Ethernet cable that is supplied or a standard network cable
!
(CAT-5) to connect the device to the PC. It is not important whether the
Ethernet cable has straight or crossed wiring.
Always use a shielded Ethernet cable.
17
Connecting the Gigaset SX682 WiMAX
Connecting Gigaset SX682 WiMAX to the PC
ì Connect one Ethernet cable plug to the Ethernet port on the Gigaset SX682 WiMAX.
ì Connect the other plug of the Ethernet cable to the LAN interface on the PC.
Optional: connecting several terminals
If you wish to connect several terminals (for example a PC and a laptop) and establish
an Internet connection with all the devices, connect a switch or hub to your Gigaset
SX682 WiMAX.
A DHCP server is integrated into your Gigaset SX682 WiMAX. Please
i
ensure that a second DHCP server is not activated on your server. For
details on this, read the operating instructions for your switch/hub.
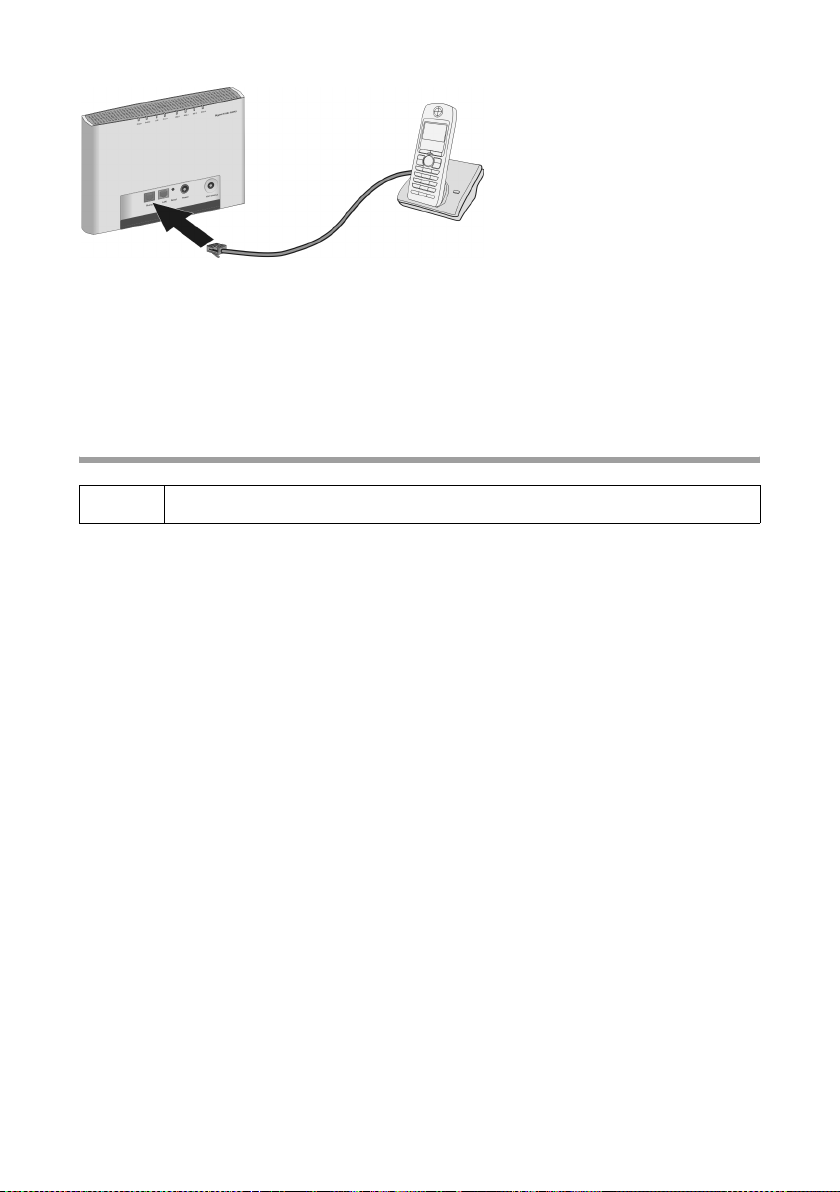
Connecting a telephone, fax machine or answer machine
You can connect an analogue terminal, such as a telephone with cord, cordless telephone, fax machine or answer machine, and operate them via the Internet in future
(Internet telephony/VoIP).
i
Depending on the connection plug on your analogue terminal, you may
require an additional adapter (TAE socket on the RJ11 plug).
18
Connecting the Gigaset SX682 WiMAX
ì Connect the plug on the ana-
logue terminal to the Phone
connection on the Gigaset
SX682 WiMAX.
If your analogue terminal has a TAE plug, first connect this to the adapter (connect a
telephone to the F-coded socket, a fax machine or answer machine to the N-coded
socket). Then connect the adapter plug to the Phone connection on the Gigaset SX682
WiMAX.
ì If necessary connect the telephone, fax machine or answer machine to the mains
power supply.
Switching on the devices
! Only use the Gigaset SX682 WiMAX with the mains adapter supplied.
ì Connect the mains adapter plug to the Gigaset SX682 WiMAX socket.
ì Power up the PC.
ì Connect the mains adapter to the mains power supply.
The system starts up and performs a self-test. After the self-test, the Gigaset SX682
WiMAX continually attempts to register with a WiMAX network. Registration may be
successful immediately. If not, registration will take place when the Gigaset SX682
WiMAX is being configured.
ì Check the LEDs during startup:
LEDs during startup:
–The Power power supply LED lights up green, and the Gigaset SX682 WiMAX
starts a self-test. If the LED does not light up, check that the mains adapter is connected correctly and the power socket is live.
–The LAN Ethernet LED is continuously lit green. If the LED does not light up,
check that the Ethernet cable is connected correctly.
– If registration with a WiMAX network has already been successful, the Online LED
lights up green. If the LED does not light up, register your Gigaset SX682 WiMAX
during configuration.
19
Restarting and resetting the Gigaset SX682 WiMAX
Restarting and resetting the Gigaset SX682 WiMAX
The reset button is located inside the Gigaset
SX682 WiMAX so that it cannot be pressed
accidentally. If you need to restart or reset the
Gigaset SX682 WiMAX, use a thin object such as
an opened up paper clip.
Rebooting the Gigaset SX682 WiMAX
ì Briefly press the reset button (for less than 5 seconds). The configuration settings
will remain, the Gigaset SX682 WiMAX will be restarted.
You can also restart the Gigaset SX682 WiMAX via the user interface or by briefly cutting
the power supply.
Returning the Gigaset SX682 WiMAX to factory settings
If you no longer have access to your Gigaset SX682 WiMAX, you can also restore factory
settings with the reset button on the back of the device.
! When the factory settings are restored, all personal settings are deleted.
ì Press and hold the reset button for more than 5 seconds.
The 4 RSSI LEDs will begin to flash green. The configuration settings are returned to the
factory settings and the Gigaset SX682 WiMAX is restarted. This process takes about
25 seconds. The Gigaset SX682 WiMAX will then automatically try to set up a connection to a WiMAX network; depending on the connection quality, 0 to 4 RSSI LEDs will
permanently light up green.
Factory settings
After restoring the factory settings, your Gigaset SX682 WiMAX will be in its original
condition:
ì Proceed as follows to start operating your device again:
20

Restarting and resetting the Gigaset SX682 WiMAX
Menu Setting
Basic Setup Wizard Execute the Basic Setup Wizard to configure your device
and to establish a connection to the WiMAX network, see
"Basic Setup Wizard" on page 27.
Advanced Settings –
Administration –
System Password
Protect the configuration interface of your device with a
password, see "System password" on page 42.
If the device came from your provider with a preset system password, this will now be valid again. Please check
the documents supplied by your provider.
21
Configuration with the Web browser
Configuration with the Web browser
You do not need to install any software on your PC to configure your Gigaset SX682
WiMAX; the configuration program is stored on the device. Open this software in the
same way as an Internet page in the Web browser and make the required settings. Your
settings are then stored directly on the device.
On startup, the Basic Setup Wizard helps you set up a connection to the WiMAX network
and configure your Internet access.
For experienced users:
i
Presentation of the configuration program
To configure your Gigaset SX682 WiMAX, we recommend the Microsoft Internet
Explorer Version 7.0 or higher or Mozilla Firefox Version 2.0 or higher Web browser.
However, you can also use most other or older Web browsers.
– IP address: 192.168.2.1
– Subnet mask: 255.255.255.0
i
Number and amount of the functions and settings provided by the configuration program may differ specific to a project.
User interface
Launching the user interface
ì Open your Web browser.
ì Enter the IP address of your Gigaset SX682 WiMAX in the address field of your Web
browser:
http://192.168.2.1
ì Press Enter (Return).
If a system password has been set up on your Gigaset SX682 WiMAX, the login screen
will now open.
ì Enter the system password supplied by your provider in the text box and click Ok.
The start page (Home) of the user interface opens, in which you can change the language if necessary (see page 25).
Change the system password later to one of your own (see "System password" on
page 42).
If no system password has been set up on your Gigaset SX682 WiMAX, a security warning will appear first. You should then assign a system password as soon as possible.
ì Confirm the security warning with Ok.
The user interface start page opens.
22
User interface
1
2
3
4
5
6
1
2
3
If the login screen does not open:
ì Check the connections; see "Connecting the Gigaset SX682 WiMAX" on page 16.
ì If you use a firewall on the PC, it must allow connection to the Gigaset SX682
WiMAX. If applicable, switch off the firewall for a test; if you can then open the login
screen, configure the firewall accordingly. For details, refer to the user guide for your
firewall.
If you have changed the standard settings on your PC, you might not be able to open
the configuration pages.
ì For details on how to find and rectify the fault, see "Fault tracing" on page 55.
Saving the user interface address
ì You can add the address of the login screen to your favourites/bookmarks so that
you will no longer need to enter the IP address manually in future:
– Internet Explorer: Add to Favorites button
–Firefox: Bookmarks > Add Bookmark
UI elements
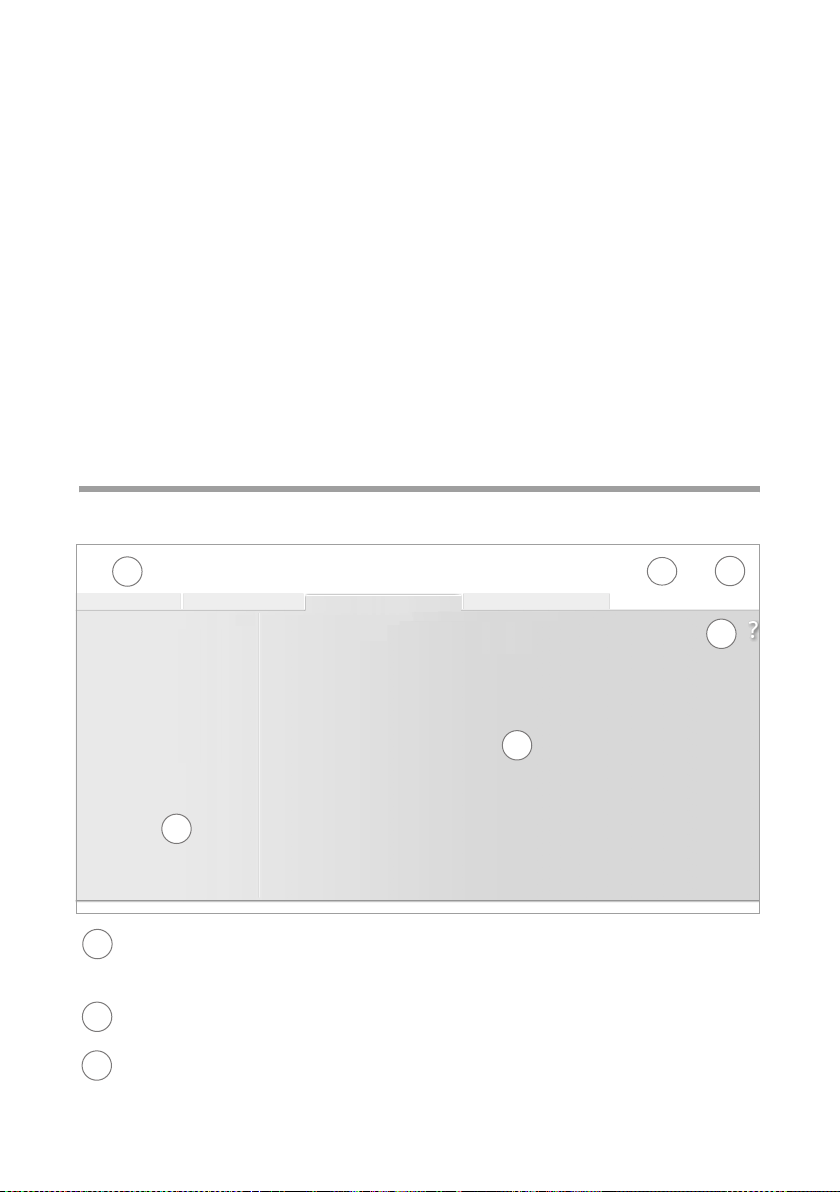
The user interface you open with the Web browser is divided into the following sections:
Home Basic Setup Wizard Advanced Settings Status
Operating Mode
Internet
...
...
...
Antenna selection
Tab selection:
Open the Home, Basic Setup Wizard, Advanced Settings or Status tabs to dis-
play the contents of each configuration area.
Language button:
Select your language.
Logout button:
This button is only displayed if a system password is set up.
Log off from your Gigaset SX682 WiMAX.
Language Logout
23
User interface
4
5
6
Open Help window button:
Open the online Help relating to the menu item currently in the working area.
Menu area:
Click the menu items to display the respective pages of the currently open configuration area or a submenu.
Working area:
Check the settings on your Gigaset SX682 WiMAX and change them as necessary.
Buttons
Open online Help.
Click this button if you require information about the screen you currently
have open. The corresponding Help topic is opened.
Logout Button with which you end the connection between the PC and the Gigaset
SX682 WiMAX.
Back Return to the previous screen in the Basic Setup Wizard.
Next Move on to the next screen in the Basic Setup Wizard.
Cancel Changed settings are not applied and you return to the next highest level.
Ok Save the settings and return to the next highest level.
End Save the settings and exit the Basic Setup Wizard.
You will see other buttons depending on the screen currently open. If you require further information about these, open the online Help at the appropriate place using the
question mark button.
Input fields
On the configuration screens, change the required settings using the following input
fields:
Option buttons:
Two or more buttons, of which one is activated. As soon as you click
another option button, it is activated and the one previously selected is
reset. You will find option buttons wherever there is a choice between
several possibilities, e.g. whether or not you wish to use an external or
the internal antenna.
Text field :
Enter text or digits. Click in the field to activate input mode. You will find
text fields at points where you can specify text or numbers as required,
e.g. a new system password.
24

User interface
Setting the language
The user interface is initially displayed in English. However, you can select another language, e.g. German, French, Spanish.
ì If you wish to set your language, click the Language button at the top right. This
opens the page for setting the language.
ì Click the arrow next to the selection field to open it and select your language.
ì Click Ok to change the language.
Opening online Help
There is an online Help for each screen of the configuration program, which you can
open directly on the screen.
ì Click the question mark button at the top right.
The online Help is shown in the right pane of the configuration program.
ì If necessary, click Open Help window to open the online Help in a separate
window.
Menu structure
The menu of the user interface on your Gigaset SX682 WiMAX is split into the following
main areas: Home, Basic Setup Wizard, Advanced Settings and Status. Under these
menu options, you will find the following areas:
Home
Basic Setup Wizard
Advanced Settings
Status
Start page and starting point for all configuration and administration tasks. It also shows the connection status and allows you to
set the language, see "User interface" on page 22.
Establish a connection to the WiMAX network, optimise the
antenna direction and set up your Internet connection and VoIP
access, see "Basic Setup Wizard" on page 27.
Configure your Internet and VoIP access and your local network
and perform administration tasks. For example, you can enter a
system password for access to your Gigaset SX682 WiMAX or
change it, see "Configuration with the Web browser" on page 22.
Obtain information on the operating status of your Gigaset SX682
WiMAX and read off the device and version numbers as well as IP
addresses; see "Status" on page 45.
Internet See "Internet" on page 46.
Local Network See "Local network LAN" on page 47.
Tel eph ony See "Telephony" on page 47.
Device Status See "Device status" on page 48.
Radio Status See "Radio status" on page 48.
25
 Loading...