

Page 1

EN Dear Customer,
Gigaset Communications GmbH is the legal successor to
Siemens Home and Office Communication Devices GmbH &
Co. KG (SHC), which in turn continued the Gigaset business
of Siemens AG. Any statements made by Siemens AG or
SHC that are found in the user guides should therefore be
understood as statements of Gigaset Communications
.
GmbH
We hope you enjoy your Gigaset.
DE Sehr geehrte Kundin, sehr geehrter Kunde,
FR Chère Cliente, Cher Client,
IT Gentile cliente,
NL Geachte klant,
ES Estimado cliente,
PT SCaros clientes,
die Gigaset Communications GmbH ist Rechtsnachfolgerin
der Siemens Home and Office Communication Devices
GmbH & Co. KG (SHC), die ihrerseits das Gigaset-Geschäft
der Siemens AG fortführte. Etwaige Erklärungen der
Siemens AG oder der SHC in den Bedienungsanleitungen
sind daher als Erklärungen der Gigaset Communications
GmbH zu verstehen.
Wir wünschen Ihnen viel Freude mit Ihrem Gigaset.
la société Gigaset Communications GmbH succède en droit
à Siemens Home and Office Communication Devices GmbH
& Co. KG (SHC) qui poursuivait elle-même les activités Gigaset de Siemens AG. Donc les éventuelles explications de Siemens AG ou de SHC figurant dans les modes d’emploi
doivent être comprises comme des explications de Gigaset
Communications GmbH.
Nous vous souhaitons beaucoup d’agrément avec votre
Gigaset.
la Gigaset Communications GmbH è successore della Siemens Home and Office Communication Devices GmbH &
Co. KG (SHC) che a sua volta ha proseguito l’attività della
Siemens AG. Eventuali dichiarazioni della Siemens AG o
della SHC nei manuali d’istruzione, vanno pertanto intese
come dichiarazioni della Gigaset Communications GmbH.
Le auguriamo tanta soddisfazione con il vostro Gigaset.
Gigaset Communications GmbH is de rechtsopvolger van
Siemens Home and Office Communication Devices GmbH &
Co. KG (SHC), de onderneming die de Gigaset-activiteiten
van Siemens AG heeft overgenomen. Eventuele uitspraken
of mededelingen van Siemens AG of SHC in de gebruiksaanwijzingen dienen daarom als mededelingen van Gigaset
Communications GmbH te worden gezien.
Wij wensen u veel plezier met uw Gigaset
la Gigaset Communications GmbH es derechohabiente de la
Siemens Home and Office Communication Devices GmbH &
Co. KG (SHC) que por su parte continuó el negocio Gigaset
de la Siemens AG. Las posibles declaraciones de la
Siemens AG o de la SHC en las instrucciones de uso se
deben entender por lo tanto como declaraciones de la Gigaset Communications GmbH.
Le deseamos que disfrute con su Gigaset.
Gigaset Communications GmbH é a sucessora legal da Siemens Home and Office Communication Devices GmbH &
Co. KG (SHC), que, por sua vez, deu continuidade ao sector
de negócios Gigaset, da Siemens AG. Quaisquer declarações por parte da Siemens AG ou da SHC encontradas nos
manuais de utilização deverão, portanto, ser consideradas
como declarações da Gigaset Communications GmbH.
Desejamos que tenham bons momentos com o seu Gigaset.
DA Kære Kunde,
FI Arvoisa asiakkaamme,
SV Kära kund,
NO Kjære kunde,
EL Αγ α πητή πελάτισσα, αγαπητέ πελάτη,
HR Poštovani korisnici,
.
SL Spoštovani kupec!
Gigaset Communications GmbH er retlig efterfølger til Siemens Home and Office Communication Devices GmbH &
Co. KG (SHC), som fra deres side videreførte Siemens AGs
Gigaset-forretninger. Siemens AGs eller SHCs eventuelle
forklaringer i betjeningsvejledningerne skal derfor forstås
som Gigaset Communications GmbHs forklaringer.
Vi håber, du får meget glæde af din Gigaset.
Gigaset Communications GmbH on Siemens Home and
Office Communication Devices GmbH & Co. KG (SHC)-yri-
tyksen oikeudenomistaja, joka jatkoi puolestaan Siemens
AG:n Gigaset-liiketoimintaa. Käyttöoppaissa mahdollisesti
esiintyvät Siemens AG:n tai SHC:n selosteet on tämän
vuoksi ymmärrettävä Gigaset Communications GmbH:n
selosteina.
Toivotamme Teille paljon iloa Gigaset-laitteestanne.
Gigaset Communications GmbH övertar rättigheterna från
Siemens Home and Office Communication Devices GmbH &
Co. KG (SHC), som bedrev Gigaset-verksamheten efter Siemens AG. Alla förklaringar från Siemens AG eller SHC i
användarhandboken gäller därför som förklaringar från
Gigaset Communications GmbH.
Vi önskar dig mycket nöje med din Gigaset.
Gigaset Communications GmbH er rettslig etterfølger etter
Siemens Home and Office Communication Devices GmbH &
Co. KG (SHC), som i sin tur videreførte Gigaset-geskjeften i
Siemens AG. Eventuelle meddelelser fra Siemens AG eller
SHC i bruksanvisningene er derfor å forstå som meddelelser
fra Gigaset Communications GmbH.
Vi håper du får stor glede av din Gigaset-enhet.
η Gigaset Communications GmbH είναι η νομική διάδοχος της
Siemens Home and Office Communication Devices GmbH &
Co. KG (SHC), η οποία έχει αναλάβει την εμπορική
δραστηριότητα Gigaset της Siemens AG. Οι δηλώσεις της
Siemens AG ή της SHC στις
επομένως δηλώσεις της Gigaset Communications GmbH.
Σας ευχόμαστε καλή διασκέδαση με τη συσκευή σας Gigaset.
Gigaset Communications GmbH pravni je sljednik tvrtke
Siemens Home and Office Communication Devices GmbH &
Co. KG (SHC), koji je nastavio Gigaset poslovanje tvrtke
Siemens AG. Zato sve izjave tvrtke Siemens AG ili SHC koje
se nalaze u uputama za upotrebu treba tumačiti kao izjave
tvrtke Gigaset Communications GmbH.
Nadamo se da sa zadovoljstvom koristite svoj Gigaset
uređaj.
Podjetje Gigaset Communications GmbH je pravni naslednik
podjetja Siemens Home and Office Communication Devices
GmbH & Co. KG (SHC), ki nadaljuje dejavnost znamke
Gigaset podjetja Siemens AG. Vse izjave podjetja Siemens
AG ali SHC v priročnikih za uporabnike torej veljajo kot izjave
podjetja Gigaset Communications GmbH.
Želimo vam veliko užitkov ob uporabi naprave Gigaset.
οδηγίες χρήσ
ης αποτ
ελούν
Issued by
Gigaset Communications GmbH
Schlavenhorst 66, D-46395 Bocholt
Gigaset Communications GmbH is a trademark
licensee of Siemens AG
© Gigaset Communications GmbH 2008
All rights reserved.
Subject to availability. Rights of modifications
reserved.
www.gigaset.com
Page 2

CS Vážení zákazníci,
společnost Gigaset Communications GmbH je právním
nástupcem společnosti Siemens Home and Office
Communication Devices GmbH & Co. KG (SHC), která dále
přejala segment produktů Gigaset společnosti Siemens AG.
Jakékoli prohlášení společnosti Siemens AG nebo SHC, které
naleznete v uživatelských příručkách, je třeba považovat za
prohlášení společnosti Gigaset Communications GmbH.
Doufáme, že jste s produkty Gigaset spokojeni.
SK Vážený zákazník,
Spoločnosť Gigaset Communications GmbH je právnym
nástupcom spoločnosti Siemens Home and Office
Communication Devices GmbH & Co. KG (SHC), ktorá zasa
pokračovala v činnosti divízie Gigaset spoločnosti Siemens
AG. Z tohto dôvodu je potrebné všetky vyhlásenia
spoločnosti Siemens AG alebo SHC, ktoré sa nachádzajú v
používateľských príručkách, chápať ako vyhlásenia
spoločnosti Gigaset Communications GmbH.
Veríme, že budete so zariadením Gigaset spokojní.
PL Szanowny Kliencie,
Firma Gigaset Communications GmbH jest spadkobiercą
prawnym firmy Siemens Home and Office Communication
Devices GmbH & Co. KG (SHC), która z kolei przejęła
segment produktów Gigaset od firmy Siemens AG. Wszelkie
oświadczenia firm Siemens AG i SHC, które można znaleźć
w instrukcjach obsługi, należy traktować jako oświadczenia
firmy Gigaset Communications GmbH.
Życzymy wiele przyjemności z korzystania z produktów
Gigaset.
TR Sayın Müşterimiz,
Gigaset Communications GmbH, Siemens AG'nin Gigaset
işletmesini yürüten Siemens Home and Office
Communication Devices GmbH & Co. KG (SHC)'nin yasal
halefidir. Kullanma kılavuzlarında bulunan ve Siemens AG
veya SHC tarafından yapılan bildiriler Gigaset
Communications GmbH tarafından yapılmış bildiriler olarak
algılanmalıdır.
Gigaset'ten memnun kalmanızı ümit ediyoruz.
RO Stimate client,
Gigaset Communications GmbH este succesorul legal al
companiei Siemens Home and Office Communication
Devices GmbH & Co. KG (SHC), care, la rândul său, a
continuat activitatea companiei Gigaset a Siemens AG.
Orice afirmaţii efectuate de Siemens AG sau SHC şi incluse
în ghidurile de utilizare vor fi, prin urmare, considerate a
aparţine Gigaset Communications GmbH.
Sperăm ca produsele Gigaset să fie la înălţimea dorinţelor
dvs.
SR Poštovani potrošaču,
Gigaset Communications GmbH je pravni naslednik
kompanije Siemens Home and Office Communication
Devices GmbH & Co. KG (SHC), kroz koju je nastavljeno
poslovanje kompanije Gigaset kao dela Siemens AG. Stoga
sve izjave od strane Siemens AG ili SHC koje se mogu naći u
korisničkim uputstvima treba tuma
Gigaset Communications GmbH.
Nadamo se da ćete uživati u korišćenju svog Gigaset
uređaja.
BG Уважаеми потребители,
Gigaset Communications GmbH е правоприемникът на
Siemens Home and Office Communication Devices GmbH
& Co. KG (SHC), която на свой ред продължи бизнеса на
подразделението Siemens AG. По тази причина
всякакви изложения, направени от Siemens AG или
SHC, които се намират в ръководствата за
потребителя, следва да се разбират като изложения на
Gigaset Communications GmbH.
Надяваме се да ползвате с удоволствие вашия Gigaset.
izjave kompanije
čiti kao
RU Уважаемыи покупатель!
Компания Gigaset Communications GmbH является
правопреемником компании Siemens Home and Office
Communication Devices GmbH & Co. KG (SHC), которая,
ою очередь, приняла подразделение Gigaset в свое
в св
управление от компании Siemens AG. Поэтому любые
заявления, сделанные от имени компании Siemens AG
или SHC и встречающиеся в руководствах
пользователя, должны восприниматься как заявления
компании Gigaset Communications GmbH.
Мы надеемся, что продукты Gigaset удовлетворяют
вашим требованиям.
HU T
isztelt Vásárló!
A Siemens Home and Communication Devices GmbH & Co.
KG (SHC) törvényes jogutódja a Gigaset Communications
GmbH, amely a Siemens AG Gigaset üzletágának utódja.
Ebből következően a Siemens AG vagy az SHC felhasználói
kézikönyveiben található bármely kijelentést a Gigaset
Communications GmbH kijelentésének kell tekinteni.
Reméljük, megelégedéssel használja Gigaset készülékét.
Issued by
Gigaset Communications GmbH
Schlavenhorst 66, D-46395 Bocholt
Gigaset Communications GmbH is a trademark
licensee of Siemens AG
© Gigaset Communications GmbH 2008
All rights reserved.
Subject to availability. Rights of modifications
reserved.
www.gigaset.com
Page 3
Gigaset SL44 / deutsch / A31008-M1609-R101-1-6Z19 / overview.fm / 20.08.2004
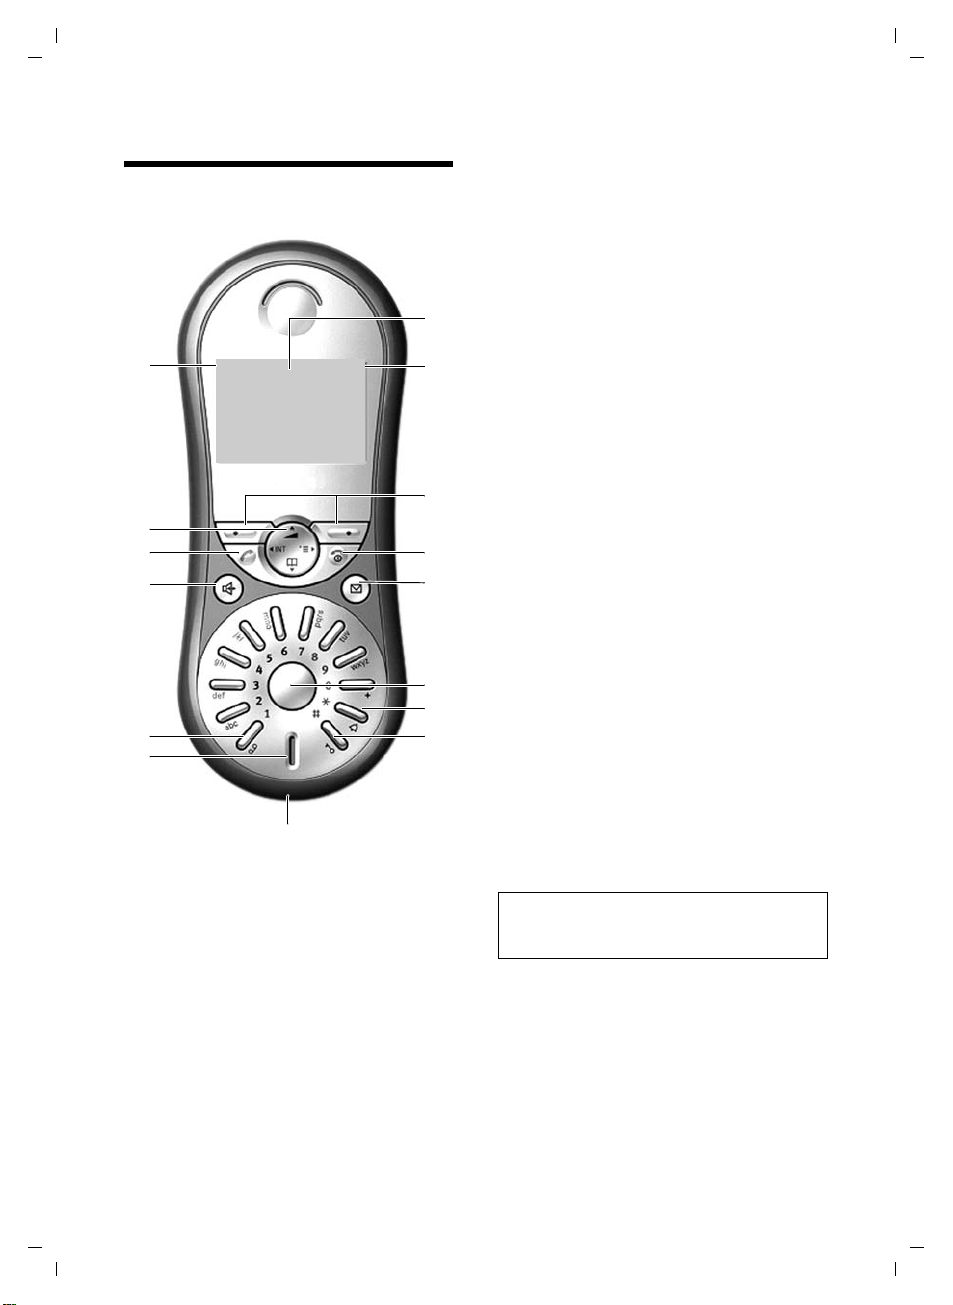
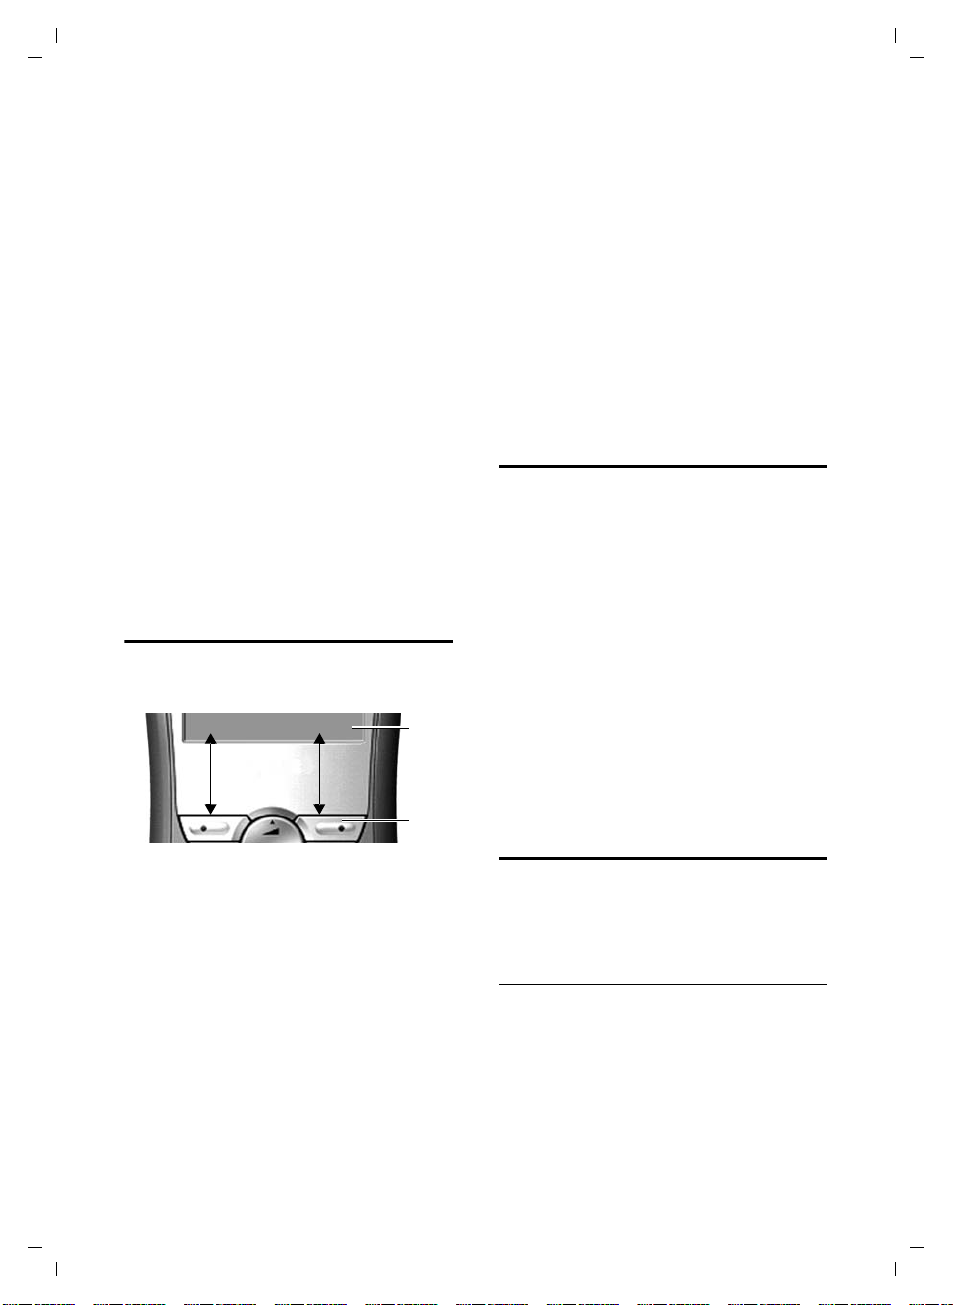
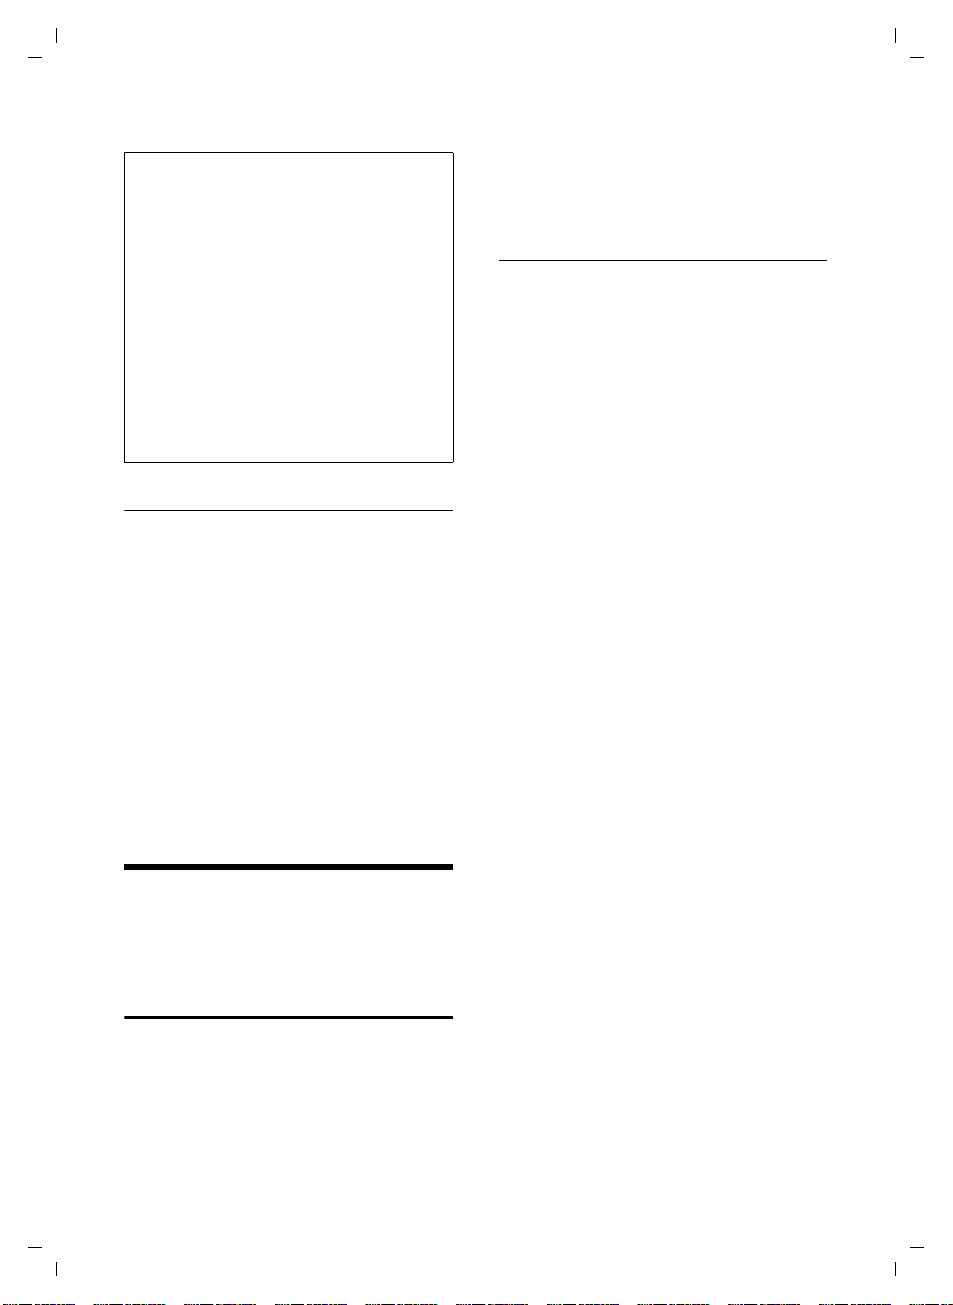
Kurzübersicht Mobilteil
Kurzübersicht Mobilteil
15
14
13
12
11
10
ÐV
INT 1
28.09.04 09:45
§§§§§§§?§§§§§§§§§ §§§§§§§SMS§§§§§§
9
1 Display (Anzeigefeld) im Ruhezustand
2 Ladezustand des Akkus
= e V U (leer bis voll)
= blinkt: Akku fast leer
e V U blinkt: Akku wird geladen
3 Display-Tasten (S. 7)
4 Auflegen-, Ein-/Aus-Taste
Gespräch beenden, Funktion abbrechen,
eine Menüebene zurück (kurz drücken),
zurück in Ruhezustand (lang drücken),
1
2
3
4
5
6
7
8
Mobilteil ein-/ausschalten (im Ruhezustand
lang drücken)
5 Nachrichten-Taste
Zugriff auf die Anrufer- und Nachrichtenlisten;
Blinkt: neue Nachricht oder neuer Anruf
6 FunktionstasteR-Taste
7 Stern-Taste
Klingeltöne ein/aus (lang drücken),
Wechsel zwischen Groß-, Klein- und Ziffern-
schreibung
8 Raute-Taste
Tastensperre ein/aus (lang drücken)
9 Anschlussbuchse für Headset und
PC-Interface
10 Mikrofon
11 Tas te 1
T-NetBox (Anrufbeantworter im Netz)
auswählen (lang drücken)
12 Freisprech-Taste
Umschalten zwischen Hörer- und
Freisprechbetrieb;
Leuchtet: Freisprechen eingeschaltet;
Blinkt: ankommender Ruf, automatische
Wahlwiederholung
13 Abheben-Taste
Gespräch annehmen, Wahlwiederholungs-
liste öffnen (kurz drücken), Wählen einlei-
ten (lang drücken)
14 Steuer-Taste (S. 6)
15 Empfangsstärke
Ð i Ñ Ò (hoch bis gering)
| blinkt: kein Empfang
Hinweis:
Darstellung eines Mobilteils an einer SMS-fähigen Basis.
1
Page 4

Gigaset SL44 / deutsch / A31008-M1609-R101-1-6Z19 / SL44_IVZ.fm / 20.08.2004
Inhaltsverzeichnis
Inhaltsverzeichnis
Kurzübersicht Mobilteil . . . . . . . . 1
Sicherheitshinweise . . . . . . . . . . . 3
Gigaset SL44 – ein Mobilteil mit
vielen Extras . . . . . . . . . . . . . . . . . 4
Telefon in Betrieb nehmen . . . . . 4
Akkus einlegen . . . . . . . . . . . . . . . . . . 4
Anmeldung . . . . . . . . . . . . . . . . . . . . . . 4
Akkus laden . . . . . . . . . . . . . . . . . . . . . 5
Gürtelclip befestigen . . . . . . . . . . . . . . 5
Basis wechseln . . . . . . . . . . . . . . . . . . . 6
Namen der Basis ändern . . . . . . . . . . . 6
Mobilteil ein-/ausschalten . . . . . . . . . . 6
Tastensperre ein-/ausschalten . . . . . . . 6
Datum und Uhrzeit einstellen . . . . . . . 6
Telefon bedienen . . . . . . . . . . . . . 6
Steuer-Taste . . . . . . . . . . . . . . . . . . . . . 6
Display-Tasten . . . . . . . . . . . . . . . . . . . . 7
Zurück in den Ruhezustand . . . . . . . . . 7
Menü-Führung . . . . . . . . . . . . . . . . . . . 7
Korrektur von Falscheingaben . . . . . . . 8
Hinweise zur Bedienungs
anleitung . . . . . . . . . . . . . . . . . . . . 8
Symbole . . . . . . . . . . . . . . . . . . . . . . . . 8
Beispiel Menü-Eingabe . . . . . . . . . . . . . 8
Beispiel mehrzeilige Eingabe . . . . . . . . 9
Telefonieren . . . . . . . . . . . . . . . . 10
Extern anrufen . . . . . . . . . . . . . . . . . . 10
Gespräch beenden . . . . . . . . . . . . . . . 10
Anruf annehmen . . . . . . . . . . . . . . . . 10
Freisprechen . . . . . . . . . . . . . . . . . . . . 10
Stummschalten . . . . . . . . . . . . . . . . . 11
Intern anrufen . . . . . . . . . . . . . . . . . . 11
Telefonbuch und Listen nutzen 11
Telefonbuch . . . . . . . . . . . . . . . . . . . . 11
E-Mail-Verzeichnis . . . . . . . . . . . . . . . 13
Wahlwiederholungsliste . . . . . . . . . . . 14
Anrufer- und Nachrichtenliste
aufrufen . . . . . . . . . . . . . . . . . . . . . . . 14
Walky-Talky-Modus einstellen . 15
Walky-Talky-Modus einschalten . . . . . 15
Walky-Talky-Modus ausschalten . . . . . 15
Mobilteil im Walky-Talky-Modus für
Babyalarm nutzen . . . . . . . . . . . . . . . . 15
Mobilteil einstellen . . . . . . . . . . . 16
Schnellzugriff auf Funktionen und
Nummern . . . . . . . . . . . . . . . . . . . . . . 16
Display-Sprache ändern . . . . . . . . . . . 17
Display einstellen . . . . . . . . . . . . . . . . 17
Logo einstellen . . . . . . . . . . . . . . . . . . 17
Nachtmodus einstellen . . . . . . . . . . . . 18
Automatische Rufannahme ein-/
ausschalten . . . . . . . . . . . . . . . . . . . . . 18
Sprachlautstärke ändern . . . . . . . . . . . 18
Klingeltöne ändern . . . . . . . . . . . . . . . 18
Sound-Manager . . . . . . . . . . . . . . . . . 20
Hinweistöne ein-/ausschalten . . . . . . . 21
Wecker einstellen . . . . . . . . . . . . . . . . 21
Termin einstellen . . . . . . . . . . . . . . . . 21
Nicht angenommene Termine, Jahrestage
anzeigen . . . . . . . . . . . . . . . . . . . . . . . 22
Notrufnummer . . . . . . . . . . . . . . . . . . 23
Mobilteil in den Lieferzustand
zurücksetzen . . . . . . . . . . . . . . . . . . . . 23
Anhang . . . . . . . . . . . . . . . . . . . . 23
Pflege . . . . . . . . . . . . . . . . . . . . . . . . . 23
Kontakt mit Flüssigkeit . . . . . . . . . . . 23
Fragen und Antworten . . . . . . . . . . . . 24
Kundenservice (Customer Care) . . . . . 24
Technische Daten . . . . . . . . . . . . . . . . 25
Garantie Deutschland und Österreich 26
Garantie-Schein Belgien . . . . . . . . . . . 27
Garantie Schweiz . . . . . . . . . . . . . . . . 27
PC Interface . . . . . . . . . . . . . . . . . . . . . 28
Spiel „Ballon Shooter“ . . . . . . . . . . . . . 28
Text schreiben und bearbeiten . . . . . . 28
Zubehör . . . . . . . . . . . . . . . . . . . . 30
Stichwortverzeichnis . . . . . . . . . 31
2
Page 5

Gigaset SL44 / deutsch / A31008-M1609-R101-1-6Z19 / start_guide_time.fm / 20.08.2004
Sicherheitshinweise
Sicherheitshinweise
Achtung:
Lesen Sie vor Gebrauch die Sicherheitshinweise und die Bedienungsanleitung.
Klären Sie Ihre Kinder über deren Inhalt und über die Gefahren bei der Benutzung des Telefons auf.
Verwenden Sie nur das mitgelieferte Steckernetzgerät, wie auf der Unterseite
$
‹
Œ
der Ladeschale angegeben.
Legen Sie nur die empfohlenen, aufladbaren Akkus (S. 25) ein! D.h. keinen
anderen Akkutyp und keine nicht wieder aufladbare Batterien, da erhebliche
Gesundheits- und Personenschäden nicht auszuschließen sind.
Legen Sie die wieder aufladbaren Akkus richtig gepolt ein und verwenden Sie
sie gemäß dieser Bedienungsanleitung.
Medizinische Geräte können in ihrer Funktion beeinflusst werden. Beachten Sie
die technischen Bedingungen des jeweiligen Umfeldes (z.B. Arztpraxis).
Das Mobilteil kann in Hörgeräten einen unangenehmen Brummton verursachen.
Stellen Sie die Ladeschale nicht in Bädern oder Duschräumen auf. Mobilteil und
Ladeschale sind nicht spritzwassergeschützt (S. 23).
Telefon inkl. Walky-Talky-Funktion ausschalten, während Sie sich im Flugzeug
aufhalten. Gegen versehentliches Einschalten sichern.
Nutzen Sie das Telefon nicht in explosionsgefährdeten Umgebungen
(z.B. Lackierereien).
Geben Sie Ihr Gigaset nur mit der Bedienungsanleitung an Dritte weiter.
ƒ
Entsorgen Sie Akkus und Telefon umweltgerecht.
Hinweis:
Nicht alle in dieser Bedienungsanleitung beschriebenen Funktionen sind in allen Ländern verfügbar.
3
Page 6
Gigaset SL44 / deutsch / A31008-M1609-R101-1-6Z19 / start_guide_time.fm / 20.08.2004
Gigaset SL44 – ein Mobilteil mit vielen Extras
Gigaset SL44 – ein Mobilteil
mit vielen Extras
Ihr Gigaset SL44 bietet Ihnen nicht nur die
Möglichkeit, bis zu 200 Telefonnummern
und E-Mail-Adressen zu speichern (S. 11) Ihr Gigaset SL44 kann mehr:
u Belegen Sie die Tasten des Telefons mit
wichtigen Nummern oder häufig
benutzten Funktionen. Die Wahl der
Nummer bzw. der Start der Funktion
erfolgt dann mit einem Tastendruck
(S. 16).
u Nehmen Sie Ihren Lieblingssound mit
dem Mobilteil auf und gestalten Sie
Ihren persönlichen Klingelton (S. 20).
u Kennzeichnen Sie wichtige Gesprächs-
partner als VIP – so erkennen Sie Ihre
wichtigen Anrufe bereits am „Ton“
(S. 12).
u Speichern Sie für wichtige Telefon-
bucheinträge ein Sprachmuster - das
Telefon wählt „auf Zuruf“ (S. 13).
u Speichern Sie Termine (S. 21) und Jah-
restage (S. 12) in Ihrem Telefon – Ihr
Telefon erinnert Sie rechtzeitig.
Viel Spaß mit Ihrem neuen
Gigaset SL44!
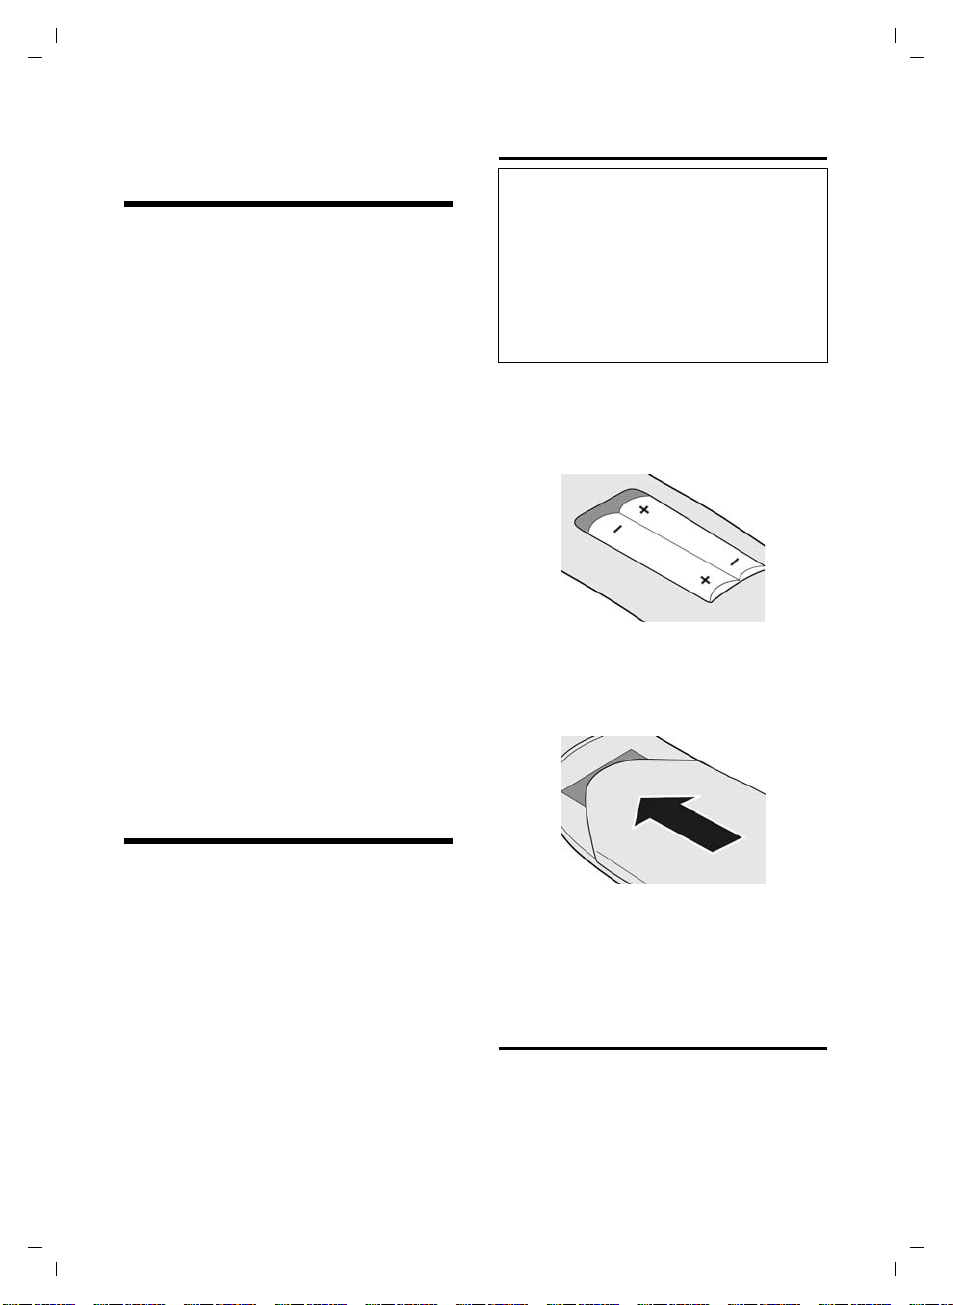
Akkus einlegen
Achtung:
Nur die von Siemens auf S. 25 empfohlenen
aufladbaren Akkus verwenden! D.h. auf keinen Fall eine herkömmliche (nicht wieder aufladbare) Batterie oder andere Akkutypen, da
erhebliche Gesundheits- und Sachschäden
nicht auszuschließen sind. Es könnte z.B. der
Mantel der Batterie oder der Akkus zerstört
werden oder die Akkus könnten explodieren.
Außerdem könnten Funktionsstörungen oder
Beschädigungen des Gerätes auftreten.
¤ Akkus richtig gepolt einsetzen (siehe
schematische Darstellung).
Die Polung ist im bzw. am Akkufach
gekennzeichnet.
Akkudeckel schließen
¤ Deckel etwas nach unten versetzt auf-
legen und nach oben schieben, bis er
einrastet.
Telefon in Betrieb nehmen
Die Verpackung enthält:
u ein Mobilteil Gigaset SL44,
u eine Ladeschale
(inkl. Steckernetzgerät),
u zwei Akkus,
u einen Akkudeckel,
u einen Gürtelclip,
u eine Bedienungsanleitung.
Wie Sie die Ladeschale anschließen, finden Sie am Ende dieser Bedienungsanleitung.
4
Akkudeckel öffnen
¤ Unterhalb der Oberkante auf den Akku-
deckel drücken und nach unten schie-
ben.
Anmeldung
Bevor Sie Ihr Gigaset SL44 nutzen können,
müssen Sie es an einer Basis anmelden. Es
kann an bis zu vier Basen angemeldet werden. Der Anmeldevorgang ist basisabhängig.
Page 7
Gigaset SL44 / deutsch / A31008-M1609-R101-1-6Z19 / start_guide_time.fm / 20.08.2004
Telefon in Betrieb nehmen
Manuelle Anmeldung Gigaset SL44
Schaltet sich das Mobilteil nach Einlegen
der Akkus nicht automatisch ein, müssen
Sie zunächst die Akkus laden.
Die manuelle Anmeldung des Mobilteils
müssen Sie am Mobilteil und an der Basis
einleiten.
Nach erfolgreicher Anmeldung wechselt
das Mobilteil in den Ruhezustand. Im Display wird die interne Nummer des
Mobilteils angezeigt, z. B. INT 1. Andernfalls wiederholen Sie den Vorgang.
1. Am Mobilteil
v ¢ Ð ¢ Mobilteil ¢ MT anmelden
s Basis auswählen, z.B. Basis 1
§OK§ drücken.
und
~ System-PIN der Basis (Lieferzu-
stand: 0000) eingeben und
§OK§ drücken. Im Display blinkt
z.B. Basis 1.
2. An der Basis
Starten Sie innerhalb von 60 Sek. die
Anmeldung an der Basis entsprechend der
jeweiligen Bedienungsanleitung.
Akkus laden
¤ Steckernetzgerät der Ladeschale in die
Steckdose stecken.
¤ Mobilteil mit dem Display nach vorn in
die Ladeschale stellen.
Lassen Sie das Mobilteil zum Laden der
Akkus in der Ladeschale stehen. Das Aufladen der Akkus wird im Display oben rechts
durch Blinken des Akkusymbols e angezeigt. Während des Betriebs zeigt das
Akku-Symbol den Ladezustand des Akkus
an (S. 1).
Erstes Laden und Entladen der Akkus
Eine korrekte Anzeige des Ladezustands
ist nur möglich, wenn die Akkus zunächst
vollständig geladen und entladen werden.
¤ Dazu das Mobilteil ununterbrochen
acht Stunden in der Ladeschale stehen
lassen. Ihr Mobilteil muss für das Aufla-
den nicht angeschaltet sein.
¤ Danach das Mobilteil aus der Lade-
schale nehmen und erst wieder hinein-
stellen, wenn der Akku vollständig ent-
laden ist.
Hinweise:
– Das Mobilteil darf nur in eine dafür vorge-
sehene Ladeschale gestellt werden.
– Steht das Mobilteil in der Ladeschale, lädt
es auch, wenn es ausgeschaltet ist.
– Hat sich das Mobilteil wegen leerer Akkus
abgeschaltet und wird dann in die Ladeschale gestellt, schaltet es sich automatisch
ein.
– Nach dem ersten Laden und Entladen kön-
nen Sie Ihr Mobilteil nach jedem Gespräch
in die Ladeschale zurückstellen.
Bitte beachten Sie:
u Den Lade- und Entlade-Vorgang immer
wiederholen, wenn Sie die Akkus aus
dem Mobilteil entfernen und wieder
einlegen.
u Die Akkus können sich während des
Aufladens erwärmen. Das ist ungefähr-
lich.
u Die Ladekapazität der Akkus reduziert
sich technisch bedingt nach einiger
Zeit.
Gürtelclip befestigen
Am Mobilteil sind etwa auf Höhe des Displays seitliche Aussparungen für den
Gürtelclip vorgesehen.
¤ Drücken Sie den Gürtelclip so auf der
Rückseite des Mobilteils an, dass die
Nasen des Gürtelclips in die Aussparun-
gen einrasten.
Die Zunge des Gürtelclips muss zum
Akkufach gerichtet sein.
5
Page 8
Gigaset SL44 / deutsch / A31008-M1609-R101-1-6Z19 / start_guide_time.fm / 20.08.2004
Telefon bedienen
Basis wechseln
Ist Ihr Mobilteil an mehreren Basen angemeldet, können Sie es auf eine bestimmte
Basis oder auf die Basis mit dem besten
Empfang (Beste Basis) einstellen.
¢ Ð ¢ Mobilteil ¢ Basisauswahl
v
s Eine der angemeldeten Basen
oder Beste Basis auswählen
§OK§ drücken.
und
Namen der Basis ändern
Automatisch werden die Namen „Basis 1“
bis „Basis 4“ vergeben. Sie können den
Namen Ihrer Basis ändern.
¢ Ð ¢ Mobilteil ¢ Basisauswahl
v
s Basis auswählen und §Ändern§
drücken.
~ Neuen Namen max. 16-stellig
eingeben (S. 28).
§Sichern§ Display-Taste drücken, um die
Einstellung zu speichern.
a Lang drücken (Ruhezustand).
Datum und Uhrzeit einstellen
Solange Sie Datum und Uhrzeit noch nicht
eingestellt haben, drücken Sie die Display-
§Zeit§, um das Eingabefeld zu öffnen.
Tas te
Um die Uhrzeit zu ändern, öffnen Sie das
Eingabefeld über:
¢ Ð ¢ Datum/Uhrzeit
v
¤ Mehrzeilige Eingabe ändern:
Datum:
Tag, Monat und Jahr 6-stellig eingeben.
Zeit:
Stunden und Minuten 4-stellig einge-
ben, z.B. Q M 1 5
für 7:15 Uhr.
§Sichern§ Display-Taste drücken.
Telefon bedienen
Steuer-Taste
Mobilteil ein-/ausschalten
a Auflegen-Taste lang drücken.
Sie hören den Bestätigungston.
Tastensperre ein-/ausschalten
# Raute-Taste lang drücken.
Sie hören den Bestätigungston. Ist die Tas-
tensperre eingeschaltet, sehen Sie im Display das Symbol Ø.
Die Tastensperre schaltet sich automatisch
aus, wenn Sie angerufen werden. Nach
Gesprächsende schaltet sie sich wieder
ein.
Achtung!
Die eingegebene Notrufnummer (S. 23) kann
auch bei eingeschalteter Tastensperre gewählt
werden.
6
Im Folgenden ist die Seite der Steuer-Taste
schwarz markiert (oben, unten, rechts,
links), die Sie in der jeweiligen Bediensituation drücken müssen (z.B. v für „rechts
auf die Steuer-Taste drücken“).
Die Steuer-Taste hat verschiedene Funktionen:
Im Ruhezustand des Mobilteils
s Telefonbuch öffnen.
v Hauptmenü öffnen.
u Liste der Mobilteile öffnen.
t Kurz drücken: Klingeltöne des
Mobilteils einstellen (S. 18).
Lang drücken: Sprachwahl
einleiten (S. 13).
Page 9
Gigaset SL44 / deutsch / A31008-M1609-R101-1-6Z19 / start_guide_time.fm / 20.08.2004
Telefon bedienen
Im Hauptmenü und in Eingabefeldern
Mit der Steuer-Taste bewegen Sie die
Schreibmarke nach oben t, unten s,
rechts v oder links u.
In Listen und Untermenüs
t / s Zeilenweise nach oben/unten
blättern.
v Untermenü öffnen bzw. Aus-
wahl bestätigen.
u Eine Menü-Ebene zurück-
springen bzw. abbrechen.
Während eines externen Gesprächs
s Telefonbuch öffnen.
v Menü öffnen.
u Interne Rückfrage einleiten.
t Sprachlautstärke für Hörer-
bzw. Freisprechmodus
ändern.
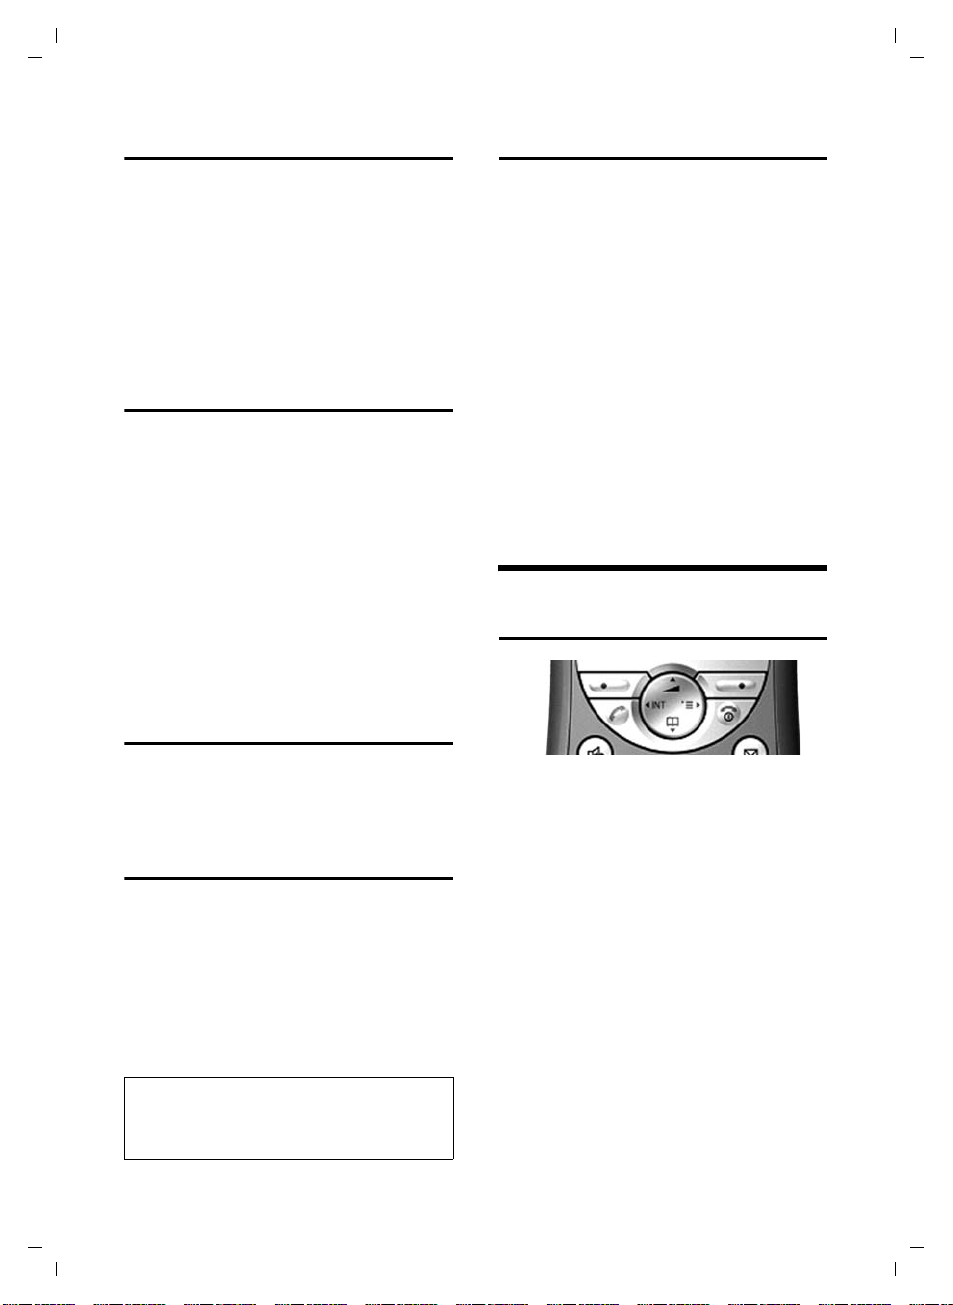
Display-Tasten
Die Funktionen der Display-Tasten wechseln je nach Bediensituation. Beispiel:
§§§§§§§§§§§?§§§§§§§§§§ §§§§§§§§SMS§§§§§§
1 Aktuelle Funktionen der Display-Tasten wer-
den in der untersten Displayzeile angezeigt.
2Display-Tasten
Die darunter liegende Display-Taste drücken, um die Funktion aufzurufen.
Die wichtigsten Display-Symbole sind:
§§§§§§§§§§?§§§§§§§§§§§ Linke Display-Taste, solange
sie noch nicht mit einer Funktion belegt ist (S. 16).
¨ Das Hauptmenü oder ein
situationsabhängiges Menü
öffnen.
W Lösch-Taste: Zeichenweise von
rechts nach links löschen.
1
2
Î Eine Menü-Ebene zurücksprin-
gen bzw. Vorgang abbrechen.
Œ E-Mail-Verzeichnis öffnen.
Ò Telefonbuch öffnen.
Ó Nummer ins Telefonbuch
kopieren.
Ÿ An Basen mit integriertem
Anrufbeantworter: Externen
Anruf an den Anrufbeantworter weiterleiten.
• Wahlwiederholungsliste
öffnen (basisabhängig).
Zurück in den Ruhezustand
Von einer beliebigen Stelle im Menü kehren Sie wie folgt in den Ruhezustand
zurück:
¤ Auflegen-Taste a lang drücken.
Oder:
¤ Keine Taste drücken: Nach 2 Min. wech-
selt das Display automatisch in den
Ruhezustand.
Änderungen, die Sie nicht durch Drücken
§OK§, §Ja§, §Sichern§, §Senden§ oder mit
von
Speichern
haben, werden verworfen.
Ein Beispiel für das Display im Ruhezu-
stand ist auf S. 1 abgebildet.
Menü-Führung
Die Funktionen Ihres Telefons werden
Ihnen über ein Menü angeboten, das aus
mehreren Ebenen besteht.
Hauptmenü (erste Menü-Ebene)
Drücken Sie v im Ruhezustand des
Mobilteils, um das Hauptmenü zu öffnen.
Die Hauptmenü-Funktionen werden im
Display als farbige Symbole angezeigt.
Auf eine Funktion zugreifen, d.h. das
zugehörige Untermenü (nächste MenüEbene) öffnen:
§OK§ bestätigt bzw. gespeichert
7
Page 10
Gigaset SL44 / deutsch / A31008-M1609-R101-1-6Z19 / start_guide_time.fm / 20.08.2004
Hinweise zur Bedienungsanleitung
¤ Mit der Steuer-Taste zur Funktion navi-
gieren (q und r). In der Kopfzeile
des Displays wird der Name der Funktion angezeigt. Drücken Sie auf die Display-Taste
§OK§.
Untermenüs
Die Funktionen der Untermenüs werden
in Listenform angezeigt.
Auf eine Funktion zugreifen:
¤ Mit der Steuer-Taste q zur Funktion
blättern und
Wenn Sie die Auflegen-Taste a einmal
kurz drücken, springen Sie in die vorherige Menüebene zurück bzw. brechen den
Vorgang ab.
Korrektur von Falscheingaben
Falsche Zeichen im Text korrigieren Sie,
indem mit der Steuer-Taste zu der Fehleingabe navigieren. Sie können dann:
u mit X das Zeichen links von der
Schreibmarke löschen
u Zeichen links von der Schreibmarke
einfügen
u bei der Eingabe von Uhrzeit und Datum
etc. Zeichen (blinkt) überschreiben
§OK§ drücken.
Hinweise zur
Bedienungsanleitung
In dieser Bedienungsanleitung werden
bestimmte Symbole und Schreibweisen
verwendet, die hier erklärt sind.
Symbole
<E-Mail-Verzeich.> / Neuer Eintrag (Bsp.)
Eine der beiden angegebenen
Menüfunktionen auswählen.
~ Ziffern oder Buchstaben ein-
geben.
§Sichern§ Invers werden die aktuellen
Funktionen der Display-Tasten
dargestellt, die in der untersten Display-Zeile angeboten
werden.
q Steuer-Taste oben oder unten
drücken: nach oben oder
unten blättern.
r Steuer-Taste rechts oder links
drücken: z.B. Einstellung auswählen.
c / Q / * usw.
Abgebildete Taste am
Mobilteil drücken.
Beispiel Menü-Eingabe
In der Bedienungsanleitung werden die
Schritte, die Sie ausführen müssen, in verkürzter Schreibweise dargestellt. Im Folgenden wird am Beispiel „Farbschema des
Displays einstellen“ diese Schreibweise
erläutert. In den Kästchen steht jeweils,
was Sie tun müssen.
¢ Ð ¢ Display
v
¤ Im Ruhezustand des Mobilteils rechts
auf die Steuer-Taste drücken, um das
Hauptmenü zu öffnen.
¤ Mit der Steuer-Taste das Symbol Ð
auswählen – Steuer-Taste rechts, links,
oben oder unten drücken.
In der Kopfzeile des Displays wird Einstel-
lungen angezeigt.
¤ Auf die Display-Taste §OK§ drücken, um
die Funktion Einstellungen zu bestätigen.
Das Untermenü Einstellungen wird angezeigt.
¤ So oft unten auf die Steuer-Taste drü-
cken, bis die Menüfunktion Display
ausgewählt ist.
¤ Auf die Display-Taste §OK§ drücken, um
die Auswahl zu bestätigen.
8
Page 11

Gigaset SL44 / deutsch / A31008-M1609-R101-1-6Z19 / start_guide_time.fm / 20.08.2004
Hinweise zur Bedienungsanleitung
Farbschema Auswählen und
§OK§ drücken.
¤ So oft unten auf die Steuer-Taste drü-
cken, bis die Menüfunktion Farbschema
ausgewählt ist.
¤ Auf die Display-Taste §OK§ drücken, um
die Auswahl zu bestätigen.
s Farbschema auswählen und
§OK§ drücken (‰ =aktuelle
Farbe).
¤ Oben oder unten auf die Steuer-Taste
drücken, um das Farbschema auszuwählen.
¤ Auf die Display-Taste §OK§ drücken, um
die Auswahl zu bestätigen.
Das ausgewählte Farbschema ist mit ‰
markiert.
a Lang drücken (Ruhezustand).
¤ Lang auf die Auflegen-Taste drücken,
damit das Mobilteil in den Ruhezustand wechselt.
Aktivierung:
Ein oder Aus auswählen.
¤ Rechts oder links (r) auf die Steuer-
Taste drücken, um Ein oder Aus auszuwählen.
Datum:
Tag/Monat 4-stellig eingeben.
¤ Auf die Taste s drücken, um in die
nächste Zeile zu wechseln.
Die zweite Zeile ist mit [ ] als aktiv
gekennzeichnet.
¤ Datum mit den Ziffer-Tasten eingeben.
Zeit:
Stunden/Minuten 4-stellig eingeben.
¤ Auf die Taste s drücken.
Die dritte Zeile ist mit [ ] als aktiv
gekennzeichnet.
¤ Uhrzeit mit den Ziffer-Tasten einge-
ben.
Beispiel mehrzeilige Eingabe
In vielen Situationen können Sie in mehreren Zeilen einer Anzeige Einstellungen
ändern oder Daten eingeben.
Die mehrzeilige Eingabe wird in dieser
Bedienungsanleitung in verkürzter
Schreibweise dargestellt. Im Folgenden
wird am Beispiel „Termin speichern“ diese
Schreibweise erläutert. In den Kästchen
steht jeweils, was Sie tun müssen.
Sie sehen die folgende Anzeige:
Aktivierung: f Ein g
Datum: 21.03
Zeit: 11:11
Text: XXXXX...
Î Sichern
Text:
Display-Taste
(max. 32-stellig) eingeben und
drücken.
§Ändern§ drücken. Text
§OK§
¤ Auf die Taste s drücken.
Die vierte Zeile ist mit < > als aktiv
gekennzeichnet.
¤ Auf die Display-Taste §Ändern§ drücken,
um das Eingabe-Feld zu öffnen. Text
eingeben (S. 28).
¤ Auf die Display-Taste §OK§ drücken.
9
Page 12
Gigaset SL44 / deutsch / A31008-M1609-R101-1-6Z19 / start_guide_time.fm / 20.08.2004
Telefonieren
Anruf annehmen
¤ Änderungen speichern.
Das Symbol ¼ wird angezeigt.
Sie können Ihre Änderungen je nach
Bediensituation auf zwei Arten speichern.
¤ Auf die Display-Taste §Sichern§ drücken.
Oder:
¤ Auf die Taste v drücken. Mit q Spei-
chern auswählen und
§OK§ drücken.
¤ In jedem Fall anschließend lang auf
die Taste a drücken.
Das Mobilteil wechselt in den Ruhezustand und zeigt das Symbol ¼ an.
Telefonieren
Extern anrufen
Externe Anrufe sind Anrufe in das öffentliche Telefonnetz.
~c Nummer eingeben und Abhe-
ben-Taste drücken.
Oder:
c~ Abheben-Taste c lang drü-
cken und dann die Nummer
eingeben.
Mit der Auflegen-Taste a können Sie das
Wählen abbrechen.
Hinweise:
– Das Wählen mit Telefonbuch (S. 1, S. 11)
oder Wahlwiederholungsliste (S. 7, S. 14)
spart wiederholtes Tippen von Nummern.
– Sie können Tasten mit Nummern von Tele-
fonbucheinträgen belegen (S. 16).
– Mit Sprachwahl können Sie Nummern
durch Aufsprechen des Namens wählen.
(S. 13).
Gespräch beenden
a Auflegen-Taste drücken.
Ein ankommender Anruf wird dreifach am
Mobilteil signalisiert: durch Klingeln, eine
Anzeige im Display und Blinken der Freisprech-Taste d.
Sie haben folgende Möglichkeiten, den
Anruf anzunehmen:
¤ Auf die Abheben-Taste c drücken.
¤ Auf die Freisprech-Taste d drücken.
Steht das Mobilteil in der Ladeschale und
ist die Funktion Aut.Rufannahme eingeschaltet (S. 18), nimmt das Mobilteil einen
Anruf automatisch an, wenn Sie es aus der
Ladeschale nehmen.
Stört der Klingelton, drücken Sie die Display-Taste
annehmen, solange er im Display angezeigt wird.
§Ruf aus§. Den Anruf können Sie
Freisprechen
Beim Freisprechen halten Sie das Mobilteil
nicht ans Ohr, sondern legen es z.B. vor
sich auf den Tisch. So können sich auch
andere an dem Telefonat beteiligen.
Freisprechen ein-/ausschalten
Beim Wählen einschalten
~d Nummer eingeben und Frei-
sprech-Taste drücken.
¤ Wenn Sie jemanden mithören lassen,
sollten Sie dies Ihrem Gesprächspart-
ner mitteilen.
Zwischen Hörer- und Freisprechbetrieb
wechseln
d Freisprech-Taste drücken.
Während eines Gesprächs schalten Sie das
Freisprechen ein oder aus.
Wenn Sie das Mobilteil während eines
Gesprächs in die Ladeschale stellen wollen:
¤ Die Freisprech-Taste d beim
Hineinstellen gedrückt halten.
10
Page 13
Gigaset SL44 / deutsch / A31008-M1609-R101-1-6Z19 / start_guide_time.fm / 20.08.2004
Telefonbuch und Listen nutzen
Wie Sie die Sprachlautstärke ändern,
s. S. 18.
Stummschalten
Sie können das Mikrofon Ihres Mobilteils
während eines externen Gesprächs ausschalten. Ihr Gesprächspartner hört dann
eine Wartemelodie.
u Steuer-Taste links drücken, um
das Mobilteil stummzuschalten.
” Display-Taste drücken, um die
Stummschaltung aufzuheben.
Intern anrufen
Interne Gespräche mit anderen, an derselben Basis angemeldeten Mobilteilen sind
kostenlos.
Ein bestimmtes Mobilteil anrufen
u Internen Ruf einleiten.
~ Nummer des Mobilteils einge-
ben.
Alle Mobilteile anrufen („Sammelruf“)
u Internen Ruf einleiten.
* Stern-Taste drücken. Alle
Mobilteile werden gerufen.
Telefonbuch
Im Telef onbuch speichern Sie Nummern
und zugehörige Namen.
¤ Telefonbuch im Ruhezustand mit der
Tas te s öffnen.
Länge der Einträge
Nummer: max. 32 Ziffern
Name: max. 16 Zeichen
Hinweis:
Für den Schnellzugriff auf eine Nummer aus
dem Telefonbuch (Kurzwahl) können Sie die
Nummer auf eine Taste legen (S. 16).
Nummer im Telefonbuch speichern
s ¢ Neuer Eintrag
¤ Mehrzeilige Eingabe ändern:
Nummer:
Nummer eingeben.
Name:
Namen eingeben.
Jahrestag:
Ggf. Jahrestag eingeben (S. 12).
¤ Änderungen speichern.
Ist Ihr Telefon an eine Telefonanlage angeschlossen, müssen Sie ggf. eine Vorwahl
speichern. Lesen Sie dazu bitte die Bedienungsanleitung Ihrer Telefonanlage.
Gespräch beenden
a Auflegen-Taste drücken.
Telefonbuch und Listen
nutzen
In Telefonbuch und E-Mail-Verzeichnis
können Sie insgesamt max. 200 Einträge
speichern (Anzahl abhängig vom Umfang
der einzelnen Einträge).
Telefonbuch, E-Mail-Verzeichnis erstellen
Sie individuell für Ihr Mobilteil.
Telefonbuch-Eintrag auswählen
s Telefonbuch öffnen.
Sie haben folgende Möglichkeiten:
u Mit s zum Eintrag blättern, bis der
gesuchte Name ausgewählt ist.
u Die ersten Zeichen (max. 10) des
Namens eingeben, ggf. mit s zum
Eintrag blättern.
Mit Telefonbuch wählen
s ¢ s (Eintrag auswählen)
c Abheben-Taste drücken. Num-
mer wird gewählt.
11
Page 14

Gigaset SL44 / deutsch / A31008-M1609-R101-1-6Z19 / start_guide_time.fm / 20.08.2004
Telefonbuch und Listen nutzen
Telefonbuch-Einträge verwalten
s ¢ s (Eintrag auswählen)
Eintrag ansehen
§Ansehen§ Display-Taste drücken. Eintrag
wird angezeigt.
Zurück mit
§OK§.
Eintrag ändern
§Ansehen§ §Ändern§
Display-Tasten nacheinander
drücken.
¤ Änderungen ausführen und speichern.
Weitere Funktionen nutzen
s ¢ s (Eintrag auswählen)
¢ v (Menü öffnen)
Folgende Funktionen können Sie mit q
auswählen:
Nr. verwenden
Eine gespeicherte Nummer ändern
oder ergänzen. Dann wählen oder weitere Funktionen durch Drücken von ©
aufrufen.
Eintrag ändern
Ausgewählten Eintrag ändern.
Eintrag löschen
Ausgewählten Eintrag löschen.
Eintrag als VIP (nur Telefonbuch)
Telefonbuch-Eintrag als VIP (Very
Important Person) markieren und ihm
eine bestimmte Klingel-Melodie zuweisen. Sie erkennen VIP-Anrufe dann an
der Klingel-Melodie.
Voraussetzung: Rufnummernübermittlung („CLIP“)
Muster aufn. (nur Telefonbuch)
Namen des ausgewählten Eintrags aufsprechen und als Sprachmuster speichern (S. 13).
Muster anhören
Sprachmuster abspielen (S. 13).
Muster löschen
Sprachmuster löschen (S. 13).
Liste löschen
Alle Einträge im Telefonbuch löschen.
Speicherplatz
Anzahl der noch freien Einträge im
Telefonbuch und E-Mail-Verzeichnis
(S. 13) anzeigen lassen.
Jahrestag im Tel efon buch speichern
Sie können zu jeder Nummer im Telefonbuch einen Jahrestag speichern und eine
Zeit angeben, zu der am Jahrestag ein
Erinnerungsruf erfolgen soll.
¢ s (Eintrag auswählen; S. 11)
s
§Ansehen§ §Ändern§
Display-Tasten nacheinander
drücken.
s In die Zeile Jahrestag: sprin-
gen.
§Ändern§ Display-Taste drücken.
¤ Mehrzeilige Eingabe ändern:
Datum:
Tag/Monat 4-stellig eingeben.
Zeit:
Stunde/Minute für den Erinnerungsruf
4-stellig eingeben.
Signal:
Art der Signalisierung auswählen und
§OK§ drücken.
¤ Änderungen speichern (S. 10).
Hinweis:
Für einen Erinnerungsruf ist die Zeitangabe
notwendig. Wenn Sie die optische Signalisierung gewählt haben, ist die Zeitangabe nicht
nötig und wird automatisch auf 00:00 gesetzt.
Jahrestag löschen
s ¢ s (Eintrag auswählen; S. 11)
s In die Zeile Jahrestag: sprin-
gen.
§Ändern§ §Löschen§ §Sichern§
Display-Tasten nacheinander
drücken.
Erinnerungsruf an einem Jahrestag
Ein Erinnerungsruf wird mit dem ausgewählten Klingelton am Mobilteil signalisiert.
12
Page 15

Gigaset SL44 / deutsch / A31008-M1609-R101-1-6Z19 / start_guide_time.fm / 20.08.2004
Telefonbuch und Listen nutzen
§Ruf aus§ Display-Taste drücken, um den
Erinnerungsruf zu beenden.
Sprachwahl
Sie können Nummern aus dem Telefonbuch durch Ansage des Namens wählen.
Damit ihr Telefon Sie „erkennt“, müssen
Sie für jeden Namen ein Sprachmuster
aufnehmen, d.h. den Namen laut ins
Mobilteil sprechen und speichern.
Zusätzlich können Sie ihr Telefon so einstellen, dass es statt einem Klingelton, bei
einem externen Anruf den entsprechenden Namen des Anrufers ansagt, s. S. 19.
Für insgesamt 30 Telefonbuch-Einträge
können Sie jeweils ein Sprachmuster speichern. Einträge mit Sprachmuster sind mit
´ markiert.
Sprachmuster aufnehmen
Sprechen Sie das Sprachmuster in einer
leisen Umgebung auf. Der Abstand zum
Mobilteil sollte ca. 25 cm betragen. Das
Sprachmuster kann 1,5 Sek. lang sein.
Hinweis:
Nutzen Sie die Sprachwahl überwiegend mit
einem Freisprechset, ist es vorteilhaft, das
Sprachmuster über das Freisprechset aufzunehmen.
¢ s (Eintrag auswählen; S. 11)
s
v Menü öffnen.
Muster aufn.Auswählen.
OK Display-Taste drücken, um die
Aufnahme zu starten.
Es ertönt ein kurzes Signal. Auf dem Display erscheint eine entsprechende Aufforderung. Sprechen Sie den Namen. Wiederholen Sie den Namen nach Aufforderung
auf dem Display und einem weiteren Signalton. Sind die beiden Sprachaufnahmen
zu unterschiedlich, werden Sie aufgefordert, die Eingabe zu wiederholen.
Hinweis:
Reicht der Speicherplatz für ein neues Sprachmuster nicht aus, erscheint ein Hinweis auf
dem Display. Das Mobilteil kehrt automatisch
zum Telefonbuch zurück. Ein Sprachmuster
löschen und erneut Muster aufn. auswählen.
Um ein Sprachmuster zu ändern, müssen
Sie es löschen (S. 13) und neu aufnehmen.
Mit Sprachwahl wählen
t Lang drücken.
Sprechen Sie nach dem Signalton den
Namen. Stimmt der Name mit dem hinterlegten Sprachmuster überein, wird er wiederholt. Die Nummer wird gewählt.
Sprachmuster anhören
s ¢ s (Eintrag mit ´ auswählen)
v Menü öffnen.
Muster anhören
Auswählen und
Das Sprachmuster wird im
Freisprechmodus abgespielt.
a Lang drücken (Ruhezustand).
OK drücken.
Sprachmuster löschen
s ¢ s (Eintrag mit ´ auswählen)
v Menü öffnen.
Muster löschen
Auswählen und
a Lang drücken (Ruhezustand).
Der Telefonbucheintrag bleibt erhalten.
OK drücken.
E-Mail-Verzeichnis
Im E-Mail-Verzeichnis speichern Sie
E-Mail-Adressen.
Neue E-Mail-Adresse speichern
s Telefonbuch öffnen.
<E-Mail-Verzeich.>
Auswählen und
§OK§ drücken.
13
Page 16

Gigaset SL44 / deutsch / A31008-M1609-R101-1-6Z19 / start_guide_time.fm / 20.08.2004
Telefonbuch und Listen nutzen
Neuer Eintrag
Auswählen und
~ E-Mail-Adresse eingeben
(max. 60 Zeichen).
§OK§ drücken.
¤ Änderungen speichern (S. 10).
Während der Eingabe können Sie mit ©
das Menü öffnen und folgende Funktionen nutzen:
'.' einfügen / '@' einfügen
Einen Punkt oder das Zeichen @ einfügen.
E-Mail-Adressen verwalten
s ¢ <E-Mail-Verzeich.>
¢ s (Eintrag auswählen; S. 11)
Eintrag ansehen
§Ansehen§ Display-Taste drücken. Der Ein-
trag wird angezeigt.
Zurück mit
§OK§.
Eintrag ändern
§Ansehen§ §Ändern§
Display-Tasten nacheinander
drücken.
¤ Änderungen ausführen und speichern
(S. 10).
Weitere Funktionen nutzen
s ¢ <E-Mail-Verzeich.>
¢ s (Eintrag auswählen; S. 11)
¢ v (Menü öffnen)
Wie im Telefonbuch (S. 12) können Sie folgende Funktionen mit s auswählen:
Eintrag ändern
Eintrag löschen
Liste löschen
Wahlwiederholungsliste
Manuelle Wahlwiederholu ng
c Taste kurz drücken.
s Eintrag auswählen.
c Abheben-Taste erneut
drücken. Nummer wird
gewählt.
Bei Anzeige eines Namens können Sie sich
mit der Display-Taste
hörige Nummer anzeigen lassen.
§Ansehen§ die dazuge-
Einträge der Wahlwiederholungsliste verwalten
c Taste kurz drücken.
s Eintrag auswählen.
v Menü öffnen.
Folgende Funktionen können Sie mit q
auswählen:
Aut. Wahlwiederh.
Die Nummer wird in festen Abständen
(mind. alle 50 Sek.) automatisch
gewählt. Dabei blinkt die Freisprech-
Taste, „Lauthören“ ist eingeschaltet.
– Teilnehmer meldet sich: Abheben-
Tas te cdrücken. Die Funktion ist
beendet.
– Kein Teilnehmer meldet sich: Der
Ruf bricht nach ca. 30 Sek. ab. Nach
Drücken einer beliebigen Taste oder
zehn erfolglosen Versuchen endet
die Funktion.
Nr. verwenden (wie im Telefonbuch, S. 12)
Nr. ins Tel.buch
Eintrag ins Telefonbuch übernehmen
(S. 11).
Eintrag löschen (wie im Telefonbuch,
S. 12)
Liste löschen (wie im Telefonbuch, S. 12)
In der Wahlwiederholungsliste stehen die
zehn am Mobilteil zuletzt gewählten Nummern (max. 32 Ziffern). Steht eine der
Nummern im Telefonbuch, wird der zugehörige Name angezeigt.
14
Anrufer- und Nachrichtenliste aufrufen
Im Ruhezustand wird für neue Anrufe
oder Nachrichten ein Symbol im Display
angezeigt. Die Anzahl neuer Einträge wird
Page 17

Gigaset SL44 / deutsch / A31008-M1609-R101-1-6Z19 / start_guide_time.fm / 20.08.2004
Walky-Talky-Modus einstellen
unterhalb des jeweiligen Symbols angezeigt. Sobald ein neuer Eintrag in einer
Liste eingeht, ertönt ein Hinweiston. Die
Tas te f blinkt.
Wenn Sie die blinkende Taste f drücken,
rufen Sie die Listen auf, die neue Nachrichten enthalten.
Walky-Talky-Modus
einstellen
Die Walky-Talky-Funktion ermöglicht die
Kommunikation zwischen zwei Mobilteilen, unabhängig davon, wie weit diese
von der Basis entfernt sind.
Beispiel: Sie fahren in Urlaub und nehmen zwei Walky-Talky-fähige Mobilteile
mit. Stellen Sie an beiden Mobilteilen die
Walky-Talky-Funktion ein.
Voraussetzung:
Eine der folgenden Voraussetzungen
muss erfüllt sein.
u Beide Mobilteile sind an derselben
Basis angemeldet.
u Beide Mobilteile sind an verschiedenen
Basen angemeldet und beide sind auf
Beste Basis eingestellt (S. 6).
u Eines der Mobilteile ist an keiner Basis
angemeldet und das angemeldete
Mobilteil ist auf Beste Basis eingestellt.
u Beide Mobilteile sind an keiner Basis
angemeldet.
Bitte beachten Sie:
u Im Walky-Talky-Modus beträgt die
Reichweite zwischen den Mobilteilen
im freien Gelände max. 300 m.
u Die Mobilteile sind für kommende
Anrufe nicht mehr erreichbar.
u Im Walky-Talky-Modus verringern sich
die Betriebszeiten der Mobilteile erheblich.
u Auch wenn Sie Ihr Mobilteil aus- und
wieder einschalten, bleibt der WalkyTalky-Modus erhalten.
Walky-Talky-Modus einschalten
v ¢ í ¢ Walky-Talky
Wenn Sie im Walky-Talky-Modus auf die
Abheben-Taste c oder Freisprech-Taste
d drücken, geht der Ruf an alle
Mobilteile, die im Walky-Talky-Modus sind.
Die Verbindung erfolgt mit dem ersten
Mobilteil, das den Walky-Talky-Ruf
annimmt.
u Das Einstellen der Sprachlautstärke und
der Hinweistöne erfolgt genau so, als
wenn Ihre Mobilteile Kontakt mit der
Basis hätten (S. 18).
u „Klingelton aus-/einschalten“ (S. 21)
und „Tastensperre ein-/ausschalten“
(S. 6) sind im Walky-Talky-Modus mög-
lich.
u Um das Menü zu öffnen, die Display-
Tas te © drücken.
Walky-Talky-Modus ausschalten
§Aus§ Display-Taste drücken.
Mobilteil im Walky-Talky-Modus für Babyalarm nutzen
Mit dieser Funktion können Sie die WalkyTalky-Funktion als Babyalarm benutzen.
Der Babyalarm geht dann an alle
Mobilteile, die sich im Walky-Talky-Modus
befinden, sobald im Raum der eingestellte
Geräuschpegel erreicht ist.
Während des Anrufs sind alle Tasten
gesperrt bis auf die Auflegen-Taste. Nach
dem Auflegen bleibt die Funktion einge-
schaltet. Nach Ausschalten des Mobilteils
muss die Funktion wieder eingeschaltet
werden.
15
Page 18
Gigaset SL44 / deutsch / A31008-M1609-R101-1-6Z19 / start_guide_time.fm / 20.08.2004
Mobilteil einstellen
Die Wahl der Nummer bzw. der Start der
Achtung!
– Prüfen Sie bei Inbetriebnahme unbe-
dingt die Funktionsfähigkeit. Testen Sie
z. B. die Empfindlichkeit und den Verbindungsaufbau.
– Die eingeschaltete Funktion verringert die
Betriebszeit Ihres Mobilteils erheblich. Das
Mobilteil ggf. in die Ladeschale stellen.
Dadurch wird sichergestellt, dass sich der
Akku nicht leert.
– Der Abstand zwischen Mobilteil und Baby
sollte 1 bis 2 Meter betragen. Das Mikrofon
muss zum Baby zeigen.
– Beachten Sie, dass der Babyalarm der
Walky-Talky-Funktion keine optimale
Sicherheit bietet.
Babyalarm einschalten/ausschalten
© Display-Taste drücken.
Babyalarm Auswählen und §OK§ drücken.
Aktivierung:
Zum Einschalten Ein auswählen. Zum
Ausschalten Aus auswählen.
Empfindl.:
Empfindlichkeit für den erforderlichen
Geräuschpegel (Niedrig oder Hoch) einstellen.
Funktion erfolgt dann mit einem Tastendruck.
Zifferntaste/Funktionstaste oder linke Display-Taste belegen
Voraussetzung: Die Zifferntaste, die
Funktionstaste, bzw. die linke DisplayTaste ist noch nicht mit einer Nummer
oder Funktion belegt.
¤ Auf die Display-Taste §§§§§§§§§§?§§§§§§§§§§§ bzw. lang
auf die Zifferntaste oder die Funktions-
taste ú drücken.
Die Liste der möglichen Tastenbelegungen wird geöffnet. Folgendes steht zur
Auswahl:
Kurzwahl
Taste mit einer Nummer aus dem Tele-
fonbuch belegen.
Das Telefonbuch wird geöffnet.
¤ Einen Eintrag auswählen und §OK§
drücken.
Löschen oder ändern Sie den Eintrag
im Telefonbuch, so wirkt sich dies nicht
auf die Belegung der Ziffern- bzw. Dis-
play-Taste aus.
¤ Änderungen speichern (S. 10).
Der Babyalarm ist jetzt ein-, bzw. ausgeschaltet.
Mobilteil einstellen
Ihr Mobilteil ist voreingestellt. Sie können
die Einstellungen individuell ändern.
Schnellzugriff auf Funktionen und Nummern
Die linke Display-Taste, die Funktionstaste
ú sowie die Zifferntasten Q und
2 bis O können Sie mit je einer
Nummer oder einer Funktion belegen.
Termine / Wecker
Taste mit dem Menü zum Einstellen
und Einschalten eines Termins bzw. des
Weckers belegen (S. 21):
¢ Termine / Wecker
ì
Neue Aufnahme
Taste mit dem Menü zum Aufnehmen
neuer Sound belegen (S. 20).
¢ <Neuer Sound>
Ë
Abhängig von der Basis, stehen Ihnen
zusätzlich folgende Funktionen zur Verfügung:
Anrufb.-Modus
Taste mit dem Menü zur Auswahl des
Anrufbeantworter-Modus belegen.
Nr. unterdrücken
Übermittlung der Rufnummer beim
nächsten Anruf unterdrücken.
16
Page 19

Gigaset SL44 / deutsch / A31008-M1609-R101-1-6Z19 / start_guide_time.fm / 20.08.2004
Mobilteil einstellen
Info-Dienste
Taste mit dem Menü zum Bestellen
eines Info-Dienstes belegen.
SMS-Benachricht.
Taste mit dem Menü zum Einschalten
der Benachrichtung via SMS belegen.
Anrufb.-Modus
Taste mit dem Menü zur Auswahl des
Anrufbeantworter-Modus belegen
(siehe Bedienungsanleitung der Basis):
¢ Ansagen ¢ Modus
Î
Hinweis:
Wird durch die Tastenbelegung ein Funktionsmenü geöffnet, bewirkt ein kurzes Drücken
auf die Auflegen-Taste a den Wechsel in den
Ruhezustand (nicht in das übergeordnete
Menü).
Ist die linke Display-Taste belegt, wird in
der untersten Displayzeile über der Display-Taste die ausgewählte Funktion bzw.
der Name der Rufnummer im Telefonbuch
angezeigt (ggf. abgekürzt).
Funktion starten, Nummer wählen
Im Ruhezustand des Mobilteils Zifferntaste lang drücken bzw. linke DisplayTas te kurz drücken.
Je nach Tastenbelegung:
u Nummern werden direkt gewählt.
u Menü der Funktion wird geöffnet.
Belegung einer Taste änd ern
Display-Taste
¤ Linke Display-Taste lang drücken.
Die Liste der möglichen Tastenbelegungen wird geöffnet.
¤ Gehen Sie weiter vor, wie beim ersten
Belegen der Taste (S. 16) beschrieben.
§Ändern§ Display-Taste drücken. Die
Liste der möglichen Tastenbelegungen wird angezeigt.
¤ Gehen Sie weiter vor, wie beim ersten
Belegen der Taste (S. 16) beschrieben.
Display-Sprache ändern
Sie können sich die Display-Texte in verschiedenen Sprachen anzeigen lassen.
¢ Ð ¢ Mobilteil ¢ Sprache
v
Die aktuelle Sprache ist mit ‰ markiert.
s Sprache auswählen und §OK§
drücken.
a Lang drücken (Ruhezustand).
Wenn Sie aus Versehen eine für Sie unverständliche Sprache eingestellt haben:
v 5 I1
Tasten nacheinander drücken.
s Die richtige Sprache auswäh-
len und
Display einstellen
Sie können zwischen vier Farbschemen
und mehreren Kontraststufen auswählen.
¢ Ð ¢ Display
v
Farbschema
Auswählen und
s Farbschema auswählen und
§OK§ drücken (‰ =aktuelle
Farbe).
a Kurz drücken.
Kontrast Auswählen und
r Kontrast auswählen.
§Sichern§ Display-Taste drücken.
a Lang drücken (Ruhezustand).
§OK§ drücken.
§OK§ drücken.
§OK§ drücken.
Zifferntaste/Funktionstaste
¤ Zifferntaste bzw. Funktionstaste kurz
drücken.
Logo einstellen
Sie können sich im Ruhezustand ein Logo
anzeigen lassen. Es ersetzt die Anzeige im
Ruhezustand. Dadurch können Datum,
Zeit und Name überdeckt werden.
17
Page 20

Gigaset SL44 / deutsch / A31008-M1609-R101-1-6Z19 / start_guide_time.fm / 20.08.2004
Mobilteil einstellen
Das Logo wird in bestimmten Situationen
nicht angezeigt, z. B. während eines
Gesprächs oder wenn das Mobilteil abgemeldet ist.
Ist ein Logo aktiviert, ist der Menüpunkt
Logo mit ‰ markiert.
¢ Ð ¢ Display ¢ Logo
v
Die aktuelle Einstellung wird angezeigt.
¤ Die folgenden Einstellungen ggf.
ändern:
Aktivierung:
Ein (Logo wird angezeigt) oder Aus
(kein Logo) auswählen.
Bild:
Ggf. Logo ändern (siehe unten).
¤ Änderungen speichern (S. 10).
Wenn das Logo die Anzeige überdeckt,
kurz auf eine beliebige Taste drücken um
das Ruhedisplay mit Uhrzeit und Datum
anzuzeigen.
Logo ändern
v ¢ Ð ¢ Display ¢ Logo
s In die Zeile Bild: springen.
§Ansehen§ Display-Taste drücken. Das
aktive Logo wird angezeigt.
s Bild auswählen und
drücken.
§OK§
¤ Änderungen speichern.
Nachtmodus einstellen
Steht das Mobilteil in der Ladeschale,
bleibt das Display halbhell. Wenn Sie das
stört, können Sie den Nachtmodus einstellen. Das Display wird dann ganz dunkel,
wenn das Mobilteil in der Ladeschale
steht.
¢ Ð ¢ Display
v
Nachtmodus
Auswählen und
(‰ =ein).
a Lang drücken (Ruhezustand).
§OK§ drücken
Automatische Rufannahme ein-/ ausschalten
Wenn Sie diese Funktion eingeschaltet
haben, nehmen Sie das Mobilteil bei
einem Anruf einfach aus der Ladeschale,
ohne die Abheben-Taste c drücken zu
müssen.
¢ Ð ¢ Mobilteil
v
Aut.Rufannahme
Auswählen und
(‰ =ein).
a Lang drücken (Ruhezustand).
§OK§ drücken
Sprachlautstärke ändern
Sie können die Lautstärke für das Freisprechen in fünf und die Hörerlautstärke in
drei Stufen einstellen. Die Einstellungen
können Sie nur während eines externen
Gesprächs vornehmen.
Die Lautstärke für das Freisprechen können Sie nur ändern, wenn die das Freisprechen eingestellt ist (S. 10).
Sie führen ein externes Gespräch.
t Menü öffnen.
r Lautstärke auswählen.
§Sichern§ Ggf. Display-Taste drücken,
um die Einstellung dauerhaft
zu speichern.
Wenn t mit einer anderen Funktion
belegt ist, z.B. beim Makeln:
v Menü öffnen.
Lautstärke Auswählen und
Einstellung vornehmen (siehe oben).
§OK§ drücken.
Klingeltöne ändern
u Lautstärke:
Sie können zwischen fünf Lautstärken
(1–5; z.B. Lautstärke 2 = ˆ)
und dem „Crescendo“-Ruf (6; Laut-
stärke wird mit jedem Klingelton lauter
= ‰) wählen.
18
Page 21

Gigaset SL44 / deutsch / A31008-M1609-R101-1-6Z19 / start_guide_time.fm / 20.08.2004
Mobilteil einstellen
u Klingeltöne:
Sie können einen beliebigen Sound aus
dem Sound-Manager (S. 20) auswählen.
Sie können die Klingeltöne für folgende
Funktionen unterschiedlich einstellen:
u Für ext. Anrufe: Für externe Anrufe
Wenn Sie die Einstellungen für ISDNBasen ändern, sehen Sie bitte in der
Bedienungsanleitung Ihrer Basis nach.
u Für int. Anrufe: Für interne Anrufe
u Für Termine: Für eingestellte Termine
(S. 21)
u Für Wecker: Für einen eingestellten
Weckruf (S. 21)
u Für alle gleich: Für alle Funktionen gleich
Einstellungen für einzelne Funktionen
Stellen Sie Lautstärke und Melodie abhängig von der Art der Signalisierung ein. Sie
können für externe Anrufe auch veranlassen, dass der Name des Anrufers angesagt
wird. Dazu muss jedoch das entsprechende Sprachmuster zuvor aufgenommen worden sein (S. 13).
Im Ruhezustand öffnen Sie das Menü Klin-
geltöne, indem Sie t kurz drücken.
¢ ï ¢ Klingeltöne
v
q Einstellung, z.B. Für ext. Anrufe,
auswählen und
r Lautstärke (1–6) einstellen.
s In die nächste Zeile springen.
r Melodie auswählen.
s Nur für externe Anrufe: In die
Zeile Name ansag. springen.
r Namensansage ein- oder aus-
schalten.
§OK§ drücken.
¤ Änderungen speichern (S. 10).
Einstellungen für alle Funktionen gleich
v ¢ ï ¢ Klingeltöne ¢ Für alle gleich
¤ Lautstärke und Klingelton einstellen
(siehe „Einstellungen für einzelne
Funktionen“).
§Ja§ Display-Taste drücken, um die
Abfrage zu bestätigen.
a Lang drücken (Ruhezustand).
Klingelton aus-/einschalten
Sie können vor der Annahme eines Anrufs
oder im Ruhezustand an Ihrem Mobilteil
den Klingelton auf Dauer oder für den
aktuellen Anruf ausschalten. Das Wiedereinschalten während eines externen
Anrufs ist nicht möglich.
Klingelton auf Dauer ausschalten
* Stern-Taste so lange gedrückt
halten, bis der Klingelton nicht
mehr hörbar ist.
Im Display erscheint das Symbol Ú.
Klingelton wieder einschalten
* Stern-Taste lang drücken.
Klingelton für den aktuellen Anruf
ausschalten
§Ruf aus§ Display-Taste drücken.
Aufmerksamkeitston ein-/ausschalten
Sie können statt des Klingeltons einen
Aufmerksamkeitston einschalten. Bei
einem Anruf ertönt dann ein kurzer Ton
(„Beep“) anstelle des Klingeltons.
* Stern-Taste lang drücken und
innerhalb von 3 Sek.:
§Beep§§ Display-Taste drücken. Ein
Anruf wird nun durch einen
kurzen Aufmerksamkeitston
signalisiert. Im Display steht
º
.
19
Page 22
Gigaset SL44 / deutsch / A31008-M1609-R101-1-6Z19 / start_guide_time.fm / 20.08.2004
Mobilteil einstellen
Sound-Manager
Der Sound-Manager des Mobilteils verwaltet Klingeltöne und Sounds, die Sie als
Klingeltonmelodie verwenden können. Er
kann folgende Sound-Typen verwalten:
Symbol Sound Format
Ù Klingeltöne; Monophon Standard
× Polyphon Standard
× Polyphon .psf
Ö Monophon iMelody
Ø Aufgenommener Sound P2CM
Das Symbol wird im Sound-Manager vor
dem Namen angezeigt. In Ihrem Telefon
sind 3 Ù und 17 × voreingestellt. Die voreingestellten Sounds können Sie nicht
umbenennen oder löschen.
Sounds im .psf- und im iMelody-Format
können Sie von einem PC herunterladen
(S. 28). Sounds im P2CM-Format können
Sie selbst mit Ihrem Gigaset SL44 aufnehmen.
Sie können die vorhandenen Sounds
anhören und Sounds, die Sie auf das
Mobilteil geladen und gespeichert haben,
im Sound-Manager umbenennen und
löschen.
Sounds aufnehmen
Sie können Sounds über den SoundManager aufnehmen (max. Länge
30 Sek.).
¢ Ë ¢ <Neuer Sound>
v
§OK§ Display-Taste drücken. Die
Aufnahme über das Mikrofon
startet.
§Beenden§ Display-Taste drücken. die Auf-
nahme wird beendet.
Während der Aufnahme können Sie mit
der Display-Taste
unterbrechen und anschließend mit
wieder aufnehmen.
Nach erfolgreicher Aufnahme, wird diese
zur Kontrolle nochmals wiedergegeben.
§Pause§ die Aufnahme
§Aufn.
§Sichern§ Display-Taste drücken, um
Aufnahme zu speichern.
Namen ändern (maximal 16
Zeichen, keine Leerzeichen,
Sonderzeichen und Umlaute
verwenden) und
§Sichern§ drü-
cken. Der Eintrag wird mit
dem neuen Namen gespeichert.
§Neu§ Display-Taste drücken. Die
Aufnahme wird verworfen
und neue Aufnahme wird
gestartet
§Beenden§ Display-Taste drücken. die Auf-
nahme wird beendet.
Sound abspielen
v ¢ Ë ¢ q (Eintrag auswählen)
§Anhören§ Display-Taste drücken. Sounds
werden abgespielt. Mit der
Tas te q zwischen Einträgen
wechseln.
§Beenden§ Display-Taste drücken. Wieder-
gabe wird beendet.
a Lang drücken (Ruhezustand).
Während Sie Sounds abspielen, können
Sie mit der Display-Taste
§Lautst.§ die Laut-
stärke einstellen.
Haben Sie einen Sound in einem ungülti-
gen Dateiformat abgespeichert, erhalten
Sie nach dem Auswählen eine Fehlermeldung. Mit Î brechen Sie den Vorgang ab. Mit
§Löschen§ löschen Sie den
Sound.
Sound umbenennen/löschen
Sie haben einen Eintrag ausgewählt. Ist
ein Sound nicht löschbar (è), stehen diese
Optionen nicht zur Verfügung.
v Menü öffnen.
Situationsbedingt können Sie folgende
Funktionen wählen:
Name ändern
Auswählen und
ändern (maximal 16 Zeichen, keine
§OK§ drücken. Namen
20
Page 23

Gigaset SL44 / deutsch / A31008-M1609-R101-1-6Z19 / start_guide_time.fm / 20.08.2004
Mobilteil einstellen
Leerzeichen, Sonderzeichen und
Umlaute verwenden) und
Der Eintrag wird mit dem neuen
Namen gespeichert.
Eintrag löschen
Der ausgewählte Eintrag wird gelöscht.
Eine gelöschte Klingeltonmelodie wird
automatisch ersetzt. Ein gelöschte Klingeltonmelodie für VIP-Anrufe oder Jahrestage wird nicht automatisch ersetzt.
§OK§ drücken.
Hinweistöne ein-/ausschalten
Ihr Mobilteil weist Sie akustisch auf verschiedene Tätigkeiten und Zustände hin.
Folgende Hinweistöne können Sie unabhängig voneinander ein- oder ausschalten:
u Tastenklick: Jeder Tastendruck wird
bestätigt.
u Quittungstöne:
– Bestätigungston (aufsteigende
Tonfolge): am Ende der Eingabe/Einstellung und beim Eintreffen einer
SMS bzw. eines neuen Eintrags in
der Anrufbeantworterliste (basisabhängig) oder der Anruferliste
– Fehlerton (absteigende Tonfolge):
bei Fehleingaben
– Menü-Endeton: beim Blättern am
Ende eines Menüs
u Akkuton: Der Akku muss geladen wer-
den.
¢ ï ¢ Hinweistöne
v
¤ Mehrzeilige Eingabe ändern:
Tastenklick:
Ein oder Aus auswählen.
Quittung:
Ein oder Aus auswählen.
Akkuton:
Ein, Aus oder in Verb. auswählen. Der
Akkuwarnton wird ein- oder ausgeschaltet bzw. ertönt nur im Gesprächszustand.
¤ Änderungen speichern (S. 10).
Den Bestätigungston beim Hineinstellen
des Mobilteils in die Ladeschale können
Sie nicht ausschalten.
Wecker einstellen
Voraussetzung: Datum und Uhrzeit sind
eingestellt (S. 6).
Wecker ein-/ausschalten und einstellen
v ¢ ì ¢ Wecker
¤ Mehrzeilige Eingabe ändern:
Aktivierung:
Ein oder Aus auswählen.
Zeit:
Weckzeit 4-stellig eingeben.
¤ Änderungen speichern (S. 10).
Das Symbol ¼ wird angezeigt.
Ein Weckruf wird mit der ausgewählten
Klingeltonmelodie (S. 18) am Mobilteil
signalisiert. Der Weckruf ertönt 60 Sek.
lang. Im Display wird Wecker angezeigt.
Während eines Anrufs wird ein Weckruf
nur durch einen kurzen Ton signalisiert.
Weckruf ausschalten
Voraussetzung: Es ertönt ein Weckruf.
§Ruf aus§ Display-Taste oder beliebige
Taste drücken.
Termin einstellen
Sie können sich von Ihrem Mobilteil an bis
zu 5 Termine erinnern lassen (Lautstärke
und Melodie, s. S. 18).
Termin speichern
Voraussetzung: Datum und Uhrzeit sind
eingestellt (S. 6).
¢ ì ¢ Termine
v
Die Liste der gespeicherten Termine wird
angezeigt. Wenn Sie bereits fünf Termine
21
Page 24

Gigaset SL44 / deutsch / A31008-M1609-R101-1-6Z19 / start_guide_time.fm / 20.08.2004
Mobilteil einstellen
gespeichert haben, müssen Sie zunächst
einen bestehenden Termin löschen.
<Neuer Eintrag>
Auswählen und
§OK§ drücken.
¤ Mehrzeilige Eingabe ändern:
Aktivierung:
Ein oder Aus auswählen.
Datum:
Tag/Monat 4-stellig eingeben.
Zeit:
Stunden/Minuten 4-stellig eingeben.
Text:
Display-Taste
(max. 16-stellig) eingeben und
cken. De r Text wird als Terminname in
der Liste und beim Terminruf im Display
angezeigt. Wenn Sie keinen Text eingeben, werden Datum und Zeit des Termins angezeigt.
Änderungen speichern (S. 10).
Das Symbol ¼ wird angezeigt. D er Termin
ist in der Terminliste mit ‰ markiert. Die
Termine werden in der Liste nach dem
Datum sortiert.
Ein Terminruf wird mit der ausgewählten
Klingeltonmelodie (S. 18) signalisiert. Der
Terminruf ertönt 30 Sek. lang. Es wird der
angegebene Text oder Datum und Uhrzeit
angezeigt.
Während eines Anrufs wird ein Termin nur
durch einen kurzen Ton signalisiert.
§Ändern§ drücken. Text
§OK§ drü-
Termine verwalten
v ¢ ì ¢ Termine ¢ (Termin 1–5
auswählen)
Termin ansehen/ändern:
§Ansehen§ Di splay-Taste drücken. Termin
wird angezeigt.
Zurück mit
§Ändern§ Ggf. Display-Taste drücken,
um Eintrag zu ändern.
§OK§ oder:
¤ Änderungen ausführen.
Weitere Menüfunktionen nutzen:
v Menü öffnen.
Sie haben folgende Möglichkeiten:
Eintrag ändern
Ausgewählten Termin ändern.
Eintrag löschen
Ausgewählten Termin löschen.
Liste löschen
Alle Termine löschen.
Terminruf ausschalten oder beantworten
Voraussetzung: Es ertönt ein Terminruf.
§Ruf aus§ Display-Taste drücken, um den
Terminruf auszuschalten.
Nicht angenommene Termine, Jahrestage anzeigen
Nicht angenommene Termine/Jahrestage
(S. 12) werden in folgenden Fällen in der
Liste Ereignisse gespeichert:
u Sie nehmen einen Termin/Jahrestag
nicht an.
u Der Termin/Jahrestag wurde während
eines Anrufs signalisiert.
u Das Mobilteil ist zum Zeitpunkt eines
Termins/Jahrestages ausgeschaltet.
Der neueste Eintrag steht am Anfang der
Liste.
Liegt in dieser Liste ein neuer Termin/Jahrestag vor, steht im Display
Sie die Display-Taste drücken, wird die
Liste Ereignisse geöffnet.
Liste über Menü öffnen:
¢ ì ¢ Ereignisse
v
s Termin/Jahrestag auswählen.
Informationen zum Termin/
Jahrestag werden angezeigt.
Ein abgelaufener Termin ist
mit ¼ markiert, ein abgelaufener Jahrestag mit ‚.
§§Löschen§ Display-Taste drücken, um Ter-
min/Jahrestag zu löschen.
a Lang drücken (Ruhezustand).
§Termin§. Wenn
22
Page 25
Gigaset SL44 / deutsch / A31008-M1609-R101-1-6Z19 / start_guide_time.fm / 20.08.2004
Anhang
Sind in der Liste 10 Einträge gespeichert,
wird beim nächsten Terminruf der älteste
Eintrag gelöscht.
Notrufnummer
Im Lieferzustand ist 112 als Notrufnummer eingetragen. Sie können die Notrufnummer ändern oder löschen.
Die Notrufnummer können Sie auch bei
eingeschalteter Tastensperre wählen.
Notrufnummer ändern
v ¢ Ð ¢ Mobilteil ¢ Notrufnummer
Die Notrufnummer wird angezeigt. Sie
können die Nummer nicht mit c aus diesem Menü wählen.
~ Notrufnummer ändern.
© Display-Taste drücken.
Speichern Auswählen und
Die Eingabe ist gespeichert.
§OK§ drücken.
Notrufnummer wählen
Die Notrufnummer kann auch bei eingeschalteter Tastensperre (S. 6) gewählt
werden.
~ Notrufnummer eingeben.
c Abheben-Taste drücken.
Mobilteil in den Lieferzustand zurücksetzen
Sie können individuelle Einstellungen und
Änderungen zurücksetzen. Einträge des
Telefonbuchs, der Anruferliste, des E-MailVerzeichnisses, die Anmeldung des
Mobilteils an der Basis sowie der Inhalt des
Sound-Managers bleiben erhalten.
¢ Ð ¢ Mobilteil ¢ Mobilteil-Reset
v
§Ja§ Display-Taste drücken.
a Lang drücken (Ruhezustand).
Mit a oder Display-Taste §Nein§ das Zurück-
setzen abbrechen.
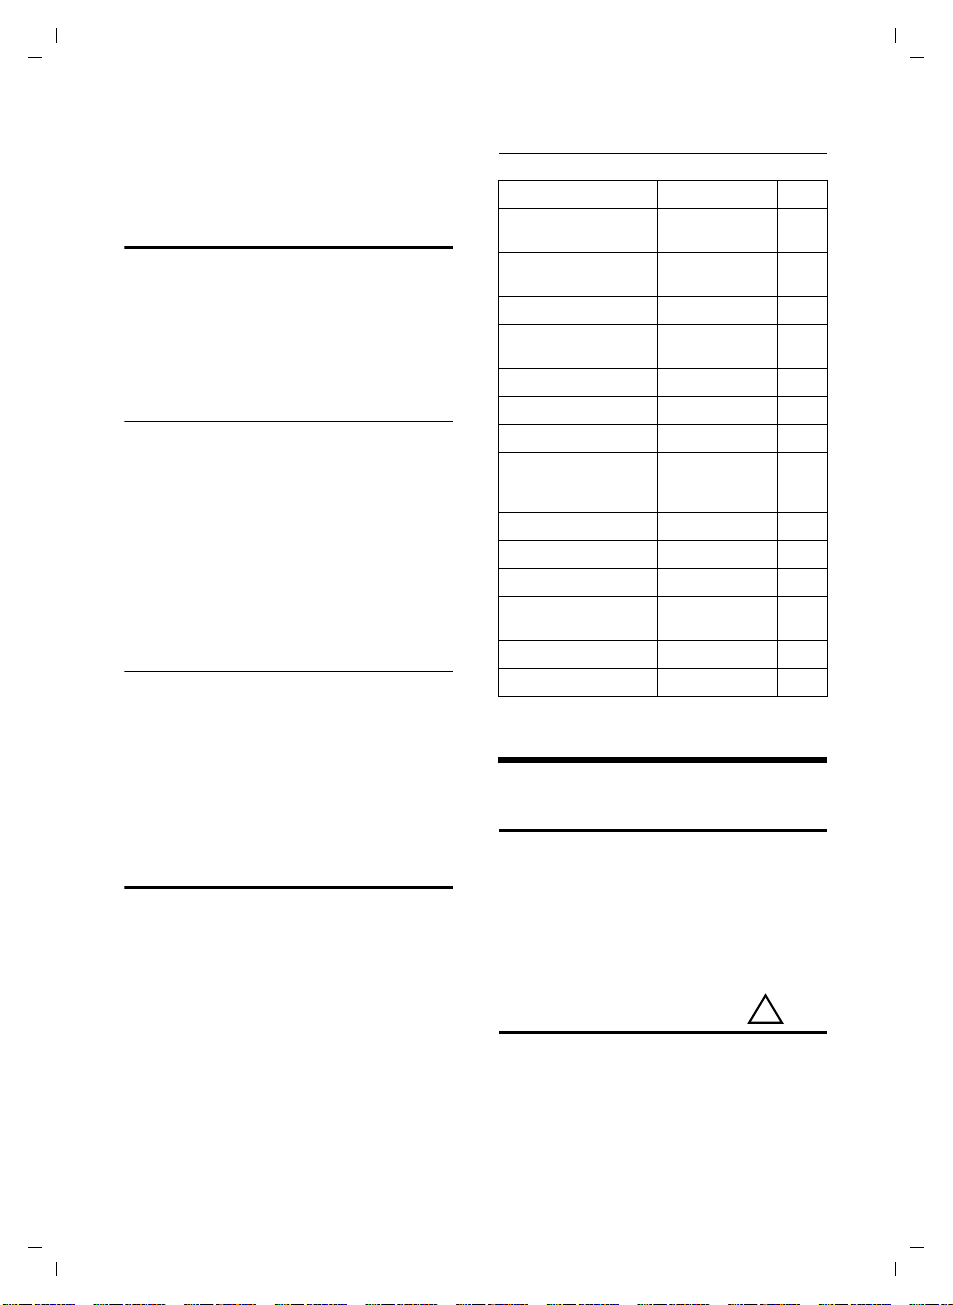
Lieferzustand des Mobilteils
Funktion Lieferzustand Seite
Akkuton/Tastenklick/
Quittungston
Automatische Rufan-
nahme
Walky-Talky aus S. 15
Babyalarm: Empfind-
lichkeit
Funktionstaste Keine Funktion
Basisauswahl Basis 1 S. 6
Display-Sprache länderspez. S. 17
Lautstärke: Freispre-
chen/Hörer/Klingelton, Wecker, Termin
Logo ein S. 17
Nachtmodus aus S. 18
Notrufnummer 112 S. 23
Texteingabehilfe
EATONI
Wecker/Termin aus S. 21
Zeichensatz Standard S. 29
ein S. 19
ein S. 18
hoch S. 16
3/1/5 S. 18
ein S. 29
Anhang
Pflege
¤ Ladeschale und Mobilteil mit einem
feuchten Tuch (keine Lösungsmittel)
oder einem Antistatiktuch abwischen.
Nie ein trockenes Tuch verwenden. Es
besteht die Gefahr der statischen Aufladung.
Kontakt mit Flüssigkeit
¤ Das Mobilteil sofort ausschalten, falls
es mit Flüssigkeit in Kontakt gekom-
men ist.
¤ Auf keinen Fall das Mobilteil ein-
schalten.
¤ Sofort Akkus entnehmen.
!
23
Page 26
Gigaset SL44 / deutsch / A31008-M1609-R101-1-6Z19 / start_guide_time.fm / 20.08.2004
Anhang
Lassen Sie die Flüssigkeit aus dem Mobilteil abtropfen. Gehen Sie ausschließlich
wie folgt vor:
¤ Das Mobilteil waagrecht mit dem offe-
nen Akkufach nach unten halten.
¤ Das Mobilteil senkrecht halten. Dabei
das Mobilteil leicht nach vorne und hinten kippen und jeweils leicht schütteln.
¤ Alle Teile trocken tupfen und das
Mobilteil anschließend mindestens 72
Stunden mit geöffnetem Akkufach
und der Tastatur nach unten an einem
trockenen, warmen Ort lagern (nicht:
Mikrowelle, Backofen o.Ä.).
Nach vollständigem Austrocknen ist in
vielen Fällen die Inbetriebnahme wieder
möglich.
Fragen und Antworten
Treten beim Gebrauch Ihres Telefons
Fragen auf, stehen wir Ihnen unter
www.siemens-mobile.com/gigasetcustomercare rund um die Uhr zur Verfügung.
Außerdem sind in der folgenden Tabelle
häufig auftretende Probleme und mögliche Lösungen aufgelistet.
Das Display zeigt nichts an.
1. Mobilteil ist nicht eingeschaltet.
¥ Auflegen-Taste a lang drücken.
2. Die Akkus sind leer.
¥ Akkus laden bzw. austauschen (S. 4,
S. 5).
Das Mobilteil reagiert nicht auf einen Tastendruck.
Tastensperre ist eingeschaltet.
¥ Raute-Taste
Im Display blinkt „Basis x“.
1. Mobilteil ist außerhalb der Reichweite der
Basis.
lang drücken (S. 6).
#
¥ Abstand Mobilteil/Basis verringern.
2. Mobilteil wurde abgemeldet.
¥ Mobilteil anmelden (S. 4).
Im Display blinkt Basissuche.
Mobilteil ist auf Beste Basis eingestellt und
keine Basis in Reichweite.
¥ Abstand Mobilteil/Basis verringern.
Das Mobilteil klingelt nicht.
Klingelton ist ausgeschaltet.
¥ Klingelton einschalten (S. 19).
Ihr Gesprächspartner hört Sie nicht.
Sie haben die Taste
Mobilteil ist „stummgeschaltet“.
u (INT) gedrückt. Das
¥ Mikrofon wieder einschalten (S. 11).
Sie hören bei der Eingabe einen Fehlerton
(absteigende Tonfolge).
Aktion ist fehlgeschlagen/Eingabe ist fehlerhaft.
¥ Vorgang wiederholen.
Beachten Sie dabei das Display und lesen Sie
ggf. in der Bedienungsanleitung nach.
Kundenservice (Customer Care)
Wir bieten Ihnen schnelle und individuelle
Beratung!
Unser Online-Support im Internet:
Deutschland: www.siemens-mobile.de/
gigasetservice
Österreich: www.siemens-mobile.at
Schweiz und Belgien: www.siemens-
mobile.com/gigasetcustomercare
Immer und überall erreichbar. Sie erhalten
24 Stunden Unterstützung rund um
unsere Produkte. Sie finden dort ein interaktives Fehler-Suchsystem, eine Zusammenstellung der am häufigsten gestellten
Fragen und Antworten sowie Bedienungsanleitungen zum Download.
Persönliche Beratung zu unserem Angebot erhalten Sie bei
24
Page 27
Gigaset SL44 / deutsch / A31008-M1609-R101-1-6Z19 / start_guide_time.fm / 20.08.2004
Anhang
Premium-Hotline Deutschland:
0190-7-45822 (1,24 Euro/Min.)
Premium-Hotline Österreich:
0900-30-0808 (1,35 Euro/Min.)
Es erwarten Sie qualifizierte Siemens-Mitarbeiter, die Ihnen bezüglich Produktinformation und Installation kompetent zur
Seite stehen. Im Falle einer notwendigen
Reparatur, evtl. Garantie- oder Gewährleistungsansprüche erhalten Sie schnelle
und zuverlässige Hilfe bei unseren Service-Centern.
Service-Center Deutschland:
01805-333222 (0,12 Euro/Min.)
Service-Center Österreich:
051707-5004 (Ortstarif)
051707-5044 (Fax)
Service-Center Schweiz:
0848-212 000
www.siemens-mobile.com/contact
Service-Center Belgien:
078-15 22 21
Weitere Servicenummern finden Sie am
Ende der Bedienungsanleitung unter
„Service“.
Die persönliche Abgabe Ihres SiemensGerätes ist ausschließlich möglich in
Österreich:
Siemens Service Shop
u Erdberger Lände 28, A-1030 Wien
u Quellenstr. 2, A-1100 Wien
Montag bis Freitag von 8-18 Uhr
Bitte halten Sie Ihren Kaufbeleg bereit.
In Ländern, in denen unser Produkt nicht
durch autorisierte Händler verkauft wird,
werden keine Austausch- bzw. Reparaturleistungen angeboten.
Zulassung
Dieses Produkt ist für den weltweiten
Betrieb vorgesehen, außerhalb des Europäischen Wirtschaftsraums (mit Ausnahme der Schweiz) abhängig von nationaler Zulassung. Länderspezifische Beson-
derheiten sind berücksichtigt. Die Übereinstimmung des Geräts mit
grundlegenden Anforderungen der
R&TTE-Direktive ist durch das CE-Kennzeichen bestätigt.
Auszug aus der Originalerklärung:
„We, Siemens AG, declare, that the above mentioned product is manufactured according to
our Full Quality Assurance System certified by
CETECOM ICT Services GmbH with ANNEX V of
the R&TTE-Directive 99/5/EC. The presumption
of conformity with the essential requirements
regarding Council Directive 99/5/EC is ensured“
Senior Approvals Manager
The Declaration of Conformity (DoC) has been
signed. In case of need a copy of the original
DoC can be made available via the company
hotline.
Technische Daten
Empfohlene Akkus
(Stand bei Drucklegung der Bedienungsanleitung)
Nickel-Metall-Hydrid (NiMH):
u Sanyo Twicell 650
u Sanyo Twicell 700
u Panasonic 700mAh "for DECT"
u GP 700mAh
u Yuasa Technology AAA Phone 700
u Varta Phone Power AAA 700mAh
u GP 850 mAh
u Sanyo NiMH 800
u Yuasa Technologies AAA 800
u VARTA PhonePower AAA 700 mAh
Das Mobilteil wird mit zugelassenen Akkus
ausgeliefert.
25
Page 28
Gigaset SL44 / deutsch / A31008-M1609-R101-1-6Z19 / start_guide_time.fm / 20.08.2004
Anhang
Betriebszeiten/Ladezeiten des Mobilteils
Kapazität 800 mAh
Bereitschaftszeit etwa 150 Stunden (6 Tage)
Gesprächszeit etwa 10 Stunden
Ladezeit etwa 8 Stunden
Betriebs- und Ladezeiten gelten nur bei
Verwendung der empfohlenen Akkus.
Allgemeine technische Daten
Abmessungen
Mobilteil
Abmessungen/
Ladeschale
Gewicht Mobilteil
mit Akkus
Gewicht/Ladeschale
134,3 x 55 x 30,7 mm
(L × B × H)
86,6 x 85,4 x 46,4 mm
(L x B x H)
127 g
41 g
Garantie Deutschland und Österreich
Dem Verbraucher (Kunden) wird unbeschadet seiner Mängelansprüche gegenüber dem Verkäufer eine Haltbarkeitsgarantie zu den nachstehenden Bedingungen eingeräumt:
u Neugeräte und deren Komponenten,
die aufgrund von Fabrikations- und/
oder Materialfehlern innerhalb von
24Monaten ab Kauf einen Defekt aufweisen, werden von Siemens nach
eigener Wahl gegen ein dem Stand der
Technik entsprechendes Gerät kostenlos ausgetauscht oder repariert. Für
Verschleißteile (z. B. Akkus, Tastaturen,
Gehäuse) gilt diese Haltbarkeitsgarantie für sechs Monate ab Kauf.
u Diese Garantie gilt nicht, soweit der
Defekt der Geräte auf unsachgemäßer
Behandlung und/oder Nichtbeachtung
der Handbücher beruht.
u Diese Garantie erstreckt sich nicht auf
vom Vertragshändler oder vom Kunden
selbst erbrachte Leistungen (z.B. Installation, Konfiguration, Softwaredownloads). Handbücher und ggf. auf einem
separaten Datenträger mitgelieferte
Software sind ebenfalls von der Garantie ausgeschlossen.
u Als Garantienachweis gilt der Kaufbe-
leg, mit Kaufdatum. Garantieansprüche sind innerhalb von zwei Monaten
nach Kenntnis des Garantiefalles geltend zu machen.
u Ersetzte Geräte bzw. deren Komponen-
ten, die im Rahmen des Austauschs an
Siemens zurückgeliefert werden,
gehen in das Eigentum von Siemens
über.
u Diese Garantie gilt für in der Europäi-
schen Union erworbene Neugeräte.
Garantiegeberin ist die Siemens Aktiengesellschaft, Schlavenhorst 88,
D-46395 Bocholt und für in Österreich
erworbene Neugeräte die Siemens
Aktiengesellschaft, Quellenstraße 2,
A-1100 Wien.
u Weiter gehende oder andere Ansprü-
che aus dieser Herstellergarantie sind
ausgeschlossen. Siemens haftet nicht
für Betriebsunterbrechung, entgangenen Gewinn und den Verlust von
Daten, zusätzlicher vom Kunden aufgespielter Software oder sonstiger Informationen. Die Sicherung derselben
obliegt dem Kunden. Der Haftungsausschluss gilt nicht, soweit zwingend
gehaftet wird, z.B. nach dem Produkthaftungsgesetz, in Fällen des Vorsatzes, der groben Fahrlässigkeit, wegen
der Verletzung des Lebens, des Körpers
oder der Gesundheit oder wegen der
Verletzung wesentlicher Vertragspflichten. Der Schadensersatzanspruch
für die Verletzung wesentlicher Vertragspflichten ist jedoch auf den vertragstypischen, vorhersehbaren Schaden begrenzt, soweit nicht Vorsatz
oder grobe Fahrlässigkeit vorliegt oder
wegen der Verletzung des Lebens, des
Körpers oder der Gesundheit oder nach
26
Page 29

Gigaset SL44 / deutsch / A31008-M1609-R101-1-6Z19 / start_guide_time.fm / 20.08.2004
Anhang
dem Produkthaftungsgesetz gehaftet
wird.
u Durch eine erbrachte Garantieleistung
verlängert sich der Garantiezeitraum
nicht.
u Soweit kein Garantiefall vorliegt,
behält sich Siemens vor, dem Kunden
den Austausch oder die Reparatur in
Rechnung zu stellen. Siemens wird den
Kunden hierüber vorab informieren.
u Eine Änderung der Beweislastregeln
zum Nachteil des Kunden ist mit den
vorstehenden Regelungen nicht verbunden.
Zur Einlösung dieser Garantie wenden Sie
sich bitte an den Siemens Telefonservice.
Die Rufnummer entnehmen Sie bitte der
Bedienungsanleitung.
Garantie-Schein Belgien
Dem Verbraucher (Kunden) wird unbeschadet seiner Mängelansprüche gegenüber dem Vertragshändler eine Garantie zu
den nachstehenden Bedingungen eingeräumt:
u Wenn das neue Gerät oder Zubehör
innerhalb von 24 Monaten nach
Ankauf Defekte aufweist infolge von
Produktions- bzw. Materialfehlern, hat
Siemens die Wahl, das Gerät kostenlos
zu reparieren oder durch ein anderes,
dem Stand der Technik
entsprechendes Gerät zu ersetzen. Im
Falle von Teilen, die dem Verschleiß
ausgesetzt sind (wie Batterien,
Tastatur, Gehäuse), gilt diese Garantie
für eine Dauer von sechs Monaten
nach Kaufdatum.
u Diese Garantie gilt nicht, soweit der
Defekt der Geräte auf unsachgemäßer
Behandlung und/oder Nichtbeachtung
der Handbücher beruht.
u Diese Garantie erstreckt sich nicht auf
vom Vertragshändler oder vom
Kunden selbst erbrachte Leistungen
(z.B. Installation, Konfiguration,
Softwaredownloads). Handbücher
und ggf. auf einem separaten
Datenträger mitgelieferte Software
sind ebenfalls von der Garantie
ausgeschlossen.
u Als Garantienachweis gilt der
Kaufbeleg, mit Kaufdatum.
Garantieansprüche sind innerhalb von
zwei Monaten nach Feststellung des
Defekts geltend zu machen.
u Ersetzte Geräte bzw. deren
Komponenten, die im Rahmen des
Austauschs an Siemens
zurückgeliefert werden, gehen in das
Eigentum von Siemens über.
u Diese Garantie gilt für in der
Europäischen Union erworbene
Neugeräte. Garantiegeberin für in
Belgien erworbene Geräte ist Siemens
S.A. Chaussée de Charleroi 116,B1060
Bruxelles
u Weitergehende oder andere
Ansprüche aus dieser Garantie sind
ausgeschlossen, ausgenommen
soweit die Haftung auf zwingendem
Recht beruht wie etwa die gesetzliche
Regelung zur Produkthaftung.
u Durch eine erbrachte Garantieleistung
verlängert sich der Garantiezeitraum
nicht.
u Soweit kein Garantiefall vorliegt,
behält sich Siemens vor, dem Kunden
den Austausch oder die Reparatur in
Rechnung zu stellen.
u Eine Änderung der Beweislastregeln
zum Nachteil des Kunden ist mit den
vorstehenden Regelungen nicht
verbunden.
Zur Einlösung dieser Garantie wenden Sie
sich bitte an den Siemens Telefonservice.
Die Rufnummer entnehmen Sie bitte der
Bedienungsanleitung.
Garantie Schweiz
Die Garantiedauer beträgt 24 Monate.
27
Page 30
Gigaset SL44 / deutsch / A31008-M1609-R101-1-6Z19 / start_guide_time.fm / 20.08.2004
Anhang
PC Interface
Sie können das Mobilteil über ein Datenkabel (S. 30) mit Ihrem Rechner verbinden. Ihr Rechner kann dann mit Hilfe eines
Programms (kostenloser Download unter
www.siemens-mobile.com/gigasetsl44
mit Ihrem Mobilteil kommunizieren. Sie
können auf das Telefonbuch Ihres
Mobilteils zugreifen und Sounds vom
Rechner auf das Mobilteil laden.
Während der Datenübertragung zwischen
Mobilteil und PC wird im Display Datenüber-
tragung angezeigt. Während dieser Zeit
sind keine Eingaben über die Tastatur
möglich und ankommende Anrufe werden ignoriert.
)
Spiel „Ballon Shooter“
Ziel des Spieles ist es, möglichst viele Ballons zu treffen.
Spiel starten
v ¢ í ¢ Balloon Shooter
Spiel mit der Display-Taste starten.
Weitere Optionen
Ein Menü mit weiteren Optionen wird
geöffnet, wenn Sie die Display-Taste ©
drücken.
Balloon Shooter spielen
¤ Um das Fadenkreuz nach links, rechts,
oben oder unten zu bewegen, drücken
Sie folgende Tasten:
¢
¢
p
¢
¢
¤ Um das Fadenkreuz nach links unten,
links oben, rechts unten oder rechts
oben zu bewegen, drücken Sie folgende Tasten:
Tas te Bewegung
1, 2,
I Links unten
4, 5, L Links oben
M, N, O Rechts oben
Q, *, # Rechts unten
¤ Um einen Ballon abzuschießen, drü-
cken Sie die Funktionstaste ú.
Während des Spiels können Sie durch langes Drücken der Stern-Taste * den
Sound ein-/ und ausschalten und durch
Drücken der Nachrichten-Taste f das
Spiel anhalten und wieder fortsetzen.
Text schreiben und bearbeiten
Beim Erstellen eines Textes gelten folgende Regeln:
u Die Schreibmarke (Cursor) mit u v
t s steuern.
u Zeichen werden links von der Schreib-
marke eingefügt.
u Stern-Taste
vom Modus „Abc“ zu „123“ und von
„123“ zu „abc“ und von „abc“ zu „Abc“
(Großschreibung: 1. Buchstabe großgeschrieben, alle weiteren klein) zu
wechseln. Stern-Taste * vor der
Eingabe des Buchstabens drücken.
u Stern-Taste
die Auswahlzeile der Zeichen, die der
Stern-Taste zugeordnet sind.
u Bei Einträgen ins Telefonbuch wird der
erste Buchstabe des Namens automatisch großgeschrieben, es folgen kleine
Buchstaben.
Namen schreiben
(ohne Texteingabehilfe)
Wenn Sie eine Taste lang drücken, werden
die Zeichen der entsprechenden Taste in
der untersten Display-Zeile angezeigt
und nacheinander markiert. Wenn Sie die
Taste loslassen, wird das markierte Zeichen im Eingabefeld eingefügt.
Ob die Groß-, Klein- oder Ziffernschreibung eingestellt ist, wird Ihnen im Display
angezeigt.
kurz drücken, um
*
lang drücken: Zeigt
*
28
Page 31

Gigaset SL44 / deutsch / A31008-M1609-R101-1-6Z19 / start_guide_time.fm / 20.08.2004
Anhang
SMS schreiben (mit Texteingabehilfe)
Voraussetzung: Ihre Basis unterstützt
SMS.
Die Texteingabehilfe EATONI unterstützt
Sie beim Schreiben von SMS.
Jeder Taste zwischen Q und O
sind mehrere Buchstaben und Zeichen
zugeordnet (siehe Zeichensatztabellen,
S. 29). Diese werden in einer Auswahlzeile
direkt unter dem Textfeld (über den Display-Tasten) angezeigt, sobald Sie eine
Taste drücken. Der nach der Wahrscheinlichkeit am ehesten gesuchte Buchstabe
wird invers dargestellt und steht am
Anfang der Auswahlzeile. Er wird in das
Textfeld übernommen.
470(2) Ç Abc
Hallo Peter, kann heute
nicht kommen. Ic
hgi
W¨
1 EATONI ist eingeschaltet
2SMS-Text
3Auswahlzeile
Ist dieser Buchstabe richtig, bestätigen Sie
ihn, indem Sie die nächste Taste drücken.
Entspricht er nicht dem gesuchten, drücken Sie so oft kurz auf die Raute-Taste
#, bis der gesuchte Buchstabe invers
in der Darstellungszeile erscheint und
damit in das Textfeld übernommen wird.
Wenn Sie die Raute-Taste # lang
drücken, wird die Auswahlzeile der Zeichen angezeigt, die der Raute-Taste zugeordnet sind.
Texteingabehilfe aus-/einschalten
Voraussetzung: Sie schreiben eine SMS.
© Display-Taste drücken.
Txt.eingabehilfe
Auswählen und
(‰ =ein).
a Auflegen-Taste kurz drücken,
um in das Textfeld zurückzukehren. Den Text eingeben.
1
2
3
§OK§ drücken
Reihenfolge der T elefonb uch ein träge
Die Telefonbucheinträge werden generell
alphabetisch sortiert. Leerzeichen und Ziffern haben dabei erste Priorität. Die Sortierreihenfolge ist wie folgt:
1. Leerzeichen (hier mit s dargestellt)
2. Ziffern (0–9)
3. Buchstaben (alphabetisch)
4. Restliche Zeichen
Wollen Sie die alphabetische Reihenfolge
der Einträge umgehen, fügen Sie vor dem
Namen ein Leerzeichen oder eine Ziffer
ein. Diese Einträge rücken dann an den
Anfang des Telefonbuchs. Namen, denen
Sie einen Stern voranstellen, stehen am
Ende des Telefonbuchs.
Sonderzeichen eingeben
Standardschrift
.
*#
Abc-->
#
123
123 -->
@
abc
1 Q
*) **)
Leer-
1x
zeichen
Leerzeichen
2x 1 Â ,
3x £ 1 ? * \
4x $
â
!/&
5x ¥ £ 0 ( §
6x ¤ $ + )
7x ¥ - <
8x ¤ : =
9x ¿ >
10x ¡ %
11x “
12x ‘
13x ;
14x _
*) Telefonbuch und andere Listen
**) Beim Schreiben einer SMS
29
Page 32

Gigaset SL44 / deutsch / A31008-M1609-R101-1-6Z19 / accessories_SAG.fm / 20.08.2004
Zubehör
Zubehör
Mobiles Freisprechset mit P2T-Taste
Mit dem mobilen Freisprechset können Sie telefonieren und
haben die Hände dabei frei.
Data Cable DCA-500
Zum Anschluss des Telefons an die serielle RS232-Schnittstelle Ihres Rechners.
Data Cable USB DCA-510
Zum Anschluss des Telefons an die USB-Schnittstelle Ihres
Rechners.
Alle Zubehörteile und Akkus können Sie über den Fachhandel bestellen.
Oder bestellen Sie direkt per Internet über den Online-Shop: www.siemens-mobile.com/
shop.
Dort erhalten Sie auch aktuelle Produktinformationen.
Verwenden Sie nur Originalzubehör. So vermeiden Sie mögliche Gesundheitsund Sachschäden und stellen sicher, dass alle relevanten Bestimmungen eingehalten werden.
30
Page 33

Gigaset SL44 / deutsch / A31008-M1609-R101-1-6Z19 / SL44_SIX.fm / 20.08.2004
Stichwortverzeichnis
Stichwortverzeichnis
A
Abbrechen (Vorgang) . . . . . . . . . . . . . 7
Abheben-Taste
Akku
einlegen
empfohlene Akkus
laden
Akkusymbol
Akkuton
Ändern
Display-Sprache
Klingelton
Namen der Basis
Notrufnummer
Sprachlautstärke
Anhören
Sprachmuster
Anmelden (Mobilteil)
Annehmen, Anruf
Anruf
annehmen
Anrufen
extern
intern
Anruferliste
Anzeigen
nicht angenommene Jahrestage
nicht angenommene Termine
Notrufnummer
Speicherplatz
Auflegen-Taste
Aufmerksamkeitston
Aufnehmen
Sprachmuster
Ausschalten
Klingelton unterdrücken
Mobilteil
Tastensperre
Ter minruf
Automatische Rufannahme
B
Babyalarm. . . . . . . . . . . . . . . . . . . . . 15
aktivieren
Empfindlichkeit
Balloon Shooter
. . . . . . . . . . . . . . . 1, 10
. . . . . . . . . . . . . . . . . . . . . 4
. . . . . . . . . . . . . 25
. . . . . . . . . . . . . . . . . . . . . . . . 5
. . . . . . . . . . . . . . . . . . . . 5
. . . . . . . . . . . . . . . . . . . . . . 21
. . . . . . . . . . . . . . . 17
. . . . . . . . . . . . . . . . . . . 18
. . . . . . . . . . . . . . . 6
. . . . . . . . . . . . . . . 23
. . . . . . . . . . . . . . 18
. . . . . . . . . . . . . . . . 13
. . . . . . . . . . . . . 4
. . . . . . . . . . . . . . . 10
. . . . . . . . . . . . . . . . . . . 10
. . . . . . . . . . . . . . . . . . . . . . 10
. . . . . . . . . . . . . . . . . . . . . . 11
. . . . . . . . . . . . . . . . . . . . 14
. . . 22
. . . . . 22
. . . . . . . . . . . . . . . 23
. . . . . . . . . . . . . . . . . 12
. . . . . . . . . . . . . . . 1, 10
. . . . . . . . . . . . . 19
. . . . . . . . . . . . . . . . 13
. . . . . . . . . 20
. . . . . . . . . . . . . . . . . . . . . 6
. . . . . . . . . . . . . . . . . . 6
. . . . . . . . . . . . . . . . . . . 22
. . . . . 10, 18
. . . . . . . . . . . . . . . . . . . 16
. . . . . . . . . . . . . . . 16
. . . . . . . . . . . . . . . . . 28
Basis
Namen der Basis ändern
wechseln
Beenden
Gespräch
Beispiel
Mehrzeilige Eingabe
Menü-Eingabe
Bestätigungston
Beste Basis
Betrieb (Telefon in Betrieb nehmen)
Betriebszeit des Mobilteils
im Babyalarm-Modus
. . . . . . . . . . . . . . . . . . . . 6
. . . . . . . . . . . . . . . . . . . .10
. . . . . . . . . . . . . . . . 8
. . . . . . . . . . . . . . . . .21
. . . . . . . . . . . . . . . . . . . . . 6
. . . . . . . . . 6
. . . . . . . . . . . . 9
. . 4
. . . . . . . . . .26
. . . . . . . . . . . .16
D
Datum einstellen . . . . . . . . . . . . . . . . 6
Display
Display-Sprache ändern
Display-Tasten
einstellen
im Ruhezustand
Kontrast
. . . . . . . . . . . . . . . . . . . . . . . .17
Logo
Nachtmodus
unverständliche Sprache
Display-Taste belegen
Display-Tasten
. . . . . . . . . . . . . . . . . 7
. . . . . . . . . . . . . . . . . . . .17
. . . . . . . . . . . . . . . . . . . . .17
. . . . . . . . . . . . . . . . . .18
. . . . . . . . . . . . . . . . . . 1
. . . . . . . . . .17
. . . . . . . . . . . . . . . 7
. . . . . . . . .17
. . . . . . . . . . . . .16
E
EATONI (Texteingabehilfe) . . . . . . . . .29
Ein-/Aus-Taste
Einschalten
Hinweistöne
Klingelton unterdrücken
Mobilteil
Rufannahme
Tastensperre
Ter min
Einstellen
Datum
Display-Sprache
Hörerlautstärke
Klingeltonlautstärke
Klingelton-Melodie
Lautsprecherlautstärke
Lautstärke, Melodie
Logo
Melodie
Mobilteil (individuell)
Nachtmodus
. . . . . . . . . . . . . . . . . . . 1
. . . . . . . . . . . . . . . . . .21
. . . . . . . . .20
. . . . . . . . . . . . . . . . . . . . . 6
. . . . . . . . . . . . . . . . . .18
. . . . . . . . . . . . . . . . . . 6
. . . . . . . . . . . . . . . . . . . . . .21
. . . . . . . . . . . . . . . . . . . . . . 6
. . . . . . . . . . . . . . .17
. . . . . . . . . . . . . . . .18
. . . . . . . . . . . .18
. . . . . . . . . . . . .19
. . . . . . . . . .18
. . . . . . . . . . . . .19
. . . . . . . . . . . . . . . . . . . . . . . .17
. . . . . . . . . . . . . . . . . . . . .19
. . . . . . . . . . .16
. . . . . . . . . . . . . . . . . .18
31
Page 34

Gigaset SL44 / deutsch / A31008-M1609-R101-1-6Z19 / SL44_SIX.fm / 20.08.2004
Stichwortverzeichnis
Sprachlautstärke
. . . . . . . . . . . . . . . . . . . . . . 21
Ter min
Uhrzeit
Wecker
Einstellungen s. Einstellen
Eintrag
auswählen (Menü)
Eintragen, Notrufnummer
E-Mail-Verzeichnis
Empfindlichkeit, Babyalarm
Erinnerungsruf
Escape-Taste
. . . . . . . . . . . . . . . . . . . . . . 6
. . . . . . . . . . . . . . . . . . . . . 21
. . . . . . . . . . . . . . 18
. . . . . . . . . . . . . . 7
. . . . . . . . . 23
. . . . . . . . . . . . . . . 13
. . . . . . . . 16
. . . . . . . . . . . . . . . . . 12
. . . . . . . . . . . . . . . . . . . . 7
F
Falscheingaben (Korrektur) . . . . . . . . . 8
Fehlerbehebung
Fehlerton
Flüssigkeit
Freisprechen
Freisprech-Taste
Funktionstaste
. . . . . . . . . . . . . . . . 24
. . . . . . . . . . . . . . . . . . . . . 21
. . . . . . . . . . . . . . . . . . . . . 23
. . . . . . . . . . . . . . . . . . . 10
. . . . . . . . . . . . . . . . . 1
. . . . . . . . . . . . . . . . . . 1
G
Garantie . . . . . . . . . . . . . . . . . . . . . . 26
Gespräch
beenden
intern
. . . . . . . . . . . . . . . . . . . . 10
. . . . . . . . . . . . . . . . . . . . . . 11
H
Hinweistöne . . . . . . . . . . . . . . . . . . . 21
Hörerbetrieb
Hörerlautstärke
Hörgeräte
. . . . . . . . . . . . . . . . . . . 10
. . . . . . . . . . . . . . . . . 18
. . . . . . . . . . . . . . . . . . . . . . 3
I
In Betrieb nehmen
Tel efo n
Intern
telefonieren
Internes Gespräch
. . . . . . . . . . . . . . . . . . . . . . 4
. . . . . . . . . . . . . . . . . . 11
. . . . . . . . . . . . . . . 11
J
Jahrestag . . . . . . . . . . . . . . . . . . . . . 12
im Telefonbuch speichern
nicht angenommenen anzeigen
nicht annehmen
. . . . . . . . . . . . . . 22
. . . . . . . . 12
. . . 22
K
Klingelton
ändern
Lautstärke einstellen
. . . . . . . . . . . . . . . . . . . . . 18
. . . . . . . . . . . 18
Melodie einstellen. . . . . . . . . . . . . .19
unterdrücken
Klingeltöne
einstellen
Korrektur von Falscheingaben
Kundenservice
. . . . . . . . . . . . . . . . .20
. . . . . . . . . . . . . . . . . . .6, 7
. . . . . . . 8
. . . . . . . . . . . . . . . . . .24
L
Ladezeiten des Mobilteils . . . . . . . . . .26
Ladezustandsanzeige
Lautstärke
einstellen
Hörer
Klingelton
Lautsprecher
Sprache Mobilteil
Lieferzustand
Mobilteil
Liste
Anruferliste. . . . . . . . . . . . . . . . . . .14
E-Mail-Verzeichnis
Mobilteile
Logo
Löschen
Jahrestag
Sprachmuster
Ter min
Zeichen
Lösch-Taste
. . . . . . . . . . . . . . . . . . . .19
. . . . . . . . . . . . . . . . . . . . . . .18
. . . . . . . . . . . . . . . . . . . .18
. . . . . . . . . . . . . . . . . . . . .23
. . . . . . . . . . . . . . . . . . .6, 7
. . . . . . . . . . . . . . . . . . . . . . . . .17
. . . . . . . . . . . . . . . . . . . .22
. . . . . . . . . . . . . . . . . . . . . .22
. . . . . . . . . . . . . . . . . . . . . 8
. . . . . . . . . . . . . . . . . . . . 7
. . . . . . . . . . . . . 5
. . . . . . . . . . . . . . . . . .18
. . . . . . . . . . . . . .18
. . . . . . . . . . . . . .13
. . . . . . . . . . . . . . . . .13
M
Manuelle Wahlwiederholung . . . . . . .14
Medizinische Geräte
Mehrzeilige Eingabe
Melodie, Klingelton
Menü
eine Menüebene zurück
Eintrag
Endeton
öffnen
Tas te
Menü-Eingabe
Mikrofon
Mobilteil
abmelden
an weiterer Basis anmelden
anmelden
Babyalarm nutzen
Betriebs- und Ladezeiten
Display-Sprache
. . . . . . . . . . . . . . . . . . . . . . 7
. . . . . . . . . . . . . . . . . . . . .21
. . . . . . . . . . . . . . . . . . . . .6, 7
. . . . . . . . . . . . . . . . . . . . . . . 7
. . . . . . . . . . . . . . . . . . . . . . 1
. . . . . . . . . . . . . . . . . . . . 4
. . . . . . . . . . . . . . . . . . . . 4
. . . . . . . . . . . . . . 3
. . . . . . . . . . . . . . 9
. . . . . . . . . . . . . .19
. . . . . . . . . 7
. . . . . . . . . . . . . . . . . . 8
. . . . . . . 6
. . . . . . . . . . . . . .15
. . . . . . . . .26
. . . . . . . . . . . . . . .17
32
Page 35

Gigaset SL44 / deutsch / A31008-M1609-R101-1-6Z19 / SL44_SIX.fm / 20.08.2004
Stichwortverzeichnis
ein-/ausschalten
einstellen (individuell)
Hinweistöne
in Lieferzustand zurücksetzen
Kontakt mit Flüssigkeit
. . . . . . . . . . . . . . . . . . . . . . 6, 7
Liste
. . . . . . . . . . . . . . . . . . . . . . . 17
Logo
mehrere nutzen
Nachtmodus
Ruhezustand
Sprachlautstärke
stummschalten
Wechsel zu bestem Empfang
Wechsel zu einer anderen Basis
. . . . . . . . . . . . . . . . 6
. . . . . . . . . . 16
. . . . . . . . . . . . . . . . . 21
. . . . . 23
. . . . . . . . . . 23
. . . . . . . . . . . . . . . . 6
. . . . . . . . . . . . . . . . . 18
. . . . . . . . . . . . . . . . . . 7
. . . . . . . . . . . . . . 18
. . . . . . . . . . . . . . . 11
. . . . . . 6
. . . . . 6
N
Nachrichten
. . . . . . . . . . . . . . . . . . . . . . . . 1
Taste
Nachrichten-Taste
Listen aufrufen . . . . . . . . . . . . . . . 14
Nachtmodus
Name
ansagen
der Basis ändern
Nicht angenommen
Jahrestag
Ter min
Notrufnummern
Nummer
im Telefonbuch speichern
. . . . . . . . . . . . . . . . . . . 18
. . . . . . . . . . . . . . . . . 13, 19
. . . . . . . . . . . . . . . 6
. . . . . . . . . . . . . . . . . . . . 22
. . . . . . . . . . . . . . . . . . . . . . 22
. . . . . . . . . . . . . . . . . 6
. . . . . . . . 11
O
Öffnen
. . . . . . . . . . . . . . . . . . . . . 6, 7
Menü
Tel efo nbuch
. . . . . . . . . . . . . . . . . 6, 7
P
PC Interface . . . . . . . . . . . . . . . . . . . 28
Pflege,Telefon
. . . . . . . . . . . . . . . . . . 23
Q
Quittungstöne. . . . . . . . . . . . . . . . . . 21
R
Raute-Taste . . . . . . . . . . . . . . . . . . . 1, 6
Reihenfolge im Telefonbuch
. . . . . . . . . . . . . . . . . . . . . . . . 1
R-Taste
Rufannahme
Ruhezustand (Display)
Ruhezustand, zurückkehren in den
. . . . . . . . . . . . . . . . . . . 18
. . . . . . . . 29
. . . . . . . . . . . . . 7
. . . . 7
S
Sammelruf. . . . . . . . . . . . . . . . . . . . .11
Sicherheitshinweise
Signalton s. Hinweistöne
Sonderzeichen eingeben
Sound
Klingelton
Sound-Manager
Speicherplatz
Telefonbuch, Kurzwahlliste,
E-Mail-Verzeichnis
Sperre
Tastensperre ein-/ausschalten
Sprache, Display
Sprachlautstärke
Sprachmuster
anhören
aufnehmen
löschen
Sprachwahl
wählen
Sprachwahl einleiten
Steckernetzgerät
Stern-Taste
Steuer-Taste
Stummschalten des Mobilteils
Suchen im Telefonbuch
Symbol
Klingelton
Ter min
Wecker
. . . . . . . . . . . . . . . . . . . . .13
. . . . . . . . . . . . . . . . . . . . . .13
. . . . . . . . . . . . . . . . . . . .13
. . . . . . . . . . . . . . . . . . . . . .13
. . . . . . . . . . . . . . . . . . .1, 19
. . . . . . . . . . . . . . . . . . . . . .22
. . . . . . . . . . . . . . . . . . . . . .21
. . . . . . . . . . . . . . 3
. . . . . . . . . .29
. . . . . . . . . . . . . . . . . . . .18
. . . . . . . . . . . . . . . . .20
. . . . . . . . . .12
. . . . . 6
. . . . . . . . . . . . . . . . .17
. . . . . . . . . . . . . . . .18
. . . . . . . . . . . . . . . . . . .13
. . . . . . . . . . . .6, 7
. . . . . . . . . . . . . . . . 3
. . . . . . . . . . . . . . . . . . .1, 6
. . . . . . .11
. . . . . . . . . . .11
. . . . . . . . . . . . . . . . . . . .19
T
Tas te
. . . . . . . . . . . . . . . . . . . . . . 1
R-Taste
Taste 1 (Schnellwahl)
Taste belegen
Tas ten
Abbrechen-Taste
Abheben-Taste
Auflegen-Taste
Display-Tasten
Ein-/Aus-Taste
Escape-Taste
Freisprechen-Taste
Funktionstaste
Lösch-Taste
Menü-Taste
Nachrichten-Taste
Raute-Taste
. . . . . . . . . . . . . 1
. . . . . . . . . . . . . . . . . . .16
. . . . . . . . . . . . . . . 7
. . . . . . . . . . . . . .1, 10
. . . . . . . . . . . . . .1, 10
. . . . . . . . . . . . . . . .1, 7
. . . . . . . . . . . . . . . . . 1
. . . . . . . . . . . . . . . . . . 7
. . . . . . . . . . . . . . 1
. . . . . . . . . . . . . . . . 1
. . . . . . . . . . . . . . . . . . . 7
. . . . . . . . . . . . . . . . . . . 7
. . . . . . . . . . . . . . 1
. . . . . . . . . . . . . . . . . .1, 6
33
Page 36

Gigaset SL44 / deutsch / A31008-M1609-R101-1-6Z19 / SL44_SIX.fm / 20.08.2004
Stichwortverzeichnis
Schnellwahl
Stern-Taste
Steuer-Taste
Tastensperre
Tastensperre
Technische Daten
Tel efo nbuch
Eintrag vornehmen
Einträge verwalten
Jahrestag speichern
öffnen
Reihenfolge der Einträge
Telefonbucheintrag/Jahrestag
speichern
Tel efo niere n
Anruf annehmen
extern
intern
Ter min
ausschalten . . . . . . . . . . . . . . . . . . 22
benennen
einschalten/einstellen
nicht angenommenen anzeigen
nicht annehmen
Tex t
schreiben, bearbeiten
Texteingabehilfe
. . . . . . . . . . . . . . . . . . . 1
. . . . . . . . . . . . . . . . . 1, 19
. . . . . . . . . . . . . . . . . 1, 6
. . . . . . . . . . . . . . . . . . 6
. . . . . . . . . . . . . . . . . . . . 6
. . . . . . . . . . . . . . . 25
. . . . . . . . . . . . . . . . . . . 11
. . . . . . . . . . . . 11
. . . . . . . . . . . . . 12
. . . . . . . . . . . . 12
. . . . . . . . . . . . . . . . . . . . . 6, 7
. . . . . . . . 29
. . . . . . . . . . . . . . . . . . 11
. . . . . . . . . . . . . . 10
. . . . . . . . . . . . . . . . . . . . . . 10
. . . . . . . . . . . . . . . . . . . . . . 11
. . . . . . . . . . . . . . . . . . . 22
. . . . . . . . . . . 21
. . . 22
. . . . . . . . . . . . . . 22
. . . . . . . . . . . 28
. . . . . . . . . . . . . . . . 29
U
Uhrzeit einstellen . . . . . . . . . . . . . . . . 6
V
Verpackungsinhalt. . . . . . . . . . . . . . . . 4
W
Wählen, Notrufnummer. . . . . . . . . . . 23
Wahlwiederholung, manuell
Wahlwiederholungsliste
Walkie-Talkie
einstellen
Walky-Talky
ausschalten
einschalten
Warnton s. Hinweistöne
Wartemelodie
Wecker
einstellen
. . . . . . . . . . . . . . . . . . . . 15
. . . . . . . . . . . . . . . . . . 15
. . . . . . . . . . . . . . . . . . 15
. . . . . . . . . . . . . . . . . . 11
. . . . . . . . . . . . . . . . . . . . 21
. . . . . . . 14
. . . . . . . . . . . 14
Z
Zeichensatztabelle . . . . . . . . . . . . . . 29
Zifferntaste belegen
. . . . . . . . . . . . . 16
34
Page 37

Gigaset SL44 / IM1 engl / A31008-M1609-R101-1-6Z19 / overview.fm / 20.08.2004
Handset at a glance
Handset at a glance
15
14
13
12
11
10
ÐV
INT 1
28/09/04 09:45
§§§§§§§§?§§§§§§§§§ §§§§§§§SMS§§§§§
9
1 Display in idle status
2 Battery charge condition
= e V U (empty to full)
= flashes: battery nearly empty
e V U flashes: battery charging
3 Display keys (page 7)
4 End call key, On/Off key
End call, cancel function, go back one
menu level (press briefly), back to idle status
(press and hold), activate/deactivate hand-
1
2
3
4
5
6
7
8
set (press and hold in idle status)
5 Message key
Access to the calls and messages lists;
Flashes: new message or new call
6 Function key recall key
7 Star key
Ringer tones on/off (press and hold),
toggles between upper/lower case
and digits
8 Hash key
Keypad lock on/off (press and hold)
9 Connection socket for headset and
PC interface
10 Microphone
11 Key 1
Select T-NetBox network mailbox
(your network provider's answering
machine) (press and hold)
12 Handsfree Key
Switch between earpiece and handsfree
mode;
Lights up: handsfree activated;
Flashes: incoming call, automatic last
number redial
13 Talk key
Answer a call, open last number redial list
(press briefly), start dialling (press and hold)
14 Control key (page 6)
15 Signal strength
Ð i Ñ Ò (good to low)
| flashes: no reception
1
Page 38

Gigaset SL44 / IM1 engl / A31008-M1609-R101-1-6Z19 / SL44_IVZ.fm / 20.08.2004
Contents
Contents
Handset at a glance . . . . . . . . . . . 1
Safety precautions . . . . . . . . . . . . 3
Gigaset SL44 –
a handset with many extras . . . . 4
Setting up the telephone
for use . . . . . . . . . . . . . . . . . . . . . . 4
Inserting the batteries . . . . . . . . . . . . . 4
Registering your phone . . . . . . . . . . . . 4
Charging batteries . . . . . . . . . . . . . . . . 5
Attaching the belt clip . . . . . . . . . . . . . 5
Changing the base station . . . . . . . . . . 6
Changing the name of the
base station . . . . . . . . . . . . . . . . . . . . . 6
Activating/deactivating the handset . . 6
Activating/deactivating the
keypad lock . . . . . . . . . . . . . . . . . . . . . . 6
Setting the date and time . . . . . . . . . . 6
Operating the phone . . . . . . . . . . 6
Control key . . . . . . . . . . . . . . . . . . . . . . 6
Display keys . . . . . . . . . . . . . . . . . . . . . 7
Return to idle status . . . . . . . . . . . . . . . 7
Menu management . . . . . . . . . . . . . . . 7
Correcting wrong inputs . . . . . . . . . . . 8
Notes on the user-guide . . . . . . . 8
Symbols . . . . . . . . . . . . . . . . . . . . . . . . 8
Example of menu input . . . . . . . . . . . . 8
Example of input of more
than one line . . . . . . . . . . . . . . . . . . . . 9
Making calls . . . . . . . . . . . . . . . . 10
Making an external call . . . . . . . . . . . 10
End call . . . . . . . . . . . . . . . . . . . . . . . . 10
Answering a call . . . . . . . . . . . . . . . . . 10
Handsfree talking . . . . . . . . . . . . . . . . 10
Muting . . . . . . . . . . . . . . . . . . . . . . . . 11
Making internal calls . . . . . . . . . . . . . 11
Using the directory and lists . . . 11
Directory . . . . . . . . . . . . . . . . . . . . . . . 11
E-mail directory . . . . . . . . . . . . . . . . . 13
Last number redial list . . . . . . . . . . . . 14
Viewing the calls and
messages list . . . . . . . . . . . . . . . . . . . 14
Setting Walky-Talky mode . . . . . 15
Activating Walky-Talky mode . . . . . . . 15
Deactivating Walky-Talky mode . . . . . 15
Using a handset in Walky-Talky
mode as a room monitor . . . . . . . . . . 15
Handset settings . . . . . . . . . . . . . 16
Shortcuts for functions
and numbers . . . . . . . . . . . . . . . . . . . . 16
Changing the display language . . . . . 17
Setting the display . . . . . . . . . . . . . . . 17
Setting logo . . . . . . . . . . . . . . . . . . . . . 17
Setting night mode . . . . . . . . . . . . . . . 18
Activating/deactivating
Auto Answer . . . . . . . . . . . . . . . . . . . . 18
Adjusting the loudspeaker volume . . . 18
Changing ringer tones . . . . . . . . . . . . 18
Sound manager . . . . . . . . . . . . . . . . . 19
Activating/deactivating
advisory tones . . . . . . . . . . . . . . . . . . . 21
Setting the alarm clock . . . . . . . . . . . . 21
Setting an appointment . . . . . . . . . . . 21
Displaying missed
appointments and anniversaries . . . . 22
Emergency number . . . . . . . . . . . . . . 23
Restoring the handset to
default settings . . . . . . . . . . . . . . . . . . 23
Care . . . . . . . . . . . . . . . . . . . . . . . . . . . 24
Contact with liquid . . . . . . . . . . . . . . . 24
Questions and answers . . . . . . . . . . . . 24
Service (Customer Care) . . . . . . . . . . . 25
Specifications . . . . . . . . . . . . . . . . . . . 25
Guarantee Certificate Ireland . . . . . . . 26
Guarantee Certificate
United Kingdom . . . . . . . . . . . . . . . . . 27
PC Interface . . . . . . . . . . . . . . . . . . . . . 28
"Balloon Shooter" game . . . . . . . . . . . 28
Writing and editing text . . . . . . . . . . . 28
Accessories . . . . . . . . . . . . . . . . . 30
Index . . . . . . . . . . . . . . . . . . . . . . 31
2
Page 39

Gigaset SL44 / IM1 engl / A31008-M1609-R101-1-6Z19 / start_guide_time.fm / 20.08.2004
Safety precautions
Safety precautions
Caution:
Read the safety precautions and the user-guide before use.
Explain their contents and the potential risks involved in using the telephone to your children.
Only use the mains adapter supplied, as indicated on the underside of the
$
‹
Œ
charger.
Fit only the recommended rechargeable batteries (page 25)! Do not use any
other battery type or non-rechargeable batteries as this could result in significant health risks and personal injury.
Insert rechargeable batteries as indicated by their polarity symbols, and use
them according to these instructions.
The operation of medical appliances may be affected. Be aware of the technical
conditions in your particular environment (e.g. doctor's surgery).
The handset may cause an unpleasant humming noise in hearing aids.
Do not install the charging cradle in bathrooms or showers. The handset and
base are not waterproof (page 24).
Switch off your phone, including the Walky-Talky function, when on board an
aircraft. Ensure that it cannot be switched on again accidentally.
Do not use your phone in environments with a potential explosion hazard
(e.g. auto paint shops).
If you give your Gigaset to someone else, make sure you also give them the
ƒ
operating user-guide.
Dispose of the batteries and phone in accordance with environmental regulations.
Note:
Not all of the functions described in this user-guide are available in all countries.
3
Page 40

Gigaset SL44 / IM1 engl / A31008-M1609-R101-1-6Z19 / start_guide_time.fm / 20.08.2004
Gigaset SL44 – a handset with many extras
Gigaset SL44 –
a handset with many extras
Your Gigaset SL44 not only lets you store
up to 200 telephone numbers and e-mail
addresses (page 11) – your Gigaset SL44
can do much, much more:
u Assign important numbers or fre-
quently used functions to your telephone keys. You can then dial the
number or start the function by pressing a key (page 16).
u Record your favourite sound with the
handset and create your personal
ringer tone (page 20).
u You can designate important people as
VIPs so you can tell important calls by
the ringer melody (page 12).
u Store a voice pattern for important
directory entries – the phone dials on
command (page 13).
u You can store appointments (page 21)
and anniversaries (page 12) on your
phone and it will remind you of them in
advance.
Have fun using your new Gigaset SL44!
Inserting the batteries
Caution:
Use only the rechargeable batteries recommended by Siemens on page 25! Never use a
conventional battery (non-rechargeable) or
other battery types as this may cause significant damage to health and property. For
example, the jacket of the battery could be
destroyed or the battery could explode. The
phone could also malfunction or be damaged
as a result of using batteries that are not of the
recommended type.
¤ Insert the batteries ensuring correct
polarity (see figure).
The polarity is indicated in or on the battery compartment.
Closing the battery cover
¤ Place the cover on the battery compart-
ment a little down from the latch and
push it up until it clicks into position.
Setting up the telephone
for use
The package contains:
u one Gigaset SL44 handset,
u one charging cradle (incl. mains unit),
u two batteries,
u one battery cover,
u one belt clip,
u one user-guide.
Connecting the charging cradle is
described at the end of this operating
user-guide.
4
Opening the battery cover
¤ Press on the battery cover below the
upper edge and push it downwards.
Registering your phone
Before you can use your Gigaset SL44 you
must register it to a base unit. It can be
registered on up to four bases. The actual
registration procedure will depend on the
type of base unit.
Page 41

Gigaset SL44 / IM1 engl / A31008-M1609-R101-1-6Z19 / start_guide_time.fm / 20.08.2004
Setting up the telephone for use
Manual registration of the
Gigaset SL44
If the handset does not activate automatically when the batteries are fitted, you
have to charge the batteries first.
You must activate manual registration of
the handset at both the handset and the
base station.
After it has registered, the handset returns
to idle status. The internal number of the
handset appears in the display, e.g. INT 1.
Otherwise repeat the procedure.
1. On the handset
v ¢ Ð ¢ Handset ¢ Register H/Set
s Select base, e.g. Base 1 and
§OK§.
press
~ Enter the system PIN of the
base (the default is 0000) and
§OK§. You will see,
press
e.g. Base 1.
2. On the base station
Initiate registration on the base within
60 seconds as described in the base unit's
instructions.
Charging batteries
¤ Plug the mains unit of the charging cra-
dle into a mains power socket.
¤ Place the handset in the charging cra-
dle with its display facing forward.
To charge the batteries, place the handset
in the charging cradle. Battery charging is
indicated in the top right of the display by
the flashing battery icon e. During
handset operation, the battery icon indicates the charge status of the battery
(page 1).
First battery charge and discharge
The correct charge status can only be displayed when the batteries are first fully
charged and discharged.
¤ To do this, leave the handset in the
charging cradle for eight hours with-
out interruption. Your handset need
not be switched on for it to charge.
¤ Once the battery is fully charged,
remove the handset from the cradle
and do not put it back again until the
battery is fully discharged.
Note:
– The handset should only be placed in a
charging cradle that is designed for it.
– When the handset is in the cradle, it
charges even if it is switched off.
– If the handset has switched itself off
because the batteries are flat and it is then
placed in the cradle, it will switch itself on
automatically.
– After the first battery charge and discharge
you may replace your handset in the charging cradle after every call.
Please note:
u Always repeat the charging and dis-
charging procedure if you remove the
batteries from the handset and insert
them again.
u The batteries may warm up as they are
charging. This is not dangerous.
u After a while the charge capacity of the
batteries will decrease for technical rea-
sons.
Attaching the belt clip
Small holes are provided on the side of the
handset at about the level of the display.
These are for the belt clip.
¤ Press the belt clip onto the back of the
handset so that the belt clip lugs click
into the holes.
The tongue of the belt clip must be
aligned to the battery compartment.
5
Page 42

Gigaset SL44 / IM1 engl / A31008-M1609-R101-1-6Z19 / start_guide_time.fm / 20.08.2004
Operating the phone
Changing the base station
If your handset is registered to more than
one base, you can set it to a particular
base or to the base that has the best
reception (Best Base).
¢ Ð ¢ Handset ¢ Select Base
v
s Select one of the registered
bases or Best Base and
§OK§.
press
Changing the name of the
base station
The names "Base 1" to "Base 4" are
assigned automatically. You can change
the name of your base.
¢ Ð ¢ Handset ¢ Select Base
v
s Select a base and press §Edit§.
~ Enter new name, max.
16 characters (page 28).
§Save§ Press the display key to save
the setting.
a Press and hold (idle status).
The keypad lock deactivates automatically
if someone calls you. It re-activates when
the call is finished.
Note:
The entered emergency number (page 23) can
still be called when the keypad lock is active.
Setting the date and time
Providing you have not yet set the date
and time, press the display key
open the input field.
To change the time, open the input field
via:
¢ Ð ¢ Date/Time
v
§Time§ to
¤ Change entries of more than one line:
Date:
Enter the day, month and year with
6digits.
Time:
Enter hours and minutes with 4 digits,
e.g. Q M 1 5 for
07:15.
§Save§ Press the display key.
Activating/deactivating the
handset
a Press the end call key and
hold. You hear the confirmation beep.
Activating/deactivating the
keypad lock
# Press and hold the hash key.
You hear the confirmation beep. The icon
Ø appears in the display when the keypad
lock is activated.
6
Operating the phone
Control key
In the following information the side of
the control key (top, bottom, right, left)
you have to press in each operating situation is shown in black (e.g. v for "press
the right of the control key").
The control key has a number of different
functions:
Page 43

Gigaset SL44 / IM1 engl / A31008-M1609-R101-1-6Z19 / start_guide_time.fm / 20.08.2004
Operating the phone
When the handset is in idle state
s Open the directory.
v Open main menu.
u Open the list of handsets.
t Press briefly: set handset
ringer tones (page 18).
Press and hold: initiate voiceactivated dialling (page 13).
In the main menu and in input fields
Use the control key to move the cursor
up t, down s, right v or left u.
In lists and submenus
t / s Scroll up/down line by line.
v Open submenu or confirm
selection.
u Go back a menu level or can-
cel.
During an external call
s Open the directory.
v Open menu.
u Initiate an internal enquiry
(consultation).
t Adjust loudspeaker volume for
earpiece and handsfree mode.
Display keys
The functions for the display keys change
depending on the situation. Example:
§§§§§§§§§§§?§§§§§§§§§§ §§§§§§§§SMS§§§§§§
1
The most important display icons are:
§§§§§§§§§§?§§§§§§§§§§§ Left display key, providing it
has still not been assigned a
function (page 16).
¨ Open the main menu or a
context-dependent menu.
W Delete key: delete from right
to left one character at a time.
Î Go back a menu level or cancel
procedure.
ΠOpen e-mail directory.
Ò Open the directory.
Ó Copy number to directory.
Ÿ On bases with built-in answer-
ing machine: forward external
call to the answering machine.
• Open the last number redial
list (base-dependent).
Return to idle status
You can return to idle status from anywhere in the menu as follows:
¤ Press the end call key a and hold.
Or:
¤ Press no key: After 2 minutes the dis-
play will return automatically to its idle
status.
Changes which you have not confirmed/
stored by pressing
with Save Entry
An example of the display in the idle status
is shown on page 1.
§OK§, §Yes§, §Save§, §Send§ or
§OK§ will be rejected.
2
1 Current display key functions are shown in
the bottom display line.
2Display keys
Press the display key underneath to launch
the function.
Menu management
Your telephone's functions are accessed in
a menu that has a number of levels.
Main menu (first menu level)
With the handset in idle status, press v to
open the main menu.
The main menu functions are shown in
the display as coloured icons.
7
Page 44

Gigaset SL44 / IM1 engl / A31008-M1609-R101-1-6Z19 / start_guide_time.fm / 20.08.2004
Notes on the user-guide
Access a function, i.e. open the relevant
submenu (next menu level):
¤ Navigate to the required function with
the control key (q and r). The display header shows the name of the
function. Press the display key
§OK§.
Submenus
The functions in the submenus are displayed as lists.
Accessing a function:
¤ Scroll to the function with the control
key q and press
To return to the previous menu level or
to cancel the operation, press the end call
key a.
Correcting wrong inputs
You can correct wrong characters in the
text by navigating to the incorrect entry
with the control key. You can then:
u press X to delete the character to the
left of the cursor
u insert character to the left of the cursor
u when entering the time and date etc.,
overwrite the (flashing) character.
§OK§.
Notes on the user-guide
This section explains the meaning of certain symbols and typographical conventions that are used in these user-guide.
Symbols
<E-Mail Directory> / New Entry (example)
Select one of the two menu
functions indicated.
~ Enter digits or letters.
§Save§ The current functions for the
display keys are shown reverse
highlighted and are offered in
the bottom display line.
q Press the top or bottom of the
control key: scroll up or down.
r Press the control key on the
right or left: e.g. select setting.
c / Q / * etc.
Press the matching key on the
handset.
Example of menu input
This user-guide uses symbols to guide
you through the settings of your phone.
The example below shows you how to
read the symbols and gives you explanations in the text boxes.
¢ Ð ¢ Display
v
¤ With the handset in idle status, press
on the right of the control key to open
the main menu.
¤ Use the control key to select the Ð
icon – press the control key on the
right, left, top or bottom.
H/Set Settings appears in the display
header.
¤ Press the display key §OK§ to confirm the
function H/Set Settings.
The submenu H/Set Settings is displayed.
¤ Press the bottom of the control key
repeatedly until the menu function
Display is selected.
¤ Press the display key §OK§ to confirm the
selection.
8
Page 45

Gigaset SL44 / IM1 engl / A31008-M1609-R101-1-6Z19 / start_guide_time.fm / 20.08.2004
Notes on the user-guide
Colour Scheme
Select and press
§OK§.
¤ Press the bottom of the control key
repeatedly until the menu function
Colour Scheme is selected.
¤ Press the display key §OK§ to confirm the
selection.
s Select colour scheme and
§OK§ (‰ = current colour).
press
¤ Press the top or bottom of the control
key to select the colour scheme.
¤ Press the display key §OK§ to confirm the
selection.
The selected colour scheme is indicated
by a ‰.
a Press and hold (idle status).
¤ Press the end call key and hold until the
handset returns to idle status.
Example of input of more
than one line
In many situations you can change settings in several lines of a display or enter
data.
Input of more than one line is shown as
sequences of symbols in these user-guide.
This system is explained below using the
example of "saving an appointment".
The different steps are explained in the
text boxes.
You see the following display:
Appoint.: f On g
Date: 21.03
Time: 11:11
Notes: Appoint.
Î Save
Appoint.:
Select On or Off.
¤ Press on the right or left (r) of the
control key to select On or Off.
Date:
Enter the day/month (4 digits).
¤ Press the s key to move to the next
line.
The second line is identified as active
with [ ].
¤ Enter the date using the numerical
keys.
Time:
Enter the hours/minutes (4 digits).
¤ Press the s key.
The third line is identified as active
with [ ].
¤ Enter the time using the numerical
keys.
Notes:
Press the display key
(up to 32 digits) and press
§Edit§. Enter text
§OK§.
¤ Press the s key.
The fourth line is identified as active
with < >.
¤ Press the display key §Edit§ to open the
input field. Enter the text (page 28).
¤ Press the display key §OK§.
9
Page 46

Gigaset SL44 / IM1 engl / A31008-M1609-R101-1-6Z19 / start_guide_time.fm / 20.08.2004
Making calls
Answering a call
¤ Save the changes.
You will see the ¼ symbol.
Depending on the operating situation
you can store your changes in two ways.
¤ Press the display key §Save§.
Or:
¤ Press the v key. Use q to select Save
Entry and press
§OK§.
¤ In each case you should then press and
hold the a key.
The handset changes to idle status and
shows the ¼ icon.
Making calls
The handset indicates an incoming call in
three ways: it rings, there is a display on
the screen, and the handsfree key d
flashes.
You can take the call in the following
ways:
¤ Press the talk key c.
¤ Press the handsfree key d.
If the handset is in the charging cradle and
the Auto Answer function is activated
(page 18), the handset will take a call
automatically when you lift it out of the
cradle.
If the ringer is intrusive, press the display
§Silence§. You can take the call so long as
key
it is displayed on the screen.
Making an external call
External calls are calls using the public telephone network.
~c Enter the number and press
the talk key.
Or:
c~ Press and hold the talk key c
and then enter the number.
You can cancel the dialling operation with
the end call key a.
Note:
– Dialling with the directory (page 1,
page 11) or last number redial list (page 7,
page 14) saves you repeatedly keying in
phone numbers.
– You can assign numbers from directory
entries to keys (page 16).
– You can use voice-activated dialling to dial
numbers by saying the name (page 13).
End call
a Press the end call key.
Handsfree talking
For handsfree talking you need not hold
the handset to your ear, but you lay it, for
example, in front of you on a table. This
enables others to also take part in the call.
Activating/deactivating handsfree
Activating while dialling
~d Enter the number and press
the handsfree key.
¤ You should inform your caller before
you use the handsfree function so that
they know someone else may be listen-
ing.
Switching between earpiece and
handsfree mode
d Press the handsfree key.
Switch handsfree on or off during a call.
If you wish to place the handset in the
charging cradle during a call:
¤ Press the handsfree key d and hold it
while placing the handset in the base.
To find out how to adjust the volume, see
page 18.
10
Page 47

Gigaset SL44 / IM1 engl / A31008-M1609-R101-1-6Z19 / start_guide_time.fm / 20.08.2004
Using the directory and lists
Muting
You can deactivate the microphone in
your handset during an external call.
The caller then hears a wait melody.
u Press on the left of the control
key to mute the handset.
” Press the display key to cancel
muting.
Making internal calls
Internal calls to other handsets registered
on the same base are free.
Calling a specific handset
u Initiate an internal call.
~ Enter the number of the hand-
set.
Calling all handsets ("group call")
u Initiate an internal call.
* Press the star key. All handsets
are called.
End call
a Press the end call key.
Using the directory and lists
You can store up to 200 entries in the
directory and e-mail directory (the actual
number depends on the size of the individual entries).
You create the directory and e-mail directory for your individual handset.
Directory
Length of entries
Number: max. 32 digits
Name: max. 16 characters
Note:
You can assign a number to a key for speed
dialling to the number in the directory
(speed dialling) (page 16).
Storing a number in the directory
s ¢ New Entry
¤ Change entries of more than one line:
Number:
Enter number.
Name:
Enter name.
Annivers.:
Enter anniversary if required (page 12).
¤ Save the changes.
If your phone is connected to a PABX you
may have to save a dialling code. Please
refer to the user-guide for your PABX.
Selecting a directory entry
s Open the directory.
You have the following options:
u Use s to scroll to the entry until the
required name is selected.
u Enter the first characters of the name
(max. 10), or scroll to the entry with
s.
Dialling with the directory
s ¢ s (Select entry)
c Press the talk key. The number
is dialled.
You can store numbers and matching
names in the directory.
¤ With the handset in idle status, open
the directory by pressing s.
11
Page 48

Gigaset SL44 / IM1 engl / A31008-M1609-R101-1-6Z19 / start_guide_time.fm / 20.08.2004
Using the directory and lists
Managing directory entries
s ¢ s (Select entry)
View entry
§View§ Press the display key.
The entry is displayed.
Back with
§OK§.
Changing an entry
§View§ §Edit§ Press keys one after the other.
¤ Make changes and save.
Using other functions
s ¢ s (Select entry)
¢ v (Open menu)
The following functions can be selected
with q:
Display Number
Edit or add a stored number. Then dial
or use other functions by pressing ©.
Edit Entry
Edit the selected entry.
Delete Entry
Delete a selected entry.
VIP Entry (directory only)
Mark a directory entry as VIP (Very
Important Person) and assign it a particular ringer melody. You will now be
able to tell VIP calls from the ringer melody.
Precondition: this feature requires
Calling Line Identification ("CLIP").
Record Pattern (directory only)
Record the name of the selected entry
and save it as a voice pattern (page 13).
Play Pattern
Play voice pattern (page 13).
Delete Pattern
Delete voice pattern (page 13).
Delete List
Delete all entries in the directory.
Available Memory
Display the number of entries that are
still available in the directory and e-mail
(page 13) directory.
Storing an anniversary in the directory
You can store an anniversary for every
number in the directory, and specify a
time when you will receive a reminder
call.
¢ s (Select entry; page 11)
s
§View§ §Edit§
Press keys one after the other.
s Scroll to the line Annivers.:.
§Edit§ Press the display key.
¤ Change entries of more than one line:
Date:
Enter the day/month (4 digits).
Time:
Enter the hour/minute for the reminder
call using 4 digits.
Prompt:
Select the type of signal and press
§OK§.
¤ Save the changes (page 10).
Note:
You must enter the time for a reminder call. If
you have chosen a visual signal it is not necessary to enter a time and it will automatically be
set to 00:00.
Deleting an anniversary
s ¢ s (Select entry; page 11)
s Scroll to the line Annivers.:.
§Edit§ §Delete§ §Save§
Press keys one after the other.
Reminder call on an anniversary
A reminder call is signalled on the handset
with the selected ring tone.
§Silence§ Press the display key to end
the reminder call.
12
Page 49

Gigaset SL44 / IM1 engl / A31008-M1609-R101-1-6Z19 / start_guide_time.fm / 20.08.2004
Using the directory and lists
V oice-acti vated diallin g
You can dial numbers from the directory
by saying the name. To enable your telephone to "recognise" you, you must record
a voice pattern for each name, i.e. say the
name loudly into the handset and save it.
You can also set your telephone to say the
name of the caller instead of ringing for an
external call, see page 19.
You can save one voice pattern for each of
a total of 30 directory entries. Entries that
have a voice pattern are marked with ´.
Recording a voice pattern
Record your voice pattern in quiet surroundings. Hold the handset about 25 cm
away. The voice pattern may be about
1.5 seconds long.
Note:
If you usually use voice-activated dialling on a
handsfree set, it is best to record the voice pattern using the handsfree set.
¢ s (Select entry; page 11)
s
v Open menu.
Record Pattern
Select.
OK Press the display key to start
the recording.
You will hear a short signal. A prompt
appears in the display. Speak the name.
Repeat the name when prompted to do so
in the display and after you hear another
signal tone. If your two recordings are too
different from each other, you will be
asked to repeat them.
Note:
If there is insufficient memory for a new voice
pattern this is indicated in the display. The
handset returns automatically to the directory.
Delete a voice pattern and select Record Patter n
again.
To change a voice pattern, you must
delete it (page 13) and record it again.
Using voice-activated dialling
t Press and hold.
Say the name after the signal tone. If the
name matches the recorded voice pattern,
it is repeated. The number is dialled.
Playing the voice pattern
s ¢ s (Select entry with ´ )
v Open menu.
Play Pattern Select and press OK. The voice
pattern is played in handsfree
mode.
a Press and hold (idle status).
Deleting the voice pattern
s ¢ s (Select entry with ´ )
v Open menu.
Delete Pattern
Select and press
a Press and hold (idle status).
The directory entry is not affected.
OK.
E-mail directory
You can store e-mail addresses in the
email directory.
Saving a new e-mail address
s Open the directory.
<E-Mail Directory>
Select and press
New Entry Select and press §OK§.
~ Enter e-mail address
(max. 60 characters).
§OK§.
¤ Save the changes (page 10).
While making an entry you can open the
menu with © and use the following
functions:
Insert '.' / Insert '@'
Insert a full stop or the @ character.
13
Page 50

Gigaset SL44 / IM1 engl / A31008-M1609-R101-1-6Z19 / start_guide_time.fm / 20.08.2004
Using the directory and lists
Managing e-mail addresses
s ¢ <E-Mail Directory>
¢ s (Select entry; page 11)
View entry
§View§ Press the display key. The
number is displayed.
Back with
§OK§.
Changing an entry
§View§ §Edit§ Press keys one after the other.
¤ Make changes and save (page 10).
Using other functions
s ¢ <E-Mail Directory>
¢ s (Select entry; page 11)
¢ v (Open menu)
As for the directory (page 12), you can
select the following functions with s:
Edit Entry
Delete Entry
Delete List
Last number redial list
The last number redial list shows the last
ten numbers dialled on the handset
(max. 32 digits). If one of the numbers is
in the directory, then the corresponding
name will be displayed.
Manual last number redial
c Press the key briefly.
s Select entry.
c Press the talk key again.
The number is dialled.
When displaying a name, you can have the
respective number displayed by using the
display key
§View§.
Managing entries in the last number
redial list
c Press the key briefly.
s Select entry.
v Open menu.
The following functions can be selected
with q:
Automatic Redial
The number is dialled automatically at
set intervals (at least every
50 seconds). At the same time the
handsfree key flashes and "open listen-
ing" is activated.
– The other party answers the call:
press the talk key c. The function is
ended.
– The other party does not answer:
the call is cancelled after approx.
30 seconds. The function ends
when any key is pressed or after ten
unsuccessful attempts.
Display Number (page 12)
Copy to Directory
Copy an entry to the directory
(page 11).
Delete Entry (page 12)
Delete List (page 12)
Viewing the calls and
messages list
In idle status, the handset screen displays
an icon for new calls or messages. The
number of new entries is shown beneath
the corresponding icon. An advisory tone
sounds as soon as a new message arrives
on a list. The message key f flashes.
If you press the flashing f key, you
access the lists which contain new messages.
14
Page 51

Gigaset SL44 / IM1 engl / A31008-M1609-R101-1-6Z19 / start_guide_time.fm / 20.08.2004
Setting Walky-Talky mode
Setting Walky-Talky mode
The Walky-Talky function allows two handsets to communicate with each other no
matter how far they are from the base.
Example: You go on holiday and take two
handsets with Walky-Talky functionality
with you. Set the Walky-Talky function on
both handsets.
Precondition:
One of the following conditions must
apply.
u Both handsets are registered to the
same base station.
u Both handsets are registered to differ-
ent bases and both are set to Best Base
(page 6).
u One of the handsets is not registered to
any base and the registered handset is
set to "Best Base".
u Neither handset is registered to a base.
Please note:
u The maximum range between hand-
sets in Walky-Talky mode is 300 metres
outdoors.
u The handsets cannot be reached by
incoming calls.
u Handset operating times are severely
shortened in Walky-Talky mode.
u The Walky-Talky mode is retained even
when you switch your handset off and
back on.
Activating Walky-Talky mode
v ¢ í ¢ Walky-Talky
If, when you are in Walky-Talky mode,
you press the talk key c or the handsfree
key d the call will go to all the handsets
that are in Walky-Talky mode. The connection is made with the first handset to
answer the Walky-Talky call.
u The loudspeaker volume and advisory
tones are set in exactly the same way as
if your handsets were in range of the
base (page 18).
u "Activate/deactivate ringer" (page 21)
and "Activate/deactivate keypad lock"
(page 6) are available in Walky-Talky
mode.
u To open the menu, press the display
key ©.
Deactivating Walky-Talky mode
§OFF§ Press the display key.
Using a handset in Walky-Talky
mode as a room monitor
With this function you can use the
Walky Talky function as a room monitor.
The room monitor will then call all the
handsets that are in Walky-Talky mode
as soon as the set noise level is reached
in the room.
During the call, all keys are locked except
the end call key. The room monitor
function remains active after you end the
call. The function must be activated again
if the handset has been switched off.
Note:
– You should always check the operation
of the room monitor before use. Test, for
example, the sensitivity and the connection.
– The active room monitor function consider-
ably reduces the operating time of the
handset. Place the handset in the charging
cradle if necessary. This ensures that the
battery does not discharge.
– The handset should be positioned 1 to
2 metres away from the baby. The microphone must be directed towards the baby.
– Please note that, as a Walky-Talky function,
the room monitor does not offer absolute
security.
15
Page 52

Gigaset SL44 / IM1 engl / A31008-M1609-R101-1-6Z19 / start_guide_time.fm / 20.08.2004
Handset settings
Activating/deactivating the
room monitor
© Press the display key.
Room Monitor
Select and press
Room M.:
To activate, select On. To deactivate,
select Off.
Level:
Set sensitivity for the required noise
level (Low or High).
§OK§.
¤ Save the changes (page 10).
The room monitor has now been activated
or deactivated.
Handset settings
Your handset is preconfigured, but you
can change the settings to suit your individual requirements.
Shortcuts for functions
and numbers
You can assign a number or function to
the left display key, the function key ú
and the numerical keys Q and 2
to O.
You can then dial the number or start the
function by pressing a key.
Assigning to a numerical key/function
key or the left display key
Precondition: Neither the numerical key,
the function key, nor the left display key
has yet been assigned a number or function.
¤ Press the display key §§§§§§§§§§?§§§§§§§§§§§ or press
and hold the numerical key or the function key ú.
The list of possible key assignments is
opened. You can choose between the following options:
Quick Dial
Assign a number from the directory to
the key.
The directory is opened.
¤ Select an entry and press §OK§.
If you delete or edit the entry in the
directory, this will not affect the assign-
ment to the numerical key or display
key.
Set Appoints. / Alarm Clock
Assign the menu for setting and acti-
vating an appointment or the alarm
clock to a key (page 21):
¢ Set Appoints. / Alarm Clock
ì
New Record
Assign the menu for recording a new
sound to a key (page 20).
¢ <New Record>
Ë
Depending on the base station the following functions are also available:
Answer M. Mode
Assign the menu for selecting answer-
ing machine mode to a key.
Withhold No.
Withhold transfer of the phone number
for the next call
Info Services
Assign the menu for ordering an infor-
mation service to a key.
SMS Notific.
Assign the menu for activating notifica-
tion via SMS to a key:
Answer M. Mode
Assign the menu for selecting answer-
ing machine mode to a key (see operat-
ing user-guide for the base unit):
¢ Announcements ¢ Set Ans. Mode
Î
16
Page 53

Gigaset SL44 / IM1 engl / A31008-M1609-R101-1-6Z19 / start_guide_time.fm / 20.08.2004
Handset settings
Changing the display language
Note:
If a function menu is opened by assigning a
key, briefly pressing the end call key
a change to idle status (not to the next menu
up).
If a function or number has already been
assigned to the left display key, the
selected function or name for the phone
number (or its abbreviation) in the directory will be displayed in the lowest display
line above the display key.
a effects
Starting function, dialling number
With the handset in idle status, press and
hold the numerical key or press the left
display key briefly.
Depending on the key assignment:
u The numbers are dialled directly.
u The menu for the function is opened.
Changing the assignment to a key
Press the display key
¤ Press and hold the left display key.
The list of possible key assignments is
opened.
¤ Proceed as described for the first
assignment to the key (page 16).
Numerical key/Function key
¤ Press numerical key or function key
briefly.
§Change§ Press the display key. The list
of possible key assignments is
displayed.
¤ Proceed as described for the first
assignment to the key (page 16).
You can view the display texts in different
languages.
¢ Ð ¢ Handset ¢ Language
v
The current language is indicated by ‰.
s Select a language and
§OK§.
press
a Press and hold (idle status).
If you accidentally choose a language you
do not understand:
v 5 I1
Press keys one after the other.
s Select the correct language
and press
§OK§.
Setting the display
You have a choice of four colour schemes
and several different contrasts.
¢ Ð ¢ Display
v
Colour Scheme
Select and press
s Select colour scheme and
§OK§ (‰ = current colour).
press
a Press briefly.
Contrast Select and press §OK§.
r Select contrast.
§Save§ Press the display key.
a Press and hold (idle status).
§OK§.
Setting logo
You can display a logo when the handset is
in idle status. This will replace the idle status display. It may conceal the date, time
and name.
In certain situations the logo is not displayed, e.g. during a call or if the handset
has been de-registered.
If a logo has been activated, the menu
point Screen Picture is marked with ‰.
17
Page 54

Gigaset SL44 / IM1 engl / A31008-M1609-R101-1-6Z19 / start_guide_time.fm / 20.08.2004
Handset settings
¢ Ð ¢ Display ¢ Screen Picture
v
The current setting is displayed.
¤ Change the following settings if
required:
Activation:
Select On (logo is displayed) or Off
(no logo).
Picture:
Change logo if required (see below).
¤ Save the changes (page 10).
If the logo conceals the display, press any
key briefly to show the idle display with
the time and date.
Changing logo
v ¢ Ð ¢ Display ¢ Screen Picture
s Scroll to the line Picture:.
§View§ Press the display key. The
active logo is displayed.
s Select a picture and press
§OK§.
¤ Save the changes.
Setting night mode
The display is dimmed in idle status. If this
bothers you, you can set night mode. The
display then does completely dark when
the handset is placed in the charging cradle.
¢ Ð ¢ Display
v
Night Mode Select and press §OK§ (‰ =on).
a Press and hold (idle status).
Activating/deactivating
Auto Answer
If you have activated this function, when
you get a call you can simply lift the handset out of the charging cradle without having to press the talk key c.
¢ Ð ¢ Handset
v
Auto Answer
Select and press §OK§ (‰ =on).
a Press and hold (idle status).
Adjusting the loudspeaker
volume
You can set the loudspeaker volume for
handsfree speaking to five different levels
and the earpiece volume to three different
levels. You can only make these adjustments during an external call.
The handsfree volume can only be
adjusted when handsfree talking is set
(page 10).
You are conducting an external call.
t Open menu.
r Select volume.
§Save§ Press the display key if
required to save the setting
permanently.
If t is assigned a different function,
e.g. toggling:
v Open menu.
Volume Select and press
Make setting (see above).
§OK§.
Changing ringer tones
u Volume:
You can choose between five volume
levels (1-5; e.g. Volume 2 =
ˆ) and the "crescendo" ring
(6; the volume increases with each ring
tone = ‰).
u Ringer tones:
You can select any sound from the
sound manager (page 19).
You can set different ringer tones for the
following functions:
u Ext. Calls: For external calls
If you change the settings for ISDN
bases, please refer to the operating
user-guide for your base.
18
Page 55

Gigaset SL44 / IM1 engl / A31008-M1609-R101-1-6Z19 / start_guide_time.fm / 20.08.2004
Handset settings
u Internal Calls: For internal calls
u Appointments: For set appointments
(page 21)
u Alarm: For a pre-set wake-up call
(page 21)
u All: For all functions to ring the same
Settings for individual functions
Set the volume and melody depending on
the type of ringing. For external calls you
can also arrange to have the caller's name
announced, but you must first record the
appropriate voice pattern (page 13).
With the handset in idle status, open the
menu Ringer Settings by pressing t
briefly.
¢ ï ¢ Ringer Settings
v
q Setting, e.g. select Ext. Calls,
and press
r Set volume (1-6).
s Scroll to the next line.
r Select melody.
s For external calls only: scroll to
the line Announce.
r Activate or deactivate name
annopuncement.
§OK§.
¤ Save the changes (page 10).
Settings for all functions to ring the
same
v ¢ ï ¢ Ringer Settings ¢ All
¤ Set volume and ringer tone (see "Set-
tings for individual functions").
§Yes§ Press the display key to con-
firm the prompt.
a Press and hold (idle status).
Activating/deactivating the ringer
You can cancel the ringer on your handset
before you answer a call or when the
handset is in idle status; the ringer can be
cancelled permanently or just for the current call. The ringer cannot be re-activated
while an external call is in progress.
Cancelling the ringer permanently
* Press the star key and hold
until you can no longer hear
the ringer tone.
The Ú icon appears in the display.
Re-activating the ringer
* Press and hold the star key.
Deactivating the ringer for the current call
§Silence§ Press the display key.
Activating/deactivating the alert tone
In place of the ringer tone you can activate
an alert tone. When you get a call, you will
hear a short tone ("Beep") instead of the
ring tone.
* Press and hold the star key
and within 3 seconds:
§Beep on§ Press the display key. A call is
now signalled by one brief
alert tone. You will now see
º
in the display.
Sound manager
The handset sound manager manages
ringer tones and sounds which you can
use as a ringer melody. It can manage the
following types of sound:
Icon Sound Format
Ù Ringer tones; mono-
× Polyphonic Standard
phonic
× Polyphonic .psf
Ö Monophonic iMelody
Ø Recorded sound P2CM
Standard
19
Page 56

Gigaset SL44 / IM1 engl / A31008-M1609-R101-1-6Z19 / start_guide_time.fm / 20.08.2004
Handset settings
The icon is shown in the sound manager
in front of the name. Three Ù and 17 ×
are preconfigured in your telephone. You
can rename or delete the preconfigured
sounds.
You can download sounds in .psf and in
iMelody format from a PC (page 28). You
can use your Gigaset SL44 to record your
own sounds in P2CM format.
You can listen to existing sounds, and
rename and delete sounds you have
loaded and stored on the handset, in the
sound manager.
Recording sounds
You can record sounds via the sound manager (max. length 30 seconds).
¢ Ë ¢ <New Record>
v
§OK§ Press the display key. Record-
ing via the microphone starts.
§End§ Press the display key. The
recording is ended.
During the recording you can interrupt the
recording using the display key
then start recording again with
Once the recording has been made successfully, it is replayed for you to check.
§Save§ Press the display key to save
the recording. Edit the name
(up to 16 characters, do not
use spaces, special characters
or umlauts) and press
The entry is stored with the
new name.
§New§ Press the display key. The
recording is rejected and a
new recording is started.
§End§ Press the display key. The
recording is ended.
§Pause§ and
§Record.
§Save§.
Playing a sound
v ¢ Ë ¢ q (Select entry)
§Play§ Press the display key. Sounds
are played. Swap between
entries using the q key.
§End§ Press the display key. Playback
ends.
a Press and hold (idle status).
While you are playing sounds you can set
the volume using the display key
§Volume§.
If you have s tored a s ound in a n invali d fil e
format you will receive an error message
when you select it. Cancel the process
with Î. You can delete the sound
§Delete§.
with
Renaming/deleting a sound
You have selected an entry. If a sound cannot be deleted (è), these options are not
available.
v Open menu.
You can select the following functions,
depending on the situation:
Rename
Select and press
(up to 16 characters, do not use spaces,
special characters or umlauts) and
§OK§. The entry is stored with the
press
new name.
Delete Entry
The selected entry is deleted. A deleted
ringer melody is replaced automati-
cally. A deleted ringer melody for VIP
calls or anniversaries is not replaced
automatically.
§OK§. Edit the name
20
Page 57

Gigaset SL44 / IM1 engl / A31008-M1609-R101-1-6Z19 / start_guide_time.fm / 20.08.2004
Handset settings
Activating/deactivating
advisory tones
Your handset uses ‘advisory tones’ to tell
you about different activities and statuses.
The following advisory tones can be activated and deactivated independently of
each other:
u Key beep: Each key press is acknowl-
edged.
u Acknowledge tones:
– Confirmation tone (rising tone
sequence): at the end of the entry/
setting and when an SMS or a new
entry arrives in the answering
machine list (depending on base) or
the calls list
– Error tone (descending tone
sequence): when you make an
incorrect entry
– Menu end tone: when scrolling at
the end of a menu
u Battery tone: the battery needs to be
charged.
¢ ï ¢ Advisory Tones
v
¤ Change entries of more than one line:
Key Tones:
Select On or Off.
Confirm.:
Select On or Off.
Battery:
Select On, Off or In Call. The battery
warning tone is activated or deactivated or only rings during a call.
¤ Save the changes (page 10).
You cannot deactivate the confirmation
tone when you insert the handset into the
charging cradle.
Setting the alarm clock
Precondition: The date and time have
already been set (page 6).
Activating/deactivating and setting
the alarm clock
v ¢ ì ¢ Alarm Clock
¤ Change entries of more than one line:
Alarm Clock:
Select On or Off.
Time:
Enter the wake-up time (4 digits).
¤ Save the changes (page 10).
You will see the ¼ icon.
A wake-up call with selected ringer mel-
ody (page 18) is signalled on the handset.
The wake-up call sounds for 60 seconds.
The display shows Alarm Clock.
During a call a wake-up call is only signalled by a brief tone.
Deactivating the wake-up call
Precondition: A wake-up call is in
progress.
§Silence§ Press the display key or
any key.
Setting an appointment
You can set your handset to remind you of
up to 5 appointments (for volume and
melody, see page 18).
Saving an appointment
Precondition: The date and time have
already been set (page 6).
¢ ì ¢ Set Appoints.
v
The list of saved appointments is displayed. If you have already saved five
appointments you must first delete an
existing appointment.
21
Page 58

Gigaset SL44 / IM1 engl / A31008-M1609-R101-1-6Z19 / start_guide_time.fm / 20.08.2004
Handset settings
<New Entry>
Select and press
§OK§.
¤ Change entries of more than one line:
Appoint.:
Select On or Off.
Date:
Enter the day/month (4 digits).
Time:
Enter the hours/minutes (4 digits).
Notes:
Press the display key
(up to 16 digits) and press
is displayed as an appointment name in
the list and shown in the display when
you have an appointment call. If you do
not enter any text, the date and time of
the appointment are shown.
§Edit§. Enter text
§OK§. The text
¤ Save the changes (page 10).
You will see the icon ¼. The appointment
is marked in the appointment list with ‰.
The appointments are arranged in the list
according to date.
An appointment is signalled with the
selected ringer melody (page 18). The
appointment call sounds for 30 seconds.
The specified text or date and time are displayed.
During a call an appointment call is only
signalled by a brief tone.
Managing appointments
v ¢ ì ¢ Set Appoints. ¢ (Select
Appoint. 1-5)
Viewing/editing an appointment:
§View§ Press the display key. The
appointment is displayed.
Back with
§Edit§ If required, press the display
key to edit the entry.
§OK§ or:
¤ Make changes.
Using other menu functions:
v Open menu.
You have the following options:
Edit Entry
Edit selected appointment.
Delete Entry
Delete selected appointment.
Delete List
Delete all appointments.
Switching off or answering an
appointment call
Precondition: The appointment call is in
progress.
§Silence§ Press the display to switch off
the appointment call.
Displaying missed
appointments and anniversaries
Missed appointments/anniversaries
(page 12) are stored in the following cases
in the Missed Dates list:
u You did not keep an appointment/anni-
versary.
u The appointment/anniversary was sig-
nalled during a call.
u The handset was switched off at the
time of the appointment/anniversary.
The newest entry is at the beginning of
the list.
If there is a new appointment/anniversary
in the list, the display shows
If you press the display key the Missed
Dates list is opened.
Opening the list via the menu:
¢ ì ¢ Missed Dates
v
s Select appointment/
anniversary.
This will display information
about the appointment/anniversary. A missed appointment is marked with ¼, a
missed anniversary with ‚.
§Appoint.§.
22
Page 59

Gigaset SL44 / IM1 engl / A31008-M1609-R101-1-6Z19 / start_guide_time.fm / 20.08.2004
Handset settings
§§Delete§ Press the display key to delete
an appointment/anniversary.
a Press and hold (idle status).
If 10 entries are stored in the list the oldest
entry is deleted at the next appointment
call.
Emergency number
When the phone is supplied 112 is entered
as the emergency number. You can
change or delete the emergency number.
You can also dial the emergency number
when the keypad lock is activate.
Changing an emergency number
v ¢ Ð ¢ Handset ¢ Add. Emerg. No
The emergency number is displayed. You
cannot dial the number with c from this
menu.
~ Change emergency number.
© Press the display key.
Save Entry Select and press
is stored.
Dialling the emergency number
The emergency number can still be called
when the keypad lock (page 6) is active.
~ Enter emergency number.
c Press the talk key.
§OK§. The entry
Restoring the handset to
default settings
You can reset individual settings and
changes you have made. This will not
affect entries in the directory, the calls list,
the e-mail directory, the handset's registration to the base, or the content of the
sound manager.
¢ Ð ¢ Handset ¢ Reset Handset
v
§Yes§ Press the display key.
a Press and hold (idle status).
Cancel the resetting with a or the display
§No§.
key
Default settings for the handset
Function Default set-
Battery tone/Key click/
Confirmation tone
Auto answer on page 18
Walky-Talky off page 15
Room monitor:
sensitivity
Function key no function
Base selection Base1 page 6
Display language country-spe-
Volume: handsfree/
earpiece/ringer, alarm
clock, appointment
Logo on page 17
Night mode off page 18
Emergency number 112 page 23
EATONI predictive
text
Alarm clock/appoint-
ment
Character set Standard page 29
ting
on page 19
high page 16
cific
3/1/5 page 18
on page 29
off page 21
Page
page 17
23
Page 60

Gigaset SL44 / IM1 engl / A31008-M1609-R101-1-6Z19 / start_guide_time.fm / 20.08.2004
Appendix
Appendix
Care
¤ Wipe the charging cradle and the hand-
set with a damp cloth (do not use solvent) or an antistatic cloth.
Never use a dry cloth. This can cause
static.
Contact with liquid
¤ Switch the handset off immediately if it
comes into contact with liquid.
¤ Do not switch the handset on under
any circumstances.
¤ Remove the batteries immediately.
Allow the liquid to drain from the handset.
Proceed only as follows:
¤ Hold the handset horizontally with the
open battery compartment facing
down.
¤ Hold the handset vertically and tilt it
slightly backwards and forwards, shaking it gently.
¤ Pat all parts dry, then place the handset
with the battery compartment open
and the keypad facing down in a dry,
warm place for at least 72 hours (not
in a microwave, oven etc.).
When it is completely dry you will normally be able to use it again.
!
Questions and answers
If you have any queries about the use of
your phone, you can contact us at any
time at www.siemens-mobile.com/gigasetcustomercare. The table below contains
a list of common problems and possible
solutions.
The display is blank.
1. The handset is not switched on.
¥ Press the 'end call' key a and hold.
2. The batteries are flat.
¥ Charge or replace the batteries (page 4,
page 5).
The handset does not respond to a key press.
The keypad lock is activated.
¥ Press and hold the hash key
(page 6).
"Basis x" flashes in the display.
1. The handset is outside the range of the
base.
#
¥ Move the handset closer to the base.
2. The handset has been de-registered.
¥ Register the handset (page 4).
Base Search flashes in the display.
The handset is set for Best Base and no base is
within range.
¥ Move the handset closer to the base.
Handset does not ring.
The ringer is switched off.
¥ Activate the ringer (page 19).
The other party cannot hear you.
You have pressed the
set is "muted".
u (INT) key. The hand-
¥ Switch on the microphone again (page 11).
You hear an error tone when keying an input
(a descending sequence of tones).
Action has failed/invalid input.
¥ Repeat the operation.
Watch the display and refer to the userguide if necessary.
24
Page 61

Gigaset SL44 / IM1 engl / A31008-M1609-R101-1-6Z19 / start_guide_time.fm / 20.08.2004
Appendix
Service (Customer Care)
We offer you support that is fast and tailored to your specific needs!
Our Online Support on the Internet:
www.siemens-mobile.com/customercare
This site can be accessed at any time wherever you are. It will give you 24/7 support
for all our products. It also provides interactive troubleshooting, a list of FAQs and
answers plus user-guide for you to download.
For fast and dependable assistance with
any repairs or guarantee/warranty claims,
contact our Service Centres.
Service Centre Ireland:
18 50 77 72 77
Service Centre United Kingdom:
08705 334411
You will be given personal advice about
our range of products on our Premium
Hotline:
United Kingdom:
0906 9597555
Please have your receipt ready when calling.
Replacement or repair services are not
offered in countries where our product is
not sold by authorised dealers.
Authorisation
This product is designed for world-wide
operation, depending on national
approval outside the European Economic
Area (except Switzerland). Country-specific conditions have been taken into
account. The CE mark attests to the
phone's compliance with the essential
requirements of the R&TTE directive.
£ 0.75 per minute
Excerpt from the original declaration:
"We, Siemens AG, declare, that the above mentioned product is manufactured according to
our Full Quality Assurance System certified by
CETECOM ICT Services GmbH with ANNEX V of
the R&TTE-Directive 99/5/EC. The presumption
of conformity with the essential requirements
regarding Council Directive 99/5/EC is ensured"
Senior Approvals Manager
The Declaration of Conformity (DoC) has been
signed. In case of need, a copy of the original
DoC can be made available via the company
hotline.
Specifications
Recommended batteries
(Valid at the time of going to press)
Nickel-metal-hydride (NiMH):
u Sanyo Twicell 650
u Sanyo Twicell 700
u Panasonic 700mAh "for DECT"
u GP 700mAh
u Yuasa Technology AAA Phone 700
u Varta Phone Power AAA 700mAh
u GP 850 mAh
u Sanyo NiMH 800
u Yuasa Technologies AAA 800
u VARTA PhonePower AAA 700 mAh
The handset is supplied with recommended batteries.
25
Page 62

Gigaset SL44 / IM1 engl / A31008-M1609-R101-1-6Z19 / start_guide_time.fm / 20.08.2004
Appendix
Handset operating times/
charging times
Capacity 800 mAh
Standby time approx. 150 hours (6 days)
Calling time approx. 10 hours
Charging time approx. 8 hours
The operating and charging times apply
only when using the recommended batteries.
General specifications
Dimensions,
handset
Dimensions/
charging cradle
Weight of handset
with batteries
Weight/charging
cradle
134.3 x 55 x 30.7 mm
(L × W × H)
86.6 x 85.4 x 46.4 mm
(L x W x H)
127 g
41 g
Guarantee Certificate Ireland
u Without prejudice to any claim the user
(customer) may have in relation to the
dealer or retailer, the customer shall be
granted a manufacturer's Guarantee
under the conditions set out below:
u In the case of new devices and their
components exhibiting defects resulting from manufacturing and/or material faults within 24 months of purchase, Siemens shall, at its own option
and free of charge, either replace the
device with another device reflecting
the current state of the art, or repair the
said device. In respect of parts subject
to wear and tear (including but not limited to, batteries, keypads, casing), this
warranty shall be valid for six months
from the date of purchase.
u This Guarantee shall be invalid if the
device defect is attributable to
improper care or use and/or failure to
comply with information contained in
the user user-guides. In particular
claims under the Guarantee cannot be
made if:
– The device is opened (this is classed
as third party intervention)
– Repairs or other work is done by per-
sons not authorised by Siemens.
– Components on the printed circuit
board are manipulated
– The software is manipulated
– Defects or damage caused by drop-
ping, breaking, lightning or ingress
of moisture. This also applies if
defects or damage was caused by
mechanical, chemical, radio inter-
ference or thermal factors
(e.g.: microwave, sauna etc.)
– Devices fitted with accessories not
authorised by Siemens
u This Guarantee shall not apply to or
extend to services performed by the
authorised dealer or the customer
themselves (e.g. installation, configuration, software downloads). User
user-guides and any software supplied
on a separate data medium shall be
excluded from the Guarantee.
u The purchase receipt, together with the
date of purchase, shall be required as
evidence for invoking the Guarantee.
Claims under the Guarantee must be
submitted within two months of the
Guarantee default becoming evident.
u Ownership of devices or components
replaced by and returned to Siemens
shall vest in Siemens.
u This Guarantee shall apply to new
devices purchased in the European
Union. For Products sold in the Republic
of Ireland the Guarantee is issued by
Siemens Ireland Limited, Ballymoss
Road, Sandyford Industrial Estate,
Dublin 18 – The Republic of Ireland.
u Any other claims resulting out of or in
connection with the device shall be
excluded from this Guarantee.
26
Page 63

Gigaset SL44 / IM1 engl / A31008-M1609-R101-1-6Z19 / start_guide_time.fm / 20.08.2004
Appendix
Nothing in this Guarantee shall
attempt to limit or exclude a Customers
Statutory Rights, nor the manufacturer's liability for death or personal
injury resulting from its negligence.
u The duration of the Guarantee shall not
be extended by services rendered
under the terms of the Guarantee.
u Insofar as no Guarantee default exists,
Siemens reserves the right to charge
the customer for replacement or repair.
u The above provisions do not imply a
change in the burden of proof to the
detriment of the customer.
To make a claim under this Guarantee,
please contact the Siemens helpdesk on
1850 777 277. This number is also to be
found in the accompanying user guide.
Guarantee Certificate
United Kingdom
Without prejudice to any claim the user
(customer) may have in relation to the
dealer or retailer, the customer shall be
granted a manufacturer's Guarantee
under the conditions set out below:
u In the case of new devices and their
components exhibiting defects resulting from manufacturing and/or material faults within 24 months of purchase, Siemens shall, at its own option
and free of charge, either replace the
device with another device reflecting
the current state of the art, or repair the
said device. In respect of parts subject
to wear and tear (including but not limited to, batteries, keypads, casing), this
warranty shall be valid for six months
from the date of purchase.
u This Guarantee shall be invalid if the
device defect is attributable to
improper treatment and/or failure to
comply with information contained in
the user user-guides.
u This Guarantee shall not apply to or
extend to services performed by the
authorised dealer or the customer
themselves (e. g. installation, configuration, software downloads). User
user-guides and any software supplied
on a separate data medium shall be
excluded from the Guarantee.
u The purchase receipt, together with the
date of purchase, shall be required as
evidence for invoking the Guarantee.
Claims under the Guarantee must be
submitted within two months of the
Guarantee default becoming evident.
u Ownership of devices or components
replaced by and returned to Siemens
shall vest in Siemens.
u This Guarantee shall apply to new
devices purchased in the European
Union. For Products sold in the United
Kingdom the Guarantee is issued by:
Siemens plc, Information & Communication Mobile Devices. Siemens House,
Oldbury, Bracknell, RG12 8FZ.
u Any other claims resulting out of or in
connection with the device shall be
excluded from this Guarantee. Nothing
in this Guarantee shall attempt to limit
or exclude a Customers Statutory
Rights, nor the manufacturer's liability
for death or personal injury resulting
from its negligence.
u The duration of the Guarantee shall not
be extended by services rendered
under the terms of the Guarantee.
u Insofar as no Guarantee default exists,
Siemens reserves the right to charge
the customer for replacement or repair.
u The above provisions does not imply a
change in the burden of proof to the
detriment of the customer.
To invoke this Guarantee, please contact
the Siemens telephone service. The relevant number is to be found in the accompanying user guide.
27
Page 64

Gigaset SL44 / IM1 engl / A31008-M1609-R101-1-6Z19 / start_guide_time.fm / 20.08.2004
Appendix
PC Interface
You can connect the handset (page 30) to
your computer using a data cable. Your
computer can then communicate with
your handset using a program you can
download free of charge at www.siemensmobile.com/gigasetsl44). You can access
your handset directory and load sounds
from the computer into the handset.
Data Transfer is shown in the display while
data is being transferred between the
handset and the PC. During this time it is
not possible to make entries using the keypad and incoming calls are ignored.
"Balloon Shooter" game
The aim of the game is to hit as many balloons as possible.
Starting the game
v ¢ í ¢ Balloon Shooter
Start the game with the display key.
Other options
A menu showing other options is opened
if you press the display key ©.
Playing Balloon Shooter
¤ To move the sights to the left, right, up
or down press the following keys:
¢
¢
p
¢
¢
¤ To move the sights to the bottom left,
top left, bottom right or top right press
the following keys:
Key Movement
1, 2,
4, 5, L Top lef t
M, N, O Top right
Q, *, # Bottom right
I Bottom left
During the game, you can switch the
sound on and off by pressing and holding
the star key * and you can pause and
continue the game by pressing the message key f.
Writing and editing text
The following rules apply when writing a
text:
u The cursor is controlled with
uvts.
u Characters are added to the left of the
cursor.
u Press the star key
switch from the "Abc" mode to "123",
and from "123" to "abc" and from "abc"
back to "Abc" (upper case: 1st letter
upper case, all others lower case).
Press the star key * before entering the letter.
u Press the star key
Shows the selection line of the characters assigned to the star key.
u The first letter of the name of directory
entries is automatically capitalised, followed by lower case letters.
Writing names (without predictive text)
When you press a key and hold it, the
characters of that key appear in the bot-
tom display line and are highlighted one
after another. When you release the key
the highlighted character is inserted into
the input field.
You can see in the display whether upper
case, lower case or digits are selected.
*
*
briefly to
and hold:
¤ To shoot a balloon, press the function
key ú.
28
Page 65

Gigaset SL44 / IM1 engl / A31008-M1609-R101-1-6Z19 / start_guide_time.fm / 20.08.2004
Appendix
Writing SMS (with predictive text)
Precondition: Your base station supports
SMS.
EATONI predictive text helps you when
you are writing text messages.
Each key between Q and O is
assigned several letters and characters
(see the character set tables, page 29).
These appear in a selection line immediately under the text panel (over the display keys) as soon as you press a key. The
letter you are most likely looking for is
reverse highlighted and is at the beginning of the selection line. It is copied into
the text panel.
470(2) Ç Abc
Hello Peter, I cannot come
today. Ic
hgi
W¨
1 EATONI is activated
2 Text of the message
3 Selection line
If this letter is the one you want, confirm it
by pressing the next key. If it is not the one
you want, briefly press the hash key
# repeatedly until the required letter
is reverse highlighted on the display line
and copied into the text panel.
If you press and hold the hash key #,
you will see the selection line of characters
that are assigned to the hash key.
Deactivating/activating predictive text
Requirement: You are writing a text message.
© Press the display key.
Predictive Text
Select and press
a Press the end call key briefly
to return to the text panel.
Enter the text.
1
2
3
§OK§ (‰ =on).
Order of directory entries
The directory entries are usually sorted in
alphabetical order. Spaces and digits take
first priority. The sort order is as follows:
1. Space (shown here as s)
2. Digits (0–9)
3. Letters (alphabetical)
4. Other characters
To avoid the alphabetical order of the
entries, insert a space or a digit in front of
the name. These entries will now move to
the beginning of the directory. Names
which you have preceded with an asterisk
will move to the end of the directory.
Entering special characters
Standard characters
.
*#
Abc-->
#
123
123 -->
@
abc
1 Q
*) **)
1x
Space Space
2x 1 Â ,
3x £ 1 ? * \
4x $
â
!/&
5x ¥ £ 0 ( §
6x ¤ $ + )
7x ¥ - <
8x ¤ : =
9x ¿ >
10x ¡ %
11x “
12x ‘
13x ;
14x _
*) Directory and other lists
**) When writing a text message
29
Page 66

Gigaset SL44 / IM1 engl / A31008-M1609-R101-1-6Z19 / accessories_SAG.fm / 20.08.2004
Accessories
Accessories
Mobile handsfree set with P2T key
With the mobile handsfree set you can make a call while
keeping your hands free.
Data Cable DCA-500
For connecting your telephone to the serial RS232 interface
of your computer.
Data Cable USB DCA-510
For connecting your telephone to the USB interface of your
computer.
All accessories and batteries are available from your mobile phone retailer.
Or you can order direct online from the Online Shop: www.siemens-mobile.com/shop
The Online Shop also has the latest product information.
Only use original accessories. This will avoid possible health risks and damage,
and also ensure that all the relevant regulations are complied with.
.
30
Page 67

Gigaset SL44 / IM1 engl / A31008-M1609-R101-1-6Z19 / SL44_SIX.fm / 20.08.2004
Call all
Index
A
Acknowledge tones. . . . . . . . . . . . . . 21
Activating
advisory tones
appointment
call acceptance
handset
keypad lock
suppressing ringer
Advisory tones
Alarm clock
. . . . . . . . . . . . . . . . . . . . . . 21
setting
Alert tone
Anniversary
display missed
. . . . . . . . . . . . . . . . . . . . . . 22
missed
storing in directory
Answer, call
Appointment
activating/setting
deactivating
display missed
. . . . . . . . . . . . . . . . . . . . . . 22
missed
specifying
Assigning to a key
Assigning to the display key
Assigning to the numerical key
Auto answer
B
Balloon Shooter. . . . . . . . . . . . . . . . . 28
Base station
changing
changing name of base station
Battery
charging
inserting
recommended batteries
Battery icon
Battery tone
Best base
C
Call
answer
. . . . . . . . . . . . . . . . . . . . . . . . 10
end
external
internal
. . . . . . . . . . . . . . . . 21
. . . . . . . . . . . . . . . . . 21
. . . . . . . . . . . . . . . 18
. . . . . . . . . . . . . . . . . . . . . . 6
. . . . . . . . . . . . . . . . . . . 6
. . . . . . . . . . . . . 19
. . . . . . . . . . . . . . . . . 21
. . . . . . . . . . . . . . . . . . . . . 19
. . . . . . . . . . . . . . . . . . . . 12
. . . . . . . . . . . . . . . . 22
. . . . . . . . . . . . . 12
. . . . . . . . . . . . . . . . . . . 10
. . . . . . . . . . . . . . 21
. . . . . . . . . . . . . . . . . . 22
. . . . . . . . . . . . . . . . 22
. . . . . . . . . . . . . . . . . . . 22
. . . . . . . . . . . . . . . 16
. . . . . . . . 16
. . . . . . 16
. . . . . . . . . . . . . . . . 10, 18
. . . . . . . . . . . . . . . . . . . . . 6
. . . . . 6
. . . . . . . . . . . . . . . . . . . . . 5
. . . . . . . . . . . . . . . . . . . . . 4
. . . . . . . . . 25
. . . . . . . . . . . . . . . . . . . . 5
. . . . . . . . . . . . . . . . . . . 21
. . . . . . . . . . . . . . . . . . . . . . 6
. . . . . . . . . . . . . . . . . . . . . 10
. . . . . . . . . . . . . . . . . . . . . 10
. . . . . . . . . . . . . . . . . . . . . 11
. . . . . . . . . . . . . . . . . . . . . . . .11
Calls list
Cancel (operation)
Care, phone
Changing
Character set chart
Charge status display
Confirmation beep
Control key
Correcting wrong inputs
Customer Care
. . . . . . . . . . . . . . . . . . . . . . .14
. . . . . . . . . . . . . . . 7
. . . . . . . . . . . . . . . . . . . .24
display language
emergency number
loudspeaker volume
name of base station
. . . . . . . . . . . . . . . . . . . . . . .18
ringer
. . . . . . . . . . . . . . .17
. . . . . . . . . . . . .23
. . . . . . . . . . . .18
. . . . . . . . . . . . 6
. . . . . . . . . . . . . . .29
. . . . . . . . . . . . . 5
. . . . . . . . . . . . . . .21
. . . . . . . . . . . . . . . . . . .1, 6
. . . . . . . . . . . 8
. . . . . . . . . . . . . . . . . .25
D
Deactivating
appointment call
handset
keypad lock
suppressing ringer
Delete key
Deleting
anniversary
appointment
characters
voice pattern
Dialling, emergency number
Directory
administering entries
making an entry
opening
order of entries
storing anniversary
Display
change display language
contrast
display keys
emergency number
in idle status
logo
memory
missed anniversaries
missed appointments
night mode
setting
wrong language
Display keys
. . . . . . . . . . . . . . . . . . . . . 6
. . . . . . . . . . . . . . . . . . . . . 7
. . . . . . . . . . . . . . . . . . . . . .11
. . . . . . . . . . . . . . . . . . . . . 7
. . . . . . . . . . . . . . . . . . . . .17
. . . . . . . . . . . . . . . . . . . . . . . .17
. . . . . . . . . . . . . . . . . . . . .12
. . . . . . . . . . . . . . . . . . . . . .17
. . . . . . . . . . . . . . .22
. . . . . . . . . . . . . . . . . . . 6
. . . . . . . . . . . . . .19
. . . . . . . . . . . . . . . . . . .23
. . . . . . . . . . . . . . . . . .23
. . . . . . . . . . . . . . . . . . . . 8
. . . . . . . . . . . . . . . . . .13
. . . . . . . . . . .12
. . . . . . . . . . . . . . .11
. . . . . . . . . . . . . . . .29
. . . . . . . . . . . . .12
. . . . . . . . . . . . . . . . . . . 7
. . . . . . . . . . . . .23
. . . . . . . . . . . . . . . . . . 7
. . . . . . . . . . . .22
. . . . . . . . . . .22
. . . . . . . . . . . . . . . . . . .18
. . . . . . . . . . . . . . .17
. . . . . . . . . . . . . . . . . . . . 1
. . . . . . . . .17
Index
. . . . . . . .23
31
Page 68

Gigaset SL44 / IM1 engl / A31008-M1609-R101-1-6Z19 / SL44_SIX.fm / 20.08.2004
Index
E
Earpiece mode . . . . . . . . . . . . . . . . . 10
Earpiece volume
EATONI (predictive text)
E-mail directory
Emergency numbers
End call
End call key
Entering special characters
Entering, emergency number
Entry
Error beep
Escape key
Example
. . . . . . . . . . . . . . . . . . . . . . . 10
selecting (menu)
input of more than one line
menu input
. . . . . . . . . . . . . . . . 18
. . . . . . . . . . . 29
. . . . . . . . . . . . . . . . . 13
. . . . . . . . . . . . . . 6
. . . . . . . . . . . . . . . . . . 1, 10
. . . . . . . . 29
. . . . . . . 23
. . . . . . . . . . . . . . . 7
. . . . . . . . . . . . . . . . . . . . . 21
. . . . . . . . . . . . . . . . . . . . . 7
. . . . . . . 9
. . . . . . . . . . . . . . . . . . . 8
F
Factory settings
handset
Function key
. . . . . . . . . . . . . . . . . . . . . 23
. . . . . . . . . . . . . . . . . . . . 1
G
Guarantee. . . . . . . . . . . . . . . . . . . . . 26
H
Handset
activating/deactivating
advisory tones
changing for best reception
changing to another
base station
contact with liquid
de-registering
display language
idle status, return to
. . . . . . . . . . . . . . . . . . . . . . . . . . 7
list
. . . . . . . . . . . . . . . . . . . . . . . 17
logo
loudspeaker volume
muting
night mode
operating and charging times
registering
registering on another
base station
restoring factory settings
setting (individual)
using more than one
using room monitor
. . . . . . . . . . . . . . . . 21
. . . . . . . . . . . . . . . . . 4
. . . . . . . . . . . . . . . . . . . . . 11
. . . . . . . . . . . . . . . . . . 18
. . . . . . . . . . . . . . . . . . . . 4
. . . . . . . . . . . 6
. . . . . . . 6
. . . . . . . . . . . . . . . . 6
. . . . . . . . . . . . . 24
. . . . . . . . . . . . . . 17
. . . . . . . . . . . . . 7
. . . . . . . . . . . . 18
. . . . . 26
. . . . . . . . . . . . . . . . 6
. . . . . . . . 23
. . . . . . . . . . . . . 16
. . . . . . . . . . . . 6
. . . . . . . . . . . . 15
Handset charging times
Handset operating time
in room monitor mode
Handsfree key
Handsfree talking
Hash key
Hearing aids
. . . . . . . . . . . . . . . . . . 1
. . . . . . . . . . . . . . . . . . . . .1, 6
. . . . . . . . . . . . . . . . . . . . 3
. . . . . . . . . . .26
. . . . . . . . . .15
. . . . . . . . . . . . . . . .10
I
Icon
alarm clock
appointment
ringer
Idle status (display)
Initiating voice-activated dialling
Input of more than one line
Internal call
. . . . . . . . . . . . . . . . . . .21
. . . . . . . . . . . . . . . . . .22
. . . . . . . . . . . . . . . . . . . . . . .19
. . . . . . . . . . . . . . 7
. . . . . 7
. . . . . . . . 9
. . . . . . . . . . . . . . . . . . . .11
K
Key 1 (fast access) . . . . . . . . . . . . . . . 1
Keypad lock
Keys
cancel key
control key
delete key
display keys
end call key
escape key
fast access
function key
handsfree key
hash key
keypad lock
menu key
message key
On/Off key
recall key
star key
talk key
. . . . . . . . . . . . . . . . . . . . 6
. . . . . . . . . . . . . . . . . . . . 7
. . . . . . . . . . . . . . . . . .1, 6
. . . . . . . . . . . . . . . . . . . . 7
. . . . . . . . . . . . . . . . . .1, 7
. . . . . . . . . . . . . . . . .1, 10
. . . . . . . . . . . . . . . . . . . 7
. . . . . . . . . . . . . . . . . . . 1
. . . . . . . . . . . . . . . . . . 1
. . . . . . . . . . . . . . . . . 1
. . . . . . . . . . . . . . . . . . . .1, 6
. . . . . . . . . . . . . . . . . . . 6
. . . . . . . . . . . . . . . . . . . . 7
. . . . . . . . . . . . . . . . . . 1
. . . . . . . . . . . . . . . . . . . 1
. . . . . . . . . . . . . . . . . . . . 1
. . . . . . . . . . . . . . . . . . . .1, 19
. . . . . . . . . . . . . . . . . . . .1, 10
L
Language, display. . . . . . . . . . . . . . . .17
Last number redial list
Last number redial, manual
. . . . . . . . . . . . . . . . . . . . . . . .24
Liquid
List
calls list
e-mail directory
handsets
. . . . . . . . . . . . . . . . . . . . .14
. . . . . . . . . . . . . . . . . . . . . 7
. . . . . . . . . . . .14
. . . . . . . .14
. . . . . . . . . . . . . . . .13
32
Page 69

Gigaset SL44 / IM1 engl / A31008-M1609-R101-1-6Z19 / SL44_SIX.fm / 20.08.2004
Index
Lock
activating/deactivating keypad
. . . . . . . . . . . . . . . . . . . . . . . . . 17
Logo
Loudspeaker volume
. . . . . . . . . . . . . 18
. . . . . 6
M
Mains unit. . . . . . . . . . . . . . . . . . . . . . 3
Making calls
answer call
external
internal
Manual last number redial
Medical appliances
Melody, ringer
Memory
directory, speed dial list,
e-mail directory
Menu
back one menu level
end tone
entry
. . . . . . . . . . . . . . . . . . . . . . . . . 7
key
opening
Menu input
Message key
open lists
Messages
. . . . . . . . . . . . . . . . . . . . . . . . . 1
key
Microphone
Missed
anniversary
appointment
Muting handset
. . . . . . . . . . . . . . . . . . 10
. . . . . . . . . . . . . . . . . . . . . 10
. . . . . . . . . . . . . . . . . . . . . 11
. . . . . . . . . 14
. . . . . . . . . . . . . . . 3
. . . . . . . . . . . . . . . . . . 19
. . . . . . . . . . . 12
. . . . . . . . . . . . 7
. . . . . . . . . . . . . . . . . . . . 21
. . . . . . . . . . . . . . . . . . . . . . . . 7
. . . . . . . . . . . . . . . . . . . . . . 7
. . . . . . . . . . . . . . . . . . . . . 8
. . . . . . . . . . . . . . . . . . . . 14
. . . . . . . . . . . . . . . . . . . . 1
. . . . . . . . . . . . . . . . . . 22
. . . . . . . . . . . . . . . . . 22
. . . . . . . . . . . . . . . . . 11
N
Name
announcing
changing the base station
Night mode
Number
storing in the directory
. . . . . . . . . . . . . . . 13, 19
. . . . . . . . 6
. . . . . . . . . . . . . . . . . . . . 18
. . . . . . . . . . 11
O
On/Off key . . . . . . . . . . . . . . . . . . . . . 1
Opening
directory
menu
Operating time for handset
Operation (preparing to use
Order of entries in directory
. . . . . . . . . . . . . . . . . . . . . 7
. . . . . . . . . . . . . . . . . . . . . . . 7
. . . . . . . . 26
the phone)
. . . . . . . . . . . . . . . . . . 4
. . . . . . . . 29
P
Pack contents. . . . . . . . . . . . . . . . . . . 4
PC Interface
Playing
voice pattern
Predictive text
Preparing for use
telephone
. . . . . . . . . . . . . . . . . . . .28
. . . . . . . . . . . . . . . . . .13
. . . . . . . . . . . . . . . . . .29
. . . . . . . . . . . . . . . . . . . . 4
R
Recall key. . . . . . . . . . . . . . . . . . . . . . 1
Recording
voice pattern
Register (handset)
Reminder call
Ring delay
Ringer
changing
setting melody
setting volume
suppressing
Ringer tones
setting
Room monitor
activating
sensitivity
. . . . . . . . . . . . . . . . . .13
. . . . . . . . . . . . . . . 4
. . . . . . . . . . . . . . . . . . .12
. . . . . . . . . . . . . . . . . . . . .18
. . . . . . . . . . . . . . . . . . . .18
. . . . . . . . . . . . . . . .19
. . . . . . . . . . . . . . . .18
. . . . . . . . . . . . . . . . . .19
. . . . . . . . . . . . . . . . . . . . . . 7
. . . . . . . . . . . . . . . . . .15
. . . . . . . . . . . . . . . . . . . .16
. . . . . . . . . . . . . . . . . . . .16
S
Safety precautions . . . . . . . . . . . . . . . 3
Search in directory
Sensitivity, room monitor
Setting
alarm clock
appointment
. . . . . . . . . . . . . . . . . . . . . . . . 6
date
display language
earpiece volume
handset (individual)
. . . . . . . . . . . . . . . . . . . . . . . .17
logo
loudspeaker volume
melody
night mode
ringer melody
ringer volume
time
volume, melody
Setting the date
Setting the time
Settings, see Setting
Signal beep, see Advisory tones
. . . . . . . . . . . . . . . . . . . . . .19
. . . . . . . . . . . . . . . . . . . . . . . . 6
. . . . . . . . . . . . . . .11
. . . . . . . . . .16
. . . . . . . . . . . . . . . . . . .21
. . . . . . . . . . . . . . . . . .21
. . . . . . . . . . . . . . .17
. . . . . . . . . . . . . . .18
. . . . . . . . . . . .16
. . . . . . . . . . . .18
. . . . . . . . . . . . . . . . . . .18
. . . . . . . . . . . . . . . . .19
. . . . . . . . . . . . . . . . .18
. . . . . . . . . . . . . . .19
. . . . . . . . . . . . . . . . . 6
. . . . . . . . . . . . . . . . . 6
33
Page 70

Gigaset SL44 / IM1 engl / A31008-M1609-R101-1-6Z19 / SL44_SIX.fm / 20.08.2004
Index
Sound
. . . . . . . . . . . . . . . . . . . . . . 18
ringer
Sound manager
Specifications
Star key
Storing directory entry/anniversary
. . . . . . . . . . . . . . . . . . . . . 1, 19
. . . . . . . . . . . . . . . . . 19
. . . . . . . . . . . . . . . . . . 25
. . 11
T
Talk key. . . . . . . . . . . . . . . . . . . . . 1, 10
Tex t
writing and editing
Tro ubl eshoot ing
. . . . . . . . . . . . . 28
. . . . . . . . . . . . . . . . 24
V
Voice pattern
deleting
playing
recording
Voice-activated dialling
dialling
Volume
earpice
handset loudspeaker
loudspeaker
ringer
setting
. . . . . . . . . . . . . . . . . . . . . 13
. . . . . . . . . . . . . . . . . . . . . 13
. . . . . . . . . . . . . . . . . . . . 13
. . . . . . . . . . . 13
. . . . . . . . . . . . . . . . . . . . . 13
. . . . . . . . . . . . . . . . . . . . . 18
. . . . . . . . . . . 18
. . . . . . . . . . . . . . . . . . 18
. . . . . . . . . . . . . . . . . . . . . . 18
. . . . . . . . . . . . . . . . . . . . . . 19
W
Wait melody . . . . . . . . . . . . . . . . . . . 11
Walky-Talky
activating
deactivating
setting
Warning beep, see Advisory tones
Wrong inputs (correcting)
. . . . . . . . . . . . . . . . . . . 15
. . . . . . . . . . . . . . . . . . 15
. . . . . . . . . . . . . . . . . . . . . . 15
. . . . . . . . . . 8
34
Page 71

Gigaset SL44 / IM1 fr / A31008-M1609-R101-1-6Z19 / overview.fm / 20.08.2004
Présentation (combiné)
Présentation (combiné)
15
14
13
12
11
10
ÐV
INT 1
28/09/04 09:45
§§§§§§§?§§§§§§§§§ §§§§§§§SMS§§§§§§
9
1 Ecran couleur (état de veille)
2 Etat de charge de la batterie
= e V U (déchargé à chargé)
= clignotant : batterie presque vide
e V U clignotant : batterie en cours
de charge
3 Touches Ecran (p. 7)
4 Touche « Raccrocher » et Marche/Arrêt
- Mettre fin à la communication
- Annuler la fonction en cours
1
2
3
4
5
6
7
8
- Remonter d'un niveau de menu
(appui bref)
- Retour à l'état de veille (appui long)
- Allumer/éteindre le combiné (appui long)
5 Touche « Messages »
Accès au journal des appels et à la liste des
messages
Clignotant : nouveau message ou nouvel
appel
6 Touche de fonctionTouche R
7 Touche « Etoile »
- Activer/Désactiver les sonneries
(Appui long depuis l'état de veille)
- Modes MAJ / Min / Num
(Appuis successifs durant la saisie)
8 Touche « Diè se »
Verrouillage clavier (appui long)
9 Prise pour casque et interface PC
10 Microphone
11 Touche 1
Appui long : messagerie externe ou répondeur (selon la base)
12 Touche « Mains-li bres »
Alterner entre les modes « Ecouteur » et
« Mains-Libres »
Témoin allumé : Mains-Libres activé
Témoin clignotant : appel entrant
13 Touche « Décrocher »
- Prendre l'appel
- Appui bref : liste des N° Bis
- Appui long : prise de ligne, composer
un N°.
14 Touche d e navigation (p. 7)
15 Intensité de réception
Ð i Ñ Ò (forte à faible)
| clignotant : pas de réception
Remarque :
Représentation d'un combiné inscrit à une
base supportant les SMS.
1
Page 72

Gigaset SL44 / IM1 fr / A31008-M1609-R101-1-6Z19 / SL44_IVZ.fm / 20.08.2004
Sommaire
Sommaire
Présentation (combiné) . . . . . . . . 1
Consignes de sécurité . . . . . . . . . 3
Gigaset SL44 –
plus qu'un simple téléphone . . . . 4
Mise en service . . . . . . . . . . . . . . . 4
Insertion des batteries . . . . . . . . . . . . . 4
Inscription . . . . . . . . . . . . . . . . . . . . . . . 5
Charge des batteries . . . . . . . . . . . . . . 5
Fixation du clip ceinture . . . . . . . . . . . . 6
Changement de base . . . . . . . . . . . . . . 6
Modification du nom de la base . . . . . 6
Marche/arrêt du combiné . . . . . . . . . . . 6
Verrouillage clavier . . . . . . . . . . . . . . . . 6
Réglage de la date et de l'heure . . . . . . 6
Utilisation du combiné . . . . . . . . . 7
Touche de navigation . . . . . . . . . . . . . 7
Touches écran . . . . . . . . . . . . . . . . . . . 7
Retour à l’état de repos . . . . . . . . . . . . 8
Navigation dans le menu . . . . . . . . . . . 8
Correction d'erreurs de saisie . . . . . . . . 8
Remarques concernant le
manuel d'utilisation . . . . . . . . . . . 8
Symboles utilisés . . . . . . . . . . . . . . . . . 8
Exemples de représentation . . . . . . . . 9
Téléphoner . . . . . . . . . . . . . . . . . 10
Appel externe . . . . . . . . . . . . . . . . . . . 10
Fin de la communication . . . . . . . . . . 11
Prise d’appel . . . . . . . . . . . . . . . . . . . . 11
Mains-libres . . . . . . . . . . . . . . . . . . . . 11
Secret microphone . . . . . . . . . . . . . . . 11
Appel interne . . . . . . . . . . . . . . . . . . . 11
Répertoire et autres listes . . . . . 12
Répertoire principal . . . . . . . . . . . . . . 12
Répertoire des adresses e-mail . . . . . 14
Liste des numéros Bis . . . . . . . . . . . . . 15
Touche « Messages » . . . . . . . . . . . . . 15
Réglage du mode
Walky-Talky . . . . . . . . . . . . . . . . . 16
Activation du mode Walky-Talky . . . . 16
Désactivation du mode
Walky-Talky . . . . . . . . . . . . . . . . . . . . . 16
Utilisation du combiné pour
la surveillance de pièce en
mode Walky-Talky . . . . . . . . . . . . . . . . 16
Accès rapide à des fonctions
et numéros . . . . . . . . . . . . . . . . . . . . . 17
Modification de la
langue d’affichage . . . . . . . . . . . . . . . 19
Réglage écran . . . . . . . . . . . . . . . . . . . 19
Ecran de veille . . . . . . . . . . . . . . . . . . . 19
Réglage du mode nuit . . . . . . . . . . . . 20
Activation/désactivation du
décroché automatique . . . . . . . . . . . . 20
Réglage du volume d'écoute . . . . . . . 20
Modification des sonneries . . . . . . . . . 20
Gestion des mélodies . . . . . . . . . . . . . 21
Tonalités d'avertissement . . . . . . . . . . 23
Réglage du réveil/de l'alarme . . . . . . . 23
Agenda . . . . . . . . . . . . . . . . . . . . . . . . 23
Dates échues . . . . . . . . . . . . . . . . . . . . 24
Numéro d'urgence . . . . . . . . . . . . . . . 25
Réinitialisation du combiné . . . . . . . . 25
Annexe . . . . . . . . . . . . . . . . . . . . . 26
Entretien . . . . . . . . . . . . . . . . . . . . . . . 26
Contact avec un liquide . . . . . . . . . . . 26
Questions et réponses . . . . . . . . . . . . 26
Assistance clients (Customer Care) . . 27
Caractéristiques techniques . . . . . . . . 27
Garantie France . . . . . . . . . . . . . . . . . . 28
Garantie Belgique . . . . . . . . . . . . . . . . 29
Garantie Suisse . . . . . . . . . . . . . . . . . . 30
Interface PC . . . . . . . . . . . . . . . . . . . . . 30
Jeu « Ballon Shooter » . . . . . . . . . . . . . 30
Saisie et édition de texte . . . . . . . . . . . 31
Accessoires . . . . . . . . . . . . . . . . . 33
Index . . . . . . . . . . . . . . . . . . . . . . 34
2
Page 73

Gigaset SL44 / IM1 fr / A31008-M1609-R101-1-6Z19 / start_guide_time.fm / 20.08.2004
Consignes de sécurité
Consignes de sécurité
Attention :
Lisez attentivement le mode d'emploi et les consignes de sécurité avant l'utilisation.
Informez vos enfants sur les recommandations qui y figurent et mettez-les en garde contre les risques
liés à l'utilisation du téléphone.
Utiliser exclusivement le bloc-secteur fourni, comme indiqué sous le chargeur.
$
Utiliser uniquement les batteries rechargeables recommandées par Siemens
(p. 27) ! Ne jamais utiliser d'autres types de batteries ni des piles non rechargeables, qui peuvent endommager le combiné et représenter un risque pour la
santé ou occasionner des blessures.
‹
Œ
Positionner correctement les batteries rechargeables (en respectant la polarité)
et les utiliser conformément à ce mode d'emploi.
Le combiné peut perturber le fonctionnement de certains équipements médicaux. Tenir compte à ce sujet des recommandations émises par le corps médical.
Le combiné peut provoquer un bourdonnement désagréable dans les aides
auditives. De façon générale, ne pas placer d'appareil électronique à proximité
immédiate du téléphone.
Ne pas installer le chargeur dans une salle de bains ou de douche. Le combiné
et le chargeur ne sont pas étanches aux projections d'eau (p. 26).
Eteindre le téléphone pendant que vous êtes en avion (fonction Walky-Talky
incluse). S'assurer que le téléphone ne peut pas être mis en marche involontairement.
Ne pas utiliser le téléphone dans un environnement présentant un risque
d'explosion (p.ex. ateliers de peinture).
Lorsque vous confiez votre Gigaset à un tiers, veiller toujours à joindre le mode
ƒ
d'emploi.
Bien respecter les règles concernant la protection de l'environnement lorsque
vous mettez au rebut le téléphone et les batteries. Ne pas jeter ces dernières au
feu, ni les ouvrir ou les mettre en court-circuit.
Remarque :
Toutes les fonctions décrites dans ce mode d'emploi ne sont pas nécessairement disponibles dans
tous les pays et sur tous les réseaux. Elles peuvent être assujetties à des abonnements de services
à souscrire spécifiquement.
3
Page 74

Gigaset SL44 / IM1 fr / A31008-M1609-R101-1-6Z19 / start_guide_time.fm / 20.08.2004
Gigaset SL44 – plus qu'un simple téléphone
Gigaset SL44 –
plus qu'un simple téléphone
Votre Gigaset SL44 ne se contente pas de
permettre l'enregistrement d'environ
200 numéros de téléphone et adresses
e-mail (p. 12) – il sait faire beaucoup plus
que cela :
u Créez des raccourcis pour l'appel
abrégé de numéros importants ou
l'accès direct à une fonction souvent
utilisée. Il suffit alors d'une seule pression de touche pour accéder directement au numéro ou à la fonction associé (p. 17).
u Enregistrez les sons favoris avec le com-
biné et configurez une sonnerie personnelle (p. 22).
u Attribuez le statut VIP à vos correspon-
dant importants – vous pourrez ainsi
reconnaître leurs appels grâce à une
sonnerie spécifique (p. 12).
u Enregistrez un modèle vocal pour les
fiches les plus importantes du répertoire. Grâce à la reconnaissance vocale,
le téléphone appellera automatiquement votre correspondant au simple
énoncé de son nom (p. 13).
u Enregistrez rendez-vous (p. 23) et
dates anniversaire (p. 13) dans votre
téléphone – il vous les rappellera à
temps.
Appréciez votre nouveau Gigaset SL44 !
Vous trouverez à la fin de ce manuel des
indications sur le raccordement du chargeur.
Insertion des batteries
Remarque :
Utilisez uniquement les batteries rechargeables homologuées par Siemens p. 27 ! N'utilisez jamais des piles normales (non rechargeables) ou d'autres types de batteries, qui peuvent endommager le combiné ou présenter un
risque pour la santé. Par exemple, il est possible que l'enveloppe de la pile ou de la batterie
soit endommagée ou que les batteries explosent. En outre, l'appareil peut subir des dysfonctionnements ou dommages.
¤ Placez les batteries en respectant la
polarité (voir schéma).
La polarité est indiquée dans ou sur le
compartiment des batteries.
Fermeture du couvercle batterie
¤ Posez le couvercle décalé un peu vers le
bas et poussez-le vers le haut jusqu'à ce
qu'il s'enclenche.
Mise en service
L'emballage contient les éléments
suivants :
u un combiné Gigaset SL44
u un chargeur (avec bloc secteur)
u deux batteries
u un couvercle batterie
u un clip ceinture
u un mode d’emploi
4
Ouverture du couvercle batterie
¤ Appuyez au-dessous du bord supérieur
sur le couvercle batterie et poussez-le
vers le bas.
Page 75

Gigaset SL44 / IM1 fr / A31008-M1609-R101-1-6Z19 / start_guide_time.fm / 20.08.2004
Mise en service
Inscription
Avant de pouvoir utiliser le Gigaset SL44,
vous devez l'inscrire à une base. Le combiné peut être inscrit à quatre bases. La
procédure d'inscription dépend de la base.
Inscription manuelle du combiné
Gigaset SL44
Vous devez activer l'inscription du combiné au niveau du combiné et de la base
utilisée.
Si le combiné ne se met pas en marche
après l'insertion des batteries, vous devez
d'abord charger ces dernières (voir chap.
« Charge des batteries »).
Après une inscription réussie, le combiné
se met dans l'état de repos. Le numéro
interne du combiné s'affiche à l'écran,
p. ex. INT 1. Dans le cas contraire, répétez
la procédure.
1. Sur le combiné
v ¢ Ð ¢ Combiné ¢ Inscrire comb.
s Sélectionner la base, p.ex.
Base 1 et appuyer sur
~ Entrer le code PIN système de
la base (réglage usine : 0000)
et appuyer sur
clignote p.ex. Base 1.
2. Au niveau de la base
Démarrez l'inscription dans les 60 s sur la
base conformément au mode d'emploi
fourni avec votre base.
§OK§.
§OK§. A l'écran
Charge des batteries
A la livraison, les batteries ne sont pas
chargées.
¤ Raccordez le bloc secteur à la fiche cor-
respondante sur le chargeur fourni puis
l'autre extrémité à une prise de courant.
¤ Posez le combiné écran face à vous sur
son chargeur.
Pour charger les batteries, laissez le combiné sur le chargeur. Le chargement de la
batterie est signalé en haut à droite de
l'écran par le clignotement du témoin de
charge e. Pendant le fonctionnement, le
témoin de charge signale l'état de charge
des batteries (p. 1).
Premier cycle de charge et décharge des
batteries
Pour que l'état de charge soit affiché correctement, les batteries doivent d'abord
être chargées et déchargées entièrement.
¤ Laissez à cet effet le combiné sur le
chargeur sans interruption pendant
huit heures sans tenir compte du
témoin de charge. Votre combiné n'a
pas besoin d'être en marche pour la
charge.
¤ Retirez ensuite le combiné de sur son
chargeur et utilisez-le ainsi, sans le
reposer dessus, jusqu'à épuisement
complet des batteries.
Remarques :
– Le combiné doit uniquement être posé sur
la base prévue pour cela.
– Si le combiné se trouve sur la base, il se
charge aussi quand il est éteint.
– Si le combiné s'est éteint à cause de
batteries vides et est replacé sur la base,
il s'allume automatiquement.
– Une fois le premier cycle de charge et
décharge effectué, vous pouvez reposer le
combiné sur son chargeur après chaque
communication.
A noter :
u Répétez le premier cycle de charge et
décharge chaque fois que vous retirez
les batteries du combiné et les remettez
en place.
u Les batteries peuvent s'échauffer
durant la charge ; il s'agit d'un phénomène normal et sans danger.
u Pour des raisons techniques, la capacité
de charge des batteries diminue au fil
du temps et nécessite, à terme, leur
remplacement.
5
Page 76

Gigaset SL44 / IM1 fr / A31008-M1609-R101-1-6Z19 / start_guide_time.fm / 20.08.2004
Mise en service
Fixation du clip ceinture
Le combiné est pourvu au niveau de
l'écran de trous latéraux prévus pour la
fixation du clip ceinture.
¤ Placez le clip ceinture à l'arrière du
combiné et appuyez jusqu'à ce que les
ergots s'enclipsent dans les trous.
La languette du clip ceinture doit être
pointée vers le compartiment des batteries.
Changement de base
Si votre combiné est inscrit sur plusieurs
bases, vous pouvez sélectionner une certaine base ou celle offrant la meilleure
qualité de réception (Meilleure base).
¢ Ð ¢ Combiné ¢ Sélect. Base
v
s Sélectionner une base où il a
été inscrit ou Meilleure base et
appuyer sur
Modification du nom de la base
Les noms « Base 1 » à « Base 4 » sont attribués automatiquement. Vous pouvez
modifier le nom de votre base.
¢ Ð ¢ Combiné ¢ Sélect. Base
v
s Sélectionner la base et
appuyer sur
~ Entrer un nouveau nom de
16 caractères max. (p. 31).
§Sauver§ Appuyer sur la touche écran
pour enregistrer le réglage.
a Appuyer longuement (état de
repos).
§OK§.
§Modifier§.
Marche/arrêt du combiné
a Appuyer sur la touche Raccro-
cher longuement. Vous entendez le bip de confirmation.
Verrouillage clavier
# Appuyer longuement sur la
touche Dièse.
Vous entendez le bip de confirmation. Si le
clavier est verrouillé, Ø s'affiche.
Le verrouillage du clavier est automatiquement désactivé lorsque vous recevez un
appel. A la fin de la communication, il est
réactivé.
Remarque :
Le numéro d'urgence (p. 25) entré peut aussi
être appelé quand le clavier est verrouillé.
Réglage de la date et de l'heure
Tant que vous n'avez pas réglé la date et
l'heure, appuyez sur la touche écran
pour ouvrir le champ de saisie.
Hre§
Pour modifier l'heure, ouvrez le champ de
saisie avec :
¢ Ð ¢ Date/Heure
v
§Dat./
¤ Renseigner les différentes lignes :
Date :
Entrer le jour, le mois et l'année avec
6 caractères.
Heure :
Entrer les heures et minutes avec
4 caractères, p. ex. Q M
1 5 pour 07:15.
§Sauver§ Appuyer sur la touche écran.
Remarque :
La date et l'heure peuvent aussi être automatiquement transmises par le réseau à la première communication.
6
Page 77

Gigaset SL44 / IM1 fr / A31008-M1609-R101-1-6Z19 / start_guide_time.fm / 20.08.2004
Utilisation du combiné
Utilisation du combiné
Touche de navigation
Dans ce qui suit, le côté de la touche de
navigation que vous devez utiliser dans
une situation donnée est marqué en noir
(en haut, en bas, à droite, à gauche)
(p.ex. v pour « appuyer sur le côté droit
de la touche de navigation »).
La touche de navigation a différentes
fonctions :
A l'état de repos du combiné
s Ouvrir le répertoire principal.
v Ouvrir le menu principal.
u Ouvrir la liste des combinés.
t Appuyer brièvement : régler
les sonneries du combiné
(p. 20).
Appuyer longuement : activer la numérotation vocale
(p. 14).
Dans le menu principal et les champs de
saisie
Avec la touche de navigation, vous déplacez le curseur vers le haut t, vers le bas
s, à droite v ou à gauche u.
Dans les listes et les sous-menus
t / s Naviguer vers le haut ou vers
le bas ligne par ligne.
v Ouvrir le sous-menu ou confir-
mer la sélection.
u Remonter d'un niveau de
menu ou annuler l'opération.
Pendant une communication externe
s Ouvrir le répertoire principal.
v Ouvrir le menu.
u Activer le double appel
interne.
t Modifier le volume d'écoute
pour le mode écouteur ou
mains-libres.
Touches écran
Les fonctions des touches écran varient
selon le contexte. Exemple :
§§§§§§§§§§§?§§§§§§§§§§
1 Les fonctions accessibles par les touches
écran sont affichées sur la dernière ligne au
bas de l'écran.
2 Touches écran
Appuyer sur la touche écran située dessous pour appeler la fonction.
Principales icônes affichées :
§§§§§§§§§§?§§§§§§§§§§§ Touche écran gauche tant
qu'aucune fonction n'y est
affectée (p. 17).
¨ Ouvrir le menu principal ou un
menu contextuel.
W Touche Effacer : effacer carac-
tère par caractère de la droite
vers la gauche.
Î Remonter d'un niveau de
menu ou annuler l'opération.
Œ Ouvrir le répertoire des e-
mails.
Ò Ouvrir le répertoire principal.
Ó Copier le numéro dans le
répertoire.
Ÿ Sur les bases à répondeur
intégré : renvoyer l'appel
externe au répondeur.
• Ouvrir la liste des numéros Bis
(selon la base).
§§§§§§§§SMS§§§§§§
1
2
7
Page 78

Gigaset SL44 / IM1 fr / A31008-M1609-R101-1-6Z19 / start_guide_time.fm / 20.08.2004
Remarques concernant le manuel d'utilisation
Retour à l’état de repos
Depuis n'importe quel niveau du menu
vous retournez à l'état de repos de la
manière suivante :
¤ Appuyer sur la touche Raccrocher a
longuement.
Ou :
¤ N'appuyer sur aucune touche : après
2 minutes, l'écran revient automatiquement à l'état de repos.
Les modifications non validées ou enregistrées par pression de
§Envoi§ ou Sauvegarder §OK§ sont rejetées.
Un exemple d'affichage à l'état de repos
est reproduit p. 1.
§OK§, §Oui§, §Sauver§,
Navigation dans le menu
Les fonctions de votre téléphone sont proposées par le biais d'un menu constitué de
plusieurs niveaux.
Menu principal (premier niveau)
Appuyez sur v à l'état de repos pour
ouvrir le menu principal.
Les groupes de fonctions du menu principal sont affichés sous forme d'icônes en
couleur dont la signification est rappelée
en haut de l'écran.
Pour accéder à un groupe de fonctions et
ouvrir le sous-menu correspondant (prochain niveau) :
¤ Déplacer le curseur avec la touche de
navigation (q et r) pour sélectionner l'icône. La première ligne de l'écran
affiche le nom de la fonction. Appuyez
sur la touche écran
§OK§.
Sous-menus
Les fonctions des sous-menus sont affichées sous forme de listes.
Pour accéder à une fonction :
¤ Sélectionner la fonction avec la touche
de navigation q et appuyer sur
§OK§.
Si vous appuyez une fois sur la touche Raccrocher a brièvement, vous revenez au
niveau précédent ou annulez l'opération
Correction d'erreurs de saisie
Vous pouvez corriger les erreurs de saisie
en vous positionnant sur l'entrée incorrecte avec la touche de navigation. Vous
avez alors la possibilité :
u d'effacer avec X le caractère à gauche
du curseur
u d'insérer le caractère à gauche du cur-
seur
u de remplacer le caractère (clignotant)
par exemple lors de la saisie de l'heure
et de la date.
Remarques concernant le
manuel d'utilisation
Ce mode d'emploi utilise certains symboles et représentations expliqués ci-après.
Symboles utilisés
<Répert. e-mail> / Nouvelle entrée (ex.)
Sélectionner l'une des deux
fonctions indiquées.
~ Entrer des chiffres ou des let-
tres.
§Sauver§ Fonctions attribuées aux tou-
ches écran et présentées sur la
dernière ligne au bas de
l'écran.
q Appuyer sur la touche de navi-
gation en haut ou en bas :
feuilleter vers le haut ou vers
le bas.
r Appuyer sur la touche de navi-
gation à droite ou à gauche :
p. ex. Sélectionner l'option.
c / Q / *, etc.
Appuyer sur la touche reproduite sur le combiné.
8
Page 79

Gigaset SL44 / IM1 fr / A31008-M1609-R101-1-6Z19 / start_guide_time.fm / 20.08.2004
Remarques concernant le manuel d'utilisation
Exemples de représentation
s Sélectionner la configuration
Utilisation des menus
Le mode d'emploi décrit en abrégé les étapes que vous devez effectuer. Cette représentation est illustrée par l'exemple
suivant :
« Configuration des couleurs de l'écran »
Le texte encadré explique en détail les
manipulations.
¢ Ð ¢ Réglage écran
v
¤ Appuyer sur la touche de navigation
en haut ou en bas pour sélectionner la
configuration des couleurs.
¤ Appuyer sur la touche écran §OK§ pour
valider la sélection.
La configuration des couleurs sélectionnée est marquée par ‰.
de couleurs et appuyer sur
(‰ = couleur actuelle).
§OK§
¤ A l'état de repos du combiné, appuyer
su r la to uche de navig ation p our ouvri r
le menu principal.
¤ Avec la touche de navigation, sélec-
tionner le symbole Ð – appuyer sur la
touche de navigation à droite, à gauche, en haut ou en bas.
La première ligne de l'écran affiche Régla-
ges.
¤ Appuyer sur la touche écran §OK§ pour
valider la fonction Réglages.
Le sous-menu Réglages s'affiche.
¤ Appuyer sur la touche de navigation
jusqu'à ce que la fonction Réglage éc ran
soit sélectionnée.
¤ Appuyer sur la touche écran §OK§ pour
valider la sélection.
Conf. couleur
Sélectionner et appuyer
§OK§.
sur
¤ Appuyer sur la touche de navigation
jusqu'à ce que la fonction Conf. couleur
soit sélectionnée.
¤ Appuyer sur la touche écran §OK§ pour
valider la sélection.
a Appuyer longuement
(état de repos).
¤ Appuyer longuement sur la touche
Raccrocher pour mettre le combiné à
l'état de repos.
Ecran multi lignes
Dans de nombreuses situations, plusieurs
lignes de saisie sont proposées pour un
même écran.
La saisie multiligne décrite dans ce mode
d'emploi est reproduite en abrégé. Elle est
illustrée par la fonction « Enregistrement
d'un rendez-vous ». Le texte encadré explique ce que vous devez faire.
L'écran affiche :
Activation : f Act. g
Date : 21 03
Heure : 11:11
Texte : Rendez-vous
Î Sauver
Activation :
Sélectionner Act. ou Dés..
¤ Appuyer sur le côté droit ou gauche
(r) de la touche de navigation pour
sélectionner Act. ou Dés..
9
Page 80

Gigaset SL44 / IM1 fr / A31008-M1609-R101-1-6Z19 / start_guide_time.fm / 20.08.2004
Téléphoner
Date :
Entrer le jour/mois avec 4 caractères.
¤ Appuyer sur la touche s pour passer
à la ligne suivante.
La deuxième ligne est sélectionnée et
marquée [ ].
¤ Entrer la date avec les touches numéri-
ques.
Heure :
Entrer l'heure/lesminutes avec
4caractères.
¤ Appuyer sur la touche s.
La troisième ligne est sélectionnée et marquée [ ].
¤ Entrer la date avec les touches numéri-
ques.
Texte :
Appuyer sur la touche écran
Entrer le texte (max. 32 caractères) et
appuyer sur
§OK§.
§Modifier§.
¤ Appuyer sur la touche s.
La quatrième ligne est sélectionnée et
marquée < >.
¤ Appuyer sur la touche écran §Modifier§
pour ouvrir le champ de saisie. Saisir le
texte (p. 31).
¤ Appuyer sur la touche écran §OK§.
¤ Enregistrer les modifications.
L’i cône ¼ s’affiche.
Vous pouvez enregistrer de deux façons
les modifications, selon le contexte.
¤ Directement en appuyant sur la touche
§Sauver§.
écran
Ou :
¤ Via le menu en appuyant sur la
touche v. Sélectionner avec q Sau-
vegarder et appuyer sur
§OK§.
¤ Toujours appuyer ensuite longue-
ment sur la touche a.
Le combiné passe à l'état de repos et affiche l'icône ¼.
Téléphoner
Appel externe
Les appels externes sont des appels à destination du réseau public.
~c Entrer le numéro et appuyer
sur la touche Décrocher.
Ou :
c~ Appuyer sur la touche Décro-
cher c longuement puis
entrer le numéro.
Appuyez sur la touche Raccrocher a pour
annuler la numérotation.
Remarques :
– La numérotation à partir du répertoire prin-
cipal (p. 1, p. 12) ou la liste de numéros Bis
(p. 7, p. 15) évite l'introduction répétée de
numéros.
– Vous pouvez créer à partir d'une fiche du
répertoire un raccourci touche (p. 17) pour
un appel abrégé.
– La reconnaissance vocale facilite l'appel de
vos principaux correspondants enregistrés
dans le répertoire (p. 13).
10
Page 81

Gigaset SL44 / IM1 fr / A31008-M1609-R101-1-6Z19 / start_guide_time.fm / 20.08.2004
Téléphoner
Fin de la communication
a Appuyer sur la touche Raccro-
cher.
Prise d’appel
Un appel entrant est signalé de trois
façons : par la sonnerie, par l'affichage et
par le clignotement de la touche Mainslibres d.
Vous pouvez prendre un appel de diverses
façons :
¤ Appuyer sur la touche Décrocher c.
¤ Appuyer sur la touche Mains-libres d.
Si le combiné est placé sur la base et que
la fonction Décroché auto. est activée
(p. 20), le combiné prendra l'appel dès
que vous l'aurez retiré du chargeur.
Si la sonnerie vous dérange, appuyez sur
la touche écran
dre l'appel tant qu'il s'affiche à l'écran.
Mains-libres
Ne tenez pas le combiné à l'oreille en
mode mains-libres. Posez-le p. ex. sur la
table devant vous. D'autres personnes
pourront alors participer à la communication.
Activation/désactivation du
mode Mains-libres
§Silence§. Vous pouvez pren-
Pendant une communication, vous activez
ou désactivez le mode mains-libres.
Pour remettre en place le combiné sur la
base sans interrompre la communication
mains-libres :
¤ Maintenir la touche Mains-libres d
enfoncée pendant l'insertion.
Pour modifier le volume d'écoute, voir
p. 20.
Secret microphone
Vous pouvez désactiver le micro de votre
combiné pendant une communication
externe. Votre correspondant entend alors
une musique d'attente.
u Appuyer sur le côté gauche de
la touche de navigation pour
désactiver le micro.
” Appuyer sur la touche écran
pour réactiver le micro.
Appel interne
Les communications avec d'autres combinés inscrits sur la même base sont gratuites.
Appel vers un combiné en particulier
u Activer un appel interne.
~ Entrer le N° du combiné ou le
sélectionner dans la liste proposée.
Activation lors de la numérotation
~d Entrer le numéro et appuyer
sur la touche Mains-libres.
¤ Si vous faites écouter la conversion à
d'autres personnes, prévenez votre correspondant.
Alterner les modes écouteur et mainslibres
d Appuyer sur la touche Mains-
libres.
Appel vers tous les combinés (« appel
général ou collectif »)
u Activer un appel interne.
* Appuyer sur la touche Etoile.
Tous les combinés sont appelés.
Fin de la communication
a Appuyer sur la touche Raccro-
cher.
11
Page 82

Gigaset SL44 / IM1 fr / A31008-M1609-R101-1-6Z19 / start_guide_time.fm / 20.08.2004
Répertoire et autres listes
Répertoire et autres listes
Vous pouvez enregistrer jusqu'à
200 fiches réparties entre le répertoire
principal et le répertoire e-mail (le nombre
dépend de l'étendue des entrées).
Dans une configuration multi combinés,
chaque combiné possède ses propres
répertoires. Il est cependant possible de
copier tout ou parties de ces répertoires
d'un combiné à l'autre.
Répertoire principal
Dans le répertoire principal, vous enregistrez les numéros et noms correspondants.
¤ Ouvrir le répertoire principal à l'état de
repos avec la touche s.
Longueur des entrées
Numéro : 32 chiffres max.
Nom : 16 caractères max.
Remarque :
Pour accéder rapidement à un numéro du
répertoire principal (numérotation abrégée),
vous pouvez affecter une touche de raccourci
à la fiche correspondante du répertoire (p. 17).
Saisie d'une nouvelle fiche
s ¢ Nouvelle entrée
¤ Renseigner les différentes lignes :
Numéro :
Entrer le numéro.
Nom :
Entrer le nom.
Annivers. :
Entrer éventuellement la date anniversaire (p. 13).
¤ Enregistrer les modifications.
Si votre base téléphonique utilisée avec le
combiné est connectée à un auto-commutateur privé, vous devez éventuellement
faire précéder le numéro d'appel d'un préfixe. Pour cela, reportez-vous au mode
d'emploi de l'auto-commutateur ou/et de
votre base.
Sélection d'une fiche
s Ouvrir le répertoire.
Vous avez le choix entre les possibilités
suivantes :
u Naviguer avec s jusqu'à la fiche cor-
respondante, jusqu'à ce que le nom
recherché soit sélectionné.
u Entrer les premiers caractères
(max. 10) du nom. Naviguer le cas
échéant avec s jusqu'à la fiche.
Numérotation
s ¢ s (sélectionner la fiche)
c Appuyer sur la touche Décro-
cher. Le numéro est composé.
Gestion des fiches
s ¢ s (sélectionner la fiche)
Affichage d'une fiche
§Afficher§ Appuyer sur la touche écran.
L'entrée s'affiche.
Retour avec
§OK§.
Modification d'une fiche
§Afficher§ §Modifier§
Appuyer sur les touches écran
l'une après l'autre.
¤ Effectuer les modifications et les enre-
gistrer
Utilisation d'autres fonctions
s ¢ s (sélectionner la fiche)
¢ v (ouvrir le menu)
Vous pouvez sélectionner les fonctions
suivantes avec q :
Utiliser le No
Modifier ou compléter un numéro
enregistré. Composer le numéro ou
appeler d'autres fonctions par pression
de ©.
12
Page 83

Gigaset SL44 / IM1 fr / A31008-M1609-R101-1-6Z19 / start_guide_time.fm / 20.08.2004
Répertoire et autres listes
Modifier entrée
Modifier l’entrée sélectionnée.
Effacer entrée
Supprimer l’entrée sélectionnée.
Entrer comme VIP (uniquement répertoire
principal)
Sélectionner une fiche de répertoire
comme VIP (Very Important Person) et
lui attribuer une mélodie spécifique.
Vous reconnaîtrez alors les appels VIP à
la mélodie.
Condition : présentation du numéro
de l'appelant
Enreg. modèle (uniquement répertoire
principal)
Prononcer le nom de la fiche sélectionnée et l'enregistrer comme modèle
vocal (p. 14) pour la reconnaissance
vocale.
Ecouter modèle
Ecouter le modèle vocal (p. 14).
Effac. modèle
Supprimer le modèle vocal (p. 14).
Effacer liste
Supprimer toutes les fiches du répertoire principal.
Mémoire dispo.
Afficher le nombre d'entrées libres
dans le répertoire principal (p. 14) et le
répertoire e-mail.
Enregistrer une date anniversaire
Vous pouvez enregistrer, pour chaque
fiche du répertoire principal, une date
anniversaire et entrer l'heure à laquelle
vous souhaitez que cette date vous soit
rappelée.
¢ s (sélectionner la fiche ; p. 12)
s
§Afficher§ §Modifier§
Appuyer sur les touches écran
l'une après l'autre.
s Placer le curseur sur la ligne
Annivers. :.
§Modifier§ Appuyer sur la touche écran.
¤ Renseigner les différentes lignes :
Date :
Entrer le jour/mois avec 4 caractères.
Heure :
Entrer l'heure/les minutes du rappel
avec 4 caractères.
Mémo :
Sélectionner le type de signalisation et
appuyer sur
§OK§.
¤ Enregistrer les modifications (p. 10).
Remarque :
Pour être rappelé, il faut entrer une heure. Si
vous avez sélectionné une signalisation optique, l'entrée de l'heure n'est pas nécessaire.
Elle est automatiquement réglée sur 00:00.
Suppression d'une date anniversaire
s ¢ s (sélectionner la fiche ; p. 12)
s Placer le curseur sur la ligne
Annivers. :.
§Modifier§ §Effacer§ §Sauver§
Appuyer sur les touches écran
l'une après l'autre.
Rappel de date anniversaire
Un rappel de date anniversaire est signalé
avec la mélodie que vous avez choisie sur
le combiné.
§Silence§ Appuyer sur la touche écran
pour terminer le rappel.
Reconnaissance vocale
Vous pouvez appeler un numéro du répertoire simplement en prononçant le nom
associé. Pour que votre téléphone vous
« reconnaisse », vous devez entrer un
modèle vocal pour chaque nom, c'est-àdire énoncer à haute voix le nom et l'enregistrer dans le combiné.
Si vous avez souscrit au service
« Présentation du numéro de l'appelant »,
ce modèle vocal pourra être utilisé pour
annoncer vocalement l'appel de votre correspondant (voir p. 21)
Vous pouvez enregistrer un modèle vocal
pour au maximum 30 des fiches du réper-
13
Page 84

Gigaset SL44 / IM1 fr / A31008-M1609-R101-1-6Z19 / start_guide_time.fm / 20.08.2004
Répertoire et autres listes
toire principal. Ces fiches sont alors repérées par le symbole ´.
Enregistrement d'un modèle vocal
Enregistrez le modèle dans un
environnement silencieux, à une distance
de 25 cm environ du combiné. Le modèle
vocal peut avoir une longueur de 1,5 s.
Remarque :
Si vous utilisez la numérotation vocale principalement avec un kit mains-libres, il est avantageux d'enregistrer le modèle avec le kit
mains-libres.
¢ s (sélectionner la fiche ; p. 12)
s
v Ouvrir le menu.
Enreg. modèle
Sélectionner.
OK Appuyer sur la touche écran
pour démarrer l'enregistrement.
Un signal bref retentit. L'écran affiche
l'invite correspondante. Enoncez le nom.
Répétez le nom après y avoir été invité et
un deuxième signal sonore. Dans le cas où
les deux enregistrements sont trop différents, le téléphone vous invite à recommencer.
Remarque :
Si l'espace en mémoire ne suffit plus pour
l'enregistrement d'un modèle vocal, un message le signale à l'écran. Le combiné repasse
au répertoire principal. Effacer un modèle
vocal et resélectionner Enreg. modèle.
Pour modifier un modèle vocal, vous
devez l'effacer (p. 14) puis le réenregistrer.
Numérotation vocale
t Appuyer longuement.
Prononcez le nom après le signal sonore.
Si le nom correspond au modèle vocal
enregistré, il sera répété. Le numéro sera
composé.
Ecoute d'un modèle vocal
s ¢ s (sélectionner la fiche
marquée ´ )
v Ouvrir le menu.
Ecouter modèle
Sélectionner et appuyer
OK. Le modèle vocal est
sur
écouté en mode mains-libres.
a Appuyer longuement (état de
repos).
Suppression d'un modèle vocal
s ¢ s (sélectionner la fiche
marquée ´)
v Ouvrir le menu.
Effac. modèle
Sélectionner et appuyer
OK.
sur
a Appuyer longuement (état de
repos).
La fiche du répertoire reste conservée.
Répertoire des adresses e-mail
Le répertoire e-mail vous permet d'enregistrer des adresses électroniques.
Enregistrement d'une nouvelle
adresse e-mail
s Ouvrir le répertoire.
<Répert. e-mail>
Sélectionner et appuyer
§OK§.
sur
Nouvelle entrée
Sélectionner et appuyer
§OK§.
sur
~ Entrer l'adresse e-mail
(60 caractères max.).
¤ Enregistrer les modifications (p. 10).
Pendant l'entrée, vous pouvez ouvrir le
menu avec © et utiliser les fonctions
suivantes :
Insérer "." / Insérer "@"
Insérer un point ou le caractère @.
14
Page 85

Gigaset SL44 / IM1 fr / A31008-M1609-R101-1-6Z19 / start_guide_time.fm / 20.08.2004
Répertoire et autres listes
Gestion des adresses e-mail
s ¢ <Répert. e-mail>
¢ s (sélectionner l'entrée ; p. 12)
Affichage d'une entrée
§Afficher§ Appuyer sur la touche écran.
L’entrée s'affiche.
Retour avec
§OK§.
Modification d'une entrée
§Afficher§ §Modifier§
Appuyer sur les touches écran
l'une après l'autre.
¤ Effectuer les modifications et les enre-
gistrer (p. 10).
Utilisation d'autres fonctions
s ¢ <Répert. e-mail>
¢ s (sélectionner l'entrée ; p. 12)
¢ v (ouvrir le menu)
Comme dans le répertoire (p. 13) vous
pouvez sélectionner les fonctions suivantes avec s :
Modifier entrée
Effacer entrée
Effacer liste
Liste des numéros Bis
La liste des numéros Bis contient les dix
derniers numéros composés (32 chiffres
max.). Si l'un des numéros figure dans le
répertoire, le nom correspondant s'affiche.
Renumérotation manuelle
c Appuyer brièvement sur la
touche.
s Sélectionner une entrée.
c Réappuyer sur la touche
Décrocher. Le numéro est
composé.
Lorsqu'un nom apparaît à l'écran, vous
pouvez utiliser la touche écran
pour visualiser le numéro correspondant.
§Afficher§
Gestion des entrées de la liste des
numéros Bis
c Appuyer brièvement sur la
touche.
s Sélectionner une entrée.
v Ouvrir le menu.
Vous pouvez sélectionner les fonctions
suivantes avec q :
Renumérot.Auto.
Le numéro est appelé à intervalles fixes
(au moins toutes les 50 s). La touche
Mains-libres clignote et la fonction
« Ecoute amplifiée » est activée.
– Le correspondant prend l'appel :
appuyer sur la touche Décrocher c.
La fonction est terminée.
– Personne ne prend l'appel : l'appel
est interrompu au bout de 30 s environ. Après pression d'une touche
quelconque ou dix essais infructueux, la fonction se termine.
Utiliser le No (comme dans le répertoire
principal, p. 12).
No.vers répert.
Reprendre l'entrée dans le répertoire
principal (p. 12).
Effacer entrée (comme dans le répertoire
principal, p. 13).
Effacer liste (comme dans le répertoire
principal, p. 13).
Touche « Messages »
A l'état de repos, une icône s'affiche pour
les nouveaux appels ou messages. Le
nombre de nouvelles entrées s'affiche
sous l'icône correspondante. Dès qu'une
nouvelle entrée est présente, une tonalité d'avertissement retentit. La touche f
clignote.
Si vous appuyez sur la touche clignotante
f, vous appelez les listes qui renferment
les nouveaux messages.
15
Page 86

Gigaset SL44 / IM1 fr / A31008-M1609-R101-1-6Z19 / start_guide_time.fm / 20.08.2004
Réglage du mode Walky-Talky
Réglage du mode
Walky-Talky
La fonction Walky-Talky permet à deux
combinés de communiquer ensemble,
indépendamment de leur éloignement
par rapport à la base.
Exemple : vous partez en vacances et
vous prenez deux combinés dotés d'une
fonction Walky-Talky. Activez la fonction
Walky-Talky sur les deux combinés.
Condition :
Une des conditions suivantes doit être
remplie.
u Les deux combinés sont inscrits à la
même base.
u Les deux combinés sont inscrits à des
bases différentes et sont paramétrés
sur Meilleure base (p. 6).
u L'un des combinés n’est inscrit à
aucune base et le combiné inscrit est
paramétré sur la meilleure base.
u Les deux combinés ne sont inscrits à
aucune base.
A noter :
u La portée entre les combinés peut
atteindre au max. 300 m en terrain
dégagé en mode Walky-Talky.
u Les combinés ne peuvent plus recevoir
d’appels entrants.
u En mode Walky-Talky, l’autonomie des
combinés est fortement réduite.
u Le mode Walky-Talky reste activé même
après la mise à l'arrêt et la remise en
marche du combiné.
Activation du mode Walky-Talky
v ¢ í ¢ Walky-Talky
Si vous appuyez en mode Walky-Talky sur
la touche Décrocher c ou sur la touche
Mains-libres d, l'appel sera transmis à
tous les combinés qui se trouvent en
mode Walky-Talky. La communication est
établie avec le premier combiné qui prend
l'appel Walky-Talky.
u Le réglage du volume du haut-parleur
et des bips d’avertissement s’effectue
comme si le combiné était en contact
avec la base (p. 20).
u Les fonctions « Activation/désactiva-
tion de la sonnerie » (p. 23) et
« Activation/désactivation du verrouillage du clavier » (p. 6) sont disponibles en mode Walky-Talky.
u Pour ouvrir le menu, appuyez sur la
touche écran ©.
Désactivation du mode
Walky-Talky
§Arrêt§ Appuyer sur la touche écran.
Utilisation du combiné pour
la surveillance de pièce en
mode Walky-Talky
Cette fonction permet d'utiliser la fonction
Walky-Talky comme surveillance de pièce.
L'alarme surveillance de pièce est transmise à tous les combinés réglés en mode
Walky-Talky dès que le niveau sonore configuré est atteint dans la pièce.
Pendant une alarme de surveillance de
pièce, toutes les touches sont verrouillées
à l'exception de la touche Raccrocher.
Après avoir raccroché, la fonction reste
activée. Après la mise à l'arrêt du combiné, il faut réactiver cette fonction.
16
Page 87

Gigaset SL44 / IM1 fr / A31008-M1609-R101-1-6Z19 / start_guide_time.fm / 20.08.2004
Réglages du combiné
Réglages du combiné
Attention !
– Vérifiez impérativement le fonctionne-
ment à la mise en service. Testez p. ex. la
sensibilité et l'établissement de la communication.
– La fonction activée diminue considérable-
ment l'autonomie du combiné. Placez le cas
échéant le combiné sur la base de manière
à éviter que la batterie ne se vide.
– La distance optimale entre le combiné et
l'endroit à surveiller est comprise entre 1 et
2 mètres. Le microphone doit être dirigé
vers l'endroit à surveiller.
– Notez que la surveillance de pièce en mode
Walky-Talky n'offre pas de sécurité optimale.
Activation/désactivation de
la surveillance de pièce
© Appuyer sur la touche écran.
Surveill. Pièce
Sélectionner et appuyer
§OK§.
sur
Activation :
Pour activer sélectionner Ma.. Pour
désactiver, sélectionner Arrêt.
Sensibil. :
Régler la sensibilité pour le niveau
sonore (Faible ou Elevée).
¤ Enregistrer les modifications (p. 10).
La surveillance de pièce est maintenant
activée, désactivée.
Votre combiné est préréglé. Vous pouvez
personnaliser ses réglages.
Accès rapide à des fonctions
et numéros
La touche écran gauche, la touche de
fonction ú et les touches numériques
Q et 2 à O peuvent être
affectées à l'appel direct d'un numéro ou
d'une fonction.
La composition du numéro ou le démarrage de la fonction s'effectue par appui
long sur la touche.
Affectation d'une touche numérique/
touche de fonction ou de la touche
écran gauche
Condition : la touche numérique, la touche de fonction ou la touche écran gauche
n'est pas encore affectée à un numéro ou
une fonction.
¤ Appuyer sur la touche écran §§§§§§§§§§?§§§§§§§§§§§ ou
longuement sur la touche numérique
ou sur la touche de fonction ú.
La liste des affectations possibles s'affiche.
Les options suivantes sont disponibles :
Raccourcis Tches
Affecter la touche à l'appel direct d'un
numéro du répertoire principal.
Le répertoire principal s'ouvre.
¤ Sélectionner une entrée et appuyer
§OK§.
sur
Si vous effacez ou modifiez l'entrée
dans le répertoire principal, cette
action ne se répercute pas sur l'occupa
Agenda / Réveil/Alarme
Affecter la touche au menu de réglage
et d'activation d'un rendez-vous ou de
la fonction réveil/alarme (p. 23) :
¢ Agenda / Réveil/Alarme
ì
17
Page 88

Gigaset SL44 / IM1 fr / A31008-M1609-R101-1-6Z19 / start_guide_time.fm / 20.08.2004
Réglages du combiné
Nouvel enregistr.
Affecter la touche au menu d'enregistrement d'un nouveau son (p. 22).
¢ <Nvl enregistr.>
Ë
Selon la base, les fonctions suivantes sont
disponibles en plus :
Secret app/appel
Supprimer la tranmission du numéro
au prochain appel.
Info - Services
Affecter la touche au menu de commande d'un service d'information.
Notific. par SMS
Af fecte r la to uche au menu d'ac tivat ion
de la notification par SMS. Dépend de
la base utilisée.
Mode Répondeur
Affecter la touche au menu de sélection
du mode Répondeur (voir aussi mode
d'emploi de la base) :
¢ Annonces ¢ Mode
Î
Remarque :
Si l'affectation de la touche a pour effet
d'ouvrir un menu, une pression brève sur la
touche Raccrocher
à l'état de repos (pas au menu supérieur).
Si la touche écran gauche est occupée, la
dernière ligne de l'écran au-dessus de la
touche écran affiche la fonction sélectionnée ou le nom attribué au numéro d'appel
dans le répertoire principal (le cas échéant
en abrégé).
a fait passer le téléphone
Démarrage de la fonction,
numérotation
A l'état de repos du combiné, appuyer longuement sur la touche numérique ou
brièvement sur la touche écran gauche.
En fonction de l'affectation de la touche :
u Composition directe des numéros.
u Ouverture du menu de la fonction.
Modification de l'affectation d'une
touche
Touche écran
¤ Appuyer longuement sur la touche
écran gauche.
La liste des affectations possibles s'affiche.
¤ Effacer le numéro ou la fonction en
appuyant sur la touche écran
affichée en regard dans la liste des
affectations possibles.
§Effacer§
¤ Poursuivez conformément à la descrip-
tion de la première affectation de la
touche (p. 17).
Touche numérique/touche de fonction
¤ Appuyer brièvement sur la touche
numérique ou touche de fonction, le
numéro ou la fonction affectée à cette
touche s'affiche sur la touche écran de
gauche.
§Modifier§ Appuyer sur la touche écran.
La liste des affectations possibles s'affiche.
¤ Effacer le numéro ou la fonction en
appuyant sur la touche écran
affichée en regard dans la liste des
affectations possibles.
§Effacer§
¤ Poursuivez conformément à la descrip-
tion de la première affectation de la
touche (p. 17).
18
Page 89

Gigaset SL44 / IM1 fr / A31008-M1609-R101-1-6Z19 / start_guide_time.fm / 20.08.2004
Réglages du combiné
Modification de la
langue d’affichage
Vous avez le choix entre différentes langues.
¢ Ð ¢ Combiné ¢ Langue
v
La langue en cours d’utilisation est marquée par ‰.
s Sélectionner la langue et
appuyer sur
a Appuyer longuement (état de
repos).
Vous avez malencontreusement défini la
mauvaise langue (et ce qui s'affiche reste
incompréhensible) :
v 5 I1
Appuyer les touches l'une
après l'autre.
s Sélectionner la bonne langue
et appuyer sur
§OK§.
§OK§.
Réglage écran
Vous avez le choix entre quatre configurations de couleurs et plusieurs niveaux de
contraste.
¢ Ð ¢ Réglage écran
v
Conf. couleur
Sélectionner et appuyer
§OK§.
sur
s Sélectionner la configuration
de couleurs et appuyer sur
(‰ = couleur actuelle).
a Appuyer brièvement.
Contraste Sélectionner et appuyer
§OK§.
sur
r Sélectionner le contraste.
§Sauver§ Appuyer sur la touche écran.
a Appuyer longuement (état de
repos).
§OK§
Ecran de veille
Vous pouvez faire afficher un écran de
veille à l'état de repos. Cet écran remplace
l'affichage à l'état de repos. La date,
l'heure et le nom pourront être masqués.
L'écran de veille ne s'affiche pas dans certaines situations, p. ex. pendant une communication ou si le combiné n'est pas inscrit.
Si un écran de veille est actif, la fonction
Ecran de veille ‰ est cochée.
¢ Ð ¢ Réglage écran ¢ Ecran de
v
veille
Le réglage actuel est visible à l'écran.
¤ Modifier le cas échéant les réglages
suivants :
Activation :
Act. (écran de veille affiché ou Dés. (pas
d'écran de veille).
Image :
Modifier si nécessaire l'écran de veille
(voir ci-dessous).
¤ Enregistrer les modifications (p. 10).
Si l'écran de veille recouvre l'affichage,
appuyer brièvement sur une touche quelconque pour afficher l'écran de repos avec
la date et l'heure.
Modification de l'écran de veille
v ¢ Ð ¢ Réglage écran ¢ Ecran de
veille
s Se placer sur la ligne Image :.
§Afficher§ Appuyer sur la touche écran.
L'écran de veille actif s'affiche.
s Sélectionner l'image et
appuyer sur
§OK§.
¤ Enregistrer les modifications.
19
Page 90

Gigaset SL44 / IM1 fr / A31008-M1609-R101-1-6Z19 / start_guide_time.fm / 20.08.2004
Réglages du combiné
Réglage du mode nuit
Si le combiné se trouve sur la base, la luminosité de l'écran diminue après quelques
instants. Si cet éclairage vous dérange,
vous pouvez activer le mode nuit. Lorsque
le mode nuit est activé (veille éclairage),
l'éclairage de l'écran et du clavier s'éteint.
Il se rallume en cas d'appel entrant ou de
prise en main du combiné.
¢ Ð ¢ Réglage écran
v
Mode nuit Sélectionner et appuyer
§OK§ (‰ =marche).
sur
a Appuyer longuement (état de
repos).
Activation/désactivation du
décroché automatique
Si vous avez activé cette fonction prenez
simplement le combiné du chargeur lorsque vous recevez un appel sans presser sur
la touche Décrocher c.
¢ Ð ¢ Combiné
v
Décroché auto.
Sélectionner et appuyer
§OK§ (‰ =marche).
sur
a Appuyer longuement (état de
repos).
Réglage du volume d'écoute
Vous pouvez régler le volume d'écoute
pour le mode Mains-libres en cinq et le
volume écouteur en trois niveaux. Ces
réglages ne sont possibles que pendant un
appel externe.
Vous ne pouvez modifier le volume pour le
mode Mains-libres que si vous avez activé
la fonction Mains-libres (p. 11).
Vous êtes en communication avec un correspondant externe.
t Ouvrir le menu.
r Sélectionner le volume.
§Sauver§ Appuyer si nécessaire sur la
touche écran pour enregistrer
le réglage durablement.
Si t est affecté à une autre fonction,
p.ex. Va-et-vient :
v Ouvrir le menu.
Volume Sélectionner et appuyer
§OK§.
sur
Réglage (voir plus haut).
Modification des sonneries
u Volume :
Vous avez le choix entre cinq volumes
(1–5 ; p. ex. Volume 2 = ˆ) et
sonnerie à volume crescendo (6 ; le
volume augmente à chaque sonnerie =
‰).
u Sonneries :
Vous pouvez sélectionner un son quelconque dans le menu gestion mélodie
(p. 21).
Vous avez la possibilité de régler individuellement les sonneries pour les fonctions suivantes :
u Appels externes : pour les appels exter-
nes
Si vous utilisez une base RNIS, veuillez
consulter le mode d'emploi de votre
base pour le réglage des sonneries sur
appel externe.
u Appels internes : pour les appels internes
u Rendez-vous : pour les rendez-vous fixés
(p. 23)
u Réveil / alarme : pour une sonnerie de
réveil définie (p. 23)
u Tous appels : réglages identiques pour
toutes les fonctions
20
Page 91

Gigaset SL44 / IM1 fr / A31008-M1609-R101-1-6Z19 / start_guide_time.fm / 20.08.2004
Réglages du combiné
Réglages pour certaines fonctions
Réglez le volume et la mélodie en fonction
du type de signal. Vous pouvez aussi
régler le téléphone de façon qu'il annonce
le nom de l'appelant externe. Cette fonction nécessite l'enregistrement préalable
du modèle vocal (p. 13).
A l'état de repos, vous pouvez ouvrir le
menu Régl.sonnerie en appuyant t briè-
vement.
¢ ï ¢ Régl.sonnerie
v
q Réglage, p.ex. Appels externes-
Sélectionner et appuyer
§OK§.
sur
r Régler le volume (1–6).
s Se placer sur la ligne suivante.
r Sélectionner la mélodie.
s Se placer sur la ligne suivante
(appels externes uniquement).
s Uniquement pour les appels
externes : se placer sur la ligne
Annonc.nom.
r Activer ou désactiver
l'annonce du nom.
¤ Enregistrer les modifications (p. 10).
Réglages identiques pour toutes
les fonctions
v ¢ ï ¢ Régl.sonnerie ¢ Tous appels
¤ Réglage du volume et de la sonnerie
(voir « Réglages pour certaines
fonctions »).
§Oui§ Appuyer sur la touche écran
pour confirmer la demande.
a Appuyer longuement (état de
repos).
Activation/désactivation
de la sonnerie
Vous pouvez désactiver avant la prise d'un
appel ou à l'état de repos la sonnerie sur
votre combiné pour tous les appels suivants (depuis l'état de repos) ou pour
l'appel en cours (avant de décrocher). Il
n'est pas possible de réactiver la sonnerie
durant un appel externe.
Désactivation de la sonnerie pour
tous les appels
* Maintenir la touche Étoile
enfoncée.
Le symbole Ú s'affiche à l'écran.
Réactivation de la sonnerie
* Appuyer de manière prolon-
gée sur la touche Etoile.
Désactivation de la sonnerie pour
l’appel en cours
§Silence§ Appuyer sur la touche écran.
Activation/désactivation
du bip d'appel
A la place de la sonnerie, vous pouvez activer un bip d'appel. A la place de la sonnerie un bip court (« Bip ») retentit alors
dans le cas d'un appel.
* Appuyer longuement sur la
touche Etoile et en l'espace
de 3 secondes :
§Bip§§ Appuyer sur la touche écran.
Désormais, les appels sont
signalés par un bip court.
L'écran affiche º.
Gestion des mélodies
Le menu gestion des mélodies du combiné gère les mélodies et les sons utilisables comme mélodies. Il peut gérer les
types de son suivants :
Icône Sons Format
Ù Sonneries ; monopho-
× Polyphoniques standard
niques
× Polyphoniques .psf
Ö Monophoniques iMelody
Ø Son enregistré P2CM
standard
21
Page 92

Gigaset SL44 / IM1 fr / A31008-M1609-R101-1-6Z19 / start_guide_time.fm / 20.08.2004
Réglages du combiné
L'icône est placée devant le nom dans la
gestion des mélodies. Sur votre téléphone, 3 Ù et 17 × sont prédéfinis. Vous
ne pouvez renommer ou supprimer les
sons prédéfinis.
Vous avez la possibilité de télécharger les
sons au format .psf et iMelody à partir d'un
PC (p. 30). Avec votre Gigaset SL44, vous
pouvez enregistrer des mélodies au format P2CM.
Vous pouvez écouter les sons disponibles
et renommer ou supprimer dans le menu
gestion des mélodies les sons que vous
avez chargés et enregistrés sur le combiné.
Enregistrement de sons
Vous pouvez enregistrer des sons par le
biais du menu de gestion des mélodies
(longueur max. 30 s).
¢ Ë ¢ <Nvl enregistr.>
v
§OK§ Appuyer sur la touche écran.
L'enregistrement via le microphone démarre.
§Fin§ Appuyer sur la touche écran.
L’enregistrement s'arrête.
Pendant l'enregistrement, vous pouvez
interrompre cette opération avec la touche écran
§Enreg..
Après un enregistrement réussi, celui-ci
repasse pour contrôle.
§Sauver§ Appuyer sur la touche écran
§Nouveau§ Appuyer sur la touche écran.
§Fin§ Appuyer sur la touche écran.
§Pause§ puis reprendre avec
pour l'enregistrer. Modifier le
nom (16 caractères max., pas
de blancs, de caractères spéciaux ni d'accents) et appuyer
§Sauver§. L'entrée est enre-
sur
gistrée sous un nouveau nom.
Rejet de l'enregistrement et
démarrage d'un nouvel enregistrement.
Fin de l'enregistrement.
Ecoute de sons
v ¢ Ë ¢ q (sélectionner l'entrée)
§Ecouter§ Appuyer sur la touche écran.
Ecoute de sons. La touche q
commute entre les entrées.
§Fin§ Appuyer sur la touche écran.
Fin de l'écoute.
a Appuyer longuement (état de
repos).
Pendant que vous écoutez les sons, vous
pouvez régler le volume avec la touche
§Volume§.
écran
Si vous avez enregistré un son dans un for-
mat fichier invalide, un message d'erreur
s'affiche après la sélection. Avec Î,
vous annulez l'opération. Avec
§Effacer§,
vous effacez le son.
Renommer/Effacer un son
Vous avez sélectionné une entrée. Si un
son ne peut être effacé (è), ces options ne
sont pas disponibles.
v Ouvrir le menu.
Selon le contexte, les fonctions suivantes
sont disponibles :
Renommer
Sélectionner et appuyer sur
fier le nom (16 caractères max., pas
d'espace, de caractères spéciaux ni
d'accents) et appuyer sur
est enregistrée sous un nouveau nom.
Effacer entrée
L’entrée sélectionnée est effacée. Une
mélodie de sonnerie supprimée est
automatiquement remplacée. Une
mélodie pour appels VIP ou dates anniversaires n'est pas automatiquement
remplacée.
§OK§. Modi-
§OK§. L'entrée
22
Page 93

Gigaset SL44 / IM1 fr / A31008-M1609-R101-1-6Z19 / start_guide_time.fm / 20.08.2004
Réglages du combiné
Tonalités d'avertissement
Votre combiné vous informe par un signal
sonore des différents états et activités.
Vous pouvez activer/désactiver les tonalités d'avertissement suivantes, indépendamment les unes des autres :
u Clic clavier : chaque pression sur une
touche est confirmée.
u Bips d'avertissement :
– Tonalité de confirmation
(séquence de sons montante) : à la
fin d'une saisie ou d'un réglage, à la
réception d'un SMS ou d'une nouvelle entrée dans la liste répondeur
(selon la base) ou du journal des
appels
– Tonalité d'erreur (séquence de sons
descendante) : en cas de saisie
incorrecte
– Tonalité de fin de menu : lorsque
vous arrivez à la fin d'un menu
u Tonalité de batterie : la batterie doit
être rechargée.
¢ ï ¢ Tonal. avertis.
v
¤ Renseigner les différentes lignes :
Clic clavier :
Sélectionner Act. ou Dés..
Bip confir.:
Sélectionner Act. ou Dés..
Batter.:
Sélectionner Act., Dés. ou En ligne. Le
bip d'avertissement de la batterie est
activé ou désactivé ou ne retentit que
pendant une communication.
¤ Enregistrer les modifications (p. 10).
Vous ne pouvez désactiver le bip de confirmation à l'insertion du combiné sur la
base.
Réglage du réveil/de l'alarme
Condition : la date et l'heure ont été
réglées (p. 6).
Activation/désactivation et réglage du
réveil/de l'alarme
v ¢ ì ¢ Réveil/Alarme
¤ Renseigner les différentes lignes :
Activation :
Sélectionner Act. ou Dés..
Heure :
Entrer l'heure de réveil avec
4 caractères.
¤ Enregistrer les modifications (p. 10).
L'icône ¼ apparaît à l'écran.
Le déclenchement du réveil/de l'alarme
est signalé sur le combiné avec la sonnerie
sélectionnée (p. 20). L'appel de réveil/
d'alarme retentit 60 s. Le texte Réveil/
Alarme s'affiche à l'écran.
Pendant un appel, le réveil/l'alarme est
signalé par un bip court.
Arrêt du réveil/de l'alarme
Condition : un appel de réveil/d'alarme
retentit.
§Silence§ Appuyer sur la touche écran
ou sur une touche quelconque.
Agenda
Vous pouvez vous faire rappeler 5 rendezvous par votre combiné (volume et mélodie, voir p. 20).
Enregistrement d'un rendez-vous
Condition : la date et l'heure ont été
réglées (p. 6).
¢ ì ¢ Agenda
v
23
Page 94

Gigaset SL44 / IM1 fr / A31008-M1609-R101-1-6Z19 / start_guide_time.fm / 20.08.2004
Réglages du combiné
La liste des rendez-vous enregistrés s'affiche. Si vous avez déjà enregistré cinq rendez-vous, vous devez d'abord effacer un
rendez-vous fixé.
<Nouv. entrée>
Sélectionner et appuyer
§OK§.
sur
¤ Renseigner les différentes lignes :
Activation :
Sélectionner Act. ou Dés..
Date :
Entrer le jour/mois avec 4 caractères.
Heure :
Entrer l'heure/lesminutes avec
4 caractères.
Texte :
Appuyer sur la touche écran
Entrer le texte (max. 16 caractères) et
appuyer sur
comme nom de rendez-vous dans la
li ste et lors du rappel. Si vous n' ave z pas
entré de texte, la date et l'heure du rendez-vous s'affichent.
Enregistrer les modifications (p. 10).
L’i cô ne ¼ s’affiche. Le rendez-vous est
marqué par ‰ dans la liste. Les rendezvous sont triés par date dans la liste.
Un rendez-vous est signalé par la sonnerie
sélectionnée (p. 20). Le rappel du rendezvous retentit 30 s. Le texte ou la date et
l'heure définis s'affichent.
Pendant un appel, le rendez-vous est
signalé par un bip court.
§OK§. Le texte s'affiche
§Modifier§.
Gestion des rendez-vous
v ¢ ì ¢ Agenda ¢ (Rendez-vous
1–5, sélectionner)
Affichage/modification du rendez-vous :
§Afficher§ Appuyer sur la touche écran.
Le rendez-vous s'affiche.
Retour avec
§Modifier§ Appuyer si nécessaire sur la
touche écran pour modifier
l'entrée.
§OK§ ou :
¤ Effectuer les modifications.
Utilisation d'autres fonctions de menu :
v Ouvrir le menu.
Vous avez le choix entre les possibilités
suivantes :
Modifier entrée
Modifier le rendez-vous sélectionné.
Effacer entrée
Effacer le rendez-vous sélectionné.
Effacer liste
Effacer tous les rendez-vous.
Rappel de rendez-vous : Arrêt ou
réponse
Condition : un rappel de rendez-vous
retentit.
§Silence§ Appuyer sur la touche écran
pour désactiver le rappel de
rendez-vous.
Dates échues
Les rendez-vous, dates anniversaire non
acquittés à expiration (p. 13) sont enregistrés dans la liste Dates échues dans les cas
suivants :
u Vous n'acquittez pas un rendez-vous/
une date anniversaire.
u Le rendez-vous/la date anniversaire a
été signalé(e) pendant un appel.
u Le combiné est éteint au moment du
rappel du rendez-vous/de la date anniversaire.
La toute nouvelle entrée se trouve au
début de la liste.
Si cette liste comporte un nouveau rendez-vous ou une nouvelle date anniversaire, l'écran affiche
appuyez sur la touche écran, la liste Dates
échues s'ouvre.
Il est aussi possible d'ouvrir la liste par le
menu :
¢ ì ¢ Dates échues
v
s Sélectionner un rendez-vous/
une date anniversaire.
§Agenda§. Si vous
24
Page 95

Gigaset SL44 / IM1 fr / A31008-M1609-R101-1-6Z19 / start_guide_time.fm / 20.08.2004
Réglages du combiné
Les informations sur le rendezvous ou sur la date anniversaire s'affichent. Un rendezvous échu est identifié par ¼,
une date anniversaire échue
est identifiée par ‚.
§Effacer§ Appuyer sur la touche écran
pour effacer le rendez-vous/la
date anniversaire.
a Appuyer longuement (état de
repos).
Si vous avez enregistré 10 entrées dans la
liste, l'entrée la plus ancienne est effacée
au prochain rappel de rendez-vous.
Numéro d'urgence
Par défaut, le numéro 112 est enregistré
comme numéro d'urgence. Vous pouvez
modifier ou supprimer le numéro
d'urgence.
Le numéro d'urgence reste accessible en
cas de verrouillage du clavier.
Modification du numéro d'urgence
v ¢ Ð ¢ Combiné ¢ No d'urgence
Le numéro d'urgence s'affiche. Vous ne
pouvez pas composer le numéro avec c
dans ce menu.
~ Modifier le numéro d'urgence.
© Appuyer sur la touche écran.
Sauvegarder
Sélectionner et appuyer sur
§OK§. La saisie est enregistrée.
Composition du numéro d’urgence
Le numéro d'urgence (p. 6) peut aussi être
appelé quand le clavier est verrouillé.
~ Entrer le numéro d'urgence.
c Appuyer sur la touche Décro-
cher.
Réinitialisation du combiné
Vous pouvez annuler les configurations
personnalisées. Les entrées du répertoire
principal, du journal des appels, du répertoire e-mail, l'inscription du combiné à la
base et le contenu de la gestion des mélodies sont conservés.
¢ Ð ¢ Combiné ¢ Réinit. Combiné
v
§Oui§ Appuyer sur la touche écran.
a Appuyer longuement (état de
repos).
Annuler la réinitialisation avec a ou la
touche écran
Réglages usine du combiné
Fonction Réglage usine Page
Bip batterie/clic cla-
vier/bip de confirmation
Décroché automatique
Walky-Talky désactivé p. 16
Surveillance de
pièce : sensibilité
Touche de fonction pas de fonction
Sélection de la base Base 1 p. 6
Langue d’affichage spécifique au
Volume : mainslibres/écouteur/sonnerie, réveil/alarme,
rendez-vous
Ecran de veille activé p. 19
Mode nuit désactivé p. 20
Numéro d'urgence 112 p. 25
Saisie intuitive
EATONI
Réveil/alarme/rendez-
vous
Jeu de caractères standard p. 32
§Non§.
activé p. 21
activé p. 20
élevé p. 17
p. 19
pays
3/1/5 p. 20
activé p. 31
désactivé p. 23
25
Page 96

Gigaset SL44 / IM1 fr / A31008-M1609-R101-1-6Z19 / start_guide_time.fm / 20.08.2004
Annexe
Annexe
Entretien
¤ Essuyez le chargeur et le combiné avec
un chiffon légèrement humecté (pas
de solvant) ou un chiffon antistatique.
N'utilisez jamais un chiffon sec. Il existe
un risque de charge statique.
Contact avec un liquide
¤ Eteignez immédiatement le combiné
s'il entre en contact avec un liquide.
¤ Retirez immédiatement les batteries.
Laissez le liquide s'écouler. Procédez
exclusivement comme suit :
¤ Placez le combiné à l'horizontale, com-
partiment batteries ouvert vers le bas.
¤ Tenez le combiné à la verticale. Inclinez
le combiné légèrement en avant puis
en arrière et agitez-le en douceur
durant ces opérations.
¤ Séchez toutes les parties avec un chif-
fon absorbant et placez le combiné au
moins 72 heures, compartiment bat-
teries ouvert et clavier vers le bas, dans
un endroit sec, chaud (pas dans un
four à micro-ondes, autre four ou un
appareil analogue).
Une fois complètement sec, il est possible
que le combiné puisse fonctionner à nouveau. Cependant, si ce n'est pas le pas, le
bénéfice de la garantie ne pourra être
accordé.
Questions et réponses
Si, au cours de l'utilisation de votre téléphone, des questions apparaissent, nous
nous tenons à votre disposition à l'adresse
suivante :
siemens-mobile.com/gigasetcusto-
www.
mercare
!
Par ailleurs, le tableau suivant répertorie
les problèmes éventuels et les solutions
possibles.
L'écran n'affiche rien.
1. Le combiné n'est pas allumé.
¥ Appuyer sur la touche Raccrocher a
longuement.
2. Les batteries sont vides.
¥ Recharger/remplacer les batteries (p. 4,
p. 5).
Le combiné ne réagit pas à une pression de
touche.
Le verrouillage du clavier est activé.
¥ Appuyer sur la touche Dièse
guement (p. 6).
Dans l'affichage «Base x» clignote.
1. Le combiné est hors de la zone de portée de
la base.
#
lon-
¥ Réduire la distance entre le combiné et la
base.
2. Le combiné a été retiré.
¥ Inscrire le combiné (p. 5).
Sur l'écran Recherche base clignote.
Le combiné est réglé sur Meilleure base et
aucune base n'est dans la plage de réception.
¥ Réduire la distance entre le combiné et la
base.
Le combiné ne sonne pas.
La sonnerie est désactivée.
¥ Activer la sonnerie (p. 21).
Votre correspondant n’entend rien.
Appui sur la touche
en mode « micro désactivé ».
u (INT). Le combiné est
¥ Réactiver le microphone (p. 11).
Emission d'une tonalité d'erreur à la saisie
(séquence de sons descendante).
Echec de l'action/entrée erronée.
¥ Répéter l'opération.
Observer l'écran pendant l'action et consulter le cas échéant le mode d'emploi.
26
Page 97

Gigaset SL44 / IM1 fr / A31008-M1609-R101-1-6Z19 / start_guide_time.fm / 20.08.2004
Annexe
Assistance clients
(Customer Care)
Pour vos besoins, nous vous proposons
une aide rapide et personnalisée !
Notre support technique en ligne sur
Internet :
www.siemens-mobile.com/gigasetcustomercare
Accessible en permanence et de n'importe
où. Vous disposez d'une assistance
24 heures sur 24 sur tous nos produits.
Vous trouverez à cette adresse un système
de détection d'erreurs, une compilation
des questions les plus fréquemment
posées et des réponses, ainsi que les
manuels d'utilisation des produits et les
dernières mises à jour des logiciels à télécharger.
Vous trouverez des conseils personnalisés
sur nos produits en contactant notre ligne
d'assistance Premium :
Assistance Premium pour la France :
08 99 70 01 85
(1,35 Euro TTC/Appel puis 0,34 Euro TTC/Minute)
Des collaborateurs Siemens compétents
se tiennent à votre disposition pour vous
fournir des informations sur nos produits
et vous expliquer leur installation.
Pour vos besoins de réparation ou vos
questions liées aux droits de garantie,
vous obtiendrez une assistance rapide et
fiable auprès de nos centres de service,
aux numéros suivants :
centre de services France :
01 56 38 42 00
centre de services Belgique :
078 15 22 21
centre de services Suisse :
080 8212 000
www.siemens-mobile.com/contact
Munissez-vous de votre preuve d'achat.
Nous ne proposons pas d'échange ou de
services de réparation dans les pays où
notre produit n'est pas distribué pas des
revendeurs autorisés.
Homologation
Ce produit se destine à un usage mondial.
En dehors de l'Union européenne
(à l'exception de la Suisse), son emploi
est subordonné à un agrément national.
Les spécificités nationales sont prises en
compte. La conformité de l'appareil avec
les exigences fondamentales de la directive européenne R&TTE est confirmée par
le label CE.
Extrait de la déclaration originale :
„We, Siemens AG, declare, that the above mentioned product is manufactured according to
our Full Quality Assurance System certified by
CETECOM ICT Services GmbH with ANNEX V of
the R&TTE-Directive 99/5/EC. The presumption
of conformity with the essential requirements
regarding Council Directive 99/5/EC is ensured.“
Accord du directeur
The Declaration of Conformity (DoC) has been
signed. Si nécessaire, une copie de la déclaration originale peut être obtenue via la hotline
de la société.
Caractéristiques techniques
Batteries recommandées
(état au moment de l'impression du mode
d'emploi)
Nickel-Hydrure métallique (NiMH)
u Sanyo Twicell 650
u Sanyo Twicell 700
u Panasonic 700mAh « for DECT »
u GP 700mAh
u Yuasa Technology AAA Phone 700
u Varta Phone Power AAA 700mAh
u GP 850 mAh
u Sanyo NiMH 800
27
Page 98

Gigaset SL44 / IM1 fr / A31008-M1609-R101-1-6Z19 / start_guide_time.fm / 20.08.2004
Annexe
u Yuasa Technologies AAA 800
u VARTA PhonePower AAA 700 mAh
Le combiné n'est livré qu'avec des batteries homologuées.
Temps d'utilisation/de charge
du combiné
Capacité 800 mAh
Autonomie en
veille
Autonomie en
communication
Temps de charge environ 8 heures
jusqu'à 150 heures
(6 jours)
jusqu'à 10 heures
Les temps d'utilisation et de charge indiqués ne sont valables qu'en cas d'utilisation des batteries recommandées.
Caractéristiques générales
Dimensions du
combiné
Dimensions du
chargeur
Poids du
combiné avec batteries
Poids du chargeur 41 g
134,3 x 55 x 30,7 mm
(L × l × H)
86,6 x 85,4 x 46,4 mm
(L x l x H)
127 g
Garantie France
La présente garantie bénéficie, dans les
conditions ci-après, à l'utilisateur final
ayant procédé à l'acquisition de ce
Produit Siemens (ci-après le Client). Pour
la Fran ce, la pr ésent e gar antie ne l imite e n
rien, ni ne supprime, les droits du Client
issus des articles 1641 et suivants du
Code Civil Français relatifs à la garantie
légale des vices cachés.
u Si ce Produit Siemens et ses compo-
sants présentent des vices de fabrication et/ou de matière dans les 24 mois
suivant son achat neuf, Siemens procédera à sa réparation ou le remplacera
gratuitement et de sa propre initiative
par un modèle identique ou par un
modèle équivalent correspondant à
l'état actuel de la technique. La présente garantie n'est valable que pendant une période de 6 mois à compter
de sa date d'achat neuf pour les pièces
et éléments de ce Produit Siemens qui
sont soumis à l'usure (par ex. batteries,
claviers et boîtiers).
u La présente garantie n'est pas valable
en cas de non-respect des informations
contenues dans le mode d'emploi, ou
en cas de dommage manifestement
provoqué par une manipulation ou une
utilisation inadéquate.
u La présente garantie ne s'applique pas
aux éléments et données fournis par le
vendeur du Produit Siemens, ou installés par le Client lui-même (par ex. l'installation, la configuration, le téléchargement de logiciels, l'enregistrement
de données). Sont également exclus de
la présente garantie le manuel d'utilisation ainsi que tout logiciel fourni séparément sur un autre support de données, ainsi que les Produits Siemens
dotés d'éléments ou d'accessoires non
homologués par Siemens, les Produits
dont les dommages sont causés volontairement ou par négligence (bris, casses, humidité, température inadéquate, oxydation, infiltration de
liquide, surtension électrique, incendie, ou tout autre cas de force
majeure), les Produits Siemens présentant des traces d'ouverture (ou de réparation et/ou modifications effectuées
par un tiers non agréé par Siemens), et
les Produits envoyés en port dû à Siemens ou à son centre agréé.
u La factu re ou l e ticket de caisse comp or-
tant la date d'achat par le Client sert de
preuve de garantie. Une copie de ce
document justifiant de la date de
départ de la garantie est à fournir pour
toute mise en œuvre de la présente
garantie. Un justificatif d'achat doit au
moins comporter le nom et le logo de
l'enseigne, la date d'achat, le modèle
28
Page 99

Gigaset SL44 / IM1 fr / A31008-M1609-R101-1-6Z19 / start_guide_time.fm / 20.08.2004
Annexe
concerné et le prix. Le Client doit faire
valoir ses droits à garantie dans les
deux mois de la découverte du vice du
téléphone, sauf disposition impérative
contraire.
u Le présent Produit Siemens ou ses com-
posants échangés et renvoyés à Siemens ou son prestataire deviennent
propriété de Siemens.
u La présente garantie s'applique unique-
ment aux Produits Siemens neufs achetés au sein de l'Union Européenne. Elle
est délivrée par Siemens SAS, 9, rue du
Docteur Finot, F- 93200 SAINT DENIS
pour les téléphones achetés en France.
u La présente garantie représente l'uni-
que recours du Client à l'encontre de
Siemens pour la réparation des vices
affectant le Produit Siemens. Siemens
exclut donc toute autre responsabilité
au titre des dommages matériels et
immatériels directs ou indirects, et
notamment la réparation de tout préjudice financier découlant d'une perte de
bénéfice ou d'exploitation, ainsi que
des pertes de données. En aucun cas
Siemens n'est responsable des dommages survenus aux biens du Client sur
lesquels est connecté, relié ou intégré
le Produit Siemens, sauf disposition
impérative contraire.
u De même, la responsabilité de Siemens
ne peut être mise en cause pour les
dommages survenus aux logiciels intégrés dans le Produit Siemens par le
Client ou tout tiers à l'exception de Siemens.
u La mise en jeu de la présente garantie,
et l'échange ou la réparation concernant le Produit Siemens ne font pas naître une nouvelle période de garantie,
qui demeure en tout état de cause la
durée initiale, sauf disposition impérative contraire.
u Siemens se réserve le droit de facturer
au client les frais découlant du remplacement ou de la réparation du Produit
Siemens lorsque le défaut du Produit
Siemens n'est pas couvert par la garantie. De même Siemens pourra facturer
au Client les frais découlant de ses
interventions sur un Produit Siemens
remis par le Client et en bon état de
fonctionnement.
Pour faire usage de la présente garantie,
veuillez contacter en priorité votre revendeur, ou bien le service téléphonique de
Siemens dont vous trouverez le numéro
dans le manuel d'utilisation ci-joint.
Garantie Belgique
Une garantie est assurée à l'utilisateur
(client), sans préjudice des revendications
envers le détaillant concernant les vices et
aux conditions suivantes :
u Si un nouvel appareil, ainsi que ses
accessoires, présente des vices de fabrication ou de matériaux dans les 24
mois suivant son achat, Siemens peut
le réparer gratuitement ou le remplacer
par un appareil correspondant à l'état
de la technique, à sa discrétion. Cette
garantie s'applique aux pièces soumises à l'usure (comme les batteries, claviers, boîtiers) pendant les six mois suivant l'achat.
u Cette garantie ne s'applique pas si le
défaut de l'appareil est dû à une manipulation incorrecte et/ou à un non-respect des indications du guide.
u Cette garantie ne s'étend pas aux opé-
rations effectuées par le concessionnaire ou le client lui-même (p. ex. installation, configuration, téléchargement de logiciels). Les guides et les
logiciels éventuellement fournis sur un
support de données distinct sont également exclus de la garantie.
u La preuve d'achat datée tient lieu de
garantie. Le client doit faire valoir les
revendications concernant la garantie
dans les deux mois suivant la prise de
connaissance du défaut.
29
Page 100

Gigaset SL44 / IM1 fr / A31008-M1609-R101-1-6Z19 / start_guide_time.fm / 20.08.2004
Annexe
u Les appareils remplacés, ainsi que leurs
composants, qui sont renvoyés à Siemens dans le cadre d'un échange redeviennent sa propriété.
u Cette garantie porte sur les nouveaux
appareils achetés dans l'Union européenne. Le garant pour les appareils
achetés en Belgique est Siemens S.A.
Chaussée de Charleroi 116, B1060
Bruxelles
u Les revendications accrues ou autres
relatives à cette garantie sont exclues,
sauf en cas de responsabilité obligatoire, notamment dans le cas du règlement sur la responsabilité du fait des
produits.
u La mise en œuvre de la garantie ne pro-
longe pas la période de garantie.
u Si la garantie ne s'applique pas, Sie-
mens se réserve le droit de facturer
l'échange ou la réparation au client.
u Les dispositions précédentes n'impli-
quent pas une modification de la règle
de charge de la preuve au détriment du
client.
Pour faire jouer la garantie, contactez le
service téléphonique de Siemens. Vous
trouverez les numéros correspondants
dans le guide d'utilisation.
Garantie Suisse
Pendant le transfert de données entre le
combiné et le PC, l'écran affiche Echange
données. Durant ce temps, aucune donnée
ne peut être entrée au clavier et tous les
appels entrants sont ignorés.
Jeu « Ballon Shooter »
Le but du jeu est de toucher le plus de ballons possible.
Démarrage
v ¢ í ¢ Balloon Shooter
Démarrer le jeu avec la touche écran.
Autres options
Un menu proposant des options supplémentaires s'ouvre sur pression de la
touche ©.
Durant le jeu
¤ Pour déplacer le réticule à gauche, à
droite, en haut ou en bas, appuyez sur
les touches suivantes :
¢
¢
p
¢
¢
¤ Pour déplacer le réticule à gauche en
bas, à gauche en haut, à droite en bas
ou à droite en haut, appuyez sur les
touches suivantes :
La durée de garantie est de 24 mois
Interface PC
Vous pouvez relier le combiné au moyen
d'un câble de transfert (p. 33) à votre ordinateur. Votre ordinateur peut alors dialoguer avec votre combiné par le biais d'un
programme (téléchargeable gratuitement
sur www.siemens-mobile.com/
gigasetsl44). Vous avez la possibilité
d'appeler le répertoire principal de votre
combiné et d'y charger des sons à partir de
l'ordinateur.
30
Tou che Déplacement
1, 2,
4, 5, L A gauche en haut
M, N, O A droite en haut
Q, *, # A droite en bas
I A gauche en bas
¤ Pour tirer un ballon, appuyez sur la tou-
che de fonctionú.
Pendant le jeu, vous pouvez activer ou
désactiver le son avec la touche Etoile
* et arrêter/poursuivre le jeu avec la
touche Messages f.
 Loading...