

Gigaset SL3501 User Manual And Safety Precautions
Gigaset SL 3501, USA, A31008-L350-U122-2-7619
Cover 4215.fm
Be inspired
26.06.03
User Manual and
Safety Precautions

Gigaset SL 3501, USA, A31008-L350-U122-1-7619
congratulation.fm
26.06.0
Congratulations
Congratulations on your purchase of the Siemens Gigaset SL 3501 telephone system! This phone´s 2.4 GHz frequency and high-speed digital voice encoding provide
reception and voice clarity that is superior to other cordless phones. And, its digital
spread spectrum technology will provide you with secure, private conversations.
DO NOT RETURN
THIS PRODUCT TO THE
STORE!
Please read the following important information.
For Siemens Customer Care, product operation
information, or for problem resolution, call toll-free
1-888-777-0211
9 a.m. to 8 p.m. Central Standard Time Monday-Saturday
s
s
ss
www.my-siemens.com
Register now!
It’s fast progress in the world of communication. Register today for the world of Siemens mobile on „my-siemens.com“ and stay current with customized information on Siemens latest
products and applications.
Please go to: www.icm.siemens.com/register
II
Gigaset SL 3501, USA, A31008-L350-B102-1-7619
General
Quick Reference
Handset
Turning on/off the handset
(see page 6)
Turning keypad protection on/
off (see page 7)
Turning tones on/off
(see page 68)
Making an external call
(see page 10)
Redialing a number
(see page 17)
Saving a called number
in the directory (see page 23)
Dialing from the directory
(see page 24)
Dialing from the call log
(see page 38)
Setting the handset volume
(see page 68)
Making an Internal call to a specific handset
Making an Internal call to a all
handsets (see page 10)
Transferring a call to another
handset
Making a consultation call
hold down a
hold down ª
hold down «
o
c
z if necessary D select entry c
z MENU D [
o[Name] if necessary D c or D c
D
? D [ if necessary F G entry c
MENU D [ [
DF
F
F
F
F
Call Log
Sound Settings
or
Save
G
and D to select internal user c
and D c
and D to select internal user [ a
and D to select internal user [ ; end: End
Intercom Call
Send to Dir
umschl_v.fm
Handset Volume
26.06.0
Setting the date and time
(see page 8)
Setting the alarm clock
(see page 19)
Answering machine
Playing back messages
(see page 45)
Skipping to the next message:
(see page 46)
Repeating the message
Deleting messages
(see page 47)
Skipping to the previous message (see page 46)
MENU D [ D [
Set
date and time F G D Save
MENU D [ D [
Appoint./Clock Date/Time
Appoint./Clock Alarm Clock
Enter settings F G D Save
? D [ or hold down]
Ans Msg.:
G or ^
F or ]
MENU D [ or press Delete
2 x F
Delete Old Msg.
III
Gigaset SL 3501, USA, A31008-L350-B102-1-7619
–
–
–
a
umschl_v.fm
26.06.0
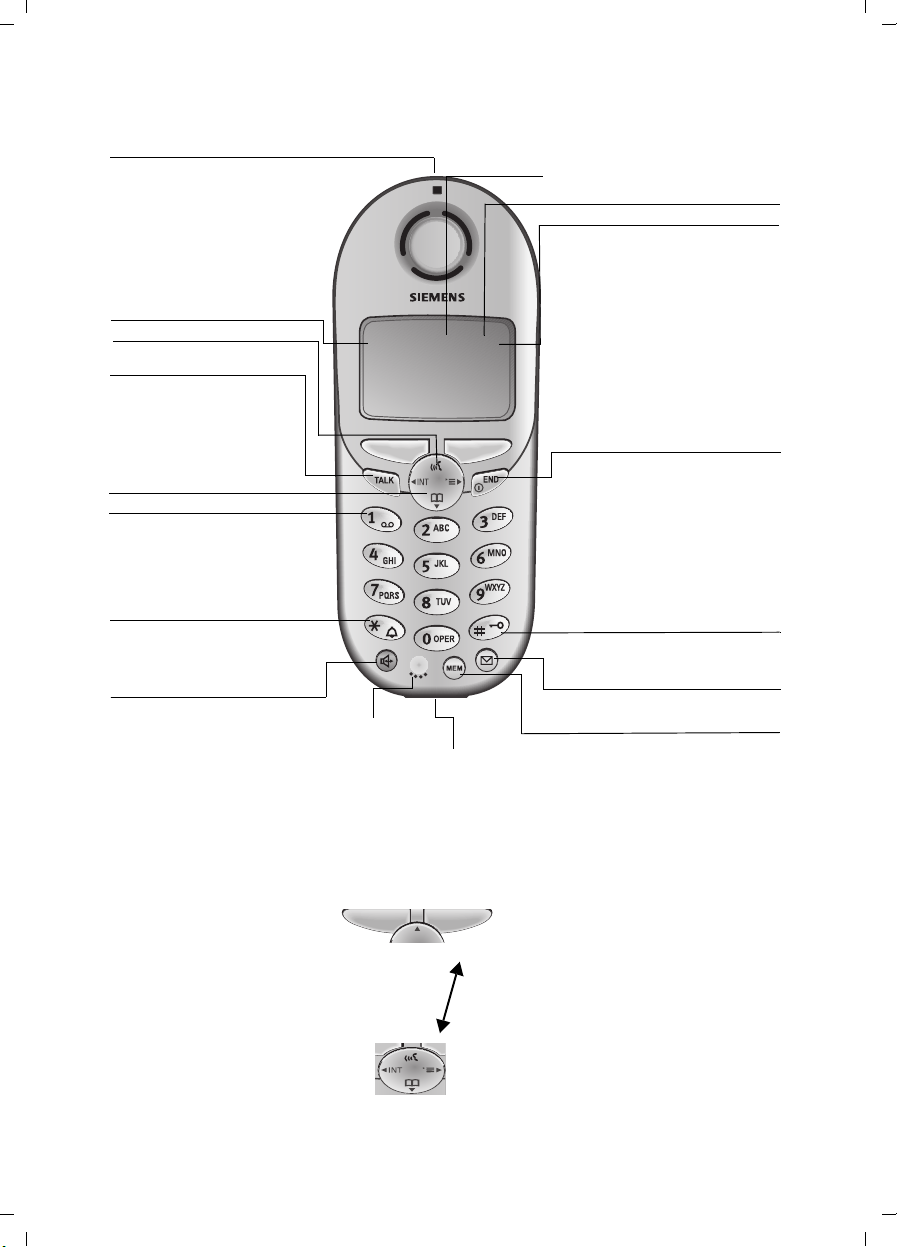
Handset Diagram
Status LED (light)
Lights up during a call;
Flashes for:
– Incoming calls
– New messages
– Alarm calls, appoint-
ments, anniversaries
Signal strength
Navi key
Ta l k k ey
Accept call
Dial number
Switch from handset to
speakerphone.
Ñ ¸ e
Annabella
07.19.03 01:13pm
{
MENU
Open directory
Key 1
(Programmable) Hold
down to select Answ.
machine/telco voice
mailbox
Star key (*)
Hold down to turn on
nd off the ringer
Handsfree key
witch from handset to
andsfree talking.
Microphone
Socket
–for Headset,
– MP3-Player
Answering machine symbol if registered to SL 3501
Display (display field)
Charging status
= empty
U full
flashes: Battery low
Current functions
and display keys
With the display keys, you
have access to the current
functions.
End call and On/
Off key
– end call
– cancel function
– back one menu level
(press briefly)
– return to idle state
(hold down)
– on/off in idle status
(hold down)
Pound key
Hold down to turn on and off
the keypad protection
Caller list
Access to message lists
Memory key
Accesses speed dial
numbers
Using the Navi Key and Soft Keys
Soft keys
Navi key
IV
With the soft keys you can
carry out functions that can
also be partly controlled with
the navi key.
The side of the navi key
which you must press is indicated in the operating instructions by arrows:
F/ G (left/right)
E/ D (top/bottom)
Gigaset SL 3501, USA, A31008-L350-B102-1-7619
umschl_v.fm
General
Functions of the Navi Key
The Navi key has different functions in specific operating situations.
26.06.0
Navi key When the tele-
phone is idle
E
D
G
F
Open directory Downward Cursor one
Open menu Select entry (OK) Cursor to the right
Open the list of internal users
In lists and menus In an entry field
Upward Cursor one
One menu level
back (cancel)
line up
line down
Cursor to the left
Displays
The following symbols appear in the display, depending on the operating situation:
Soft keys Meaning
MENU Menu button: Activate the general menu when telephone is idle
Z
W
{
Í
Example for menu operation: setting the volume for the speakerphone
Confirm menu function and select. End and save the setting
Delete key (Backspace): Delete entries from right to left
Automatic redial key: Open the list of the last 5 numbers dialed
One menu level back, cancel
1. MENU Press
2.
3.
4.
5.
6.
D
Z
Z
or F Select the required volume for speakerphone.
G
Save
Scroll to Sound Settings.
Select Sound Settings.
Select Handset Volume.
Store the required volume for speakerphone.
G or the right soft key ¿.
V
Gigaset SL 3501, USA, A31008-L350-B102-1-7619
umschl_v.fm
26.06.0
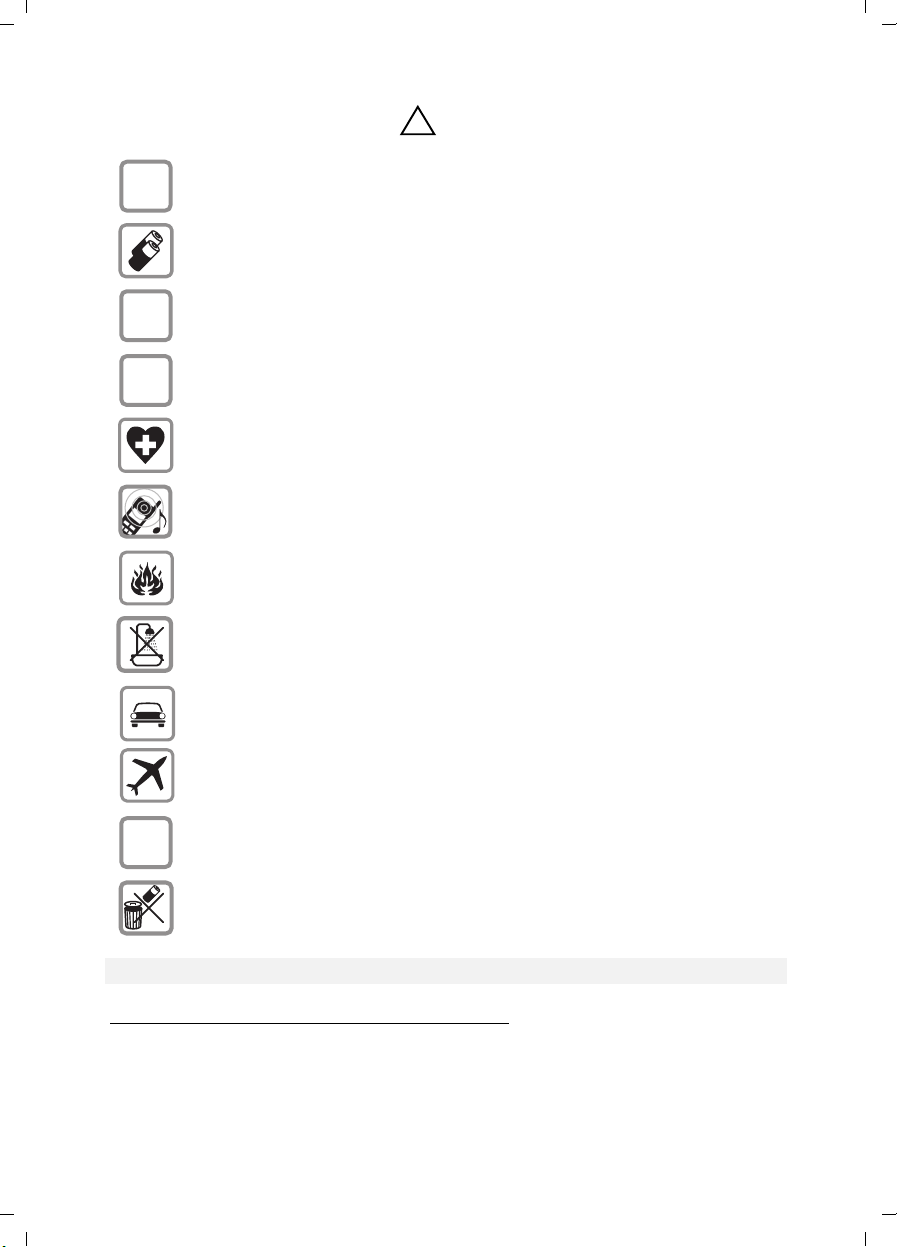
Safety precautions*
Only use the power supply unit supplied as indicated on the underside of the
$
‹
Œ
device.
Only insert approved rechargeable batteries of the same type. Never use ordi-
nary (non-rechargeable) batteries as they may pose a health hazard or cause injury.
Make sure the rechargeable battery is inserted the right way round
Use the battery specified in these operating instructions
The phone may affect medical equipment so always switch your phone off before
entering hospitals or doctors’ practices.
The handset may cause an unpleasant humming noise in hearing aids.
Do not operate the phone in places where there is a risk of explosion (such as paint
workshops).
The handset is not splash-proof (see page 33).
!
Drivers must not use the phone while driving.
The phone must be switched off at all times in an aircraft. Make sure it cannot be
ƒ
Emergency numbers cannot be dialed if the keypad lock is activated!
*. see also page 86
switched on accidentally.
If you give your Gigaset to someone else you should also give them the operating
instructions.
Dispose of batteries and the phone carefully. Do not pollute the environment.
VI

Gigaset SL 3501, USA, A31008-L350-U122-2-7619 4015coivz.fm 26.06.03
Contents
Safety precautions . . . . . . . . . . . . . . . . . . . . . . . . . . . . . . . . . . . . VI
Telephone set up . . . . . . . . . . . . . . . . . . . . . . . . . . . . . . . . . . . . . . . 2
Date and time . . . . . . . . . . . . . . . . . . . . . . . . . . . . . . . . . . . . . . . . . . 8
Making calls . . . . . . . . . . . . . . . . . . . . . . . . . . . . . . . . . . . . . . . . . . 10
Enhanced telephone features . . . . . . . . . . . . . . . . . . . . . . . . . . . 17
Operating the answering machine . . . . . . . . . . . . . . . . . . . . . . . 41
Customizing the answering
machine settings . . . . . . . . . . . . . . . . . . . . . . . . . . . . . . . . . . . . . . 51
Handset operation . . . . . . . . . . . . . . . . . . . . . . . . . . . . . . . . . . . . . 54
Customizing handset settings . . . . . . . . . . . . . . . . . . . . . . . . . . . 68
Base station settings . . . . . . . . . . . . . . . . . . . . . . . . . . . . . . . . . . . 73
Advanced settings . . . . . . . . . . . . . . . . . . . . . . . . . . . . . . . . . . . . . 75
Appendix . . . . . . . . . . . . . . . . . . . . . . . . . . . . . . . . . . . . . . . . . . . . . 78
Safety precautions . . . . . . . . . . . . . . . . . . . . . . . . . . . . . . . . . . . . . 86
Menu table . . . . . . . . . . . . . . . . . . . . . . . . . . . . . . . . . . . . . . . . . . . 89
Index . . . . . . . . . . . . . . . . . . . . . . . . . . . . . . . . . . . . . . . . . . . . . . . . . 92
1
Gigaset SL 3501, USA, A31008-L350-U122-2-7619
Telephone set up
Telephone set up
This delivery units contains:
• 1 Gigaset SL 3501base station
• 1 Gigaset SL 30 handset
• 1 power supply unit
• 1 telephone cord
• 1 belt clip
• 1 rechargeable NiMh battery
• 1 user manual
• 1 Quick Start Guide
Installing the base station
vorberei.fm
26.06.03
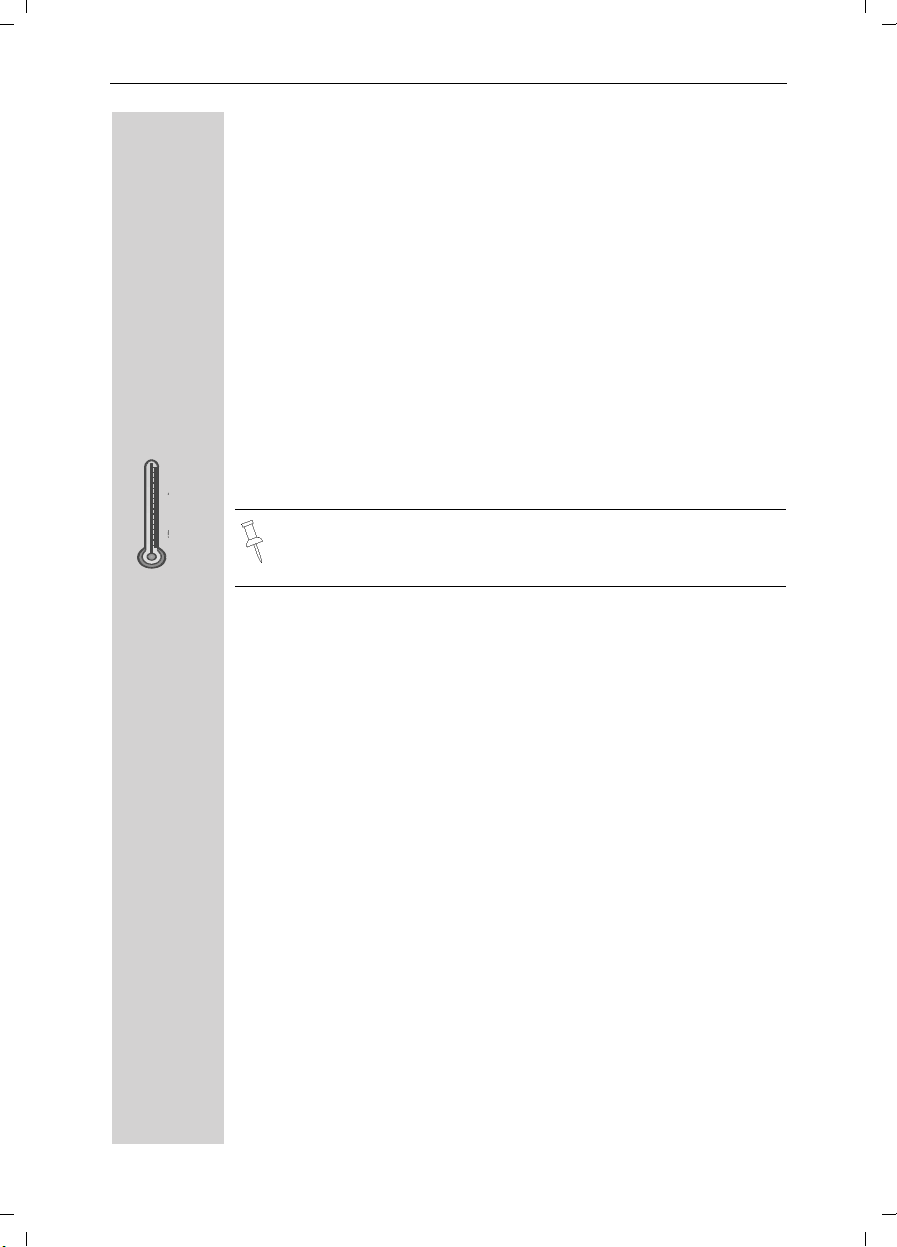
100° F
40° F
The base station is designed for operation in protected rooms with a
temperature range from +40°F to +100°F.
IMPORTANT! For best reception, place the base in a high central location, away from other electrical devices.
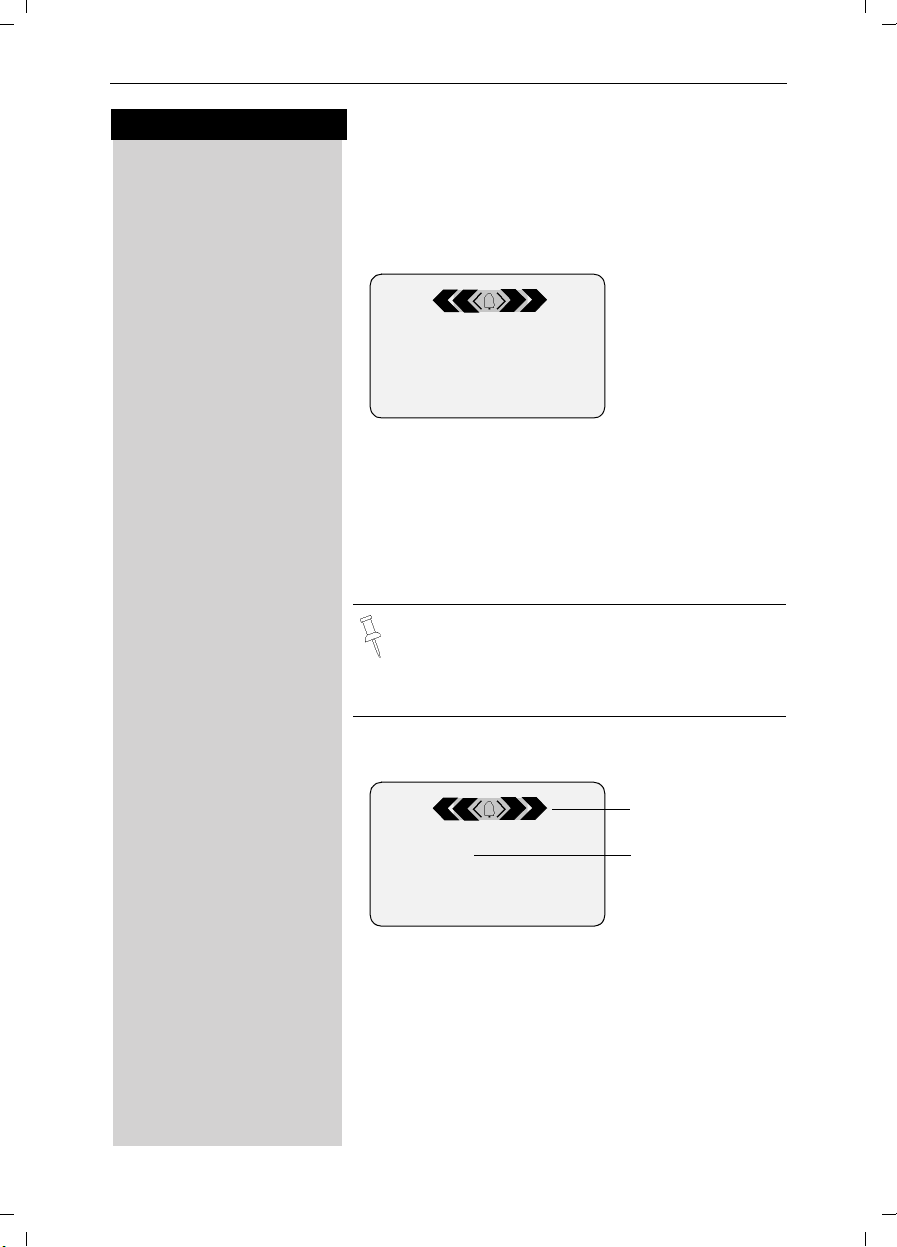
Range and reception strength
The base station range is approx. 1000 feet outdoors and up to
150 feet indoors. The receive strength display shows the quality of the
radio contact between the base station and the handset:
receive strength 100%
Ð
receive strength 75%
i
receive strength 50%
Ñ
low receive strength
Ò
no reception (flashes)
|
2
Gigaset SL 3501, USA, A31008-L350-U122-2-7619
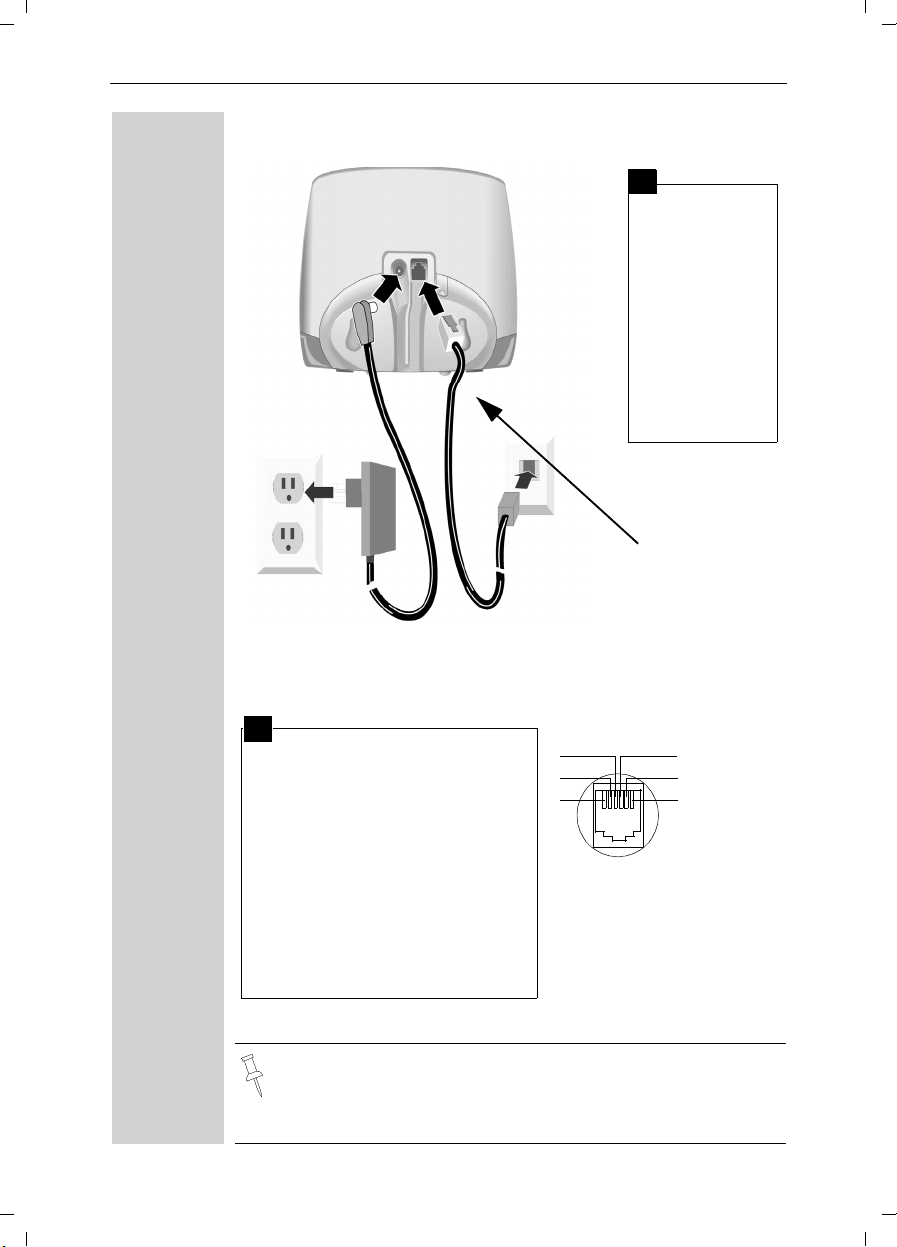
Connecting the base station
Power supply unit with
cord (110 VAC/60 Hz)
vorberei.fm
Telephone set up
1
● Insert the
small plug on
cord into
phone jack
1
● Place cord in
the base cable channel,
● insert power
supply unit
into wall outlet.
Key to register
additional
handsets/Page
handsets.
Telephone jack with telephone cord
RJ11C
26.06.0
2
● Insert plug on the telephone cord
into telephone jack on base unit
(clicks into place),
● Place cord in cable channel on
the bottom of the base,
● Insert other end of plug into tele-
3
2
1
4
1
2
5
3
6
4
5
6
phone jack on the wall.
● The installation of the base unit
should allow at least 8 inches
between the base and persons
to be in compli ance with FCC RF
exposure guidelines
● Only use the power supply unit included as indicated on the
rear side of the base.
● Use the telephone cord supplied. Do not use any old cords.
● Do not use an outlet controlled by a wall switch.
free
free
a
b
free
free
3
Gigaset SL 3501, USA, A31008-L350-U122-2-7619
Telephone set up
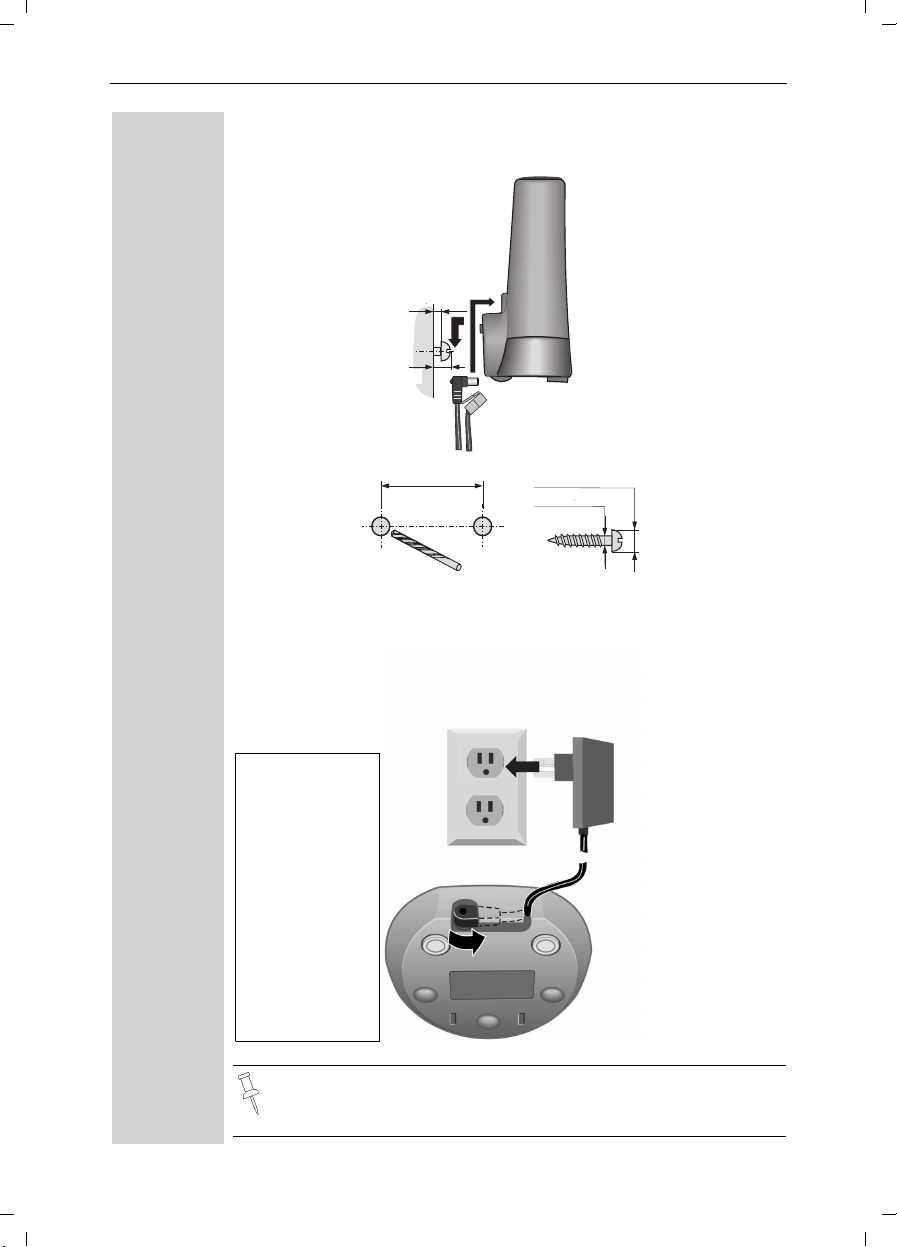
Wall-mounting the base
max.
5,3 mm
0,21 inch
0,1 inch
2,5 mm
2,74 inch
69,6 mm
vorberei.fm
0,31 inch
max. ø 7,9 mm
0,16 inch
max. ø 4 mm
2x
26.06.03
Connecting the charging unit
Plug-in power
supply unit
(110 VAC/60Hz)
with mains cable
● Insert the
small connector of the
mains cable
into the jack,
● Turn the con-
nector in the
direction of
the arrow,
● Plug the
power supply
unit into the
socket.
Only use the plug-in power supply unit supplied
(as identified under the charging unit).
4

Gigaset SL 3501, USA, A31008-L350-U122-2-7619
Operating the handset
The display is protected by a plastic film.
Remove the protective plastic film!
Inserting the battery pack
● Insert the battery, as shown above.
● Place cover and push gently upward until it clicks into place (the unit
is shipped with the battery cover off).
● To open, press the grooved area on the cover and slide back.
vorberei.fm
26.06.0
Telephone set up
k
Ö
● Use only a rechargeable NiMH battery. Do not use Lithium or
non-rechargeable battery.
● Never use non-Siemens charging units as these can damage
the battery.
Placing handset into the charging unit and charging the battery
Leave the handset in the charger for about 5.5 hours the first time the
battery is charged. The charging status symbol flashes on the handset,
indicating that the battery is being charged:
Ý
Ü
battery empty (symbol
flashes)
battery 1/3 charged
battery 2/3 charged
Û
battery fully charged
Ú
5
Gigaset SL 3501, USA, A31008-L350-U122-2-7619
Telephone set up
● Once the initial charging operation is completed, you can pla-
ce your handset into the charger after each call. Charging is
controlled electronically. This ensures optimum charging and
prolongs battery life.
● The battery heats up during charging. This is normal and not
dangerous.
● The battery charging status is correctly displayed only after
uninterrupted charging/discharging. You should therefore avoid removing the battery unnecessarily.
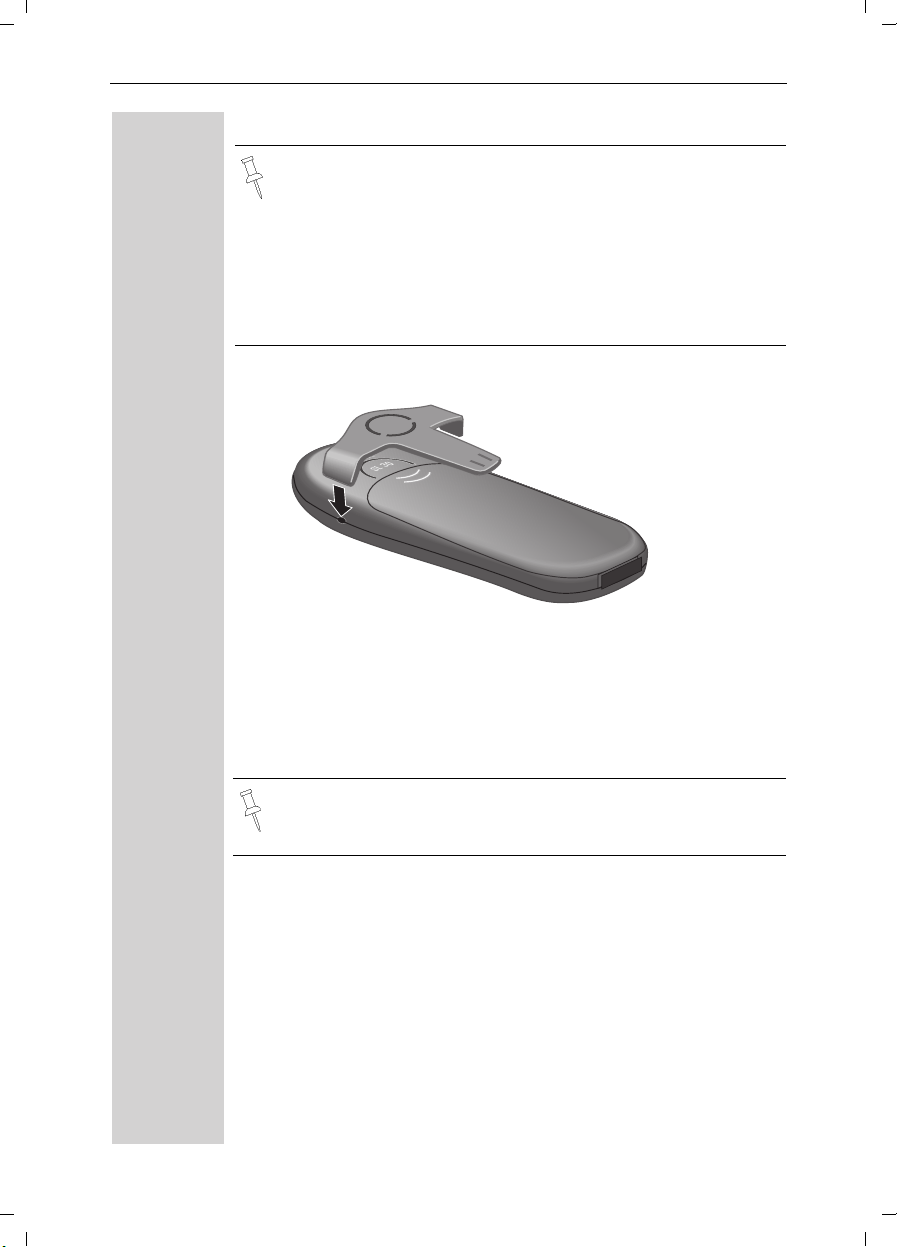
Attaching the belt clip
vorberei.fm
26.06.03
Push the belt clip onto the back of the handset until the tabs click into
place.
Turning handset on/off
a To turn handset on/off, hold down the End key – you will hear a con-
firmation beep.
The handset is turned on as soon as you insert the battery and
place the handset in the charging unit.
6
Gigaset SL 3501, USA, A31008-L350-U122-2-7619
Turning Keypad Lock on/off
You can disable the handset keys when carrying the unit in your pocket
or bag. This protects from accidental key presses. If there is an incoming call, the key lock is automatically turned off and turned back on after the call has ended.
Accepting a call: Press the Talk key.
c
ª To turn on/off, hold down the keypad lock/the pound key – you will
hear the confirmation beep*!
Note: 911/Emergency calls can not be made when the key pad
is locked.
vorberei.fm
26.06.0
Telephone set up
*. Confirmation beep = rising tone sequence,
Error beep = falling tone sequence.
7
Gigaset SL 3501, USA, A31008-L350-U122-2-7619
uhrzeit.fm
Date and time
Press keys:
Date and time
Setting the date and the time
The date and time settings are necessary in order for
the date and time of the arriving of messages/incoming
calls to be displayed correctly.
You can also set the clock mode, to the 12 hour mode
(AM and PM) or 24 hour mode. If you subscribe the
Caller ID the date and time are automatically set. If you
do not subscribe to Caller ID follow the steps below to
set the date and time.
• The default setting is 12 hour mode.
• If you subscribe to Caller ID, the date and time
may be sent from your telephone service and
will be automatically set.
Date
MENU Press Menu.
D Appoint./Clock [
ееееееееееееееееееееееееееееееее
D Date/Time [
ееееееееееееееееееееееееееееееее
For example:
Þ¢ŸÞÞ] Enter the month/day/year (for example: 05-20-01, as
Scroll to Appoint/Clock and confirm.
Scroll to Date/Time and confirm.
The current setting is displayed in the MM-DD-YY
mode.
shown).
26.06.03
Time
D Scroll down one line.
] Þ Þ ¢ Enter the hours/minutes (for example: 10.05 am, as
shown).
Factory default: 12 hour mode. If am or pm is displayed
next to the time, 12 hour mode is activated. If you
move the cursor to the time field, you can change from
am to pm using the left display key.
Clock mode (12 or 24 hours)
By default, the clock is set to the 12 hour mode
and am or pm is displayed next to the time. If
you move the cursor to the time field, you can
change from am to pm using the left soft key.
D Scroll down one line to set mode.
F G If necessary, select either 24 hour or 12 hour display
mode.
Save Save the settings.
8

Gigaset SL 3501, USA, A31008-L350-U122-2-7619
Press keys:
Area codes
To conveniently call back a user from the call log (see
page 38) you will need to key in and store the area code
where your telephone is installed (Local Area Code). If
it is installed in a Multiple Area Code Area you will also
have to key in and store the Extra Codes for that area.
Local area code
MENU Press Menu.
D Base Settings [
ееееееееееееееееееееееееееееееее
D Area Codes [
ееееееееееееееееееееееееееееееее
D Local Area Code [
ееееееееееееееееееееееееееееееее
MENU Press Menu.
Save Entry [
ееееееееееееееееееееееееееееееее
MENU Press Menu.
D Base Settings [
ееееееееееееееееееееееееееееееее
D Area Codes [
ееееееееееееееееееееееееееееееее
D Extra Codes [
ееееееееееееееееееееееееееееееее
Scroll to Base Settings and confirm.
Scroll to Area Codes and confirm.
Scroll to Local Area Code and confirm.
o Key in your Local Area Code.
Scroll to Save Entry and confirm.
Extra codes
Scroll to Base Settings and confirm.
Scroll to Area Codes and confirm.
Scroll to Extra Codes and confirm. The first entry of list
of codes will be displayed.
To add or change a code:
D Scroll down using navi key desired code location.
Edit Press Edit.
o Key in the Extra Code.
uhrzeit.fm
26.06.03
Date and time
MENU Press Menu.
Save Entry [
ееееееееееееееееееееееееееееееее
Scroll to Save Entry and confirm.
Repeat the last steps until all the Extra Codes for your
area have been keyed in.
9
Gigaset SL 3501, USA, A31008-L350-U122-2-7619
Making calls
Press keys:
Making calls
Making an external call
telef.fm
26.06.03
o X Dial the telephone number. If necessary use the back-
c Press the Talk key.
a To end the call, press the End key.
MENU Press Menu.
D Insert Pause [
ееееееееееееееееееееееееееееееее
For example:
F Press INT on the navi key. Your own handset is identi-
D E c Scroll to the handset you want to call and press the Talk
or
e.g. Ÿ Simply enter the number of the handset you want to
space key to correct mistakes.
To insert a pause when dialing a number:
Scroll to Insert Pause and confirm.
• You can also press the Talk key first
enter the telephone number – each digit is dialed immediately.
• You can cancel the dialing operation with the
End key.
and then
Making an intercom call
Intercom calls are calls to other registered handsets
and do not tie up your telephone line (for example, calls
within your home from the kitchen to the living room).
fied by “<”.
key.
call.
10
Paging all handsets
F Press INT on the navi key.Your own handset is identi-
fied by “<”.
« Press the « key

Gigaset SL 3501, USA, A31008-L350-U122-2-7619
Press keys:
Ending an internal call
a Press the END key to end the call.
Answering a call
Your handset rings (ringer) and the status LED flashes.
c
/u Press the TALK or speakerphone u key.
or
With the “Auto Answer” feature you may answer a call
by simply removing the handset from the charger (for
instructions on how to turn on the “Auto Answer” feature see page 71).
telef.fm
26.06.03
Making calls
C Press the MEM key in lower right corner of handset for
R
ееееееееееееееееееееееееееее
C Press the MEM key again to reconnect the first call.
Anwering a waiting call
While on an active call, you will hear the Call Waiting tone. Announce to the first caller that you will place them
on hold.
3 seconds to answer the second caller.
An „R“ will be displayed as confirmation you have answered Call Waiting.
*
Reconnecting the first call
While on an active call, you will hear the Call Waiting tone. Announce to the first caller that you will place them
on hold.
Toggle between the two calls by pressing the MEM
key.
* Subscription required from your local
telephone provider
11
Gigaset SL 3501, USA, A31008-L350-U122-2-7619
Making calls
Press keys:
Accepting or rejecting a waiting call
If you receive an external call during an internal call you
will hear the call waiting tone if you subscribe to this
feature from your local telephone company.
Rgr Off Accept
5551234
telef.fm
26.06.03
Accept Press Accept - The internal call is ended; you are con-
Reject Press Reject –You stay connected to the internal user.
5125551234
ееееееееееееееееееееееееееее
John Smith
ееееееееееееееееееееееееееее
nected to the external call.
Answering Caller ID calls
Caller ID is a service provided by the local telephone company which allows your Gigaset to
display the name and number of the person who
is calling you. Contact your local telephone company to subscribe to Caller ID service.
An incoming call is displayed as follows:
Bell Icon
0891234567
Rgr Off Accept
If both number and name were transmitted, then
both will be shown. If the number is stored in the telephone book, only the name stored will appear.
Telephone
number
12
External
еееееееееееееееееееееееееееееее
Private Call
ееееееееееееееееееееееееееее
Out of Area
ееееееееееееееееееееееееееее
If you have not applied for Caller ID service.
The caller has chosen to block his or her number.
If the number is not available to your telephone compa-
ny, Out of Area will be displayed instead.
Gigaset SL 3501, USA, A31008-L350-U122-2-7619
Press keys:
telef.fm
26.06.03
Making calls
Unknown
ееееееееееееееееееееееееееее
If the caller is unknown or no available Caller ID information is received by the local telephone company.
In the first displayline you see a bell:
● if you have not applied for Caller ID service,
● if the caller has chosen to block his or her name,
● if the name is not available to your telephone com-
pany.
Handset speakerphone
Using your handset speakerphone offers the following
advantages:
● Before dialing, you hear the dial tone without having
to lift the handset to your ear.
● Other people can listen in and join on the call.
● Leaves your hands free, for example to take notes.
o Dial the desired number.
u Press the speakerphone key u.
Using the handset speakerphone during a call
u Press to turn on the handset speakerphone.
To set the volume during a call, press the speakerphone key u again.
F G Raise or lower the volume using the navi key.
Save Save the volume level.
c To change from speakerphone to the handset, press
Talk. To end the call, press End or place the handset in
the charger.
a End the call.
If you want to place the handset in the charging
unit during a call (if for example the battery is
low), keep the speakerphone key u pressed
while placing it in the charger.
13

Gigaset SL 3501, USA, A31008-L350-U122-2-7619
Making calls
Press keys:
Muting the handset
You can mute your handset during an external call to
talk privately to another person in the room. The external caller cannot hear your conversation. You cannot
hear your caller either.
F While on an active call, Press Int on the navi key to
mute the microphone – the call is placed on hold and
the external caller will hear music.
Î To return to the external caller, press the escape key.
Picking up a call from the answering machine
While the answering machine is recording a message
(status LED lights up), you can still pick up the call if you
want to talk to the caller.
c Press the Talk key.
The recording will end and you can talk to the caller.
If the handset speakerphone is on, the speakerphone key
listen in on the recording on up to four handsets.
telef.fm
26.06.03
u flashes during recording. You can
MENU Open the menu.
D Call Record [
ееееееееееееееееееееееееееееееее
MENU Press Menu.
D Call Record [
ееееееееееееееееееееееееееееееее
14
Recording a call
You can use the answering machine to record an external call.
To start the recording while you are on an external call:
To start the recording
Scroll to Call Record and confirm.
The option is marked as active (9).
The answering machine symbol
that call is being recorded.
To e n d t h e r e c or d in g
End call recording.
The marker (
) is deleted.
9
¸ flashes to indicate
Gigaset SL 3501, USA, A31008-L350-U122-2-7619
Press keys:
The recorded call is stored in the message list of
the answering machine.
In some states it may be illegal to record the person on the other end of a phone conversation
without their expressed permission. Please
obey your local laws and regulations. Always ask
the other party whether recording the call is OK.
Telco Voice Mail
If you subscribe to voice mail from your local telephone
company, you may use your Gigaset handset to retrieve messages. It is recommended you store the access number in the "1" key.
Storing access number for retrieving Voice Mail
MENU Press Menu.
D Answering M. [
ееееееееееееееееееееееееееееееее
D Set Key 1 [
ееееееееееееееееееееееееееееееее
D Voice Mail [
ееееееееееееееееееееееееееееееее
MENU Press Menu.
Save Entry [
ееееееееееееееееееееееееееееееее
Scroll to Ans Machine and confirm.
Select to Set Key 1 and confirm.
Set the Voice Mail.
o Dial the voice mail access number.
Scroll to Save Entry and confirm.
telef.fm
26.06.03
Making calls
Once you have saved the voice mail access number, simply hold down the
set and you are directly connected to the Telco
voice mail system. Follow the Telco instructions.
] key on the hand-
15

Gigaset SL 3501, USA, A31008-L350-U122-2-7619
Making calls
Press keys:
Direct inward dialing
With direct inward dialing, an external caller can directly call an internal number (see page 91). To use this feature the answering machine must be turned on.
After dialing your telephone number, the caller hears
the standard announcement or the direct inward
dialing announcement as recorded.
An example for a direct inward dialing announcement:
“Hello this is the Smiths. To talk to John press 1.
To talk to Mary press 2. To talk to Jimmy press 3.
Press the star button if you don’t mind who you
talk to.“
The call will not be answered by the answering machine if the standard announcement is set.
The caller then has five seconds in which to dial a handset's internal number.
If there is still nobody to answer the call, the answering
machine (see page 51) will pick up the call.
telef.fm
26.06.03
MENU Open the menu.
D Base Settings [
ееееееееееееееееееееееееееееееее
D DID Settings [
ееееееееееееееееееееееееееееееее
D Dir.Inward Dial [
ееееееееееееееееееееееееееееееее
Accept Accept the call.
16
Setting direct inward dialing
When direct-inward-dialing is set an external caller can
call the internal number of your handset directly.
Activate or deactivate direct inward dialing
Select the menu item and confirm.
Select the menu item and confirm.
Direct inward dialing is activated and marked with 9.
To deactivate, confirm the marked function with [ .
The marker is deleted.
Picking up a call
If direct inward dialing is on and if a call is not answered
on a certain handset, you can pick up the call on your
handset.
c Press the Talk key
or
Gigaset SL 3501, USA, A31008-L350-U122-2-7619
Press keys:
Enhanced telephone features
In addition to its standard features, your Gigaset offers
a number of other fast, convenient, enhanced features.
Redial
Your handset automatically saves the last five telephone numbers dialed (see page 29).
Manual redial
z Press the Redial soft key.
D Select the desired telephone number/name using the
navi key.
c Press the Talk or Speakerphone key – the telephone num-
ber is dialed.
Automatic redial
The Gigaset can automatically redial a telephone number ten times (with an interval of 20 seconds in each
case). The speakerphone key flashes and the speaker
is active during this operation.
This function turns itself off after 10 unsuccessful
tries.
To cancel automatic redial, press or any key.
The person you called is not available:
z Press the Redial soft key.
D Scroll to the desired telephone number/name.
MENU Press Menu.
D Auto Redial [
ееееееееееееееееееееееееееееееее
Scroll to Auto Redial and confirm – After a few moments the phone will start redialing the number.
When the user answers:
c Press the Talk or Speakerphone key.
Automatic redialing is turned off if you subsequently make a call. You must turn it back on afterwards if still desired.
komfort.fm
26.06.03
Enhanced telephone features
Off
17
Gigaset SL 3501, USA, A31008-L350-U122-2-7619
Enhanced telephone features
Press keys:
Delete entry from redialing list
z Press the Redial soft key.
D Scroll to desired telephone number.
MENU Press Menu.
D Delete Entry [
ееееееееееееееееееееееееееееееее
Scroll to Delete Entry and confirm.
Copying the redial number to the directory
z Press the Redial soft key.
D Scroll to desired telephone number.
MENU Press Menu.
D Send to Dir [
ееееееееееееееееееееееееееееееее
MENU Press Menu.
Save Entry [
ееееееееееееееееееееееееееееееее
Scroll to Send to Dir and confirm.
The telephone number is entered in the directory.
o If desired, edit the name and number (and, if appropria-
te, an anniversary, (see page 28)).
Save the entry by confirming.
komfort.fm
26.06.03
18
For more information about editing letters and
characters (see page 78).
Gigaset SL 3501, USA, A31008-L350-U122-2-7619
Press keys:
Setting the alarm
Your Gigaset has an alarm function to help you keep
track of your schedule. You must set the time and date
first (see page 8) in order for the alarm to work.
Turning the alarm on
The active alarm clock rings every day at the set time.
If you have set a time for the alarm call, this is indicated
by the
The telephone is idle:
MENU Open the menu.
D Appoint./Clock [
ееееееееееееееееееееееееееееееее
D Alarm Clock [
ееееееееееееееееееееееееееееееее
F G Scroll right (on) or left (off) with the navi key to turn
for example
Þ £Þ Þ Enter the hours/minutes. The example here is 6.00 am.
F G Scroll left or right to choose the ringer melody.
Scroll to Appoint./Clock and confirm.
Scroll to Alarm Clock and confirm.
The current setting is displayed.
alarm on or off.
D Scroll down one line to enter time.
Entering the time for the alarm
D Scroll down one line.
Choosing the ringer melody for the alarm
Save Save the settings.
Alarm will not sound if the room monitor is on or
during automatic redial.
¼
icon in the display.
komfort.fm
26.06.03
Enhanced telephone features
19
Gigaset SL 3501, USA, A31008-L350-U122-2-7619
Enhanced telephone features
Press keys:
Turning the alarm off
When the alarm rings and the LED flashes (about 30
seconds) press any key on the handset to turn off the
alarm sound.
MENU Press Menu.
D Appoint./Clock [
ееееееееееееееееееееееееееееееее
D Alarm Clock [
ееееееееееееееееееееееееееееееее
Scroll to Appoint./Clock and confirm.
Scroll to Alarm Clock and confirm.
F G Scroll left with the navi key to turn the alarm off.
Save Save the settings.
Stopping the alarm sound
An alarm clock rings and the LED flashes (about 30
seconds). Press any key on the handset to turn off the
alarm sound.
There is no snooze setting. The alarm will sound
until turned off.
The alarm will sound daily at the set time until
you turn it off through the menu.
komfort.fm
26.06.03
MENU Press Menu.
D Appoint./Clock [
ееееееееееееееееееееееееееееееее
Set Appointment [
ееееееееееееееееееееееееееееееее
F G Scroll right on the navi key to turn on.
for example
20
Þ¢ŸÞ Enter month/day (for example: 05.20 am as shown).
Schedule
Your handset is able to remind you of one appointment. You need to store the date and time of this appointment. You may only set one appointment at a
time.
If you have set an appointment, this is indicated by the
¼
icon in the display.
Setting an appointment
Scroll to Appoint./Clock and confirm.
Scroll to Set Appointment and confirm.
Activating the appointment alarm
D Scroll down one line to enter date.
Entering the date
D Scroll down one line to enter time.
Gigaset SL 3501, USA, A31008-L350-U122-2-7619
Press keys:
Entering the time
for example
Þ¬Þ¢ Enter the hours/minutes (for example: 9.05 am as
shown).
Factory setting: 12 h mode. If am or pm is displayed
next to the time, the 12 h format is active.
If you move the cursor into the time field, you can use
the left display key to change from am to pm.
D Scroll down one line to choose ringer melody.
Choosing the ringer melody for the appointment
alarm
F G Scroll with the navi key to choose the ringer melody.
Save Save the settings.
An appointment alarm will ring only if the handset is idle. An appointment alarm can not ring if
the room monitor is on or during automatic redial.
Turning off the appointment alarm
An appointment alarm sounds the same way as an incoming call. The handset rings and the status LED flashes (approx. 30 sec).
Press any key to turn off the appointment alarm.
komfort.fm
26.06.03
Enhanced telephone features
MENU Open the menu.
D Appoint./Clock [
ееееееееееееееееееееееееееееееее
Set Appointment [
ееееееееееееееееееееееееееееееее
F G Select if the current setting is .
Save Save the settings.
Turning off the appointment function
Select Appoint./Clock and confirm.
Select Set Appointment and confirm.
Off On
21

Gigaset SL 3501, USA, A31008-L350-U122-2-7619
Enhanced telephone features
Press keys:
Display missed appointments and anniversaries
If you do not answer an appointment call after nine
rings, it will automatically turn off. The calls are then saved in an appointment list.
The display will show date in lower right hand corner of
the display to show an new, unanswered appointment.
Press the right soft key to show the list of events.
Then select OK.
Proceed as follows to display the appointment:
MENU Press Menu.
D Appoint./Clock [
ееееееееееееееееееееееееееееееее
D Dates [
ееееееееееееееееееееееееееееееее
Scroll to Appoint./Clock and confirm.
Scroll to Dates and confirm.
D [ Select a missed appointment. The information on the
missed appointment is displayed.
A missed appointment is identified by ¼.
A missed anniversary (see page 28) is identified by
‚.
Press
versary.
[ Go back to the list.
komfort.fm
Missed Appt.
Delete to delete a missed appointment/anni-
¼
26.06.03
22
Gigaset SL 3501, USA, A31008-L350-U122-2-7619
Press keys:
Directory
The Directory D allows you to store up to 200 telephone numbers.
Storing a directory entry
D Open the Directory list by pressing the bottom of the
navi key.
D New Entry [
ееееееееееееееееееееееееееееееее
Scroll to New Entry and confirm.
o Enter the telephone number (max. 32 digits).
Follow all local telephone company dialing requirements, such as 7-digit, 10-digit or 11-digit dialing.
komfort.fm
26.06.03
Enhanced telephone features
D o Scroll to the name field and enter the name (max. 16
MENU Press the menu.
Save Entry [
ееееееееееееееееееееееееееееееее
MENU Press Menu
D Save to Dir [
ееееееееееееееееееееееееееееееее
o Enter the name of the caller if desired.
MENU Press the menu.
Save Entry [
ееееееееееееееееееееееееееееееее
characters)
(Optionally you can also enter the anniversary, (see
page 28) ).
Save the entry by pressing OK.
● Refer to character map in the Appendix
(page 78) for using the keypad to enter names
and numbers.
● Control the cursor with Gor F. Delete a
character with
serted to the left of the cursor.
X. Characters are always in-
Copying a telephone number to the directory during a call
You are conducting an external call:
Scroll to Save to Dir and confirm.
A menu opens in which you can enter the telephone
number and the name of the caller. If the number has
been transmitted it automatically appears in the menu.
Save the entry by pressing OK.
23

Gigaset SL 3501, USA, A31008-L350-U122-2-7619
Enhanced telephone features
Press keys:
Dialing a number from the directory
D Open the directory by pressing the bottom of the navi
key.
The names are listed in alphabetical order.
D Scroll to the desired name.
or You may enter the first letter of the desired name using
the keypad to jump ahead in the list. The letters of the
alphabet are shown on the keypad.
For example:
^ Press the 3 key
komfort.fm
once for David.
26.06.03
^^ Press the 3 key
^^^ Press the 3
c Press the Talk or Speakerphone key. The telephone
D Open the Directory list by pressing the bottom of the
D Scroll to desired name.
Display Press Display.
Edit Press Edit to open the menu for making changes.
o If desired change the telephone number.
D o Scroll to the name field and, if desired, change the
D o Scroll to the anniversary field and, if desired, change
MENU Press the menu.
Save Entry [
ееееееееееееееееееееееееееееееее
twice for Eric.
key three times for Frank.
number is dialed.
Displaying and editing a directory entry
navi key.
If desired, you can change the telephone number/
name:
name.
the date and time of the anniversary (see page 28).
Confirm changes by selecting Save Entry and pressing
OK.
● Refer to character map in the Appendix
(page 78) for using the keypad to enter names
and numbers.
● Control the cursor with Gor F. Delete a
character with X. Characters are always inserted to the left of the cursor.
24
 Loading...