

Page 1
Gigaset WLAN
Practical tips
Page 2

Contents
Contents
Introduction . . . . . . . . . . . . . . . . . . . . . . . . . . . . . . . . 3
Local networks with Gigaset products . . . . . . . . . . . . . . . . . . . . . . . . . . . . . . . . . . . . . . 4
Wired local network (Ethernet) . . . . . . . . . . . . . . . . . . . . . . . . . . . . . . . . . . . . . . . . 5
Wireless local network (WLAN) . . . . . . . . . . . . . . . . . . . . . . . . . . . . . . . . . . . . . . . . 6
Ad-hoc network . . . . . . . . . . . . . . . . . . . . . . . . . . . . . . . . . . . . . . . . . . . . . . . . . . . . 6
Infrastructure Network . . . . . . . . . . . . . . . . . . . . . . . . . . . . . . . . . . . . . . . . . . . . . . 7
Extending a wireless network using a repeater . . . . . . . . . . . . . . . . . . . . . . . . . . . . 9
Roaming . . . . . . . . . . . . . . . . . . . . . . . . . . . . . . . . . . . . . . . . . . . . . . . . . . . . . . . . . 10
Possible uses . . . . . . . . . . . . . . . . . . . . . . . . . . . . . . . . . . . . . . . . . . . . . . . . . . . . . . . . 11
Releasing files and printers for shared use . . . . . . 13
Making your own files and printers available (Windows XP) . . . . . . . . . . . . . . . . . . . 15
Configuring the network . . . . . . . . . . . . . . . . . . . . . . . . . . . . . . . . . . . . . . . . . . . . 15
Selecting computer names and workgroup . . . . . . . . . . . . . . . . . . . . . . . . . . . . . . 18
Checking the network settings . . . . . . . . . . . . . . . . . . . . . . . . . . . . . . . . . . . . . . . 19
Completing the installation procedure . . . . . . . . . . . . . . . . . . . . . . . . . . . . . . . . . 20
Releasing files and printers . . . . . . . . . . . . . . . . . . . . . . . . . . . . . . . . . . . . . . . . . . 21
Making your own files and printers available (Windows 2000) . . . . . . . . . . . . . . . . . 24
Installing network services . . . . . . . . . . . . . . . . . . . . . . . . . . . . . . . . . . . . . . . . . . 24
Selecting computer names and workgroup . . . . . . . . . . . . . . . . . . . . . . . . . . . . . . 26
Setting the TCP/IP protocol . . . . . . . . . . . . . . . . . . . . . . . . . . . . . . . . . . . . . . . . . . . 27
Setting up user names . . . . . . . . . . . . . . . . . . . . . . . . . . . . . . . . . . . . . . . . . . . . . . 29
Releasing files and printers . . . . . . . . . . . . . . . . . . . . . . . . . . . . . . . . . . . . . . . . . . 32
Making your own files and printers available
(WIN 98 / 98 SE / ME) . . . . . . . . . . . . . . . . . . . . . . . . . . . . . . . . . . . . . . . . . . . . . . . . . . 37
Setting up a PC as Client for Microsoft Networks . . . . . . . . . . . . . . . . . . . . . . . . . 37
Selecting computer names and workgroup . . . . . . . . . . . . . . . . . . . . . . . . . . . . . . 40
Selecting the access control . . . . . . . . . . . . . . . . . . . . . . . . . . . . . . . . . . . . . . . . . 40
Setting the TCP/IP protocol . . . . . . . . . . . . . . . . . . . . . . . . . . . . . . . . . . . . . . . . . . . 41
Installing utilities for file and printer release . . . . . . . . . . . . . . . . . . . . . . . . . . . . . 44
Releasing files and printers . . . . . . . . . . . . . . . . . . . . . . . . . . . . . . . . . . . . . . . . . . 46
Using released files and printers . . . . . . . . . . . . . . 49
Using files and printers on the network (Windows XP) . . . . . . . . . . . . . . . . . . . . . . . 50
Setting up a user account . . . . . . . . . . . . . . . . . . . . . . . . . . . . . . . . . . . . . . . . . . . 50
Accessing released drives or folders from your PC . . . . . . . . . . . . . . . . . . . . . . . . 53
Accessing released printers from your PC . . . . . . . . . . . . . . . . . . . . . . . . . . . . . . . 55
Using files and printers on the network (Windows 2000) . . . . . . . . . . . . . . . . . . . . . 58
Setting up user names . . . . . . . . . . . . . . . . . . . . . . . . . . . . . . . . . . . . . . . . . . . . . . 58
Accessing released drives or folders from your PC . . . . . . . . . . . . . . . . . . . . . . . . 58
Accessing released printers from your PC . . . . . . . . . . . . . . . . . . . . . . . . . . . . . . . 61
Using files and printers on the network (Win 98 / 98 SE / ME) . . . . . . . . . . . . . . . . . . 63
Setting up user names . . . . . . . . . . . . . . . . . . . . . . . . . . . . . . . . . . . . . . . . . . . . . . 63
1
Page 3

Contents
Accessing released drives or folders from your PC . . . . . . . . . . . . . . . . . . . . . . . . 66
Accessing released printers from your PC . . . . . . . . . . . . . . . . . . . . . . . . . . . . . . . 69
Defining IP addresses . . . . . . . . . . . . . . . . . . . . . . . 72
Private IP addresses . . . . . . . . . . . . . . . . . . . . . . . . . . . . . . . . . . . . . . . . . . . . . . . . . . . 72
Windows 98 . . . . . . . . . . . . . . . . . . . . . . . . . . . . . . . . . . . . . . . . . . . . . . . . . . . . . . . . . 73
Windows XP . . . . . . . . . . . . . . . . . . . . . . . . . . . . . . . . . . . . . . . . . . . . . . . . . . . . . . . . . 77
Windows 2000 . . . . . . . . . . . . . . . . . . . . . . . . . . . . . . . . . . . . . . . . . . . . . . . . . . . . . . . 80
Glossary . . . . . . . . . . . . . . . . . . . . . . . . . . . . . . . . . . 84
Index . . . . . . . . . . . . . . . . . . . . . . . . . . . . . . . . . . . . . 95
2
Page 4

Introduction
Introduction
This document provides a number of example applications for the use of Siemens
Gigaset devices for local networks. It describes the most frequently used of the variety
of options that these Siemens products offer you.
This chapter provides an overview of the various network configurations and possible
applications. The following chapters provide more detailed descriptions of how to use
these options.
Please note:
u The user interfaces depicted in this guide may differ from those on your screen
because of the settings you have made. For Windows screens, the default state
has been presented. There may also be minor differences due to different update
cycles of user interface and this manual.
u In the examples we assume that the Gigaset network components have been
installed and configured as per the corresponding operating instructions.
u This document is not part of the official package. It does not give rise to any legal
rights.
Trademarks
Microsoft, Windows 98, Windows 98 SE, Windows ME, Windows 2000, Windows XP and
Internet Explorer are registered trademarks of the Microsoft Corporation.
Super G is a registered trademark of Atheros Communications, Inc.
3
Page 5
Introduction
Local networks with Gigaset products
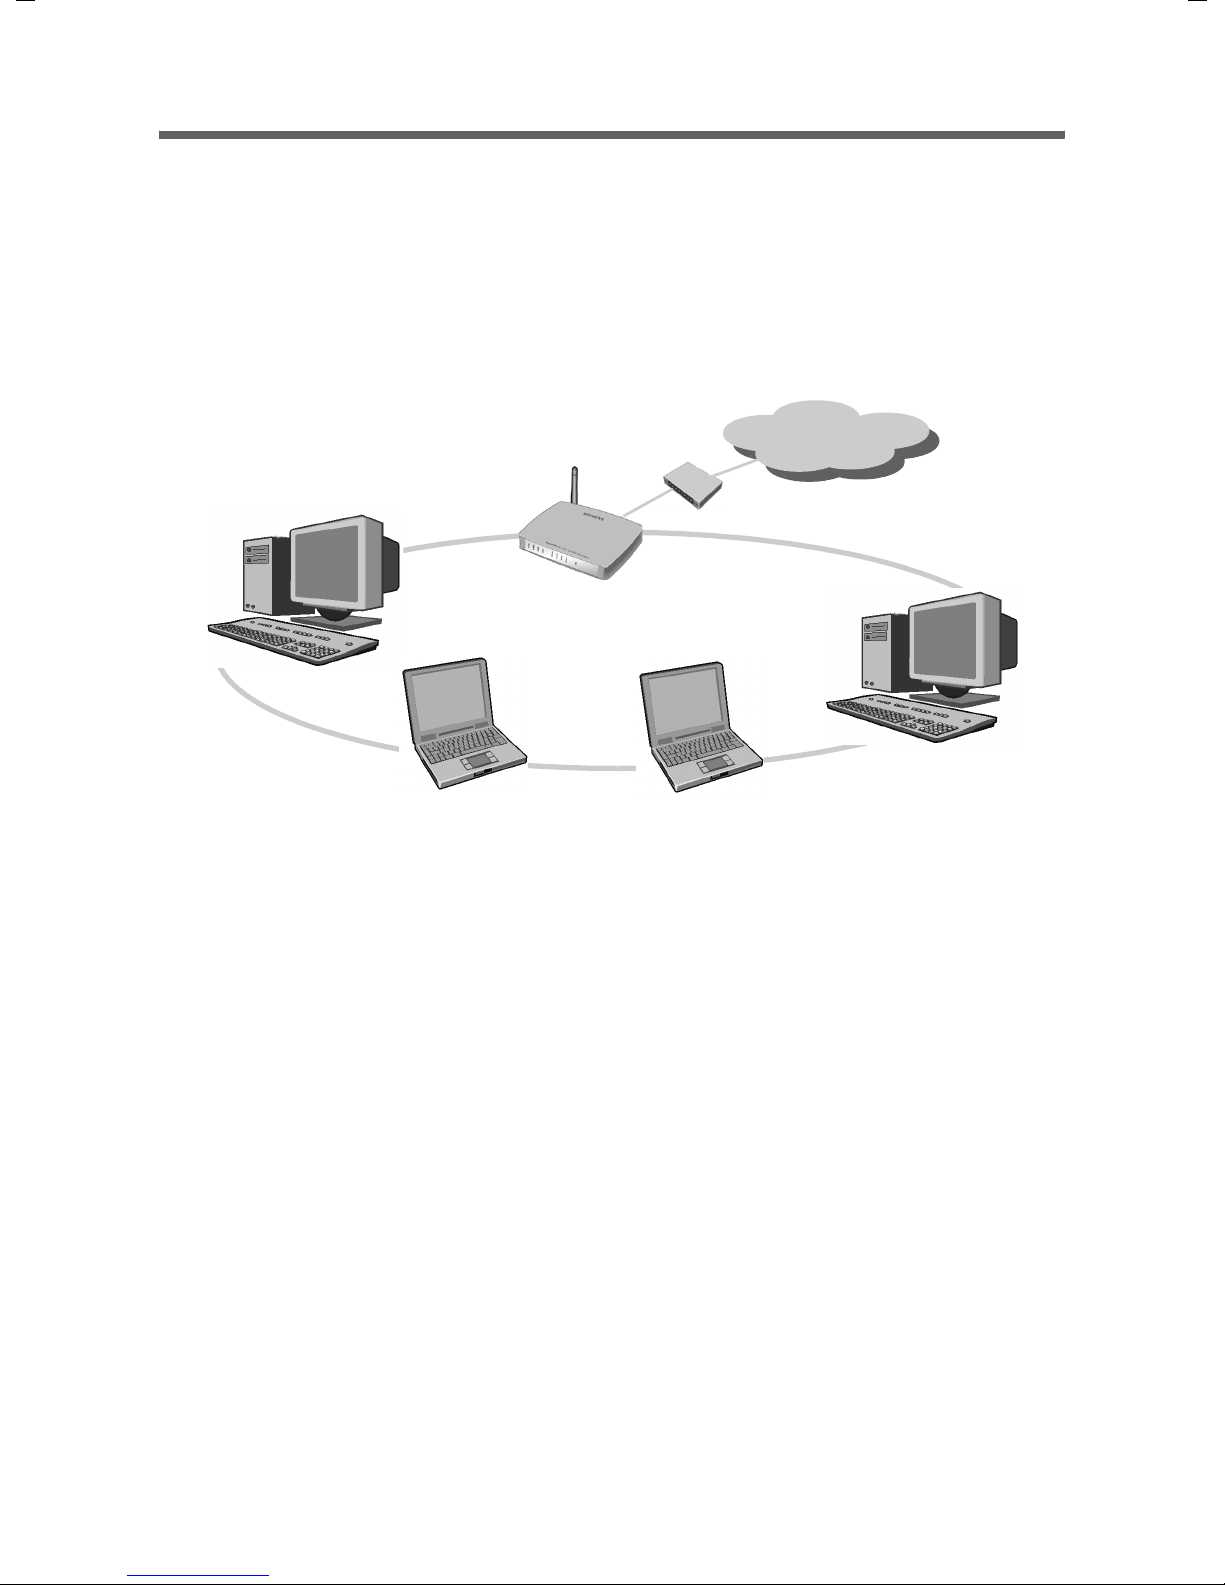
You can use Siemens Gigaset WLAN devices to set up a local network, e.g. a home network. All the PCs in this network can communicate with each other and have access to
the Internet. The PCs can run on Windows 98, Windows ME, Windows 2000 or Windows
XP. Gigaset Routers e.g. the Gigaset SE551/WLAN dsl/cable have an interface to enable
Internet access, so that you can connect a DSL or cable modem for Internet access (WAN
interface).
Internet
Windows 2000
Windows ME
Gigaset SE551 WLAN dsl/cable
Modem
local network
Windows XP
Windows 98 SE
You can set up the network in a number of ways. You can
u Use a Gigaset SE551 WLAN dsl/cable to set up a wired local network (see page 5).
u Use the Gigaset SE551 WLAN dsl/cable to set up a local network comprising wireless
and wired network components (see page 8).
u Use the wireless network adapters Gigaset PC Card 108, a Gigaset USB Adapter 108
or a Gigaset USB Stick 108 to set up a wireless network without routers, i.e. connect
PCs directly with each other (see page 6), or connect PCs to a Gigaset SE551 WLAN
dsl/cable (see page 7).
u Use one or more Gigaset WLAN Repeaters to extend the range of your wireless local
network (see page 10).
4
Page 6
Introduction
Wired local network (Ethernet)
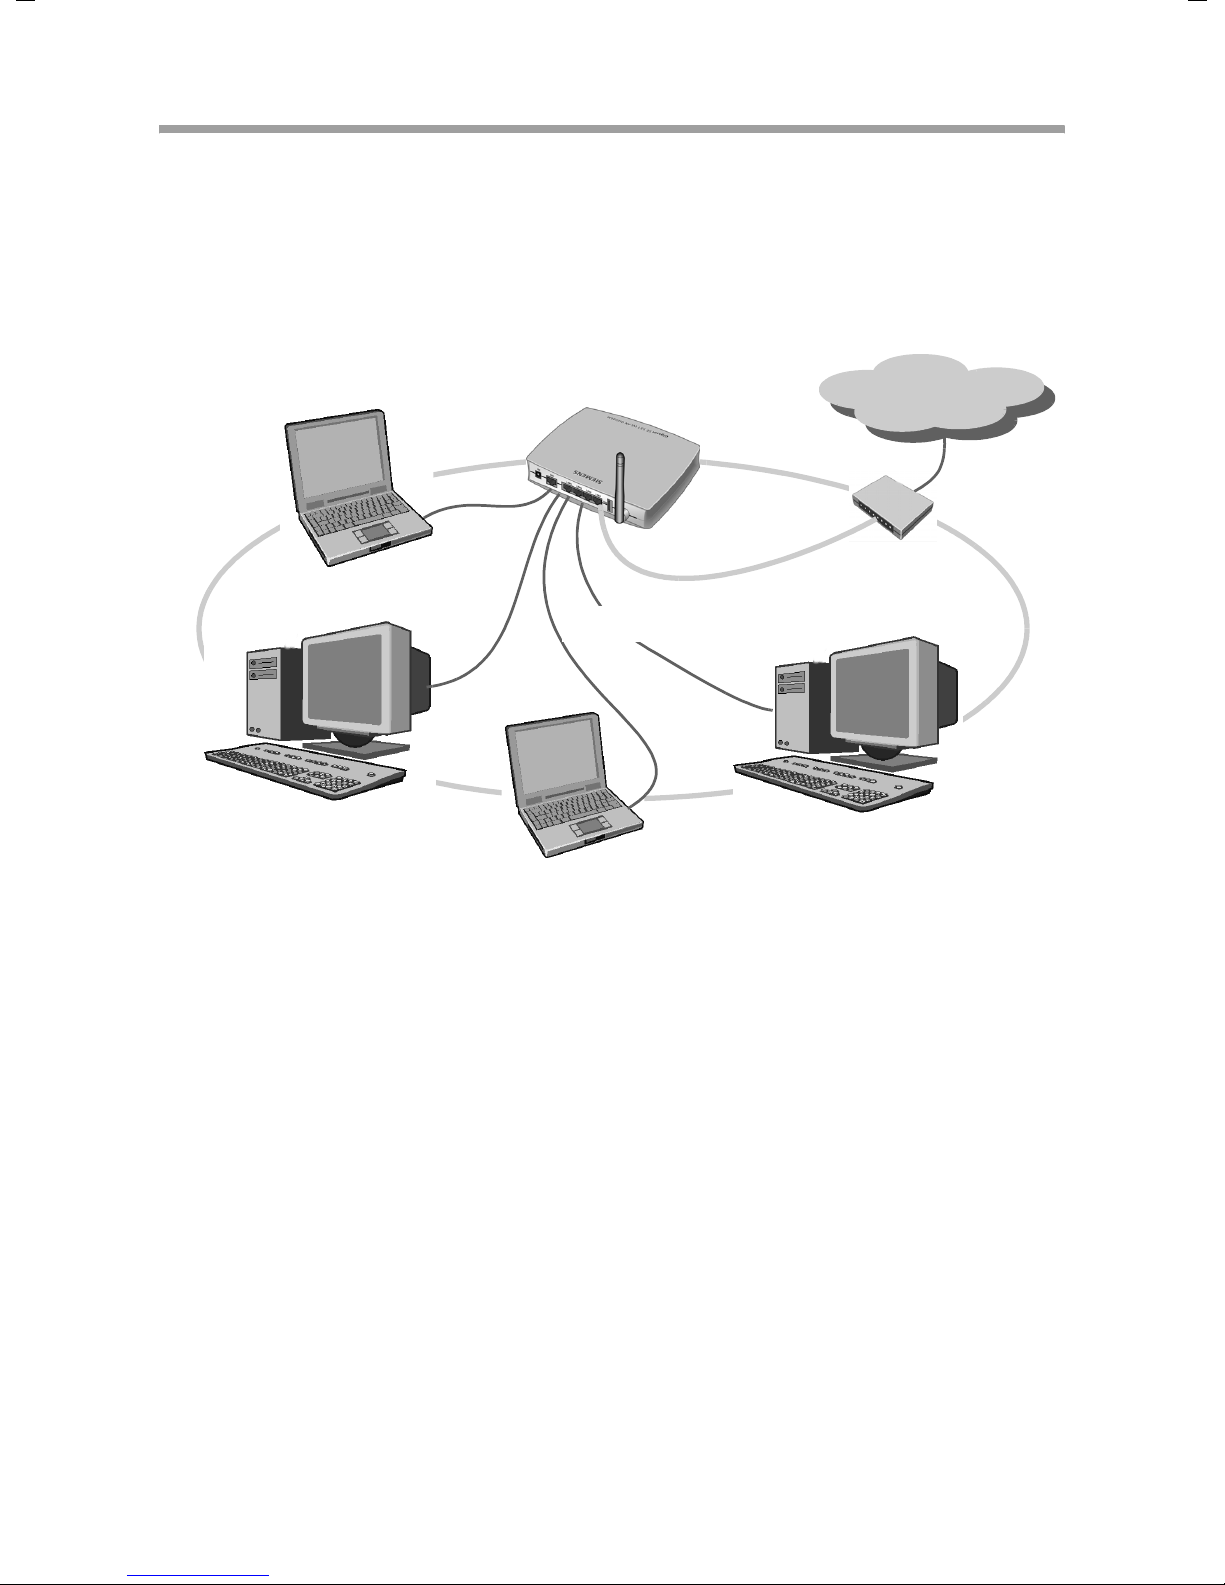
In a wired local network the PCs are linked via an Ethernet cable. The Siemens Gigaset
SE551 WLAN dsl/cable has four Ethernet LAN ports for connecting four PCs. The PCs
must have an Ethernet network adapter that is connected via an Ethernet cable to a LAN
port on the router. New PCs frequently come supplied with such a socket. You can buy
Ethernet cables (CAT-5) from specialist retailers.
Internet
Ethernet
The WAN interface on the Gigaset SE551 WLAN dsl/cable allows all PCs in the network
to access the Internet simultaneously. To use this feature you will need the access data
from an Internet Service Provider, e. g. T-Online.
5
Page 7
Introduction
Wireless local network (WLAN)
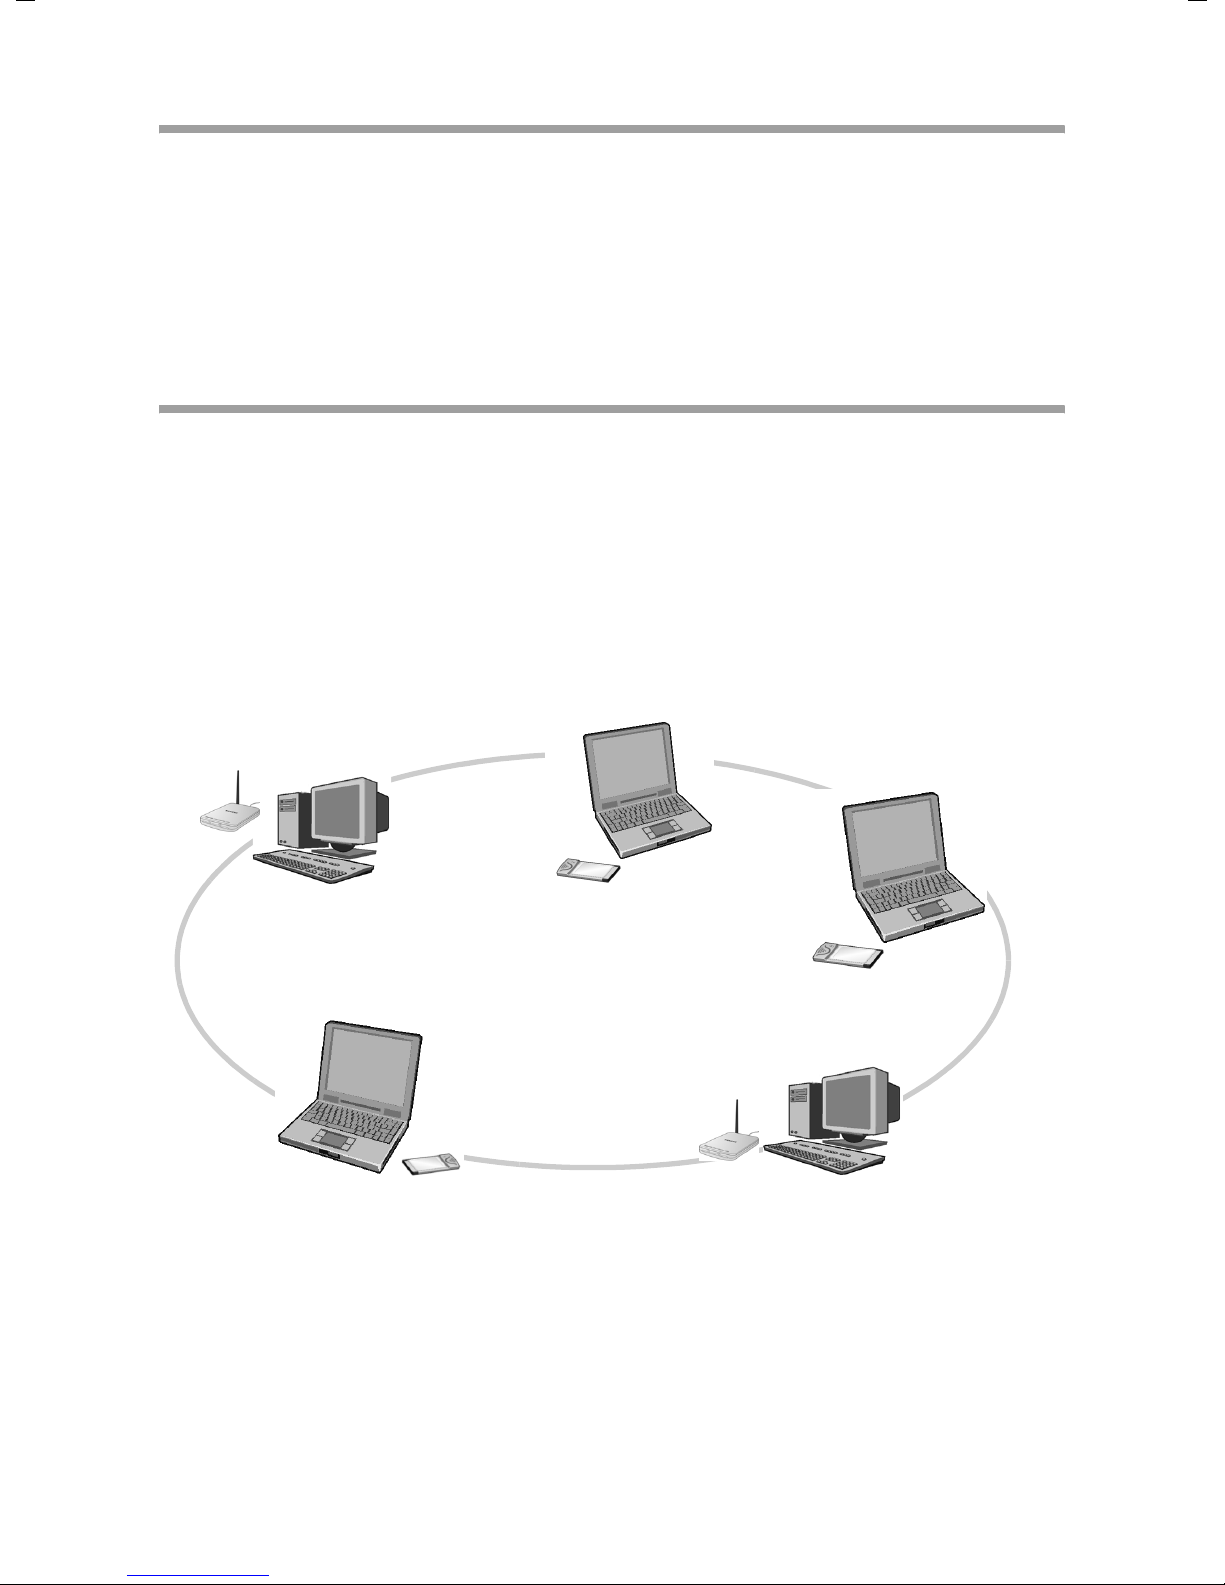
In a wireless local network (WLAN), the PCs are linked to each other via a wireless connection. The PCs must be equipped with a wireless network adapter (e.g. the Gigaset PC
Card 108 or Gigaset USB Adapter).
We generally differentiate between two types of wireless networks:
u ad-hoc mode
u infrastructure mode
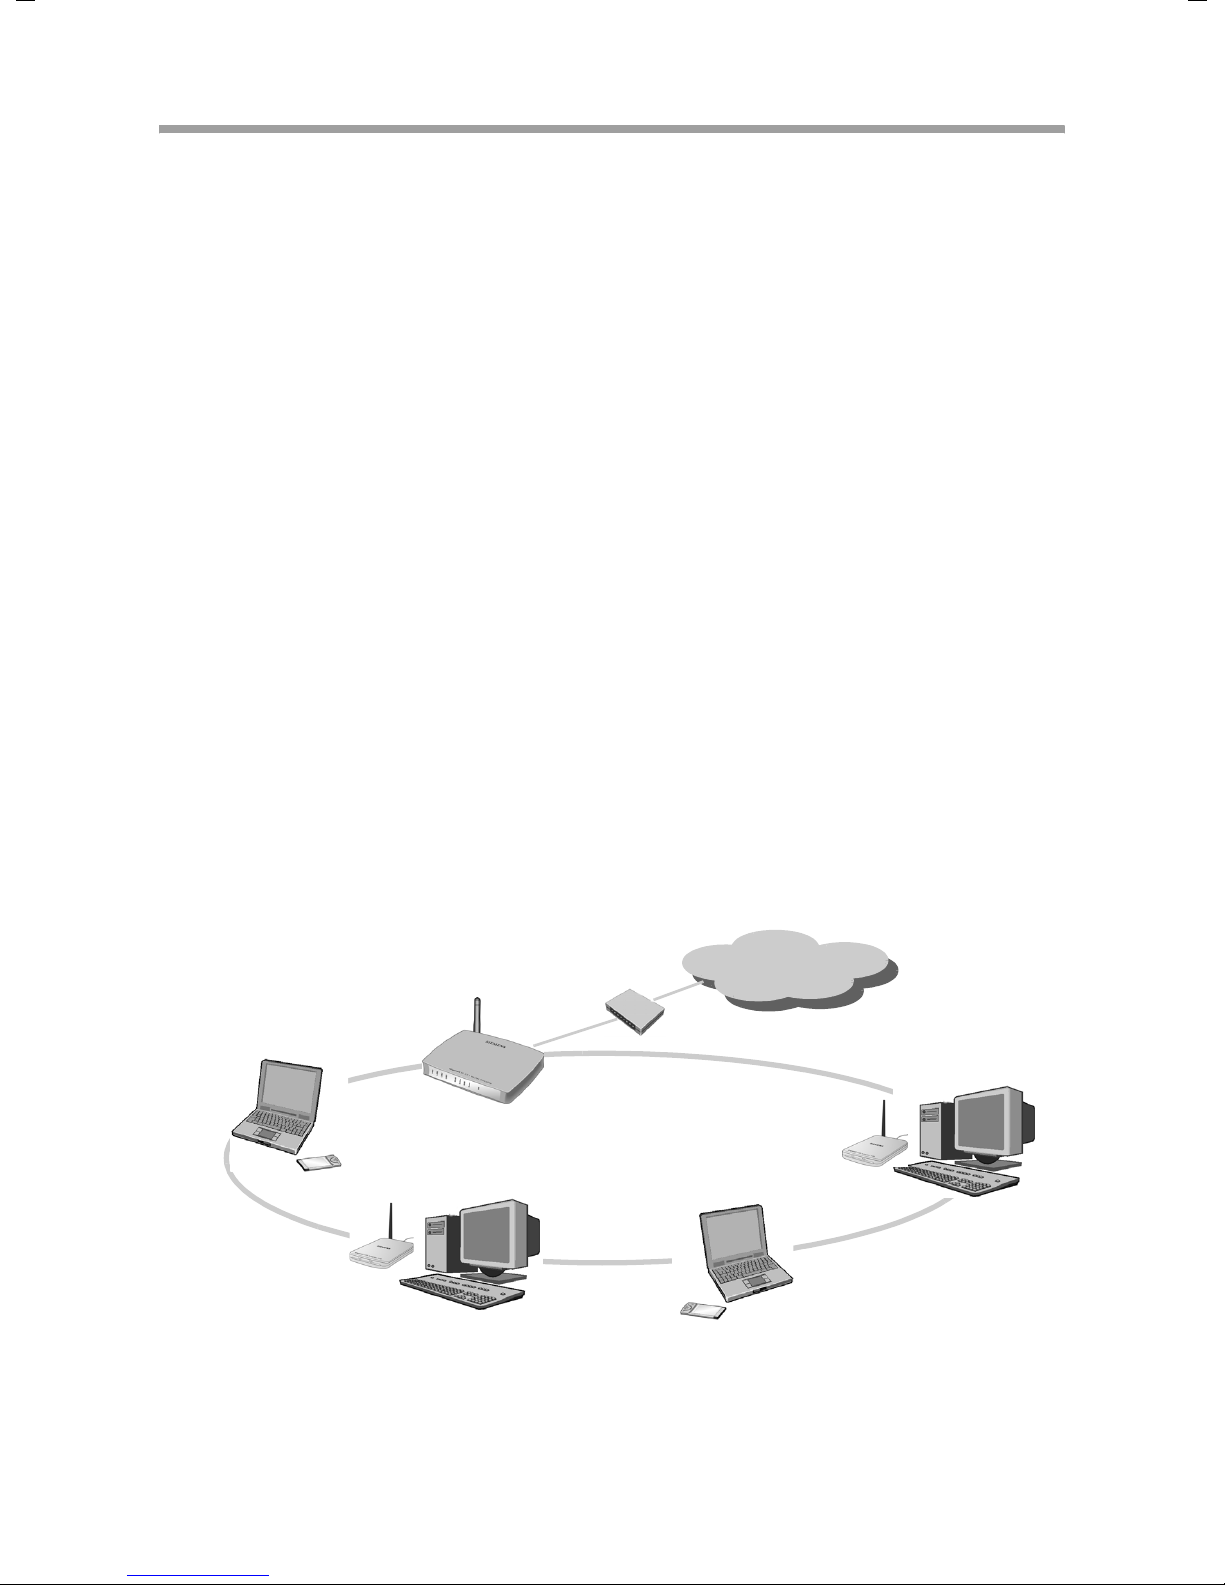
Ad-hoc network
Ad-hoc networking is a new concept in network communications that is rapidly gaining
in popularity. Ad-hoc networks do not have any fixed network infrastructure. The mobile
network components that communicate with each other directly and without wire connections form the network "ad-hoc", i.e. as and when required. All the stations on the
network have the same rights. Ad-hoc networks are used wherever communications
networks have to be set up quickly and without any existing network infrastructure and
where the participants are on the move.
An ad-hoc network is a wireless network set up without using a router.
(((
Ad-hoc network
(((
(((
6
Page 8
Introduction
Infrastructure Network
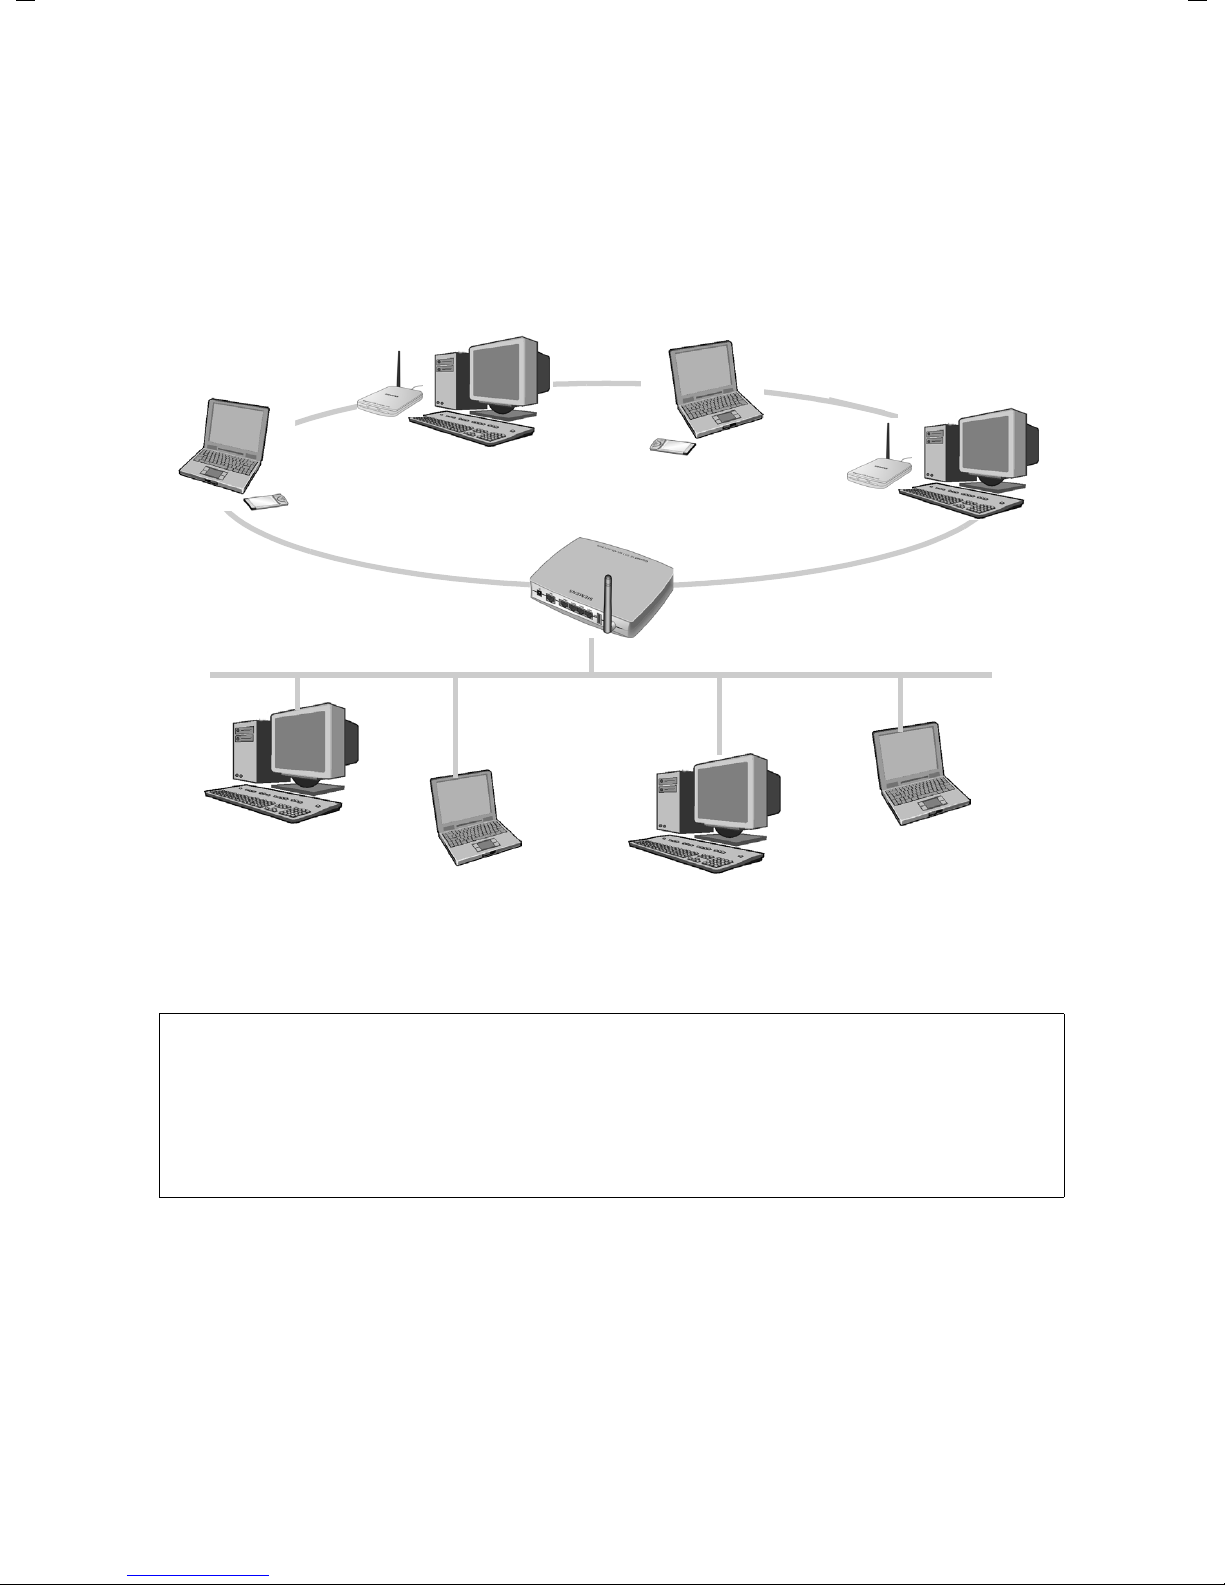
The infrastructure mode is used to connect wireless and wired networks with each
other. In addition to the mobile stations, the infrastructure mode needs an access point,
also known as a base station. In infrastructure mode, the stations on the network always
communicate with each other via an access point. Unlike the ad-hoc mode, the access
point sets up the wireless network on a permanent basis, and every station that wants
to be part of the wireless network has to register with the access point before it is
allowed to exchange data. Using an access point also extends the range of the wireless
network.
The access point establishes the connection from the mobile stations of a wireless network to a wired LAN (Ethernet) or to the Internet. In this case, this is referred to the
router functionality of the device. The access point sends data packets that are not
addressed to stations in its network "outside" and passes data packets coming from "outside" to the appropriate station in its network.
The Gigaset SE551 WLAN dsl/cable is such an access point. You can use it for connecting
u wireless linked PCs to the Internet and
u connect PCs with a wireless connection to a wired network.
Infrastructure mode is the standard configuration for the Gigaset SE551 WLAN dsl/
cable. This configuration is described in the quick guide enclosed with the router.
Connecting wireless networks to the Internet
The Gigaset SE551 WLAN dsl/cable has a WAN interface that permits simultaneous
access of all the stations to the Internet. To use this feature, you will need a DSL or cable
connection from an Internet Service Provider. Please check whether your Internet Service Provider supports parallel access by several PCs.
Internet
)))(((
Modem
(((
(((
(((
(((
7
Page 9
Introduction
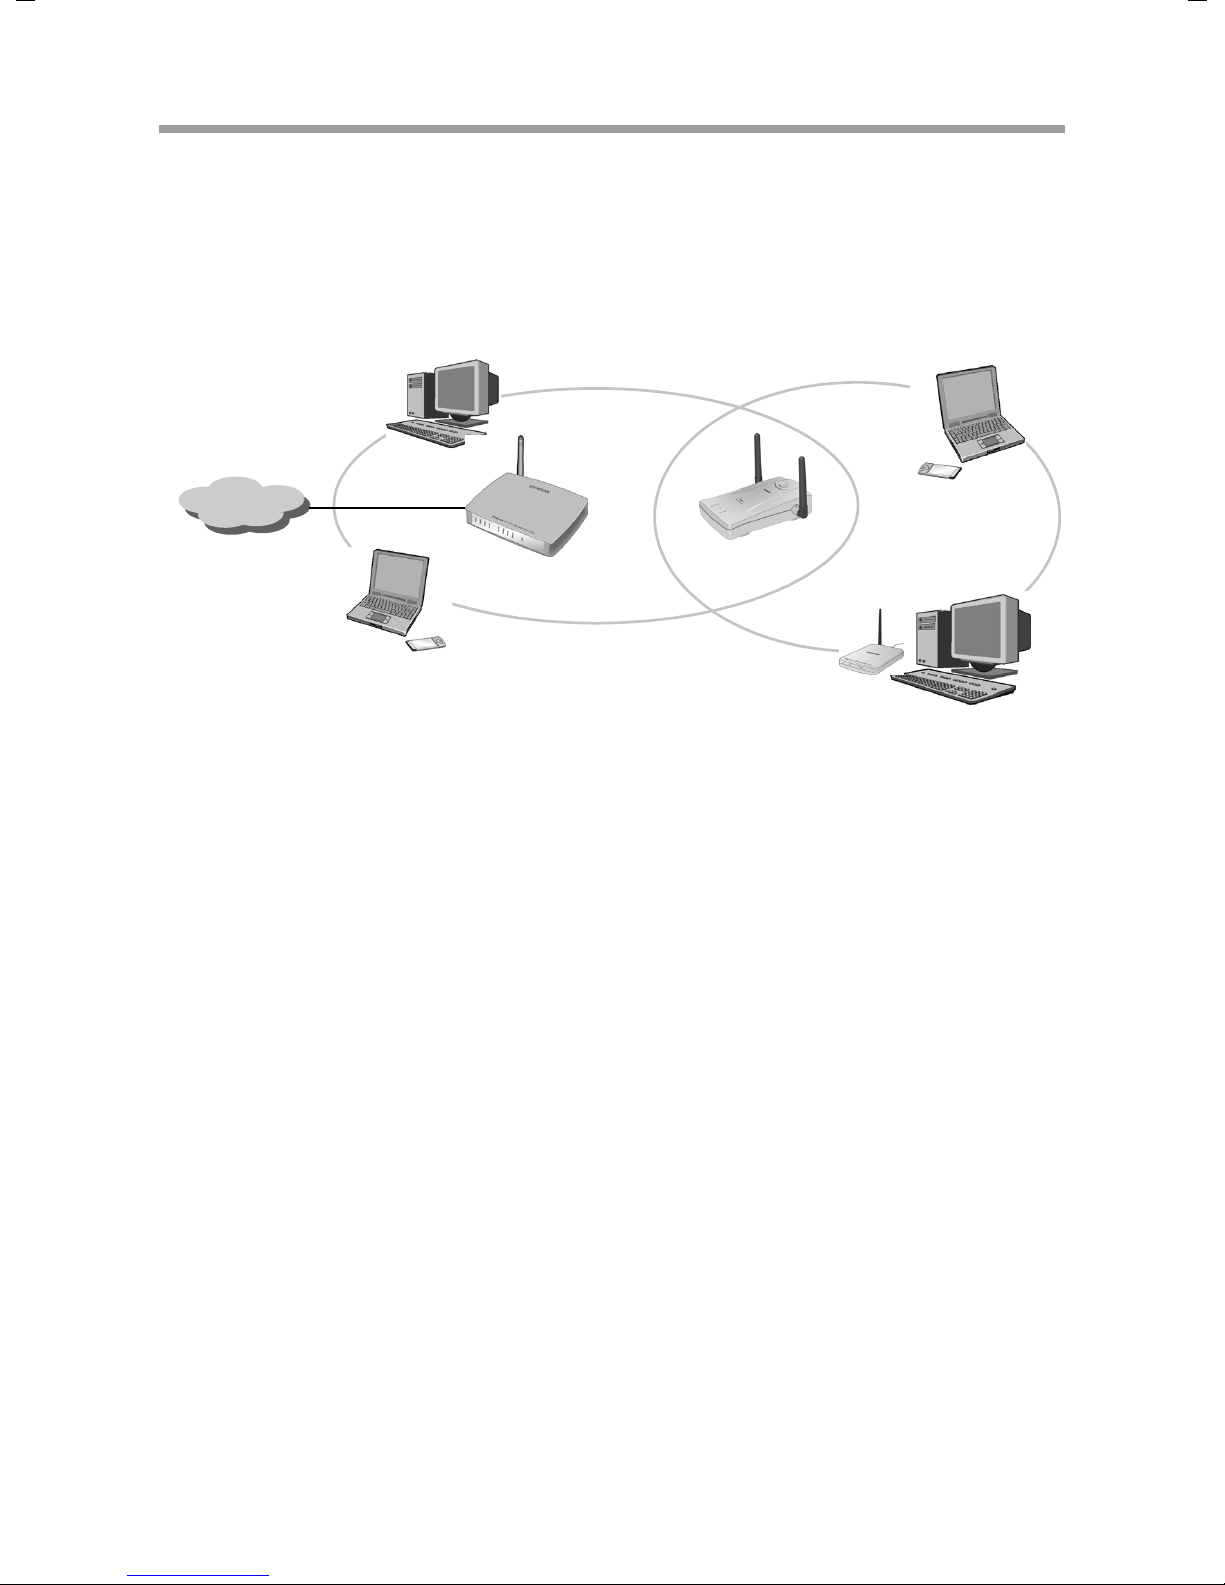
Linking a wireless network (WLAN) to a wired network (LAN)
A major advantage of wireless networks is their ability to work easily with existing wired
networks. You can set up a wireless network to link mobile stations with an existing
wired network. This requires all the stations in the wireless network to work in infrastructure mode.
(((
(((
(((
(((
Wireless local network (WLAN)
Access point
)))(((
Ethernet
The Gigaset SE551 WLAN dsl/cable has four Ethernet interfaces (LAN ports). Up to four
PCs can be connected directly to these LAN ports. These PCs also access the Internet via
the Gigaset SE551 WLAN dsl/cable.
Please note:
You can also connect an Ethernet router to a LAN port, providing access to a larger
wired network. If you want to connect the Gigaset network to an existing network, a
variety of settings need to be taken into account. Therefore we cannot provide a general example for this use; the configuration depends greatly on the networks in question. We advise having configuration of such a network carried out by an expert.
8
Page 10
Introduction
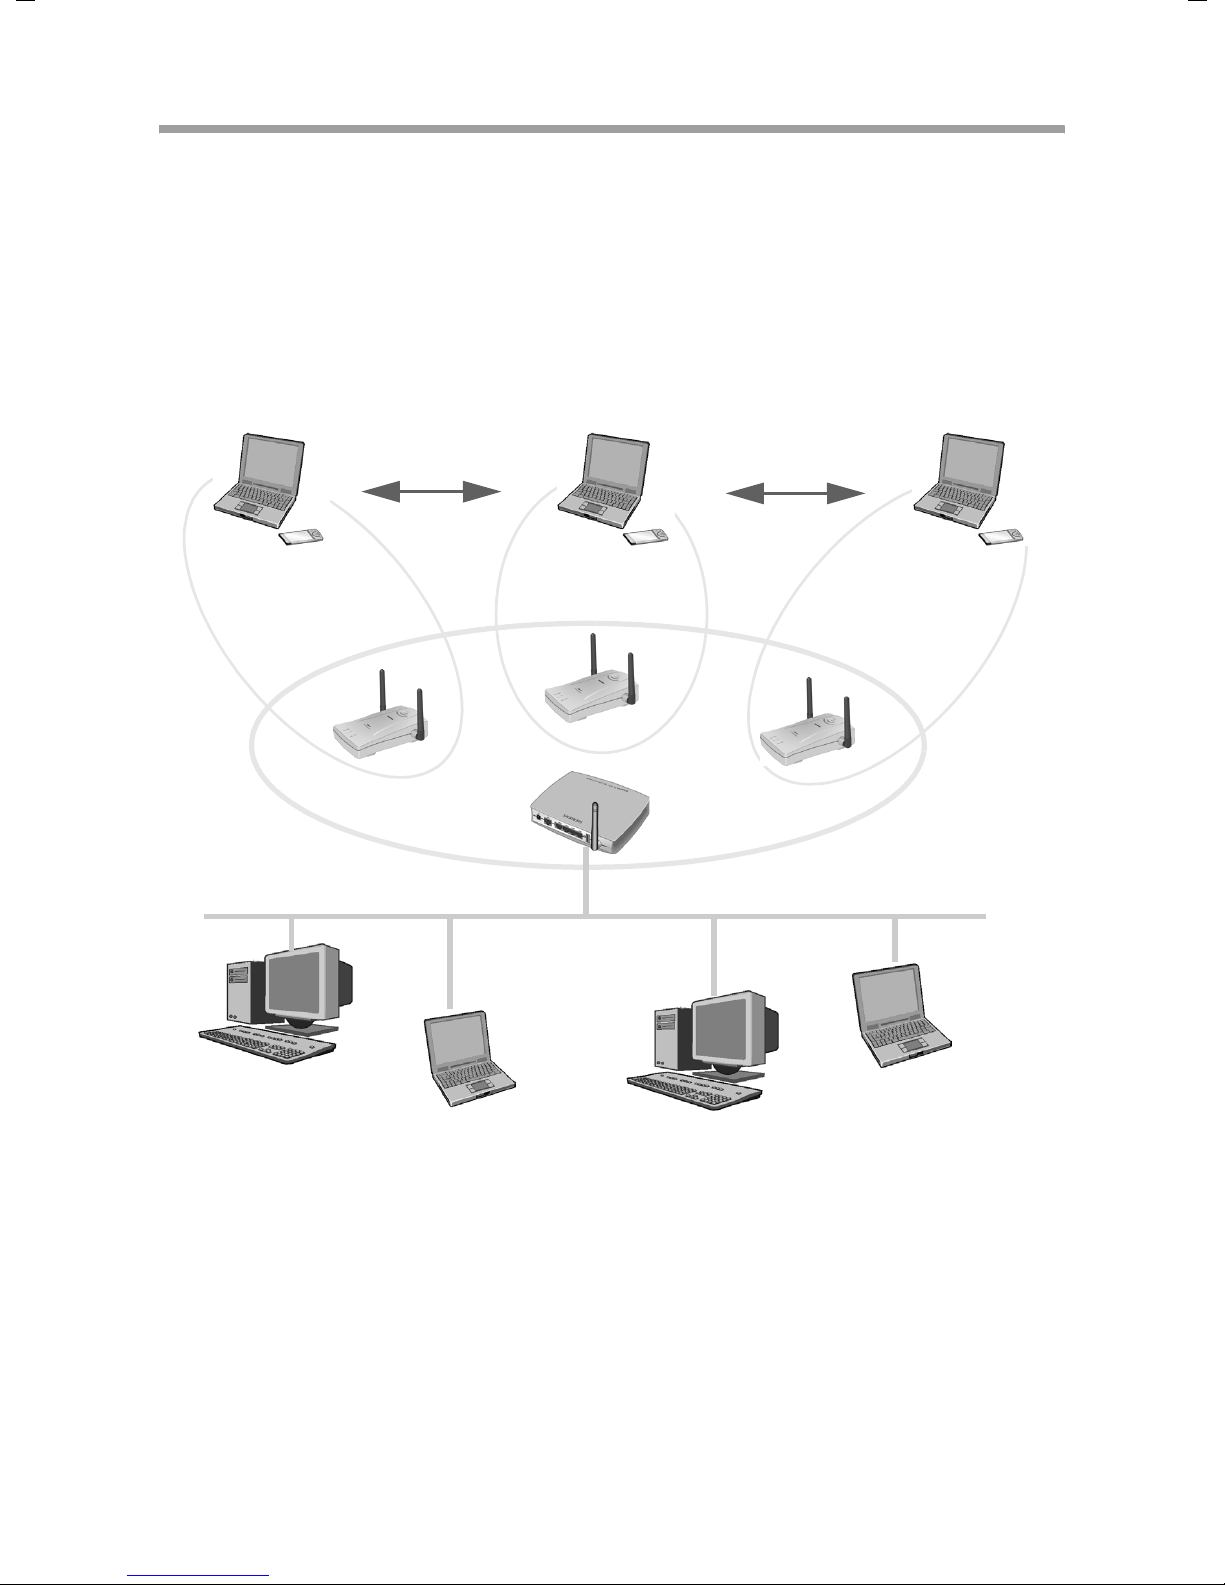
Extending a wireless network using a repeater
You can use a repeater, e.g. the Gigaset WLAN Repeater 108 to extend the coverage of
your wireless network. To do this, set it up at the limit of the range of your wireless network. The Gigaset WLAN Repeater will now transmit data traffic into its own wireless
area. This technology allows you to set up wireless networks that cover a much larger
area than would be possible with the Gigaset SE551 WLAN dsl/cable alone.
)))
)))
(((
)))
Internet
Gigaset WLAN Repeater
(((
)))
PCs to be connected in a wireless local network via a Gigaset WLAN Repeater must be
equipped with a wireless network adapter.
9
Page 11
Introduction
Roaming
In a wireless network with several repeaters, roaming allows the connected subscribers
(PCs) to move freely between the different repeaters without breaking their contact
with the access point. As soon as there is a risk of losing contact, the PC automatically
searches for another repeater with a stronger signal. This allows you to set up wireless
networks that cover a much larger area than would be possible with just a single access
point (and a single additional repeater). Multiple repeaters also allow more subscribers
to be served simultaneously. The main area of application for WLANs with roaming is on
large company sites and in universities.
((( ((( (((
Repeater
Access
point
Ethernet
In a roaming network, all the users must use the same SSID and encryption. The access
point must be connected to a wired network (Ethernet). For details, refer to the operating instructions on the CD supplied.
10
Page 12

Introduction
Possible uses
No matter which type of network you have opted for, Gigaset products for local networks offer a wealth of uses.
u Shared use of files
You can use your Gigaset SE551 WLAN dsl/cable or a PC in the network as a file
server.
All central data are then
– stored in a bulk memory connected directly to the USB interface on your Gigaset
SE551 WLAN dsl/cable
– or in the data system of a PC in the network.
Users on other PCs can hook up folders or entire drives on this file server to their own
PCs and work with them as if they were actually on their local PC. Various access
rights can be assigned.
How to connect a bulk memory to the Gigaset SE551 WLAN dsl/cable and use it in
the network is described in the device's user guide.
How to release files on one PC for access to users on other PCs is described in Chapter
"Releasing files and printers for shared use":
– for Windows XP from page 21
– for Windows 2000 from page 32
– for Windows 98, 98 SE, ME from page 46
How to make released files on other PCs available on your PC is described in Chapter
"Using released files and printers":
– for Windows XP from page 53
– for Windows 2000 from page 58
– for Windows 98, 98 SE, ME from page 66
u Shared use of printers
Printers can be made available to PCs in the network in two ways:
– directly via the USB interface on your Gigaset SE551 WLAN dsl/cable
– via the PC on the network to which the printer is connected
All users can print their files at these printers.
Being directly connected to the Gigaset SE551 WLAN dsl/cable offers the advantage
that the printer is always available without having to ensure that a specific PC is
switched on. How to connect a printer to the Gigaset SE551 WLAN dsl/cable and use
it in the network is described in the device's user guide.
How to release a printer on one PC is described in Chapter "Releasing files and printers for shared use":
– for Windows XP from page 23
– for Windows 2000 from page 36
– for Windows 98, 98 SE, ME from page 47
11
Page 13

Introduction
How to make the printer connected to another PC available on your PC is described
in Chapter ""Using released files and printers" on page 49":
– for Windows XP from page 55
– for Windows 2000 from page 61
– for Windows 98, 98 SE, ME from page 69
u Controlled access to the Internet
You want to prevent users accessing particular Internet services or children having
access to any Internet pages at all. With the Gigaset Routers you can
– completely isolate PCs from the Internet.
– restrict access to Internet services,
– prevent access to particular web domains or Internet sites.
u Protecting local networks from unauthorised access
To protect your network from unauthorised access, you can for example
– set up access control for wireless users,
– set data encryption (only on wireless networks).
u Running games, conferences and telephony via the Internet
The Gigaset SE551 WLAN dsl/cable comes programmed with a comprehensive firewall functionality that protects your local network against unauthorized access from
the Internet. Some applications however, such as games, video conferences, Internet telephony etc., require the possibility of external access from the Internet to local
applications. The normal configuration of the router does not permit "external"
access and supports only those Internet applications that do not need more than
one connection (e.g. file transfer, email ...).
u Making your own server available on the Internet
Advanced Internet users might like to set up a Web server of their own so that they
can have their own home page or other offerings on the Internet. This requires a particular configuration for the Gigaset SE551 WLAN dsl/cable.
You will find information regarding the configuration of the four above-named functions of your Gigaset SE551 WLAN dsl/cable in the device's user guide.
12
Page 14
Releasing files and printers for shared use
Releasing files and printers for shared use
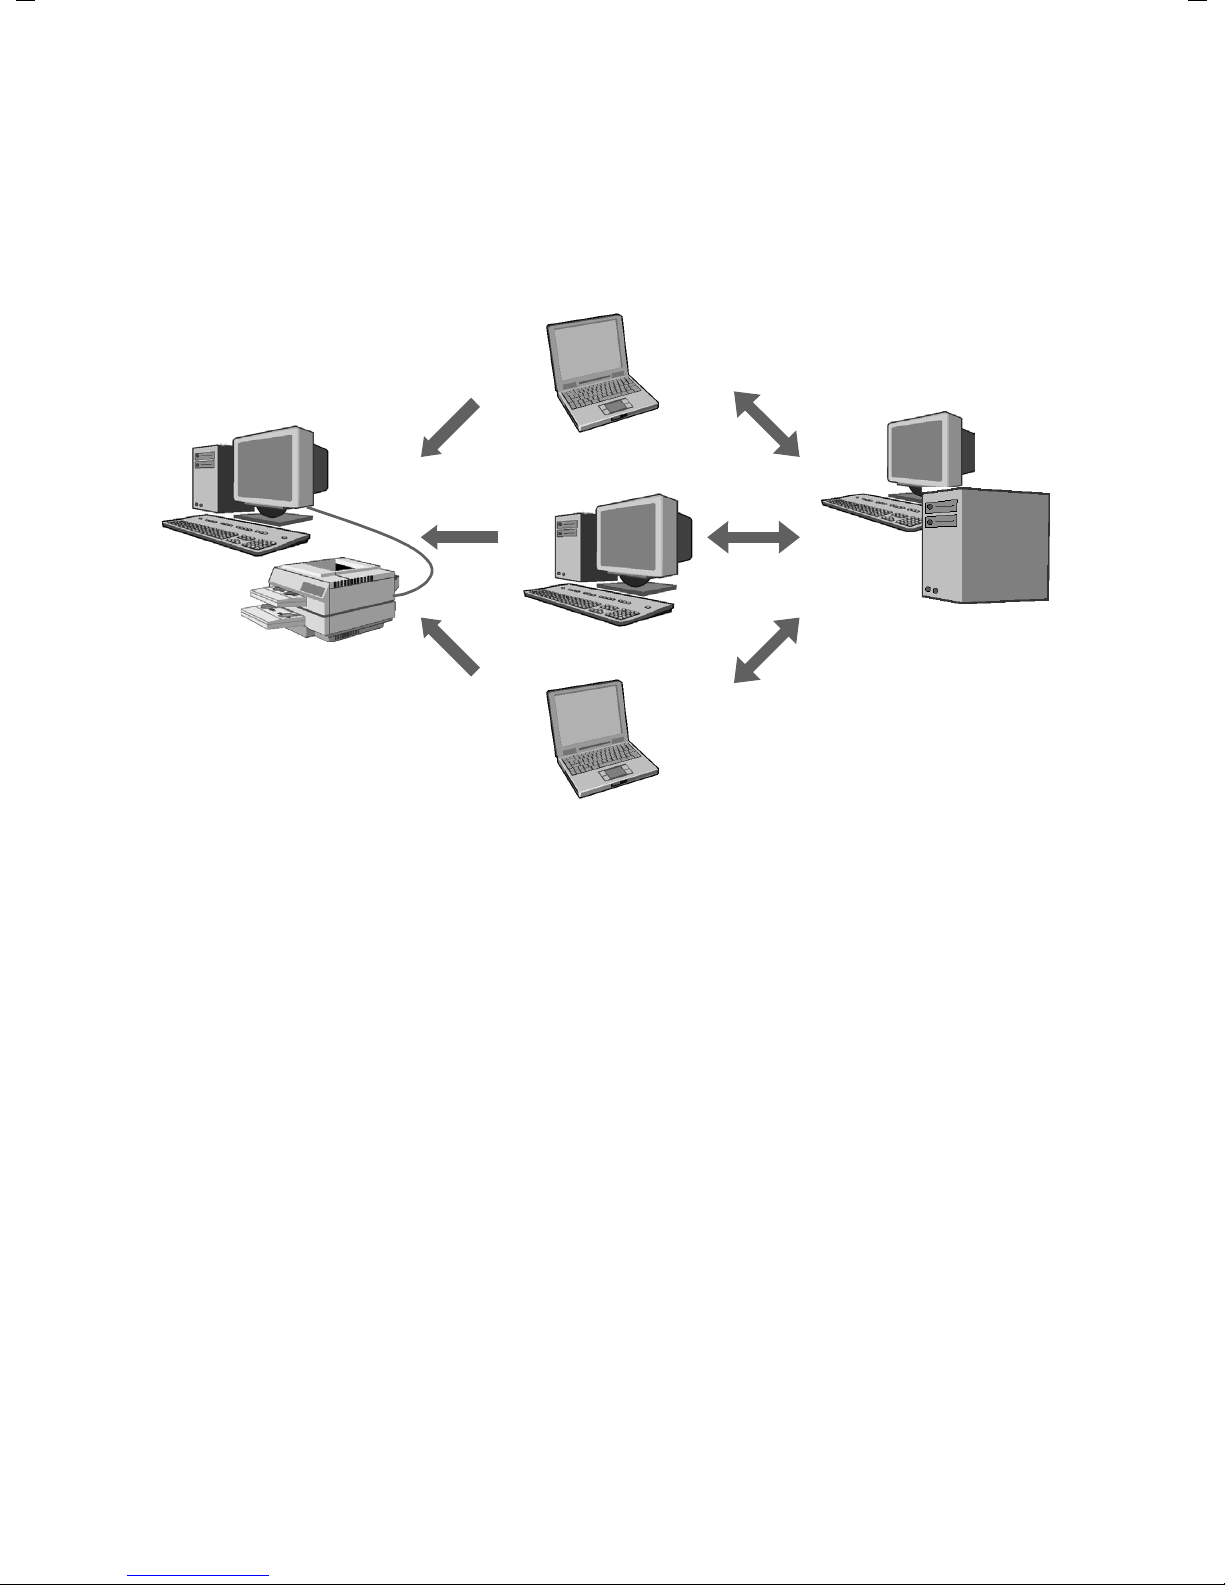
A very common function of local networks is to allow the shared use of files and printers. Users can access from any PC on the network those files made available by another
PC on that network, or they can print their files via a printer administered on another PC.
File
Server
This chapter describes what steps you must carry out to release files and printers for network usage. It assumes that the network cards or wireless network adapters have
already been installed in the PCs and that the PCs are either connected via a router or
directly via an ad-hoc network.
The following steps are necessary before files and printers can be shared on the network:
u The network has to be set up on all the computers. The Internet protocol (TCP/IP) has
to have been set as the connection method.
u All PCs have to have been assigned to the same network (workgroup).
u Users who want to make their files or printer available have to release them on
their PC.
u After that, users who want to use other users' files or printers can make them avail-
able on their PC. This is described in Chapter "Using released files and printers" from
page 49.
13
Page 15

Releasing files and printers for shared use
Network configuration, release and use differ depending on the Windows operating
system used.
Please note:
If you are using Windows 2000 on your network, you have to set up for all users who
are to have access to resources on a Windows 2000 PC the appropriate user IDs on the
Windows 2000 PC and their own PCs.
The following table provides an overview as to where you can find the relevant information.
Windows XP Windows
Windows 98
2000
Setting up the network page 15 page 24 page 37
Releasing your files page 21 page 32 page 46
Releasing your printers page 23 page 36 page 47
Setting up user names page 50 page 29 page 63
Using files on other PCs page 53 page 58 page 66
Using printers on other PCs page 55 page 61 page 69
14
Page 16
Releasing files and printers for shared use
Making your own files and printers available (Windows XP)
To release files or printers on a PC with Windows XP for other users on the network:
1. Configure the network (see below).
2. Select computer names and workgroup (see page 18).
3. Accept network settings (see page 19).
4. Close installation procedures (see page 20).
5. Release files and printer (see page 21).
Configuring the network
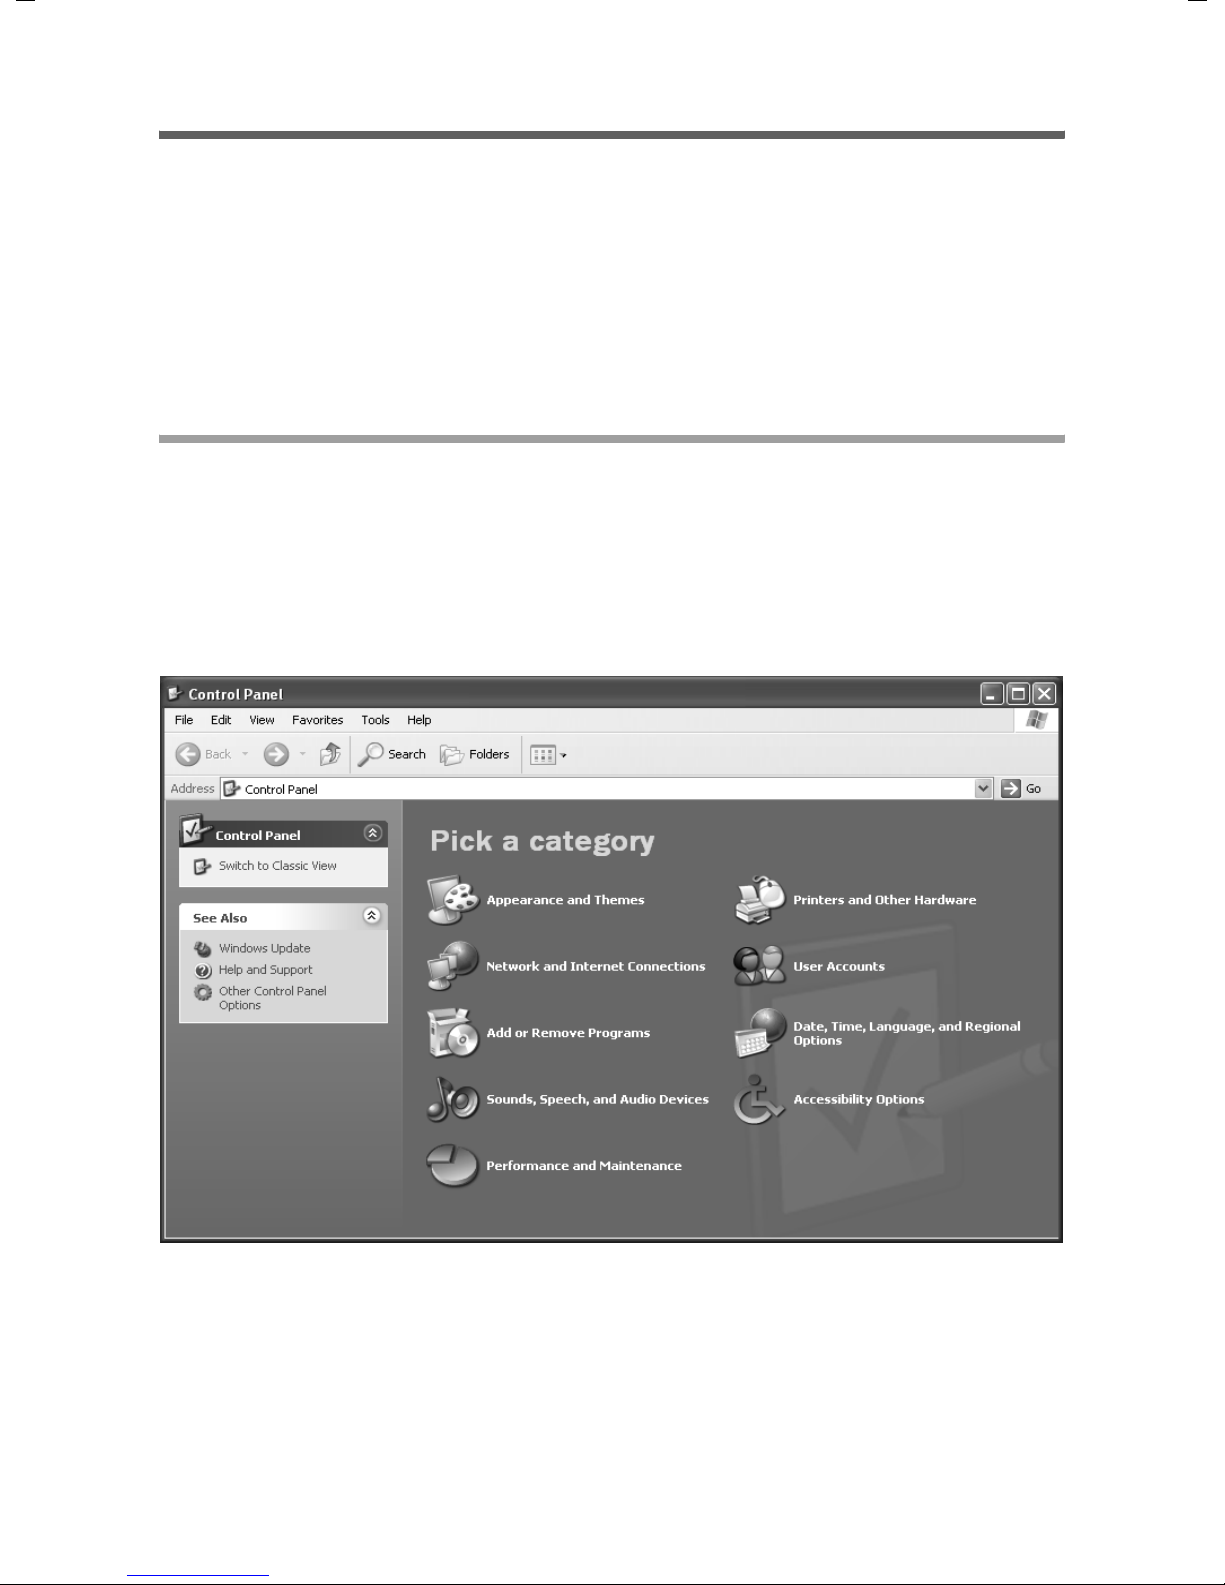
Configuring the network in this case means selecting Internet connection as the connection method. You can do this with the network wizard.
Launching the network wizard
Launch the network wizard as follows:
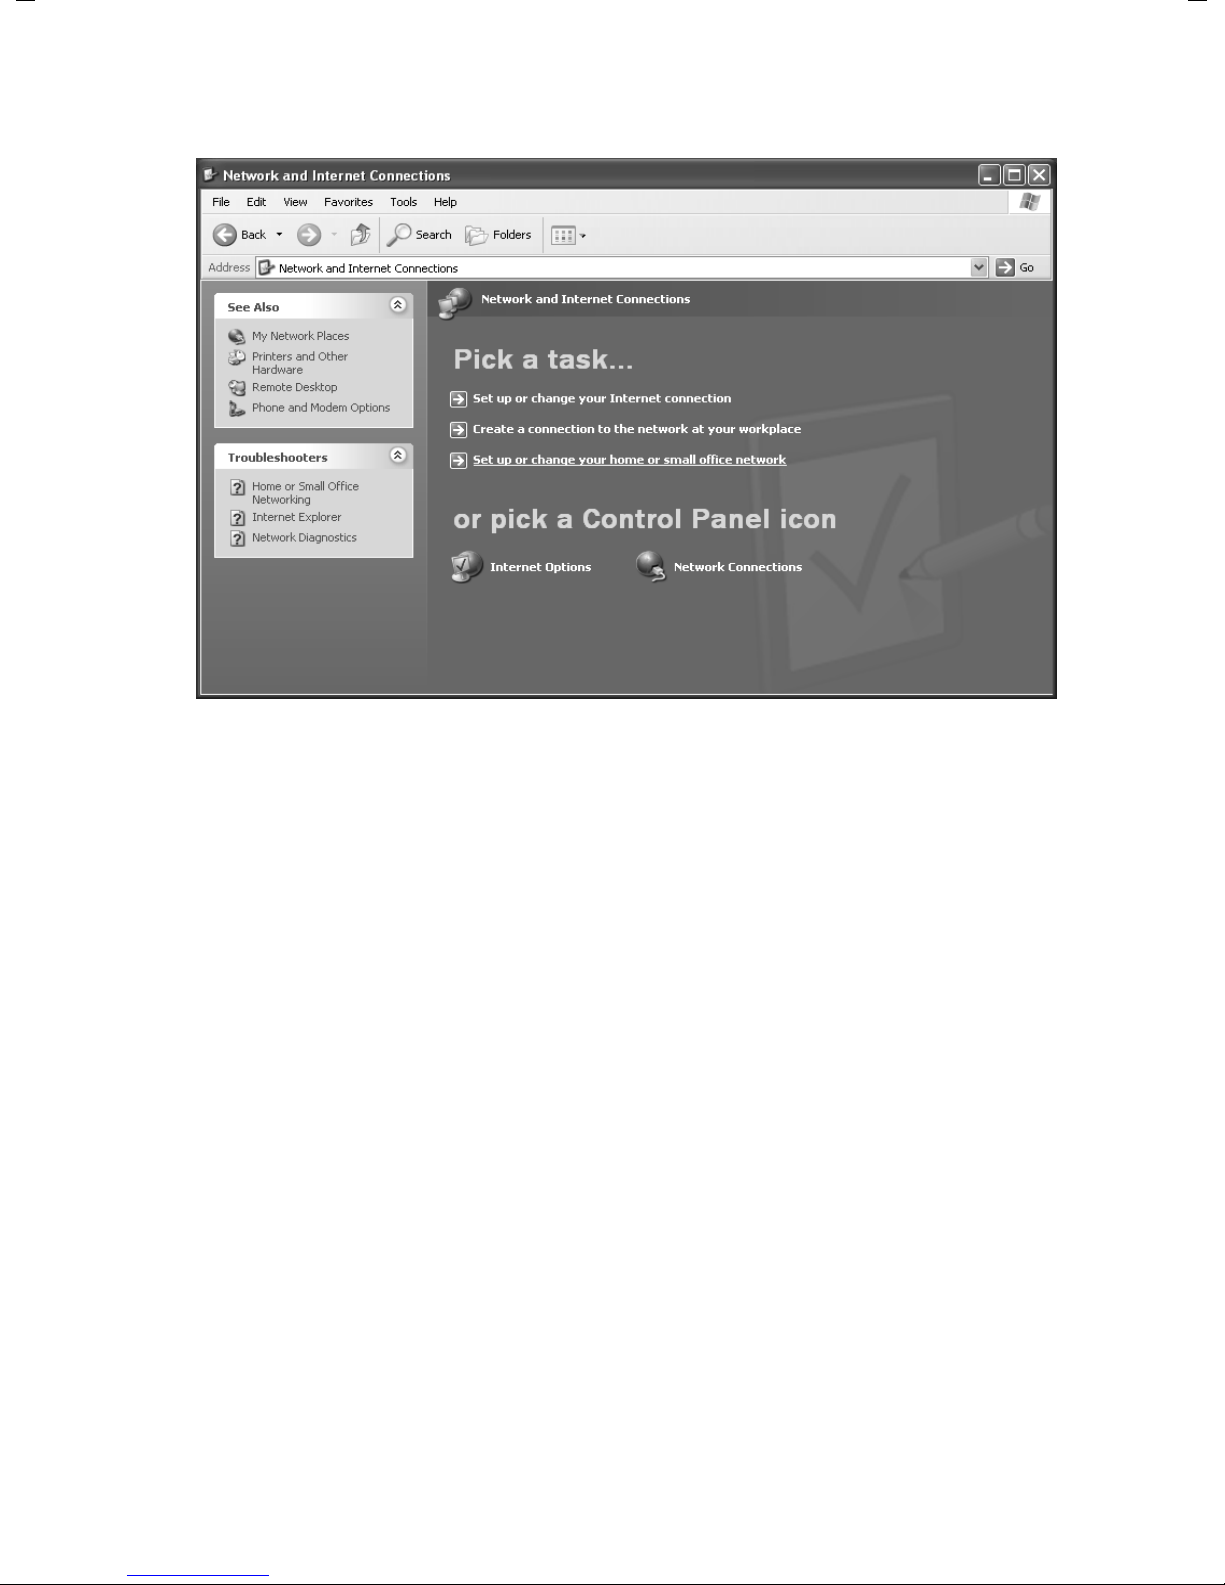
ì Open the Control Panel and then Network and Internet Connections.
15
Page 17
Releasing files and printers for shared use
ì Now select Set up or change your home or small office network.
This launches the network wizard.
ì Skip the welcome screen and the checklist by clicking Next each time.
16
Page 18
Releasing files and printers for shared use
Selecting Internet connection as connection method
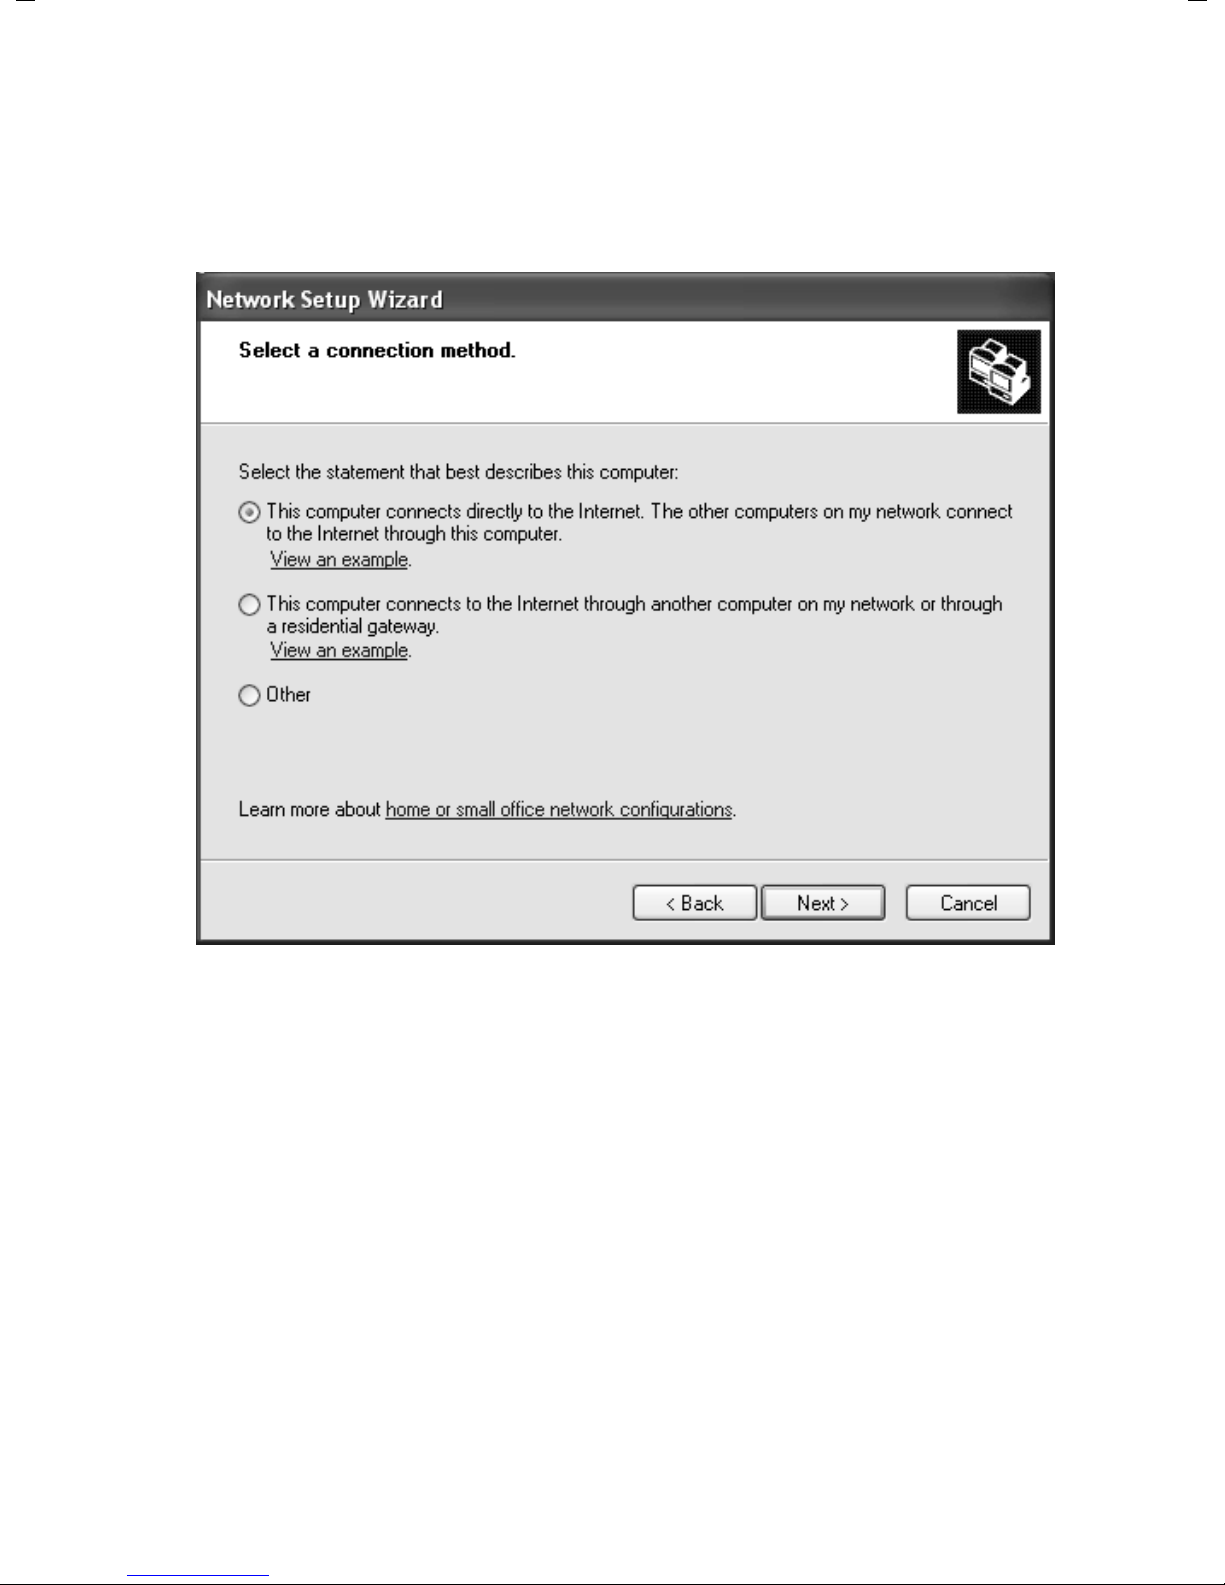
You will be prompted to select a connection method.
ì Select Other and confirm with Next.
You will now see a screen listing various connection methods.
ì Select This computer connects directly to the Internet. The other computers on
my network connect to the Internet through this computer and click Next.
ì In the next window select your network adapter and click Next.
ì Skip the message This network configuration is not advisable with Next.
17
Page 19
Releasing files and printers for shared use
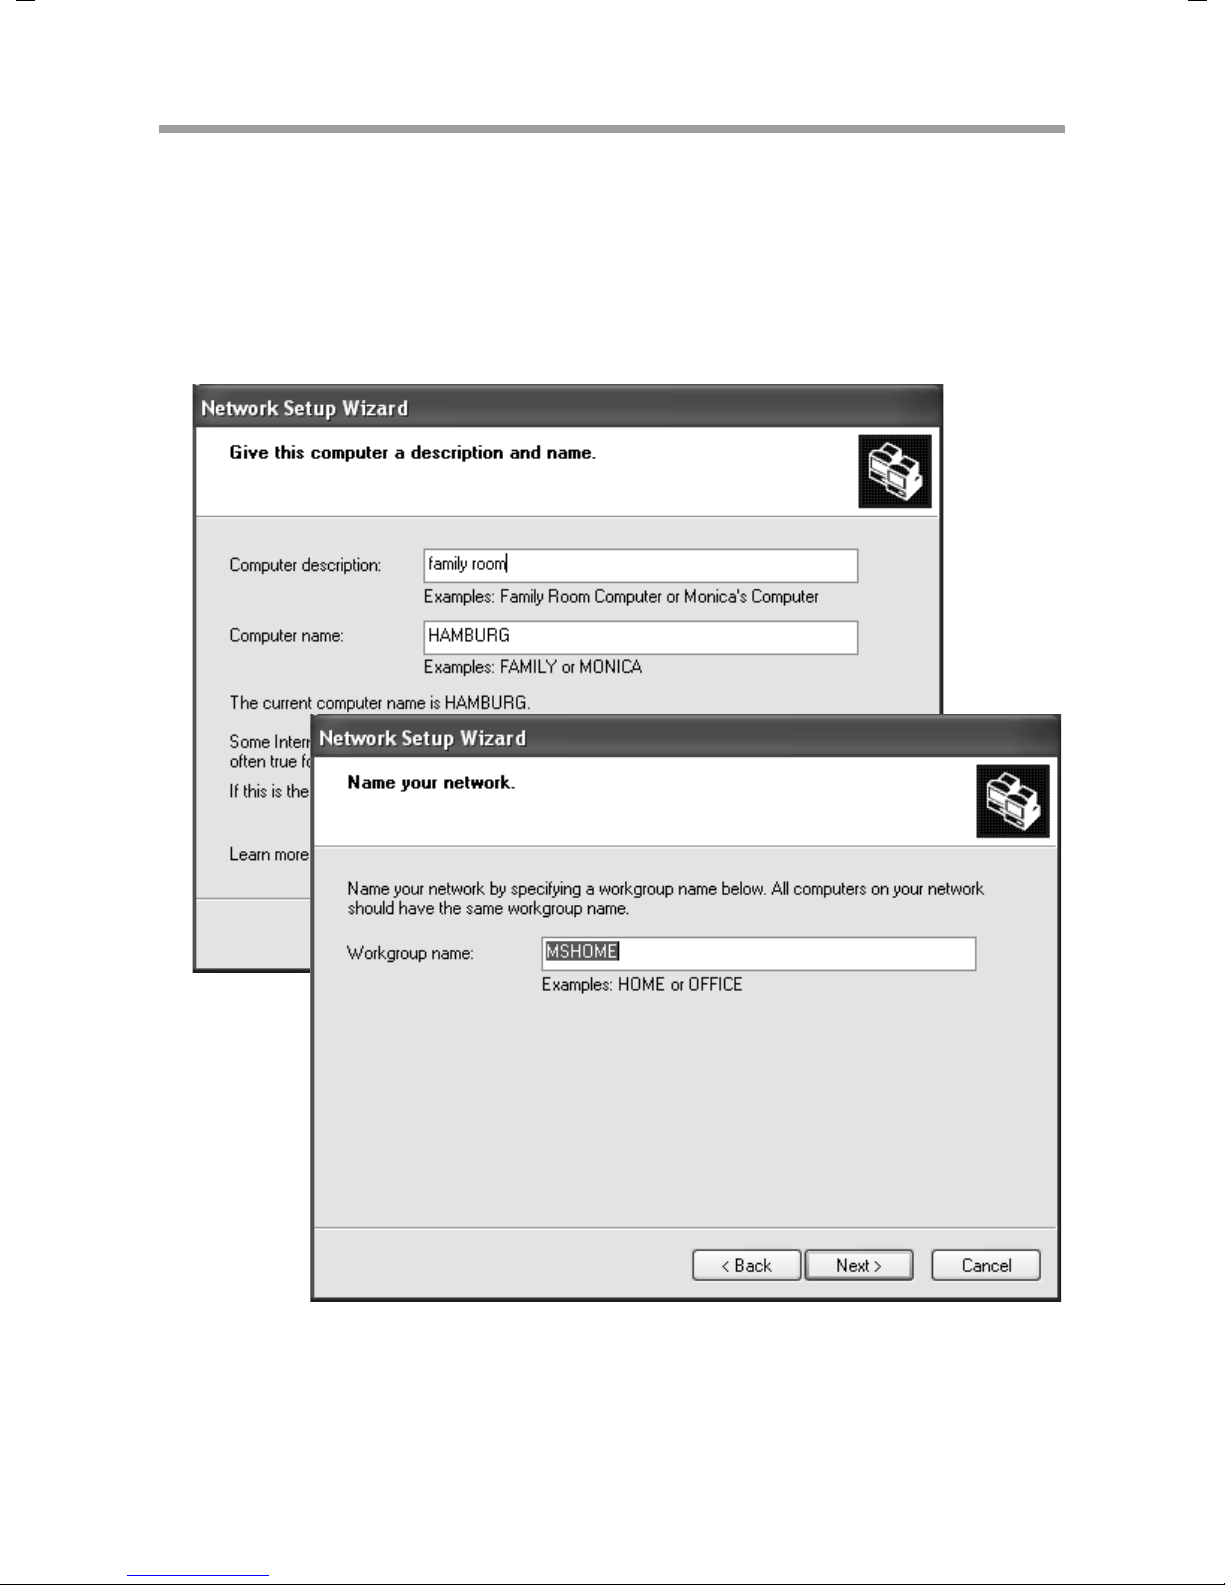
Selecting computer names and workgroup
Now you have to specify a name for the PC and assign it to a workgroup.
ì Enter the name the PC is to appear under on the network. This name must be unique
within the network. You can complete the Computer description box or leave it
empty. Then click Next.
ì Enter a name for the workgroup the PC is to belong to. This name must be identical
for all the PC's in the network. Confirm this with Next.
18
Page 20
Releasing files and printers for shared use
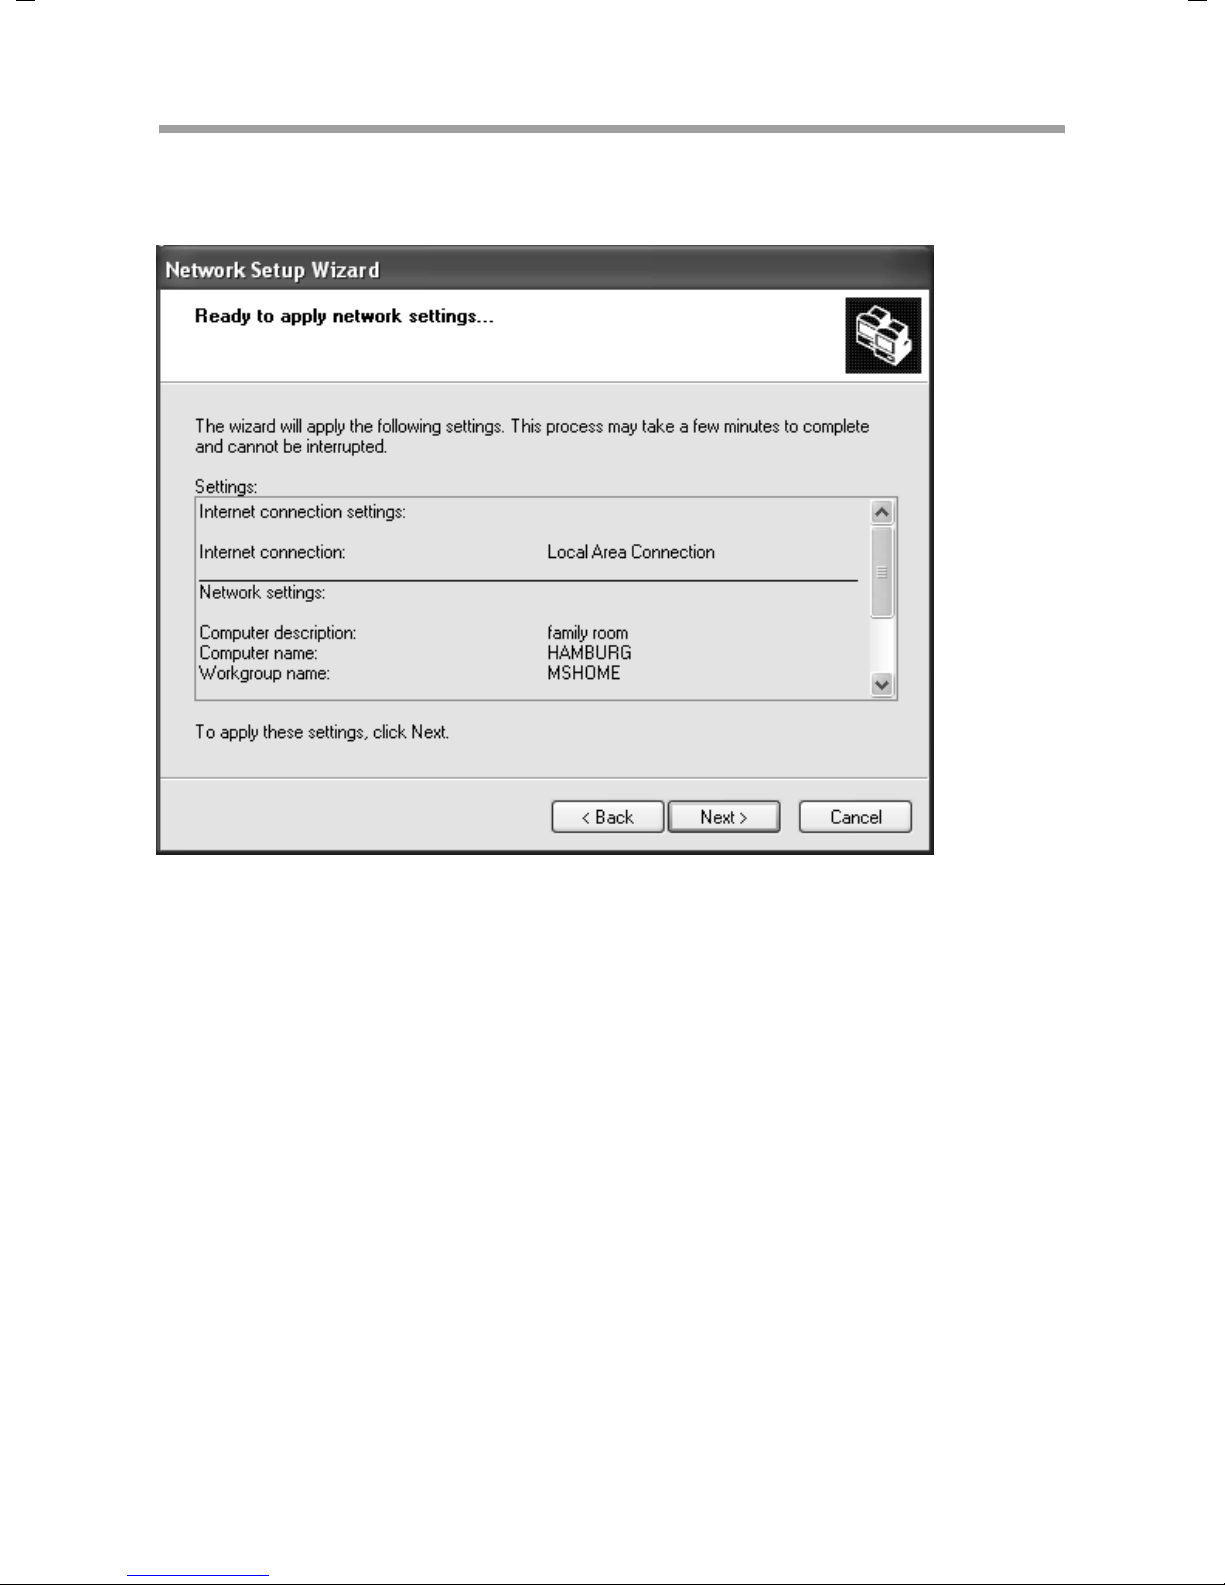
Checking the network settings
You will now see a screen in which you can check the settings you have made and make
any changes you want.
ì Click Back if you want to make any changes or click Next, if you want to leave them
unchanged.
19
Page 21

Releasing files and printers for shared use
Completing the installation procedure
If you do not want to install any more PCs:
ì Select Only finish the wizard, as it is not run on other computers and confirm
twice with Next.
ì Answer the prompt Do you want to restart your computer now? with Yes.
ì If you want to set up a network on other PCs with Windows XP, you can now create
a network installation disk.
ì Select Create a network installation disk and click Next.
ì Follow the screen instructions and insert a disk. The necessary data will now be cop-
ied. Now label the disk as Network installation.
ì Confirm the next two screens with Next and complete the installation procedure by
rebooting the PC.
After restarting the PC, your local network is installed.
To set up the network on the other PCs with the same settings, insert the disk in the
drive and run Netsetup with a double click.
20
Page 22
Releasing files and printers for shared use
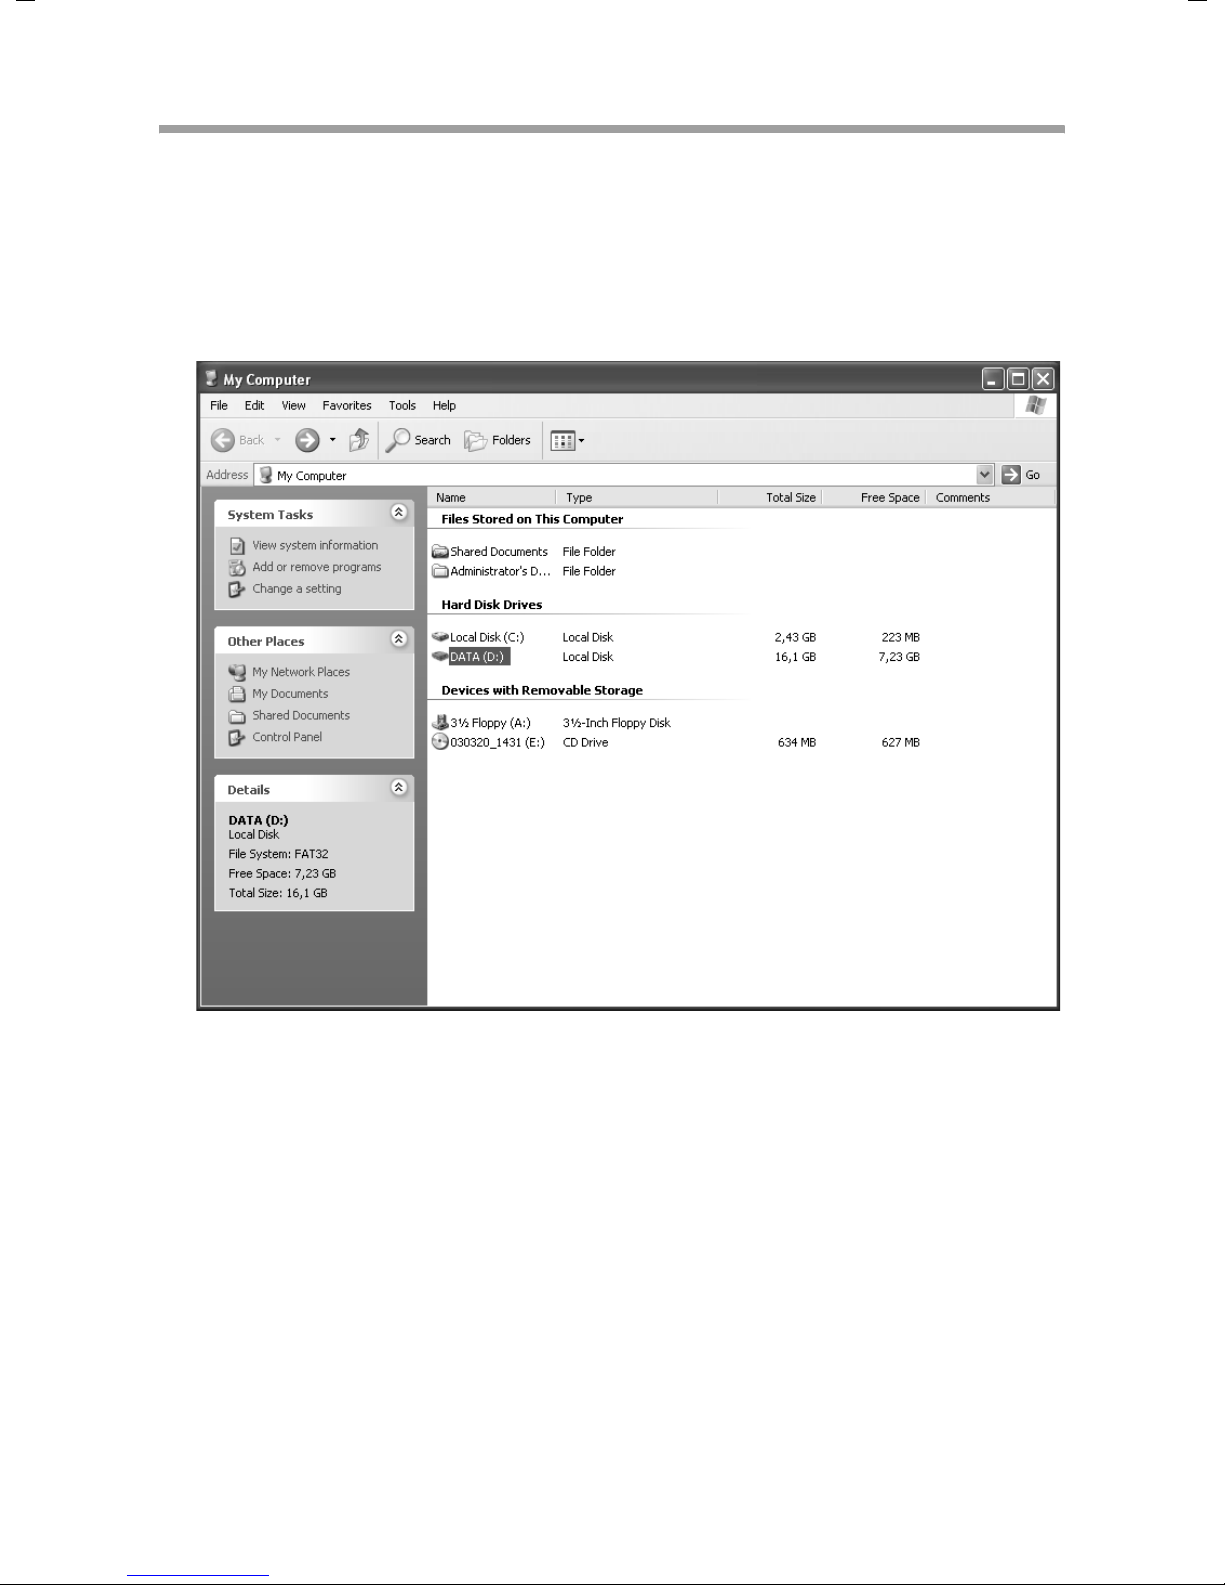
Releasing files and printers
You can now release files and printers on your PC for other users on the network.
Releasing files
ì Open the Desktop and left-click the folder or drive you want to release.
ì Now select the entry Release and security with the right-hand mouse button from
the pop-up menu.
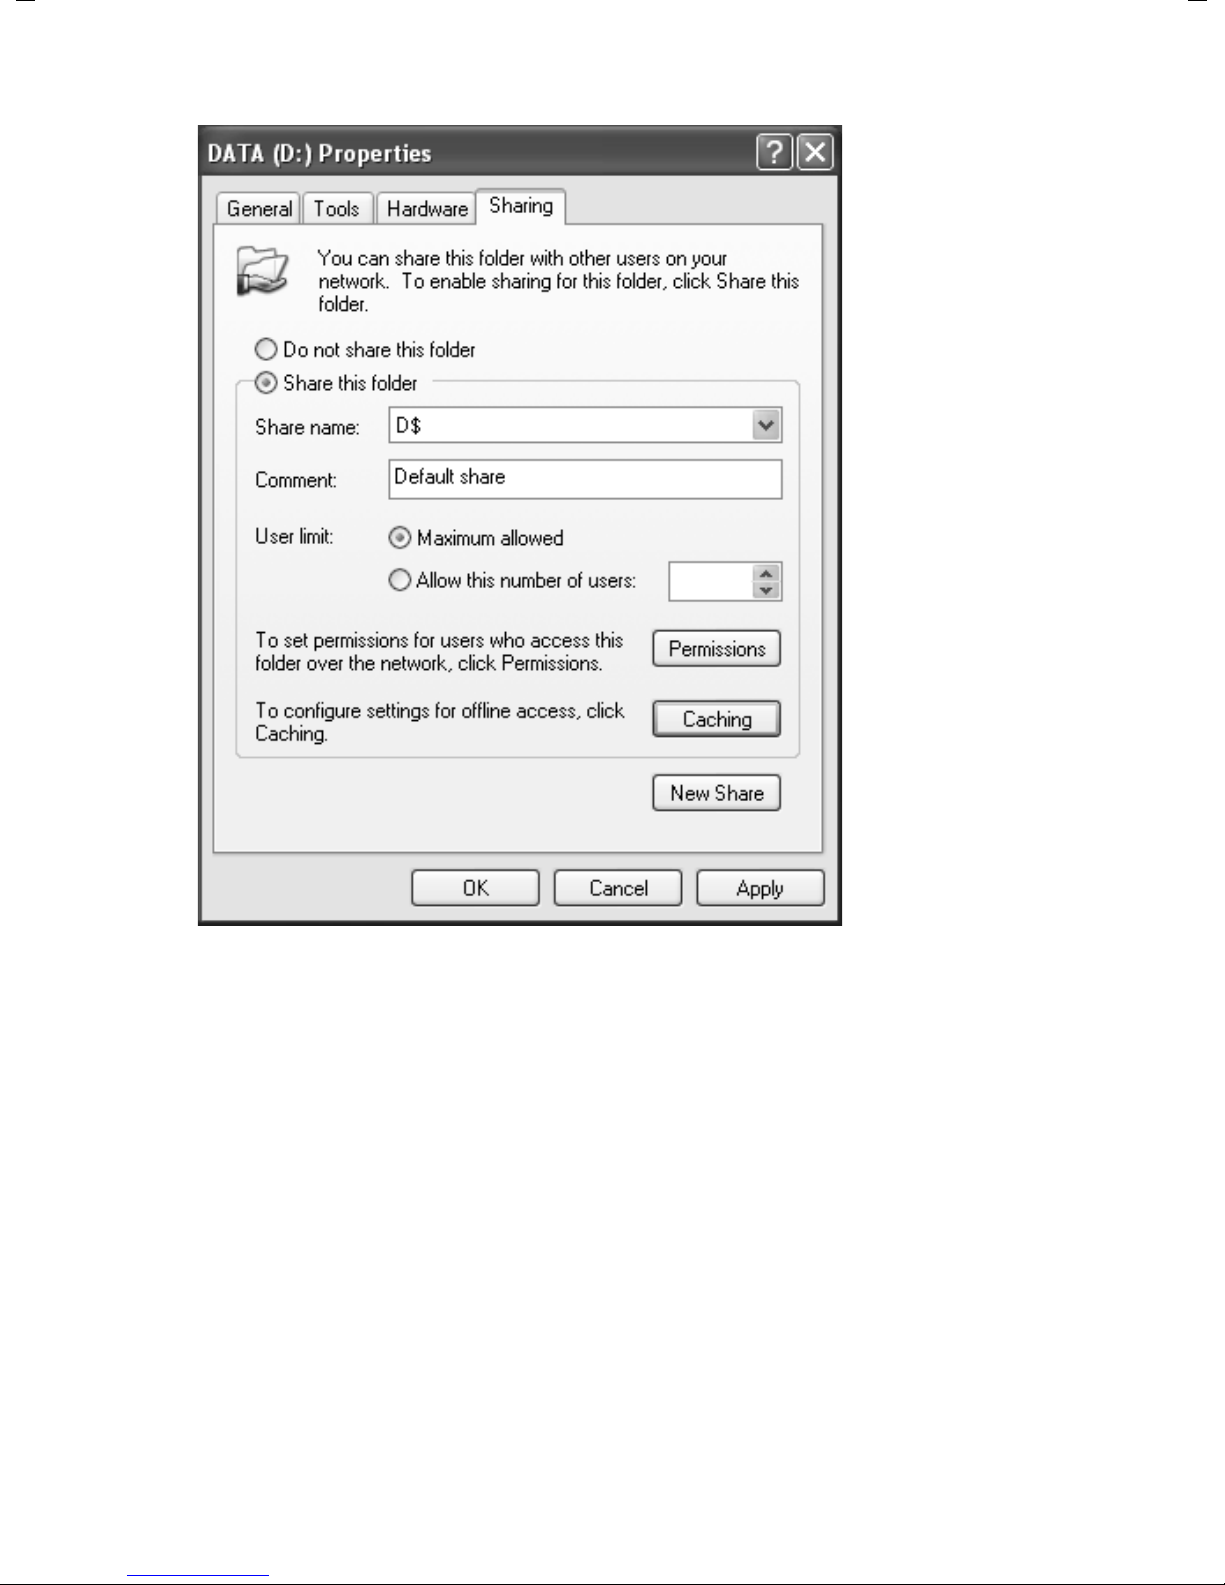
ì In the window that now opens, select in Network release and security the options:
– Release this folder on the network and
– Network users can edit files.
21
Page 23
Releasing files and printers for shared use
ì Finally assign a Share name. From now on, your drive or folder will appear on the
network under this name.
ì Use Apply to save the current settings. Click OK to close release configuration.
If a hand now appears below your folder or drive on the Desktop then you have configured everything correctly.
22
Page 24
Releasing files and printers for shared use
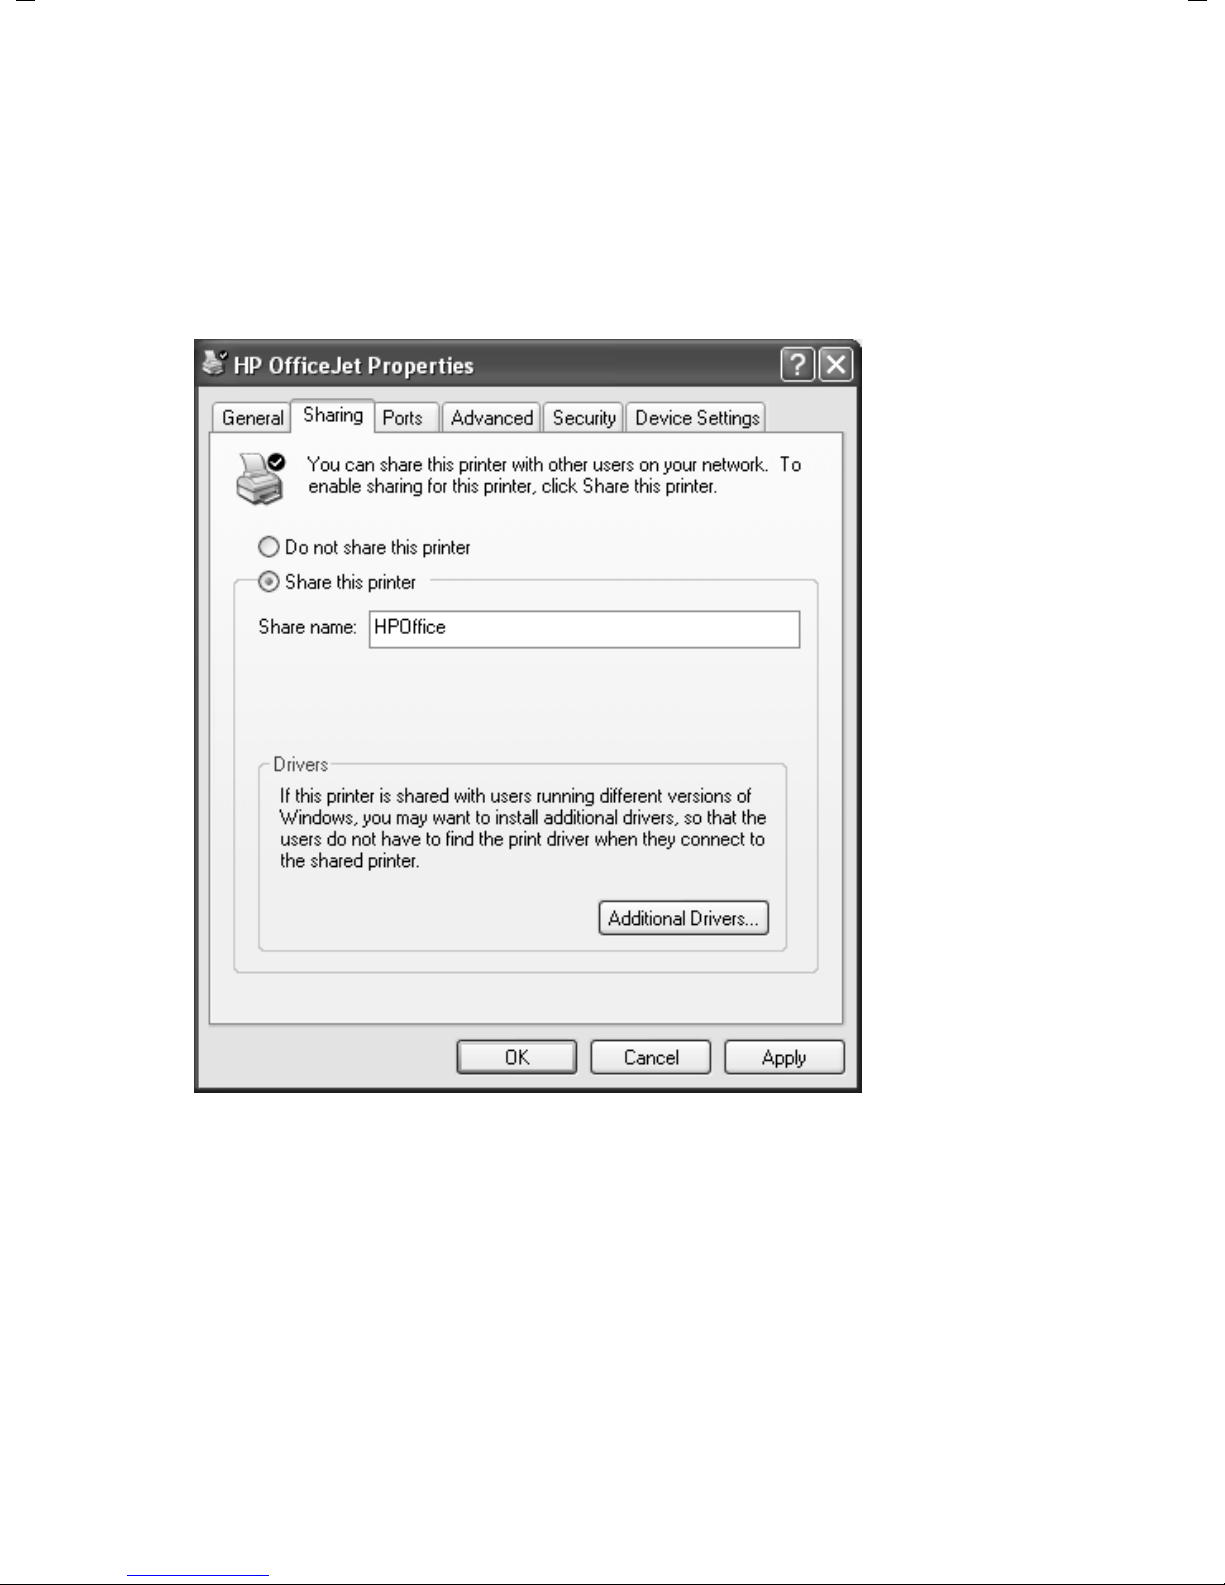
Releasing printers
ì To release printers select Printers and Faxes in the start menu.
ì Left-click the printer you want to release.
ì Now select the entry Sharing with the right-hand mouse button.
ì The window for defining the printer properties will appear, and the Sharing tab is
open.
ì Select Share this printer and assign a Share name. From now on, your printer will
be available to all the other users on the network under this name.
ì Use Apply to save the current settings. Click OK to close release configuration.
23
Page 25
Releasing files and printers for shared use
Making your own files and printers available (Windows 2000)
To release files or printers on a PC with Windows 2000 for other users on the network:
1. Install the network services (see below).
2. Select computer names and workgroup (see page 26).
3. Set TCP/IP protocol (see page 27).
4. Set up users (see page 29).
5. Release files and printer (see page 32).
Installing network services
You have to install the network services before the PCs in your network can access
shared resources. Have your Installation CD to hand. Then:
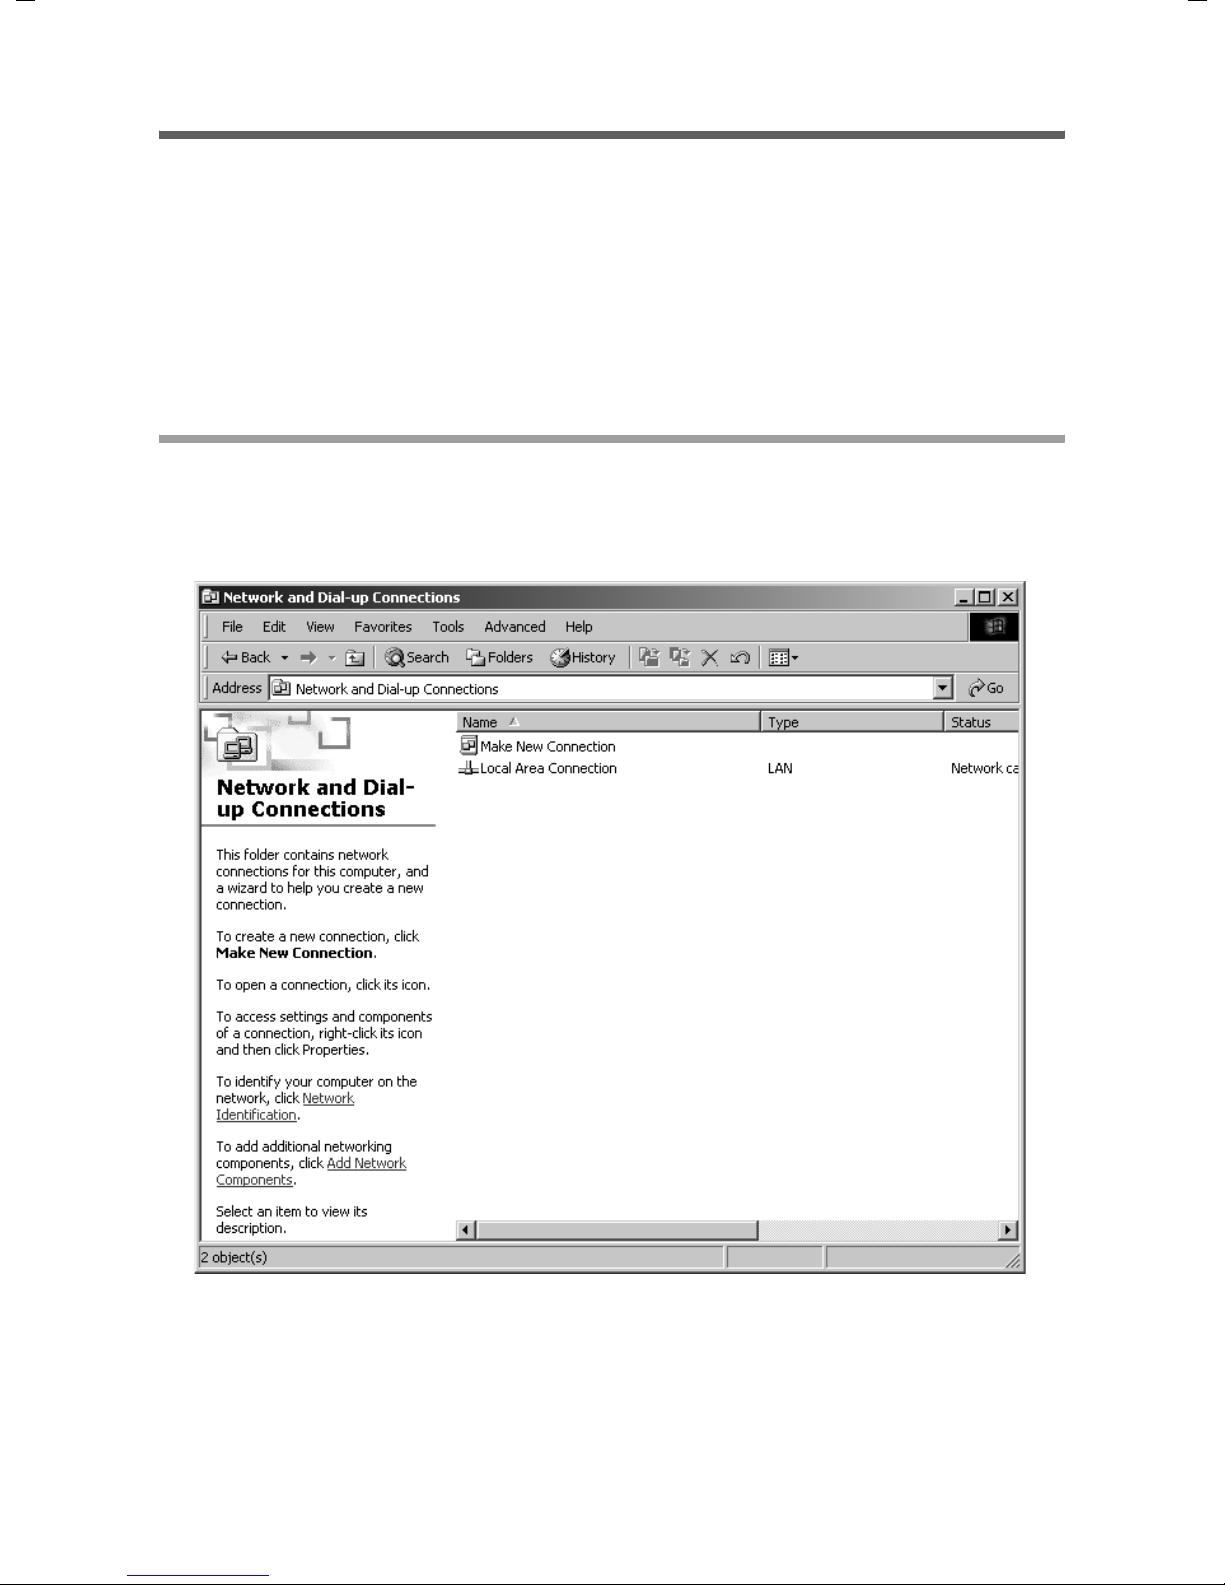
ì Open the Control Panel and then open Network and Dial-up Connections.
ì Select in the left-hand pane the entry Add network components.
24
Page 26
Releasing files and printers for shared use
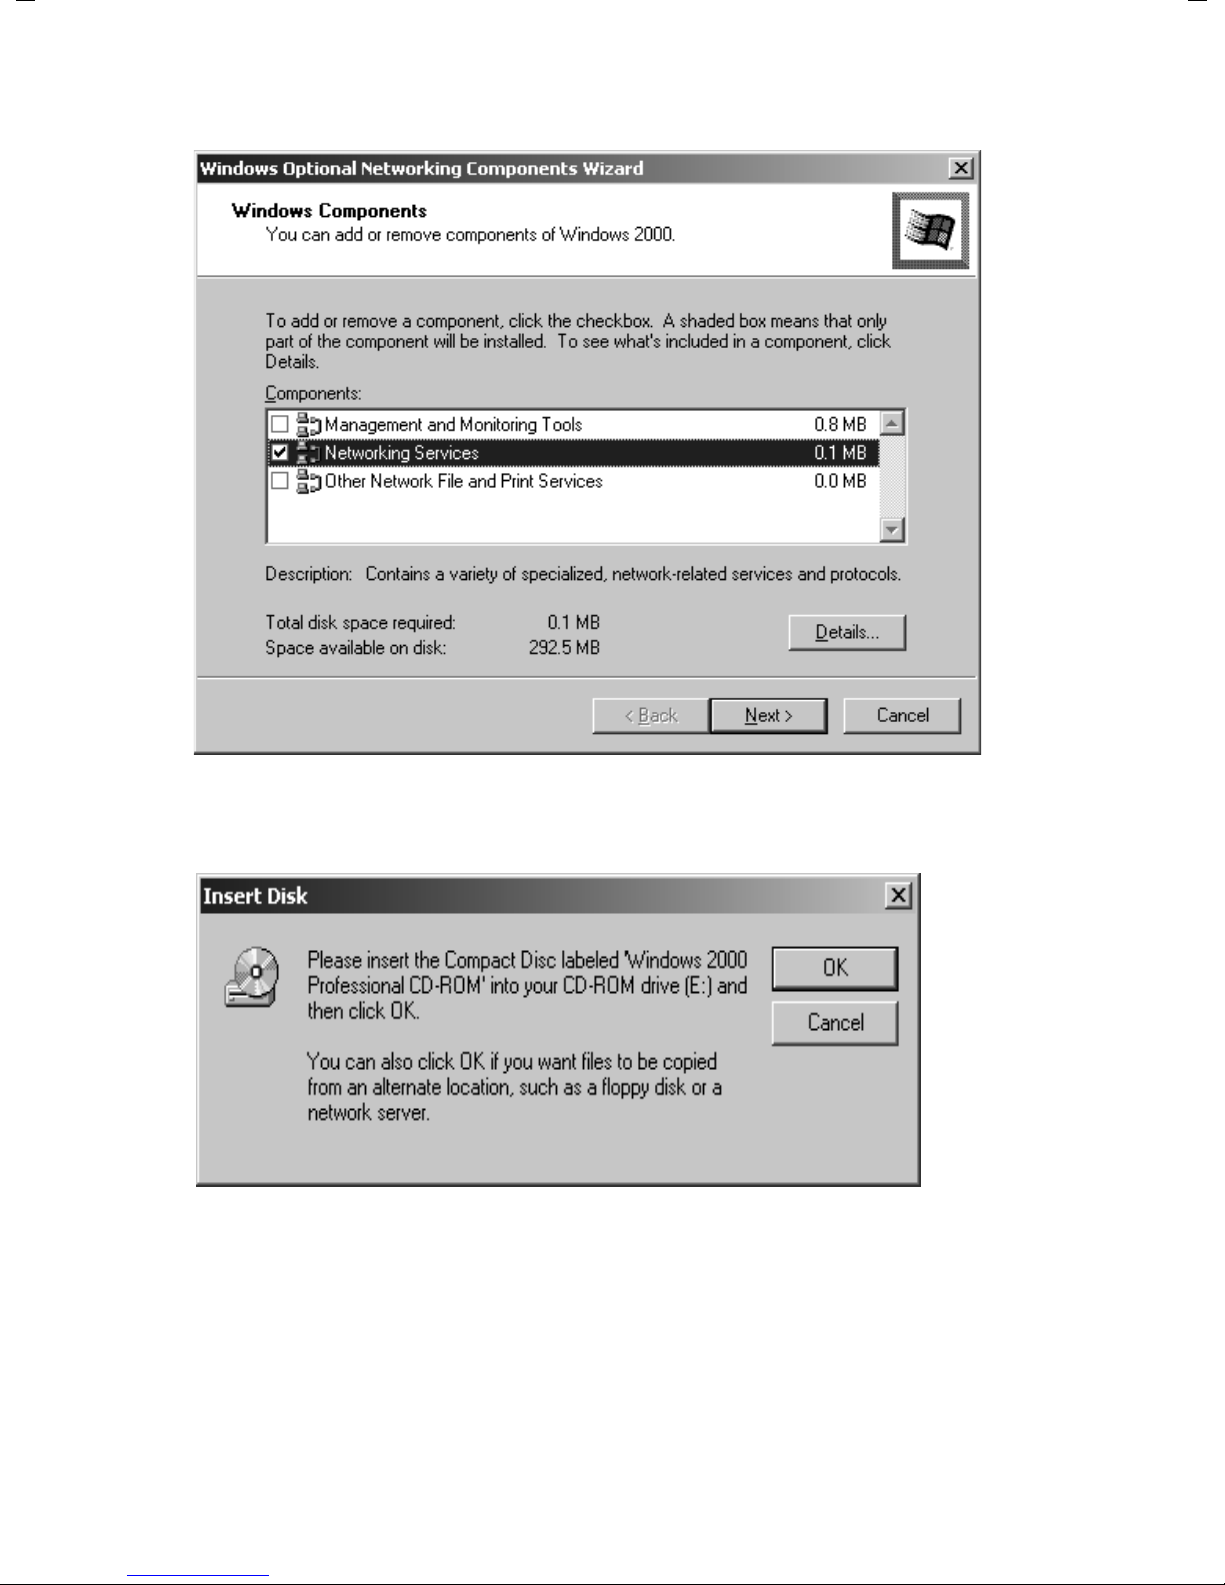
ì Select Networking services and click Next
ì Insert the WIN2000 CD and click the OK button to install all the required compo-
nents.
25
Page 27
Releasing files and printers for shared use
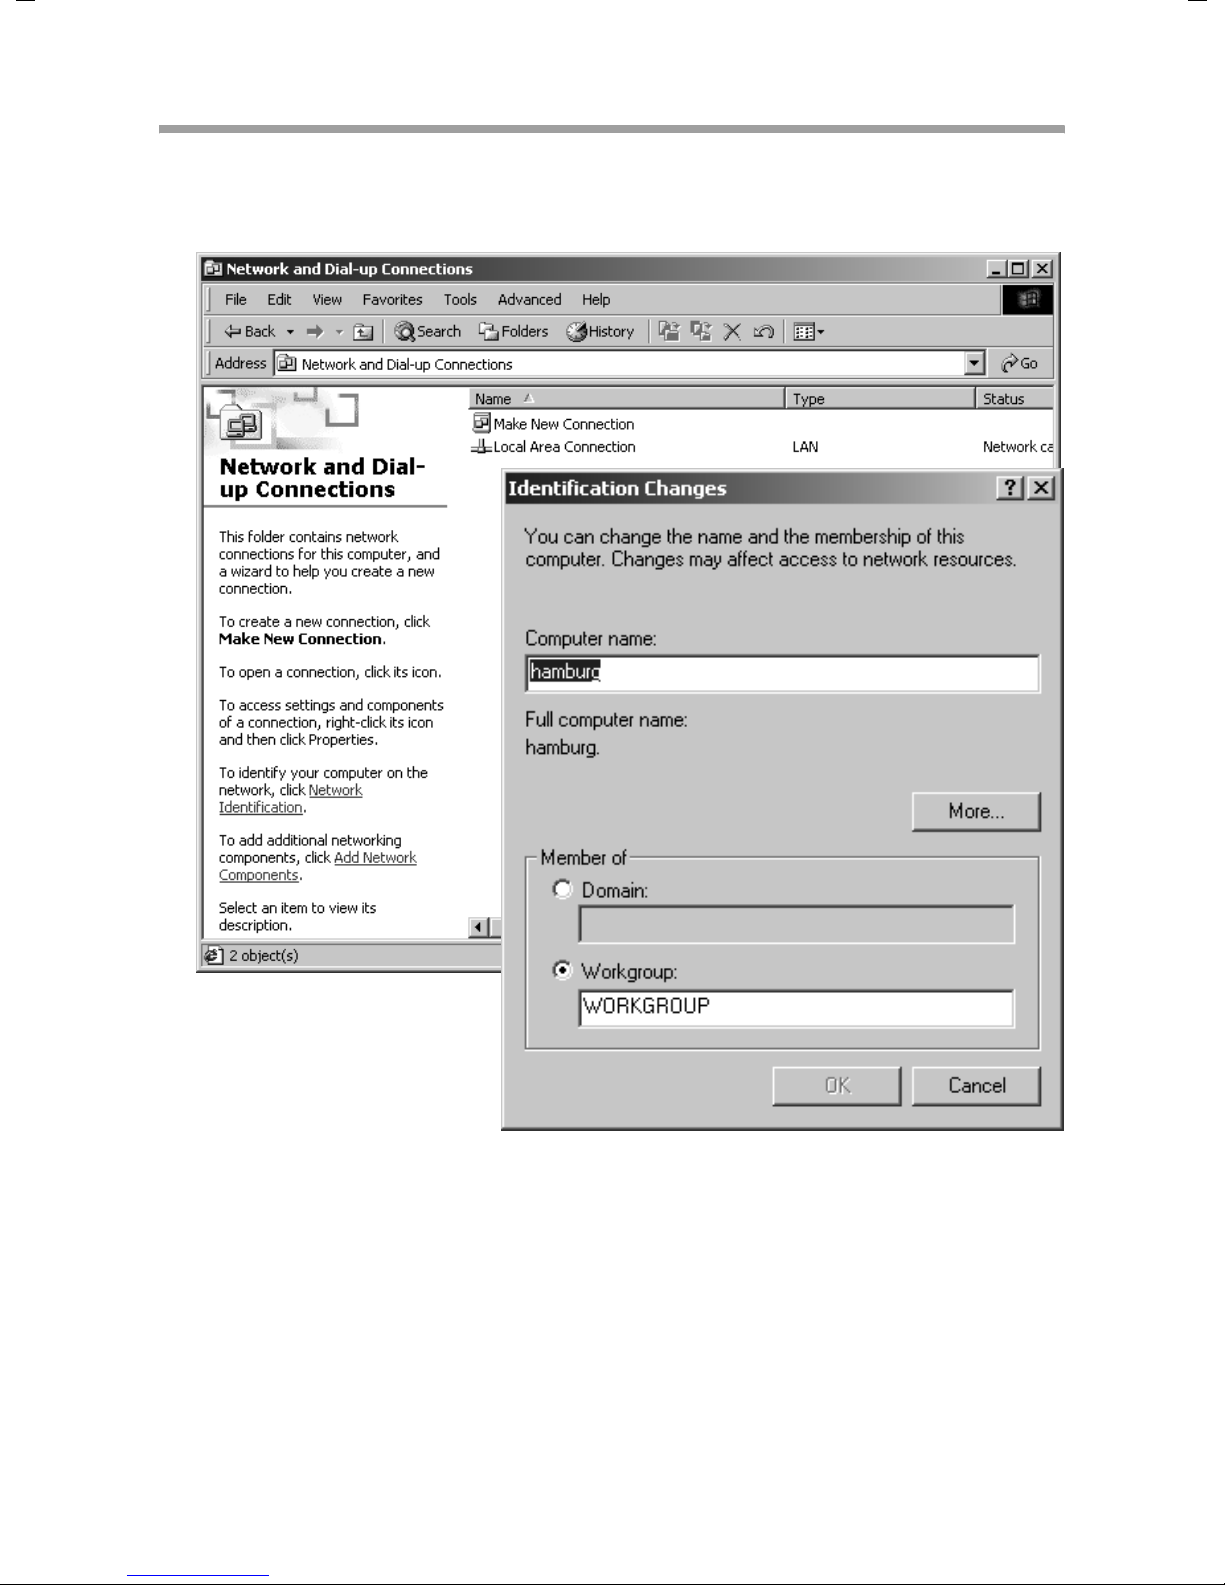
Selecting computer names and workgroup
Now you have to specify a name for the PC and assign it to a workgroup.
ì Click Network identification and then Properties
ì In the Computer name box, enter the name the PC is to appear under on the net-
work. This name must be unique within the network.
ì In the Workgroup box, enter a name for the workgroup. This name must be the
same for all the PCs on the network.
ì Confirm this with OK.
26
Page 28
Releasing files and printers for shared use
Setting the TCP/IP protocol
The TCP/IP protocol ensures that the PCs on the network can communicate with each
other. This protocol requires certain settings which you will now make so that it can
function smoothly.
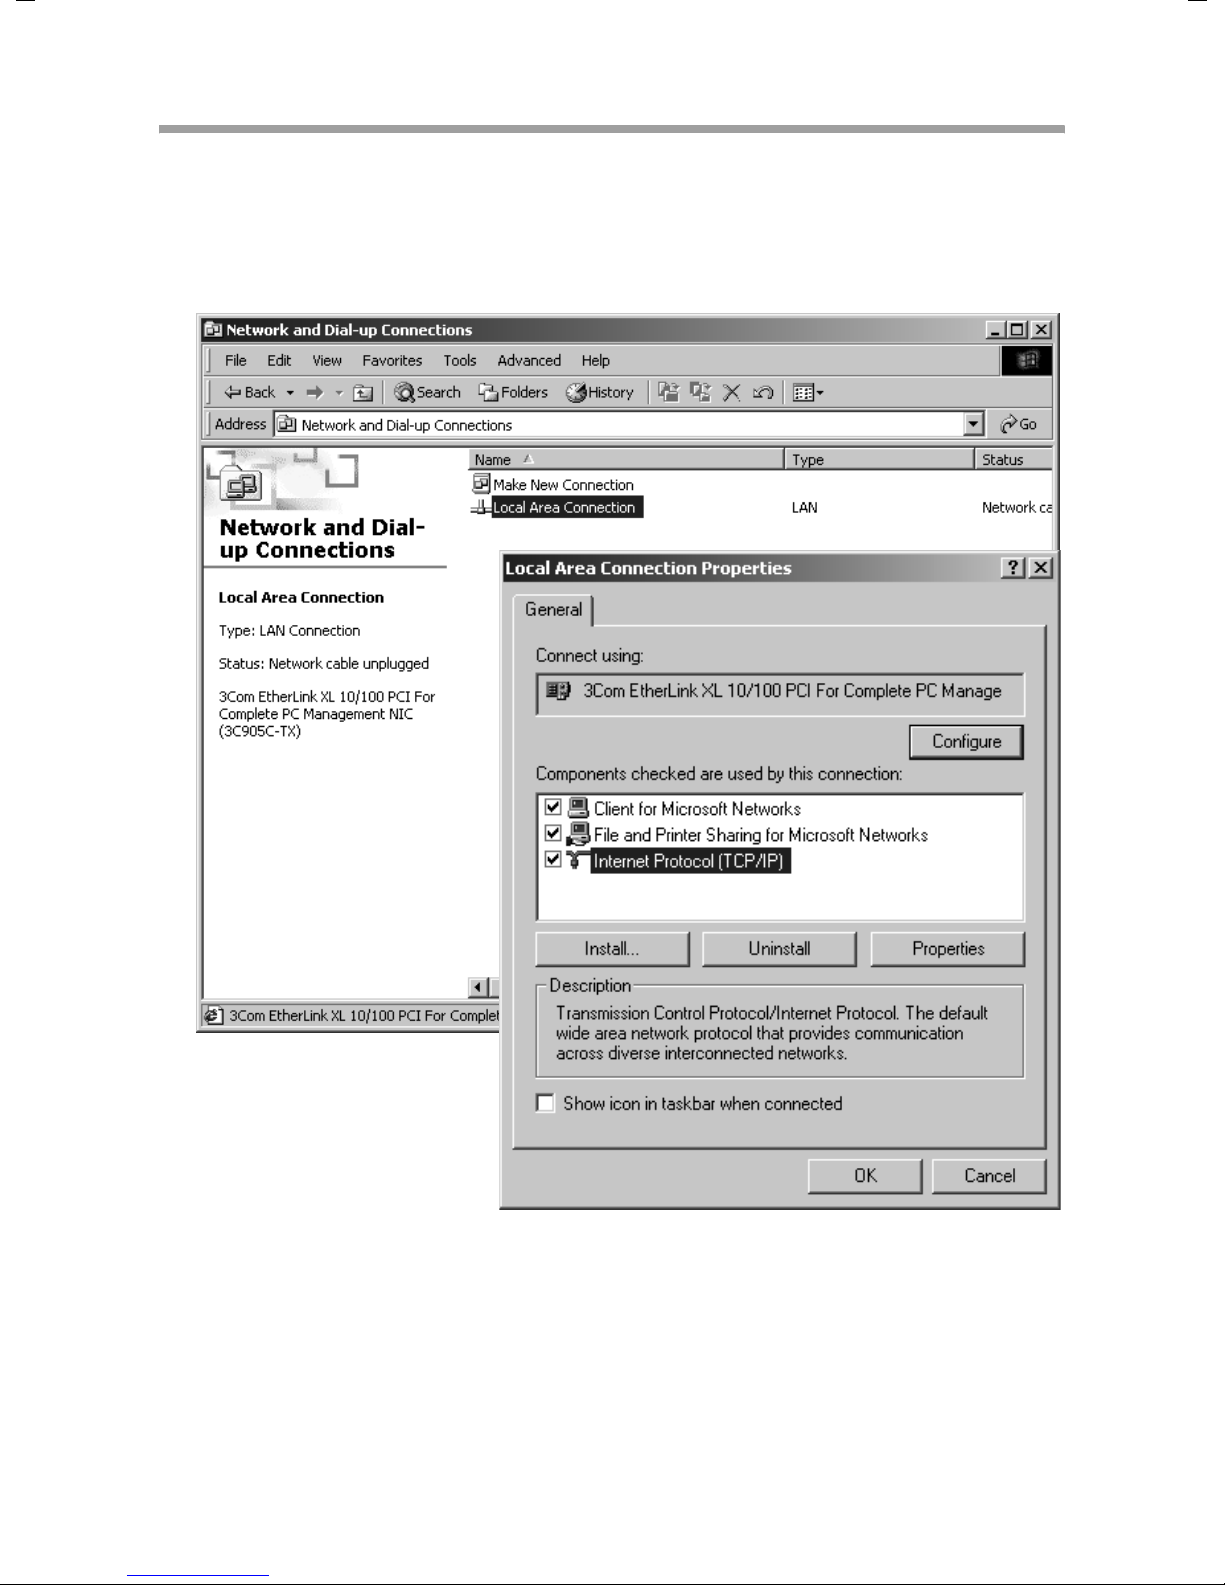
ì Right click to open Local Area Connection. In the next window click Properties.
ì In the lower section of the window, select the option Display icon in taskbar when
connected.
ì Left-click to select Internet Protocol (TCP/IP) and click Properties.
27
Page 29
Releasing files and printers for shared use
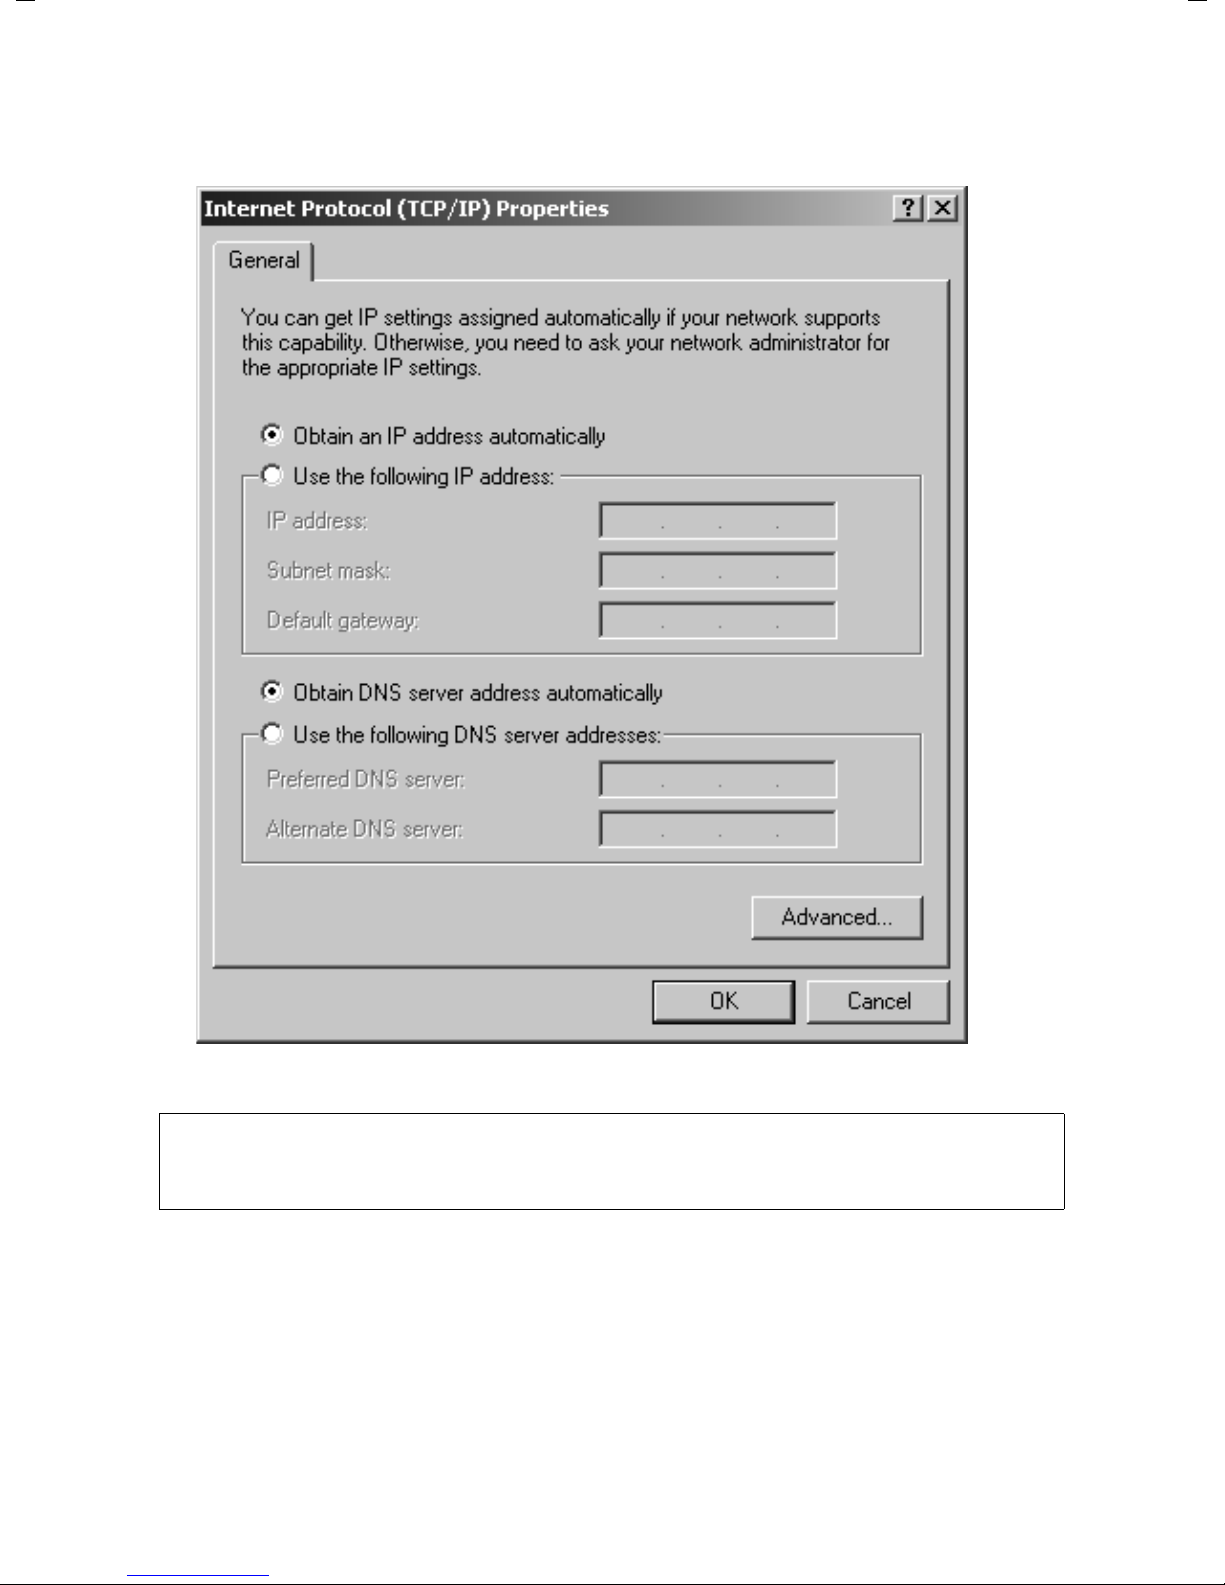
ì Select the entries Obtain an IP address automatically and Obtain DNS server
address automatically.
ì Close this and the next window with OK.
Note:
You can of course define IP addresses manually. This is necessary for example in adhoc networks. How to assign static IP addresses is described on page 72 onwards.
28
Page 30
Releasing files and printers for shared use
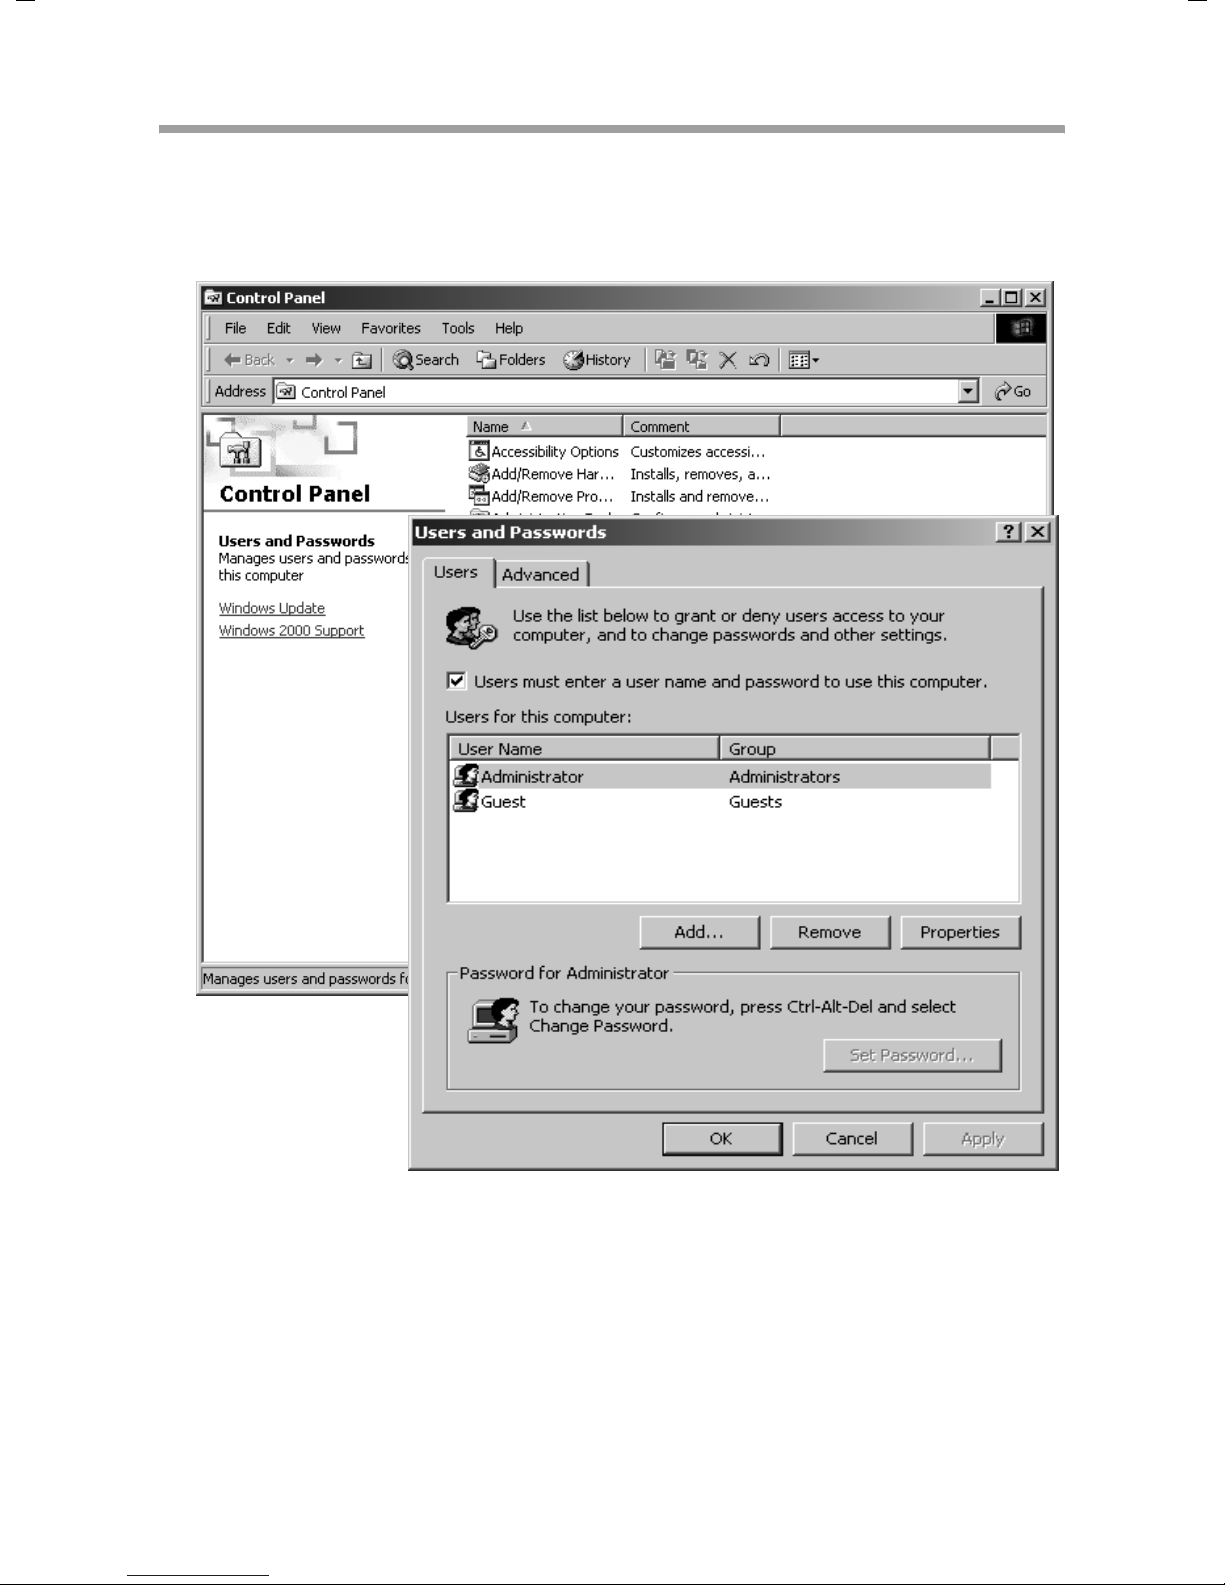
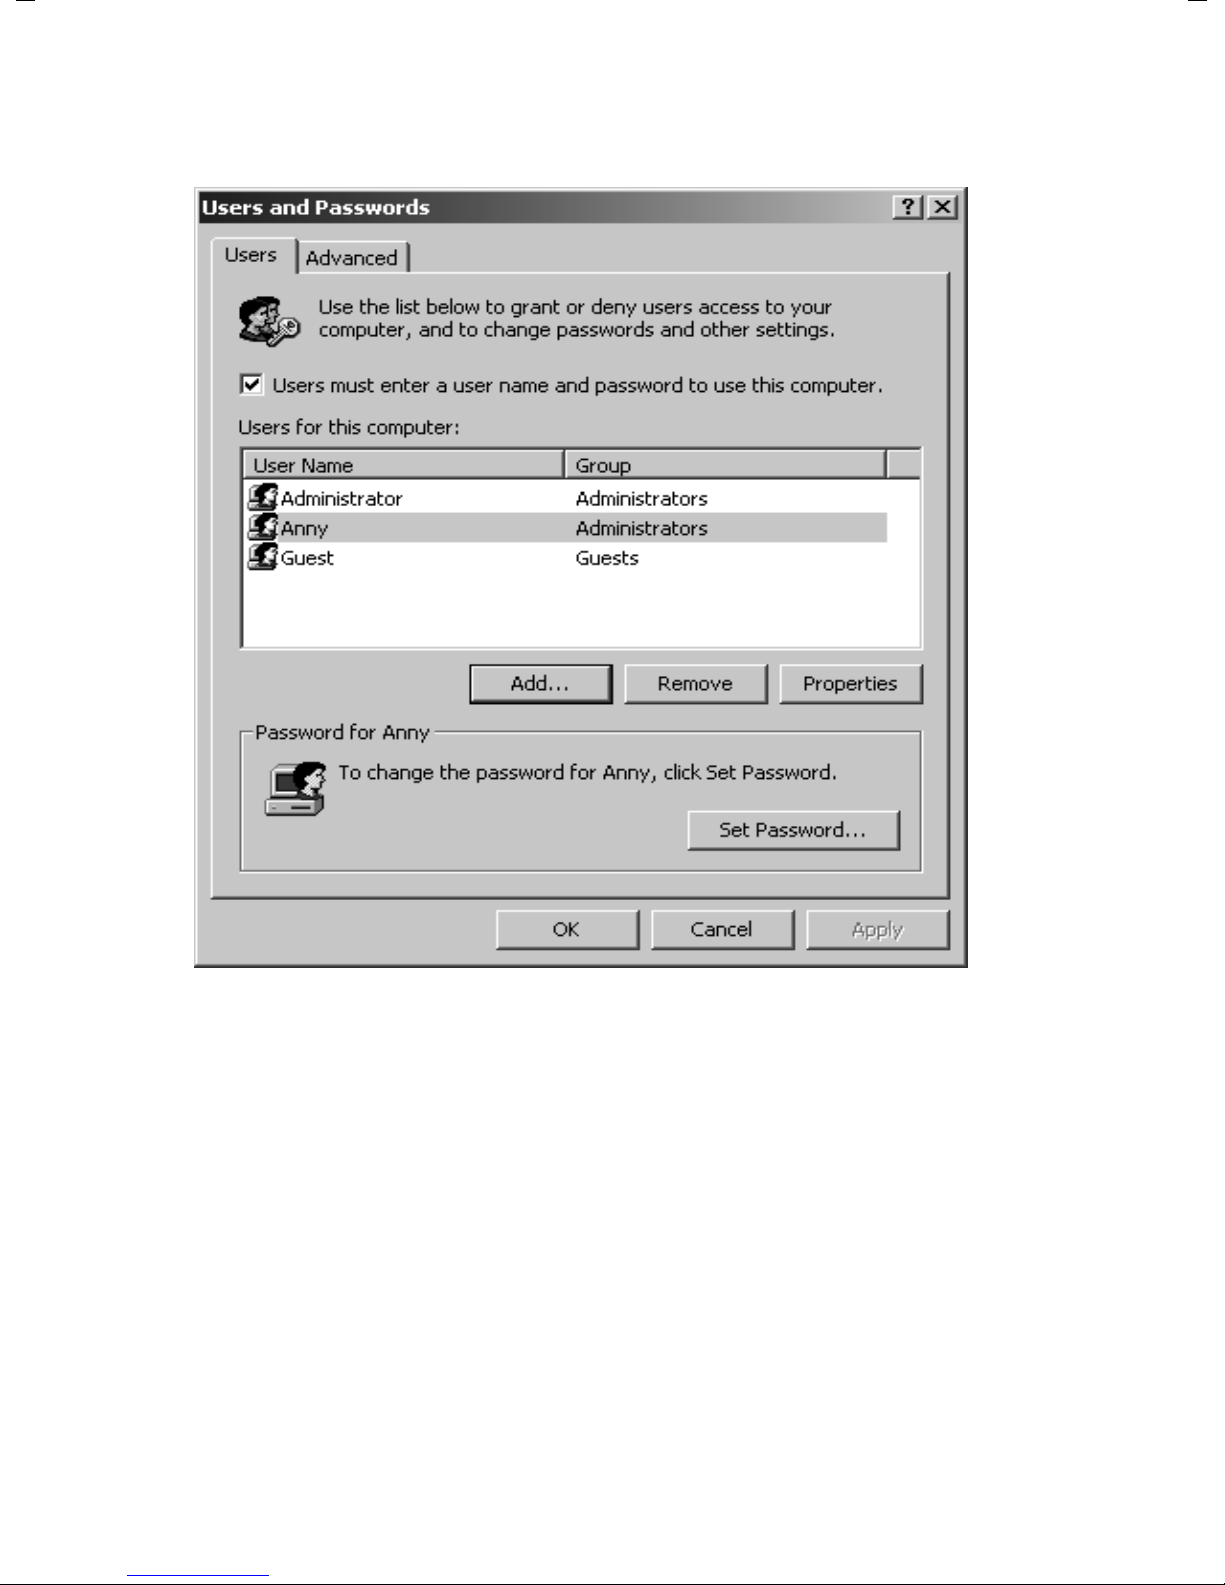
Setting up user names
All the users who want to access resources released on your PC have to be given a user
entry. You should set up these users now so that you can assign access rights for them.
ì Open the Control Panel and then open Users and passwords.
ì Select Users must enter a user name and password for this computer.
ì Click Add.
29
Page 31
Releasing files and printers for shared use
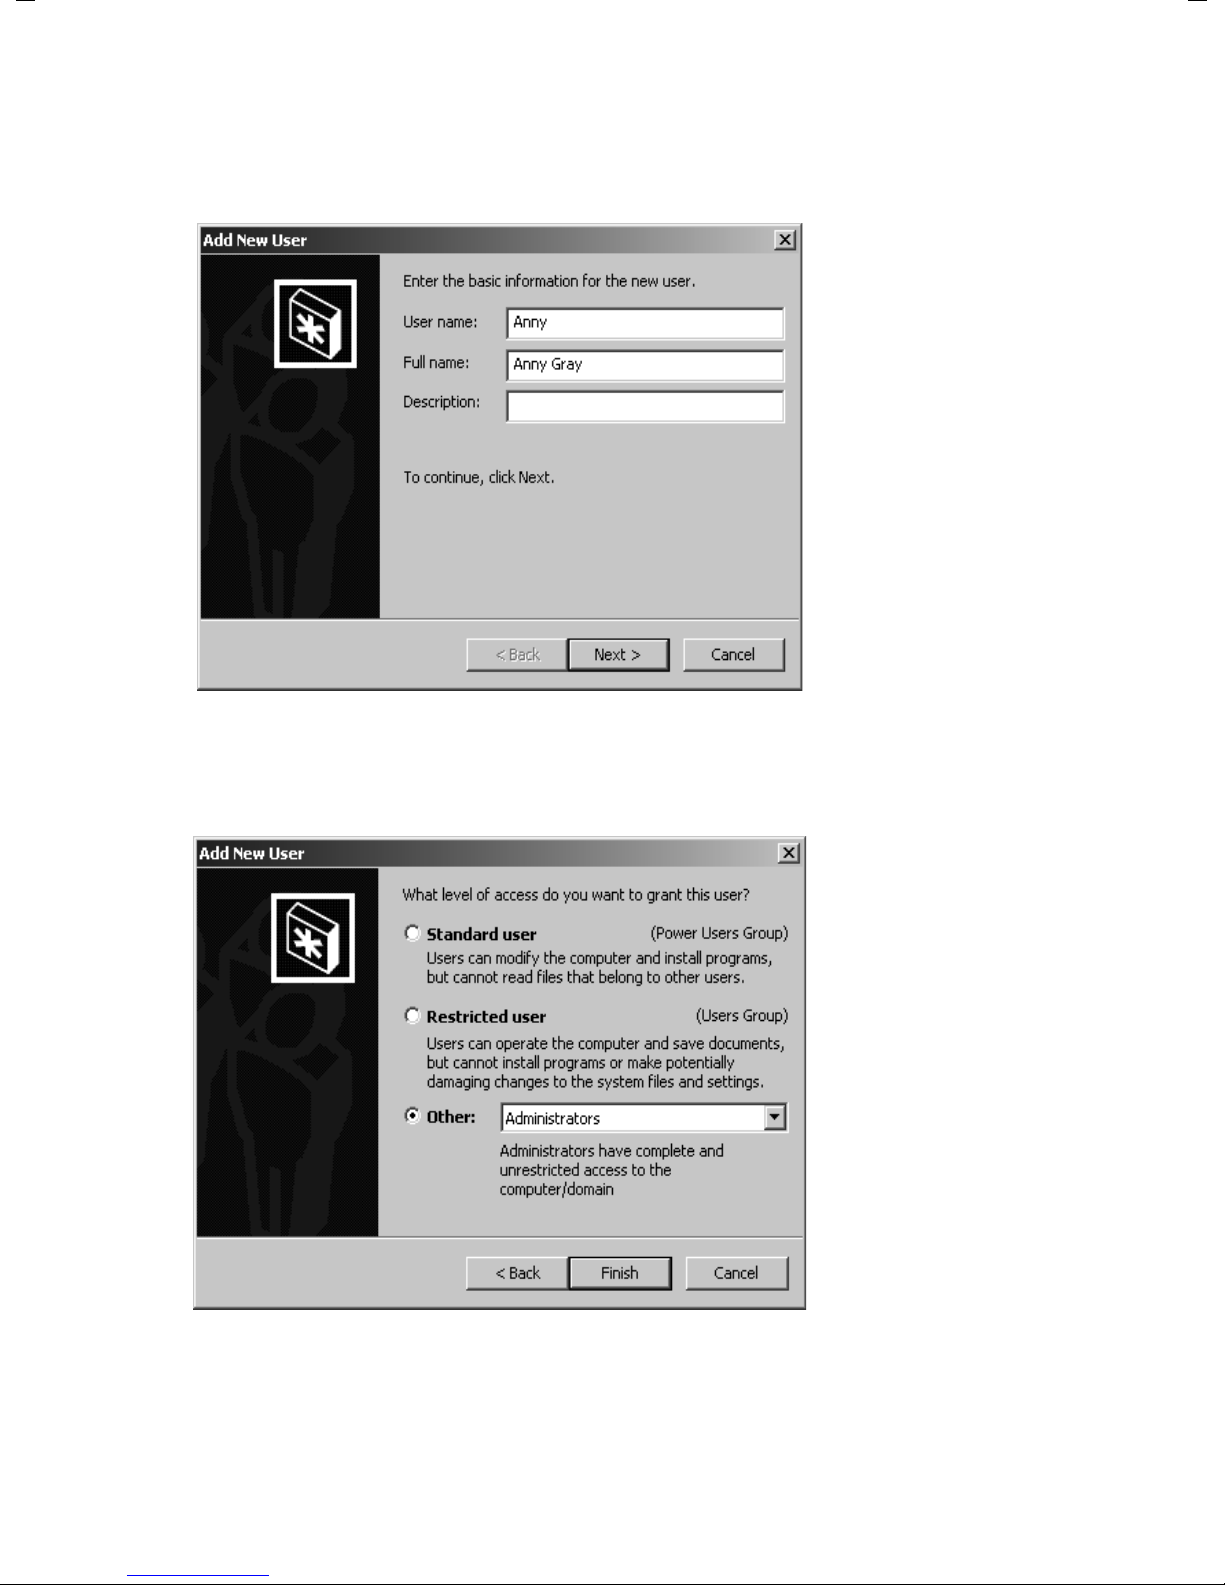
ì Enter a user name of your choice. This must be unique on the network. The boxes
Full name and Description can be left blank.
ì Confirm this with Next.
ì Now assign a password and confirm it by entering it again. Confirm this with Next.
ì In the next window you can define the type of access. Select Other, choose Admi-
nistrators from the selection list and click Finish.
ì Save the settings with Apply and close user administration with OK.
30
Page 32
Releasing files and printers for shared use
ì If you ever want to change your password, open this window again, select the user
name in question and click Set Password.
31
Page 33
Releasing files and printers for shared use
Releasing files and printers
You can now release files and printers on your PC for other users on the network.
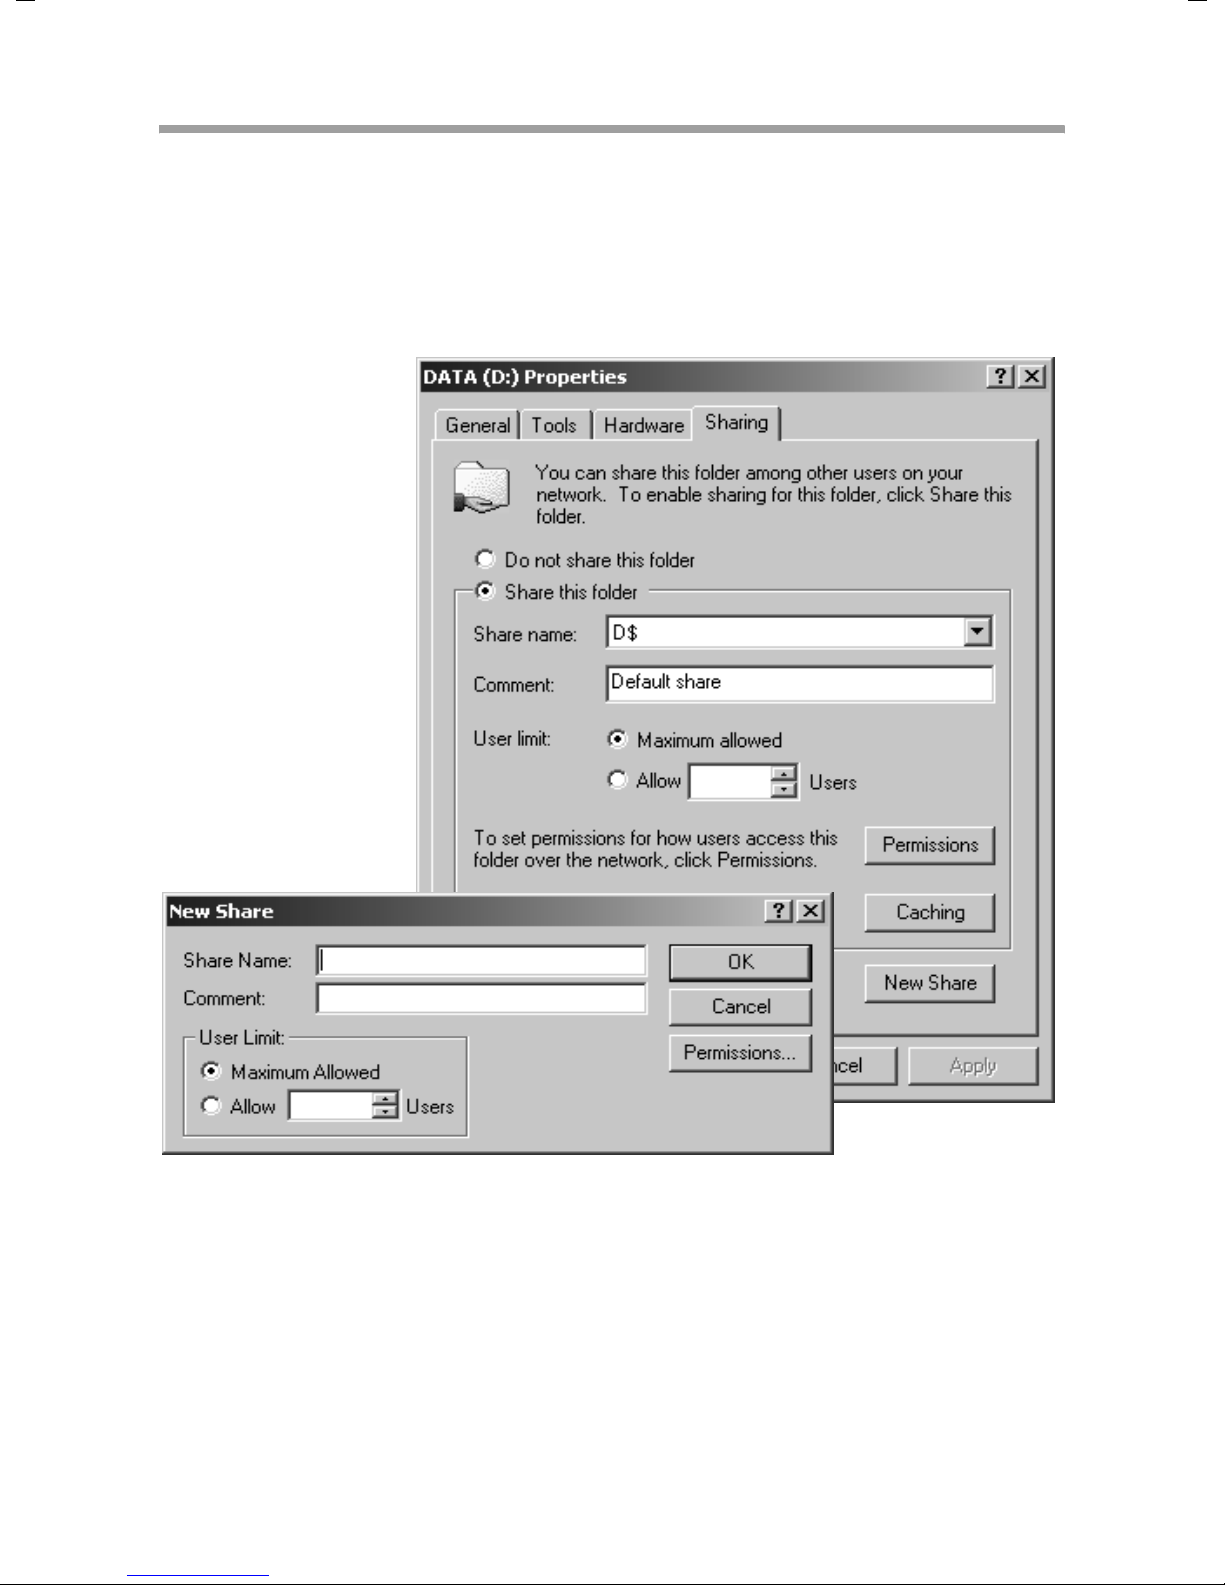
Releasing files
ì Open the Desktop and right click the folder or drive you want to release.
ì Now select the entry Share with the left-hand mouse button from the pop-up
menu.
ì Select Share this folder and click New share.
ì Assign a share name and, if you want, a comment of your choice. From now on, your
drive or folder will appear on the network under this name.
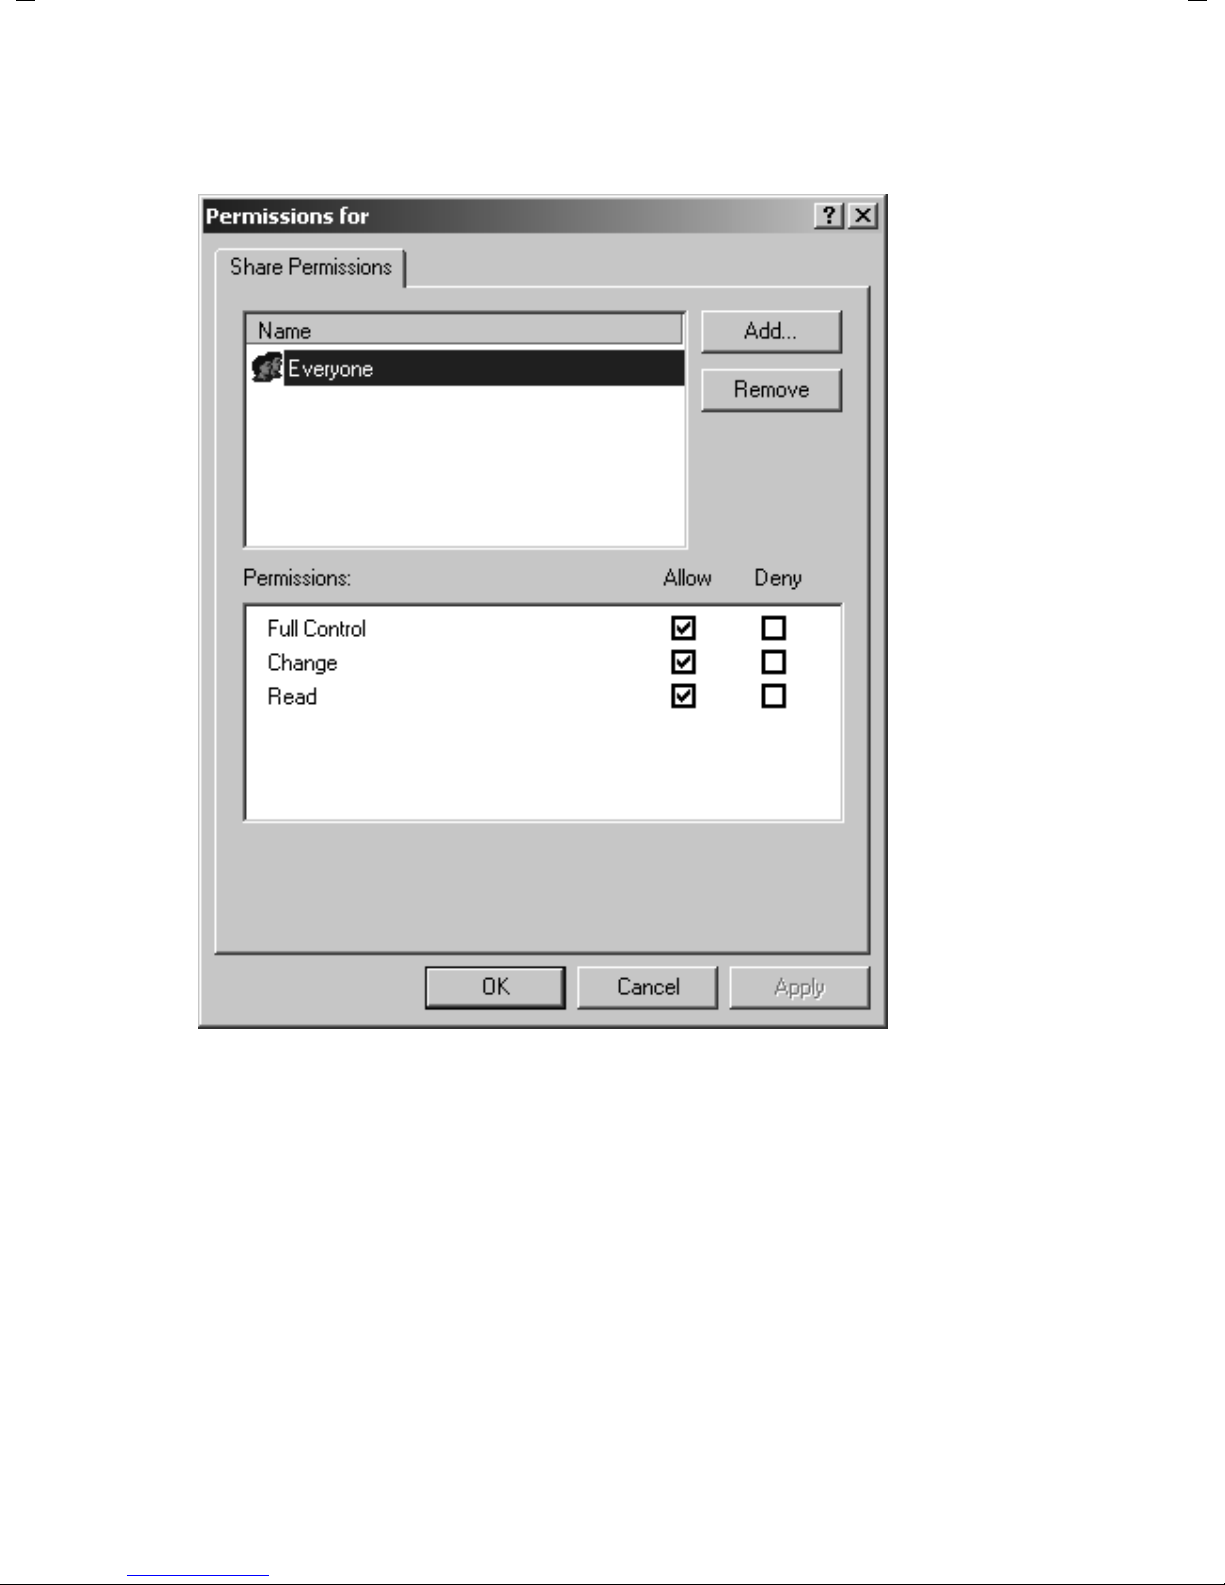
ì Now click Permissions.
32
Page 34
Releasing files and printers for shared use
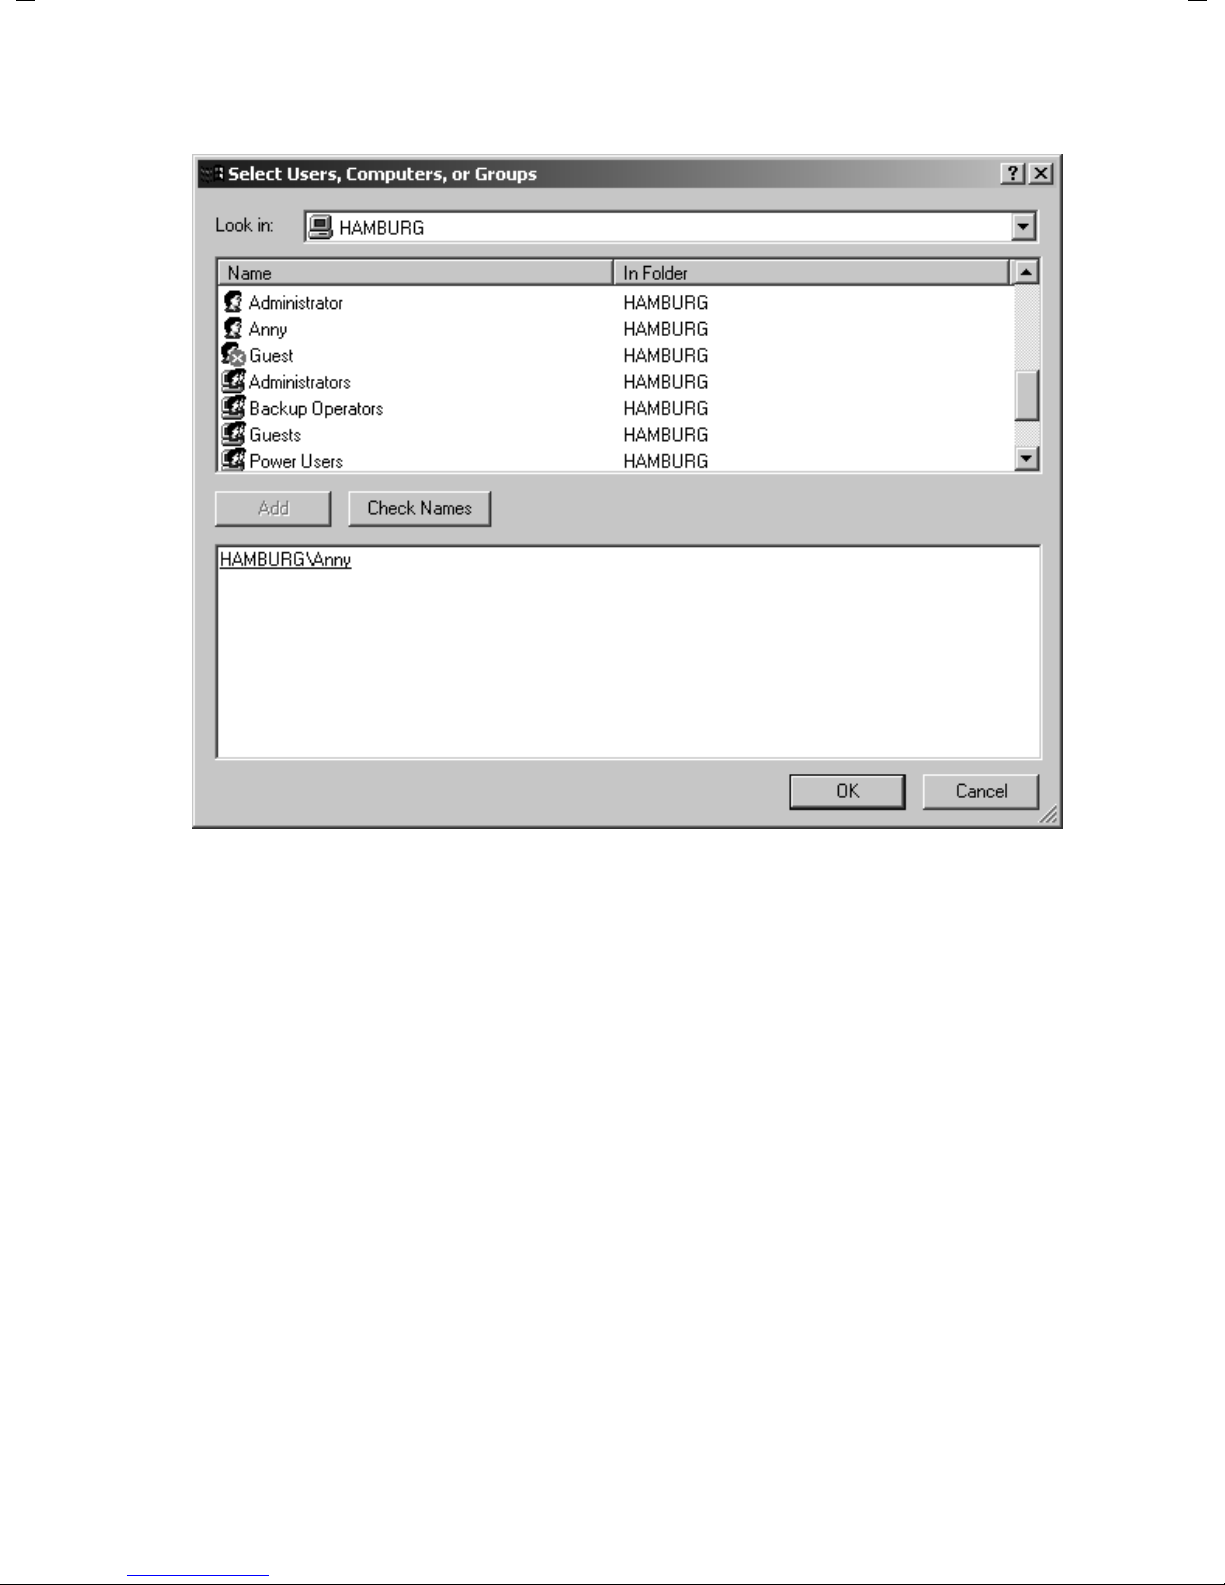
Now you can assign user rights to the registered users.
ì Click Add.
33
Page 35
Releasing files and printers for shared use
ì Select the users you created earlier and click Add.
34
Page 36
Releasing files and printers for shared use
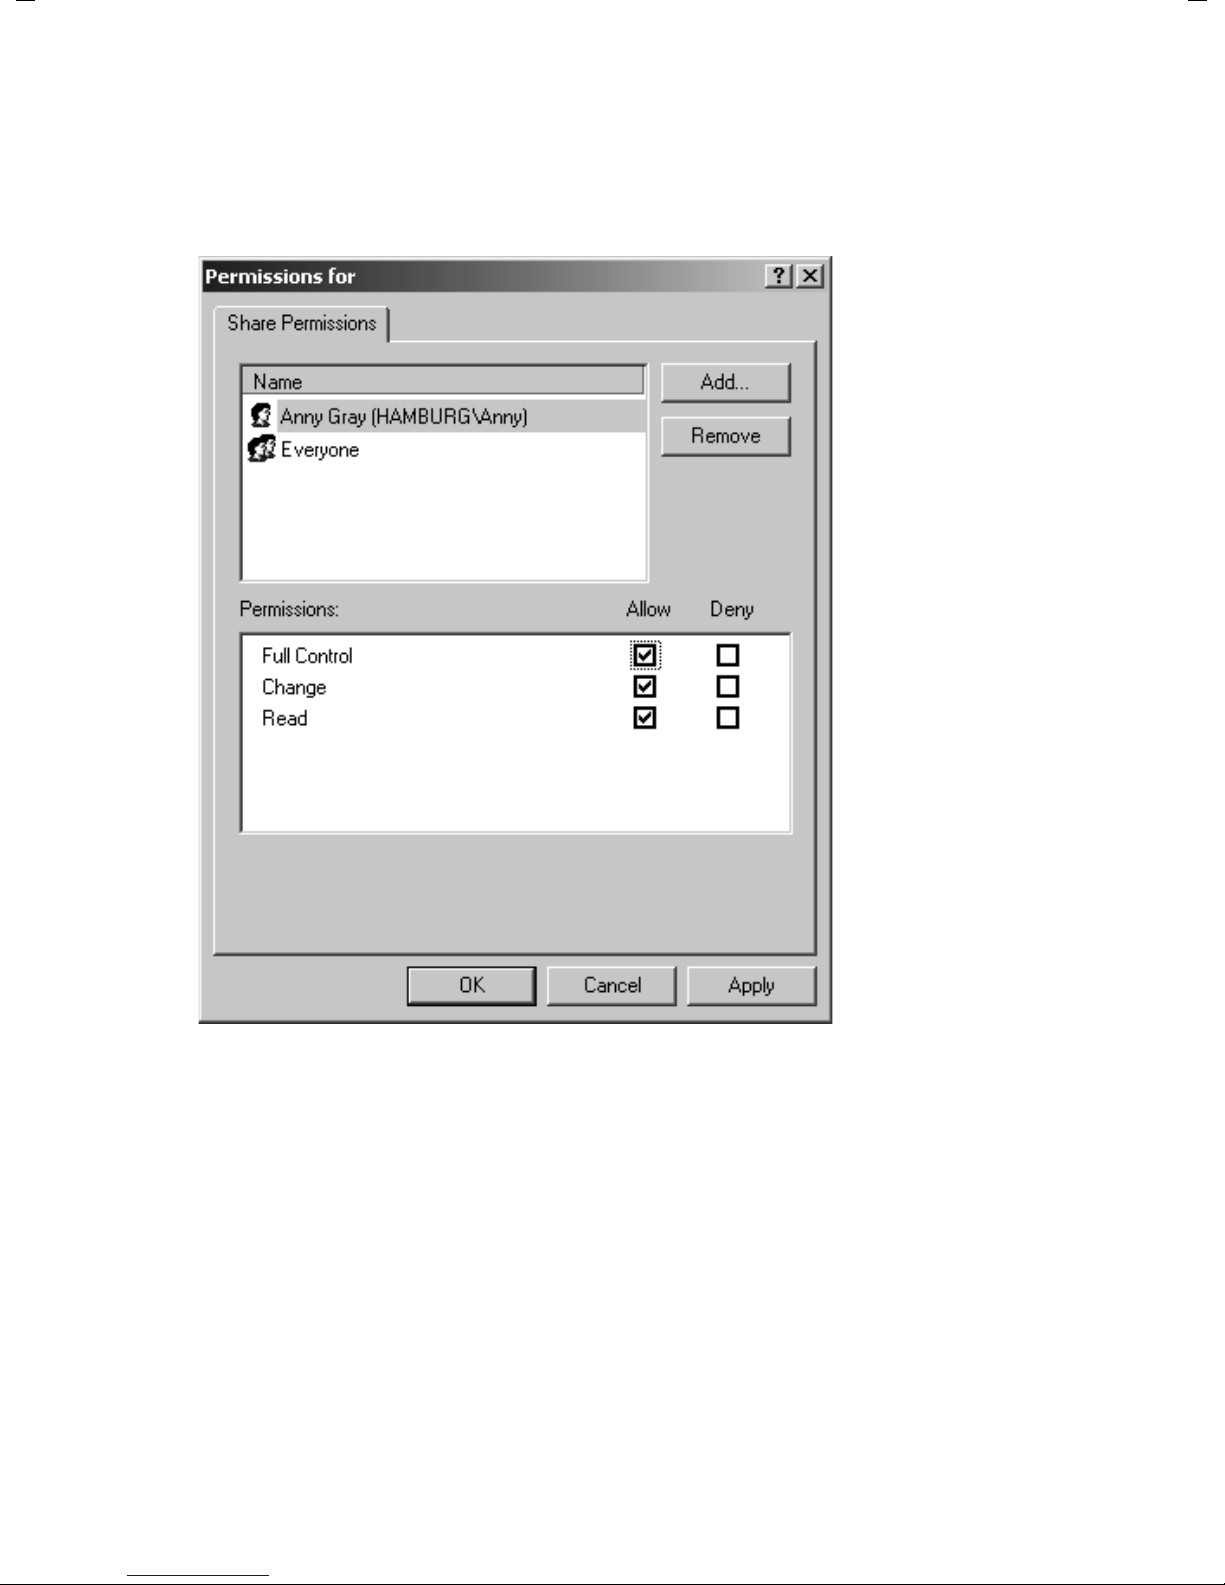
In the next window you can define who should have which access rights to your PC. Normally the read only right is chosen.
ì Select a user in the upper pane, and then in the lower pane the rights you want to
assign.
ì To save the settings you have made, click Apply and OK. Close the next window as
well with OK. Close the properties window with OK.
35
Page 37
Releasing files and printers for shared use
Releasing printers
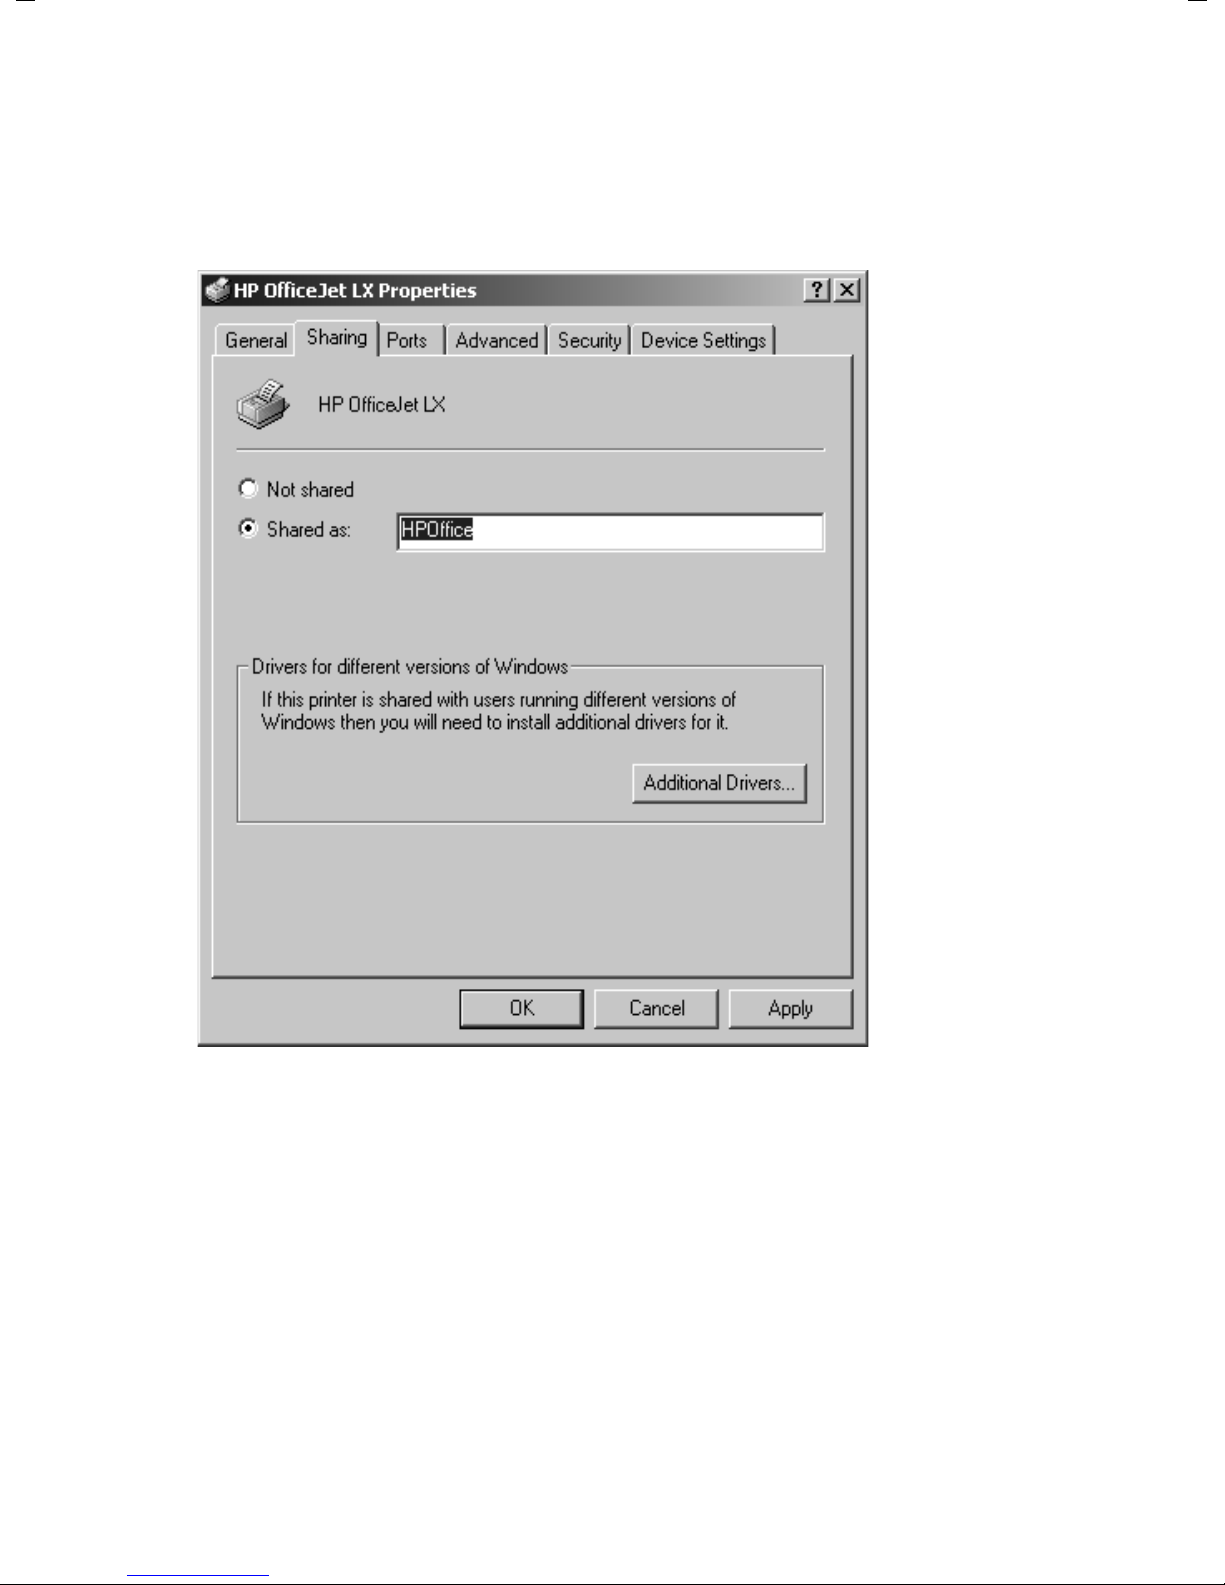
ì To release printers select Printers and Faxes in the start menu.
ì Right-click the printer you want to release.
ì Now select the entry Sharing with the left-hand mouse button.
ì Select Shared as and assign a share name. From now on, your printer will be avail-
able to all the other users on the network under this name.
ì If this printer is to be accessed by users with PCs that have a different operating sys-
tem, you will have to install additional drivers. To do this click Additional drivers...
and follow the instructions.
ì Use Apply to save the current settings. Click OK to close share configuration.
36
Page 38

Releasing files and printers for shared use
Making your own files and printers available
(WIN 98 / 98 SE / ME)
To release files or printers on a PC with Windows 98 for other users on the network:
1. Set up PC as Client for Microsoft Networks (see page 37).
2. Select computer names and workgroup (see page 40).
3. Select type of access control (see page 40).
4. Set TCP/IP protocol (see page 41).
5. Install utilities for file and printer release (see page 44).
6. Release files and printer (see page 46).
Setting up a PC as Client for Microsoft Networks
Before the PCs in your network can access shared resources, you have to define a Microsoft Network, i.e. all the PCs have to be configured as Clients of a Microsoft Network.
This can be done as follows:
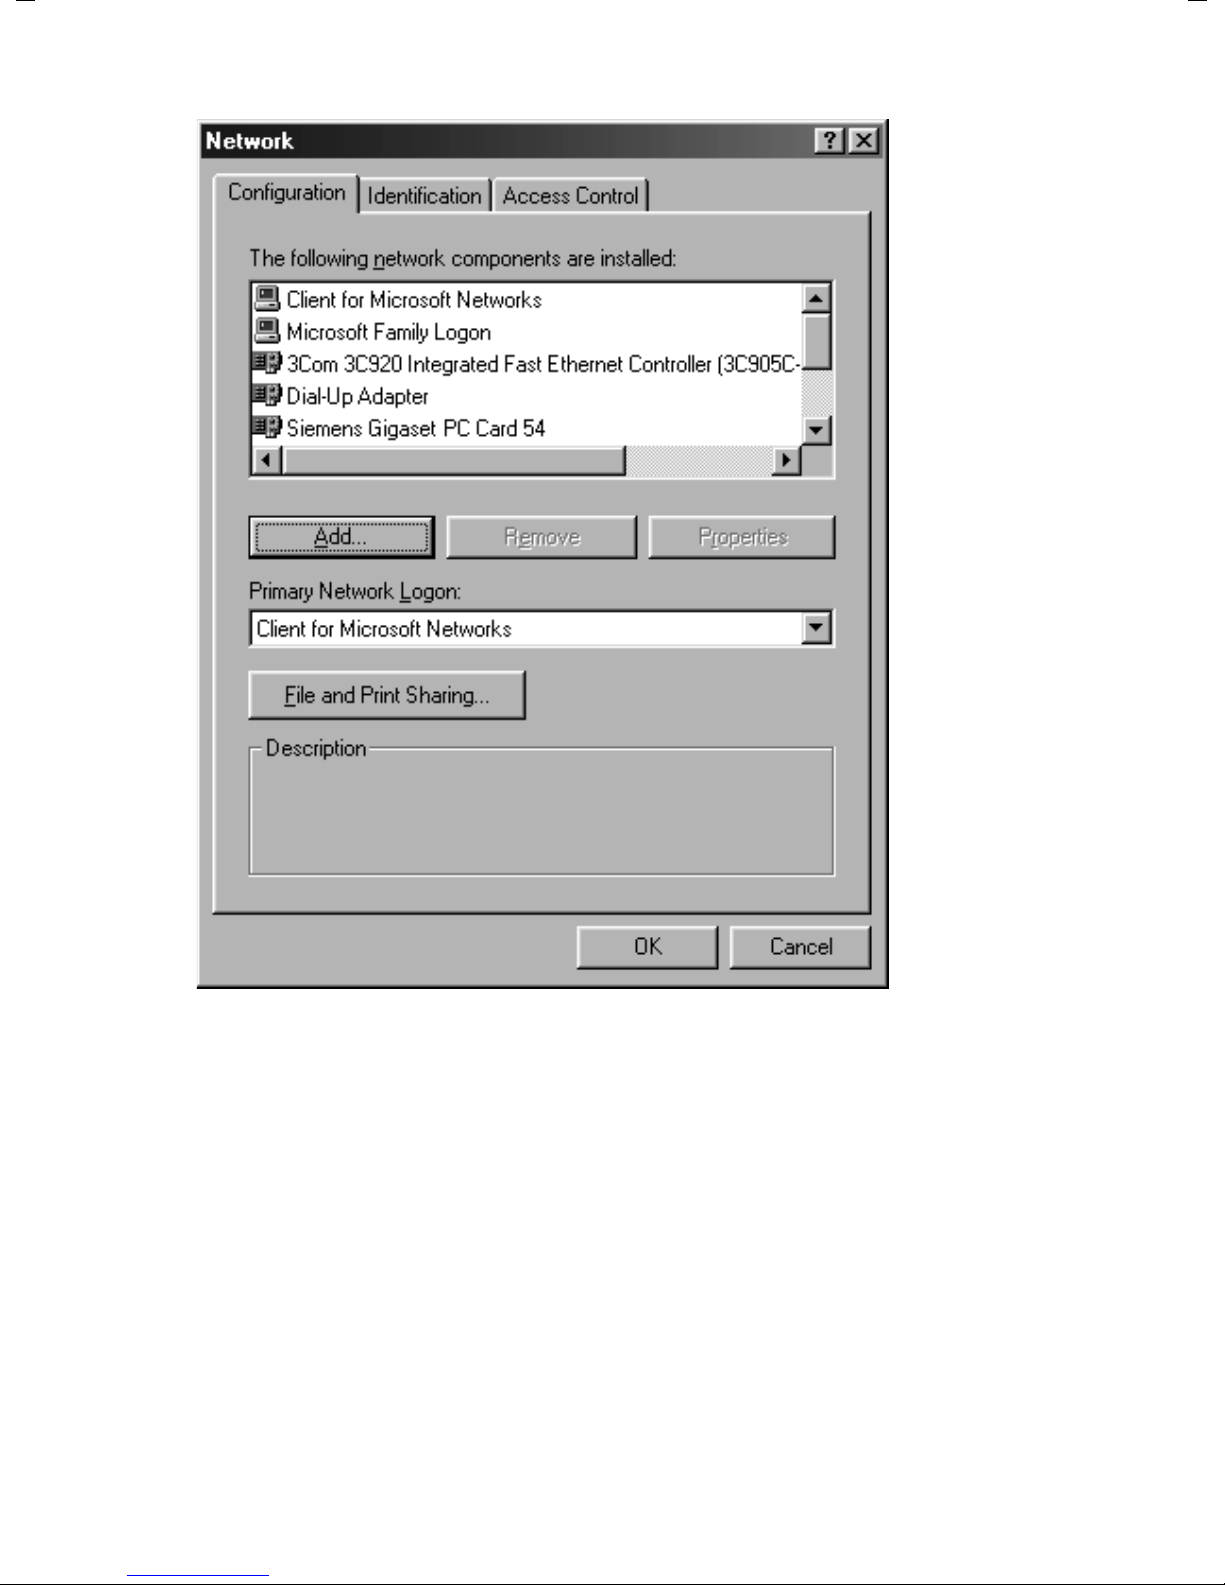
ì Open the Control Panel and then open Network.
ì Check whether the list of components contains the entry Client for Microsoft
Networks.
37
Page 39
Releasing files and printers for shared use
If the entry exists, please continue from page 40.
38
Page 40
Releasing files and printers for shared use
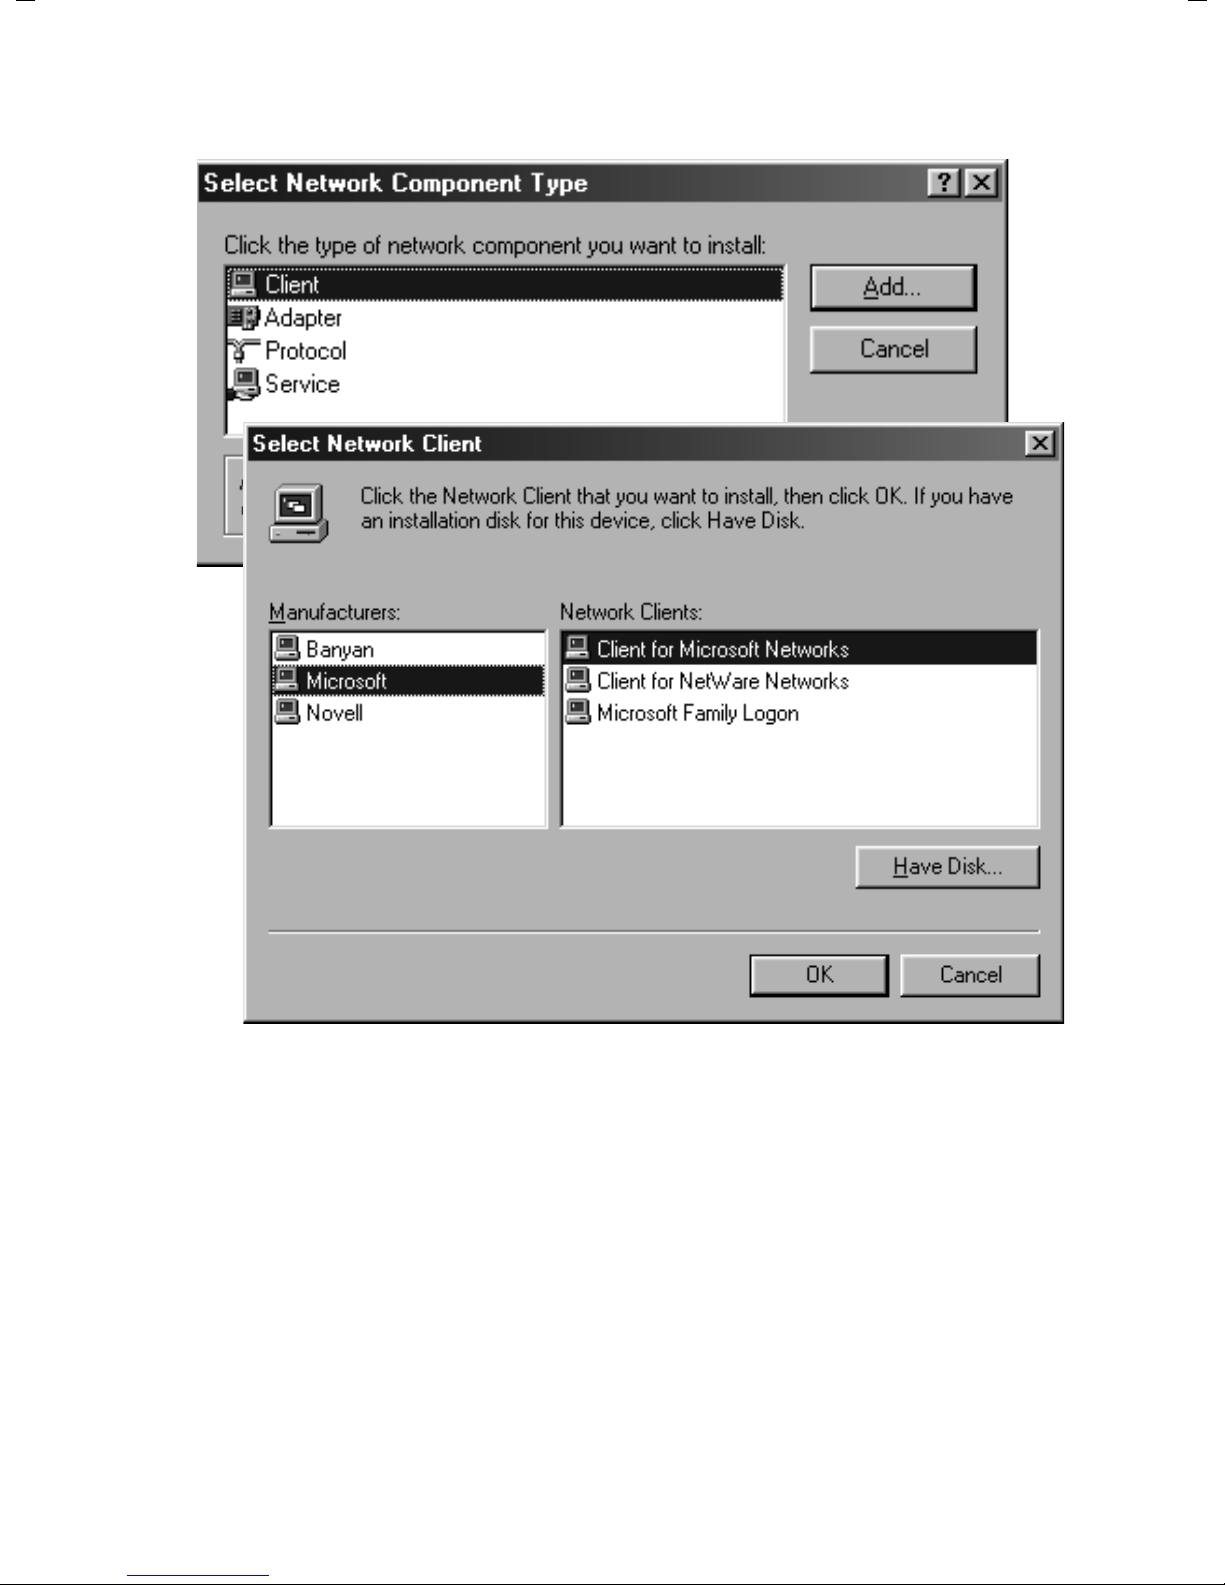
ì If the entry does not exist, click Add.
ì Select as network component type Client and click Add.
ì Select in Manufacturers the entry Microsoft and in Network clients the entry
Client for Microsoft Networks before confirming with OK.
39
Page 41

Releasing files and printers for shared use
Selecting computer names and workgroup
Now you have to specify a name for the PC and assign it to a workgroup.
ì In the Network window move from Configuration to the Identification tab.
ì In the Computer name box, enter the name the PC is to appear under on the net-
work. This name must be unique within the network.
ì In the Workgroup box, enter a name for the workgroup. This name must be the
same for all the PCs on the network.
ì The Description box can be left empty.
Selecting the access control
Now you can define which access rights are to be assigned to resources you want to
release.
ì In the Network window move from Identification to the Access control tab.
–Use the option Access control at release level to define that access to released
files or printer is to be password protected.
–The option Access control at user level defines that access is permitted only for
certain users or groups.
40
Page 42
Releasing files and printers for shared use
Setting the TCP/IP protocol
The TCP/IP protocol ensures that the PCs on the network can communicate with each
other. This protocol requires certain settings which you will now make so that it can
function smoothly.
Checking the TCP/IP entry
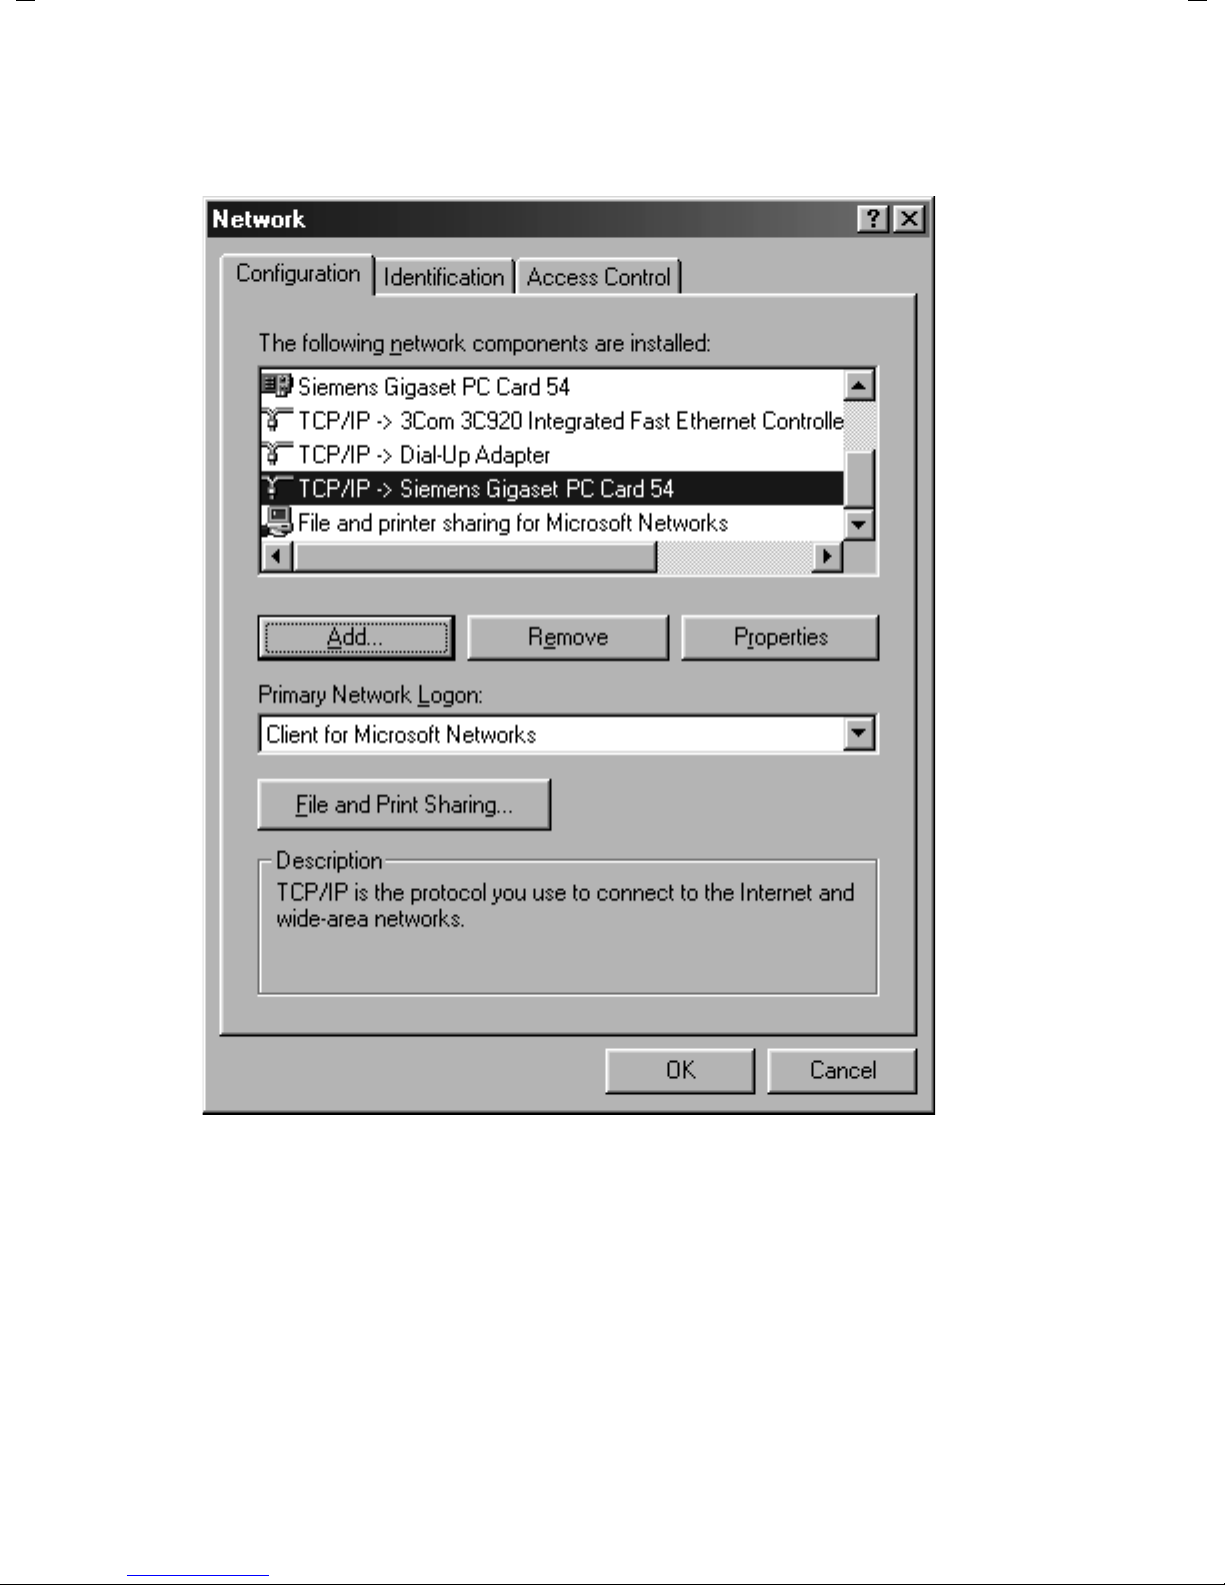
ì In the Network window, check that there is a TCP/IP > entry for your network card
or network adapter in the list of components. To do this, in the Network window,
switch to the Configuration tab. If for example you are using a Gigaset PC Card 108
as the wireless network adapter, the list must contain the entry TCP/IP > Siemens
Gigaset PC Card 108.
ì If the entry for your network card or network adapter is there, please turn to
page 41.
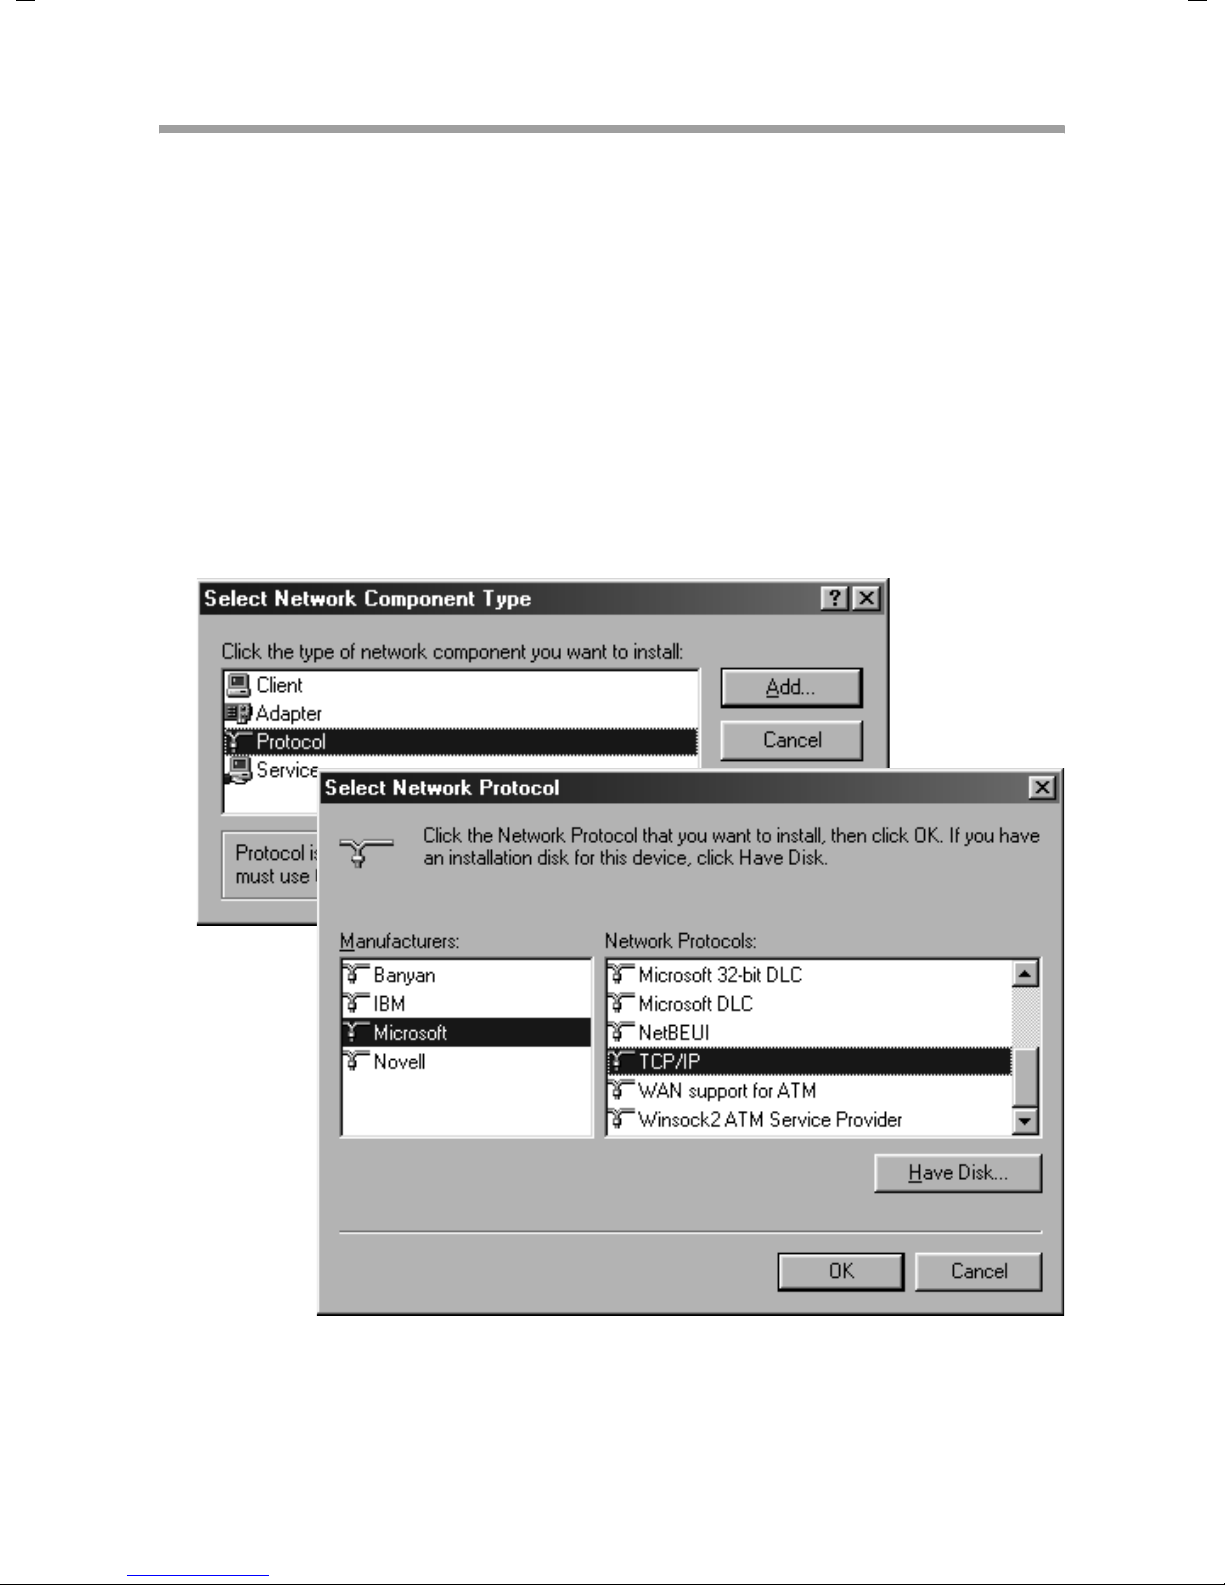
ì If the entry does not exist, click Add.
ì Select as network component type Protocol and click Add.
ì Select in Manufacturers the entry Microsoft and in Network protocol the entry
TCP/IP before confirming with OK.
ì Set TCP/IP protocol.
41
Page 43
Releasing files and printers for shared use
ì To do this, in the Network window, switch to the Configuration tab.
ì Select the TCP/IP > entry for your network card and click Properties.
42
Page 44
Releasing files and printers for shared use
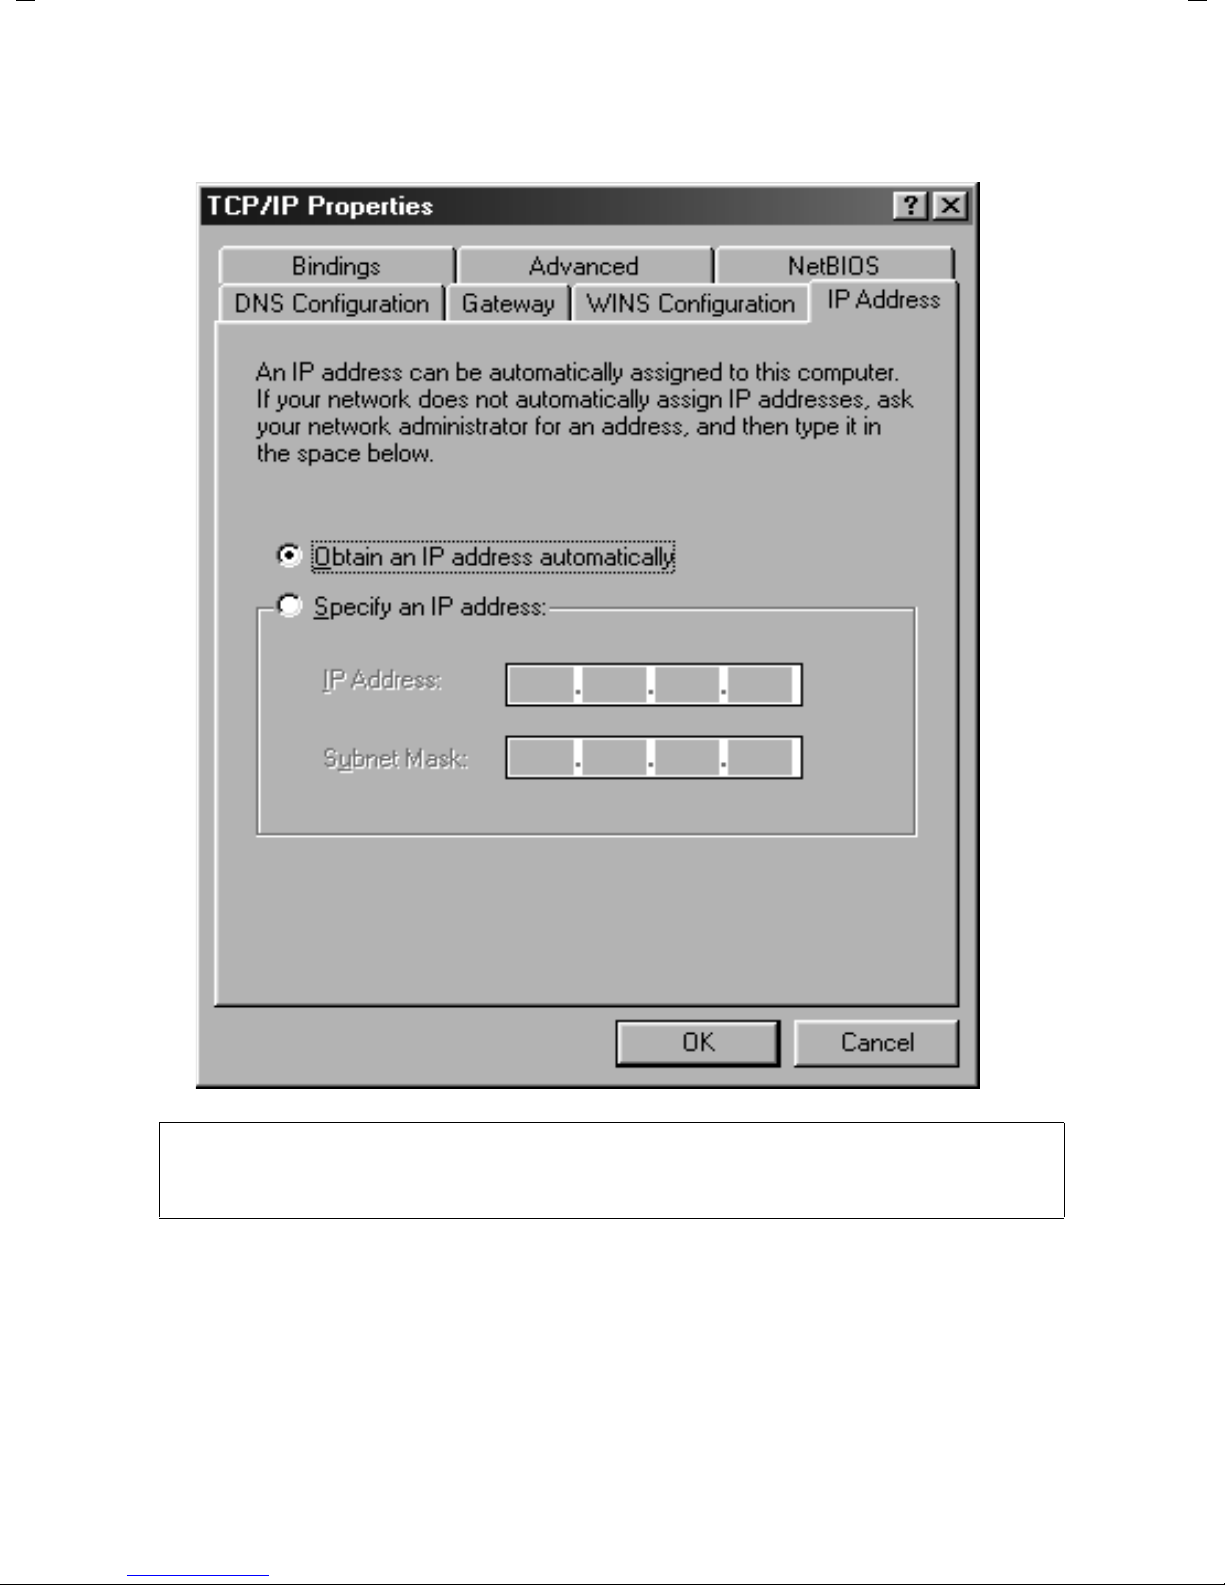
ì Open the IP address tab, select the entry Obtain an IP address automatically and
finish with OK.
Note:
You can of course define IP addresses manually. This is necessary for example in adhoc networks. How to assign static IP addresses is described on page 72 onwards.
43
Page 45
Releasing files and printers for shared use
Installing utilities for file and printer release
You cannot release files and printers on your PC for other users on the network if the
utility for file and printer release has not been installed.
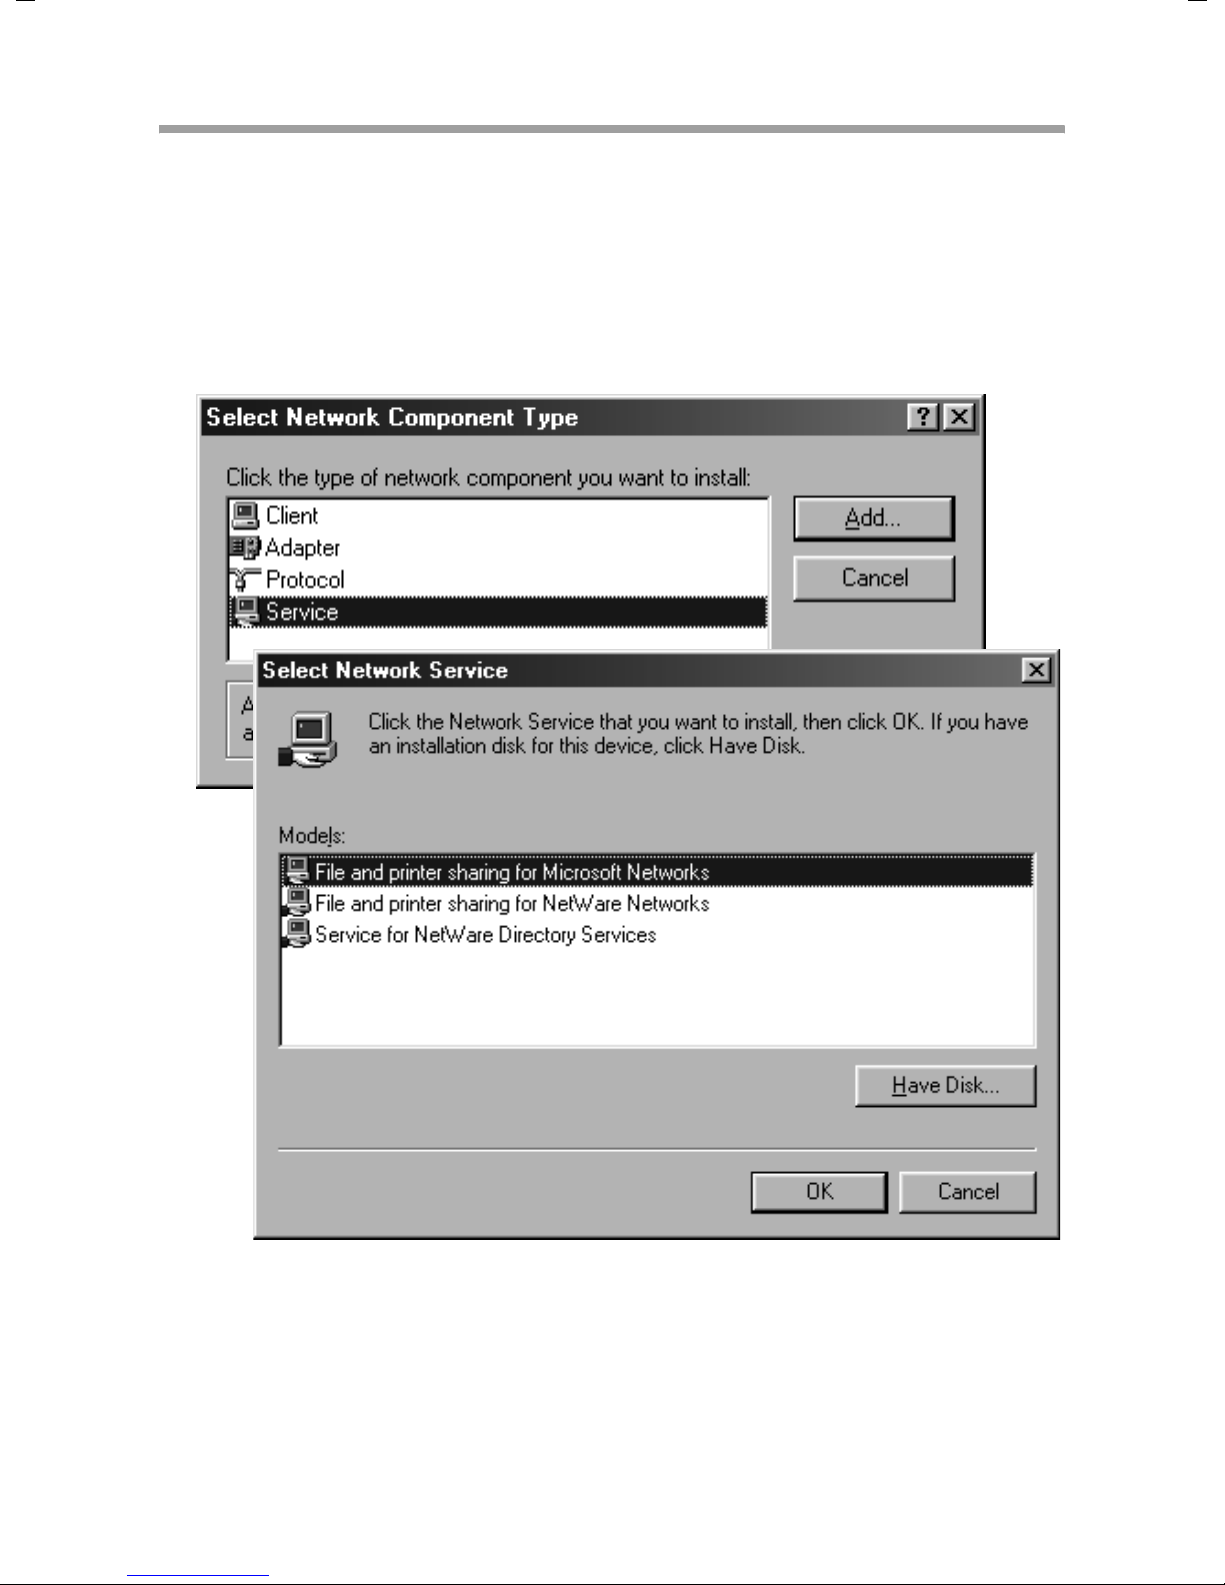
ì First of all you have to check in the Network window whether the list of components
has the entry File and printer sharing for Microsoft Networks.
ì If the entry exists, please continue from page 45.
ì If the entry does not exist, click Add.
ì From the list select the entry Service and click Add.
ì Select File and printer sharing for Microsoft Networks and click OK.
44
Page 46
Releasing files and printers for shared use
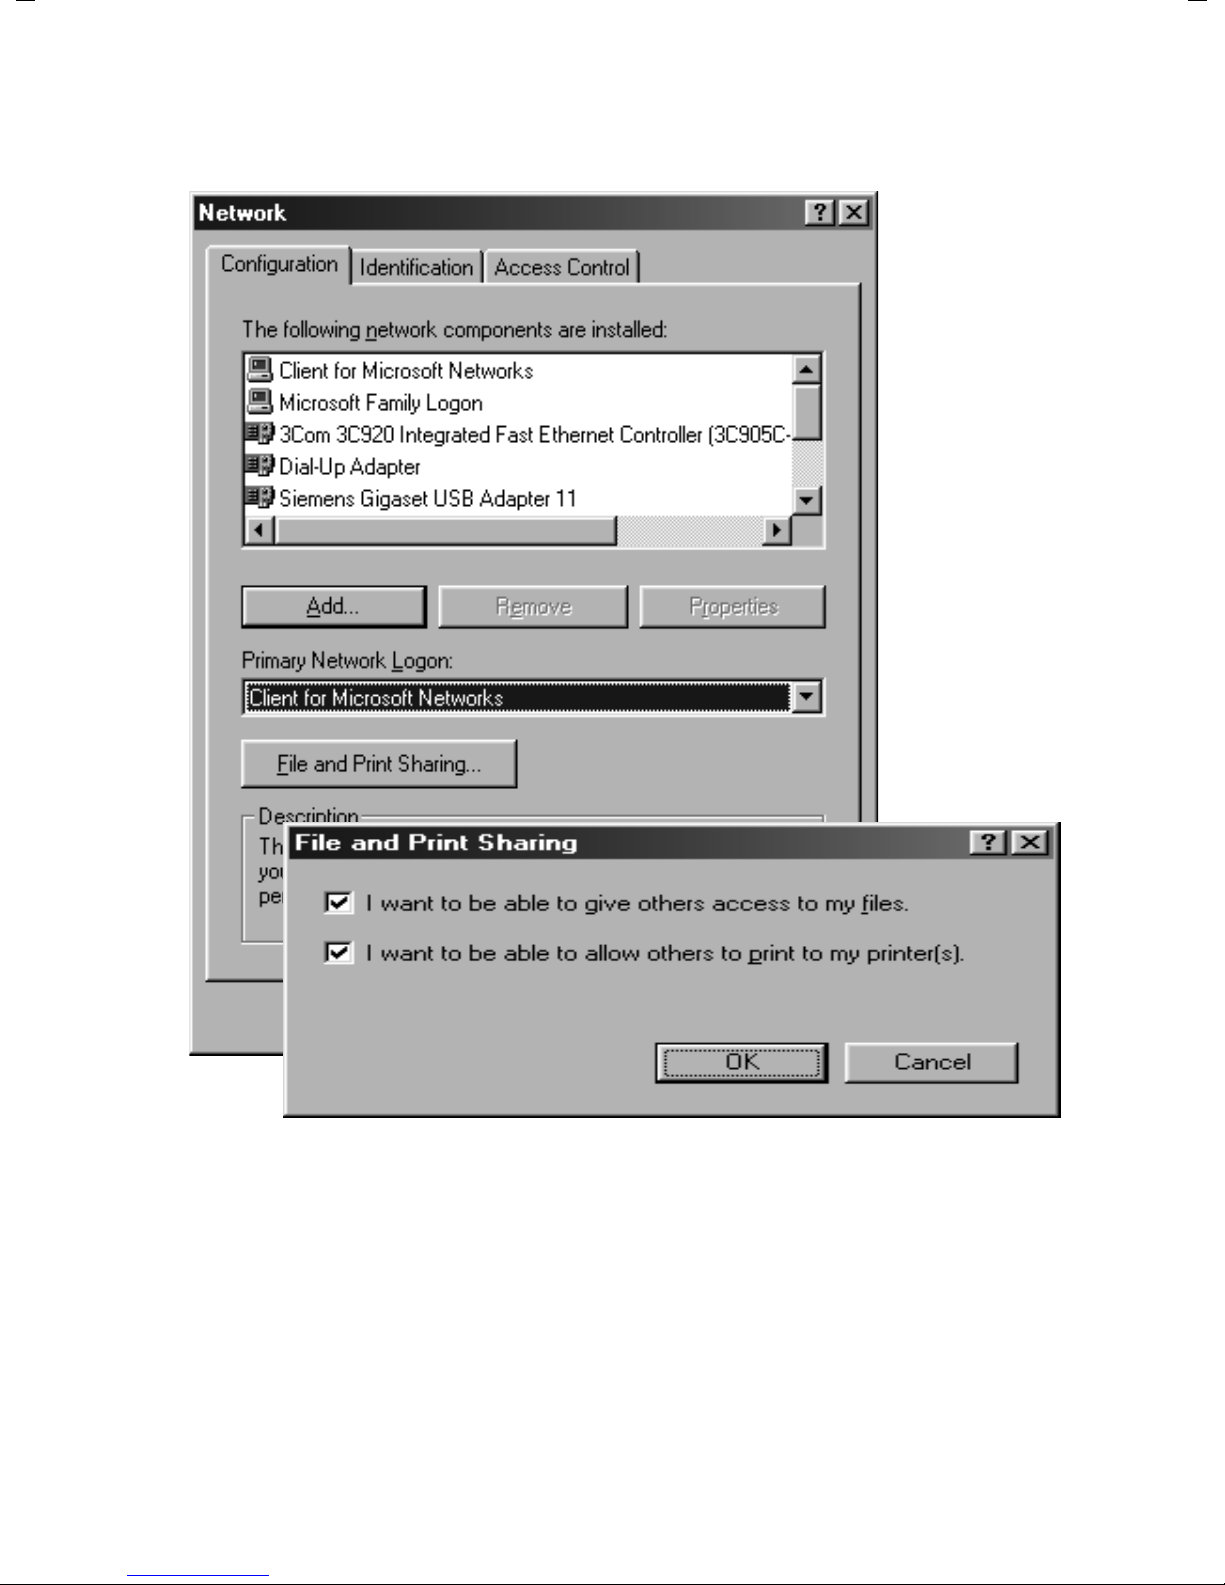
ì Now select in the Primary network logon box the entry Client for Microsoft
Networks and then click File and print sharing.
ì In the File and print sharing window you can choose whether to release files or
printers or both for other users.
ì Close all the windows with OK.
You will now need the Windows installation CD. Windows will copy some files from the
installation CD before prompting you to reboot your computer. Then the network is
ready for use.
45
Page 47
Releasing files and printers for shared use
Releasing files and printers
You can now release drives, folders or printers on your PC for other users on the network.
Releasing files
ì Open the Desktop and select with the left mouse button what you want to release.
– Select a drive or
– Open a drive and select a folder.
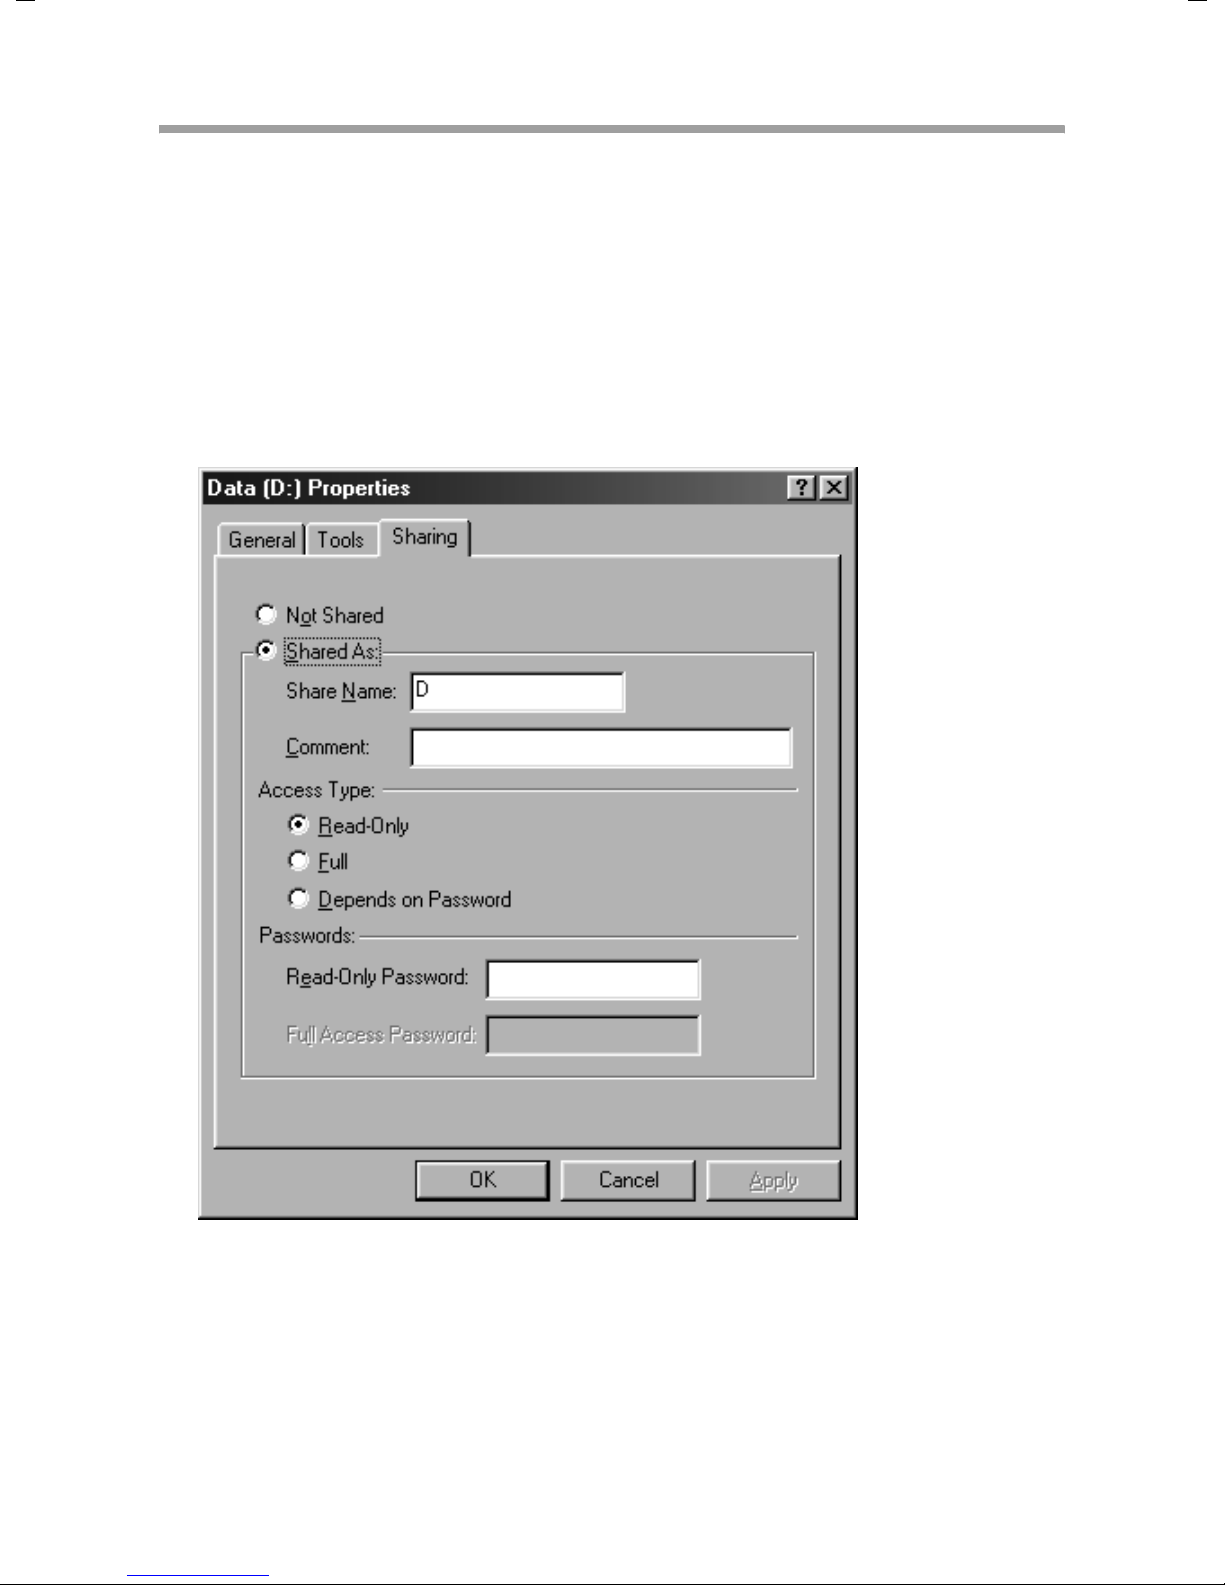
ì Now select Share with the right-hand mouse button from the pop-up menu. The fol-
lowing window will appear.
ì Now select the Shared as box and enter a share name and, if you want, a comment
of your choice. From now on, your drive or folder will appear on the network under
this name.
46
Page 48
Releasing files and printers for shared use
ì Select one of the following access types:
Read only: If you want to allow other users to open and read documents
but not edit or delete them.
Full: If you want to allow other users to edit, add or delete files.
Depends on
password: If you want to grant various users different access rights.
ì Click Apply to save your settings and finish with OK.
Releasing printers
ì Open the printer manager with Start – Settings – Printers.
ì Left-click the printer you want to release.
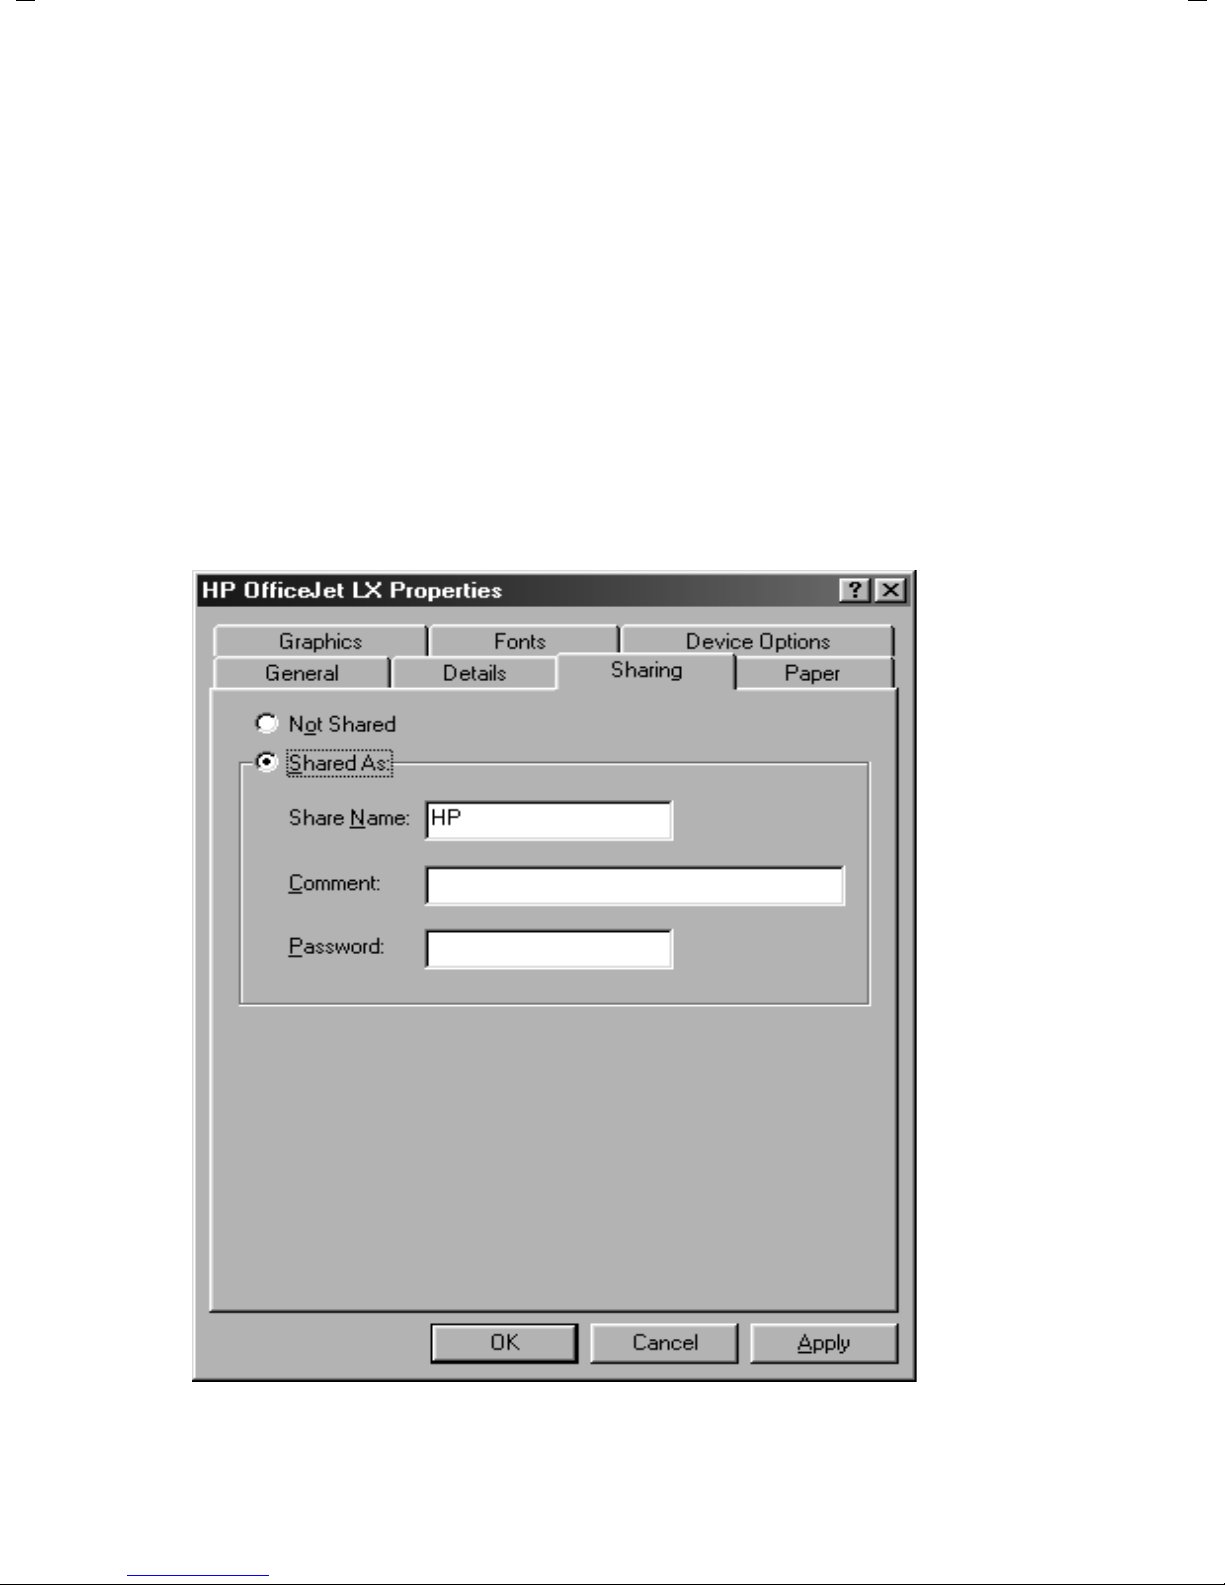
ì Now select Share with the right-hand mouse button from the pop-up menu. The fol-
lowing window will appear.
47
Page 49

Releasing files and printers for shared use
ì Now select the Shared as box and enter a share name and, if you want, a comment
of your choice. From now on, your printer will be available to all the other users on
the network under this name.
ì Click Apply to save your settings and finish with OK.
48
Page 50

Using released files and printers
Using released files and printers
This chapter describes the steps for using files or printers that are shared on the network
on your system. It assumes that the network cards or wireless network adapters are
installed in your PC and that the PCs are either connected via a router or directly via an
ad-hoc network.
Network configuration, release and use differ depending on the Windows operating
system used.
The following table provides an overview of where you can find the relevant information in this chapter.
Windows XP Windows
2000
Setting up user names page 50 page 58 page 63
Using files on other PCs page 53 page 58 page 66
Using printers on other PCs page 55 page 61 page 69
Windows 98
49
Page 51
Using released files and printers
Using files and printers on the network (Windows XP)
You can use resources on your PC such as files and printers that have been made available by other PCs.
If the resource you want to use on your PC is on a Windows 2000 system then you have
to set up user accounts for all the users who are to have access. The same user IDs have
to be entered as on the releasing system.
Setting up a user account
To set up a user account:
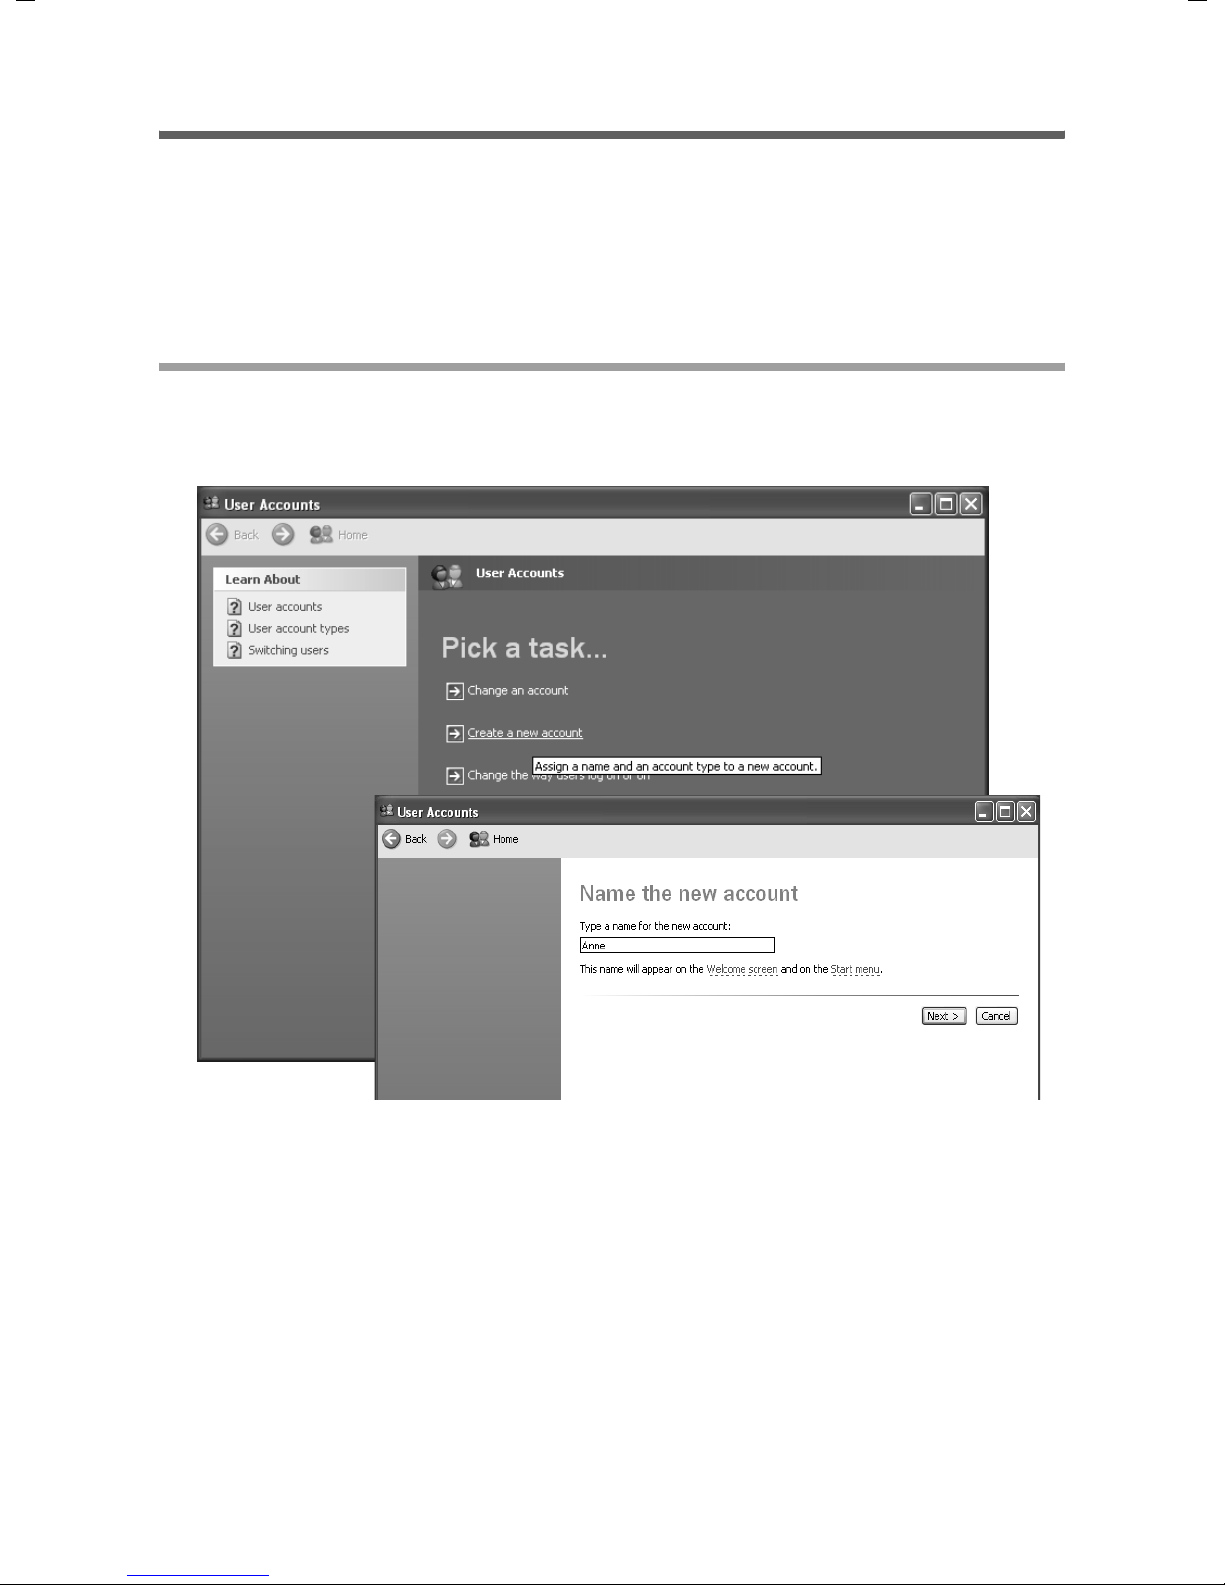
ì Open the Control Panel and then User accounts.
ì Select Create new account.
ì Enter a name for the user.
ì Click Next.
50
Page 52
Using released files and printers
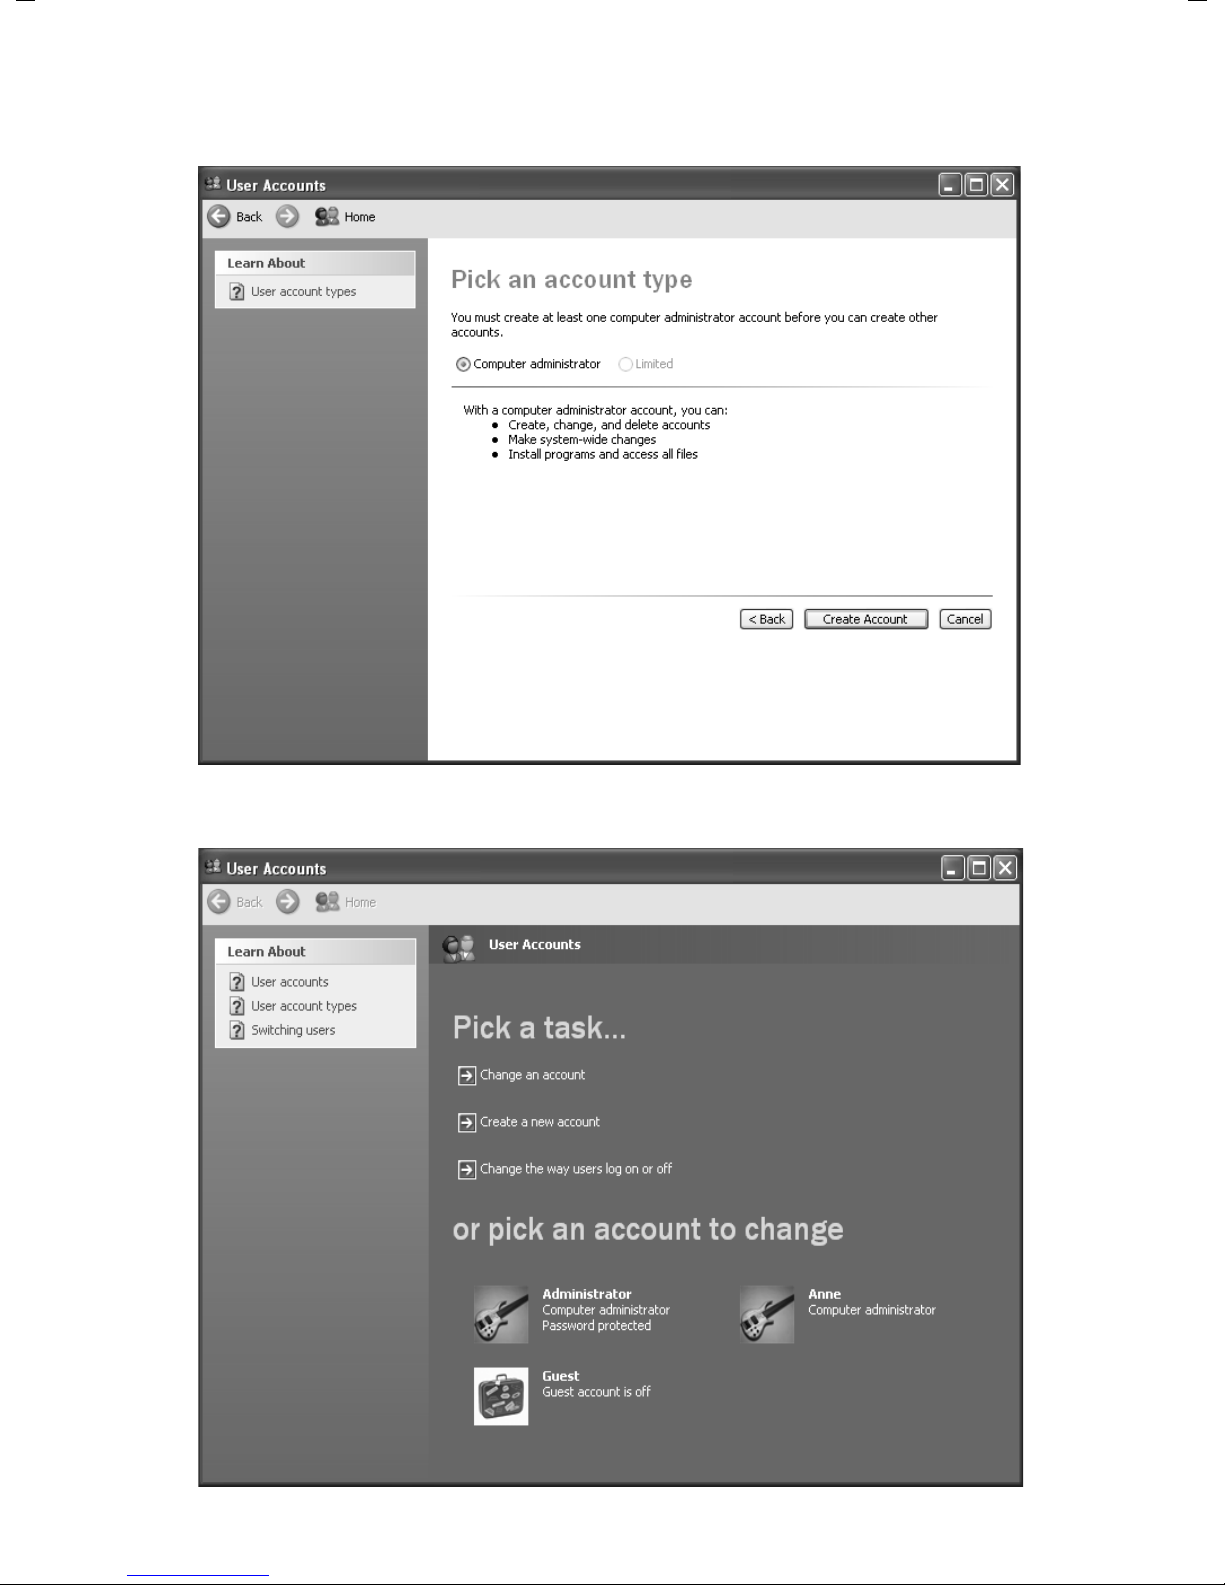
ì Select Limited as account type. Then the newly created user will not have any
administrator rights on your PC.
ì Click Create account. You will now see the new user account.
51
Page 53
Using released files and printers
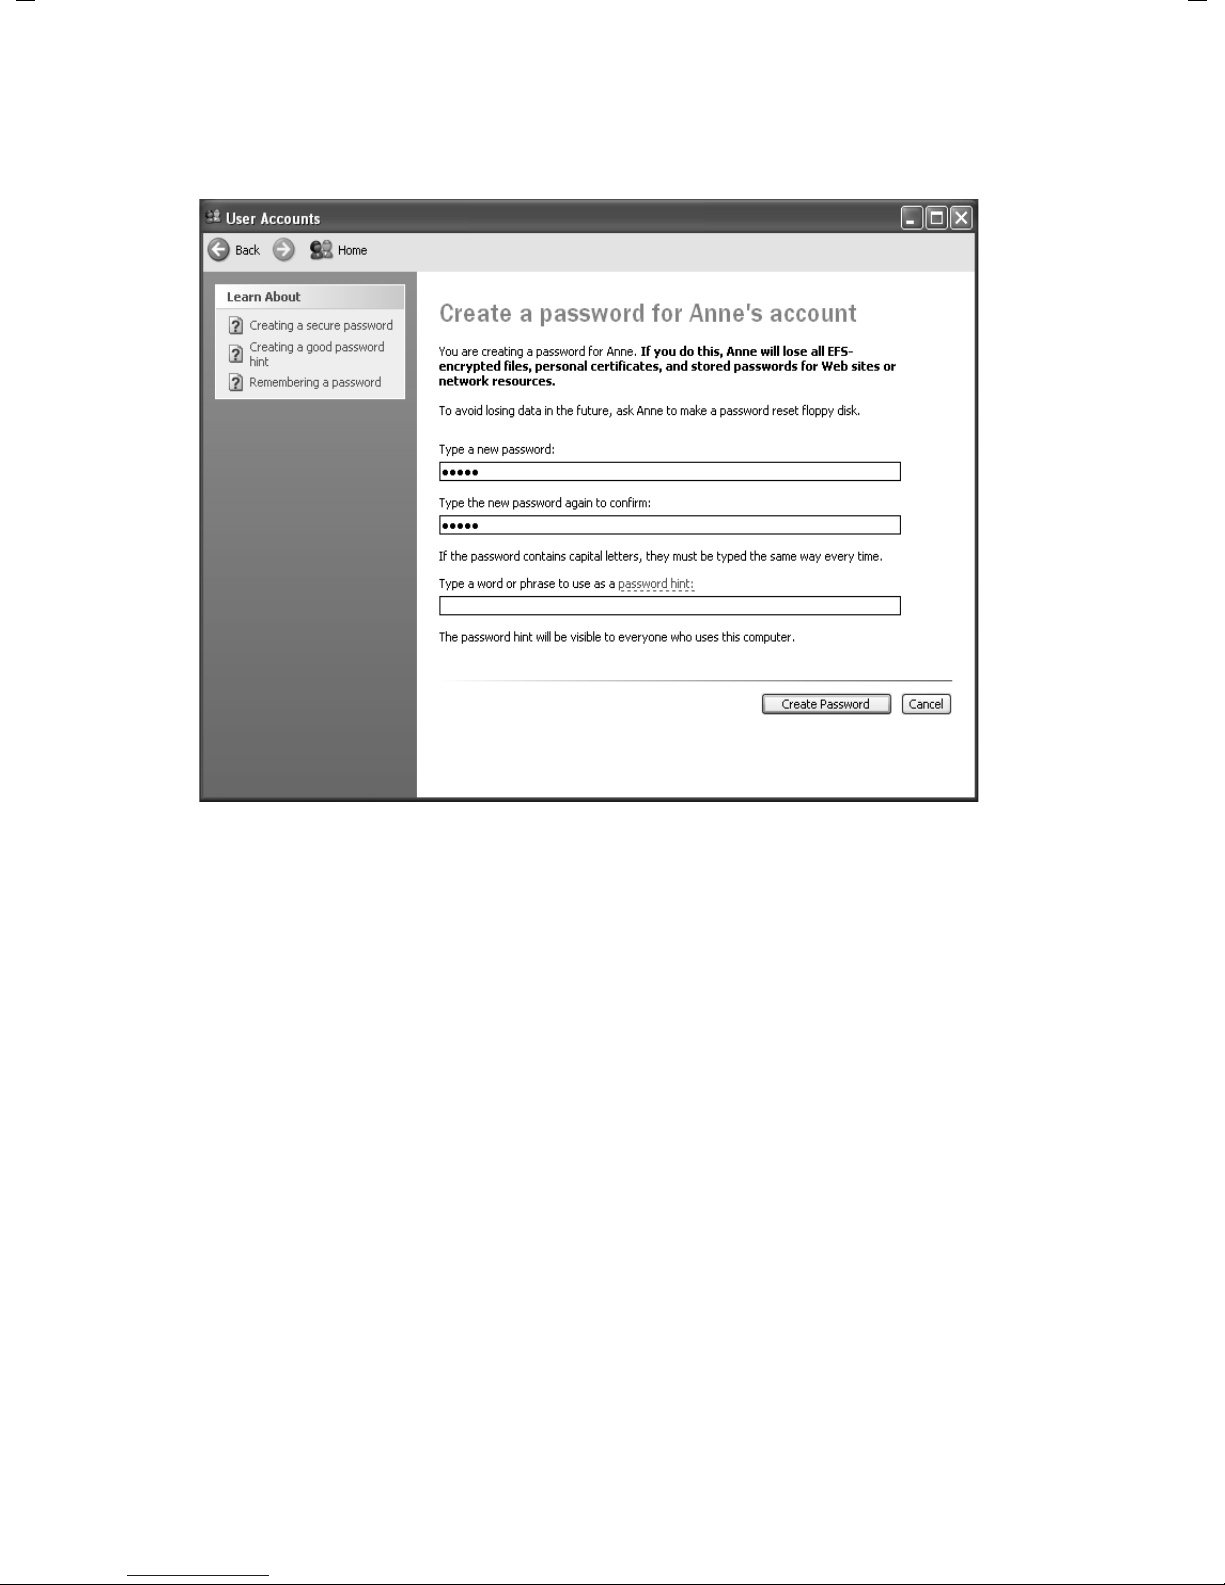
ì You should now assign a password. To do this click the new user account.
ì Select Create Password.
ì Enter a password and then enter it again as confirmation.
ì Click Create Password.
52
Page 54
Using released files and printers
Accessing released drives or folders from your PC
You can access drives and folders released on other PCs in two different ways:
u via the My NetworkPlaces of your PC (see page 66).
You should choose this alternative if for example you want to copy files or folders
from another PC to your own or vice versa.
u by hooking on to your PC's file system (see page 53).
You should choose this alternative if you want to work directly with the files or folders of the other PC. In this case, hook on an entire released drive or folder in your
PC's file system and work with the files as if they were files on your PC.
Please note:
Drives or folders can be simultaneously hooked onto several PCs. It is therefore possible for other users to access the data. Most applications (e. g. word processing software) lock files once they have been opened. This prevents inconsistent data pools. If
you cannot open a file because it is locked, you will normally see a message to that
effect.
To hook up network drives:
ì Open the Desktop.
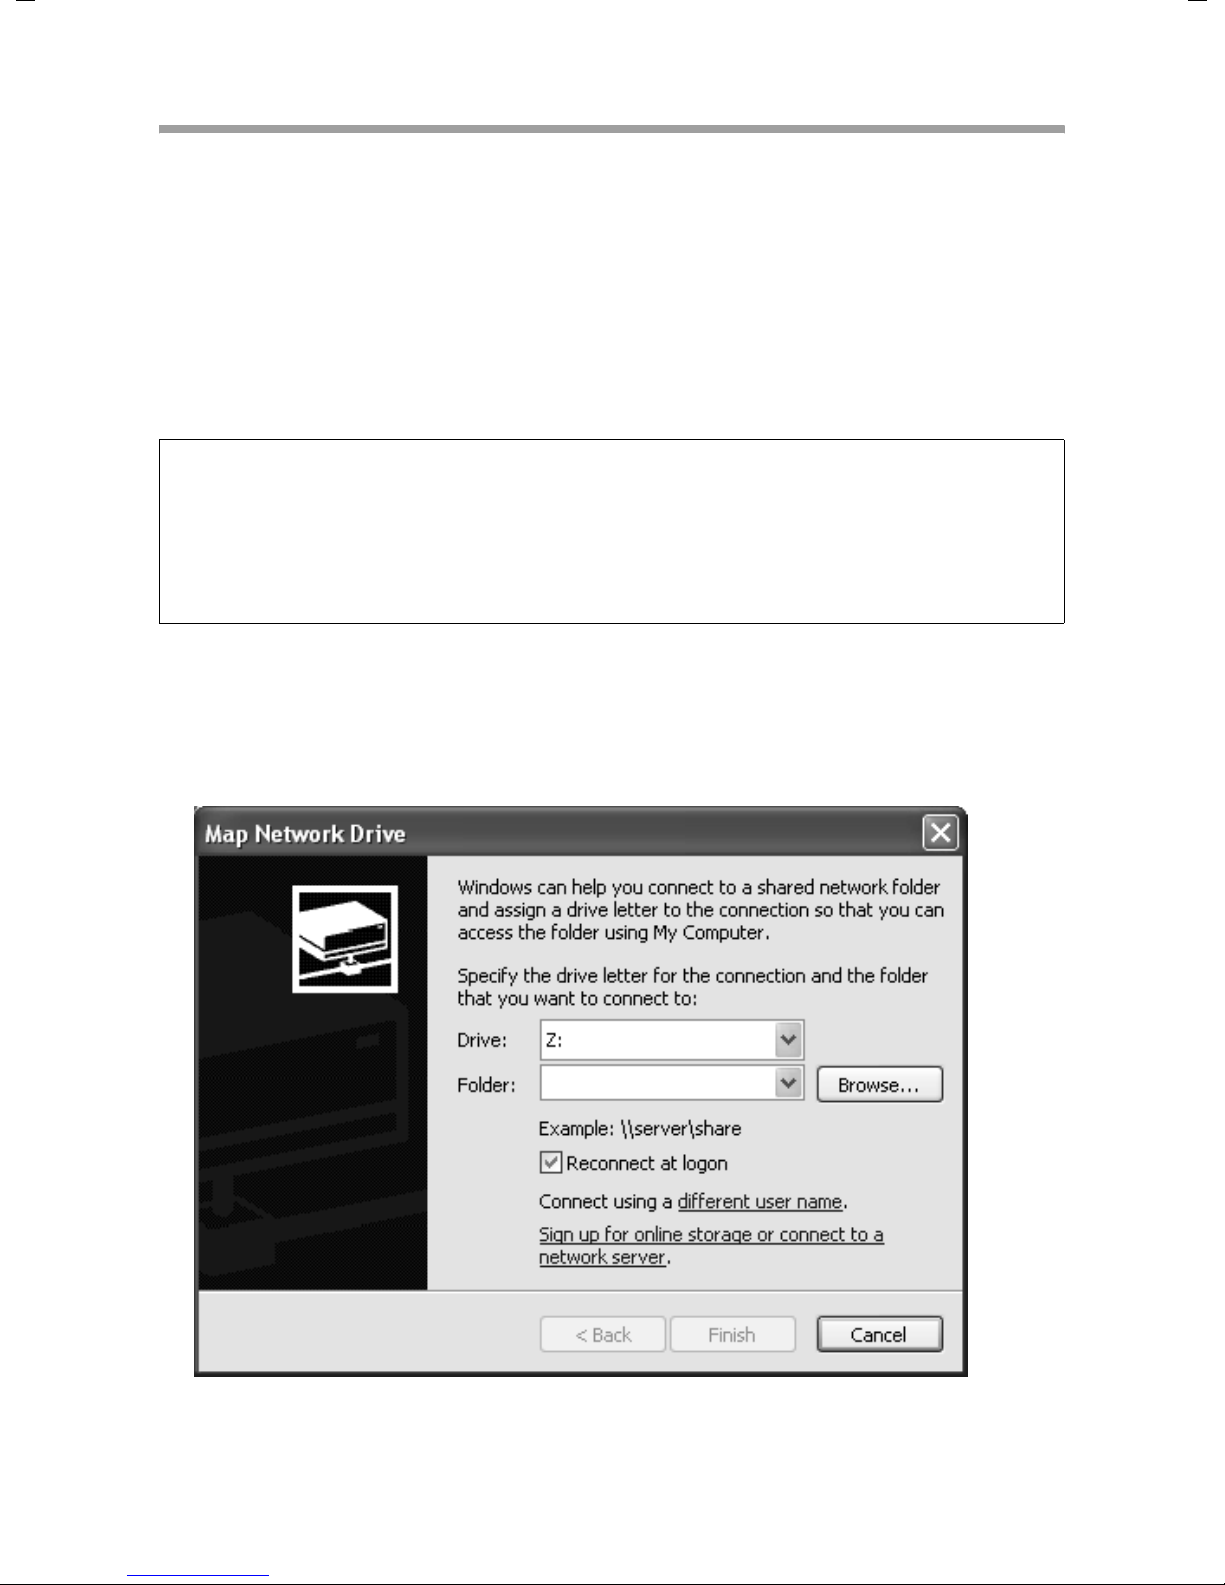
ì In the Extras menu, select Map network drive.
ì Select the drive name under which the remote drive is to be hooked on to your PC.
53
Page 55
Using released files and printers
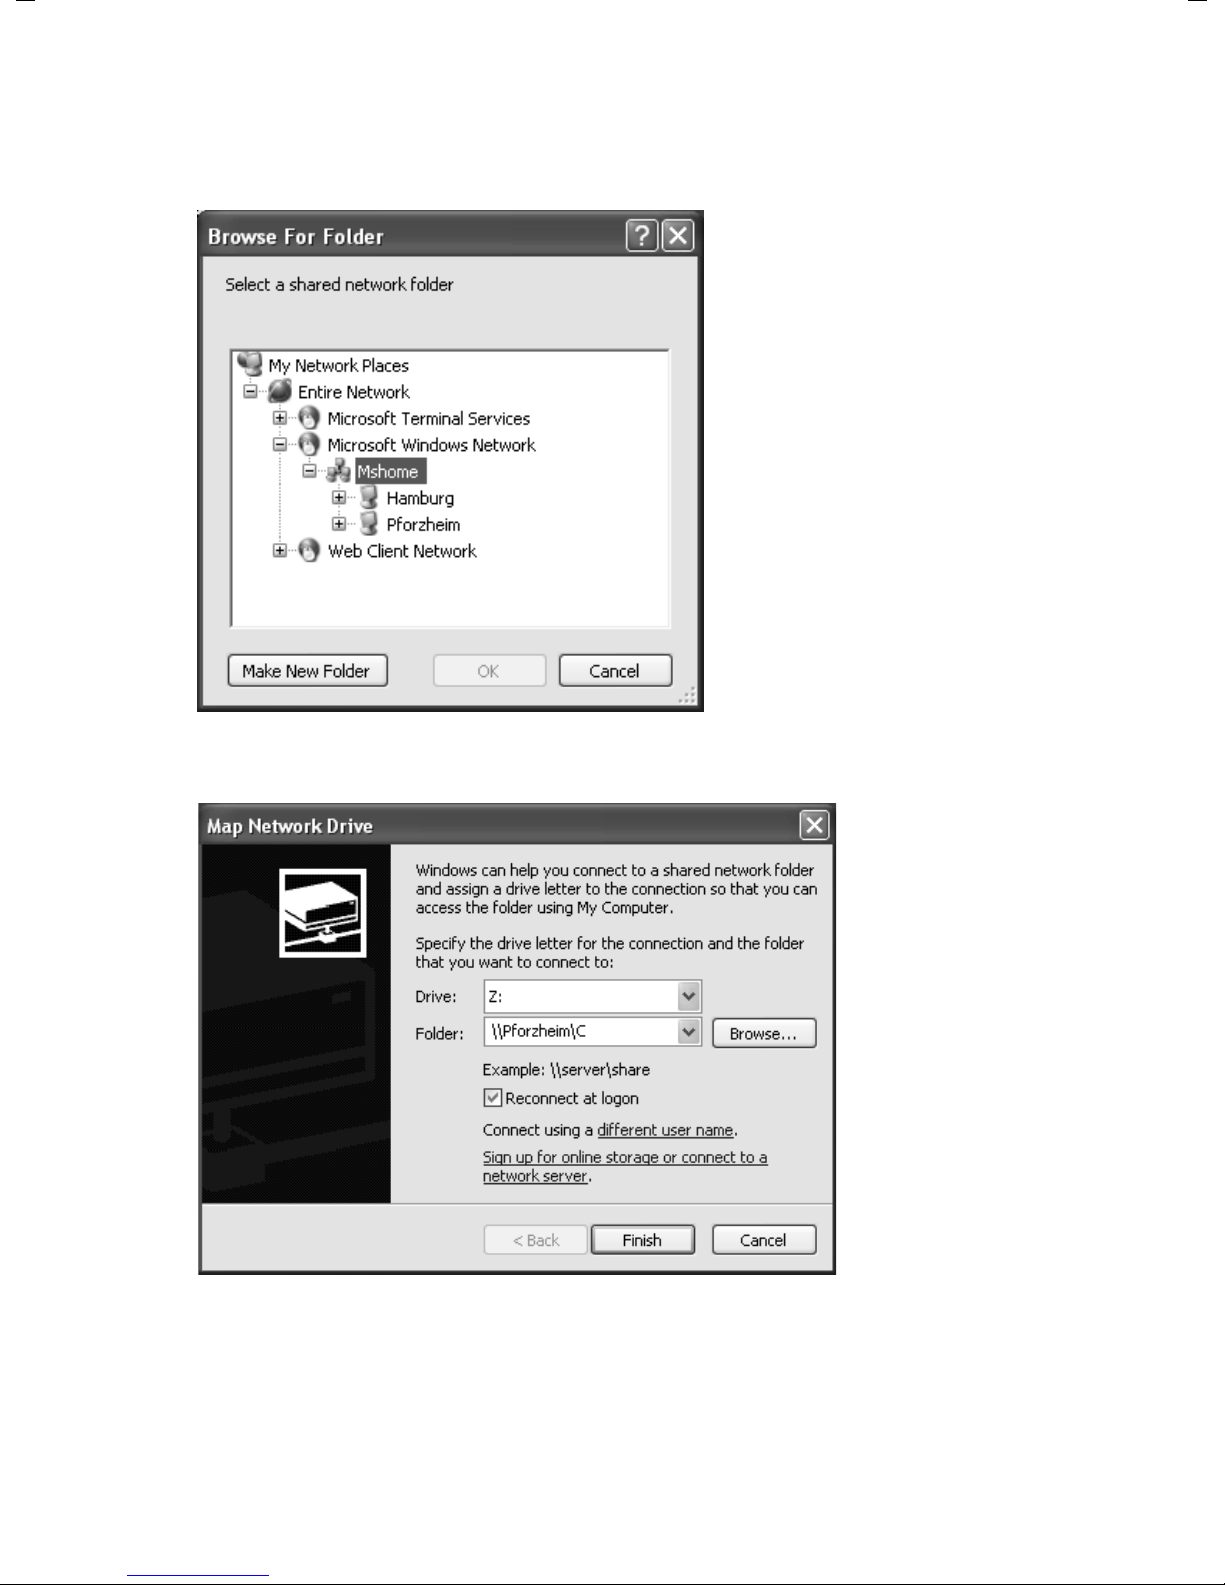
ì Enter a name under which the drive or folder is to be released for the network. To do
this click Browse. This will open a screen in which you can search the network environment.
ì Select the resource you want and click OK.
ì If you select the option Reconnect at logon, Windows will hook the drive on every
time you start your PC, provided the remote PC is running.
ì Click Finish.
ì Now open the desktop. The remote drive is now available as the network drive. You
can access the files as if they were on your own PC.
54
Page 56
Using released files and printers
Accessing released printers from your PC
If there is a printer on your local network and it has been released, you can use it to print
out your data. To do this you have to set it up on your PC as the network printer. This can
be done as follows:
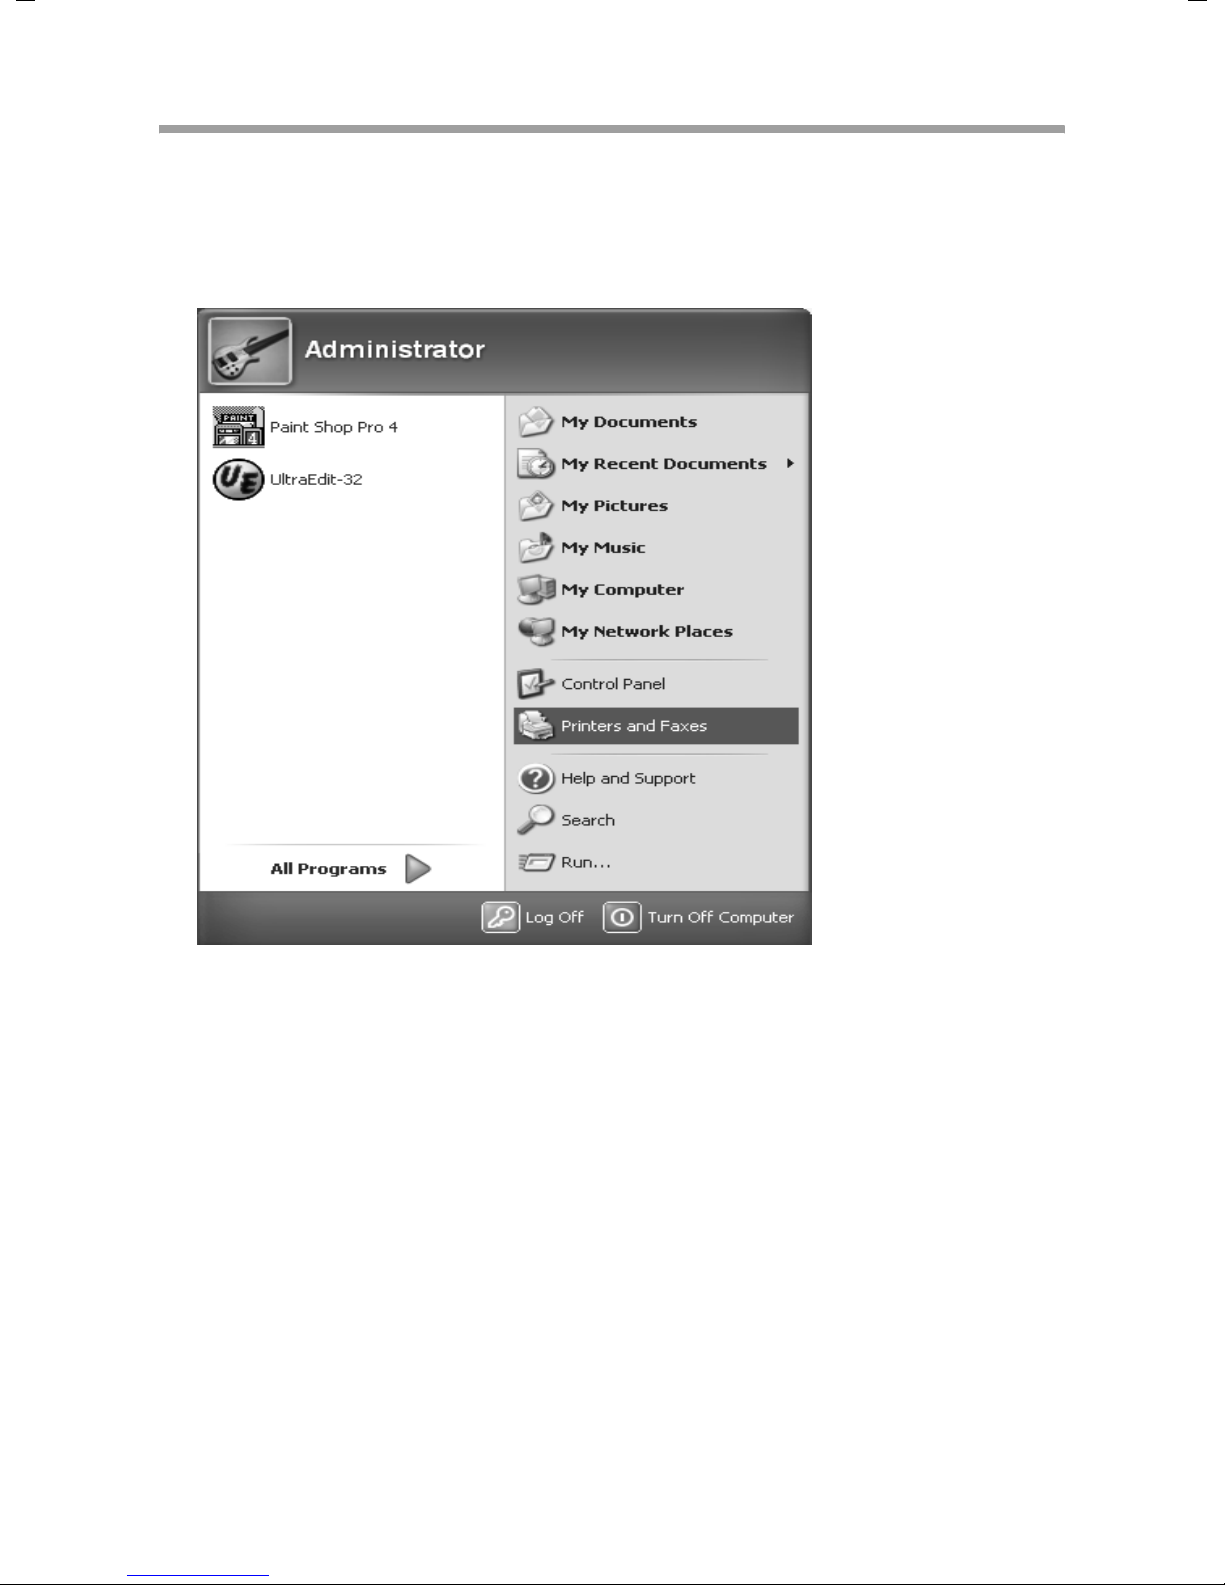
ì Open the printer manager with Printers and Faxes in the Start menu.
ì Select Add printer. This opens the printer installation wizard.
ì Click Next.
ì In the next window select Network printer or printer connected to another com-
puter.
ì Click Next again.
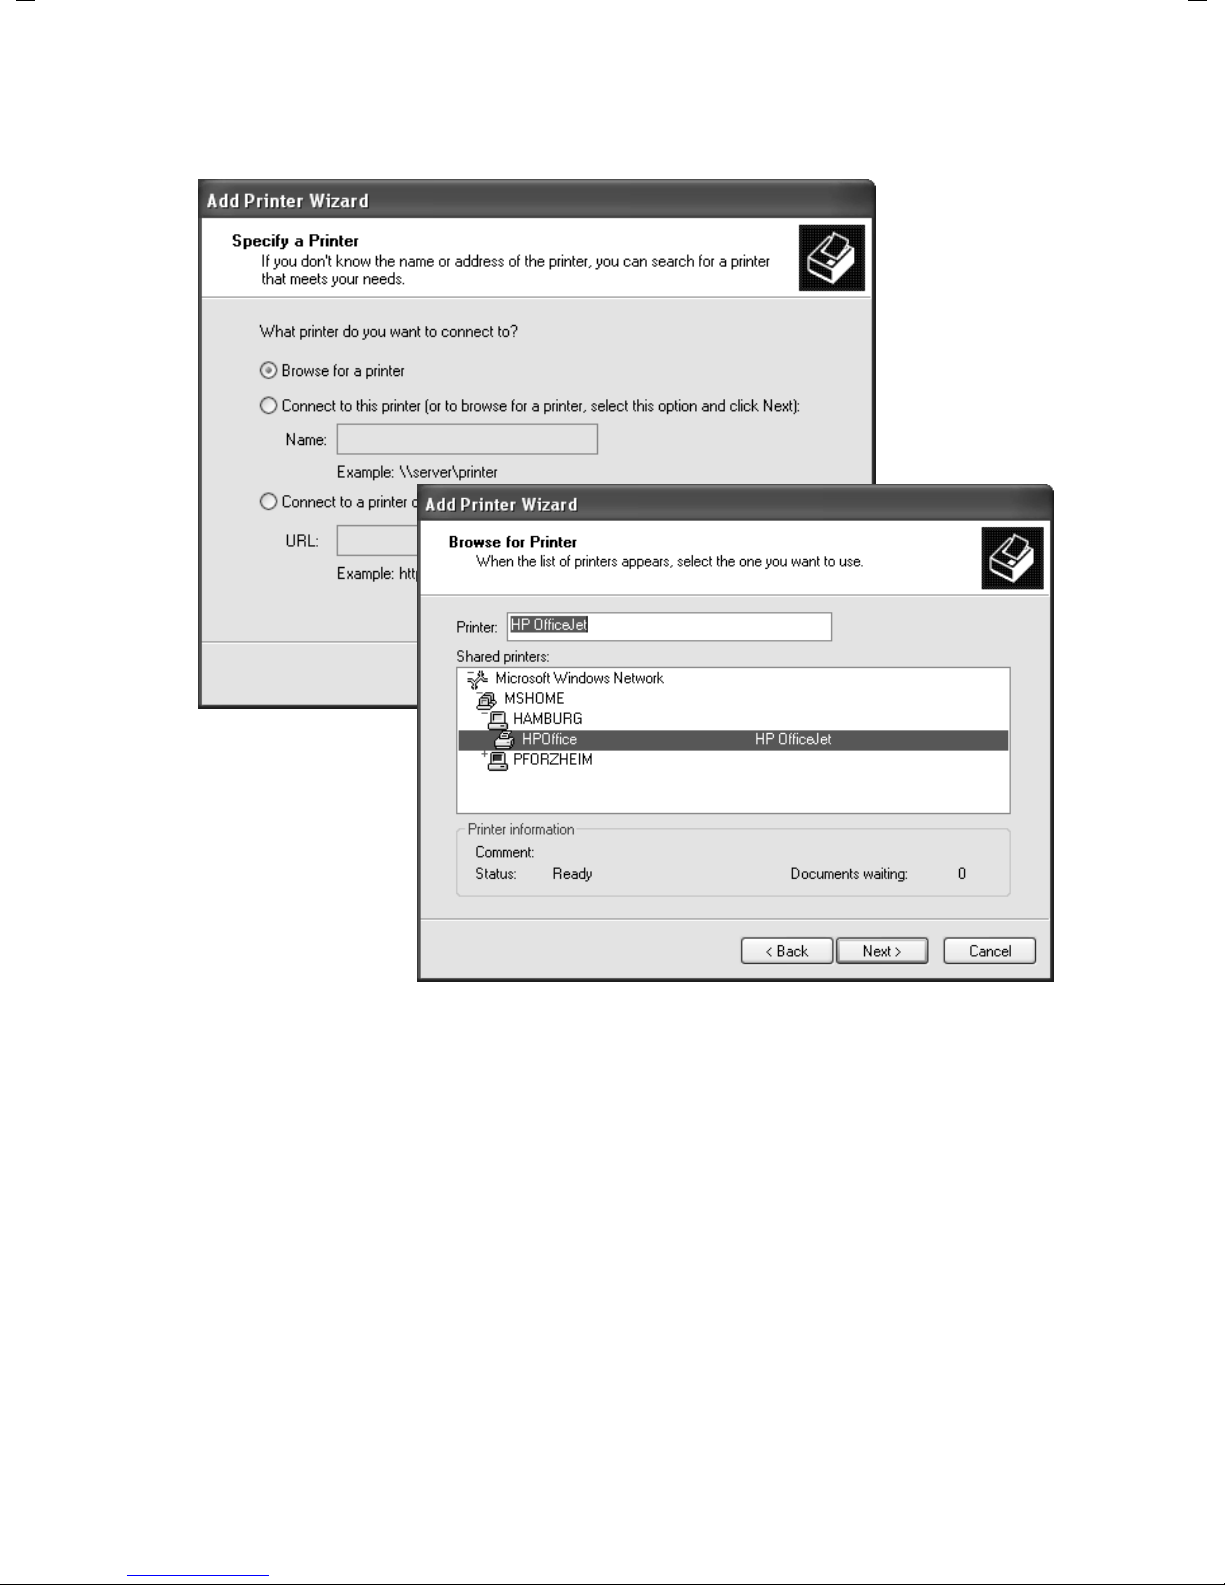
ì Select Browse for a printer to look for the printer on the network.
55
Page 57
Using released files and printers
ì Click Next. This will open a screen in which you can search the network environment
for the printer.
ì Select the printer you want and click Next.
56
Page 58
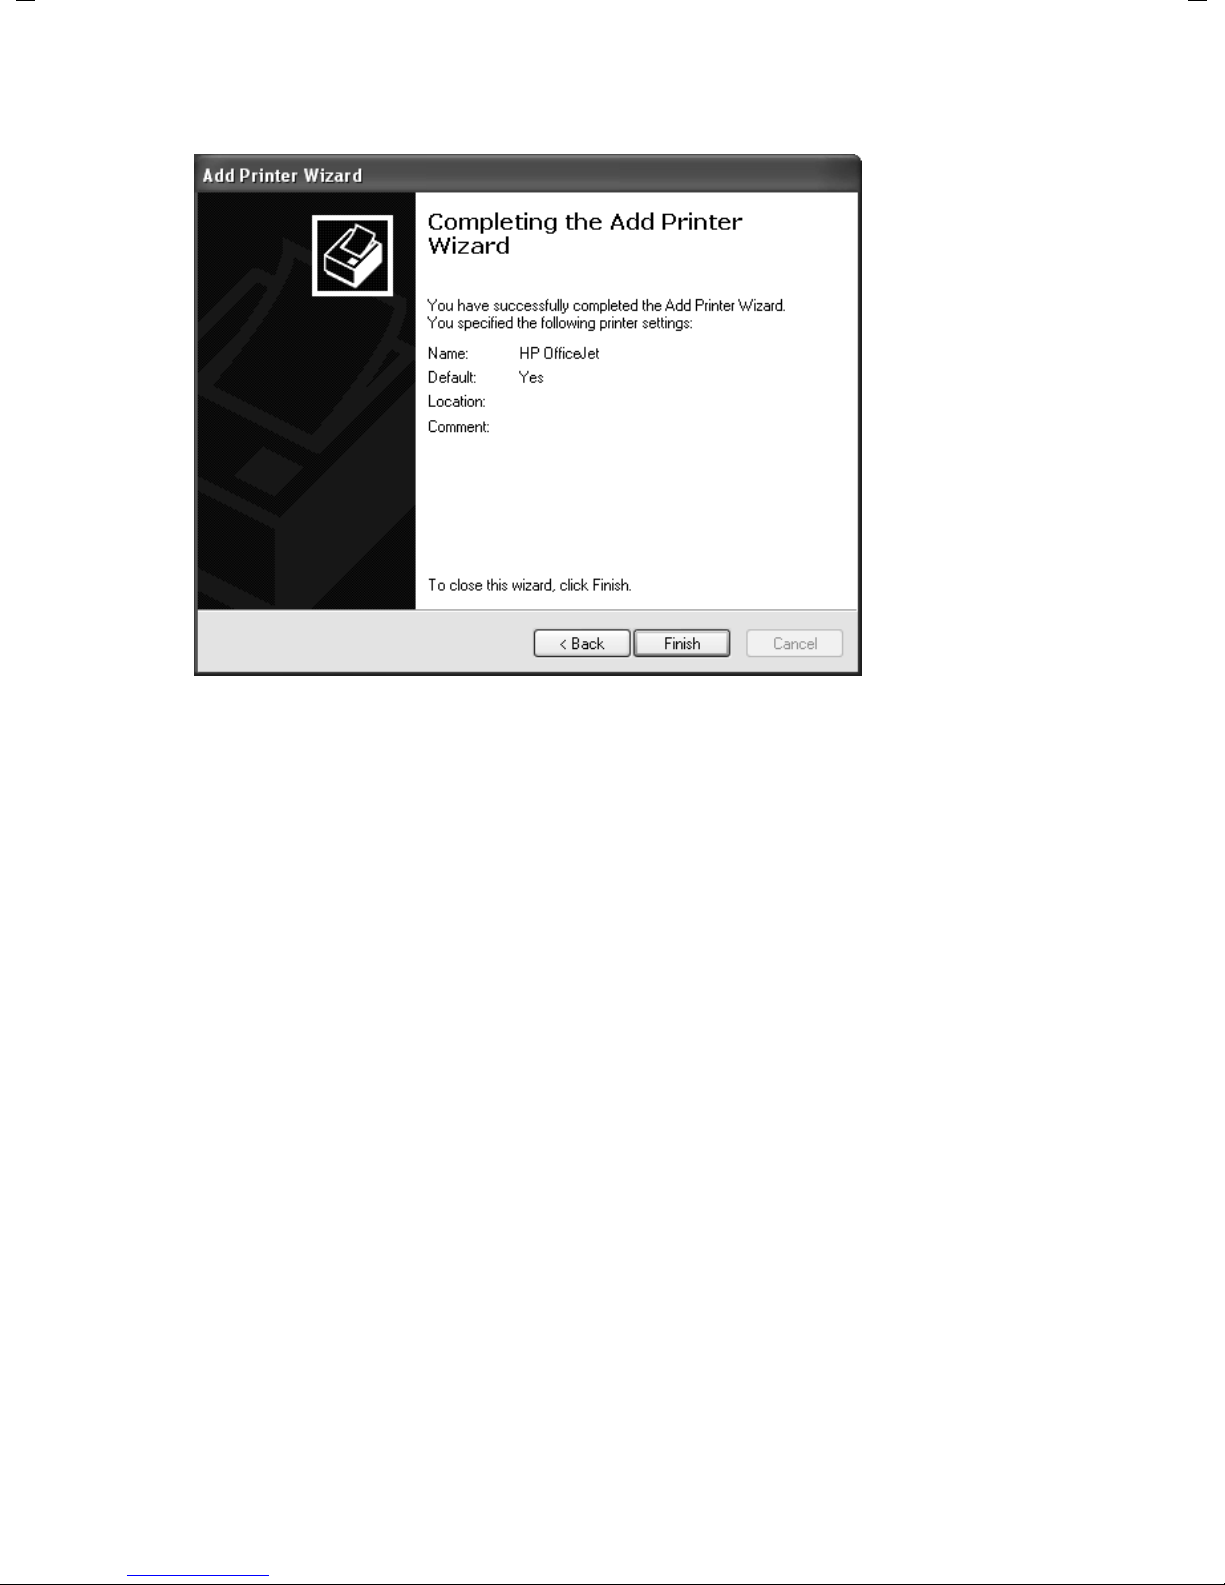
ì Complete printer installation with Finish.
Using released files and printers
The newly installed printer will now appear in the printer list and can be used just like a
local printer.
57
Page 59

Using released files and printers
Using files and printers on the network (Windows 2000)
You can use resources on your PC such as files and printers that have been made available by other PCs. To do this you have to make these resources available on your PC.
Setting up user names
To access files or printers on a Windows 2000 computer, you must set up a user name
that corresponds to the release. This user name must also have been set up on the system which is releasing the files or printers. That is why setting up a user name has
already been described in Chapter "Releasing files and printers for shared use" in the section "Setting up user names" on page 29.
Accessing released drives or folders from your PC
You can access drives and folders released on other PCs in two different ways:
u via the My NetworkPlaces of your PC (see page 66).
You should choose this alternative if for example you want to copy files or folders
from another PC to your own or vice versa.
u by hooking on to your PC's file system (see page 59).
You should choose this alternative if you want to work directly with the files or folders of the other PC. In this case, hook on an entire released drive or folder in your
PC's file system and work with the files as if they were files on your PC.
Please note:
Drives or folders can be simultaneously hooked onto several PCs. It is therefore
possible for other users to access the data. Most applications (e. g. word processing software) lock files once they have been opened. This prevents inconsistent
data pools. If you cannot open a file because it is locked, you will normally see a
message to that effect.
58
Page 60
Using released files and printers
To hook up network drives:
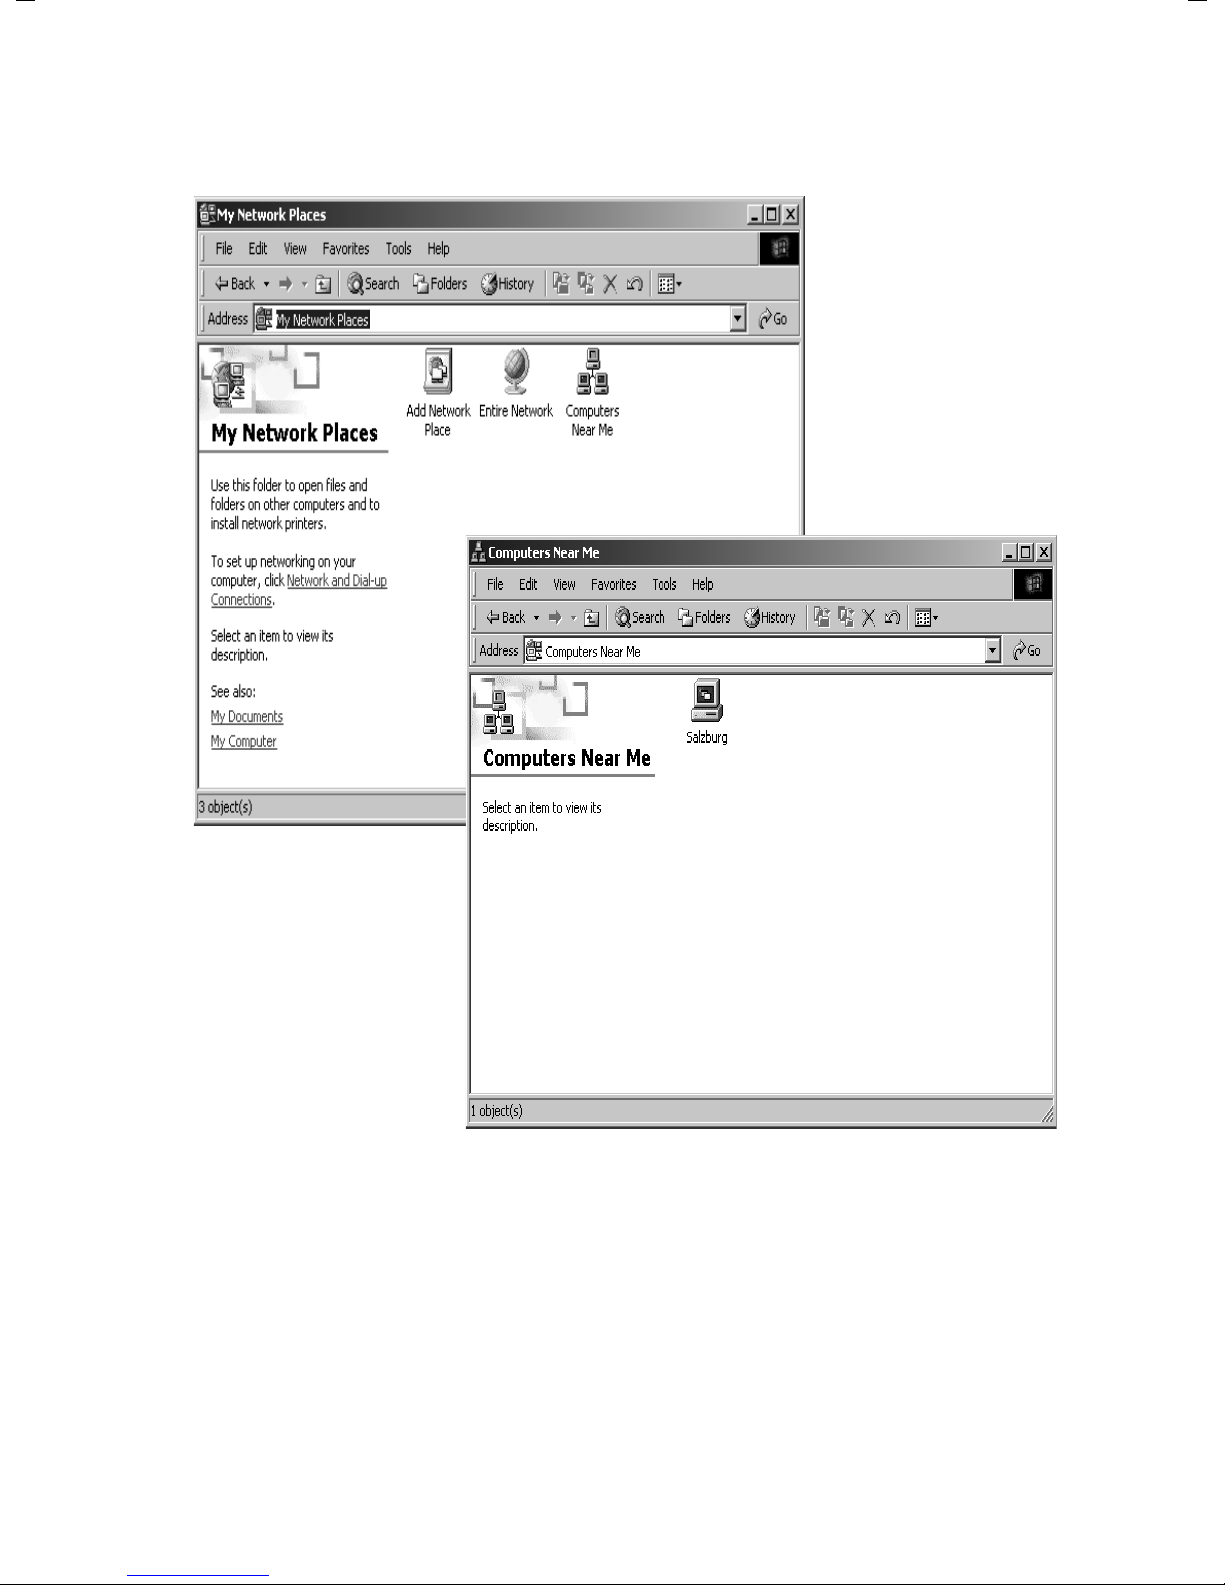
ì Open the My NetworkPlaces and then Computers near me.
ì Open the PC containing the resources you want to access with a double click. You
will now see the shared resources on that PC.
59
Page 61
Using released files and printers
ì Left-click the resource you want to attach to your PC and open the pop-up menu
with the right-hand mouse button Map network drive.
ì Select the drive name under which the remote drive is to be hooked on to your PC.
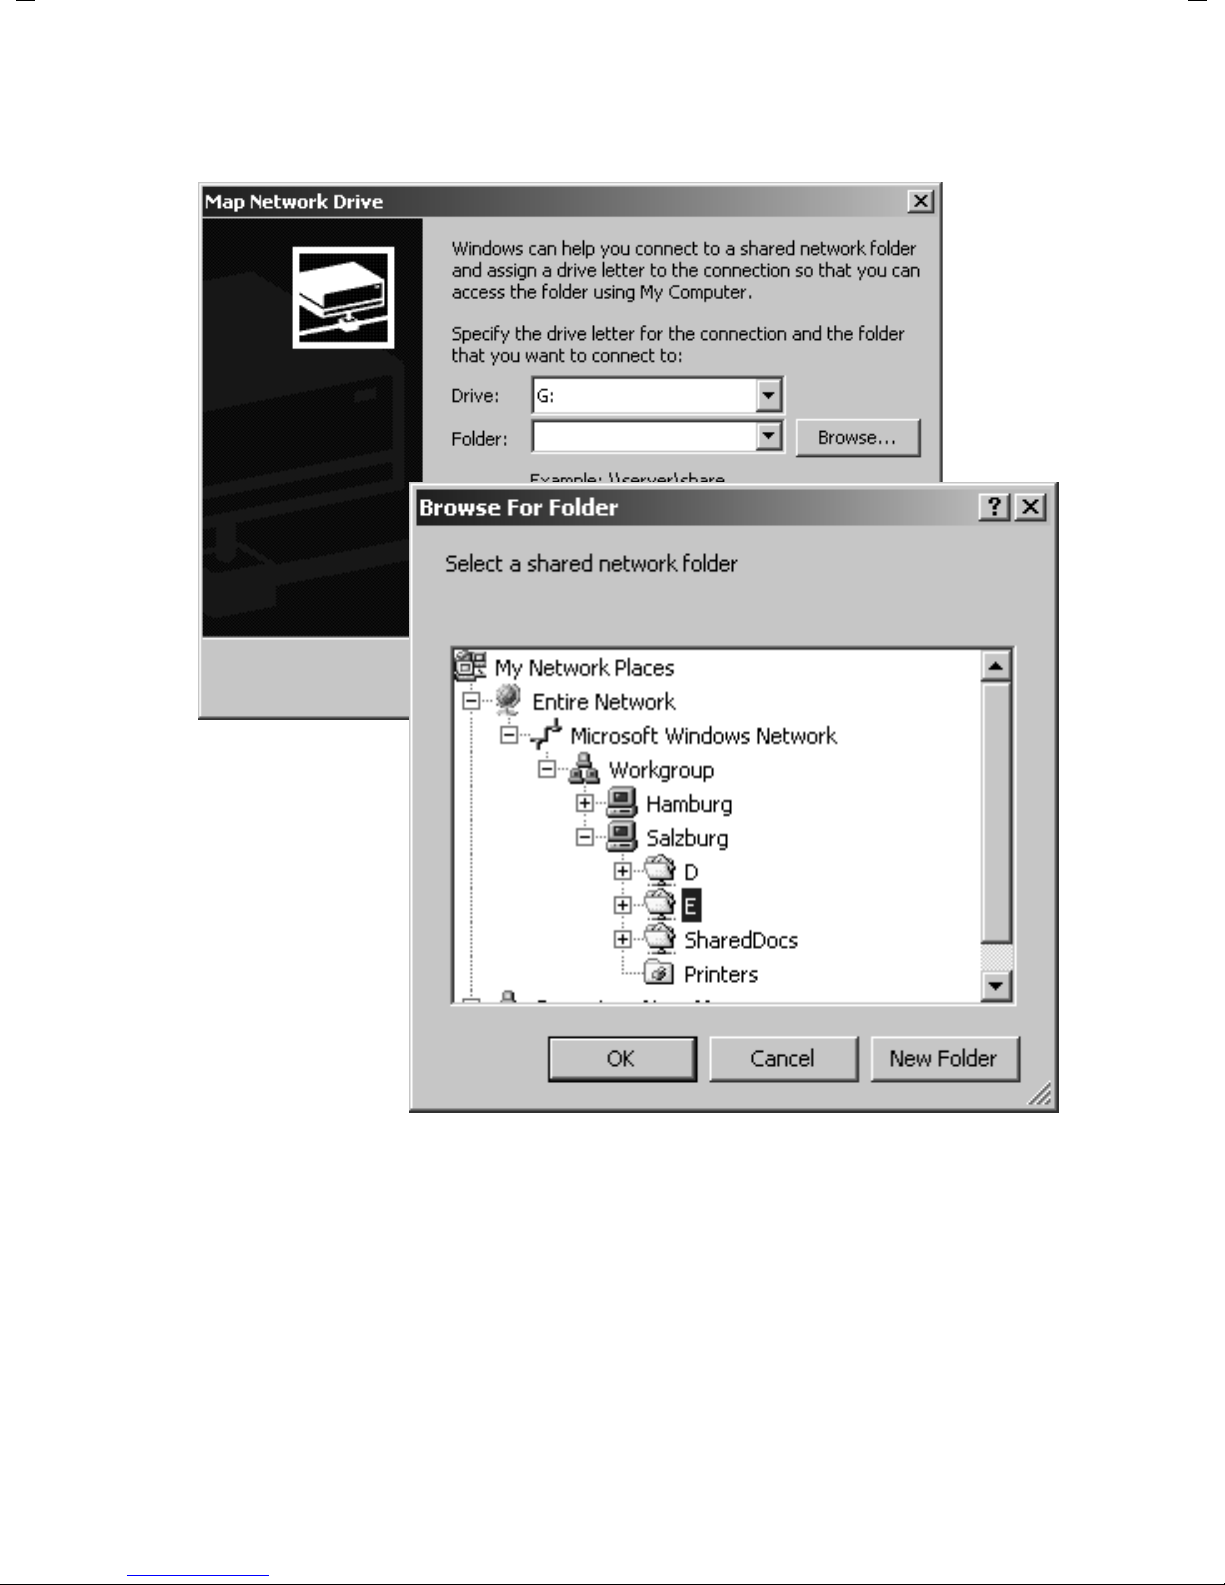
ì Enter a name under which the drive or folder was released or click Browse. This will
open a screen in which you can search the network environment.
60
Page 62
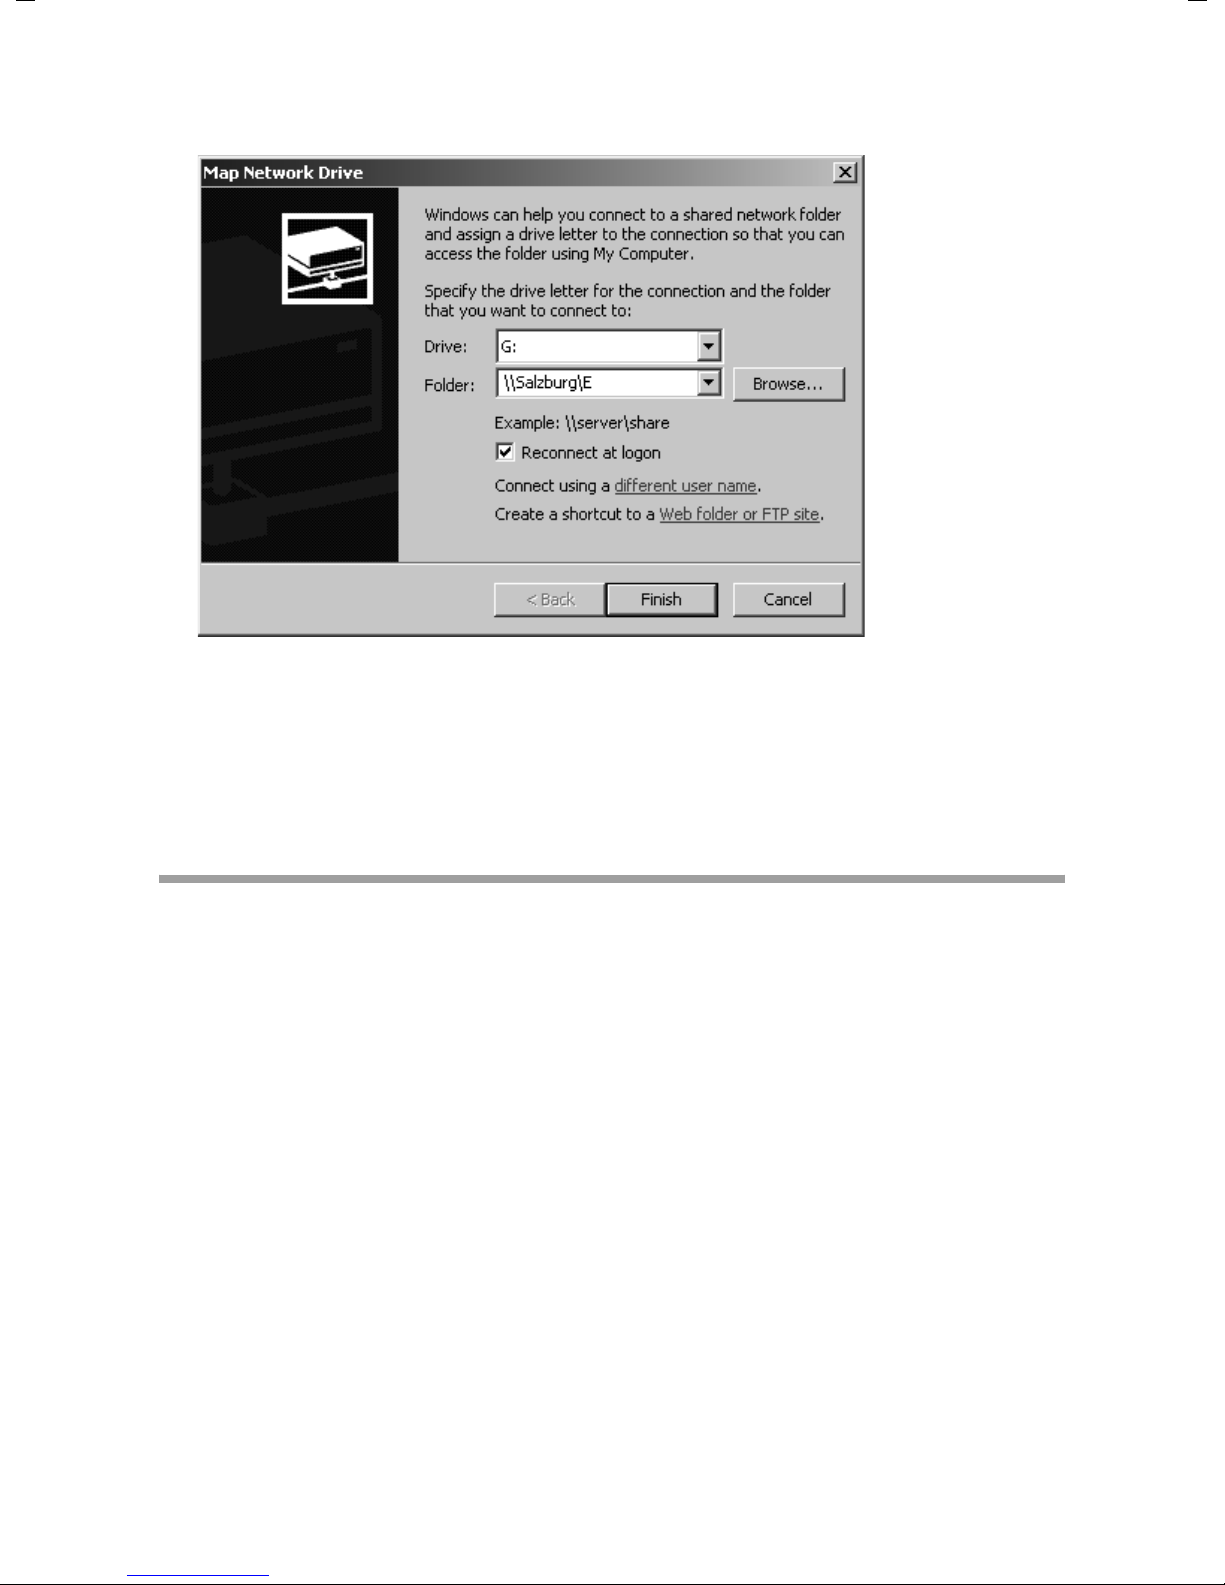
ì Select the resource you want and click OK.
Using released files and printers
ì If you select the option Reconnect at logon, Windows will hook the drive on every
time you start your PC, provided the remote PC is running.
ì Click Finish.
ì Now open the Desktop. The remote drive is now available as the network drive. You
can access the files as if they were on your own PC.
Accessing released printers from your PC
If there is a printer on your local network and it has been released, you can use it to print
out your data. To do this you have to set it up on your PC as the network printer. This can
be done as follows:
ì Open the printer manager with Start – Settings – Printers.
ì Click the Add printer icon. This opens the printer installation wizard.
ì Click Next.
ì In the next window select Network printer.
ì Click Next again.
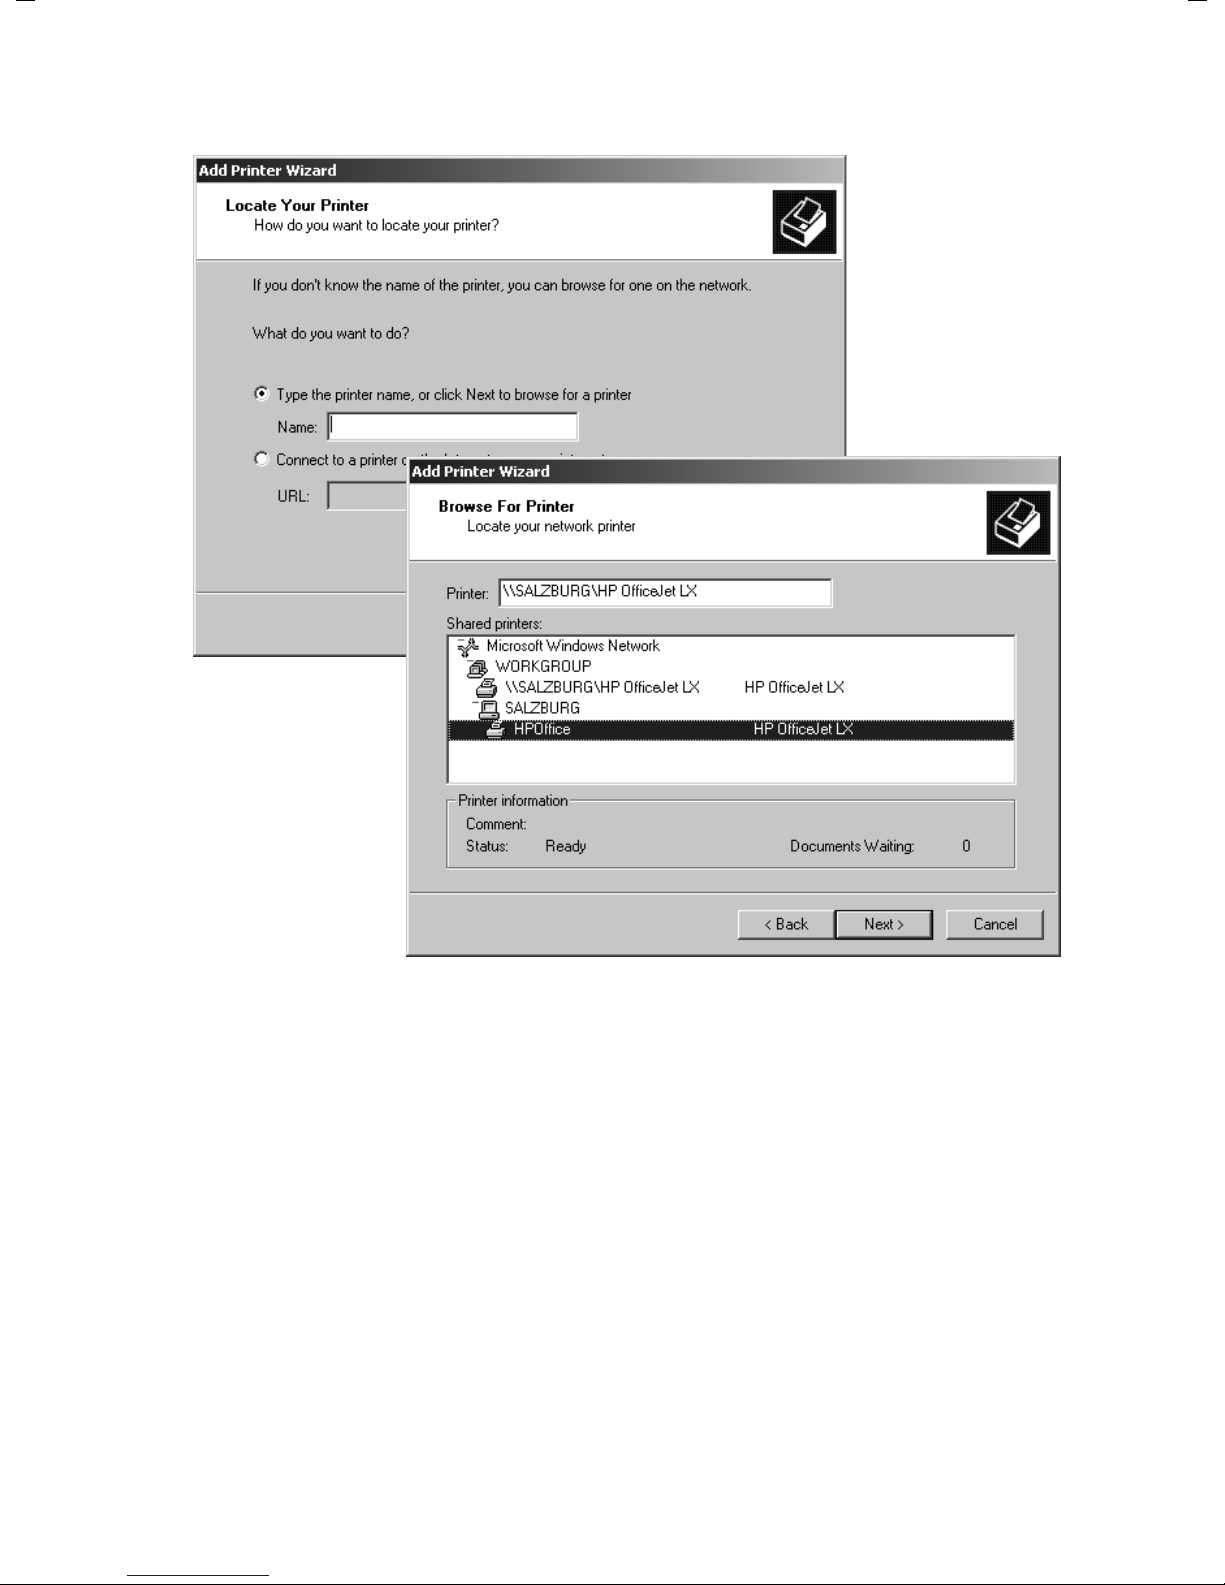
ì Select Enter printer name or click "next" to look for a printer and click Next. This
will open a screen in which you can search the network environment for the printer.
61
Page 63
Using released files and printers
ì Select the printer you want and click Next.
ì Answer the prompt whether the printer is to be used as the standard printer with Yes
or No and click Next.
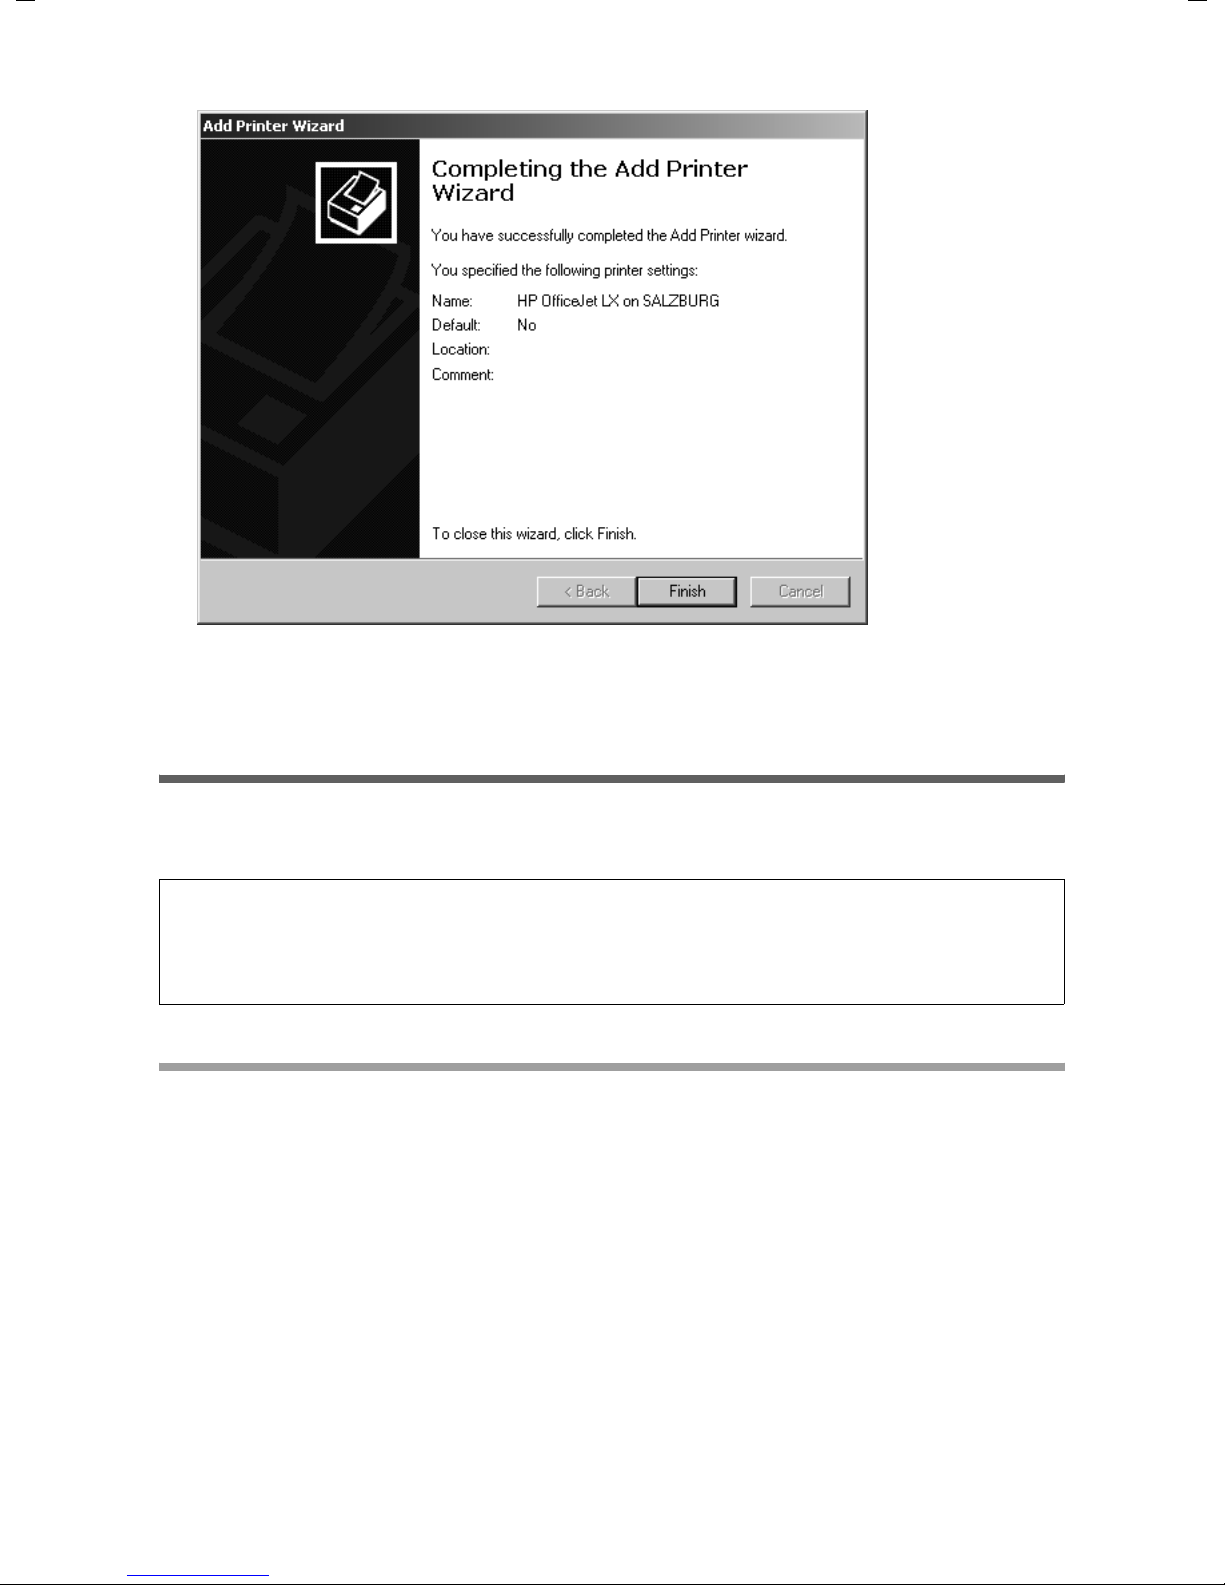
ì Complete printer installation with Finish.
62
Page 64
Using released files and printers
The newly installed printer will now appear in the printer list and can be used just like a
local printer.
Using files and printers on the network (Win 98 / 98 SE / ME)
You can use resources on your PC such as files and printers that have been released by
other PCs.
Please note:
If the resource you want to use on your PC is on a Windows 2000 system then you have
to set up user IDs for all the users who are to have access. The same user IDs have to
be entered as on the releasing system.
Setting up user names
To set up a user ID:
ì Open the Control Panel and then open User.
ì If there are no user entries yet, you will see a welcome screen. Confirm this with
Next.
ì If there are user names already, you will see the user list. Click New user and then
Next.
63
Page 65
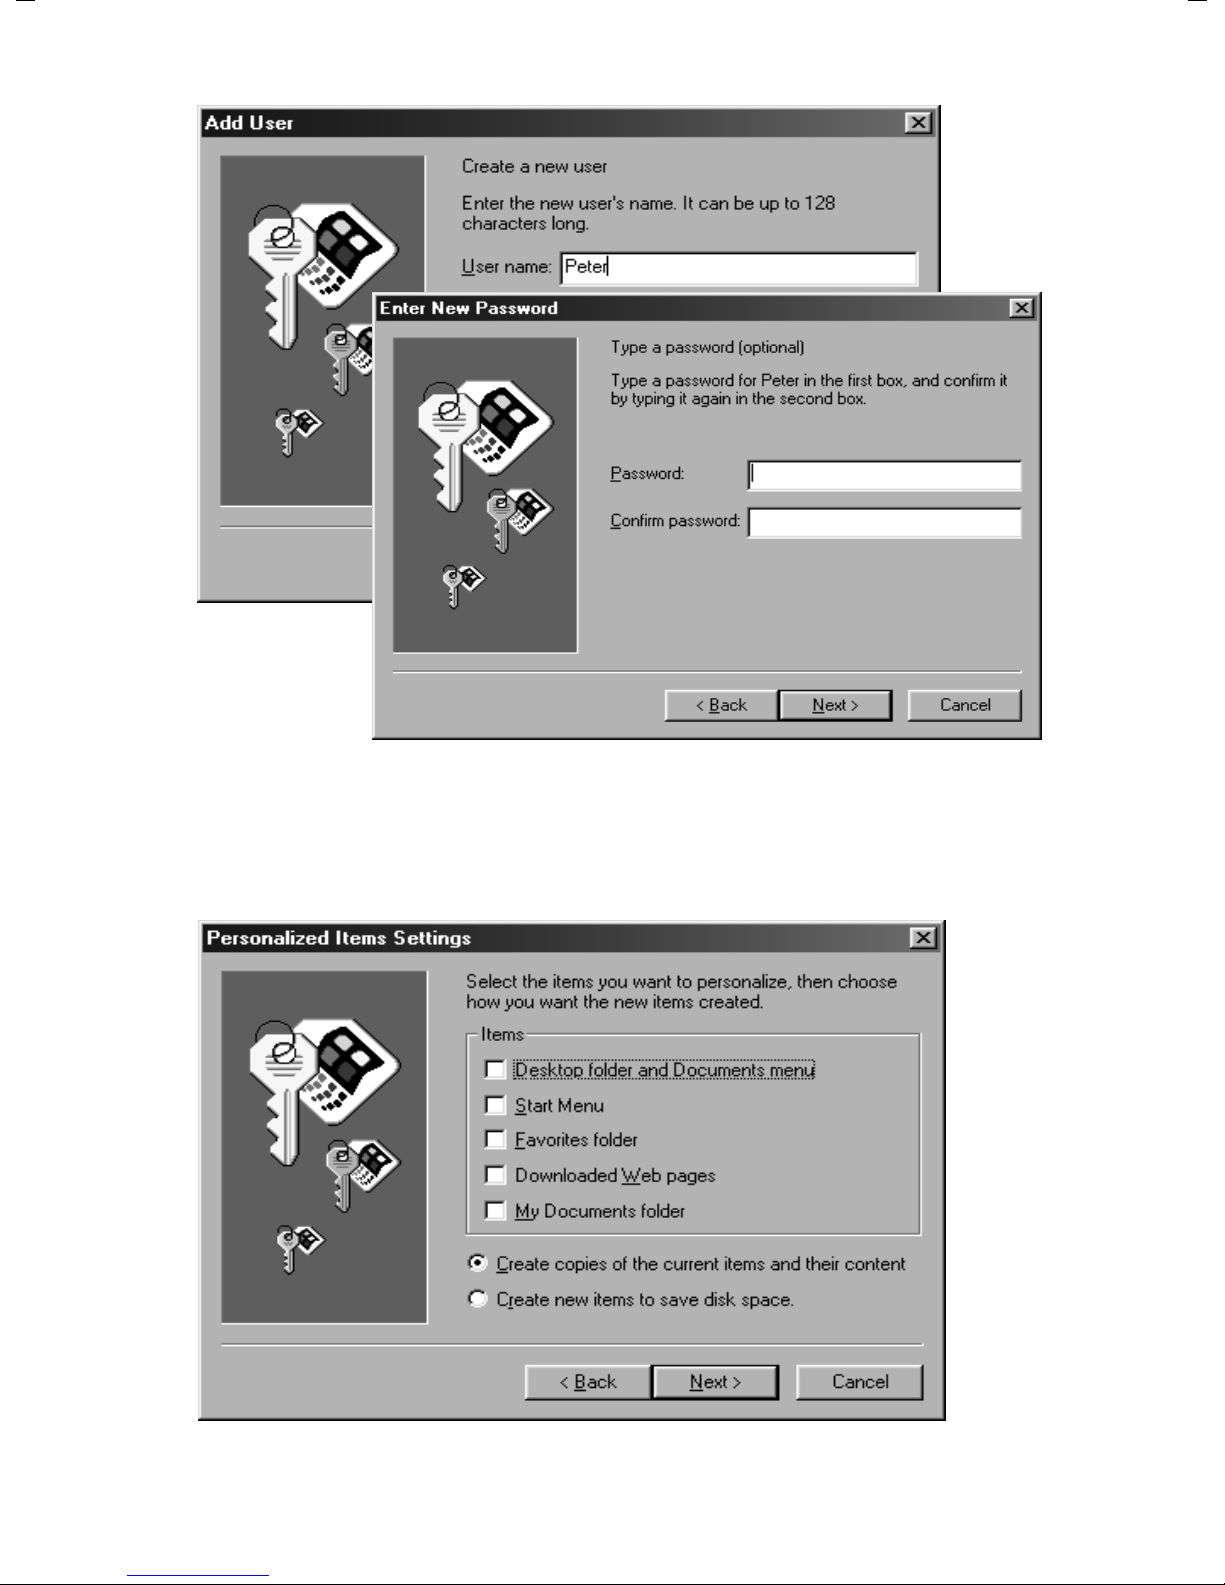
Using released files and printers
ì Enter a user name and click Next.
ì Enter a password, repeat it and click Next.
ì Define the settings for the user's interface. If you want to apply the current settings
for the user, click Next.
The user has now been registered.
64
Page 66
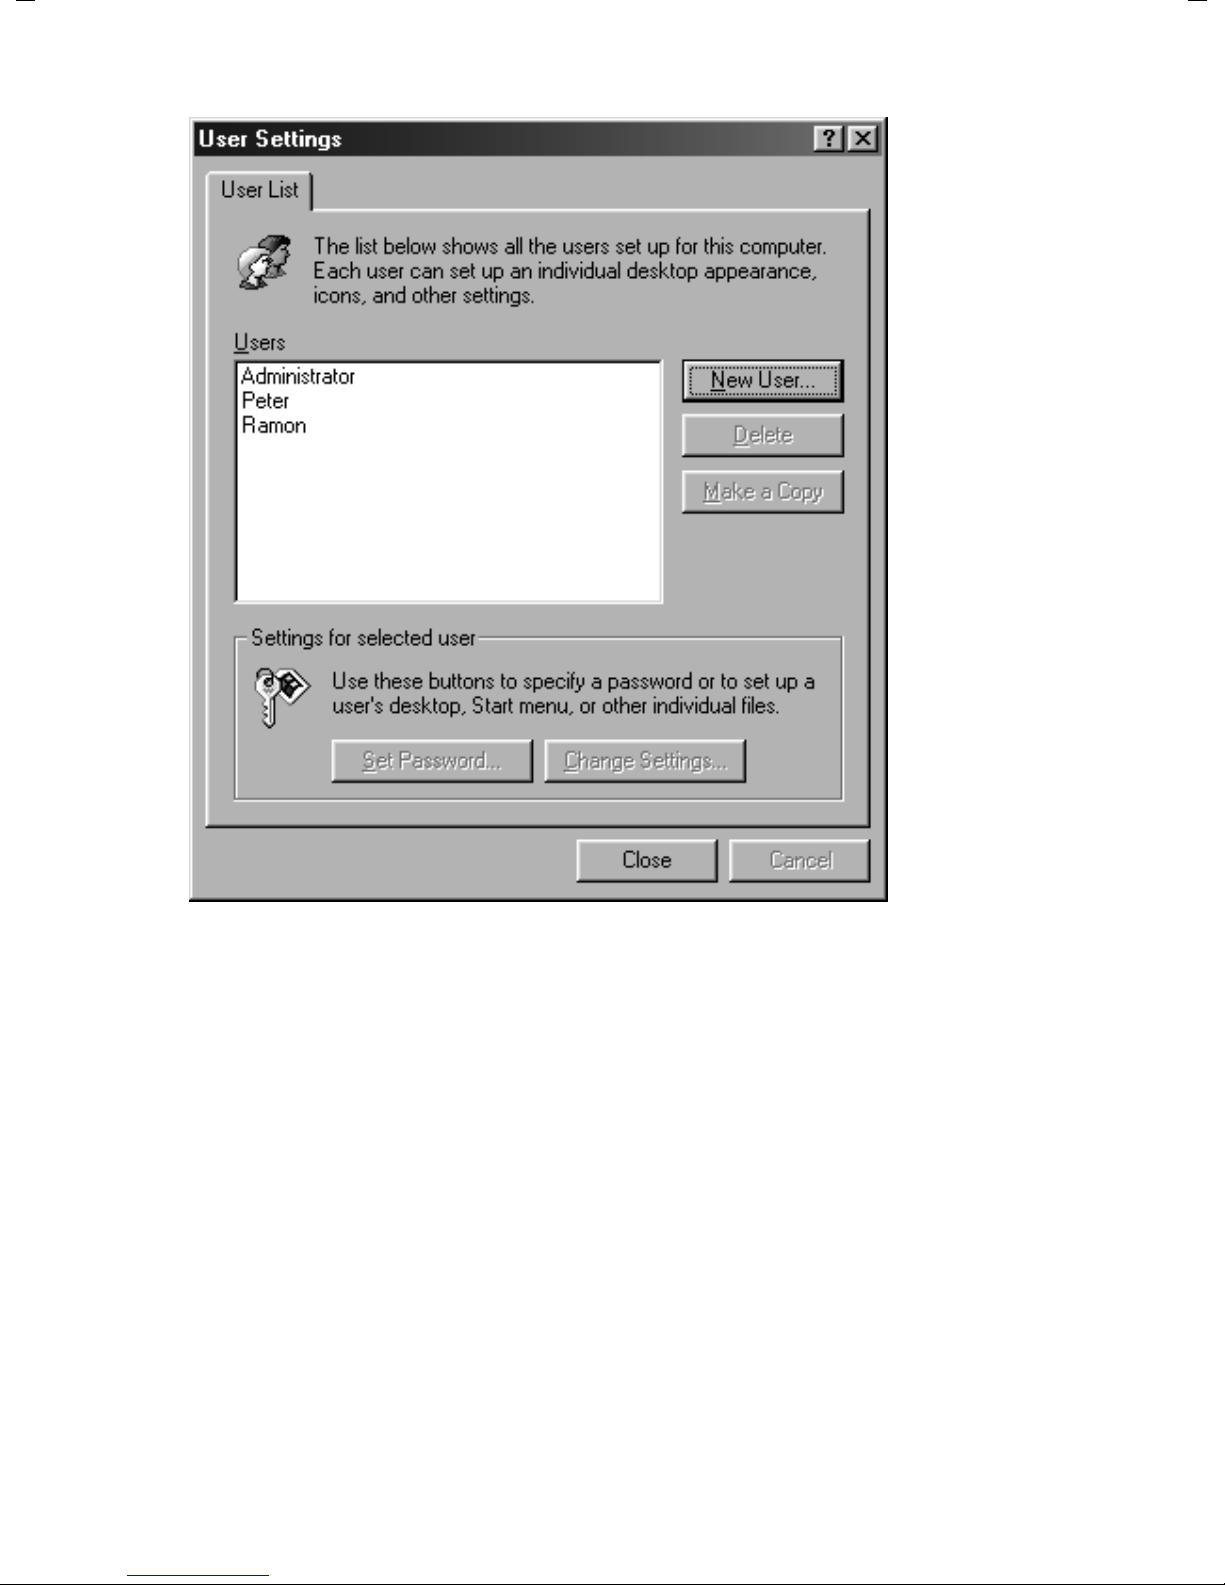
Using released files and printers
ì Either enter further users or close user administration with Close.
65
Page 67
Using released files and printers
Accessing released drives or folders from your PC
You can access drives and folders released on other PCs in two different ways:
u via the My NetworkPlaces of your PC (see page 66).
You should choose this alternative if for example you want to copy files or folders
from another PC to your own or vice versa.
u by hooking on to your PC's file system (see page 67).
You should choose this alternative if you want to work directly with the files or folders of the other PC. In this case, hook on an entire released drive or folder in your
PC's file system and work with the files as if they were files on your PC.
Please note:
Drives or folders can be simultaneously hooked onto several PCs. It is therefore
possible for other users to access the data. Most applications (e. g. word processing software) lock files once they have been opened. This prevents inconsistent
data pools. If you cannot open a file because it is locked, you will normally see a
message to that effect.
Accessing external files via the My NetworkPlaces
If the network has been set up on all the PCs with the same workgroup, then you can
access released drives and folders via your PC's network environment.
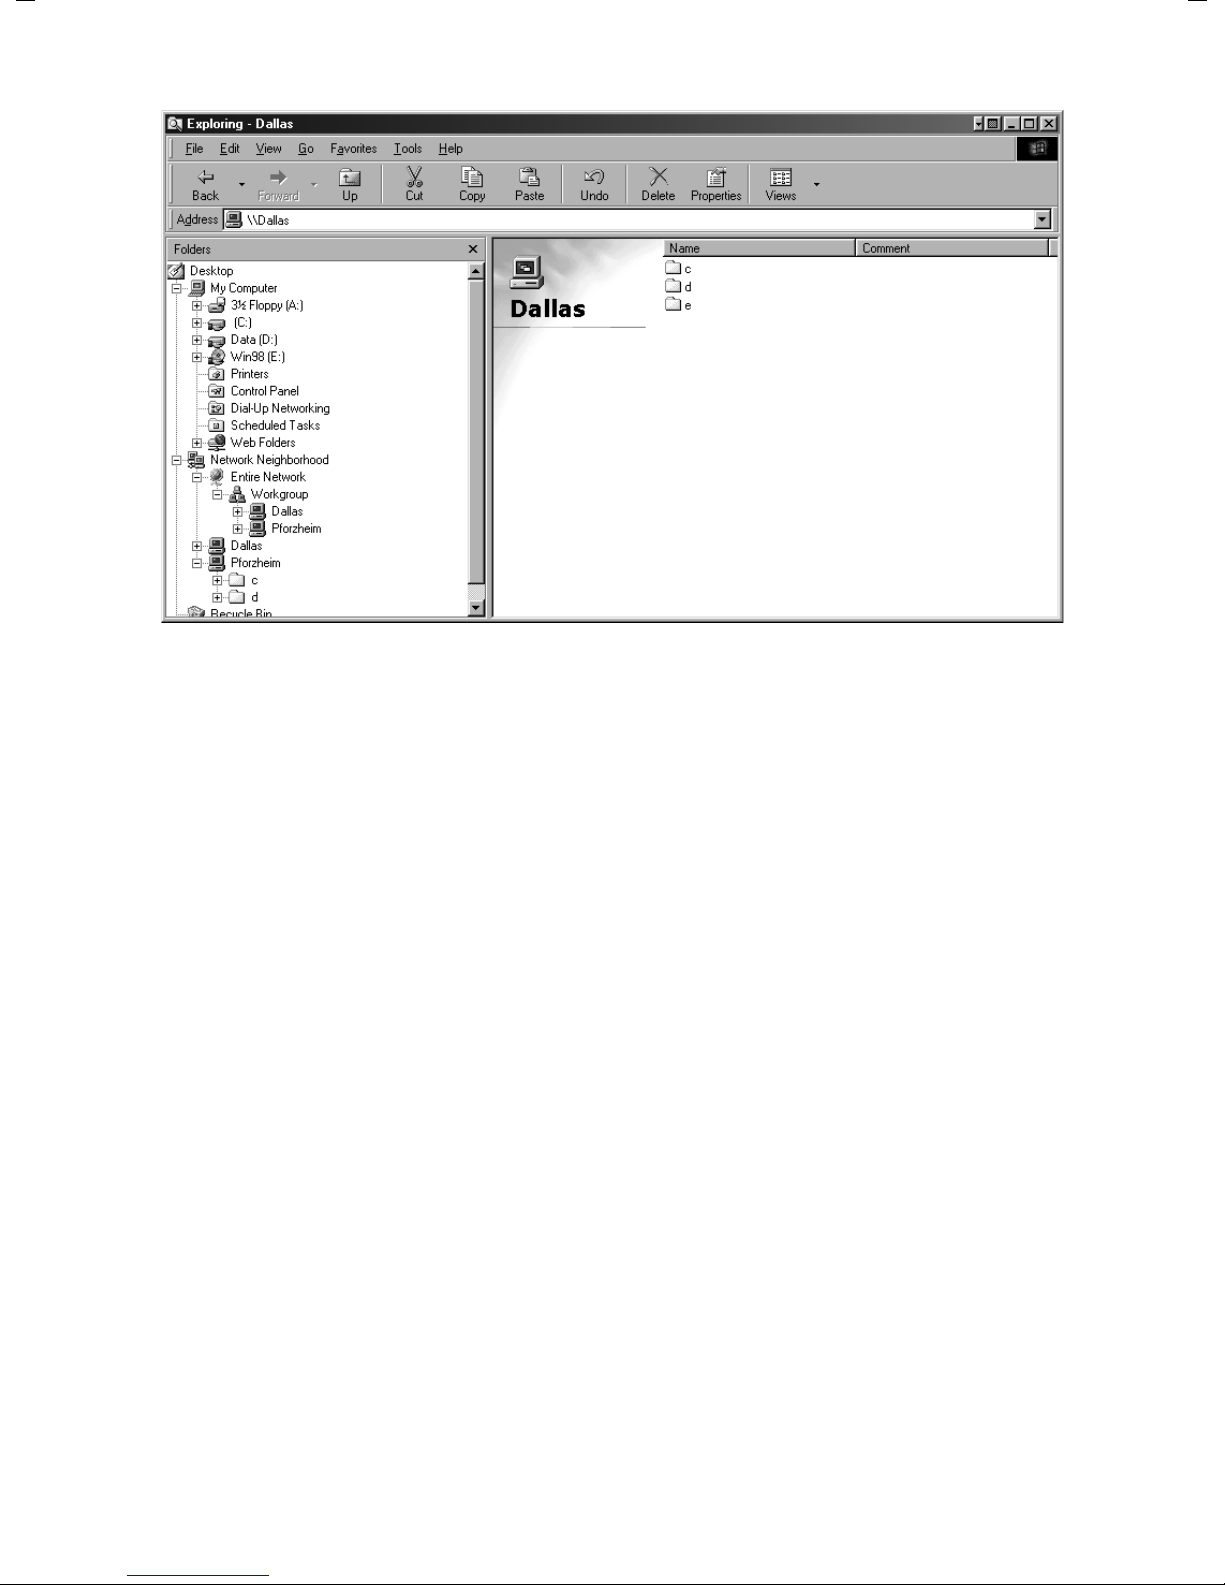
You will find the My NetworkPlaces both as an icon on your PC desktop and also in the
file tree in the left-hand pane of Windows Explorer. The illustration depicts as an example the My NetworkPlaces in Windows Explorer. In the My NetworkPlaces you will find
the entry Entire network, under this the workgroup to which the PCs have been
assigned and then the names of all the PCs comprising this workgroup.
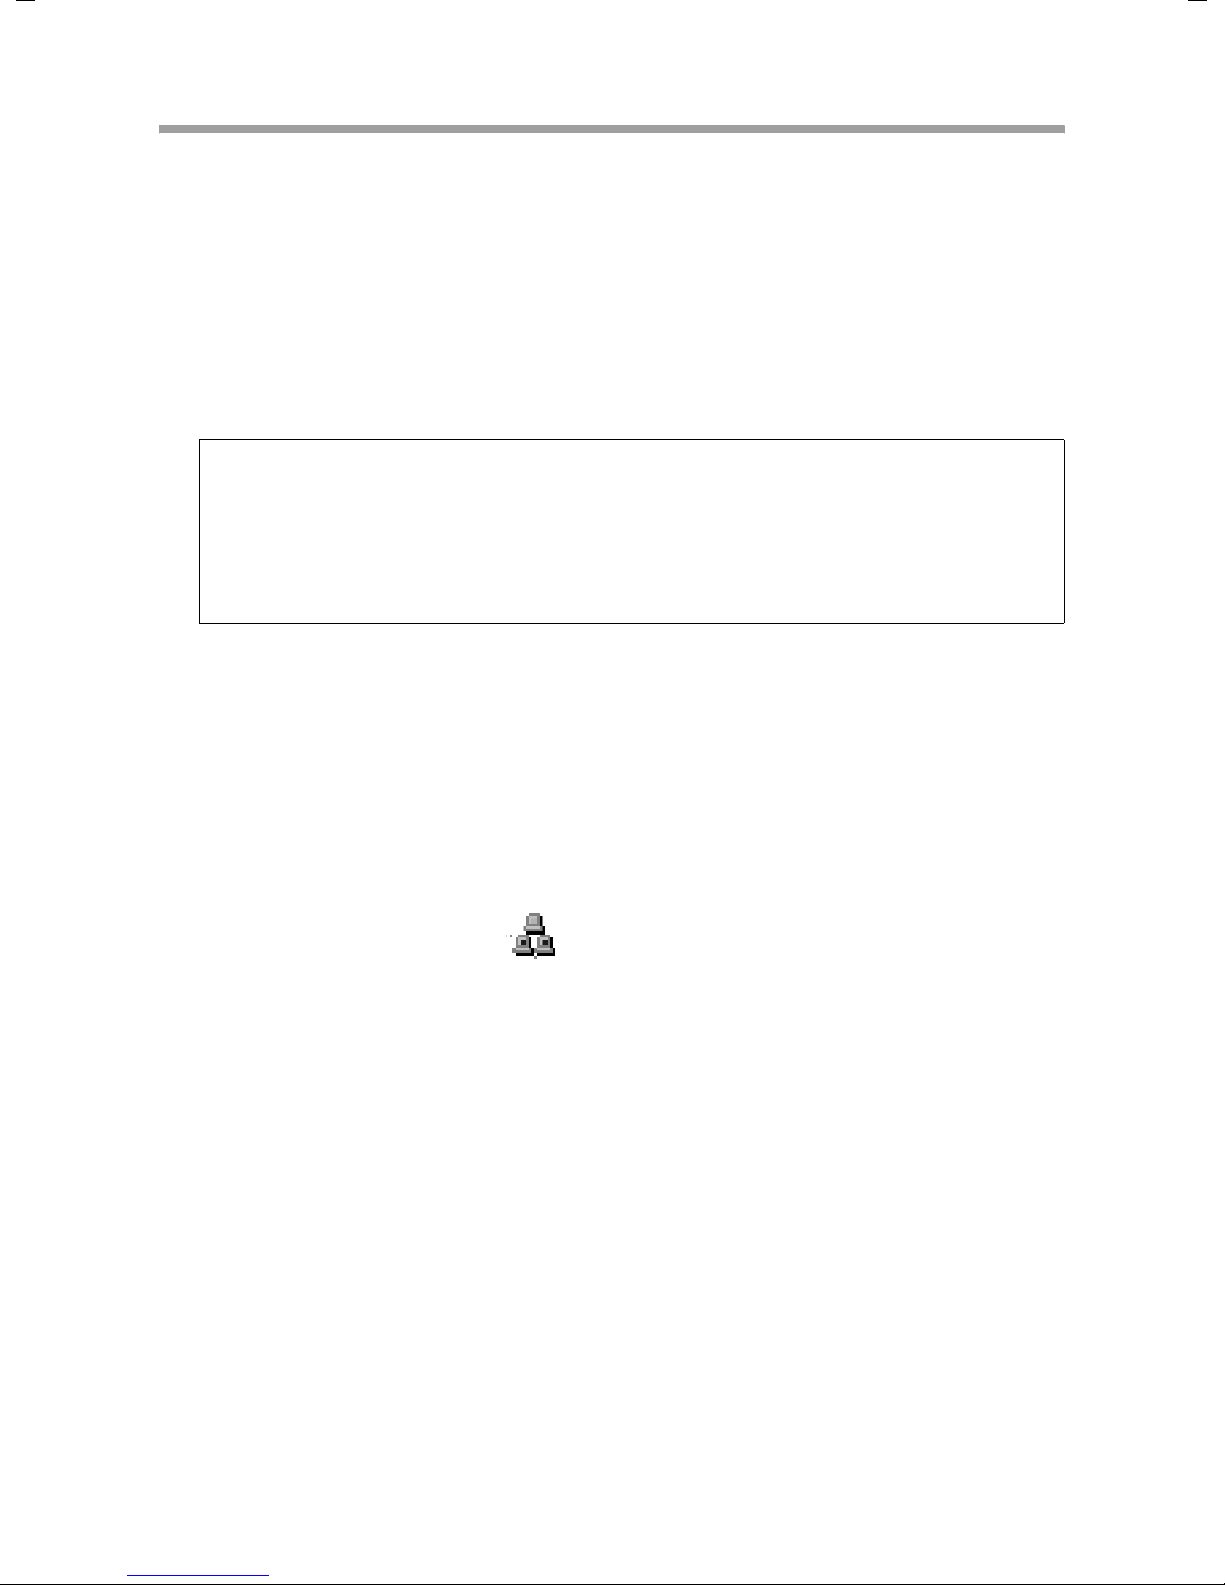
Workgroups are marked with the symbol:
66
Page 68
Using released files and printers
Clicking a PC name shows the released drives and folders on this PC under the name
assigned when they were released. You can navigate through the file system in the
usual Windows Explorer way by clicking a drive or folder and then opening other
branches of the file tree.
Hooking external files on to your own file system
You can hook released drives or folders on to your PC and use them as if they were actually on your own computer.
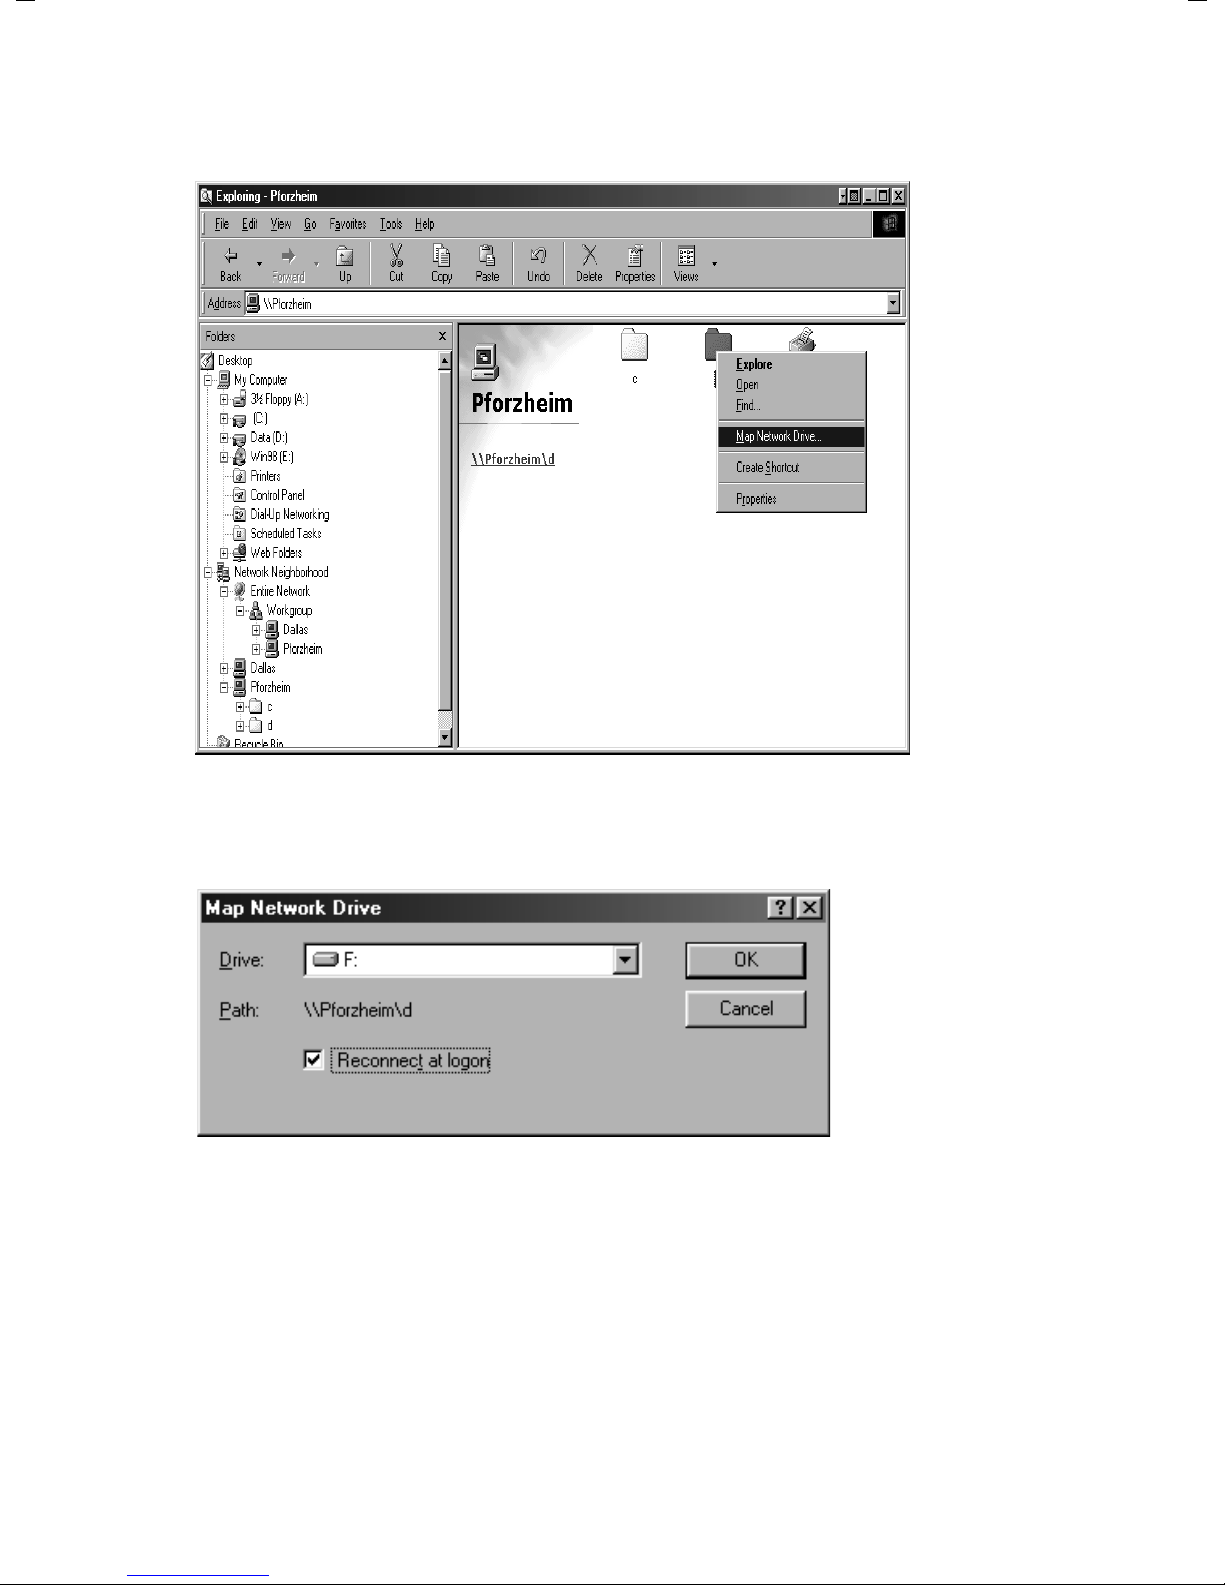
ì Open the My NetworkPlaces.
67
Page 69
Using released files and printers
ì Open the PC containing the resources you want to access with a double click. You
will now see the released resources on that PC.
ì Left click the resource you want to hook on.
ì Open the pop-up menu with the right-hand mouse button and select Map network
drive.
ì Select the drive name under which the remote drive is to be hooked on to your PC.
The next free drive will be prompted. If you select the option Reconnect at logon,
Windows will hook the drive on every time you start your PC, provided the remote
PC is running.
ì Now open the desktop. The remote drive is now available as the network drive. You
can access the files as if they were on your own PC.
68
Page 70
Using released files and printers
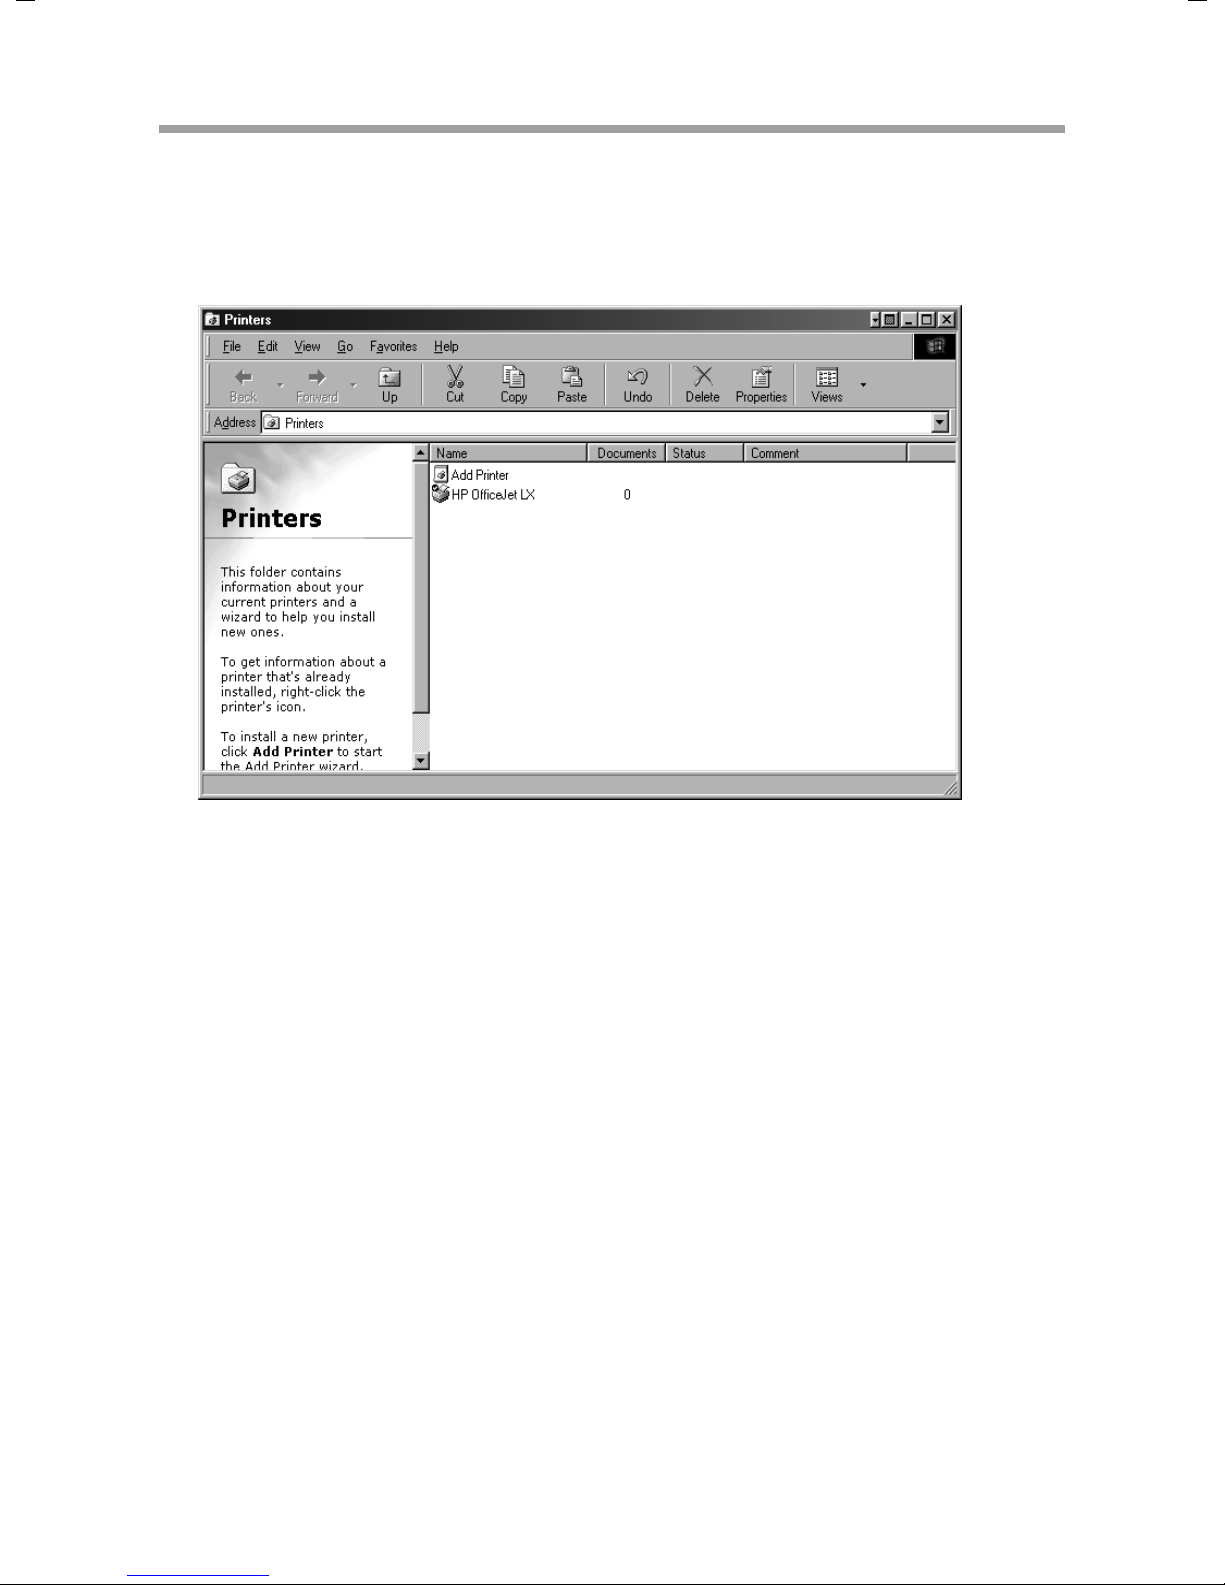
Accessing released printers from your PC
If there is a printer on your local network and it has been released, you can use it to print
out your data. To do this you have to set it up on your PC as the network printer. This can
be done as follows:
ì Open the printer manager with Start – Settings – Printers.
ì Double-click the Add printer icon. This opens the printer installation wizard.
ì Click Next.
ì In the next window select Network printer.
ì Click Next again.
69
Page 71
Using released files and printers
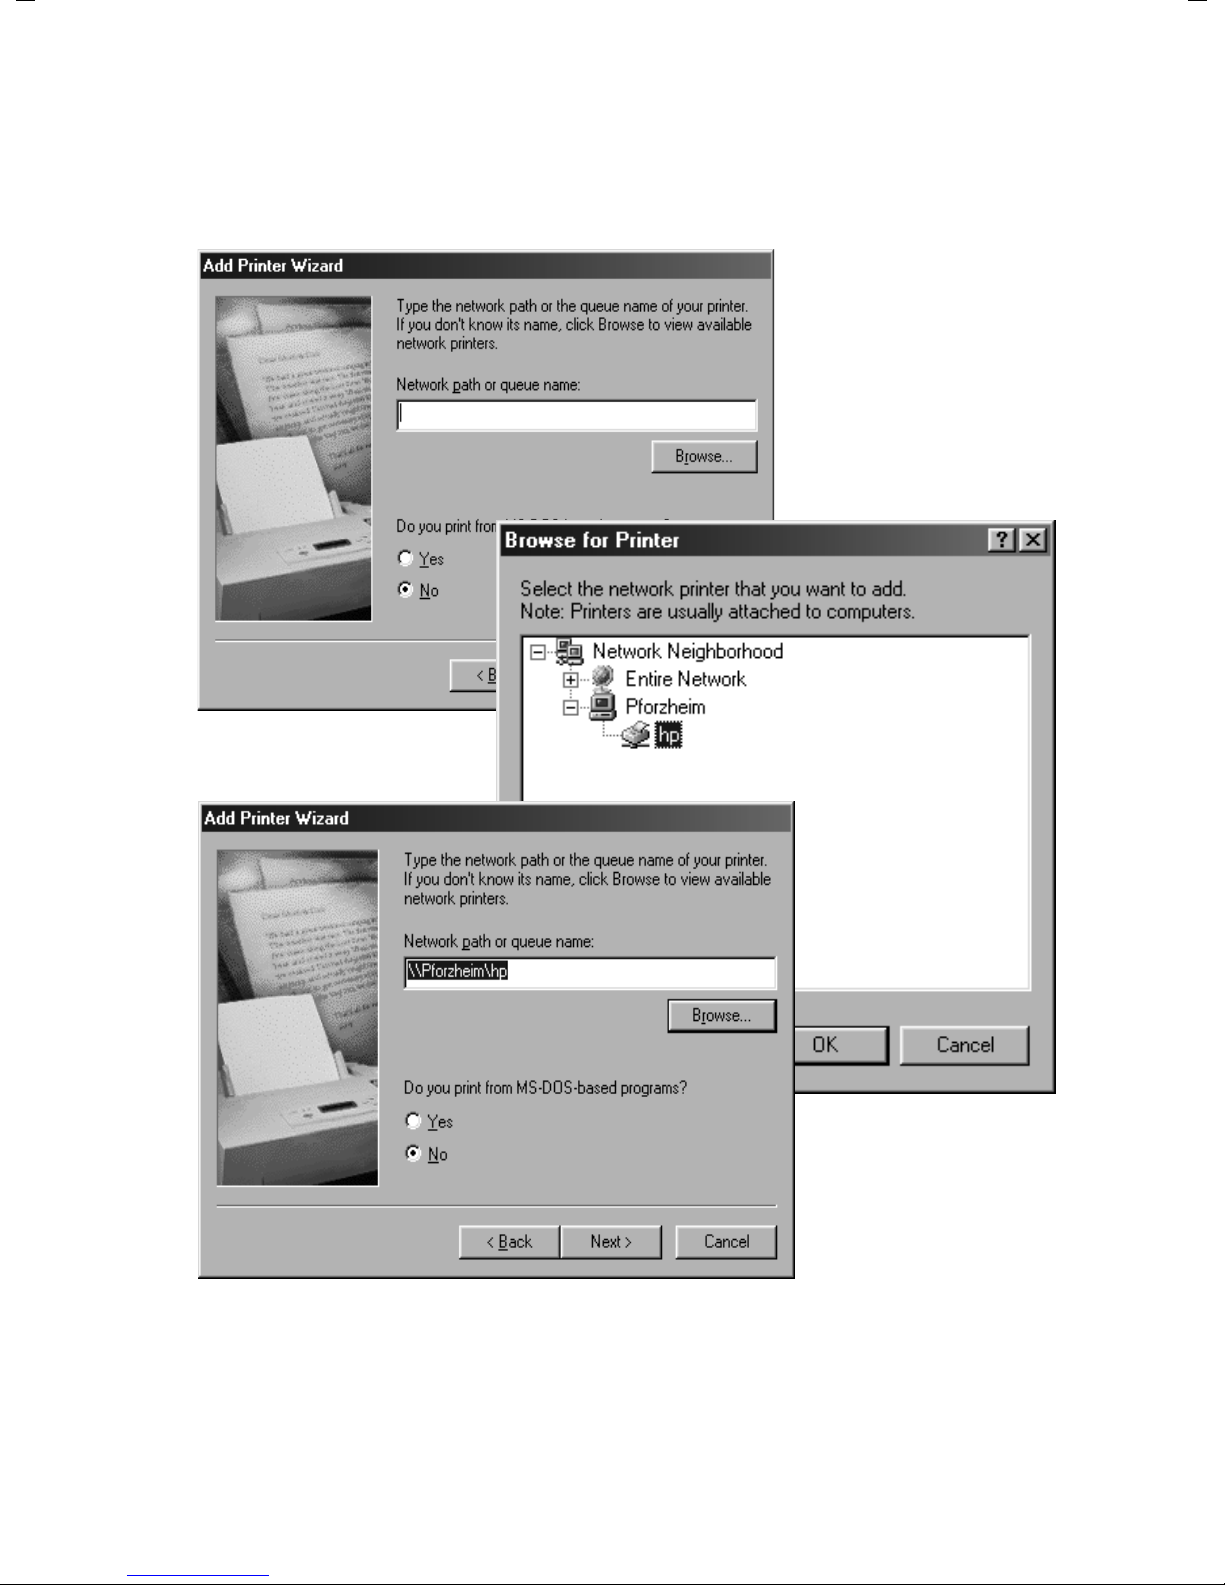
ì Enter the name under which the printer was released for the network. To do this
click Browse. This will open a screen in which you can search the network environment for the printer.
ì Select the printer you want and click OK.
ì The printer will now be displayed. Click Next.
70
Page 72
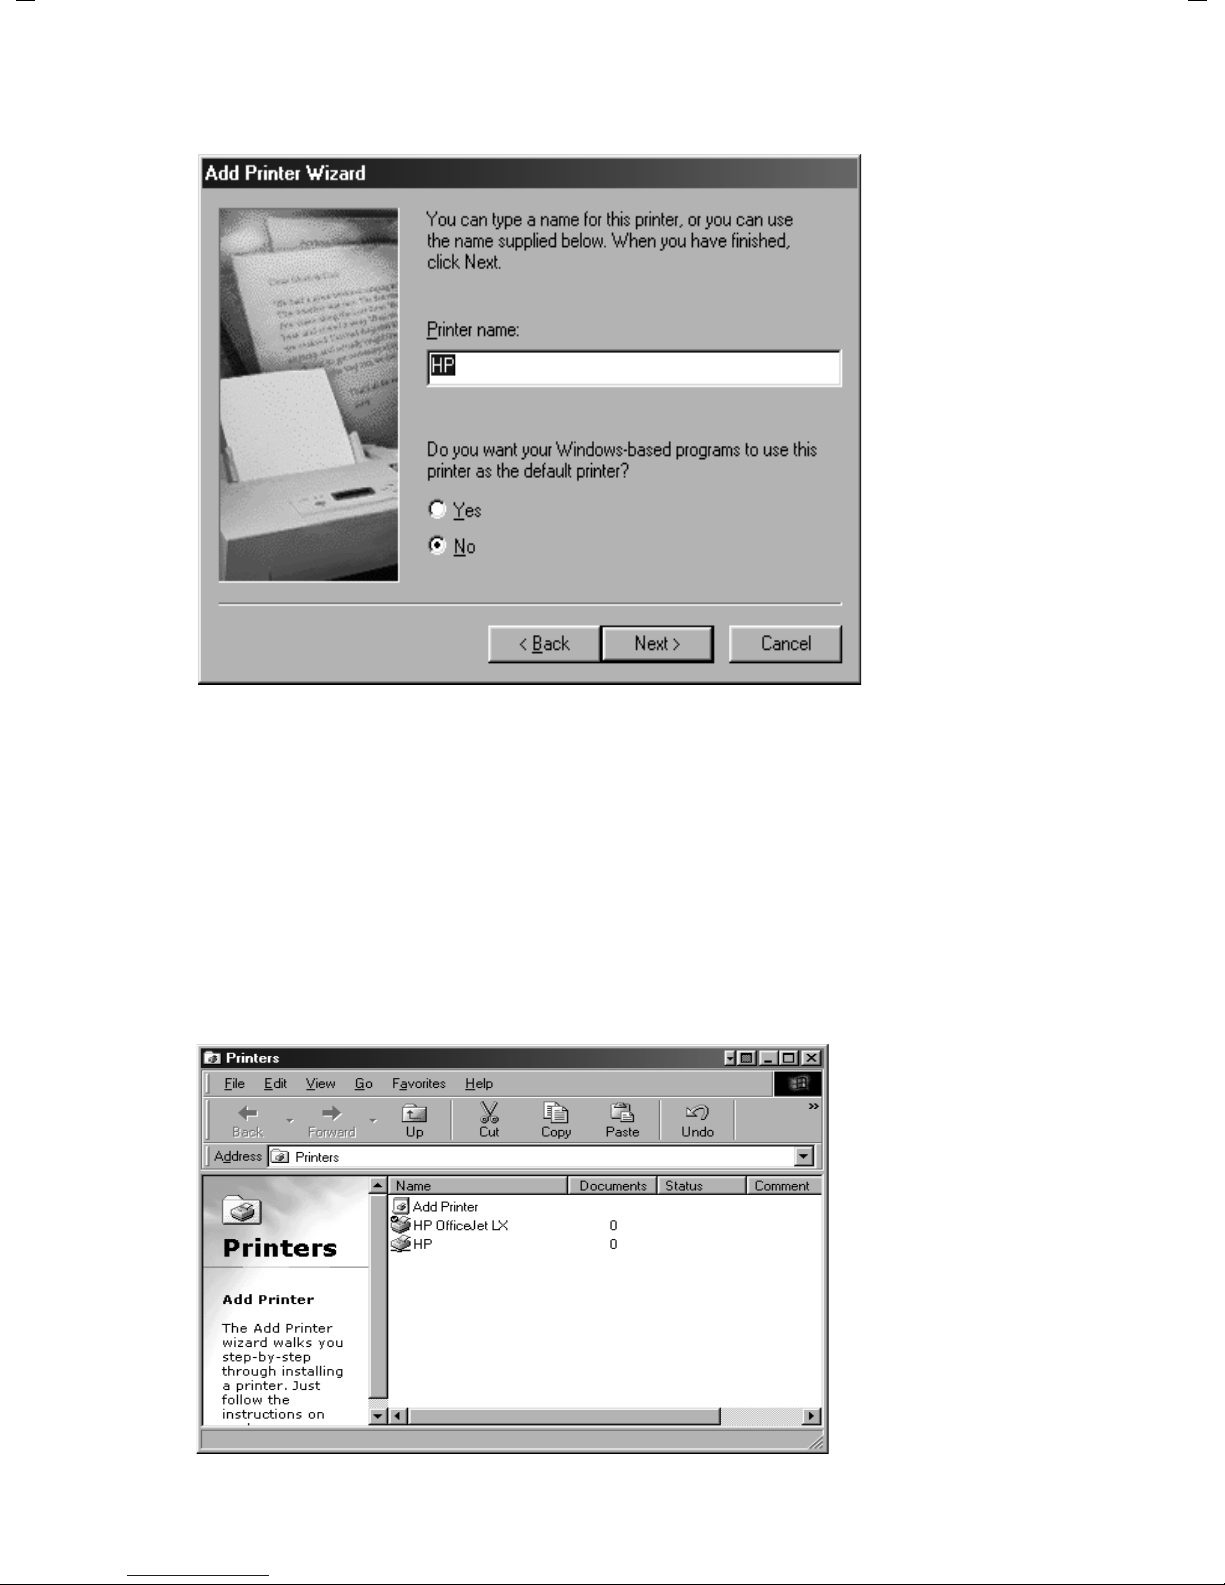
ì Now enter a name for the printer on your PC.
Using released files and printers
ì Click Next.
ì You can now print a test page if you want. This will show you whether the printer is
functioning properly on the network.
ì Click Finish.
ì Windows will now need some driver files. You will be prompted to insert your
Windows CD in the CD drive. Insert the CD and click OK.
ì Once the driver files have been successfully installed, a test page will be printed.
ì The newly installed printer will now appear in the printer list and can be used just
like a local printer.
71
Page 73

Defining IP addresses
Defining IP addresses
The IP address is used for the unique identification of a network component. You can
define IP addresses as static or dynamic. This is done while defining the PC network configuration. In many cases the IP addresses are defined as dynamic and so can change
every time you log in to the network.
For some applications however you have to make sure that the PCs always have the
same IP address.
If you opted for automatic assignment of IP addresses during installation, you can
change this via the PC network configuration.
Network configuration differs depending on the Windows operating system you are
using. Below you will find the procedure for Windows 98 from page 73, for Windows XP
from page 77 and for Windows 2000 from page 80.
Private IP addresses
You can determine your own private IP addresses for the PCs in your local network. To
do this use addresses from an address block reserved for private use. This is the address
block
192.168.0.0 – 192.168.255.254
Example:
PC 1: 192.168.15.1
PC 2: 192.168.15.2 etc.
Please note:
The subnet mask used must be 255.255.255.0. This means that the first three address
segments for all network components (including the router) must be identical.
u Correct is e. g.:
Router address: 192.168.2.1
PC 1: 192.168.2.12
PC 2: 192.168.2.60 ...
u Incorrect would be e. g.:
Router address: 192.168.2.1
PC 1: 192.168.3.2
PC 2: 192.168.4.3
72
Page 74
Defining IP addresses
Windows 98
To set an IP address for your PC:
ì Select Start – Settings – Control Panel.
ì Double-click the Network icon.
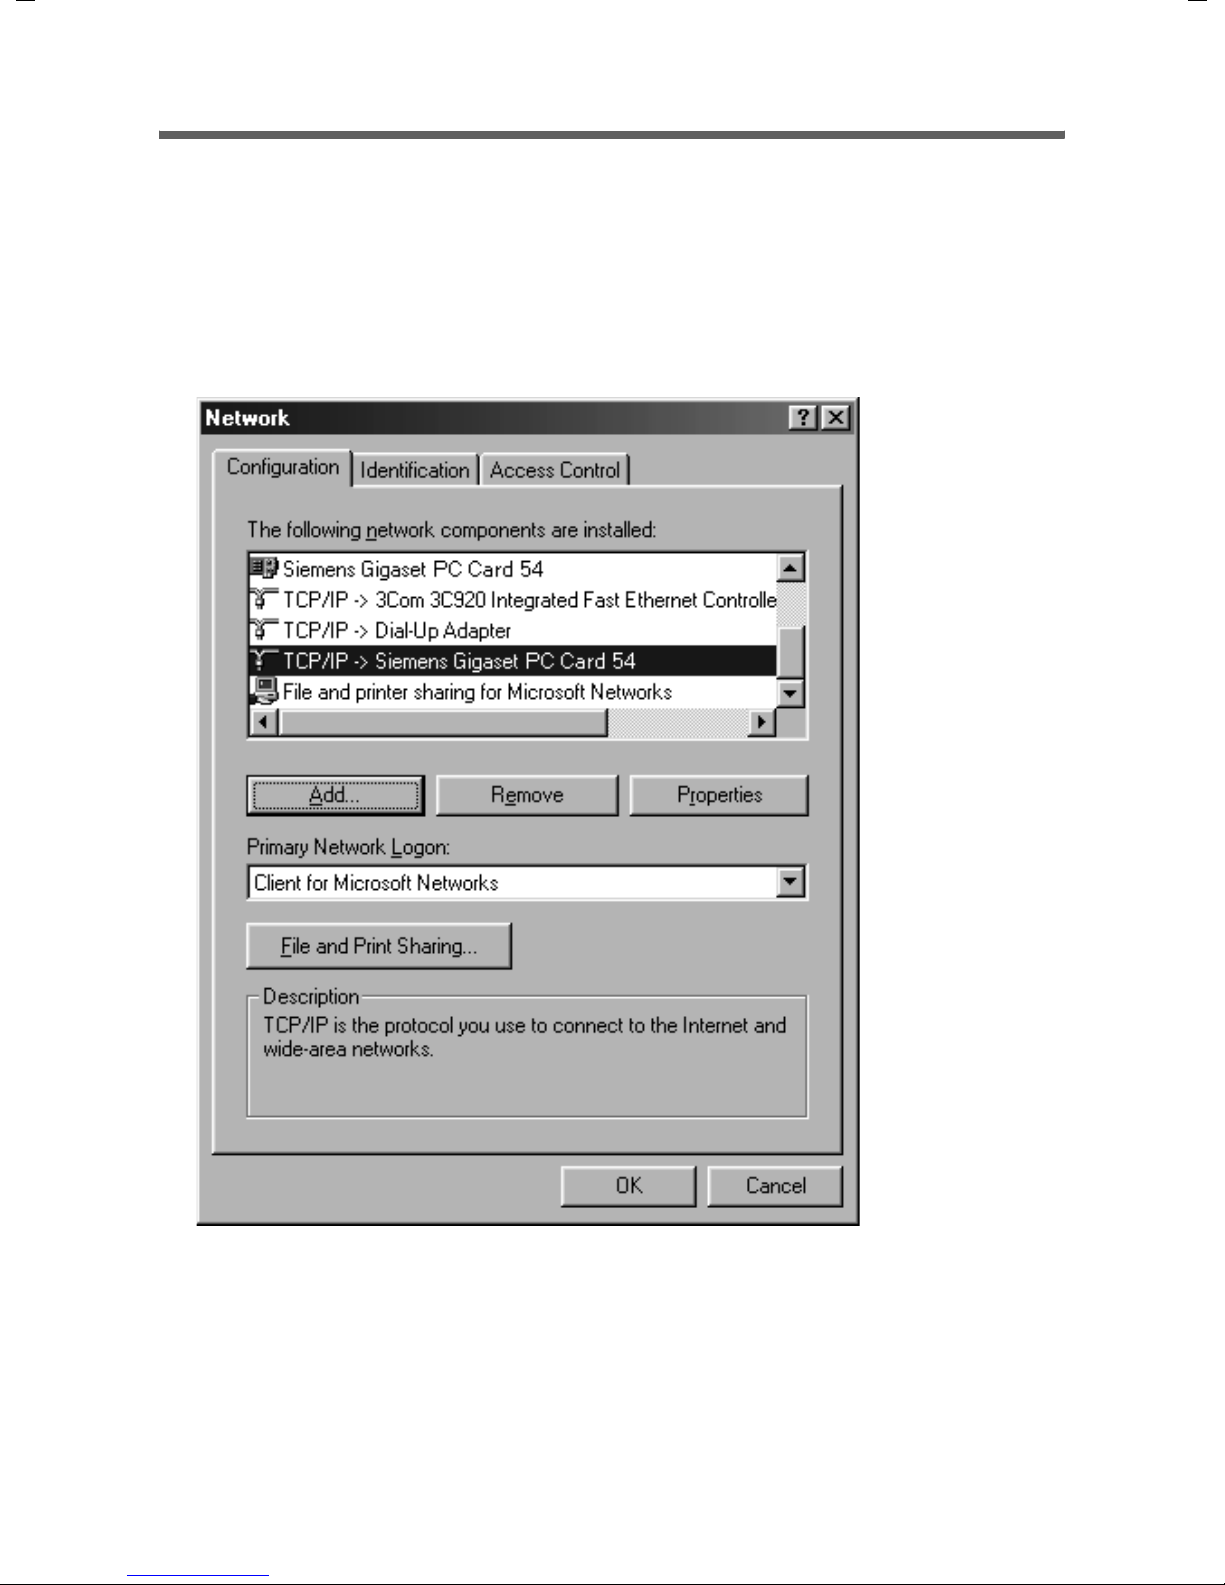
ì In the Network window, select the TCP/IP entry for your network card or network
adapter in the Configuration tab. Make sure you select the right TCP/IP entry if there
are several in the selection list.
73
Page 75
Defining IP addresses
ì Click Properties.
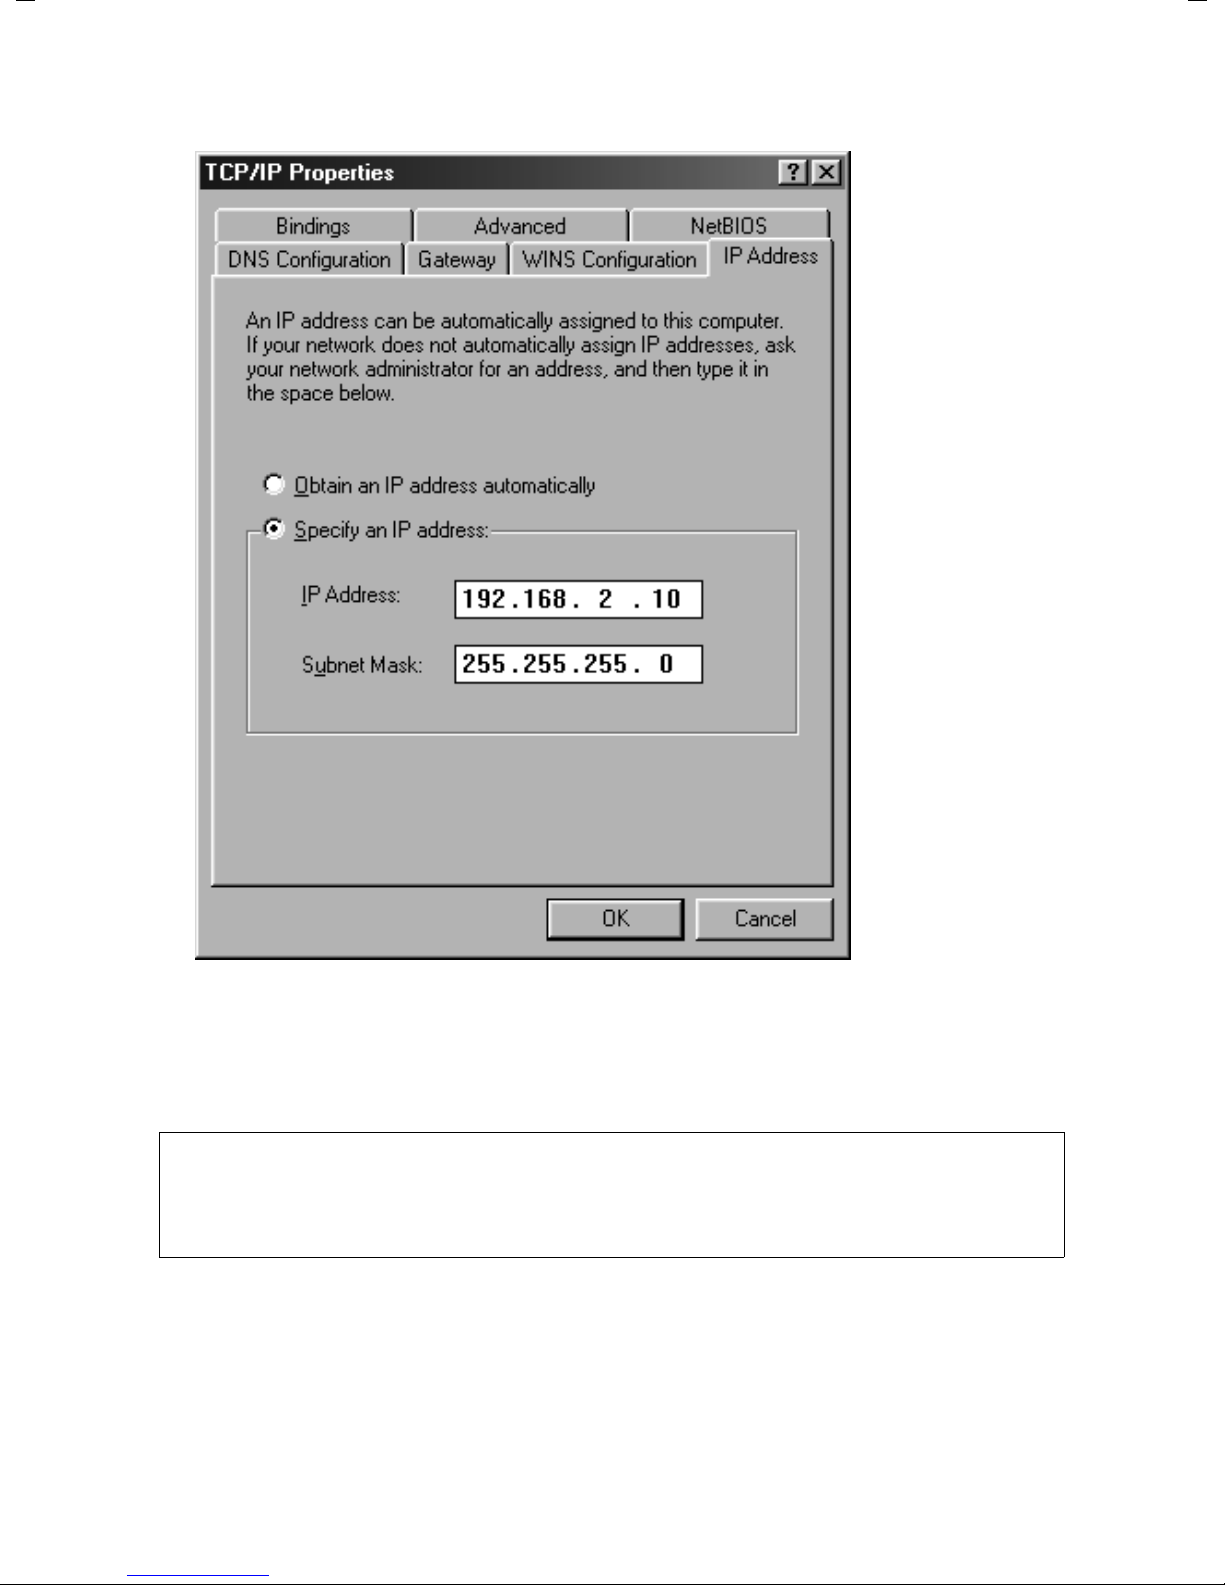
ì Click the IP address tab and check the Specify an IP address option.
ì Enter the IP address for the PC in the IP address box. Please bear in mind the infor-
mation on page 72.
ì Enter the subnet mask 255.255.255.0 in the box Subnet Mask.
Note:
If your PC has already been configured with a static IP address and you now need a
dynamic one, select Obtain an IP address automatically. Then no further informa-
tion will be required.
74
Page 76
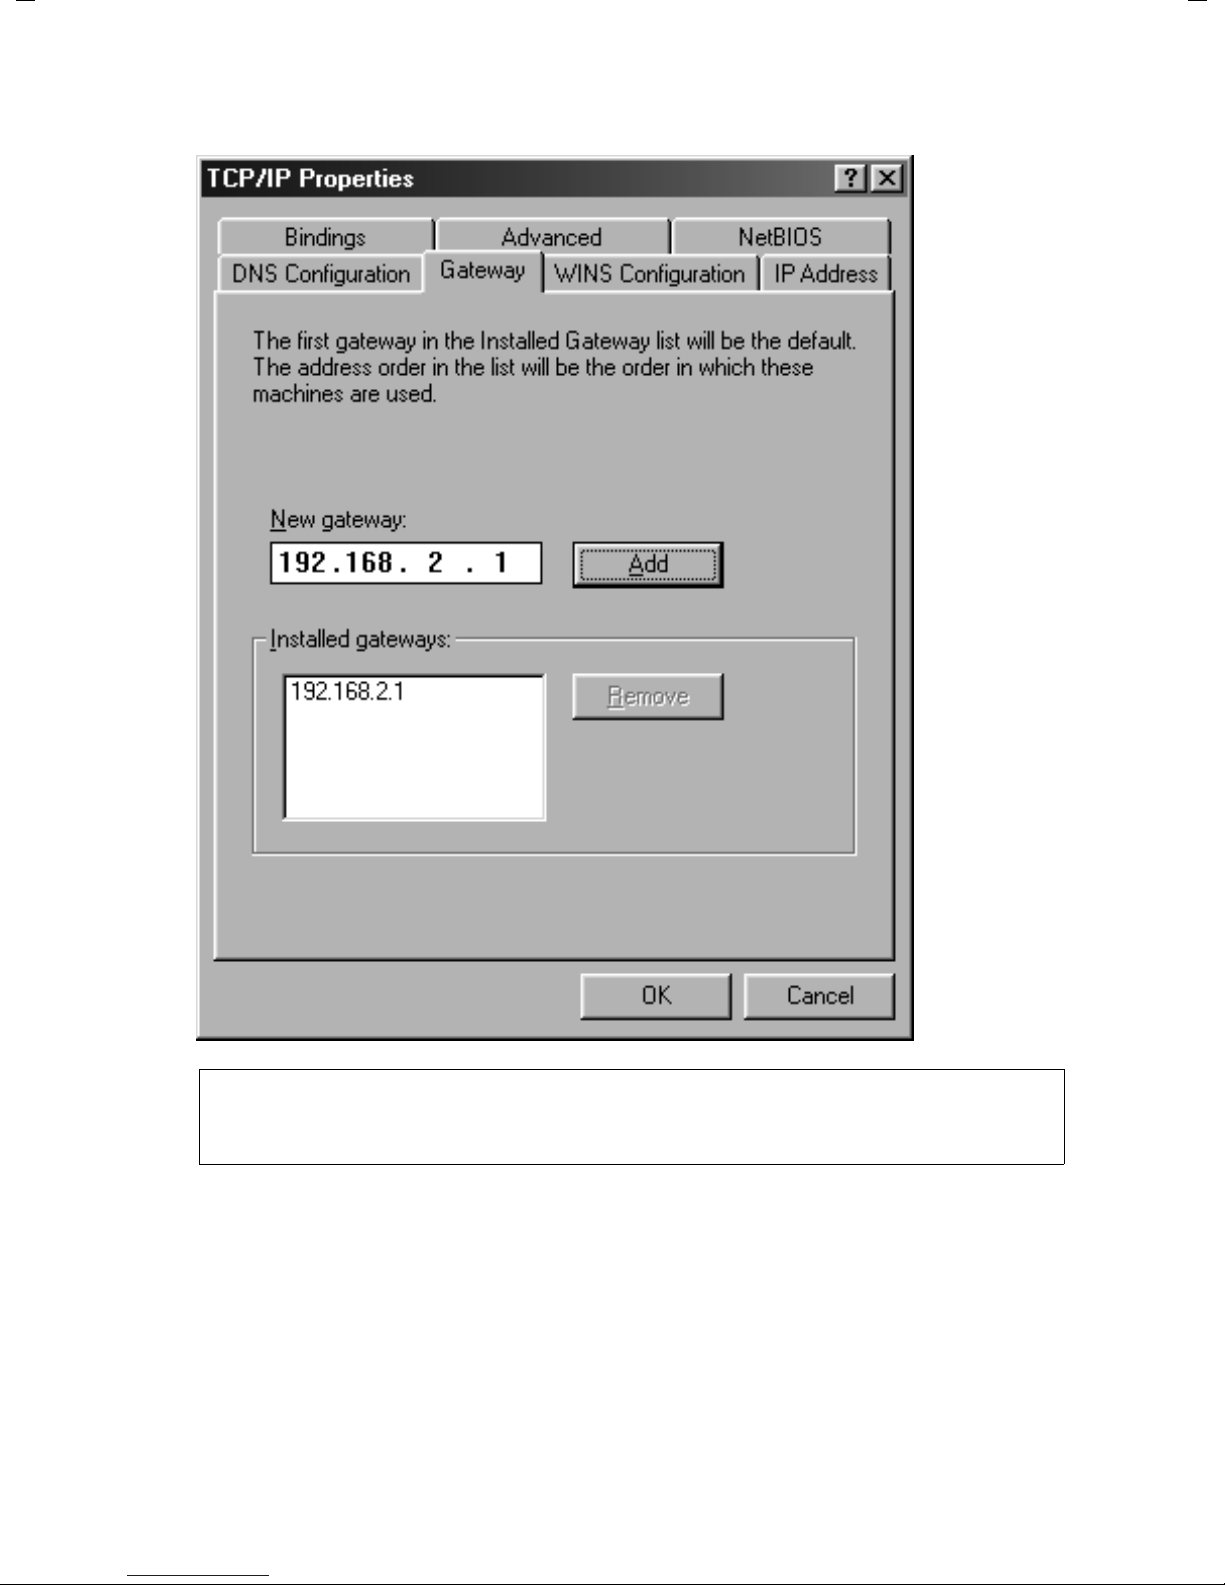
ì Open the Gateway tab.
Defining IP addresses
Note:
A gateway acts as a bridge between two networks with a different architecture. In
our case this is the Gigaset Router between the local TCP/IP network and the WAN
ì Enter the IP address of the router in the New Gateway box and then click Add.
75
Page 77
Defining IP addresses
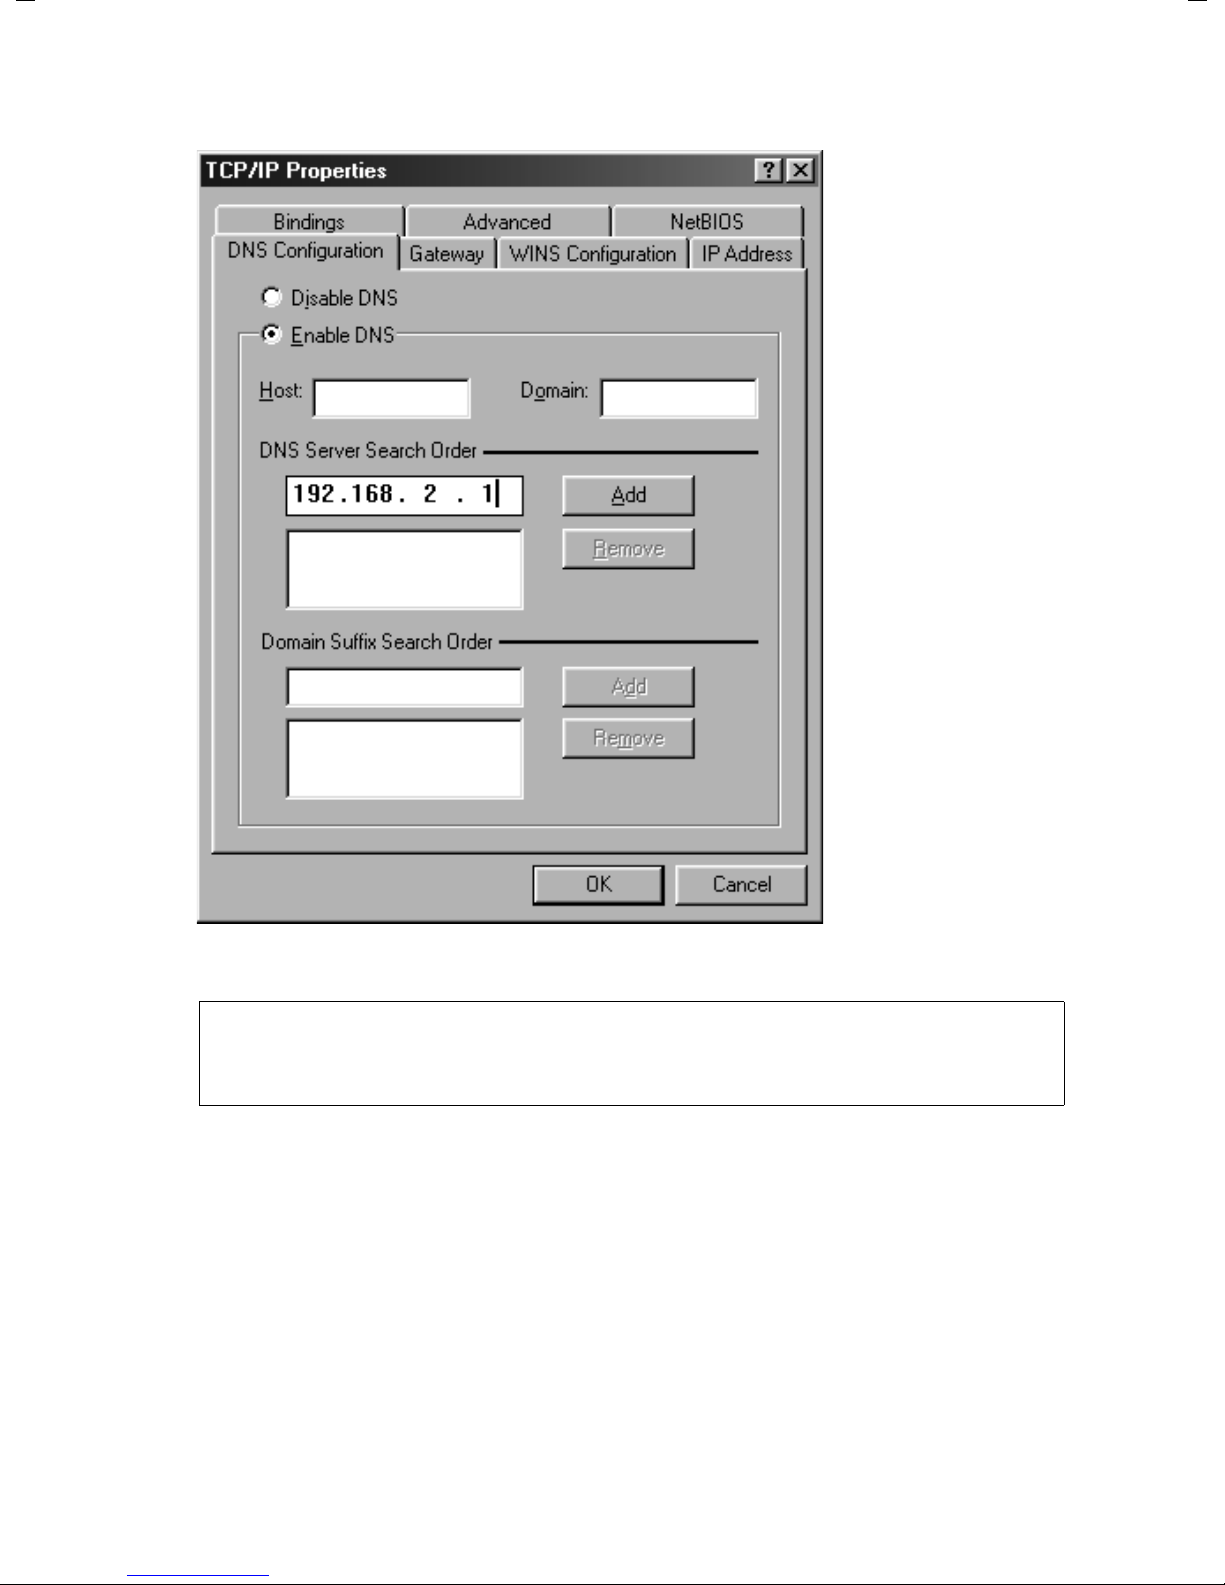
ì Open the DNS configuration tab.
ì Select Enable DNS.
Note:
DNS (Domain Name System) allows IP addresses to be assigned to a PC or domain
names.
ì Enter the IP address of the router in DNS Server Search Order.
ì Click Add.
ì Click OK twice to close the Network window.
ì Restart your network.
76
Page 78
Defining IP addresses
Windows XP
Please note:
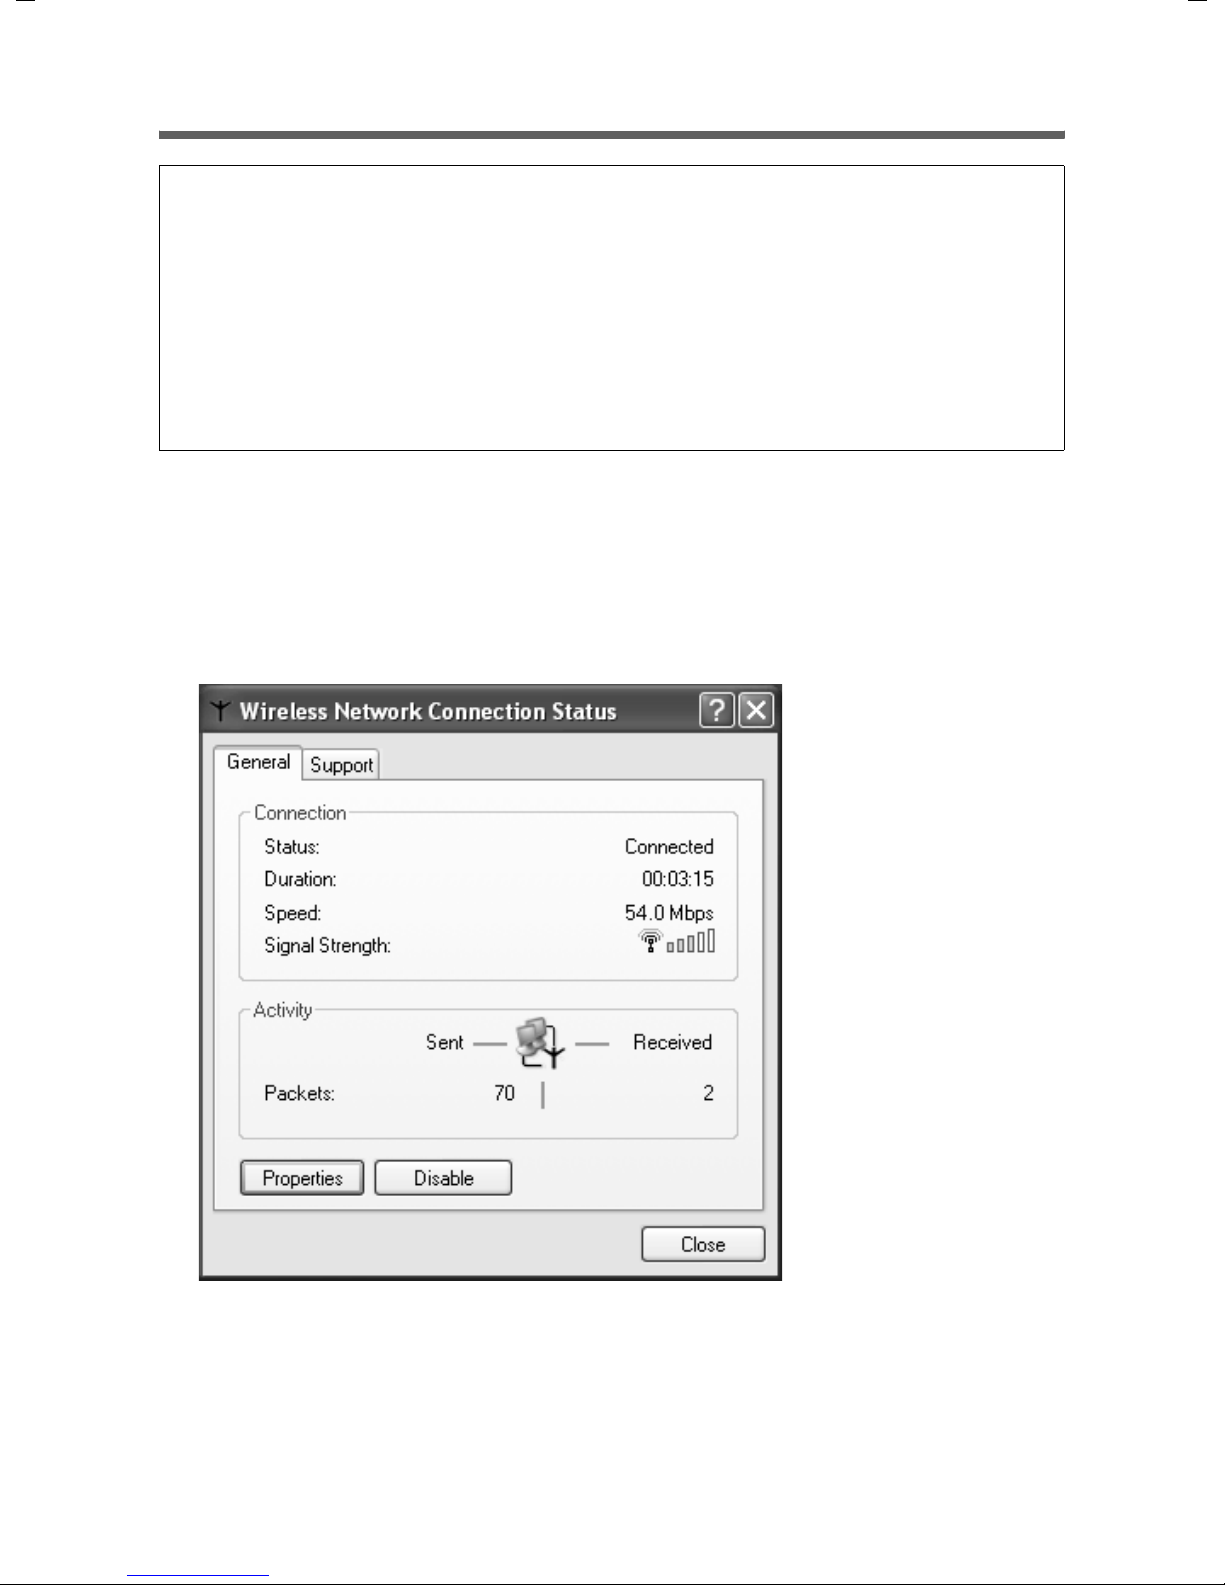
If you have a wireless connection between the router and PC: Make sure that the Use
Windows to configure the settings function has been disabled.
This can be done as follows:
1. Click Start – Settings – Control Panel – Network Connections – LAN or High-
Speed Internet – Wireless Network Connection – Properties.
2. In Wireless Network Connection Properties click Wireless Networks.
3. Deactivate Use Windows to configure my wireless network settings.
To set a static IP address for your PC:
ì Click Start – Control Panel.
ì Select Network and Internet Connections and then click the Network Connec-
tions icon.
ì Double-click the LAN connection with which you are connected to the router.
77
Page 79
Defining IP addresses
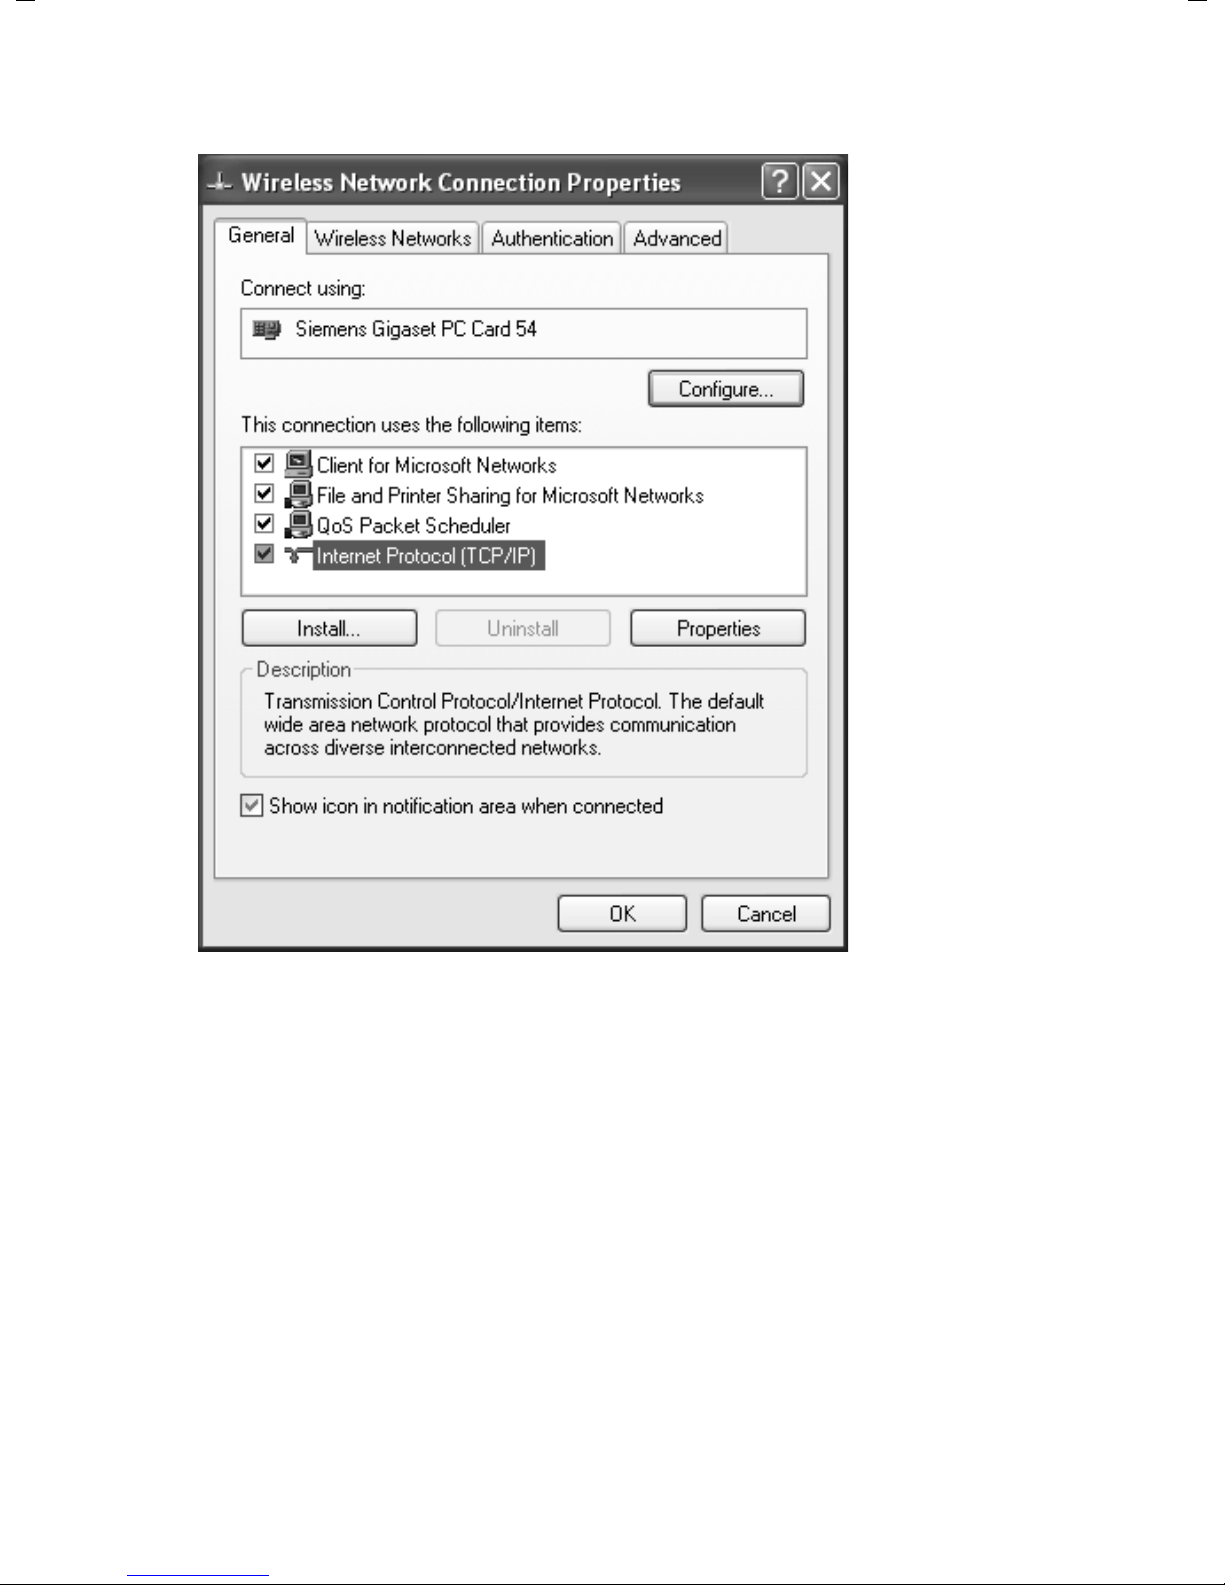
ì In the General tab click Properties.
78
Page 80
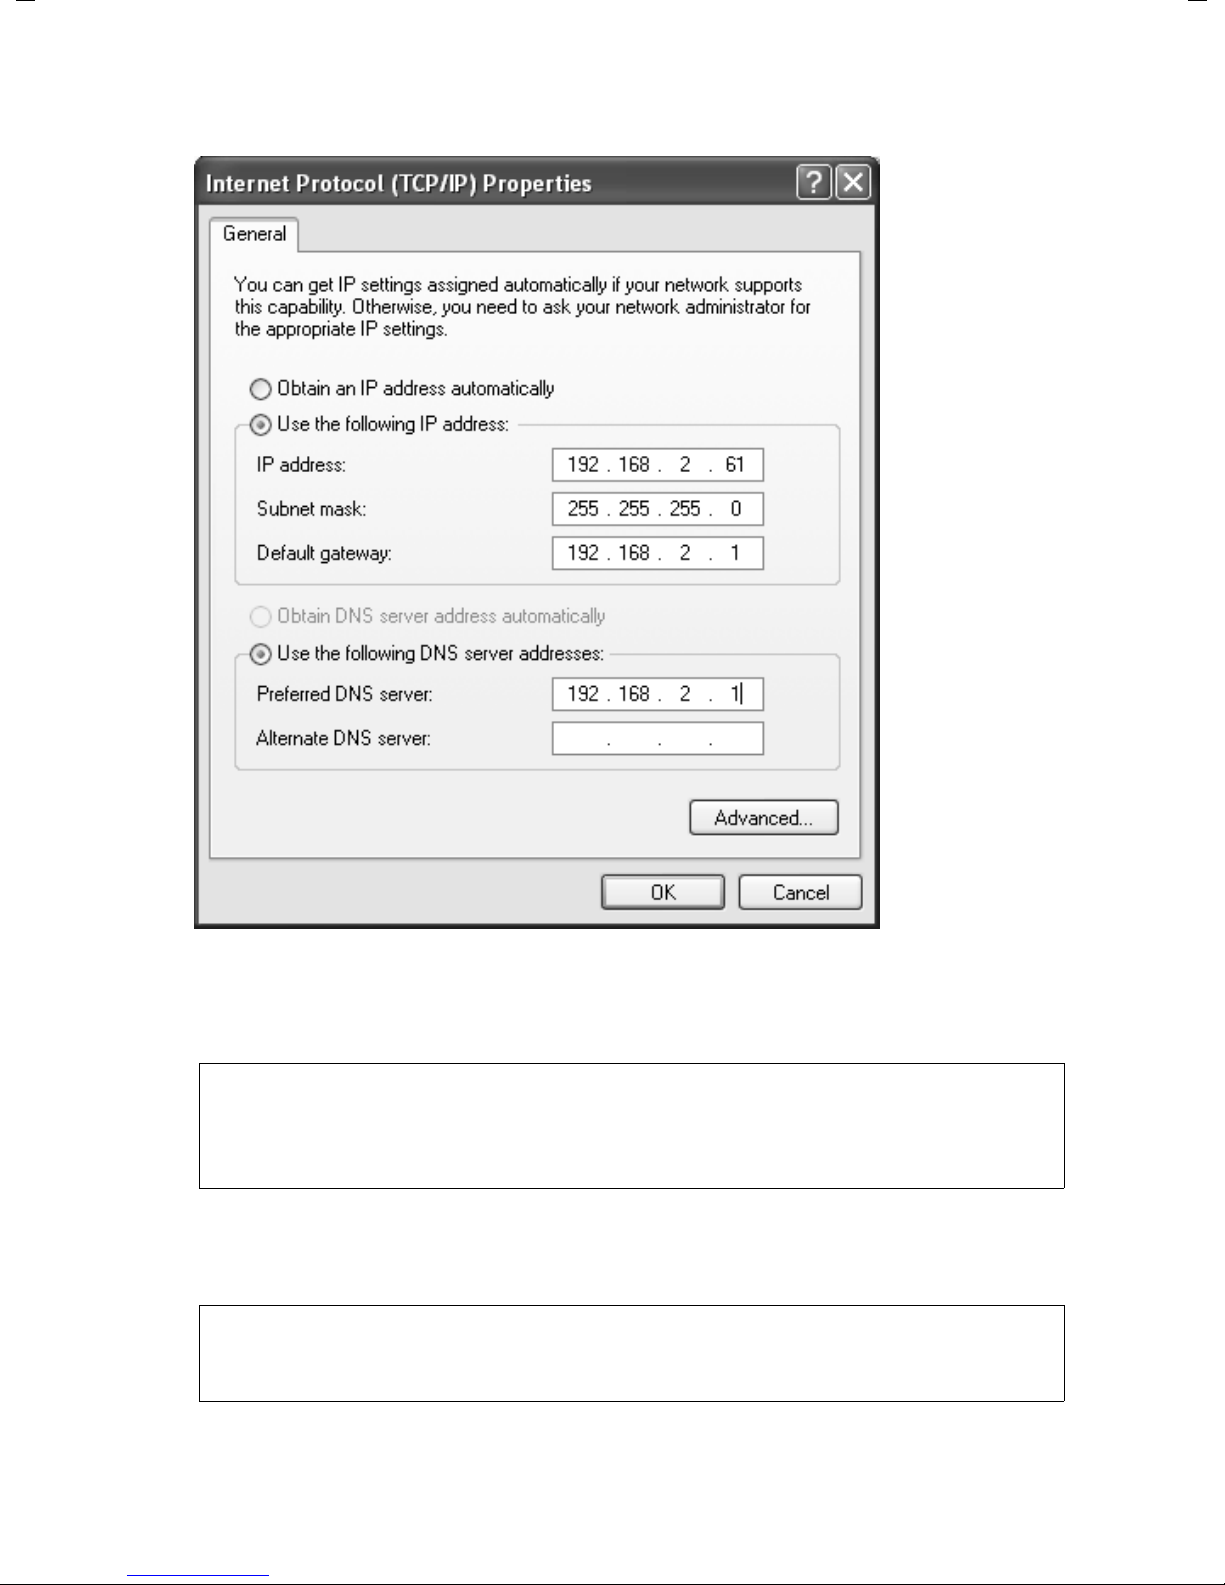
ì Select Internet Protocol (TCP/IP) and click Properties.
Defining IP addresses
ì Select Use the following IP address.
ì Enter the IP address for the PC in the IP address box. Please bear in mind the infor-
mation on page 72.
Note:
If your PC has already been configured with a static IP address and you now need
a dynamic one, select Obtain an IP address automatically. Then no further
information will be required.
ì Enter the subnet mask 255.255.255.0 in the Subnet mask box.
ì Enter the IP address for the router in the Standard-Gateway box.
Note:
A gateway acts as a bridge between two networks with a different architecture. In
our case this is the Gigaset Router between the local TCP/IP network and the WAN
79
Page 81
Defining IP addresses
ì Select Use the following DNS server addresses.
Note:
DNS (Domain Name System) allows IP addresses to be assigned to a PC or domain
names.
ì Enter the IP address for the router in the Preferred DNS server box.
ì Click OK or Cancel to close each window.
ì Restart your network.
Windows 2000
To set a static IP address for your PC:
ì Click Start – Settings – Control Panel.
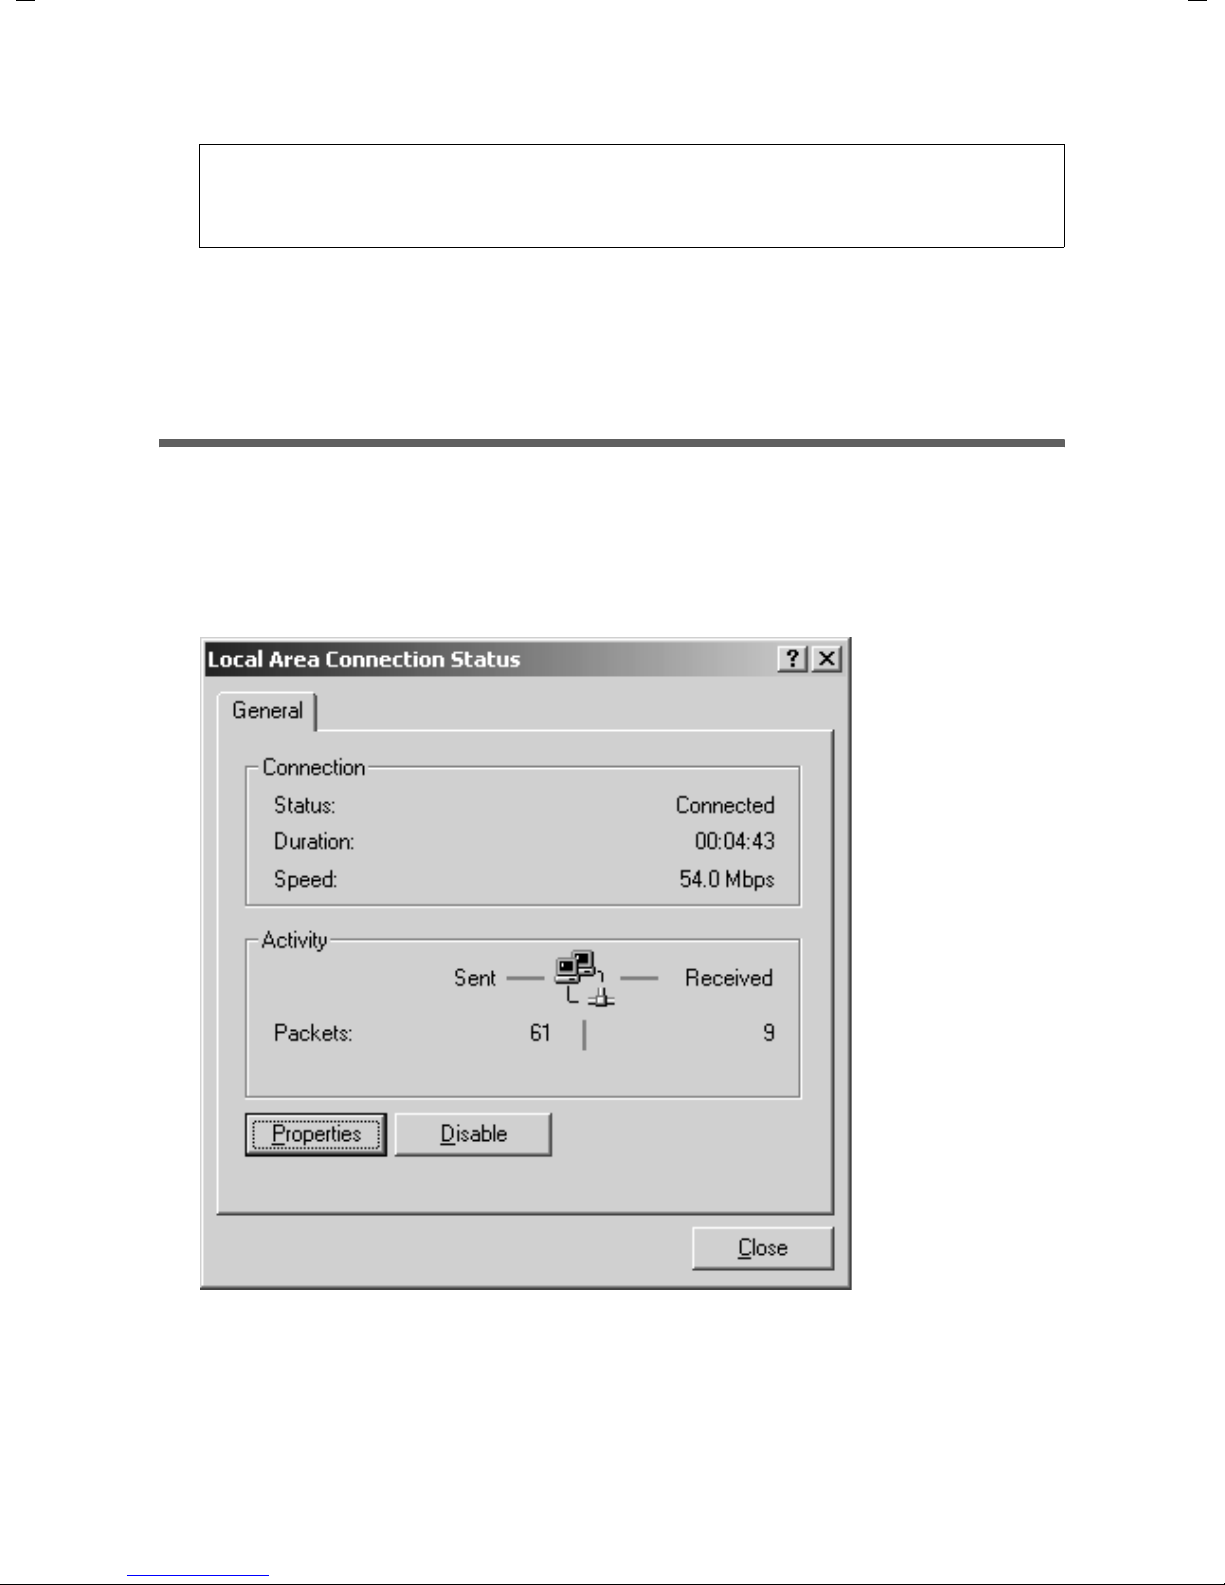
ì Double click the Network and Dial-up Connections icon and then Local Area Con-
nection.
80
Page 82
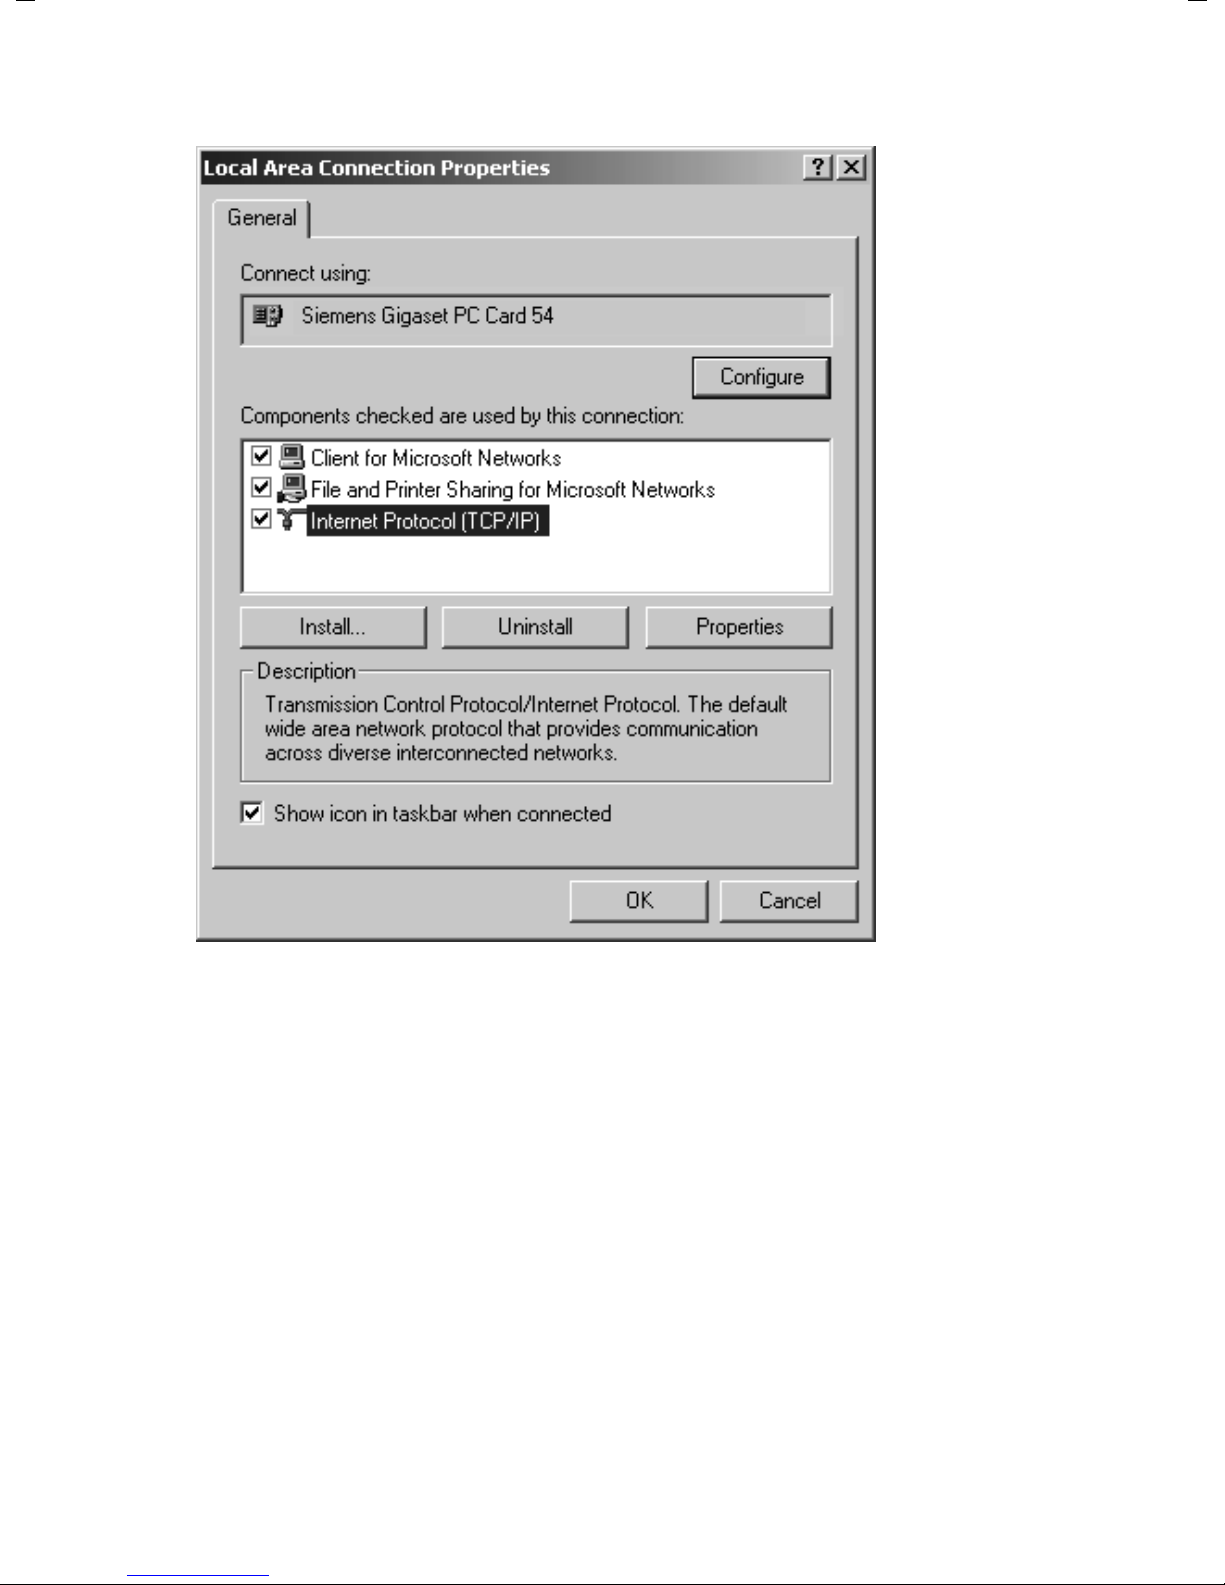
ì In the General tab click Properties.
Defining IP addresses
81
Page 83
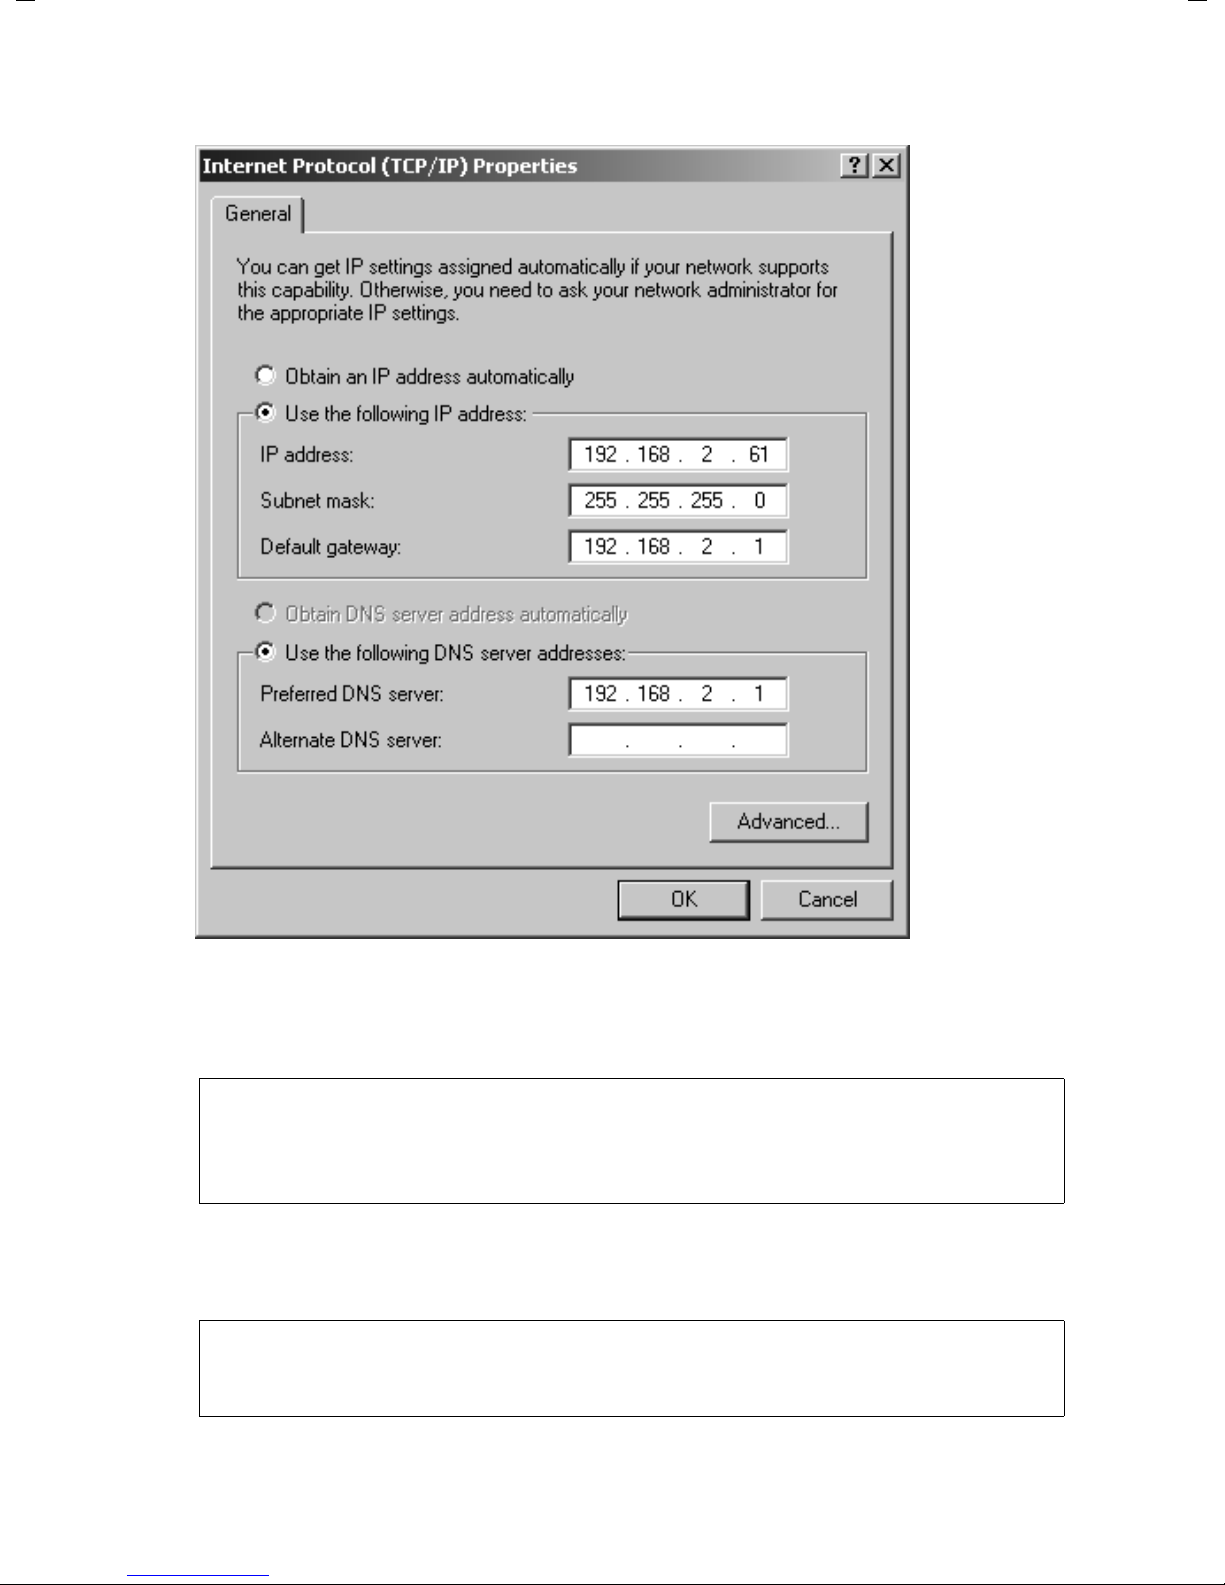
Defining IP addresses
ì Select Internet Protocol (TCP/IP) and click Properties.
ì Select Use the following IP address.
ì Enter the IP address for the PC in the IP address box. Please bear in mind the infor-
mation on page 72.
Note:
If your PC has already been configured with a static IP address and you now need
a dynamic one, select Obtain an IP address automatically. Then no further
information will be required.
ì Enter the subnet mask 255.255.255.0 in the Subnet mask box.
ì Enter the IP address for the router in the Standard-Gateway box.
Note:
A gateway acts as a bridge between two networks with a different architecture. In
our case this is the Gigaset Router between the local TCP/IP network and the WAN.
82
Page 84

Defining IP addresses
ì Select Use the following DNS server addresses.
Note:
DNS (Domain Name System) allows IP addresses to be assigned to a PC or domain
names.
ì Enter the IP address for the router in the Preferred DNS server box.
ì Close this and the next window with OK.
ì Restart your network.
83
Page 85

Glossary
Glossary
Access point
An Access Point, such as the Gigaset SE551 WLAN dsl/cable, is the heart of a wireless
local network (WLAN). It ensures the connecting of network components linked by wire
and handles the data traffic in the wireless network. The Access Point is also the interface to other networks, e. g. an existing Ethernet LAN or via a modem to the Internet.
The operating mode of wireless networks with an Access Point is called Infrastructure
mode.
Ad-hoc mode
The Ad-hoc mode is a way operating wireless local networks (WLAN) in which the network components set up a spontaneous network without an Access point, e. g. several
Notebooks used in a conference. All the network components have equal rights. They
must be fitted with a wireless Network adapter.
Auto-Reconnect
Auto-Reconnect means that applications such as Web Browser, Messenger and E-Mail
automatically open a connection to the Internet when they are launched. This can lead
to high charges if you are not using Flat rate. This function can be deactivated at the
Gigaset SE551 WLAN dsl/cable to reduce costs.
Bridge
A Bridge connects several network segments to form a joint network, e. g. to make a
TCP/IP network. The segments can have different physical characteristics, e. g. different
connections such as Ethernet and wireless LANs. Linking individual segments via
Bridges allows local networks of practically unlimited size.
See also: Switch, Hub, Router, Gateway
Broadcast
A Broadcast is a data packet not directed to a particular recipient but to all the network
components on the network. The Gigaset SE551 WLAN dsl/cable does not pass broadcast packets on; they always remain within the local network (LAN) it administers.
BSSID
Basic Service Set ID
BSSID permits unique differentiation of one wireless network (WLAN) from another. In
Infrastructure mode the BSSID is the MAC address of the Access point. In wireless net-
works in Ad-hoc mode the BSSID is the MAC address of any one of the participants.
Client
A Client is an application that requests a service from a Server. For example, an HTTP
Client on a PC in a local network requests data, i.e. Web pages, from an HTTP Server on
the Internet. Frequently the network component (e. g. the PC) on which the Client
application is running is also called a Client.
84
Page 86

Glossary
DHCP
Dynamic Host Configuration Protocol
DHCP handles the automatic assignment of IP addresses to network components. It was
developed because in large networks – especially the Internet – the defining of IP
addresses is very complex as participants frequently move, drop out or new ones join.
A DHCP Server automatically assigns the connected network components (DHCP
Clients) Dynamic IP addresses from a defined IP address pool thus saving a great deal of
configuration work. It also allows address pools to be used more effectively: Since not
all participants are on the network at the same time, the same IP address can be
assigned to different network components in succession as and when required.
The Gigaset SE551 WLAN dsl/cable includes a DHCP Server and so it can automatically
assign IP addresses for the PCs on its local network. You can define for a particular PC
that its IP address will never change.
DHCP Server
See DHCP
DMZ
Demilitarised Zone
DMZ describes a part of a network that is outside the Firewall. A DMZ is so to speak set
up between a network you want to protect (e. g. a LAN) and an insecure network (e. g.
the Internet). A DMZ is useful if you want to offer Server services on the Internet which
for security reasons are not to be run from behind the firewall or if Internet applications
do not work properly behind a firewall. A DMZ permits unrestricted access from the
Internet to only one or a few network components, while the other network components remain secure behind the firewall.
DNS
Domain name
DNS permits the assignment of IP addresses to computers or Domain names that are
easier to remember. A DNS Server has to administer this information for each LAN with
an Internet connection. As soon as a page on the Internet is called up, the browser
obtains the corresponding IP address from the DNS Server so that it can establish the
connection.
On the Internet the assignment of Domain names to IP addresses follows a hierarchical
system. A local PC only knows the address of the local Name Server. This in turn knows
all the addresses of the computers on the local network and the next higher Name
Server, which again knows addresses on its network and that of the next Name Server.
DNS Server
See DNS
Domain name
The Domain name is the reference to one or more Web Servers on the Internet. The
Domain name is mapped via the DNS service to the corresponding IP address.
85
Page 87

Glossary
DSL
Digital Subscriber Line
DSL is a data transmission technique in which a connection to the Internet can be run
at 1.5 Mbps over normal telephone lines. A DSL connection is provided by an Internet
Service Provider. It requires a DSL modem.
Dynamic IP address
A dynamic IP address is assigned to a network component automatically via DHCP. This
means that the IP address of a network component can change with every login or at
certain intervals.
See also: Static IP address
DynDNS
Dynamic DNS
Domain Name Service (DNS) is used to assign Domain names and IP addresss. For Dyna-
mic IP addresss this service is now enhanced with the so-called Dynamic DNS (DynDNS).
This permits the use of a PC with a changing IP address as a Server on the Internet.
DynDNS ensures that a service on the Internet can always be addressed under the same
Domain name regardless of the current IP address.
Encryption
Encryption protects confidential information against unauthorised access. With an
encryption system data packets can be sent securely over a network. The Gigaset SE551
WLAN dsl/cable uses WEP encryption for secure data transmission over wireless networks.
Ethernet
Ethernet is a network technology for local networks (LAN) defined by IEEE as Standard
IEEE 802.3. Ethernet uses a base band cable with a transmission rate of 10 or 100 Mbps.
Firewall
Firewalls are used by network operators as protection against unauthorised external
access. This involves a whole bundle of hardware and software actions and technologies
that control the data flow between the private network to be protected and an unprotected network such as the Internet.
See also: NAT
Flat rate
Flat rate is a particular billing system for Internet connections. The Internet Service Pro-
vider charges a monthly fee regardless of the duration and number of logins.
Full duplex
Data transmission mode in which data can be sent and received at the same time.
See also: Half duplex
86
Page 88

Glossary
Gateway
A Gateway is a device for connecting networks with completely different architectures
(addressing, protocols, application interfaces etc). Although it is not totally correct, the
term is also used as a synonym for Router.
Global IP address
See Public IP address
Half duplex
Operating mode for data transfer. Only one side can receive or send data at a time.
See also: Full duplex
HTTP proxy
An HTTP proxy is a Server that network components use for their Internet connections.
All requests are sent via the proxy.
Hub
A Hub connects several network components in a star-topology network by sending all
the data it receives from one network component to all the other network components.
See also Switch, Bridge, Router, Gateway
IEEE
Institute of Electrical and Electronic Engineers
IEEE is an international body for defining network standards, especially for standardizing LAN technologies, transmission protocols and speeds, and wiring.
IEEE 802.11
IEEE 802.11 is a standard for wireless 2.4-GHz band LANs. In so-called Infrastructure
mode end devices can be connected to a base station (Access point) or connect with
each other spontaneously (Ad-hoc mode).
Infrastructure mode
Infrastructure mode is a way of operating wireless local networks (WLAN), in which an
Access point handles the data traffic. Network components cannot establish a direct
connection with each other as is the case in Ad-hoc mode.
Internet
The Internet is a wide-area network (WAN) linking several million users around the
world. A number of Protocols have been defined for exchanging data known by the
name TCP/IP. All participants in the Internet are identifiable by an IP address. Servers are
addressed by a Domain name (e. g. siemens.com). Domain Name Service (DNS) is used
to assign Domain names to IP addresses.
Among the most important Internet services are:
u electronic mail (email)
u World-Wide Web (WWW)
u file transfer (FTP)
u discussion forums (Usenet / Newsgroups)
87
Page 89

Glossary
Internet Service Provider
An Internet Service Provider offers access to the Internet for a fee.
IP
Internet Protocol
The IP Protocol is one of the TCP/IP protocols. It is responsible for the addressing of par-
ticipants in a network using IP addresses and routes data from the sender to the recipi-
ent. It decides the paths along which the data packets travel from the sender to the
recipient in a complex network (routing).
IP address
An IP address is a network-wide unique address of a network component in a network
based on the TCP/IP protocol (e. g. in a local network (LAN) or on the Internet). The IP
address has four parts (decimal numbers) separated by periods (e. g. 192.168.2.1). The
IP address comprises the network number and the computer number. Depending on the
Subnet mask one, two or three parts form the network number, the remainder the com-
puter number. You can find out the IP address of your PC using the ipconfig com-
mand.
IP addresses can be assigned manually (see Static IP address) or automatically (see
Dynamic IP address).
On the Internet Domain names are normally used instead of the IP addresses. DNS is
used to assign Domain names to IP addresses.
The Gigaset SE551 WLAN dsl/cable has a Private IP address and a Public IP address.
IP address pool
The Gigaset SE551 WLAN dsl/cable IP address pool defines a range of IP addresses that
the router's DHCP Server can use to assign Dynamic IP addresses.
IPSec
Internet Protocol Security
The term IPSec covers a number of Protocols used for encrypted transmission of data
packets over the Internet. IPSec uses digital certificates for device authentication. IPSec
is offered by Internet Service Providers for implementing Virtual Private Networks
(VPN).
See also: PPTP, L2TP
ISP
Internet Service Provider see Internet Service Provider
L2TP
Layer Two Tunneling Protocol
L2TP is an extension of PPTP and is offered by Internet Service Providers for implementing Virtual Private Networks (VPN). It covers most of the features of PPTP but with less
overhead and is better for managed networks.
88
Page 90

Glossary
LAN
A local network links network components so that they can exchange data and share
resources. The physical range is restricted to a particular area (a site). As a rule the users
and operators are identical. A local network can be connected to other local networks
or a wide-area network (WAN) such as the Internet.
You can use the Gigaset SE105 dsl/cable to set up both a wired local Ethernet network
and also as wireless network as per the IEEE 802.11g standard.
Local IP address
See Private IP address
MAC address
Media Access Control
The MAC address is used for the globally unique identification of a Network adapter. It
comprises six parts (hexadecimal numbers), e. g. 00-90-96-34-00-1A. The MAC address
is assigned by the network adapter manufacturer and cannot be changed.
Mbps
Million bits per second
Specification of the transmission speed in a network.
MRU
Maximum Receive Unit
The MRU defines the maximum payload data within a data packet.
MTU
Maximum Transmission Unit
The MTU defines the maximum length of a data packet that can transported over the
network at a time.
NAT
Network Address Translation
NAT is a method for implementing IP addresses (mostly Private IP addresses) in a net-
work on one or more Public IP addresses on the Internet. With NAT several network components in a LAN can share the router's public IP address to connect to the Internet. The
network components of the local network are hidden behind the router's IP address registered on the Internet. As a result of this security function NAT is frequently used as par t
of the network Firewall. If you want to make services on a PC on the local network available on the Internet despite NAT, you can configure the Gigaset SE551 WLAN dsl/cable
as a Virtual server.
Network
A network is a group of devices connected in wired or wireless mode so that they can
share resources such as files and peripherals. A general distinction is made between
local networks (LAN) and wide-area networks (WAN).
89
Page 91

Glossary
Network adapter
The network adapter is the hardware device that realises the connection of a network
component to a local network. The connection can be wired or wireless. A wired network adapter is for example an Ethernet network card. Wireless network adapters are for
example the Gigaset PC Card 108 and Gigaset USB Adapter 108.
A network adapter has a unique address, the MAC address.
Port
Data is exchanged between two applications in a network via a Port. The port number
addresses an application within a network component. The combination of IP address/
port number uniquely identifies the recipient or sender of a data packet within a network. Some applications (e. g. Internet services such as HTTP or FTP) work with fixed
port numbers, others are allocated a free port number every time they need one.
Port Forwarding
In Port Forwarding the Gigaset SE551 WLAN dsl/cable directs data packets from the
Internet that are addressed to a particular Port to the corresponding port of the appro-
priate network component. This enables servers on the local network to offer services
on the Internet without them needing a Public IP address.
See also: Virtual server
PPPoE
Point-to-Point Protocol over Ethernet
PPPoE is a Protocol for connecting network components in a local wired network to the
Internet via a modem.
PPTP
An Internet connection using PPTP Protocol that creates a "tunnel" within an Internet
connection for secure private connection in which the data is sent in encrypted form.
The PPTP protocol is used in a Virtual Private Network (VPN).
Private IP address
The private IP address is is a network component's address on the local network (LAN).
The network operator can assign any address he or she wants. Devices that act as a link
from a local network, such as the Gigaset SE551 WLAN dsl/cable, have a private and a
Public IP address.
Protocol
A protocol describes the agreements for communicating on a network. A protocol contains rules for opening, administering and closing a connection, about data formats,
time frames and error handling. Communications between two applications require different protocols at various levels, e. g. the TCP/IP protocols for the Internet.
Public IP address
The public IP address is a network component's address on the Internet. It is assigned
by the Internet Service Provider. Devices that act as a link from a local network, such as
the Gigaset SE551 WLAN dsl/cable, have a public and a Private IP address.
90
Page 92

Glossary
Re-key Interval
The re-key interval is the period after which new keys are automatically generated for
data encryption with WPA-PSK.
Remote Management
Remote Management describes the possibility of administering a network from a network component that is not on the local network (LAN) itself.
Roaming
Roaming involves the use of several routers to extend the range of a network. The PCs
on the network can switch dynamically between several Access Points.
Router
A router directs data packages from one local network (LAN) to another via the fastest
route. A Router permits the connecting of network with different network technologies.
For example, it can link a local network with Ethernet or WLAN technology to the Inter-
net.
See also: Bridge, Switch, Hub, Gateway
Server
A Server makes a service available to other network components (Clients). Frequently
the term Server is used for a computer. But it can also mean an application that provides
a particular service such as DNS or Web service.
SMTP
Simple Mail Transfer Protocol
The SMTP Protocol is part of the TCP/IP protocol family. It governs the exchange of elec-
tronic mail on the Internet. Your Internet Service Provider provides you with access to
an SMTP server.
SSID
Service Set Identifier
The SSID identifies the stations of a wireless network (WLAN). All the wireless network
components with the same SSID form a shared network. The SSID can be freely
assigned.
Static IP address
A static IP address is assigned to a network component manually during network configuration. Unlike a Dynamic IP address, a static IP address never changes.
Subnet mask
The subnet mask determines how many parts of the IP addresses of a network represent
the network number and how many the computer number.
The subnet mask administered by the Gigaset SE551 WLAN dsl/cable is always
255.255.255.0. That means the first three parts of the IP address form the network
number and the final part is used for assigning computer numbers. The first three parts
of the IP address of all network components are in this case always the same.
91
Page 93

Glossary
Super G
Super G technology can increase the transmission rate in the network to up to 108 Mbps
by using channel bundling.
Subnetwork
A subnetwork divides a network into smaller units.
Switch
A Switch, like a Hub, is an element for linking different network segments or components. Unlike a hub, the switch has its own intelligence that enables it to further packets
to only that subnetwork or network component they are meant for.
See also: Bridge, Hub, Router, Gateway
TCP
Transmission Control Protocol
The TCP Protocol is part of the TCP/IP protocol family. TCP handles data transport
between communication partners (applications). TCP is a session-based transmission
protocol, i.e. it sets up, monitors and terminates a connection for transporting data.
See also: UDP
TCP/IP
Protocol family on which the Internet is based. IP form the basis for every PC-to-PC con-
nection. TCP provides applications with a reliable transmission link in the form of a continuous data stream. TCP/IP is the basis on which services such as WWW, Mail and News
are built. There are other protocols as well.
Tunneling
Tunneling is a procedure in which the data traffic of the one Protocol is transmitted with
the help of a different protocol. For example, data packets of a private network can be
packed in IP packets and transported over the Internet as if in a tunnel. Tunneling procedures are used nowadays for the secure transmission of data in a Virtual Private Network (VPN). The IP packages from a local network are encrypted and transmitted over
the Internet using a tunnelling protocol (e. g. PPTP).
UDP
User Datagram Protocol
UDP is a Protocol of the TCP/IP protocol family that handles data transport between com-
munication partners (applications). Unlike TCP UDP is a non-session based protocol. It
does not establish a fixed connection. The data packets, so-called datagrams, are sent
as a Broadcast. The recipient is responsible for making sure the data is received. The
sender is not notified about whether it is received or not.
UPnP
Universal Plug and Play
UPnP technology is used for the spontaneous linking of home or small office networks.
Devices that support UPnP carry out their network configuration automatically once
they are connected to a network. They also provide their own services or use services of
other devices on the network automatically.
92
Page 94

Glossary
URL
Universal Resource Locator
Globally unique address of a Domain on the Internet.
Virtual server
A virtual Server provides a service on the Internet that runs not on itself but another network component. The Gigaset SE551 WLAN dsl/cable can be configured as a virtual
server. It then directs incoming calls for a service via Port Forwarding directly to the
appropriate Port of the network component in question.
VPN
A VPN is a network connection in which the data are transmitted over the Internet using
special Tunneling protocols (e. g. PPTP, L2TP, IPSec) securely, i.e. encrypted. VPNs are
used to connect private networks at different locations with each other without having
to lease a transmission line. The Internet is used instead.
WAN
Wide Area Network
A WAN is a network that is not restricted to one particular area, such as the Internet. A
WAN is run by one or more public providers to enable private access. You access the
Internet via an Internet Service Provider.
WEP
Wired Equivalent Privacy
WEP is a security protocol defined in the IEEE 802.11 standard. It is used to protect wireless transmissions in a WLAN against unauthorised access through Encryption of the
data transmitted.
Wireless network
See WLAN
WLAN
Wireless LAN
Wireless LANs enable network components to communicate with and access a network
using radio waves as the transport medium. A wireless LAN can be connected as an
extension to a wired LAN or it can form the basis for a new network. The basic element
of a wireless network is the so-called wireless cell. This is the area where the wireless
communication takes place. A WLAN can be operated in Ad-hoc mode or Infrastructure
mode.
WLAN is currently specified in Standard IEEE 802.11. The Gigaset SE551 WLAN dsl/cable
complies with Standard 802.11g.
WPA
WPA was developed to improve security provided by WEP. To generate keys, WPA uses
more complex methods, e.g. TKIP (Temporal Key Integrity Protocol). In addition, WPA
can use an authentication server (e.g. a RADIUS server) to increase security.
93
Page 95

Glossary
WPA-PSK
WPA Preshared Key: Variant of WPA data encryption, in which new keys are automatically generated at regular intervals by means of a keyword (Pre-shared key). The key is
updated after defined periods (Re-key Interval).
XR
eXtended Range
The Access Point's XR function (Extended Range) is activated if the range is too large to
establish a connection. It increases the range and, at the same time, decreases the
transmission rate.
94
Page 96

Index
Index
A
Access control
at release level . . . . . . . . . . . . . . . . 40
at user level . . . . . . . . . . . . . . . . . . 40
defining (Windows 98)
Access point . . . . . . . . . . . . . . . . . 7, 84
Address block for IP addresses . . . . . . 72
Ad-hoc mode
Ad-hoc network. . . . . . . . . . . . . . . . . . 6
Assigning static IP addresses
Windows 2000
Windows 98 . . . . . . . . . . . . . . . . . . 73
Windows XP . . . . . . . . . . . . . . . . . . 77
Auto-Reconnect
. . . . . . . . . . . . . . . . . 6, 84
. . . . . . . . . . . . . . . . 80
. . . . . . . . . . . . . . . . . 84
. . . . . . . . . . 40
B
Base station. . . . . . . . . . . . . . . . . . . . . 7
Bridge
Broadcast . . . . . . . . . . . . . . . . . . . . . 84
BSSID. . . . . . . . . . . . . . . . . . . . . . . . . 84
. . . . . . . . . . . . . . . . . . . . . . . . 84
C
Change user passwords
Windows 2000 . . . . . . . . . . . . . . . . 31
Checking network settings
(Windows XP)
Client . . . . . . . . . . . . . . . . . . . . . . . . 84
Connecting network drives
Windows 2000
Windows 98 . . . . . . . . . . . . . . . . . . 68
Windows XP . . . . . . . . . . . . . . . . . . 53
Connection method
. . . . . . . . . . . . . . . 19
. . . . . . . . . . . . . . . . 60
. . . . . . . . . . . . . . 17
D
Define computer name
Windows 2000 . . . . . . . . . . . . . . . . 26
Windows 98
Windows XP . . . . . . . . . . . . . . . . . . 18
Define workgroup
Windows 2000
Windows 98 . . . . . . . . . . . . . . . . . . 40
DHCP. . . . . . . . . . . . . . . . . . . . . . . . . 85
. . . . . . . . . . . . . . . . . . 40
. . . . . . . . . . . . . . . . 26
Digital Subscriber Line see DSL
DMZ. . . . . . . . . . . . . . . . . . . . . . . . . . 85
. . . . . . . . . . . . . . . . . . . . . . . . . . 85
DNS
DNS Server. . . . . . . . . . . . . . . . . . 76, 85
Domain name . . . . . . . . . . . . . . . . . . 85
Domain Name Service see DNS
. . . . . . . . . . . . . . . . . . . . . . . . . . 86
DSL
Dynamic DNS Service see DynDNS
Dynamic Host Configuration Protocol
see DHCP
Dynamic IP address
DynDNS
. . . . . . . . . . . . . . . . . . . . . . . 86
. . . . . . . . . . . . . . 86
E
Encryption . . . . . . . . . . . . . . . . . . . . . 86
Entering a gateway
Windows 2000
Windows 98 . . . . . . . . . . . . . . . . . . 75
Windows XP
Ethernet. . . . . . . . . . . . . . . . . . . 5, 7, 86
Ethernet network
linking with wireless network
Extending coverage . . . . . . . . . . . . . . . 9
Extending range. . . . . . . . . . . . . . . . . . 4
. . . . . . . . . . . . . . . . 82
. . . . . . . . . . . . . . . . . . 79
. . . . . . 8
F
Files
shared use in a network . . . . . . . . . 13
Firewall . . . . . . . . . . . . . . . . . . . . . . . 86
Flat rate
Full duplex . . . . . . . . . . . . . . . . . . . . . 86
. . . . . . . . . . . . . . . . . . . . . . . 86
G
Gateway. . . . . . . . . . . . . . 75, 79, 82, 87
Gigaset PC Card 108
Gigaset Router see Router
Gigaset SE551 WLAN dsl/cable . . . . . 4, 5
Gigaset USB Adapter 108
Global IP address see public IP address
. . . . . . . . . . . . . 4, 6
. . . . . . . . . . . 4
H
Half duplex . . . . . . . . . . . . . . . . . . . . 87
Home network
. . . . . . . . . . . . . . . . . . . 4
95
Page 97

Index
HTTP proxy . . . . . . . . . . . . . . . . . . . . 87
. . . . . . . . . . . . . . . . . . . . . . . . . . 87
Hub
I
IEEE. . . . . . . . . . . . . . . . . . . . . . . . . . 87
Infrastructure mode. . . . . . . . . . . . 7, 87
Infrastructure network
Institute of Electrical and Electronic
Engineers see IEEE
Internet
Internet access . . . . . . . . . . . . . . . . . . 4
Internet Protocol see IP Protocol
Internet provider see Internet Service
Internet Service Provider
IP address
address block . . . . . . . . . . . . . . . . . 72
dynamic
pool . . . . . . . . . . . . . . . . . . . . . . . . 88
private . . . . . . . . . . . . . . . . . . . 72, 90
public
static . . . . . . . . . . . . . . . . . . . . . . . 91
IP protocol. . . . . . . . . . . . . . . . . . . . . 88
IPSec
ISP see Internet Service Provider
. . . . . . . . . . . . . . . . . . . . . 7, 87
Provider
. . . . . . . . . . . . . . . . . . 72, 88
. . . . . . . . . . . . . . . . . . . . . 86
. . . . . . . . . . . . . . . . . . . . . . . 90
. . . . . . . . . . . . . . . . . . . . . . . . . 88
. . . . . . . . . . . . . 7
. . . . . . . . 5, 88
L
L2TP . . . . . . . . . . . . . . . . . . . . . . . . . 88
. . . . . . . . . . . . . . . . . . . . . . . . 8, 89
LAN
Launch
network wizard . . . . . . . . . . . . . . . 15
Launch network wizard (Windows XP) 15
Layer Two Tunneling Protocol see L2TP
Local IP address see private IP address
Local network
. . . . . . . . . . . . . . . . . . 89
M
MAC address . . . . . . . . . . . . . . . . . . . 89
Making drives available
Windows 2000
Windows 98 . . . . . . . . . . . . . . . . . . 66
Windows XP . . . . . . . . . . . . . . . . . . 53
Making files available
Windows 2000
Windows 98 . . . . . . . . . . . . . . . . . . 66
. . . . . . . . . . . . . . . . 58
. . . . . . . . . . . . . . . . 58
Windows XP
Making folders available
Windows 2000
Windows 98 . . . . . . . . . . . . . . . . . . 66
Windows XP
Making printers available
Windows 2000 . . . . . . . . . . . . . . . . 61
Windows 98
Windows XP . . . . . . . . . . . . . . . . . . 55
Maximum Receive Unit see MRU
Maximum Transmission Unit see MTU
. . . . . . . . . . . . . . . . . . . . . . . . . 89
Mbps
Microsoft Network . . . . . . . . . . . . . . . 37
Mobile network
MRU. . . . . . . . . . . . . . . . . . . . . . . . . . 89
MTU. . . . . . . . . . . . . . . . . . . . . . . . . . 89
. . . . . . . . . . . . . . . . . . 53
. . . . . . . . . . . . . . . . 58
. . . . . . . . . . . . . . . . . . 53
. . . . . . . . . . . . . . . . . . 69
. . . . . . . . . . . . . . . . . . 6
N
NAT . . . . . . . . . . . . . . . . . . . . . . . . . . 89
Network. . . . . . . . . . . . . . . . . . . . . . . 89
ad-hoc
infrastructure . . . . . . . . . . . . . . . . . . 7
wired . . . . . . . . . . . . . . . . . . . . . . . . 5
wireless
Network adapter . . . . . . . . . . . . . . . . 90
Ethernet . . . . . . . . . . . . . . . . . . . . . . 5
wireless
Network Address Translation see NAT
Network Client
setting up a (Windows 98)
Network components
mobile . . . . . . . . . . . . . . . . . . . . . . . 6
Network configuration
Windows 2000
Windows 98 . . . . . . . . . . . . . . . . . . 37
Windows XP
Network environment
Windows 98 . . . . . . . . . . . . . . . . . . 66
Network service
installing a (Windows 2000)
. . . . . . . . . . . . . . . . . . . . . . . 6
. . . . . . . . . . . . . . . . . . . . . . 6
. . . . . . . . . . . . . . . . . . . . . . 6
. . . . . . . 39
. . . . . . . . . . . . . . . . 24
. . . . . . . . . . . . . . . . . . 15
. . . . . . 24
P
Password for users
Windows 2000
Windows 98 . . . . . . . . . . . . . . . . . . 64
. . . . . . . . . . . . . . . . 30
96
Page 98

Index
PC
configuring as Microsoft Network
Client
defining a name (Windows 2000) . 26
defining a name (Windows 98)
defining a name (Windows XP). . . . 18
Point-to-Point Protocol over Ethernet
see PPPoE
Point-to-Point Tunneling Protocol
see PPTP
. . . . . . . . . . . . . . . . . . . . . . . . . . 90
Port
Port Forwarding. . . . . . . . . . . . . . . . . 90
Port number . . . . . . . . . . . . . . . . . . . 90
Possible uses
PPPoE . . . . . . . . . . . . . . . . . . . . . . . . 90
PPTP . . . . . . . . . . . . . . . . . . . . . . . . . 90
Printer
shared use in a network
Private IP address
Protocol. . . . . . . . . . . . . . . . . . . . . . . 90
Public IP address . . . . . . . . . . . . . . . . 90
. . . . . . . . . . . . . . . . . . . . . 37
. . . 40
. . . . . . . . . . . . . . . . . . . 11
. . . . . . . . . 13
. . . . . . . . . . . . . . . . 90
R
Releasing files
Windows 2000 . . . . . . . . . . . . . . . . 32
Windows 98 . . . . . . . . . . . . . . . . . . 46
Windows XP
Releasing printers
Windows 2000 . . . . . . . . . . . . . . . . 36
Windows 98
Windows XP . . . . . . . . . . . . . . . . . . 23
Remote Management . . . . . . . . . . . . 91
Repeater
Rights for user access
Roaming
Router . . . . . . . . . . . . . . . . . . . . . . 4, 91
for wired networks . . . . . . . . . . . . . . 5
. . . . . . . . . . . . . . . . . . . . . . . 9
(Windows 2000) . . . . . . . . . . . . . 35
. . . . . . . . . . . . . . . . . . . 10, 91
. . . . . . . . . . . . . . . . . . 21
. . . . . . . . . . . . . . . . . . 47
S
Server . . . . . . . . . . . . . . . . . . . . . . . . 91
virtual . . . . . . . . . . . . . . . . . . . . . . 93
Service Set Identifier see SSID
Setting the TCP/IP protocol
Windows 2000
Windows 98 . . . . . . . . . . . . . . . . . . 41
Setting up network printers
. . . . . . . . . . . . . . . . 27
Windows 2000
Windows 98
Windows XP . . . . . . . . . . . . . . . . . . 55
Setting up user IDs
Windows 2000
Windows 98 . . . . . . . . . . . . . . . . . . 63
Simple Mail Transfer Protocol see SMTP
. . . . . . . . . . . . . . . . . . . . . . . . . 91
SMTP
Specify workgroup
Windows XP . . . . . . . . . . . . . . . . . . 18
. . . . . . . . . . . . . . . . . . . . . . . . . . 91
SSID
Static IP address . . . . . . . . . . . . . . . . . 91
Subnet mask . . . . . . . . . . 74, 79, 82, 91
Subnetwork
Switch . . . . . . . . . . . . . . . . . . . . . . . . 92
. . . . . . . . . . . . . . . . 61
. . . . . . . . . . . . . . . . . . 69
. . . . . . . . . . . . . . . . 29
. . . . . . . . . . . . . . . . . . . . 92
T
TCP . . . . . . . . . . . . . . . . . . . . . . . . . . 92
TCP/IP . . . . . . . . . . . . . . . . . . . . . . . . . 92
TKIP (Temporal Key Integrity
Protocol)
Transmission Control Protocol see TCP
Transmission speed . . . . . . . . . . . . . . 89
Tunnel
Tunneling. . . . . . . . . . . . . . . . . . . . . . 92
. . . . . . . . . . . . . . . . . . . . . . . . 90
. . . . . . . . . . . . . . . . . . . 93
U
UDP . . . . . . . . . . . . . . . . . . . . . . . . . . 92
Universal Plug and Play see UPnP
Universal Resource Locator see URL
. . . . . . . . . . . . . . . . . . . . . . . . . 92
UPnP
. . . . . . . . . . . . . . . . . . . . . . . . . . 93
URL
User
settings for user interface
(Windows 98)
User account
setting up a (Windows XP) . . . . . . . 50
User Datagram Protocol see UDP
User list (Windows 98)
User name
Windows 2000
Windows 98 . . . . . . . . . . . . . . . . . . 64
Windows XP . . . . . . . . . . . . . . . . . . 50
User password
Windows 2000
Windows 98 . . . . . . . . . . . . . . . . . . 64
Windows XP
. . . . . . . . . . . . . . . 64
. . . . . . . . . . . . 65
. . . . . . . . . . . . . . . . 30
. . . . . . . . . . . . . . . . 30
. . . . . . . . . . . . . . . . . . 52
97
Page 99

Index
Utility
for file and printer release
(Windows 98)
. . . . . . . . . . . . . . . 44
V
Virtual Private Network see VPN
Virtual server
VPN . . . . . . . . . . . . . . . . . . . . . . . . . . 93
. . . . . . . . . . . . . . . . . . . 93
W
WAN . . . . . . . . . . . . . . . . . . . . . . . . . 93
WAN interface
WEP. . . . . . . . . . . . . . . . . . . . . . . . . . 93
. . . . . . . . . . . . . . . . . 4, 7
Wide Area Network see WAN
Wired Equivalent Privacy see WEP
and WEP encryption
Wired network
Wireless cell
Wireless LAN see WLAN
Wireless network . . . . . . . . . . . . . . . . 93
ad-hoc mode
infrastructure mode . . . . . . . . . . . . . 7
Wireless network adapter . . . . . . . . . . . 6
WLAN
. . . . . . . . . . . . . . . . . . . . . 6, 8, 93
operating types. . . . . . . . . . . . . . . . . 6
. . . . . . . . . . . . . . . . . . . 5
. . . . . . . . . . . . . . . . . . . . 93
. . . . . . . . . . . . . . . . . . 6
98
Page 100

Issued by
Siemens Communications
Haidenauplatz 1
D-81667 Munich
© Siemens AG 2005
All rights reserved. Subject to availability.
Rights of modification reserved.
Siemens Aktiengesellschaft
www.siemens.com/gigaset
No.: A31008-M1029-B101-1-7643
 Loading...