

Page 1
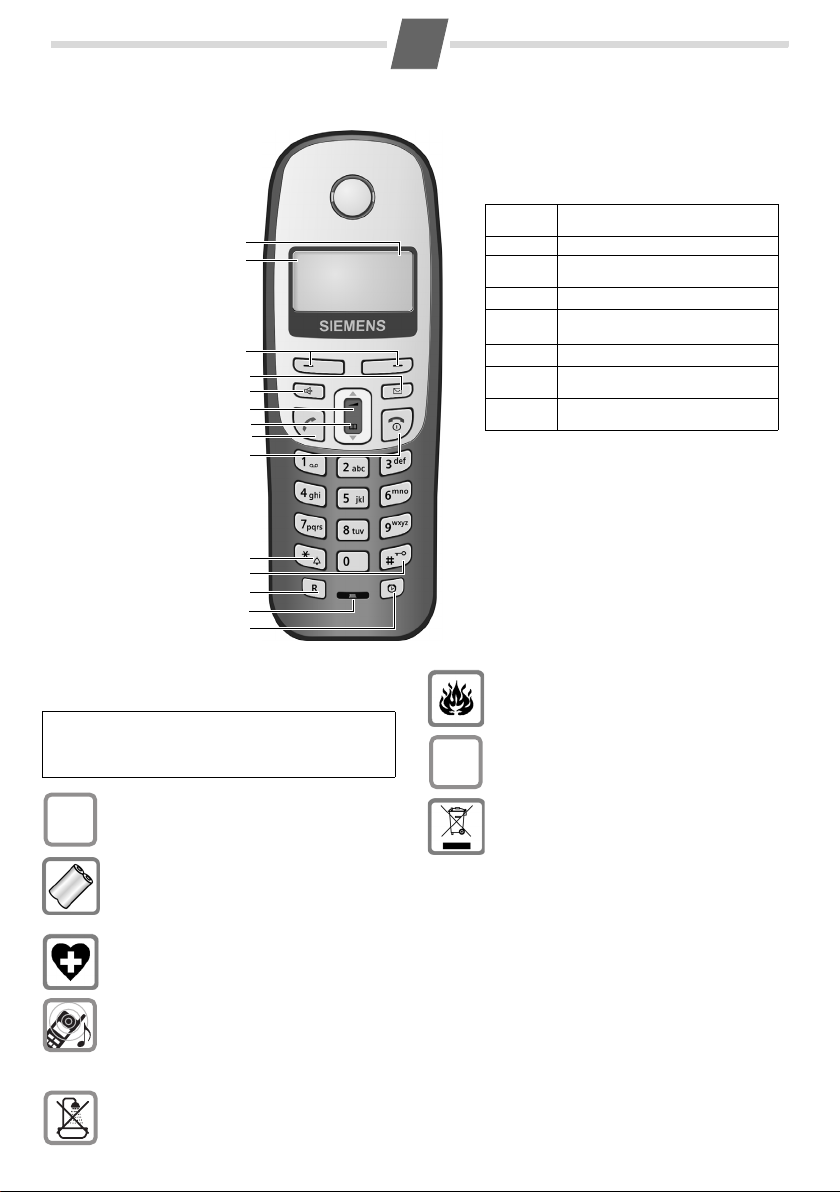
Gigaset C36H handset
1
1 Charge status of the
battery pack
2 Internal number
of the handset
3Display keys
4Message key
5 Handsfree key
1
2
6 Control key
7Directory key
8 Talk key
9 End call and
On/Off key
10 Ringtone on/off (press
and hold in idle status)
11 Key lock on/off
(press and hold)
12 Recall key
3
4
5
6
7
8
9
- Confer (flash)
- Dialling pause
(press and hold)
13 Microphone
14 Alarm clock key
10
11
12
13
14
Safety precautions
Read this User Guide and the safety precautions
carefully before use. Explain their contents to your
W
children, and the potential hazards associated
with using the telephone.
Only use the mains unit supplied.
$
Fit only the approved rechargeable battery
pack! Never use a conventional (non-recharge-
able) battery pack as this could damage your
health and cause injury. Use the battery pack as
directed in this user guide (page 2).
The operation of medical appliances may be
affected. Be aware of the technical conditions
within the particular environment (e.g. doctor's
practice).
Do not hold the rear of the handset to your ear
when it is ringing or when the handsfree function is activated. Otherwise you risk serious and
permanent damage to your hearing.
The handset may cause an unpleasant humming noise in hearing aids.
Do not install the phone in a bathroom or
shower room. The handset is not splashproof.
2 V
11.12. 11:56
INT MENU
Display keys:
Pressing the keys launches whichever function
that appears above them in the display.
Display
icon
INT
MENU
“
U
T
˜
OK
Do not use the telephone in environments
subject to explosion hazard (e.g. auto paint
shops).
If you give your Gigaset to someone else, make
sure you also give them the user guide.
ƒ
All electrical and electronic products should be
disposed of separately from the municipal
waste stream via designated collection facilities
appointed by the government or the local
authorities.
The correct disposal and separate collection of
your old appliance will help prevent potential
negative consequences for the environment
and human health. It is a precondition for reuse
and recycling of used electrical and electronic
equipment.
For more detailed information about disposal of
your old appliance, please contact your city
office, waste disposal service or the shop where
you purchased the product.
Emergency numbers cannot be dialled if the key lock
(page 1) is activated!
Not all of the functions described in this User Guide are
available in all countries.
Function when pressed
Call all registered handsets.
Open main/submenu
(see Menu tree, page 6).
Go back one menu level.
Scroll up/down or adjust volume
with u.
Move cursor to left/right with u.
Backspace deletes one character
at a time.
Confirm menu function or
save entry.
Page 2
2
Setting up the telephone for use
Setting up the handset for use
Note:
The display is protected by a plastic film.
Please remove the protective film!
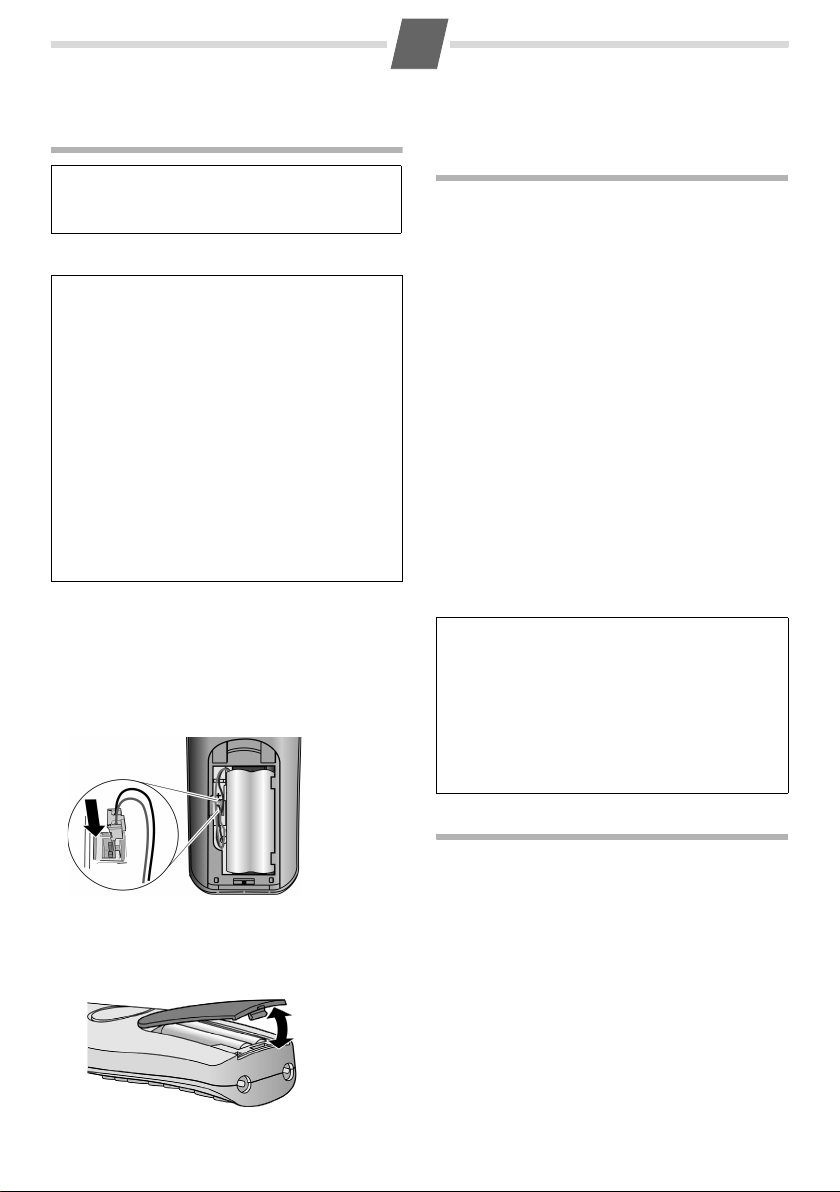
Fitting the battery pack
◆ Place the battery leads in the cable guides so
that the battery cover cannot catch on the leads
and damage them when it is closed.
◆ Use only the rechargeable battery pack
recommended by Gigaset Communications
GmbH * (page 5), i.e. never use a conventional
(non-rechargeable) battery pack as this may
cause significant damage to health and property.
For example, the outer casing of the battery pack
could be destroyed or the battery pack could
explode. The phone could also malfunction or be
damaged as a result of using batteries that are not
of the recommended type.
◆ Only use the battery charger supplied.
◆ Only place the handset in the charging cradle
that is intended for it.
* Gigaset Communications GmbH is a licensee of the
Siemens trademark.
◆ Insert the plug into the socket as shown in the
enlarged view.
◆ Insert the battery pack.
◆ Place the cords in the cord routing.
Opening the battery cover
Place your fingernail between the cover and the
housing and pull the cover upwards.
Registering the handset
A Gigaset C36H handset can be registered on up to
four base stations.
You must initiate handset registration on the handset and on the base station.
After it has registered, the handset returns to idle
status. If several handsets are registered on the
base station, the internal number is shown in the
top left of the display after registration, e.g. 2.
If the internal numbers 1 to 4 have already been
assigned (four handsets have already been registered), handset number four is de-registered and
overwritten.
On the base station
To find out how to register the handset on the base
station, see the user guide for the base station.
On the handset
MENU ¢ Settings ¢ OK ¢ Handset ¢ OK
¢ Register HS ¢ Enter the base station PIN
(default setting: 0000)
Registering
Registration can take up to 5 minutes.
Note:
You can register the Gigaset C36H handset on the
Gigaset C36H0/C36H5 base station automati-
cally too. Precondition: The handset is not registered on a base station. Place the handset in the
charging cradle of the base station with its dis-
play facing forward. You will hear a confirmation
tone. Leave the handset in the base station until it
is registered.
flashes in the display.
¢ OK.
Closing the battery cover
Insert the cover into the top end of the battery
compartment and press down until it clicks into
place.
Charging the battery pack
Plug the mains unit for the charging cradle into the
socket and place the handset in the charging cradle
with the display facing forward.
To charge the battery pack, leave the handset in
the charging cradle for approx. 5 hours. The battery pack is now fully charged. The charge status of
the battery pack is only correctly displayed after
uninterrupted charging/discharging. Therefore you
should not interrupt the charging process.
Charging is electronically controlled to prevent
overcharging. The battery pack heats up during
charging. This is normal and not dangerous. After
a time its charge capacity will decrease for technical reasons.
You must set the date and time to ensure that the
times of calls are logged correctly (see Menu tree
page 6).
Page 3

3
Once the phone is registered and the time set, the
idle display looks as shown on page 1.
Activating/deactivating the handset
Press and hold the End call key a.
If you place a deactivated handset into the charging cradle, it will automatically activate.
Making calls
Making external calls and ending a call
External calls are calls using the public telephone
network.
~
(Enter the phone number) ¢c.
The number is dialled. (Or you can first press and
hold
c [dial tone] and then enter the number.)
During the call you can adjust the earpiece volume
using
t.
End the call/cancel dialling:
Press the End call key
a.
Answering a call
An incoming call is indicated by ringing, by a flashing handsfree key
on the screen.
You can answer the call by:
◆ Pressing the Talk key c.
◆ Pressing the handsfree key d.
When Auto Answer is activated (see Menu tree,
page 6) simply remove the handset from the
charging cradle.
d (Gigaset A 26) and a display
Handsfree talking
Once you have entered the phone number you can
immediately call in handsfree mode by pressing
(the
d key lights up continuously). During a call,
you can switch between the earpiece and handsfree mode by pressing
ume with
t.
d. Set the handsfree vol-
d
Using the directory and lists
Directory
To open the directory: press v .
You can save up to 40 phone numbers
(max. 32 digits) with corresponding names
(max. 14 characters).
Note:
You can assign a number from the directory to a
key for speed dialling (page 3).
Saving the first number in the directory
v
¢ New Entry? ¢OK
~
~
Enter number and press OK.
Enter name and press OK.
Saving a number in the directory
v
¢ MENU ¢ New Entry ¢ OK
~
~
Enter number and press OK.
Enter name and press OK.
Selecting a directory entry
Open the directory with v. You have the following
options:
◆ Use u to scroll to the entry until the required
name is selected.
◆ Enter the first character of the name or scroll to
the entry with
u, if required.
Dialling with the directory
v
¢ u (Select entry) ¢ c
Using other functions
v ¢ v (Select entry) ¢ MENU
The following functions can be selected with u:
New Entry
Show Number
Use Number
Edit Entry
Delete Entry
Send Entry
Delete List
Send List
Shortcut
Add a new entry.
Display the phone number.
Edit or add to a saved number.
Then dial or use other functions
with MENU.
Edit selected entry.
Delete selected entry.
Send a single entry to another
handset (page 4).
Delete all directory entries.
Send the complete list to
another handset (page 4).
For speed dial, assign the
current entry to a key.
IP Dialling and VIP storage
You can store IP or VIP numbers on 0,2-9. Dial the
number by pressing and holding down the relevant
number key.
Page 4

4
Storing the IP number
Press the control key v ¢MENU ¢ OK ¢New
Entry ¢ OK
Please follow this sequence:
1 Enter the IP access number.
2 Insert “P” by pressing and holding the S key if
neccessary.
3 Enter IP number and password, end with #.
End with OK, then enter name, such as “IP”
Note:
The entry method may differ when using different
IP Cards. VIP numbers can be entered directly.
Setting the shortcut key
MENU ¢ Scroll touShortcut ¢Scroll u to select
a number (0,2-9), for example: Shortcut: 2 ¢ OK
Using the shortcut key
By pressing and holding the shortcut key, the relevant IP or VIP number will be dialled. (For example:
press and hold key 2, the IP number will be dialled,
then dial the long distance number)
Sending the directory to another handset
Preconditions:
◆ The sending and receiving handsets must both
be registered on the same base station.
◆ The other handset and the base station can
send and receive directory entries.
v ¢ u (Select entry) ¢ MENU ¢ Send Entry /
Send List ¢ OK ¢ ~ (Enter the internal number
of the receiving handset) ¢ OK
Last number redial list
This list contains the ten last dialled numbers.
Dialling from the last number redial list
c
u
c
Managing entries in the last number redial list
c
u
MENU Press the display key.
Press the key briefly.
Select entry.
Press the Talk key again. The number is
dialled.
Press the key briefly.
Select entry.
You can select the following settings:
Use Number
Copy to Dir.
Delete Entry
Delete List
(as in the directory, page 3)
Copy an entry to the directory
(as in the directory, page 3)
(as in the directory, page 3)
Opening lists with the message key
When a new entry is made in the list, a signal
sounds and the display blinks. The display also
shows a message.
When you press the
played. If only one list contains new messages, this
will be opened automatically.
f key, all the lists are dis-
Setting handset
Change display language
MENU ¢ Settings ¢ OK ¢ Handset ¢ OK
¢ Language ¢ OK ¢ Select the language
¢ OK
The current language is indicated by ‰.
If you accidentally choose a language you do not
understand:
MENU
¢ 321 (Press the keys one after the other)
Select the correct language with u and press OK.
Setting the alarm clock
Activating/deactivating the alarm clock
MENU ¢ Alarm Clock ¢ OK ¢ Activation
¢ OK (‰ =in)
Or: Press the alarm clock key g.
When the alarm clock rings, press any key to switch
it off for 24 hours.
Setting the wake up time
MENU ¢ Alarm Clock ¢ OK ¢ Wake-up time
¢ OK
Enter the wake up time in hours and minutes, then
press OK.
Resetting the handset
You can reset any individual settings and changes
that you have made. Entries in the directory, the
calls list and the handset's registration on the base
station will be retained.
MENU ¢ Settings ¢ OK ¢ Handset ¢ OK
¢ Reset Handset ¢ OK
Cancel the reset with
a.
Page 5

5
Appendix
Entering special characters
Standard characters
1x 2x 3x 4x 5x 6x
Space
1
Q
P
Abc-->
#
Specifications
Recommended battery pack
(Valid at the time of going to press)
Nickel-metal-hydride (NiMH):
C36H handset: V30145-K1310-X359, -X402
The handset is supplied with the recommended
battery pack.
General specifications
WDCT standard is supported
Range up to 300 m outdoors,
Power supply to
charging cradle
Environmental conditions in operation
Care
Wipe the handset with a damp cloth (do not use
solvent) or an antistatic cloth.
Never use a dry cloth. This can cause static.
1 £ $ ¥ ¤
.,?!0+
* / ( ) < =
123
123-->
#@ \ &
abc
up to 50 m indoors
230 V ~/50 Hz
+5 °C to +45 °C;
20% to 75% humidity
Contact with liquid
!
If the handset has come into contact with liquid:
◆ Switch off the handset and remove the
battery pack immediately.
◆ Allow the liquid to drain from the handset.
◆ Pat all parts dry, then with the battery compart-
ment open and the keypad facing down place
the handset in a dry, warm place for at least
72 hours (not in a microwave, oven etc.).
◆ Do not switch on the handset again until it is
completely dry.
When it has fully dried out, you will normally be
able to use it again.
Questions and answers
If you have any queries about the use of your
phone, you can contact us any time at
www.gigaset.com/cn
Call hotline: 4006 706 007
The table below contains a list of common
problems and possible solutions.
Problem Cause Solution
Nothing
appears in
the display.
No reaction to
keystroke.
No wireless
connection to
the base station, Base
flashes in the
display.
. Or
The handset is not
switched on.
Battery pack is
flat.
The key lock is
activated.
The handset is
outside the range
of the base station.
The handset is not
registered.
The base station is
not switched on.
Press the End call key
a for approx. 5 sec-
onds or place the
handset into the
charging cradle.
Charge/replace the
battery pack (page 2).
Press the hash key
for approx. 2 sec-
onds (page 1).
Move the handset
closer to the base
station.
Register the handset
(page 2).
Check the mains plug
on the base station.
R
Page 6

6
Menu tree
Your phone has an extensive range of features.
These are offered in the form of menus.
With the phone in idle status, press
MENU (open
menu), scroll to the required function and then
press
OK to confirm your choice.
1 Alarm Clock
1-1 Activation Activating/deactivating the alarm clock
1-2 Wake-up time Input format: HHMM
2 Audio Settings
2-1 Ringer Volume 5 levels + "Crescendo" available
2-2 Ringer Melody 2-2-1 External Calls 10 ringtones available for external calls
2-2-2 Internal Calls 10 ringtones available for internal calls
2-2-3 Alarm Clock 10 ringtones available for alarm clock
2-3 Advis. Tones activating/deactivating
2-4 Battery Low 2-4-1 Off Tone when battery pack is
2-4-2 On always
2-4-3 During Call only during a call
3Settings
3-1 Date/Time Enter date (YY MMDDformat), then time (HHMM format)
3-2 Handset 3-2-1 Language Set the display language
3-2-2 Auto Answer Activate/deactivate auto-answer
3-2-3 Register HS Manually register the handset
3-2-4 Reset Handset Reset the handset
To return to idle status: press and hold key
There are two ways in which you can access a func-
tion:
◆ Scroll with keys t and v,
◆ Key in the appropriate digit combination,
e.g. MENU
almost flat:
I1to set the date and time.
never
a.
Issued by
Gigaset Communications GmbH
Schlavenhorst 66
D-46395 Bocholt
Gigaset Communications GmbH is a licensee of the Siemens trademark.
© Gigaset Communications GmbH 2009
All rights reserved. Subject to availability.
Rights of modification reserved.
www.gigaset.com
A31008-M1851-Y101-1-5D19
This user guide is made from 100% recycled paper.
GigasetC36H Product type:
HWDCD8218(100)P/TSD
 Loading...