

Page 1

s
The digital cordless
DECT telephone
*LJDVHW
100
Operating Manual
and Safety Precautions
!
Page 2

Gigaset 100, GB/IRL, A31008-G100-B100-2-7619
Brief overview
Base station
symbol
Constant:
–
ready for dialling/receiving
calls
Flashing:
–
Connection to
base station
no
Giga100.fm
Handset key
– Accept/end call
– Dial call number
(when have digits
already stored)
02.04.01
Speed dialling
Recall key
–For PABXs and
select carrier
services
Dial pause
–Hold down!
Displays
4
Base station symbol
Save
Special displays
C
Redial
Keypad lock
– Lock on/off
hold down to
activate / de-activate!
Memory key
– For saving
– For settings
Lift handset
J
@
P
1
_
* character
# character
Recall key
Pause
Memory empty
____
ª
ª
«
2
Keypad lock
Handset ready for
registration
Handset searching
for registered base
Handset found
base that is ready for
registration
Page 3

Gigaset 100, GB/IRL, A31008-G100-B100-2-7619
Giga100.fm
02.04.01
Safety precautions
• Only use the power supply unit supplied as indicated
at the rear side of the base unit.
• Only use the battery supplied or the approved battery type (see page 7).
• Do not install in the immediate vicinity of other devices
e.g. stereo system, television, office equipment or microwave, as they could affect each other.
• Medical equipment can be affected by the handset.
• The handset can cause an unpleasant humming sound in
hearing aids.
• Do not hold the handset to your ear when it is ringing (incoming ring tone).
• Do not install the handset in bathrooms or showers.
• Do not operate the handset in environments where there
is risk of explosion (e.g. paint shops).
• Dispose of batteries and the telephone in an environmentally friendly manner and in accordance with the relevant
legislation.
• Ensure that the operating instructions are included when
passing on your Gigaset 100 to a third party.
• The handset’s battery compartment features the following
diagram:
–
h
operating instructions.
– Ensure correct battery connector polarity (red cable:
plus pole, black cable: minus pole), otherwise the handset will not work properly. Incorrect polarity can damage
the handset and battery.
Operate battery type in accordance with these
3
Page 4

Gigaset 100, GB/IRL, A31008-G100-B100-2-7619
Giga100.fm
Putting the telephone into service
Step 1: Connecting the base station
First of all, connect your base station to the telephone jack
and the mains supply.
02.04.01
220 V/
• Insert
small round connector of
the power cable
into the socket.
230 V
• Place the cable in the cable duct
(for strain relief).
• Insert the power supply unit into
the wall socket.
• Insert
the rectangular
connector provided on
the telephone cable
into the socket.
• Place the cable in the cable duct.
• Insert telephone jack into telephone socket.
* Appearance may differ depending on the country!
Telephone
jack*
If you do not want to use the telephone cable supplied,
ensure that you use either a straightforward extension cable
or a telephone cable with 3/4 connector assignment,
otherwise your Gigaset 100 will not function correctly.
1free
2free
3L a
4L b
5free
6free
4
Page 5
Gigaset 100, GB/IRL, A31008-G100-B100-2-7619
11221
2
Giga100.fm
02.04.01
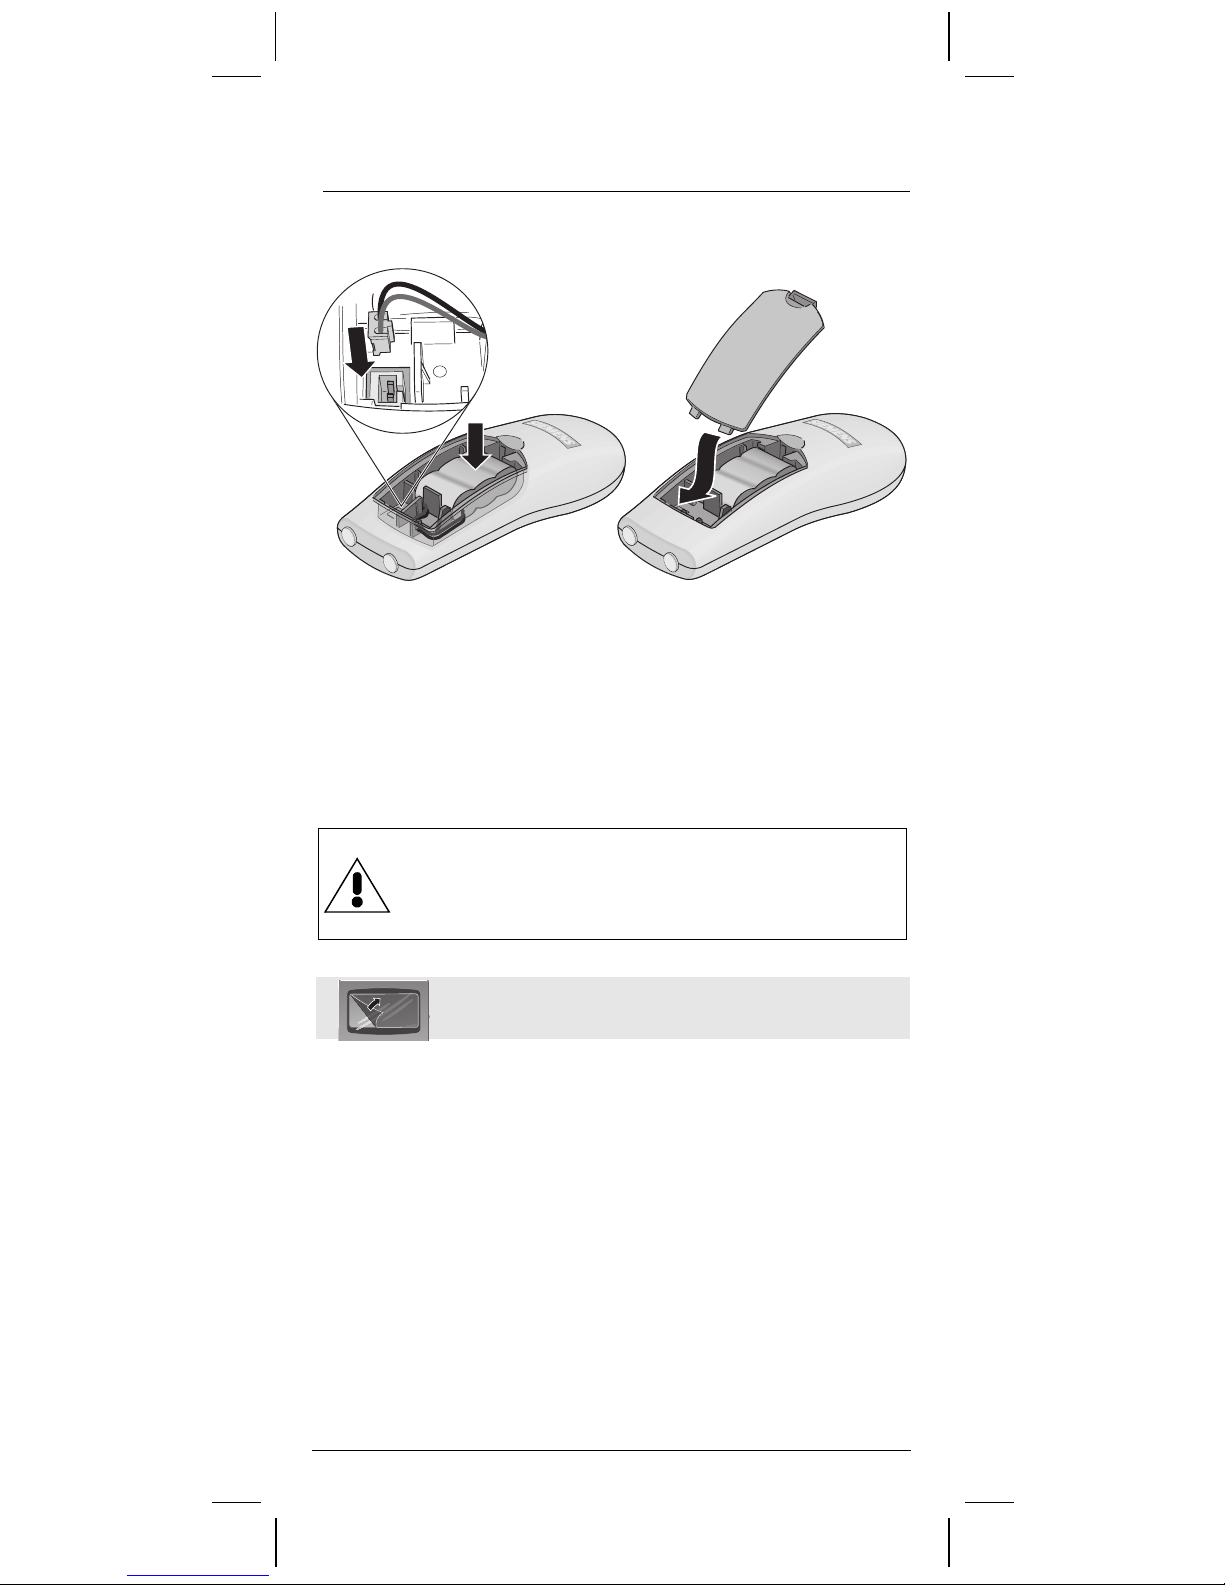
Putting the telephone into service
Step 2: Inserting the battery
• Insert the battery connector in to the socket (see inset); it
must lock securely into place.
• Place the battery in the battery compartment.
• Insert the battery cable in the clip provided.
• Slide the cover into the battery compartment and push
forward until it clicks into place. To open the cover, lift it
up.
• Only use approved batteries.
• Never use non-Siemens charging units as these
can damage the batteries.
The display is protected by a film.
Please remove protective film.
5
Page 6

Gigaset 100, GB/IRL, A31008-G100-B100-2-7619
6
Giga100.fm
Putting the telephone into service
Step 3: Registering the handset at the base station
Before you can make or receieve telephone calls you need
to register the handset at the base station.
Make sure the base station is connected to the
power supply (Step 1) and the battery is inserted
in the handset (Step 2).
Place the handset in the base station and
leave it there until registration is complete.
S
02.04.01
The registration display will appear. This may
take up to 5 minutes depending on the
charge level of the battery.
. symbol will flash on the display.
The
Unplug the power supply unit (220V/230V)
from the mains socket.
The handset must remain in the base station. Plug the power supply unit back into
the mains socket.
After about 90 seconds the
stop flashing and the normal standby display
will appear. The handset is now registered at
this base station.
symbol will
6
Page 7

Gigaset 100, GB/IRL, A31008-G100-B100-2-7619
Giga100.fm
Putting the telephone into service
Step 4: Charging the battery
The battery supplied is not charged.
02.04.01
6
S
To charge the battery, place the handset in
the base station. For the first charging we
recommend a continuous charging time for
at least 16 hours. You can then make calls.
Step 5: Setting short flash time (100ms) for the
signalling key
A short flash time (100ms) is required to operate the recall
key. Press the following keys to set the flash time:
1KdK
Battery information
• Once the first charging operation is completed, you can
replace the handset in the base station after any call.
• The batteries warm up during charging - this is normal
and not a cause for concern.
Handset operating times/charging time
Capacity
300 (mAh) up to 100 h up to 10 h approx. 16 h
Standby
time
Ta l k t i m e
Charging
time
Power consumption in standby mode
No charging approx. 1.7 watts
While charging approx. 2.1 watts
Approved battery
Nickel-cadmium (NiCd)
Type 1a (300 mAh)V30145-K1310-X147 NiCd
Batteries are available from your stockist or via the Internet,
from Siemens Service Shop at:
http://www.siemens.siemens.ie/shop; alternatively see also
last page.
7
Page 8

Gigaset 100, GB/IRL, A31008-G100-B100-2-7619
Making calls
Making a call
Giga100.fm
02.04.01
7
1
You can also dial a number by pressing the handset key first
and then entering the relevant digits.
You can use the recall key
key down). This may be necessary for international calls or
when dialling in to automatic announcement services.
Enter the call number.
Press the handset key. A connection is set
up. The icon
Did you enter the wrong number by
mistake? If so, then press the handset key
twice.
1
.
appears on the display.
C
to insert a
,
pause
(hold the
Ending a call
1
or
Press the handset key. The icon
from the display;
pears
C
disap-
6
place the handset in the base station.
The connection is cleared down.
S
Accepting a call
1
Redialling a number
The last call number dialled is saved.
)
1
Press the handset key. The connection is
set up.
Dial the call number.
Press the handset key. The connection is
set up.
8
Page 9

Gigaset 100, GB/IRL, A31008-G100-B100-2-7619
Giga100.fm
02.04.01
Making calls
Saving/changing a call number (speed dialling)
You can save up to 10 telephone numbers as speed dialling
digits and dial them at the push of a button.
K
e.g.
d
7
K
Press the memory key followed by the
speed dialling key.
Enter the speed dialling digit (0 to 9).
Enter the call number.
Save the speed dialling digit. You will hear
the confirmation beep.
Speed dialling
e.g.
d
1
The speed dialling digit "0" is automatically activated by
holding down number with the identification the speed dialling key. We therefore recommend assigning a frequently
dialled number to "0" (e.g. a network access number).
Press the speed dialling key.
Select the speed dialling digit (0 to 9).
Press the handset key. The connection is
set up.
Cost-effective telephony
You can use the network access numbers of various providers to minimise costs (Call-by-Call
ring of the service provider. Like a call number, these
numbers can be saved as speed dialling digits (0 to 9).
You can, however, also dial the network access or call numbers as usual.
• Network access using a speed dialling digit
71
PQVCXCKNCDNGKPCNNEQWPVTKGU
Hold down the speed dialling key.The speed
dial memory location "0" with the network
access number is automatically displayed.
Enter the user’s call number and dial the
complete number via the handset keypad.
*
), depends on the offe-
9
Page 10

Gigaset 100, GB/IRL, A31008-G100-B100-2-7619
Giga100.fm
02.04.01
Cost-effective telephoning
• "Linking" or chaining of multiple speed dialling digits
You can link multiple access numbers and call numbers
that have been saved as
speed dialling numbers
.
e.g.
d
e.g.
1
Further access numbers can be saved as speed dialling
numbers
To use them press
key.
Hold down the speed dialling key.
Memory location "0" with the network
access number is displayed.
Press the speed dialling key once more.
Select the speed dialling digit
user. The network access number and the
call number are chained and displayed.
Press the handset key. The connection is
set up.
(0 to 9)
.
and then the relevant speed dialling
(0 to 9)
for a
Settings
Handset volume
You can set the handset volume to any of three levels.
KY
e.g.
D
K
Activate the function.
Change the volume (levels
1 to 3
) and save.
Ringer volume
You have three volumes to choose from.
KG
cK
e.g.
Activate the function – the ringer sounds.
Change the ringer volume (levels
save.
10
1 to 3
) and
Page 11

Gigaset 100, GB/IRL, A31008-G100-B100-2-7619
Settings
Ringer melody
You can choose between two ringer melodies.
Giga100.fm
02.04.01
KO
DK
e.g.
Activate the function – the ringer sounds.
Select the ringer melody (version 1
or 2) and save.
Keypad lock
When the keypad is locked, nothing happens if you inadvertently press a key. You can continue to accept calls in the
usual manner.
L
____
Hold down for more than
1 second to activate/deactivate.
The display icon appears if active.
Operating behind a PABX
If you operate your Gigaset behind a PABX, it may be necessary to change the preset Dual Tone Multifrequency Dialling
(DTMF) procedure and flash times (please refer to the operating instructions of your PABX).
Use digits 1 to 4 to set the following:
1 DTMF,long flash 250 ms
2 DTMF, short flash 100 ms
3 DP (Dial Pulsing) 1.5/1
4 DP 2/1
1
KdY
e.g.
K
Did you enter the wrong number by mistake? Then press
the handset key
standby.
Press the handset key.
Activate the function.
Enter the desired setting (1 to 4).
Save the setting.
twice or wait until the display returns to
1
11
Page 12

Gigaset 100, GB/IRL, A31008-G100-B100-2-7619
Tips
Maintenance
Giga100.fm
02.04.01
Simply wipe your telephone with a
static wipe.
discharge!
Never
use a dry cloth as this can cause static
Troubleshooting
Malfunction Possible
causes
Registration did
not work.
No display. The battery is not
No reaction to
keystroke.
The battery is not
sufficiently
charged.
Handset and
base station were
not prepared for
registration.
charged.
The keypad is
locked.
damp cloth
Solution
Charge the battery for 16 hours
(see page 7).
Remove and then
re-insert the power supply unit.
Charge the battery or replace it
(see page 7).
Press
second.
or an anti-
for 1
L
No radio connection to the base
station:
flashing!
icon
The handset is
outside the base
station range.
The handset is
not registered.
The base station
is not active.
Move closer to
the base station.
Register the
handset (see
page 7).
Check the power
supply unit at the
base station.
Range
The range is up to 30 m indoors and approx. 200 m outdoors. The base station symbol
exceeded.
flashes when the range is
12
Page 13

Gigaset 100, GB/IRL, A31008-G100-B100-2-7619
Giga100.fm
02.04.01
Tips
Guarantee
In Ireland, Siemens AG offers a twelfe-month guarantee for
this device from the date of purchase from the stockist.
Over this period, Siemens AG will rectify all material or
manufacturing defects by repairing or replacing the defective device.
The guarantee shall not cover damage caused by improper
use, wear and tear or third party access. The guarantee shall
not cover consumables or defects which only slightly
decrease the value or serviceability of the defice.
Service
•Ireland: Siemens hotline 1850777277
Siemens Service should only be contacted in the event of
problems with the unit. Your stockist will be happy to answer any questions on unit operation. Contact your provider
for questions concerning telephone connections.
Gigaset 100 is designed for operation in your country as indicated on
the box. Special country-specific features have been taken into consideration. If you have any queries with regard to differences in public
telephone networks, please contact your dealer or operator. Unit
compliance with the basic requirements of the R&TTE directive is
confirmed by the CE symbol.
We, Siemens AG, declare, that the above mentioned product is manufactured
according to our Full Quality Assurance System certified by CETECOM ICT
Services GmbH with the registration number "Q810820M" in compliance with
ANNEX V of the R&TTE-Directive 99/05/EC. The presumption of conformity
with the essential requirements regarding Council Directive 99/05/EC is
ensured.
Senior Approvals Manager
13
Page 14

Gigaset 100, GB/IRL, A31008-G100-B100-2-7619
Giga100.fm
02.04.01
Herausgegeben vom Bereich
Information and
Communication mobile
Haidenauplatz 1
D-80667 München
Siemens Aktiengesellschaft
http://www.siemens.com/gigaset
A31008- G100- B100- 2- 7619
©Siemens AG 2001.
All rights reserved.
Liefermöglichkeiten und
technische Änderungen vorbehalten.
Bestell-Nr.: A31008-G100-B100-2-7619
Printed in Germany 04/01
14
 Loading...