

Gigaphone VT-2420, 2420 - VT Cordless Extension Handset, VT2431 Introduction Manual

1
IMPORTANT:
The VT2420 is an Accessory Handset for use with the VT2431 GIGAPHONE
system. You must have the VT2431 in order to use the VT2420 Accessory Handset.
This manual is designed to familiarize you with the VT2420 Accessory Handset
setup, registration and basic functions. For detailed operational instructions,
please refer to the VT2431 manual.
To order additional system Handsets (model# VT 2420), battery packs, or
headsets, call VTech Communications Inc at 1-800-595-9511.
Introduction

2
When using your telephone equipment, basic safety precautions should always be
followed to reduce the risk of fire, electric shock and injury to persons, including the
following:
1. Read and understand all instructions.
2. Follow all warnings and instructions marked on the product.
3. Unplug this product from the wall outlet before cleaning. Do not use liquid
cleaners or aerosol cleaners. Use a damp cloth for cleaning.
4. Do not use this product near water (for example, near a bath tub, kitchen sink,
or swimming pool).
5. Do not place this product on an unstable cart, stand, or table. The product
may fall, causing serious damage to the product.
6. Slots and openings in the cabinet and the back or bottom are provided for
ventilation. To protect it from overheating, these openings must not be blocked
by placing the product on the bed, sofa, rug, or other similar surface. This product
should never be placed near or over a radiator or heat register. This product
should not be placed in a built-in installation where proper ventilation is not
provided.
7. This product should be operated only from the type of power source indicated
on the marking label. If you are not sure of the type of power supply to your
home, consult your dealer or local power company.
8. Do not allow anything to rest on the power cord. Do not locate this product
where the cord will be abused by persons walking on it.
9. Never push objects of any kind into this product through cabinet slots as they
may touch dangerous voltage points or short out parts that could result in a
risk of fire or electric shock. Never spill liquid of any kind on the product.
10. To reduce the risk of electric shock, do not disassemble this product, but take
it to a VTech authorized service facility. Opening or removing cabinet parts
other than specified access doors may expose you to dangerous voltages or
other risks. Incorrect reassemb-ling can cause electric shock when the appliance
is subsequently used.
11. Do not overload wall outlets and extension cords as this can result in the risk
of fire or electric shock.
Important Safety Instructions

3
12. Unplug this product from the wall outlet and refer servicing to a VTECH
authorized service facility under the following conditions:
A. When the power supply cord or plug is damaged or frayed.
B. If liquid has been spilled into the product.
C. If the product has been exposed to rain or water.
D. If the product does not operate normally by following the operating
instructions. Adjust only those controls that are covered by the operating
instructions, because improper adjustment of other controls may result in
damage and will often require extensive work by a VTech authorized
technician to restore the product to normal operation.
E. If the product has been dropped and the cabinet has been damaged.
F. If the product exhibits a distinct change in performance.
13. Avoid using a telephone (other than a cordless type) during an electrical storm.
There may be a remote risk of electric shock from lighting.
14. Do not use the telephone to report a gas leak in the vicinity of the leak.
VTECH COMMUNICATIONS INC
SERVICE DEPT. at 1-800-595-9511. In Canada, call VTech Electronics Ltd at 1-800267-7377.
SAVE THESE INSTRUCTIONS
4
Setup
Registration And Operation Of The VTECH VT2420
Accessory Handset
Your VTECH GIGAPHONE system can operate up to 4 Handsets.
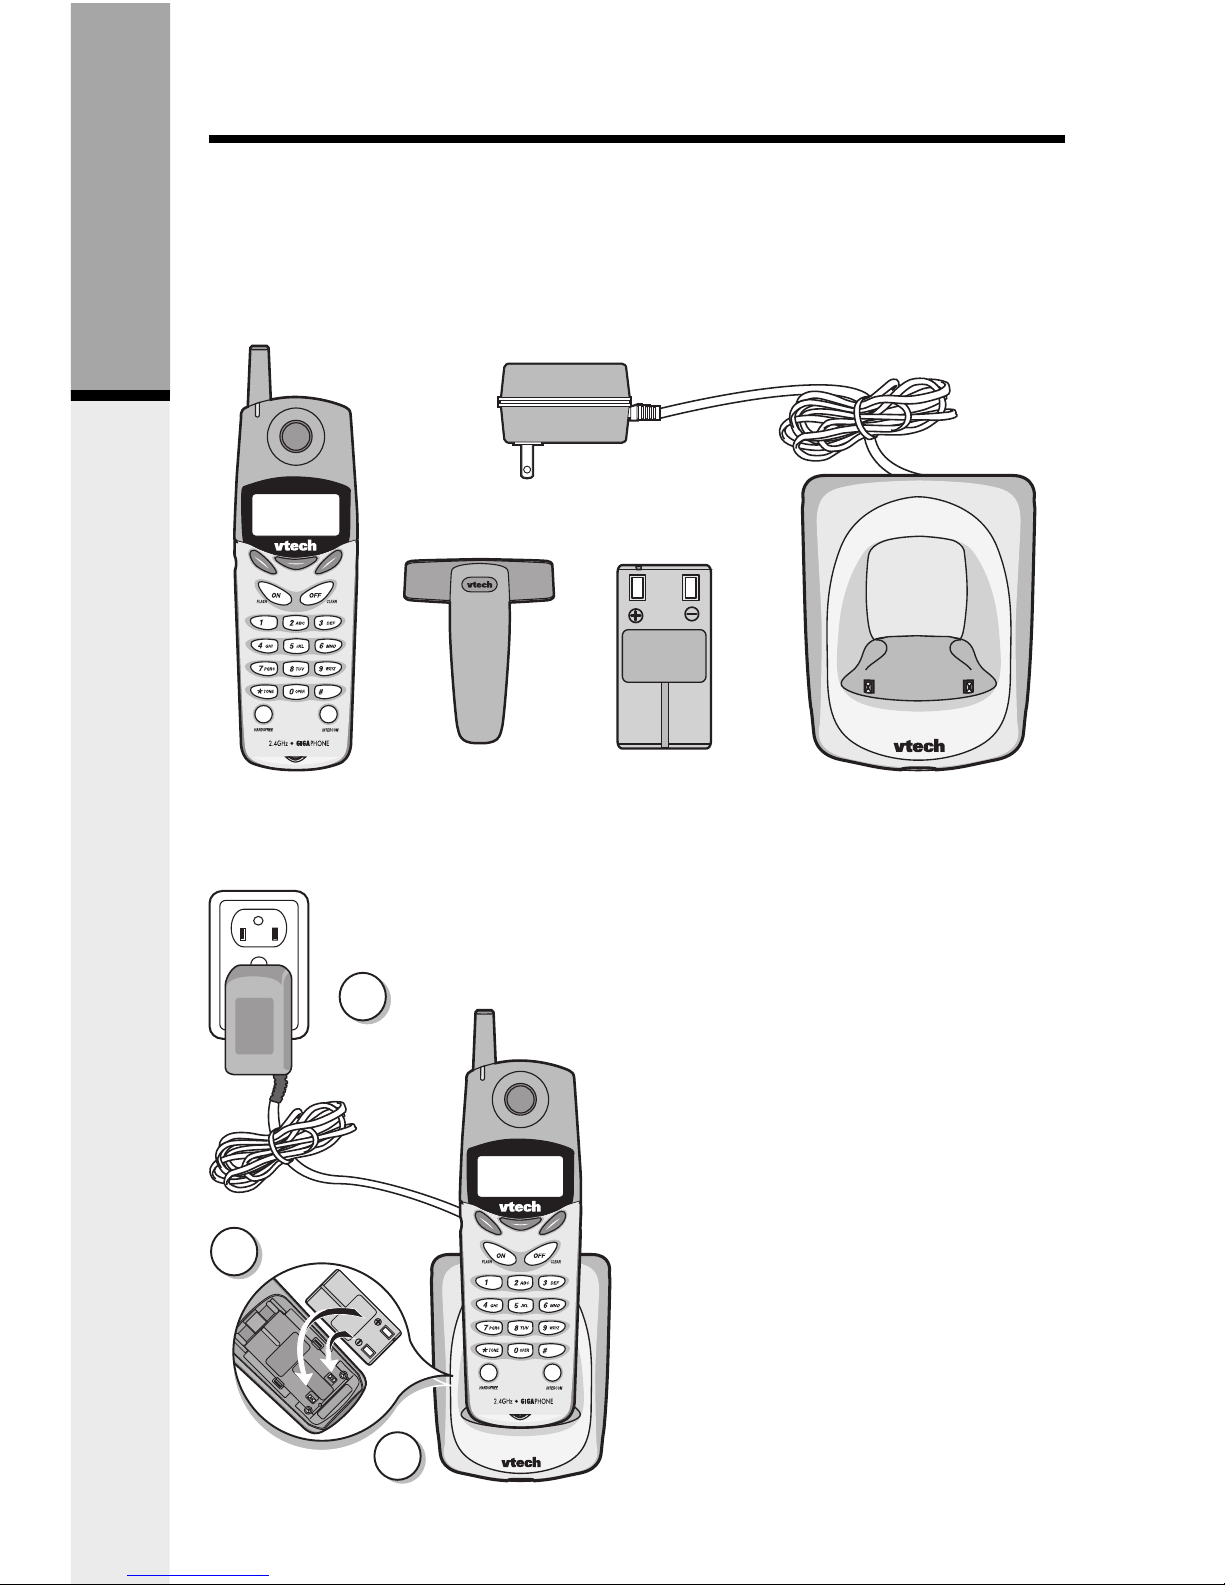
The VTECH accessory Handset consists of the following:
Setup Of The VT2420
Accessory Handset
1. Plug the AC power adapter into an
electrical outlet.
2. Remove the Handset battery cover
by pressing on the indent and
sliding downward.
3. Place the new battery pack in the
Handset, with the metal contacts
aligned with the charge contacts in
the battery compartment.
4. Replace the battery cover by sliding
it upward.
5. Place the Handset in the Charge
Cradle, and allow it to charge for
12 hours. After the initial charge,
a maintenance charge of 8 hours
should be sufficient.
Handset
Battery Pack
Charger Unit
Belt Clip
Getting Started
1
5
3

5
Follow the steps below:
1. Remove the battery cover by
pressing on the indent and sliding
downward.
2. Place the new battery pack in the
handset with the metal contacts
aligned with the charge contacts in
the battery compartment.
3. Replace the battery cover by
sliding it upwards.
4. If the new battery pack is not
already charged, place the handset
in the base unit, or a remote
charging stand, and allow it to
charge for 12 hours. After initial
charge, a maintenance charge of
8 hours should be sufficient.
Installation of Battery Pack in Handset
The original Handset that is shipped with your GIGAPHONE system will be
automatically registered to the Base. This Handset is HANDSET 1.
As you register additional Handsets to the system, they will be assigned extension
numbers in the following order: HANDSET 2, HANDSET 3, and finally HANDSET
4.
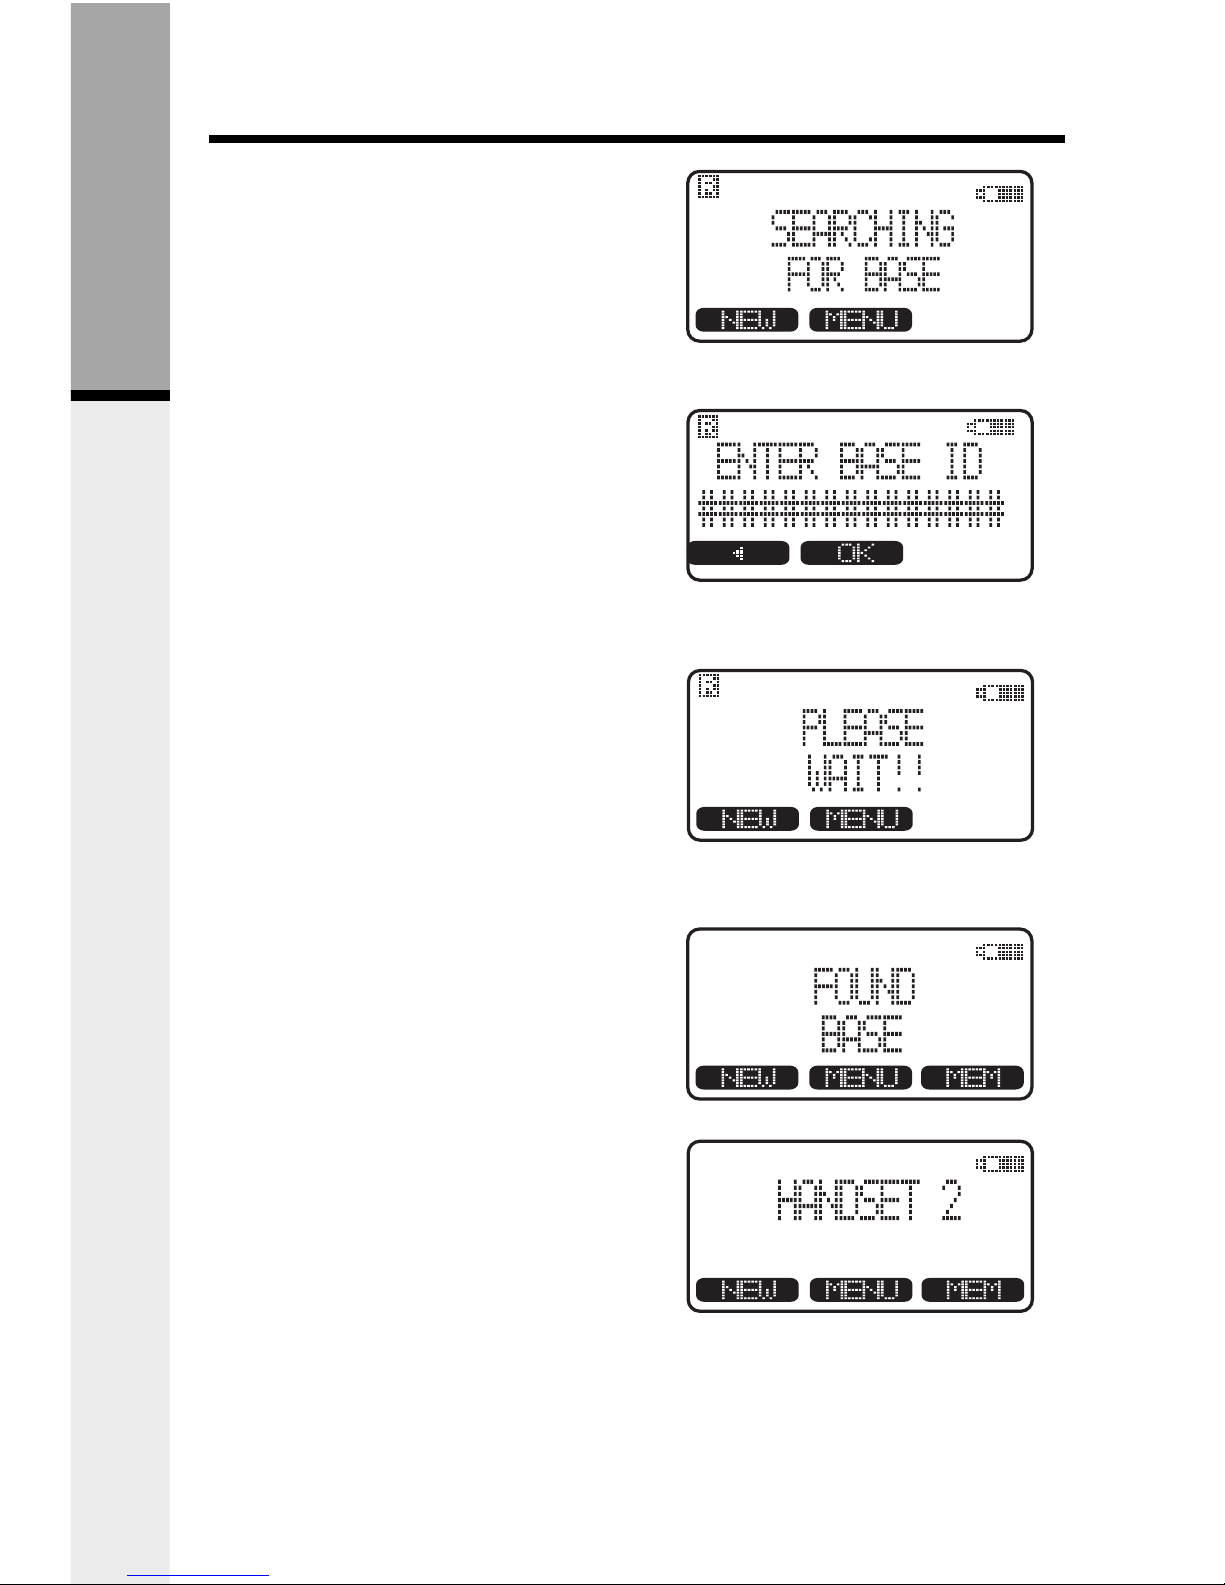
Whenever a Handset battery pack is installed, the Handset will automatically begin
SEARCHING FOR BASE (if previously registered), or it will prompt you to ENTER
BASE ID to register the new Handset.
1
3
2
Getting Started
6
Enter Base ID Code
1. After charging the Handset, remove
it from its Charge Cradle, the
screen will display:
2. Press
NEW
, then enter the 15 digit
Base Unit ID code, located on the
underside of the Base Unit.
3. Press
OK
. The Handset will display:
PLEASE WAIT!!
4. Wait approximately 15 seconds.
The Handset will display:
FOUND BASE
If the Handset displays: BASE
BUSY TRY LATER, this indicates
that the system is in use. Wait until
the Base Unit is in the idle (on
hook) mode, and repeat step 2 to
4.
Congratulations! You can now enjoy the
benefits of your VTECH multi-Handset
system.
Registration
Getting Started
7
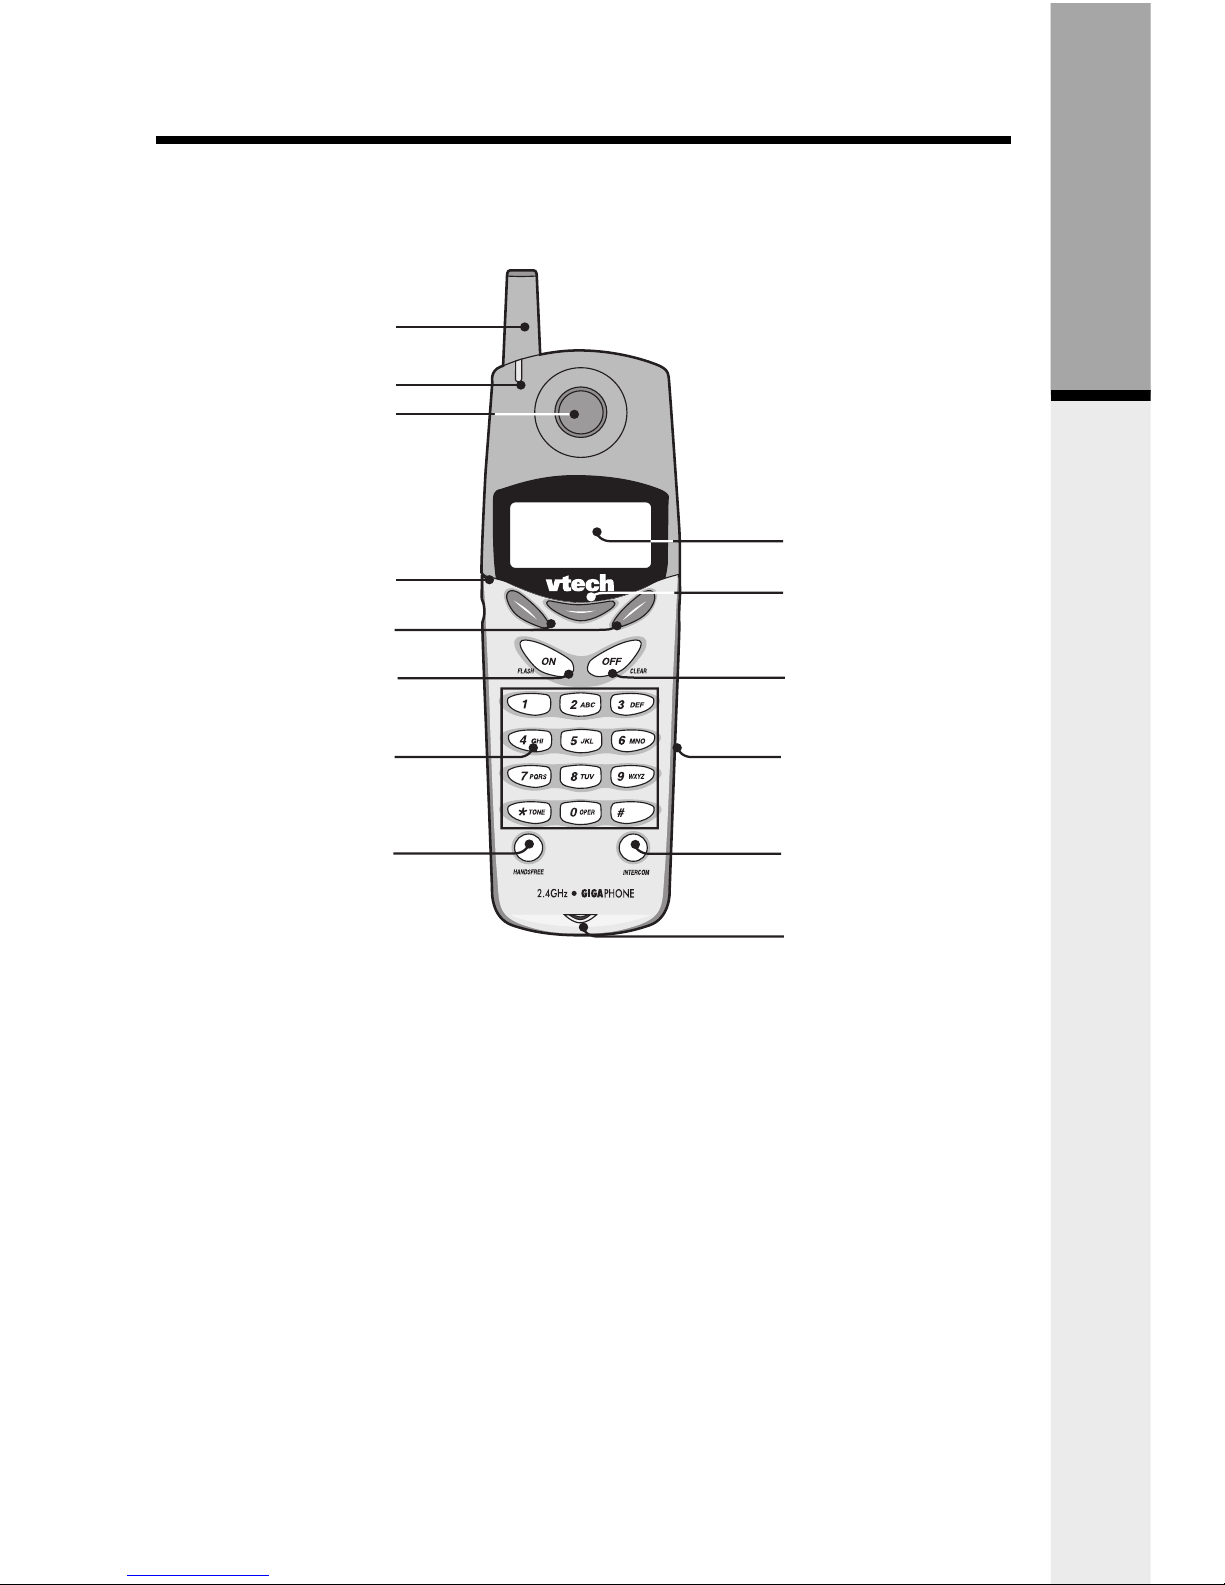
The Handset Layout
1. Antenna
2.
Message Waiting Indicator
3. Earpiece
4. Headset Jack (2.5mm)
5. Scroll Keys
6. On (Flash)
7. Dialing Key (0-9)
8.
Handsfree Speakerphone
9. LCD Display
10. Select
11. Off (Clear)
12. Battery Compartment
13. Intercom
14. Microphone
1
3
4
5
6
7
8
9
10
11
14
12
2
13
Getting Started
8
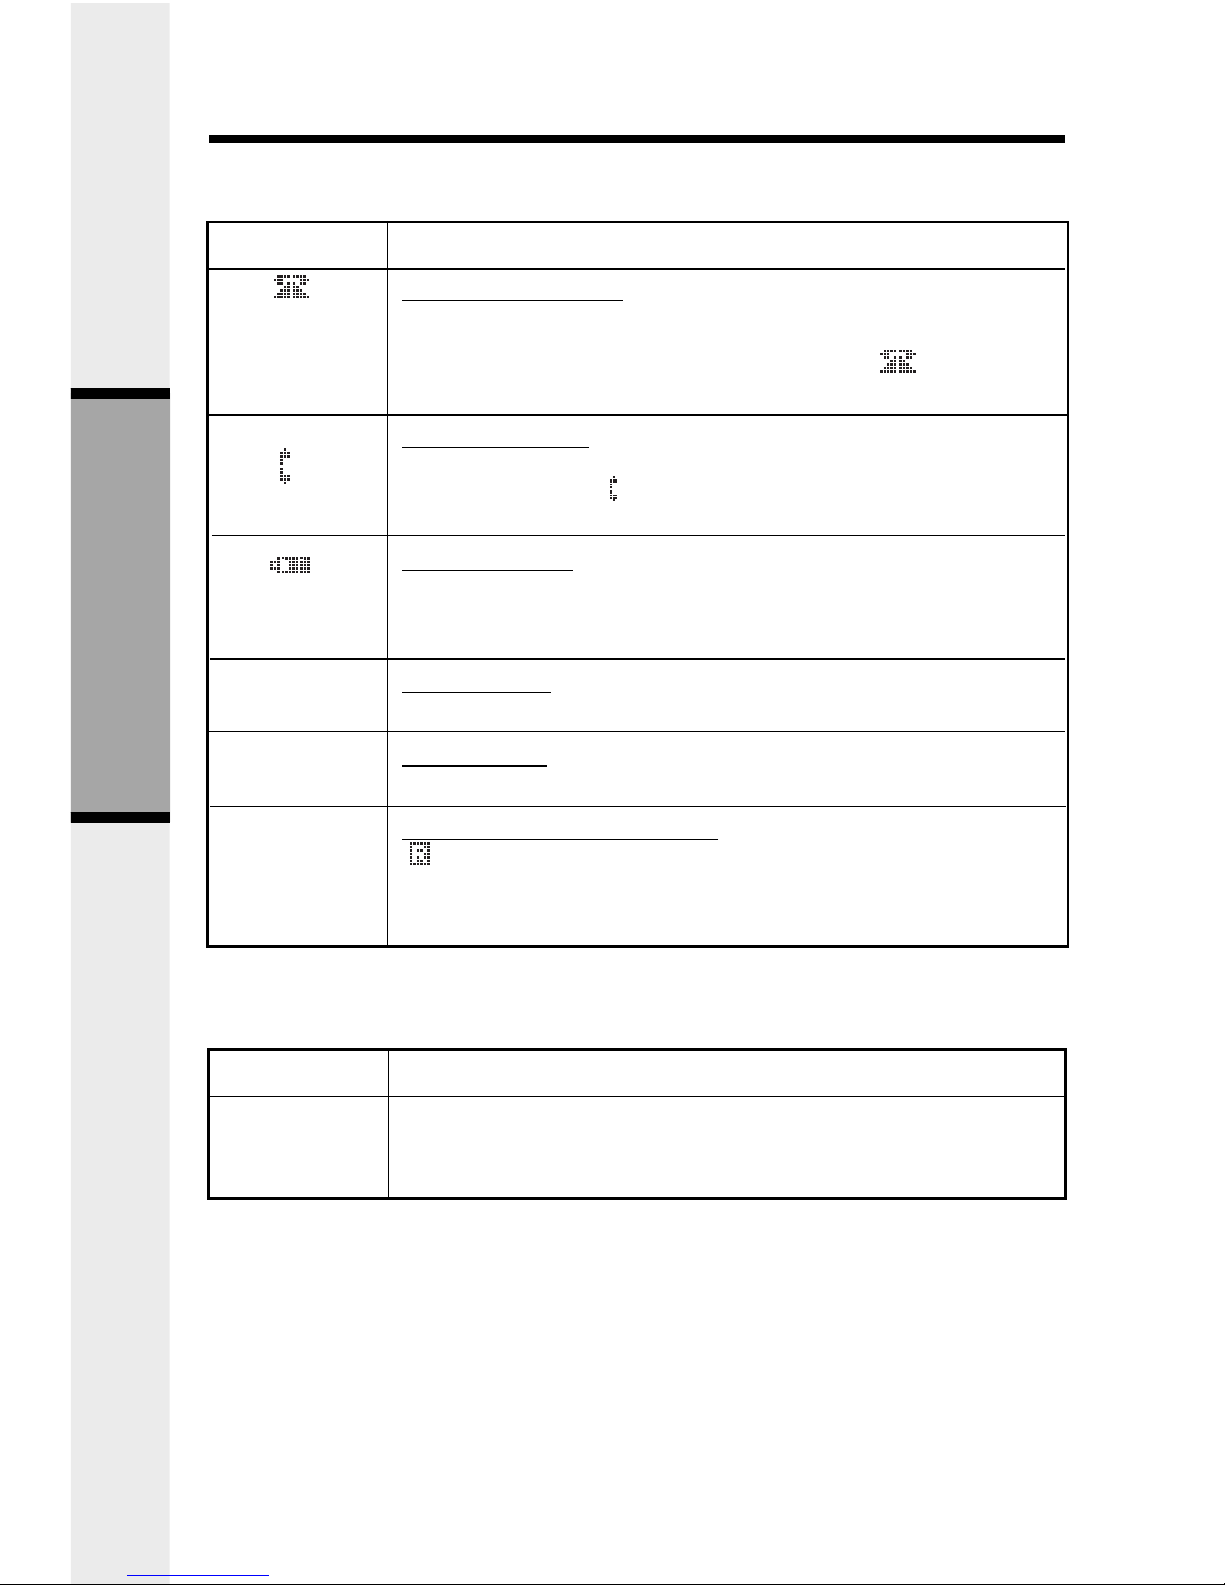
Handset Icons
Icon
Description
Line In Use indicator
On steady with no number next to it when a parallel set is in use.
On steady with one or more numbers next to it, indicating which
extensions are using the line. For example, 12 indicates
that Handset 1 and Handset 2 are on an outside call.
Intercom indicator
On steady with the extension numbers currently on an intercom
call. For example, 02 indicates that the Base and Handset
2 are on an intercom call.
Battery indicator
Cycles (Low, Medium, and High) when Handset battery is
charging.
Flashes when a low battery condition is detected.
Mute indicator
On steady when the Handset microphone is muted.
Hold indicator
On steady when the line is on hold.
Handset Registration indicator
FFF when a Handset is either not registered, or is searching for
a Base unit.
On steady when a Handset is registered with a base unit.
M
H
R
Handset Indicators
Handset LEDs
LED
Message
Waiting
Description
• Light to indicate that you have new messages in your voicemail.
Service must be subscribed to through your local telephone
company.
Handset Operation
 Loading...