

Gigafast EE2400-SV User Manual

EE2400-SV
24 Ports Fast
Ethernet Switch
USER'S GUIDE
1

TABLE OF CONTENTS
1
UNPACKING INFORMATION....................................................4
2 PRODUCT INTRODUCTION......................................................5
2.1 MODELS.....................................................................................5
2.2 KEY FEATURES ..........................................................................5
2.3 FRONT PANEL ............................................................................6
2.3.1 10/100Mbps TP Ports........................................................6
2.3.2 Cabling..............................................................................6
2.3.3 Status LEDs.......................................................................6
2.4 REAR PANEL ..............................................................................6
2.4.1 Power Socket.....................................................................6
3 INSTALLATION ............................................................................7
3.1 TO LOCATE THE SWITCH ON A DESKTOP......................................7
3.2 RACKMOUNT PLACEMENT..........................................................7
4 HELPFUL S UGGE STIONS ..........................................................8
4.1 PRIOR TO INSTALLATION............................................................8
4.2 HALF- AND FULL-DUPLEX .........................................................8
4.3 FAST ETHERNET.........................................................................8
4.4 AUTO-NEGOTIATION..................................................................9
4.5 MAC ADDRESS TABLE...............................................................9
5 SMART FU N CTIO N SETT ING S...............................................10
5.1 HARDWARE INSTALLATION.......................................................10
5.2 SOFTWARE INSTALLATION........................................................10
5.3 START SWITCH CONFIGURATION SOFTWARE............................ 11
6 USE FUNCTION MENU.............................................................13
6.1 SWITCH CONFIGURATION SOFTWARE.......................................13
6.1.1 New .................................................................................13
2

6.1.2 Open................................................................................13
6.1.3 Model ..............................................................................14
6.1.4 About...............................................................................14
6.1.5 Exit..................................................................................14
6.1.6 24-Port Switch Configuration Software..........................15
6.2 SYSTEM BASE CONFIGURATION...............................................15
6.2.1 System Base Configuration Page....................................16
6.2.2 Packet drop if..................................................................16
6.2.3 Backoff operation mode.................................................. 16
6.2.4 Address table mapping....................................................16
6.2.5 Address aging out............................................................17
6.2.6 Back pressure ..................................................................17
6.2.7 Priority Setting................................................................17
6.3 PRIORITY SETTING ...................................................................18
6.3.1 Priority Setting Page (Port Base)...................................18
6.3.2 High/Low priority setting................................................18
6.3.3 IP base (TOS) priority recognition..................................19
6.3.4 VLAN tagging base (TCI) priority recognition...............19
6.4 VLAN GROUP SETTING...........................................................19
6.4.1 VLAN Group Setting Pages(Port Base)..........................19
6.4.2 VLAN Group 1 to 23 (G01 to G23).................................19
6.5 SPEED,DUPLEX,FLOW CONTROL SETTING...............................20
6.5.1 802.3x Flow Control Setting (Port Base)........................20
6.5.2 Speed and Duplex Setting (Port Base)............................20
7 PRODUCT SPECIFICATIONS ..................................................21
3
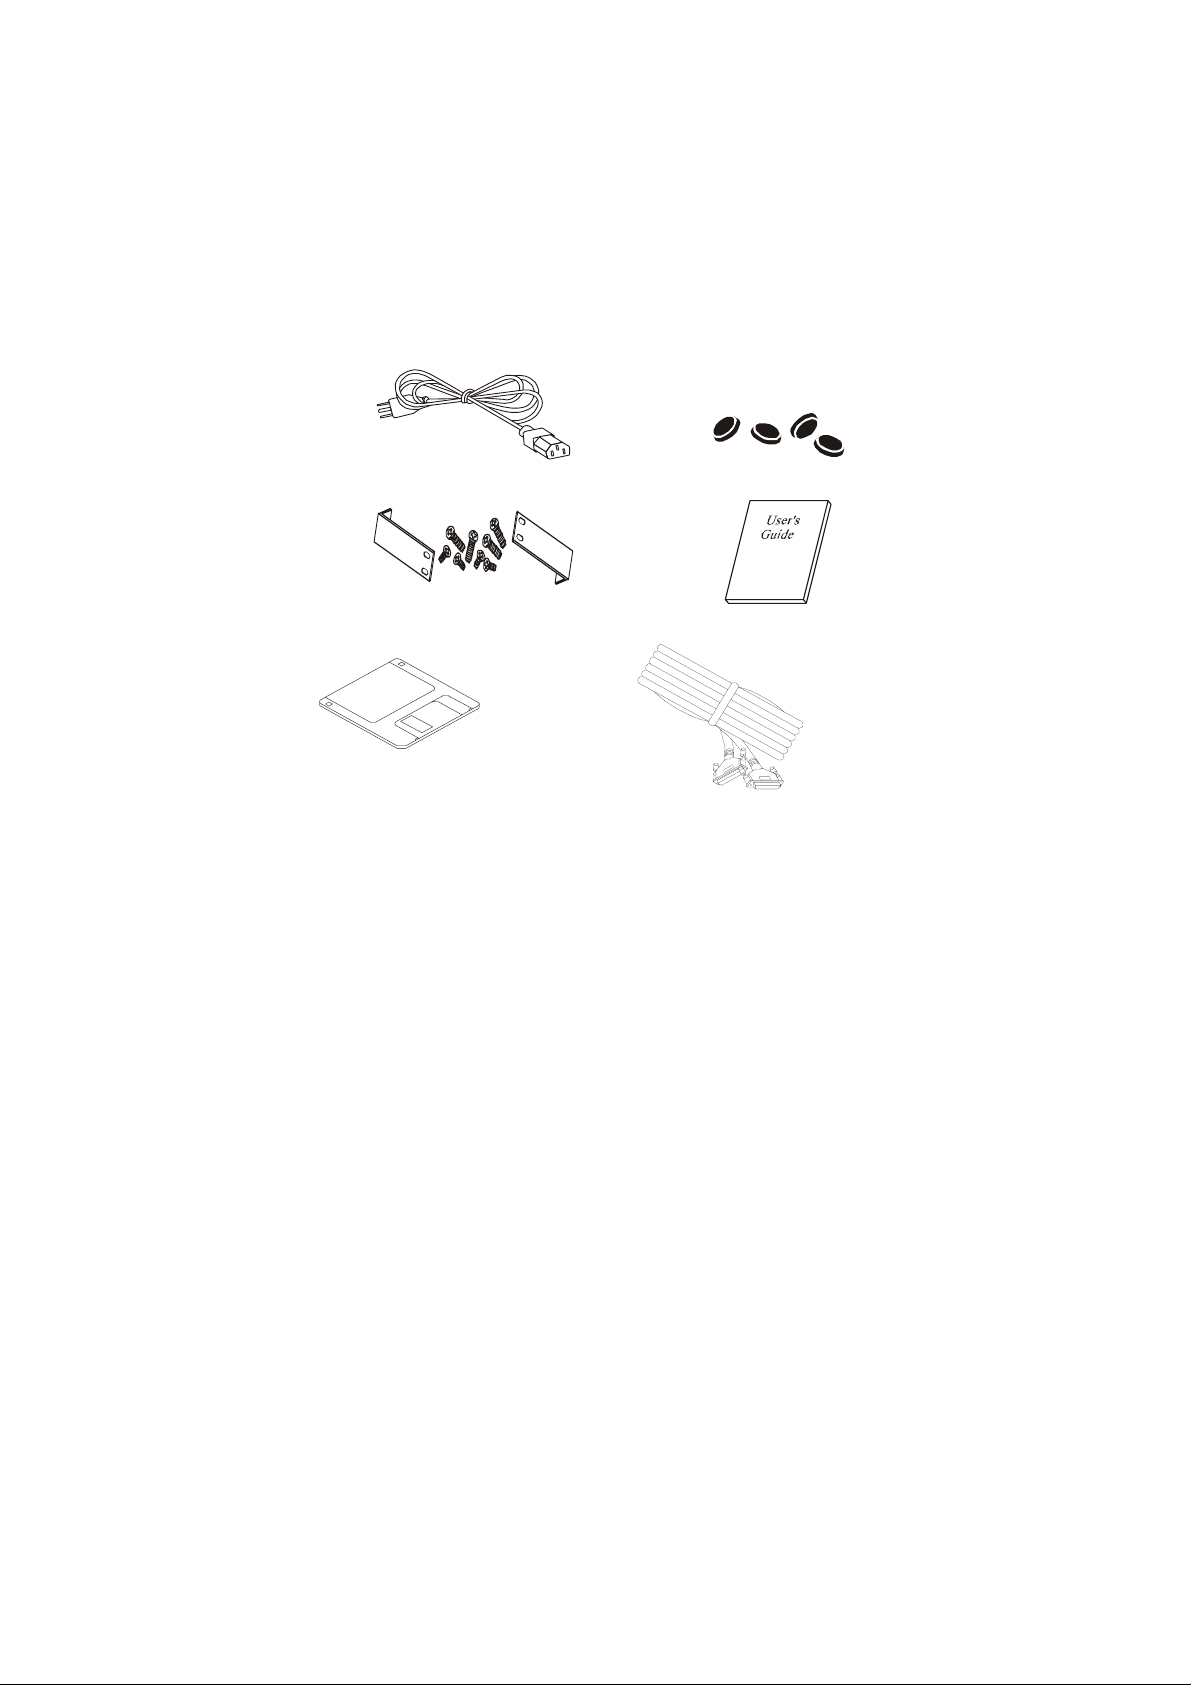
1 UNPACKING INFORMATION
Thank you for purchasing the Switch. Before continuing, please check the
contents of the product package. This product package should contain the
following items:
.One (1) Switch
.One (1) Software Disk
.One (1) Console Cable
.One (1) Power Cord
.Four (4) Rubber Feet
.One (1) Rackmount Kit
.This User’s Guide
If anything is missing, please contact your place of purchase.
24-Port 100BASE-TX Fast Ethernet Switch
Power Cord Rubber Feet
Rackmount Kit (Optional) User’s Guide
Software Disk Console Cable
4

2 PRODUCT INTRODUCTION
2.1 Models
The Switch is a multi-speed, versatile network device combining both standard
and "Big-Pipe" ports under the same hood. The Switch is a Twenty-Four (24)
ports Fast Ethernet Switch.
2.2 Key Features
.Support QoS function based on IEEE 802.1p/802.1q port priority, VLAN tag
priority and TCP/IP header’s TOS/DS.
.Supports VLAN, up to 24 group VLANs.
.Provide console port and software for easy configuration.
.Store-and-Forward technology filtering/forwarding is used to eliminate bad
packets.
.Back-Pressure Flow-Control support for Half-Duplex operation.
.IEEE802.3x Flow-Control support for Full-Duplex operation.
.All connectors and LEDs on front panel for easy access and real time viewing
of Switch status.
.All TP ports support Auto-MDI/MDIX, and Auto-Negotiation function.
5
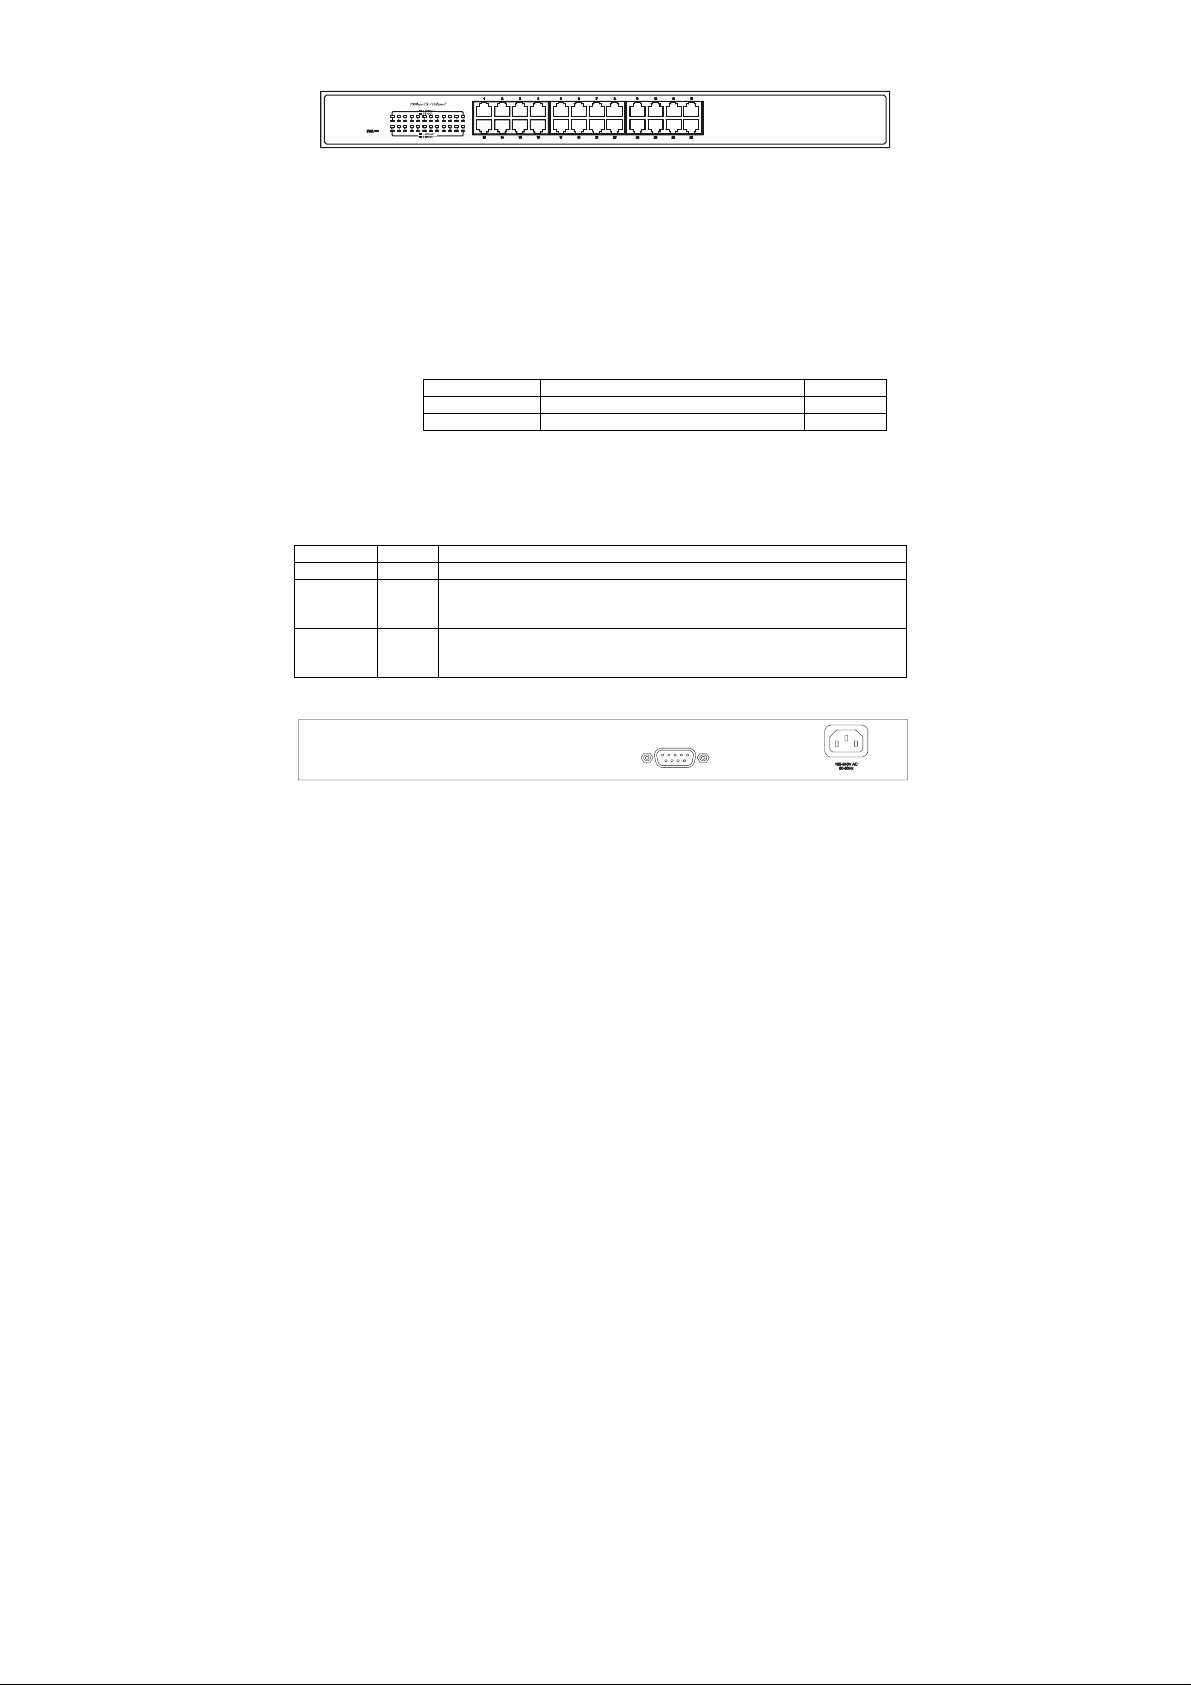
2.3 Front Panel
2.3.1 10/100Mbps TP Ports
Each 10/100Mbps TP port provides an Auto-Negotiation function that senses for
the attached device's maximum operating speed and automatically sets the
Switch to operate at that speed. Users only need to connect a network device
into any TP port. Auto-MDIX is also supported on all TP ports which allows
uplinking to another Switch free of cross-over or straight cable selection hassle.
2.3.2 Cabling
10Mbps -When transmitting at 10Mbps Category 3, 4 or 5 TP cabling with
100Mbps -To transmit at 100Mbps requires Category 5 TP cabling.
Note: Category 5 UTP cable is recommended whenever installing new cabling.
2.3.3 Status LEDs
The Switches come with a complete range of LEDs. The table below lists each
LEDs name, color and a brief description of its function.
Name Color Function
Pwr Green Lit: Power "On"
LINK/ACT Green Lit: When the port has a valid physical connection with another
FD/COL Amber Lit: When the port is set to Full-Duplex mode.
RJ-45 sockets can be used.
Port Type Cable Type Connector
10BASE-T Category 3, 4 or 5 TP RJ-45
100BASE-TX Cat.5 TP RJ-45
device.
Blinks: When the port is sending or receiving data (Activity).
Blinks: When a collision is detected, when the port is in
Half-Duplex mode.
2.4 Rear Panel
2.4.1 Power Socket
The Power Socket is designed to be used with the power cord included in the
product package.
.Attach the female end of the cord to the power connector on the back panel.
.Attach the male end of the cord to a grounded power outlet.
6
3 INSTALLATION
The Switch is "Plug-&-Play". It does not require software configuration. Users
can immediately use any of the features of this product simply by attaching the
cables and turning on the power.
If user need advanced smart functions to manage LAN network more effectively,
we provide software and cable for easy configuration of the Switch. Please see
section 5 and 6 for further details.
3.1 To locate the switch on a desktop
.Attach the Four (4) rubber feet included in the product package to the bottom
of the Switch, one in each corner.
.Place the Switch on a clean, flat desk or tabletop close to a power outlet.
.Plug in all network connections and the power cord, and Power “ON”.
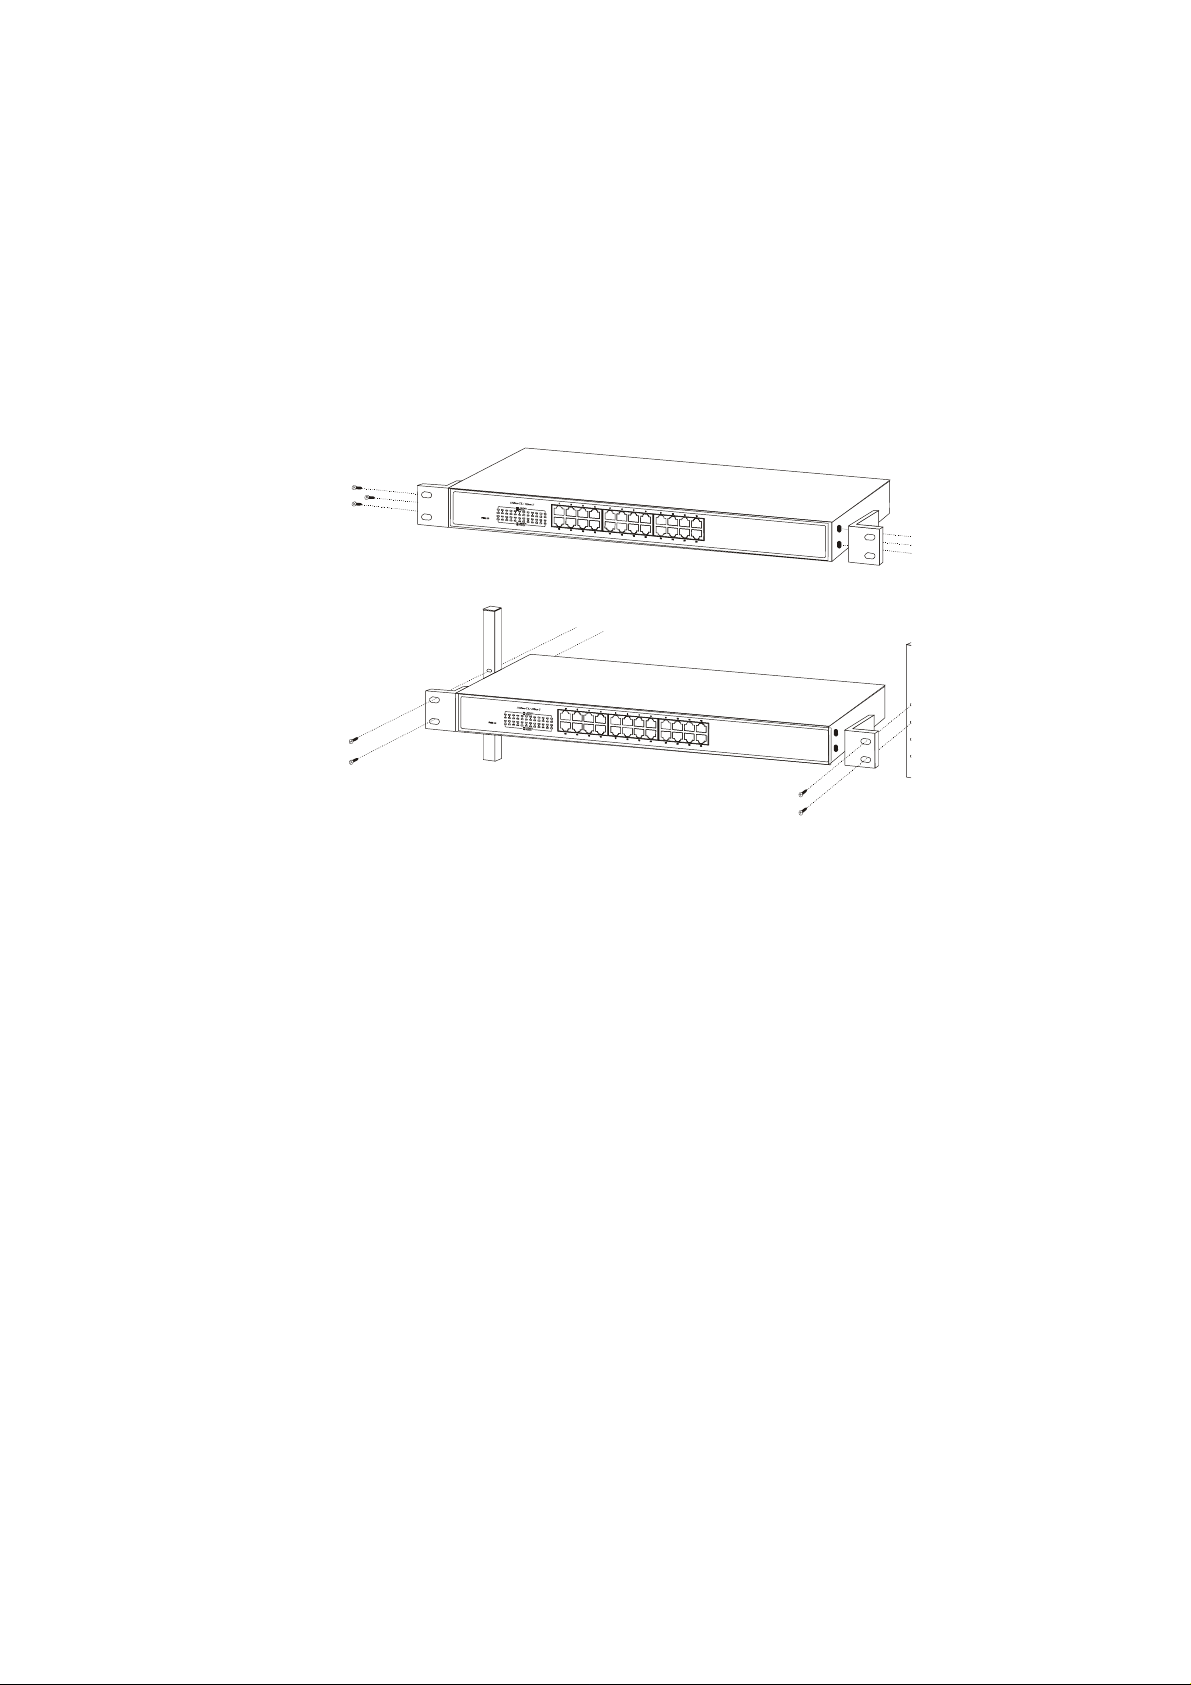
3.2 Rackmount placement
.Attach One (1) rackmounting bracket on each side of the Switch front panel
and secure each bracket with the provided screws.
.Use the other provided screws to secure each Switch to the rack.
Use the other provided screws to secure each Switch to the rack.
7
 Loading...