

Page 1

U8300
USB Hybrid TV Dongle
User's Manual
English
Deutsch
Français
Español
Русский
Türkçe
Polski
Česky
Português
Page 2
English
Chapter 1 Introduction
Thanks for your purchasing. It is highly recommended that you check all the functions
that the device supports carefully before using the program. This manual will guide you
through the essential information of how to use this application program.
TM
VIVO
is a multi-functional, graphical and easy-to-use application software that offers
you the most comprehensive multimedia entertainment enjoyment. Please notice that
the multimedia functions may vary depending on the product you purchased.
1.1 Software Features
● It’s a multi-functional, graphical software application program that consumes less RAM
space and CPU capacity.
● Time-shifting: Any programs can be paused and continued whenever you want.
● PIP/POP (Picture-In-Picture/Picture-Out-Picture): You can watch different TV
programs simultane-ously by multi-displays and drag/adjust screens.
● It supports multi-viewing of programs/channels (programs/channels must be from the
same stream/TV service provider)
● It supports 3x3, 4x4, 5x5, L Type and Circle Type multi-channel preview.
● It supports schedule-recording function to record your favorite TV shows.
● It supports analog recording in MPEG1, MPEG2, MPEG4, H.264, PSP, and IPod
formats
● It supports Digital Zoom in Original, 2X, 3X and 4X
● Adjustments in viewing windows: Full Screen, Sizable Screen and Borderless Screen
● It supports Program stream (PS) and Transport stream (TS) digital recording format.
● It supports decoding of digital TV for HDTV and H.264
- 2 -
Page 3
1.2 TV Setup
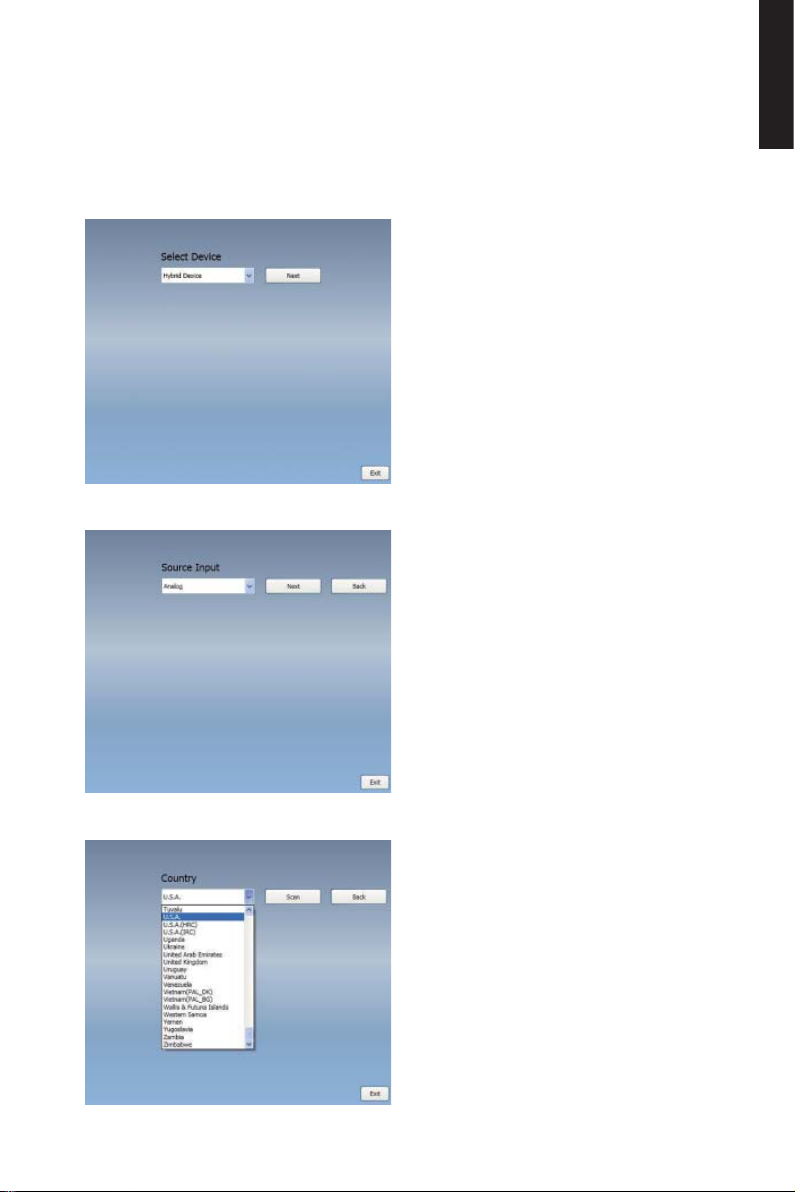
1.2.1 Channel Scanning
When you run VIVOTM for the fi rst time, the system will guide you through the necessary
steps of chan-nel scanning.
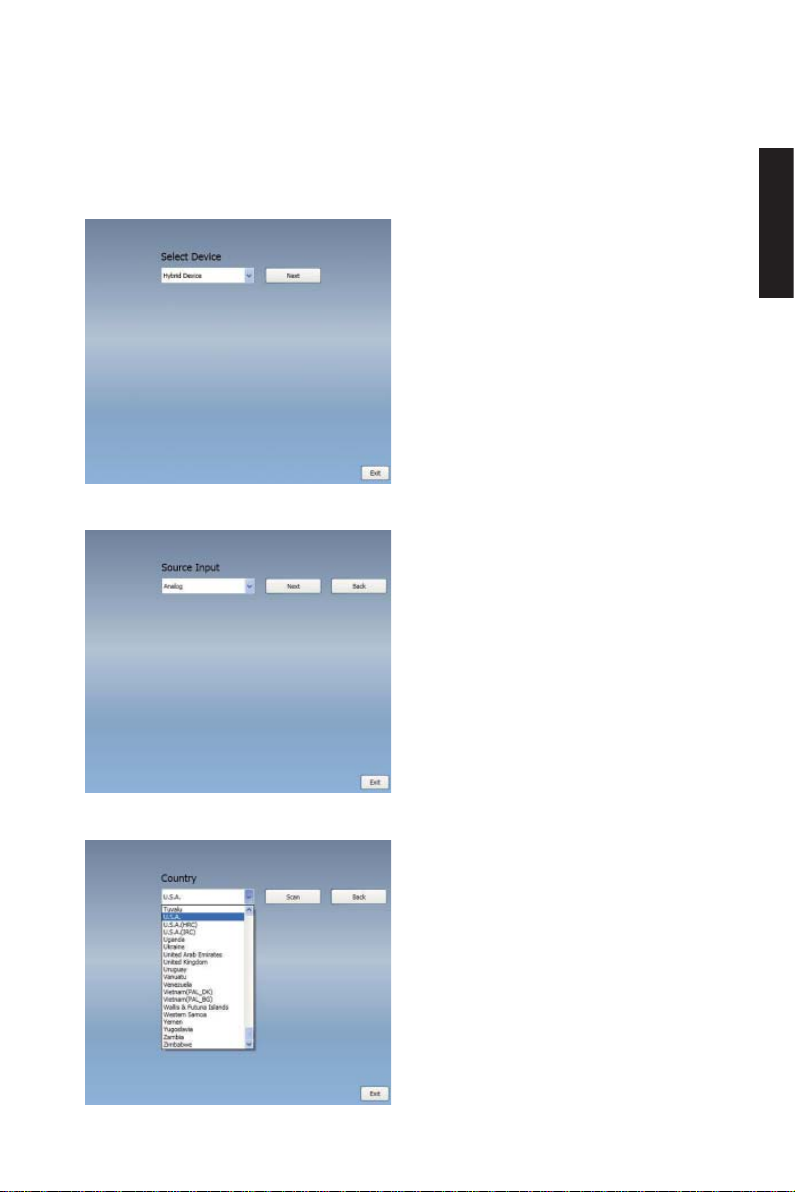
1. Please select the device type (e.g.
digital, analog or hybrid) you purchased
and click “Next”.
2. Select the signal source (the signal
strength may vary depending on the
product you purchased and the area you
live), and click “Next”.
English
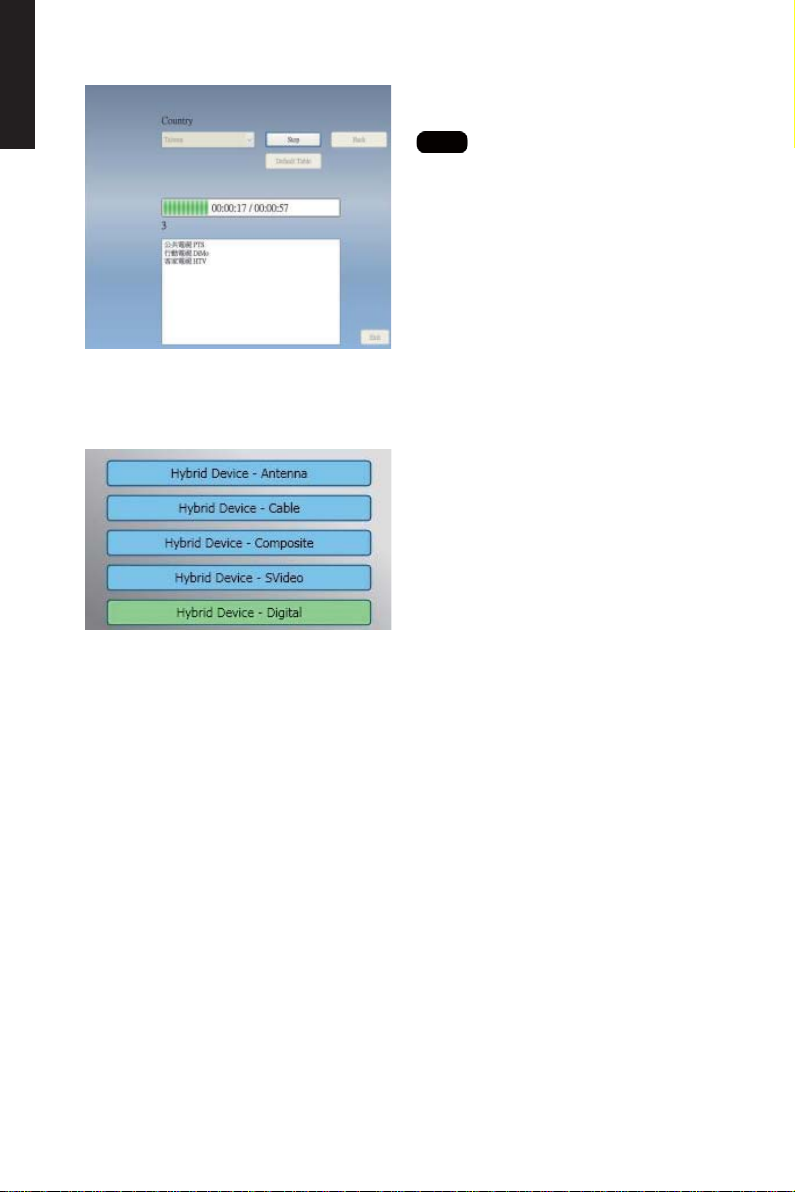
3. Please select the country you live
and then click “Channel Scan”.
- 3 -
Page 4
English
1.2.2 Source Input
4. Click “Exit” to finish the setup after
the scanning is completed.
Note
you may load default channel list
to watch TV without the waiting time for
channel scanning.
1. Select your device and signal source
such as Digital, Analog (Cable or
Antenna), Video (Composite, S-Video).
TM
will import the signal source
VIVO
you select. It is recommended that you
select the signal source that your device
supports.
Antenna TV: If you choose Antenna
TV, please make sure your antenna (for
analog TV reception) is properly installed
and is able to receive signals.
Cable TV: If you want to watch Cable
TV, please ensure that you have properly
plugged your analog (cable) TV cord to
the wall outlet of your cable TV.
Video: If you want to watch DVD videos,
it’s available through the additional
Composite, S-Video input. Please check
if the device you have supports this
function.
2. IF you’d like to listen to FM radio,
please click FM button directly. Please
make sure that the product you
purchased supports this function.
- 4 -
Page 5
Chapter 2 Digital TV
You can watch live Digital TV with VIVOTM Once you have done your initial setup (source
input and channel scan), you can enjoy watching and recording TV program with this
multi-functional software ap-plication.
Note
Make sure your device supports digital signal in order to watch digital TV.
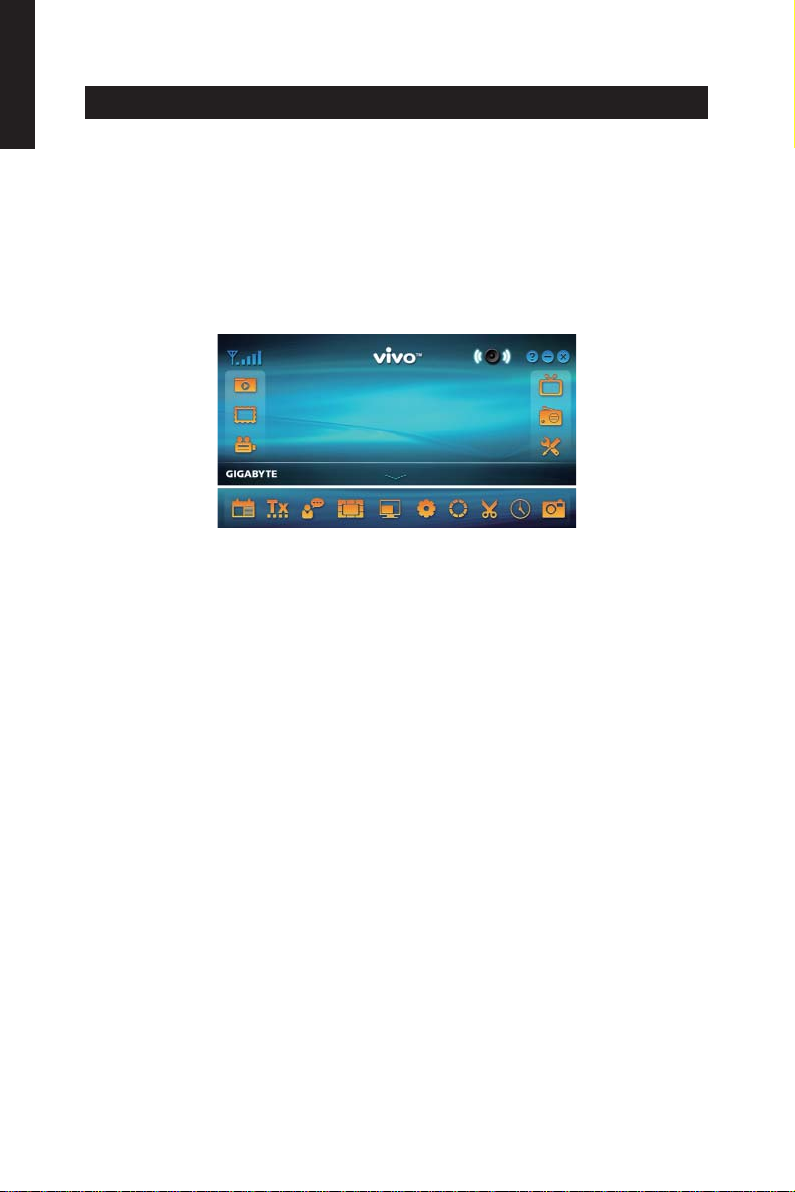
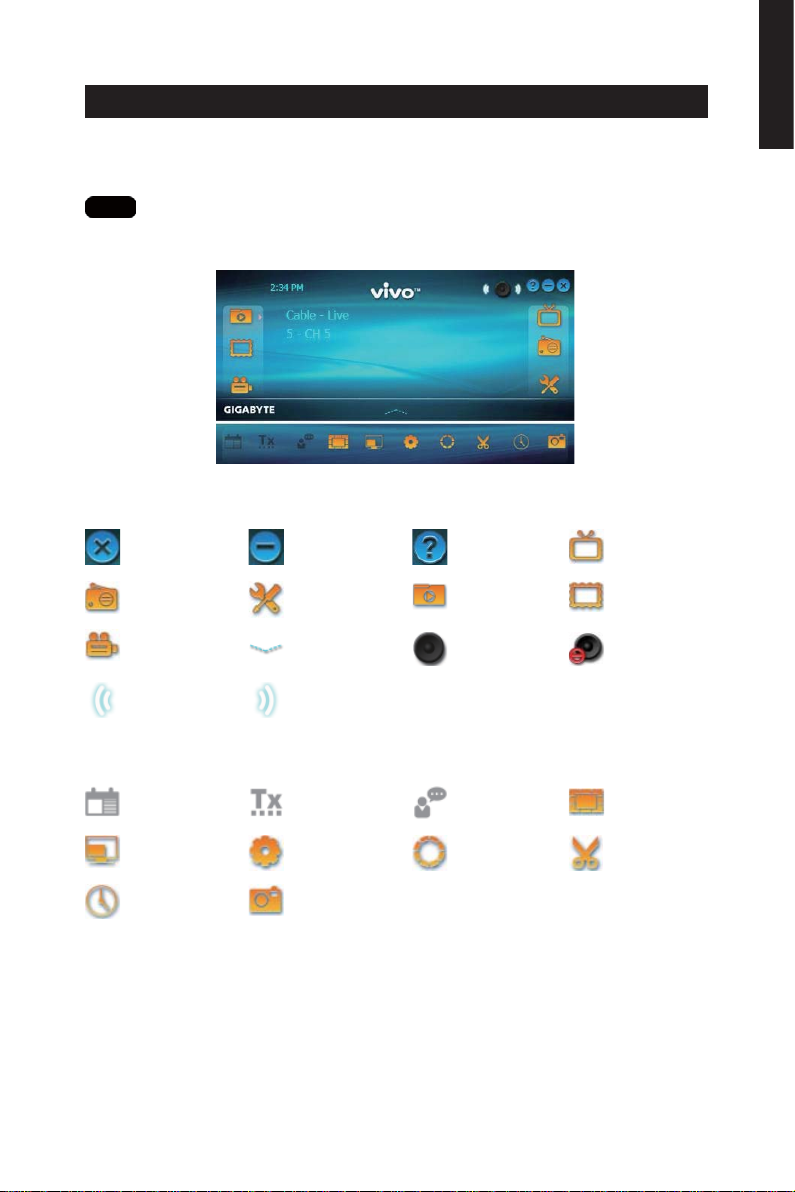
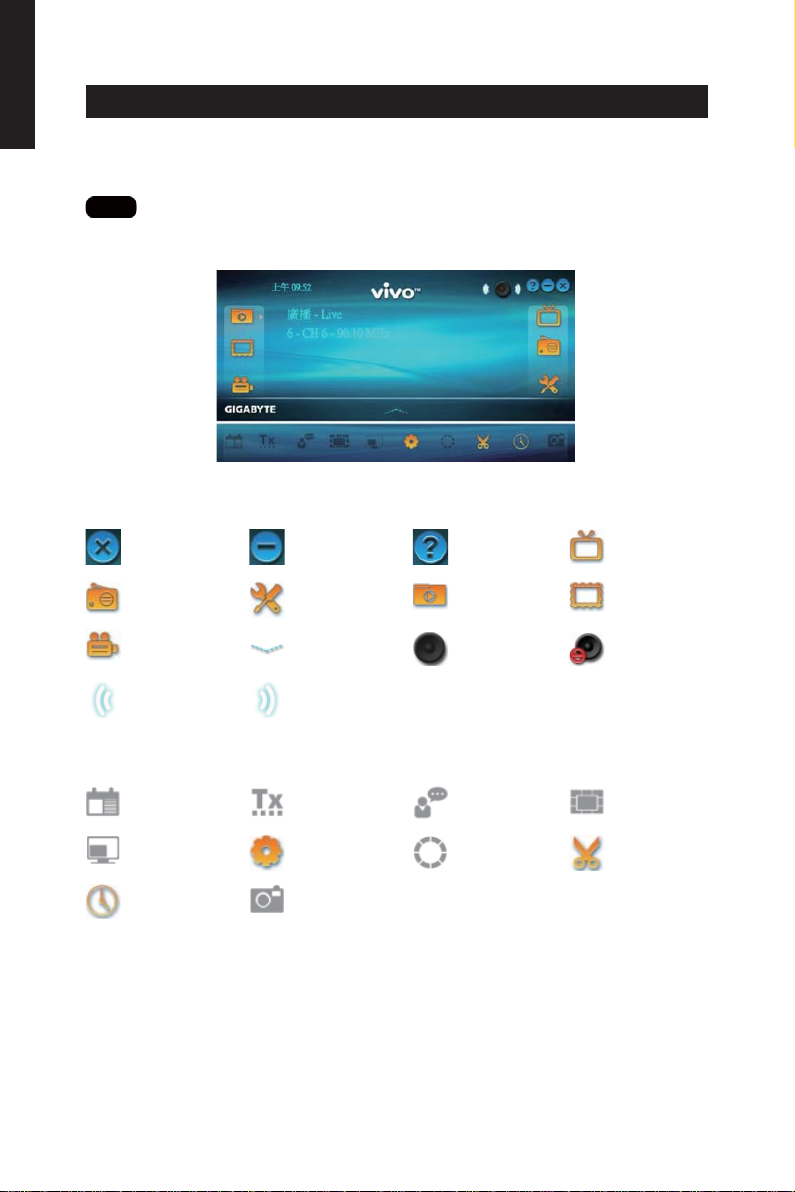
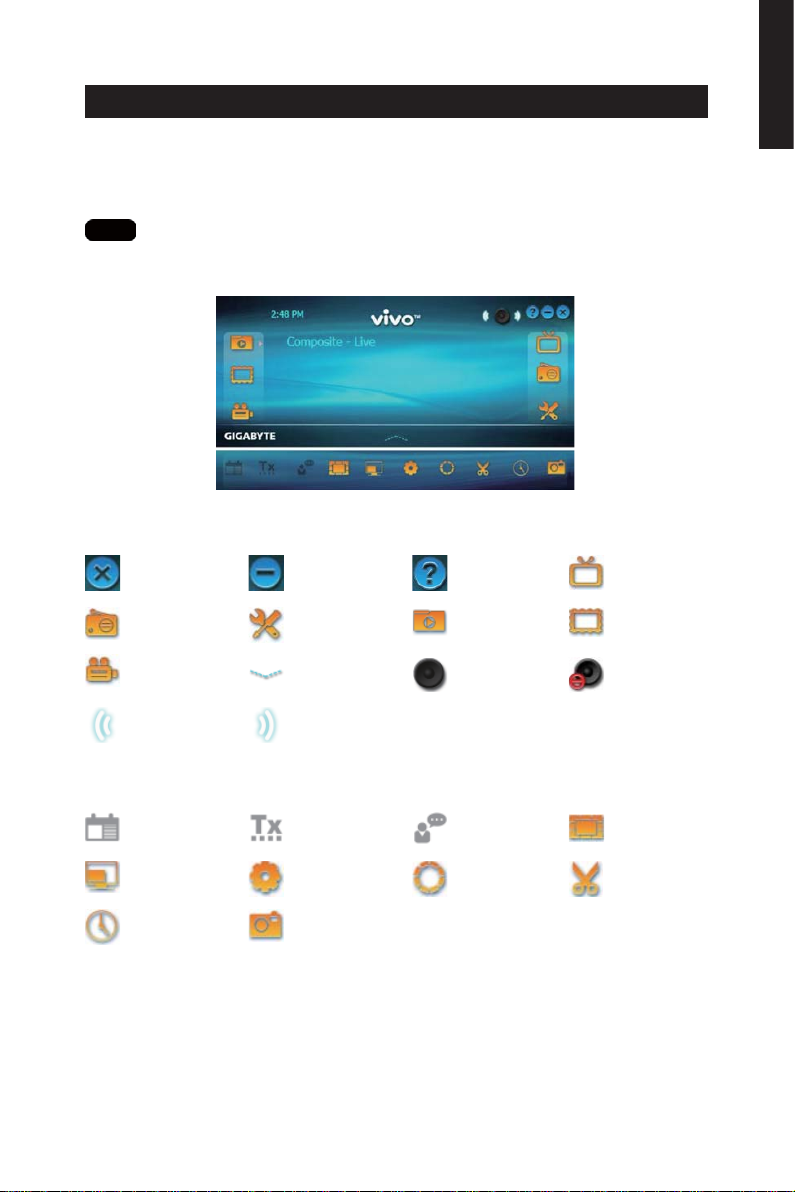
2.1 Main Panel
Buttons
English
Exit
FM Mode
Schedule
Recording
Left Audio
Hotkey Bar
EPG
Display Ratio
Time Shifting
Minimize
Setup
Open Bar
Right Audio
Teletext
OSD
Snapshot
- 5 -
About
Playback
Audio Mode/
Mute
Subtitle
Default Color
Source Input
Photo
Mute Mode/
Audio
Channel
preview
Capture
Page 6

English
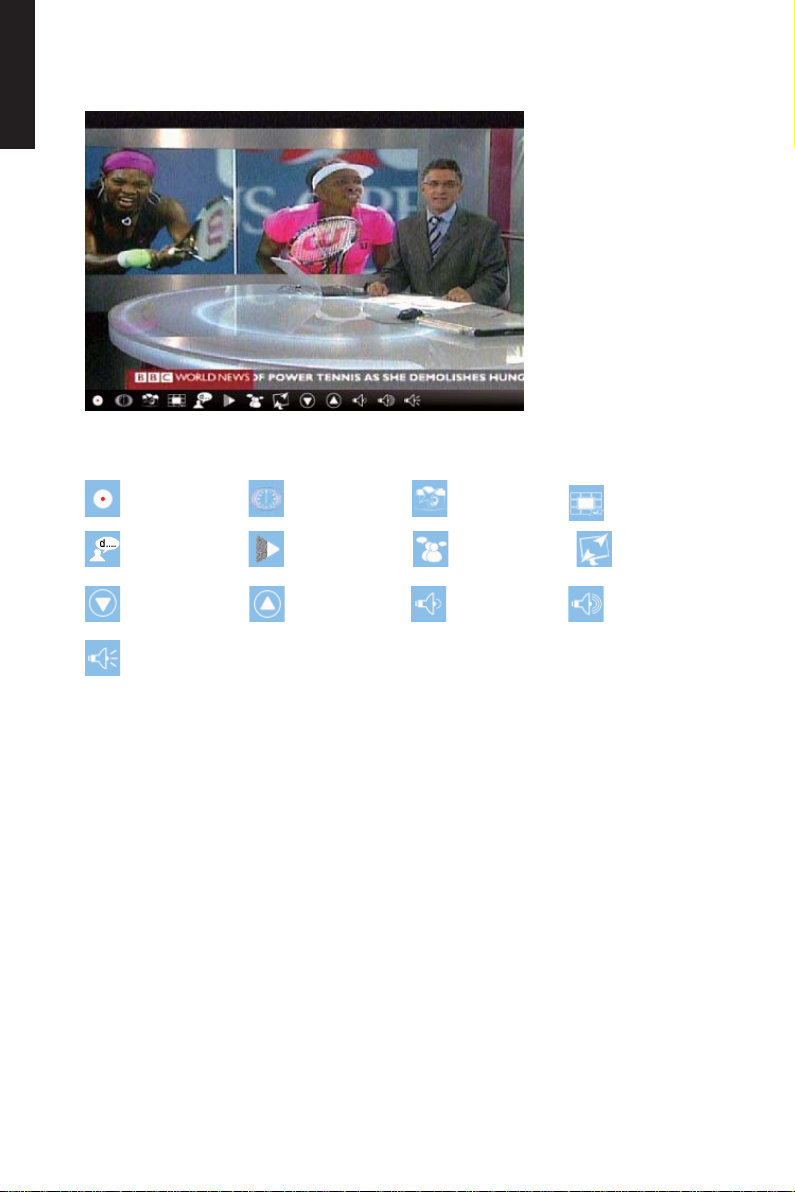
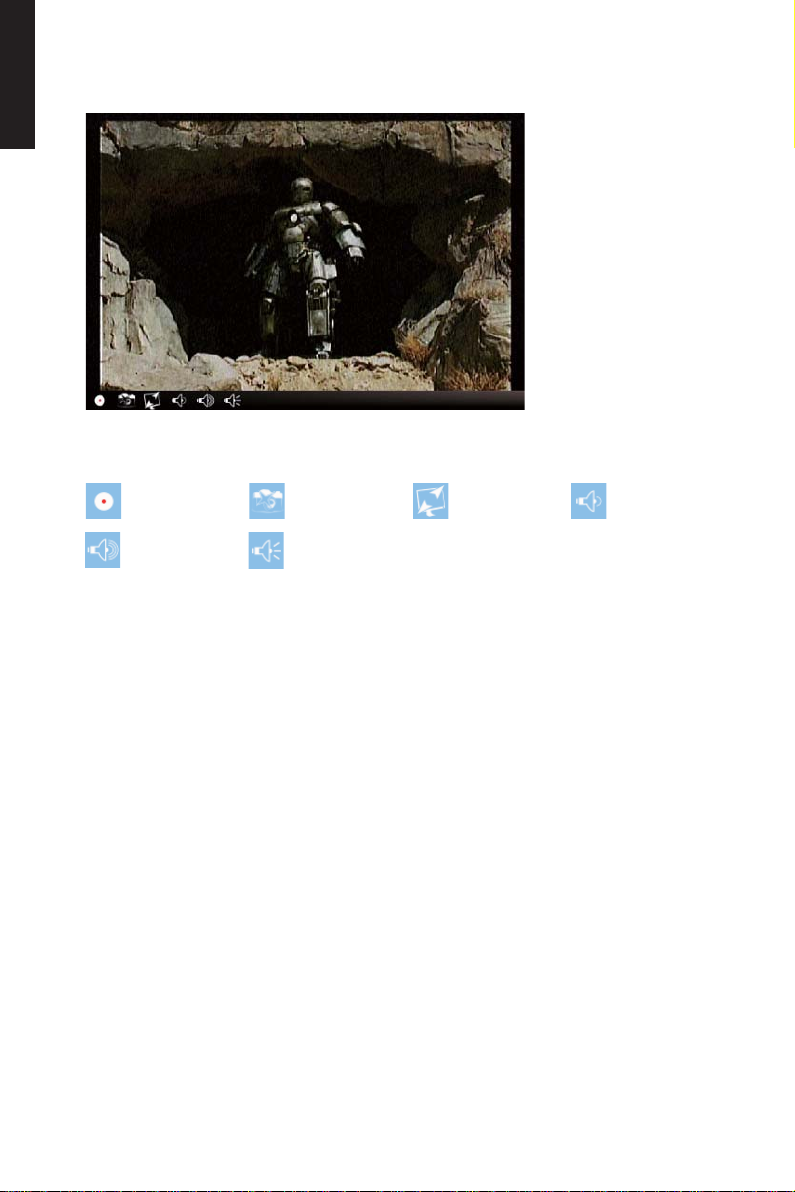
2.2 TV Panel
Control Buttons
Capture
Time-Shifting
Snapshot
Channel
Preview
EPG
Channel Up
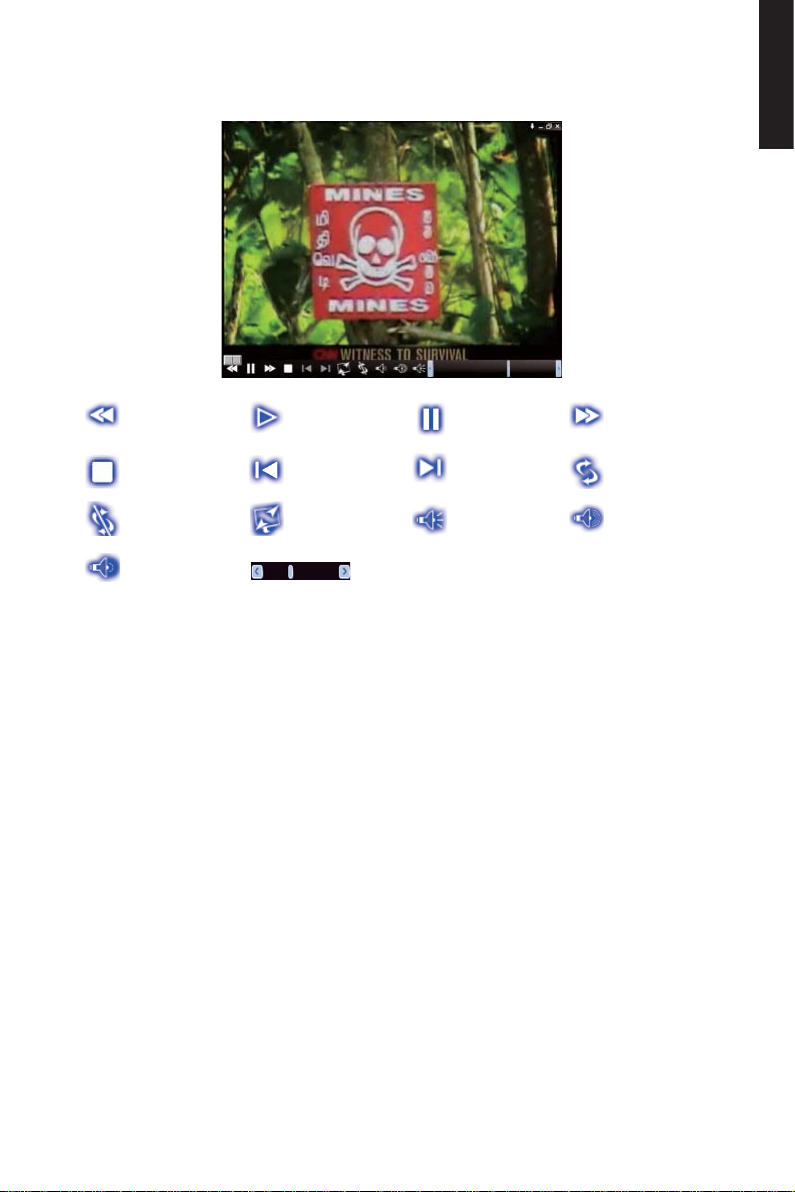
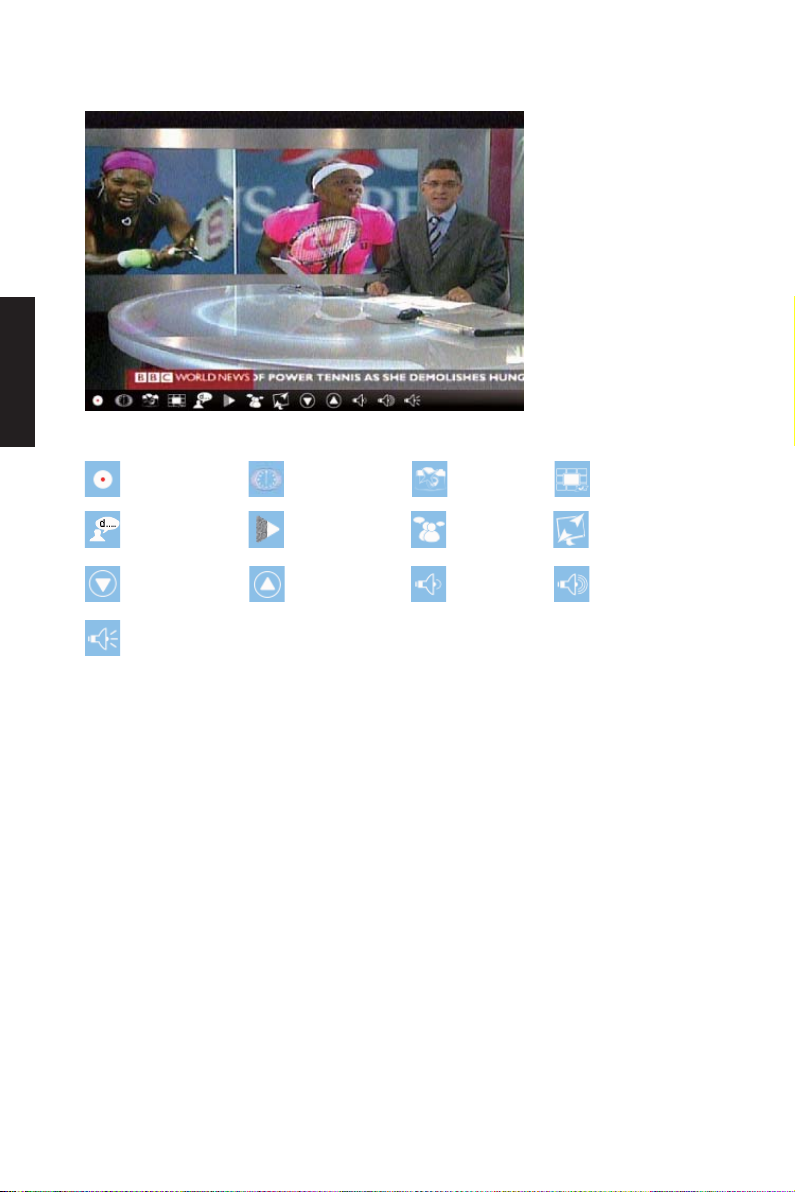
Capture: Click to capture the scenes you like. Once you capture the scene, it is saved
in your Video Path.
SAP
Volume Down
- 6 -
Display Ratio
Volume Up
Channel
Down
Audio Mode/
Mute
Page 7
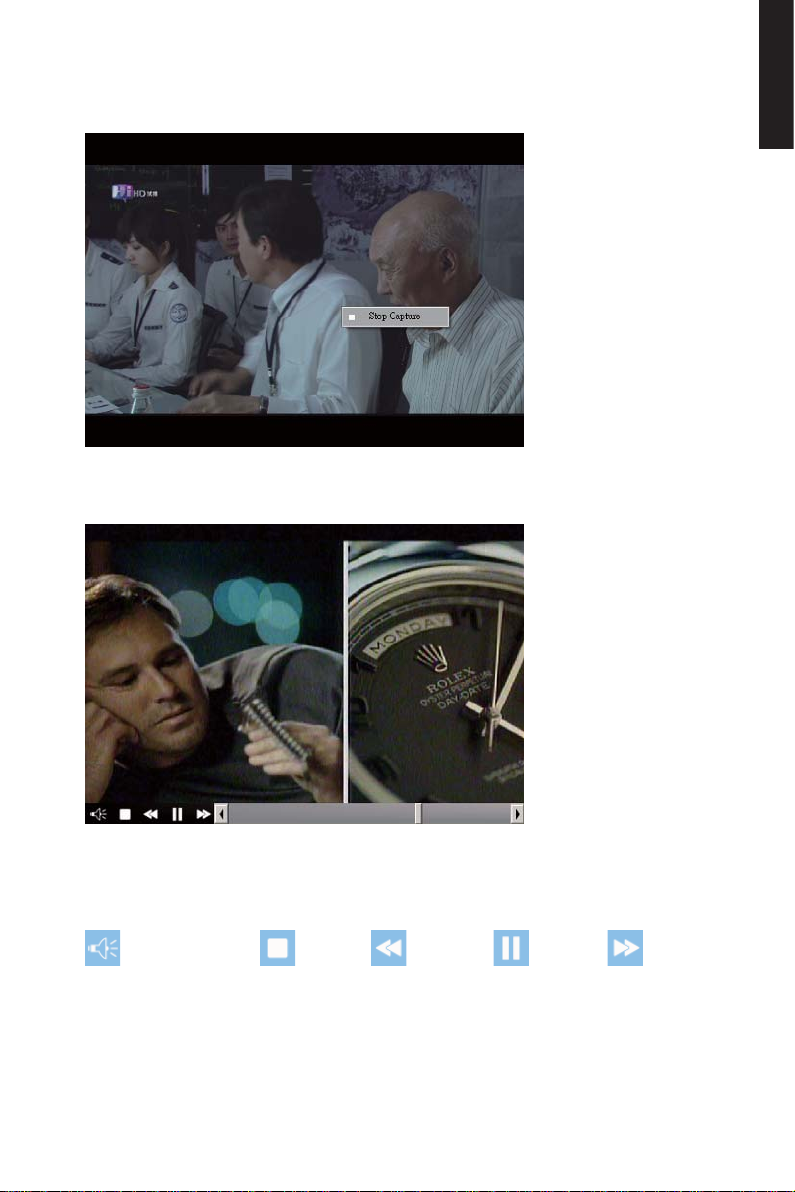
If you’d like to stop capture, click caption button again or right click on the screen and
then enable “Stop Capture”.
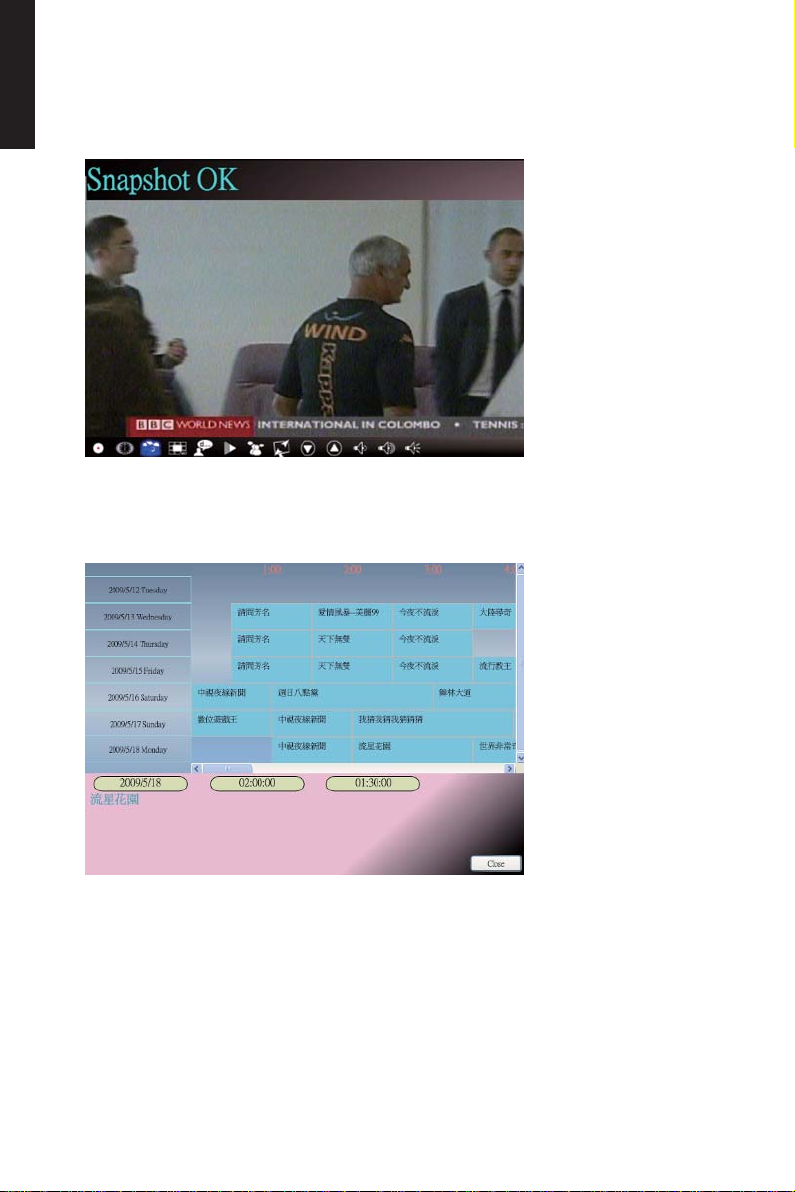
Time Shifting: This icon enables Time-shifting function once clicked. Time Shifting
function records the TV program you are currently watching.
English
This function enables you to pause/fast-forward/rewind TV shows so you won’t miss any
part when you left the show for something else. Control buttons defi ne as table below.
Audio Mode/Mute
Stop
Backward
Pause
Forward
- 7 -
Page 8
English
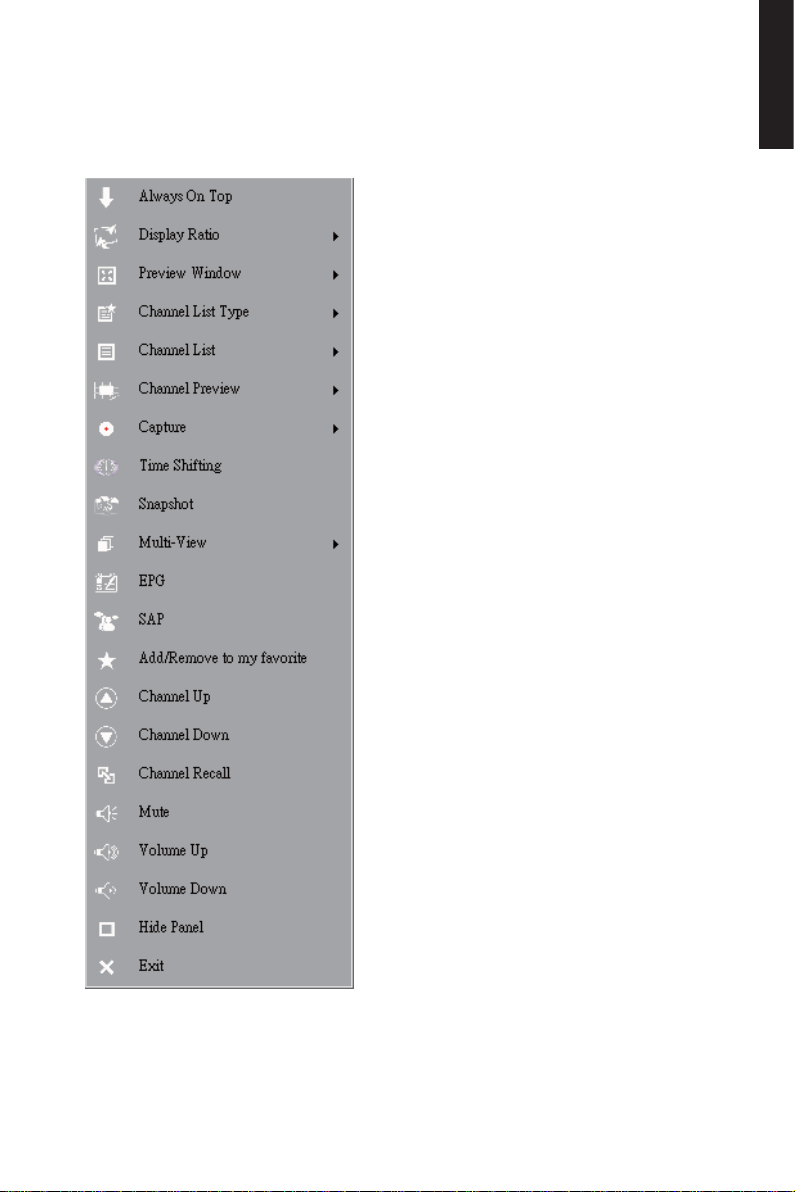
Snapshot: You can click the “Snapshot” icon to take snapshots. When the screen
shows “Snapshot OK”, it means the image has been successfully taken into your fi le
folder as picture fi les.
Channel-preview: Channel list preview from the beginning. You can set preview format
and interval in Setup page (Refers to Chapter 6).
EPG: You can receive and view information of TV programs of each digital TV channel
with this function.
SAP: Turn On/Off SAP sound (Depends on TV program provider)
Display Ratio: Change ratio base on a routine setting. (Free/4:3/16:9/Base on source)
Channel Down/UP: Select previous or next channel.
Volume Down/UP: Adjust TV volume to be loud or quiet
Audio/Mute Mode: Turn TV volume on or off.
- 8 -
Page 9
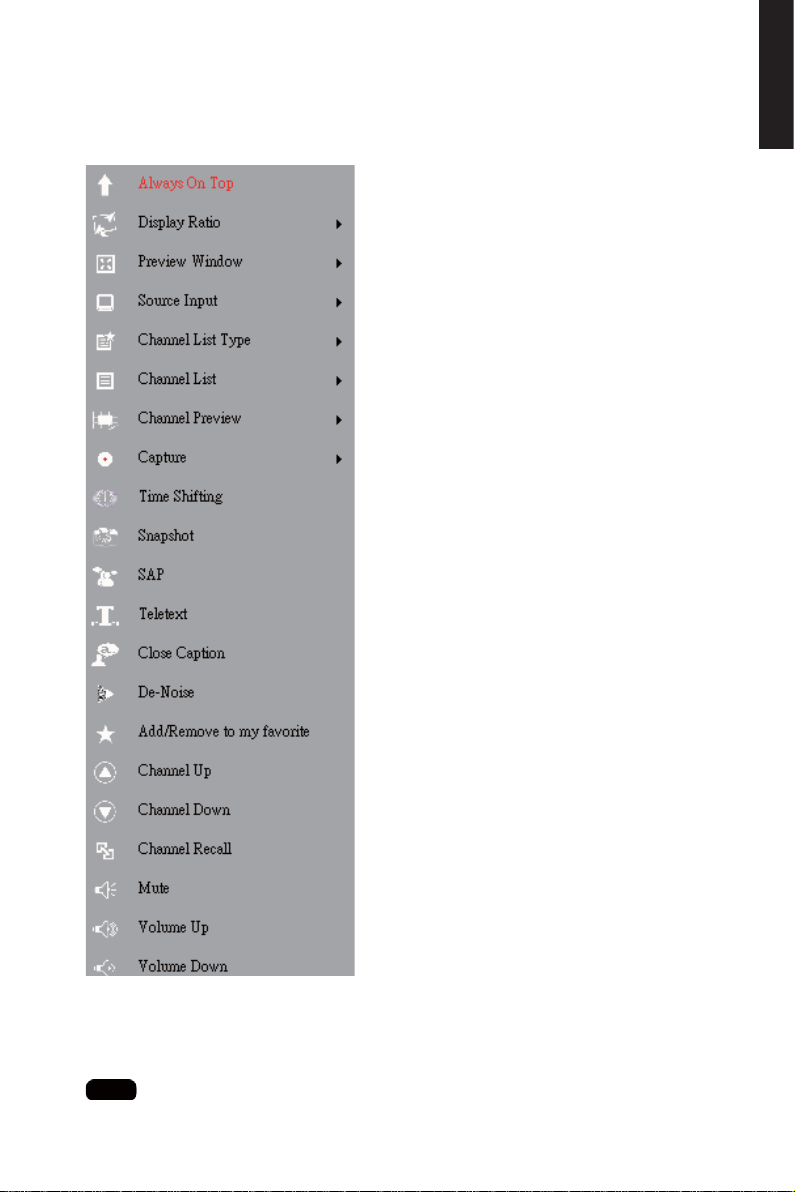
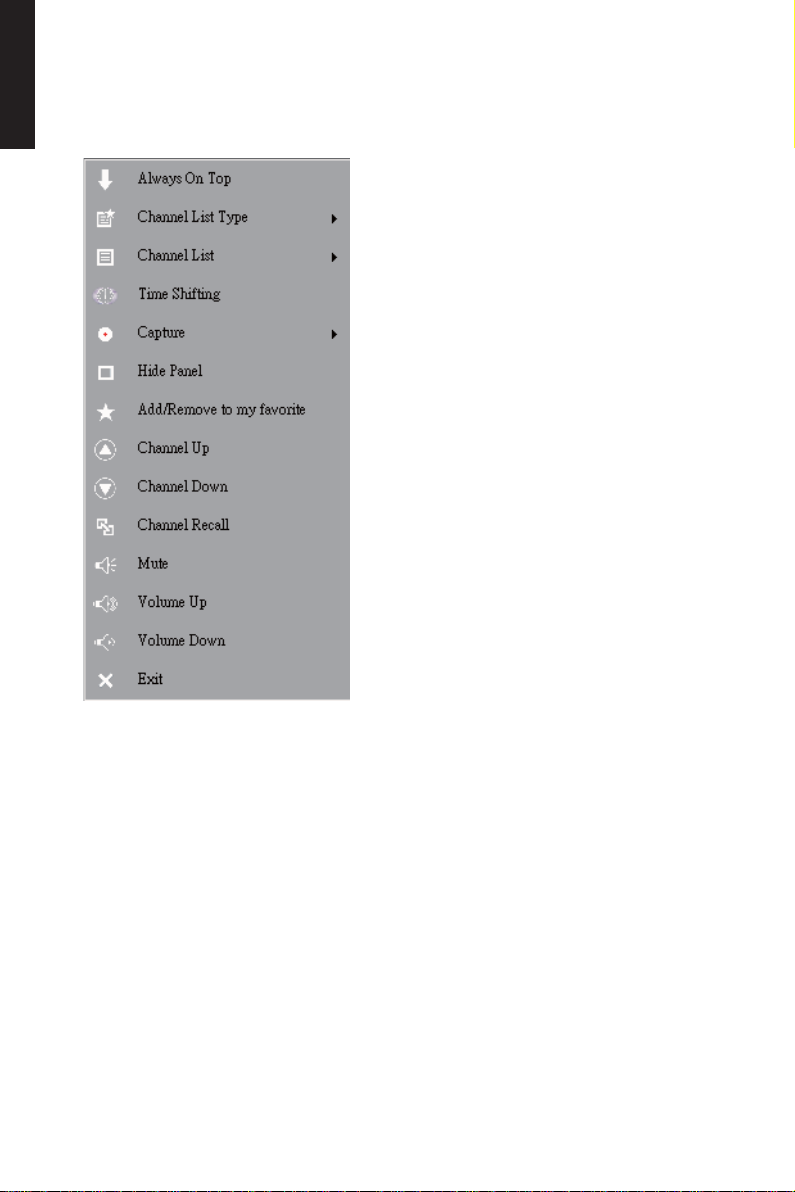
2.3 The Tool Menu
While you are watching digital TV on VIVOTM, you can enable the Tool Menu with a
mouse right-click. The Tool Menu allows you to access and activate functions of VIVOTM,
which provides you another op-tion besides the icons on the interface.
English
TM
Always On Top: Enables VIVO
to remain on top of all other application windows. It is
the same if you click on the “Always On Top” at the upper right corner of the regular TV
mode window.
- 9 -
Page 10
English
Display Ratio: You can adjust your display ratio when you move your mouse cursor to
the arrow at the -as you click on the Display Ratio function icon on the interface.
Free: The initial ratio when you start VIVO
TM
and you can adjust it by dragging the edge
of the VIVOTM window.
Base On Source: The display ratio will be based on the signal source.
Apply To All Channels: If you select this option, the adjusted display ratio will be applied
to all of your available channels.
Preview Window: You can change your TV viewing screen to Full Screen, Sizable
Screen or Borderless Screen.
Channel List Type: There are two types of Channel List Type – Normal or My Favorite.
You can select which type to load your channel list. It is the same as you do in the
Channel Setting page. The default is Normal.
Channel List: Displays your available channels. It’s the same as you open the Channel
Setting.
- 10 -
Page 11

Channel Preview: You can decide which type of channel preview – 3x3, 4x4, 5x5, L
Type or Circle Type.
Capture: You can choose to capture the TV scenes in TS or PS formats.
Time Shifting: Enable Time Shifting mode. It is the same as you click on the Time
Shifting icon on the main interface.
Snapshot: Activate Snapshot function to take the Snapshot. You can also do the same
if you click on the Snapshot icon on the main interface.
Multi-view: Allows you to multi-view channels/programs. Once you move your mouse
cursor to the er-ror at the right, you can select “Start Multi-view”. You can then watch
multiple channels/programs that are from the same signal frequency at the same time.
English
Start Multi-view: When you activate Multi-view by selecting “Start Multi-view”, notice
that two other viewing screens appear within the main TV screen.
Note
You can then drag the sub screens that were in the main viewing screen out.
Those sub screens that were dragged out can be enlarged and relocated up to your
viewing demands.
- 11 -
Page 12

English
P.I.P/P.O.P: Once you activate Multi-view, you can enable multi-view in Pic-ture-inPicture/Picture-out-Picture mode.
Stop Multi-view: Select this option to stop Multi-view. Once you selected it, the two sub
screens will go off.
EPG: The same as main panel.
SAP: The same as main panel.
Add/Remove to my favorite: Add a channel to My Favorite or remove a channel from
My Favorite.
Channel Up: Go to the next channel on the channel list.
Channel Down: Go to the last channel on the channel list.
Channel Recall: Return to the previously accessed channel
Mute On: Enable/disable the mute function
Volume Up: Increase the volume
Volume Down: Decrease the volume
Hide Panel: Hide or show the control panel (the VIVOTM interface)
Exit: Close/Exit VIVOTM window
- 12 -
Page 13
Chapter 3 Analog TV
You can watch live Analog TV with VIVOTM. Once you have done your initial setup (source
input and channel scan), you can enjoy watching and recording TV program with this
multi-functional software ap-plication.
Note
Make sure your device supports analog signal in order to watch analog TV.
3.1 Main Panel
Buttons
English
Exit
FM Mode
Schedule
Re-cording
Left Audio
Hotkey Bar
EPG(Disable)
Display Ratio
Time Shifting
Minimize
Setup
Open Bar
Right Audio
Teletext
(Disable)
OSD
Snapshot
About
Playback
Audio Mode/
Mute
Subtitle
(Disable)
Default Color
Source Input
Photo
Mute Mode/
Audio
Channel
Pre-view
Capture
- 13 -
Page 14
English
3.2 TV Panel
Control Buttons
Capture
Time-Shifting
Snapshot
Channel
Preview
Close Caption
Channel
Down
Audio Mode/
Mute
Capture: Please refer to item 2.2 in Chapter 2.
Time Shifting: Please refer to item 2.2 in Chapter 2.
Snapshot: Please refer to item 2.2 in Chapter 2.
Channel-preview: Please refer to item 2.2 in Chapter 2.
Close Caption: Enable to turn on close caption.
De-Noise: To enable De-Noise function to make much clear Analog TV reception.
SAP: Please refer to item 2.2 in Chapter 2.
Display Ratio: Please refer to item 2.2 in Chapter 2.
Channel Down/UP: Please refer to item 2.2 in Chapter 2.
Volume Down/UP: Please refer to item 2.2 in Chapter 2.
Audio/Mute Mode: Please refer to item 2.2 in Chapter 2.
De-Noise SAP
Channel Up
Volume Down
Display Ratio
Volume Up
- 14 -
Page 15
3.3 The Tool Menu
Please refer to item 2.3 in Chapter 2. There are few different between Digital TV and
Analog TV mode.
English
Close Caption: Helps you watch Analog TV with close caption assistance. This function
will depend on TV program provider.
De-Noise: You can enable De-Noise function to enhance Analog TV quality.
Note
Analog TV doesn’t support Multi-View function due to the TV standard limitation.
- 15 -
Page 16
English
Chapter 4 FM Radio
You can listen to live FM radio with VIVOTM Once you have done your initial setup (source
input and channel scan), you can enjoy listening and recording radio program with this
multi-functional software application.
Note
Make sure your device supports analog signal in order to watch analog TV.
4.1 Main Panel
Buttons
Exit
FM Mode
Schedule
Re-cording
Left Audio
Hotkey Bar
EPG(Disable)
Display Ratio
(Disable)
Time Shifting
Minimize
Setup
Open Bar
Right Audio
Teletext
(Disable)
OSD
Snapshot
(Disable)
About
Playback
Audio Mode/
Mute
Subtitle
(Disable)
Default Color
(Disable)
Source Input
Photo
Mute Mode/
Audio
Channel Preview(Disable)
Capture
- 16 -
Page 17

4.2 Radio Panel
Control Buttons
Capture
Time-Shifting
Reduce Frequency
English
Add
Frequency
Channel Down
Audio Mode/
Mute
Capture: Please refer to item 2.2 in Chapter 2.
Time Shifting: Please refer to item 2.2 in Chapter 2.
Reduce Frequency: Adjust radio frequency in minus.
Add Frequency: Adjust radio frequency in plus.
Channel Down/UP: Please refer to item 2.2 in Chapter 2.
Volume Down/UP: Please refer to item 2.2 in Chapter 2.
Audio/Mute Mode: Please refer to item 2.2 in Chapter 2.
Channel Up
Volume Down
Volume Up
- 17 -
Page 18
English
4.3 The Tool Menu
Please refer to item 2.3 in Chapter 2. There are fewer options than TV mode and all
functions remainder are the same.
- 18 -
Page 19
Chapter 5 Video Input
You can import additional Video source to VIVOTM through Composite Video, S-Video
input. Once you connect your device, Video source and PC together, VIVOTM will autodetect source category. You can easily enjoy DVD or other multi-media by VIVOTM even
record to your PC or laptop directly.
Note
Make sure your device supports video input.
5.1 Main Panel
Buttons
English
Exit
FM Mode
Schedule
Re-cording
Left Audio
Hotkey Bar
EPG(Disable)
Display Ratio
Time Shifting
Minimize
Setup
Open Bar
Right Audio
Teletext
(Disable)
OSD
Snapshot
- 19 -
About
Playback
Audio Mode/
Mute
Subtitle
(Disable)
Default Color
Source Input
Photo
Mute Mode/
Audio
Channel Preview
Capture
Page 20
English
5.2 Video Panel
Control Buttons
Capture
Time-Shifting
Reduce Frequency
Volume Down
Volume Up
Capture: Please refer to item 2.2 in Chapter 2.
Snapshot: Please refer to item 2.2 in Chapter 2.
Display Ratio: Please refer to item 2.2 in Chapter 2.
Volume Down/UP: Please refer to item 2.2 in Chapter 2.
Audio/Mute Mode: Please refer to item 2.2 in Chapter 2.
Audio Mode/
Mute
- 20 -
Page 21

5.3 The Tool Menu
Please refer to item 2.3 in Chapter 2. There are fewer options than TV mode and all
functions remainder are the same.
English
- 21 -
Page 22
English
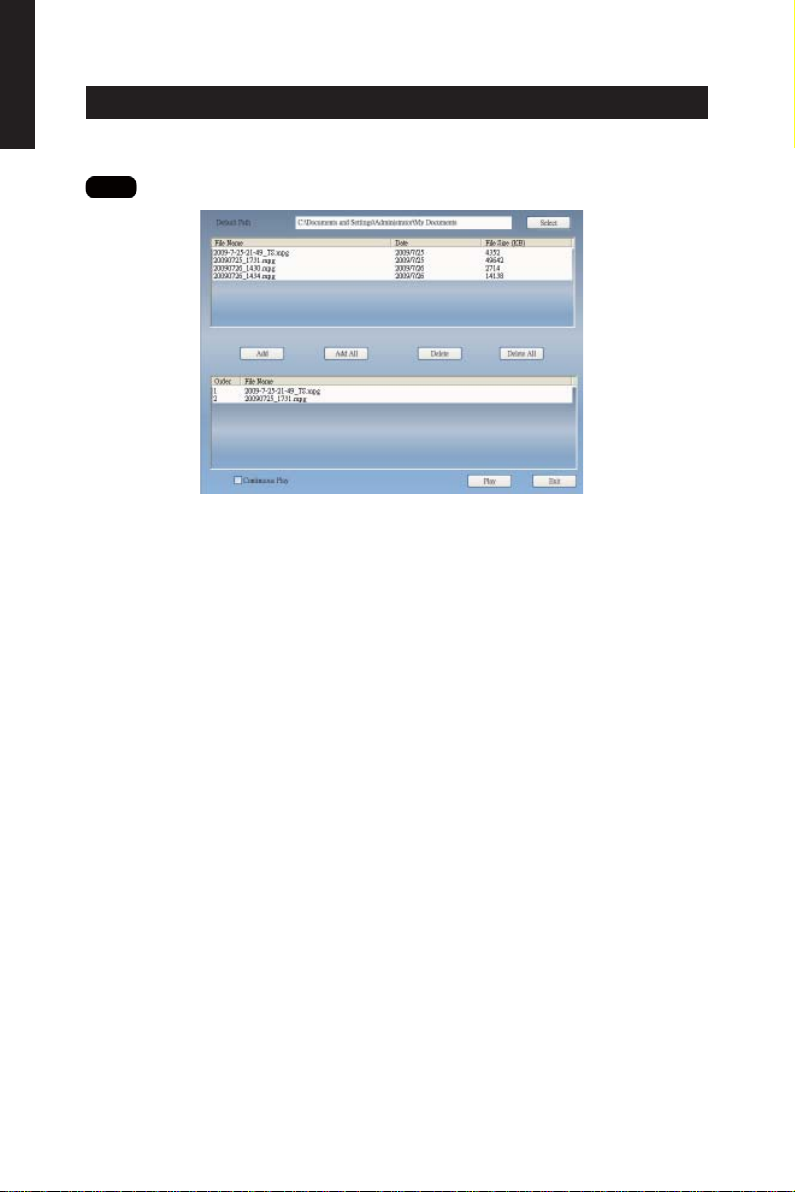
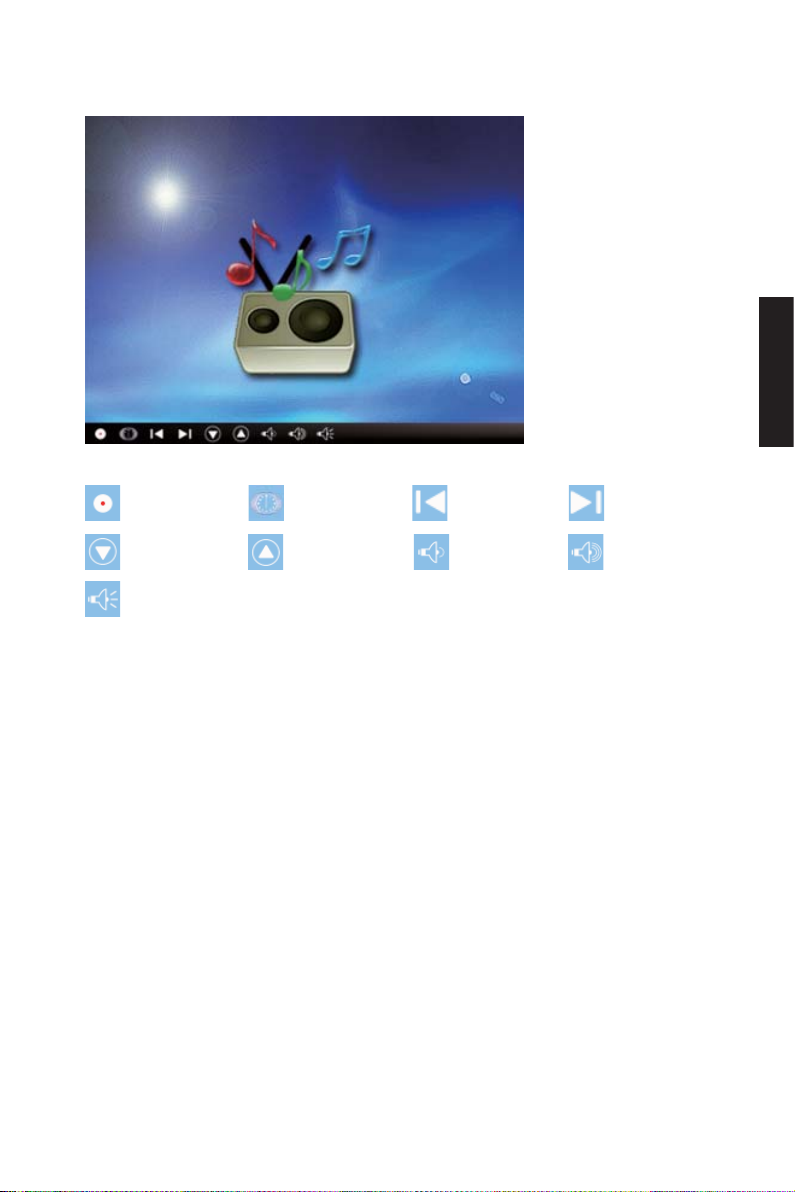
Chapter 6 Playback
When you click on this icon, you can choose a recorded fi le for playback or a fi le from
folders in your PC.
Note
continuous fi le playback is available
Add: add a selected fi le to the playlist at the bottom half of the window
Add All: add all the fi les to the playlist
Delete: delete a fi le from the playlist
Delete All: delete all the fi les on the playlist
Play: play the selected fi le that are on the playlist at the bottom half of Playback
Exit: exit Playback
When you selected a fi le for playback, VIVO
TM
will plays the video for you in another
screen as illustrated below.
- 22 -
Page 23
6.1 Control Buttons for Playback Mode:
English
Backward
Stop
Repeat (off)
Volume Down
Play
Previous File
Display Ratio
Control Slide for Playback
Pause
Next File
Audio
Forward
Repeat (on)
Volume Up
- 23 -
Page 24
English
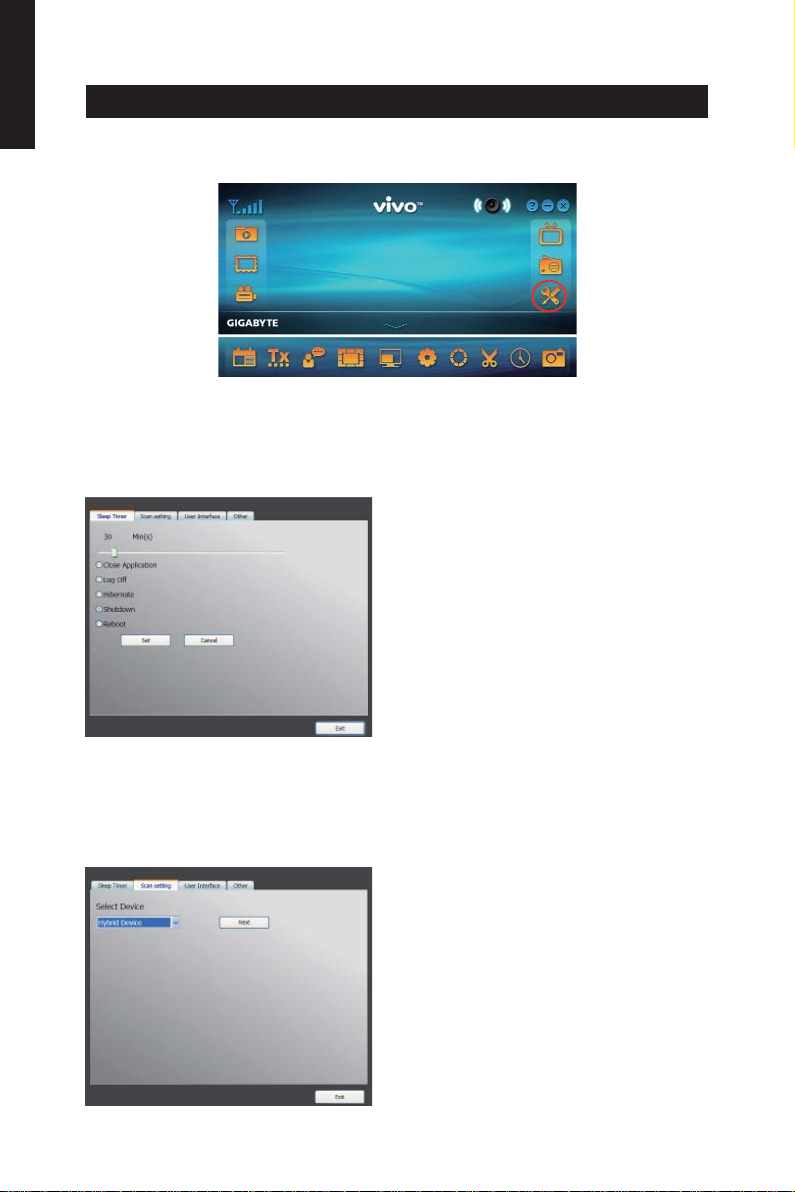
Chapter 7 Setup
In VIVOTM, you can simply make settings as your favorite in Setup page. Since VIVO
has been launched, click Setup button to access Setup page.
7.1 General Setting
You can fi nd Sleep Timer, Scan Setting, User Interface and Other, 4 options, in Setup
page. Those can help you to improve your power saving, scanning adjustment, colorful
UI and language and location.
7.1.1 Sleep Timer
TM
You might watch TV but get sleepy after minutes later or leave your TV for emergency.
For any specifi c reason, you would like to ask VIVOTM to help you on something. There
are 5 options, Close Application, Log off, Hibernate, Shutdown, and Reboot, for setting.
Besides, you can move time shuttle left or right to adjust time period.
7.1.2 Scan Setting
- 24 -
Page 25
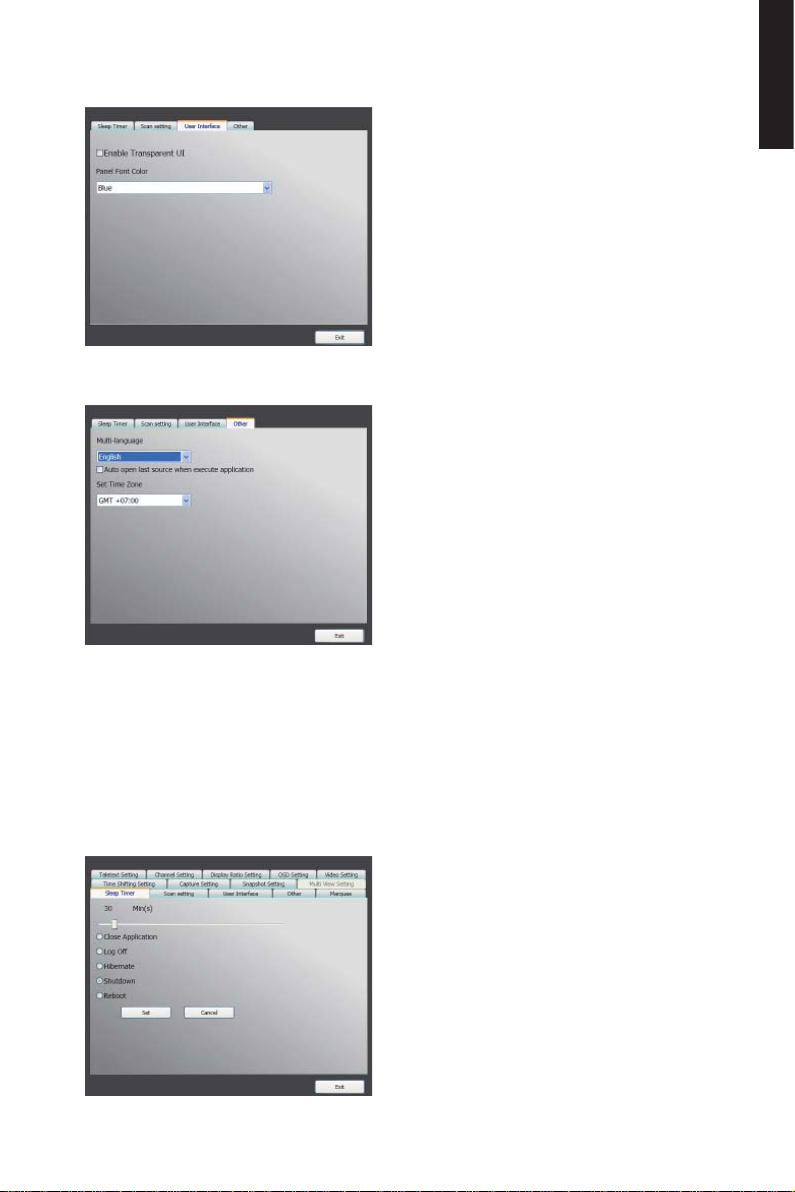
7.1.3 User Interface
7.1.4 Other
English
7.2 Advanced Setting
You can not only find Sleep Timer, Scan Setting, User Interface and Other but
Marquee, Time Shifting Setting, Capture Setting, Snapshot Setting, Multi View
Setting, Teletext Setting, Channel Setting, Dis-play Ratio Setting, OSD Setting and
Video Setting.
- 25 -
Page 26
English
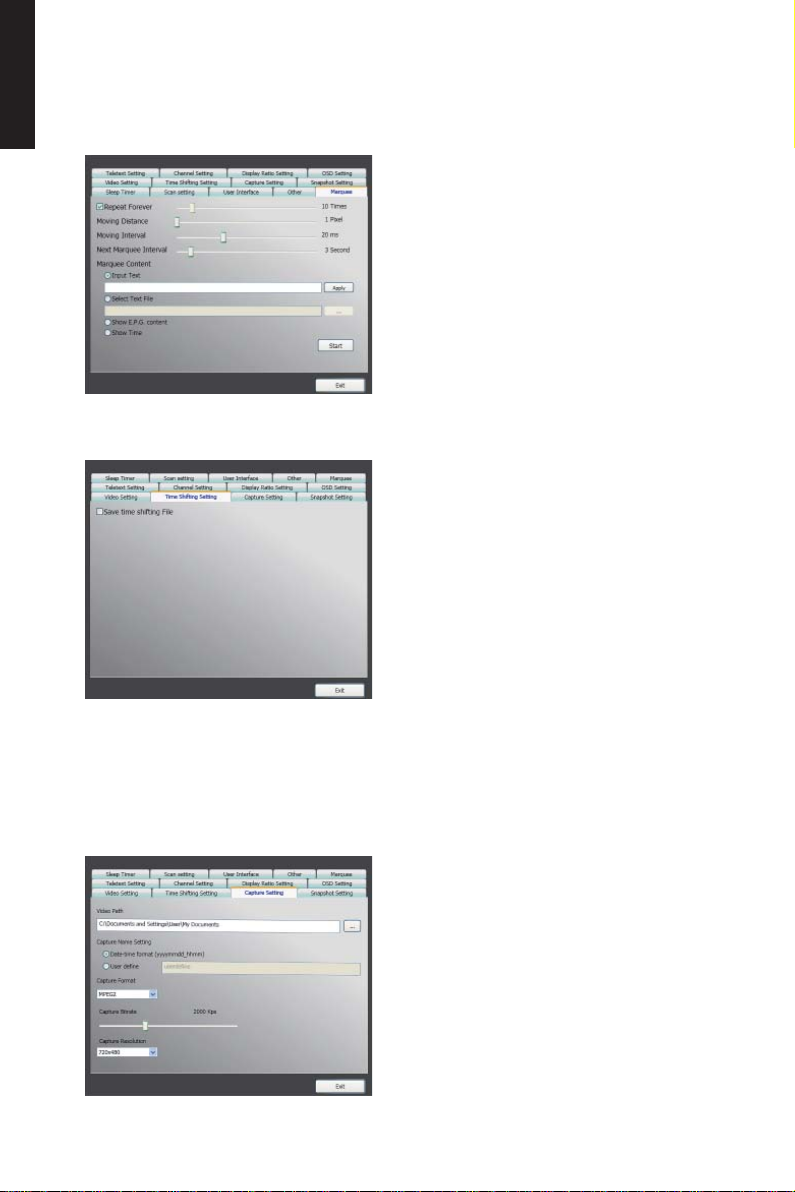
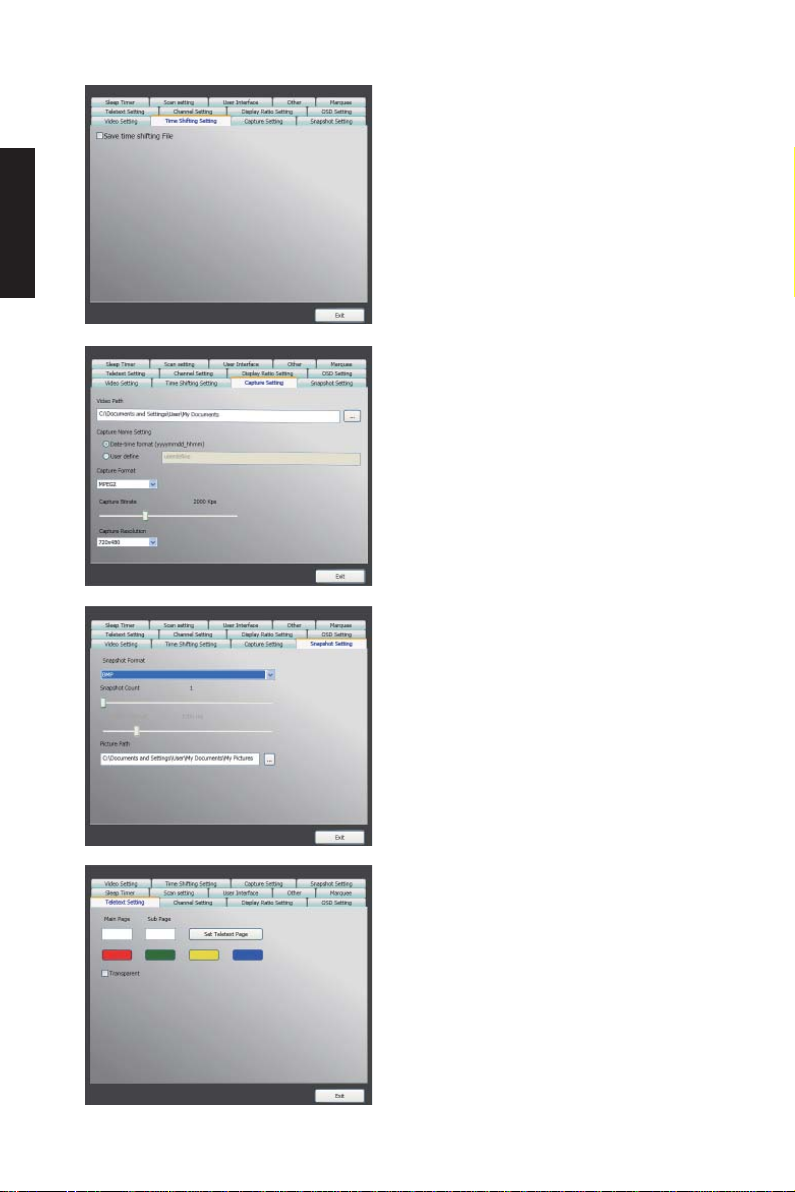
7.2.1 Marquee Setting
Here we can set the properties of the marquee such as moving distance, interval, the
content, and so on.
7.2.2 Time Shifting Setting
Here we can decide to save the fi le or not.
7.2.3 Capture Setting
Here we can set where to save the fi le, the captured fi le name, or set the capture stream
type.
- 26 -
Page 27
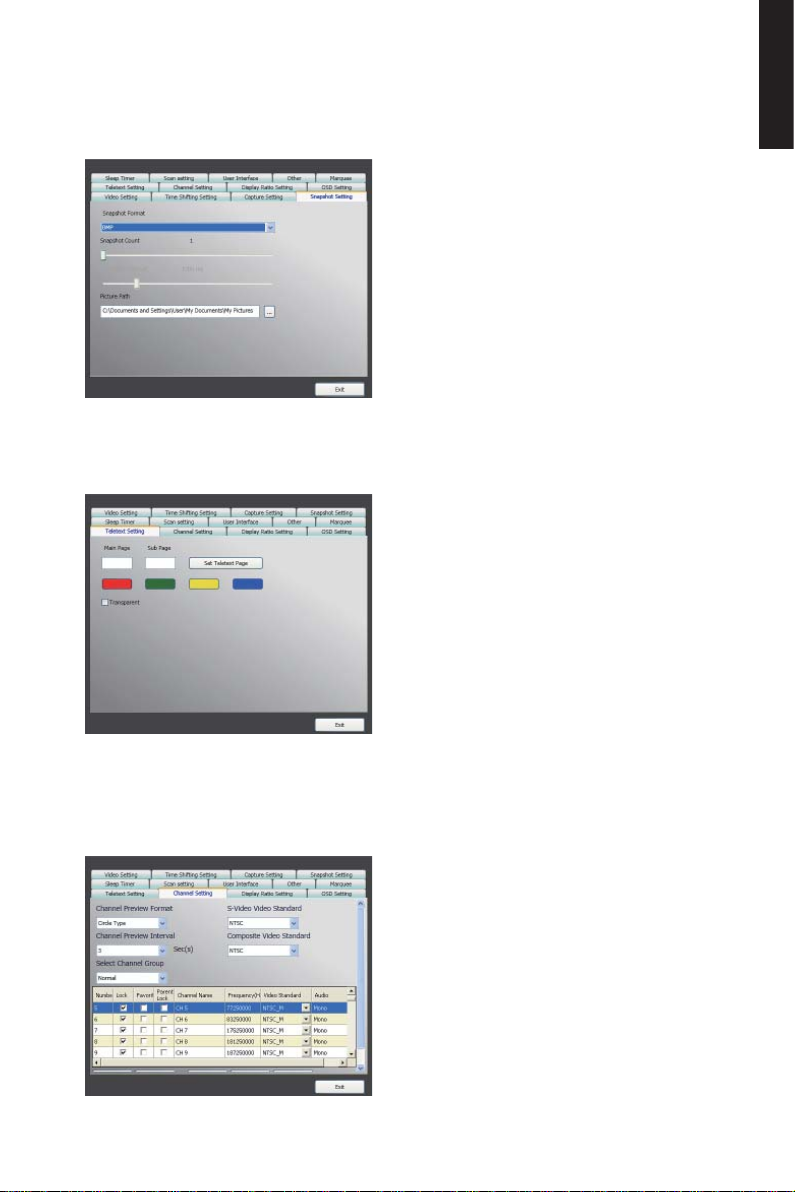
7.2.4 Snapshot Setting
Here we can set the snapshot fi le format, where to save the pics, and the how many
pics will be saved when using the snapshot function.
7.2.5 Teletext Setting
Here we can input the teletext main page and sub page, or use the color button to
switch teletext page.
English
7.2.6 Channel Setting
Here we can set the channel preview type, preview interval, channel group, and channel
management.
- 27 -
Page 28
English
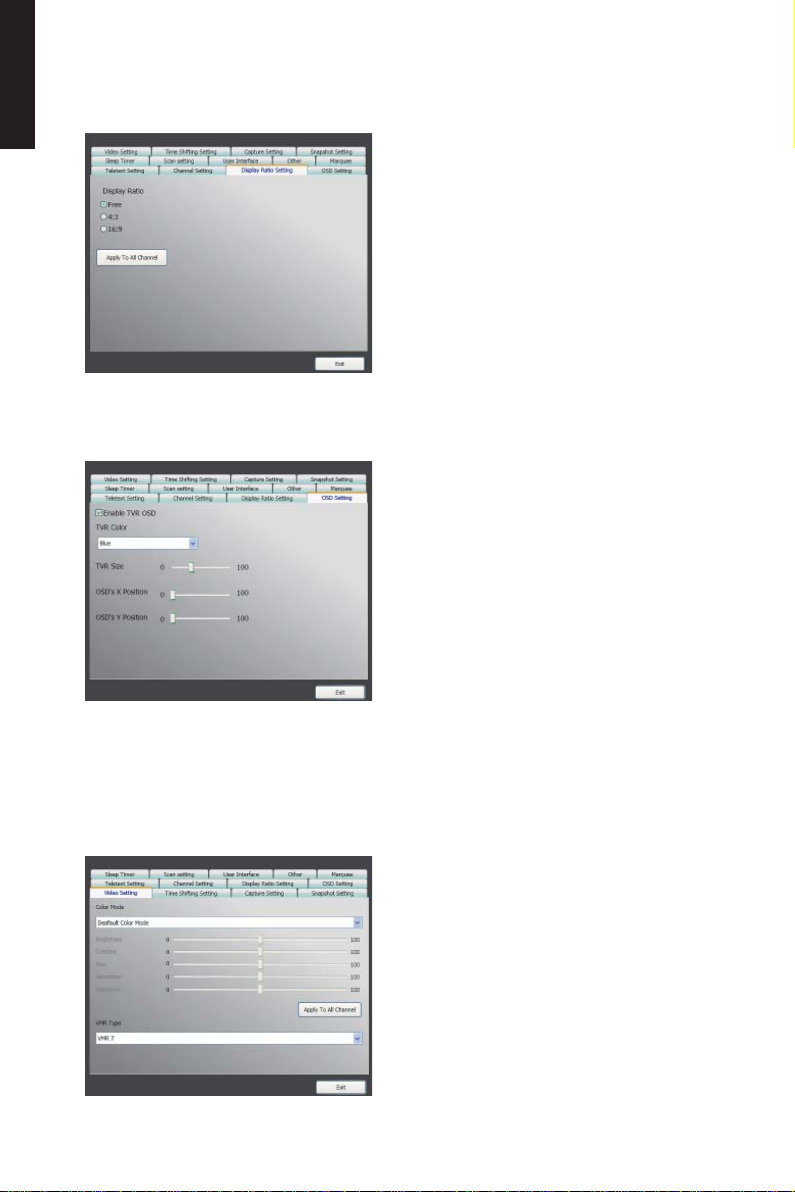
7.2.7 Display Ratio Setting
Here we can set the display ratio and apply to all channels.
7.2.8 OSD Setting
Here we can set the OSD color, show or not, and adjust the position, the font color.
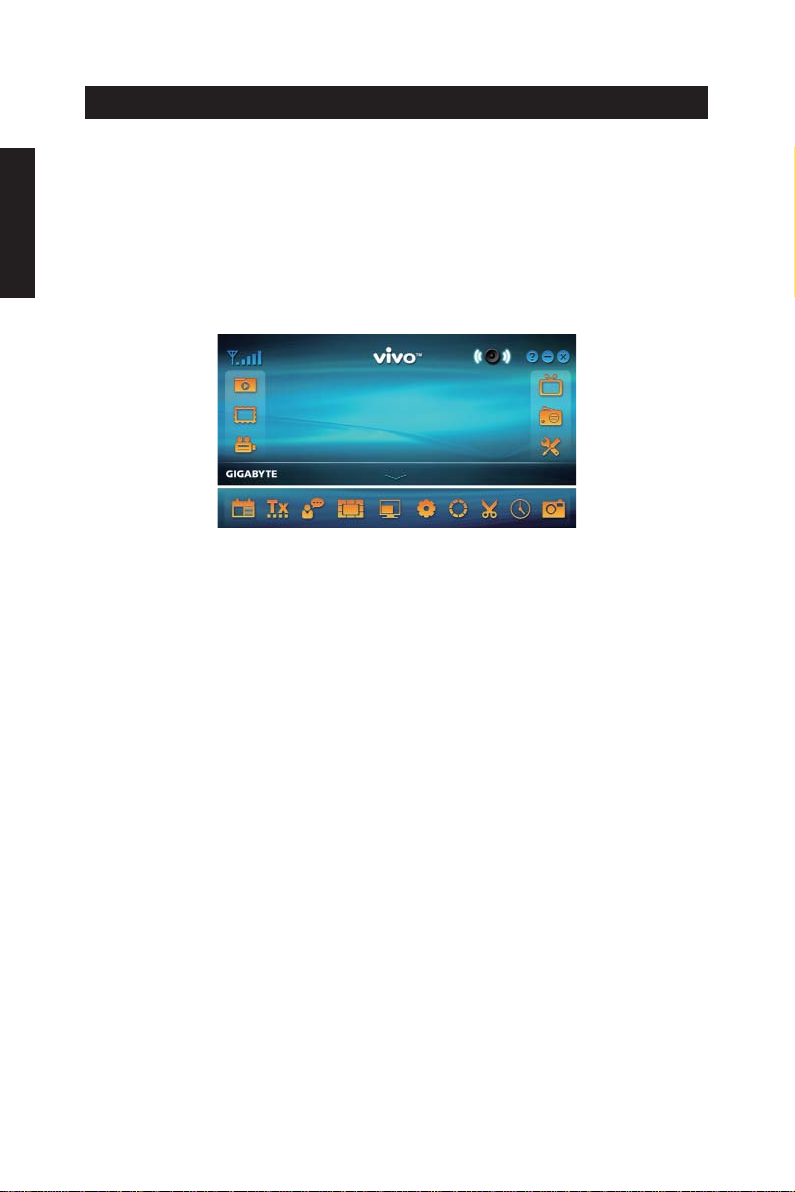
7.2.9 Video Setting
Here we can adjust the brightness, blue, red, contrast, saturation, the VMR type, and
enable DxVA or not.
- 28 -
Page 29
Deutsch
Kapitel 1 Einleitung
Vielen Dank für Ihren Kauf. Es wird dringend empfohlen, dass Sie alle von diesem
Gerät unterstützten Funktionen sorgfältig prüfen, bevor Sie dieses Programm benutzen.
Diese Anleitung vermittelt Ihnen grundlegende Informationen darüber, wie Sie dieses
Programm benutzen können.
VIVO™ ist eine multifunktionale, grafi sche und einfach zu benutzende Software, die
Ihnen ein umfassendes Multimedia-Unterhaltungserlebnis bietet. Bitte beachten Sie,
dass sich die Multimediafunktionen abhängig von Ihrem gekauften Modell voneinander
unterscheiden können.
1.1 Softwarefunktionen
● Ein multifunktionales, grafi sches Softwareprogramm, das wenig RAM Speicher und
CPU Kapazität benötigt.
● Time Shift: Programme können angehalten und fortgesetzt werden wann immer Sie
möchten.
● PIP/POP (Bild-in-Bild/Bild-neben-Bild): Sie können verschiedene TV-Programme über
mehrere Monitore und durch Erweitern/Anpassen der Bildschirme gleichzeitig
ansehen.
● Unterstützt Multiansicht von Programmen/Kanälen (Programme/Kanäle müssen vom
selben Stream/TV Serviceanbieter sein)
● Unterstützt 3x3, 4x4, 5x5, L-Typ und Ringtyp Multikanal-Vorschau
● Unterstützt geplante Aufnahmefunktion zur Aufnahme Ihrer Lieblingssendungen.
● Unterstützt analoge Aufnahme in MPEG1, MPEG2, MPEG4, H.264, PSP und iPod
Formaten
● Unterstützt Digitalzoom im Original, 2X, 3X und 4X
● Anpassung der Ansichtsfenster: Vollbild, Verstellbarer Bildschirm und Randloser
Bildschirm
● Unterstützt die digitalen Aufnahmeformate Programmstream (PS) und Transportstream
(TS).
● Unterstützt Decodierung von Digital-TV für HDTV und H.264.
- 1 -
Page 30
1.2 TV Einrichtung
1.2.1 Kanalsuche
Wenn Sie VIVO™ zum ersten Mal ausführen, wird Ihnen das System die erforderlichen
Schritte für die Kanalsuche anzeigen.
1. Bitte wählen Sie den gekauften
Gerätetyp (z.B. Digital, Analog oder
Hybrid) und klicken anschließend auf
„Weiter“.
2. Wählen Sie die Originalquelle
(die Signalstärke kann abhängig vom
gekauften Produkt und der Region, in
der Sie leben, unterschiedlich sein) und
klicken anschließend auf „Weiter“.
Deutsch
3. Bitte wählen Sie das Land, in dem
Sie leben und klicken anschließend auf
„Kanalsuche“.
- 2 -
Page 31

Deutsch
1.2.2 Quelleneingang
4. Klicken Sie nach dem Ende des
Suchvorgangs auf „Beenden“, um die
Einrichtung abzuschließen.
Anmerkung
Sie können auch die
Standard-Kanalliste laden, um
fernzusehen ohne auf die Kanalsuche
warten zu müssen.
1. Wählen Sie Ihr Gerät und die
Signalquelle, z.B. Digital, Analog (Kabel
oder Antenne), Video (Composite,
S-Video). VIVO™ wird die von Ihnen
gewählte Signalquelle importieren. Es
wird empfohlen die Signalquelle zu
wählen, die Ihr Gerät unterstützt.
Antennen-TV: Wenn Sie AntennenTV wählen, stellen Sie bitte sicher,
dass Ihre Antenne (für analogen TVEmpfang) richtig installiert ist und Signale
empfangen kann.
Kabel-TV: Wenn Sie Kabel-TV sehen
möchten, stellen Sie bitte sicher, dass
Sie Ihr analoges (Kabel) Kabel-TV mit
dem Anschluss Ihres Kabelfernsehers
verbunden haben.
Video: Wenn Sie DVD Videos
ansehen möchten, so ist dies über
den zusätzlichen Composite, S-Video
Eingang möglich. Bitte prüfen Sie, dass
das von Ihnen benutzte Gerät diese
Funktion unterstützt.
2. Wenn Sie FM-Radio hören möchten,
klicken Sie bitte direkt auf die FM-Taste.
Bitte stellen Sie sicher, dass das von
Ihnen gekaufte Produkt diese Funktion
unterstützt.
- 3 -
Page 32

Kapitel 2 Digital-TV
Sie können mit VIVO™ Live Digital-TV ansehen. Nachdem Sie die erstmalige
Einrichtung abgeschlossen haben (Quelleneingang und Kanalsuche), können Sie mit
dieser multifunktionalen Software das TV-Programm ansehen und aufzeichnen.
Anmerkung
sehen zu können.
2.1 Hauptfenster
Schaltfl ächen
Stellen Sie sicher, dass Ihr Gerät Digitalsignale unterstützt, um Digital-TV
Deutsch
Beenden
FM-Modus
Geplante
Aufnahme
Audio Links
Schnellstartleiste
EPG
Bildseitenverhä
ltnis
Time Shift
Minimieren
Einrichtung
Leiste öffnen
Audio Rechts
Teletext
OSD
Schnappschuss
- 4 -
Über
Wiedergabe
Audiomodus/
Stumm
Untertitel
Standardfarbe
Quelleneingang
Foto
Stumm-Modus/
Audio
Kanalvorschau
Aufnahme
Page 33

Deutsch
2.2 TV-Anzeige
Steuerungsschaltfl ächen
Aufnahme
Time Shift
Schnappschuss
Kanalvorschau
EPG
Kanal nach oben
Aufnahme: Zur Aufnahme Ihrer gewünschten Szenen: Nach der Aufnahme der Szene
ist sie in Ihrem Videopfad gespeichert.
SAP
Lautstärke
verringern
- 5 -
Bildseitenverhä
ltnis
Lautstärke
erhöhen
Kanal nach
unten
Audiomodus/
Stumm
Page 34

Wenn Sie die Aufnahme beenden möchten, klicken Sie erneut auf Aufnahme oder
führen Sie einen Rechtsklick auf dem Bildschirm aus und aktivieren anschließend
„Aufnahme beenden“.
Time Shift: Diese Schaltfl äche aktiviert nach einmaligen Klicken die Time Shift Funktion
(Zeitversetztes Fernsehen). Die Time Shift Funktion zeichnet die TV-Programme auf,
die Sie gerade ansehen.
Deutsch
Diese Funktion ermöglicht Ihnen das Anhalten/Vorspulen/Zurückspulen der TVSendung, so dass Sie keinen Teil verpassen, wenn Sie die Sendung aus irgendwelchen
Gründen nicht weiter sehen konnten. Beschreibung der Steuerungstasten:
Audiomodus/
Stumm
Stopp
Zurück
Pause
Vorwärts
Schnappschuss: Sie können auf die Schaltfläche „Schnappschuss“ klicken, um
Schnappschüsse aufzunehmen. Wenn auf dem Bildschirm „Schnappschuss OK“
erscheint, bedeutet dies, dass das Bild erfolgreich als Bilddatei in Ihrem Dateiordner
abgelegt wurde.
- 6 -
Page 35

Deutsch
Kanalvorschau: Vorschau der Kanalliste von Beginn an. Sie können das
Vorschauformat und das Intervall auf der Seite Einrichtung einstellen (Siehe Kapitel 6).
EPG: Mit dieser Funktionen können Sie Informationen über das TV-Programm von
jedem digitalen TV-Kanal empfangen und anzeigen.
SAP: Ein/Ausschalten von SAP Ton (Abhängig vom TV-Programmanbieter)
Bildseitenverhältnis: Ändern des Bildseitenverhältnisses auf Standardeinstellungen.
(Frei/4:3/16:9/Basierend auf Quelle)
Kanal nach unten/nach oben: Auswahl des vorherigen oder nächsten Kanals.
Lautstärke verringern/erhöhen: Anpassen der TV-Lautstärke auf laut oder leise.
Audio/Stumm Modus: Ein/Ausschalten des TV-Tons.
- 7 -
Page 36

2.3 Das Werkzeugmenü
Während Sie mit VIVO™ Digital-TV ansehen, können Sie das Werkzeugmenü durch
einen Rechtsklick mit Ihrer Maus aktivieren. Das Werkzeugmenü ermöglicht Ihnen den
Zugriff und die Aktivierung von VIVO™ Funktionen und bietet Ihnen somit neben den
Schaltfl ächen im Programmfenster eine weitere Steuerungsmöglichkeit an.
Deutsch
Immer im Vordergrund: Ermöglicht es VIVO™, immer vor allen anderen
Programmfenstern zu stehen. Dies ist dasselbe als wenn Sie auf „Immer im
Vordergrund“ in der oberen rechten Ecke des normalen TV-Modus Fensters klicken.
- 8 -
Page 37

Deutsch
Bildseitenverhältnis: Sie können das Bildseitenverhältnis anpassen, wenn Sie Ihren
Mauscursor auf den Pfeil rechts neben dieser Option bewegen. Es stehen die Optionen
Frei, 4:3, 16:9, Basierend auf Quelle und Für alle Kanäle übernehmen zur Verfügung.
Sie können dies auch tun, indem Sie auf die Schaltfläche Bildseitenverhältnis im
Programmfenster klicken.
Frei: Das ursprüngliche Verhältnis, wenn Sie VIVO™ starten. Sie können es einstellen,
indem Sie an den Kanten des VIVO™ Fensters ziehen.
Basierend auf Quelle: Das Bildseitenverhältnis wird auf der Signalquelle basieren.
Für alle Kanäle übernehmen: Wenn Sie diese Optionen wählen, wird das ausgewählte
Bildseitenverhältnis für alle verfügbaren Kanäle übernommen.
Vorschaufenster: Sie können das TV-Ansichtsfenster auf Vollbild, Verstellbarer
Bildschirm oder Randloser Bildschirm ändern.
Kanallistenart: Es gibt zwei Arten von Kanallisten - Normal oder Favoriten. Sie können
auswählen, welche Art der Kanalliste geladen werden soll. Sie können dies auch tun,
indem Sie es auf der Kanaleinstellungsseite auswählen. Der Standard ist Normal.
Kanalliste: Zeigt Ihre verfügbaren Kanäle an. Sie können dies auch tun, indem Sie die
Kanaleinstellung öffnen.
- 9 -
Page 38

Kanalvorschau: Sie können entscheiden, welche Art der Kanalvorschau verwendet
werden soll - 3x3, 4x4, 5x5, L-Typ oder Kreistyp.
Aufnahme: Sie können auswählen, ob Sie TV-Szenen im TS- oder PS-Format
aufnehmen möchten.
Time Shift: Den Time Shift Modus aktivieren. Sie können dies auch tun, indem Sie im
Hauptfenster auf die Schaltfl äche Time Shift klicken.
Schnappschuss: Aktivieren der Schnappschuss-Funktion, um einen Schnappschuss
aufzunehmen. Sie können dies auch tun, indem Sie im Hauptfenster auf die Schaltfl äche
Schnappschuss klicken.
Multi-Ansicht: Ermöglicht Ihnen die Multi-Ansicht von Kanälen/Programmen. Nachdem
Sie Ihren Mauscursor auf den Pfeil an der rechten Seite gesetzt haben, können
Sie „Multi-Ansicht starten“ auswählen. Sie können anschließend mehrere Kanäle/
Programme derselben Signalfrequenz gleichzeitig ansehen.
Deutsch
Multi-Ansicht starten: Wenn Sie die Multi-Ansicht durch Auswahl von „Multi-Ansicht
starten“ aktivieren, beachten Sie, dass zwei weitere Ansichtsfenster innerhalb des TVFensters erscheinen.
- 10 -
Page 39

Deutsch
Anmerkung
Sie können die Unterfenster anschließend aus dem Hauptansichtsfenster
herausziehen. Diese Unterfenster können dann vergrößert und Ihren Sehgewohnheiten
entsprechend an anderen Stellen angezeigt werden.
P.I.P/P.O.P: Nachdem Sie Multi-Ansicht aktiviert haben, können die Multi-Ansicht im
Bild-in-Bild/Bild-neben-Bild Modus aktivieren.
Multi-Ansicht stoppen: Wählen Sie diese Option, um Multi-Ansicht zu stoppen. Wenn
Sie diese Optionen auswählen, werden die beiden Unterfenster geschlossen.
EPG: Wie im Hauptfenster.
SAP: Wie im Hauptfenster.
Zu Favoriten hinzufügen/entfernen: Fügen Sie einen Kanal zu Ihren Favoriten hinzu
oder entfernen Sie einen Kanal von Ihren Favoriten.
Kanal nach oben: Anzeige des nächsten Kanals auf der Kanalliste.
Kanal nach unten: Anzeige des vorherigen Kanals auf der Kanalliste.
Kanal Wiederholung: Rückkehr zum zuletzt angezeigten Kanal
Stumm Ein: Aktivieren/Deaktivieren der Stumm-Funktion
Lautstärke erhöhen: Erhöhen der Lautstärke
Lautstärke verringern: Verringern der Lautstärke
Fenster ausblenden: Ausblenden oder Anzeigen des Hauptfensters (das VIVO™
Fenster)
Beenden: Schließen/Beenden des VIVO™ Fensters
- 11 -
Page 40

Kapitel 3 Analog-TV
Sie können mit VIVO™ Live Digital-TV ansehen. Nachdem Sie die erstmalige
Einrichtung abgeschlossen haben (Quelleneingang und Kanalsuche), können Sie mit
dieser multifunktionalen Software das TV-Programm ansehen und aufzeichnen.
Anmerkung
sehen zu können.
3.1 Hauptfenster
Schaltfl ächen
Stellen Sie sicher, dass Ihr Gerät Digitalsignale unterstützt, um Digital-TV
Deutsch
Beenden
FM-Modus
Geplante
Aufnahme
Audio Links
Schnellstartleiste
EPG
(
Deaktivieren
Bildseitenverhä
ltnis
Time Shift
Minimieren
Einrichtung
Leiste öffnen
Audio Rechts
)
Teletext
(
Deaktivieren
OSD
Schnappschuss
)
Über
Wiedergabe
Audiomodus/
Stumm
Untertitel
(
Deaktivieren
Standardfarbe
Quelleneingang
Foto
Stumm-Modus/
Audio
)
Kanalvorschau
Aufnahme
- 12 -
Page 41

Deutsch
3.2 TV-Anzeige
Steuerungsschaltfl ächen
Aufnahme
Geschlossene
Untertitel
Kanal nach unten
Audiomodus/
Stumm
Aufnahme: Bitte siehe Abschnitt 2.2 in Kapitel 2.
Time Shift: Bitte siehe Abschnitt 2.2 in Kapitel 2.
Schnappschuss: Bitte siehe Abschnitt 2.2 in Kapitel 2.
Kanalvorschau: Bitte siehe Abschnitt 2.2 in Kapitel 2.
Geschlossene Untertitel: Zum Einschalten von geschlossenen Untertiteln.
Entrauschen: Zum Aktivieren der Entrauschen-Funktion für einen klareren Analog-TV
Empfang.
SAP: Bitte siehe Abschnitt 2.2 in Kapitel 2.
Bildseitenverhältnis: Bitte siehe Abschnitt 2.2 in Kapitel 2.
Kanal nach unten/nach oben: Bitte siehe Abschnitt 2.2 in Kapitel 2.
Lautstärke verringern/erhöhen: Bitte siehe Abschnitt 2.2 in Kapitel 2.
Time Shift
Entrauschen SAP
Kanal nach oben
Schnappschuss
Lautstärke
verringern
Kanalvorschau
Bildseitenverhä
ltnis
Lautstärke
erhöhen
Audio/Stumm Modus: Bitte siehe Abschnitt 2.2 in Kapitel 2.
- 13 -
Page 42

3.3 Das Werkzeugmenü
Bitte siehe Abschnitt 2.3 in Kapitel 2. Zwischen dem Digital-TV und dem Analog-TV
Modus gibt es einige Unterschiede:
Deutsch
Geschlossene Untertitel: Hilft Ihnen beim Ansehen von Analog-TV mit geschlossenen
Untertiteln. Diese Funktion hängt von Ihrem TV-Programmanbieter ab.
Entrauschen: Sie können die Entrauschen-Funktion aktivieren, um die Analog-TV
Qualität zu verbessern.
Anmerkung
nicht unterstützt.
Wegen der TV-Norm Einschränkung wird Multi-Ansicht von Analog-TV
- 14 -
Page 43

Deutsch
Kapitel 4 FM-Radio
Sie können mit VIVO™ Live FM-Radio anhören. Nachdem Sie die erstmalige
Einrichtung abgeschlossen haben (Quelleneingang und Kanalsuche), können Sie mit
dieser multifunktionalen Software das Radioprogramm anhören und aufzeichnen.
Anmerkung
Radio hören zu können.
4.1 Hauptfenster
Schaltfl ächen
Stellen Sie sicher, dass Ihr Gerät die FM-Funktion unterstützt, um FM-
Beenden
FM-Modus
Geplante
Aufnahme
Audio Links
Schnellstartleiste
EPG
(
Deaktivieren
Bildseitenverhä
ltnis
Time Shift
Minimieren
Einrichtung
Leiste öffnen
Audio Rechts
)
Teletext
(
Deaktivieren
OSD
Schnappschuss
(
Deaktivieren
)
)
Über
Wiedergabe
Audiomodus/
Stumm
Untertitel
(
Deaktivieren
Standardfarbe
(
Deaktivieren
Quelleneingang
Foto
Stumm-Modus/
Audio
)
)
Kanalvorschau
(
Deaktivieren
Aufnahme
)
- 15 -
Page 44

4.2 Radiofenster
Steuerungsschaltfl ächen
Aufnahme
Kanal nach unten
Audiomodus/
Stumm
Aufnahme: Bitte siehe Abschnitt 2.2 in Kapitel 2.
Time Shift
Kanal nach oben
Frequenz
verringern
Lautstärke
verringern
Deutsch
Frequenz
erhöhen
Lautstärke
erhöhen
Time Shift: Bitte siehe Abschnitt 2.2 in Kapitel 2.
Frequenz verringern: Anpassung der Radiofrequenz nach unten.
Frequenz erhöhen: Anpassung der Radiofrequenz nach oben.
Kanal nach unten/nach oben: Bitte siehe Abschnitt 2.2 in Kapitel 2.
Lautstärke verringern/erhöhen: Bitte siehe Abschnitt 2.2 in Kapitel 2.
Audio/Stumm Modus: Bitte siehe Abschnitt 2.2 in Kapitel 2.
- 16 -
Page 45

Deutsch
4.3 Das Werkzeugmenü
Bitte siehe Abschnitt 2.3 in Kapitel 2. Es gibt weniger Funktionen als im TV-Modus und
alle Funktionen sind identisch.
- 17 -
Page 46

Kapitel 5 Video-Eingang
Sie können über den Composite Video, S-Video Eingang zusätzliche Videoquellen in
VIVO™ importieren. Sobald Sie Ihr Gerät, die Videoquelle und den PC miteinander
verbunden haben, wird VIVO™ die Quellkategorie automatisch erkennen. Sie können
DVD oder andere Medien einfach mit VIVO™ ansehen und sogar direkt auf Ihrem PC
oder Laptop aufnehmen.
Anmerkung
5.1 Hauptfenster
Schaltfl ächen
Stellen Sie sicher, dass Ihr Gerät den Video-Eingang unterstützt.
Deutsch
Beenden
FM-Modus
Geplante
Aufnahme
Audio Links
Schnellstartleiste
EPG
(
Deaktivieren
Bildseitenverhä
ltnis
Time Shift
Minimieren
Einrichtung
Leiste öffnen
Audio Rechts
)
Teletext
(
Deaktivieren
OSD
Schnappschuss
)
Über
Wiedergabe
Audiomodus/
Stumm
Untertitel
(
Deaktivieren
Standardfarbe
Quelleneingang
Foto
Stumm-Modus/
Audio
)
Kanalvorschau
Aufnahme
- 18 -
Page 47

Deutsch
5.2 Videofenster
Steuerungsschaltfl ächen
Aufnahme
Lautstärke
erhöhen
Aufnahme: Bitte siehe Abschnitt 2.2 in Kapitel 2.
Time Shift: Bitte siehe Abschnitt 2.2 in Kapitel 2.
Schnappschuss
Audiomodus/
Stumm
Bildseitenverhä
ltnis
Lautstärke
verringern
Bildseitenverhältnis: Bitte siehe Abschnitt 2.2 in Kapitel 2.
Lautstärke verringern/erhöhen: Bitte siehe Abschnitt 2.2 in Kapitel 2.
Audio/Stumm Modus: Bitte siehe Abschnitt 2.2 in Kapitel 2.
- 19 -
Page 48

5.3 Das Werkzeugmenü
Bitte siehe Abschnitt 2.3 in Kapitel 2. Es gibt weniger Funktionen als im TV-Modus und
alle Funktionen sind identisch.
Deutsch
- 20 -
Page 49

Deutsch
Kapitel 6 Wiedergabe
Wenn Sie auf diese Schaltfl äche klicken, können Sie eine aufgenommene Datei oder
eine Datei aus den Ordnern Ihres PC für die Wiedergabe auswählen. (
dauerhafte Dateiwiedergabe ist verfügbar)
Hinzufügen: Hinzufügen einer ausgewählten Datei zur Wiedergabeliste in der unteren
Fensterhälfte
Alle hinzufügen: Hinzufügen aller Dateien zur Wiedergabeliste
Löschen: Löschen einer Datei aus der Wiedergabeliste
Alle löschen: Löschen aller Dateien aus der Wiedergabeliste
Anmerkung
Wiedergabe: Wiedergabe der ausgewählten Dateien in der Wiedergabeliste in der
unteren Fensterhälfte
Beenden: Wiedergabe beenden
Wenn Sie eine Datei zur Wiedergabe ausgewählt haben, wird VIVO™ das Video für Sie
wie nachfolgend gezeigt auf einem anderen Bildschirm anzeigen.
- 21 -
Page 50

6.1 Steuerung im Wiedergabemodus:
Deutsch
Zurück
Stopp
Wiederholung
(aus)
Lautstärke
verringern
Wiedergabe
Vorherige Datei Nächste Datei
Bildseitenverhä
ltnis
Kontrollschieber für Wiedergabe
Pause
Audio
Vorwärts
Wiederholung
(ein)
Lautstärke
erhöhen
- 22 -
Page 51

Deutsch
Kapitel 7 Einrichtung
Mit VIVO™ können Sie Einstellungen auf der Einrichtungsseite ganz einfach nach Ihren
Wünschen vornehmen. Klicken Sie nach dem Start von VIVO™ auf die Schaltfl äche
Einrichtung, um die Einrichtungsseite anzuzeigen.
7.1 Allgemeine Einstellung
Die 4 Optionen auf der Einrichtungsseite sind Sleep Timer, Sucheinstellung,
Benutzeroberfläche und Andere. Damit können Sie die Energieeinstellungen,
Sucheinstellungen, farbige Benutzeroberfl äche, sowie Sprache und Standort festlegen.
7.1.1 Sleep Timer
Sie könnten beim Fernsehen müde werden und einschlafen oder den Fernseher wegen
eines Notfalls vergessen auszuschalten. Es gibt viele verschiedene Situationen, in
denen Ihnen VIVO™ behilfl ich sein kann. Es gibt 5 Optionen: Anwendung schließen,
Abmelden, Ruhezustand, Herunterfahren und Neustart. Daneben können Sie die
Zeitleiste nach links oder rechts schieben, um die Zeitdauer einzustellen.
7.1.2 Sucheinstellung
- 23 -
Page 52

7.1.3 Benutzeroberfl äche
7.1.4 Andere
7.2 Erweiterte Einstellung
Sie können nicht nur die Funktionen
Sleep Timer, Sucheinstellung,
Benutzeroberfläche und Andere finden,
sondern auch Lauftext, Time Shift
Einstellung, Aufnahme Einstellung,
Schnappschuss Einstellung, MultiAnsicht Einstellung, Teletext Einstellung,
Kanaleinstellung, Bildseitenverhältnis
Einstellung, OSD Einstellung und Video
Einstellung.
Deutsch
7.2.1 Lauftext Einstellung
Hier können die Eigenschaften von Lauftext
eingestellt werden, z.B. Bewegung, Intervall,
der Inhalt, usw.
- 24 -
Page 53
Deutsch
7.2.2 Time Shift Einstellung
Hier kann ausgewählt werden, ob die Datei
gespeichert werden soll oder nicht.
7.2.3 Aufnahme Einstellung
Hier kann eingestellt werden, wohin die
Datei gespeichert werden soll, wie die
aufgenommene Datei heißen soll oder die
Aufnahme als Stream erfolgen soll.
7.2.4 Schnappschuss Einstellung
Hier können das Dateiformat für
Schnappschüsse, den Speicherort der
Bilder und die Anzahl der zu speichernden
Bilder bei der Benutzung der SnapshotFunktion eingestellt werden.
7.2.5 Teletext Einstellung
Hier können die Teletext Hauptseite und die
Unterseite eingegeben werden. Alternativ
können die Farbschaltfl ächen zum Wechsel
der Teletextseiten benutzt werden.
- 25 -
Page 54

7.2.6 Kanal Einstellung
Hier können die Art der Kanalvorschau, das
Vorschau-Intervall, die Kanalgruppe und die
Kanalverwaltung eingestellt werden.
7.2.7 Bildseitenverhältnis Einstellung
Hier kann das Bildseitenverhältnis eingestellt
und für alle Kanäle übernommen werden.
7.2.8 OSD Einstellung
Hier können die OSD Farbe, Anzeige oder
nicht eingestellt, sowie die Position und die
Schriftfarbe angepasst werden.
Deutsch
7.2.9 Video Setting
Here we can adjust the brightness, blue,
red, contrast, saturation, the VMR type, and
enable DxVA or not.
- 26 -
Page 55

Français
Chapitre 1 Introduction
Nous vous remercions de votre achat. Il est vivement recommandé de vérifi é toutes les
fonctionnalités de votre appareil avant d’utiliser ce logiciel. Ce manuel vous fournira les
informations essentielles pour utiliser cette application.
VIVO™ est un logiciel graphique multifonctions et facile d’utilisation qui vous permet
de profi ter des joies du multimédia. Veuillez noter que les fonctions multimédia peuvent
varier suivant le produit que vous avez acheté.
1.1 Fonctionnalités du logiciel
● Ce logiciel graphique multifonctions consomme peu de mémoire RAM et de capacité
processeur.
● Décalage temporel : lors de la visualisation en direct d’un programme vous pouvez le
mettre en pause et reprendre sa lecture à tout moment.
● PIP/POP (Picture-In-Picture/Picture-Out-Picture, mode incrustation d’images) : vous
pouvez regarder plusieurs programmes TV en même temps sur le même écran et
déplacer et ajuster la taille des différentes fenêtres.
● Multivisionnage de programmes/chaînes (les programmes/chaînes doivent provenir d
même fl ux vidéo/fournisseur du service TV).
● Prévisualisation aux formats 3x3, 4x4, 5x5, type L et type circulaire.
● Enregistrement programmé.
● Compatible avec les formats d’enregistrement analogique suivant : MPEG1, MPEG2,
MPEG4, H.264, PSP et formats pour iPod.
● Zoom numérique 2X, 3X et 4X.
● Réglage de la fenêtre d’affi chage : plein écran, fenêtre redimensionnable et fenêtre
sans bordure.
● Compatible avec l’enregistrement numérique des fl ux de programmes (PS) et des fl ux
de transport (TS).
● Décodage de la TV numérique aux normes HDTV et H.264.
- 1 -
Page 56

1.2 Installation de la télévision
1.2.1 Balayage des chaînes
Au premier démarrage de VIVO™ le système vous guidera au travers des différentes
étapes du balayage des chaînes.
1. Veuillez sélectionner le type de votre
matériel (numérique, analogique ou
hybride) puis cliquez sur « Suivant ».
2. Sélectionnez la source du signal
(la force du signal peut varier suivant le
produits que vous avez acheté et l’endroit
où vous vivez) puis cliquez sur
«Suivant ».
Français
3. Sélectionnez votre pays puis cliquez
sur « Balayage des chaînes ».
- 2 -
Page 57

Français
1.2.2 Sélection de l’entrée
4. Cliquez sur « Quitter » pour finir
l’installation une fois que le balayage est
terminé.
Note
vous devez charger la liste
des chaînes par défaut si vous voulez
regarder la télévision sans perdre de
temps à balayer les chaînes pour les
mémoriser.
1. Sélectionner le type de votre matériel
et la source du signal : Numérique,
Analogique (câble ou antenne), Vidéo
(Composite, S-Vidéo). VIVO™ va
enregistrer la source du signal que vous
avez sélectionné. Il est recommandé de
sélectionner la source du signal qui est
supporté par votre matériel.
Antenne télévision : si vous choisissez
Antenne télévision, veuillez vous assurer
que votre antenne (pour une réception
de la TV analogique) est correctement
installé et est capable de recevoir les
signaux.
Télévision par le câble : si vous voulez
regarder la télévision par le câble,
veuillez vous assurer que le câble est
bien bien branché sur la prise murale du
câble.
Vidéo : si vous souhaitez regarder
des DVD vidéo, ceci est possible par
l’intermédiaire des entrées Composite,
S-Vidéo. Veuillez vous assurer que votre
matériel supporte cette fonction.
2. Si vous voulez écouter la radio FM
veuillez cliquez directement sur le bouton
FM. Veuillez vous assurer que votre
matériel supporte cette fonction.
- 3 -
Page 58

Chapitre 2 Télévision numérique
Vous pourrez regarder en direct et enregistrer la télévision numérique avec VIVO™ dès
que l’installation est terminée (entrée sélectionnée et chaînes mémorisées).
Note
veuillez vous assurer que votre matériel est compatible avec les signaux
numériques avant de regarder la télévision numérique.
2.1 Ecran principal
Boutons
Français
Quitter
Mode FM
Enregistrement
programmé
Audio gauche
Panel szybkiego dostępu
EPG
Format
d’affi chage
Décalage
temporel
Réduire
Installation
Open Bar
Audio droite
Télétexte
OSD
Capture d’écran
- 4 -
A propos
Lecture
Mode Audio/
Silence
Sous-titres
Couleur par
défaut
Entrées
Photo
Mode Silence/
Audio
Prévisualisation
d’une chaîne
Capture
Page 59

Français
2.2 Menu télévision
Boutons de contrôle
Enregistrement
Guide
Electronique des
Programmes
Chaîne suivante
Décalage
temporel
SAP
Volume -
Capture
d’écran
Format
d’affi chage
Volume +
Prévisualisation
des chaînes
Chaîne
précédente
Mode Audio/
Silence
Enregistrement : Cliquez sur Enregistrement pour enregistrer une scène que vous
aimez. Une fois la scène capturée elle sera enregistrée dans votre dossier Video.
- 5 -
Page 60

Pour arrêter l’enregistrement veuillez appuyer encore une fois sur Enregistrement
ou faites un clic du bouton droit de votre souris sur l’écran et sélectionnez « Arrêter
l’enregistrement ».
Décalage temporel : un clic sur cet icône active le décalage temporel. Cette fonction
permet d’enregistrer le programme que vous regardez.
Français
Cette fonction vous permet de mettre en pause, faire une avance rapide ou un retour
rapide du programme TV que vous êtes en train de regarder un programme à la
télévision, ainsi vous ne raterez plus un instant du programme si vous devez quitter
momentanément votre écran. Les boutons de contrôles sont décrit ci-dessous.
Mode Audio/
Silence
Stop
Retour
Pause
Avance
- 6 -
Page 61

Français
Capture d’écran : Vous pouvez faire des captures d’écran en cliquant sur l’icône «
Capture d’écran ». Le message « Capture d’écran OK » vous indique que l’écran a été
capturé et l’image a été enregistré dans le dossier Images.
Prévisualisation des chaînes : liste des chaînes avec prévisualisation depuis le début.
Vous pouvez paramétrez le format d’affi chage de la prévisualisation ainsi que l’intervalle
de temps entre deux chaînes dans le menu Installation (Voir le Chapitre 6).
Guide Electronique des Programmes : vous pouvez recevoir et consulter les
programmes TV de chaque chaîne numérique avec cette fonction.
SAP : active ou désactive la fonction SAP qui permet de changer la langue du
programme en cours (ce service dépend de votre opérateur TV).
Format d’affi chage : change le format de l’affi chage (Libre/4:3/16:9/Prédéfi ni).
Chaîne précédente/suivante : sélectionne la chaîne précédente ou la chaîne suivante.
Volume -/+ : ajuste le niveau sonore.
Mode Audio/Silence : active ou coupe le son.
- 7 -
Page 62

2.3 Le menu Outil
Vous pouvez activer le menu Outil lorsque vous regardez la télévision numérique sur
VIVO™ par un clic sur le bouton droit de la souris. Le menu Outil vous permet d’accéder
et d’activer les fonctions de VIVO™, sans passer par les icônes de l’interface
Français
Toujours apparent : permet à VIVO™ de rester toujours devant les autres fenêtres
d’applications. Vous obtiendrez le même résultat si vous cliquez sur « Toujours apparent
» dans le coin haut-droit de la fenêtre du mode TV normal.
- 8 -
Page 63

Français
Format d’affi chage : vous pouvez choisir le format d’affi chage en déroulant le sous-
menu en pointant votre souris sur la fl èche à droite de cette option. Vous pouvez choisir
entre Libre, 4:3, 16:9, Prédéfini et Appliquer à toutes les chaînes. Le résultat est le
même que vous si cliquez sur l’icône Format d’affi chage de l’interface.
Libre : le format d’affi chage initial quand on lance VIVO™, vous pouvez ajuster la taille
de la fenêtre en faisant un clic du bouton droit de la souris sur un bord de la fenêtre de
VIVO™ et en déplaçant le curseur tout en laissant appuyé votre doigt sur le bouton droit
de la souris.
Prédéfi ni : le format d’affi chage défi ni par le signal.
Appliquer à toutes les chaînes : si vous sélectionnez cette option, le format d’affi chage
actuel sera appliqué à toutes les chaînes disponibles.
Fenêtre de prévisualisation : vous pouvez changer le format d’affichage de votre
télévision dans l’un des modes suivants : plein écran, fenêtre redimensionnable et
fenêtre sans bordure.
Type de liste de chaînes : il y a deux type de liste de chaînes – Normal et Mes
préférées. Vous pouvez sélectionner le type de liste à charger. Cette action peut aussi
s’effectuer dans le menu Installation des chaînes. La valeur par défaut est Normal.
Liste des chaînes : affi che les chaînes disponibles. Cette action peut aussi s’effectuer
dans le menu Installation des chaînes.
- 9 -
Page 64

Prévisualisation des chaînes : vous pouvez choisir le type de prévisualisation des
chaînes - 3x3, 4x4, 5x5, type L or type circulaire.
Enregistrement : vous pouvez choisir d’enregistrer une portion de programme TV au
format TS ou PS.
Décalage temporel : active le mode décalage temporel. Cette action est aussi possible
en cliquant sur l’icône Décalage temporel de l’interface principal.
Capture d’écran : active la fonction de capture d’écran pour prendre un instantané de
votre écran. Cette action est aussi possible en cliquant sur l’icône Capture d’écran de
l’interface principal.
Multi visualisation : permet de regarder plusieurs chaînes ou programmes à la fois.
Affi chez le sous-menu en pointant votre souris sur la fl èche à droite et cliquez sur «
Commencer la multi visualisation ». Vous pourrez alors regarder plusieurs chaînes ou
programmes en même temps provenant du même signal.
Français
Commencer la multi visualisation : veuille noter que lorsque vous activez la multi
visualisation deux autres écrans vont apparaître dans l’écran principal.
- 10 -
Page 65

Note
vous pouvez déplacer et redimensionner ces écrans secondaires à votre
convenance dans l’écran principal.
P.I.P./P.O.P. : une fois activé le mode multi visualisation vous pouvez choisir entre la
visualisation d’une image dans l’image (P.I.P.) ou la visualisation d’une image en dehors
de l’image (P.O.P.).
Français
Arrêter le mode multi visualisation : permet d’arrêter le mode multi visualisation. Les
deux écrans secondaires vont disparaitre.
Guide Electronique des Programmes : même utilisation que dans le menu principal.
SAP : même utilisation que dans le menu principal.
Ajouter/Enlever de mes préférées : ajouter ou enlever une chaîne de Mes préférées.
Chaîne suivante : passe à la chaîne suivante de la liste des chaînes.
Chaîne précédente : passe à la chaîne précédente de la liste des chaînes.
Rappel chaîne : retourne à la chaîne précédemment sélectionnée.
Silence : active/désactive le mode silence.
Volume + : augmente le volume du son.
Volume - : descend le volume du son.
Cache l’interface de contrôle : cache ou affiche l’interface de contrôle (l’interface
VIVO™).
Quitter : Ferme/Quitte la fenêtre VIVO™.
- 11 -
Page 66

Chapitre 3 Télévision analogique
Vous pourrez regarder en direct et enregistrer la télévision analogique avec VIVO™ dès
que l’installation est terminée (entrée sélectionnée et chaînes mémorisées).
Note
veuillez vous assurer que votre matériel est compatible avec les signaux
numériques avant de regarder la télévision analogique.
3.1 Ecran principal
Boutons
Français
Quitter
Mode FM
Enregistrement
programmé
Audio gauche
Barre d’accès rapide
EPG
(Désactivé)
Format
d’affi chage
Décalage
temporel
Réduire
Installation
Open Bar
Audio droite
Télétexte
(Désactivé)
OSD
Capture d’écran
- 12 -
A propos
Lecture
Mode Audio/
Silence
Sous-titres
(Désactivé)
Couleur par
défaut
Entrées
Photo
Mode Silence/
Audio
Prévisualisation
d’une chaîne
Capture
Page 67
Français
3.2 Menu télévision
Boutons de contrôle
Enregistrement
Décalage
temporel
Capture
d’écran
Prévisualisation
des chaînes
Sous-titres
Chaîne
précédente
Mode Audio/
Silence
Enregistrement : Veuillez vous référer au paragraphe 2.2 du Chapitre 2.
Décalage temporel : Veuillez vous référer au paragraphe 2.2 du Chapitre 2.
Capture d’écran : Veuillez vous référer au paragraphe 2.2 du Chapitre 2.
Prévisualisation des chaînes : Veuillez vous référer au paragraphe 2.2 du Chapitre 2.
Sous-titres : active l’affi chage des sous-titres.
Réducteur de bruit : pour activer le réducteur de bruit pour améliorer la réception de la
télévision analogique.
SAP: Veuillez vous référer au paragraphe 2.2 du Chapitre 2.
Format d’affi chage : Veuillez vous référer au paragraphe 2.2 du Chapitre 2.
Chaîne précédente/suivante : Veuillez vous référer au paragraphe 2.2 du Chapitre 2.
Volume -/+ : Veuillez vous référer au paragraphe 2.2 du Chapitre 2.
Mode Audio/Silence : Veuillez vous référer au paragraphe 2.2 du Chapitre 2.
Réducteur de
bruit
Chaîne suivante
SAP
Volume -
Format
d’affi chage
Volume +
- 13 -
Page 68

3.3 Le menu Outil
Veuillez vous référer au paragraphe 2.3 du Chapitre 2. Il y a quelques différences entre
les modes télévision numérique et télévision analogique.
Français
Sous-titres : Vous permet de regarder la télévision analogique avec des sous-titres.
Cette fonction dépend de votre opérateur de télévision.
Réducteur de bruit : Vous pouvez activer le réducteur de bruit pour améliorer la qualité
de la télévision analogique.
Note
la télévision analogique ne supporte pas la multi visualisation.
- 14 -
Page 69

Français
Chapitre 4 Radio FM
Vous pouvez écouter en direct la radio FM avec VIVO™. Une fois l’installation initiale
terminée (sélection de la source d’entrée et balayage des canaux), cette application
vous permettra d’écouter et d’enregistrer les programmes radio.
Note
veuillez vous assurer que votre appareil supporte la fonction radio FM afi n de
pouvoir écouter la radio FM.
4.1 Ecran principal
Boutons
Quitter
Mode FM
Enregistrement
programmé
Audio gauche
Barre d’accès rapide
EPG
(Désactivé)
Format
d’affi chage
(Désactivé)
Décalage
temporel
Réduire
Installation
Open Bar
Audio droite
Télétexte
(Désactivé)
OSD
Capture d’écran
(Désactivé)
- 15 -
A propos
Lecture
Mode Audio/
Silence
Sous-titres
(Désactivé)
Couleur par
défaut(Désactivé)
Entrées
Photo
Mode Silence/
Audio
Prévisualisation
d’une chaîne
(Désactivé)
Capture
Page 70
4.2 Interface radio
Boutons de contrôle
Enregistrement
Chaîne
précédente
Mode Audio/
Silence
Enregistrement : Veuillez vous référer au paragraphe 2.2 du Chapitre 2.
Décalage
temporel
Chaîne suivante
Fréquence
précédente
Volume -
Français
Fréquence
suivante
Volume +
Décalage temporel : Veuillez vous référer au paragraphe 2.2 du Chapitre 2.
Fréquence précédente : passe à la fréquence précédente.
Fréquence suivante : passe à la fréquence suivante.
Chaîne précédente/suivante : Veuillez vous référer au paragraphe 2.2 du Chapitre 2.
Volume -/+ : Veuillez vous référer au paragraphe 2.2 du Chapitre 2.
Mode Audio/Silence : Veuillez vous référer au paragraphe 2.2 du Chapitre 2.
- 16 -
Page 71

Français
4.3 Le menu Outil
Veuillez vous référer au paragraphe 2.3 du Chapitre 2. Il y a moins d’option que pour le
mode télévision et tout les rappels de fonctions sont les mêmes.
- 17 -
Page 72

Chapitre 5 Sortie vidéo
VIVO™ vous permet d’importer des sources vidéo additionnel au travers des entrées
Composite Video, S-Vidéo. Une fois votre appareil connecté à votre PC et à votre
source vidéo, VIVO™ va détecté automatiquement le type de la source vidéo. Vous
pouvez ainsi simplement profiter de vos DVD or de vos autres fichiers multimédia
avec VIVO™, vous pourrez même les enregistrer directement sur votre PC ou votre
ordinateur portable.
Note
veuillez vous assurer que votre appareil supporte la sortie vidéo.
5.1 Ecran principal
Boutons
Français
Quitter
Mode FM
Enregistrement
programmé
Audio gauche
Barre d’accès rapide
EPG
(Désactivé)
Format
d’affi chage
Décalage
temporel
Réduire
Installation
Open Bar
Audio droite
Télétexte
(Désactivé)
OSD
Capture d’écran
- 18 -
A propos
Lecture
Mode Audio/
Silence
Sous-titres
(Désactivé)
Couleur par
défaut
Entrées
Photo
Mode Silence/
Audio
Prévisualisation
d’une chaîne
Capture
Page 73

Français
5.2 Interface de contrôle vidéo
Boutons de contrôle
Enregistrement
Volume +
Enregistrement : Veuillez vous référer au paragraphe 2.2 du Chapitre 2.
Capture d’écran : Veuillez vous référer au paragraphe 2.2 du Chapitre 2.
Capture d’écran
Mode Audio/
Silence
Format
d’affi chage
Volume -
Format d’affi chage : Veuillez vous référer au paragraphe 2.2 du Chapitre 2.
Volume -/+ : Veuillez vous référer au paragraphe 2.2 du Chapitre 2.
Mode Audio/Silence : Veuillez vous référer au paragraphe 2.2 du Chapitre 2.
- 19 -
Page 74

5.3 Le menu Outil
Veuillez vous référer au paragraphe 2.3 du Chapitre 2. Il y a moins d’option que pour le
mode télévision et tout les rappels de fonctions sont les mêmes.
Français
- 20 -
Page 75

Français
Chapitre 6 Lecture
Cliquez sur cet icône (icon) pour pouvoir choisir un fi chier enregistré sur votre ordinateur
Note
et le lire. (
Ajouter : ajouter le fi chier sélectionné à la liste de lecture.
Tout ajouter : ajouter tout les fi chiers à la liste de lecture.
Supprimer : supprimer un fi chier de la liste de lecture.
Supprimer tous les: supprimer tout les fi chiers de la liste de lecture.
Lire : lire le fi chier sélectionné dans la liste de lecture.
la lecture en continue est possible)
Quitter : quitter le mode de lecture.
Lorsque vous sélectionnez un fi chier pour le lire, VIVO™ va jouer la vidéo dans un autre
écran comme indiqué ci-dessous.
- 21 -
Page 76

6.1 Boutons de contrôle pour le mode de lecture :
Français
Retour
Stop
Répété
(désactivé)
Volume -
Lecture
Fichier
précédent
Format
d’affi chage
Fichier suivant
Barre de lecture
Pause
Audio
Avance
Répété
(activé)
Volume +
- 22 -
Page 77

Français
Chapitre 7 Installation
Avec VIVO™ il est facile de personnaliser vos réglages, il suffi t de vous rendre sur la
page Préférences de votre application. Une fois VIVO™ démarré, cliquez sur le bouton
Préférences pour accéder à la page de confi guration des différents paramètres.
7.1 Réglage généraux
La page Préférences comporte 4 options, Programmation de la mise en veille,
Paramètres de balayage, Interface utilisateur et Autre. Ces réglages vous
permettront d’améliorer l’économie d’énergie, la précision du balayage des chaînes, les
couleurs de l’interface utilisateur, la langue et la localisation.
7.1.1 Programmation de la mise en veille
Vous regardez la télévision mais commencé à vous endormir quelques minutes plus tard
ou vous devez partir précipitamment, quelque soit la raison vous aimeriez demander
à VIVO™ de vous simplifi er la tâche. Il y a 5 options paramétrables pour cela : Fermer
l’application, Déconnexion, Suspendre l’activité, Éteindre et Redémarrage. Vous pouvez
ajuster la durée en bougeant vers la droite ou la gauche le curseur.
7.1.2 Paramètres de balayage
- 23 -
Page 78

7.1.3 Interface utilisateur
7.1.4 Autre
7.2 Paramètres avancés
Outre Programmation de la mise en
veille, Paramètres de balayage, Interface
utilisateur et Autre vous pourrez aussi
régler à votre convenance les options
suivantes : Marquage, Décalage temporel,
Enregistrement, Capture d’écran, Multi
visualisation, Télétexte, Chaîne, Format
d’affi chage, OSD et Vidéo.
7.2.1 Réglages Marquage
Permet de configurer les paramètres
de marquage tels que la distance de
déplacement, l’intervalle, le contenu et ainsi
de suite.
Français
- 24 -
Page 79

Français
7.2.2 Réglages Décalage temporel
Vous pouvez indiquer si vous voulez ou pas
enregistrer les fi chiers.
7.2.3 Réglages Enregistrement
Permet d’indiquer l’emplacement où vous
désirez enregistrer les enregistrements, le
nom du fi chier ou le type d’enregistrement.
7.2.4 Réglages Capture d’écran
Permet d’indiquer le format du fichier de
la capture d’écran, l’emplacement où vous
désirez enregistrer les fi chiers et combien de
fi chiers vous voulez enregistrer.
7.2.5 Réglages Télétexte
Permet d’afficher les pages du télétexte,
utilisez les boutons de couleur pour changer
la page.
- 25 -
Page 80

7.2.6 Réglages Chaîne
Permet de définir le type de chaîne à
prévisualiser, l’intervalle de prévisualiation, le
groupe de chaîne et la gestion des chaînes.
7.2.7 Réglages Format d’affi chage
Permet de définir le format d’affichage par
défaut et l’appliquer à toutes les chaînes.
7.2.8 Réglages OSD
Permet de défi nir les couleurs de l’affi chage
OSD, l’affi cher ou pas, ajuster la position de
l’affi chage OSD et sa couleur.
7.2.9 Réglages Vidéo
Permet d’ajuster la luminosité, les couleurs,
la contraste, la saturation, le type VMR et
activer ou désactiver le mode DxVA.
Français
- 26 -
Page 81

Español
Capítulo 1 Introducción
Gracias por su compra. Se recomienda encarecidamente que revise detenidamente
todas las funciones que admite el dispositivo antes de utilizar el programa. Este manual
lo guiará a través de la información esencial sobre cómo usar este programa de
aplicación.
TM
VIVO
es una aplicación informática multifuncional, gráfi ca y fácil de usar que le ofrece
el esparcimiento más completo en cuanto a entretenimiento de multimedia. Por favor
observe que las funciones de multimedia podrían variar dependiendo del producto que
compró.
1.1 Funciones del software
● Una aplicación informática multifuncional y gráfi ca que consume menos memoria
RAM y capacidad de la CPU.
● Deslizador del tiempo: cualquier programa puede pausarse y continuarse siempre
que lo desee.
● PIP/POP (Imagen superpuesta/Imagen fi ja con cambio de pantalla): puede ver
diferentes programas de televisión simultáneamente por visualizaciones múltiples y
pantallas de arrastre y ajuste.
● Admite la visión múltiple de los programas y canales (los programas y canales deben
ser de la misma transmisión y del mismo proveedor de servicios televisivos).
● Permite la vista previa de múltiples canales en los modos 3x3, 4x4, 5x5, tipo L y tipo
círculo.
● Admite la función de grabación programada para grabar sus programas de televisión
favoritos.
● Permite la grabación análoga en los formatos MPEG1, MPEG2, MPEG4, H.264, PSP
e IPED.
● Admite zoom digital en los modos original, 2X, 3X y 4X.
● Ajustes en las ventanas de vista: pantalla completa, pantalla amplia y pantalla sin
borde
● Admite el formato de grabación digital Program Stream (PS) y Transport Stream (TS).
● Permite la decodifi cación de la televisión digital para HDTV y H.264.
- 1 -
Page 82

1.2 Confi guración del televisor
1.2.1 Exploración de canales
Cuando ejecute VIVOTM por primera vez, el sistema lo guiará a través de los pasos
necesarios para la exploración de canales.
1. Por favor seleccione el tipo de
dispositivo (por ejemplo, digital, análogo
o híbrido) que compró y haga clic en
“Siguiente”.
2. Seleccione el origen de la señal
(la fuerza de la señal podría variar
dependiendo del producto que compró
y el área en donde viva) y haga clic en
“Siguiente”.
Español
1. Por favor seleccione el país en que
vive y luego haga clic en “Exploración de
canales”.
- 2 -
Page 83

Español
1.2.2 Entrada de origen
4. Haga clic en “Salir” para terminar
la configuración después de haber
completado la exploración.
Nota
usted puede cargar la lista de
canales predefinida para ver televisión
sin tener que esperar la exploración de
canales.
1. Seleccione el dispositivo y el origen
de la señal tal como Digital, Análoga
(Cable o Antena), Video (Compuesto,
S-Video). VIVO
TM
importará el origen de
la señal que seleccione. Se recomienda
que seleccione el origen de la señal que
admita su dispositivo.
Antena TV: si escoge Antena TV por
favor asegúrese de que su antena (para
recepción de televisión análoga) esté
instalada apropiadamente y que pueda
recibir señales.
Cable TV: si quiere ver televisión por
cable, por favor asegúrese de haber
conectado apropiadamente el cable
análogo del televisor al enchufe de pared
para televisión por cable.
Video: si quiere ver videos en DVD,
está disponible a través de la entrada
adicional de video compuesto, S-Video.
Por favor verifique si el dispositivo que
tiene admite esta función.
2. Si desea escuchar radio FM,
por favor haga clic en el botón FM
directamente. Por favor asegúrese de
que el producto que compró admita esta
función.
- 3 -
Page 84

Capítulo 2 Televisión digital
Usted puede ver televisión digital con VIVOTM. Una vez que haya hecho la confi guración
inicial (entrada de origen y exploración de canales), puede disfrutar de ver y grabar
programas de televisión con esta aplicación informática multifuncional.
Nota
asegúrese de que su dispositivo admita señal digital para ver televisión digital.
2.1 Panel principal
Botones
Español
Salir
Modo FM
Programar
grabación
Audio izquierdo
Minimizar
Confi guración
Barra abierta
Audio derecho
Barra de teclas programables
EPG
Relación de
visualización
Deslizador
del tiempo
Teletexto
OSD
Foto instantánea
- 4 -
Acerca de
Reproducción
Modo de audio/
Silencio
Subtítulo
Color
predefi nido
Entrada de
origen
Foto
Modo de
silencio / Audio
Vista previa
de canales
Capturar
Page 85

2.2 Panel del televisor
Español
Botones de control
Captura
EPG
Subir de canal
Capturar: haga clic para capturar las escenas que desee. Una vez que haya capturado
la escena, se guardará en su ruta de video.
Deslizador del
tiempo
SAP
Bajar
volumen
Foto
instantánea
Relación de
visualización
Subir
volumen
Vista previa
de canales
Bajar de
canal
Modo de
audio/Silencio
- 5 -
Page 86

Si desea parar la captura, haga clic otra vez en el botón de subtítulo o haga clic con el
botón derecho del ratón en la pantalla y luego active “Parar captura”.
Deslizador del tiempo: este icono activa la función de deslizador del tiempo una vez
que se le haya hecho clic. La función de deslizador del tiempo graba el programa de
televisión que está viendo actualmente.
Esta función le permite pausar, avanzar rápidamente o retroceder programas de
televisión así que no se perderá ninguna parte del espectáculo si tiene que salir a
alguna parte por alguna razón. Lo botones de control se defi nen en la tabla abajo.
Modo de audio/
Silencio
Parar
Retroceder
Pausa
Avanzar
Foto instantánea: puede hacer clic en el icono de “Foto instantánea” para tomar
fotos instantáneas. Cuando la pantalla muestre “Foto instantánea OK”, signifi ca que la
imagen se ha tomado con éxito en la carpeta de archivos como archivos de fotos.
Español
- 6 -
Page 87

Vista previa de canales: vista previa de la lista de canales desde el principio. Puede
ajustar el formato de vista previa y los intervalos en la página de configuración
(consulte el capítulo 6).
Español
EPG: usted puede recibir y ver la información de los programas de televisión de cada
canal de televisión digital con esta función.
SAP: enciende y apaga el sonido SAP (depende del proveedor del programa de
televisión)
Relación de visualización: cambia la base de la relación en una configuración de
rutina. (Libre/4:3/16:9/en base al origen).
Bajar de canal y subir de canal: selecciona el canal anterior o siguiente.
Bajar volumen y subir volumen: ajusta el volumen del televisor para que sea alto o
silencioso.
Modo de sonido y silencio: enciende o apaga el volumen del televisor.
- 7 -
Page 88

2.3 El menú de herramientas
Mientras esté viendo televisión digital en VIVOTM, podrá activar el menú de herramientas
al hacer clic con el botón derecho del ratón. El menú de herramientas le permitirá
acceder y activar las funciones de VIVOTM, que le proporciona otra opción además de
los iconos en la interfaz.
Español
TM
Siempre en la parte superior: permite que VIVO
quede en la parte superior de todas
las otras ventanas de aplicación. Pasará lo mismo si hace clic en “Siempre en la parte
superior” en la esquina superior derecha de la ventana de modo de televisión regular.
- 8 -
Page 89

Relación de visualización: usted puede ajustar la relación de visualización cuando
mueva el cursor del ratón a la fl echa a la derecha de esta opción. Las opciones son
Libre, 4:3, 16:9, En base al origen y Aplicar a todos los canales. Pasará lo mismo si
hace clic en el icono de función Relación de visualización en la interfaz.
Español
Libre: la relación inicial cuando inicia VIVO
TM
y puede ajustarla al arrastrar el borde de
la ventana de VIVOTM.
En base al origen: la relación de visualización se basará en el origen de la señal.
Aplicar a todos los canales: si selecciona esta opción, la relación de visualización
ajustada se aplicará a todos los canales disponibles.
Ventana de vista previa: puede cambiar la pantalla de vista previa del televisor a
pantalla completa, pantalla amplia y pantalla sin borde.
Tipo de lista de canales: hay dos clases de Tipo de Lista de Canales – Normal o Mi
Favorito. Puede escoger qué tipo cargará su lista de canales. Pasará lo mismo si lo
hace en la página de confi guración de canales. Lo predefi nido es normal.
Lista de canales: visualiza los canales disponibles. Pasará lo mismo si abre
confi guración de canales.
- 9 -
Page 90

Vista previa de canales: puede escoger el tipo de vista previa de los canales - 3x3,
4x4, 5x5, tipo L o tipo círculo.
Capturar: puede decidir en capturar las escenas de televisión en formatos TS o PS.
Deslizador del tiempo: permite el modo de deslizador del tiempo. Pasará lo mismo si
hace clic en el icono de deslizador del tiempo en la interfaz principal.
Foto instantánea: activa la función de foto instantánea para tomar fotos instantáneas.
Pasará lo mismo si hace clic en el icono de foto instantánea en la interfaz principal.
Vista múltiple: le permite una visión múltiple de los canales y programas. Una vez
que mueva el cursor del ratón a la fl echa a la derecha, podrá seleccionar “Iniciar vista
múltiple”. Luego podrá ver múltiples canales y programas múltiples que son de la
misma frecuencia de señal al mismo tiempo.
Iniciar vista múltiple: cuando active la vista múltiple al seleccionar “Iniciar vista
múltiple”, observará que aparecerán otras dos pantallas de vista previa dentro de la
pantalla del televisor.
Español
- 10 -
Page 91

Español
Nota
luego podrá arrastrar las subpantallas que estaban fuera de la pantalla de vista
principal. Esas subpantallas que se arrastraron pueden agrandarse y reubicarse según
sus demandas de vistas.
P.I.P/P.O.P: una vez que haya activado la vista múltiple, podrá activar la misma en el
modo Imagen superpuesta o Imagen fi ja con cambio de pantalla.
Parar vista múltiple: seleccione esta opción para parar la vista múltiple. Una vez que la
haya seleccionado, se pararán las dos subpantallas.
EPG: lo mismo que el panel principal.
SAP: lo mismo que el panel principal.
Agregar o eliminar de Mi favorito: agrega un canal a Mi Favorito o elimina un canal de
Mi Favorito.
Subir de canal: va al siguiente canal en la lista de canales.
Bajar de canal: va al último canal en la lista de canales.
Recordar un canal: regresa al canal que se ha accedido previamente.
Silencio encendido: activa o desactiva la función silenciar.
Subir volumen: sube el volumen.
Bajar volumen: baja el volumen.
Ocultar panel: oculta o muestra el panel de control (la interfaz de VIVOTM).
Salir: cierra o sale de la ventana VIVOTM.
- 11 -
Page 92

Capítulo 3 Televisión análoga
Puede ver televisión análoga con VIVOTM. Una vez que haya hecho la confi guración
inicial (entrada de origen y exploración de canales), podrá disfrutar de ver y grabar el
programa de televisión con esta aplicación informática multifuncional.
Nota
asegúrese de que su dispositivo admita señal análoga a fi n de ver televisión
análoga.
3.1 Panel principal
Botones
Salir
Modo FM
Programar
grabación
Audio izquierdo
Minimizar
Confi guración
Barra abierta
Audio derecho
Barra de teclas programables
EPG
(Desactivar)
Relación de
visualización
Deslizador
del tiempo
Teletexto
(Desactivar)
OSD Capturar
Foto instantánea
Acerca de
Reproducción
Modo de audio/
Silencio
Subtítulo
(Desactivar)
Color
predefi nido
Español
Entrada de
origen
Foto
Modo de
silencio / Audio
Vista previa
de canales
- 12 -
Page 93

Español
3.2 Panel del televisor
Steuerungsschaltfl ächen
Capturar
Subtítulos
Deslizador del
tiempo
Reducir ruido SAP
Foto
instantánea
Vista previa de
canales
Relación de
visualización
Bajar de canal
Modo de audio/
Silencio
Capturar: por favor consulte el ítem 2.2 en el Capítulo2.
Deslizador del tiempo: por favor consulte el ítem 2.2 en el Capítulo2.
Foto instantánea: por favor consulte el ítem 2.2 en el Capítulo2.
Vista previa de canales: por favor consulte el ítem 2.2 en el Capítulo2.
Subtítulos: permite activar los subtítulos.
Reducir ruido: permite que la función de eliminar ruido haga más clara la recepción de
televisión análoga.
SAP: por favor consulte el ítem 2.2 en el Capítulo2.
Relación de visualización: por favor consulte el ítem 2.2 en el Capítulo2.
Bajar de canal o subir de canal: por favor consulte el ítem 2.2 en el Capítulo2.
Bajar volumen y subir volumen: por favor consulte el ítem 2.2 en el Capítulo2.
Modo de audio/silencio: por favor consulte el ítem 2.2 en el Capítulo2.
Subir de canal
- 13 -
Bajar
volumen
Subir volumen
Page 94

3.3 El menú de herramientas
Por favor consulte ítem 2.3 en el Capítulo2. Hay algunas diferencias entre el modo de
televisión digital y televisión análoga.
Español
Subtítulos: le ayuda a ver la televisión análoga con asistencia de subtítulos. Esta
función dependerá del proveedor del programa de televisión.
Reducir ruido: puede activar la función de reducción de ruido para mejorar la calidad de
la televisión digital.
Nota
la televisión análoga no admite la función de vista múltiple debido a la limitación
estándar del televisor.
- 14 -
Page 95

Capítulo 4 Radio FM
Puede escuchar radio FM en vivo con VIVOTM. Una vez que haya hecho la confi guración
inicial (entrada de origen y exploración de canales), puede disfrutar de ver y grabar
programas de televisión con esta aplicación informática multifuncional.
Nota
asegúrese de que su dispositivo admita la función FM para escuchar radio FM.
4.1 Panel principal
Español
Botones
Salir
Modo FM
Programar
grabación
Audio izquierdo
Minimizar
Confi guración
Barra abierta
Audio derecho
Barra de teclas programables
EPG
(Desactivar)
Relación de
visualización
(Desactivar)
Deslizador
del tiempo
Teletext
(Depende)
OSD
Foto
instantánea
(Desactivar)
Acerca de
Reproducción
Modo de audio/
Silencio
Untertitel
(Desactivar)
Color
predefi nido
(Desactivar)
Entrada de
origen
Foto
Modo de
silencio / Audio
Vista previa de
canales
(Desactivar)
Capturar
- 15 -
Page 96

4.2 Panel de la radio
Botones de control
Capturar
Deslizamiento
del tiemp
Reducir la
frecuencia
Agregar
frecuencia
Español
Bajar de canal
Modo de audio/
Silencio
Capturar: por favor consulte el ítem 2.2 en el Capítulo2.
Deslizador del tiempo: por favor consulte el ítem 2.2 en el Capítulo2.
Reducir frecuencia: ajusta la radiofrecuencia a menos.
Agregar frecuencia: ajusta la radiofrecuencia a más.
Bajar de canal y subir de canal: por favor consulte el ítem 2.2 en el Capítulo2.
Bajar volumen y subir volumen: por favor consulte el ítem 2.2 en el Capítulo2.
Modo de audio/silencio: por favor consulte el ítem 2.2 en el Capítulo2.
Subir de canal
Bajar volumen
Subir
volumen
- 16 -
Page 97

Español
4.3 El menú de herramientas
Por favor consulte el ítem 2.3 en el Capítulo2. Hay menos opciones que en el modo de
televisión y todas las funciones restantes son las mismas.
- 17 -
Page 98

Capítulo 5 Entrada de video
Usted puede importar el origen de video adicional a VIVOTM a través de la entrada de
video compuesto, s- video. Una vez que conecte su dispositivo junto con el origen de
video y la PC, VIVOTM detectará automáticamente la categoría del origen. Usted puede
ver fácilmente DVD u otros multimedios con VIVO
PC o computadora portátil.
Nota
asegúrese de que su dispositivo admita la entrada de video.
5.1 Panel principal
Botones
TM
incluso grabar directamente a su
Español
Salir
Modo FM
Programar
grabación
Audio izquierdo
Minimizar
Confi guración
Barra abierta
Audio derecho
Barra de teclas programables
EPG
(Desactivar)
Relación de
visualización
Deslizador
del tiempo
Teletexto
(Depende)
OSD
Foto instantánea
- 18 -
Acerca de
Reproducción
Modo de audio/
Silencio
Subtítulo
(Desactivar)
Color
predefi nido
Entrada de
origen
Foto
Modo de
silencio / Audio
Vista previa
de canales
Capturar
Page 99

Español
5.2 Panel de video
Botones de control
Capturar
Subir volumen
Capturar: por favor consulte el ítem 2.2 en el Capítulo2.
Foto instantánea: por favor consulte el ítem 2.2 en el Capítulo2.
Foto
instantánea
Modo de audio/
Silencio
Relación de
visualización
Bajar
volumen
Relación de visualización: por favor consulte el ítem 2.2 en el Capítulo2.
Bajar volumen y subir volumen: por favor consulte el ítem 2.2 en el Capítulo2.
Modo de audio/silencio: por favor consulte el ítem 2.2 en el Capítulo2.
- 19 -
Page 100

5.3 El menú de herramientas
Por favor consulte el ítem 2.3 en el Capítulo2. Hay menos opciones que en el modo de
televisión y todas las funciones restantes son las mismas.
Español
- 20 -
 Loading...