


Copyright © 2009
All Right Reserved - Printed in China
Myou S1024 Computer User’s Manual
Original Issue: 2009/05
This manual guides you in setting up and using your new Myou S1024 Small Notebook PC. Information in the manual
has been carefully checked for accuracy and is subject to change without notice.
No part of this manual may be reproduced, stored in a retrieval system, or transmitted, in any form or by any means,
electronic, mechanical, photocopy, recording, or otherwise, without prior written consent.
Trademarks
Product names used herein are for identication purposes only and may be the trademarks of their respective
companies.
Microsoft®, MS-DOS, Windows®, and Windows® Sound System are trademarks of Microsoft Corporation.
Intel®, Atom™ is registered trademarks of Intel Corporation.
Sound Blaster, Sound Blaster Pro are trademarks of Creative Technology.
All other brands or product names mentioned in this manual are trademarks or registered trademarks of their
respective companies.
Once you have checked and conrmed that your Myou S1024 Computer system is complete, read through the
following pages to learn about all of your Myou S1024 Computer components.


I
ENGLISH
Safety Instructions
Use the following safety guidelines to help protect yourself and your Myou S1024 Computer.
When Using Your Myou S1024 Computer
CAUTION: Do not operate your portable computer for an extended period of time with the base
resting directly on your body. With extended operation, heat can build up in the base. Allowing
sustained contact with the skin can cause discomfort or a burn.
Do not attem pt to service the Myou S1024 Computer yourself. Alway s follow in stallatio n
instructions closely.
Do not carry a battery in your pocket, purse, or other container where metal objects (such as car
keys) could short-circuit the battery terminals. The resulting excessive current ow can generate
extremely high temperature and may cause burns to your skin.
Be sure that nothing rests on your AC adapter’s power cable and that the cable is not located
where it can be tripped over or stepped on.
While you are using the computer or charging the battery, place the AC adapter in a ventilated
area, like on a desktop or on the oor. Do not cover the AC adapter with papers or other items that
may prevent ventilation. Also, do not use the AC adapter while it is inside a carrying case.
Do not insert objects into the air vent of your Myou S1024 Computer. Doing so can cause short-
circuiting and may result in re or electrical shock.

II
ENGLISH
Use only the AC adapter an d batteri es th at are supplied by your Myou S1024 Computer
manufacturer. Using other types of battery or AC adapter may heighten the risk of re or explosion.
Incorrectly placed batteries may result in an explosion.
Replace only with the same or compatible battery recommended by the manufacturer.
Please discard used batteries according to the manufacturer’s instructions.
Before you connect your Myou S1024 Computer to a power source, ensure that the voltage rating
of the AC adapter matches that of the available power source.
- 115 V/60 Hz in most of North and South America and some Far Eastern countries such as
South Korea.
- 100 V/50 Hz in eastern Japan and 100 V/60Hz in western Japan.
- 230 V/50 Hz in most of Europe, the Middle East, and the Far East.
If you use an extension cord with your AC adapter, ensure that the total ampere rating of all
devices plugged into the extension cord does not exceed its total capacity.
When removing battery from your Myou S1024 Computer, rst turn off the system, disconnect the
AC adapter from the electrical outlet, then remove the battery.
To avoid risk of an el ectrical shock, do not conn ect or disc onnect a ny cable s, or perfo rm
maintenance or reconguration of this product during a thunderstorm.
Do not throw batteries into re, doing so may cause explosion. Check with local authorities rst for
battery disposal instructions.
NOTICE: When taking your Myou S1024 Computer from a colder to a warmer environment or vice
versa, allow your Myou S1024 Computer enough time to adapt to the new environment before turning
on power.
III
ENGLISH
When unplugging the power cord, please make sure that you pull on its connector or on its strain
relief loop, and not on the power cord itself. As you pull out the connector, please ensure that it is
pulled out evenly in order not to bend its connecting pins. Also, before you connect the power cord,
make sure that both connectors are correctly oriented and aligned.
Before you clean your Myou S1024 Computer, turn it off rst, unplug it from its power source, and
remove the battery.
Handle interior components with care. When removing a component, please hold it by the edge
and not on the connecting pins (such as the memory module).
When using your telephone equipments, safety instructions should always be followed in order
to prevent re, electrical shock or injuries, these instructions include:
Do not use this product near water, for example, near a bathtub, washing basins, kitchen/
laundry sinks, wet basements or swimming pools.
Avoid using cordless phones during an electrical storm as lightening may cause electrical
shocks.
Do not use the telephone to report a gas leak within the leakage area.
WARNING: Void of Warranty
If the battery is not properly handled, there may be a risk of explosion; make sure you are using
the same or compatible battery.
Please discard used batteries according to the instructions given by the manufacturer.
Please be aware that use of cracked, severely scratched or poor quality discs may damage the
optical drive and corrupt data in the disc. Such discs may break while drive operates in highspeed, in this case, your product warranty may be voided.
*
*
*

IV
ENGLISH
Regulatory Notices
Federal Communications Commission Notice
This equipment has been tested and found to comply with the limits for a Class B digital service,
pursuant to Part 15 of the FCC rules. These limits are designed to provide reasonable protection
against harmful interference in a residential installation.
Any changes or modications made to this equipment may void the user ’s authority to operate this
equipment. This equipment generates, uses, and can radiate radio frequency energy. If not installed
and used in accordance with the instructions, may cause harmful interference to radio communications.
However, there is no guarantee that interference will not occur in a particular installation. If this
equipment does cause harmful interference to radio or television reception, which can be determined
by turning the equipment off and on, the user is encouraged to try to correct the interference by one or
more of the following measures:
Reorient or relocate the receiving antenna.
Increase the separation between the equipment and receiver.
Connect the equipment into an outlet on a circuit different from that to which the receiver
is connected.
Consult the dealer or an experienced radio/TV technician for help.
All external cables connecting to this basic unit must be shielded.
For cables connectin g to PCMCIA cards , see the opt io n manua l or installat io n
instructions.

V
ENGLISH
CE Notice (European Union)
This symbol indicates this Myou S1024 Computer complies with the EMC Directive and the
European Union’s Low Voltage Directive. This symbol also indicates that S1024 meets the following
technical standards:
EN 55022 — “Limitations and Methods of Measurement for the Radio Interferences of Information
Technology Equipment.”
EN 55024 — “Information technology equipment - Immunity characteristics - Limits and methods
of measurement.”
EN 61000-3-2 — “Electromagnetic compatibility (EMC) - Chapter 3: Limits - Section 2: Limits on
the harmonic current emissions (Equipment input current up to and including 16 A per phase).”
EN 61000-3-3 — “Electromagnetic compatibility (EMC) - Chapter 3: Limits - Section 3: Limits on
the voltage uctuations and icker in low-voltage power supply systems for equipment with rate
current up to and including 16 A.”
EN 60950 — “Safety of Information Technology Equipment.”
NOTE: EN 55022 emissions requirements provide for two classications
Class A governs commercial use
Class B is governs residential use
For CB:
Only use batteries designed for this computer. The wrong battery type may explode, leak or

VI
ENGLISH
damage the computer
Do not remove any batteries from the computer while it is powerd on
Don not continue to use a battery that has been dropped, or that appears damaged (e.g. bent or
twisted) in any way. Even if the computer continues to work with a damaged battery in place, it
may cause circuit damage, which may possibly result in re.
Recharge the batteries using the Myou S1024 Computer’s system. Incorrect recharging may make
the battery explode.
Do not try to repair a battery pack. Refer any battery pack repair or replacement to your service
representative or qualied service personnel.
Keep children away from, and promptly dispose of a damaged battery. Always dispose of batteries
carefully. Batteries may explode or leak if exposed to re, or improperly handled or discarded.
Keep the battery away from metal appliances.
Afx tape to the battery contacts before disposing of the battery.
Do not touch the battery contacts with your hands or metal objects.
Battery Disposal & Caution
The product that you have purchased contains a rechargeable battery. The battery is recyclable. At
the end of its useful life, under various state and local laws. It may be illegal to dispose of this battery
into the municipal waste stream. Check with your local solid waste ofcials for details in your area for
recycling options or proper disposal.
Danger of explosion if battery is incorrectly replaced. Replace only with the same or equivalent type
recommended by the manufacturer. Discard used battery according to the manufacturer’s instructions.
VII
ENGLISH
BSMI Notice (Taiwan Only)
Most Myou S1024 Computers are classied by the Bureau of Standards,
Meteorology and Inspection (BSMI) as Class B information technology equipment (ITE).
The symbol above must be attached to the product indicating compliance with the BSMI standard.
Preface
Congratulations on your purchase of a Myou S1024 Computer! Your new Myou S1024 Computer
features the most innovative features in portable computing technology. It combines state-of-the-art
ergonomics with sophisticated architecture, providing you with a personal computer that is compact,
powerful, and easy to use. Designed for a wide range of general, business, and personal productivity
applications, this Myou S1024 Computer is an ideal choice for use in the ofce, at home, and on the
road.
This Manual contains all the information you need to set up and use your Myou S1024 Computer, It
describes all of its features in a thorough yet easy-to-read manner.

CONTENTS
TAKING CARE OF YOUR Myou S1024 Small Notebook PC ...................................2
BEFORE YOU START .................................................................................................4
Make sure you have everything ................................................................................4
Familiarize with the computer...................................................................................5
OPENING THE DISPLAY PANEL ........................................................................5
FRONT OVERVIEW .............................................................................................6
LEFT SIDE OVERVIEW .....................................................................................10
RIGHT SIDE OVERVIEW ...................................................................................11
REAR SIDE OVERVIEW ....................................................................................11
BOTTOM OVERVIEW ........................................................................................15
GETTING STARTED ..................................................................................................17
Power Sources .........................................................................................................17
CONNECTING THE POWER ADAPTER ..........................................................17
RECHARGING THE BATTERY ..........................................................................18

Power Management ..................................................................................................19
Starting Your Myou S1024 Computer .....................................................................24
POWER ON .......................................................................................................24
Status Indicators .................................................................................................26
Using Function Keys ..........................................................................................29
Using the TouchPad ...........................................................................................30
BIOS SETTING ..........................................................................................................34
The Main Menu .........................................................................................................37
Advance Menu ..........................................................................................................39
Security Menu...........................................................................................................40
Boot Menu .................................................................................................................41
Exit Menu ..................................................................................................................42
Cleaning & Maintenance ..................................................................................................43
Appendix I: Specication .................................................................................................48
Appendix II: Recovery Update Notices...........................................................................51
Appendix III: Service Centers and Policy .......................................................................53
2
ENGLISH
ENGLISH
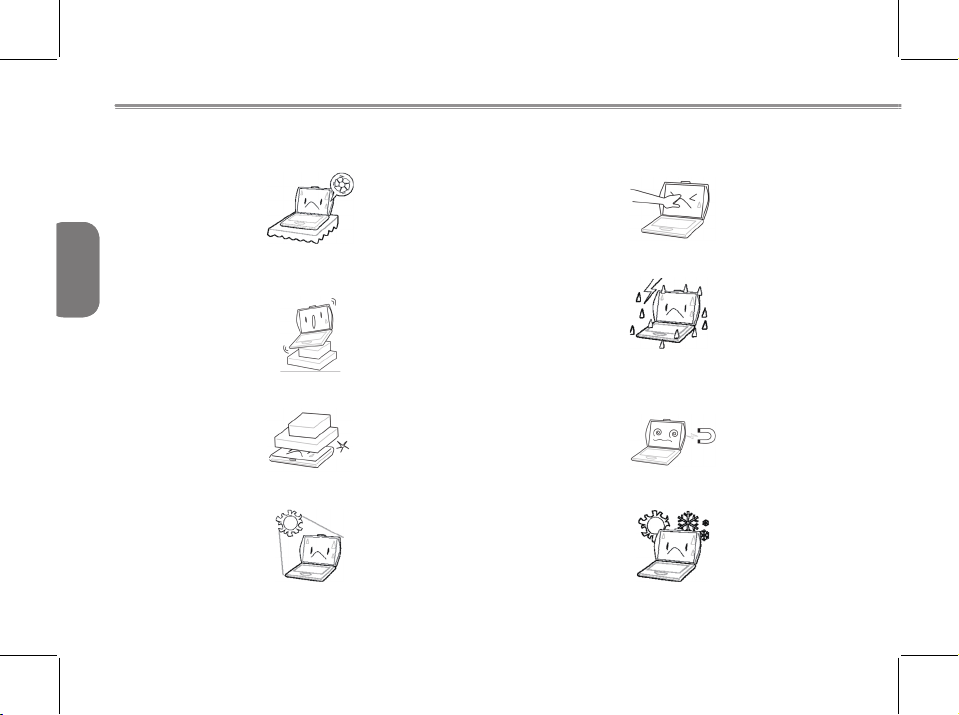
TAKING CARE OF YOUR Myou S1024 Small Notebook PC
To prevent possible overheating of the computer’
s processor, make sure you don’t block the
openings provided for ventilation.
DO NOT press or touch the display panel.
DO NOT place on uneven or unstable work
surfaces.
DO NOT use your Myou S1024 Computer under
harsh conditions.
DO NOT place or drop objects on the computer
and DO NOT apply heavy pressure on it.
DO NOT subject the computer to magnetic elds.
DO NOT expose to direct sunlight. DO NOT use or store in extreme temperatures.
3
BEFORE YOU START
ENGLISH
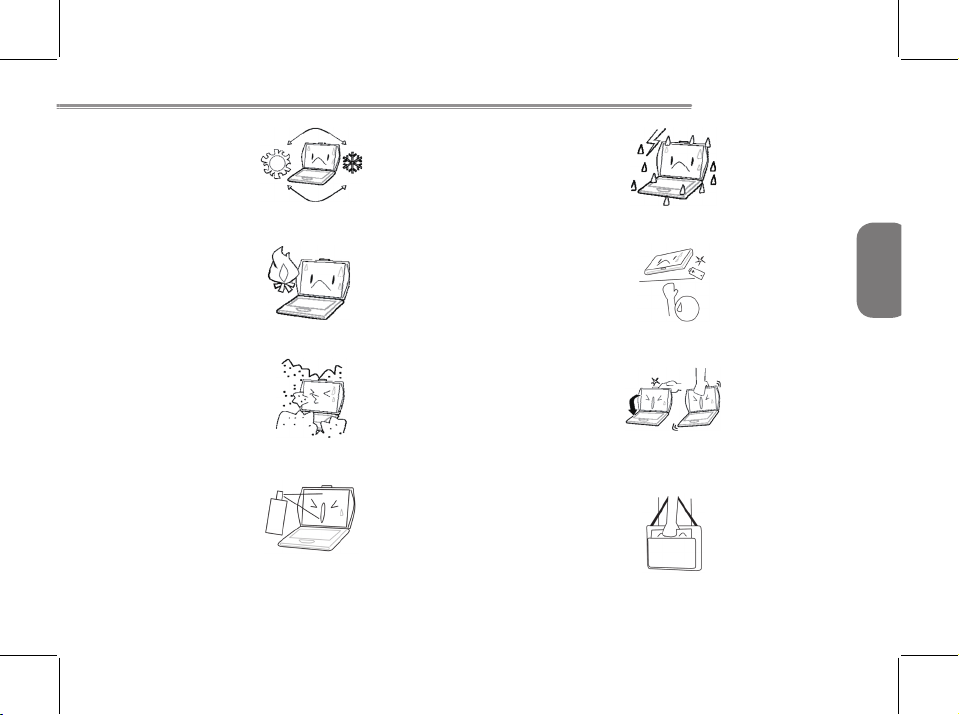
Avoid sudden changes in temperature or humidity
by keeping it away from A/C and heating vents.
DO NOT expose the computer to rain or
moisture.
DO NOT place near re or other sources of heat. DO NOT tamper with the batteries. Keep them
away from children.
DO NOT expose to dust and/or corrosive
chemicals.
DO NOT slam your Myou S1024 Computer shut
and never pick up or hold your Myou S1024
Computer by the display.
DO NOT spray water or any other cleaning uids
directly on the display.
If you are traveling with your computer, remember to
carry it as hand luggage. Do not check it in as baggage.

4
ENGLISH
BEFORE YOU START
Make sure you have everything
When you receive your Myou S1024 Small Notebook PC, unpack it carefully, and check to make
sure you have all the items listed below. For a pre-congured model you should have the following:
Myou S1024 Computer
Lithium-Ion Battery
Expansion Port
AC adapter and Powercord
User Manual
Utility CD
Polishing cloth
Handybag (Optional)
Depending upon the conguration of your Myou S1024 Computer, you may also need following
items:
Driver and Application CD
Once you have checked and conrmed that your Myou S1024 Computer system is complete, read
through the following pages to learn about all of your Myou S1024 Computer components.
5
BEFORE YOU START
ENGLISH
Familiarize with the computer
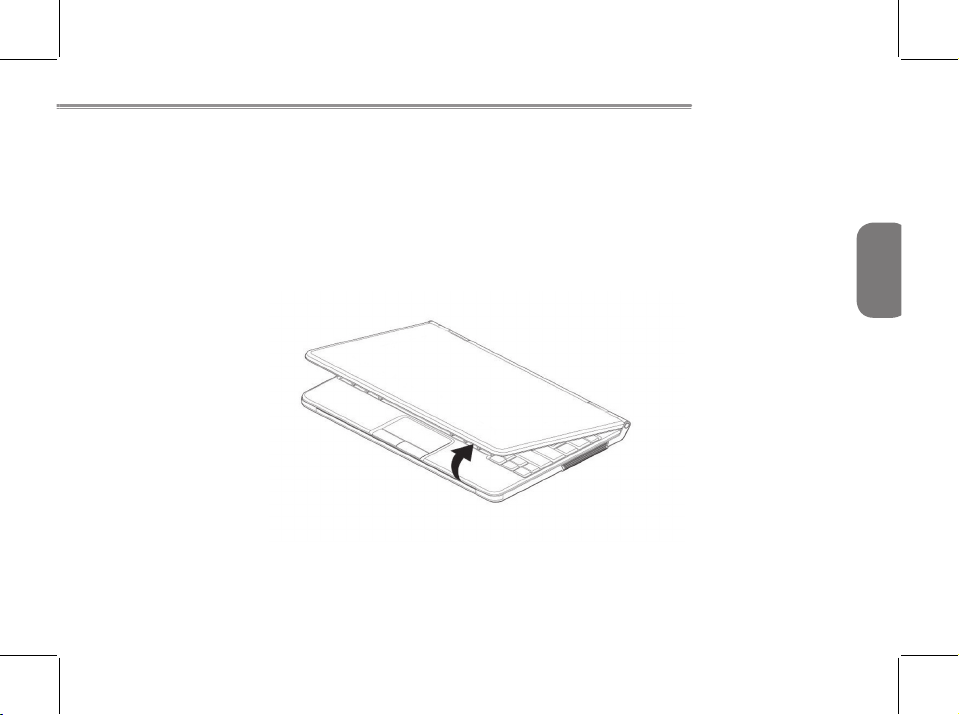
OPENING THE DISPLAY PANEL
To open, simply lift the lid up.
When closing it, be sure not to slam it shut.

6
ENGLISH
FRONT OVERVIEW
The following is an overview of the front of the Myou S1024 Computer.
Camera
The 1.3M-pixel built-in camera allows you to have more visual features such as video recording,
visual conferencing and so on. For 1.3M-pixel camera, there is an active indicator which will be
ON when the camera working.
Microphone
The built-in digital microphone is an audio input device. It allows for reception and transmission of
voice and/or other audio data to any program capable of accepting such input.
Camera Active Indicator (for 1.3Mpixel Camera)
Camera
Microphone
Display Panel
TouchPad/Buttons
Stereo Speakers
Buttons/Status
Indicators
Keyboard

7
BEFORE YOU START
ENGLISH
Display Panel
The display panel is a color LCD panel with LED back lighting for the display of text and graphics.
Keyboard
The built-in Qwerty keyboard with dedicated Windows® and function keys.
Stereo Speakers
The built-in dual speakers allow for stereo sound.
TouchPad/Buttons
Press the left and right buttons located on the edge of the touch pad to do selection and execution
functions. These two buttons are similar to the left and right buttons on a mouse.

8
ENGLISH
Buttons/Status Indicators
The Status indicator lights correspond to specic operating mode. These modes are: Power
On/Suspend status, Battery status, Hard Disk Drive (HDD) Activity, WiFi Activity, Bluetooth Activity,
3.5G or WiMax Active, Caps Lock and Num Lock. Indicator lights are embedded in the touch type
button bar – Suspend/Resume/Power On, WiFi, Bluetooth and 3.5G or WiMax.
Suspend/Resume/Power On Button
This button turns your Myou S1024 Computer on and off as well as puts it into Sleep or Suspend
mode.Or, you can press it to resume the system from Sleep or Suspend mode. The embedded
indicator will On when system On and will blinking when system in either Sleep or Suspend mode.
WiFi
Battery/HDD/Caps Lock/Num Lock
Bluetooth
Suspend/Resume/Power On Button
3.5G or WiMax

9
BEFORE YOU START
ENGLISH
WiFi
The WiFi button enables and disables Wireless LAN activity. The embedded indicator will On when
WiFi is working.
Bluetooth
The Bluetooth button enables and disables Bluetooth function. The embedded indicator will On
when Bluetooth is working.
3.5G or WiMax
The button function is depending on your system conguration. It could be use to enable or disable either 3.5G or WiMax if your system equipped either one. The embedded indicator will On
when either 3.5G or WiMax is working.
Status Indicators
There four status indicators to show the activities or enable of HDD, battery charging, Caps Lock
and Num Lock.

10
ENGLISH
LEFT SIDE OVERVIEW
The following is a brief description of the left side of the Myou S1024 Computer.
Microphone Jack
The microphone jack allows you to connect an external mono microphone.
Headphone Jack
The headphone jack allows you to connect headphone, external speakers or amplier.
Memory Card Reader
The memory card reader offers the fastest and most convenient method to transfer pictures, music
and data between your Myou S1024 Computer and ash compatible devices such as digital cameras, MP3 players, mobile phones, and PDAs.
Memory Card
Reader
Headphone Jack
Microphone Jack

11
BEFORE YOU START
ENGLISH
RIGHT SIDE OVERVIEW
The following is a brief description of the right side of the Myou S1024 Computer. There is no any I/O
port at this side.
Power Adapter Jack
Expansion Port USB Ports
REAR SIDE OVERVIEW
The following is an overview of the rear side of the Myou S1024 Computer.
USB Ports
The USB ports allow you to connect Universal Serial Bus devices. They support v2.0 of the USB
standard, which allows data transfer rates as high as 480 Mb/s.
Power Adapter Port
The power adapter port allows you to plug in the AC adapter to power your Myou S1024 Computer
and charge the internal Lithium-Ion battery.
Expansion Port
The Expansion Port Interface allows you to connect additional peripheral devices to your Myou
S1024 Computer through a “universal” port and the Power Adapter Port, as it were. The Expansion Port itself contains two additional ports, and connects to your Myou S1024 Computer through
two ports on the rear side of the Myou S1024 Computer. (Not available in all congurations.)

12
ENGLISH
FRONT SIDE OVERVIEW
The following is a brief description of the front side of the Expansion Port. There is a 26-pin connector at this side. Ports at this side are to connect with Myou S1024 Computer.
Expansion Port
VGA/LAN Port OVERVIEW
The following is an overview of Expansion Port.
LAN Port
Port Replicator Port
External Monitor Port

13
BEFORE YOU START
ENGLISH
LAN (RJ-45) Port at side direction
The LAN port is designed to support a 10/100 Base-TX standard RJ-45 plug.
External Monitor Port at rear side
The external monitor port allows you to connect an external monitor.

14
ENGLISH
Install & Remove the Expansion Port
When install or remove the Expansion Port to or from the Myou S1024 Computer, please hold the
left & right side of the Expansion Port rst.
For installing, please make sure these two ports on Expansion Port rear side are right toward to
Myou S1024 Computer ports then push Expansion Port forward to make sure the well connection.
To remove, just pull out the Expansion Port from Myou S1024 Computer.
Please note to power off the Myou S1024 Computer before install or remove the Expansion Port.
Install & Remove the Expansion Port

15
BEFORE YOU START
ENGLISH
BOTTOM OVERVIEW
The following is an overview of the bottom of the Myou S1024 Computer.
Ventilation Hole
These are open ports for the fan to dissipate heat from the computer’s internal components.
Do not block or place the computer in such a position that you inadvertently allow the outlets to
become blocked.
Battery Bay
Battery Release
Knob
Battery Lock
Ventilation Hole
Rating Label
Ventilation Hole
SIM Card Slot

16
ENGLISH
SIM Card Slot
Note:
1. Please remove the battery rst before insert the SIM card. Follow the instruction icon to insert
the SIM card then install the battery back.
2. To insert of a mobile SIM card for 3.5G function (Optional)
Rating Label
The label shows the model number and other information about your Myou S1024 Computer.
Battery Bay
The battery bay contains the internal Lithium-Ion battery. It can be opened for the removal of the
battery when stored over a long period of time or for swapping a discharged battery with a charged
Lithium-Ion battery.
Battery Lock & Release Knob
The battery bay contains the internal Lithium-Ion battery. It can be opened for the removal of the
battery when stored over a long period of time or for swapping a discharged battery with a charged
Lithium-Ion battery.

17
GETTING STARTED
ENGLISH
GETTING STARTED
Power Sources
Your computer has two types of power sources: a Lithium-Ion battery or an AC adapter.
CONNNECTING THE POWER ADAPTERS
The AC adapter provides power for operating your Myou S1024 Small Notebook PC and charging
the battery.
Connecting the AC Adapter
1. Plug the DC output cable into the DC power jack of your Myou S1024 Small Notebook PC.
2. Plug the AC adapter into an AC electrical outlet.
Switching from AC Adapter Power to Battery Power
1. Be sure that you have at least one charged battery installed.
2. Remove the AC adapter. Your Myou S1024 Computer will automatically switch from DC power
to battery power.
The Lithium-Ion battery is not charged upon purchase. Initially, you will need to
connect the AC adapter to use your Myou S1024 Small Notebook PC.

18
ENGLISH
RECHARGING THE BATTERY
The Lithium-Ion battery is recharged internally using the AC adapter. To recharge the battery,
make sure the battery is installed and the computer is connected to the AC.
There is no “memory effect” in Lithium-Ion batteries; therefore you do not need to discharge the
battery completely before recharging. The charge times will be signicantly longer if your note-
book PC is in use while the battery is charging. If you want to charge the battery more quickly, put
your computer into Suspend mode, or turn it off while the adapter is charging the battery.
Low Battery State
When the battery charge is low, a notication message appears. If you do not respond to the low
battery message, the batteries continue to discharge until they are too low to operate. When this
happens, your Myou S1024 Small Notebook PC goes into Suspend mode. There is no guarantee
your data will be saved once the Myou S1024 Computer reaches this point.
To protect your computer from damage, use only the power adapter that came with it
because each power adapter has its own power output rating.
Once your note computer goes into Suspend mode as a result of a dead battery you will be
unable to resume operation until you provide a source of power either from an adapter, or a
charged battery. Once you have provided power, you can press the Suspend/ Resume button to
resume operation. In Suspend mode, your data is maintained for some time, but if a power source
is not provided promptly, the Power indicator stops ashing and then goes out, in which case you

19
GETTING STARTED
ENGLISH
Power Management
Suspend/Resume/Power On Button
The suspend/resume/power on switch is used to turn on your Myou S1024 Computer from its off
state. Once you have connected your AC adapter or charged the internal Lithium-Ion battery, you can
power on your Myou S1024 Computer by pressing the suspend/resume/on button located above the
keyboard. If you need to take an extended break, press the button again to turn it off.
have lost the data that was not saved. Once you provide power, you can continue to use your
computer while an adapter charges the battery.
20
ENGLISH
Low Battery Alarms
How your computer responds to a low battery condition is set under Start/Control Panel/Power Options/Alarms.
Two different power alarms can be enabled or disabled: the Low Battery Alarm, and the Critical Battery
Alarm. Use the slidebar to set the power level at which the alarms are activated. Click on the Alarm
Action button to choose whether the alarm sounds, displays a message, or both.
Warning: When battery power is low, the Myou S1024 Computer will display a warning on the
screen. Take immediate action, such as saving les or connecting to the AC adapter, or data
may be lost.
When the computer alerts you that the battery is low, immediately do one of the following: Connect the
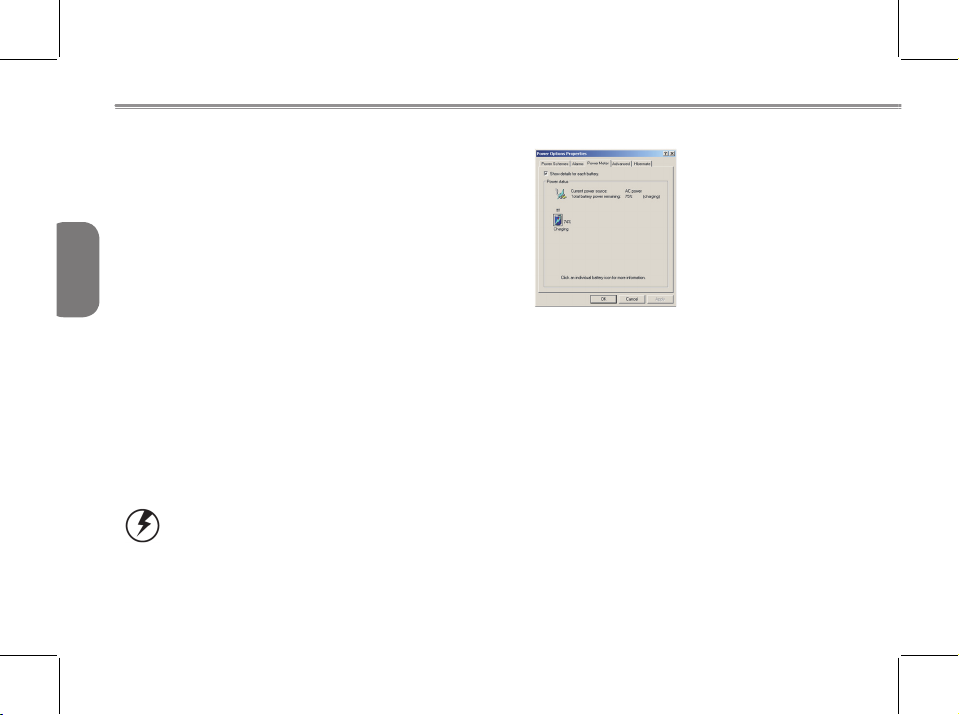
Monitoring Battery Power
There are two ways to monitor how much
power the battery has left.
1. Click start/Control Panel/Power
Options; then click Power Meter.
2. Moving the cursor to the battery icon
on the taskbar is the simplest way to
check on battery power status.
If you do not see the battery icon, enable it in Start /Control Panel/Power Options. Choose the
Advanced tab and click “Always show icon on the taskbar.”

21
Monitoring Battery Power
ENGLISH
AC power adapter.
Save your work, turn off the computer and replace the discharged battery with a charged battery.
Do not restart the computer until you have connected to an AC adapter, or replaced the discharged
battery with a charged battery.
Battery Charging
When you use the AC adapter to connect your Myou S1024 Computer to a power outlet, the internal
battery will automatically begin to recharge. While the battery is charging, the Battery Charge icon on
the Indicator panel will be active. When the battery is fully charged, the Battery Charge icon will turn
off.
If your computer is turned off or standby mode, a fully discharged battery will take about 3 hours to
recharge.
Note: A fully charged battery can run the Myou S1024 Computer for approximately 3 hours.
Power Saving Mode
Adjust the default power management settings in the Power Options/ Advanced dialog box in the
Control panel. The Power Options Properties dialog box allows you to set different actions to take
when the computer is left idle for a certain amount of time.
Suspend Mode
There are several possible settings for suspend mode, which can be selected in the Power
Management dialog box: You may have the Myou S1024 Computer standby, suspend, or you can
power off the computer altogether.

22
ENGLISH
Initiating Suspend Mode
There are several ways to initiate suspend mode. The settings can be adjusted in the Power
Management dialog box:
The computer will automatically enter suspend mode when not used for a set period of time.
Selecting the Stand by button in the Shut Down Windows dialog box.
Closing the screen cover (assuming no external monitor has been connected).
Pressing the power button (if enabled in power settings).
Power Button Settings
The function of the power button can be set to Shutdown or Standby in the Power Management Properties dialog box in the Windows Control Panel. However, holding the power button down for more
than four seconds will force a power off while operating under any situation, resulting in the loss of any
unsaved information.
Power Saving Tips
Avoid operating the audio and video applications when using battery power. Operating video, or audio
equipment increases the computer’s power requirements.
Decreasing monitor brightness can also save power. Decrease brightness by pushing <Fn> + <Right
Arrow>. Increase it by pushing <Fn> + <Left Arrow>.
The computer will automatically enter suspend mode when not used for a set period of time.
Selecting the Stand by button in the Shut Down Windows dialog box.
Closing the screen cover (assuming no external monitor has been connected).
Pressing the power button (if enabled in power settings).

23
Monitoring Battery Power
ENGLISH
When to Replace the Battery
Over time, the battery’s capacity gradually decreases. We recommend that you replace your battery
when you notice that it begins to store signicantly less charge.
Changing the Battery
Change the main battery pack as follows:
1. Turn off the computer.
2. Close the screen cover and turn the
computer over.
3. Slide the side battery latch (1) to the left
and latch (2) up. Continue to hold it until
the battery is removed.
4. Make sure the replacement battery is
properly oriented. Insert the battery into
the battery compartment.
Heat Considerations
The computer’s processor has been specially designed to consume little power, and generates very
little heat. However, working in a hot environment, or working for long periods may raise the temperature. Your computer takes the following steps to lower temperature:
The cooling fan will automatically turn on. You may feel air coming from a vent at the left side
when this happens.
If the temperature continues to rise, processor activity will be reduced. You may notice a slight loss
of performance when this happens.

24
ENGLISH
Suspend/Resume/Power On Button
The suspend/resume/power on switch is used to turn on your Myou S1024 Computer from its off
state. Once you have connected your AC adapter or charged the internal Lithium-Ion battery, you
can power on your Myou S1024 Computer by pressing the suspend/resume/on button located
above the keyboard. If you need to take an extended break, press the button again to turn it off.
Do not carry your Myou S1024 Computer around with the power on or subject it to
shocks or vibrate, as you risk damaging the hard disk.
Starting Your Myou S1024 Computer
POWER ON

25
GETTING STARTED
ENGLISH
When you power on your Myou S1024 Computer, it will perform a Power On Self Test (POST) to
check the internal parts and conguration for correct functionality. If a fault is found, your computer
emits an audio warning and/or displays an error message.
Depending on the nature of the problem, you may be able to continue by starting the operating
system or by entering the BIOS setup utility and revising the settings.
After satisfactory completion of the Power On Self Test (POST), your Myou S1024 Computer loads
the installed operating system.
Never turn off your Myou S1024 Computer during the Power On Self Test (POST), or
an un-recoverable error may occur.

26
ENGLISH
Status Indicators
The Status indicator lights correspond to specic operating modes. These modes are: AC Adapter
Status, Battery status; Hard Disk Drive Activity; Memory Card Reader Activity; and Wireless LAN/
Bluetooth Activity. Furthermore, at the top of the keyboard there are three additional status indicator lights: Caps Lock, Scroll Lock, and Num Lock.
Battery/HDD/Caps Lock/Num Lock
Power On/Suspend Status Indicator

27
GETTING STARTED
ENGLISH
Caps Lock Indicator
This indicator tells you that the keyboard is set to type in all capital letters.
Num Lock Indicator
This indicator states that the internal keyboard is set in ten-key numeric keypad mode.
Power On Indicator
This light on the power button illuminates when the computer is powered on.
Suspend Status Indicator
This light on the power button ashes while the computer is in Suspend mode.

28
ENGLISH
Battery Indicator
The dual color battery indicator tells you the battery is charging or already fully charged.
If charging the battery, the indicator is remains Green even if your Myou S1024 Computer is off.
If the battery fully charged, the indicator is remains Orange no matter the system is On or Off.
The indicator will Off if Power Adapter is not plug-in.
Hard Disk Drive (HDD) Activity Indicator
The Hard Disk Drive (HDD) Activity indicator tells you whether your internal hard drive is being
accessed and, if so, how fast.

29
GETTING STARTED
ENGLISH
Using Function Keys
Your computer has 12 function keys, F1 through F12. The functions assigned to these keys differ
for each application. You should refer to your software documentation to nd out how these keys
are used.
The [FN] key provides extended functions for the Myou S1024 Computer and is always used in
conjunction with another key.
[FN+F4]: Places the Thin Note in Sleep mode. Pressing the Power button returns it to active
mode.
[FN+F5]: Allows you to change your selection of where to send your display video. Each time
you press the combination of keys you will step to the next choice. The choices, in order, are: builtin display panel only, both built-in display panel and external monitor, or external monitor only.
[FN+F6]: Press to toggle the LCD display Backlight On or Off.
[FN+F7]: To disable the Touchpad of your system.
[FN+F8]: Mutes the computer's audio.
[FN+F11]: To enable the Numeric keys.
[FN+F12]: To enable the ScrollLock function.
[FN+Left Arrow]: Decreases the LCD display Brightness.
[FN+Right Arrow]: Increases the screen LCD display Brightness.
[FN+Down Arrow]: Decreases the computer's volume.
[FN+Up Arrow]: Increases the computer's volume.
[FN+PgUp]: To place the cursor to begin of text row
[FN+PgDn]: To place cursor to end of row

30
ENGLISH
Using the TouchPad
A TouchPad pointing device comes built into your computer. It is used to control the movement of
the pointer to select items on your display panel.
The TouchPad consists of a cursor control, a left and right button, and two scroll buttons. The
cursor control works the same way a mouse does, and moves the cursor around the display. It
only requires light pressure from the tip of your nger. The left and right buttons function the same
as mouse buttons. The actual functionality of the buttons may vary depending on the application
that is being used. Finally, the scroll buttons allow you to navigate quickly through pages, without
having to use the on-screen cursor to manipulate the up and down scroll bars.

31
GETTING STARTED
ENGLISH
Clicking
Clicking means pushing and releasing a button. To left-click, move the cursor to the item you
wish to select, press the left button once, and then immediately release it. To right click, move the
mouse cursor to the item you wish to select, press the right button once, and then immediately
release it. You also have the option to perform the clicking operation by tapping lightly on the
TouchPad once.
Double-Clicking
Double-clicking means pushing and releasing the left button twice in rapid succession. This
procedure does not function with the right button. To double-click, move the cursor to the item you
wish to select, press the left button twice, and then immediately release it. You also have the
option to perform the double-click operation by tapping lightly on the TouchPad twice.
Dragging
Dragging means pressing and holding the left button, while moving the cursor. To drag, move the
cursor to the item you wish to move. Press and hold the left button while moving the item to its
new location and then release it. Dragging can also be done using the TouchPad. First, tap the
TouchPad twice over the item you wish to move, making sure to leave your nger on the pad after
the nal tap. Next, move the object to its new location by moving your nger across the TouchPad,
and then release your nger. Using the Scroll buttons allows you to navigate through a document
quickly without using the window’s scroll bars. This is particularly useful when you are navigating
through on-line pages.

32
ENGLISH
TROUBLESHOOTING
Your Myou S1024 Small Notebook PC is sturdy and subject to few problems in the eld. However,
you may encounter simple setup or operating problems that you can solve on the spot, or problems with peripheral devices, that you can solve by replacing the device. The information in this
section helps you isolate and resolve some of these straightforward problems and identify failures
that require service.
Identifying the Problem
If you encounter a problem, go through the following procedures before pursuing complex
troubleshooting:
1. Turn off your Myou S1024 Computer.
2. Make sure the AC adapter is plugged into your Myou S1024 Computer and to an active AC
power source.
3. Make sure that any card installed in the PC Card slot is seated properly. You can also remove
the card from the slot, thus eliminating it as a possible cause of failure.
4. Make sure that any devices connected to the external connectors are plugged in properly. You
can also disconnect such devices, thus eliminating them as possible causes of failure.
5. Turn on your Myou S1024 Computer. Make sure it has been off at least 10 seconds before you
turn it on.
6. Go through the boot sequence.

33
BIOS SETTING
ENGLISH
7. If the problem has not been resolved, contact your support representative.
Before you place the call, you should have the following information ready so that the customer
support representative can provide you with the fastest possible solution:
Product name
Product conguration number
Product serial number
Purchase date
Conditions under which the problem occurred
Any error messages that have occurred
Hardware conguration
Type of device connected, if any
See the Conguration Label on the bottom of your Myou S1024 Computer for conguration and
serial numbers.

34
ENGLISH
BIOS SETTING
The BIOS Setup Utility is a hardware conguration program built into your Myou S1024 Computer’s
BIOS (basic input/output system). Your Myou S1024 Computer is already properly congured and
optimized, and you do not need to run this utility. However, if you encounter conguration problems,
you may need to run it.
Using the BIOS Setup Utility
Your Myou S1024 Computer has a BIOS setup utility which allows you to congure important system
settings, including settings for various optional functions of the computer. This chapter explains how to
use the BIOS setup utility.
BIOS Setup Menu
The BIOS setup Utility allows you to congure your computer’s basic settings. When you turn your
computer on, the system reads this information to initialize the hardware so that it can operate cor-
rectly. Use the BIOS setup utility to change your computer’s start-up conguration. For example, you
can change the security and power management routines of your system.

35
BIOS SETTING
ENGLISH
Starting the BIOS Setup Utility
You can only enter the BIOS setup utility as the computer is booting, that is between the time you turn
on the computer and before the Windows interface appears. If your computer is already on, shut down
your computer completely (power off) and restart it and then press the F2 key to enter the setup utility.
Navigating and Entering Information in BIOS
Use the following keys to move between elds and to enter information:
Select Menu
Select Item
Enter Execute Command
F1 Help
- / + Change Values
F9 Setup Defaults
F10 Save and Exit
ESC Exit
Users are allowed to enter new values to replace the default settings in certain elds, and the rest
elds are specied by system default parameters and cannot be modied by users. Reverse the
attribute of the main options and press the Enter key to enter into the submenu. Press the Esc key to
return to the previous conguration page.

36
ENGLISH
Menu Description
Main The Main screen displays a summary of your Myou S1024 Computer hardware
information, and also includes basic setup parameters.
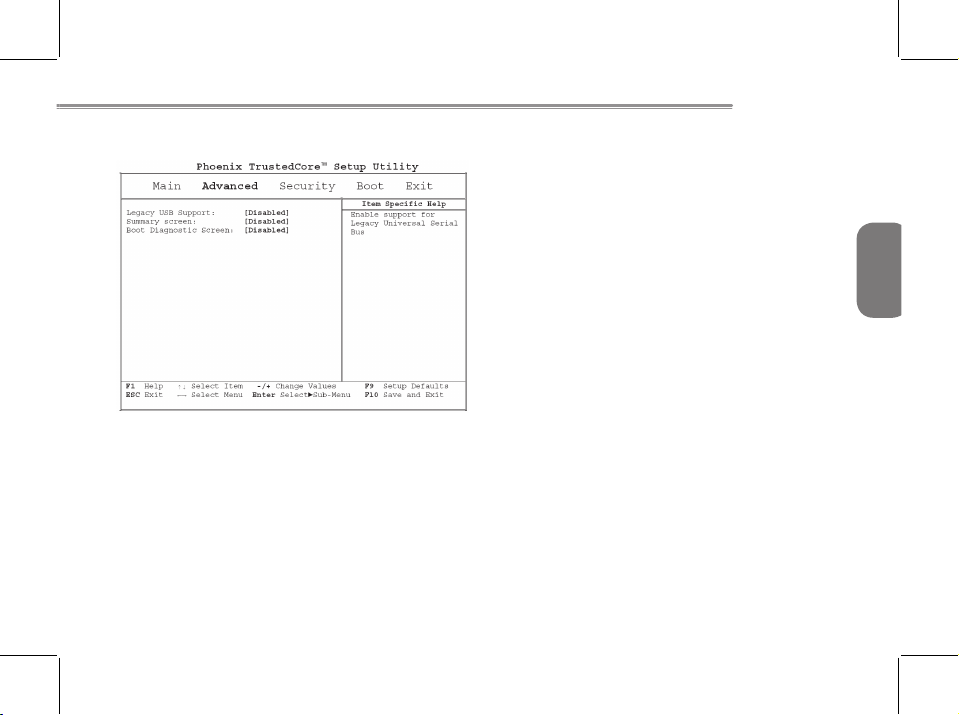
Advanced This screen contains parameters involving your hardware devices.
Security The Security screen contains parameters that help safeguard and protect your Myou
S1024 Computer from unauthorized use.
Boot To set the order of booting equipments, enabling or disabling equipments.
Exit To exit the interface of setting system.
Tips: For more information about Menu and Keys, please refer to the help information of respective selection. There may be difference of BIOS setting between different versions of BIOS
of different batch of Myou S1024 Computer produced.
Notice: The BIOS of your Myou S1024 Computer has been initialized to best settings. It’s advised you not to change it if not so necessary.
Tips: The pictures showed at this chapter may be different from those showed by your Myou
S1024 Computer due to different versions of BIOS. Please set pictures of your Myou S1024
Computer as standard.

37
BIOS SETTING
ENGLISH
The Main Menu
Tips: For more information about Menu and Keys, please refer to the help information of
respective selection. There may be difference of BIOS setting between different versions of
BIOS of different batch of Myou S1024 Computer produced.
Notice: The BIOS of your Myou S1024 Computer has been initialized to best settings. It’s advised you not to change it if not so necessary.
Tips: The pictures showed at this chapter may be different from those showed by your Myou
S1024 Computer due to different versions of BIOS. Please set pictures of your Myou S1024
Computer as standard.

38
ENGLISH
System Time
Allows you to change the system time using the hour:minute:second format of your Myou S1024
Computer.
Enter the current time for reach eld and use the -, + key to move from one eld or back to another.
You can also change the system time from your operating system.
System Date
Allows you to set the system date using the month/date/year format.
Enter the current time for reach eld and use the -, +key to move from one eld or back to another.
You can also change the system time from your operating system.
39
BIOS SETTING
ENGLISH
Advance Menu

40
ENGLISH
Security Menu
Set Supervisor Password
A supervisor password must be set before a lower-level user password can be set. After selecting
Change Supervisor Password, press Enter. You will be prompted for the new password, and then
again to verify it. Type in 6 or fewer keystrokes. If you make an error, press Esc to start over.
Set User Password
With a User password, you can enter the Setup Utility and change or remove the User password, but
you cannot enter the Setup Utility and change or remove the Supervisor password, nor enable diskette
access if it has been disabled.

41
BIOS SETTING
ENGLISH
Boot Menu
Set Supervisor Password
A supervisor password must be set before a lower-level user password can be set. After selecting
Change Supervisor Password, press Enter. You will be prompted for the new password, and then
again to verify it. Type in 6 or fewer keystrokes. If you make an error, press Esc to start over.
Set User Password
With a User password, you can enter the Setup Utility and change or remove the User password, but
you cannot enter the Setup Utility and change or remove the Supervisor password, nor enable diskette
access if it has been disabled.

42
ENGLISH
Exit Menu

43
Cleaning & Maintenance
ENGLISH
Cleaning & Maintenance
Taking Care of Your Myou S1024 Computer
The openings on the enclosure are for air convection hence your Myou S1024 Computer can be protected from overheating. DO NOT COVER THE OPENINGS.
Do not expose your Myou S1024 Computer to direct sunlight. Do not place it near sources of heat,
such as a radiator.
Do not expose your Myou S1024 Computer to temperatures below 5ºC (41ºF) or above 40ºC (104ºF).
Do not subject your Myou S1024 Computer to magnetic elds.
Do not expose your Myou S1024 Computer to rain or moisture.
Do not spill water or any liquid on your Myou S1024 Computer.
Do not subject your Myou S1024 Computer to heavy shock and vibration.
Do not expose your Myou S1024 Computer to dust and dirt.
Never place objects on top of your Myou S1024 Computer to avoid damaging your Myou S1024
Computer.
Never place your Myou S1024 Computer on uneven surfaces.
Use only a power adapter approved for use with your Myou S1024 Computer.
If your Myou S1024 Computer is not in use for a long time, disconnect it from mains to avoid possible
damage by transient over-voltage.
Never open the body of your Myou S1024 Computer. For safety reason, your Myou S1024 Computer
should only be opened by qualied service personnel.

44
ENGLISH
Taking Care of Your AC Adapter
Here are some ways to take care of your AC adapter:
Do not connect the adapter to any other device.
Do not step on the power cord or place heavy objects on top of it. Carefully route the power cord and
any cables away from all potential trafc.
When unplugging the power cord, do not pull on the cord itself but pull on the plug.
The total ampere ratings of the equipment plugged in should not exceed the ampere rating of the cord
if you are using an extension cord. Also, the total current rating of all equipment plugged into a single
wall outlet should not exceed the fuse rating.
Make sure the voltage of the power source when connect your Myou S1024 Computer to the power
outlet. If your are unsure of your local power specications, consult your dealer or local power company.
Taking Care of Your Battery Pack
Here are some ways to take care of your battery pack:
Use only batteries of the same kind as replacements. Turn the power off before removing or replacing
batteries.
Do not tamper with batteries. Keep them away from children.
Handle batteries carefully. Do not try to disassemble, crush, puncture, open, drop, mutilate, short
external contacts, disposed of in water or re, or expose it to temperatures higher than 60 C.
Recharge batteries only as described in this manual and only in ventilated areas. Never use an external charger other than the one supplied with your Myou S1024 Computer.
Do not leave batteries in hot locations for more than a day or two.

45
Cleaning & Maintenance
ENGLISH
Do not leave your battery in your Myou S1024 Computer for longer than 1 month without plugging in
the power adapter.
Do not leave battery in storage for more than 2 months without recharging it to prevent over discharge.
Over discharge will hurt the battery either.
Dispose of used batteries according to local regulations. Recycle if at all possible.
Cleaning & Serving
When cleaning your Myou S1024 Computer, follow these steps:
1. Power off your Myou S1024 Computer and remove the battery pack.
2. Disconnect the AC adapter.
3. Use a soft cloth moistened with water. Do not use liquid or aerosol cleaners.
Maintaining the LCD Quality
When it comes to screen problems, heat plays a big part. After a good working session, the typical
routine is to shut the machine and close the cover. But the display surface - no matter what type it is
- and the components inside the computer radiates heat; when you close the cover, you trap the heat
against the screen. Leave your Myou S1024 Computer’s cover open for about ten minutes while the
heat disperses. Make this a habit.
You should also enable the power management of your Myou S1024 Computer to turn off the LCD
power and
display when the system is in inactivity for some time. Adding screen savers is also acceptable.
Follow the safety guidelines mentioned earlier and how to clean your Myou S1024 Computer.

46
ENGLISH
Maintaining Your Hard Disk
Losing your data has the same consequences as a system break down. Users must make it a habit of
doing hard disk maintenance every week or so. Here is some maintenance you could do:
Always backup your data les from your hard disk.
Install the virus detecting program to monitor virus that could tamper your les.
Use SCANDISK once in a while to correct any errors found in the directory and File Allocation Table.
This will also free up space from any unused sectors.
Never move or raise the computer while the hard disk is being accessed, most especially don’t jar the
hard disk as this may cause a hard disk crash.
Use hard disk maintenance programs like Disk Defragmenter of Windows. These reorganize your hard
disk by eliminating fragmentation and improving your hard disk access time.
Install a system password in your computer so others won’t be able to use the hard disk.
Note: About maintaining data in your hard disk, please refer to Appendix II “Using the Express
Recovery Utility”.

47
Cleaning & Maintenance
ENGLISH
When You Travel
For safety and convenience when traveling, please follow these instructions:
Backup all needed les on your hard disk before traveling.
Recharge your battery overnight to ensure full battery power before you leave.
Don’t forget to bring along the AC adapter and extra battery pack.
Try to bring backup software as well.
Check the voltage rating and the outlet type of your destination. If the power cord of the adapter is different, then you need to purchase a suitable one. Consult your dealer.
Carry your Myou S1024 Computer in its carrying case or in a briefcase. Never check-in the computer
as a luggage.
Remember to apply those power saving features and techniques to save battery power.
Contact your dealer or see your service technician if any of the following occurs:
Your Myou S1024 Computer has been dropped or the body has been damaged.
Liquid has been spilled into the product.
Your Myou S1024 Computer does not operate normally

48
ENGLISH
Appendix I Specication
Processor
Intel® Atom 1.6GHz N270
OS
Microsoft Windows XP compliance
Core Logic
Intel® 945GSE
Memory
DDRII-533 1GB on board Memory
Video Interface
Intel® 945GSE
Display
10.1”LCD panel/WSVGA 1024x600, w/ LED Backlight Technology
Hard Disk Drive
1.8” ,5mm PATA HDD 60/80GB

49
Appendix
ENGLISH
Optical Drive
External ODD by USB connection
Input Device
Keyboard / Touch Pad
I/O Port
USB X 2, Mic in/Earphone out/DC-in
Media Card Reader / Expansion port connector VGA,
LAN support by expansion port.
Audio
Speaker 1 watt x 2, build-in Internal MIC
Bluetooth
BlueTooth 2.1 built-in
Web Camera
1.3M pixel CMOS camera

50
ENGLISH
LAN/Wierless LAN/3.5G
802.11b/g by mini-card / 10/100Mbit Ethernet support by expansin port / 3.5G by optional.
Keyboard
83 key keyboard
Battery
Prismatic 6 cell/pack 26.6W, Smart Battery support
Dimension &Weight
250 x 170 x 20.8mm
~900g (Including 6 cell battery)
Service
1 year global warranty
1 year battery warranty
More service information, please refer to
http://www.gigabyte.com.tw
..................................................................................................................................................................
The above specication is for users’ reference. The nal conguration depends on the Myou
S1024 Computer users bought.

51
Appendix
ENGLISH
Appendix II Recovery Update Notices
How to restore your Myou S1024 Computer to factory defaults
Time to restore: When your computer is infected by virus or there is any other reason that you want to
restore your operation system to the factory defaults.
Execute Xpress Recovery3 Lite (XR3 Lite) Professional Recovery Utility.Please take the following
procedures:
1. Start up your computer rst. Restart your computer if it has already booted into system.
2. Right after you see the startup screen (such as trademark, logo or text), the DOS screen will
appear. Press F9.
F9 is a typical hotkey to restore professional settings. Please consult with your computer
manufacture if your hotkey doesn’t function.
3. There are four options on the menu: “RESTORE” (to restore data), “ABOUT” (to display XR3
software related information) and “REBOOT” (to cancel the recovery and restart the computer).
We recommend you to select “RESTORE” to restore factory defaults.

52
ENGLISH
4. Then the prompt “Restore Image?” will appear on the menu. We recommend you to select “YES”
to restore an image le.* “Image le” is a compressed le that compresses all the Windows
operation system data. Recovery an image le allows you to restore your operation system to
factory defaults.
5. After all the selections have been made, the screen shows “RESTORE NOW…”, indicating your
computer is now recovering the operation system data. When the recovery is complete, the
computer will automatically restart and restore to factory defaults.

53
Appendix
ENGLISH
Appendix III Service Centers and Policy
This appendix will list our global service centers for your Myou S1024 Computer.
Taiwan GIGABYTE Service Center
6F, No.136, Jien-Yi Rd., Chung-Ho, Taipei Hsien, Taiwan.
TEL: +886-2-8227-6136
FAX: +886-2-8227-6163
WEB Address (English): http://www.GIGABYTE.com.tw/
WEB Address (Chinese): http://www.GIGABYTE.tw/
U.S.A. G.B.T. INC.
TEL: +1 (626) 854-9338
FAX: +1 (626) 854-9339
WEB Address: http://www.GIGABYTE.us

54
ENGLISH
China G.B.T. TECH. TRADING CO., LTD.
WEB Address: http://www.GIGABYTE.com.cn/
Shenzhen
TEL: +86-755-8240-8099
FAX: +86-755-8240-8066
Ninbo
TEL: +86-574-86869292
Fax: + 86-574-86860781
Beijing
TEL: +86-10-6297-8099
FAX: +86-10-6298-0499
Guangzhou
TEL: +86-20-3849-1240
FAX: +86-20-3849-1140
Shanhai
TEL: +86-21-5763-8748
FAX: +86-21-5763-8320

55
Appendix
ENGLISH
Xian
TEL: +86-29-85531943
FAX: +86-29-85519336
Germany
TEL: +49-40-2533-0433
Address: BULLENKOPPEL 16 22047 HAMBURG

56
ENGLISH
Warranty Clause
1. The warranty of the products of GIGABYTE shall commence from the date specied on the invoice
issued by the dealer. Consumers shall keep the purchase invoice properly to safeguard the legal
rights and interests.
2. To identify the warranty period of various products, please visist related webpages of GIGABYTE
at http://service.GIGABYTE.tw/ for query. The dealer shall be responsible for the warranty
provided or sold by the dealer itself.
3. The commencing date of warranty of products distributed or redistributed by business partners
shall be determined in accordance with Article 2.
4. This warranty does not cover the pre-installed software products, operating system, consumables
and other accessories (e.g. gifts/rucksack/disk/mouse/packaging material, etc).
5. In the absence of the sales invoice of the special dealer of GIGABYTE, the warranty period will be
determined based on the GIGABYTE label and serial number on the product.
6. In case there is no GIGABYTE label or serial number on the product, the serial number does not
match the product or is illegible, no warranty or aftersales service will be extended. In case of any
need for repair, contact the original dealer for assistance.
7. In case of any defect or malfunction in the product within 7 days from the purchase date (except
for the circumstance listed in Article 11), the consumer may request the original dealer to replace
the product with all accessories in the original packaging as well as the sales proof with a new one;

57
Appendix
ENGLISH
otherwise, the defect or malfunction will be treated by means of repair.
※
In case that the dealer has no stock for immediate replacement, it shall contact the agent as
soon as possible for replacement.
8. In case of any defect in the appearance of a new product attributed to human negligence, no
request shall be made to GIGABYTE for replacement with a new one.
9. Any product sent for repair shall be packed using the original packing material of the manufacturer
or appropriate materials (e.g. paper carton, air bag or poly foam). In case of damage during transit
due to improper packaging, GIGABYTE will not provide warranty services.
10. In case that a product sent for repair during the warranty period cannot be repaired, GIGABYTE
will replace the product with a comparable new product or an equivalent one.
11. This warranty will become invalid if the product fails or is damaged for the following reasons:
(1) Natural disaster, accident or human negligence
(2) Violation of the operating instructions in the user manual of the product
(3) Improper assembly or request for installation service
(4) Use of unauthorized accessories
(5) Use of the product not in the permitted environment
(6) Unauthorized disassembly
(7) Abnormal use
(8) Line or part oxidation
(9) Use of the product as testing device (e.g. RAM, VGA and USB test)
(10) Problems and malfunction resulting from computer virus
 Loading...