

Page 1

P55P55
V3.0
Page 2
Congratulations on your purchase of the GIGABYTE Notebook.
1
3
2
This manual will help you to get started with setting up your notebook. The final product
conguration depends on the model at the point of your purchase. GIGABYTE reserves the
right to amend without prior notice. For more detailed information, please visit our website at
www.gigabyte.com
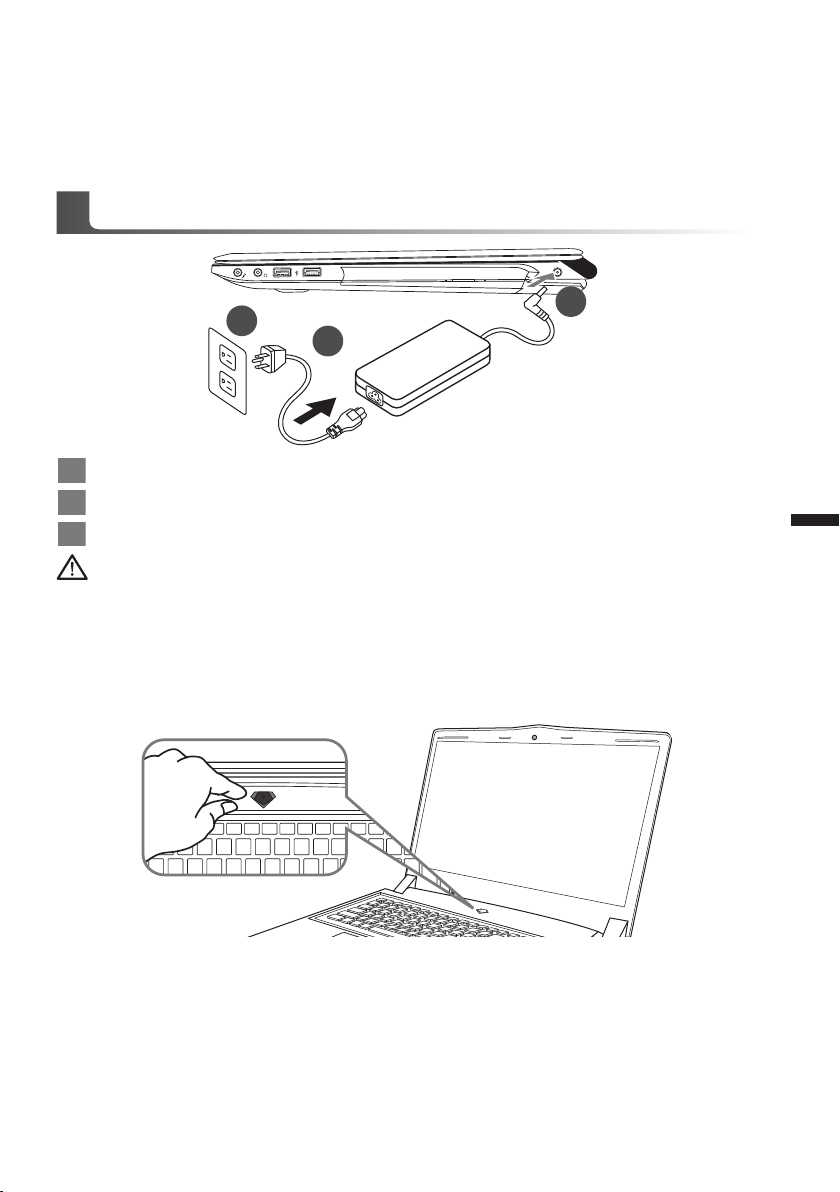
Using GIGABYTE Notebook for the First Time
1 Connect the power cord to the AC adapter.
2 Connect the AC adapter to the DC-in jack on the right side of the notebook.
3 Connect the power cord to the power outlet.
Wichtig!
•
Stellen Sie sicher, dass das Notebook mit Ihrem Netzteil verbunden und dieses an der Stechdose angeschlossen ist, wenn Sie das
Noteboon zum ersten mal einschalten.
•
Wenn Sie Ihr Notebook im Netzteil-Modus betreiben, stellen Sie sicher, dass die Steckdose nahe dem Notebook und leicht zu
erreichen ist.
•
Lokalisieren Sie das Input/Output-Label uf Ihrem Notebook und stellen Sie sicher, dass die Werte mit denen auf dem Netzteil
übereinstimmen. Einige Modelle können basierend auf den Spezi kationen unter schiedliche Werte aufführen.
•
Informationen zum Netzteil: Eingangsspannung: 100 -240 Vac / Eingangsfrequenz: 50-60 Hz / Ausgangsspannung: 19.5V
1
Deutsch
Switching on the Power
After you turn on the Notebook for the very rst time, do not turn it off until the operating system
has been congured. Please note that the volume for the audio will not function until Windows®
Setup has completed.
Booting Up the Notebook for the First Time
Depending on your conguration, the Microsoft® Windows® Boot Screen will be the rst screen that
you will see as the notebook starts up. Follow the on-screen prompts and instructions and enter
your personal information to complete the setup of the Windows® Operating System.
Page 3
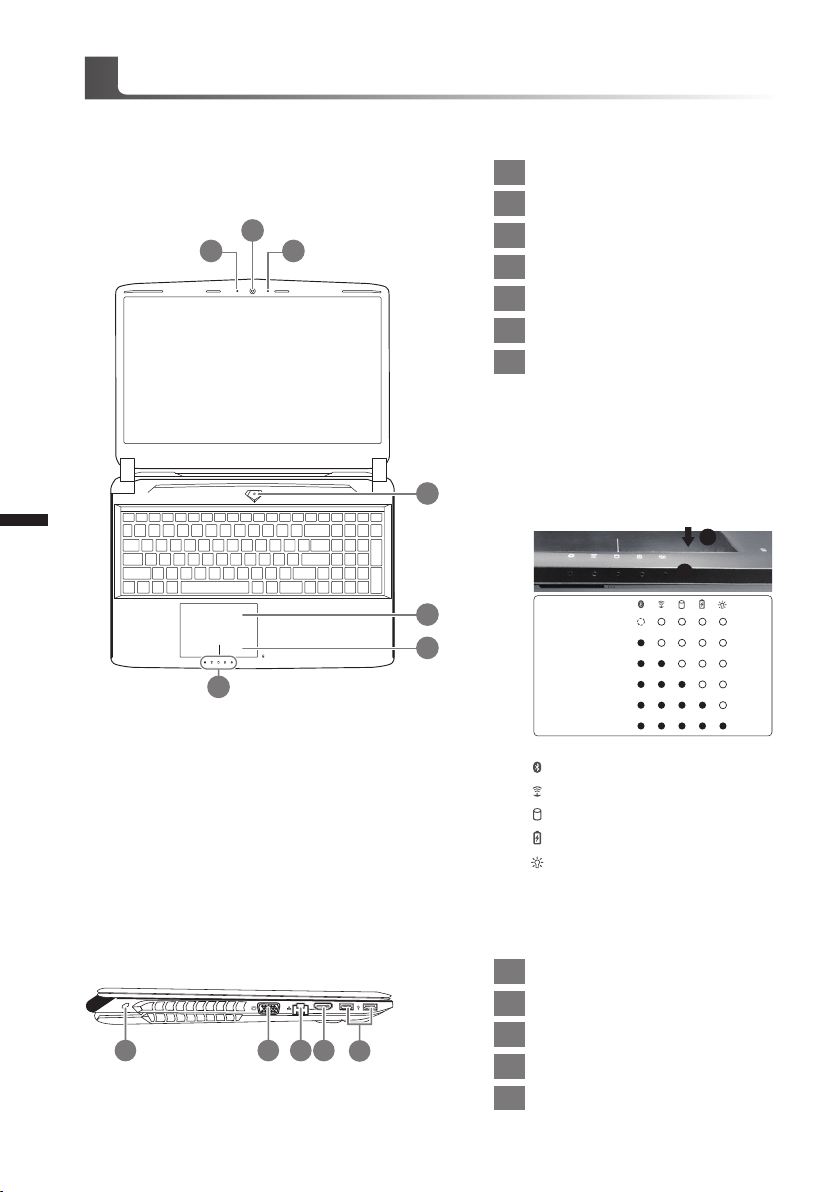
Übersicht Ihres GIGABYTE Notebooks
Ansicht von oben
2
2
1 3
1 Webcam Status Anzeige
2 Webcam
3 Mikrofon
4 Einschaltknopf
5 Touchpad
6 Akku Ladezustand Anzeige
LED Anzeigen
7
Drücken Sie den rechten Mausbutton
des Touchpads um den Akku Ladezustand zu überprüfen. Rechts-Klick
um die verbliebene Akku-Kapazität zu
prüfen. Wie unten zu sehen ist die Bat-
4
terieanzeige im Stand-by, Schlafmodus
wie auch im ausgeschalteten Zustand
verfügbar.(Akku-modus)
1
2
Deutsch
Ansicht von links
1 2 3 4
5
6
7
1 Kensington Lock
2 VGA-Anschluss
5
3 Netzwerkanschluss
4 HDMI Port
5 USB Port
<10%
11-30%
31-50%
51-70%
71-90%
>90%
Bluetooth Status Anzeige
wirelesse Lan Status Anzeige
HDD Status Anzeige
Akku Status Anzeige
Stromversorgungsstatus
Page 4
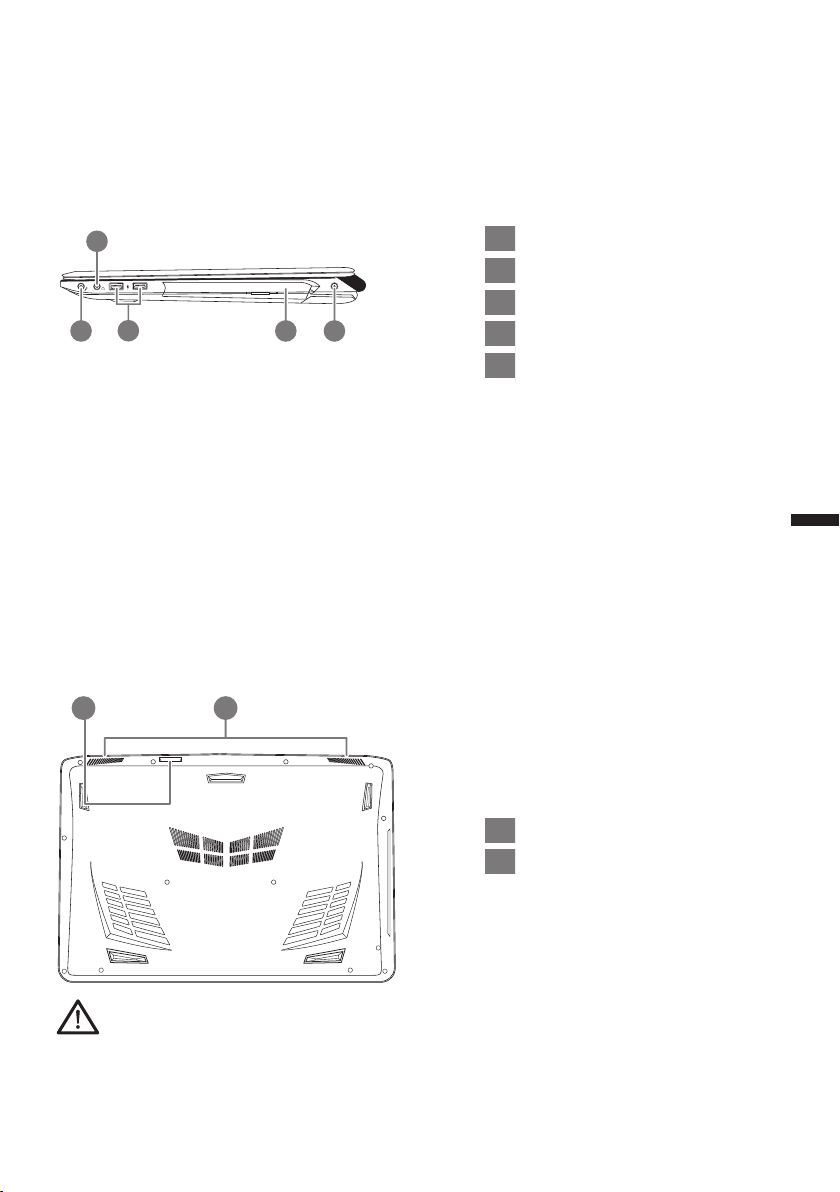
Ansicht von rechts
2
3
1 4 5
Ansicht von unten
21
1 Mikrofonaschluss
2 Kopfhöreranschluss
3 USB Port
4 Optisches Laufwerk
5 Stromeingangsbuchse
3
Deutsch
1 SD Card Reader
2 Lautsprecher
Achtung:
Entfernen Sie NICHT den eingebauten Lithium-Akku. Für jegliche Wartung kontaktieren Sie Ihre von
GIGABYTE authorisierte Service-Stelle.
Page 5

Schnelltasten
Das Notebook hat Hotkeys oder Tastatur Kombinationen für die meisten Funktionen wie
Bildschirmhelligkeit und Lautstärke. Um einen Hotkey zu aktivieren halten Sie die <Fn> Taste
gedrückt und drücken eine weitere Taste der Hotkey Kombination.
Hotkey Funktion Beschreibung
Fn + ~ Wiedergabe Medienwiedergabe Play/Pause
Fn + F1 Touchpad Schaltet das Touchpad an oder aus.
Schaltet das LCD-Display aus
Fn + F2 LCD Anzeige
Fn + F3 Lautsprecher Schaltet die Lautsprecher an oder aus.
(Drücken Sie eine beliebige Taste oder das
Touchpad um es wieder einzuschalten)
4
Fn + F4 Ruhezustand Versetzt den Computer in den Ruhezustand
Fn + F5 Lautstärke vermindern Vermindert die Lautstärke der Lautsprecher
Deutsch
Fn + F6 Lautstärke erhöhen Erhöht die Lautstärke der Lautsprecher
Fn + F7
Fn + F8 Helligkeit verringern Helligkeits des Bildschirms verringern
Fn + F9 Helligkeit erhöhen Helligkeits des Bildschirms erhöhen
Fn + F10 Webcam Schaltet die Webcam an oder aus.
Fn + F11
Fn + F12
Ausgabebildschirm
wechseln
Flugzeugmodus
Tastaturbeleuchtung
Wechselt zwischem dem Notebookbildschirm,
Externen Monitorausgang oder der Möglichkeit
beide gleichzeitig zu bereiben.
Schaltet den Flugzeugmodus AN/AUS
* Diese Funktion ist nur in bestimmten
Regionen verfügbar
Schaltet die Tastaturbeleuchtung EIN/AUS.
Page 6

GIGABYTE Software Anwendungen
GIGABYTE Smart Manager
Wenn das Gerät bereits mit einem Betriebssystem ausgeliefert wurde können Sie den
GIGABYTE Smart Manager mit einem Doppelklick auf das Desktop Icon starten. Der
GIGABYTE Smart Manager hat eine Grafische Benutzeroberfläche die es ermöglicht
Einstellungen und exklusive GIGABYTE grasche aufzurufen. Bitte beachten Sie das dies je
nach gekauften Modell unterschiedlich sein kann.
5
Deutsch
Page 7

Smart USB Backup Guide
ACHTUNG
● Sie können mit dieser Anwendung ein Backup Ihres Systems erstellen, um einen Verlust Ihres Systems
im Falle von Schäden am Gerät zu vermeiden.
● Sollten Sie die Datenträger ihres Gerätes austauschen, können Sie mit dieser Anwendung ein Backup
Ihres Systems erstellen und es nach dem Tausch der Datenträger wiederherstellen
● Bevor Sie Ihr System mit dem USB Backup wiederherstellen möchten, stellen Sie sicher, dass Sie ein
Backup Ihrer Dateien erstellt haben
● Bitte schließen Sie Ihr Gerät während des Backups an eine Stromquelle, schalten Sie Ihr System
während des Backups nicht aus und entfernen Sie nicht den USB- Datenträger
(Zuvor: Recovery Image USB)
6
Deutsch
1
2
3
4
>20G
• Bitte schließen Sie Ihren USBDatenträger mit mindestens 20GB
freiem Speicher an Ihrem Gerät an, um
ein Image Ihres Systems zu erstellen
(Bitte speichern Sie Ihre Daten von
Ihrem USB-Datenträger, da diese
Daten während des Vorgangs vom
USB-Datenträger entfernt werden)
• Legen Sie die Driver Disk in ihr
optisches Laufwerk und starten Sie die
Installation des "Smart USB Backup"
(Sollte kein optisches Laufwerk
integriert sein, nutzen sie bitte ein
externes optisches Laufwerk oder laden
sie den Treiber von folgender Seite
runter: http://www.gigabyte.com
• Starten Sie nach der Installation das
"Smart USB Backup"
• Wählen Sie vom Drop-Down Menü
Ihren USB-Datenträger und starten Sie
die Erstellung der Recovery USB Disk
5
• Nach der Erstellung der Recovery Disc erscheint ein neues Fenster
• Drücken Sie während des Startens des Systems die F12 Taste, falls Sie Ihr System
wiederherstellen möchten. Wählen Sie "boot from recovery disk". Ihr System wird nun
wiederhergestellt
• Die Wiederherstellung dauert etwa 30 Minuten (Die Zeit kann je nach Modell Ihres
USB-Datenträgers variieren)
Page 8

Anleitung zur Systemwiederherstellung
Systemwiederherstellung
Das Notebook hat eine versteckte Partition mit einer Kopie des Betriebssystems. Sollten Sie
Probleme mit dem Betriebssystem haben, können Sie jederzeit das Gerät auf Werkseinstellungen
zurücksetzen.
Bitte beachten
˙Falls die Festplatte gewechselt wurde oder die Partition gelöscht wurde, ist die
Wiederherstellungsoption nicht mehr verfügbar und das Gerät muß neu installiert werden.
˙Die Wiederherstellungsfunktion ist nur verfügbar wenn bereits bei der Auslieferung ein
Betriebssystem installiert ist. Geräte ohne Betriebssystem haben keine Wiederherstellungsfunktion.
Systemwiederherstellung starten
Die Systemwiederherstellung ist bereits vorinstalliert wenn das Gerät ausgeliefert wird.
Im Auswahlmenü können Sie die Systemwiederherstellung starten und das Gerät auf
Werkseinstellungen zurücksetzen.
In der Kurzanleitung nden Sie alle nötigen Informationen um Ihr System wiederherzustellen.
Achtung
Der PC ist jetzt betriebsbereit. Stellen Sie sicher das Ihr PC am Stromnetz ist. Der Vorgang wird
einige Minuten dauern.
Windows 7 Systemwiederherstellung
Schalten Sie das Gerät aus und starten Sie es neu.
1
7
Deutsch
2
3
Während das Notebook startet halten Sie die F9 Taste
gedrückt um das Programm zu starten.
Die Wiederherstellung beginnt und Sie sehen ein
Auswahlfenster. Wählen Sie „Recovery“ aus.
Achtung
Wenn „Recover y“ ausgewählt wird, werden alle
persönlichen Daten gelöscht und das Betriebsystem
wird auf Werkseinstellungen zurückgesetzt.
Page 9

4
Während der Wiederherstellungsprozess läuft wird Ihnen
ein Fortschrittsbalken angezeigt. Bitte vergewissern Sie
sich, dass Ihr Gerät sich am Stromnetz befindet und
schalten Sie das Gerät nicht aus.
8
Deutsch
5
Starten Sie das System nach Abschluss der
Systemwiederherstellung neu.
Windows 8.1 Systemwiederherstellung
Schalten Sie das Gerät aus und starten Sie es neu.
1
2
3
Wählen Sie „Troubleshoot“ um die Wiederherstellung zu starten. ( Sie können
auch „Continue“ auswählen um die Wiederherstellung zu beenden und
Windows 8.1 zu starten um zum Beispiel ein Backup zu erstellen)
Es gibt 2 Auswahlmöglichkeiten im Wiederherstellungsmenü
˙Refresh your PC - PC auffrischen
Sie können ihr Notebook auffrischen um die Systemstabilität zu verbessen
ohne Ihre Daten zu verlieren.
˙ Reset your PC - PC auf Werkseinstellungen zurücksetzen
Wenn Sie alle Dateien löschen wollen können Sie Ihren PC komplett
zurücksetzen.
Während das Notebook startet halten Sie die F9 Taste
gedrückt um das Programm zu starten.
Page 10

4
▓Refresh your PC - Wählen Sie „Refresh your PC“
Wählen Sie ein Konto, um fortzufahren.
Folgendes wird ausgeführt
˙Ihre Dateien und persönlichen Einstellungen werden nicht verändert
˙Ihre PC Einstellungen werden auf Werkseinstellungen gesetzt
˙Apps aus dem Windows Store bleiben erhalten
˙Apps die von Datenträgern oder Webseiten installiert wurden werden entfernt
˙Eine Liste der gelöschten Apps wird auf Ihrem Desktop gespeichert
▓▓ ▓▓▓
Reset your PC - Ihren PC auf Werkszustand setzen
Just remove my les - Nur Ihre Daten löschen
Nur persönliche Daten werden gelöscht aber die Computer Einstellungen
werden beibehalten.
Fully clean the drive - Das gesamte Lauf werk löschen
Das Laufwerk wird auf Werkseinstellungen zurückgesetzt > [Wählen Sie
„Reset“ um die Wiederherstellung auszuführen.]
folgendes wird ausgeführt
˙Alle persönlichen Daten und Programme werden gelöscht.
˙Ihr PC Einstellung werden auf Werkszustand gesetzt.
Advanced options - Erweiterte Optionen
System Restore - System Wiederherstellung
Wählen Sie einen Wiederherstellungspunkt von Windows der auf Ihrem PC
gespeichert ist
9
Deutsch
System Image Recovery - System Wiederherstellung per Image
Windows von einem bestimmten Image File wiederherstellen
Automatic Repair - Automatische Reperatur
Beheben Sie Probleme beim Start von Windows
Command Prompt - Kommandozeile
Nutzen Sie die Windows Kommandozeile zur Fehlerbehebung
UEFI Firmware Settings - UEFI Firmware Einstellungen
Änderung der UEFI Firmware Einstellungen
Startup Settings
Ändern Sie Windows Startup Verhalten
Page 11

Wärmeleitpad Installationsanleitung für eine mSSD im P55
Wenn Sie eine mSATA SSD in Ihr P55 einbauen möchten, empfehlen wir Ihnen diese Anleitung
genau zu lesen.GIGABYTE kann nicht für einen möglichen Schaden verantwortlich gemacht
werden der bei dem Einbau einer SSD entstehen kann. Bitte bedenken Sie dies vor dem Einbau.
10
Deutsch
1
• Packen Sie die mSATA SSD aus. • Packen Sie das Wäremeleitpad aus.
2
3-1 3-2
• Kleben Sie das Pad laut Abbildung auf die mSATA SSD. Achten Sie auf die goldenen Pins.
Page 12

4-1 4-2
• Stecken Sie die SSD in den mSATA Slot und befestigen Sie die Schrauben.
Achtung
●
GIGABYTE übernimmt für Schäden die durch Kunden verursacht wurden keine Verantwortung.
Bei Fragen wenden Sie sich bitte an ein autorisiertes GIGABYTE Service Center. Eventuell
anfallende Gebühren können je nach Land unterschiedlich sein.
Website: http://www.gigabyte.com/index.aspx
11
Deutsch
Page 13

12
Deutsch
Anhang
Garantie und Kundendienst:
Garantie- und Kundendiensthinweise sowie weitere Informationen finden Sie auf der
Garantiekarte oder den GIGABYTE-Kundendienstseiten:
http://www.gigabyte.com/support-downloads/technical-support.aspx
Häug gestellte Fragen:
Häug gestellte Fragen nden Sie hier:
http://www.gigabyte.com/support-downloads/faq.aspx
 Loading...