

Felicitaciones por su compra del Notebook GIGABYTE.
1
2
3
Este manual le ayudará a empezar a usar la notebook. La configuración del producto final
depende del modelo en el punto de su compra. GIGABYTE se reserva el derecho de modicar
sin previo aviso. Para obtener información más detallada, por favor visite nuestro sitio web en
www.gigabyte.com
El uso de GIGABYTE Notebook por primera vez
1
2
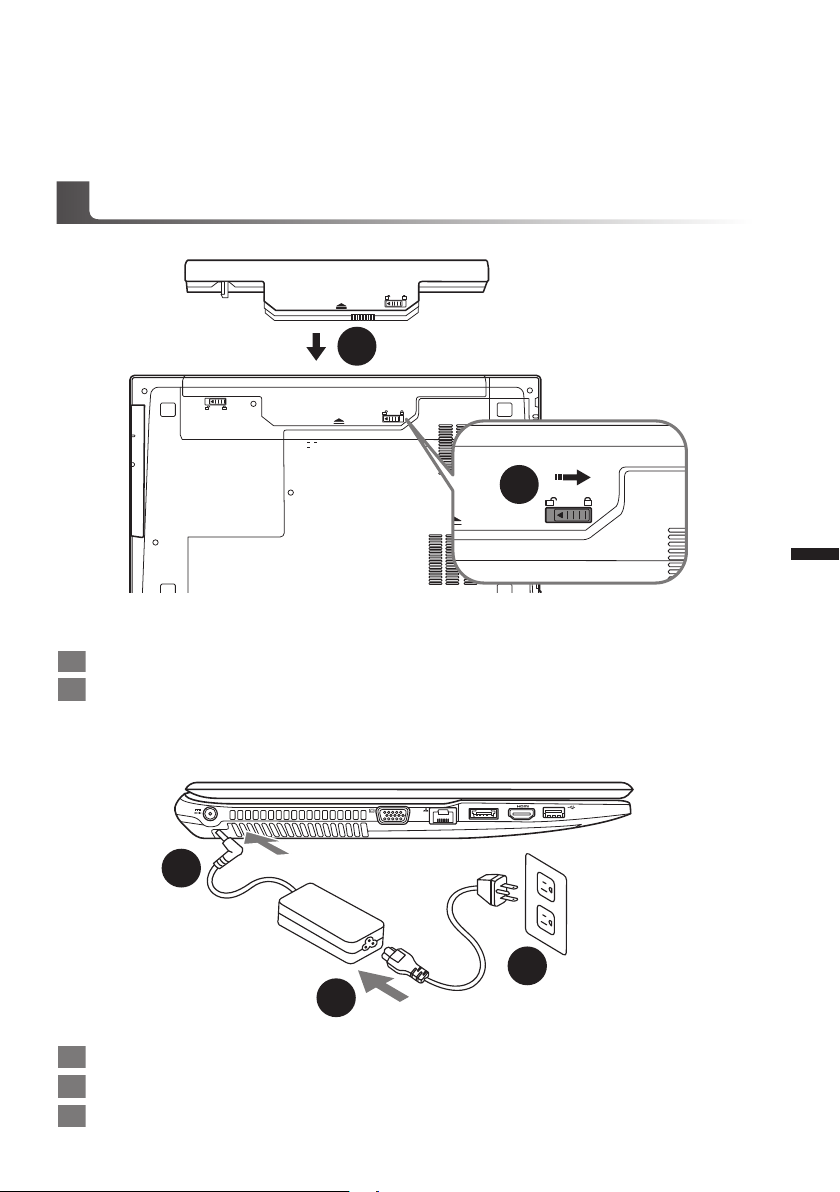
Para instalar la batería siga estos pasos:
1 Inserte la batería en el compartimento.
2 Recuerde deslizar el interruptor a la posición "Lock".
1
Español
1 Conecte el cable de alimentación al adaptador de CA.
2 Conecte el adaptador de CA a la entrada de CC en el lado derecho de la portátil.
3 Conecte el cable de alimentación a la toma de corriente.
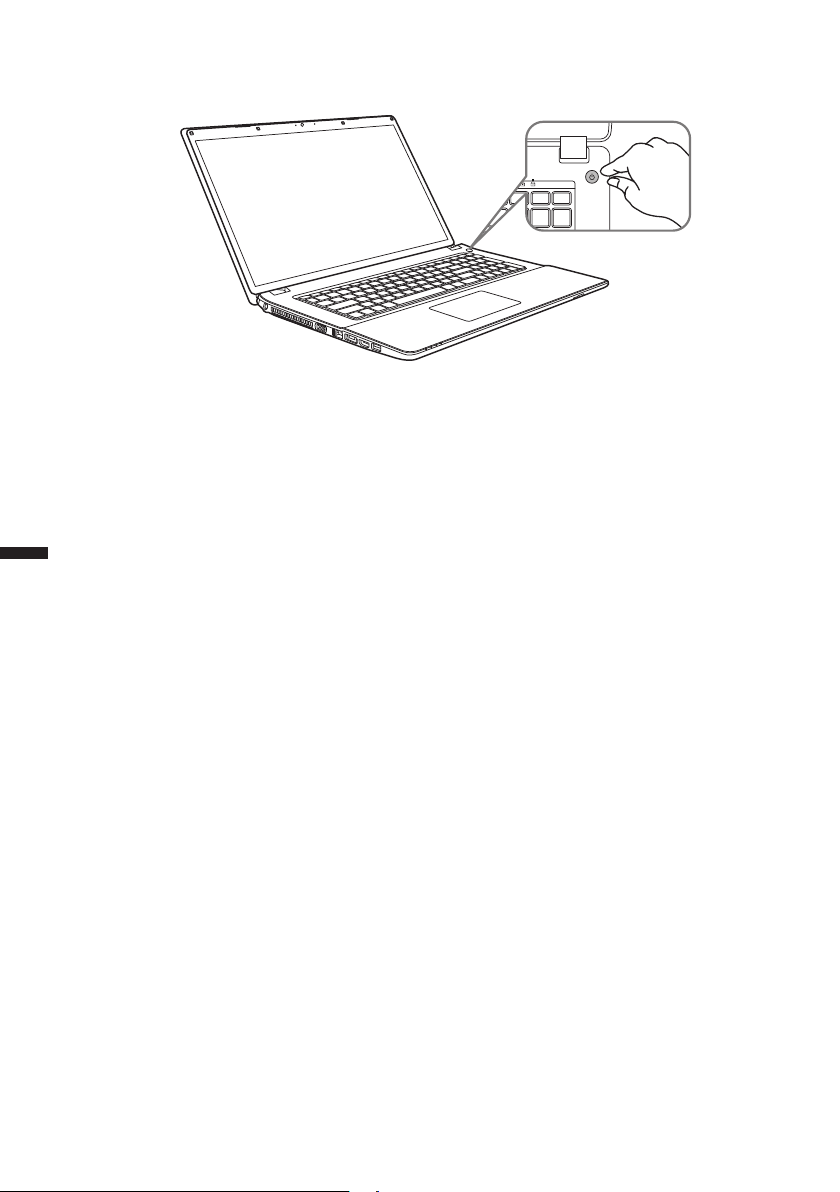
Activar el equipo
Después de activar la P17 por primera vez, no lo apague hasta que el sistema operativo haya sido
congurado. Tenga en cuenta que el volumen del audio no funcionará hasta que el programa de
instalación Windows® haya nalizado.
Arrancando la P17 por primera vez
2
Dependiendo de la conguración, la pantalla de Microsoft® Windows® Boot será la primera pantalla
que verá en la notebook . Siga las instrucciones que aparecen en pantalla y las instrucciones
e introduzca su información personal para completar la configuración del sistema operativo
Windows® .
Español
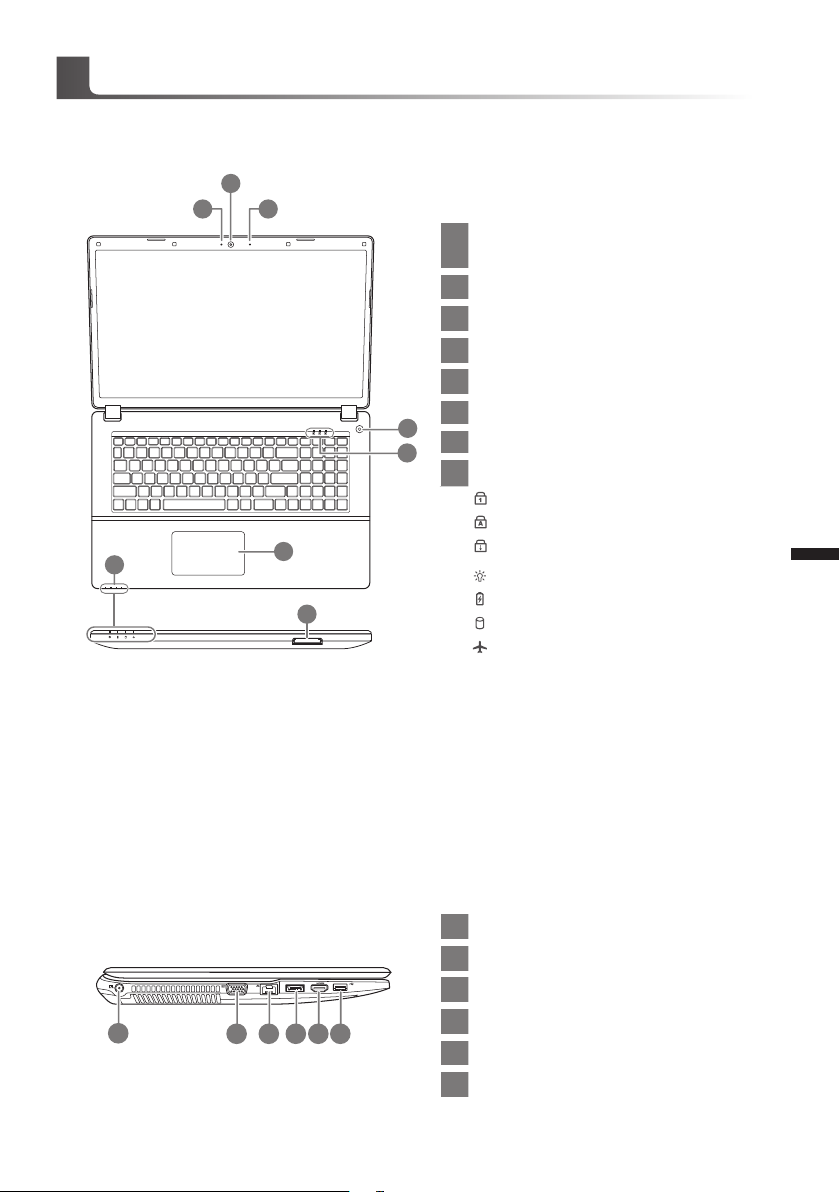
Tour GIGABYTE Notebook
Vista superior
2
1 3
7
6
8
Webcam de encendido / apagado
1
Indicador
2 cámara web
3 Micrófono incorporado
4 Botón de encendido
Indicadores LED
5
6 Touchpad y botones
4
7 Indicadores LED
5
Flash lector de tarjetas de memoria
8
Bloqueo Numérico activado
Bloq Mayús Activado
Scroll Lock Activated
Encendido / Suspendido Estado LED
Estado de la batería LED
HDD LED de estado
Estado del LED Modo de avión
3
Español
izquierda Vista
1
2 3 4 5 6
1 Entrada de corriente continua
2 D-Sub
3 LAN RJ 45
4 eSATA / USB 3.0 Combo
5 HDMI
6 USB 3.0

Vista derecha
4
Español
Vista inferior
1 Entrada de micrófono Jack
3 4
1
2
5 6
2 Salida de auriculares Jack
3 Puertos USB 2.0
4 Puertos USB 3.0
5 unidad óptica
6 Puerto de bloqueo Kensington
1
1 Batería
2 HDD y memoria Compartimiento
2

Hotkeys
La computadora utiliza accesos directos o combinaciones de teclas para acceder a los controles
más utilizados como el brillo de la pantalla y la salida de volumen. Para activar teclas de acceso
rápido, mantenga pulsada la tecla <Fn> antes de pulsar la tecla de la combinación de teclas
rápidas.
Hotkey Description Icon
Fn+Esc Centro de control Toggle (ver más)
Fan de palanca de control -
Fn+1
Fn+~ Reproducir / Pausa (en / Programas de Video Audio)
Fn+F1 Touchpad Toggle
Ventilador Automático
Control / Full Power
Fn+F2
Fn+F3 Toggle Mute
Fn+F4 Sleep Toggle
Fn+F5/F6 Disminución de volumen / Aumenta
Fn+F7 Display Toggle
Fn+F8/F9 Bright descreases / Aumenta
Fn+F10 Cámara de la PC de encendido y apagado
Fn+F11 Avión El modo Toggle
Gire LCD Backlight OFF
(Pulse una tecla o utilizar Tochpad para encender)
5
Español

Smart USB Backup Guide
WARNING
●You can backup or iginal recovery image through this application in case of losing by device damage.
● You can backup original recovery image to USB disk and restore the system if any storage system
replacement with the recovery USB disk.
● Before you restore the system through the recovery USB disk, please make sure that you have already
made the backup of your data.
●Please DO NOT shut down or un-plug the system when per forming backup through recovery USB disk.
(Original: Recovery Image USB)
1
6
Español
2
3
4
>20G
• Please plug in the USB disk which is
at least 20GB in capacity to make the
original image (backup the data in USB
rst. All data will be eliminated during
the creation of recovery USB disk)
• Insert the driver disk to your optical
drive and run the install of “Smart USB
Backup” (for none-ODD model, please
use USB ODD device or download
from http://www.gigabyte.com
• Run the “Smart USB Backup” after
nishing the install.
• Select your USB disk from the drop-
down list and start to create the
recovery USB disk.
5
• The window will pop out when the creation of recover y disk is done.
• Please press F12 on starting the system when you need to restore the system. Select
“boot from recovery USB disk” and the system will be restored.
• The time needed for restore will be around 30 mins(time needed may vary by USB disk
model) .

Recovery Guide
System Recovery (Restore your laptop operating system)
When something is going wrong with the laptop operating system, the storage of the laptop has
a hidden par tition containing a full back up image of the operating system that can be used to
restore the system to factory default settings.
Note
˙If the storage has been switched or the partition deleted, the recovery option will no longer be
available and a recovery service will be needed.
˙The recovery function is only available on devices with O/S preinstalled. Devices with DOS do not
have the recovery function.
Launch System Recovery
The system recovery feature is preinstalled before the laptop is shipped from the factory. The
option menu allows you to launch the Windows recovery tool to reinstall the operating system to
factory default.
The brief introduction below will show you how to start the recovery tool and restore your system.
All ready to go
Make sure your PC is plugged in. This will take a few minutes.
Windows 7 Recovery Guide
Turn off and restart the laptop.
1
2
3
4
During the laptop turn on process, press and hold F9
key to launch the tool.
The recover y will be activated and you will see the option
buttons on the window. Click on “Recovery” to start it.
Caution
Once the “Recover y” is selected, your personal
data and les will be deleted after the laptop st arts
restoring, and the operating system will be reset to
factory default settings.
A progress indicator bar will show on the window when
the recovery process is running. Please make sure the
AC-adapter is plugged in and do not turn off the laptop.
7
Español

5
Reinicie la computadora portátil después de la
recuperación del sistema se ha completado.
Windows 8.1 Guía de recuperación
Apague y reinicie el ordenador portátil.
1
2
8
Español
3
4
Durante la computadora portátil este en el proceso
de encendido, presione y mantenga la tecla F9 para
ejecutar la herramienta.
Seleccione la opción “Troubleshoot” para entrar en la conguración de recuperación.
(También puede elegir la opción “Continuar” para salir del sistema de recuperación y
continúe Windows 8.1 archivos o copias de seguridad de datos).
Hay dos opciones para la recuperación del sistema
˙Refresh your PC - Actualice su PC
Puede actualizar su ordenador portátil para mejorar la estabilidad del
sistema sin perder sus archivos.
˙ Reset your PC - Reinicie su PC
Si desea eliminar todos los archivos, puede reiniciar su PC por completo.
▓Refresh your PC - Seleccione la opción “Actualizar su PC”
Seleccione una cuenta para continuar.
Aquí es lo que va a suceder
˙Sus archivos y conguraciones personales no serán cambiados.
˙La configuración de PC se restaurará la configuración predeterminada de
fábrica.
˙Aplicaciones de Windows Store se mantendrá.
˙aplicaciones instaladas desde los discos o sitios web serán eliminados.
˙La lista de aplicaciones eliminadas se guardará en el escritorio.

▓▓ ▓▓▓
Reset your PC - Reinicie su PC
Just remove my les - Basta con retirar mis archivos
Sólo los datos personales y archivos serán eliminados, pero la
conguración del equipo será mantenida.
Fully clean the drive - Completamente limpie la unidad
El disco será completamente restablecido a sus valores predeterminados
de fábrica. Se necesita más tiempo. > [Haga clic en “Reset” para
ejecutar la función de recuperación.]
Aquí es lo que va a suceder
˙Todos tus archivos personales y aplicaciones serán eliminados.
˙La configuración de PC se restaurará la configuración predeterminada de
fábrica.
▓Advanced options - opciones avanzadas
System Restore - Restaurar sistema
Utilice un punto de restauración grabado en su PC para restaurar Windows
System Image Recovery - Sistema de recuperación de la imagen
Recuperar Windows utilizando un archivo de imagen del sistema especíco
Automatic Repair - Reparación automática
Solucionar problemas que impiden que Windows se cargue
Command Prompt - Símbolo del sistema
Utilice la línea de comandos para avanzados trobleshooting
9
Español
UEFI Firmware Settings - UEFI rmware Conguración
Cambiar la conguración de UEFI rmware de tu PC
Conguración de inicio
Cambiar el comportamiento de inicio de Windows

10
Apéndice
Garantía y servicio :
Garantía y servicio técnico e información relacionada, consulte la tarjeta de garantía
GIGABYTE o sitio web del servicio como en el siguiente enlace:
http://www.gigabyte.com/support-downloads/technical-support.aspx
FAQ :
FAQ (Preguntas Frecuentes) por favor consulte el siguiente enlace:http://www.gigabyte.com/
support-downloads/faq.aspx
Español
 Loading...