

Page 1

Minimum System Requirements
• IBM® or 100% PC compatible with Pentium® III 650MHz or AMD Athlon 650MHz class
processor or higher
• One available AGP 3.0 compliant slot or better
• Operating Systems Win® 2000 / Win® XP
• 64MB system memory
• 50MB of available disk space for full installation
• CD-ROM or DVD-ROM drive
Table of Contents
1. Introduction ............................................................................................................ 2
1.1. Features .....................................................................................................................................2
1.2. Board Layout ............................................................................................................................. 2
2. Hardware Installation ..............................................................................................5
3. Software Installation ................................................................................................ 6
3.1. DirectX Installation .....................................................................................................................6
3.2. Driver Installation (Windows® XP/2000) ..................................................................................6
3.3. V-Tuner 2 Installation .................................................................................................................7
3.4. HYDRAVISIONTM Installation ................................................................................................. 7
4. Appendix ............................................................................................................... 8
4.1. BIOS Flash Utility ....................................................................................................................8
4.2. How to Reflash BIOS in MS-DOS mode ...............................................................................8
4.3. Resolutions and Color Depth Table (In Windows® XP) ...........................................................8
English
12MD-R955128D-106
- 1 -
Page 2
English
1. Introduction
1.1. Features
• Powered by ATI Radeon 9550 Visual Processing Unit (VPU)
• Supports AGP 8X
• Supports Microsoft® DirectX® 9.0 and OpenGL® 1.5 feature sets
• Integrated with 128 MB DDR memory (only for GV-R955128D/GV-R955128DE/GV-R955128T)
• Integrated with 256 MB DDR memory (only for GV-R955256D/GV-R955256DP)
• Supports TV-Out, D-Sub, and DVI-I (only for GV-R955128D/GV-R955256D/GV-R955256DP/
GV-R955128DE) connectors
1.2. Board Layout
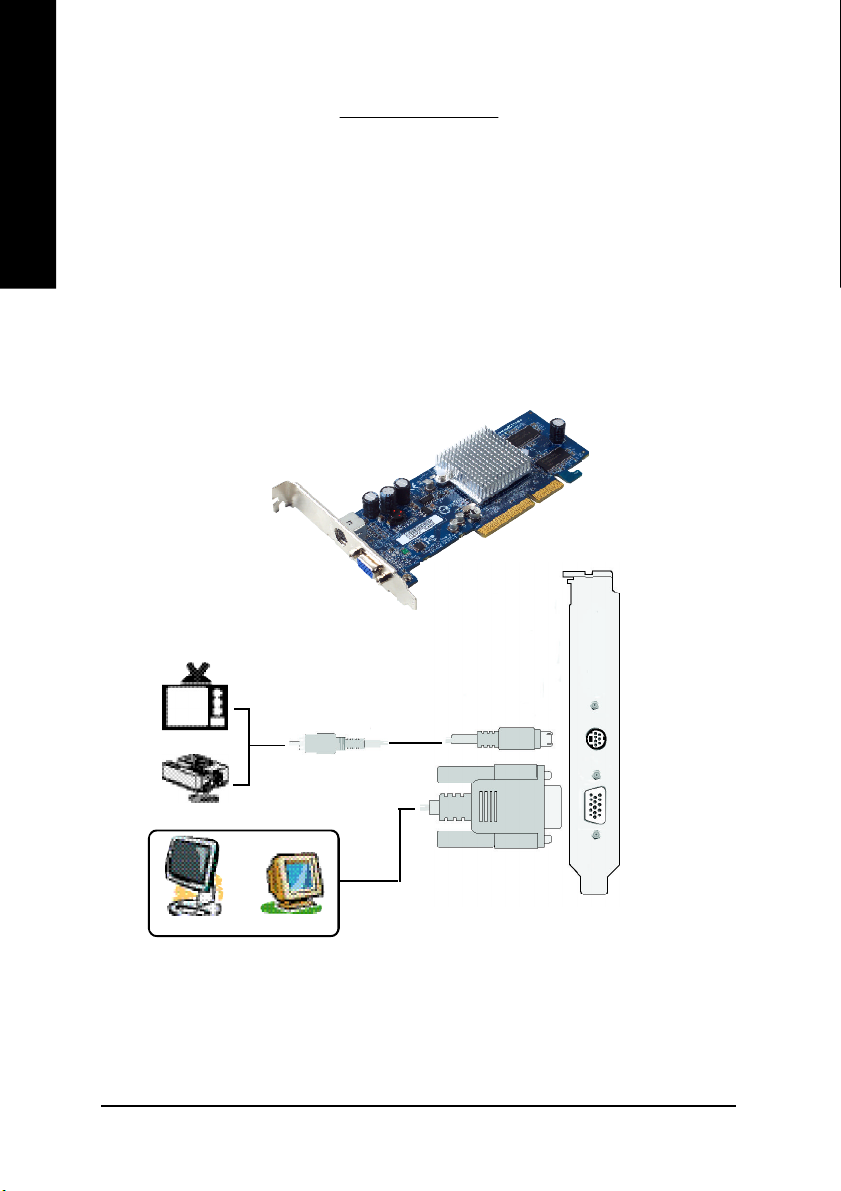
1. GV-R955128T
TV- Out
VGA Monitor Conn ector
(15-pin)
NTSC / PAL TV
Project or
OR
Ana log LCD Monitor Ana log Mon itor
AV Ou tput
TV-Out (S-Video )
VGA Mon it or Conne ctor
(15 -pin)
VGA Ou tput
- 2 -
Page 3
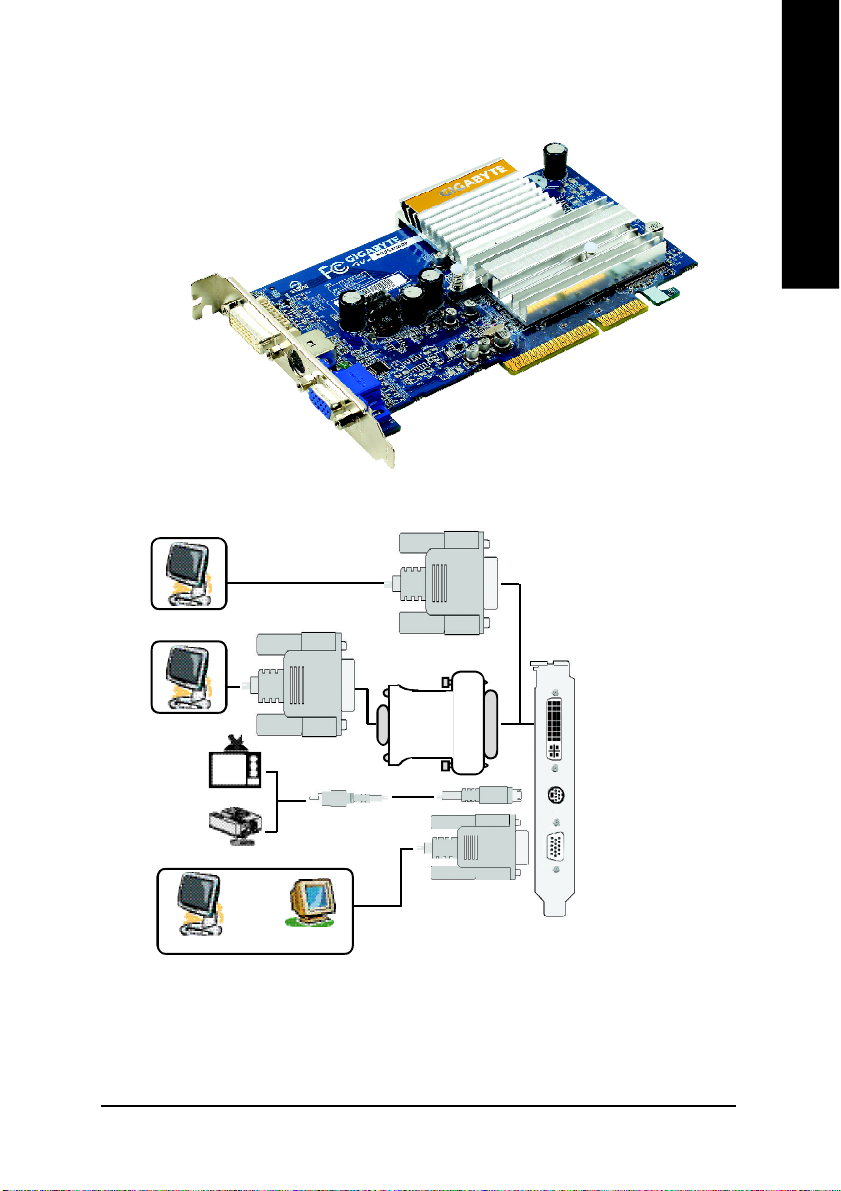
2. GV-R955256DP
DVI-I Connector
VGA Monitor Connector
(15-pin)
Digital LCD Monito r
English
TV- Out
DVI Output
DVI-I to D -Sub C onnect or
Ana log LCD Monitor
NTSC / PAL TV
Project or
Ana log LCD Monitor
OR
Ana log Mon itor
VGA Ou tput
AV Ou tput
DVI-I Con nector
TV-Out (S-Video )
VGA Mon it or Conne ctor
(15 -pin)
VGA Ou tput
- 3 -
Page 4

English
3. GV-R955128D/GV-R955256D
DVI-I Connector
TV- Out
VGA Monitor Connector
(15-pin)
DVI Output
Digital LCD Monito r
DVI-I to D -Sub C onnect or
Ana log LCD Monitor
NTSC / PAL TV
Project or
Ana log LCD Monitor
OR
Ana log Mon itor
VGA Ou tput
AV Ou tput
DVI-I Con nector
TV-Out (S-Video )
VGA Mon it or Conne ctor
(15 -pin)
VGA Ou tput
- 4 -
Page 5

4. GV-R955128DE
English
TV- Out
DVI-I Connector
NTSC / PAL TV
Project or
Digital LCD Monito r
Ana log LCD Monitor
AV Ou tput
DVI Output
TV-Out (S-Video )
DVI-I Con nector
DVI-I to D -Sub C onnect or
VGA Ou tput
2. Hardware Installation
Installing your graphics card.
Now that you have prepared your computer, you are ready to install your graphics card.
1. Locate th e
A G P slot . I f
necessary, remove the metal
cover from this
slot; then align
you r gra phi cs
card with the AGP slot, and press it in firmly until
it is fully seated.
3. Plug the display cable into your card; then turn on the
computer and monitor.
2. Replace the
screw to fasten
the card in place,
and replace the
computer cover.
- 5 -
Page 6

3. Software Installation
English
3.1. DirectX Installation
Install Microsoft DirectX to enable 3D hardware acceleration support for Windows® 2000/ Windows® XP
to achieve better 3D performance.
Note: For software MPEG support in Windows® 2000/ Windows® XP, you must install
DirectX first. Users who run Windows XP with Service Pack 2 or above do not need to install
DirectX separately.
When the Autorun window appears, click In-
stall DirectX 9.
3.2. Driver Installation (Windows® XP/2000)
Insert the driver CD disk into your CD-ROM drive, and then the Autorun window appears. If it does
not appear, please run SETUP.exe in the root directory of the driver CD disk (ex:D:\SETUP.exe).
Click Install Display Drivers (Radeon 9550
Series).
- 6 -
Page 7

3.3. V-Tuner 2 Installation
V-Tuner 2 monitors the working frequency of the graphics engine and video memory (Core Clock and
Memory Clock).
Click GIGABYTE Utility.
English
Displays core clock
Open Help pages
Displa ys memory cloc k
Select choice of
skin
3.4. HYDRAVISIONTM Installation
HYDRAVISIONTM and the Desktop Manager are activated whenever Windows® starts. Installing
HYDRAVISIONTM adds menu options to the ATI Icon.
Click on the ATI icon to access the application's features and help, or to unload the HYDRAVISION
Desktop Manager.
Click Hydravision Install.
TM
- 7 -
Page 8

4. Appendix
English
4.1. BIOS Flash Utility
1. Please download the newest BIOS Zip file for your graphics card from GIGABYTE website.
The file includes a MS-DOS-based BIOS flash utility. Or contact your local dealer for the file.
4.2. How to Reflash BIOS in MS-DOS mode
1. Extract the downloaded Zip file to your hard disk or floppy disk. This procedure assumes drive A.
2. Restart the computer in MS-DOS mode. (For Windows 2000/XP, you need a startup disk to restart
the computer in MS-DOS mode.)
3. Change the command prompt to A:\>.
4. To back up the current BIOS, at the A:\> prompt, type[BIOS flash utility name] -
s [BIOS file name](example: gvf13 -s r955128d.f1) and press Enter.
5. To flash BIOS, at the A:\> prompt, type [BIOS flash utility name] -p [BIOS
file name](example: gvf13 -p r955128d.f2) and press Enter.
6. Wait until it's done, then restart your computer.
4.3. Resolutions and Color Depth Table (In Windows® XP)
Display Max. Refresh Color Depth
Screen Rate 8bpp(256 color) 16bpp(65 K color) 32bpp(16.7M)
Resolution (Hz) Standard Mode High Mode Tru e Mode
640 x 480 200 P P P
800 x 600 200 P P P
1024 x 768 200 P P P
1152 x 864 100 P P P
1280 x 768 85 P P P
1280 x 960 160 P P P
1280 x 1024 120 P P P
1600 x 1200 100 P P P
1792 x 1344 85 P P P
1800 x 1440 70 P P P
1856 x 1392 75 P P P
1920 x 1080 75 P P P
1920 x 1200 85 P P P
1920 x 1440 75 P P P
2048 x 1536 66 P P P
- 8 -
 Loading...