

Page 1

GV-R92128TE
Upgrade your Life
Radeon 9200 Graphics Accelerator
USER'S MANUAL
R92128TE_101.p65 2003/6/30, 下午 04:101
Rev. 101
12MD-R92128TE-101
Page 2

English
Copyright
Copyright by GIGA-BYTE TECHNOLOGY CO., LTD. ("GBT") No part of this manual may
be reproduced or transmitted in any from without the expressed, written permission of GBT.
Trademarks
Third-party brands and names are the property of their respective owners.
Notice
Due to rapid change in technology, some of the specifications might be out of date
before publication of this booklet.
The author assumes no responsibility for any errors or omissions which may appear in this
document nor does it make a commitment to update the information contained herein.Please
do not remove any labels on VGA card, this may void the warranty of this VGA card.
Chapter 1 User's Manual
This product incorporates copyright protection technology that is protected by method claims
of certain U.S. patents and other intellectual property rights owned by Macrovision Corpo-
ration and other rights owners. Use of this copyright protection technology must be autho-
rized by Macrovision Corporation, and is intended for home and other limited
viewing uses only unless otherwise authorized by Macrovision Corporation. Reverse engi-
neering or disassembly is prohibited.
GV-R92128TE Graphics Accelerator - 2 -
R92128TE_101.p65 2003/6/30, 下午 04:102
Jun 24, 2003 Taipei, Taiwan
Page 3

TABLE OF CONTENTS
1. INTRODUCTION ...................................................................................... 4
1.1. PREFACE ............................................................................................... 4
1.2. KEY FEATURES ..................................................................................... 4
2. HARDWARE INSTALLATION ..................................................................5
2.1. UNPACKING ........................................................................................... 5
2.2. BOARD LAYOUT .....................................................................................6
2.3. HARDWARE INSTALLATION ................................................................... 7
3. SOFTWARE INSTALLATION .................................................................. 9
3.1. WINDOWS® 98 /98SE / WINDOWS® ME / WINDOWS® XP DRIVER
AND UTILITIES INSTALLATION ............................................................. 9
3.1.1. OPERATING SYSTEM REQUIREMENT ................................................................ 9
3.1.2. DIRECTX INSTALLATION ......................................................................................10
3.1.3. DRIVER INSTALLATION ........................................................................................12
3.1.4. UTILITIES ON DRIVER CD ................................................................................... 15
3.1.5. TASKBAR ICON ....................................................................................................18
3.1.6. DISPLAY PROPERTIES PAGES ............................................................................22
3.2. WINDOWS 2000 DRIVER INSTALLATION ..............................................30
3.3. BIOS FLASH UTILITY ........................................................................... 30
English
4. TROUBLESHOOTING TIPS ..................................................................31
5. APPENDIX............................................................................................. 32
R92128TE_101.p65 2003/6/30, 下午 04:103
Table of Content- 3 -
Page 4

1. INTRODUCTION
English
1.1. PREFACE
performance in its class, optimized for today's most compelling gaming environments and
applications. Driven by an advanced quad-pipe architecture, GV-R92128TE support the
AGP 8X standard, doubling the bandwidth of competing products and enabling more engaging
characters and effects.
1.2. KEY FEATURES
GV-R92128TE deliver a dazzling 3D experience to PC enthusiasts with the best
n Powered by the RADEON
™
9200 GPU and 128MB DDR memory for advanced 3D
graphics
n 250MHz engine and 333MHz DDR memory clock speeds
n Supports the new AGP 8X standard
n HYPER Z
n SMOOTHVISION
™
II technology integrate
™
eliminates distracting visual artifacts for smoother looking
images and without seriously compromising performance
n Dual display support with HYDRAVISION
™
n TV-Out supported
GV-R92128TE Graphics Accelerator - 4 -
R92128TE_101.p65 2003/6/30, 下午 04:104
Page 5
2. HARDWARE INSTALLATION
2.1. UNPACKING
The GV-R92128TE package contains the following:
l The GV-R92128TE graphics accelerator x 1
l This USER'S MANUAL
l CD Driver x 1
WARNING!
Expansion cards contain very delicate Integrated Circuit (IC) chips. To protect them against
damage from static electricity, you should follow some precautions whenever you work on your
computer.
1. Turn off your computer and unplug power supply.
2. Use a grounded wrist strap before handling computer components. If you do not have one,
touch both of your hands to a safely grounded object or to a metal object, such as the power
supply case.
3. Place components on a grounded antistatic pad or on the bag that came with the
components whenever the components are separated from the system.
The card contains sensitive electric components, which can be easily damaged by static electricity,
so the card should be left in its original packing until it is installed.
Unpacking and installation should be done on a grounded anti-static mat. The operator should be
wearing an anti-static wristband, grounded at the same point as the anti-static mat.
Inspect the card carton for obvious damage. Shipping and handling may cause damage to your
card. Be sure there are no shipping and handling damages on the card before proceeding.
M DO NOT APPLY POWER TO YOUR SYSTEM IF IT HAS BEEN DAMAGED ON THE
CARD.
M In order to ensure your graphics card working correctly, please use official Gigabyte BIOS
only. Use none official gigabyte BIOS might cause problem on the graphics card.
English
R92128TE_101.p65 2003/6/30, 下午 04:105
Hardware Installation- 5 -
Page 6
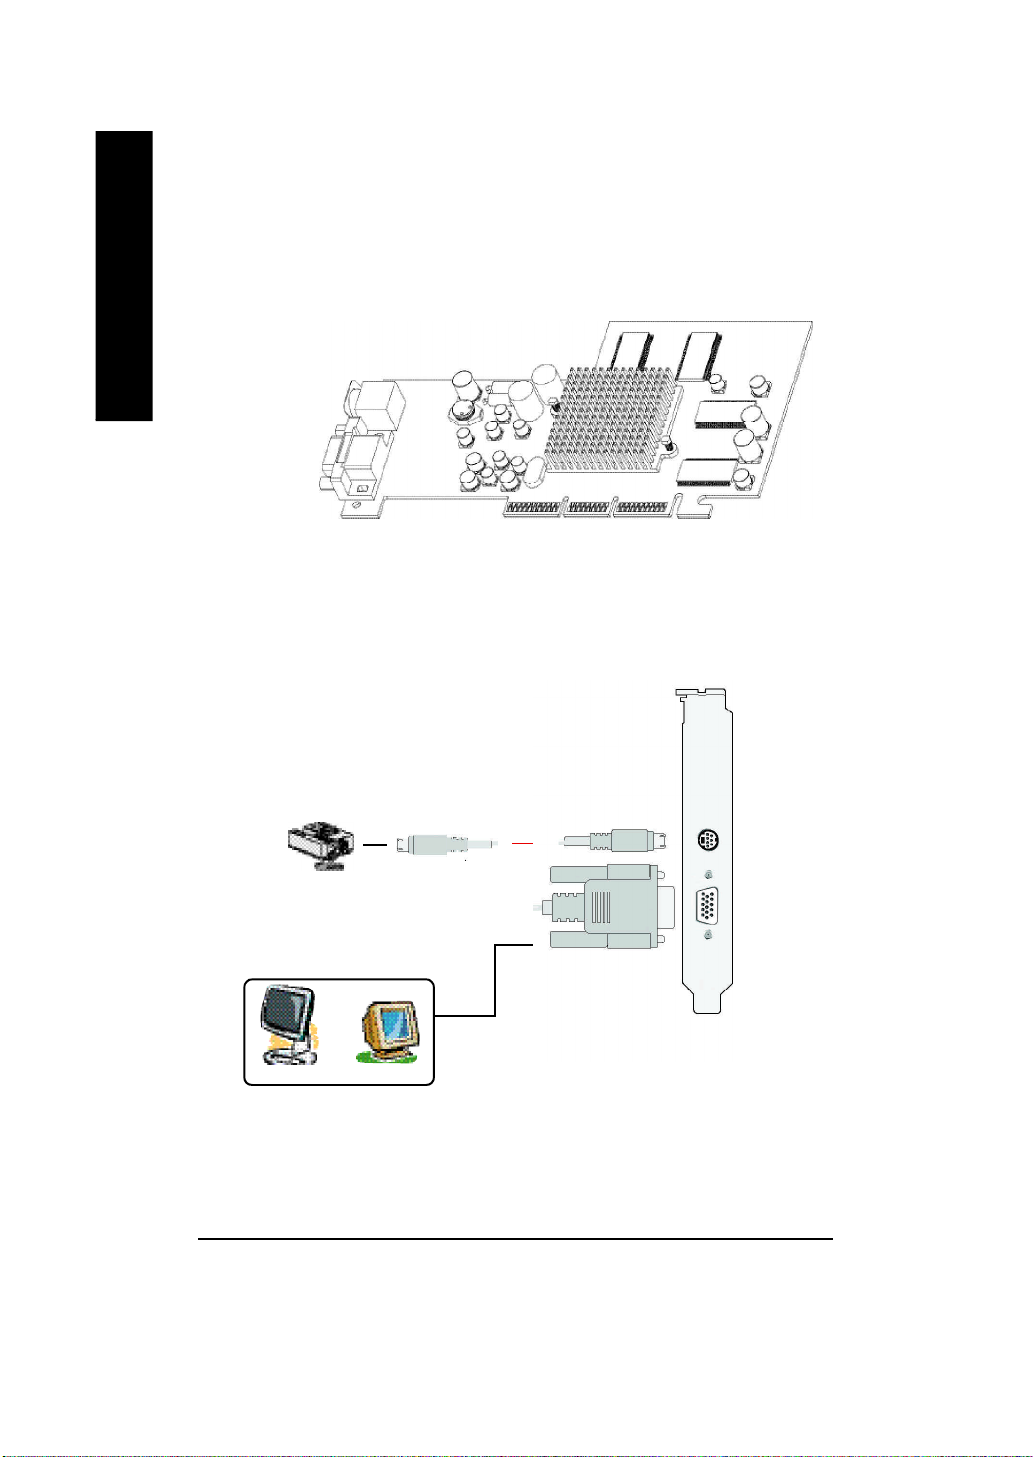
2.2. BOARD LAYOUT
1) GV-R92128TE (128MB DDR)
English
TV-Out
VGA Monitor
Con nector
(15p in )
Projector
OR
Analog LCD M onitor
Analog M onitor
GV-R92128TE Graphics Accelerator - 6 -
R92128TE_101.p65 2003/6/30, 下午 04:106
S-VideoOut put
VGA Output
S-VID-OUT
VGA Monitor
Con nector
(15p in )
Page 7
2.3. HARDWARE INSTALLATION
Installing your graphics card.
Now that you have prepared your computer, you are ready to install your graphics accelerator
card.
To install your graphics accelerator card:
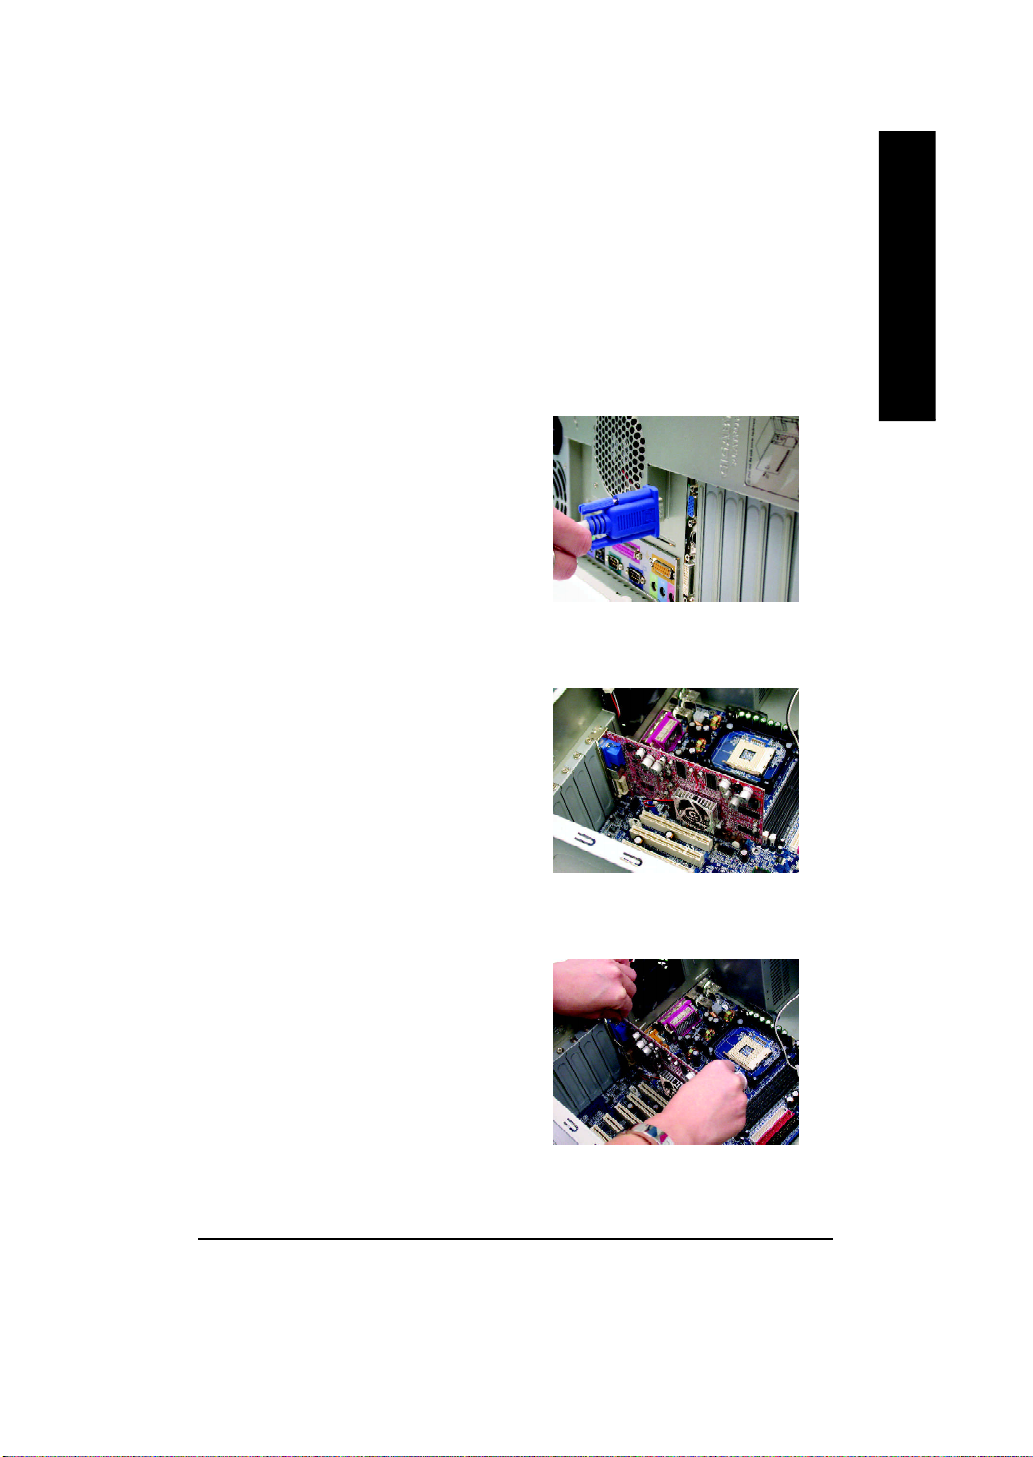
1. Power off the computer and monitor, then
disconnect the display cable from the back
of your computer.
2. Remove the computer cover. If necessary,
consult your computer's manual for help in
removing the cover.
English
3. Remove any existing graphics card from
your computer.
Or, if your computer has any on-board
graphics capability, you may need to disable
it on the motherboard. For more information,
see your computer's
documentation.
R92128TE_101.p65 2003/6/30, 下午 04:117
Hardware Installation- 7 -
Page 8
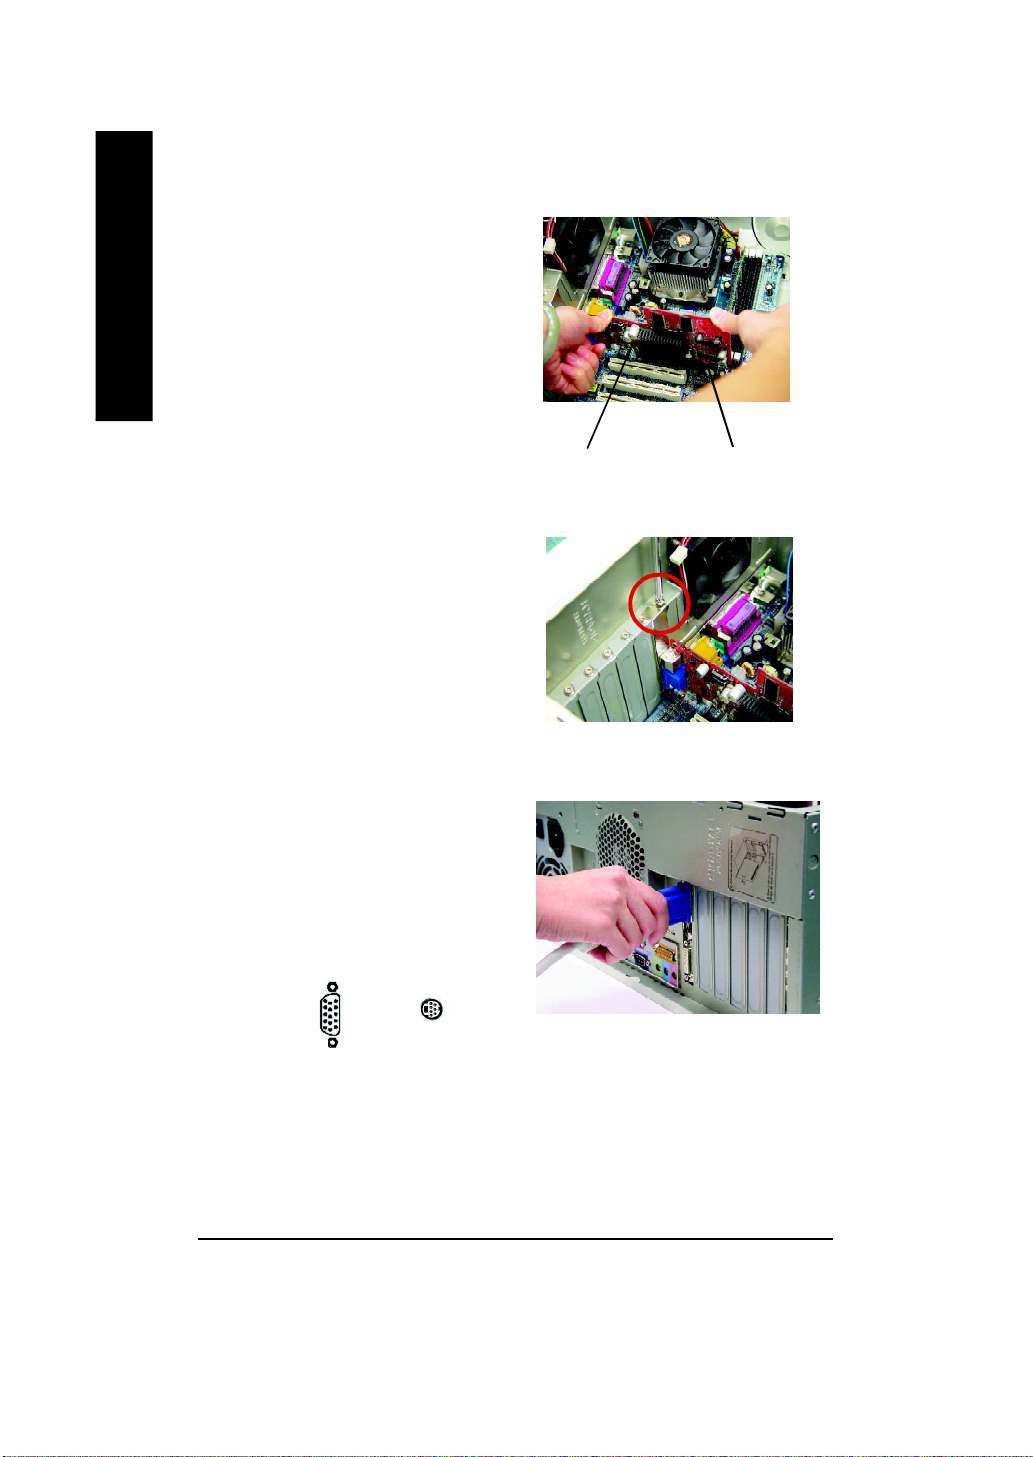
4. Locate the AGP slot. If necessary, remove
English
5. Replace the screw to fasten the card in place,
the metal cover from this slot; then align your
graphics card with the AGP slot, and press it
in firmly until the card is fully eated.
AGP slotGV-R92128 TE graphics card
and replace the computer cover.
6. Plug the display cable into your card; then
turn on the computer and monitor. If your
graphics card came with a DVI connector,
you can connect a flat panel display to the
appropriate connector, as shown below...
To VGA MONITOR
You are now ready to proceed with the installation of the graphics card driver. For detailed
instructions, select your operating system from the list below.
GV-R92128TE Graphics Accelerator - 8 -
R92128TE_101.p65 2003/6/30, 下午 04:118
To TV or VCR
Page 9

3. SOFTWARE INSTALLATION
In this manual, we assume that your CD-ROM Drive letter to be Drive D:
3.1. WINDOWS® 98 /98SE / WINDOWS® ME / WINDOWS® XP DRIVER
AND UTILITIES INSTALLATION
The installation of Win® 98/98SE / WINDOWS® 2000 / Win® ME / Win® XP drivers is very
simple. When you insert the driver CD into your CD-ROM drive, you can see the AUTORUN
window (if it does not show up, run "D:\setup.exe"). Then you can follow guides to setup
your GV-R92128TE driver (Please follow the subsection 3.1.3 "Step By Step Installation" to
install the driver for your GV-R92128TE graphics accelerator.
3.1.1. Operating system requirement
l If your OS is Microsoft Windows, when loading the GV-R92128TE drivers for the
system, please make sure your system (Windows 98/98SE, Windows2000 or Windows
ME) has installed DirectX or later.
English
l If you install the GV-R92128TE drivers for the motherboard, which consist of SIS, ALI
or VIA chipsets, please install the appropriate Driver program for that motherboard. Or
please contact your motherboard nearest dealer for M/B Driver.
R92128TE_101.p65 2003/6/30, 下午 04:119
Software Installation- 9 -
Page 10
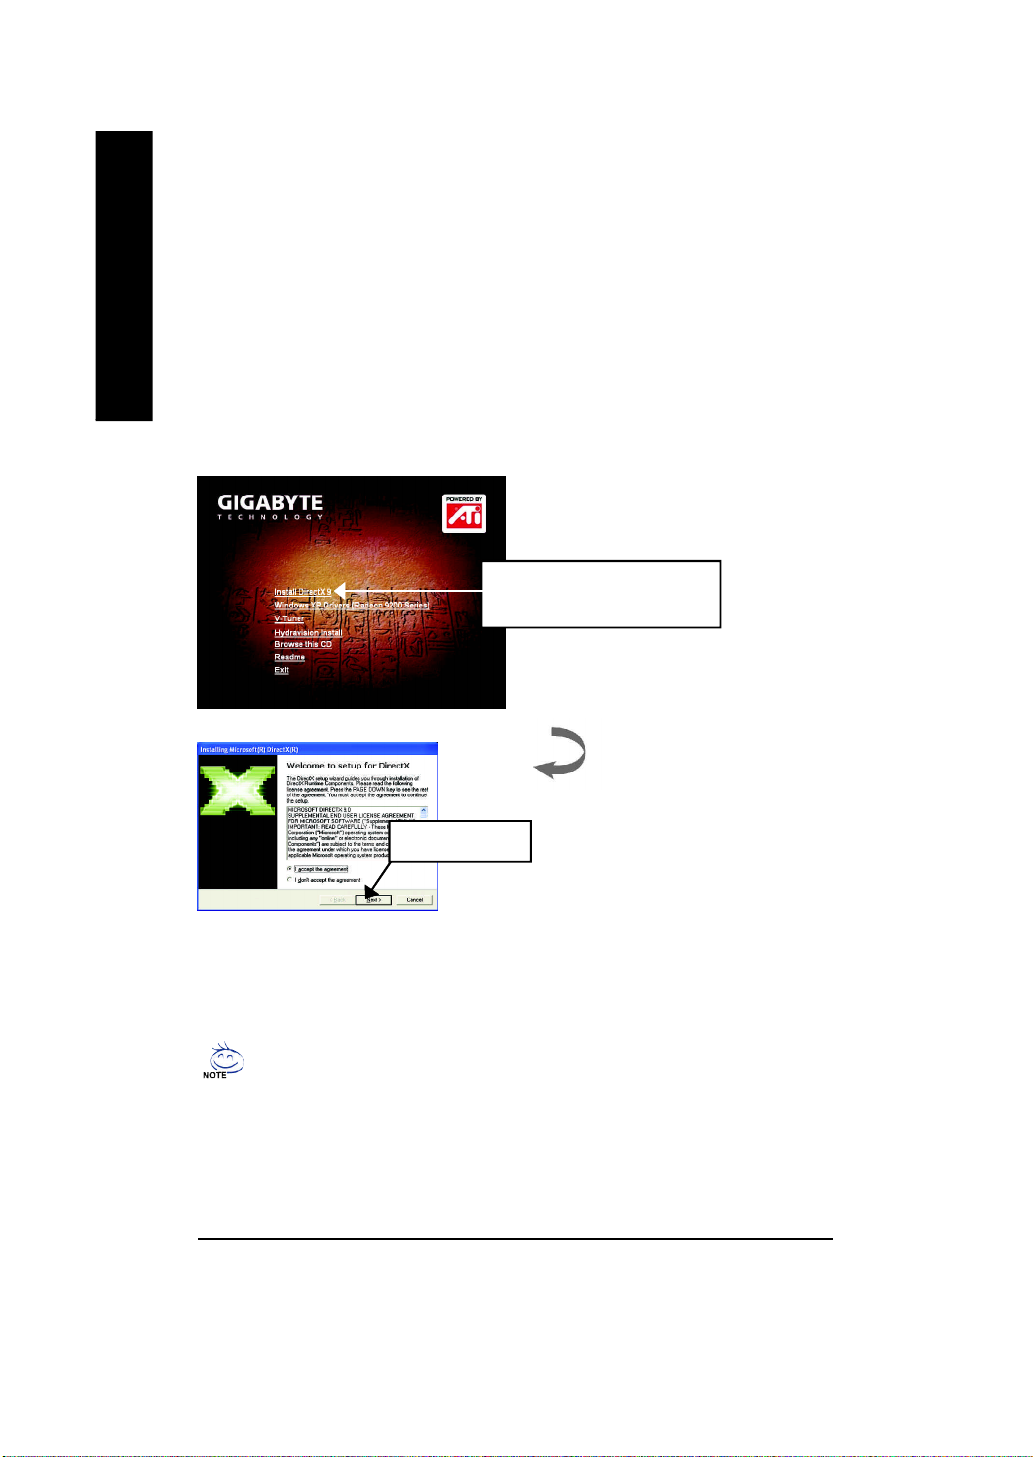
3.1.2. DirectX Installation
Install Microsoft DirectX (or later version) to enable 3D hardware acceleration support for
Windows® 98 / 98SE / Windows® 2000 / Windows® ME or Windows® XP to achieve better 3D
English
performence.
M Note: For software MPEG support in Windows® 98/ 98SE/ Windows® 2000 /
Windows® ME or Windows® XP, you must install DirectX (or later version) first.
1. Install DirectX Driver:
Click "Install DirectX 9" Item.
DirectX 9.0 is the up-to-date runtime library for all Windows operating system. This version is
capable of updating your DirectX of your operating system to what is required for your
graphics accelerator hardware to run to its best performance.
For example, if your graphics accelerator can support DirectX 8.1, updating with DirectX 9.0
can upgrade your operating system to the fullset of DirectX 8.1.
GV-R92128TE Graphics Accelerator - 10 -
R92128TE_101.p65 2003/6/30, 下午 04:1210
2.Click "Next" icon.
Page 11
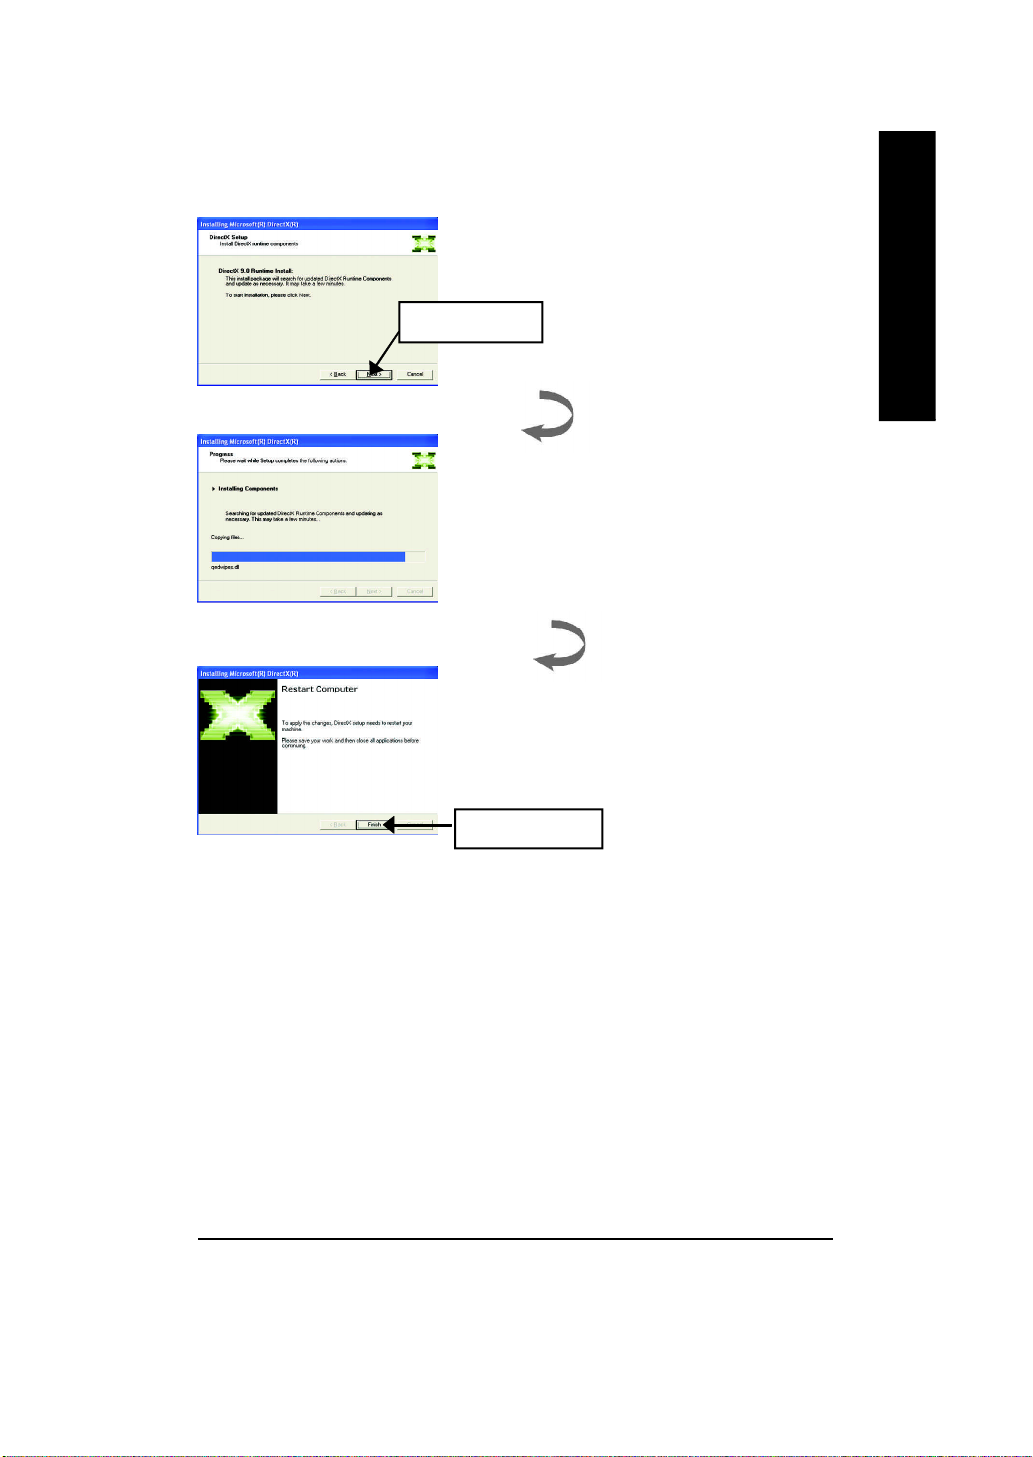
3.Click "Next" icon.
English
Then the DirectX installation is completed.
R92128TE_101.p65 2003/6/30, 下午 04:1211
4.Click "Finish" item.
Software Installation- 11 -
Page 12
3.1.3. Driver Installation
The following is the step-by-step installation guide.
English
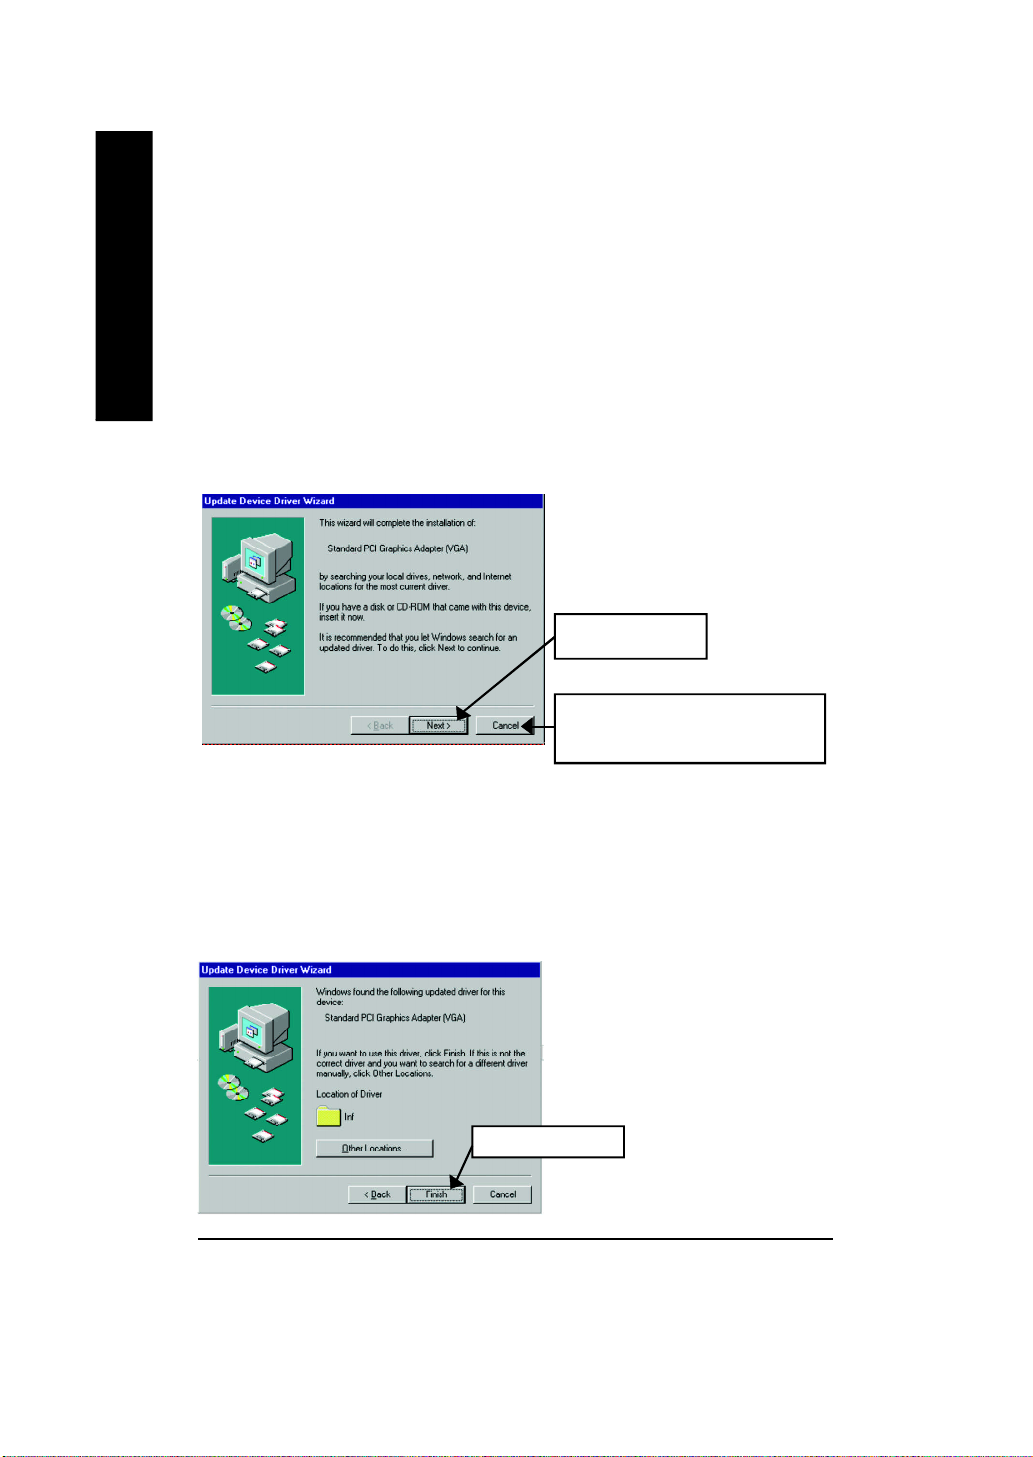
Step 1: New Hardware Found
After GV-R92128TE is inserted into your computer at the first time, the windows will automatically
detect a new hardware in the system and pop out a "New Hardware Found" message.
Please select "Do not install a driver" and press OK.
Step 2: Update Device Driver Wizard: Standard PCI Graphics Adapter(VGA)
Step 3: Update Device Driver Wizard: Finish
At this time, system will ask for your Windows CD in order to complete the VGA driver
installation.
If you don't have the CD, you can press C:\Windows\System directory.
1.Click "Next" icon.
MDon't click "Cancel", because the
system will hang if you press it.
Step 4: System Setting Change
GV-R92128TE Graphics Accelerator - 12 -
R92128TE_101.p65 2003/6/30, 下午 04:1212
2.Click "Finish" icon.
Page 13
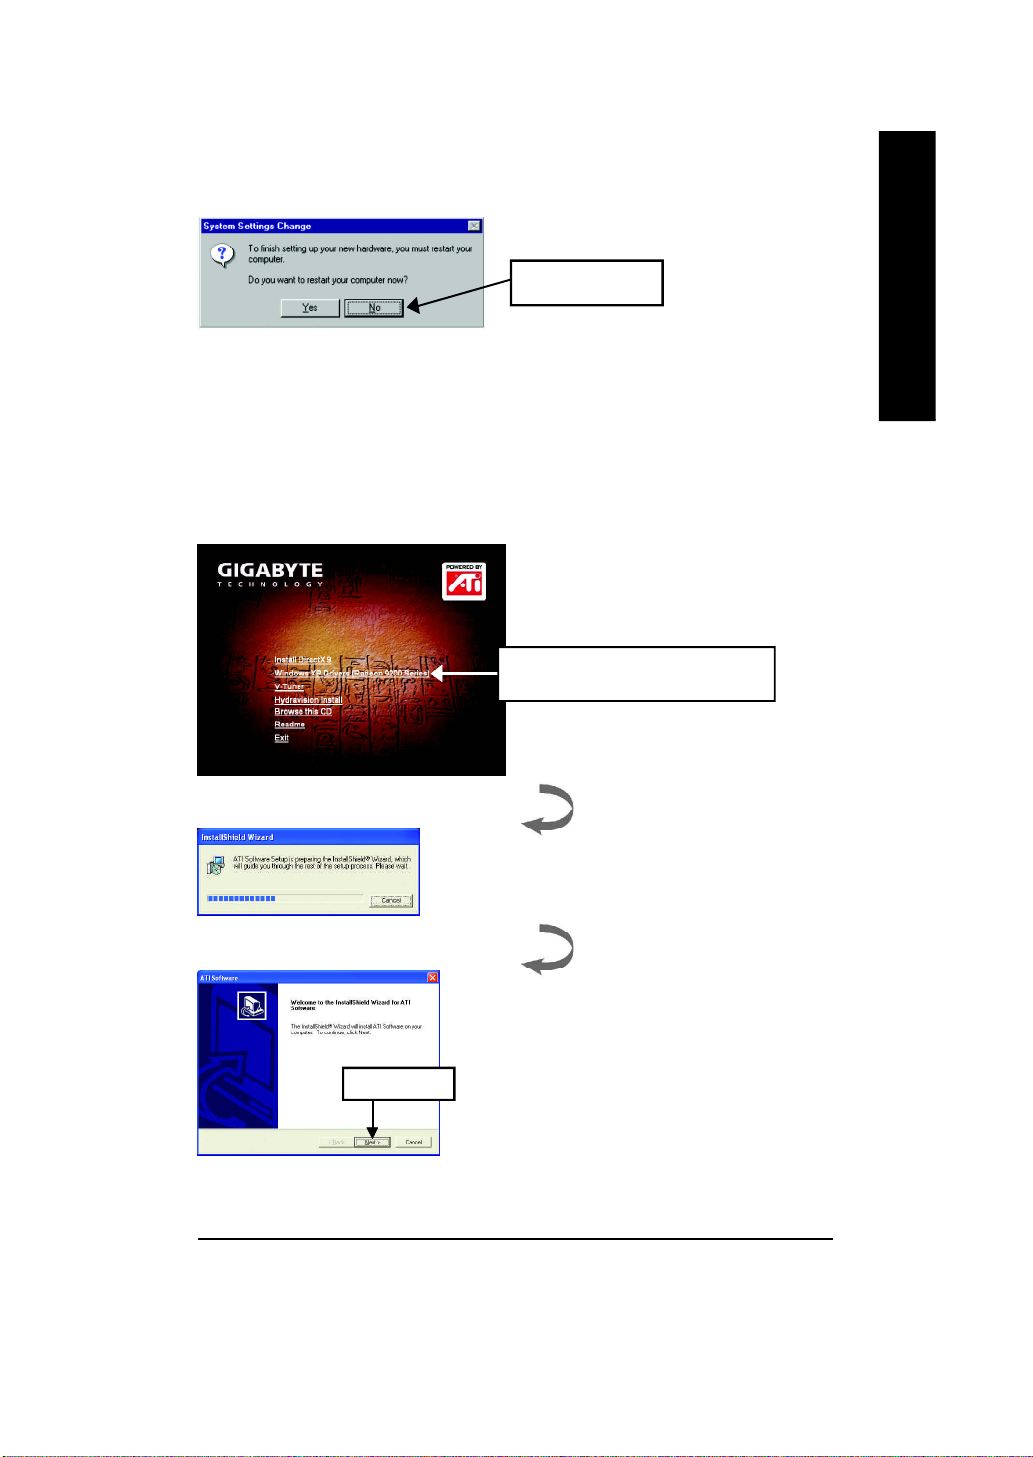
3..Click "No" icon.
After the system has finished loading, insert the GV-R92128TE driver CD disk into your CD-
ROM, and then you can see the AUTORUN window. If it does not show up, please run "D:
\setup.exe".
Step 5: Driver Setup
(Pictures below are shown in Windows XP)
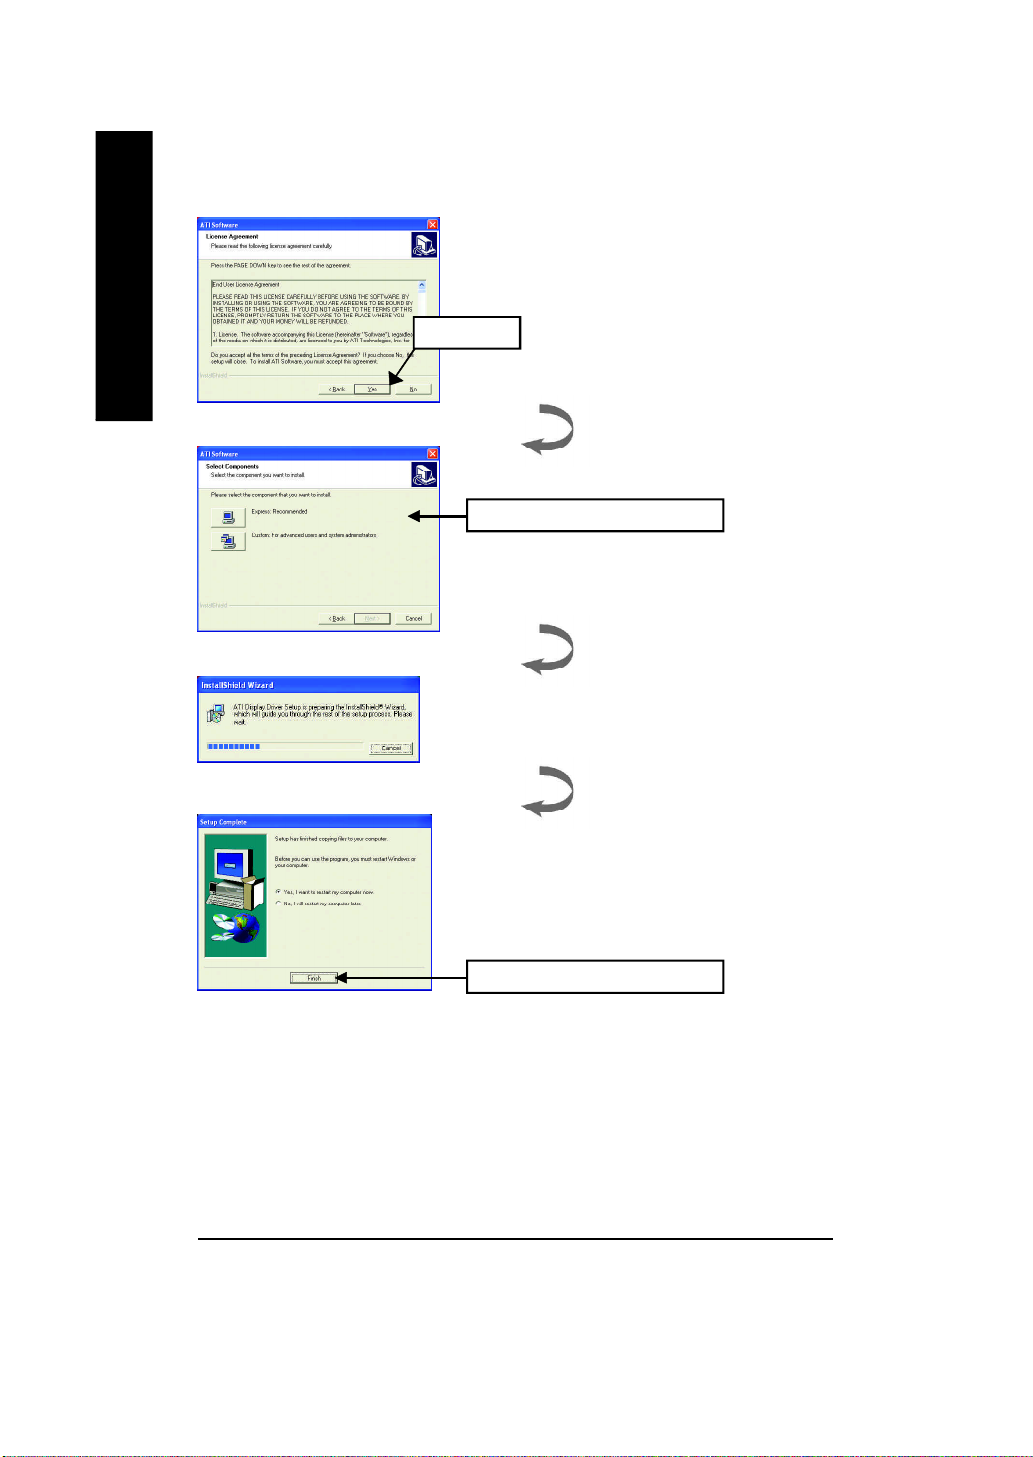
1. Click "Windows XP Drivers (Radeon
9200 Series)" item.
English
2.Click "Next".
R92128TE_101.p65 2003/6/30, 下午 04:1213
Software Installation- 13 -
Page 14
English
3.Click "Yes".
4. Click "Express" or "Custom" icon.
GV-R92128TE Graphics Accelerator - 14 -
R92128TE_101.p65 2003/6/30, 下午 04:1214
5. Click "Finish" to restart computer.
Page 15
3.1.4. Utilities on driver CD
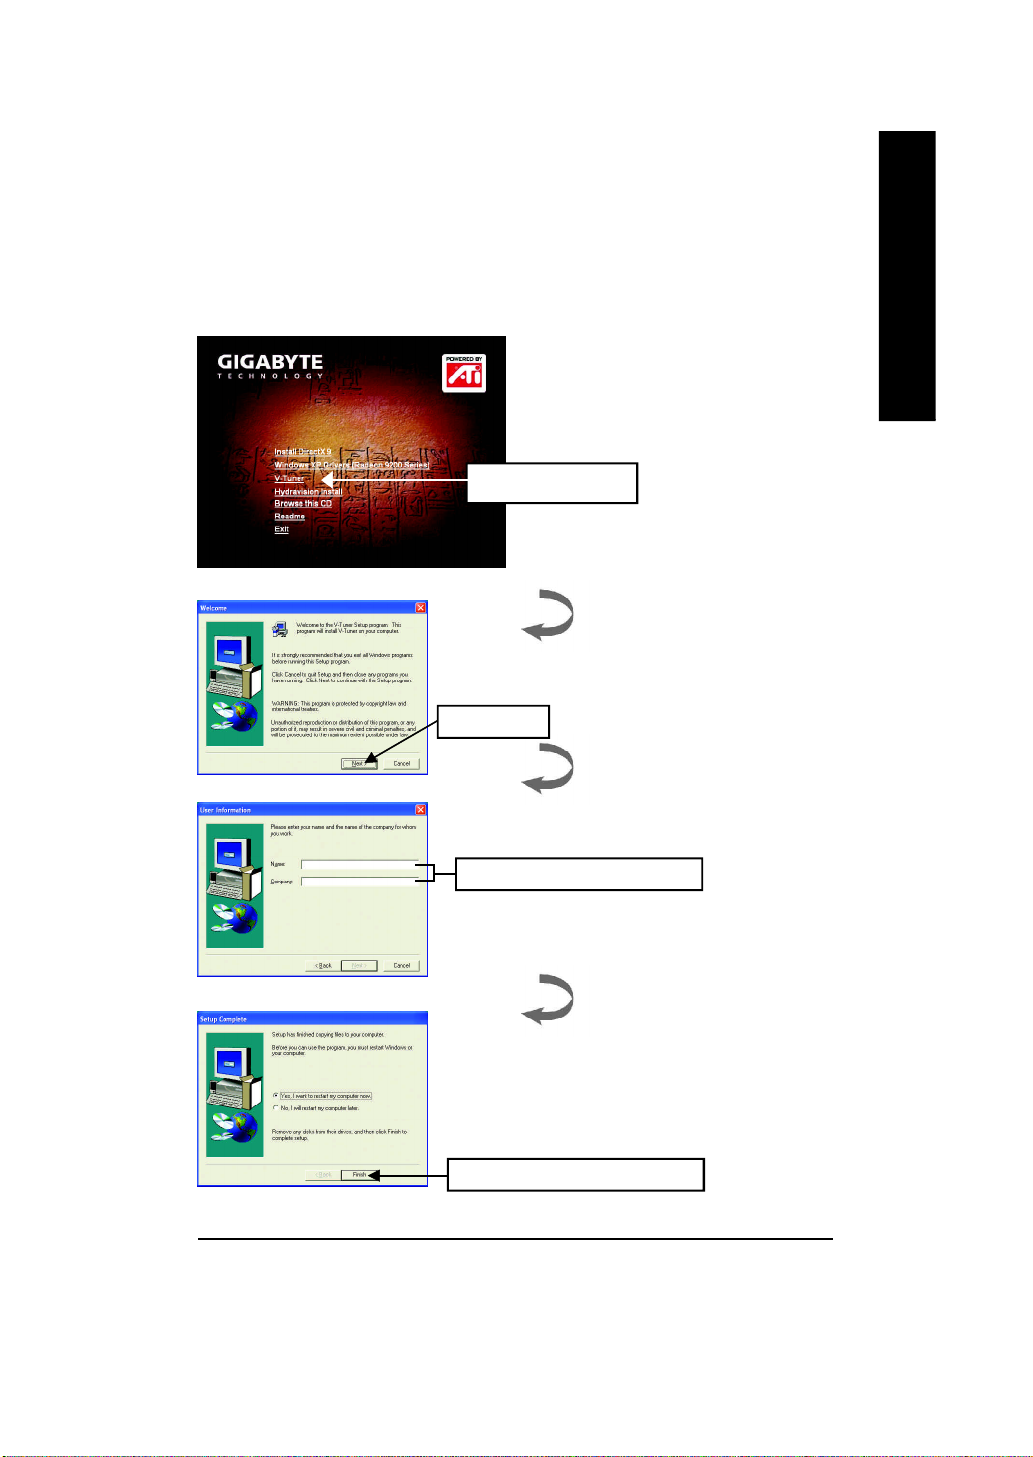
The utilities include Display Driver and V-Tuner utilities. Please follow the steps.
l Install V-Tuner :
1. Click "V-Tuner" item.
2.Click "Next".
English
R92128TE_101.p65 2003/6/30, 下午 04:1215
3. Enter your name and company.
4. Click "Finish" to restart computer.
Software Installation- 15 -
Page 16
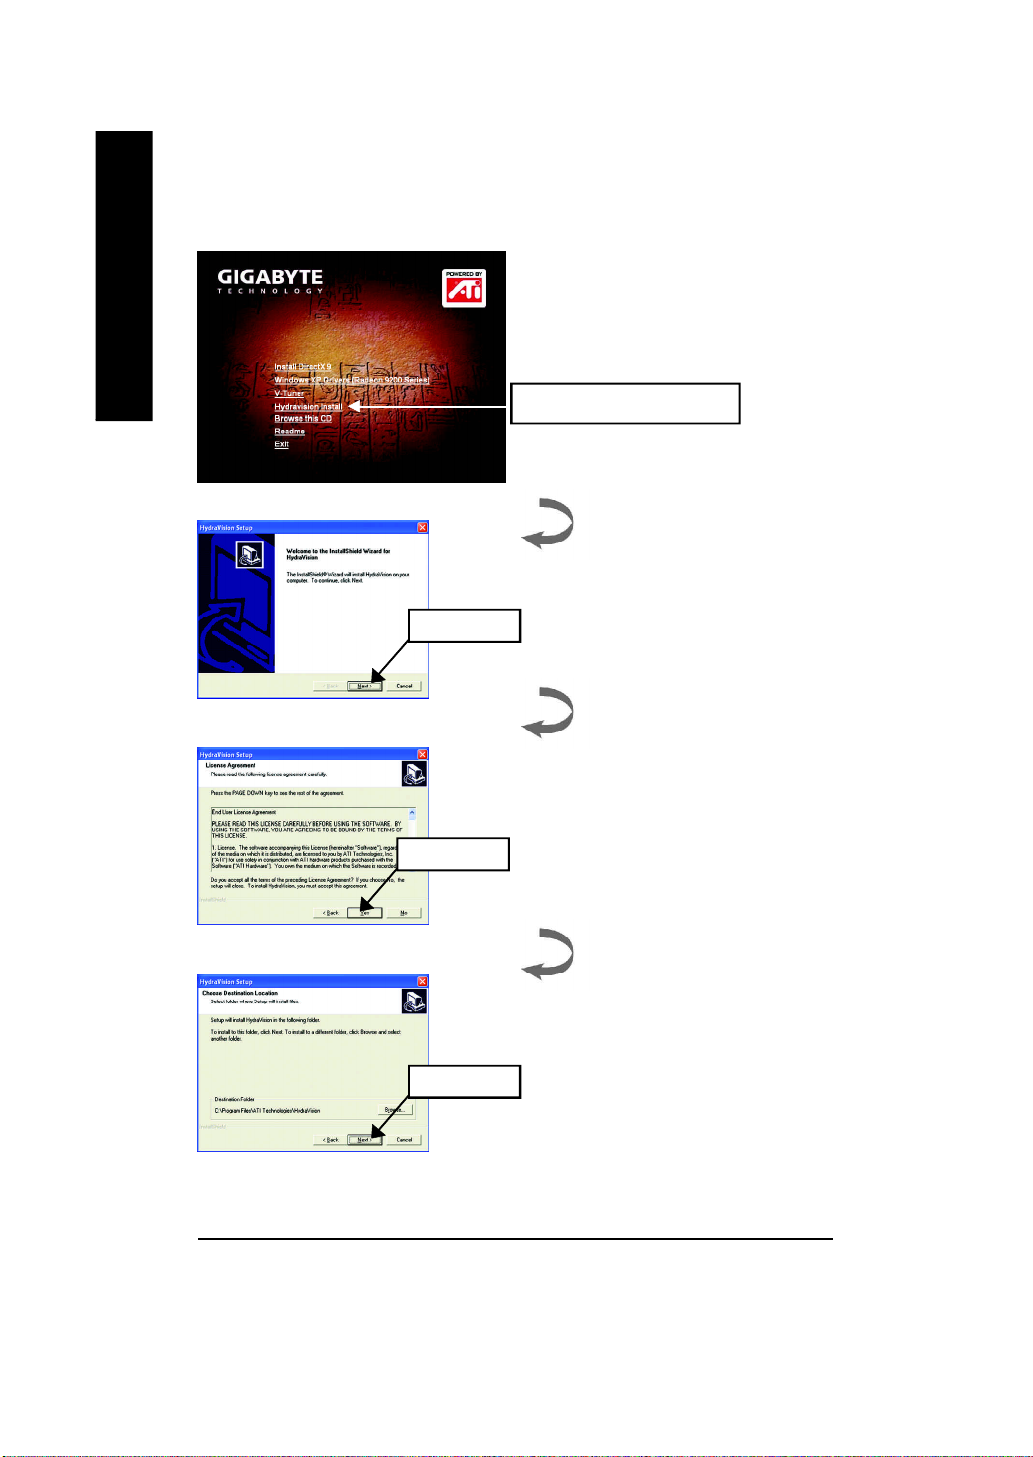
l Install Hydravision :
English
1. Click "Hydravision Install" item.
2.Click "Next".
GV-R92128TE Graphics Accelerator - 16 -
R92128TE_101.p65 2003/6/30, 下午 04:1216
3.Click "Yes".
4.Click "Next".
Page 17
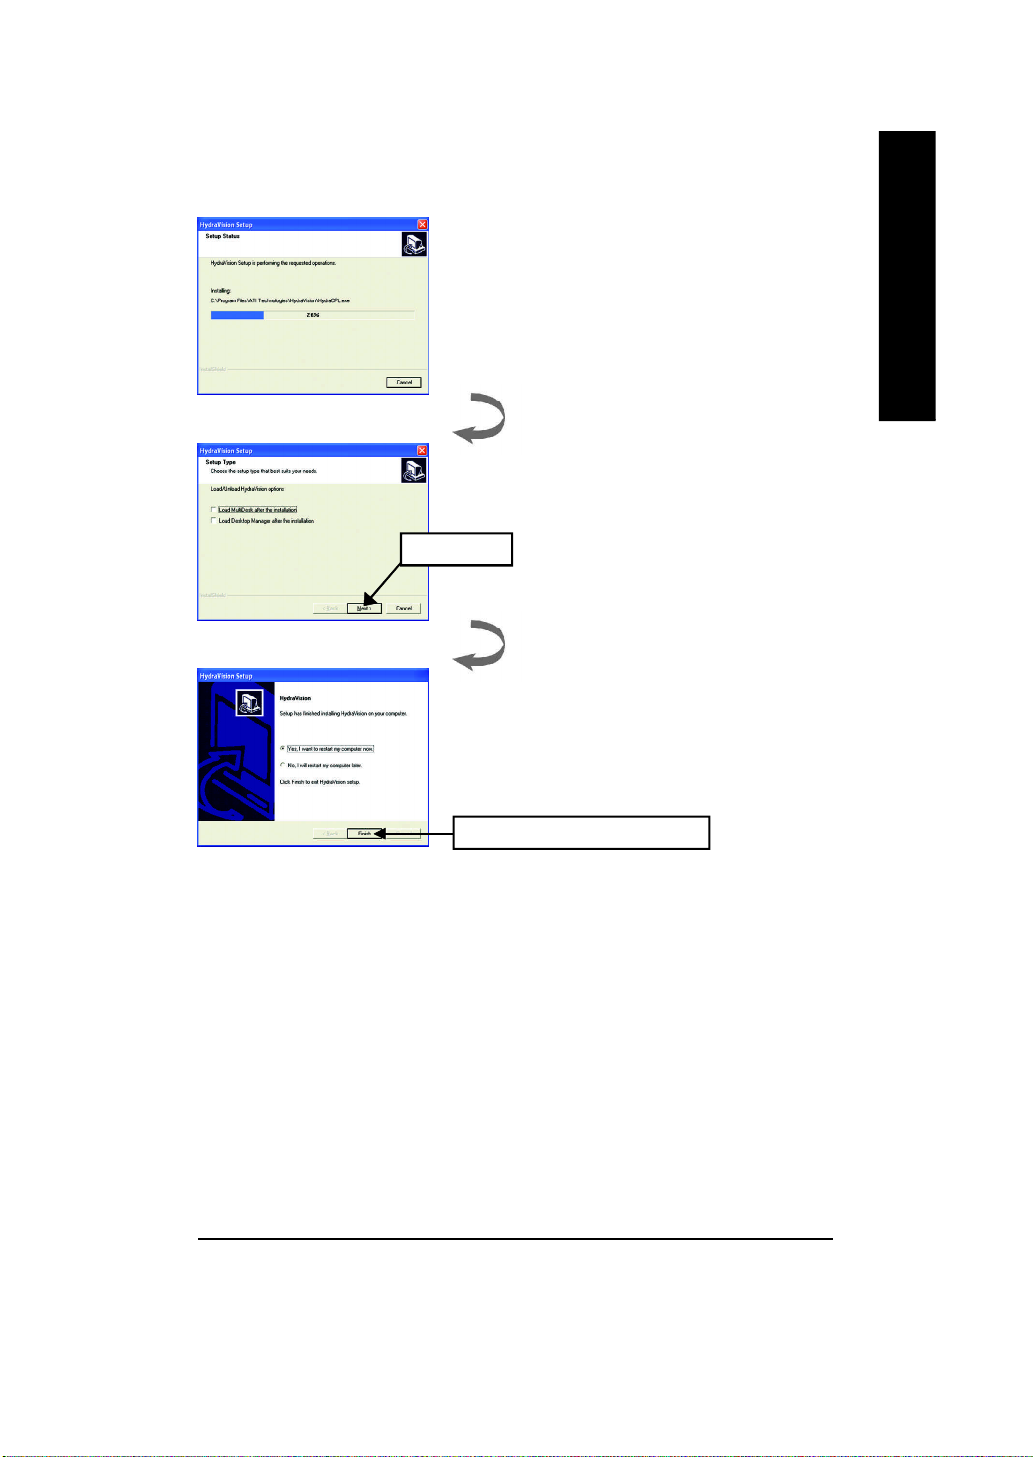
5.Click "Next".
English
R92128TE_101.p65 2003/6/30, 下午 04:1217
6. Click "Finish" to restart computer.
Software Installation- 17 -
Page 18
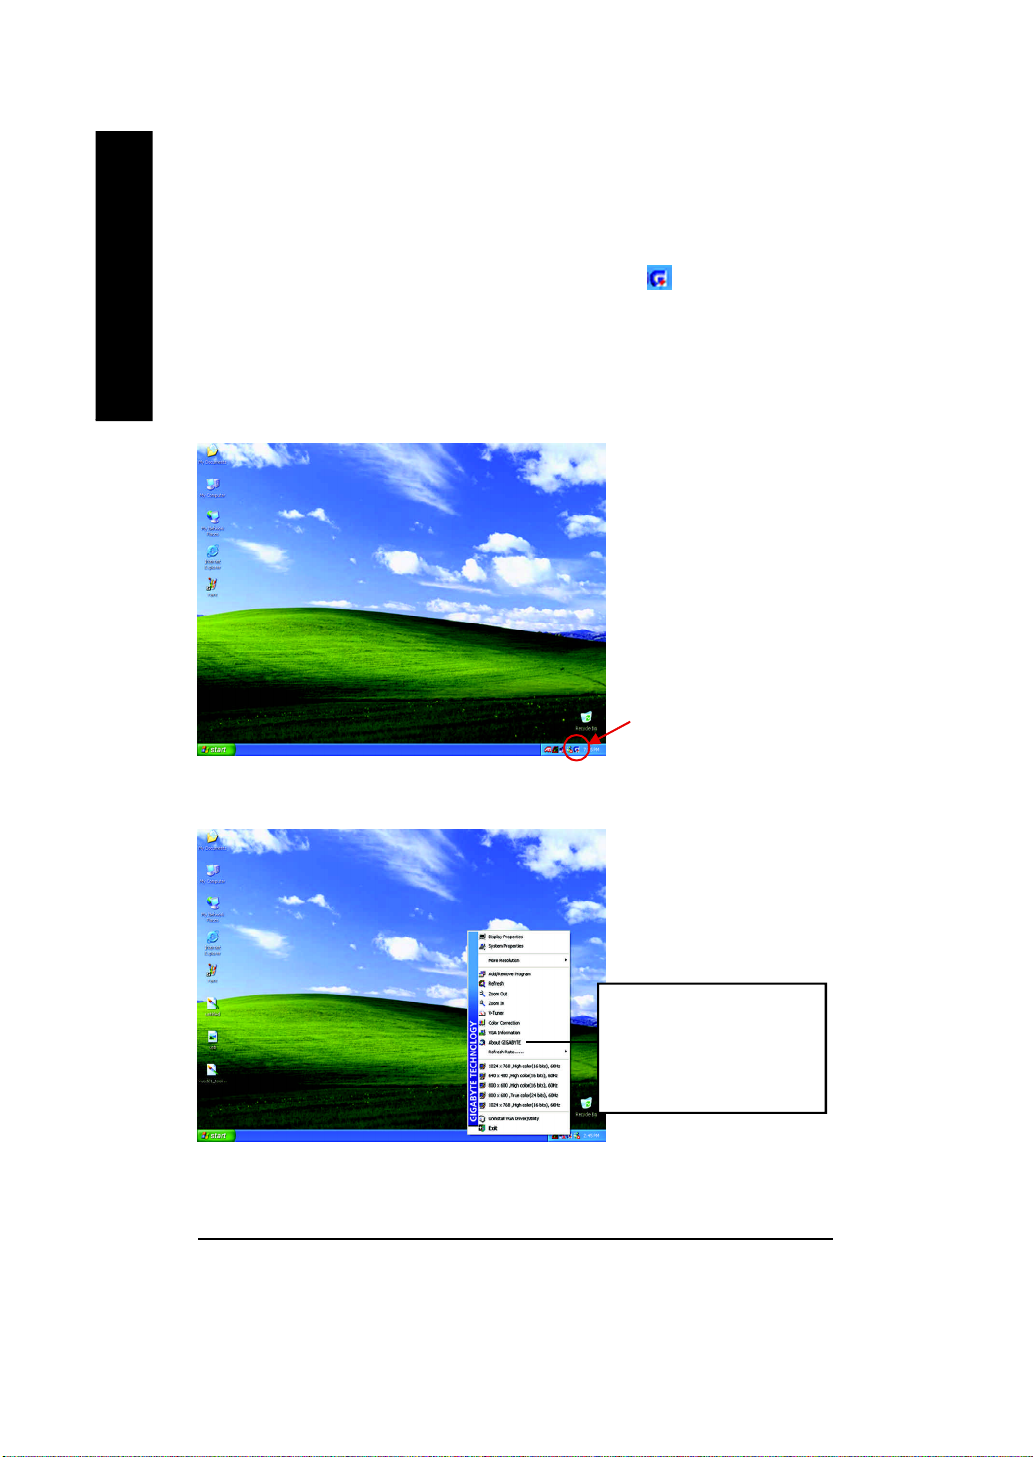
3.1.5. Taskbar Icon
After installation of the display drivers, you will find an GBT icon on the taskbar's status
English
area. Right-clicking this icon opens the GBT control panel, showing a menu composed of
shortcute of the graphics card's enhanced and other functions.
You may click the "Display Properties" item, and then click Settings. Click "Advanced" after
clickng Settings. Click the appropriate tab to change your display settings.
Right click the icon.
GV-R92128TE Graphics Accelerator - 18 -
R92128TE_101.p65 2003/6/30, 下午 04:1218
You can link to GBT website for
updated information about the
graphics card, latest drivers,
and other information.
Page 19
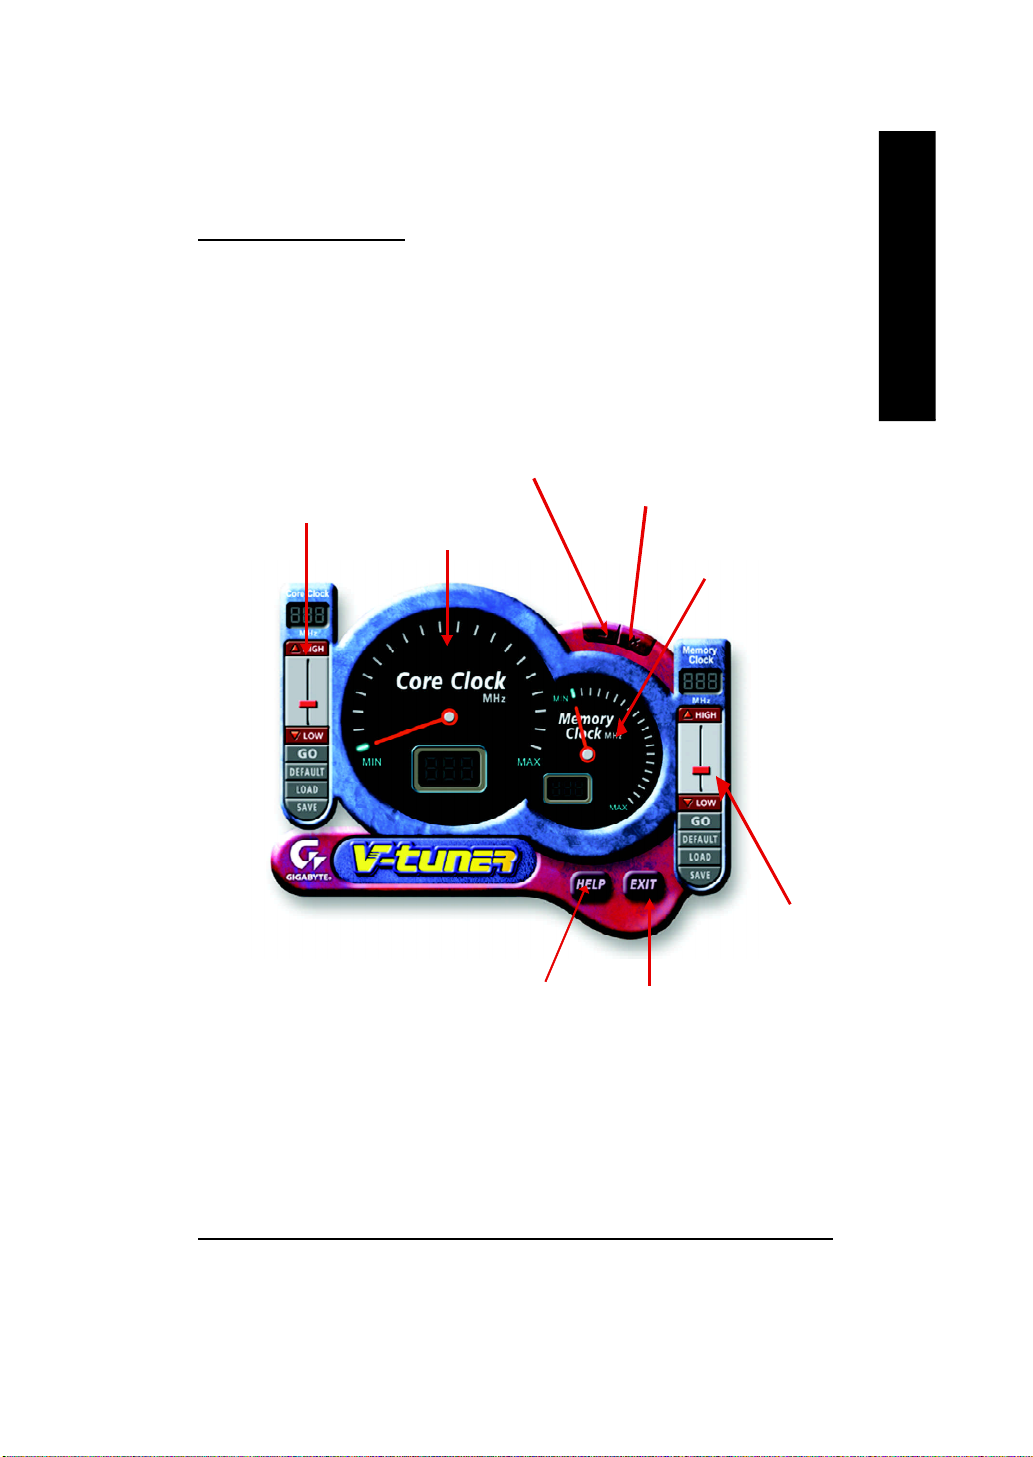
V-Tuner (Overclock Utility)
V-Tuner lets you adjust the working frequency of the graphic engine and video memory
(Core Clock and Memory Clock)
English
Display & Adjust Core
Clock
Display Core Clock
Min V-Tuner
Help Description
Close V-Tuner
Display Memory Clock
Display & Adjust
Memory Clock
Close V-Tuner To
system Tray
R92128TE_101.p65 2003/6/30, 下午 04:1219
Software Installation- 19 -
Page 20
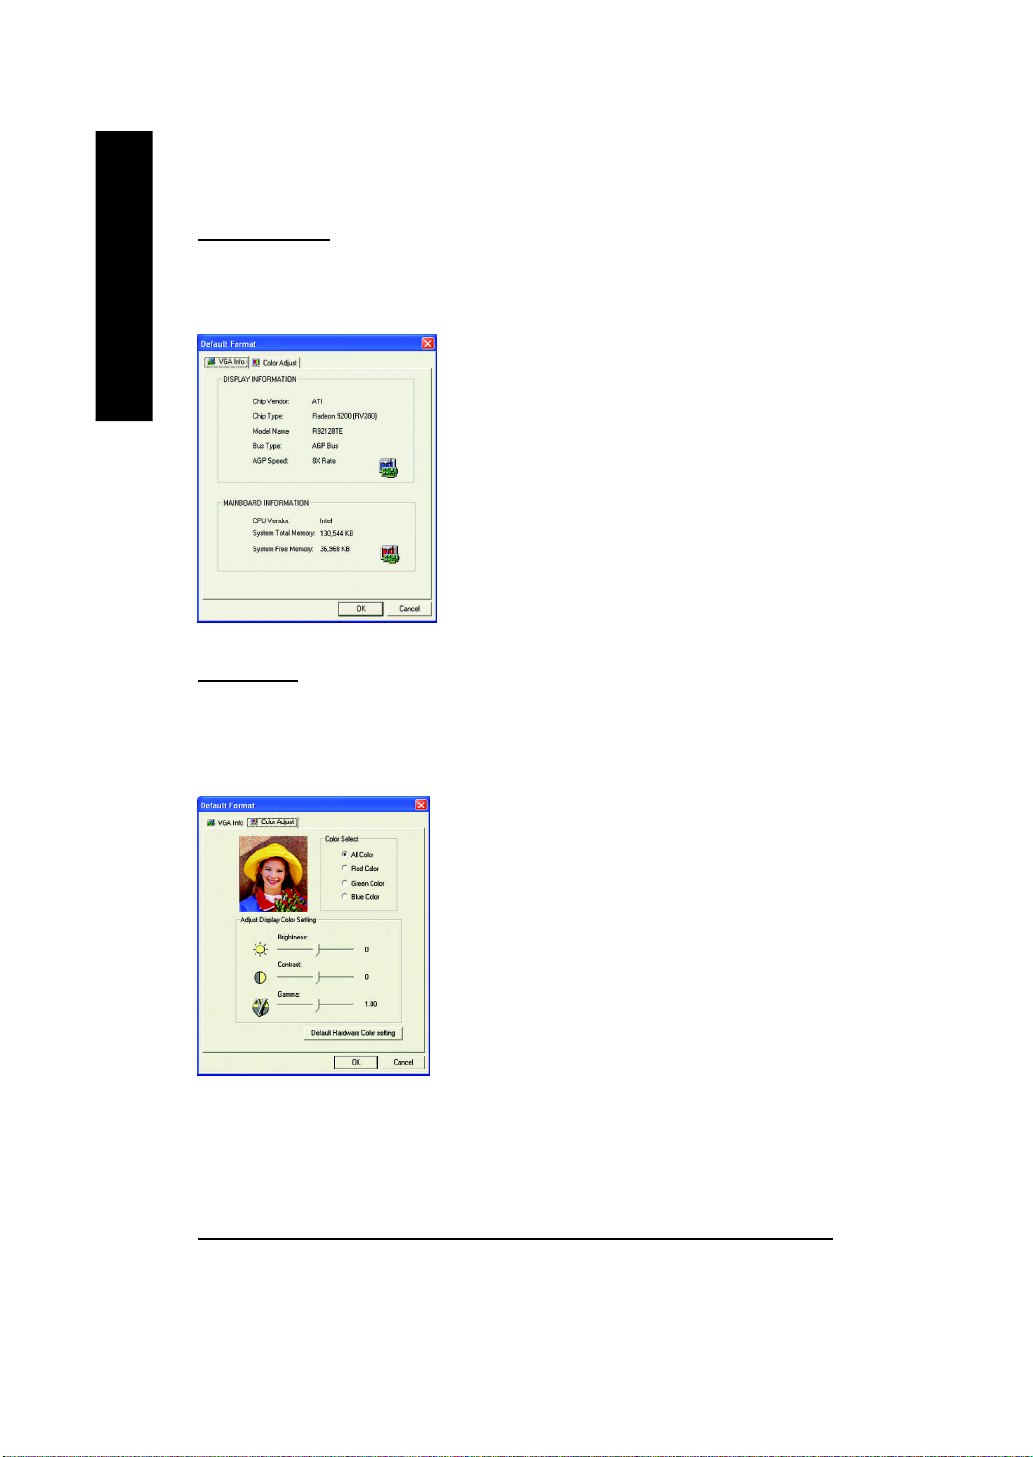
VGA Information
VGA Info lists the relevant information about your card.
English
Color Adjust
Color Adjust allows you to make color adjustments, such as brightness, contrast and
gamma values for each or all of RGB colors.
GV-R92128TE Graphics Accelerator - 20 -
R92128TE_101.p65 2003/6/30, 下午 04:1220
Page 21
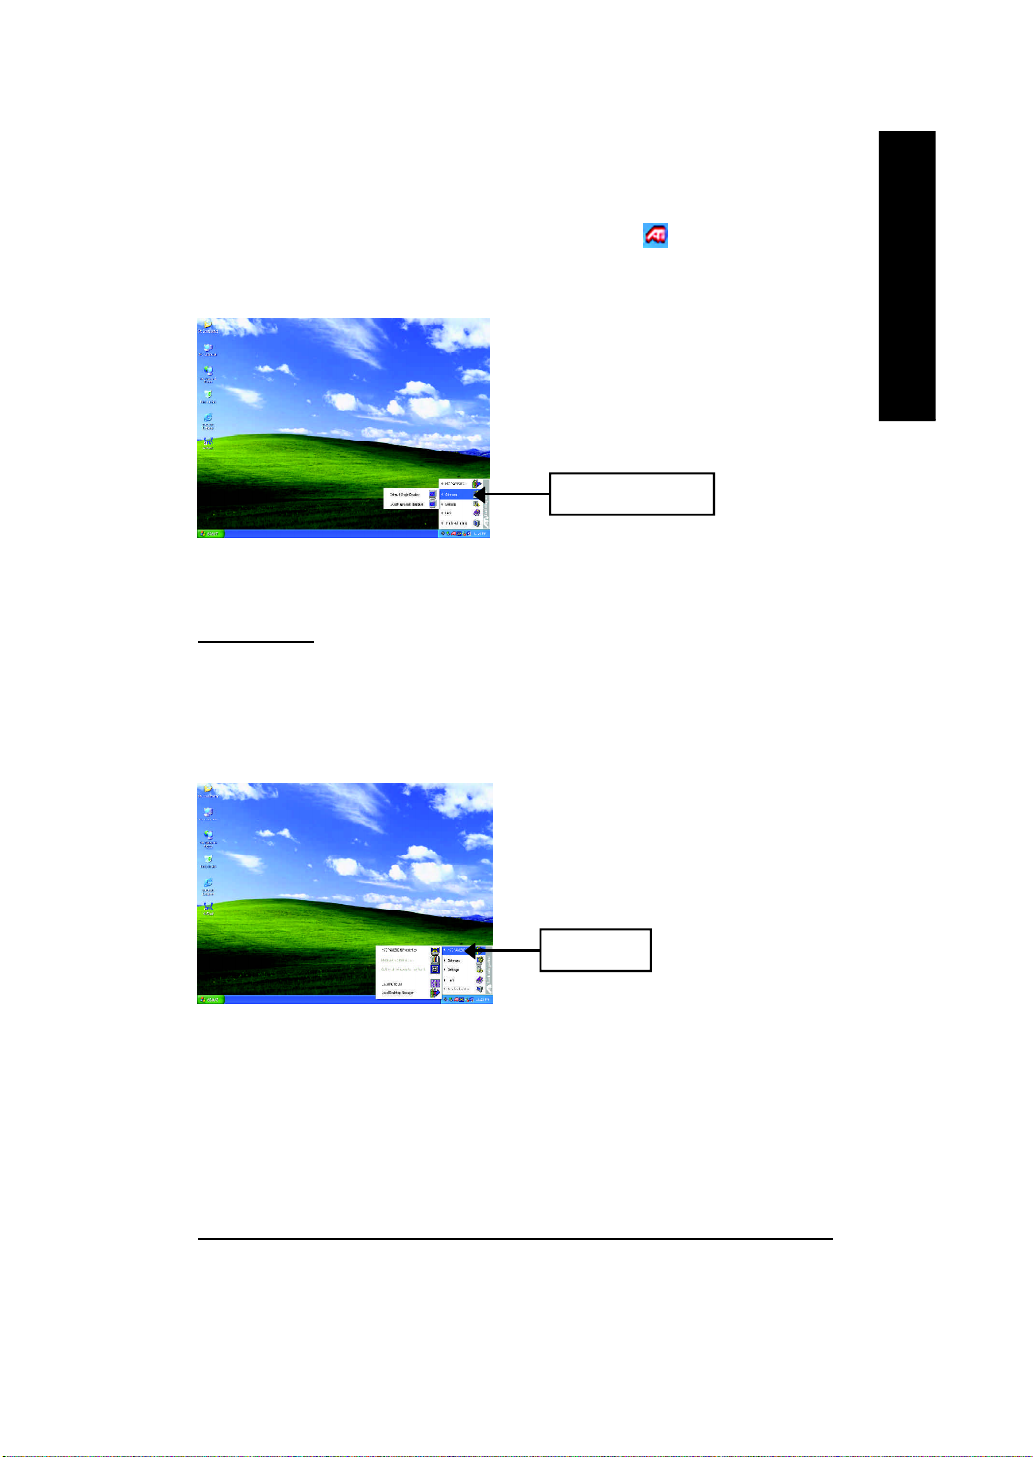
After installation of the display drivers, you will find an ATi icon on the taskbar's status
area. Clicking this icon open the ATi control panel.
1.Using Single Display
English
HYDRAVISION
™
HYDRAVISION™ and the Desktop Manager are activated whenever Windows® starts.
Installing HYDRAVISION™ adds menu options to the ATI Icon.
Click on the ATI icon to access the application's features and help, or to unload the
HYDRAVISION™ Desktop Manager.
2.Hydravision
HYDRAVISION™ is primarily software designed for multiple monitor settings. RADEON 9200
graphic cards that have more than one display output can benefit fully from this software. A
RADEON 9200 with only one display output can still take advantage of the many features of
HYDRAVISION™.
HYDRAVISION™ installation enables the Desktop Manager and creates a Windows® program
group for HYDRAVISION™ display management software.
R92128TE_101.p65 2003/6/30, 下午 04:1221
Software Installation- 21 -
Page 22
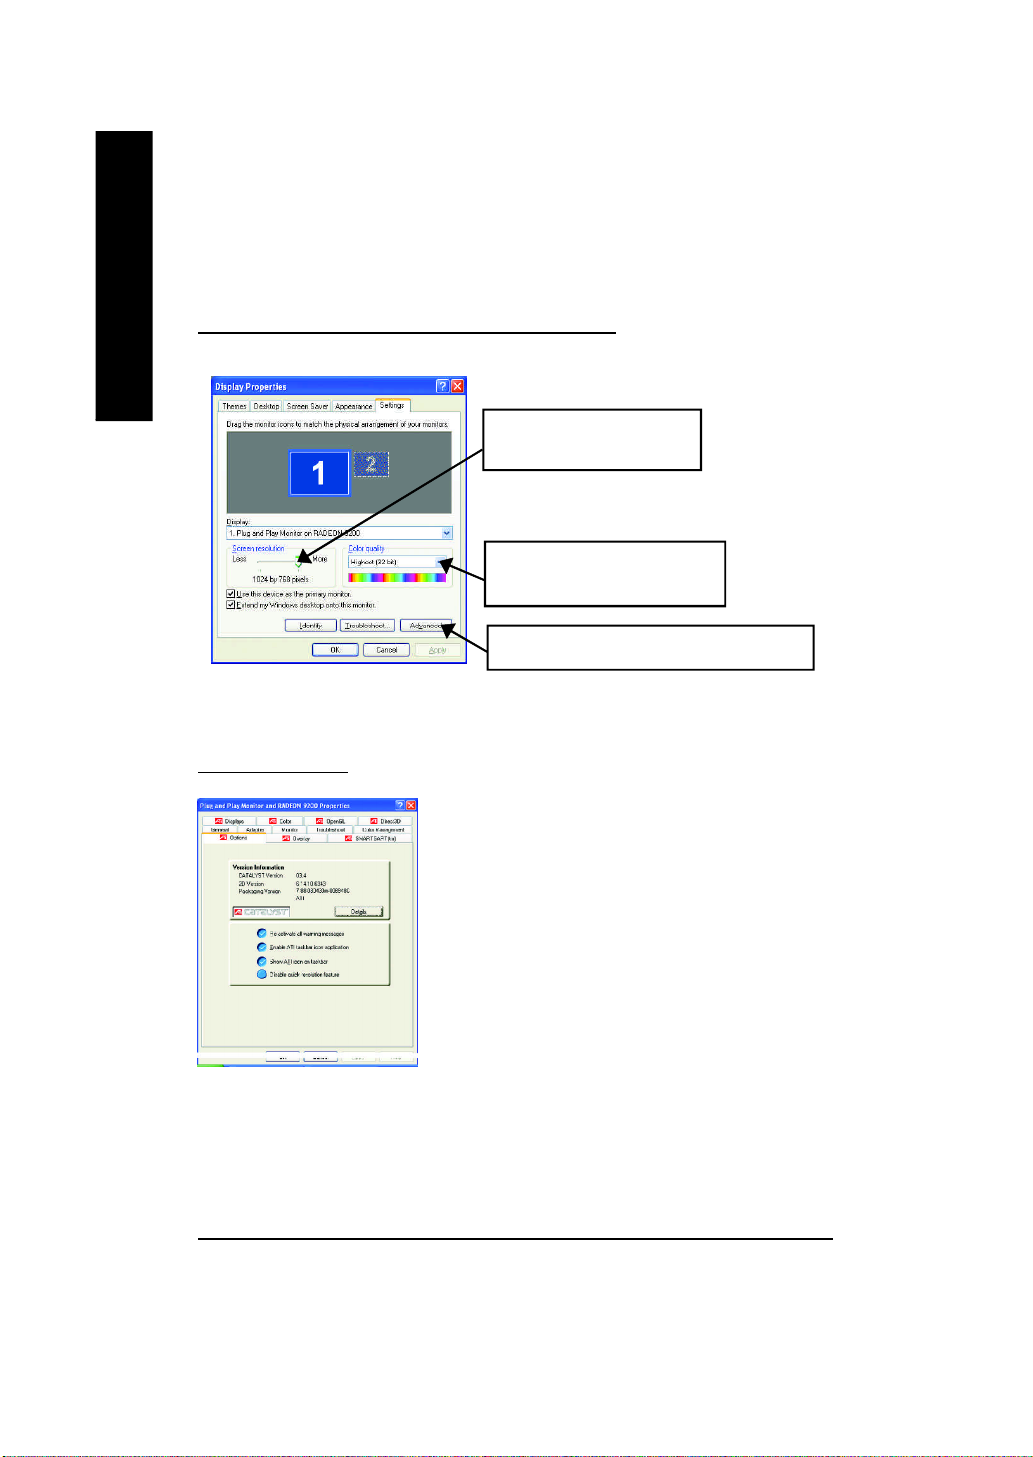
3.1.6. Display Properties pages
The screen shows the information of display adapter, color, the range of display area and
the refresh rate.
English
Settings (Resolutions and Color depth for windows)
The Setting properties page allows you to adjust the Direct 3D settings.
Options Properties
You can move the slider to the
change resolution.
You can click the item to change the
color depth.
Click "Advanced" icon for adapter and setting.
n Version Information provides the Catalyst version number,
2D version number and the driver build information.
n Details button access to the Details tab which lists the card's
hardware details and driver information.
n Re-activate all warning messages allows you to reacti-
vate any disabled graphics warning messages.
n Enable ATI taskbar icon application enables or disables
the ATI taskbar icon. However, this feature must be
enabled for ATI hotkey support.
n Show ATI icon on taskbar adds or removes the ATI icon
from the taskbar.
n Disable quick resolution feature is accessible by left-clicking the ATI icon in the taskbar.
GV-R92128TE Graphics Accelerator - 22 -
R92128TE_101.p65 2003/6/30, 下午 04:1222
Page 23
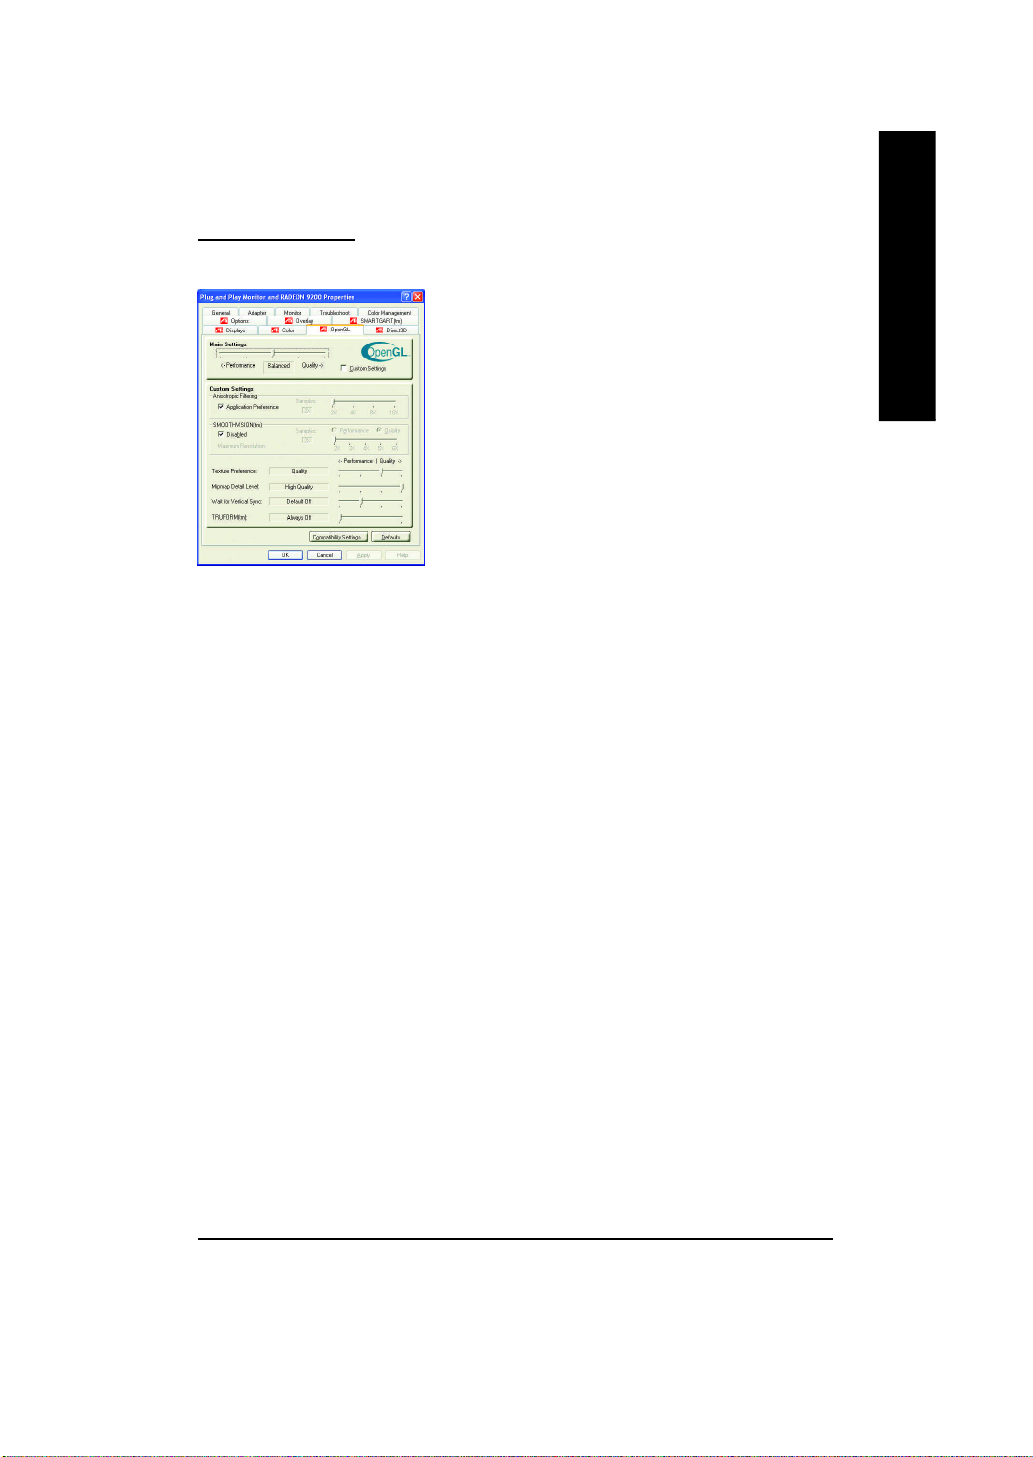
OpenGL Properties:
The OpenGL properties page gives you complete control of the OpenGL settings.
n Main Settings slider
Moving the slider to the left will maximize application
performance, while moving the slider to the right will
provide excellent 3D image quality. Moving this slider from
one position to the next changes the individual Custom
Settings sliders found below.
l Custom Settings checkbox
When Custom Settings is checked, the Main Settings
slider is disabled, allowing you to move each individual
slider in the Custom Settings section below. Setting the
individual sliders gives you complete control over your
app licati on experien ce. Using Custo m Se ttings is
recommended for advanced users only.
n Anisotropic Filtering
l Anisotropic Filtering checkbox uses a texture filtering technique that blends multiple
texture samples together. Selecting Application Preference will result in high quality textures,
with a negligible reduction in the application's performance.
l Anisotropic Filtering slider By moving this slider to the right, as the number of samples
taken increases, the quality of the final image increases significantly. 16X provides extremely
detailed, crisp-looking images as a result of the largest number of texture samples possible.
n SMOOTHVISION
l Improves image quality by removing jagged edges from 3D images, resulting in smoother,
more natural looking objects.
l SMOOTHVISION slider can be applied using different sample patterns and sample points
such as 2X, 3X, 4X, 5X or 6X. Moving this slider to the right increases sampling to provide the
most realistic 3D image.
n Texture Preference slider
Selecting this decides whether your application should use high quality or high performance
textures. Moving the slider to the right delivers the highest quality experience. Moving the slider to
the left emphasizes a high performance solution while still providing good visuals.
n Mipmap Detail Level slider
This will allow you to choose the texture quality of the mipmaps the application will use. Mipmaps
are a collection of different sized textures of the same image. As the user moves closer to a 3D
object the image quality should increase, requiring a higher quality texture of the same image. The
base mipmap is the highest quality texture, and all subsequent mipmaps are smaller sized textures
English
R92128TE_101.p65 2003/6/30, 下午 04:1223
Software Installation- 23 -
Page 24
English
n Wait for Vertical Sync
n TRUFORM makes the curved surfaces of 3D objects look smoother and more lifelike.
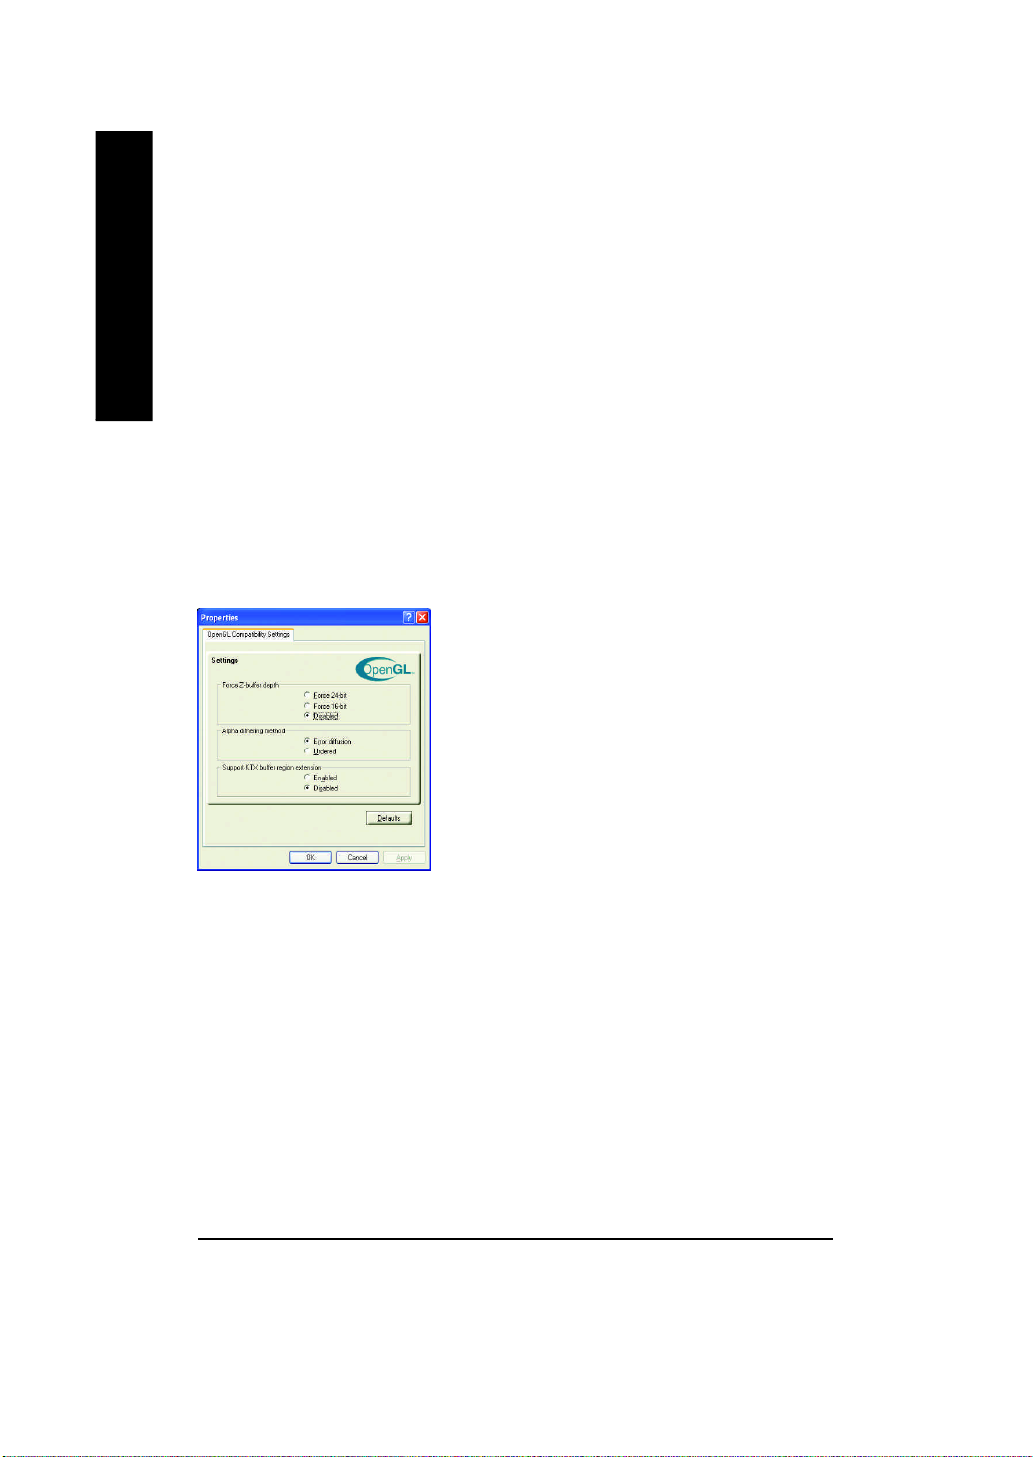
n Compatibility Settings button
l Force Z-buffer depth allows you to explicitly set the Z-Buffer depth. Most applications will
of the same image. Moving the slider to the right selects a higher quality base mipmap, delivering
the highest quality application experience. Moving the slider to the left selects a lower quality
mipmap, delivering the highest application performance.
This will lower the frame rate of full screen games but reduce the image tearing that can occur with
the higher frame rate. Selecting Application Preference allows the application to decide whether
or not it should display its frames at the refresh rate of the monitor. Selecting Always Off allows the
application to run at its highest possible frame rate, regardless of the monitor’s refresh rate which is
typically less than the frame rate at which the application will run.
This button allows you to access advanced settings that can solve compatibility issues for a few
specific OpenGL applications.
work best when Disabled is selected.
l Alpha dithering method when alpha blending will
remove certain onscreen artifacts that are
sometimes produced when both dithering and alpha
blending are enabled.
l Support KTX buffer region extension Enabling this
feature allows rapid updates of those portions of your screen
that have changed. Note that most applications will not be
affected by activating this feature.
n Defaults button
This button allows you to reset the OpenGL Settings to
default values.
GV-R92128TE Graphics Accelerator - 24 -
R92128TE_101.p65 2003/6/30, 下午 04:1224
Page 25
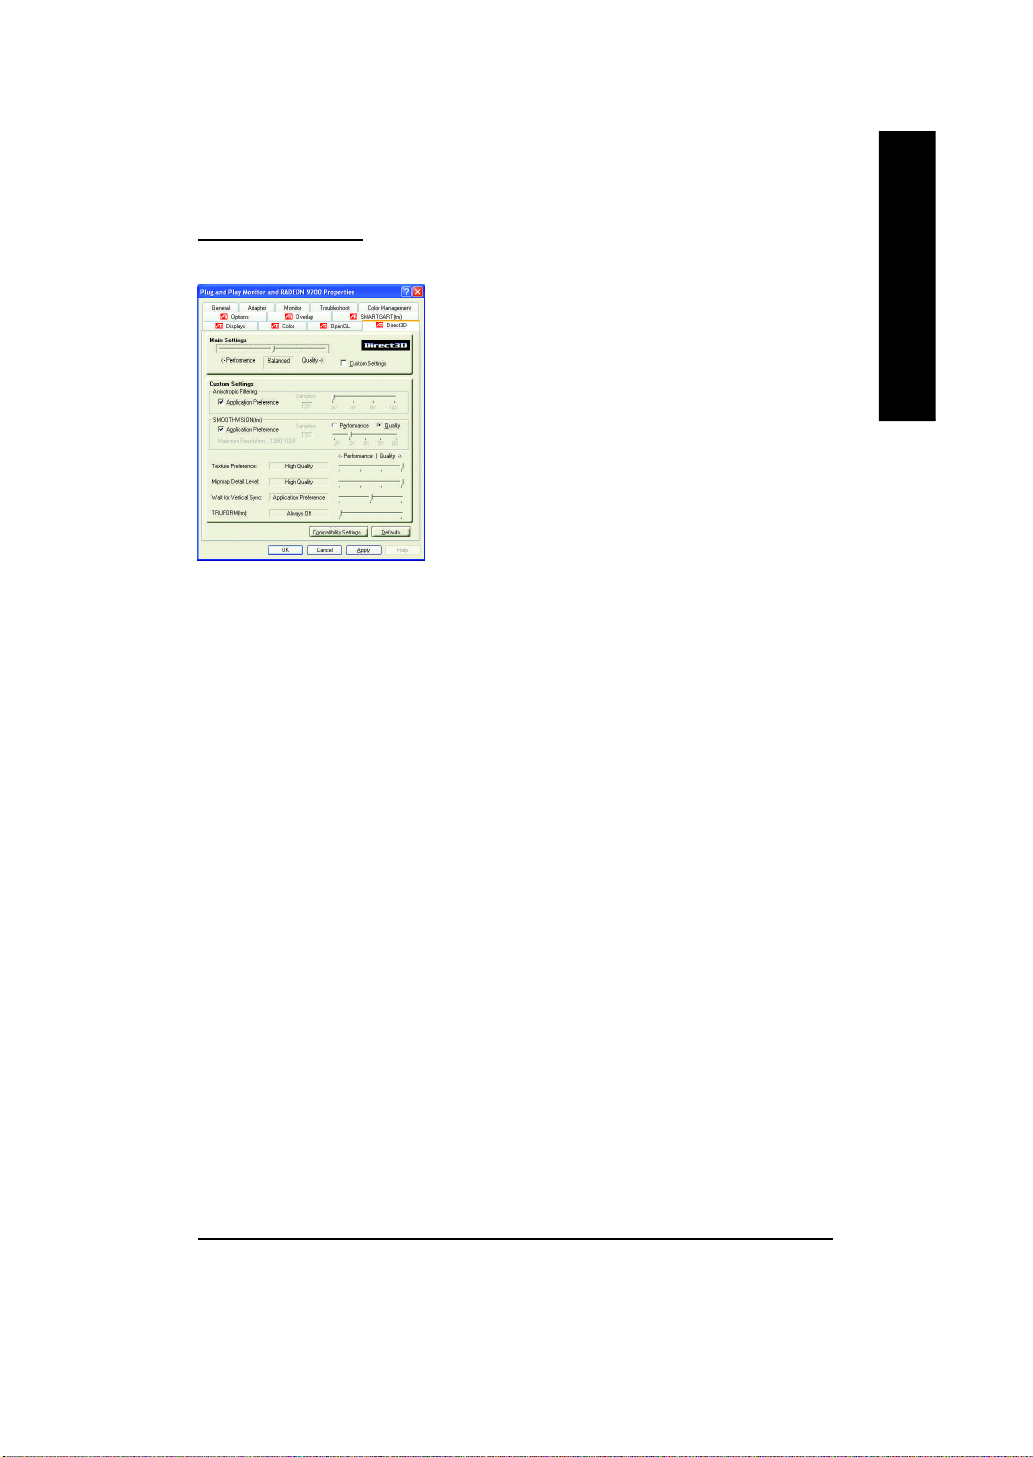
Direct 3D Properties:
The Direct 3D properties page allows you to adjust the Direct 3D settings.
n Main Settings slider
Moving the slider to the left will maximize application
performance, while moving the slider to the right will
provide excellent 3D image quality. Moving this slider from
one position to the next changes the individual Custom
Settings sliders found below.
l Custom Settings checkbox
When Custom Settings is checked, the Main Settings
slider is disabled, allowing you to move each individual
slider in the Custom Settings section below. Setting the
individual sliders gives you complete control over your
app licati on experien ce. Using Custo m Se ttings is
recommended for advanced users only.
n Anisotropic Filtering
l Anisotropic Filtering checkbox uses a texture filtering technique that blends multiple
texture samples together. Selecting Application Preference will result in high quality textures,
with a negligible reduction in the application's performance.
l Anisotropic Filtering slider By moving this slider to the right, as the number of samples
taken increases, the quality of the final image increases significantly. 16X provides extremely
detailed, crisp-looking images as a result of the largest number of texture samples possible.
n SMOOTHVISION
l Improves image quality by removing jagged edges from 3D images, resulting in smoother,
more naturallooking objects. Selecting Application Preference will result in high quality
images, with negligible reduction in the application's performance.
l SMOOTHVISION slider can be applied using different sample patterns and sample points
such as 2X, 3X, 4X, 5X or 6X. Moving this slider to the right increases sampling to provide the
most realistic 3D image.
n Texture Preference slider
Selecting this decides whether your application should use high quality or high performance
textures. Moving the slider to the right delivers the highest quality experience. Moving the slider to
the left emphasizes a high performance solution while still providing good visuals.
n Mipmap Detail Level slider
This will allow you to choose the texture quality of the mipmaps the application will use. Mipmaps
are a collection of different sized textures of the same image. As the user moves closer to a 3D
object the image quality should increase, requiring a higher quality texture of the same image. The
English
R92128TE_101.p65 2003/6/30, 下午 04:1225
Software Installation- 25 -
Page 26
English
n Wait for Vertical Sync
n TRUFORM makes the curved surfaces of 3D objects look smoother and more lifelike.
n Compatibility Settings button
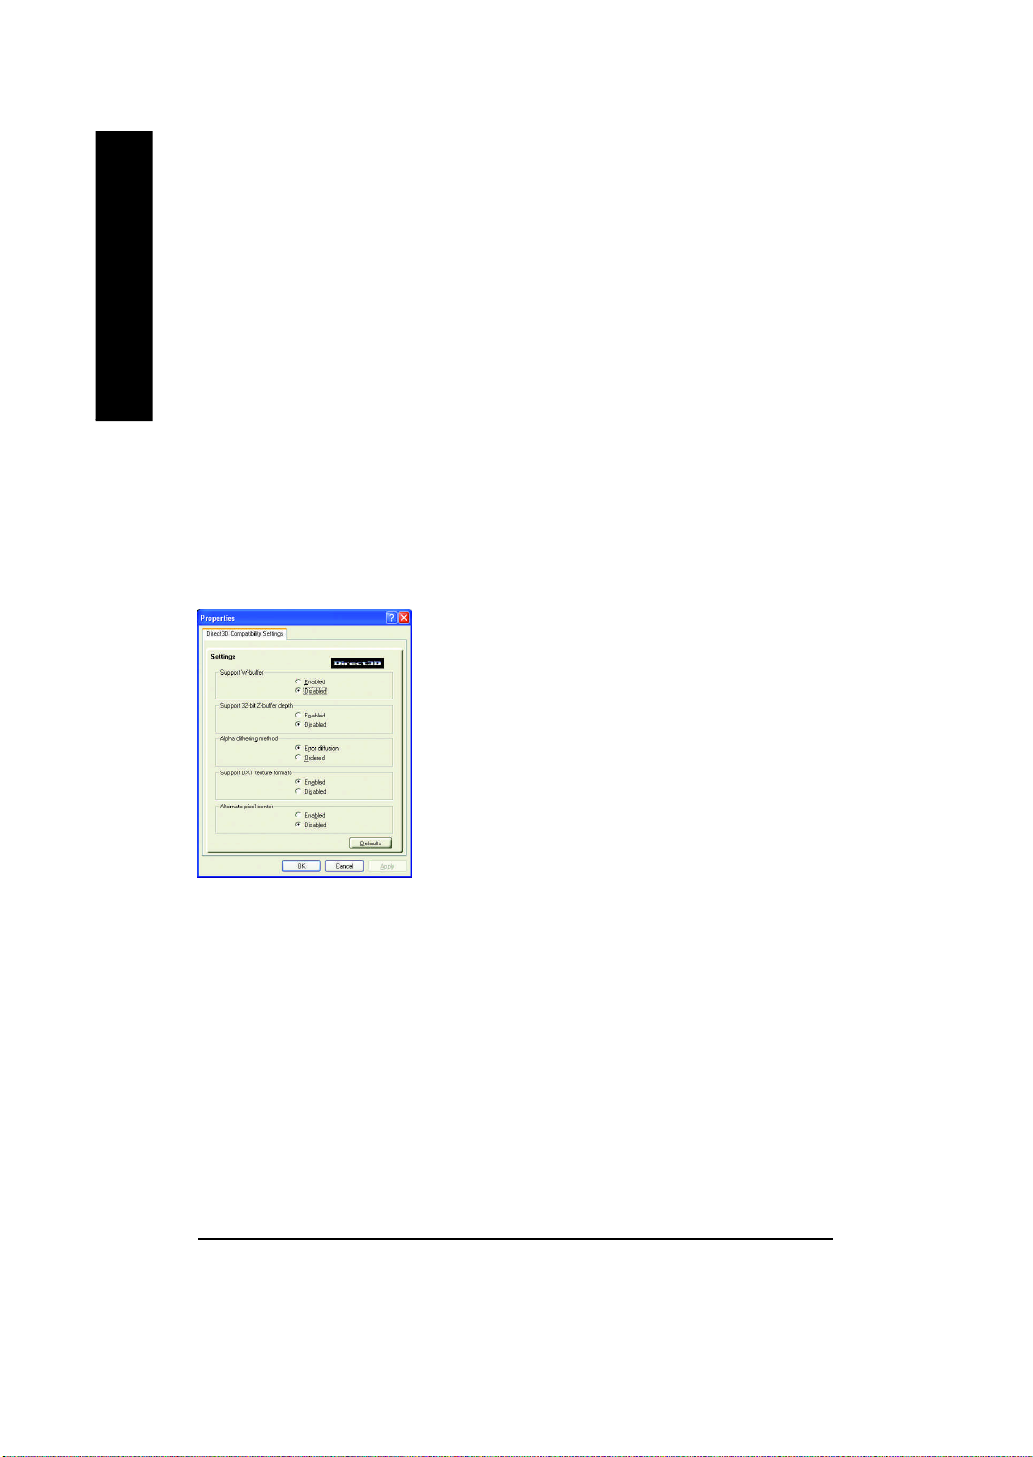
l Support W-buffer allows you to enable or disable W-buffer support. It is recommend that W-buffer
base mipmap is the highest quality texture, and all subsequent mipmaps are smaller sized textures
of the same image. Moving the slider to the right selects a higher quality base mipmap, delivering
the highest quality application experience. Moving the slider to the left selects a lower quality
mipmap, delivering the highest application performance.
This will lower the frame rate of full screen games but reduce the image tearing that can occur with
the higher frame rate. Selecting Application Preference allows the application to decide whether
or not it should display its frames at the refresh rate of the monitor. Selecting Always Off allows the
application to run at its highest possible frame rate, regardless of the monitor’s refresh rate which is
typically less than the frame rate at which the application will run.
This button allows you to access advanced settings that can solve compatibility issues for a few
specific Direct 3D applications.
support should be disabled for games that do not support this
feature.
l Support 32-bit Z-buffer depths allows you to set the 32-bit
Z-buffer rate.
l Alpha dithering method when alpha blending will
remove certain onscreen artifacts that are sometimes
produced when both dithering and alpha blending are enabled.
l Support DTX texture formats allows applications to
use this kind of texture format. There are a few applica-
tions that can only support a limited number of texture formats. By selecting Disabled, the driver
will not support DTX texture formats, thus reducing the number of texture formats supported.
l Alternate pixel center This may eliminate problems with some Direct 3D games which
display vertical and horizontal lines around textures, or text that appears incorrect. However,
this setting should only be used if you are experiencing the symptoms mentioned, as it
maycause problems with other games.
n Defaults button
This button allows you to reset the Direct 3D Settings to default values.
GV-R92128TE Graphics Accelerator - 26 -
R92128TE_101.p65 2003/6/30, 下午 04:1226
Page 27
Color Properties:
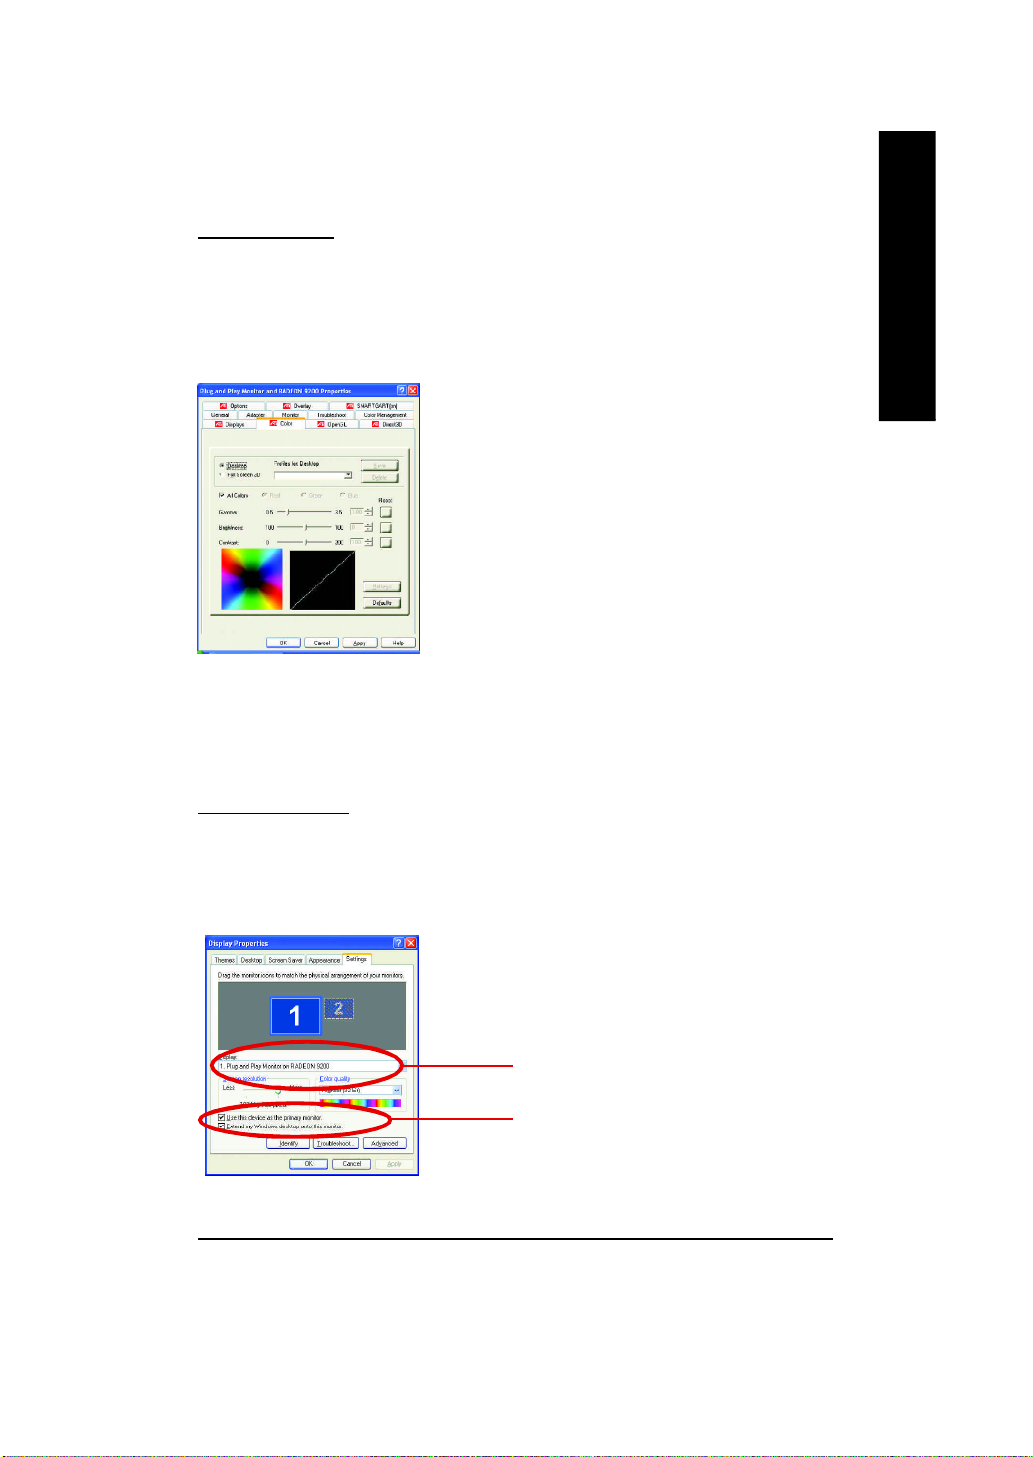
The Color Properties is used to adjust the color settings. It also allows gamma control for
video playing of the Video Overlay. The color settings affect all display devices mapped to
the view.You can change red, green, and blue display colors. Set Desktop and Video
Overlay brightness (gamma) levels can also be changed.
n Desktop increases or decreases the color brightness of your
desktop. The higher the gamma value, the higher the bright-
ness and contrast of your display.
n Full Screen 3D Note that changes to Full Screen 3D settings
will only be apparent within the Full Screen 3D application
environment.
n All Color adjusts the selected color (red, green or blue) by
moving the color curve with your mouse.
n Red / Green / Blue sliders These controls allow you to
increase or decrease the color brightness of Direct 3D and
OpenGL games played in fullscreen mode.
(NOTE: Game Gamma is NOT supported in Windows NT4.0)
n Gamma / Brightness/Contrast accesses Game Gamma properties.
n Default resets the desktop brightness and color settings to the default values.
English
Display Properties:
If your VGA card is equipped with a S-Video connector, you can use a second output
device (e.q. a TV or a computer monitor) as part of your operating desktop extending
your desktop to second device or copying your desktop on the second device.
R92128TE_101.p65 2003/6/30, 下午 04:1327
Select Display Type
Enable / Disable "Extend my windows
desktop onto this monitor"
Software Installation- 27 -
Page 28
English
3. Determine if your television (or VCR) has an S-Video or Composite video connection.
4. Looking at the back of your computer, locate your S-Video Out. Using an S-Video cable or the
5. Turn on your television (or VCR) then your computer.
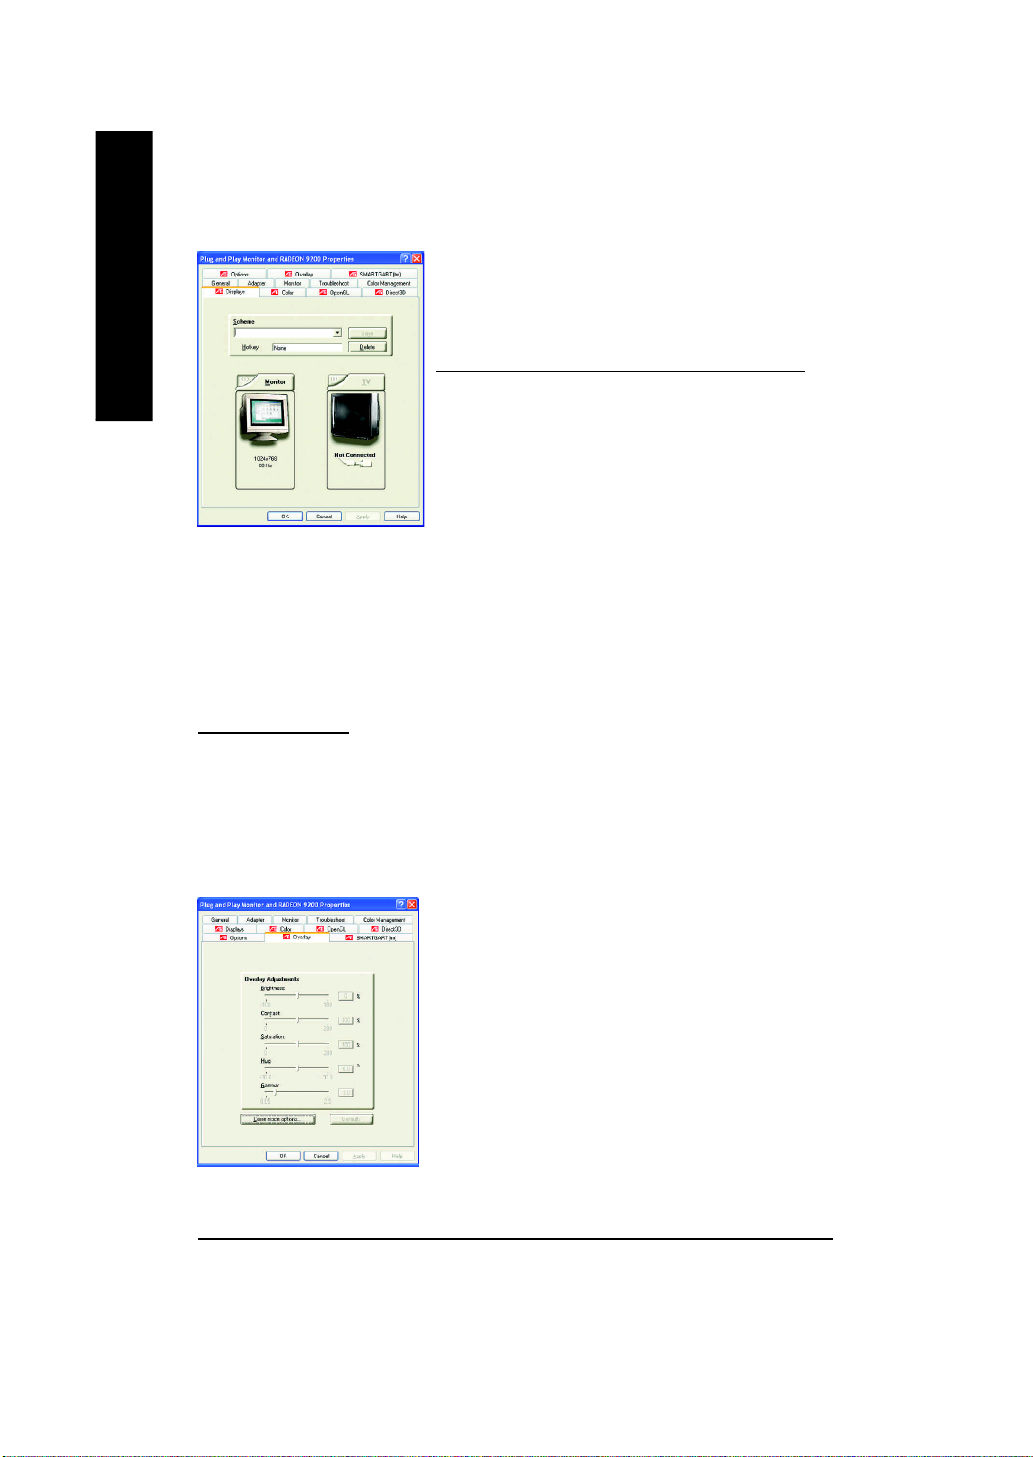
Overlay Properties:
The Overlay Properties is used to adjust the Brightness / Contrast / Saturation / Hue /
Gamma settings.
Overlay properties allows for the viewing of full-motion video on your PC. However, there is only one
video overlay, which is only available on the Primary display. The video overlay controls are
automatically activated during playback of any video file type that supports overlay adjustments.
n Defaults button allows you to reset the Overlay settings to default values.
The Display tab provides the multi monitor features. Here
you can enable/disable display devices and swap the
assignment of Primary and Secondary displays.
Connecting your graphics card to a TV or VCR
To connect your graphics card to a TV (or VCR), use an SVideo cable. However, most TVs (and VCRs) have a Composite video input, in which case you can use the supplied SVideo-to-Composite video adapter.
1. Turn off your computer and your television (or VCR).
2. Ensure your graphics card was installed correctly. (For information about placing the card in your computer and installing the enhanced graphics driver, see the user's manual.)
supplied adapter cable, attach one end of the cable to your graphics card and the other to your
television (or VCR).
n Overlay Adjustments
l Brightness allows you to adjust the brightness of the
video image.
l Contrast allows you to adjust the contrast in the video
image.
l Saturation allows you to adjust the vividness of the color.
Sliding it all the way to the left removes all color and
produces a black and white picture.
l Hue allows you to adjust the pureness or tint of the red,
green and blue components of the color.
l Gamma allows you to adjust the overall intensity of the
video image.
GV-R92128TE Graphics Accelerator - 28 -
R92128TE_101.p65 2003/6/30, 下午 04:1328
Page 29
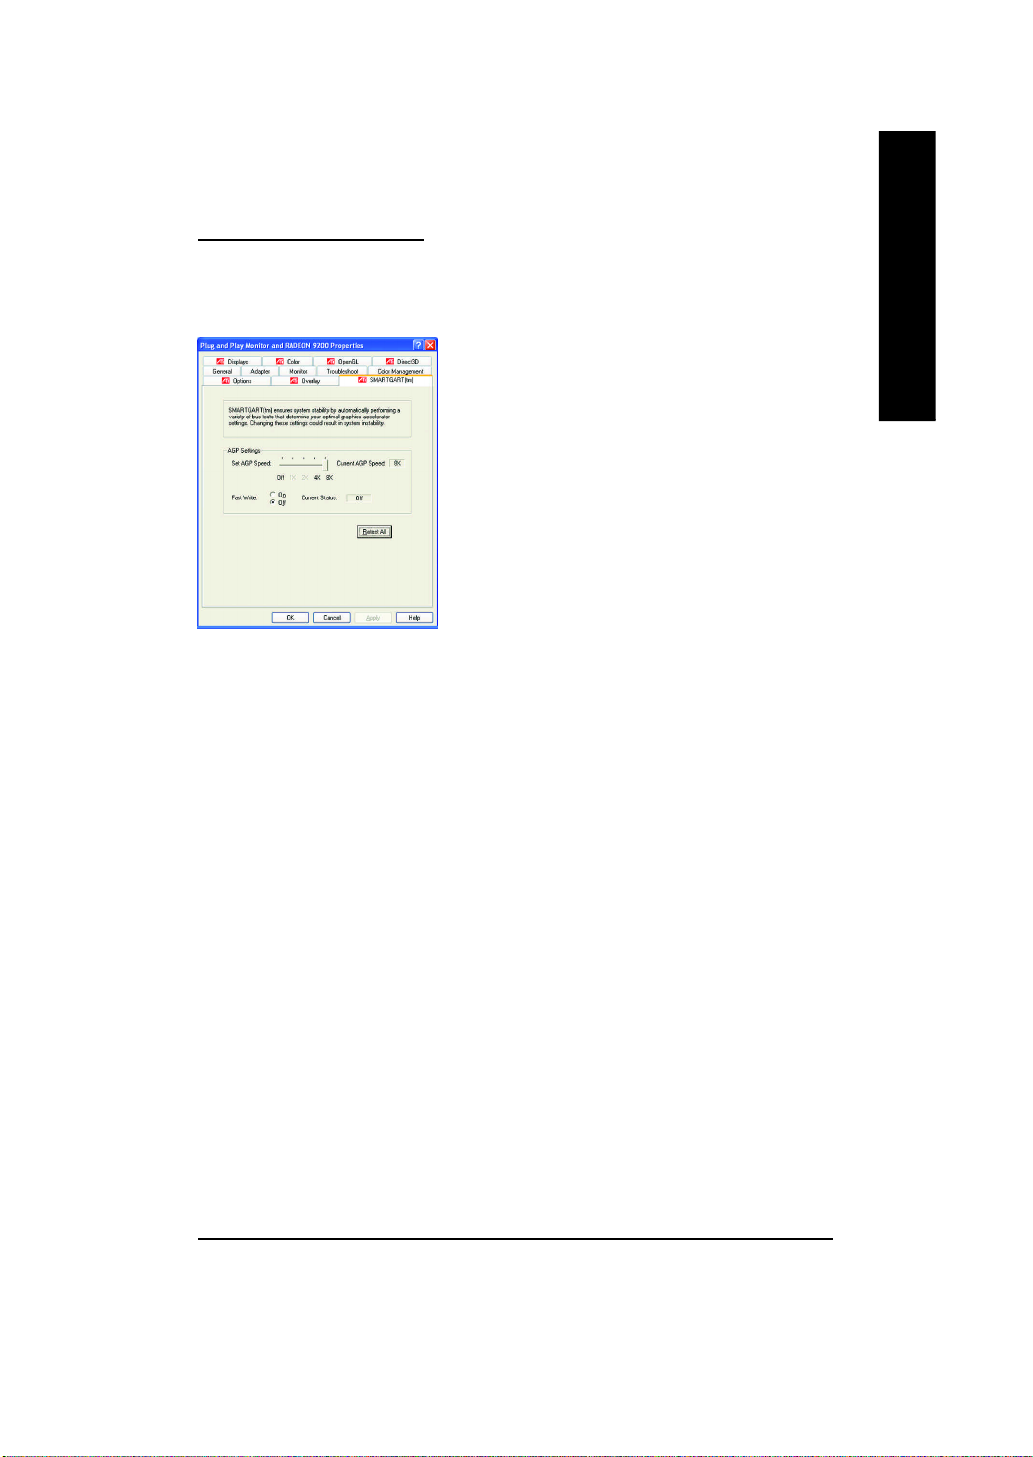
SMARTGART(tm) Properties:
The SMARTGART™ Properties ensures system stability by automatically performing a
variety of bus tests that determine your optimal graphics accelerator settings. Changing these
settings might result in system instability.
English
R92128TE_101.p65 2003/6/30, 下午 04:1329
Software Installation- 29 -
Page 30

3.2. WINDOWS 2000 DRIVER INSTALLATION
Please make sure the Windows 2000 have installed Windows ® 2000 Service Pack version
2 (or later) before installing the graphics accelerator driver.
English
With Windows® 2000 running on your computer, you need to install the GV-R92128TE
driver to take advantage of the higher performance, resolutions, and special graphic features
of the Graphics card. To ensure you install the latest driver, use the Installation CD that
shipped with your GV-R92128TE Graphics card.
To install the GV-R92128TE drivers for Windows® 2000:
1. Insert the INSTALLATION CD into your CD-ROM drive. If Windows® runs the CD
automatically.
2. Click Start.
3. Select Run.
4. Type the following:
D:\SETUP
(If D is not your CD-ROM drive, substitute D with the correct drive letter.)
5. Click "OK".
6. Click on "Windows XP Drivers (Radeon 9200 Series)" to begin the Installation
Wizard.
7. Click "Next".
8. Click "Yes" to the license agreement.
9. Follow the Wizard's on-screen instructions to complete the installation.
3.3. BIOS FLASH UTILITY
GV-R92128TE BIOS update procedure:
MNote: Please download the newest BIOS from our website (www.gigabyte.com.tw)
or contact your local dealer for the file.
MIf you want to realize the BIOS flash information, please refer to detail on page 32.
GV-R92128TE Graphics Accelerator - 30 -
R92128TE_101.p65 2003/6/30, 下午 04:1330
Page 31

4. Troubleshooting Tips
The following troubleshooting tips may help if you experience problems. Contact your dealer
or GBT for more advanced troubleshooting information.
n Check that the card is seated properly in the AGP slot.
n Ensure that the display cable is securely fastened to the card's display connector.
n Make sure that the monitor and computer are plugged in and receiving power.
n If necessary, disable any built-in graphics capabilities on your motherboard. For
more information, consult your computer's manual or manufacturer.
(NOTE: Some manufacturers do not allow the built-in graphics to be disabled or to
become the secondary display.)
n Make sure you selected the appropriate display device and graphics card when you
installed the graphics driver.
n If you have problems during bootup, start your computer in Safe Mode. In Windows
98 SE and Windows® Me, press and hold the CTRL key until the Microsoft® Windows
Startup Menu appears on the screen. Then select the number for Safe Mode, and
press Enter. (You can also use F8 to bring up the Microsoft Windows® Startup Menu.)
In Safe Mode, bring up the Device Manager and check for duplicate display adapter
and monitor entries if you are only using one graphics card.
English
®
®
n For more assistance, use the Troubleshooting Guide located in the Windows® Help or
contact your computer manufacturer.
If necessary, adjust your monitor's setting by monitor's adjust panel to make the screen
looks focused, crisp, and sharp. (Please refer to the monitor’s manual.)
R92128TE_101.p65 2003/6/30, 下午 04:1331
Troubleshooting Tips- 31 -
Page 32
5. Appendix
English
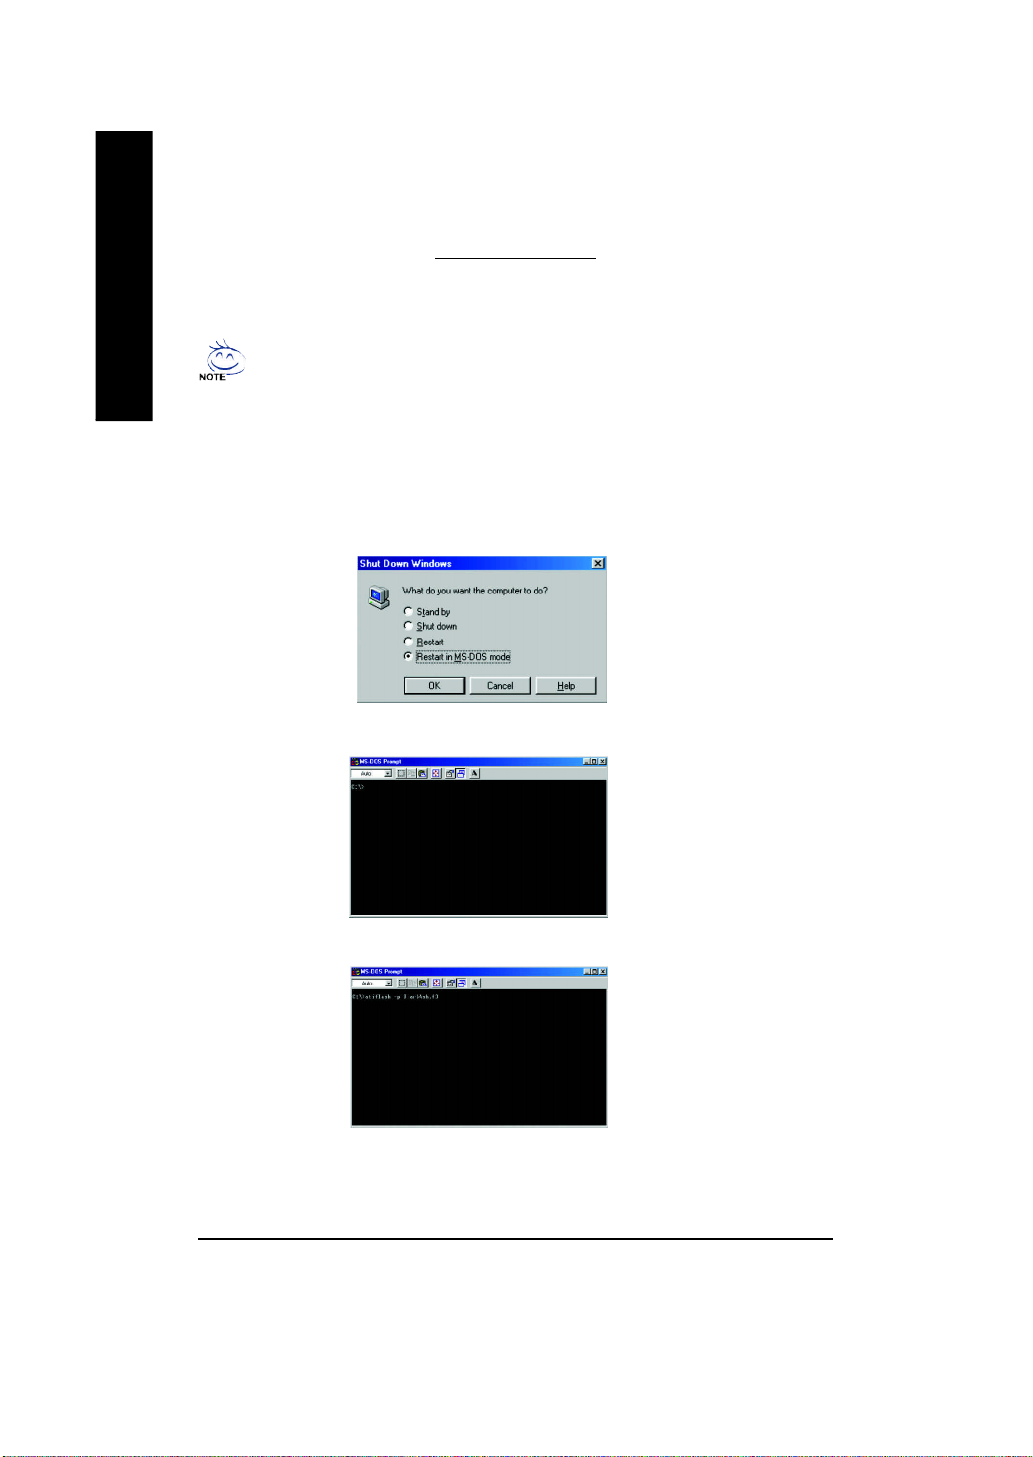
How to reflash the BIOS
How to reflash the BIOS for your graphics card?
1. Extract the Zip file to the drive C: or A:
2. Restart your PC in MS-DOS mode
/ Windows XP. please use the bootable disk to MS-DOS mode)
3. Change the command path to the file location C:\> or A:\>
We use GV-AR64SH VGA card and Atiflash BIOS flash utility as example.
(This function only for Windows 98/98SE, If your OS is Windows 2000 / Windows Me .
4. Reflash BIOS command as below : C:\> atiflash -p 0 <filename>
5. Reboot your PC when it's done.
GV-R92128TE Graphics Accelerator - 32 -
R92128TE_101.p65 2003/6/30, 下午 04:1332
 Loading...