

Page 1

GV-3D1-7950-RH
GeForce™ 7950 GX2 Graphics Accelerator
User's Manual
Rev. 102
12MD-3D17950R-102R
* The WEEE marking on the product indicates this product must not be disposed of with user's other household waste
and must be handed over to a designated collection point for the recycling of waste electrical and electronic equipment!!
* The WEEE marking applies only in European Union's member states.
Copyright
© 2006 GIGABYTE TECHNOLOGY CO., LTD
Copyright by GIGA-BYTE TECHNOLOGY CO., LTD. ("GBT"). No part of this manual may be reproduced or transmitted in any form
without the expressed, written permission of GBT.
Trademarks
Third-party brands and names are the property of their respective owners.
Notice
Please do not remove any labels on VGA card, this may void the warranty of this VGA card
Due to rapid change in technology, some of the specifications might be out of date before publication of this booklet.
The author assumes no responsibility for any errors or omissions that may appear in this document nor does the author make a
commitment to update the information contained herein.
Macrovision corporation product notice:
This product incorporates copyright protection technology that is protected by U.S. patents and other intellectual property rights.
Use of this copyright protection technology must be authorized by Macrovision, and is intended for home and other limited viewing
uses only unless otherwise authorized by Macrovision. Reverse engineering or disassembly is prohibited.
Page 2

Table of Contents
English
1. Introduction ......................................................................................... 3
2. Hardware Installation ........................................................................... 4
3. Software Installation .......................................................................... 10
4. Troubleshooting Tips ........................................................................ 26
1.1. Features ..................................................................................................... 3
1.2. Minimum system requirements ..................................................................... 3
2.1. Board layout ............................................................................................... 4
2.2. Hardware installation ................................................................................... 6
3.1. Win® XP driver and utilities installation ........................................................ 10
3.1.1. Operating system requirement ................................................................................... 10
3.1.2. DirectX installation ........................................................................................................ 10
3.1.3. Driver installation .......................................................................................................... 12
3.1.4. Display properties pages............................................................................................. 15
3.1.5. nView properties pages ............................................................................................... 20
3.2. Win® 2000 driver installation ...................................................................... 25
5. Appendix .......................................................................................... 27
5.1. How to Reflash the BIOS ........................................................................... 27
5.2. Resolutions and color depth table (In Windows® XP) .................................. 28
5.3. NVIDIA GeForce 7950 GX2 - Motherboard Compatibility List ..................... 30
GV-3D1-7950-RH Graphics Accelerator - 2 -
Page 3

1. Introduction
1.1. Features
• Powered by NVIDIA® GeForce™ 7950 GX2 Graphics Processing Unit (GPU)
• Supports the newest PCI Express x 16
• Integrated with 1GB DDRIII memory
• Supports DirectX 9.0c
• Supports NVIDIA® SLI
• Supports AV / S-Video and HDTV output
• Supports D-sub connector (by adapter)
• Supports 2 DVI-I connectors
TM
(Scalable Link Interface) technology
1.2. Minimum system requirements
• IBM® or 100% PC compatible with Pentium® III 650MHz or AMD Athlon 650MHz
class processor or higher
• One PCI Express x 16 slot
• Operating Systems Win® 2000 / Win® XP
• 64MB system memory
• 50MB of available disk space for full installation
• CD-ROM or DVD-ROM drive
• Minimum power supply 350W
(A power supply of 550 watt or above is recommended for an SLI system with the
graphics cards.)
(Note)
English
(Note): SLI technology requires a PCI Express motherboard with two x16 physical
connectors. Graphics cards working in an SLI configuration must be with the same model
name (i.e. GV-3D1-7950-RH) and from the same vendor (i.e. GIGABYTE
TECHNOLOGY).
Introduction- 3 -
Page 4
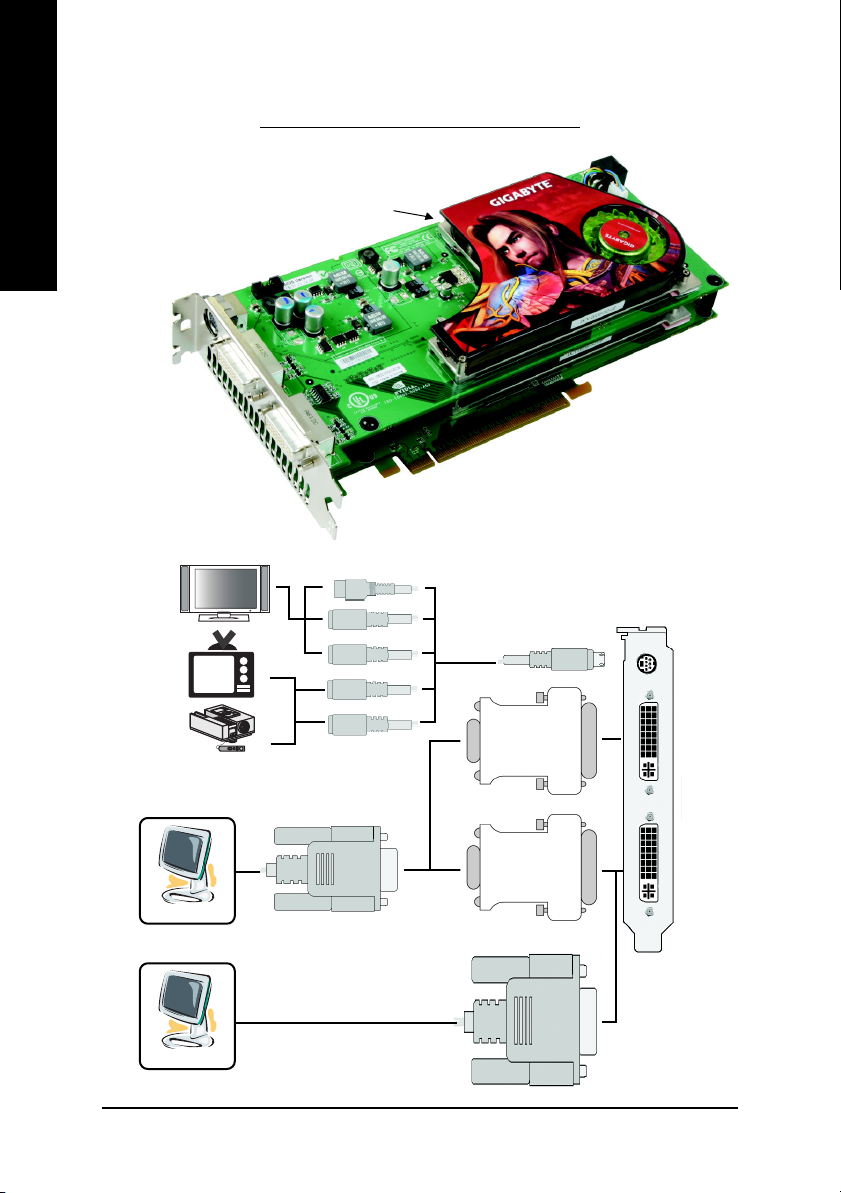
2.1. Board Layout
English
2. Hardware Installation
SLI connector
TV-out
DVI-I Connector
DVI-I Connector
HDTV
NTSC / PAL TV
Analog LCD Monitor
Digital LCD Monitor
Y
Pr
Pb Output
AV Output
S-Video Output
VGA Output
DVI Output
GV-3D1-7950-RH Graphics Accelerator - 4 -
DVI-I to D-Sub
Adapter
DVI-I to D-Sub
Adapter
TV-Out
DVI-I
Connector
DVI-I
Connector
Page 5
Expansion cards contain very delicate Integrated Circuit (IC) chips. To
protect them against damage from static electricity, you should follow some
precautions whenever you work on your computer.
1. Turn off your computer and unplug power supply.
2. Use a grounded wrist strap before handling computer components. If you do not have
one, touch both of your hands to a safely grounded object or to a metal object, such as
the power supply case.
3. Place components on a grounded antistatic pad or on the bag that came with the
components whenever the components are separated from the system.
The card contains sensitive electric components, which can be easily damaged by static
electricity, so the card should be left in its original packing until it is installed.
Unpacking and installation should be done on a grounded anti-static mat. The operator
should be wearing an anti-static wristband, grounded at the same point as the anti-static
mat.
Inspect the card carton for obvious damage. Shipping and handling may cause damage
to your card. Be sure there are no shipping and handling damages on the card before
proceeding.
DO NOT APPLY POWER TO YOUR SYSTEM IF IT HAS BEEN DAMAGED ON
THE CARD.
In order to ensure your graphics card working correctly, please use official
Gigabyte BIOS only. Use none official Gigabyte BIOS might cause problem
on the graphics card.
English
Hardware Installation- 5 -
Page 6
2.2. Hardware installation
Installing Your graphics card.
English
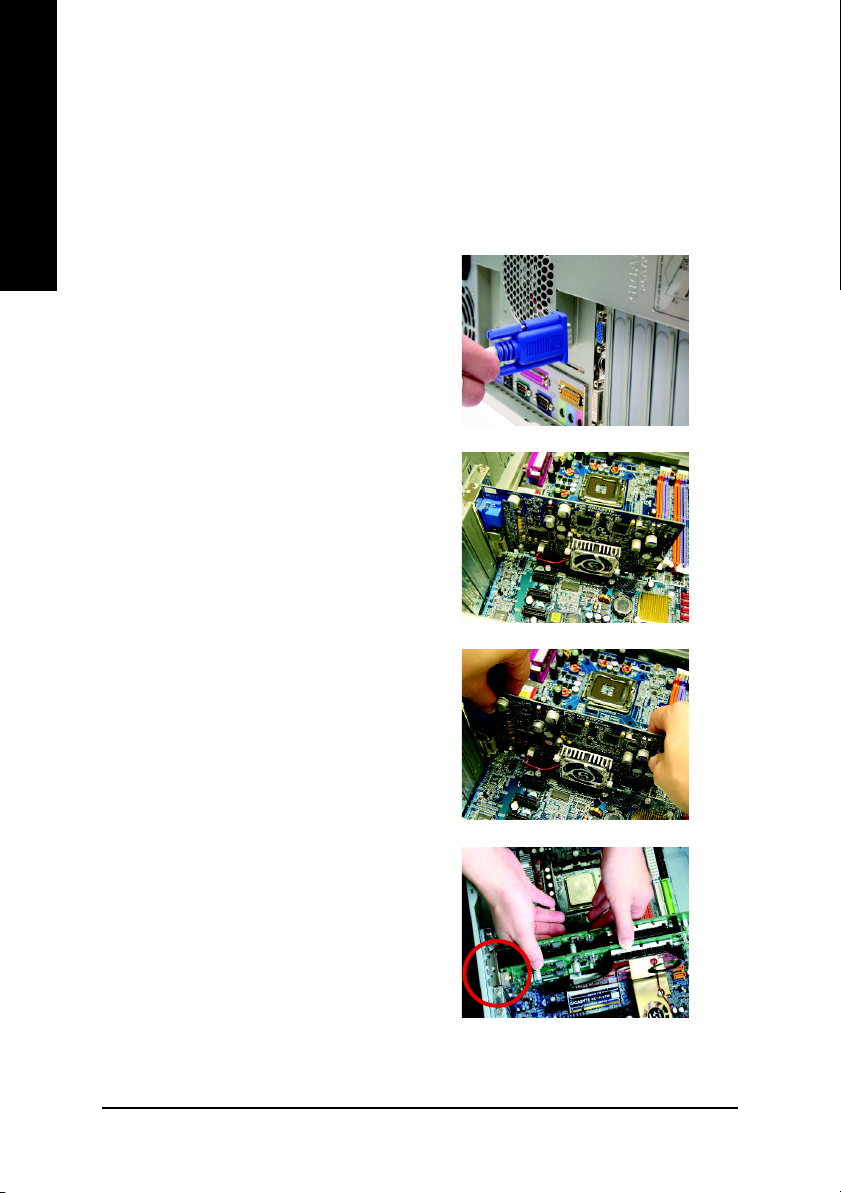
Now that you have prepared your computer, you are ready to install your graphics accelerator
card.
To remove the existing graphics card:
1. Power off the computer and monitor, then
2. Remove the computer cover. If necessary,
3. Remove any existing graphics card from
disconnect the display cable from the back
of your computer.
consult your computer's manual for help in
removing the cover.
your computer.
Or, if your computer has any on-board
graphics capability, you may need to disable
it on the motherboard. For more information,
please see your computer documentation.
To install your new graphics card:
1. Locate two PCI Express x 16 slots. If
necessary, remove the metal covers from
the slots; then align your graphics card with
the PCI Express x 16 slots, and press it in
firmly until the card is fully seated.
* Please make sure that the gold edge connectors of the graphics card is securely inserted.
GV-3D1-7950-RH Graphics Accelerator - 6 -
Page 7
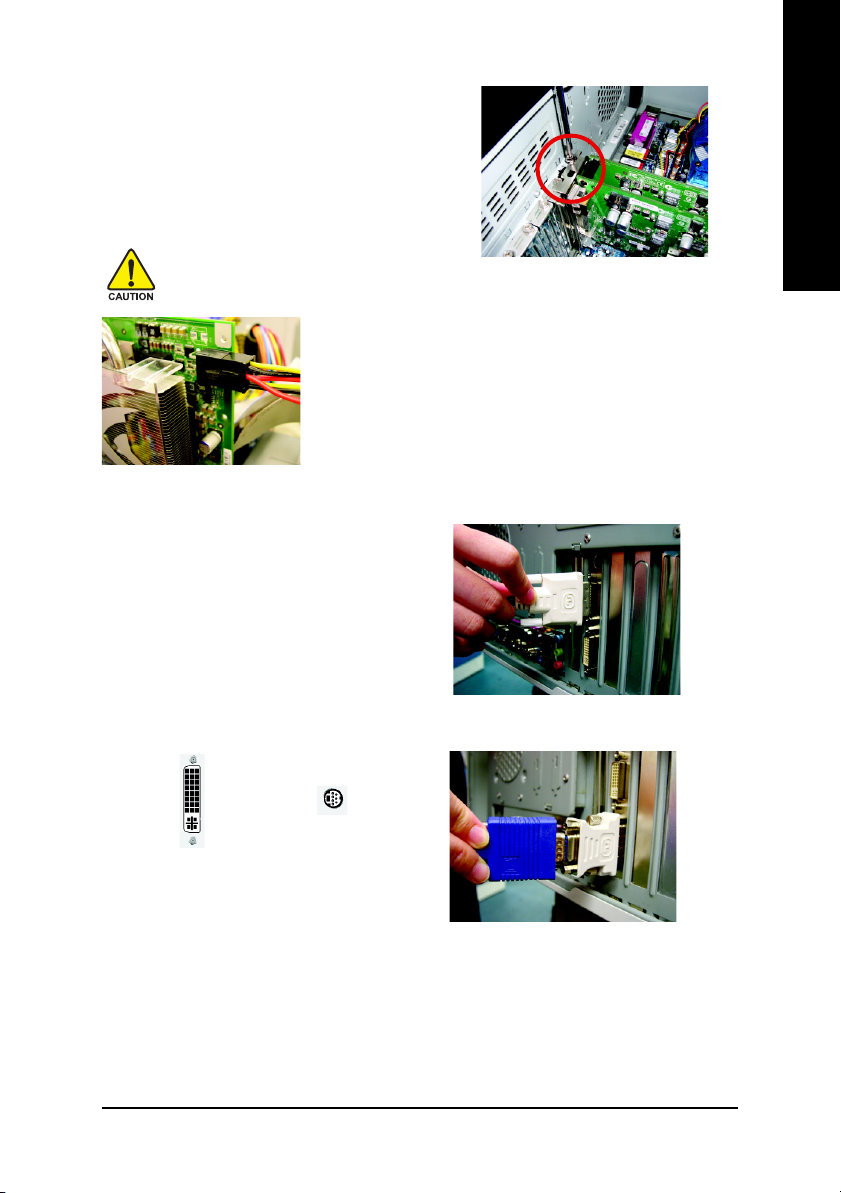
2. Replace the screw to fasten the card in place,
and replace the computer cover.
After installing the GV-3D1-7950-RH to your computer, please
remember to connect at lease one power cable on the graphics card
to the power supply connector.
We suggest you to connect both of the two power cables on the
graphics card to the power supply to achieve optimal graphics
performance.
3. Plug the display cable into your graphics
card; then turn on the computer and monitor.
To connect a flat panel directly to your
graphics card, use the DVI-I connector. To
connect a VGA monitor to the DVI-I
connector, plug the DVI-I to D-sub adapter
into the DVI-I connector, then plug the monitor
cable into the adapter. Connect a flat panel
English
To TV / VCR
To Flat Panel Display
Connect a VGA monitor via DVI-I to D-sub adapter
You are now ready to proceed with the installation of the graphics card driver. Please refer
to next chapter for detailed instructions.
Hardware Installation- 7 -
Page 8
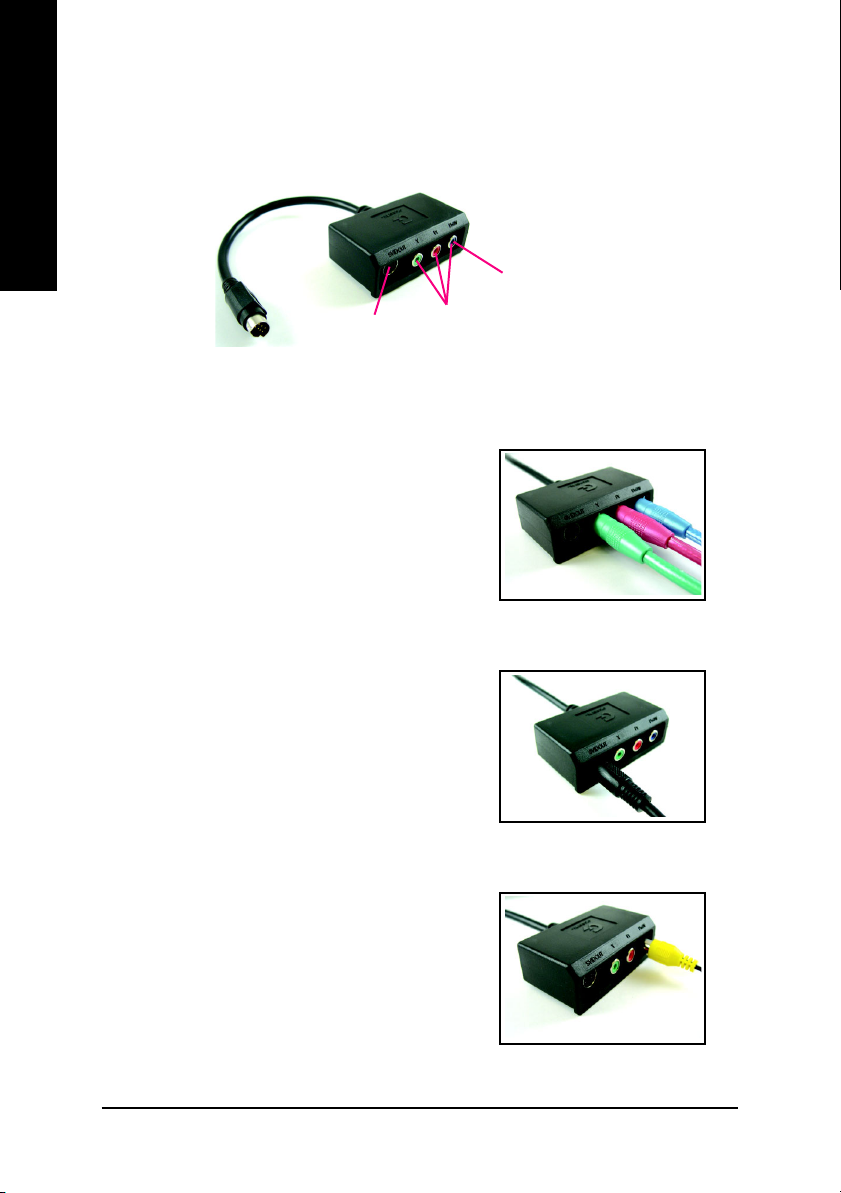
GIGABYTE Component Video Adapter for Nvidia Graphics Cards (HDTV Cable)
English
AV Out
S-Video Out
Connect to the TV-Out
port on the graphics card.
HDTV Component
(Y+Pr+Pb)
(1) Connecting HDTV
Connect your HDTV cables to the component video
adapter according to the corresponding color. (Y= Green,
Pr= Red, Pb= Blue)
(2) Connecting S-Video
If your TV has a S-Video connection, connect the S-
Video cable from your TV to the S-Video Out port on the
adapter.
(3) Connecting AV Output
If your TV has a Composite video connection, you can
connect the RCA cable from your TV to the AV Out port
on the adapter.
GV-3D1-7950-RH Graphics Accelerator - 8 -
Page 9
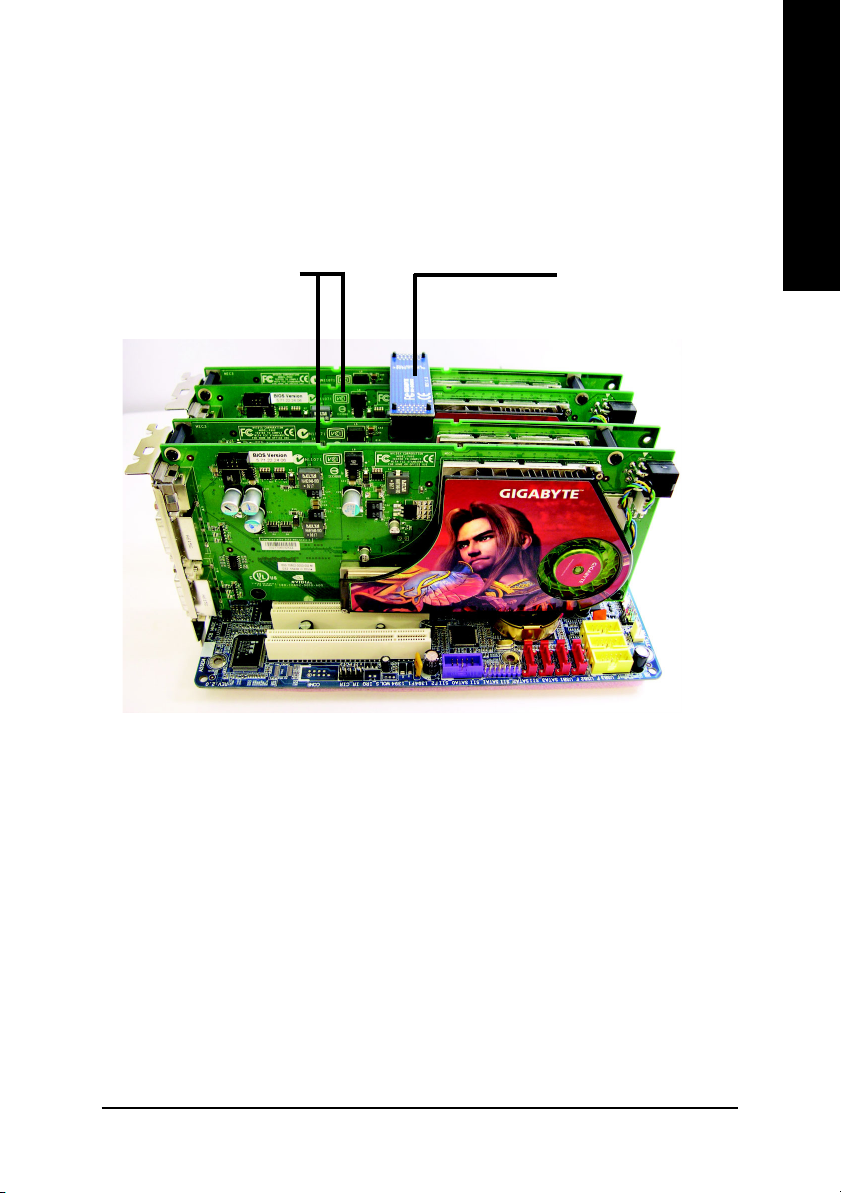
How NVIDIA® SLI
TM
(Scalable Link Interface) technology works:
In an SLI configuration, two SLI-ready graphics cards of the same model and the same
manufacturers are connected together via SLI bridge connector in a system that provides
two x 16 PCI Express slots to scale graphics performance. The picture below shows that two
graphics cards are linked in parallel in an SLI configuration.
English
Two SLI-ready graphics
cards of the same type.
(Example: GV-NX66T256DP-RH)
SLI bridge connector
(provided by motherboard
manufacturer)
Hardware Installation- 9 -
Page 10

3. Software Installation
English
In this manual, we assume that your CD-ROM Drive letter to be Drive D:
The installation of Windows® 2000 / Windows® XP drivers is very simple. When you insert the
driver CD into your CD-ROM drive, you can see the AUTORUN window (if it does not show
up, run "D:\setup.exe"). Then you can follow the guides to setup your graphics card driver.
(Please follow the subsection 3.1.3 "Driver installation" to install the driver for your graphics
accelerator.)
3.1. Windows® XP driver and utilities installation
3.1.1. Operating system requirement
3.1.2. DirectX installation
Install Microsoft DirectX to enable 3D hardware acceleration support for Windows® 2000 or
Windows® XP to achieve better 3D performance.
• When loading the graphics card drivers for the system, please make sure your system
has installed DirectX 9.0C or later version.
• If you install the graphics card drivers for the motherboard, which consist of SIS or VIA
chipsets, please install the appropriate driver program for that motherboard. Or please
contact your motherboard nearest dealer for motherboard driver.
0 Note: For software MPEG support in Windows® 2000 or Windows® XP, you must install
DirectX first. Users who run Windows XP with Service Pack 2 or above do not need to
install DirectX separately.
Step 1. When autorun window show up, click
the Install DirectX 9 item.
GV-3D1-7950-RH Graphics Accelerator - 10 -
Page 11
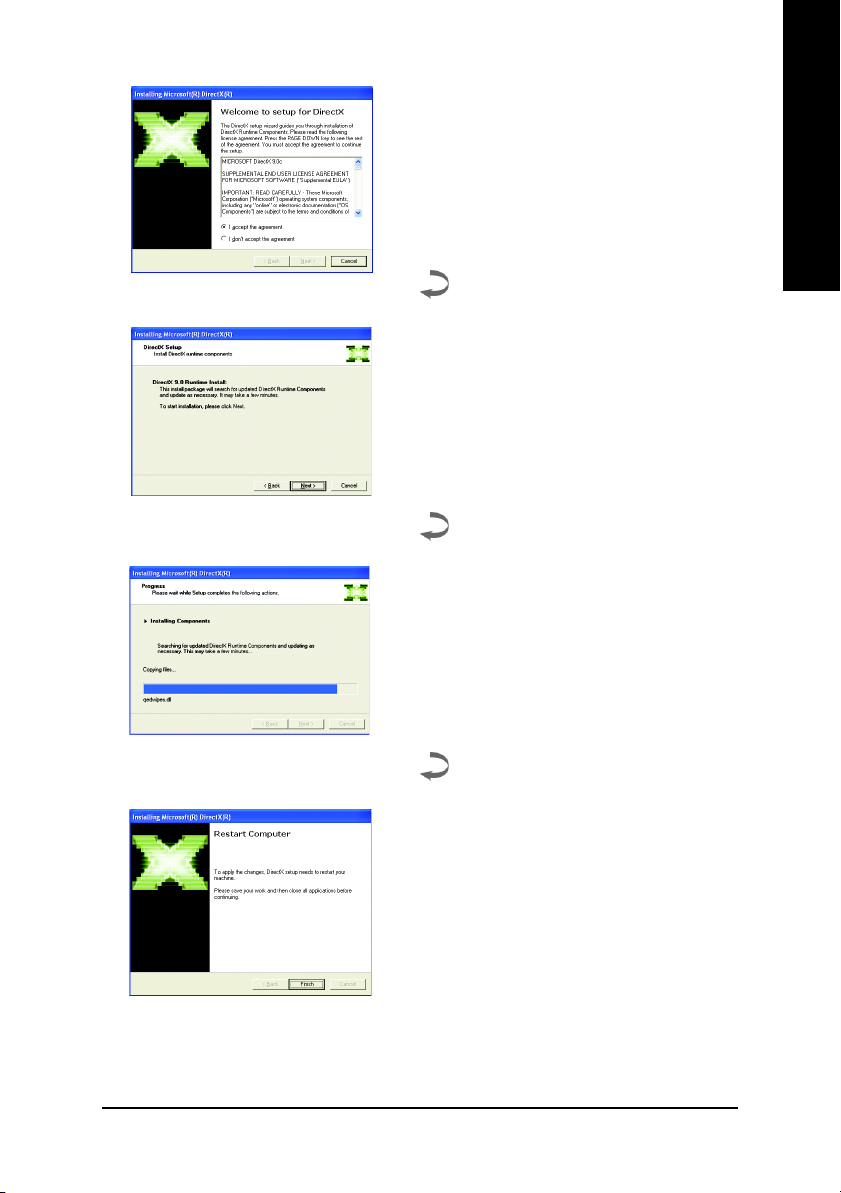
Step 2. Choose I accept the agreement and click
the "Next" button.
Step 3. Click the "Next" button.
Installing the components.
English
Step 4. Click "Finish" to restart computer.
Then the DirectX 9 installation is completed.
Software Installation- 11 -
Page 12

3.1.3. Driver installation
A. New hardware found
English
After the graphics card is inserted into your computer at the first time, the windows will
automatically detect a new hardware in the system and pop out a "New Hardware Found"
message. The following is the step-by-step installation guide.
Step 1: Found new hardware wizard: Video controller (VGA Compatible)
Step 2: Found new hardware wizard: Searching and installing
The wizard will search for the driver and install it automatically.
Click the "Next" button to install the driver. (There
is a driver CD disk that came with your graphics
accelerator, please insert it now.)
Or click the "Cancel" button to install the driver
from AUTORUN window.
Step 3: Found new hardware wizard: Finish
Click the "Finish" button to finish the installation.
GV-3D1-7950-RH Graphics Accelerator - 12 -
Page 13

B. Driver installation (Autorun Window)
Insert the driver CD disk into your CD-ROM, and then you can see the AUTORUN window.
If it does not show up, please run "D:\setup.exe".
English
Step 1. When autorun window show up,
click Display Driver item.
Step 3. Click "Next" button.
Step 4. Click "Finish" button to restart
computer. Then the driver installation is
completed.
Step 2. When autorun window show up,
click Install Display Driver item.
Windows installings the components.
Software Installation- 13 -
Page 14

After installation of the display drivers, you will find a NVIDIA icon on the taskbar's status
area. Click this icon to open the control panel.
English
Right click the icon.
GV-3D1-7950-RH Graphics Accelerator - 14 -
You can adjust the properties of
the graphics accelerator from
here.
Page 15

3.1.4. Display properties pages
To access Display Properties pages, right-click the GIGABYTE icon on the taskbar and
select Display Properties or right-click on Desktop and then select Properties. The Display
Properties dialog box shows the information of display adapter, color, the range of display
area, and the refresh rate.
Settings (Resolutions and Color depth for Windows)
You may adjust the screen resolution and color quality settings in this dialog box.
You can move the slider to change
the resolution.
You can click the item to change the color depth.
Click the "Advanced" button for adapter and setting.
English
Display Model GV-3D1-7950-RH
Matrix CRT+TV Yes
CRT+DVI Yes
DVI+TV Yes
DVI+DVI Yes
To access more advanced options, click the
"Advanced" button.
GeForce 7950 GX2 properties
After pressing the "Advanced" button in Settings, you'll see the Plug and Play Monitor and
NVIDIA GeForce 7950 GX2 Properties dialog box. Click the GeForce 7950 GX2 tab. (You can also
click the Nvidia icon on the taskbar and select Nvidia Display to access the GeForce 7950 GX2
properties page.)
This page shows the Adapter, System and
Driver version information.
You can select other properties from the pop-out menu.
Software Installation- 15 -
Page 16

Screen Adjustment Settings properties
English
Display Mode Timing Settings properties
Click the arrow icons on the desktop image to adjust the screen
to the desired position.
Click to select your display’s timing mode:
Auto-Detect is the "default" setting; it allows Windows to receive
the proper timing information directly from the display itself.
Note: Some older monitors may not support this feature.
• General Timing Formula (GTF) is a standard used by
most new displays.
• Discrete Monitor Timing (DMT) is an older standard still
in use on some displays. Enable this option if your display
requires DMT.
• Coordinated Video Timing Standard (CVT) became the
VESA standard on March 2003. CVT supports higher
resolutions better than other timing standards.
• Fixed aspect ratio timing forces the displayed image to
retain the aspect ratio of the mode rather than aspect ratio
of the display.
Note: The driver may place black borders around the displayed
image, as needed.
GV-3D1-7950-RH Graphics Accelerator - 16 -
Page 17

Performance and Quality Settings properties
The sliders lets to decide whether your application should use
quality or high performance texture.
• Application profiles: Select the application profile from the list
of profiles.
• Global driver settings: Select the Settings item and move
the slider below to set the degree of antialiasing to used in
Direct3D and OpenGL applications.
• Antialiasing settings value: allows to set the degree of the
Global Driver Settings.
SLI multi-GPU
To enable SLI mode, select the Enable SLI multi-GPU
check box and click Apply after installation of two
GV-3D1-7950-RH graphics cards on an SLI-capable
motherboard. Then restart your system when prompted.
Only Windows XP operating system supports the SLI mode.
Please do not enable SLI multi-GPU in Windows 2000.
English
Color Correction properties
The Color Correction Properties is used to compensate for
variations in luminance between a source image and its output
on a display device. Adjust the color correction settings to
provide more accurate color reproduction of images (such as
photographs) on your display device. Also, many 3D-
accelerated games may appear too dark to play. Increasing
the brightness and/or the gamma value equally across all
channels makes these games appear brighter and more
playable.
Software Installation- 17 -
Page 18

Video Overlay Settings properties
English
Tools properties
The Video Overlay Settings Properties can adjust Overlay
zoom controls and Overlay color controls. There is only one
video overlay, which is only available on the Primary display.
The video overlay controls are automatically activated during
playback of any video file type that supports overlay
adjustments. The "Adjust Colors" button will access "Color
Correction" properties page.
The NVIDIA settings taskbar utility lets you conveniently access
various features and presets you've configured in the Display
Properties directly from the Windows taskbar.
• Shortcut tools
The Desktop Manager provides enhanced nView multi-
display functionality and helps you organize your applications
for use with multiple displays and desktops.
• Display optimization
Run the Display Optimization Wizard to adjust your
display(s) for optimal viewing and representation of colors.
• Troubleshooting
This option can be used to force detection of an attached TV
set which does not report its presence to the graphics card.
NV Rotate properties
The NV Rotate Properties is used to rotate the screen. If your
monitor is capable of operating in either Landscape or Portrait
mode, you can adjust the screen by this properties.
• Landscape (0 degree rotation)
• Portrait (90 degree rotation)
• Inverted landscape (180 degree rotation)
• Inverted portrait (270 degree rotation)
GV-3D1-7950-RH Graphics Accelerator - 18 -
Page 19

Screen Resolutions & Refresh Rates properties
The Screen Resolutions & Refresh Rates Properties allows
you to adjust the screen resolution, color quality and monitor
settings (screen refresh rates). Or you can customize resolutions
and refresh rates.
Menu Editing properties
The Menu Editing Properties can remove infrequently used
screens by dragging them from the screen menu to the list
below. Restore screens to the menu by dragging them
individually, or click Restore Defaults.
To begin, select the Enable menu editing check box. To
return to normal navigation mode, do not select the check box.
English
Control Panel User Interface properties
Select the user interface you wish to use:
• Classic NVIDIA Control Panel
• New NVIDIA Control Panel
Software Installation- 19 -
Page 20

3.1.5. nView properties pages
nView is a set of desktop tools designed to help you be more productive when using your
graphics card. With nView you can set up multiple desktops to work with your applications.
English
Multiple desktops give you extra desktop areas on which to run your applications so you
won't have to crowd several open application windows on one desktop.
Enable the nView Desktop Manager features:
Right-click on desktop and choose Properties>Settings>Advanced>GeForce 7950 GX2>
Desktop Management
Access nView properties page:
To access the nView properties page, you can click the NVIDIA icon on the taskbar and
select nView Properties under nView Destop Manager (Method A). Or right-click on
Desktop, select Properties>Settings>Advanced>GeForce 7950 GX2. Double-click Desktop
Management item on the pop-up menu (Method B).
Click the "Enable" button to turn on all the nView Desktop
Manager features.
Method A: Method B:
Click the item to start nView Properties. Double-click Desktop Management to see
more nView properties.
GV-3D1-7950-RH Graphics Accelerator - 20 -
Page 21

nView Desktop Management properties
This tab contains information about the nView Desktop Manager.
The setup wizard can also be accessed from this tab.
nView Profiles properties
This tab contains a record all nView display settings for easy
software setup.
English
nView Windows properties
This tab allows you to control window and dialog box placement
when using multiple monitors.
Software Installation- 21 -
Page 22

nView Applications properties
English
nView Desktops properties
This tab allows you to control nView settings depending different
applications.
This tab allows you to create up to 32 unique desktops.
nView User Interface properties
This tab allows for customization of the nView user interface.
GV-3D1-7950-RH Graphics Accelerator - 22 -
Page 23

nView Effects properties
nView Zoom properties
English
This tab provides special windows effects that you can apply
to your applications.
This tab provides dynamic zoom functionality on the desktop.
Also enables full screen video playback via the video mirroring
control button.
nView Hot Keys properties
This tab lets you perform various actions with shortcut keys or
key combinations.
Software Installation- 23 -
Page 24

nView Mouse properties
English
nView Tools properties
This tab can modify and extend mouse behavior with kinematic
actions.
This tab can improve nView functionality for mobile and desktop
users.
GV-3D1-7950-RH Graphics Accelerator - 24 -
Page 25

3.2. Windows® 2000 driver installation
With Windows running on your computer, you need to install the graphics card driver to take
advantage of the higher performance, resolutions, and special graphics features of the
graphics card. To ensure you install the latest driver, insert the Installation CD that shipped
with your graphics card.
To install the graphics card driver for Windows® 2000, please insert the Installation CD. Then
the AUTORUN window will show up. Click Install Display Driver item, and follow the
wizard to install the driver.
If Windows® does not show the CD automatically, please run following steps:
1. Click the Start button on the control bar.
2. Select Run.
3. Type the following: D:\SETUP.exe
(If D is not your CD-ROM drive, substitute D with the correct drive letter.)
4. Click "OK".
5. Click on "Install Display Drivers" to begin the Installation Wizard.
6. Click "Next".
7. Click "Yes" to the license agreement.
8. Follow the Wizard's on-screen instructions to complete the installation.
English
Please make sure the Windows® 2000 have installed Windows® 2000
Service Pack (or later) before installing the graphics accelerator driver.
Software Installation- 25 -
Page 26

4. Troubleshooting Tips
English
The following troubleshooting tips may help if you experience problems. Contact your dealer
or GBT for more advanced troubleshooting information.
Check that the card is seated properly in the PCI Express x 16 slot.
Ensure that the display cable is securely fastened to the card's display connector.
Make sure that the monitor and computer are plugged in and receiving power.
If necessary, disable any built-in graphics capabilities on your motherboard. For
more information, consult your computer's manual or manufacturer.
(NOTE: Some manufacturers do not allow the built-in graphics to be disabled or
to become the secondary display.)
Make sure you selected the appropriate display device and graphics card when
you installed the graphics driver.
Restart your computer.
Press the F8 key on your keyboard after system starts up. When the Windows
Advanced Options Menu appears, select Safe Mode and press Enter.
After getting into Safe Mode, in Device Manager check whether the driver for the
graphics card is correct.
For more assistance, use the Troubleshooting Guide located in the Windows
®
Help or contact your computer manufacturer.
If necessary, adjust your monitor's setting by monitor's adjust panel to make the screen
looks focused, crisp, and sharp. (Please refer to the monitor's manual.)
GV-3D1-7950-RH Graphics Accelerator - 26 -
Page 27

5. Appendix
5.1. How to Reflash the BIOS
1. Extract the downloaded Zip file to your hard disk(s) or floppy disk. This procedure assumes drive
A.
2. Restart the computer in MS-DOS mode. (For Windows 2000/XP, you need a startup disk to restart
the computer in MS-DOS mode.)
3. Change the command prompt to A:\>.
4. To back up the current BIOS, at the A:\> prompt, type[BIOS flash utility name]
-s [BIOS file name] (example: gvf11 -s nx66t128d.f1) and press Enter.
5. To flash BIOS, at the A:\> prompt, type [BIOS flash utility name] -p [BIOS
file name] (example: gvf11 -p nx66t128d.f2) and press Enter.
6. Wait until it's done, then restart your computer.
English
Appendix- 27 -
Page 28

5.2. Resolutions and Color Depth Table (In Windows® XP)
English
Display Refresh Color Depth (bpp)
Screen Rate 8bpp(256 color) 16bpp(65K color) 32bpp(16.7M)
Resolution (Hz) Standard mode High mode True mode
320 x 200 60~75 333
320 x 240 60~75 333
400 x 300 60~75 333
480 x 360 60~75 333
512 x 384 60~75 333
640 x 400 (16:10) 60~75 333
640 x 480 60~240 333
720 x 480 60 333
720 x 576 50~60 333
800 x 600 60~240 333
848 x 480 60~240 333
960 x 600 (16:10) 60~240 333
1024 x 768 60~200 333
1088 x 612 (16:9) 60~200 333
1152 x 864 60~170 333
1280 x 720 (16:9) 60~150 333
1280 x 768 60~150 333
1280 x 960 60~150 333
1280 x 1024 60~150 333
1360 x 768 60~150 333
1600 x 900 (16:9) 60~120 333
1600 x 1024 60~100 333
GeForce 7950 GX2 Single Display Standard Modes
240 33X
240 33X
200 33X
170 33X
170 33X
170 33X
170 33X
170 33X
140~150 33X
120 33X
GV-3D1-7950-RH Graphics Accelerator - 28 -
To be continued...
Page 29

Display Refresh Color Depth (bpp)
Screen Rate 8bpp(256 color) 16bpp (65K color) 32bpp (16.7M)
Resolution (Hz) Standard mode High mode True mode
1600 x 1200 60~100 333
120 33X
1920 x 1080 (16:9) 30~85 333
100 33X
1920 x 1200 (16:10) 60~85 333
100 33X
1920 x 1440 60~85 333
2048 x 1536 60~85 333
English
* This table is for reference only. The actual resolutions supported depend on the monitor you use.
Appendix- 29 -
Page 30

5.3. NVIDIA GeForce 7950 GX2 - Motherboard Compatibility List
The following motherboards have been tested and passed NVIDIA's compatibility testing requirements
with the GeForce 7950 GX2 graphics card.
English
Manufacturer Model Chipset System BIOS
ABIT AA8-DuraMAX Intel 925X 2.4
ABIT AW8 Intel 955X 1.4
ABIT AN8 SLI NVIDIA nForce4 SLI 1.9
ABIT KN8 SLI NVIDIA nForce4 SLI 17
ABIT KN9 SLI NVIDIA nForce 570 10
Albatron K8SLI NVIDIA nForce4 SLI R1.12
ASUS A8N32-SLI Deluxe NVIDIA nForce4 SLI 1205
ASUS A8N5X NVIDIA nForce4 0902
ASUS A8N-E NVIDIA nForce4 Ultra 1013
ASUS A8N-SLI Deluxe NVIDIA nForce4 SLI 1016
ASUS A8N-SLI Premium NVIDIA nForce4 SLI 1011.006
ASUS A8R32-MVP Deluxe ATI CrossFire Xpress 3200 0404
ASUS A8V-E Deluxe VIA K8T890/VT8237R 1005
ASUS M2N32-SLI DELUXE NVIDIA nForce 590 0404
ASUS M2N-SLI DELUXE NVIDIA nForce 570 112
ASUS P5LD2 Intel 945P 1103
ASUS P5LD2-VM Intel 945G 0508
ASUS P5ND2-SLI NVIDIA nForce4 SLI 0304
Biostar i945 G-M7 Intel 945G 24F
DFI Infinity NF4 SLI NVIDIA nForce4 SLI 2006/04/10
ECS 945P-A Intel 945P 2.58 10/18/05
ECS KN1 SLI Lite NVIDIA nForce4 Ultra 1.1d
ECS nForce4-A939 NVIDIA nForce4 1.1g
EVGA 123-K8-NF47-AX NVIDIA nForce4 SLI 04/11/2006-NF-
Foxconn NF4SLI7AA-8EKRS2 NVIDIA nForce4 SLI Intel Ed. 537F1P34
Foxconn C51XEM2AA-8EKRS2H NVIDIA nForce 590 612W1P19
Gigabyte GA-8I945P-G Intel 945P F5
Gigabyte GA-8I945P PRO Intel 945P F5
Gigabyte GA-8N-SLI-Quad Royal NVIDIA nForce4 SLI Intel Ed. F5
Gigabyte GA-K8N Pro-SLI NVIDIA nForce4 SLI F4
Gigabyte GA-K8N-SLI NVIDIA nForce4 SLI F9
(Note)
CK804-
6A61FJ1AC-00
GV-3D1-7950-RH Graphics Accelerator - 30 -
Page 31

Manufacturer Model Chipset System BIOS
Gigabyte GA-K8N51GMF NVIDIA nForce 410/GeForce 6100 F7
Gigabyte GA-K8N51PVM9-RH NVIDIA nForce 430/GeForce 6150 F1
Gigabyte GA-K8NE NVIDIA nForce4 FB
Gigabyte GA-K8NF-9 NVIDIA nForce4 F10
Gigabyte GA-K8N-SLI NVIDIA nForce4 SLI F9
Gigabyte GA-K8NXP-9 NVIDIA nForce4 Ultra F9
Gigabyte GA-K8NXP-SLI NVIDIA nForce4 SLI F11
Intel D955XBK Intel 955X 2036
Intel D975XBX Intel 975X 1073
Intel SE7525GP2 Intel E7525 P08
iWill DK8EW 59102 NVIDIA nForce4 Pro 2200 V130
Jetway 939GT4-SLI-G NVIDIA nForce4 SLI 6/24/2006
MSI K8N Diamond Plus NVIDIA nForce4 SLI 1.2
MSI K8N Neo3 NVIDIA nForce4 1.5
MSI K8N Neo4 Platinum v1 NVIDIA nForce4 Ultra 1.D
MSI K9N-SLI Platinum NVIDIA nForce 570 1.1
MSI P4N Diamond NVIDIA nForce4 SLI Intel Edition 1.4
MSI 945P NEO2-F Intel 945P A7176IMS v3.2
12/12/05
Supermicro X6DA8 Intel E7525 1.0B
Tyan S2895 D/T NVIDIA nForce 2200/2050 2895_103k
English
(Note) For more compatible motherboards, refer to the following website:
http://www.nvidia.com/gx2
Appendix- 31 -
Page 32

English
GV-3D1-7950-RH Graphics Accelerator - 32 -
Page 33

English
Appendix- 33 -
Page 34

English
GV-3D1-7950-RH Graphics Accelerator - 34 -
 Loading...