

Page 1

Copyright
All mobile products by GIGA-BYTE Communications mentioned in this document, including the
device, accessories, software, text, music, and pictures, are owned by, or authorized by original
manufacturers to GIGA-BYTE Communications. Reproduction, transfer, distribution, or storage of
part or all of the contents in this document in any form without the prior written permission of
GIGABYTE Communications Inc. is prohibited.
GIGA-BYTE Group, GIGA-BYTE Communications Inc.
Page 2

Safety Information
This chapter contains important information on safe and efficient operation. Please read this
information before using the device.
Exposure to Radio Frequency (RF) Energy
The device contains a transmitter and a receiver. When it is ON, it receives and transmits RF
energy. Please use the device appropriately.
Specific Absorption Rate Data
The Max SAR value for this device when tested for use at the ear –
GSM900: 0.059 W/kg
DCS1800: 0.082 W/kg
Road Safety
Check the laws and regulations on the use of phones in the area where you drive. Do NOT use this
device unless you use hands-free operation while driving or riding.
Potentially Explosive Atmospheres
Turn off your phone prior to entering any area with a potentially explosive atmosphere such as gas
stations, explosive chemicals, or flammable objects.
Aircraft Safety
While in flight, switch the device to flight mode (turn off phone or wireless functions). When
instructed to do so, turn off your phone when on board an aircraft.
Facilities
Turn off the device in any facility where posted notices instruct you to do so. These facilities may
include hospitals or health care facilities that may be using equipment that is sensitive to external
RF energy.
Approved Accessories and Batteries
Use only original or manufacturer approved accessories, batteries and chargers.
MW700│2
Page 3

Regulatory Agency Identifications
For regulatory identification purposes, your product is assigned a model number of MW700.
To ensure continued reliable and safe operation of your device, use only the accessories listed
below with your MW700.
The Battery Pack has been assigned a model number of GPS-H01.
Note:
This product is intended for use with a certified Class 2 or Class 3 Limited Power Source,
rated 5 Volts DC, maximum 1 Amp power supply unit.
European Union Notice
Products with CE marking comply with the R&TTE Directive (99/5/EC), the EMC Directive
(89/336/EEC), and the Low Voltage Directive (73/23/EEC) & (2006/95/EC) issued by the
Commission of the European Community.
Compliance with these directives implies conformity to the following European Norms (in
parentheses are the equivalent international standards)
‧ EN 60950-1 (IEC 60950-1)
Safety of Information Technology Equipment.
‧ ETSI EN 301 511
Global system for mobile communications (GSM); Harmonized EN for mobile stations in the
GSM 900 and GSM 1800 bands, covering essential requirements of article 3.2 of the R&TTE
directive (1995/5/EC).
‧ ETSI EN 301 489-1
Electromagnetic compatibility and Radio spectrum Matters (ERM); ElectroMagnetic Compatibility
(EMC) standard for radio equipment and services; Part 1: Common technical requirements.
‧ ETSI EN 301 489-7
Electromagnetic compatibility and Radio spectrum Matters (ERM); ElectroMagnetic Compatibility
(EMC) standard for radio equipment and services; Part 7: Specific conditions for mobile and
portable radio and ancillary equipment of digital cellular radio telecommunications systems
(GSM and DCS).
‧ ETSI EN 301 489-17
Electromagnetic compatibility and Radio spectrum Matters (ERM); ElectroMagnetic Compatibility
(EMC) standard for radio equipment and services; Part 17: Specific conditions for 2.4 GHz
wideband transmission systems and 5 GHz high performance RLAN equipment.
‧ ETSI EN 300 328
Electromagnetic compatibility and Radio spectrum Matters (ERM); Wideband Transmission
systems; data transmission equipment operating in the 2.4 GHz ISM band and using spread
spectrum modulation techniques.
MW700│3
Page 4

Safety precautions for RF exposure
‧ Use only original manufacturer-approved accessories, or accessories that do not contain any
metal.
‧ Use of non-original manufacturer-approved accessories may violate your local RF exposure
guidelines and should be avoided.
Exposure to Radio Frequency (RF) Signals
Your device contains a radio transmitter and receiver. The radiated output power is far below the
international radio frequency exposure limits. These limits are part of comprehensive guidelines
and establish permitted levels of RF energy for the general population. The guidelines are based
on the safety standards previously set by international standards bodies:
‧ American National Standards Institute (ANSI) IEEE. C95.1-1992
‧ National Council on Radiation Protection and Measurement (NCRP). Report 86. 1986
‧ International Commission on Non-Ionizing Radiation Protection (ICNIRP) 1996
‧ Ministry of Health (Canada), Safety Code 6. The standards include a substantial safety margin
designed to assure the safety of all persons, regardless of age and health.
The exposure standard for wireless mobile phones employs a unit of measurement known as the
Specific Absorption Rate, or SAR. The standard incorporates a substantial margin of safety to give
additional protection for the public and to account for any variations in usage.
As with other mobile radio transmitting equipment, users are advised that for satisfactory operation
of the equipment and for the safety of personnel, it is recommended that no part of the human body
be allowed to come too close to the antenna during operation of the equipment.
Your device has an internal antenna. Use only the supplied integral antenna. Use of unauthorized
or modified antennas may impair call quality and damage the phone, causing loss of performance
and SAR levels exceeding the recommended limits as well as result in non-compliance with local
regulatory requirements in your country.
To assure optimal phone performance and ensure human exposure to RF energy is within the
guidelines set forth in the relevant standards; always use your device only in its normal-use
position. Do not touch or hold the antenna area unnecessarily when placing or receiving a phone
call. Contact with the antenna area may impair call quality and cause your device to operate at a
higher power level than needed. Avoiding contact with the antenna area when the phone is IN USE
optimizes the antenna performance and the battery life.
Telecommunications & Internet Association (TIA) safety information
Pacemakers
The Health Industry Manufacturers Association recommends that a minimum separation of six
inches be maintained between a handheld wireless phone and a pacemaker to avoid potential
interference with the pacemaker. These recommendations are consistent with the independent
research by and recommendations of Wireless Technology Research. Persons with pacemakers:
‧ Should ALWAYS keep the phone more than six inches from their pacemaker when the phone is
MW700│4
Page 5

turned ON.
‧ Should not carry the phone in a breast pocket.
‧Should use the ear opposite the pacemaker to minimize the potential for interference. If you have
any reason to suspect that interference is taking place, turn the phone OFF immediately
Hearing Aids
Some digital wireless phones may interfere with some hearing aids. In the event of such
interference, you may want to consult your service provider, or call the customer service line to
discuss alternatives.
Other Medical Devices
If you use any other personal medical device, consult the manufacturer of your device to determine
if they are adequately shielded from external RF energy. Your physician may be able to assist you
in obtaining this information.
Turn the phone OFF in health care facilities when any regulations posted in these areas instruct
you to do so. Hospitals or health care facilities may be using equipment that could be sensitive to
external RF energy.
WEEE Notice
The Directive on Waste Electrical and Electronic Equipment (WEEE), which entered into force as
European law on 13th February 2003, resulted in a major change in the treatment of electrical
equipment at end-of-life.
The purpose of this Directive is, as a first priority, the prevention of WEEE, and in addition, to
promote the reuse, recycling and other forms of recovery of such wastes so as to reduce disposal.
The WEEE logo (shown at the left) on the product or on its box indicates that this product must not
be disposed of or dumped with your other household waste. You are liable to dispose of all your
electronic or electrical waste equipment by relocating over to the specified collection point for
recycling of such hazardous waste. Isolated collection and proper recovery of your electronic and
electrical waste equipment at the time of disposal will allow us to help conserving natural resources.
Moreover, proper recycling of the electronic and electrical waste equipment will ensure safety of
human health and environment. For more information about electronic and electrical waste
equipment disposal, recovery, and collection points, please contact your local city center,
household waste disposal service, shop from where you purchased the equipment, or
manufacturer of the equipment.
RoHS Compliance
This product is in compliance with Directive 2002/95/EC of the European Parliament and of the
Council of 27 January 2003, on the restriction of the use of certain hazardous substances in
electrical and electronic equipment (RoHS) and its amendments.
MW700│5
Page 6

General Information
This chapter contains important information on safe and efficient operation. Please read this
information before using the device. Ignorance of the following notices may lead to violations of the
law.
․Before using the device, please make sure you have fully charged the battery.
․Do NOT remove the battery from the device during charging.
․Before inserting SIM card into the device, make sure that the device is switched off.
․Do NOT attempt to dissemble the device on your own. This should be done by an authorized
person.
․Use the device in accordance to instructions when in public facilities.
․In some countries, it is a violation against the law to record phone conversations. Always ask
permission of the other party when you are going to record a conversation.
MW700│6
Page 7

Table of Contents
Copyright…………………………………………………………………………………………..…………1
Safety Information…………………………………………………………………………………………..2
General Information…………………………………………….…………………………………….…….3
Chapter 1 Before Using Your Device………………………………………………...………………1-1
1.1 Familiarizing yourself with MW700....……………………………………………………………….1-1
1.2 Features.……....………………………………………………………………………………………1-2
1.3 Insert the Battery & SIM card………………………………………………………………………..1-3
1.4 SIM.………………………..………………………………………………………….………………..1-3
1.5 Battery.…….……………………………………………………………………….………………….1-3
1.6 Lock/Unlock.…...……………….……………………………………………………………………..1-4
1.7 Power.………………….………………………………………………………………………………1-4
Chapter 2 Getting Started.……………………………………………………………………………. 2-1
2.1 Display Information..................................................................................................................2-1
2.2 Screen Orientation...................................................................................................................2-5
2.3 Setting Time& Date..................................................................................................................2-5
2.4 Using the Stylus.......................................................................................................................2-6
2.5 Screen Alignment.....................................................................................................................2-6
2.6 Input Method............................................................................................................................2-6
2.7 Drawing on the Screen.………………………………………………………………………………2-7
2.8 Recording a Message.……………………………………………………………………………….2-7
2.9 Editing My Info.………………………………………………………………………………………..2-8
2.10 Password Setup.…………………………………………………………………………………….2-8
2.11 Memory Expansion.…………………………………………………………………………………2-8
2.12 Data Backup.………………………………………………………………………………………...2-8
2.13 Multi-Language.……………………………………………………………………………………..2-8
Chapter 3 Phone Functions .......................................................................................................3-1
3.1 Phone Dialer Screen and Key Introduction......…………………………………………………….3-1
3.2 Making a Call………………………………………………………………………………………….3-1
3.3 Receiving/Ignoring a Call..……………………………..…………………………………………….3-2
3.4 International Calls....………………………………………………………………………………….3-2
3.5 Emergency Calls ..……………………………………………………………………………………3-2
3.6 Volume Adjustment …...………………………….………………………………………………….3-2
3.7 Making a Call from Contacts.…..……………………………………………………………………3-3
3.8 Creating a New Contact ……………………………………………………………………………..3-3
3.9 Call History..……….…………………………………………………………………………………..3-3
3.10 Setting Ringtone and Password...…………………………………………………………………3-4
3.11 Block List..……………………………………………………………………………………………3-4
Chapter 4 Settings.…………........................................................................................................4-1
4.1 Personal Settings..………….....................................................................................................4-1
MW700│7
Page 8

4.2 System Settings.......................................................................................................................4-3
Chapter 5 Synchronization.……………………............................................................................5-1
5.1 Install and Use ActiveSync…...................................................................................................5-1
5.2 Synchronize via Bluetooth........................................................................................................5-1
Chapter 6 Getting Connected…..................................................................................................6-1
6.1 Internet Access........................................................................................................................6-1
6.2 GPRS Connection Settings......................................................................................................6-1
6.3 Activating GPRS Connection...................................................................................................6-1
6.4 GPRS Wizard ..........................................................................................................................6-2
6.5 Connecting with Your Personal Computer...............................................................................6-2
6.6 Bluetooth Wireless Transmissions...........................................................................................6-2
6.7 Internet Sharing.......................................................................................................................6-3
6.8 Wi-Fi ........................................................................................................................................6-4
6.9 USB .........................................................................................................................................6-4
Chapter 7 Messaging.…………………….....................................................................................7-1
7.1 E-mail and Message................................................................................................................7-1
7.2 Synchronously Process Email..................................................................................................7-1
7.3 Directly Connect to Email Server…..........................................................................................7-2
7.4 Establish Email Services……..................................................................................................7-2
7.5 Use Email and Message..........................................................................................................7-3
7.6 How to Use Push Email............................................................................................................7-4
7.7 How to Use MMS.....................................................................................................................7-5
7.8 Messenger………….…….........................................................................................................7-6
Chapter 8 Multimedia...................................................................................................................8-1
8.1 Camera ...................................................................................................................................8-1
8.2 Video Mode..............................................................................................................................8-2
8.3 Taking A GeoTagged Photo.....................................................................................................8-2
8.4 Recorder..................................................................................................................................8-2
8.5 Pictures & Videos.....................................................................................................................8-3
8.6 JAVA........................................................................................................................................8-3
8.7 Audio Mixer..............................................................................................................................8-3
Chapter 9 Applications….………..…...........................................................................................9-1
9.1 Calendar..................................................................................................................................9-1
9.2 Contacts...................................................................................................................................9-1
9.3 Tasks.......................................................................................................................................9-2
9.4 Notes…....................................................................................................................................9-2
9.5 Word Mobile.............................................................................................................................9-3
9.6 Excel Mobile.............................................................................................................................9-3
9.7 PowerPoint Mobile...................................................................................................................9-4
9.8 Windows Media Player….........................................................................................................9-4
9.9 Internet Explore…....................................................................................................................9-5
9.10 Calculator...............................................................................................................................9-6
9.11 Games…................................................................................................................................9-6
MW700│8
Page 9

9.12 STK (SIM Tool Kit).................................................................................................................9-6
9.13 Zip….………………................................................................................................................9-6
9.14 SD Add-Ons...........................................................................................................................9-6
9.15 GPS Tracking.........................................................................................................................9-6
9.16 SIM Manager.........................................................................................................................9-7
9.17 Backup Tool...........................................................................................................................9-7
Chapter 10 Managing Your Mobile...........................................................................................10-1
10.1 Memory Management..........................................................................................................10-1
10.2 Memory................................................................................................................................10-1
10.3 Add or Remove Programs....................................................................................................10-1
Chapter 11 Specifications…....………………………………………………………………………11-1
Chapter 12 FAQ...........................................................................…………….............................12-1
MW700│9
Page 10
1 Before Using Your Device
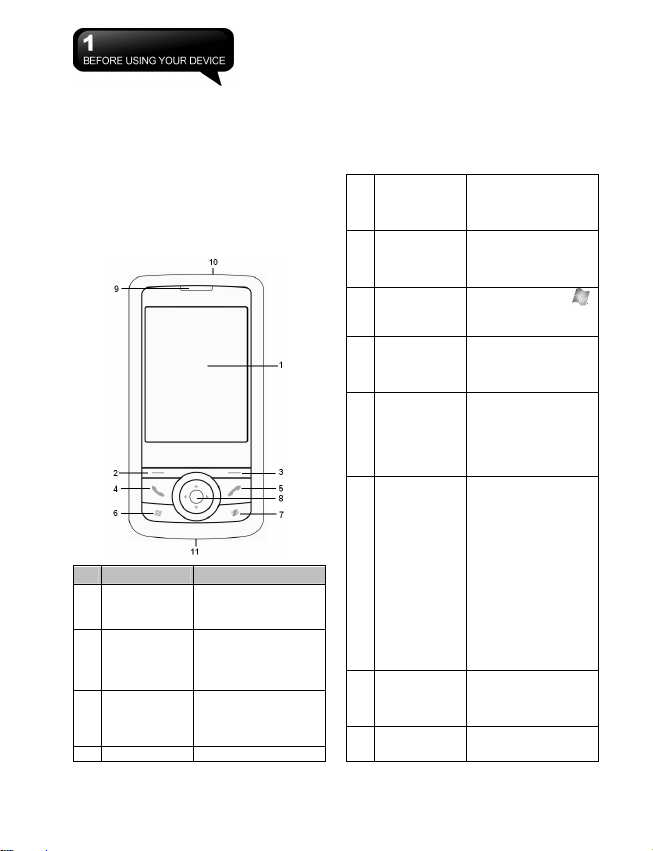
1.1 Familiarizing yourself with
MW700
This section introduces you to the hardware of
the device and its function keys.
No. Item Function
1 Touch Screen
Left Function
2
Key
Right Function
3
Key
4 Talk/Send Key You can make or
Display screen. Use
stylus to select items on
the screen.
Press to execute the
function displayed on
the bottom left of the
screen.
Press to execute the
function displayed on
the bottom right of the
screen.
5 End Key
Windows Flag
6
Key
7 GPS Key
Navigation
8
Key:
9 LED Indicator
10 Power On/Off
11 Mini USB slot
answer a call by
pressing Talk/Send key,
or go to Phone Dialer
screen.
Press this key to end a
call or to return to
Today screen from any
screen.
Press the Windows
key to open Start menu
options.
Press this key to
execute GPS function
or application. OK as
default.
Press up, down, left
and right directions to
navigate. Tap the
center key to execute
the selected function or
application.
The LED indicator
indicates the status of
your device by showing
different colors.
Red: Charging
activated.
Blue: Bluetooth is
activated.
Orange: Wi-Fi is
activated.
Green: Mobile network
is detected.
Purple: Notification,
GPS signal is detected.
Press and hold Power
key for a few seconds
to power on/off your
device.
Use USB connector to
synchronize data with
MW700 │1-1
Page 11
your desktop PC,
transmit data or charge
the battery.
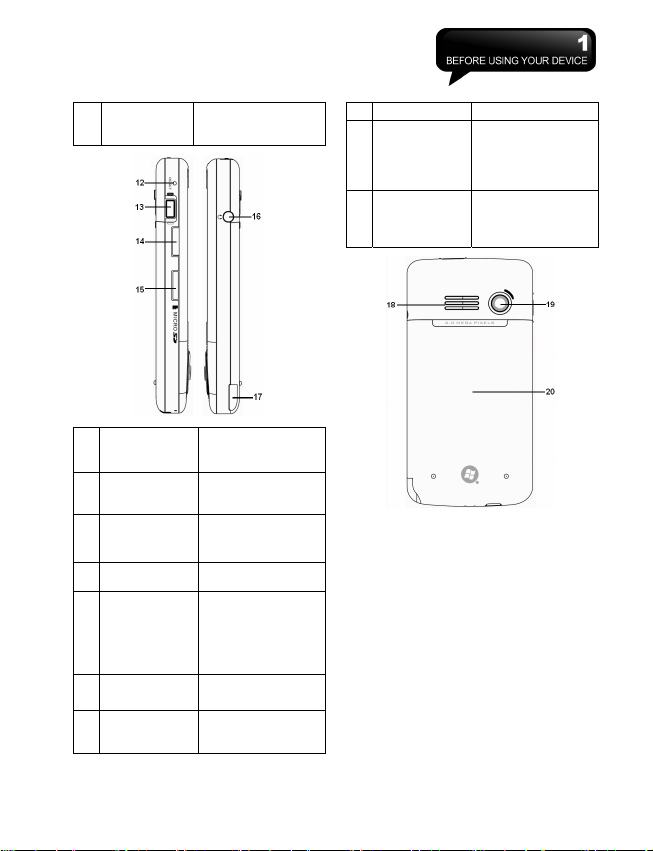
19 Camera Lens
20 Battery Cover
the built-in speaker.
The CMOS camera on
the back of the device
supports 2-mega-pixel
photo and high quality
video.
Push and slide out the
cover to replace
battery and unlock
SIM card hatch.
Soft Reset
12
Button
13 Camera Key
14 Volume Key
Micro SD card
15
slot
16 Headset Plug
17 Stylus
18 Speaker
Press the button with
stylus to soft reset
your device.
Press and hold
camera key to launch
camera function.
Slide this key upwards
or downwards to
adjust volume.
You can insert your
Micro SD card here.
Plug in headset, and
then you can listen to
the FM radio, music
via the headset or use
the device's
hands-free kit.
Use the stylus to touch
the screen panel.
Besides using stereo
headset, you may play
music/voice through
1.2 Features
MW700 is not only having mobile phone
features, it also integrates Personal Digital
Assistant (PDA) capability. The following
section provides more information about the
device features:
․Touch screen: 2.8” TFT LCD display with
65,536 colors effective.
․Navigation key, Windows key, GPS key.
․Speaker.
․Mini-USB slot for connection and battery
charging.
․Camera: 2.0 mega pixels with auto focus.
․Connections: GPRS, Bluetooth, and
Wireless LAN.
․Microsoft Windows Mobile 6: Windows Live,
MW700 │1-2
Page 12
Windows Live Messenger, Pocket Outlook,
Pocket Explorer, and Office tools (Word,
Excel, and PowerPoint). Also features
Encryption, Internet Sharing, Windows
Update, Pictures& Videos, Calculator,
Games, ActiveSync, and File Explorer.
․Other programs: SIM Manager, FM Radio,
Zip, Java, GPS Tracking, etc.
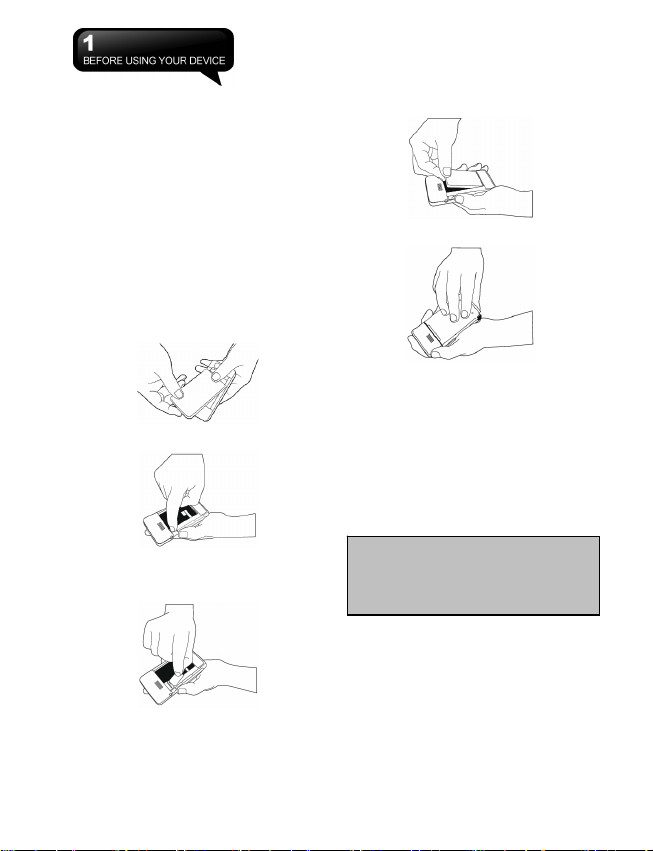
1.3 Insert the battery & SIM Card
Before inserting/removing a SIM card, please
make sure that MW700 is powered off and is
not connected to any power supply by the USB
cable or charger.
1. Look at the back of your MW700. Push and
slide on the battery cover.
2. Find the SIM card slot on the side of the
device. Open the hatch.
3. Insert the SIM card with the metallic part
facing down and the clipped corner in the
same direction and orientation shown on
the cover's instruction.
4. Insert the battery back to the battery slot.
5. Slide the battery cover back and push until
you hear “click”.
1.4 SIM
Before using your MW700, you must contact a
network operator to get a personal SIM
(Subscriber Identity Module). The SIM card
contains the device number, the services
included in your subscription, and your
personal data such as your phonebook and
messages. The phone functions are unusable
(except for emergency calls) until a valid SIM
card is inserted.
Note: If the device or the SIM card is lost
or stolen, you should contact your
network operator immediately in order to
prevent unauthorized use.
1.5 Battery
Your MW700 comes with a removable and
rechargeable Lithium Polymer battery. The
standby time and talk time will depend on your
actual usage network coverage and whether
the device is in standby mode. The battery life
may also vary depending on how frequently
the user switches between functions.
MW700 │1-3
Page 13
Note: Using any battery pack or AC
adapter (charger) not specified/endorsed
by GSmart on this phone may be
dangerous and may invalidate any
warranty and approval given to the
device. Unplug the charger from the
power supply when it is not in use.
Charging the battery
Please make sure that the battery is installed
and fully charged when using your MW700 for
the first time. You may charge the battery in
the following ways:
1. Universal AC Adapter: Plug your AC
adapter into a suitable main power socket
and plug the connector to the charging slot
of your MW700. The phone will start
charging automatically.
2. USB cable: Connect your MW700 to your
PC’s USB port with the USB cable supplied
in your package.
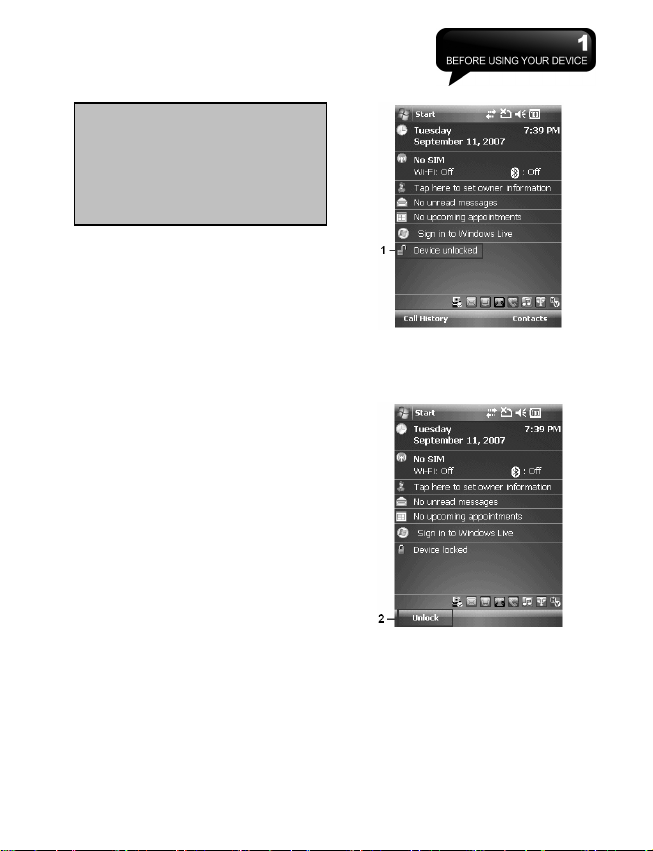
1.6 Lock/Unlock
1. Lock the device:
On Today screen, tap Device unlocked to lock
the device. The device will not respond to
touches on screen nor react to any input on the
keypad when it is locked.
You may also enable the device lock
automatically after the screen backlight is
turned off.
2. Unlock the device:
Tap Unlock on the bottom left of the screen.
Then tap Unlock button on the newly appeared
screen and the device is unlocked.
1.7 Power
Power on
While the device is powered off, press Power
key on the top of the device to power it on.
Power off
While the power is on, press and hold Power
key on the top of the device for about 5
MW700 │1-4
Page 14
seconds to turn it off. To reduce the power
consumption of your device, you may change
the backlight duration and brightness level.
Also, you can save more power by setting the
device to turn off automatically if it is not in use
for a specific period of time.
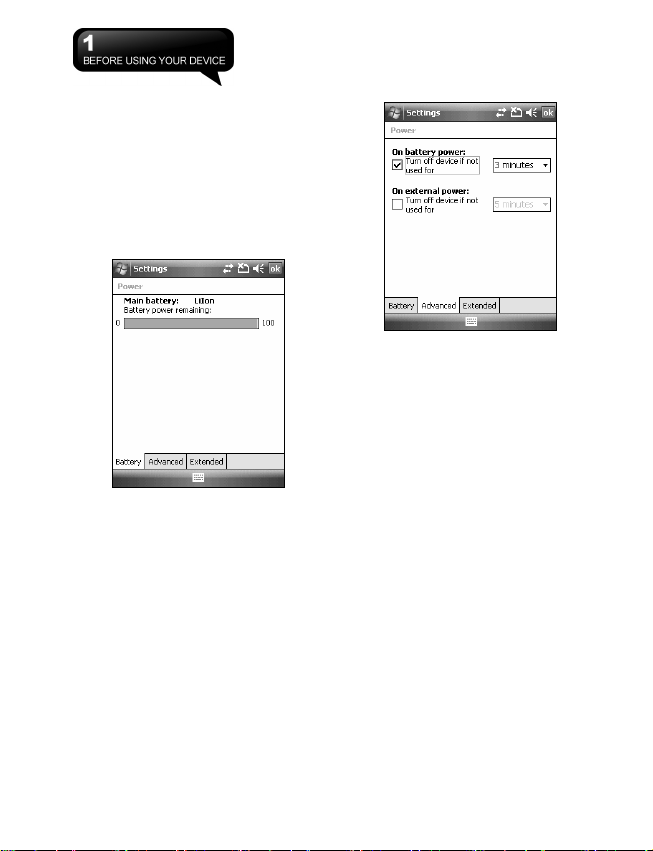
Battery power level
Tap Start > Settings > System tab > Power >
Battery tab. The bar indicates the remaining
battery power level.
Turn off the device automatically
Tap Start > Settings > System tab > Power >
Advanced tab and select the duration before
the device turns off by itself. This feature
controls the screen standby time.
Sleep Mode
1. Sleep Mode is a power saving mode
designed to reserve battery power. After
idling for a period of time, the device
automatically enters Sleep Mode. You may
also manually enter Sleep mode by
pressing power On/Off key shortly. The
backlight of the screen will turn off and the
device will go into Sleep mode. When in
Sleep mode, your device will show no
response to any operation or touches on
the screen and keypad.
2. Press the power On/Off key again to exit
Sleep mode.
3. You may set the time to activate Sleep
mode. The device will automatically enter
Sleep mode when no operation is done
within that time.
․ Tap Start > Settings > System Tab > Power
> Advanced Tab.
․ Check “Turn off device if not used for”
Please select “On battery power” or “On
external power”.
․ Select your desired time period.
․ Tap “OK” to complete this setting.
MW700 │1-5
Page 15
2 Getting Started
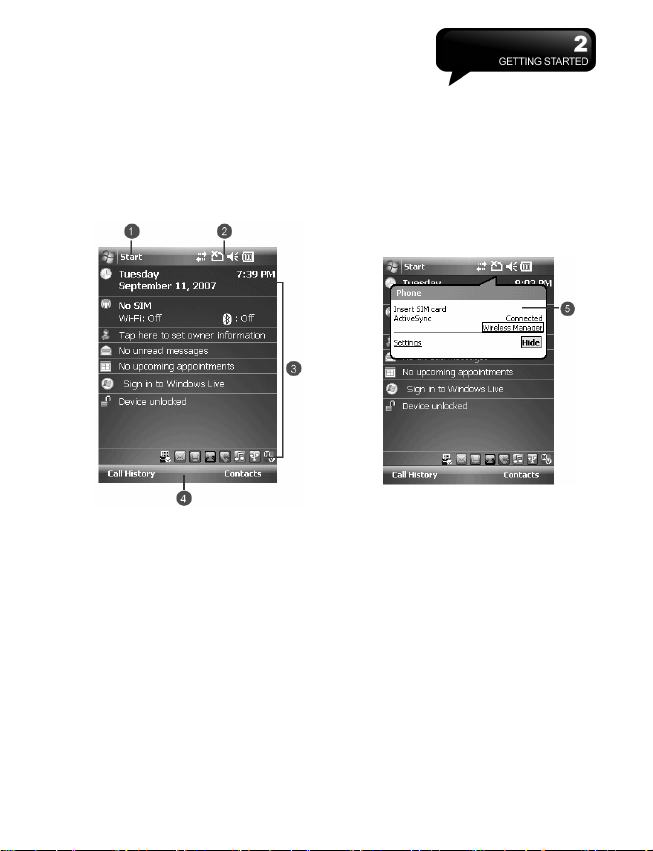
2.1 Display Information
The main screen displays the following
information:
1. Start menu
Tap here to open Windows Start menu on
the top left of the screen. To return to Today
screen at any time, tap Start > Today.
2. Status & Icon area
Display notification icons and system
status. You can tap the icon to look into the
detail or settings of the function.
3. Today screen
On Today screen, this area contains
shortcuts to certain programs and important
information of today. To change Today
screen settings, tap Start > Settings >
Personal tab > Today
4. Command area
Depending on different mode, this area
contains different features such as menu
options, input panel and commands to
create or edit a file.
5. Pop up menu
This allows you to quickly access an item.
Tap on the icon and tap again to perform an
action. To cancel it, tap other areas of the
screen.
Start Menu
1. Quick access to certain fixed Microsoft
programs.
2. The most recent 5 programs you have
used.
3. Tap on Programs to enter the Programs
menu.
4. Tap on Settings to enter the Settings menu.
5. Tap on Help to see detail information about
different features.
MW700 │2-1
Page 16
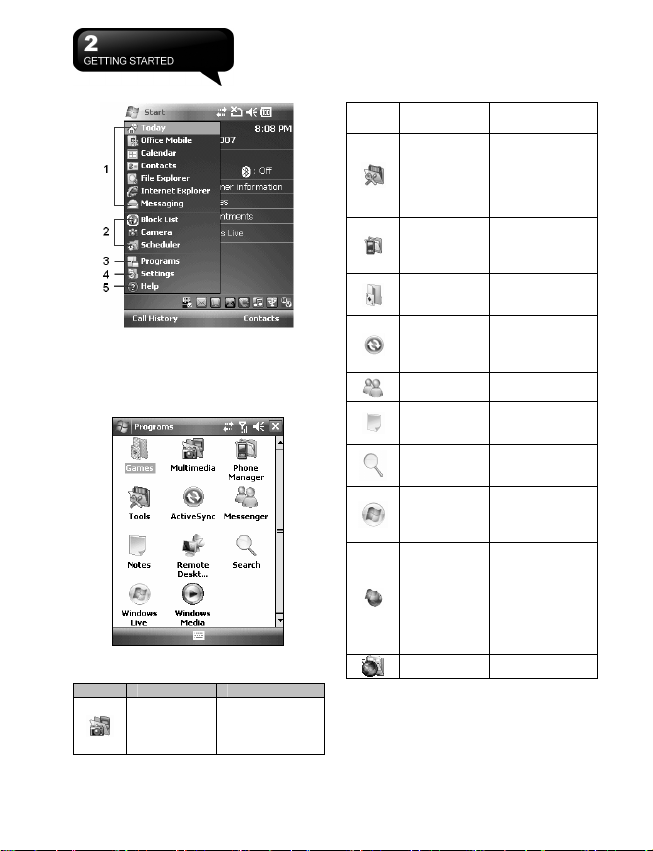
Programs
You will see many application icons under your
Programs menu. From Programs menu, you
may tap the application icon that you desired to
use to execute the application.
From Today screen > Start > Programs
Your device contains the following programs:
Icon Programs Description
Multimedia
Audio Mixer,
Camera, Photo
Editor, Pictures
& Videos,
Recorder,
JAVA,
Calculator,
Easy-Touch
Tools
Phone
Manager
Games
Active Sync
Messenger
Notes
Search
Windows
Live
Windows
Update
GPS Utility GPS Tracking
Settings
MW700 contains Personal, System, and
Connections setting items.
Menu, Pocket
Remote,
Restore to
Default, Zip
Block List, Dial
Kit, Internet
Sharing, SIM
Manager
Bubbles
Breaker,
Solitaire
Transmit data
between your
computer and
the device.
Perform MSN
functions.
Write notes,
memo, or
drawings.
Search for all
data, programs,
and files.
This is your
gateway to help
with Live
Search.
Download
updates for
Windows
Mobile setup.
To help keep
your mobile
device
protected.
MW700 │2-2
Page 17
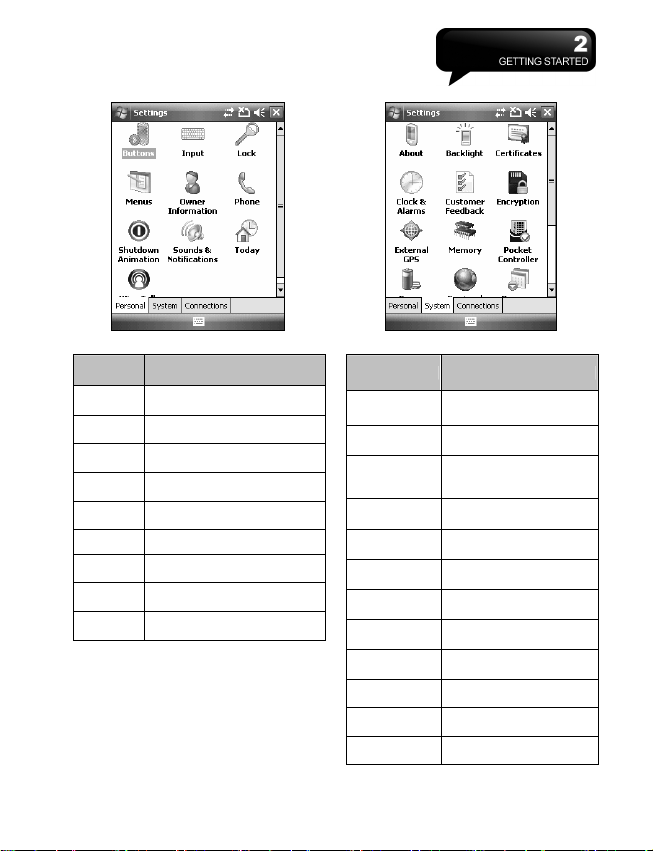
Tap Start > Settings > Personal tab:
Program Description
Buttons
Input
Lock
Menus
Owner
Information
Phone Settings for phone functions.
Shutdown
Animation
Sounds&
Notifications
Today
You may assign programs to
hard keys.
You can set your preferred input
method.
You may set a personal
password for the device.
Select the programs to be
displayed in Start menu.
You may input your personal
information.
Settings for shutdown screen.
Settings for alarm sound and
notification.
Settings for screen appearance
and display items.
MW700 │2-3
Tab Start > Settings > System Tab
Program Description
About
Backlight Settings for backlight.
Certification
Clock& Alarms Settings for time and alarms.
Memory
Power
Regional
Settings
Remove
Programs
Screen
Encryption
Customer
Feedback
Windows
Update
Contains information of the
device.
Identifies the device to
others to prevent
unauthorized access.
Memory status and running
programs.
Power status and wireless
signals.
Settings for region, number,
currency, time, and date.
Remove programs from
your device.
Screen orientation, screen
alignment, and text size.
Encrypts data in you r micro
SD card.
Customer Experience
Improvement Program.
Download updates for
Windows Mobile setup. To
Page 18
help keep your mobile
Tap Start > Settings > Connections Tab
Program Description
Beam
Bluetooth
Connections
GPRS Wizard
Wi-Fi Configurations for Wi-Fi.
USB
Wireless
Manager
Cell Broadcast
Setting
Select Operating
Band
SMS Service
Setting
device protected.
You can choose to receive
all incoming beams.
Settings for Bluetooth
function.
Settings and management
for modem connections.
Basic settings for GPRS
connection.
Use the device as a micro
SD card reader.
Turn on/off Bluetooth, flight
mode.
Receive broadcast channel
information and news from
your service provider.
Your own operating system
set up.
Receiving and sending text
message set up.
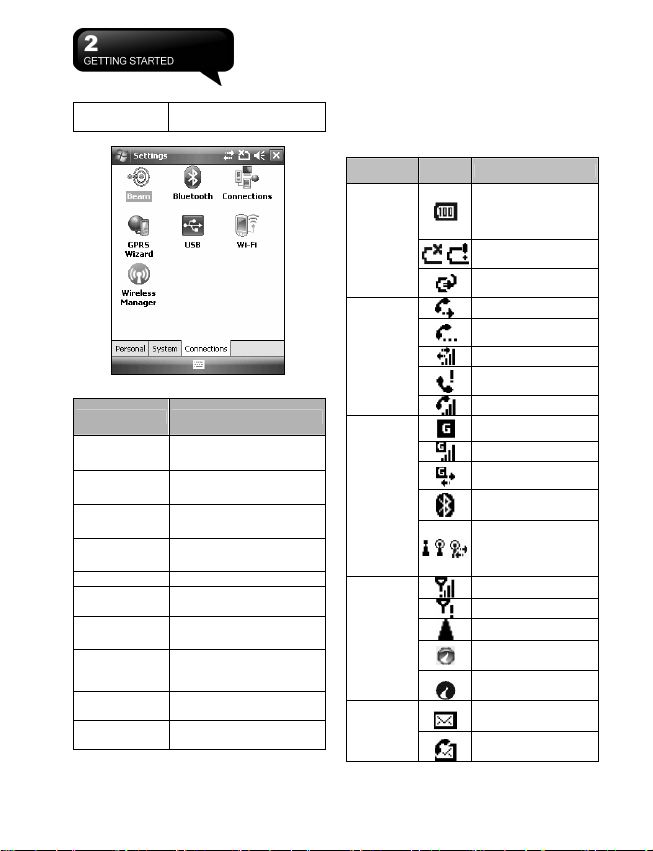
Status & Icon area
This area shows icons of basic system status
or alerts. You can tap on the icons to get the
definitions or go to the settings.
Status Type Icon Description
Main battery power is
full. The level of
battery power is
Battery
Calls
Connections
Signal
Message
shown in percentage.
Low battery. Please
recharge..
Battery is charging.
Call forward.
Call on hold.
Data call.
You have missed calls.
Voice call in active.
GPRS is in range.
GPRS is connected.
Building connection to
GPRS.
Bluetooth is activated.
Wi-Fi is activated; a
Wi-Fi network is in
range; Wi-Fi network
is connected.
Strong signal.
No signal.
Roaming.
GPS Tracking is trying
to connect.
GPS Tracking is
connected.
You have one or more
new message(s).
You have one or more
new voice mail(s).
MW700 │2-4
Page 19
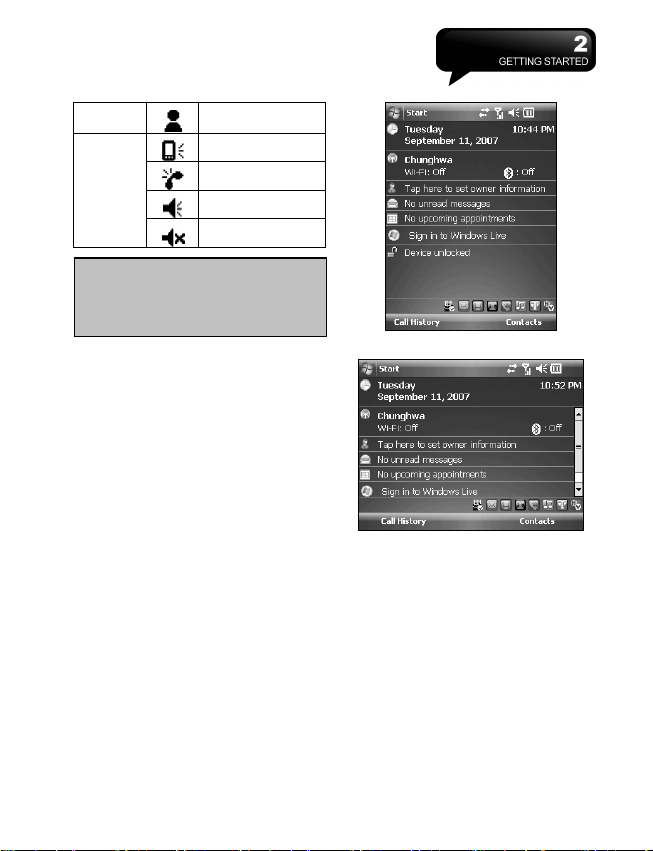
You have one or more
instant message(s).
System volume.
Phone volume.
Vol ume
Note: To choose reminder types and
sounds for your Swan, tap Start >
Settings > Personal tab > Sounds &
Notifications.
2.2 Screen orientation
You can choose your screen display in Portrait
or Landscape mode. The Portrait mode allows
you to get a better view or a better operation of
certain programs on your device, while
Landscape may be optimal for viewing longer
text files. You can also change the default
screen display by following the steps below:
1. Tap Start > Settings > System tab > Screen
> General tab.
2. On General tab screen, select your desired
orientation, Portrait, Landscape
(right-handed), or Landscape (left-handed).
3. Tap OK, and the screen will be changed
accordingly.
Ringer is on.
Ringer is off.
2.3 Setting time & date
When using MW700 for the first time, you are
required to set your time zone, time, and date.
You can also tap on the clock icon on Today
screen to setup time and date.
1. Tap Start > Settings > System tab > Clock&
Alarms > Time tab.
2. Select Home or Visiting.
3. Select your time zone.
4. Select AM / PM.
5. Use the up and down arrow aside hour,
minute and second to adjust the highlighted
time unit.
6. Tap the down arrow aside the date to open
Portrait
Landscape
MW700 │2-5
Page 20
y
a calendar, and select a desired month,
date, and year.
7. Tap OK, a pop-up window will appear on
your screen to confirm to Save Changes to
the clock settings.
8. Tap Yes to save the changes and exit.
Note: Change the time on Home zone
ma
change your Calendar schedule.
2.4 Using the stylus
Use the stylus to touch or write on your screen.
Using stylus can avoid damaging your screen.
There are 2 ways to use your stylus:
․Tap: softly tap on a desired item by your
stylus, and lift the pen from the screen.
․Press: touch and hold your stylus on a
desired item for a few seconds until a blue
dotted circle appears. This indicates that a
pop-up menu is going to be activated.
2.5 Screen alignment
When using MW700 for the first time, screen
alignment is required. If you find that the
device does not accurately respond to your
stylus taps, or you have performed a system
reset, you need to align your screen again.
1. Tap Start > Settings > System tab > Screen
> General tab.
2. Tap Align Screen on your screen.
3. On the align screen, use your stylus to
touch the crosses on the screen accurately.
4. Tap OK to exit.
2.6 Input method
Block Recognizer
With Block Recognizer, you can input
character strokes (using the stylus) that are
similar to those used on other devices.
1. On your screen keyboard, tap the arrow
icon
next to the keyboard icon for
more input methods. On the pop-up list, tap
Block Recognizer.
2. W rite letters and numbers in a
corresponding field, the system will display
the letters/numbers identified from your
handwriting.
3. Do not write letters/numbers continually to
prevent recognition error.
4. Do not write letters outside of the input
fields.
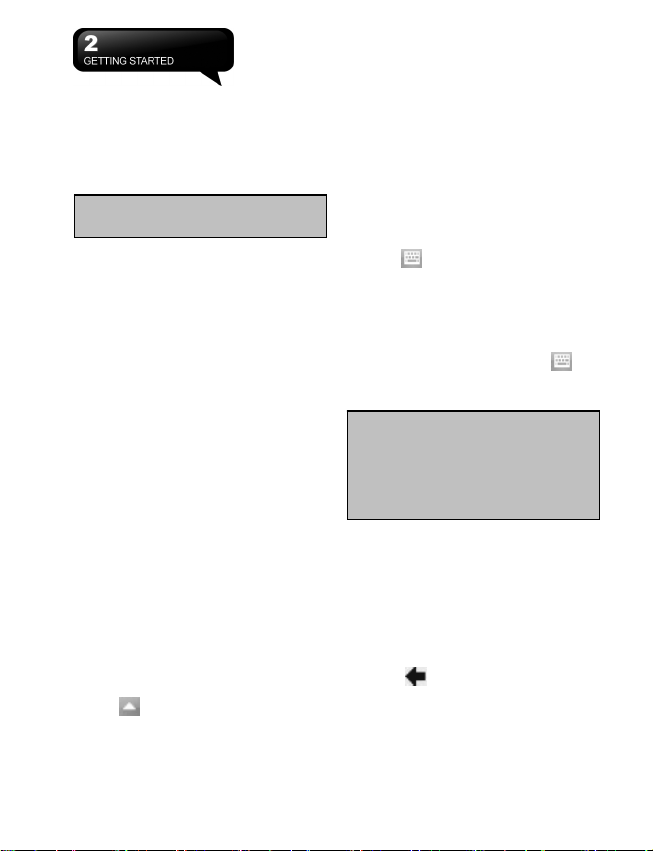
Keyboard
You can input data by using screen keyboard.
Tap icon on your screen to open the screen
keyboard
Follow the steps below to input your data:
1. On your screen keyboard, tap Shift or CAP
2. Tap the key on your screen keyboard to
3. To close the screen keyboard, tap
Letter Recognizer
1. On your screen keyboard, tap the arrow
2. W rite letters and numbers in a
3. Tap the
Transcriber
Transcriber allows you to write on the full
screen using the stylus just as you would write
on paper. Unlike Letter Recognizer and Block
.
key to input a capital letter or to input
multiple symbols.
delete.
icon again on your screen to hide the
screen keyboard.
Note: To change the displayed keyboard
size on the screen, tap the arrow beside
keyboard icon and tap Options. Under
Input screen, you may select either Large
keys or Small keys by tapping on its radio
button.
icon next to keyboard icon for more input
methods. On the pop-up list, tap Letter
Recognizer.
corresponding field on your Letter
Recognizer screen. MW700 will display the
letters/numbers that you had just input in
Letter Recognizer fields.
key to delete an input.
MW700 │2-6
Page 21

Recognizer, you can write a sentence or more
than one sentence. Pause and let Transcriber
change the written characters to typed
characters.
1. On your screen keyboard, tap the arrow
icon next to keyboard icon for more input
methods. On the pop-up list, tap
Transcriber.
2. Position the cursor where you want text to
appear.
3. Use the stylus to write anywhere on the
screen. The handwriting will be converted
to text after you lift the stylus from the
screen.
Learning how to write in Transcriber
1. Tap on the tool bar.
2. A Letter Shapes screen will appear, select
the character you wish to explore, tap the
picture of this character on top of the
screen, and it will demonstrate the writing
sequence of the letter. Select how often
you write the character using that method.
3. W hen you finish the practices, you can
save these as a profile by tapping File >
Save.
2.7 Drawing on the screen
You can draw on the screen in the same way
that you write on the screen. The difference
between writing and drawing on the screen is
how you select items and how they can be
edited. For example, selected drawings can be
resized, while writing cannot.
Creating a drawing
Cross three ruled lines on your first stroke. A
drawing box appears. Subsequent strokes in
or touching the drawing box become part of the
drawing. Drawings that do not cross three
ruled lines will be treated as writing.
Selecting a drawing
To edit drawing, select it first.
1. Tap and hold the stylus on the drawing until
the selection handle appears. To select
multiple drawings, deselect the pen button
and drag to select drawings you want.
2. You can cut, copy, and paste selected
drawings by tapping and holding the
selected drawing and tapping an editing
command on the pop-up menu, or by
tapping the command on Edit menu. To
resize a drawing, make sure Pen button is
not selected, and drag a selection handle.
To change the zoom level so it is easier to
work or view your drawing, tap Tools and
select a zoom level.
2.8 Recording a message
In any program where you can write or draw on
the screen, you can also quickly capture
thoughts, reminders, and phone numbers by
recording a message. In Calendar, Tasks, and
Contacts, you can include a recording in Notes
tab. In Notes, you can either create a
standalone recording, or include a recording in
a written note. If you want to include the
recording in a note, open the note first. In the
Messaging program, you can also add a
recording to an E-mail message.
MW700 │2-7
Page 22

Creating a recording
1. To add a recording to a note, open the note
before recording. Tap Start > Programs >
Notes.
2. If there is no Record/Playback toolbar, tap
Menu > View Recording Toolbar.
3. Hold your device’s microphone near your
mouth or another sound source.
4. To start recording, tap
5. To stop recording, tap
recording appears in the note list.
6. To play a recording, tap in the open note or
tap the recording in the note list. You can
also access the Record/Playback tool bar
by pressing down Volume key for a while.
To quickly create a recording, hold down
Volume key. When you hear the beep,
recording has begun. Release the button
when you are finished. The new recording
is stored in the open note, or as a
standalone recording, if no note is opened.
2.9 Editing my info
You can input your personal information to your
device in Owner Information.
1. Tap Start > Settings > Personal tab >
Owner Information > Identification tab.
2. Tap Name field and input your name.
3. Tap a desired input field and input your
.
. The new
information.
4. Tap Notes tab to input other information
you would like to display on your device.
5. If you want your information to be displayed
on the starting screen, tap Options tab.
2.10 Password setup
You can set your own password to prevent
unauthorized use of your device.
1. Tap Start > Settings > Personal tab >
Lock> Password tab.
2. On Password tab screen, check Prompt if
device unused for.
3. Select an appropriate time.
4. Select a password type in Password type
field.
5. Input your password in Password field and
reconfirm the password in Confirm field.
6. Tap OK, a pop-up window will appear to
confirm, “Do you want to save password
settings changes?”
7. Tap Yes to finish settings and save the
changes; No to cancel.
8. You may also input password hint message
under Hint tab screen.
9. Tap OK to save your inputs.
Note: If you forget your password, you
need to perform system default, which will
lose all your data and settings.
2.11 Memory expansion
To expand the memory of your device, you can
insert a Micro SD card into the card slot
located at the top of the phone. Make sure the
card is inserted correctly.
2.12 Data backup
MW700 supports 64MB RAM capacity;
however, you may need to back up data and
any new programs that you install in the RAM
to guard against data loss. To back up your
Contact, Calendar, etc., please set up the
synchronization partnership with your PC and
MW700 │2-8
Page 23

connect the phone with PC. ActiveSync will
start automatically.
2.13 Multi-Language
The device supports multi-language
automatically. If the documents don’t show
correctly, tap “Start” > Settings > System >
Region and select the region and the language
you want. Supported languages in alphabetic
order are: Afrikaans, Albanian, Arabic (Saudi
Arabia), Azeri (Cyrillic), Azeri (Latin), Basque,
Belarusian, Bulgarian, Catalan, Chinese (Hong
Kong S.A.R.), Chinese (Macau S.A.R.),
Chinese (People’s Republic Of China),
Chinese (Singapore), Chinese (Taiwan),
Croatian, Czech, Danish, Dutch (Belgium),
Dutch (Netherlands), English (Australia),
English (Belize), English (Canada), English
(Caribbean), English (Ireland), English
(Jamaica), English (New Zealand), English
(Philippines), English (South Africa), English
(Trindad), English (United Kingdom), English
(United States), English (Zimbabwe), Estonian,
Faroese (Faroe Islands), Finnish, French
(Belgium), French (Canada), French (France),
French (Luxembourg), French (Monaco),
French (Switzerland), FYRO Macedonian,
German (Austria), German (Germany),
German (Liechtenstein), German
(Luxembourg), German (Switzerland), Greek,
Hebrew, Hungarian, Icelandic, Italian (Italy),
Italian (Switzerland), Japanese (Japan),
Korean (Korea), Latvian, Lithuanian,
Norwegian (Bokmal), Norwegian (Nynorsk),
Polish, Portuguese (Brazil), Portuguese
(Portugal), Romanian, Russian, Serbian
(Cyrillic), Serbian (Latin), Slovak, Slovenian,
Spanish (Argentina), Spanish (Bolivia),
Spanish (Chile), Spanish (Colombia), Spanish
(Costa Rica), Spanish (Dominican Republic),
Spanish (Ecuador), Spanish (El Salvador),
Spanish (Guatemala), Spanish (Honduras),
Spanish (International Sort), Spanish (Mexico),
Spanish (Nicaragua), Spanish (Panama),
Spanish (Paraguay), Spanish (Peru), Spanish
(Puerto Rico), Spanish (Traditional Sort),
Spanish (Uruguay), Spanish (Venezuele),
Swahili, Swedish, Swedish (Finland), Tatar,
Thai, Turkish, Ukrinian, Urdu (Islamic Republic
of Pakistan), Uzbek (Cyrillic), Uzbek (Latin).
MW700 │2-9
Page 24

3 Phone Functions
3.1 Phone Dialer screen and key
Introduction
Press Talk/Send key to enter phone functions.
Please insert a SIM card before using these
functions.
Phone Dialer screen
From Phone Dialer screen, you can access
Contacts, Speed Dial, Call History, and more
options under Menu.
following features:
1. The name of the network provider
2. The number you entered
3. Touch screen keypad
4. Hide Keypad
5. Signal strength
6. Clear numbers
7. Speed Dial
8. Call History
9. Make/End a voice call
10. Menu to access more options
This screen has the
When a call is connected, the screen displays
the following:
1. The calling status
2. The name and number of the contact you
are calling
3. Speaker On/Off
4. Create a note for the call
5. Return to the dialer phone screen
6. Contact list
7. Mute the call
8. Hold the call
9. End the call
10. Menu to access more options
Note: When there is a call comes in,
press volume up / down will immediately
silent off the alert.
3.2 Making a Call
After entering the phone function, you can
make a call by entering the phone number, or
selecting a number from Contacts, Speed Dial,
and Call History.
MW700│3-1
Page 25

1. .After entering Phone Dialer screen you can
dial a number using the keypad on the
screen.
2. To delete an error input, use
on your screen.
3. Press
4. Press
Speed Dial
You can set ten phone numbers in your speed
dial list.
1. After entering phone function, press Menu >
2. On your Speed Dial List screen, you can
3. To make a call, press the corresponding
4. You can also use the navigation key to
5. Press End Key to end the call.
3.3 Receiving / Ignoring a call
When you receive a phone call, a notification
message will appear. To answer the incoming
call, tap Answer or press Talk/Send key. To
ignore or reject a call, tap Ignore to mute the
phone and reject the call. This may divert the
call to your voice mail, depending on your
network operator.
3.4 International calls
When you make an international call from any
country, you need to insert a special
international access code. If you enter “+”
symbol as a prefix before the number you are
calling, then you do not need to enter the
access code for the country you are calling
from.
To make an international call
1. Tap and hold 0 key until + sign appear. +
Key to make a call.
Key to end the call.
Speed Dial to enter your Speed Dial List.
select a contact on your list to see the
contact’s detailed information.
number on your keypad to call the contact
on your speed dial list.
select a contact you want to call on the
speed dial screen, and then press Call Key
to call.
key
replaces the international prefix of the
country that you are calling from.
2. Enter the full phone number you want to
dial. It should include the country code,
area code (without the leading zero), and
phone number.
3. Tap Talk or press Talk/Send key.
3.5 Emergency calls
Enter the international emergency number 112,
and then tap Talk or press Talk/Send key.
Additional emergency numbers may be
included on your SIM card. Contact your
network operator for more information.
If your device has entered Device Lock mode,
you have to unlock the device first before
making an emergency call.
1. Tap the Unlock on Left Function Key
2. Tap “Unlock” displayed on the bottom left of
the screen.
3.6 Volume adjustment
Tap icon on the screen and the volume
adjustment window will appear. Adjust the
volume of alert tone for all programs tapping
on
, and adjust the ring volume by tapping
.
on
1. Press Volume Adjustment key on the left
side manually or tap
incoming call volume.
2. If you press the Volume Adjustment key on
the left side of your device or
tap
> icons during call, you may
adjust the in-call volume of the phone. You
can only adjust it during a call.
> to adjust
3. When you select Vibrate, icon will
change to
icon.
4. When you select Off, icon on screen will
change to
icon.
MW700│3-2
Page 26

3.7 Making a call from contacts
On Today screen, you can tap Contacts on the
bottom right of the screen to enter Contacts. Or
under Phone Dialer screen, tap Contacts on
the bottom left of the screen to enter Contacts.
1. Enter the contact or phone number you
intend to search into the search field, the
phone will search for the contacts that
match this condition.
2. Tap and hold Navigation key upwards or
downwards to browse contacts by initial
letters in Contacts. (This function is
available for contacts synchronized from
Outlook only).
3. Tap on any contact to view that contact’s
information.
4. Under Contacts screen, tap Call on the
bottom left of the screen or tap Left Soft key
to make a call to that person.
5. Under Contacts screen, tap Menu on the
bottom right of the screen for more options.
If you would like to make a call using a
telephone, go to Contacts and highlight the
person you would like to call.
Tap Menu > Sounds DTMF; then aim your
device to the telephone receiver. Your
telephone will dial out to the desired contact
upon reception of the DTMF sounds from your
device.
3.8 Creating a new contact
On Contacts screen, tap New on the bottom
left of the screen. A blank record will appear.
1. You may set photos in Picture field for this
contact, by which the contact’s photo will
display as an incoming call photo ID.
2. You may also tap Ring tone field to set
different incoming call ring tones for your
contacts.
3. Tap OK on the top right of the screen to
save the new contact and exit.
3.9 Call history
Call History contains all outgoing calls,
incoming calls, and missed calls. You may
choose to display all or only display highlighted
items.
1. On Today screen, tap Call History on the
bottom left of the screen.
2. Tap Menu on the bottom right of the screen.
3. Select a desired function to perform. You
may change call history display method by
selecting Filter; or select Call Timers to
check incoming call numbers, call time, and
manage incoming call history.
4. On Call History screen, select the icon on
the upper left side of the main screen to
redial this number at once.
5. On Call History screen, tap and hold on a
MW700│3-3
Page 27

phone number to open a drop -down menu
for more options.
number you would like to block.
2. Select “OK” to save the settings.
Alternatively, tap “Contacts” on Today
screen, highlight the contact you would like
to block and tap “Menu”. Select “Set to
Block List”. You may also block numbers in
Call History, or create new blocked
numbers in Block List.
3.10 Setting ring tone and
password
On Phone Dialer screen, tap Menu on the
bottom right of the screen. Tap Options >
Phone tab.
1. You may select a preferred ring type.
2. If you want to download ring tones, please
use ActiveSync program in the computer
and copy the ring tone file to Application
Data/ Sounds folder in your device. The ring
tone files will be added as the options.
3. You can set keypad tone for dialing.
4. You can set personal password to prevent
unauthorized use from others.
3.11 Block List
You can choose to block specific numbers or
block all unknown calls. When a blocked
number calls, the screen will display incoming
call alert and ring but will automatically hang
up within 5 seconds.
Select Start > Programs > Phone Manager >
Block List
1. Check “Block all unknown calls” or tap
“Menu” and select “Add Block List” to add a
MW700│3-4
Page 28

4 Settings
4.1 Personal settings
You may set your personalized settings by
preference.
Buttons
You may assign programs to a hardware
button.
You may set certain keys as the activation keys
for your most commonly used programs.
1. Tap Start > Settings > Personal tab >
․Under Select a button, tap the button you
want to assign to a program, and then select a
program from Assign a program.
2. On Up/Down Control tab, Delay before first
Input
Set your preferred input method.
1. Tap Start > Settings > Personal tab > Input.
2. On Input Method tab, select a desired input
Lock
You may set a personal password to lock your
device.
A strong password must have at least 7
characters that are a combination of
uppercase and lower case letters,
and punctuation.
1. Tap Start > Settings > Personal tab > Lock
Buttons > Program Buttons tab.
repeat changes the time elapsed before
scrolling begins. Repeat rate changes the
time it takes to scroll from one item to the
next.
method. On Word Completion tab, select
the desired settings for word completion.
On Options tab, select the desired options
for writing and recording. These options
apply to any program on your device where
you can record or write. You can also
change input options by tapping the
arrow and Options.
numerals,
2. To enable this function, select how long
your device must be turned off before the
password is required for using the device by
tapping Prompt if device unused for.
3. Select the type of password you would like
to use: Strong alphanumeric or Simple PIN.
4. Enter the password and,
․If your device is configured to connect to a
network, use a strong password to help protect
network security.
․If you forget your password, you must hard
reset before you can access your device. A
hard reset will erase all files and data you have
created and any programs you have installed.
․If you have used ActiveSync to create a
backup file, all of your program data can be
restored.
Menus
Select the programs to be displayed in Start
menu.
Only 7 programs are allowed in Start menu. To
add the programs you use most often to Start
menu:
1. Tap Start > Settings > Personal tab >
Menus
2. Select the programs you want, and then tap
OK.
Owner information
Set layout, items, color and background of
Today display.
1. Tap Start > Settings > Personal tab > Owner
Information.
2. On Identification tab, enter your personal
information.
3. On Notes tab, enter any additional text you
want to display when your device is turned
on, such as:”Welcome!”
4. On Options tab, select which message will
display when your device is turned on.
MW700│4-1
Page 29

Phone
Setting for phone functions.
You can easily view and change settings, such
as the ring type and ring tone to be used for
incoming calls, and the keypad tone to be used
when entering phone numbers. You can also
protect your device from unauthorized use.
There are two ways to change phone settings:
․Tap Start > Settings > Personal tab > Phone.
․To change the phone settings from Phone
screen, tap Menu > Options.
Phone tab
Under Phone tab, you can set up the following
items:
Ring type
You can change the way that you are notified
of incoming calls. For example, you can
choose to be notified by a ring, a vibration, or a
combination of both. Tap the Ring type list, and
select the desired option.
Ring tone
Tap Ring tone list, and then select the sound
you want to use.
1. To set .wav or .mid files as ring tones, use
ActiveSync on your PC to copy the file to
\Windows\Rings folder on your device.
Select the sound from Ring tone list.
2. To download ring tones, you can make a
connection to the Internet and then
download ring tones that are compatible
with the .wav or .mid formats.
Keypad
You can change the tone you hear when
entering a phone number on the keypad. If set
to Long tones, the tone is heard continuously
for as long as the number on the keypad is
pressed. If set to Short tones, the tone is heard
only for one or two seconds.
1. Tap Keypad list; then select the option you
want.
2. To prevent tones from being heard when
entering a phone number, select Off.
Security
You may check Require PIN when phone is
used to enhance your phone security. Tap
Change PIN to change your SIM PIN number.
Services tab
Settings include Call Barring, Caller ID, Call
Forwarding, Call Waiting, Voice Mail and Text
Messages.
1. Tap Start > Settings > Personal tab > Phone
> Services tab
2. Check the items you want to select and tap
Get Settings…
3. Tap OK to save settings and return to
Personal tab screen.
Option Description
Call Barring
Caller ID
Call
Forwarding
Call Waiting
Voice Mail
and Text
Messages
Note: All services in Services are
provided by operators. Please contact
your operator for enquiries regarding
these services.
Network tab
Tap Start > Settings > Personal tab > Phone >
Network tab.
․Under Current network, tap Find Network to
automatically search for the network in use.
․Under Network Selection, select Automatic
or Manual to select network automatically or
manually.
․Under Preferred networks, tap Set Networks
to set your preferred order of networks.
Block incoming and/or outgoing
calls.
Display your name and/or phone
number for outgoing calls.
Forward all or selected incoming
calls to a different phone
number.
Notify you an incoming call while
you are on the phone.
Set up voice mail and SMS
service center.
MW700│4-2
Page 30

Sounds & Notifications
Setting for alarm sound and notifications.
Turning off sounds and the notification helps
conserve battery power. To change the ring
type and volume:
1. Tap Start > Settings > Personal tab >
Sounds & Notifications.
2. On Sounds tab, you can select the desired
actions.
3. On Notifications tab, you can customize
how you are notified about different events.
Select the event name and then select the
type of reminder. You can select a special
sound, a message, a flash light, or vibrate.
Today
Setting for screen appearance and items
displayed on the Today screen.
To change the theme of your Today screen:
1. Tap Start > Settings > Personal tab > Today.
2. On Appearance tab, select the desired
theme. To use your own background, select
Use this picture as the background and
then tap Browse to locate the desired file.
3. Choose a folder, tap the file you want, and
tap OK.
Note: The recommended picture size for
the background is 240x320 pixels in jpeg
file format. To beam a favorite theme to a
friend, select the desired theme, and tap
Beam on Appearance tab.
Customizing the displayed information:
1. Tap Start > Settings > Personal tab > Today
> Items tab.
2. Select the information you want to be
displayed on Today screen.
3. To customize the information further, select
an information type, and then tap Options
(not available for all information types).
4.2 System settings
About
This function contains information about your
device.
Version tab displays important device
information, including the amount of memory
installed. On the Device ID tab, you may need
to change your device name if you are unable
to connect to a network because another
device with the same name is already
connected.
Backlight
Configure the backlight settings and adjusts
the brightness level to save power.
Using the backlight on battery power
substantially reduces battery life. Tap Start >
Settings > System tab > Backlight.
․Tap Battery power tab to turn ON/OFF the
backlight when using battery power.
․Tap External power tab to turn ON/OFF the
backlight when using external power.
․Tap Extended tab to adjust the brightness
level.
Certificates
It’s the information about the certificate issuer
and the expiration date.
Tap Certificates to view the name of the
certificate issuer and the expiration date.
Clock & Alarms
Setting for time and alarms.
Tap Start > Settings > System tab > Clock &
Alarms.
․If you visit a particular time zone often, select
it as your Visiting time zone on Time tab so
that you can quickly see the correct date and
time.
․You can use your device as a travel alarm
clock by setting a wake-up alarm on Alarms
tab. Tap the alarm icon to select the type of
alarm you want.
․To change the way the date or time is
MW700│4-3
Page 31

displayed on your device, go to Regional
Settings by tapping Start > Settings >
System tab > Regional Settings.
Customers Feedback
Customer Experience Improvement Program
from Microsoft®.
It is Customer Experience Improvement
Program designed by Microsoft®. The purpose
is to identifying trends and usage patterns to
improve the software. You can check Send
Feedback to participate or Don't Send
Feedback to reject.
Encryption
Encrypt file s.
You can encrypt files stored on the micro SD
card by simply checking Encrypt files placed
on storage card. Once encrypted, such files
are only readable by this device.
Headset Volume Limiter
Modify your headset volume to suit your need.
You may use this application to adjust the
headset volume. On Headset Volume Limiter
screen, drag the bar to the right to turn the
headset volume up; drag the bar to the left to
turn the volume down. Tap Default button to
reset the volume to system default (105db).
Memory
Display memory status and programs that are
currently running. You may need to stop a
program if it becomes unstable or the program
memory is low. Tap Start > Settings > System
tab > Memory.
․Main tab displays the amount of memory the
system has allocated to file and data storage
versus program storage. This tab also
displays the amount of memory in use
versus the available memory.
․Storage Card tab displays how much
memory is available on the storage card that
is inserted into your device.
․Running Programs tab displays the list of
currently active programs. You can stop a
program by selecting it in the list and then
tapping Stop, or just tap Stop All to stop all the
running programs.
Power
Battery status and settings.
Tap Start > Settings > System tab > Power.
․Battery tab displays the amount of battery
power remaining. Battery power depends on
the battery type and how your device is being
used.
․Under Advanced tab, you can select options
for turning off your device to conserve
battery power.
․Under Extended tab, you can check lock
device when entering stand-by mode.
When your device enters stand-by mode, it
will automatically enable device lock.
CPU Profile
Adjust different profiles for CPU power
management.
You can choose which kind of mode you want
to use.
There are three kinds of modes:
Power saving mode
Standard mode
Performance mode
Go to Power Management:
Tap Today > Settings > System > CPU Profile.
When you enter power management, you will
find three modes:
1. Power saving mode.
2. Standard mode
3. Performance mode
Each mode has different set of preset settings,
which are shown on the screen when you
select a mode. You can choose the most
suitable mode for yourself.
Regional settings
Setting for region, number, currency, time, and
date format.
This feature allows you to customize the unit
and format for the region you are in. To access
this feature, tap Start > Settings > System tab >
MW700│4-4
Page 32

Regional Settings.
Remove Programs
Remove programs from your device
Remove Programs allows you to uninstall
programs that are saved in your device’s
storage memory. It also shows the total
available storage memory. Select a program
that you would like to remove from the program
box and tap Remove.
Screen
Setting for screen orientation, screen
alignment, and text size.
․Under General tab, you can adjust the
screen’s orientation and align the screen.
․Under Clear Type tab, you can select Enable
Clear Type to smooth the edges of screen
fonts for many programs.
․Under Text Size tab, you can adjust the text
size to see more content or increase the
readability in many programs.
System Info
Display the system information.
This feature displays the system information
Including hardware information and software
(ROM) version.
MW700│4-5
Page 33

5 Synchronization
ctiveSync
stalled
You may use Microsoft ActiveSync to
synchronize data in this device with personal
computer.
․You can synchronously update Outlook data
in this device and in your personal
computer.
․You can synchronize Microsoft Word and
Microsoft Excel files in this device and in
your personal computer. The files will
automatically convert to the compatible
version.
The default of ActiveSync is not to
automatically synchronize all data. If you would
like to change the default, you may activate or
disable the synchronization function for
specific data in ActiveSync Option.
ActiveSync may also be used for the following
purposes:
․Backup or restore saved data in this device.
․Copy files between this device and personal
computer.
․Synchronize while connecting to your
personal computer or selecting
synchronization command.
․Synchronize specific types and range of files.
For example, you may choose to
synchronize appointments of the past few
weeks.
5.1 Install and Use ActiveSync
Note: Before installing ActiveSync, do not
connect your device to the computer. You
may only connect the device to the
computer by using the USB cable AFTER
A
1. ActiveSync Installation:
is in
.
Use the enclosed CD to install Microsoft
ActiveSync in your personal computer. This
device already has built-in ActiveSync.
2. Hardware Installation:
Connect this device with your personal
computer by using the USB cable.
3. Using ActiveSync Program:
After completing installation, setup wizard
will lead you step by step. Please follow the
instructions to set up according to your
demand.
After connecting this device with your personal
computer by using the USB cable, the
computer screen will display “Connected” upon
successful connection. A green
representing “connected” will appear on the
task bar of your computer screen. Select the
Explore button of ActiveSync program of your
personal computer, to view the files in this
device. You may manage several files in the
device simultaneously.
5.2 Synchronize Via Bluetooth
Instead of using a USB cable, you may also
synchronize data via Bluetooth. Select Start >
Programs > ActiveSync > Menu, then select
icon
MW700│5-1
Page 34

“Connect via Bluetooth” and tap ”Synchronize”
in this device to process synchronization. For
descriptions regarding synchronization through
Bluetooth device, please refer to
Synchronizing Your Information > Connect to a
PC via Bluetooth” in device Help.
MW700│5-2
Page 35

6 Getting Connected
When using GPRS and Internet connection,
you will not be able to answer a call. If you
want to make a call, your device will
automatically disconnect to the Internet and
reconnect to the Internet at the end of
conversation.
6.1 Internet Access
Before using GPRS to connect to the Internet,
please confirm with your system provider
whether this service is enabled and supported
on your SIM card. If you already have a SIM
card, then you only need to apply to your
system provider for GPRS function. It is
convenient for you to work at home or travel by
using GPRS. You can use this device to
browse web pages, read or send Email, text or
MMS messages, and MSN messages through
wireless network.
6.2 GPRS Connection Settings
1. Select Start > Settings > Connections tab >
Connections > Advanced tab.
2. Select “Select Networks” to open Network
Management screen.
3. Select a desired network name from the list;
press “New” to add available network to list;
press “Edit” to modify original network
setup content.
4. Tap “OK” to save and exit.
6.3 Activating GPRS Connection
If this device is under flight mode, please turn
off flight mode beforehand.
Tap
“Wireless Manager” on the pop-up window.
Tap on “Phone” to turn the phone function on.
The
when GPRS is activated.
Tap Start > Internet Explorer.
1.
Input an URL address you desire to browse
2.
in address field and tap the arrow icon to go
to the URL.
After completing connection,
3.
become
Or you may select Start > Settings >
4.
Connections tab > Connections > Tasks
tab > Manage Existing Connection; tap and
icon on Today screen, then tap
icon will appear on Today screen
icon.
icon will
MW700│6-1
Page 36

hold on a connection to open pop-up menu
and select “Connect”.
Bluetooth Connection Settings
When Bluetooth is activated, tap
Today screen, and you will see
pop-up window.
icon on
icon in the
6.4 GPRS Wizard
When you are connected to GPRS network,
you may surf on the Internet or send and
receive email. GPRS Wizard automatically
selects your GPRS network.
1. Tap Start > Settings > Connections tab >
GPRS Wizard.
2. Tap “OK” to save the changes and exit.
6.5 Connecting with Your Personal
Computer
If you want to connect this device with your
personal computer, please see “Chapter 5
Synchronization”.
6.6 Bluetooth Wireless
Transmissions
When you want to form connection through
Bluetooth, please make sure the device you
would like to make connections with is also
equipped with Bluetooth.
MW700│6-2
Bluetooth is a short distance wireless
communication technology. Before using
Bluetooth function, please finish connection
setup first.
1. Select Start > Settings > Connections tab >
Bluetooth > Mode tab.
2. Check “Turn on Bluetooth” after entering
Mode tab screen.
Page 37

3. If you want this device to be detected by
other Bluetooth devices, please check
“Make this device discoverable to other
devices”. (Without checking this item, other
Bluetooth devices are unable to detect this
device.)
4. Select Devices tab to show all connections
formed.
5. On Devices tab screen, tap “Add New
Device” to scan for other Bluetooth devices
within effective area.
6. On Devices tab screen, select the device to
be connected, and then select “Next“. The
screen will prompt for password. After
inputting password on password input
screen, select “Next“.
7. If the password entered is correct, the
connection will be form.
Note: Optional Bluetooth accessories
such as Bluetooth headset are available.
Please contact your local dealer for
information.
Com Ports
For example, when you purchase Bluetooth
GPS supported navigation software; you can
register this device as an effective serial port
by following the instructions on the manual of
that product and the steps below:
Select Start > Settings > Connections tab >
Bluetooth > COM ports tab.
Registering New Serial Port:
1. Select “New Incoming Port” to enter setup
screen.
2. Select a port to be set.
3. Select “Finish”.
6.7 Internet Sharing
You can set the device as a wireless modem.
Internet Sharing allows your PC/Notebook be
connected to a wireless network. Before
creating a new modem via the selected
connection type, you still need to install the
drivers on your PC/Notebook. If you would like
to connect to PC using a USB cable, you will
need to install ActiveSync 4.5 or later version
on your PC. Please find the drivers in the
ActiveSync and Application Software CD.
1. Tap Start > Programs > Phone Manager >
Internet Sharing.
2. Select a USB or Bluetooth PAN as PC
Connection type.
3. Connect your phone via USB cable or
Bluetooth to a PC/Notebook, and then tap
“Connect”.
MW700│6-3
Page 38

y
6.9 USB
You may use the device as a mass storage
device or a Micro SD card reader.
1. On the device, select Start > Settings >
Connections tab > USB
2. Tap “SD Card Reader”, and then tap
“Change”.
3. Connect the device to the computer with
USB cable.
4. Your PC will automatically detect the new
hardware. Now you can view or transfer
files to and from your Micro SD card.
Note: Before you tap Connect, please
make sure that your have installed a
GPRS SIM card, and that you have
connected this phone to your
PC/Notebook by USB cable or Bluetooth
and disabled ActiveS
6.8 Wi-Fi
Wi-Fi allows this device to connect to detected
network through Wi-Fi.
1. Select Start > Settings > Connections tab >
Wireless Manager.
2. Tap “Wi-Fi”.
3. Tap “OK” to activate wireless network and
exit.
After activating Wi-Fi, a new window, “New
Network Detected”, will appear. Select
“Connect” and enter your password to the local
network. Tap “Connect” to connect to this
device via local network.
Note: Reboot is required when you
change the IP address in Start > Settings
Connections tab > Wi-Fi > Network
Adaptors tab > Edit > IP Address.
nc.
MW700│6-4
Page 39

7 Messaging
7.1 Email & Message
Before receiving and sending your email or
message, please make sure that this device
has connected to a network. When you are
connected to a network, you may go to
“Messaging” to receive and send your email or
message.
You may:
1. Use this device to directly connect with
email server and receive or send letter.
2. Synchronously update the Microsoft
Outlook or Microsoft Exchange Server
email in this device and personal computer.
The synchronization function of inbox does not
support Microsoft Outlook Express.
For more information on Email:
1. See “Establish Email Service”.
2. See “Use Email and Message”.
For more information on Short Message
Service (SMS):
1. Select Start > Messaging > Menu > Tools >
Options > Accounts tab.
2. See “Using Email and Message”.
For receiving and sending text messages
(SMS), you only need to ensure that the
phone function is activated and the satellite
icon on the top of status bar shows
not necessary to activate GPRS connection or
establish new email account and connection in
Messaging.
For MMS (Multimedia Message Service),
pleaser read “7.7 How to use MMS”.
. It is
7.2 Synchronously Process
Email
If you want to synchronously process email,
you must activate the “Inbox” synchronization
function in ActiveSync beforehand. For more
information on “Inbox” synchronization, please
see the online Help of ActiveSync in your
computer.
Inbox synchronization process rules:
1. See “6.1 Internet Access”. Please select a
desired cooperation relationship on “New
Partnership” screen in computer to
synchronously transmit information.
MW700│7-1
Page 40

2. If you choose not to perform
synchronization, you may manually copy or
move email messages between this device
and the computer.
3. Only the mail in “Inbox” of your computer
will be synchronized.
4. Only the mail in Exchange or Outlook can
be synchronized.
5. The mail from “Outbox” folder in this device
will be sent to your computer first, and then
it will be delivered through Microsoft
Exchange Server or Microsoft Outlook.
6. If a specific letter is deleted in this device,
then it will also be deleted in your computer
when you reconnect this device with
computer.
7. SMS in this device will not be synchronized.
8. You may directly receive new email from
email server without connecting to a
computer.
9. You may select to use it online or offline; if it
is online, you may directly read and reply
mail when this device is connected to email
server. You can reply a mail directly by
simply tapping “Send”.
7.3 Directly Connect to Email
Server
You may select to disconnect to the internet
after downloading only the subjects of new
messages or partial messages and decide
whether to download the full message later.
When you reconnect next time, the “Inbox” will
download in accordance to appointed methods,
and send out unsent email in Outbox.
You may choose to read just the mail within the
last few days, mail subjects only, or complete
mail. You can also choose to receive only the
attachments less than specific file size. To
make these settings, select Start > Messaging
> Menu > Tools > Options, and change email
account setup by requirement.
7.4 Establish Email Service
If you have email accounts from ISP or
company network, you may use “Messaging”
to receive or send email. Please refer to the
following instructions to set up a new email
account in”Messaging” of this device.
Please acquire the following information from
ISP or company network administrator:
1. Email address, user name and password.
2. POP3 or IMAP4 server name of Intranet
mail.
3. SMTP server name for outgoing mail.
Establish Email Services:
1. Select Start > Messaging > Menu > Tools >
New Account; or simply select “New E-mail
Account” in Messaging, and then follow the
instructions on the screen to set up a new
email account.
2. See “6.1 Internet Access” to connect this
device to a network and start receiving and
sending email and messages.
Connect with Email Server:
1. Select Messaging > Menu > Send and
Receive.
2. Select Messaging > Menu > Tools >
Options > Account tab to change email
account settings.
MW700│7-2
Page 41
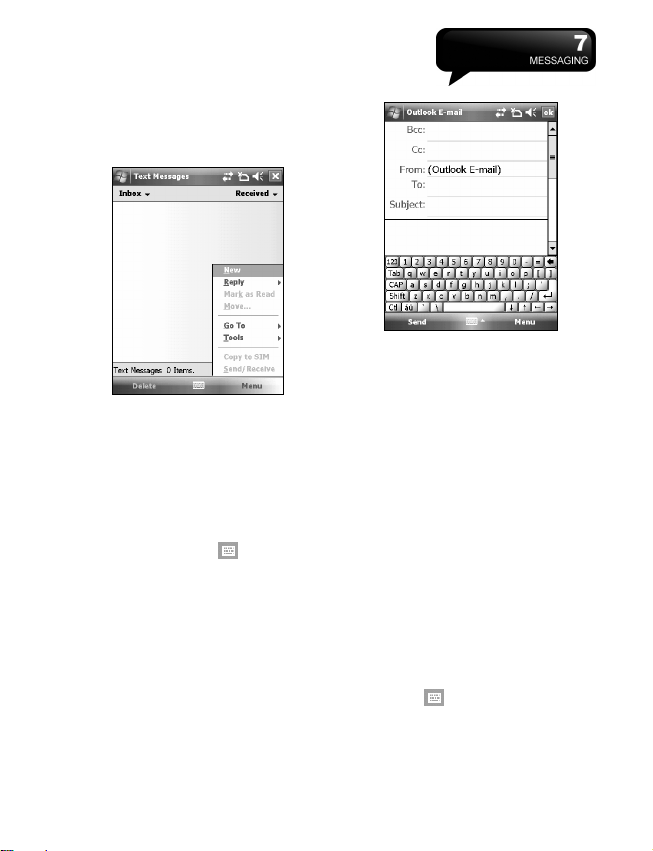
7.5 Using Email and Message
The main functions of “Messaging” are stated
as follows:
Tap “Inbox” on the top left corner of the
1.
screen for a folder name.
Tap “Date” on the top right corner of the
2.
screen for mail arrangement.
Tap and hold on a mail to open mail
3.
content.
Tap and hold on the mail to open pop-up
4.
menu.
Select Menu > New to create new a email
5.
or message.
Select the keypad icon
6.
center of the screen to activate or disable
screen keypad.
Select “Menu” to view menu.
7.
Compose and send mail:
Select Messaging > New to write a new mail.
After writing a new mail, select “Send” on the
bottom left of screen and send this new mail.
on the bottom
MW700│7-3
When composing a new mail, you can:
1. Tap “To, CC, BCC” fields to input receivers’
email addresses.
2. Tap “Subject” field to input a subject for
your new mail.
3. You may enter mail content in the empty
area on the bottom half of the screen.
4. Select “Send” to start sending your mail.
5. Select the icon on the bottom center of the
screen to activate or disable screen
keypad.
6. Select “Menu“ to open menu.
Under new mail screen, select and hold to
activate related Menu.
Read and reply mail:
Select Messaging > Menu, and then select
“Send and Receive” to start sending and
receiving new mail. Select “Inbox” on the
bottom left of screen to view Inbox. Tap on any
unread mail to view its content.
When reading mail, you can:
Tap on a contact in “To, CC, BCC” fields to
1.
save this contact as a new contact.
Tap “Reply” to compose a reply email.
2.
Select the
3.
of the screen to activate or disable screen
keypad.
Select “Menu” to open menu.
4.
icon on the bottom center
Page 42
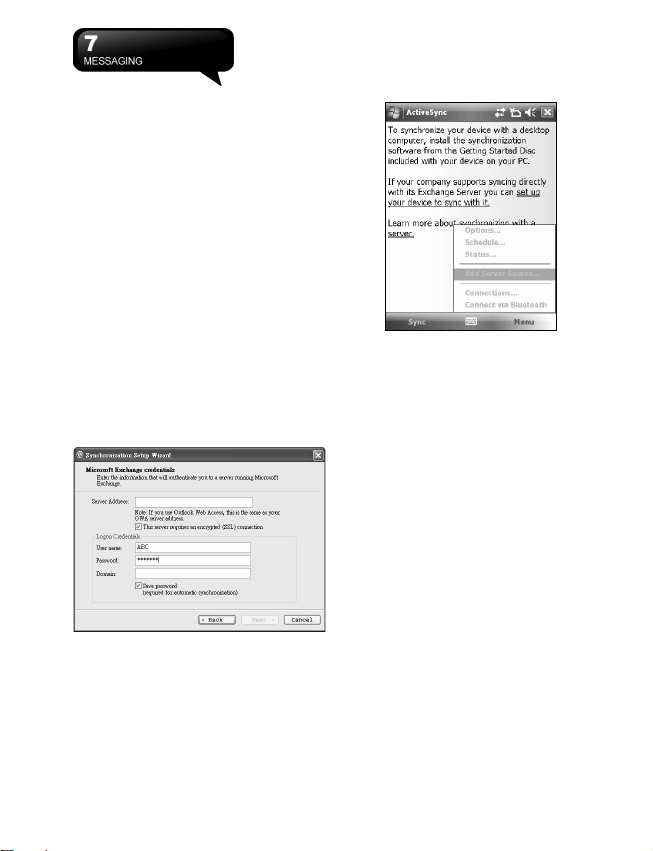
On the mail content screen, select and hold
to activate pop-up Menu.
7.6 How to Use Push Email
With push e-mail, you can have access to new
incoming e-mail in real time. This Direct Push
Technology can be enabled by the Exchange
Server 2003 administrator, bringing the latest
information to you. To use push email, please
turn on Wi-Fi or GPRS to connect to the
Exchange Server.
Enabling Direct Push on your PC:
1. Connect your device to the PC using USB
cable.
2. On the ActiveSync pop-up window, check
“Synchronize with Microsoft Exchange
Server or Personal Computer” and click on
“NEXT”.
3. Enter your network login name, password,
and domain name. If your server requires a
SSL encryption, please check “This server
requires an encrypted (SSL) connection.”
Click on “NEXT”.
4. Check the items you would like to
synchronize, for example, you may check
Inbox, Calendar, Contacts, or Tasks.
Enabling Direct Push on your device:
1. On your device, select “Start” > Programs >
ActiveSync > Menu > Add server source.
2. Input the IP address of your server in
“Server Address”.
3. Input your network login name, password,
and domain name, and then tap “NEXT”.
4. In ActiveSync on your device, select Menu
> Schedule
5. Set the Peak times to “As items arrive” and
the Off-peak times sync time to “As items
arrive”. Tap “OK”.
Now you have established a cooperative
relationship for the device and the Exchange
Server. The next time when you select Start >
ActiveSync > Sync, you may synchronize with
Exchange Server using Wi-Fi or GPRS.
Once you are connected to the network, you
may look up your Global Address List over the
air from your device by tapping “Contacts”. You
may send an email to a contact on your Global
Address List following the same steps as
sending email to a contact saved on your
device.
MW700│7-4
Page 43

Note: To be able to use direct push, you
need to have an exchange server.
Microsoft Exchange Server 2003 also
supports useful functions such as remote
device wipe. To find out more on the
benefit and usage of Microsoft Exchange
server, please visit Microsoft’s website,
http://www.microsoft.com.
7.7 How to Use MMS
Before using MMS, please go to Start >
Messaging > MMS > Menu > Tools > Options >
Accounts > MMS.
Compose and Send MMS:
Select “MMS” in “Messaging,” then select
“New” to write a new MMS. Tap “Send” on the
bottom left of the screen to send the message.
When composing a new message, you can:
Tap “To, CC, BCC” fields to input receivers’
1.
phone number.
Tap “Subject” field to input a subject for
2.
your new message.
Tap “Insert picture / video…” or ”Insert
3.
audio…” to insert media attachments.
If you would like to choose a pre-made
4.
message template, tap Menu > Template >
New From Template.
Tap “Insert text here” to input text in the
5.
message.
Tap on the
6.
message.
The message size and the slide number are
shown at the bottom status bar of the
message.
Note: You may not automatically be taken
to a blank message. If you are instead
taken to a page that displays pre-made
templates, choose the template you want.
If you would prefer to create a blank
message next time, check the "Always
choose custom" box.
icon to preview the
Adding a photo or video:
You can add either a still image or a video clip
to each individual slide. After you've tapped the
area to add a photo or vide:
Tap and hold on a file to see the "Add to
1.
Message", "Large View", "File Info" and
"Delete" options.
Tap "Select" to add the selected
2.
photo/video to the slide. Or tap "Cancel" to
return to the previous screen.
The following options are available:
- Displays photos/videos as a file list.
- Displays thumbnails (as shown here.)
- Displays individual photos.
- Lets you take a new picture.*
- Lets you capture a new video.*
*May not be available in all versions.
Adding text:
You can either enter in new text with the
keyboard, or use "My Text" to add text to any
slide. You can also insert an emotion icon or a
favorite website link into your message. My
Text contains previously saved words or
phrases.
․Tap the My Text icon to see a list of
pre-saved text messages. Tap the one you
want, and then tap "Select" to add it into the
message.
․Tap the smiling face icon to see a table of
Emoticon icons. Tap the one you want to
add it into the message.
․Tap the star icon to see a list of favorite links.
Tap the one you want, and then tap "Select"
to add it into the message.
Menu commands:
The following commands are available along
the bottom of the Create screen:
- Tap here to preview your message.
- Takes you to the previous slide.
MW700│7-5
Page 44

- Takes you to the next slide.
The first number indicates the
current slide you are viewing. The second
indicates the total number of slides. Tap here
to see a pop-up list of slides; tap the number
you wish to see.
Adding audio:
Single audio clips can be added to each slide.
You can either include an existing sound file,
or record a new one.
From the pull-down, select a location that
1.
contains audio files.
Tap the file you'd like to use.
2.
For more options, tap and hold on a file,
3.
then choose "Play Audio," "File info" or
"Delete."
You can use the playback controls to preview
the audio:
(Play/Pause and Stop controls are
available.)
- Tap this button to activate controls that
allow you to record new audio:
Record - Tap this button to begin recording.
Stop - Tap this button to stop recording.
Read and Reply Messages:
Select Start > Messaging > Menu > Inbox to
view all received MMS messages. Select any
unread mail in Inbox to view content. Use the
Play/Pause/Stop buttons to view the message.
Use the
full screen mode. Use the Left/Right Arrow
buttons to skip among the various slides (if
applicable.)
"Menu" contains follow options:
Save - Stores the current selected object.
Save into "My Text" - Saves the text into the
"My Text" list .
Assign to Contact - Lets you associate the
selected image file as a caller ID or audio file
as ringer ID. (May not be available in all
versions.)
button to display the message in
MMS Configuration:
To configure your MMS account, select Start >
Messaging > MMS > Menu > Tools > Options >
Accounts > MMS. Check the items you wish to
activate.
7.8 Messenger
Windows Live Messenger provides MSN
function including Messenger, Hotmail, and
Sync. To use these functions, you will need to
turn on GPRS or Wi-Fi.
Windows Live Messenger:
Select Start > Programs > Messenger
1.
Tap on the arrows to choose your sign in
2.
status and then tap “Sign in”.
Enter your MSN or Hotmail email address
3.
and password.
Select “Sign In”.
4.
Hotmail:
After signing in Messenger, wait for the
1.
sync to finish and then select Start >
Messaging.
Select Windows Live Inbox from the drop
2.
down menu on the top left corner. You will
find incoming emails to your Hotmail
account in the Windows Live Inbox.
MW700│7-6
Page 45

Compose Hotmail:
After signing in Messenger, wait for the
1.
sync to finish and then select Start >
Messaging.
Select Windows Live Inbox from the drop
2.
down menu on the top left corner.
Tap Menu > New.
3.
MW700│7-7
Page 46

8 Multimedia
8.1 Camera
You may use camera function in this device to
capture important moments.
1. Select Start > Programs > Multimedia >
Camera or press and hold Camera Key to
launch camera.
2. Focus on the object you want to shoot and
press halfway and hold Camera Key to
execute auto focus and then press deeply
to take a picture.
3. Use Volum e Adjustment side key to zoom
in and out.
4. Tap on
5. Tap on
Videos.
Camera Menu:
video mode.
here.
camera settings.
to change camera settings.
on screen to enter Pictures &
Video Mode: Tap on this icon to switch to
Pictures & Videos: view your photos
Camera Settings: to open the menu for
Settings:
6. Scene Mode: you may select different
scene modes to fit the shooting
environment.
7. Mode: you may select different shooting
modes for your needs.
8. Effect: you may apply many different photo
effects.
9. Size: 1600 x 1200, 1280 x 960, 800 x 600,
640 x 480, 320 x 240, 160 x 120.
10. Quality: Normal, fine, low.
11. EV: Exposure value ranging from -2.0 to
+2.0.
12. Timer Countdown: Off, 5 sec onds, 10
seconds.
13. Sequential Shoot: 18, 12, 6, 3, Off
14. Flash: Auto, On, Off.
15. Shutter sound: On, Off
16. Storage: Phone, Micro SD. (The storage
location will automatically change to Micro
SD card if the Micro SD card is plugged in
before launching camera).
17. Flicker Frequency: Auto, 50Hz, 60Hz
18. Time Stamp: Shows photo taking time on a
photo.
19. Confirm Frame: You can choose to
continue shooting, send MMS, not to save it,
or go to Pictures & Videos immediately
after shooting a photo.
MS800│8-1
Page 47

8.2 Video Mode
The device camera can also be used as a
video recorder to record memorable moments
of your life.
Select Start > Programs > Multimedia >
1.
Camera >
, or directly press and hold
Camera Key > to enter video mode.
Focus on the picture you want to film and
2.
press Camera Key to start video filming.
Press Camera Key again to stop filming.
3.
Tap on
4.
Select on screen to enter Pictures &
5.
Videos.
Video Menu:
to camera mode.
to change camera settings.
Camera Mode: Tap on this icon to switch
Pictures & Videos: view your video here.
Video Settings: to open the menu for
video recorder settings.
Settings:
1. Mode: you may select different recording
modes to fit the recording environment.
2. Effect: you may apply many different photo
effects.
3. Video Format: you can select the format
you would like to record in.
4. MMS Video: you can select to make a
recording especially for MMS.
5. Storage: Phone, microSD. (The storage
location will automatically change to
microSD card if the microSD card is
plugged in before launching video
Recorder).
6. Flicker Frequency: Auto, 50Hz, 60Hz
7. Confirm Frame: You can choose to
continue shooting, send MMS, not to save it,
or go to Pictures & Videos immediately
after recording a video clip.
8.3 Taking A GeoTagged Photo
You can take GeoTagged photos (photos that
carry the coordinates of where you were when
you took them) and easily share them with
friends through online albums like flickr.
After turning on the camera, tap the GPS
1.
button
on the bottom left of the
preview screen to enable/disable the GPS
coordinates photograph function.
After turning on GPS, it will start searching
2.
the current GPS coordination and the GPS
button will display as
When the device GPS has successfully
3.
locked on satellite signals, the GPS button
will present the status as GPS ON .
Under this mode, the photos you take will
carry the current coordinates of where you
are at in EXIF.
Aim the camera at the item you would like
4.
to capture, press halfway to focus, full
press to take the picture.
Tap the
5.
just took in “Pictures & Videos”.
Note:
of photos with coordinates always ends
with (GPS) on this device. Example:
Camera0024 (GPS).jpg
8.4 Recorder
Use recorder to record voice memo and make
note taking simple and efficient.
button to view the photo you
For your ease of use, the filename
.
MS800│8-2
Page 48

Select Start > Programs > Multimedia >
1.
Recorder.
Tap on
2.
function.
Tap on
3.
Before you start recording, you may set the
4.
recording time in
the recording.
Tap
5.
on screen. Tap on any recorded file to play
the file.
Tap Menu > Save To to choose file
6.
location.
Tap
7.
keep recording on the background; or tap
Menu > Exit to stop recording and exit.
When recording in the background, tap
8.
to return to Recorder. Tap
recording.
Note: If there is incoming call during
recording, answering the call will
automatically terminate recording. If you
want to continue recording after ending a
call, you need to reactivate recording
function.
to activate sound recording
to stop recording sound.
to set the duration of
to view the list of all your recorded
to leave recorder screen while still
to stop
8.5 Pictures & Videos
You may use “Pictures & Videos” function to
manage your photos or videos. In Pictures &
Videos > Options, you may resize the picture.
In “Menu”, you can also perform functions such
as “Set as Today Background…”, “Play Slide
Show “ or “ Send… “.
By selecting Start > Programs > Multimedia >
Pictures & Videos, you can
1. Enter different folders.
2. Select photo arrangement.
3. Tap on a thumbnail picture to view the
picture.
4. Select “Menu” for more options.
8.6 JAVA
This device supports JAVA, providing you the
freedom of using JAVA applications and
games.
8.7 Audio Mixer
Audio Mixer enables you to configure bass,
treble, and 3D effect while listing to the music.
Use Media Player to play your audio files and
then activate Audio Mixer to adjust the settings.
To activate Audio Mixer, tap Start> Programs >
Multimedia > Audio Mixer.
MS800│8-3
Page 49

Note: If you use an A2DP Bluetooth
headset to listen to the music, Audio
Mixer won’t work.
MS800│8-4
Page 50

9 Applications
9.1 Calendar
Appointments and Meetings:
You may use “Calendar” to arrange
appointments, meetings, and other events.
You may view your appointments in different
display modes. You may select preferred
display mode by tapping on the bottom left of
the screen to switch between day, week,
month, and year.
1. Select a date to go to the desired date.
2. Select an appointment on the list to view or
edit appointment details.
3. Tap on “Day” (or Week, Month, Year) on
the bottom left corner of the screen to
switch between display modes.
4. Tap on “Menu” on the bottom right corner of
the screen to open menu.
Select Calendar > Menu > Tools > Options.
You may change the display setup of Calendar
by preference.
Create an Appointment:
1. Tap Start > Calendar. Select the date and
time of appointment.
2. Tap Menu > New Appointment.
3. Select “Subject” field to edit the field or
select predefined text.
4. Select “Location” field to edit the field.
5. Select “Starts” field to select start time.
6. Select “Ends” field to change End time.
7. You can add your personal notes in Notes
tab.
8. Tap “OK” to save the appointment and
return to calendar screen.
If you select Remind me in “Reminder” field,
then the device will remind you by an alert
sound according to the settings in Start >
Settings > Personal Tab > Sound and
Notifications.
View and Update Calendar:
Select an appointment on the calendar to view
appointment summary. If you want to change
the details of an appointment, select “Edit”.
Send Meeting Notice:
You may use “Calendar” to set meeting notice
by combining with the information on Outlook
or Pocket Outlook. When you synchronize
messages or connect this device with E-mail
server, meeting reminders will be generated
automatically. Select Calendar > Menu > Tools
> Options > Appointments Tab, and select
desired meeting sending method in “Send
meeting requests via” field.
Generate Meeting Notice:
1. Select Calendar > Menu > New
Appointment
2. Select “Attendees” field. You will
enter ”Contacts”.
3. Select Attendees from the E-mail
addresses of your contacts.
4. The new meeting notice will be generated
automatically and saved in “Outbox” folder.
9.2 Contacts
“Contacts” is your address book and
information storage for the people and
businesses you communicate with. It stores
phone numbers, e-mail addresses, home
addresses, and any other information that
relates to a contact, such as a birthday or an
anniversary date. You can also add a picture
or assign a ring tone to a contact.
Phone Book:
“Contacts” helps you manage your phone
book.
1. Tap on “Enter a name…” field to input part
of name or desired or phone number to
search for that contact in the contacts list.
2. Tap on “Enter a name…” field and enter a
MW700│9-1
Page 51

letter search for contacts that starts with
that letter.
3. Tap on contact’s name or phone number to
view or edit contact’s details.
4. Tap on any contact and hold to open
pop-up menu.
5. Select “New” to add new contacts.
6. Tap on “Menu” for more options.
Add Contacts:
1. Select “New” on contacts screen.
2. Select any field to input data in selected
fields on screen or panel.
3. Move the scroll bar on the right side of the
screen to adjust screen display.
4. Select Ring tone field to set a special ring
tone for this contact.
5. If you want to add notes, select Note tab to
input desired content.
6. Tap “OK” to save and return to contacts.
Search for Contacts:
There are four contact search methods
provided in this system.
․Input the contact’s name or phone number in
input field, and then the contacts list will
show the information of this contact.
․Select “Menu” > “Filter” and select the way to
display contacts, by which your contacts list
will only display contacts in this category.
․If you want to view the contacts by
companies, select Menu > View By >
Company, then the contacts list will display
in the order of companies. The number of
contacts in each company will show on the
right hand side of company name.
․To search for a contact, select Start >
Programs > Search. Enter the name of the
contact in “Search for” field and select
“Contacts” in “Type” field. Tap on Search to
start searching.
View and Update New Contacts:
Select a contact in the contact list to view
contact summary screen. To edit a contact’s
details, select Menu > Edit on contact
summary screen.
9.3 Tasks
You may use “Tasks” to help you track
unfinished tasks.
1. To add a new task, tap on “Tap here to add
a new task”.
2. ” ! ” Represent first priority.
3. Select a single item to enter the details
screen of this time.
4. Select a single item and hold to activate the
pop-up menu.
5. On “Tasks” screen, select Menu > New
Task to add tasks.
6. You may change the arrangement of the
tasks list. On “Tasks” screen, select Menu >
Sort By.
7. You may choose to display a specific task
category in your tasks list. Select Menu >
Filter.
Add a New Task:
1. On “Tasks” screen, select Menu > New
Task
2. Select a field to input data.
3. Select “Starts” and “Due” field to set first
and last day of task.
4. You may select “Occurs” to select whether
this task has periodicity.
5. You may select “Reminder” to set a time to
remind you or select “None” (unnecessary
to alert).
6. To appoint a task as certain category, tap
on “Categories” field to select a category
from the options list.
7. To add notes, select Notes tab and input
desired content here.
8. Tap “OK” to save the task and return to
“Tasks” screen.
Check and Update Tasks:
You may select a task from tasks list to view
task summary. To change the details of this
task, select “Edit”.
9.4 Notes
You may use text notes or voice notes to
record information. You may also record voice
MW700│9-2
Page 52

prop
in “Notes”. If a note file contains voice notes in
addition to text, a small icon representing voice
notes will appear in the content area of the
note. If a notes recording is done under the
notes file list, then the recording content will be
saved as a single file.
Select arrangement of list:
Select a file on memo files list to open memo
file or play recording content.
Select a file on memo files list and hold to open
pop-up menu.
Select “New” to create a new memo.
Tap on Menu > View Recording Toolbar to
show or hide the recording tool bar.
Add Notes:
1. Tap Start > Programs > Notes. In the note
list, select “New”.
2. Tap the Input Selector arrow next to the
Input Method icon on the menu bar, tap the
input method you want, and enter your text.
3. You may generate memo by writing,
drawing, text entry and recording.
4. When finished, tap “OK” to return to the
note list.
9.5 Word Mobile
You may use Word Mobile in this device with
Microsoft Word in your computer to easily copy
and move document between this device and
your computer. Through synchronization, you
may keep updated contents in both this device
and your computer.
You may use your Word Mobile to generate
documents like letters, meeting minutes and
reports.
If you want to generate a new file, select Start
> Office Mobile > Word Mobile > New, a new
blank document will appear on screen. Your
Word Mobile can only open one document at a
time.
When you open a second document at the
same time, this device will ask you to save the
first document first. When creating a new
document or editing an old document, you may
choose to save in the following format: Word
file, RTF file and text-only file.
The saved Word Mobile file in this device could
be opened by selecting from ”Word Mobile” list
screen. To delete, copy, or send a file, select
and hold desired file names to open pop-up
menu.
After opening a Word Mobile file, you may tap
“View” to set Toolbar, Wrap to Window, and
Zoom.
1. Select a folder category shown on list
display field.
2. Tap on “Name” (or Date, Size, Type) to
change the arrangement of list.
3. Tap on a file to ope n it.
4. Tap and hold a file to open pop-up menu
5. Tap on “New” to create a new document.
6. Tap on the keypad icon to show or hide
screen input panel and select input method.
7. Tap on “Menu” to open menu for more
options.
Note: When you are synchronizing or
copying files from the device to PC, Word
Mobile files will be transformed into Word
files. While most of the text and
paragraphing will be kept during this
transformation, some of the format and
erties may be lost.
9.6 Excel Mobile
You may use Excel Mobile in this device with
Microsoft Excel in your computer to easily copy
or move files between this device and your
computer. Through computer synchronization,
you can keep updated content in both this
device and your computer.
You may use Excel Mobile to create
documents like Statement of Income and
Expenditure.
If you want to create a new Excel file, tap Start
> Office Mobile > Excel Mobile > New, and the
MW700│9-3
Page 53

screen will open a new Excel file. Your Excel
Mobile can only open one file at a time. When
you open a second file at the same time, this
device will ask you to save first file.
The saved Excel Mobile file in this device could
be opened by selecting from “Excel
Mobile” list screen. To delete, copy or send a
file, tap and hold the desired file name to open
pop-up menu.
Your Excel Mobile provides basic worksheet
tools, for example, formula, function, sorting
and filtering.
Note: When you are synchronizing or
copying files from the device to PC, Excel
Mobile files will be transformed into Excel
files. While most of the settings will be
kept during this transformation, some of
the format and properties may be lost.
9.7 PowerPoint Mobile
You may use PowerPoint Mobile in this device
with Microsoft PowerPoint in your computer to
easily copy or move document between this
device and your computer. Through computer
synchronization, you may keep the files in both
this device and your computer updated.
You may use PowerPoint Mobile to browse or
play PowerPoint file. If you want to open
PowerPoint file, select Start > Programs >
PowerPoint Mobile, the screen will show your
PowerPoint files list, from which select the file
you want to open.
1. Select the folder type demonstrated in the
list display field.
2. Select “Name” (or “Date”, “Size”, “Type”) to
change the arrangement of list.
3. Select the document to open.
4. Select and hold a document to activate
pop-up menu.
5. Select “Open” to open a file.
6. Select “Menu” for options.
9.8 Windows Media Player
Your Windows Media Player allows you to play
sound and video files in this device, select
Start > Windows Media to activate Windows
Media Player.
1. Tap the
2. Display website, from which find the music
and image you want to play.
3. Tap
current file or previous file.
4. Tap
5. Tap
6. Tap + or – to adjust volume
7. Tap the
On Windows Media Player screen, select
Menu > Library to enter library screen.
1. Select library folder
2. Menu: select “Open File” to open files not in
the library. Select “Update Library” to
update library list.
3. Select and hold the file or folder for playing,
and then select “Play” or “Queue Up”.
You may use synchronization to copy sound
and image files from your computer to this
device. The Windows Media Player in this
device can play Windows Media and MP3 files.
icon to view in full screen.
to return to the beginning of
or to play or pause
to skip to next file
icon to active or disable sound
MW700│9-4
Page 54

9.9 Internet Explorer
You may use the following methods to browse
web pages or WAP pages. Select Start >
Internet Explorer to activate Internet Explorer.
You may:
Synchronize your favorite URL links on your
PC to the device. These URL links are saved
in “My Favorite” folders in Internet Explorer on
your computer.
Connect to an Internet Server Provider (ISP) or
network and browse web pages. First, you
must establish internet connection, please see
“6.1 Internet Access”.
If you are connected to an ISP or network, you
may download files and programs from the
Internet or business Intranet.
Browsing Internet:
1. Connect this device with the Internet using
GPRS or WI-FI.
2. Select Start > Internet Explorer
3. Input website address in the blank text field.
․Select the icon
go to the link.
․You may use navigation keys or the scroll on
browser screen to adjust your screen
browsing content.
․Tap to return to previous page.
next to the blank field to
․Tap “Menu” to open Menu.
․Select and hold any location of website
content to open pop-up menu.
View Favorites:
1. On browser screen, select “Menu” >
“Favorites”.
2. On Favorites screen, select the website you
want to view.
․Select the website you would like to go to.
․You may add or delete folders or URL links.
Mobile Favorites Folder:
After installing ActiveSync to your computer,
“Mobile Favorites” folder will be added to “My
Favorite” in your computer. Only items saved
in “Mobile Favorites” can be synchronized with
this device. Follow the steps below to add your
favorite website to “Mobile Favorites”:
1. On your computer, select Internet Explorer
> Tools > Establish Mobile Favorites.
2. To change name, enter the new name in
the new window.
3. To change storage location, select “Create
New” to create a new folder or select a
folder in the new window.
4. Click on “OK” to add this website to your
Mobile Favorites folder.
Enlarge the font and start reading text on your
device with ease. Magnifier enlarges the
display font like a magnifying glass.
1. Select Start > Programs > Tools >
Magnifier.
2. Check “Program Text Magnifier” and then
select “OK” to save. When you check this
option, the font displayed in programs will
be enlarged.
3. Check “Menu Magnifier” and then select
“OK” to save. When you check this option,
the font displayed in menu will be enlarged.
4. Tap “X” on the top right of the screen to exit
without saving any changes.
Note: When you check or uncheck “Menu
Magnifier” the new settings will take effect
after a system reboot.
MW700│9-5
Page 55

9.10 Calculator
Calculator allows you to run simple operations
in this device.
Select Start > Programs > Tools > Calculator
to use your calculator.
9.11 Games
You may access “Games” to select games you
like in this device for entertainment.
1. Select Start > Programs > Games
2. Select a game to launch it.
9.12 STK (SIM Tool Kit)
The services available depend on your
operator Tap Start > Programs > Phone
Manager, and then select the STK service
provided by your operator.
9.13 ZIP
You can save storage space and increase
efficiency of the device by compressing some
of your files with this ZIP tool.
Zipping Files:
1. To zip a file, select Start > Programs > File
Manager.
2. Tap and hold on a file you would like to zip.
A pop-up menu will appear.
3. Select “Add to Zip File” in the pop-up menu.
In the newly appeared window, you may:
․Select a file name for the zip file.
․Select a compression method according to
your need.
․Set a password, which will be asked for
when you unzip the file.
4. Select “Start” to start compressing the file.
Unzipping Files:
1. To unzip a file, select Start > Programs >
Tools > Zip
2. Tap the “Unzip” button on the pop-up
window. A list of zipped files will appear.
3. You may select a different folder for more
zip files. In the file list, tap on the file you
would like to unzip.
4. Select a location where you would like to
extract the file to.
5. Tap “OK” and enter the password (if
required) to decompress the zip file.
9.14 SD Add-Ons
There may be some add-on applications in the
included Micro SD card. The install process will
be launched automatically when you insert the
card into the device. Select the application you
want and follow the instructions to install.
(Available in selected regions)
9.15 GPS Tracking
This feature allows you to record the routes
you travel through GPS tracking. You can use
any mapping software which supports .kml
or .gpx file format, such as Google Earth, to
display the routes.
Tap Start > Programs > GPS Application >
1.
GPS Tracking. After entering GPS Tracking,
the device will activate GPS and search for
the coordinates. The screen shows current
connecting information, such as GPS
status, Satellites, GPS Time, etc.
When GPS is connected, ta p “Start’ to start
2.
recording tracks.
During track recording, tap
3.
the route tracking, and tap
Then GPS stays connected, tap
4.
create your own landmark (you can take a
picture as your landmark). The next page
allows you to add the name of the landmark
and descriptions. Then tap
landmark.
Tap
5.
6.
to stop recording routes. On the
pop-up window, you may choose to save or
cancel the records. If you want to save the
record, edit the Beginning, Destination, and
File Name; selecting File Type and Save to.
Tap
to clean up all the records
unsaved.
to pause
to resume.
to
to save the
MW700│9-6
Page 56

on task bar on Today screen shows
that GPS is trying to connect.
on task bar on Today screen shows
that GPS is connected.
9.16 SIM Manager
To change contact information on your SIM
card, tap Start > Programs > Phone Manager >
SIM Manager, then tap a SIM contact and edit
it.
To copy SIM contacts to your device:
1. Tap Start > Programs > Phone Manager >
SIM Manager.
2. Select the desired item, or select all SIM
contacts by tapping Menu > Select All.
3. Tap Menu > Save to Contacts.
To copy contacts to the SIM card:
1. Tap Start > Programs > Phone Manager >
SIM Manager.
2. Tap Menu > Tools > Options.
3. On the Options screen, select the check
boxes of the types of phone numbers that
you want to be added to the SIM card.
4. Select the check boxes of the contact’s
phone numbers that you want to copy to
your SIM card; then tap “Save”.
9.17 Backup Tool
You can create backup of your personal data
and programs, and restore the data later.
Tap Start > Programs > Tools > Backup, and
follow the prompts on the screen.
MW700│9-7
Page 57

10 Managing Your Mobile
10.1 Memory Management
Select Start > Settings > System Tab >
Memory
Main Tab:
Display current memory status of this device.
Storage Card Tab:
Display the memory status of storage card in
this device.
Running Program Tab:
Display all current running programs in this
device.
Select any program from “Running Programs
List”, you may select to “Activate” or “Stop”.
Activate: run the highlighted programs
Stop: stop running highlighted programs
Stop All: stop running all programs on
“Running Programs List”
10.2 Memory
When the memory is insufficient, this device
cannot automatically allocate memory, you
may follow the steps below to free up more
memory:
1. Select Start > File Explorer
2. Use “File Explorer” to move some files to
Micro SD card. Select and hold highlighted
items by stylus and select “Cut” or “Copy”
on the pop-up menu; then select “Paste”
after switching to Micro SD card.
3. Use “File Explorer” to delete the unwanted
files.
Select Start > Messaging > Menu > Tools >
Options > Storage tab. If you have inserted a
memory card, check “Save Attachment to
Memory Card” and E-mail attachments will
automatically be saved to memory card.
Select Start > Internet Explorer > Menu > Tools
> Options > Memory Tab. Select “Clear
History” and “Delete File” to delete browsed
web page related records.
10.3 Add or Remove Programs
All programs installed in the device will be
saved in ROM (Read Only Memory) and are
not removable. Data saved in ROM will not be
lost by accident. As long as there is sufficient
space in this device, you may install suitable
programs by preference.
Adding programs through ActiveSync:
Before installing the program, please make
sure that the device processor is suitable for
the software.
1. Select Start > Settings > System Tab >
About > Version Tab to check for
information of this device.
2. Download the desired software to your
computer. (Please select software that are
designed for Pocket PC and this device)
3. Read installation instructions, “Read me”
file, or accompanied programs provided to
you.
4. Connect your computer with this device.
5. Install executive file to your computer.
․If this file contains installation program, the
installation wizard will automatically activate.
Please follow the instructions on screen.
Once the installation on your computer is
completed, the program will automatically be
installed to this device.
․If this file does not contain any installation
program, an error message will show on the
screen and tell you that this program is
invalid, which is not suitable for your
computer.
MW700│10-1
Page 58

You must move this program to this device
manually. If you cannot find any installation
instructions for this program, please use
‘Browse’ function of ActiveSync to copy
program file to Program Files folder in this
device.
After completing installation, select Start >
Programs, and then select the program icon to
launch that program.
Adding programs through Internet:
You may download software suitable for this
device from Internet.
Before installing the program, please make
sure that the device processor is suitable for
the software.
1. Select Start > Settings > System Tab >
About > Version Tab to check information in
this device.
2. Directly download programs to this device
by using Internet Explorer in this device.
(Please select programs designed for
Pocket PC and this device)
3. Read installation instructions, ‘Read me’ file,
or accompanied programs provided to you.
4. Run installation executive file in your
computer.
Adding programs to “Start” menu:
Select Start > Settings > Personal Tab >
Menus.
1. Check the programs to be displayed on
“Start” menu.
2. Press “OK” to save settings and return to
Personal Tab screen.
Remove Programs:
Select Start > Setup > System Tab > Remove
Programs.
Select the programs you would like to delete
from “Programs in storage memory” list, and
then select “Remove” to delete highlighted
programs.
If the installed programs list does not contain
the program you intend to remove, you may
use “File Explorer” in this device to find the
program and delete it by selecting and holding
the program’s name and then select “Delete”
from the pop-up menu.
MW700│10-2
Page 59
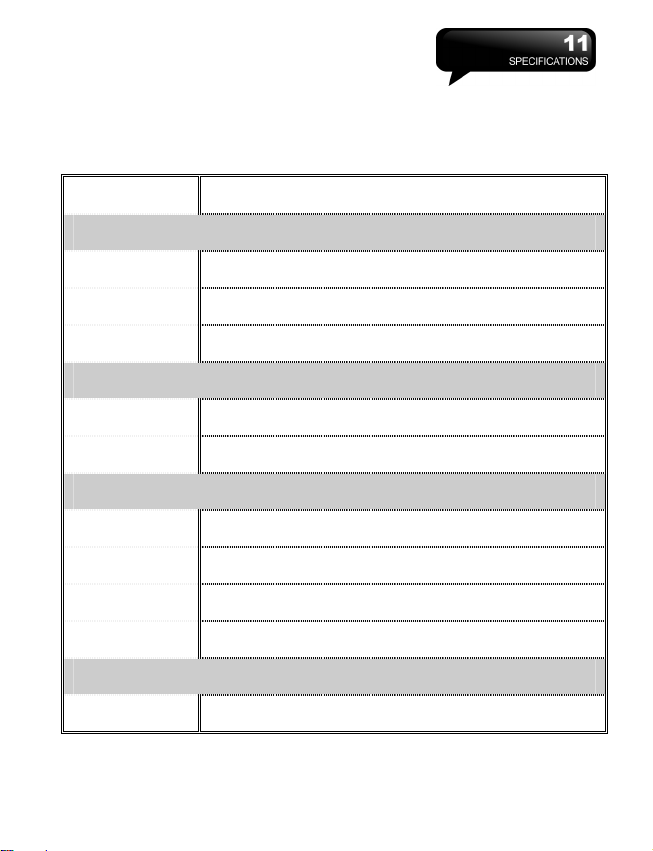
11 Specifications
Item Specification
System Information
Operating System Windows Mobile 6 Professional
Processor Marvell PXA 270 520 MHz
Memory 256 MB ROM, 64MB RAM
Size
Dimensions (mm) 116*59*14.95 mm
Weight (in grams) 130 g (Including Battery)
Battery
Battery Capacity Li-Ion 1300 mAh
Standby time Up to 150 hours
Talk time Up to 3.5 hours
Charging time 4 hours
Display Characteristics
Type 2.8”, 65K TFT LCD touch panel
MW700│11- 1
Page 60

Resolution 320*480 pixels
Band
Band EDGE; GSM 850/900/1800/1900
Connectivity
Bluetooth Bluetooth 2.0 Modulation: GFSK
Band:2.4 - 2.4835GHz
Output power:0dbm (Typical)
WLAN WLAN 802.11b/g Wireless Technology: OFDM and DSSS
Operating frequency: 2.412 - 2.462GHz
Output power:12dbm (Typical)
GPRS GPRS Class 12
WAP WAP 2.0
CSD Y
Modem dial-up Y
USB Mini USB 1.1
Image
Format JPEG, GIF, PNG, BNP, WBMP
MW700│11- 2
Page 61

Max Size (per) Depends on available RAM
Audio
Format WMA, MP3, MID, AMR, WAV,AAC
Max Size Depends on available RAM
Video
Format 3GP, MPEG4
Max Size Depends on available RAM
Phonebook
Size Depends on available RAM
Ringtone
Type MP 3, WM A, AMR
Polyphone 192 polyphonic mid file
Digital Camera
Type JPEG
Pixels 2.0 mega pixels
Resolution QVGA, QQCGA
Auto Focus Y
MW700│11- 3
Page 62

Macro Mode Y
Video Recording Y
Message
Windows Live
Messenger
SMS Y
MMS Y
E-Mail Y
Type Micro SD Card
Max Size No Limit
Y
External Memory
Operating Temperature
Temperature
-10℃~45℃
Note: Specifications may vary in some regions.
MW700│11- 4
Page 63

12 FAQ
Why can’t I turn on the device?
Please make sure that the device has sufficient
power, and that the battery is secured in the
device.
Plug the device to an outlet using the travel
charger. Check whether the LED light on the
device has lighted up, and then press the
power key on the device to turn on the device.
Why does the screen freezes and does not
respond to my commands or input?
Reboot the system to free up memory. The
system shall operate more efficiently.
If the system still lags after rebooting, you will
need to clean boot the device. To clean boot,
press and hold Camera key and Power Key at
the same time for about 3 seconds and then
release. Your device will reset to factory
defaults and reboot.
Note: When you perform a clean boot on
this device, all your personalized settings,
information, and programs installed will
be removed. The system will reset to
factory defaults.
Why can’t my device make any sound
alerts?
Tap on the speaker icon on the top right corner
of the screen, and then adjust the alert or ring
volume.
You could also use the volume key on the left
side of the device to adjust volume.
Why would the screen darken
automatically?
This is a power saving mechanism. You can
change this setting in Start > Settings >
System tab > Backlight > Battery Power tab &
External Power tab.
When I open a file or a program, an
“Insufficient Memory” message pops up.
The device memory is shared by both storage
and programs. You can follow the steps below
to free up some memory.
1. Remove some of the rarely used programs
you installed.
2. Remove rarely used files.
Why doesn’t the screen respond accurately
to my stylus taps?
Select Start > Settings > System tab > Screen
> General tab. Select “Align Screen” to align
the screen.
Why does the device launch wrong
programs or ignore my command when I
press a device key?
Select Start > Settings > Personal tab >
Buttons and check whether the programs
assigned to each key is correct. You can
change these key assignments by preference.
My device can’t form a successful
connection with ActiveSync.
Please make sure you have installed
ActiveSync 4.5 or later version on your
computer. You can find ActiveSync in the
installation CD, or you can download the latest
version from Microsoft’s website.
Please make sure you have connected the
device to the computer by plugging in the USB
cable to both the device and the computer.
Make sure that you are not running another
program that is using the same serial port.
If the connection still fails, remove ActiveSync
MW700│12-1
Page 64

y
on your computer and reinstall.
How do I take out the Micro SD card from
the SD adapter?
The card slot on this device is designed for
Micro SD cards. To remove the Micro SD card
from the SD card adapter, please hold the SD
card adapter with one hand, and slightly lift the
end of the Micro SD card and pull.
Why are there double entries in my
Contacts list?
Please go to Start > Programs > Phone
Manager > SIM Manager, and check
SIM Contacts in Contact. If you have
already copied your SIM contacts to the device,
then you need to select this option.
Can I synchronize information with PC and
Exchanger Server at the same time?
No. You can only synchronize information
either with PC or with Exchange Server at one
time.
GIGA-BYTE COMMUNICATIONS INC.
8F, No. 43, Fu-Hsin Road, Hsin-Tien,
Taipei County, Taiwan
+886-2-82192136
www.gigab
tecm.com
MW700│12-2
 Loading...