

Page 1

GN-WIAG02
IEEE 802.11b/g Mini-PCI Wireless LAN Card
User’s Manual
http://www.gigabyte.com.tw
Rev. 1.0 First Edition
Page 2

Federal Communication Commission Interference Statement
This equipment has been tested and found to comply with the limits for a Class B digital
device, pursuant to Part 15 of the FCC Rules. These limits are designed to provide
reasonable protection against harmful interference in a residential installation. This
equipment generates, uses and can radiate radio frequency energy and, if not installed
and used in accordance with the instructions, may cause harmful interference to radio
communications. However, there is no guarantee that interference will not occur in a
particular installation. If this equipment does cause harmful interference to radio or
television reception, which can be determined by turning the equipment off and on, the
user is encouraged to try to correct the interference by one of the following measures:
- Reorient or relocate the receiving antenna.
- Increase the separation between the equipment and receiver.
- Connect the equipment into an outlet on a circuit different from that to which the receiver
is connected.
- Consult the dealer or an experienced radio/TV technician for help.
FCC Caution: To assure continued compliance,any changes or modifications not
expressly approved by the party responsible for compliance could void the user's authority
to operate this equipment.
This device complies with Part 15 of the FCC Rules. Operation is subject to the following
two conditions: (1) This device may not cause harmful interference, and (2) this device
must accept any interference received, including interference that may cause undesired
operation.
IMPORTANT NOTE:
FCC Radiation Exposure Statement:
This equipment complies with FCC radiation exposure limits set forth for an uncontrolled
environment. End users must follow the specific operating instructions for satisfying RF
exposure compliance.
This transmitter must not be co-located or operating in conjunction with any other antenna
or transmitter.
Page 3

Contents
CHAPTER 1 PRODUCT OVERVIEW 1
1-1. INTRODUCTION...........................................................................................................1
1-2. FEATURES .................................................................................................................1
1-3. PHYSICAL DIMENSIONS/PACKAGING.............................................................................1
1-4. SYSTEM REQUIREMENTS ............................................................................................1
CHAPTER 2 INSTALLING THE WLAN CARD 2
2-1. INSTALLING THE DRIVER & UTILITY (WIN98SE/ME)......................................................2
2-2. INSTALLING THE DRIVER & UTILITY (WIN2000/XP).......................................................8
CHAPTER 3 USING THE UTILITY 12
3-1. LINK STATUS............................................................................................................12
3-2. SITE SURVEY...........................................................................................................16
3-3. CONFIGURATION ......................................................................................................17
3-4. STATISTICS..............................................................................................................23
DRIVER INFO............................................................................................................24
3-5.
CHAPTER 4 TROUBLESHOOTING 25
YOU ARE “802.1X”, “WPA” AND “WPA-PSK” CAN NOT BE SELECTED...........................25
I CANNOT CONNECT TO AN AP ...................................................................................25
I CAN CONNECT TO AN AP BUT I CANNOT CONNECT TO THE INTERNET ...........................25
I ALWAYS HAVE POOR LINK QUALITY AND LOW SIGNAL ..................................................26
CHAPTER 5 SPECIFICATION 27
Page 4

Chapter 1 Product Overview
1-1. Introduction
This 802.11b/g Wireless Local Area Network (WLAN) card is composed of the MAC,
Baseband, and radio components, Mini-PCI interface, and two built-in antennas. It
operates in 2.4GHz frequency bands, providing fast (up to 108Mbps) and secure (support
AES, 802.1x & WEP and WAP) connections to 802.11b and 802.11g networks from a
single card.
1-2. Features
Conforms to 802.11b/802.11g specification.
Transmits data rate up to the maximum speed of 108Mbps.
Dynamically scales the data rate.
Automatic power management to reduce battery consumption.
Two antenna connectors for supporting antenna diversity.
Seamless roaming between 802.11b and 802.11g networks.
Supports AES (Advance Encryption System), enterprise-class 802.1x security and
multiple levels of WEP encryption (64-bit /128-bit/152-bit), and WPA (Wi-Fi
Protected Access)..
Driver supports Windows 98SE/Me/2000/XP.
1-3. Physical Dimensions/Packaging
Dimensions: 59mm* 44mm* 4mm
1-4. System Requirements
1-4-1. Supported Platform:
IBM PC/AT compatible computer
1-4-2. Supported Operation System:
Windows 98SE/Me/2000/XP
1
Page 5
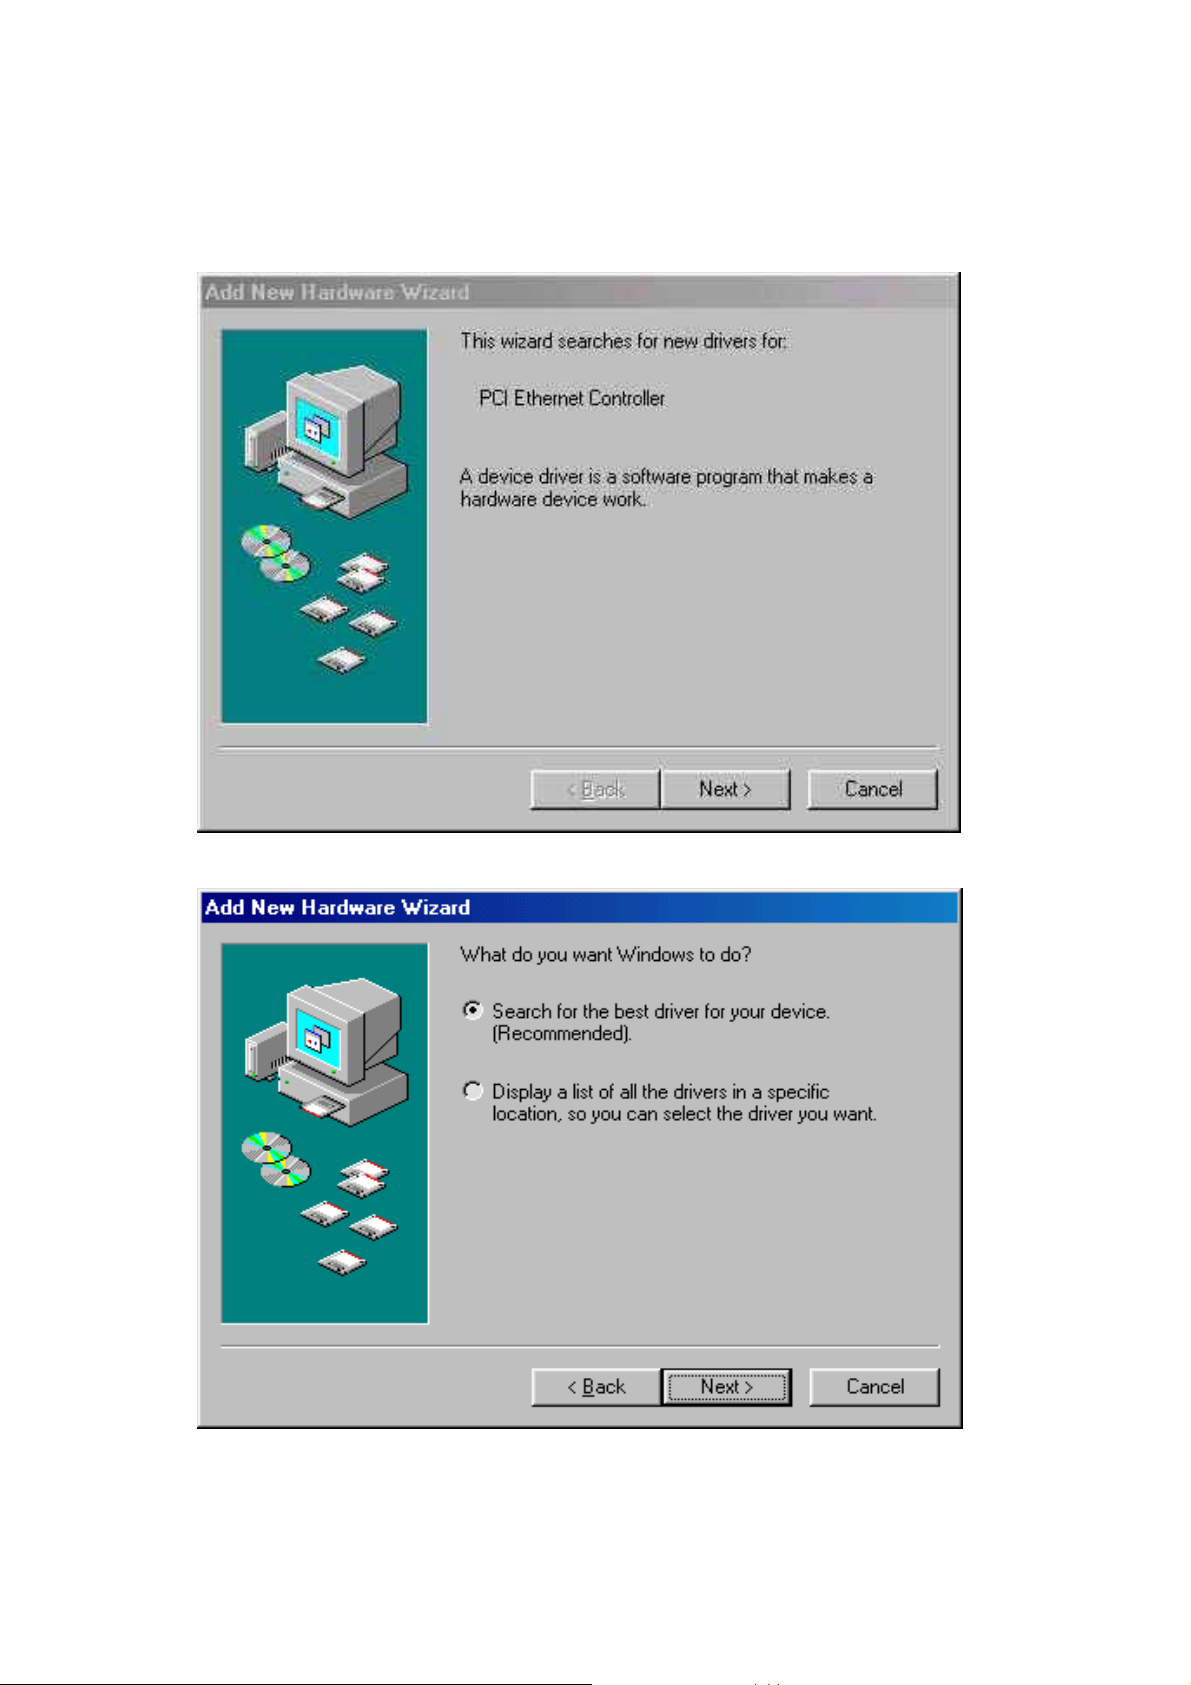
Chapter 2 Installing the WLAN Card
2-1. Installing The Driver & Utility (Win98SE/ME)
Step 1: Click “Next”, and Insert our setup CD into your CDROM drive.
Step 2: Click “Search for the best driver for your device” , and Click “Next”.
Win 98 SE
2
Page 6
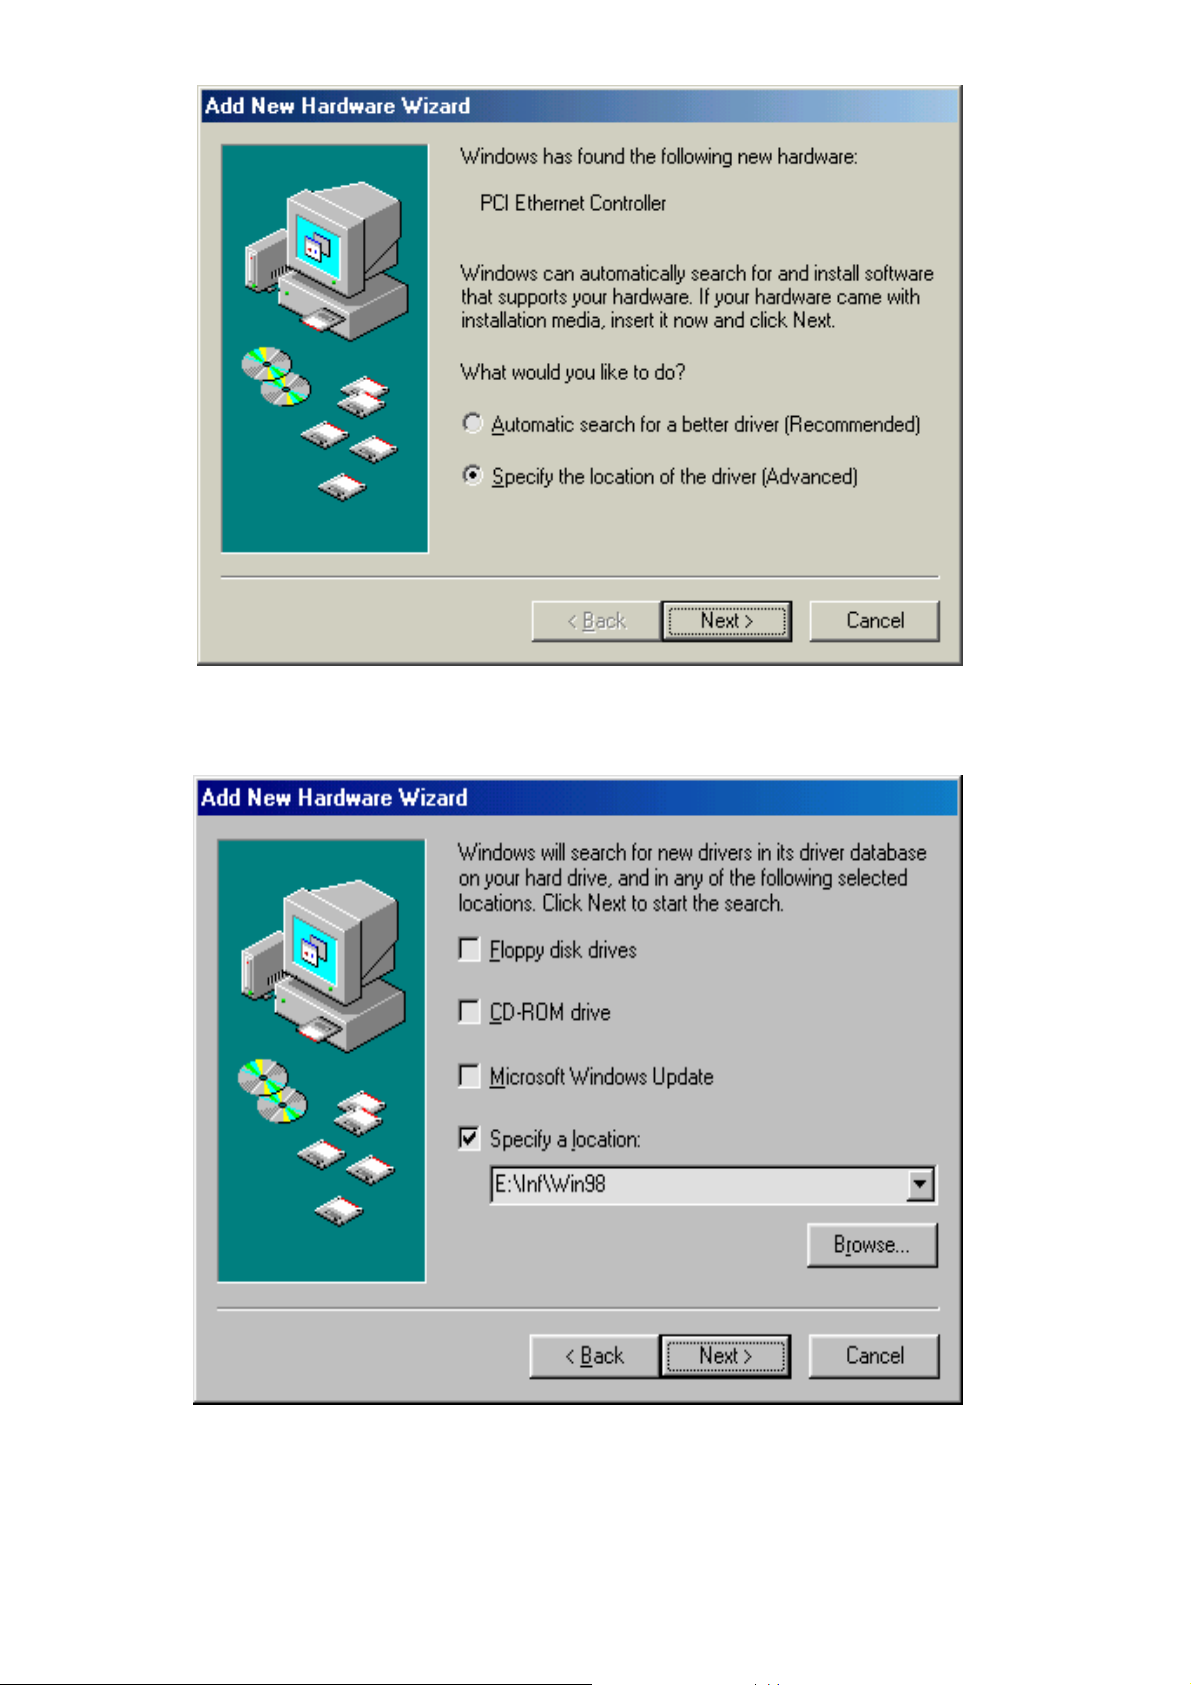
Win ME
Step 3: Click “Specify a location” , Click “ Browse” , Click “CD-ROM Device:” , Select
the directory “\Inf\Win98(Win Me)”, and Click “Next”.
Win 98 SE
3
Page 7
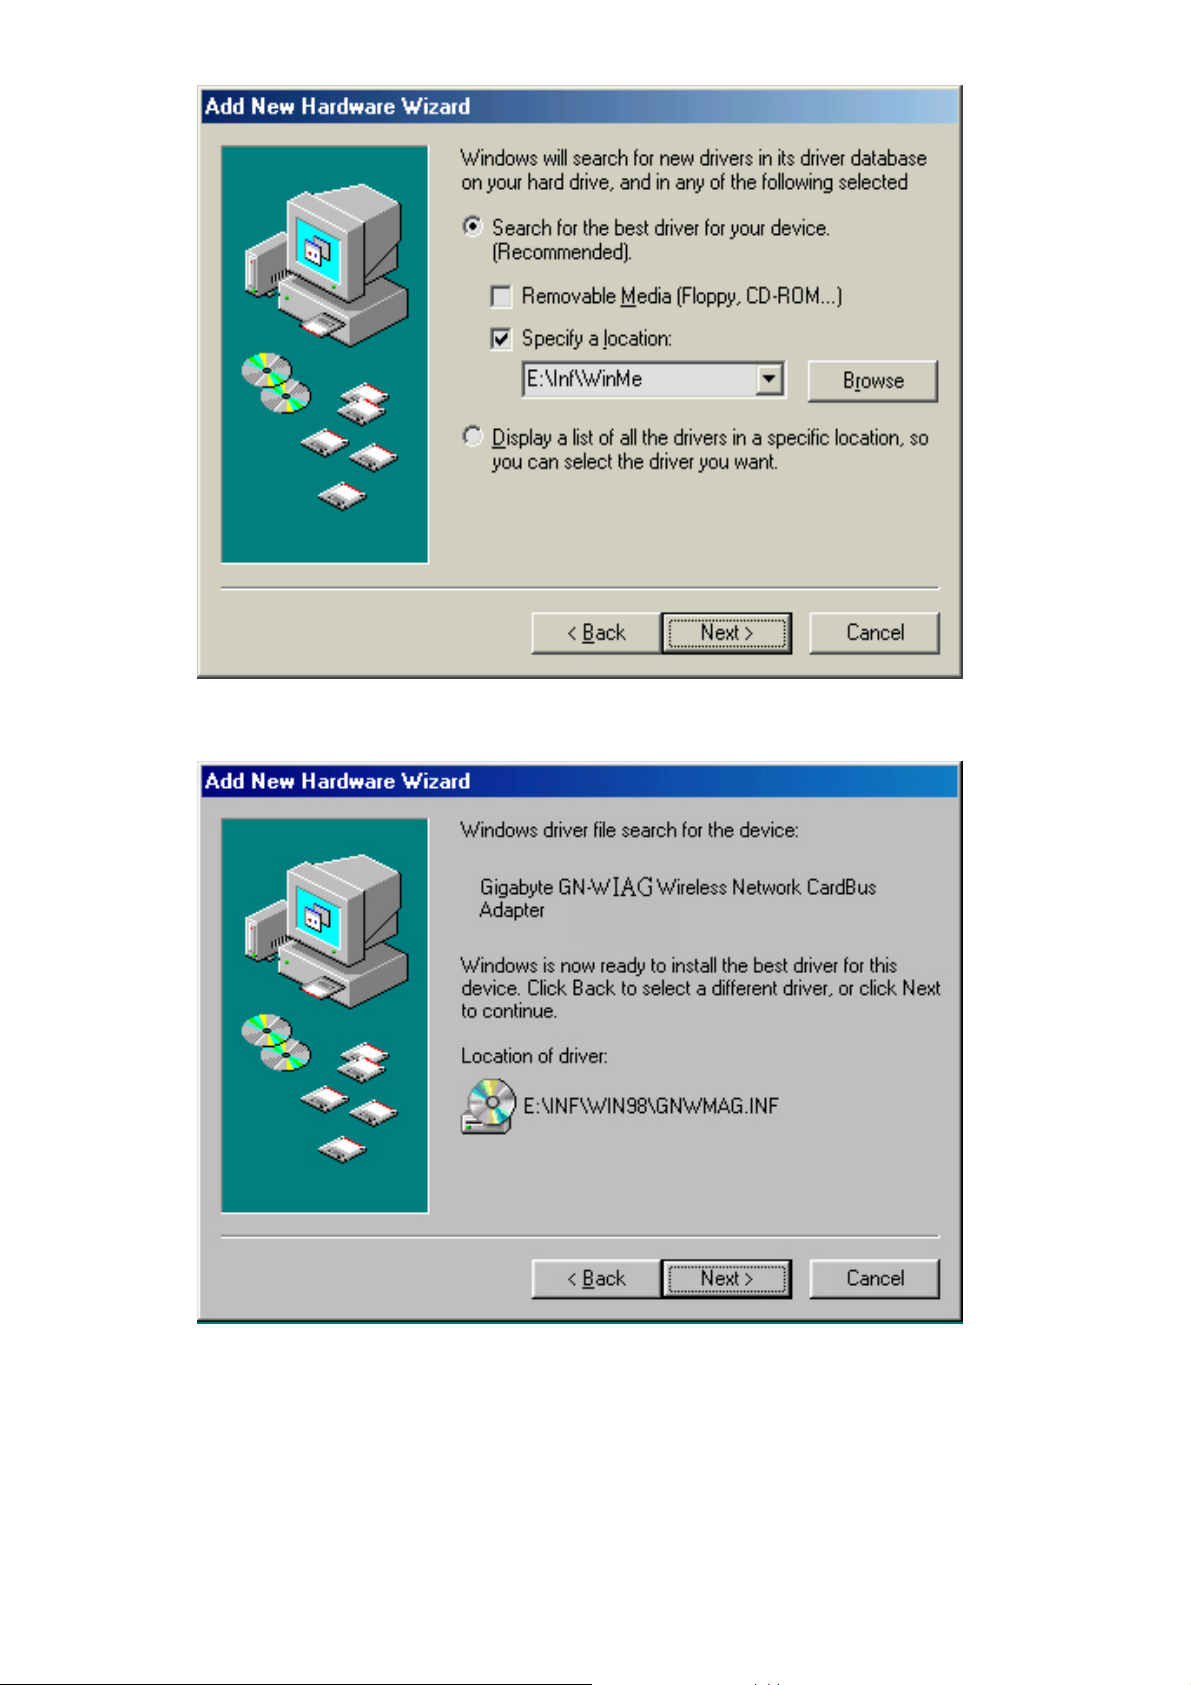
Win 98 SE
Step 4: Click “Next”.
4
Page 8
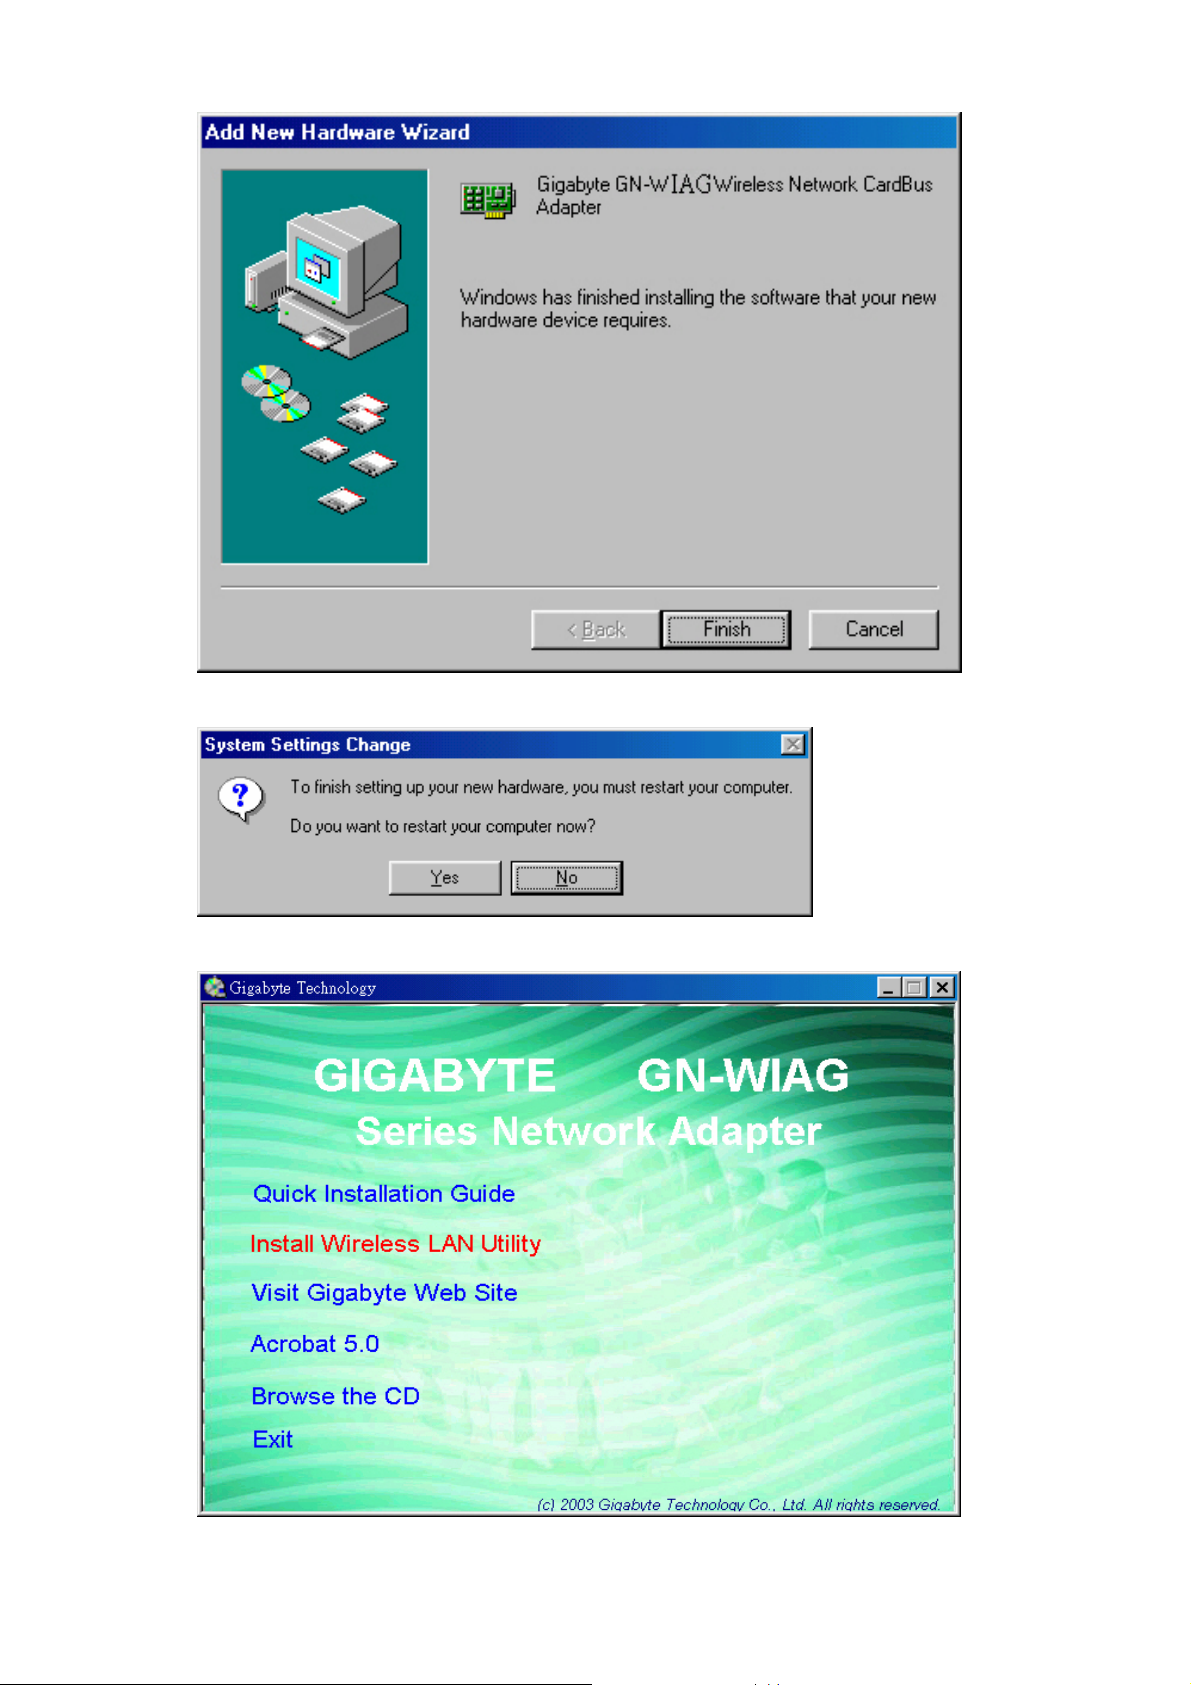
Step 5: Click “Finish”.
Step 6: Click “No”.
Step 7: Click “Install Wireless LAN Utility”.
5
Page 9
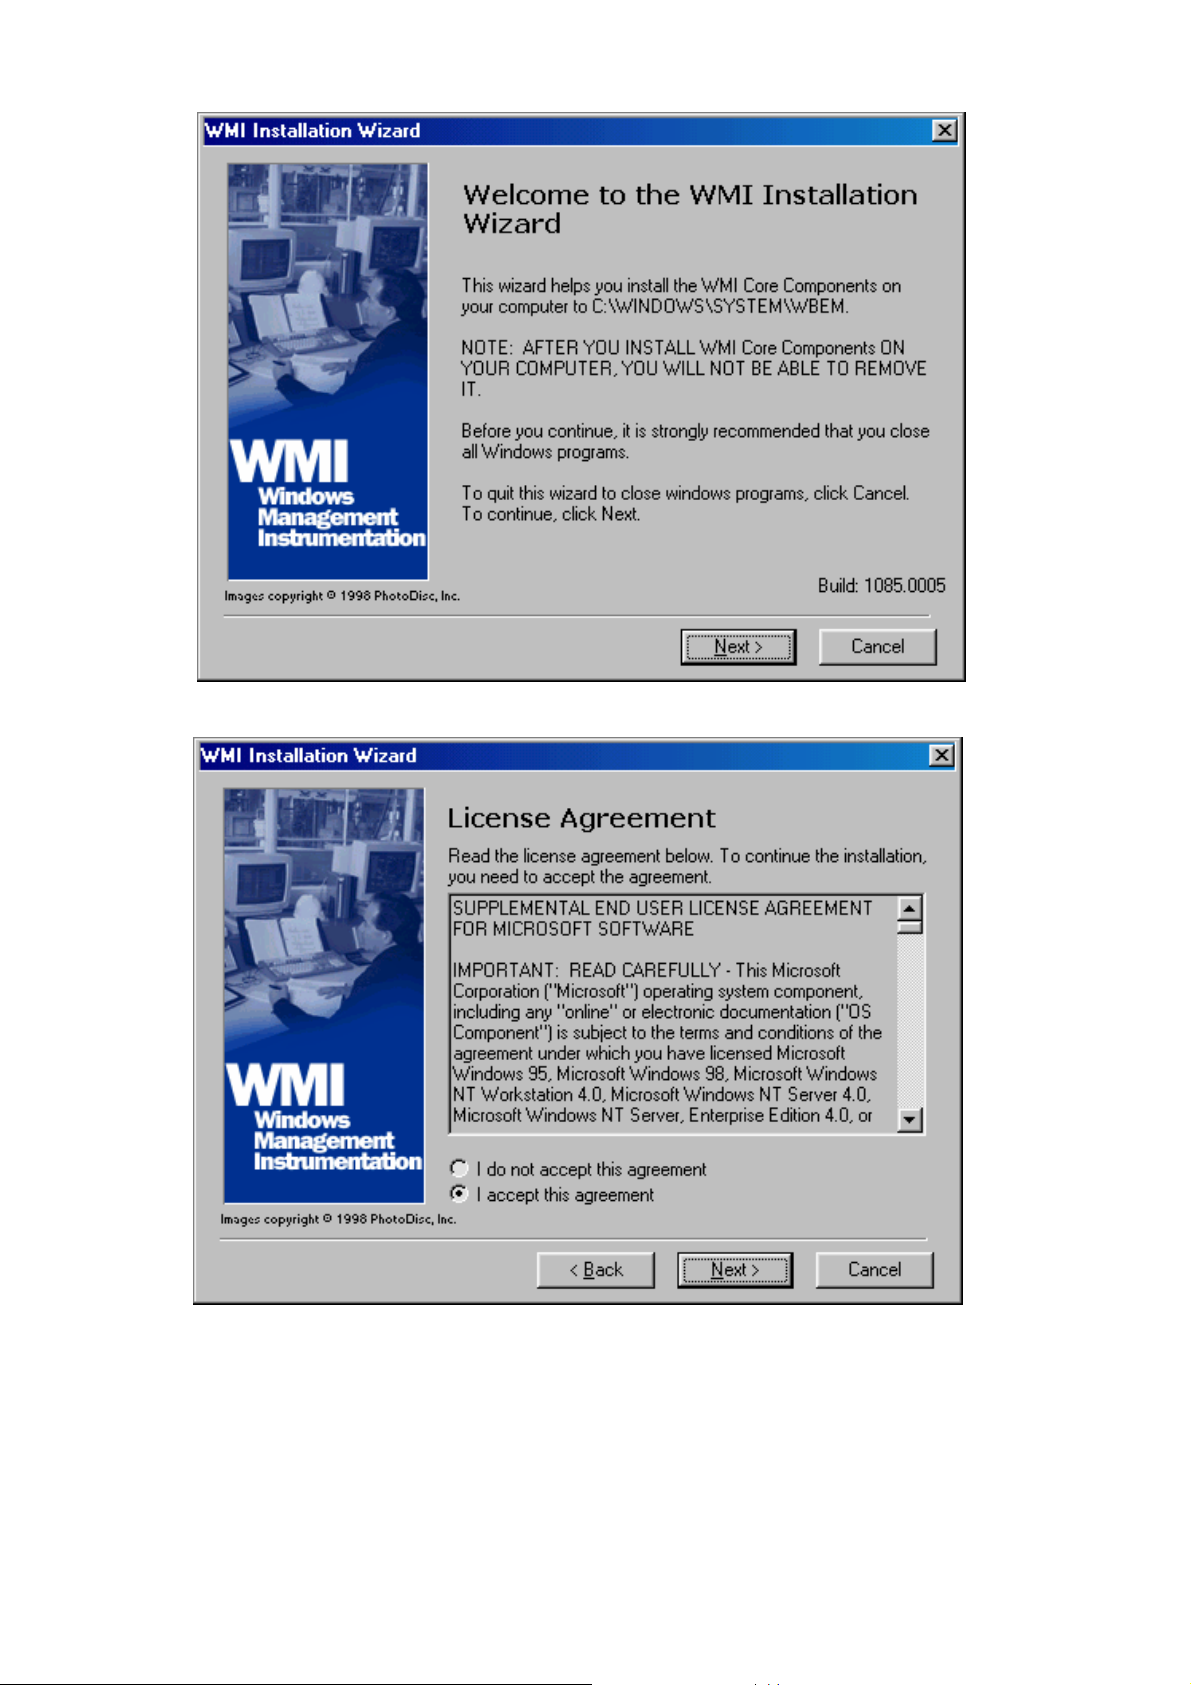
Step 8: Click “Next” (Win 98 SE only).
Step 9: Click “I accept this agreement” , and Click “Next” (Win 98 SE only).
6
Page 10
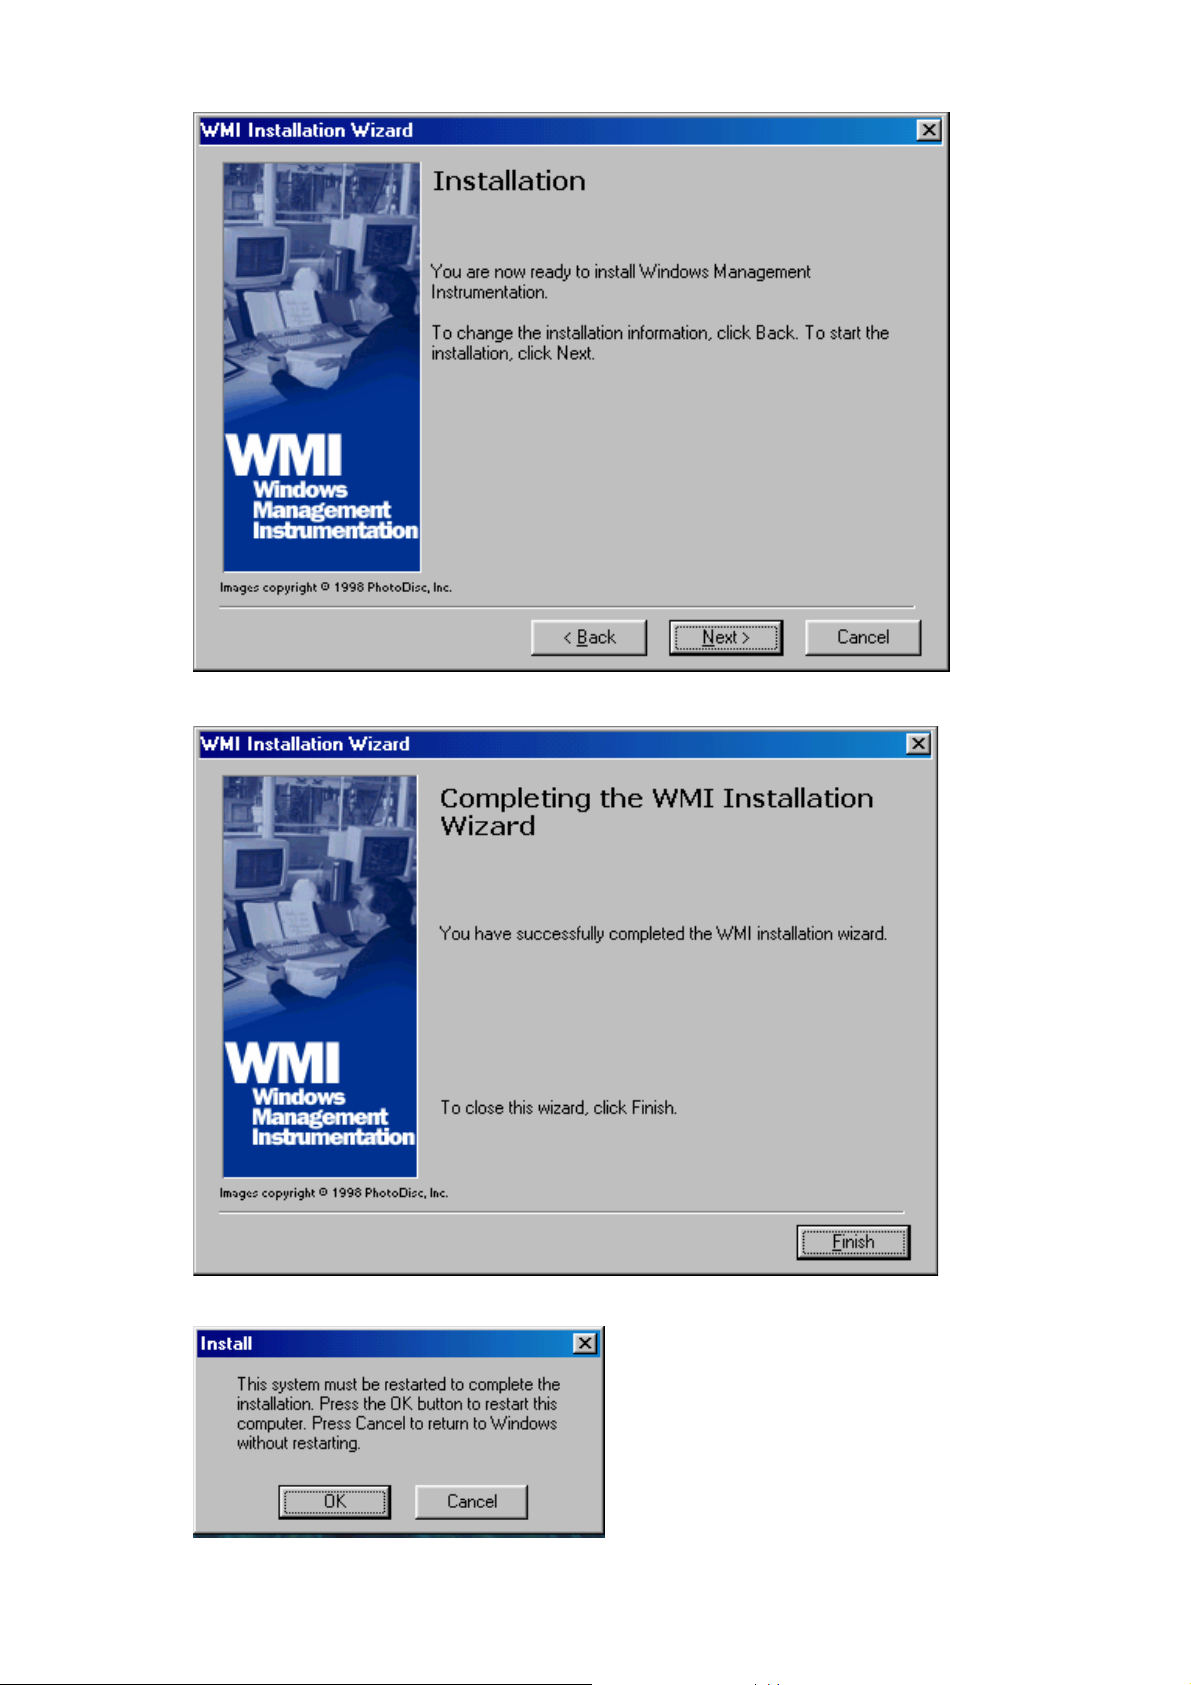
Step 10: Click “Next” (Win 98 SE only).
Step 11: Click “Finish” (Win 98 SE only).
Step 12: Click “OK” (Win 98 SE only).
7
Page 11
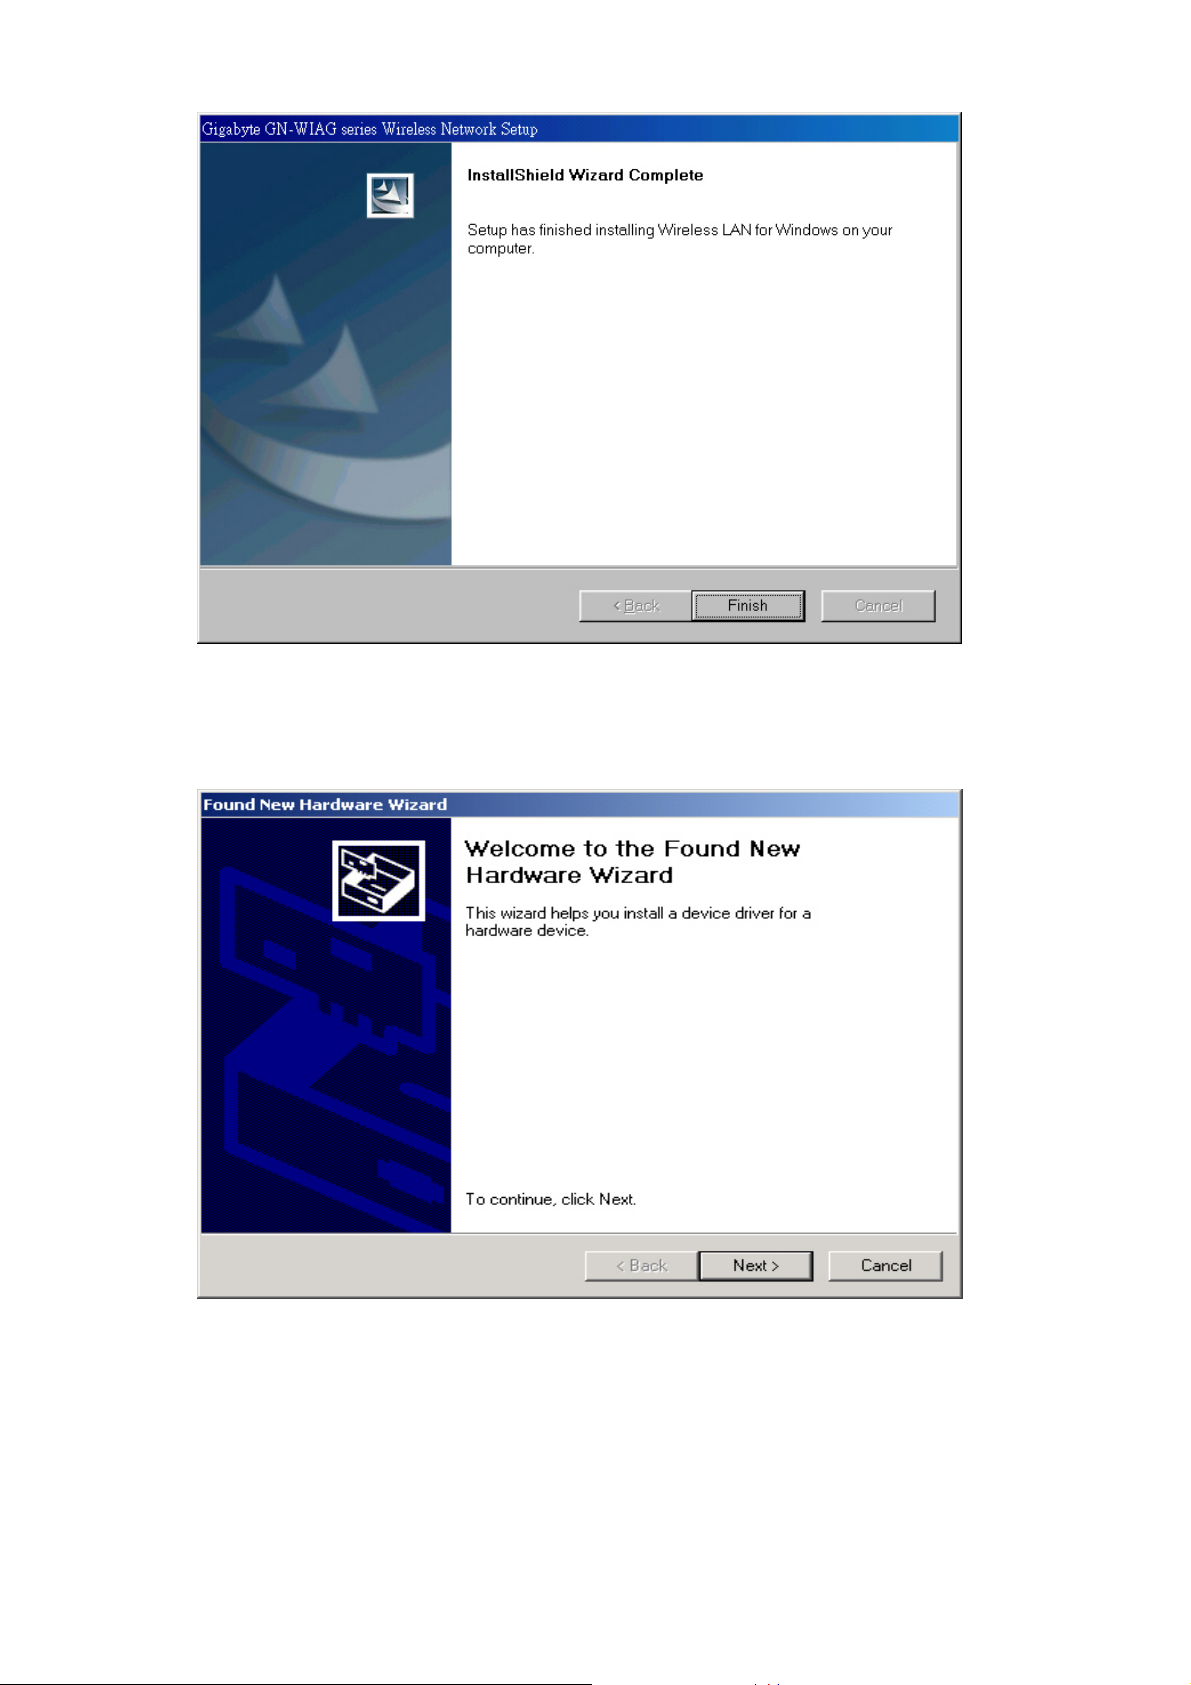
Step 13: Click “Finish” and Reboot you computer.
2-2. Installing The Driver & Utility (Win2000/XP)
Step 1: Click “Cancel”
Win 2K
8
Page 12
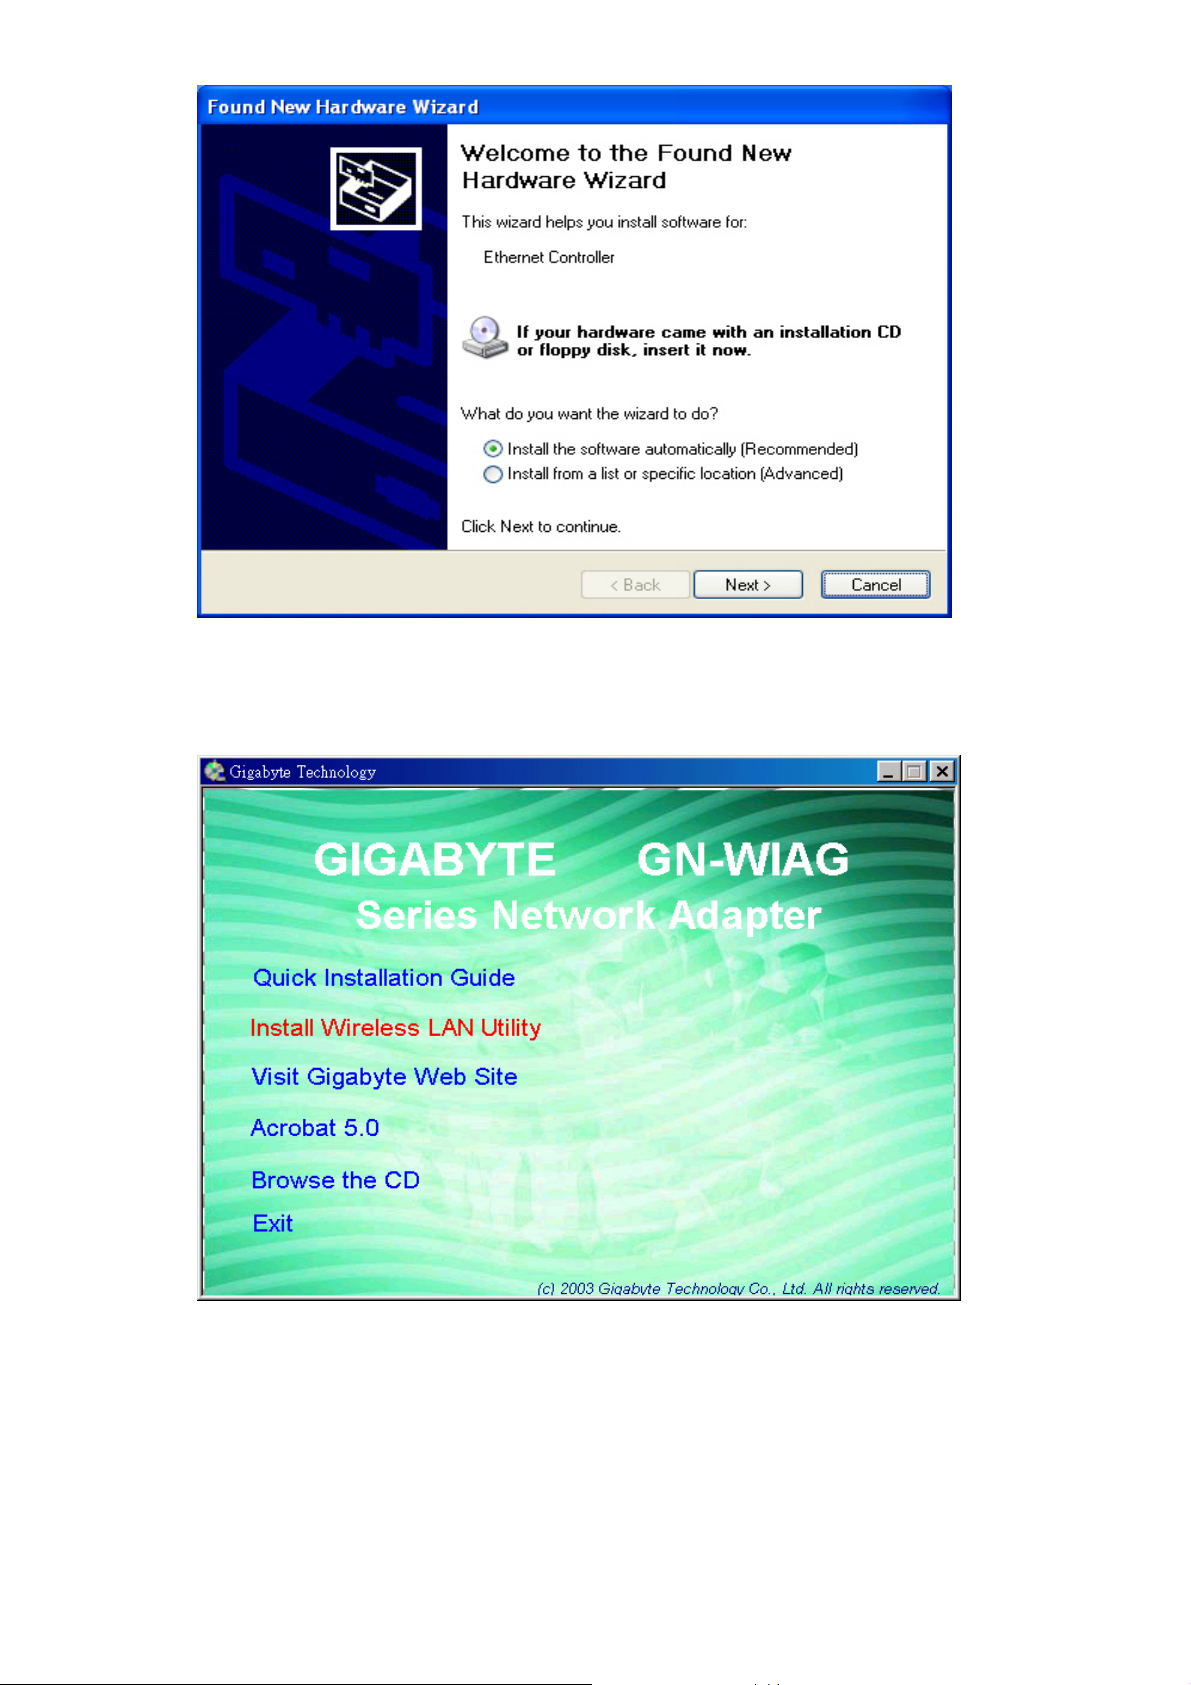
Win XP
Step 2: Insert our setup CD into your CDROM drive, the following window will pop up.
Step 3: Click “Install Wireless LAN Utility”.
9
Page 13
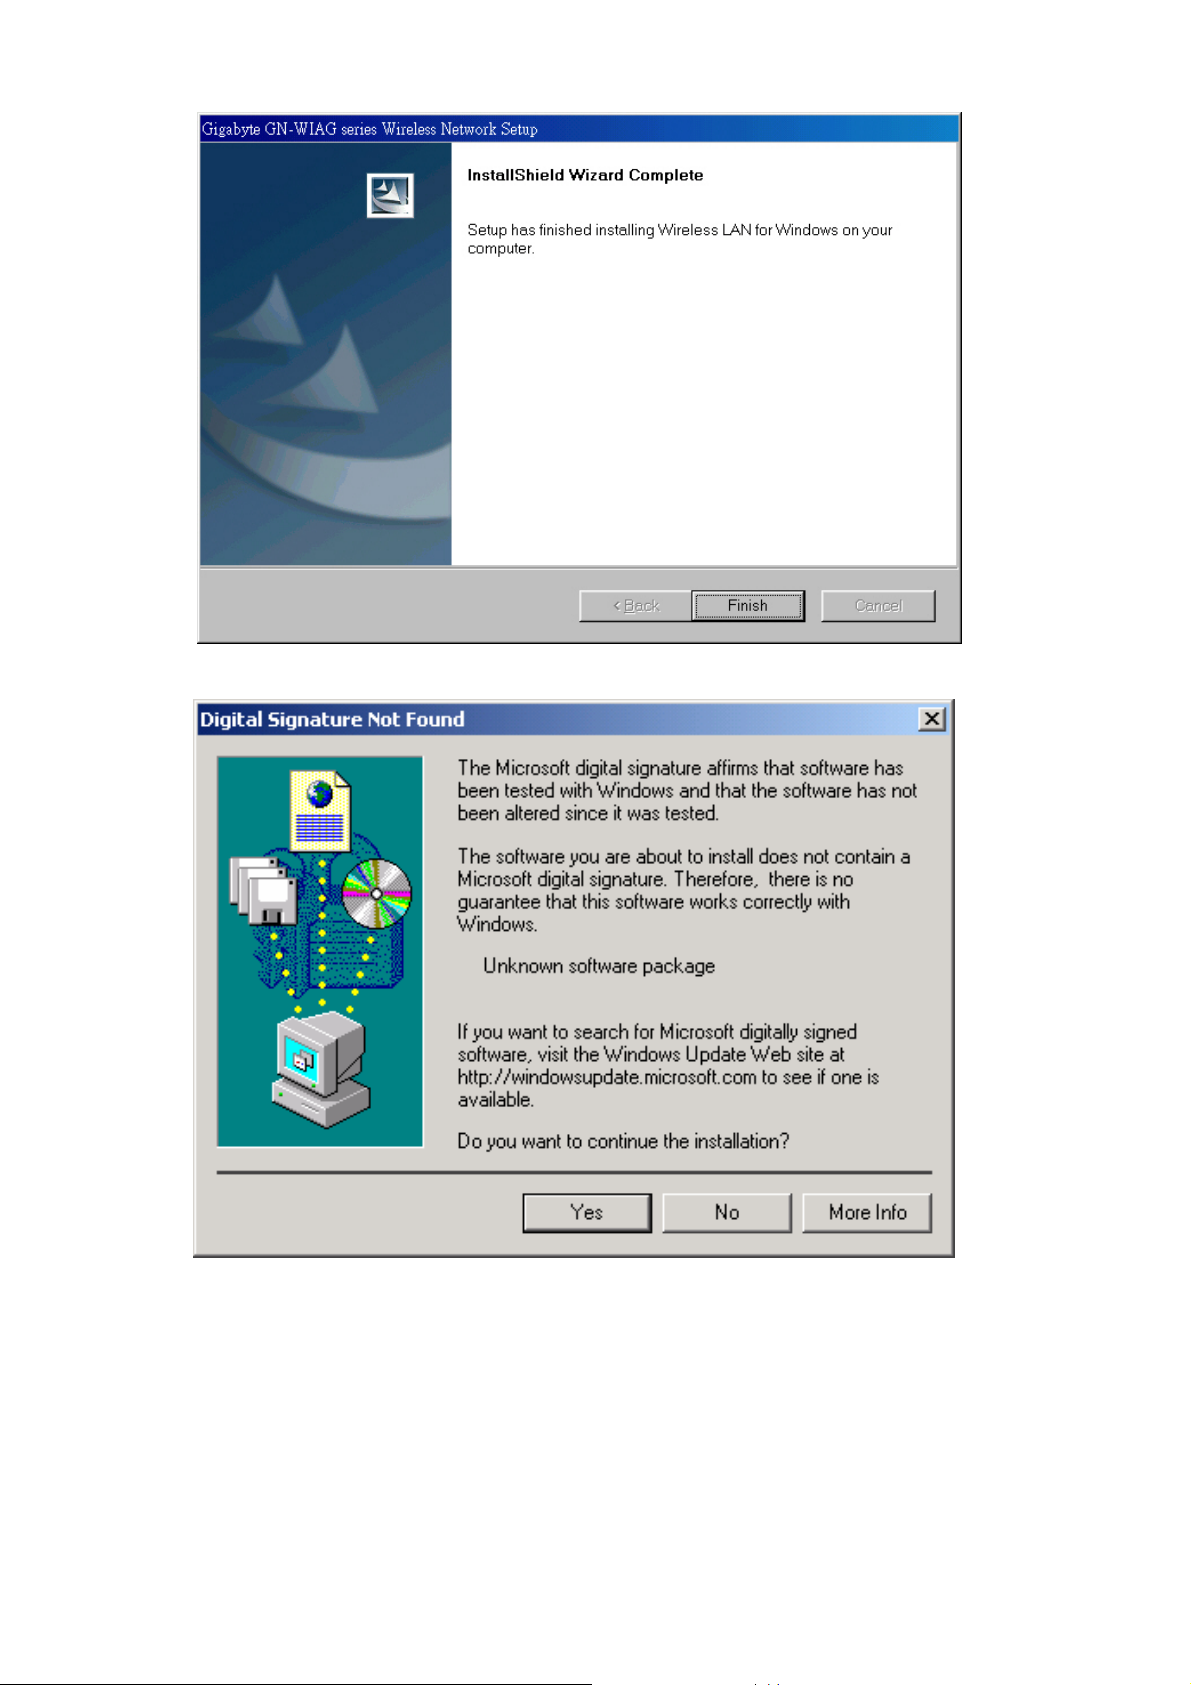
Step 4: Click “Finish”.
Step 5: Click “Yes”. (Win 2000 only)
10
Page 14
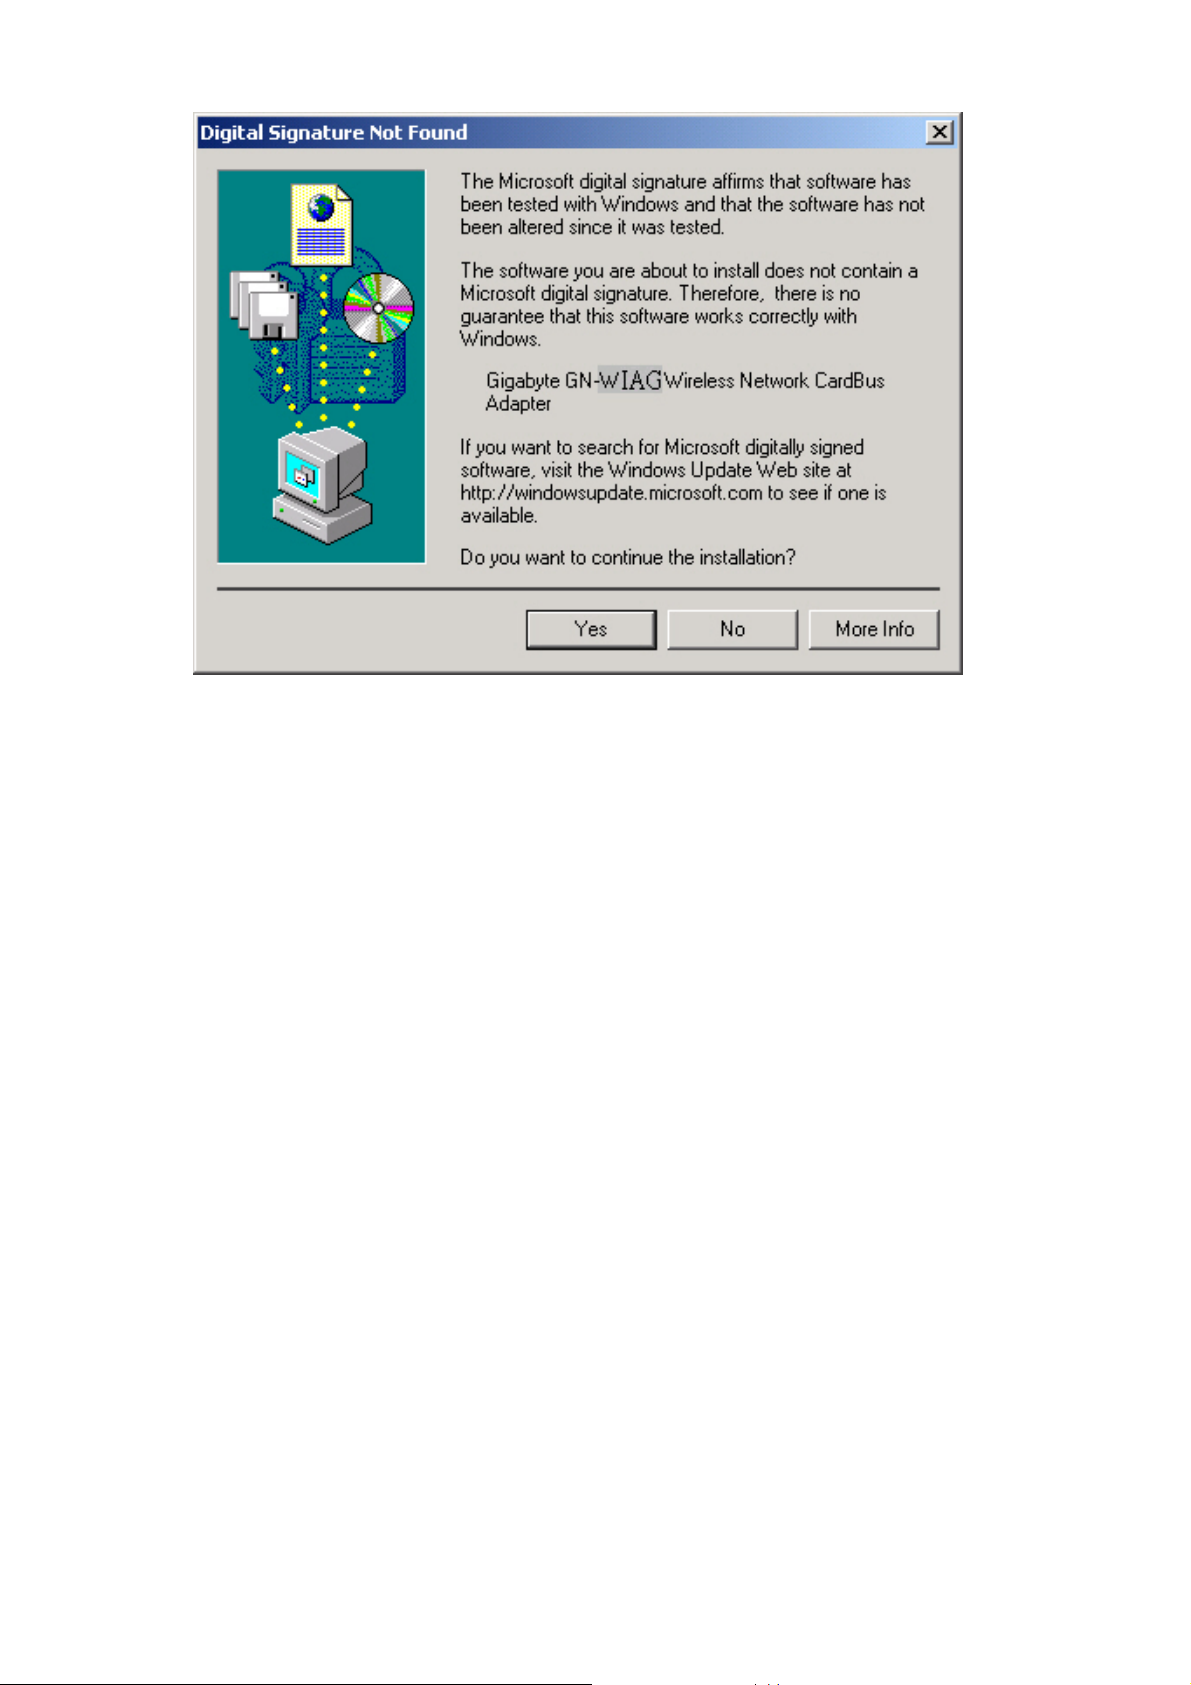
Step 6: Click “Yes”. (Win 2000 only)
11
Page 15
Chapter 3 Using The Utility
The Configuration & Monitor Utility is a powerful application that helps you to configure the
card and monitor the statistics of the communication link. Unlike the standard method of
configuring the card via the operating system utilities (e.g. Control Panel), this application
permits the dynamic modification of the configuration parameters while the card is
operating. It also offers some more configuration options. It appears as an icon on the
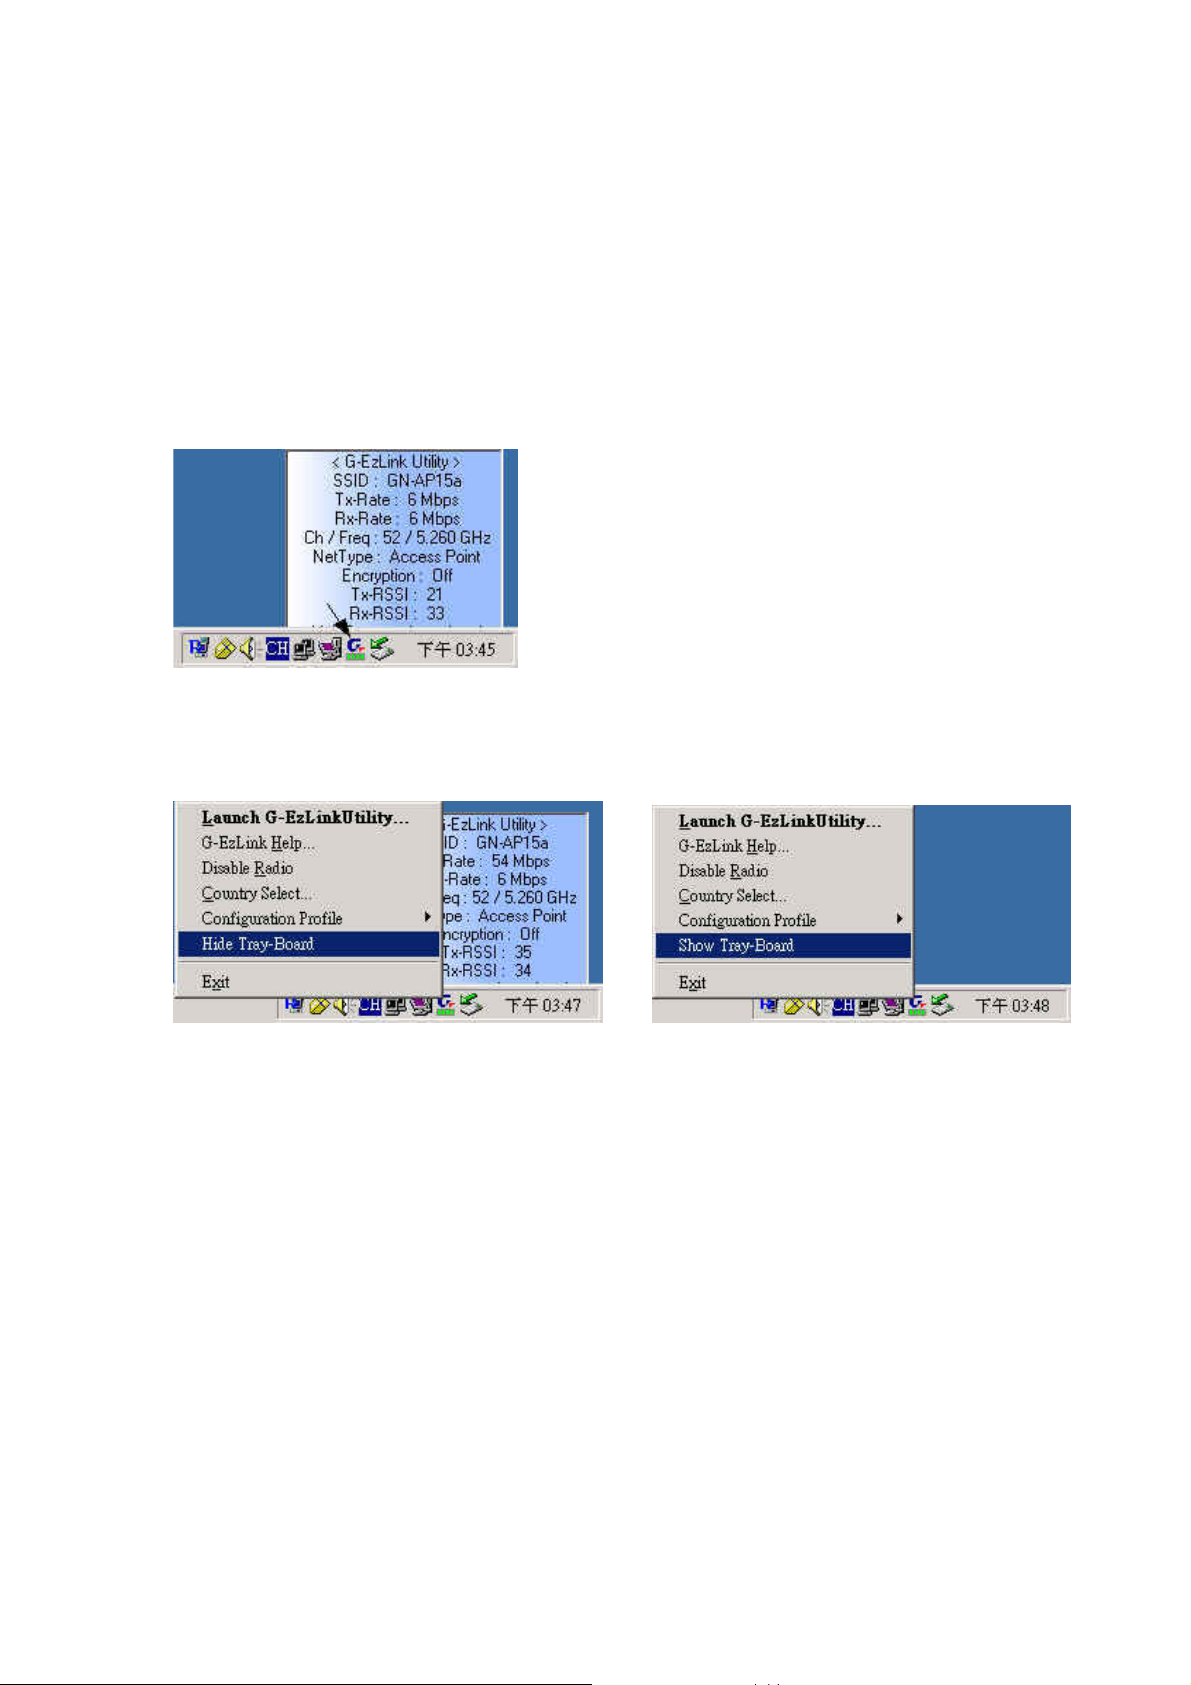
Windows system tray whenever the card is running (see Figure 3-1). The icon can tell you
the received signal strength by four small green lights. You can open it by double-clicking
on this icon.
Figure 3-1. The icon of the Configuration & Monitor Utility
You can hide or show Tray-board by clicking mouse right key on this icon (see Figure
3-2).
Figure 3-2. The icon of the Function Utility
3-1. Link Status
The “Link Status” tab shows you the current association information about the card’s
connection with a wireless network. In the middle of the screen, you can see transmit and
received signal strength for this card (see Figure 3-3).
12
Page 16
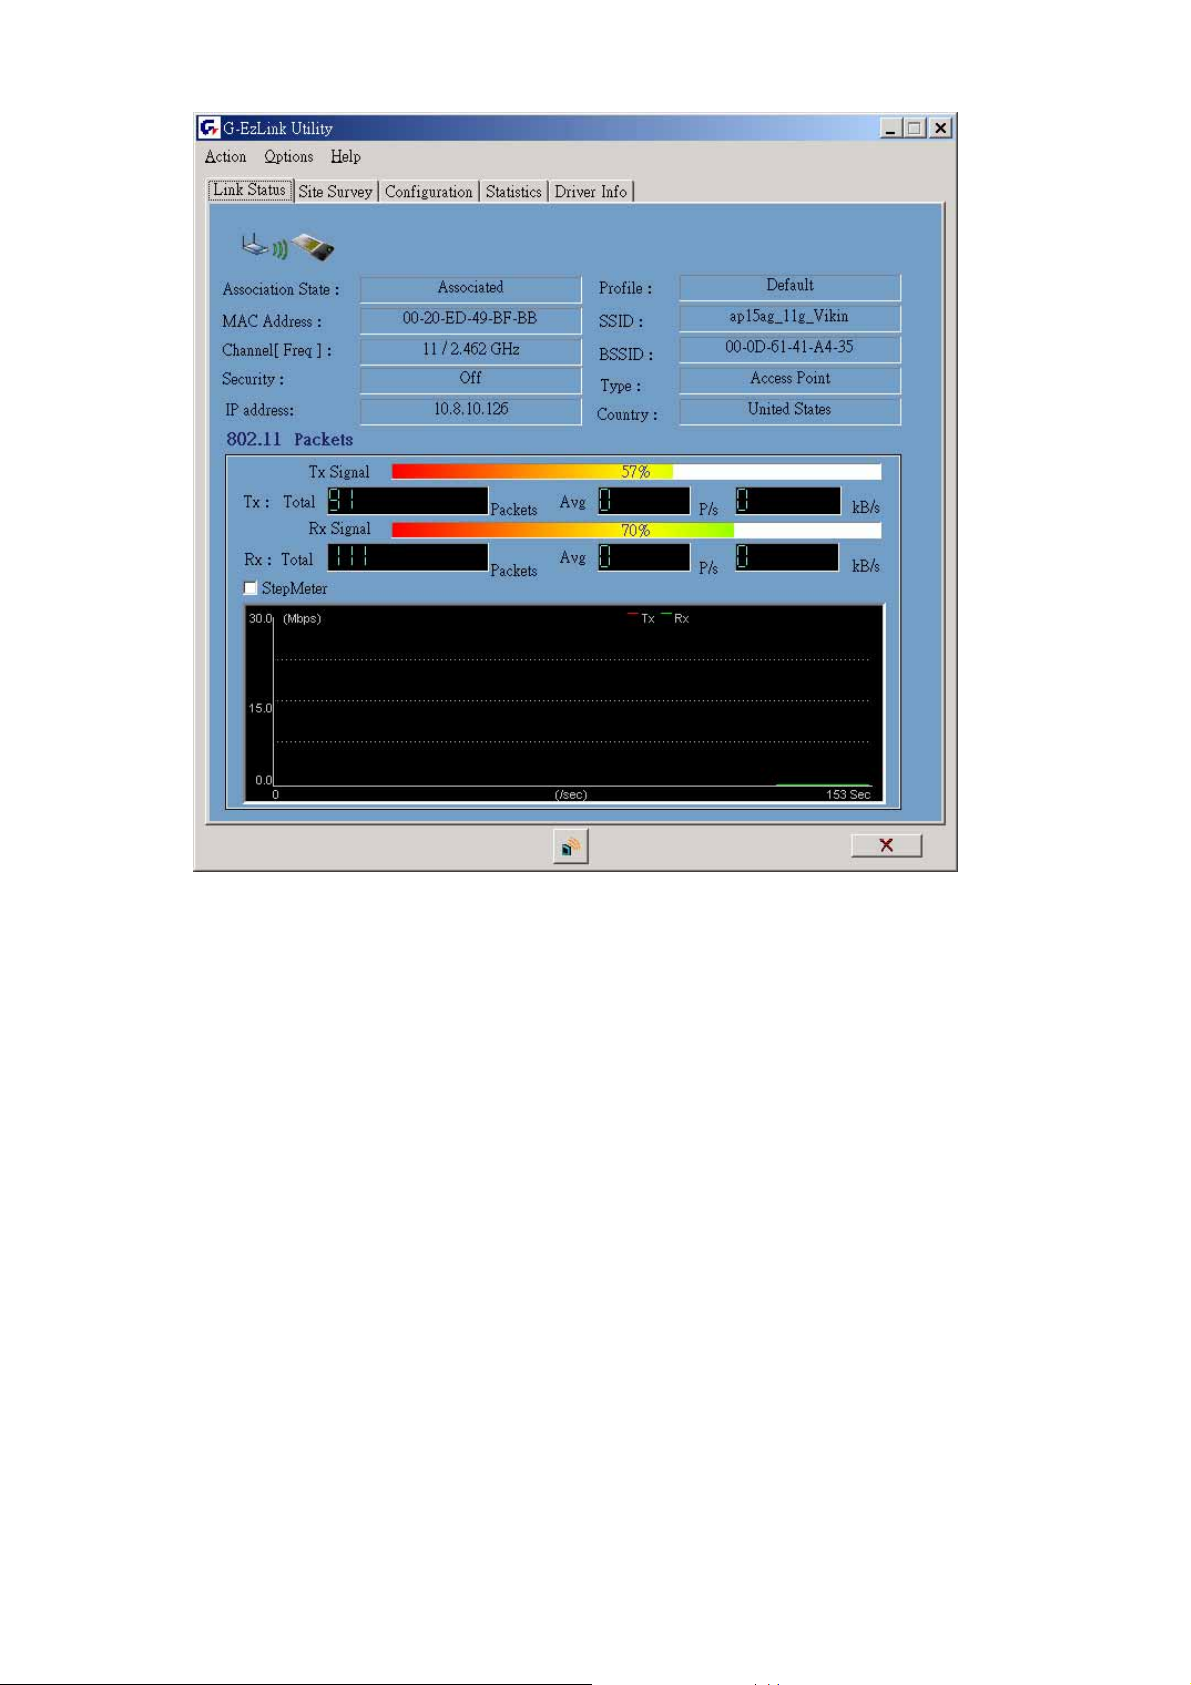
Figure 3-3. Current link status of the wireless LAN card
If you want to turn off the card’s radio, click the radio icon at the bottom of the screen, (see
Fig 3-4) shows the result Click “Yes” (see Figure 3-5). Just click it again to turn on the
radio. Click “Yes” (see Figure 3-6). In order to exit, click the “X” button at the bottom of the
screen (see Figure 3-4).
13
Page 17
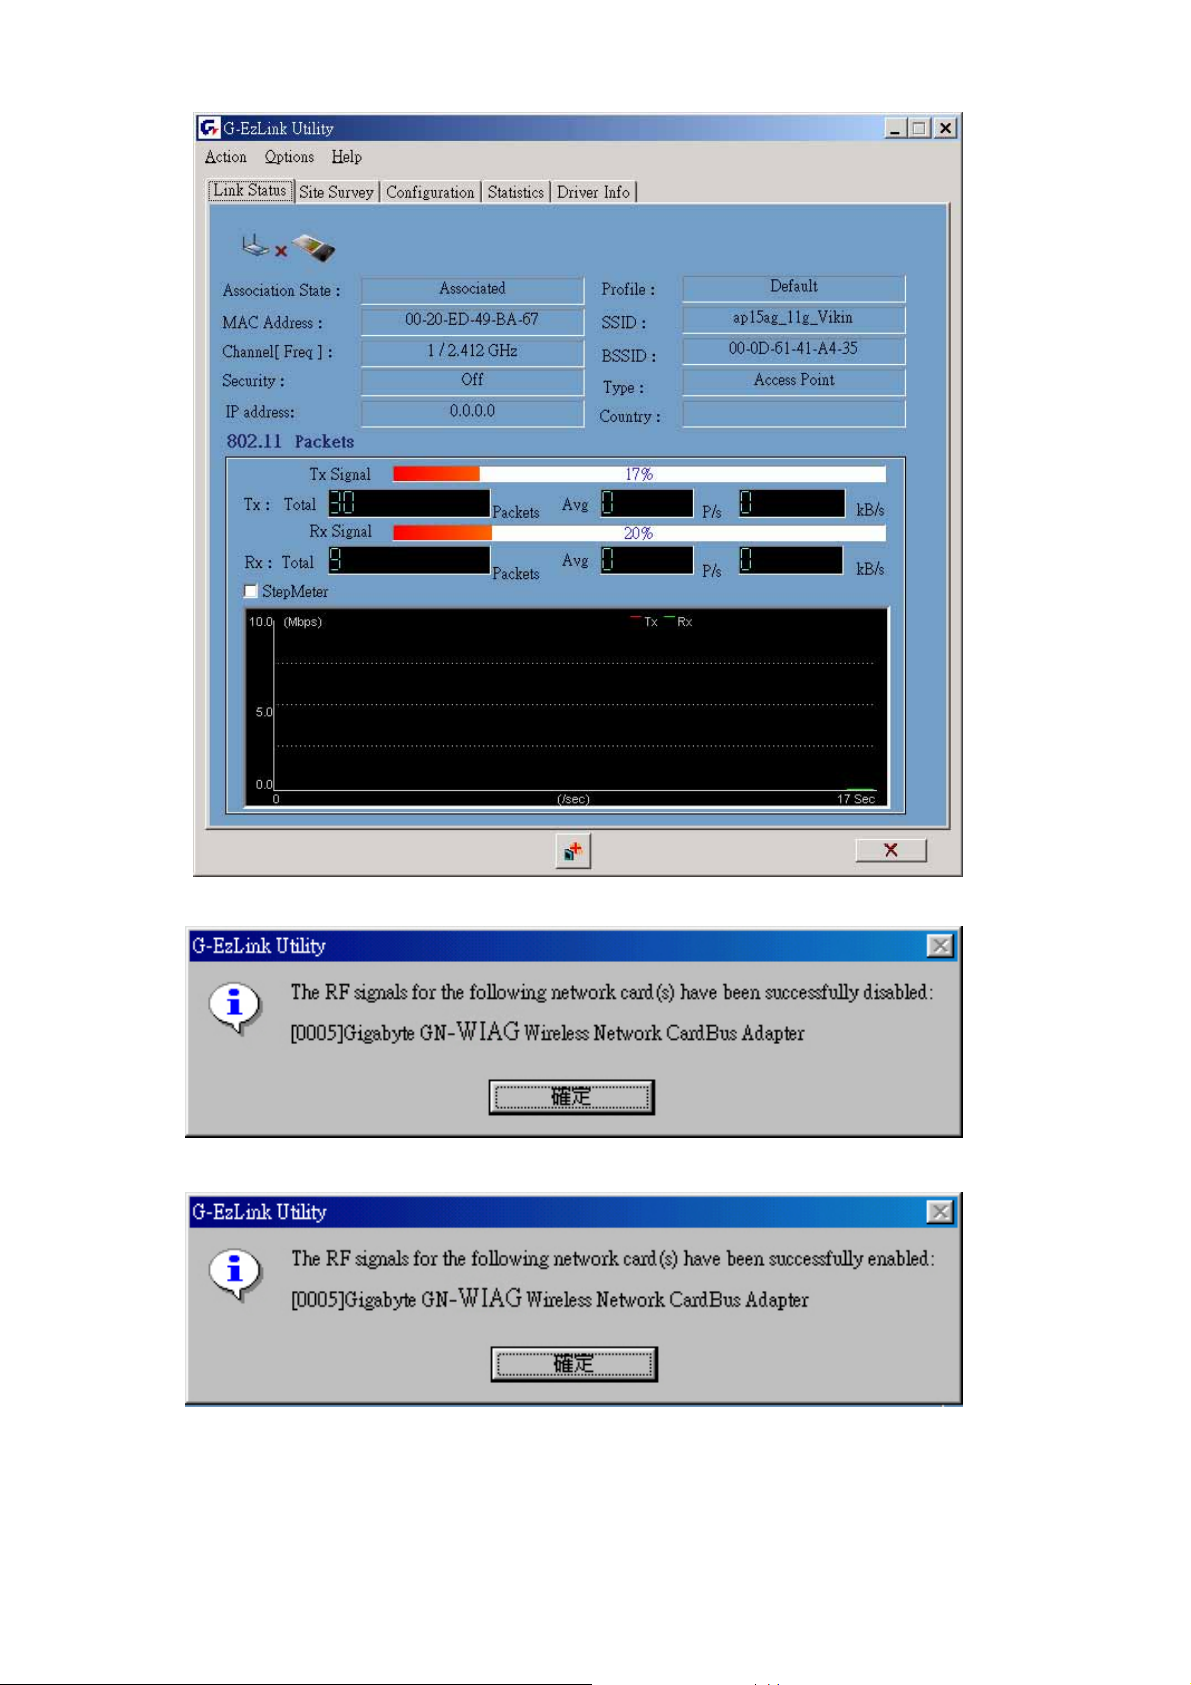
Figure 3-4. Turn off the card’s radio
Figure 3-5 Disabled WLAN Card.
Figure 3-6 Enabled WLAN Card.
Other items reports the following information:
Association State: The field shows you if WLAN card is communicating with an access
point or peer-to peer group. When the card’s network mode is set to Ad Hoc, you can
select a channel from the AD Hoc channel drop-down menu for your Ad Hoc group to use.
14
Page 18

MAC Address: This card’s physical address.
Channel [Freq]: The current channel and center frequency used by the WLAN card.
Security: The current security setting.
IP Address: WLAN Card IP Address.
Profile: various wireless settings for different environments.
SSID: Wireless network name. This is the wireless network name expressed as text string
that all members within the same network share. Devices that don’t share the same
network name cannot communicate with each other.
BSSID: Basic service set identification.
Type: The current network type.
Country: Domain .
15
Page 19
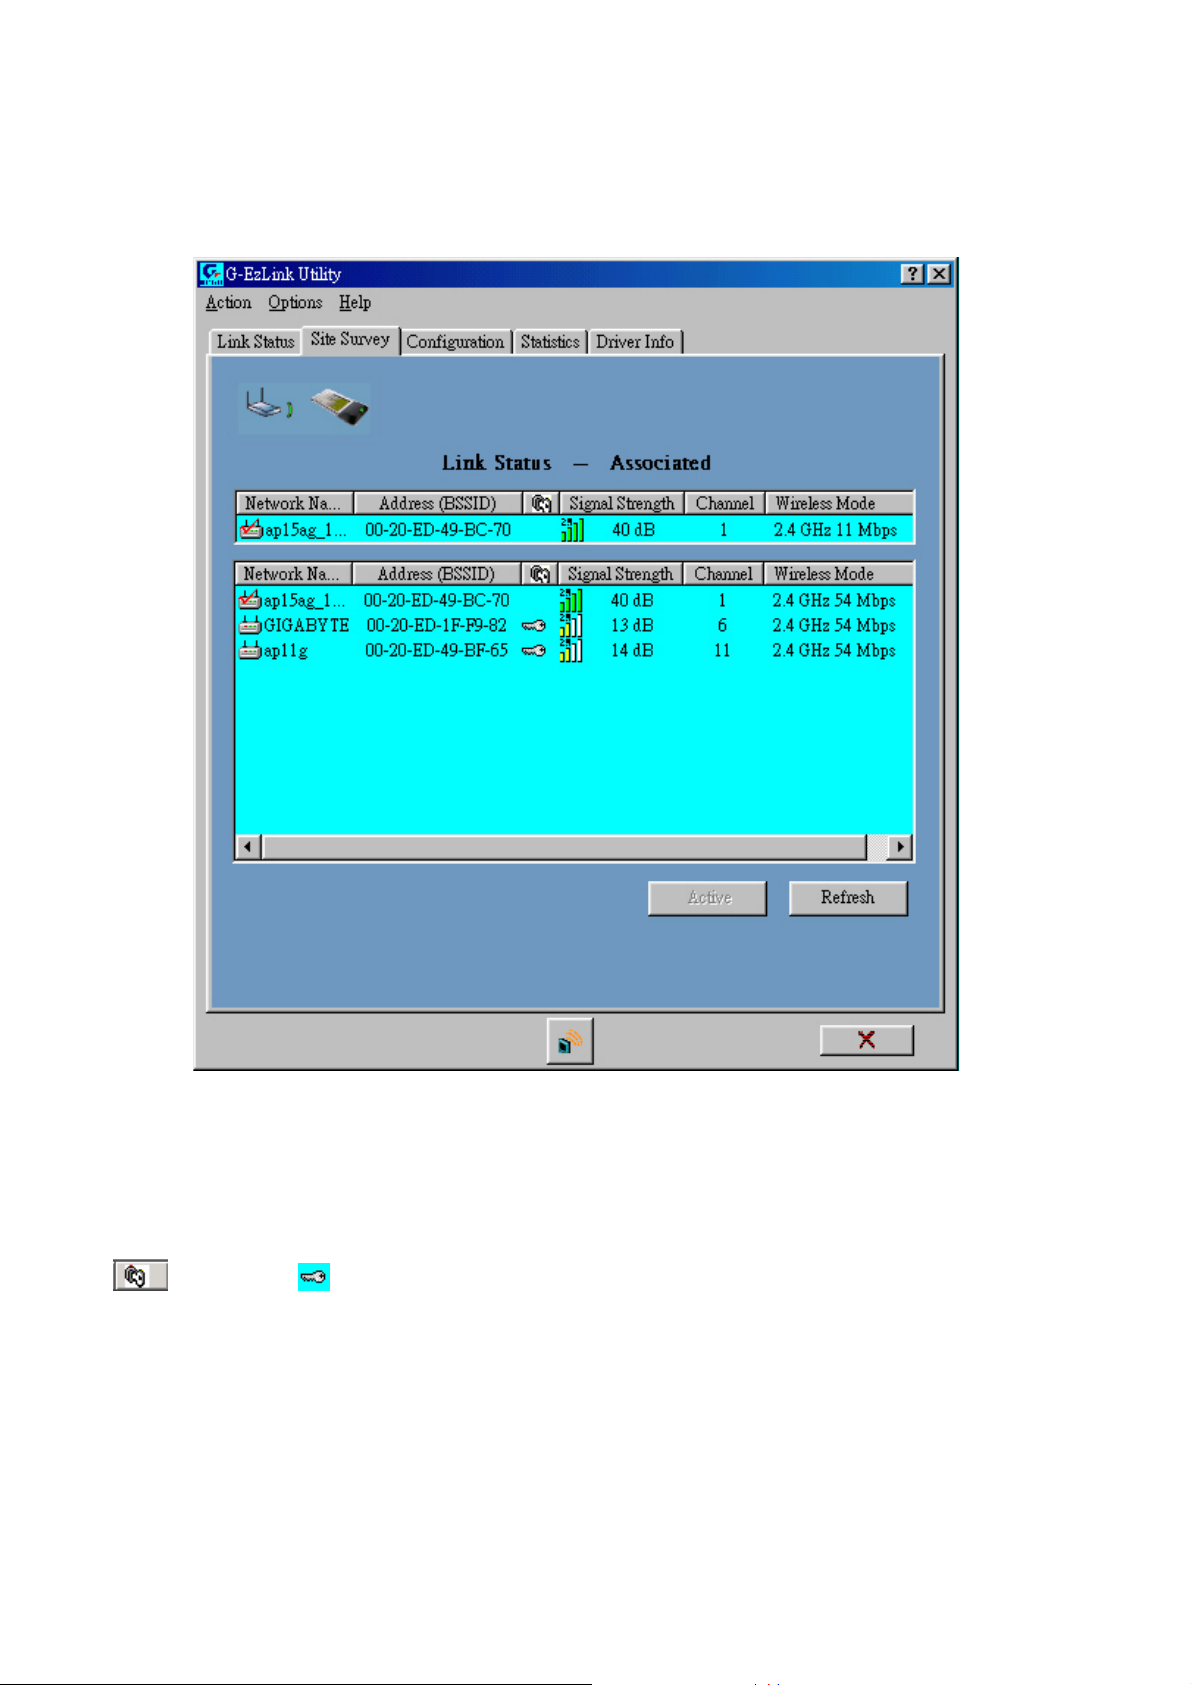
3-2. Site Survey
The “Site Survey” tab shows you the list of reachable access points and/or peer-to-peer
stations. In Fig 3-7, the card one 802.11b and three 802.11g wireless devices.
Figure 3-7. Reachable access points and/or peer-to-peer stations
Other items reports the following information:
SSID: Wireless network name.
BSSID: Basic service set identification.
(Security): (Encrypt data) or not
Signal Strength: It shows the received signal strength from the detected wireless device.
Channel: The current channel number used by the WLAN card.
Wireless Mode: 2.4GHz11Mbps(802.11b) or 2.4GHz54Mbps (802.11g) network.
Refresh: Rescan the available network and then refresh the result.
16
Page 20
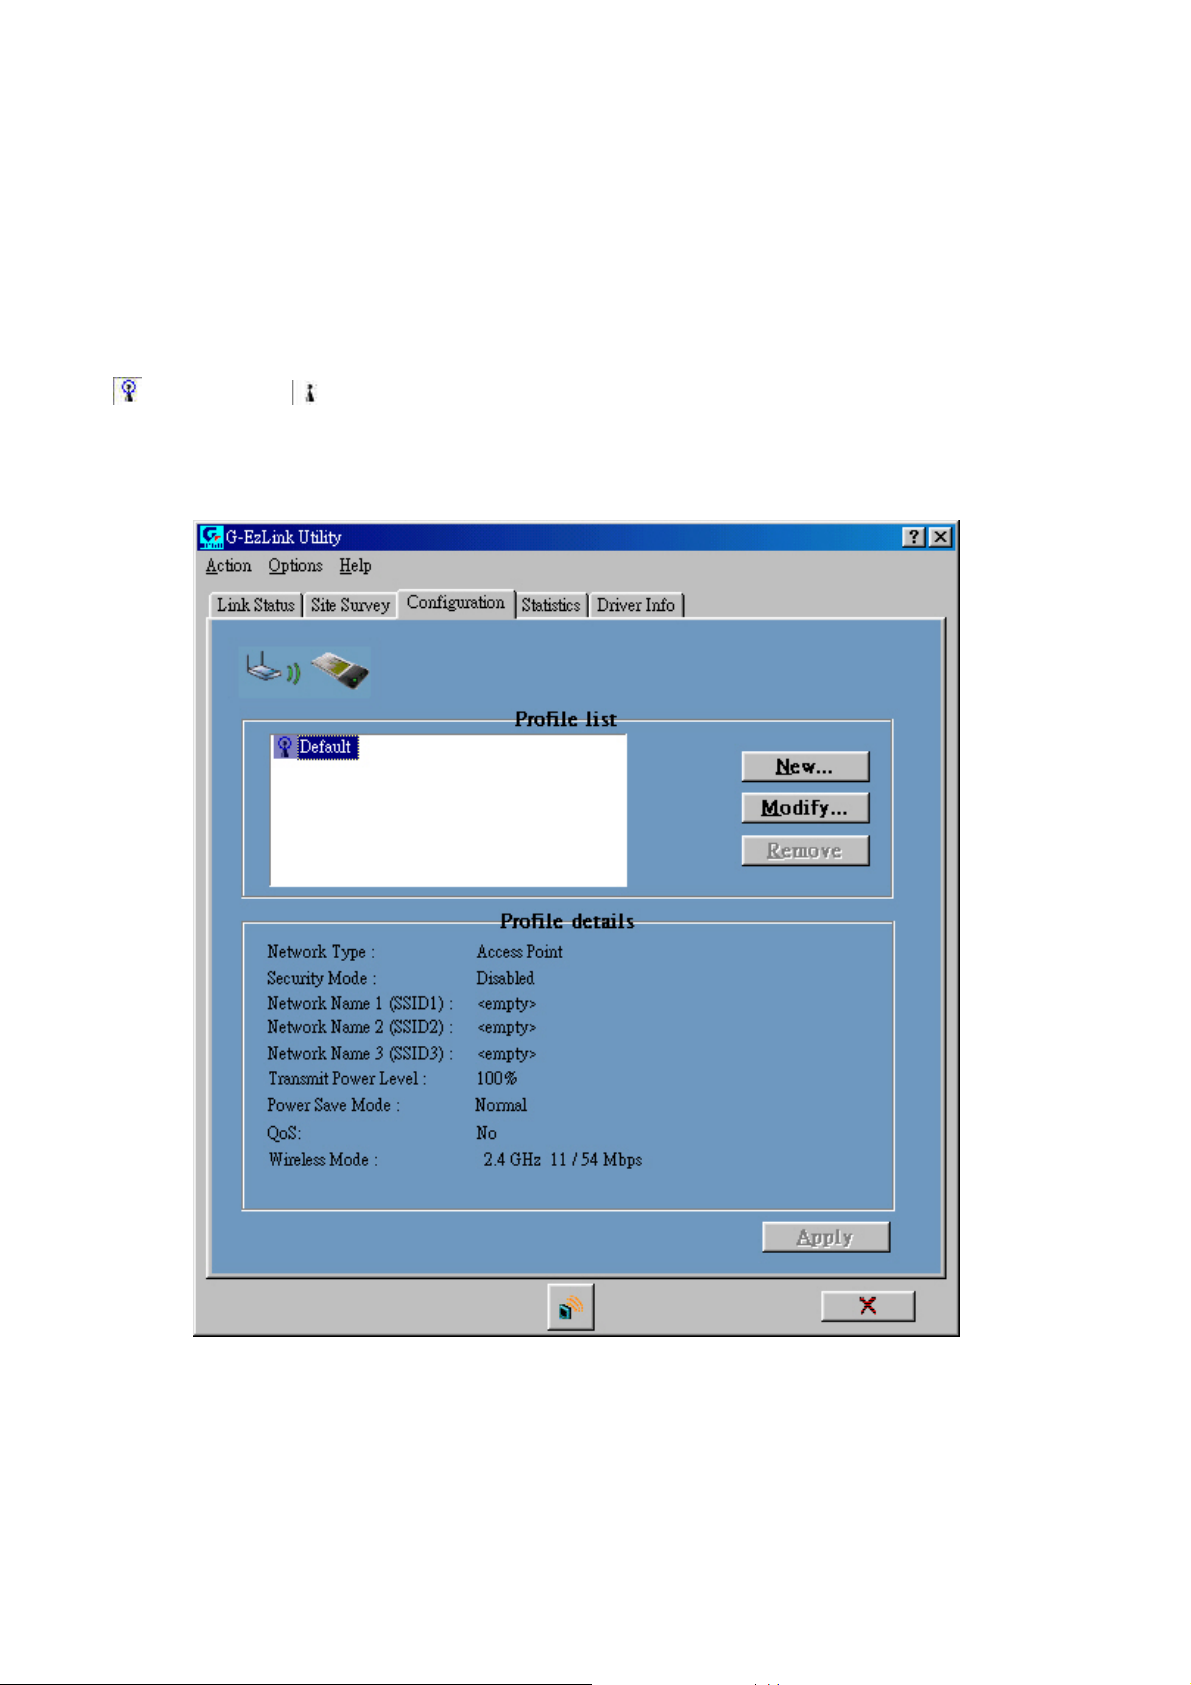
3-3. Configuration
The “Configuration” Tab contains several fields where operating parameters of the driver
can be viewed or changed. Just click “APPLY” button, changes to any of the parameters
in this panel can be applied to the driver without the need to reset the WLAN card. (see
Figure 3-8)
3-3-1. Basic setting:
Profile Name: You can save various wireless settings for different environments.
: Use Profile, : Available Profile.
Network Mode: This field allows you to select the mode from a list of supported network
mode. The modes displayed have two values: “Ad Hoc” and “Access Point”.
Figure 3-8. Configuration
3-3-2. Advance setting:
Click “Modify” button (see Figure 3-9)
17
Page 21
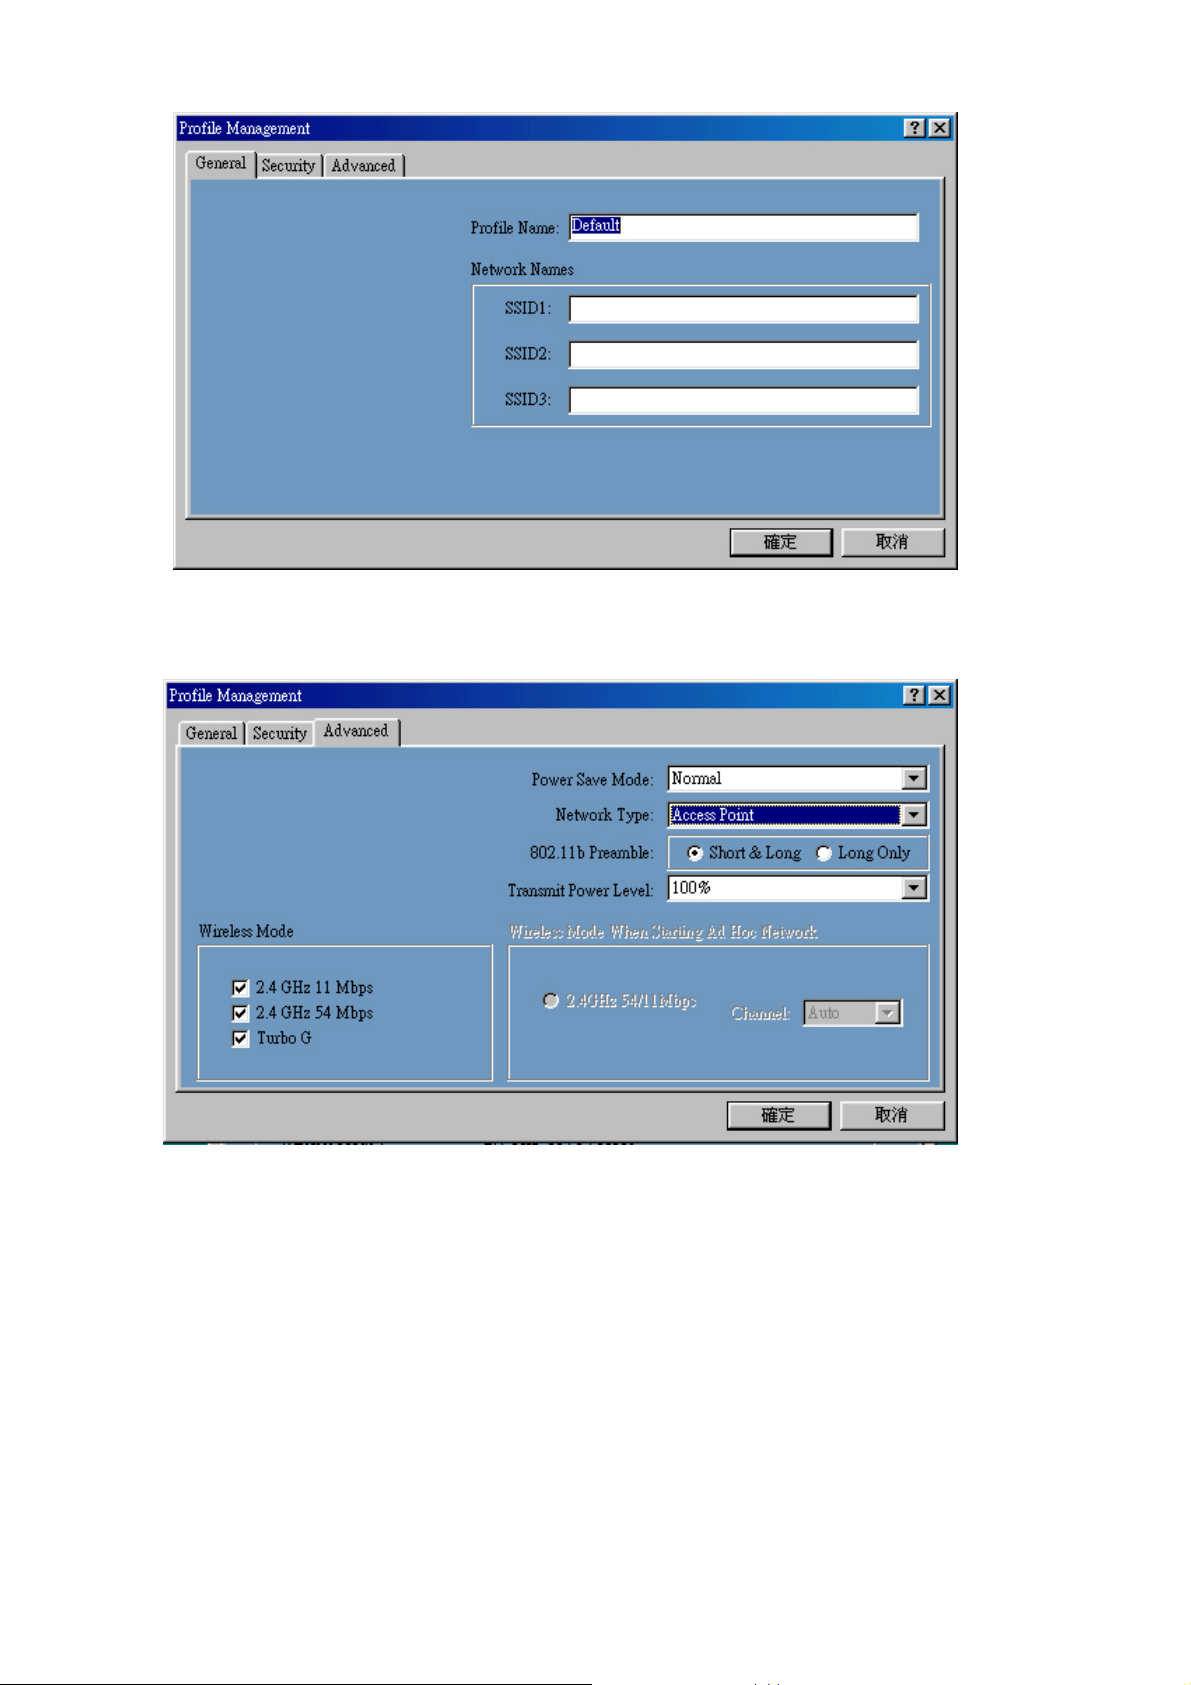
Figure 3-9
Click “Advance” button to enter the advance configuration screen (see Figure 3-10).
Figure 3-10. Advance configuration screen
Power Saving: The card supports advanced power management to extend battery life.
a. When set to “off ”: the card does not use the power saving mechanism.
b. When set to “Normal ”: the card enters into sleep status when it is inactive and only
wakes up periodically to receive some messages from the access point.
c. When set to “ Maximum ”: This case is similar to “Normal ”, but it draws less battery
power as a result of less wake up frequently. This also leads to slower response to
network request.
Wireless Mode: Specifies “2.4GHz 11Mbps”(802.11b) or “2.4GHz 54Mbps” (802.11g)
operation. The WLAN card will automatically select the optimal mode from these selected
wireless modes.
Wireless mode When Starting Ad Hoc Network: Specifies a band to establish an ad
hoc network if no matching SSID is found after scanning all available modes. Here, you
can select three different wireless modes (802.11b, 802.11g) for the communication link.
18
Page 22
802.11b Preamble: Specifies “Short & Long”, or “Long Only” preamble. Allows ad hoc
compatibility with other 2.4GHz devices.
Transmit Power Level: Select 100%, 50%, 25%, 12.5%, or lowest transmit power.
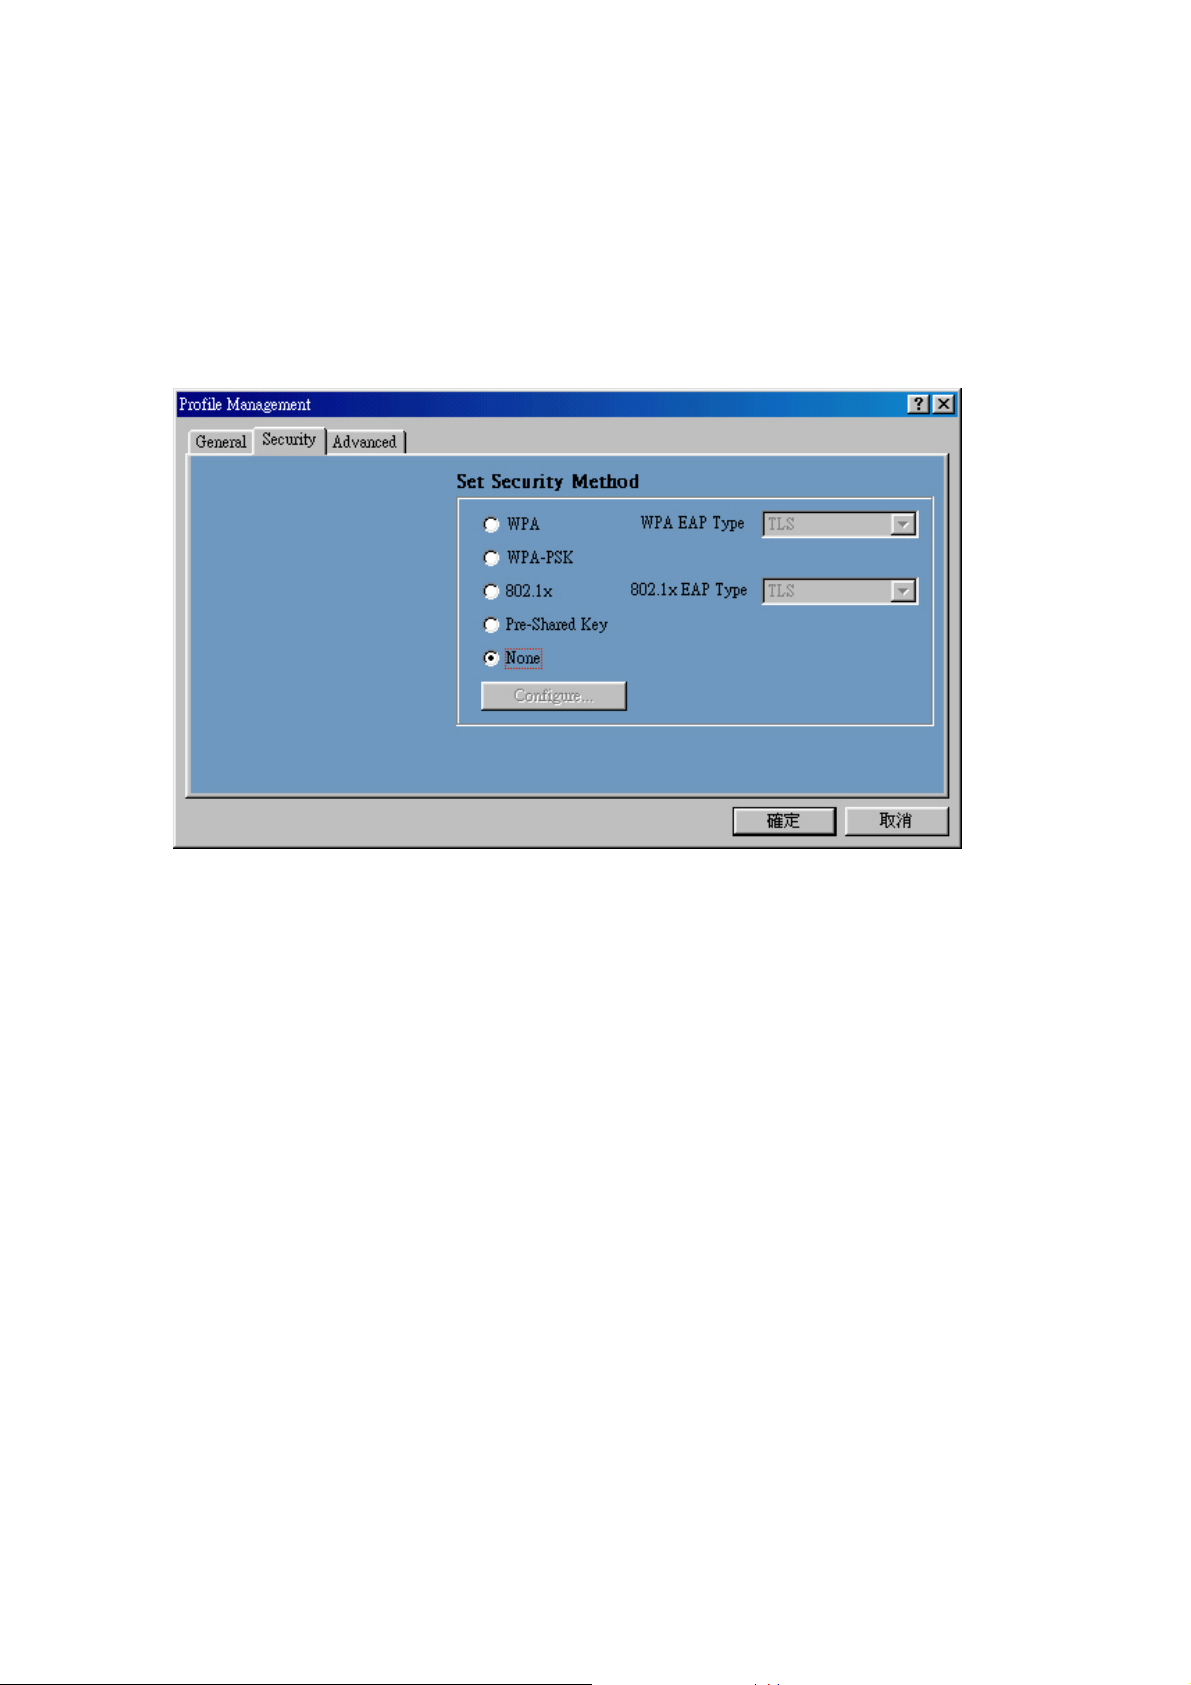
3-3-3. Security setting:
Click “Modify” and “Security” button (see Figure 3-11)
Figure 3-11
This card provides five security options: No security, WEP encryption, WPA-PSK, WPA
security and 802.1x security architecture.
3-3-3-1. No security (None):
Allows the communication between the WLAN card and access point without data
encryption.
3-3-3-2. Use WEP for authentication and encryption(Pre-Shared Keys):
To prevent unauthorized user to access the data on wireless stations, the WLAN Card
offers a secure data encryption, known as WEP (Wired Equivalent Privacy). When you
select this item, the target 802.11 device must has the same encryption keys and be
configured to use encryption in order to communicate with each other. To configure your
WEP encryption, please click “Pre-Shared Keys “then the following window will pop up
(see Figure 3-12).
19
Page 23
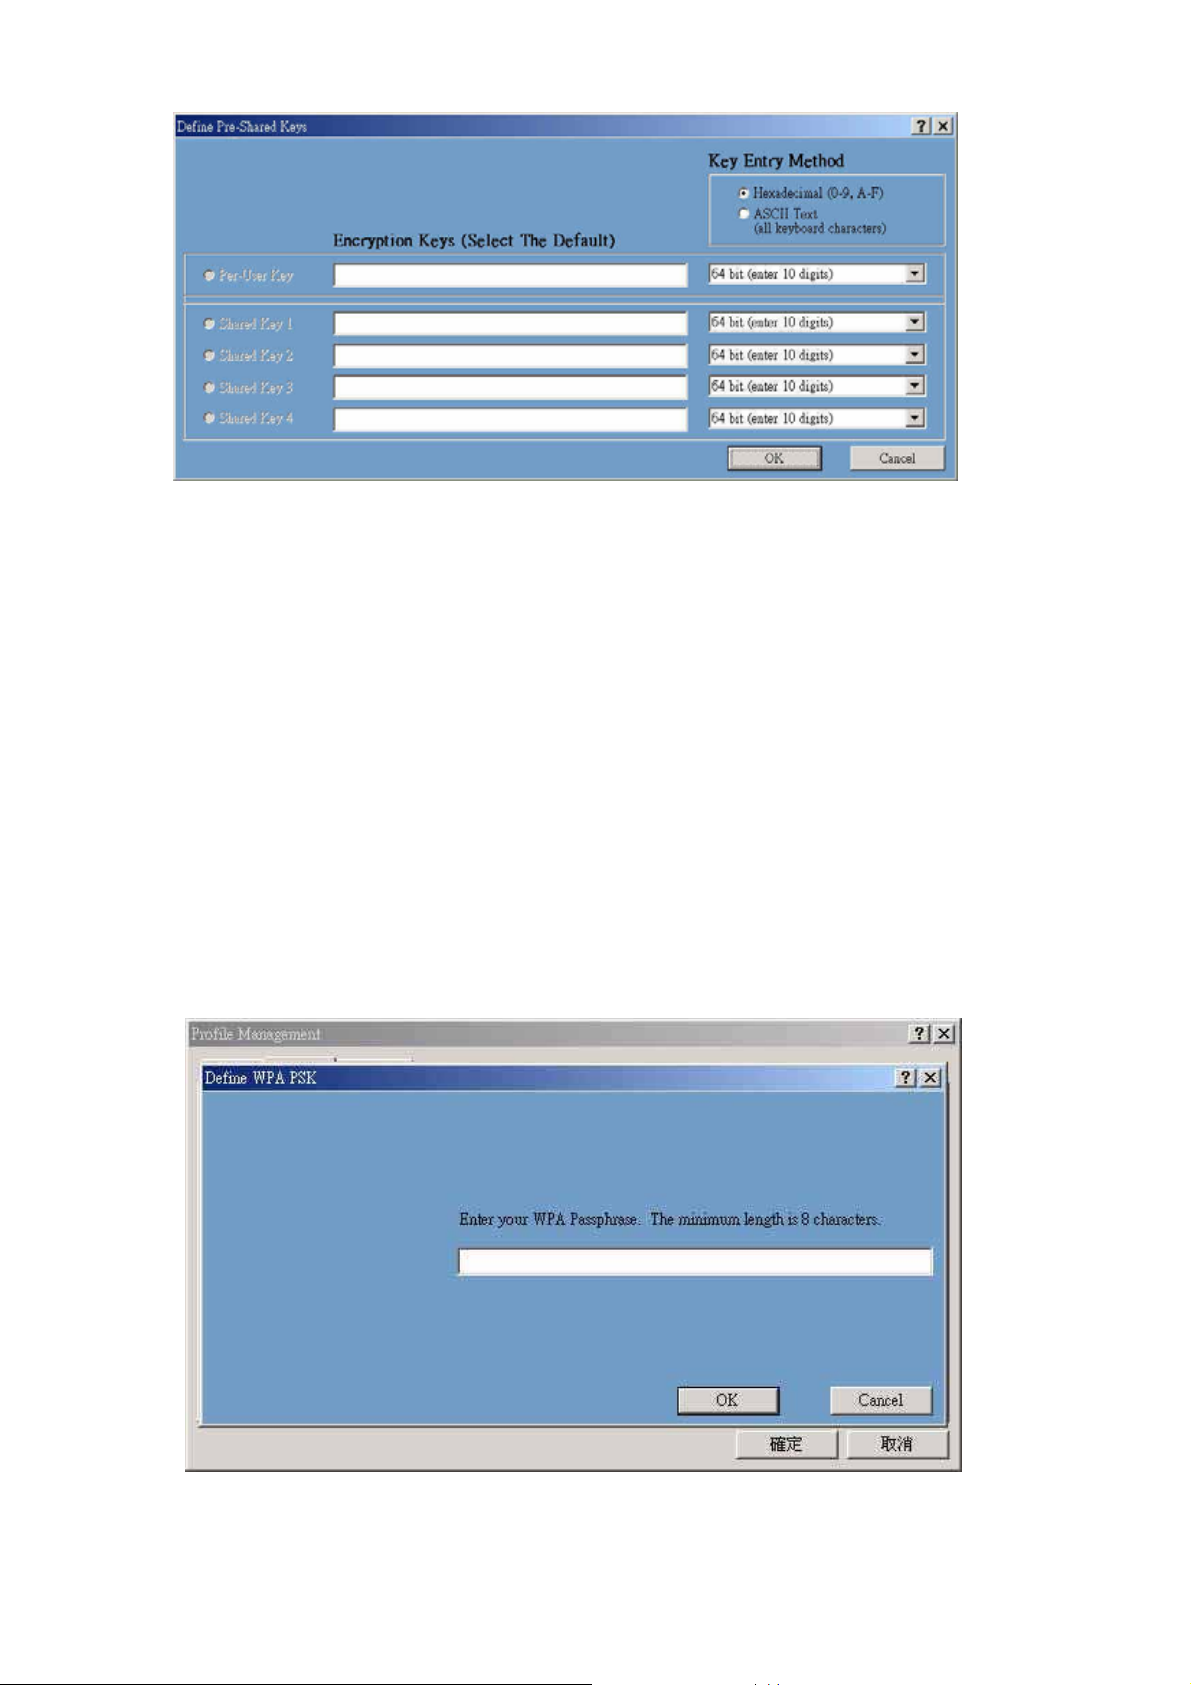
Figure 3-12. Configure WEP Key
To configure your encryption key, please follow these steps:
1. Select a Key Entry Method (Hex or ASCII).
2. Enter one unique encryption key and its key length.
3. Enter one to four different shared keys and their individual key length.
For 64-bit encryption, enter 10 digitals by Hex or 5 characters by ASCII.
For 128-bit encryption, enter 26 digitals by Hex or 13 characters by ASCII.
For 152-bit encryption, enter 32 digitals by Hex or 16 characters by ASCII.
4. Select only a key to encrypt your transmission data.
5. Click “OK” to save these settings.
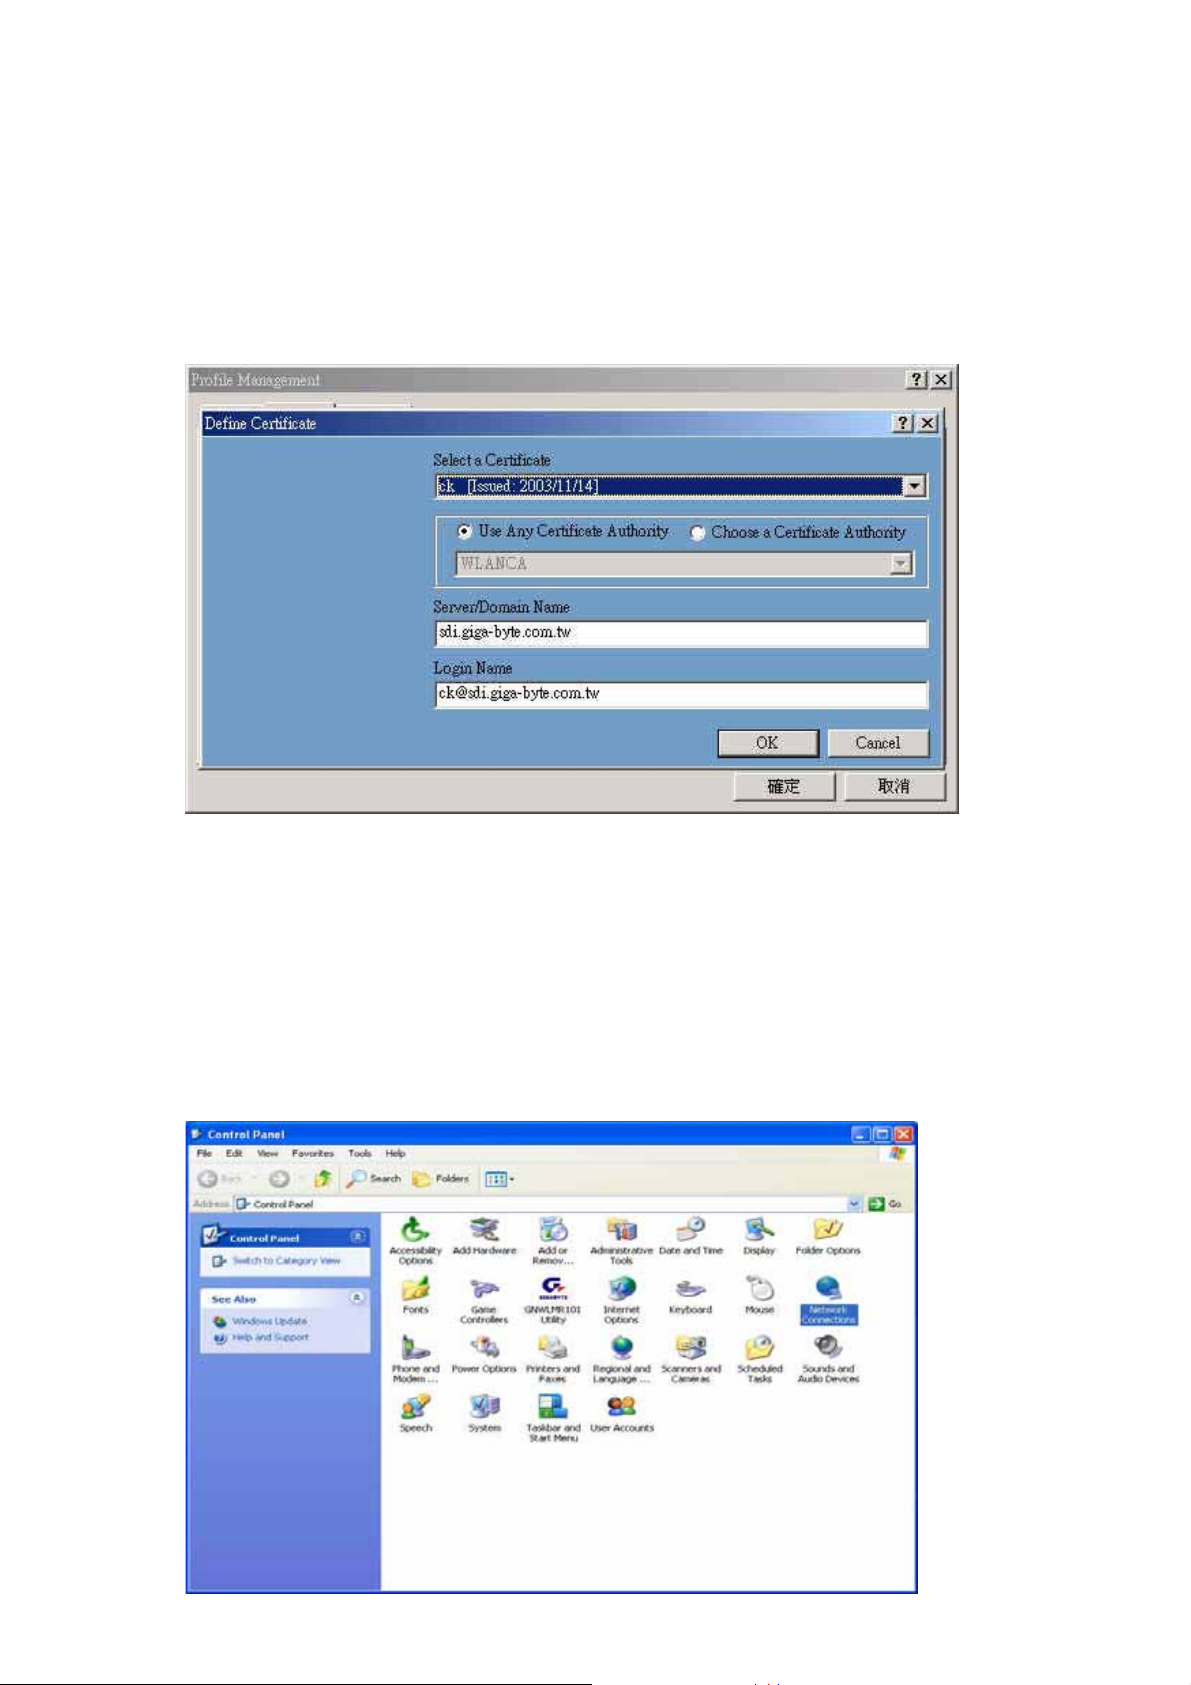
3-3-3-3. Use WPA-PSK Security (WPA Pre-Shared Keys):
When you select this item, the target 802.11 device must has the same encryption keys
and be configured to use encryption in order to communicate with each other. To configure
your WPA-PSK encryption, please click “WPA-PSK “then the following window will pop up
(see Figure 3-13).
Figure 3-13.
Configure WPA-PSK Key
3-3-3-4. Use Dynamic Security (WPA, 802.1X etc.):
WPA & 802.1X is an IEEE security standard for network security access control. It is
20
Page 24
used to control access to wired and wireless networks and dynamically provide keys for
encryption. To use this function, an access point with its WPE or 802.1X function is
required to act as an intermediary between WLAN card and the network’s RADIUS
(Remote Authentication Dial-In User Service) server. The access point blocks all traffic
from the card until the server has authenticated it. please follow these steps:
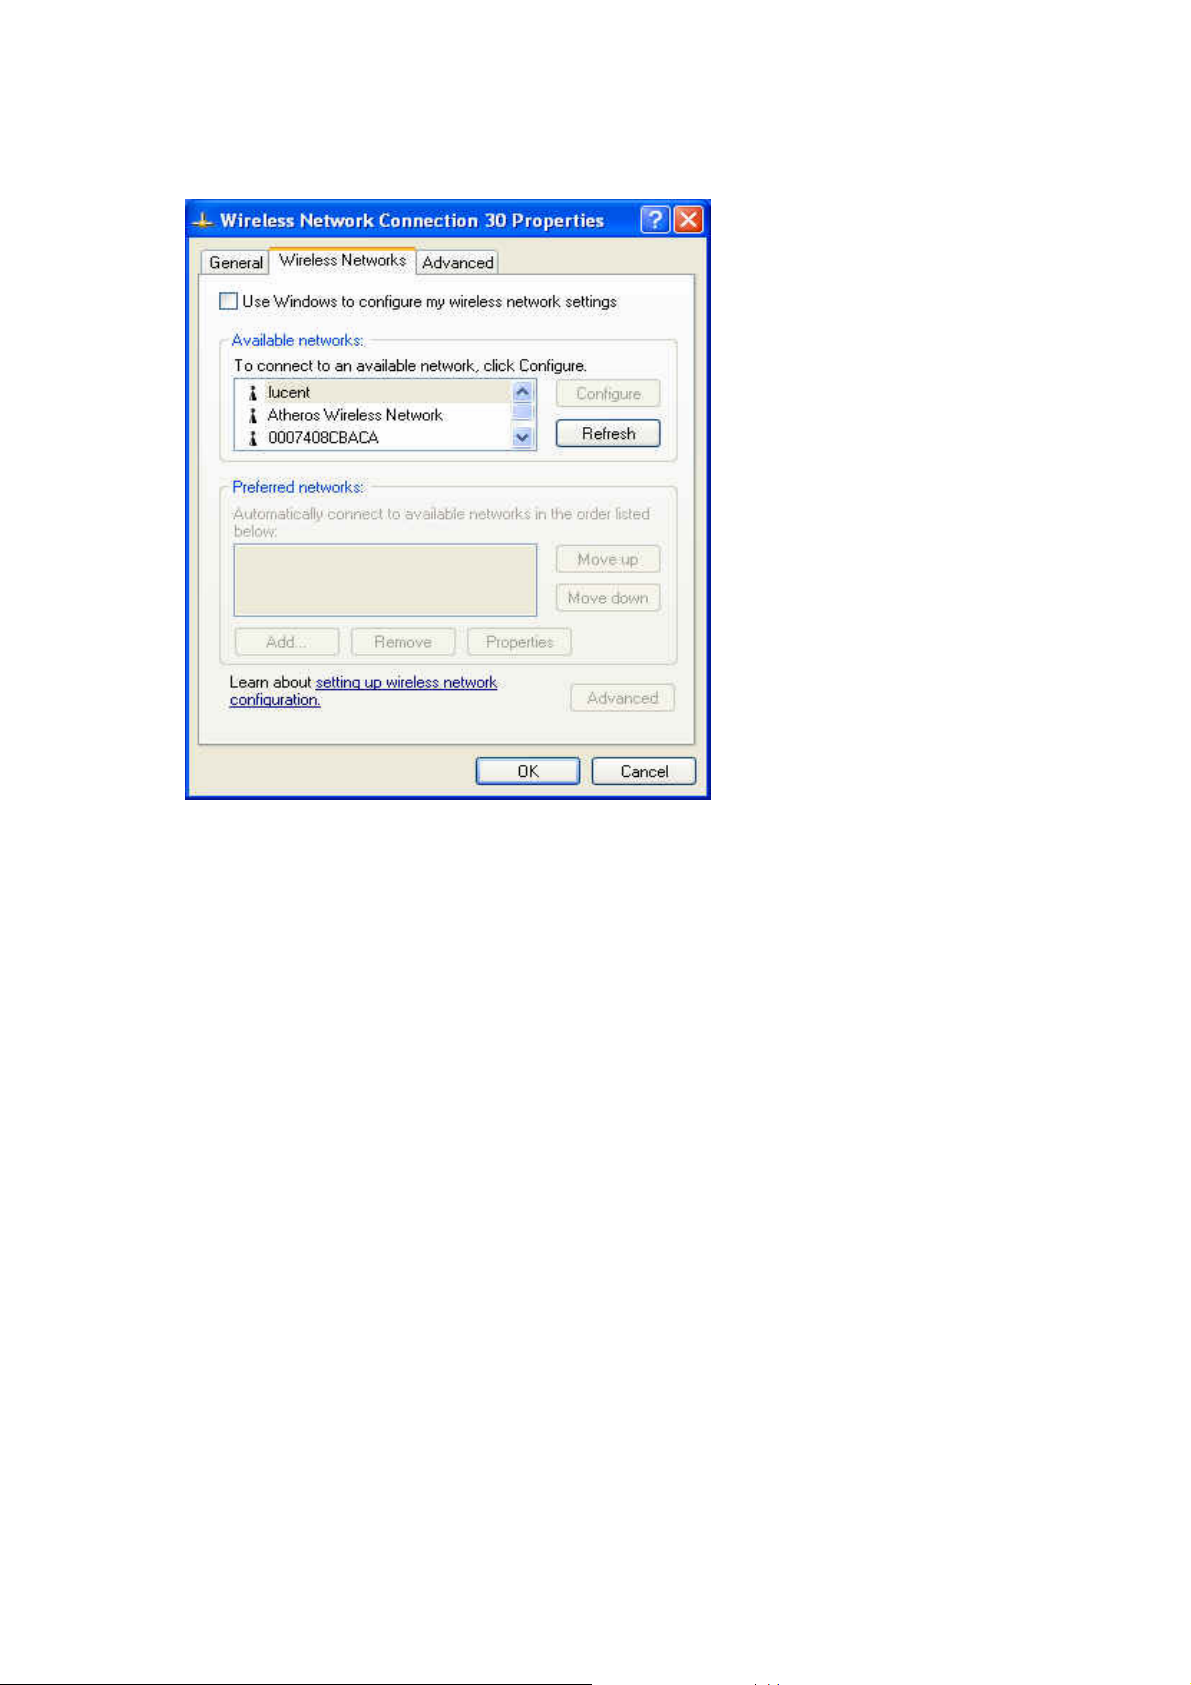
Step 1: Download Certificate.
Step 2: please click “WPA “ or “802.1x “then the following window will pop up (see Figure
3-14).
Figure
3-14. Configure WPA or 802.1X
Please follow these steps:
Step 1: Select a Certificate.
Step 2: Key-in Server(RADIUS).
Step 3: Key-in Login name.
Step 4: Click “OK” to save these settings.
Microsoft Windows XP operation system, please follow these steps:
Step 1: 「Control Panel」run「Network Connections」 (see Figure 3-15).
Figure 3-15. Control Panel
21
Page 25
Step 3: Setup Wireless LAN card(see Figure 3-16), Click ”Use Windows to configure” to
cancel the schedule and Click「OK」.
Figure 3-16. Wireless Networks
22
Page 26
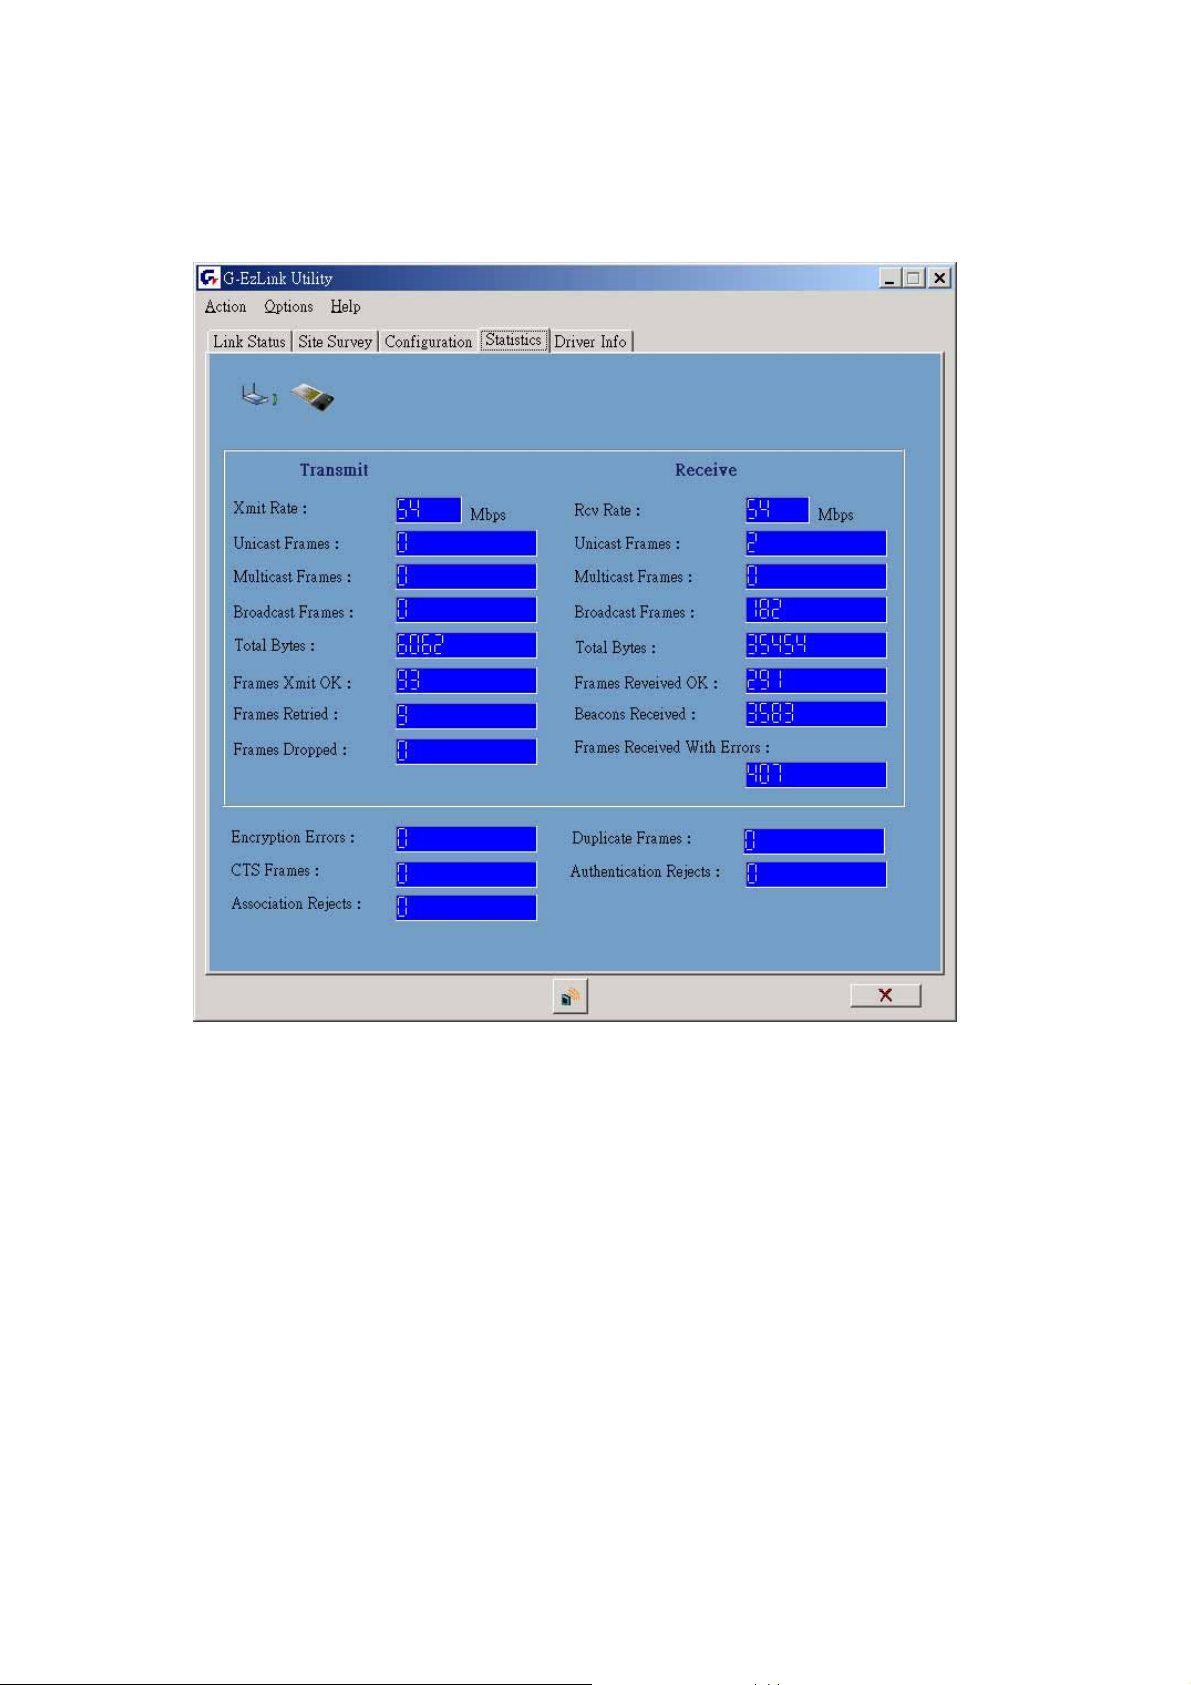
3-4. Statistics
The “Statistics” tab shows you the number of packets sent and received by the card(see
Figure 3-17).
Figure 3-17. The statistic number of packets sent and received by the card
23
Page 27
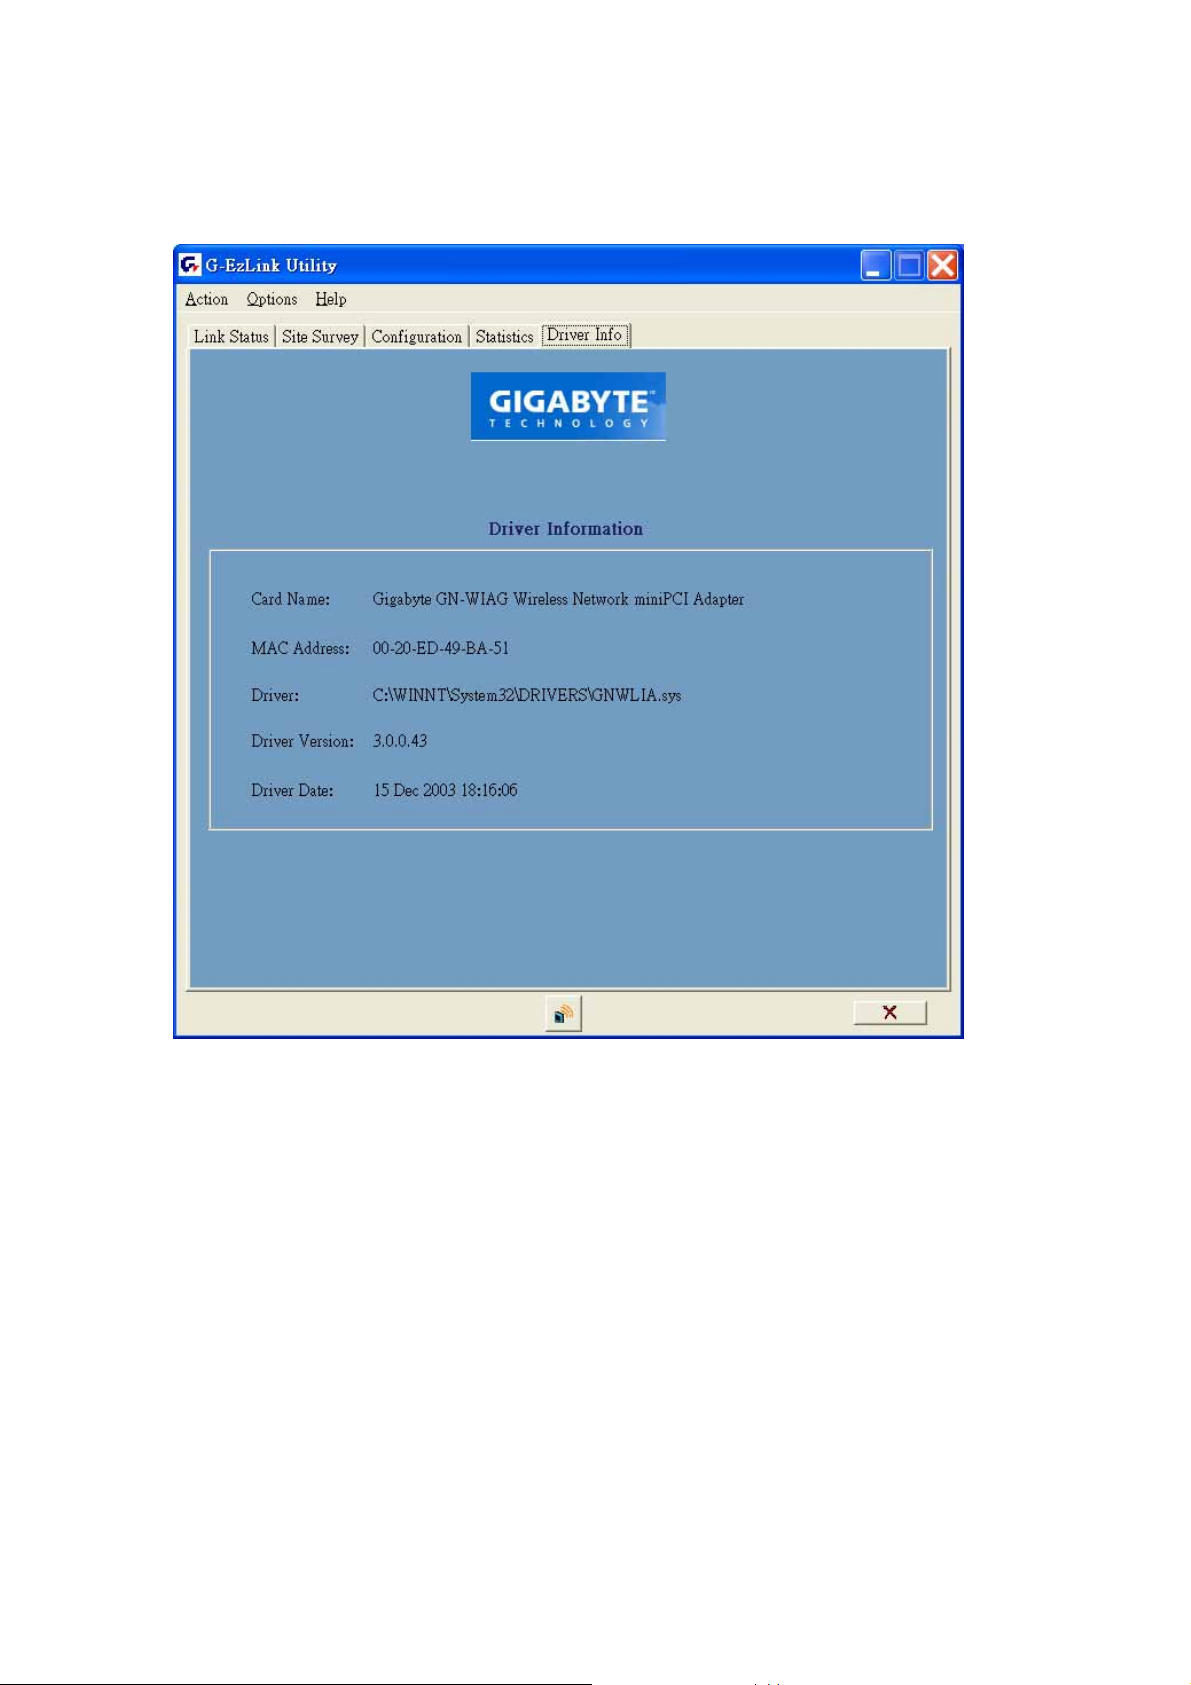
3-5. Driver Info
The “Driver Info” tab shows you the information of the card’s driver(see Figure 3-18).
Figure 3-18. Driver’s information
24
Page 28
Chapter 4 Troubleshooting
This troubleshooting guide provides answers to some common problems which you may
encounter while installing or using GIGABYTE WLAN card products.
These problems requires simple troubleshooting that you can perform by yourself.
Contact the WLAN Technical Support if you encounter problems not mentioned in this
section.
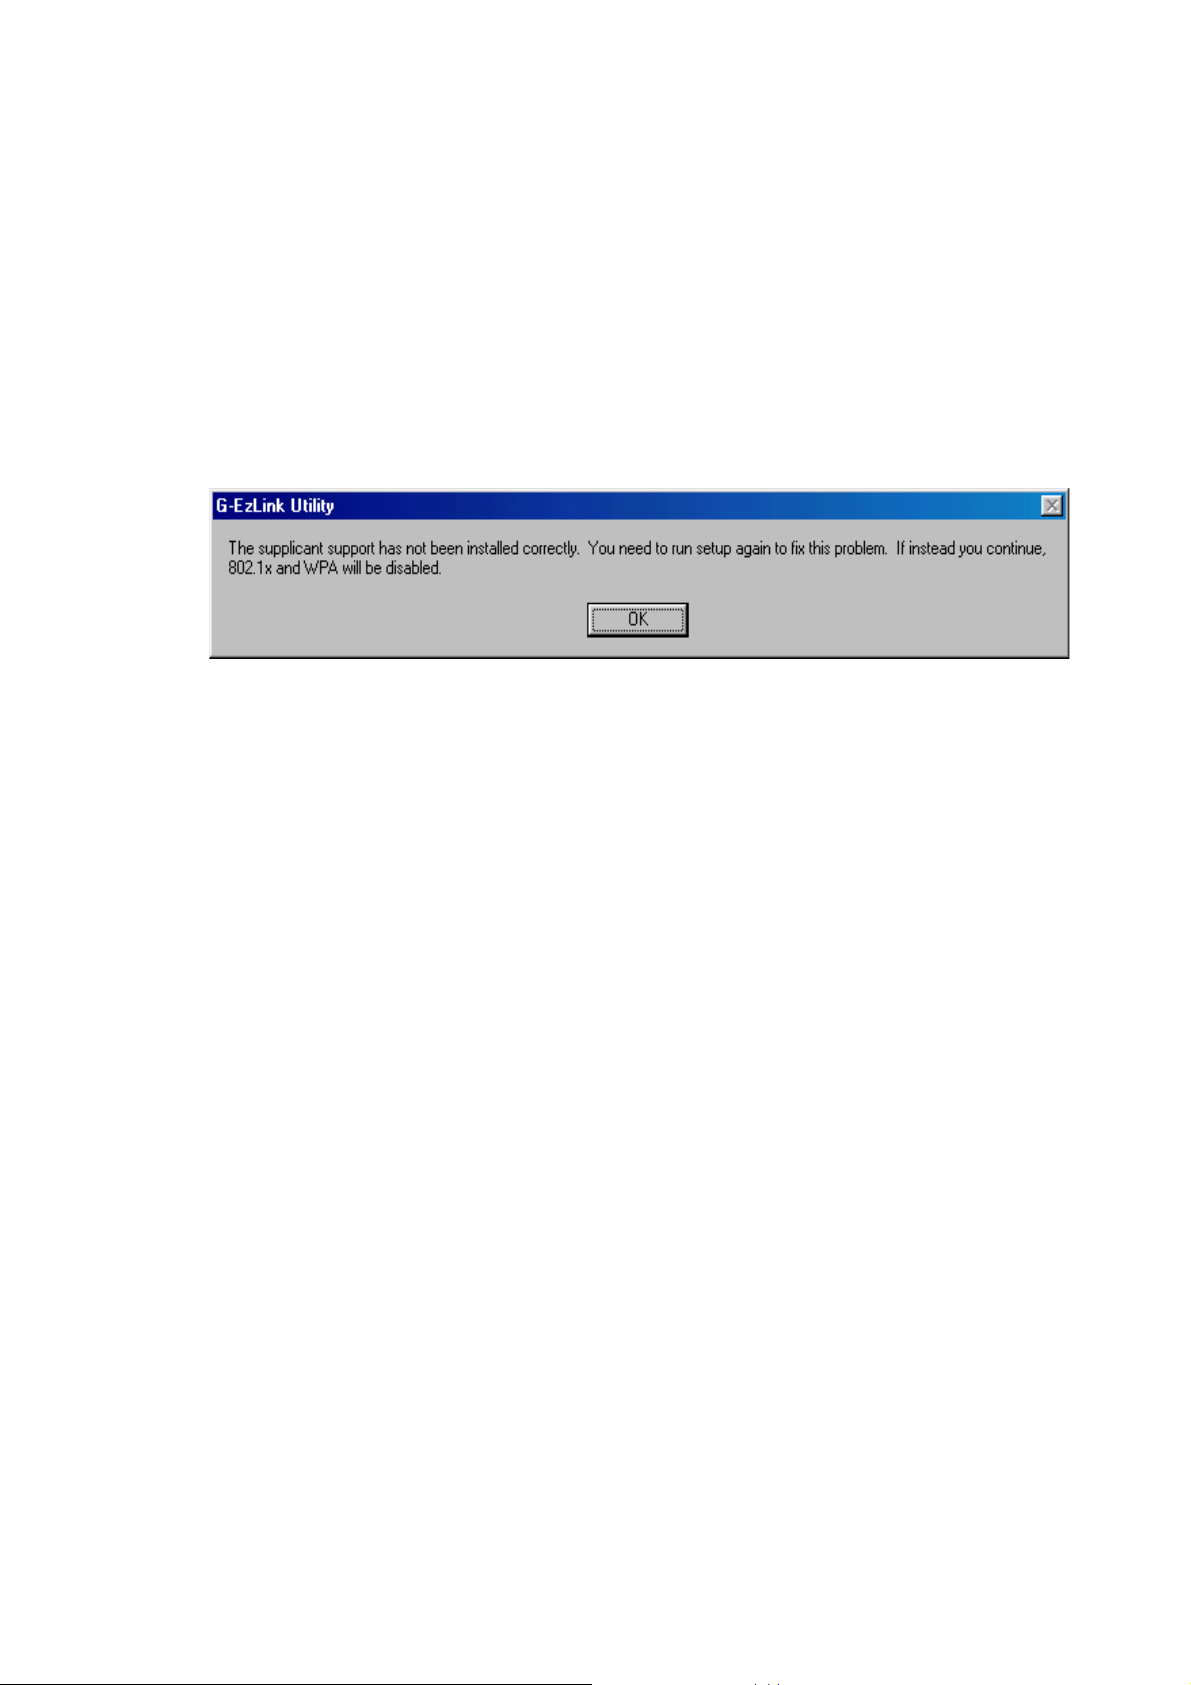
You are “802.1x”, “WPA” and “WPA-PSK” can not be selected
z If the utility shows the following window and the security option “802.1x”, “WPA”
and “WPA-PSK” can not be selected.
z Windows XP and Windows 2000:
1. Insert the CD.
2. Launch the program at \WPA\Win2kXP\AegisI5.exe
3. Click Install
z Windows 98SE:
1. Insert the CD.
2. Launch the program at \WPA\win9x\AegisI2.exe
3. Click Install
z Windows ME:
1. Right click on “Network Place”
2. Click “Add”
3. Select “Protocol” and click “Add”
4. Click “Have Disk”
5. Select the directory \WPA\WPA_FIX_ME
6. Reboot
I cannot connect to an AP
z Check if the WLAN has the some Service Set Identifier (SSID) as that of The AP.
z Check if the WLAN card and the AP have the same Encryption. if WEP or WPA
encryption is enabled, set the same WEP or WPA keys for the WLAN and AP.
z Check if the MAC address of the WLAN card is added in the AP Authorization
Table. Inquire this with your LAN administrator.
I can connect to an AP but I cannot connect to the internet
z Check if the WLAN card and the AP have the same Encryption. if WEP or WPA
25
Page 29

encryption is enabled, set the same WEP or WPA keys for the WLAN and AP.
z Make sure the network protocol parameters (IP address, subnet mask, gateway,
and DNS) of your computer are correctly set.
z Check the proxy settings of the WEB browser.
I always have poor link quality and low signal
z Keep the WLAN card away from microwave ovens and large metal objects to
avoid radio interference.
z Shorten the distance between the WLAN card and the AP or station.
26
Page 30
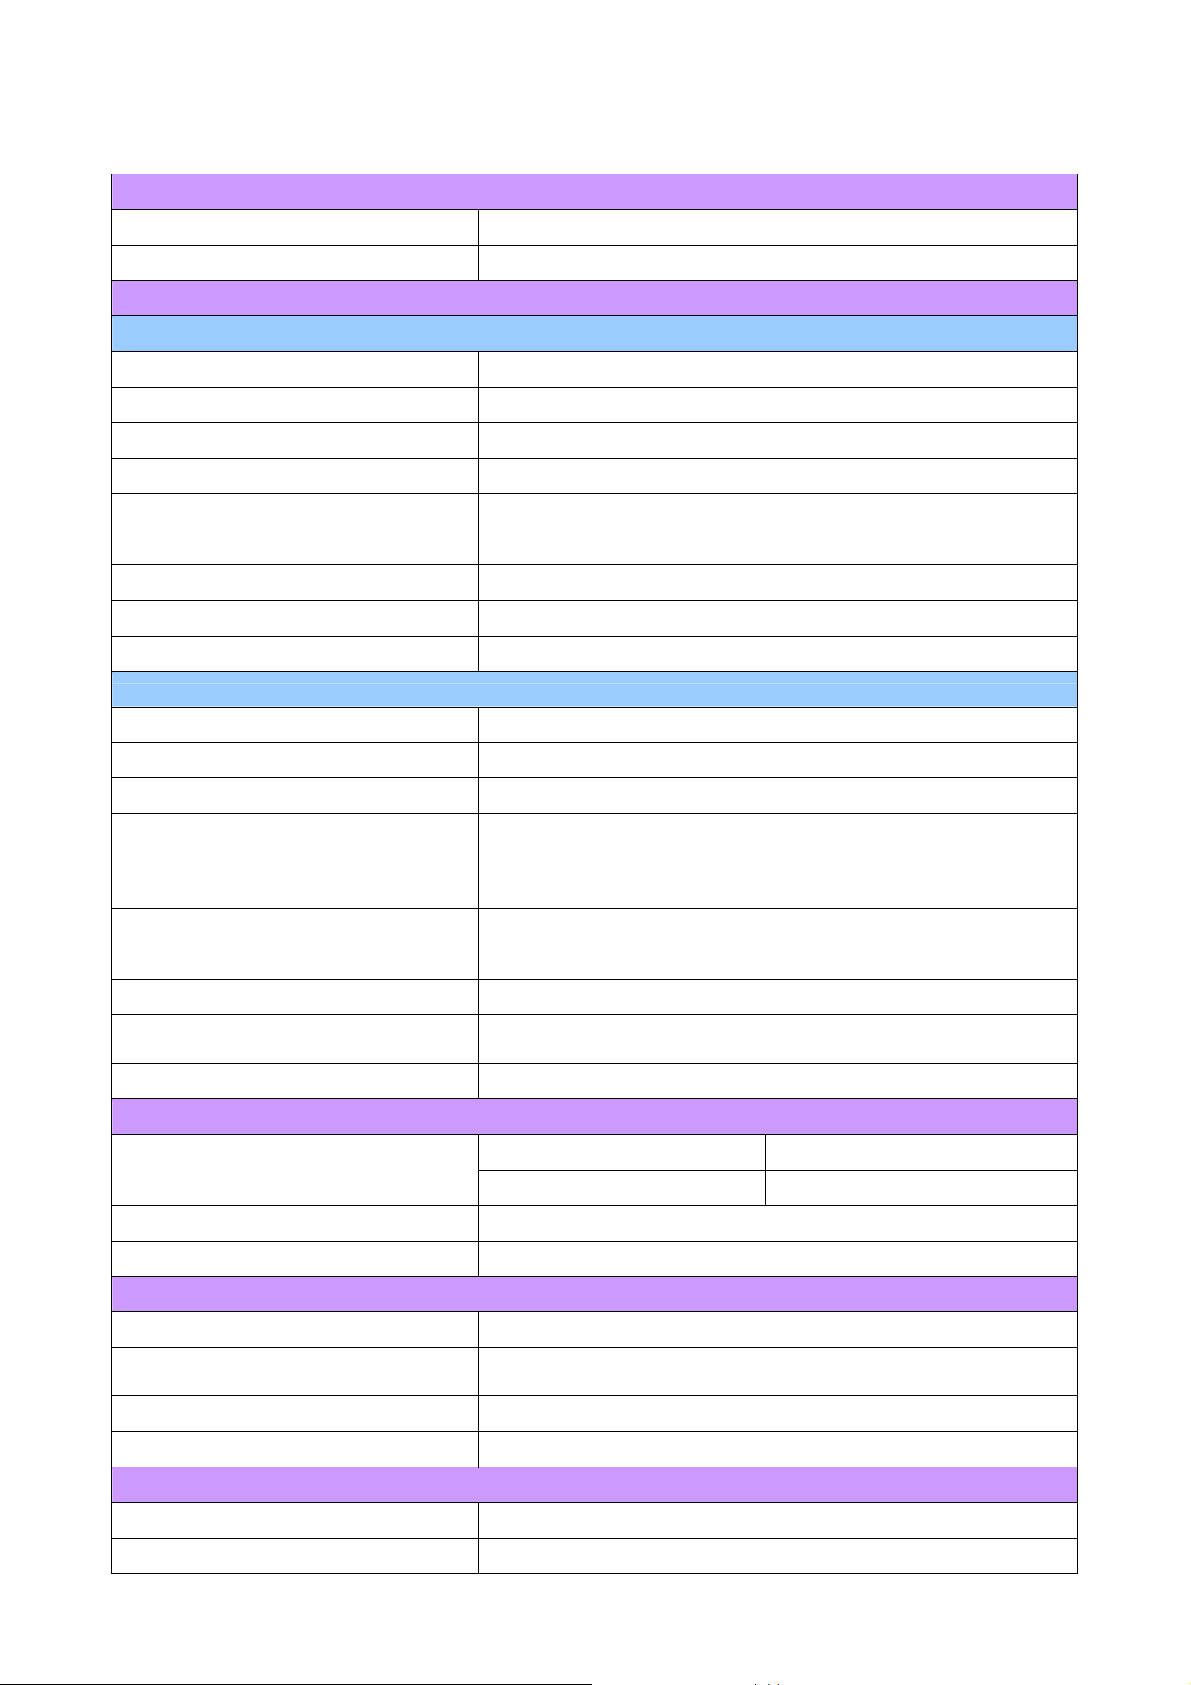
Chapter 5 Specification
1. System
Host Interface Mini-PCI Type III B
Operating Voltage
2. RF Performance
802.11B
Frequency Band 2412 ~ 2484 MHz (subject to local regulation)
Modulation Technology DSSS (Direct Sequence Spread Spectrum)
Modulation Techniques CCK, DQPSK, DBPSK
Date Rates 11, 5.5, 2, 1Mbps, auto fallback
Typical Power Consumption
Peak Output Power 25dBm @ Nominal Temp Range
Minimum Receive Sensitivity -85dBm @ 11 Mbps, Nominal Temp Range
Antenna external antennas supporting diversity
802.11G(BACKWARD COMPATIBLE TO 802.11B)
Frequency Bands 2412-2484 MHz (subject to local regulations)
3.3VDC ± 5%
Doze: 25mA
Receive: 250mA
Transmit: 560mA
Modulation Technology OFDM and DSSS
Modulation Techniques 64QAM, 16QAM, QPSK, BPSK, CCK, DQPSK, DBPSK
Date Rates Base mode: 54, 48, 36, 24, 18,12, 9, 11, 6, 5.5, 2, and 1 Mbps,
auto fallback
Turbo mode: 108, 96, 72, 48, 36, 24, 18 and 12 Mbps auto
fallback
Typical Power Consumption
Peak Output Power 27dBm @ Nominal Temp Range
Receive sensitivity Minimum -73dBm; typical -75dBm @54Mbps, Nominal Temp
Antenna external antennae supporting diversity
3.Safety Regulation and Operating Environment
EMC certification
Temperature Range Operating: 0 ~ 55 deg C, Storing: -20 ~ 65 deg C
Humidity Max. 90% Non-condensing
4. Software Support
Driver Windows 98SE/Me/2000/XP
Security
Doze: 25mA
Receive: 250 mA
Transmit: 530 mA
Range
FCC Part 15 (USA) DGT (Taiwan)
CE (Europe)
WPA; AES; 802.1X client for Windows XP;
64/128/152 bit WEP
Roaming Seamless roaming among 802.11b/g access points.
Management Utility Monitors the network situation.
5. Mechanical
Dimensions 59.6mm*44.45mm*3.50mm ± 0.15mm
Weight 12 ± 0.5 g
27
Page 31

Packaging
* Subject to Change without Notices
Packaging specially used by Gigabyte.
28
Page 32

FCC Statements:
1. This device complies with Part 15 of the FCC rules. Operation is subject to the
following two conditions:
(1) This device may not cause harmful interference, and
(2) This device must accept any interference received, including interference
that may cause undesired operation.
2. This device and its antenna(s) must not be co-located or operating in conjunction
with any other antenna or transmitter.
3. Changes or modifications to this unit not expressly approved by the party
responsible for compliance could void the user authority to operate the equipment.
4. This device is for OEM installation only, the End User manual shall not contain
informationabout how to install the module.
5. This compliance to FCC radiation exposure limits for an uncontrolled environment,
and minimum of 20 cm separation between antenna and body.
6. Only the type of antenna tested may be used.
7. The end product must carry a label stating "Contains TX FCC ID:JCK-GN-WIAG02 ".
 Loading...