

Page 1
AirCruiser MIMO Router
GN-BR03GM
User’s Guide
November 2005 - Revision 1.0
Page 2

Page 3

GN-BR03GM AirCruiser MIMO Router
Contents
Chapter 1 Getting To Know Your BR03GM..................... 1
Overview................................................................................................1
Package Contents.................................................................................1
Side Panel..............................................................................................2
LEDs.......................................................................................................3
Key Features .........................................................................................4
Chapter 2 Wireless Networking....................................... 5
Chapter 3 Before You Start.............................................. 6
What Y ou Will Need...............................................................................6
Chapter 4 Connecting the BR03GM .............................7
Overview................................................................................................7
Using a Wired Connection...................................................................7
Using a Wireless Connection ..............................................................8
Chapter 5 Connecting the Router to the Internet .......... 9
Overview................................................................................................9
Logging into the GN-BR03GM.............................................................9
Chapter 6 Advanced Setup............................................12
Overview..............................................................................................12
The Status Page..................................................................................12
The Network Configuration Screen...................................................17
The Wireless Configuration Screen..................................................25
The Static Routing Table Screen.......................................................31
The Virtual Server Screen..................................................................32
The Firewall Rule Screen ...................................................................35
The DNS Configuration Screen.........................................................37
i
Page 4

GN-BR03GM AirCruiser MIMO Router
The URL Blocking Configuration Screen.........................................38
Chapter 7 Using Management Tools.......................... 39
Overview..............................................................................................39
The PPP Monitor Screen....................................................................39
Manage Port Configuration Screen...................................................39
The Reboot Screen.............................................................................40
The Initialization Screen.....................................................................41
The Change Password Screen..........................................................41
The Change WAN MAC Screen .........................................................42
The Upgrade Firmware Screen..........................................................43
The Backup / Restore Screen............................................................43
The Log Information Screen..............................................................44
The Save Maintenance Screen..........................................................46
The Ping Screen..................................................................................47
The Help Screen..................................................................................47
The About Screen...............................................................................48
Appendix A FAQ............................................................. 49
Appendix B Using Setup Wizard................................... 51
Appendix C Configuring TCP/IP Settings..................... 56
Appendix D Troubleshooting........................................ 59
Appendix E Glossary.....................................................63
Appendix F Specifications............................................. 67
Appendix G Warranty..................................................... 69
Appendix H Regulatory Information............................. 70
Appendix I General Public License............................... 72
ii
Page 5

GN-BR03GM AirCruiser MIMO Router
Chapter 1
Getting To Know Your BR03GM
Overview
The GN-BR03GM AirCruiser MIMO (Multi-Input & Multi-Output) ** router
includes several devices in one box. First, there's the Wireless Router, which
lets you connect Wireless-G or Wireless-B devices to the network.
There's also a built-in 4-port full-duplex 10/100 Switch to connect your
wired-Ethernet devices. Connect four PCs directly, or daisy-chain out to more
hubs and switches to create as big a network as you need. This router equip
with powerful firewall and DoS protection, which can give the user maximum
protection to prevent from damage by malicious internet user. The UPnP and
MSN messenger support can provide the environment for user to surfing
internet without any trouble.
This product operates in 2.4 GHz frequency bands, providing fast (up to 54
Mbps) and secure (support WPA, WPA2 and WEP) connections to 802.11 b/g
networks. GN-BR03GM overcomes environment multi-path effect by MIMO
feature to keep stable wireless performance.
** MIMO (multiple-in, multiple-out) takes advantage of multiplexing to increase wireless bandwidth and range.
MIMO algorithms send information out over two or more antennas and the information is received via multiple
antennas as well.
Package Contents
• GN-BR03GM AirCruiser MIMO Router
• Power adapter
• Vertical Stand
• User Guide on CD-ROM
• Quick Start Guide
• SmartSetup 3 Guide
• Ethernet cable – All of the BR03GM Ethernet ports are Auto-MDIX
If there are any missing or damaged parts, please contact your local distributor
or dealer immediately.
Using a power supply with a different voltage rating than the one included with
the BR03GM may cause damage and void the warranty for this product.
1
Page 6

GN-BR03GM AirCruiser MIMO Router
A
A
Side Panel
The side panel of the GN-BR03GM AirCruiser MIMO Router contains all the
Router’s ports as well as the DC power port and initialization button.
Reset Button There are two ways to reset the Router's factory defaults.
WAN The WAN port is where you will connect your broadband
LAN1, 2, 3, 4 These ports (1, 2, 3, 4) connect the Router to PCs on your
wired network and other Ethernet network devices.
Power The Power port is where you will connect the power adapter.
Receptor for
Power
Adapter
Figure 1: Router’s Side Panel
uto MDI/MDIX WAN Port for
connecting to DSL or Cable
modem
Either press the Reset Button, for approximately five seconds,
or restore the defaults from the Management Tools>Router
Initialization screen in Router's Web-based Utility.
Internet connection.
uto MDI/MDIXLAN
Ports
2
Page 7
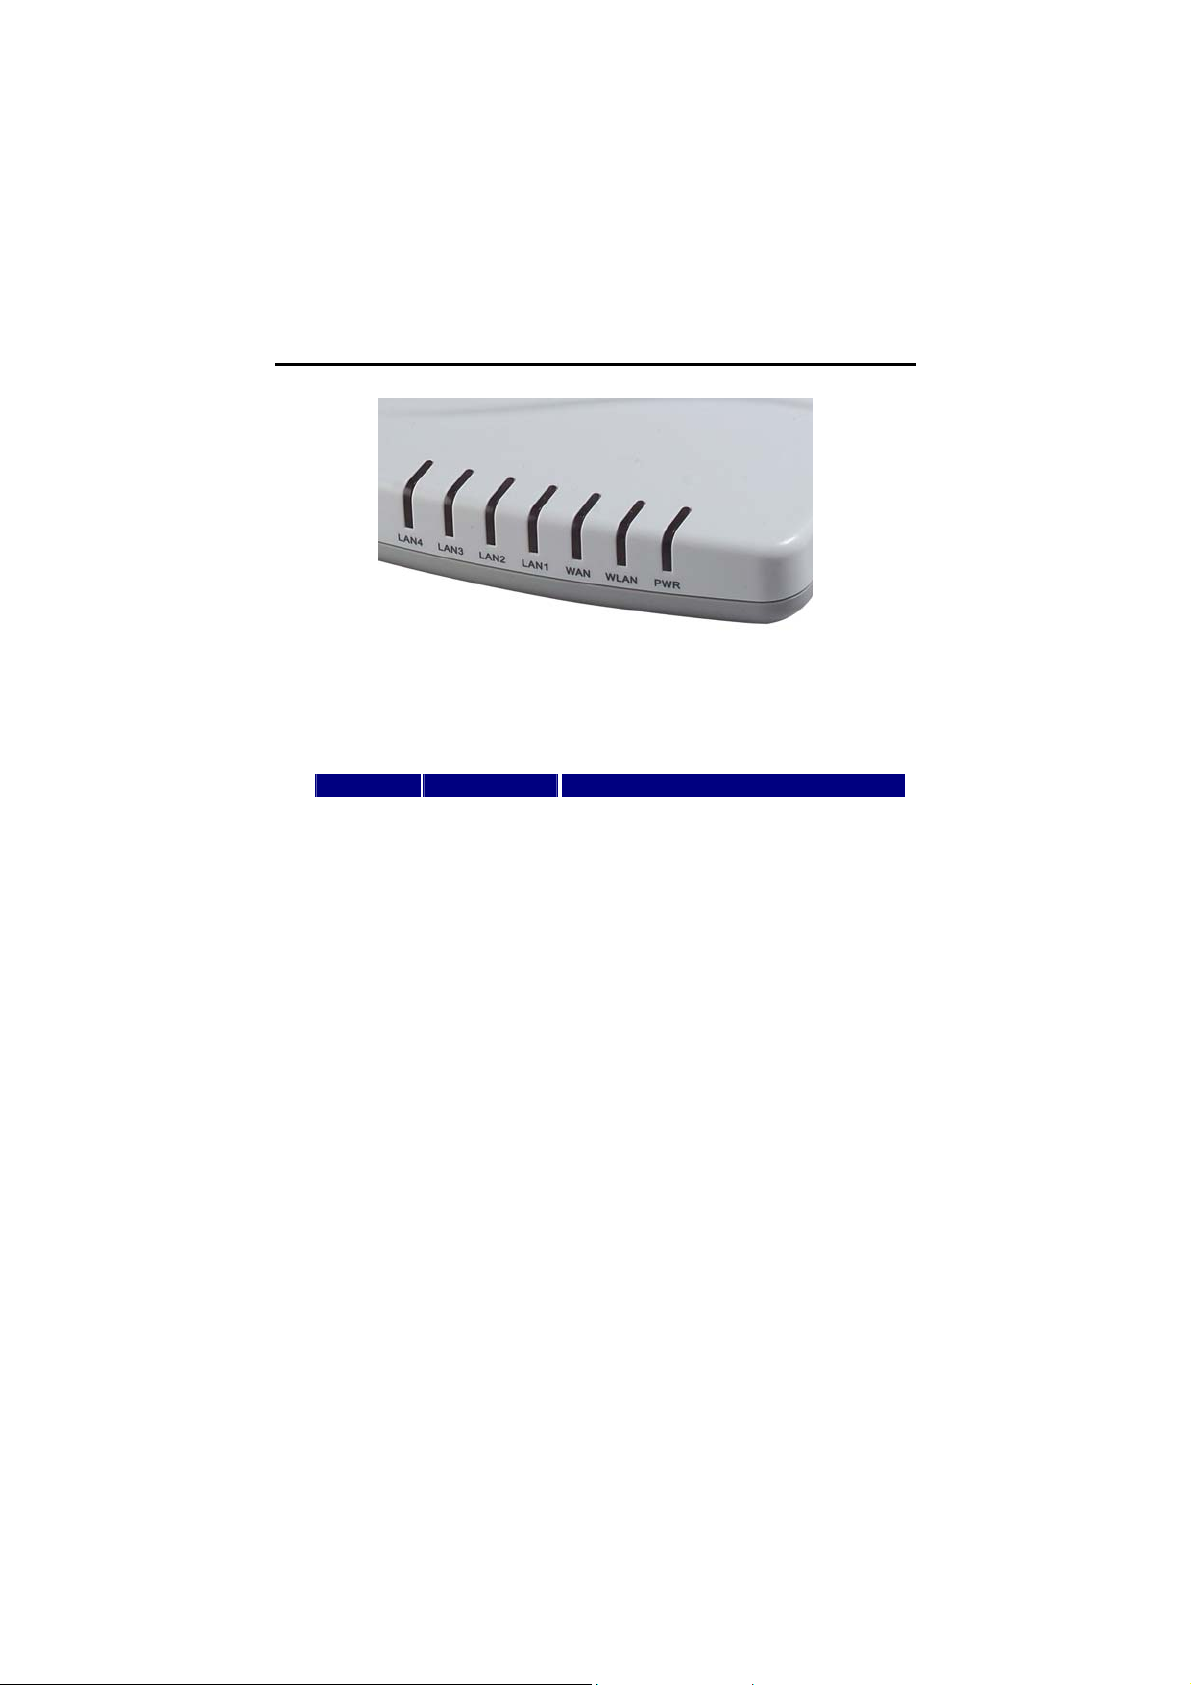
LEDs
GN-BR03GM AirCruiser MIMO Router
Figure 2: LED Layout
The table below describes the LED indicators on the front
panel of the GN-BR03GM. All LEDs are green when lit.
LED STATUS
3
Page 8

GN-BR03GM AirCruiser MIMO Router
Key Features
Conforms to IEEE 802.11g specification.
Support Smart Setup I, II, III
Support 64-bit /128-bit WEP encryption, WPA, WPA2.
Support QoS
Support PPPoE and PPPoE Unnumbered DSL connection
Support up to 4 WAN configuration records
Support DHCP client for cable/DSL connection
Support DHCP server with static and dynamic style
Support UPnP IGD 1.0
Support MSN messenger and most Internet applications
Support Firewall Filtering
Support Virtual Server
Support DMZ
Support Stateful Packet Inspection (SPI)
Support DoS Protection
Support Stealth Mode
VPN Packets Pass Through (Support PPTP/IPSec/L2TP Protocol)
Log Management (Support Firewall/UPnP/WAN Connection Log)
Easy Web Management
Support WAN side Remote Management
Support DNS Relay
Dynamic DNS supported
Web based Firmware upgrade
Support URL Blocking
MDI/MDIX Auto crossover detect
4
Page 9

GN-BR03GM AirCruiser MIMO Router
Chapter 2
Wireless Networking
A wireless local area network (or Wi-Fi for short) is exactly like a regular local
area network (LAN), except that each computer in the wireless network uses a
wireless device to connect to the network. Computers in a wireless network
share the same frequency channel and SSID, which is an identification name
shared by the wireless devices belonging to the same wireless network.
The Router transmits data to PCs equipped with wireless network adapters,
which can roam within a certain radial range of the Router. You can arrange the
Router and multiple access points to work in succession to extend the roaming
range, and you can set up your wireless network to communicate with your
Ethernet hardware as well. The big advantage of Wi-Fi is its simplicity. You can
connect computers anywhere in your home or office without the need for wires.
The computers connect to the network using radio signals, and computers can
be up to 100 feet or so apart.
Wireless Network Layout
The BR03GM AirCruiser MIMO Router has
been specifically designed for use with
both your 802.11b and 802.11g products,
and retains full backward compatibility.
After you have finished setting up your
GN-BR03GM AirCruiser MIMO Router,
your home network will be similar to the
diagram shown at the right.
Figure 3: Typical Home Wireless Network
5
Page 10

GN-BR03GM AirCruiser MIMO Router
Chapter 3
Before You Start
What You Will Need
Internet
You will need to have an active Internet account, supplied through either ADSL
or cable Modem, and your ISP user account and password information. (Your
ISP can supply you with this)
Hardware Requirements
A minimum of one PC with an installed Ethernet NIC (network interface card).
(If you have a DSL or Cable modem broadband connection to the Internet, you
should already have this). If you wish to connect wirelessly to your BR03GM
from a laptop, a wireless network PCMCIA notebook card is needed, and this
manual assumes it is already properly installed.
System Requirements
The BR03GM will work with Windows, Macintosh or Linux Operating System.
You just need a HTTP standard JavaScript-enabled browser, for example,
Microsoft Internet Explorer or Netscape Navigator 4.0 or above.
ISP Configuration Information
Depending on the type of ISP connection you have, you may need one or more
of the following configuration parameters.
ISP User ID and Password
ISP Domain Name Server (DNS)
Fixed IP address or Static IP address
Subnet Mask
Default Gateway
Host and Domain Names
If you are unsure of any of these settings, contact your ISP customer service.
6
Page 11
GN-BR03GM AirCruiser MIMO Router
Chapter 4
Connecting the BR03GM
Overview
You can connect to, and configure the BR03GM using either a wireless
connection (via notebook PC) or using a wired connection to your desktop PC.
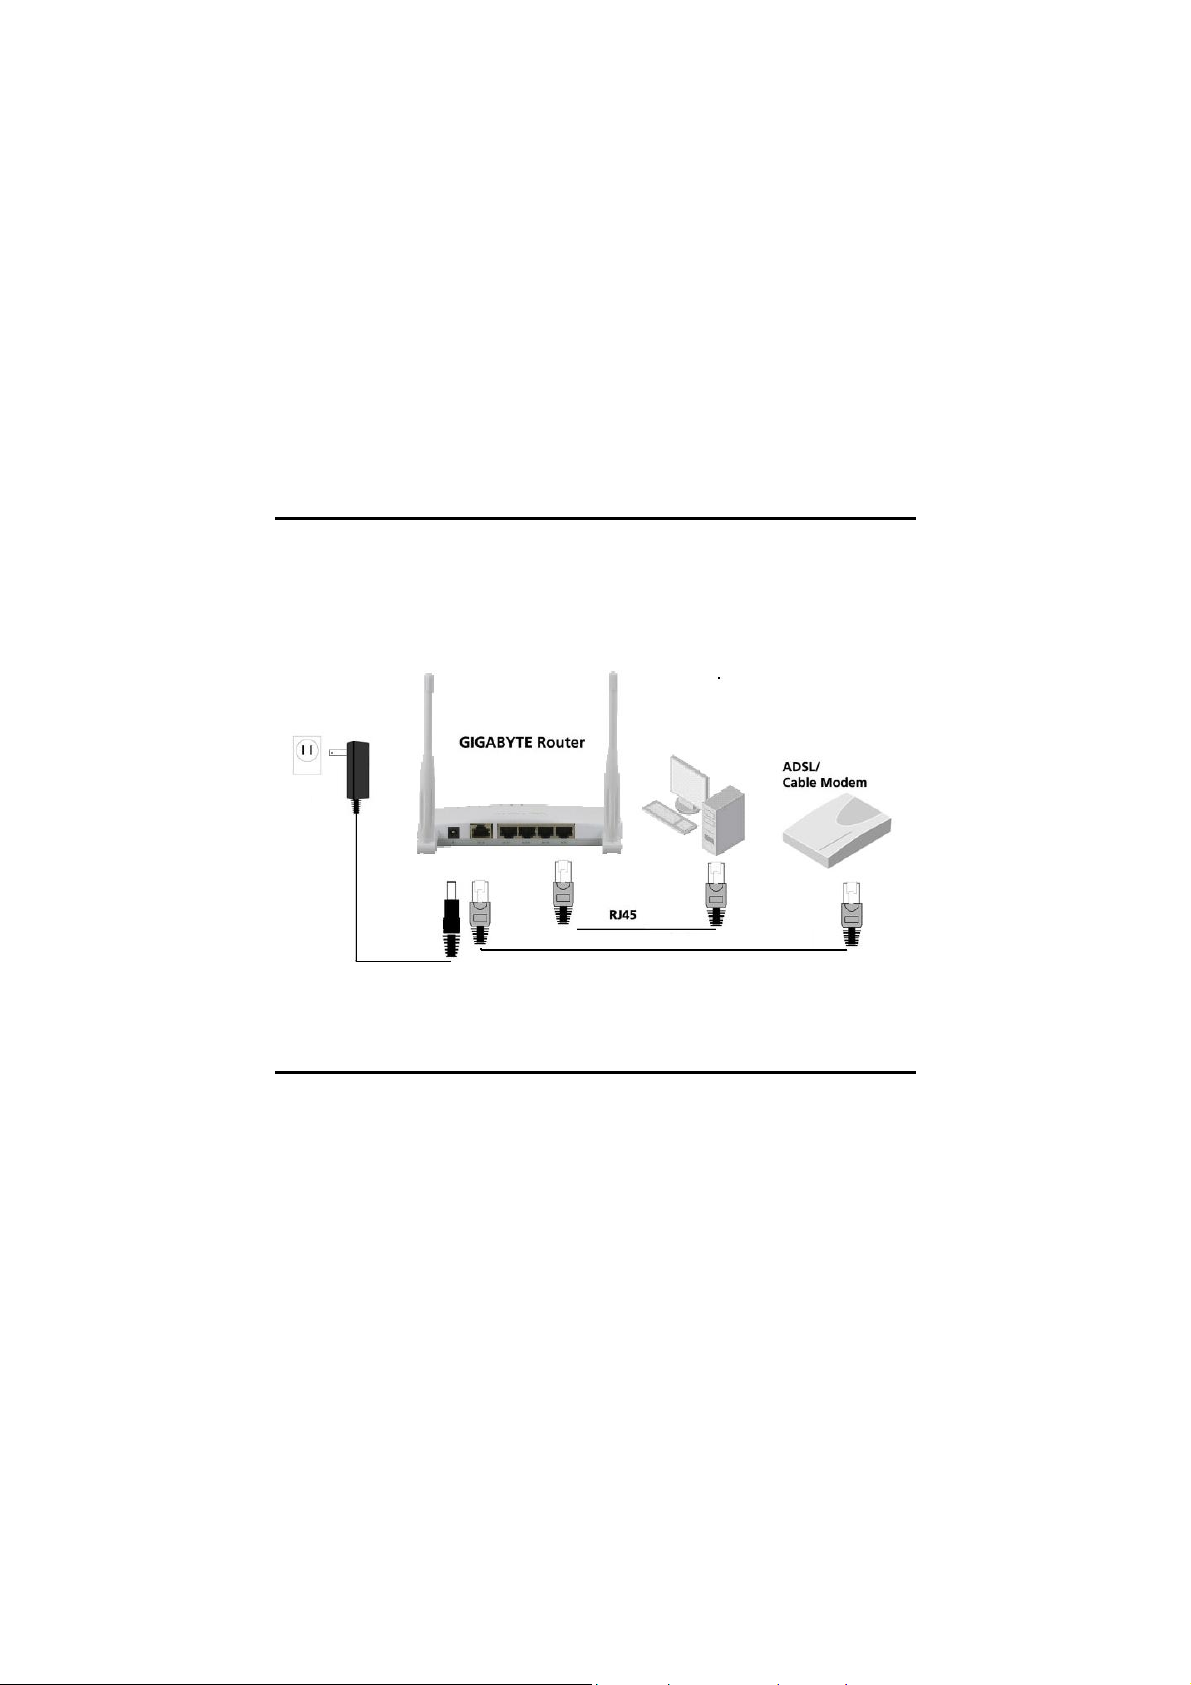
It is HIGHLY recommended for the first time setup that configuration be done
using a wired connection to your desktop PC as shown in the figure below.
Figure 4: Wired Connection Diagram
Using a Wired Connection
It is suggested for first time setup your Router that you used the wired
connection method. It is simpler, and eliminates the possibility of error due to
improperly setup wireless connection.
Step 1 Turn off all the hardware devices in your network, including the
ADSL/Cable modem by unplugging their power supply.
Step 2 Connect the Ethernet cable of your ADSL/Cable modem to the WAN
port of the GN-BR03GM.
Step 3 Connect one end of an Ethernet cable (provided) to a LAN port in the
side panel of the GN-BR03GM and the other end to the 10/100
7
Page 12

GN-BR03GM AirCruiser MIMO Router
Ethernet port of your computer. (It does not matter which LAN port you
select).
Step 4 Plug the power adapter cord into the router’s power jack and then
plug the power adapter into a power outlet.
Step 5 Turn on your ADSL/Cable modem. After verifying all the connections,
proceed to Chapter 5 Connecting the Router to the Internet.
Using a Wireless Connection
Step 1 Turn off all the hardware devices in your network, including the
ADSL/Cable modem by unplugging their power supply.
Step 2 Connect the Ethernet cable of your ADSL/Cable modem to the WAN
port of the GN-BR03GM.
Step 3 Plug the power adapter cord into the router’s power jack and then
plug the power adapter into a power outlet.
Step 4 Turn on your ADSL/Cable modem.
Step 5 Insert you PCMCIA notebook card, or wireless USB adapter into
your notebook PC.
Step 6 If using a GIGABYTE PCMCIA notebook card, SmartSetup 3 will
automatically detect your BR03GM and walk you through the setup
procedure (for more details refer to your SmartSetup 3 Guide).
Please refer to your vendor’s users manual for connecting to the
wireless network.
Step 7 When scanning for available wireless networks, your BR03GM’s
factory default SSID name is GIGABYTE. Select it using the
procedures described in your particular vendor’s notebook adapter
users manual.
Step 8 After verifying all the connections, proceed to Chapter 5
Connecting the Router to the Internet.
8
Page 13

GN-BR03GM AirCruiser MIMO Router
Chapter 5
Connecting the Router to the Internet
Overview
The BR03GM AirCruiser MIMO router is configured to work “out of the box”,
and the default settings generally do not require any modification. However, for
initial setup, you must log into the router and key in your Internet Service
Provider (ISP) settings. This only needs to be done once. Your ISP
customer service desk can provide you with the all the information you will
need.
This chapter includes two sets of instructions. First, by using SmartSetup to
configure ISP settings in your Router, and then by using Setup Wizard to for
users who wish to take more control over the ISP settings
Logging into the GN-BR03GM
SmartSetup 3 is the quickest way to securing your wireless network with
WPA/WPA2-PSK, and then controlling your Wi-F i network with its powerful and
intuitive G-EZlink utility. Please refer to your SmartSetup 3 Guide for more
information.
-4.5(u)-4(1users (asnm 0 T7s)(youc)-8.5(-BR03GMfrol(o)-5.3(w)14h )-6.6(thesteo)-5.3pw)14.7se dicribedo bllw
In( theadduc)-81(les bar( of )-6.6(yourbryo)-4.9(w)14.4(s)-7.8(e)17(er)51.9(F)-3.3 it)-9.9(y)5.6pe “
9
Page 14
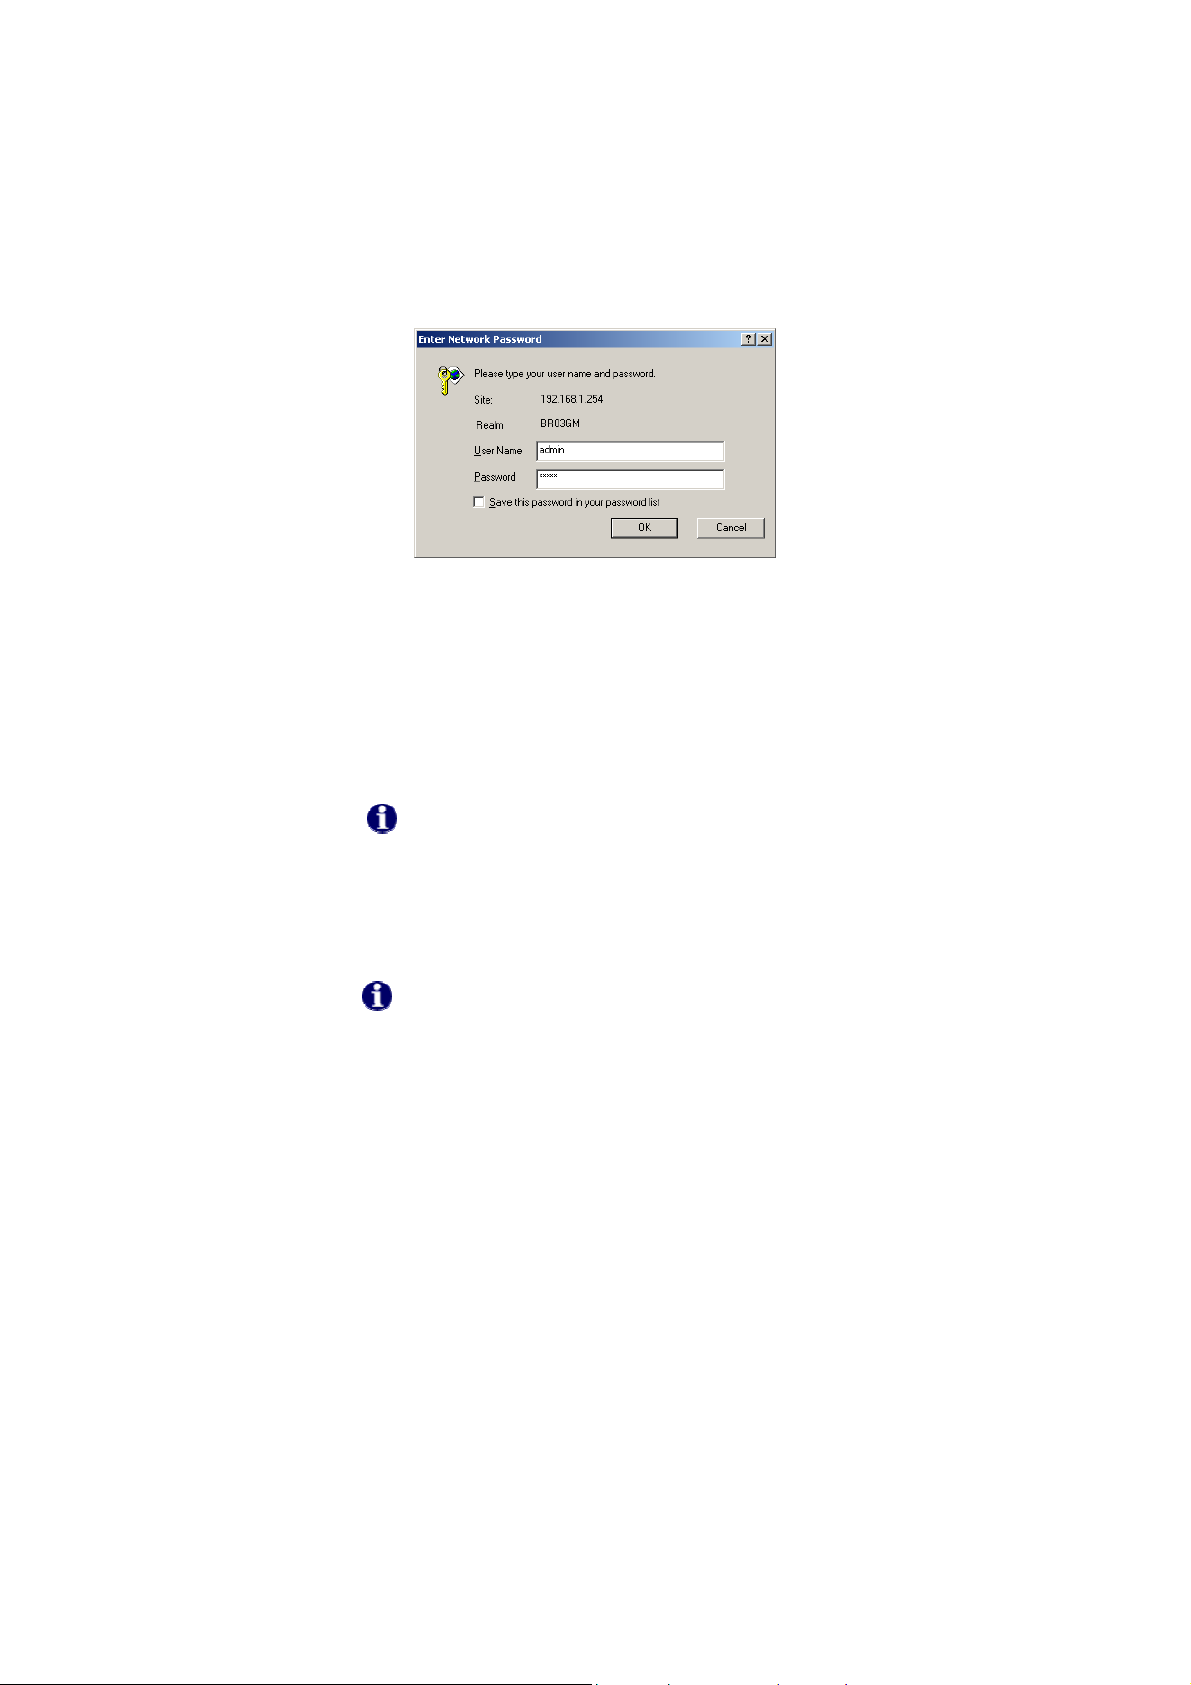
GN-BR03GM AirCruiser MIMO Router
Figure 6: Enter Network Password
C. You are now connected to the Router and SmartSetup will detect
your ISP type. If you do not see the menu sho wn below, click the
Smart Setup button in the upper left of the main menu.
After SmartSetup detects your Internet connection, it will report the
connection it finds. The possible options are:
• PPPoE
• Dynamic IP
• Static IP
If your connection is not detected automatically, simply press
the “Smart Setup” button on the menu panel to activate it.
PPPoE Internet Connection Type
If you have a PPPoE type connection, the following screen shown
below will appear prompting you to enter the ISP User Name and
Password.
Note that you only have to ent er the ISP information during
initial setup only.
Dynamic IP Internet Connection Type
If you are connecting through a Dynamic IP address, no ISP login
information is required. Just click the OK to allow the router to save
the Dynamic IP settings and the Router will reboot, brining you to the
Utility Main Page.
Static IP Internet Connection Type
If you have a Static IP address, the following screen show below will
appear prompting you to enter your WAN IP address, WAN subnet
mask, WAN gateway, and DSN information. This information is
provided by your ISP.
D. After signing in to your ISP, the router will restart and the web based
configuration utility will restart again automatically. You will be
10
Page 15

GN-BR03GM AirCruiser MIMO Router
presented with the GIGABYTE Wireless Router Main Page shown
below.
Your BR03GM AirCruiser MIMO router is now fully installed, and you are able to
wirelessly share network resources, retrieve emails, download large files,
conduct a video conference, and distribute or display digital photos, videos or
MP3 files.
11
Page 16
GN-BR03GM AirCruiser MIMO Router
Chapter 6
Advanced Setup
Overview
This chapter explains the Advanced Setup options available for the BR03GM.
The Advanced Setup Screens offer LAN and WLAN Network Configuration,
Static Routing Table, Virtual Server, Firewall Rules, and DNS Configuration.
The Advanced Setup screens are available from the links on the Main menu.
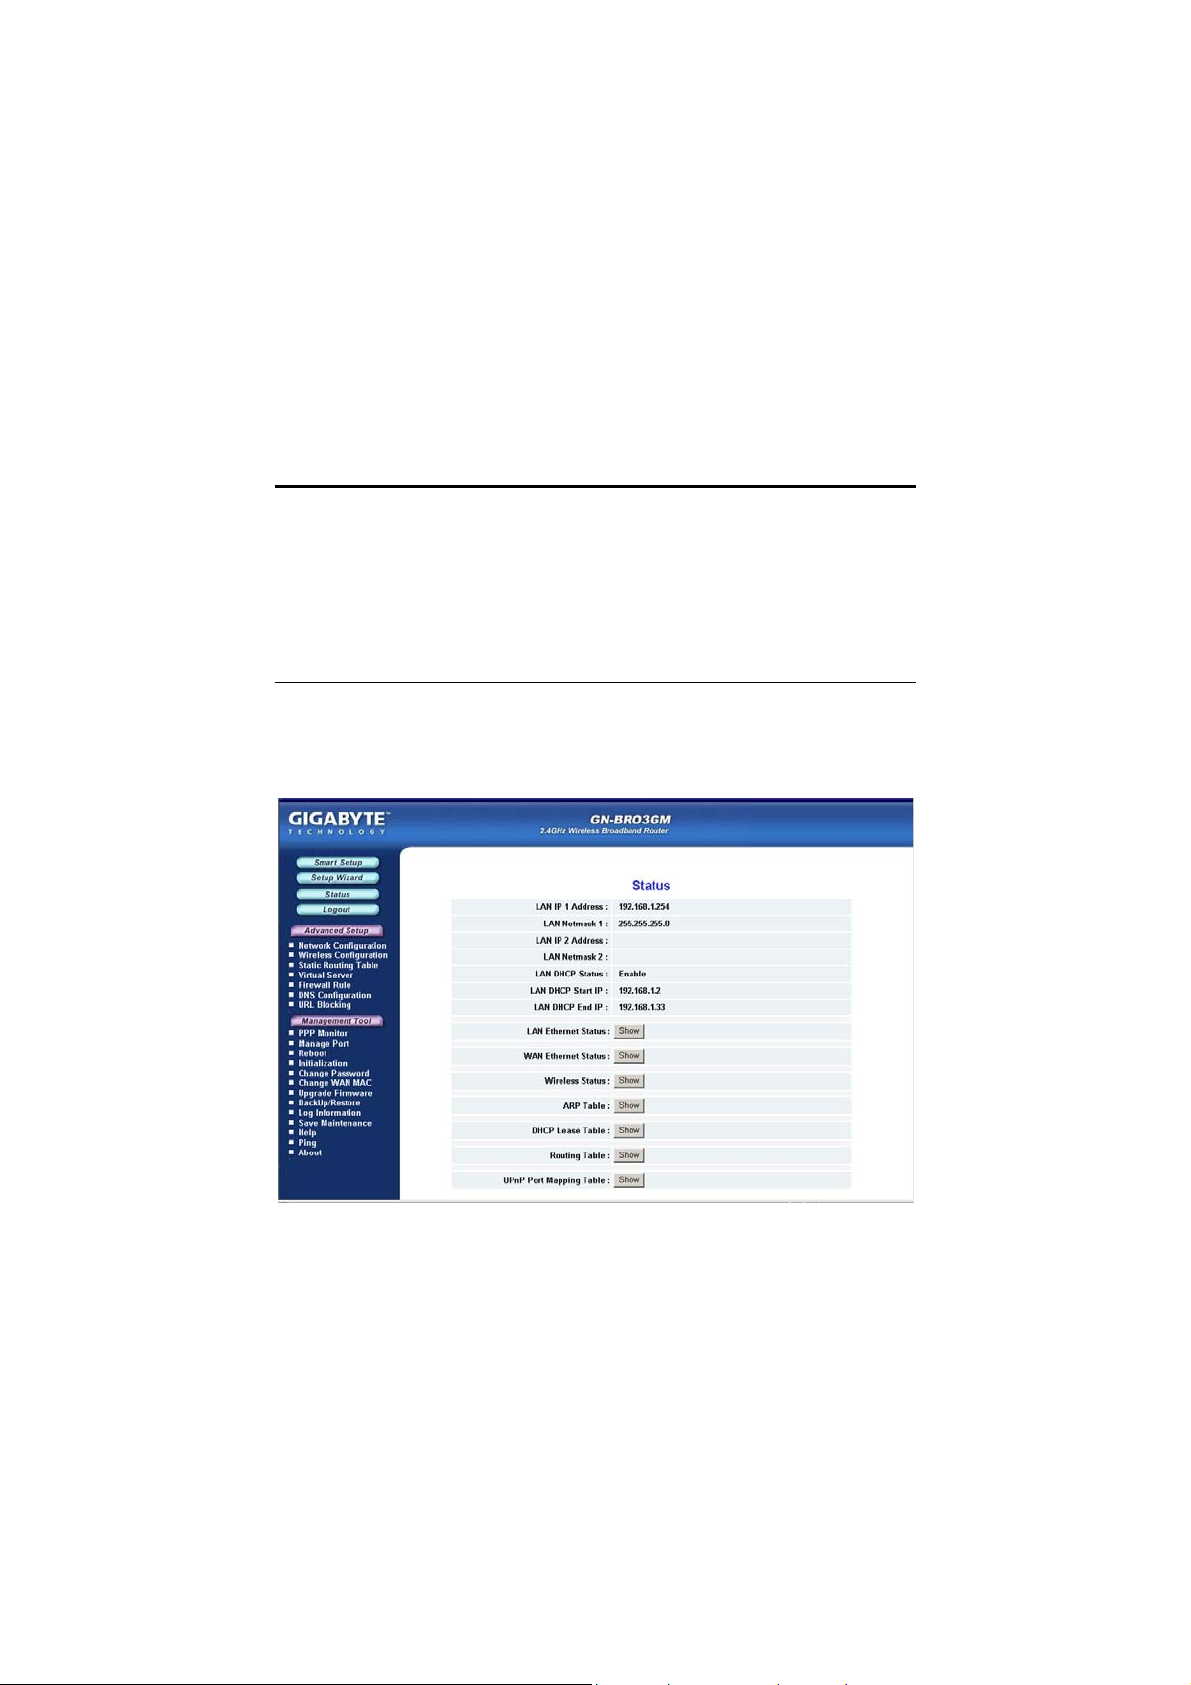
The Status Page
On the Status page the router’s current connection and configuration
information is displayed for the following; LAN Ethernet, WAN Ethernet, ARP
Table, DHCP Lease Table, Routing Table, UPnP Port Mapping Table.
Figure 7: Status Page
LAN IP 1 Address Displays the pr imary IP address being used by the Local
(LAN) port of the Router. The default is 192.168.1.254
LAN Netmask 1 Displays the IP Subnet Mask being used by the Local
(LAN) port of the router. Default is 255.255.255.0
12
Page 17
GN-BR03GM AirCruiser MIMO Router
LAN IP 2 Address Displays the alternate IP address being used by the
Local (LAN) port of the Router
LAN Netmask 2 Displays the alternate IP Subnet Mask being used by the
alternate Local (LAN) port of the router.
LAN DHCP Status Identifies if the Router’s built-in DHCP server is active for
the LAN attached devices.
LAN DHCP Start IP The starting IP number in the range possible IP
addresses issued by the DHCP server
LAN DHCP End IP The last IP number in the range possible IP addresses
issued by the DHCP server
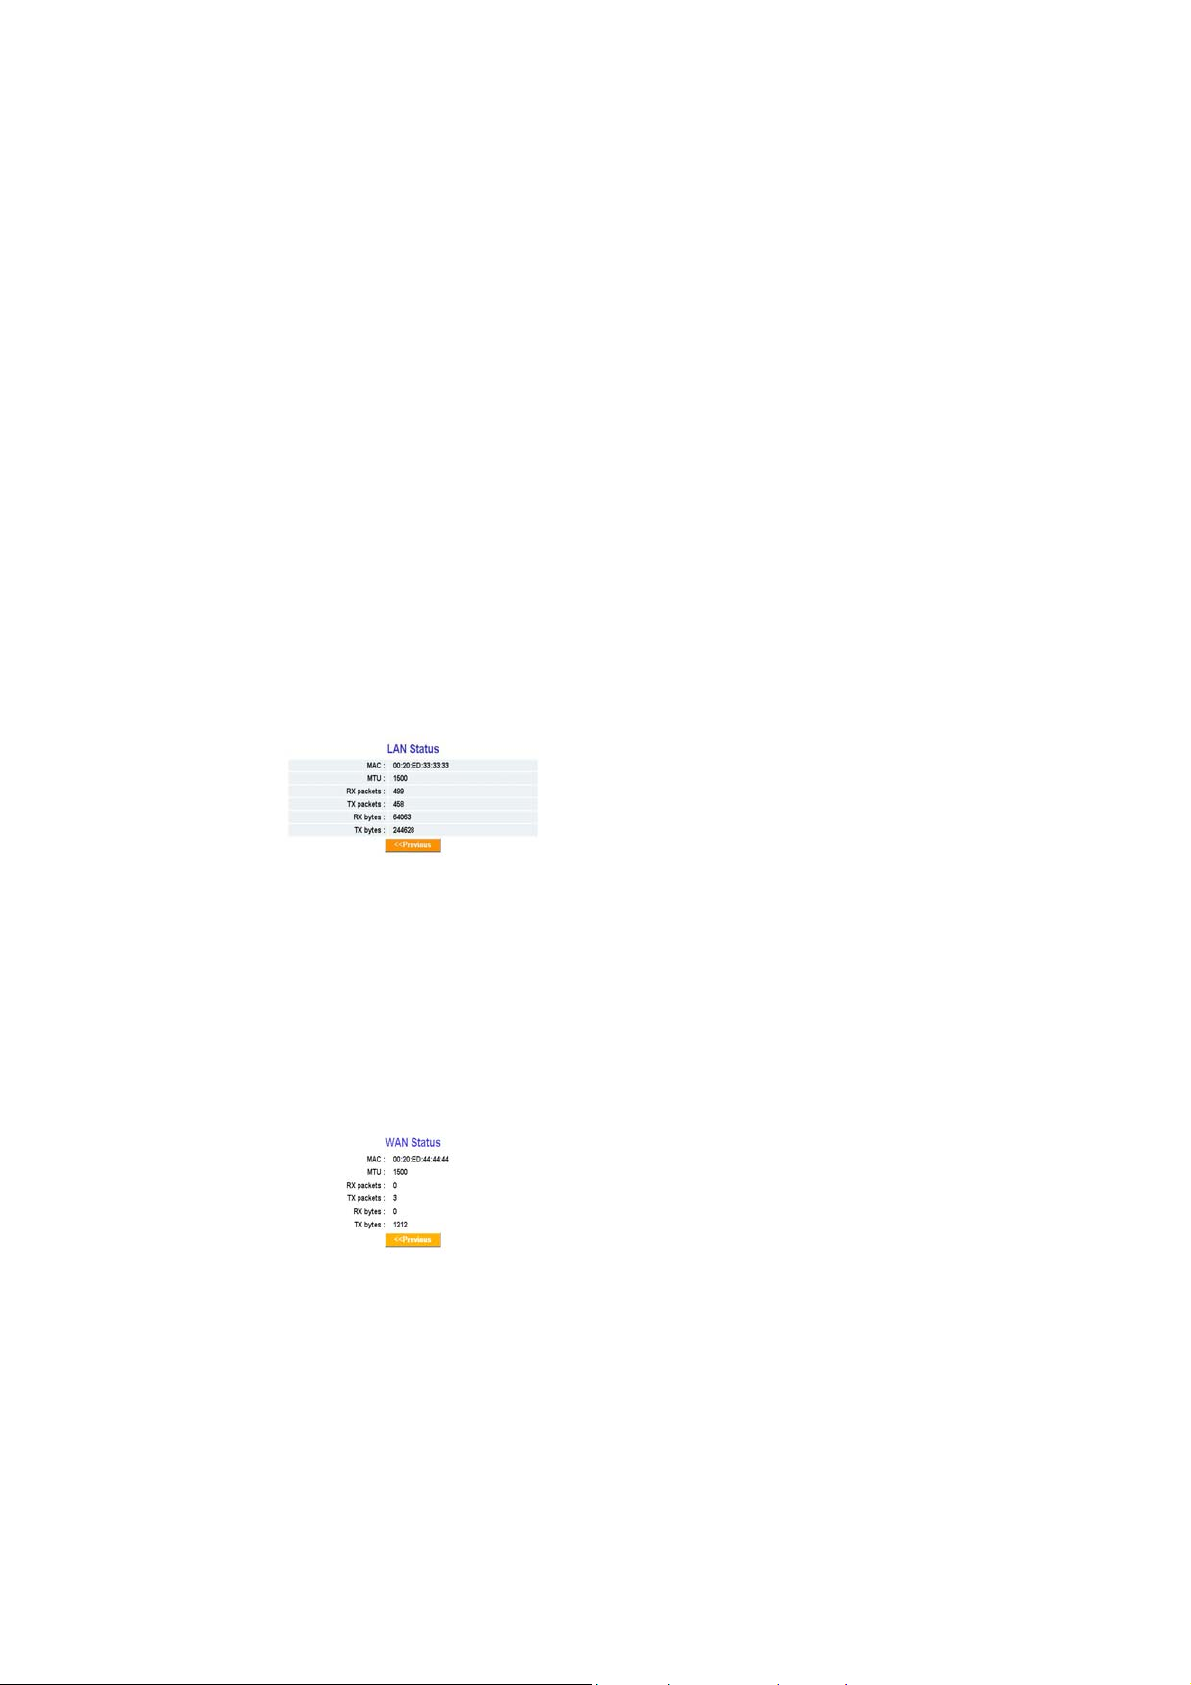
The LAN Ethernet Status Tab
On the LAN Ethernet Status the Router displays the Ethernet Status of the
current LAN current connection.
MAC This field displays the MAC
address used by the LAN port of the
router.
MTU This specifies the maximum
size of the packet permitted for
Figure 8: LAN Status
The WAN Ethernet Status button
Figure 9: WAN Status
Internet transmission.
Rx packets The number of data
packets received by the AP.
Tx packets The number of data
packets transmitted by the AP.
Rx bytes The current bandwidth
(receive) on the LAN port.
Rx bytes The current bandwidth
(transmit on the LAN port.
MAC The field displays the MAC
address used by the WAN port of the
router.
MTU The maximum size of the
packet sent from your computer to
the Internet.
Rx packets The number of
received packets of this port after
13
Page 18
GN-BR03GM AirCruiser MIMO Router
resetting or manually initial.
Tx packets The number of
transmitted packets of this port after
resetting or manually initial.
Rx bytes The current bandwidth
(receive) on the WAN port.
Rx bytes The current bandwidth
(transmit) on the WAN port.
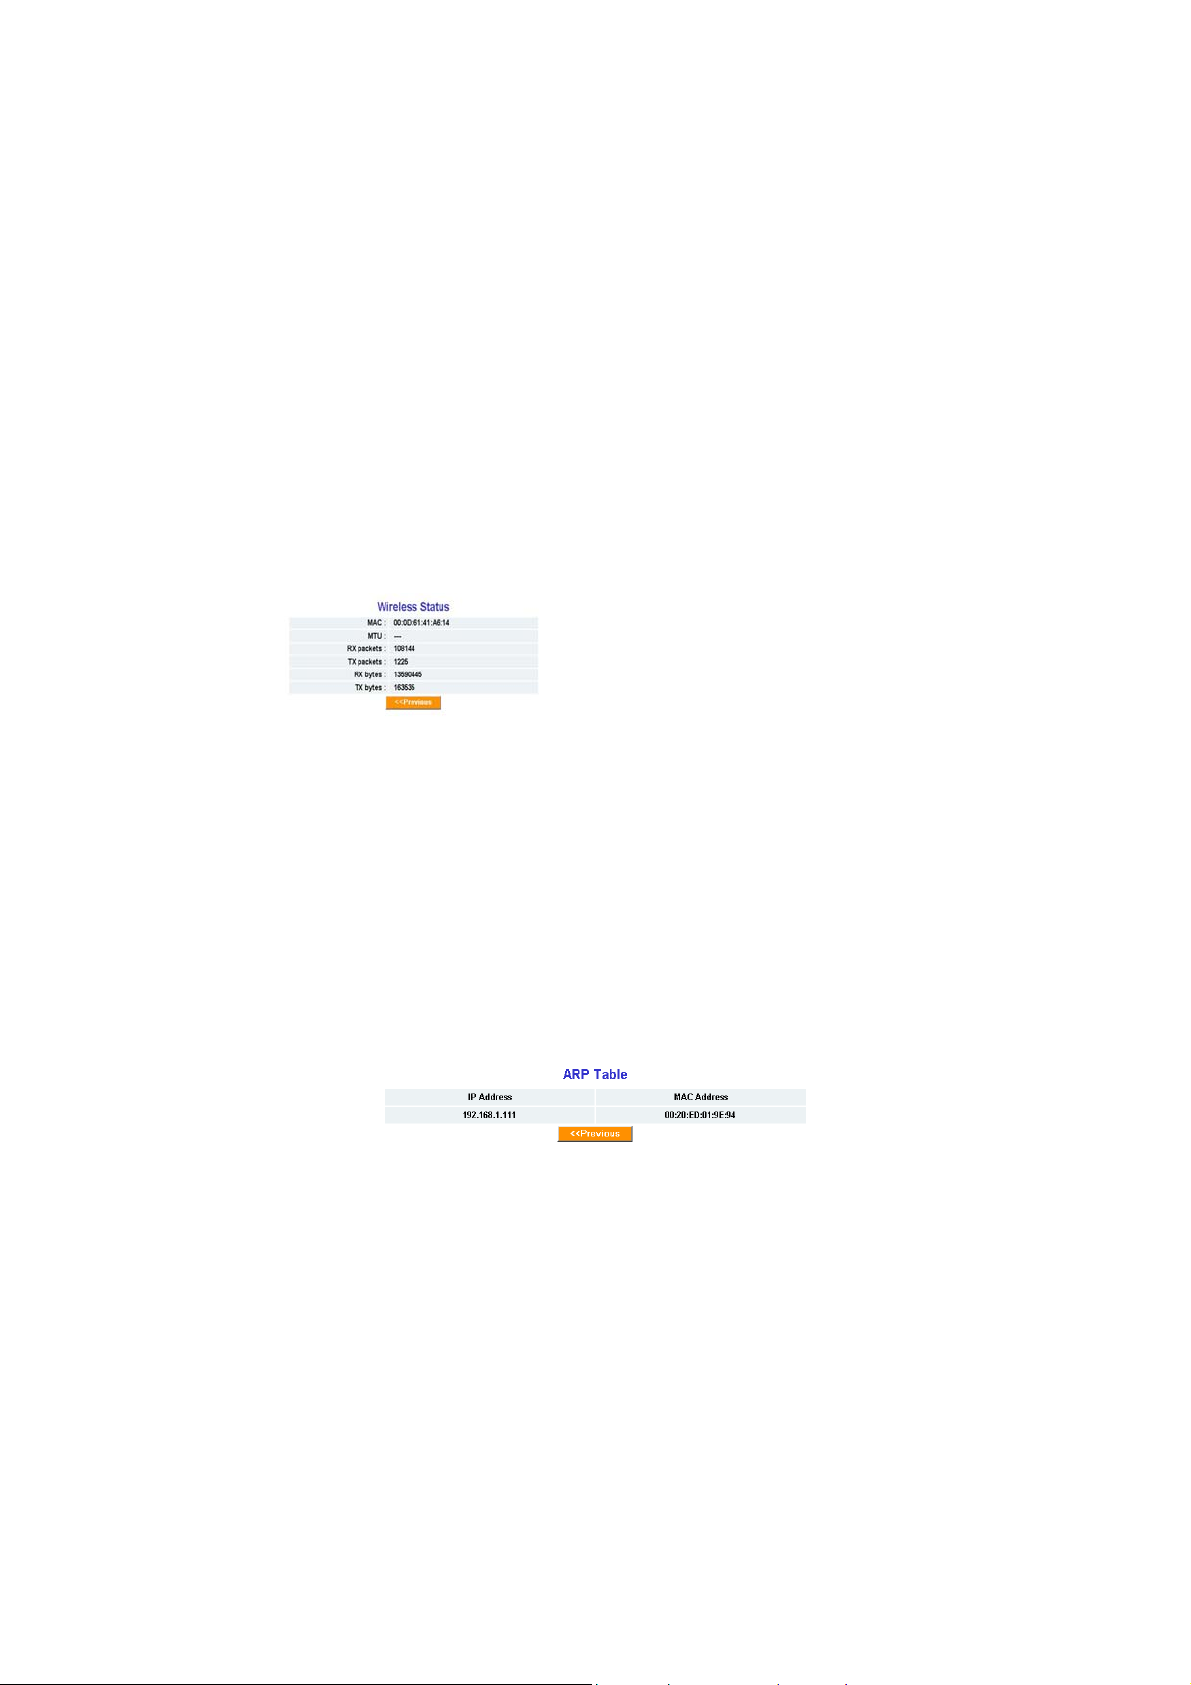
The Wireless Status
MAC The field displays the
Wireless MAC address of the router.
Rx packets The number of
received packets of this wireless
Figure 10: Wireless Status
ARP Table Tab
The ARP Table displays the associated MAC address and IP address pairs of
your local network devices. In the example below, only the BR03GM AirCruiser
MIMO Router is in the ARP Table.
port after resetting or manually
initial.
Tx packets The number of
transmitted packets of this wireless
port after resetting or manually
initial.
Rx bytes The current reception
bandwidth on the Wireless LAN.
Rx bytes The current transmission
bandwidth on the Wireless LAN.
Figure 11: ARP Table
DHCP Lease Table Tab
The DHCP server "leases" out address for specific times (Time To Live) to the
various hosts. If a host does not use a given address for some period of time,
that IP address can then be assigned to another machine. When assignments
are made or changed, the DHCP server must update the information in the
DNS server. The BR03GM DHCP Lease Table displays the associated
14
Page 19

GN-BR03GM AirCruiser MIMO Router
IP/MAC assignment and Time To Lease.
IP Address DHCP
assigned IP address on
WLAN
Routing Table Tab
To determine the best path to a distant network, the BR03GM uses RIP to
always select the path that has the least number of hops. Each router that data
must traverse is considered to be one hop. The routing table in a router using
RIP contains an entry for every known destination network. The Routing Table
displays the GN-BR03GM RIP routing details.
Figure 12: DHCP Lease Table
MAC Address MAC
address of the device with the
assigned IP
TTL The time to live (TTL) in
seconds that a resolver will
use data received from a
nameserver before it will ask
for the same data again.
Destination The IP address of
the destination network address
Figure 13: Routing Table
UPnP Port Mapping Table
The UPnP specification is based on TCP/IP and Internet protocols that let
devices communicate with each other - UPnP technology doesn't rely on
specific device drivers, using instead these standard protocols. UPnP devices
can automatically configure network addressing, announce their presence on a
network subnet, and permit the exchange of device and service descriptions.
The UPnP Port Mapping Table displays the GN-BR03GM port mapping and
UPnP packet request details.
No. The event number
Netmask The subnet of that
destination IP address
Gateway Gateway of the
destination IP address
Metric Hop count to the
destination network
Interface Type of interface
used
15
Page 20

GN-BR03GM AirCruiser MIMO Router
Figure 14: UPnP Port Mapping Table
Status Current status of the
UPnP port (enable/disable)
Client IP The IP address of
the client utilizing the port
Protocol IP protocol
(UDP/TCP)
External Port The external
port mapping
Internal Port The Internal
port mapping
Remote Host IP The IP of the
remote host (if applicable)
Lease Time Length of time
the port may be utilized for
UPnP
Create Time Time the port was
established for UPnP
Description UPnP process
16
Page 21

GN-BR03GM AirCruiser MIMO Router
The Network Configuration Screen
The Network Configuration screen consists of three areas: LAN
Configuration, WAN Configuration and WAN settings.
The LAN Configuration Tab
Figure 15: LAN Configuration
LAN Configuration
Allows you to modify the LAN parameters, and if you want to enable DHCP
automatic IP address assignments, you can enable it here, and specify a Start
and End address for the IP range.
DHCP Option
The DHCP server "leases" out address for specific times (Time To Live) to the
various hosts. If a host does not use a given address for some period of time,
that IP address can then be assigned to another machine. When assignments
are made or changed, the DHCP server must update the information in the
DNS server. The AirCruiser G DHCP Lease Table displays the associated
IP/MAC assignment and Time To Lease.
Force IP-MAC Mapping
Allows you to manually assign a specific IP address to a specific network
device (MAC address) on the network. This will be updated in the ARP table
automatically.
17
Page 22
GN-BR03GM AirCruiser MIMO Router
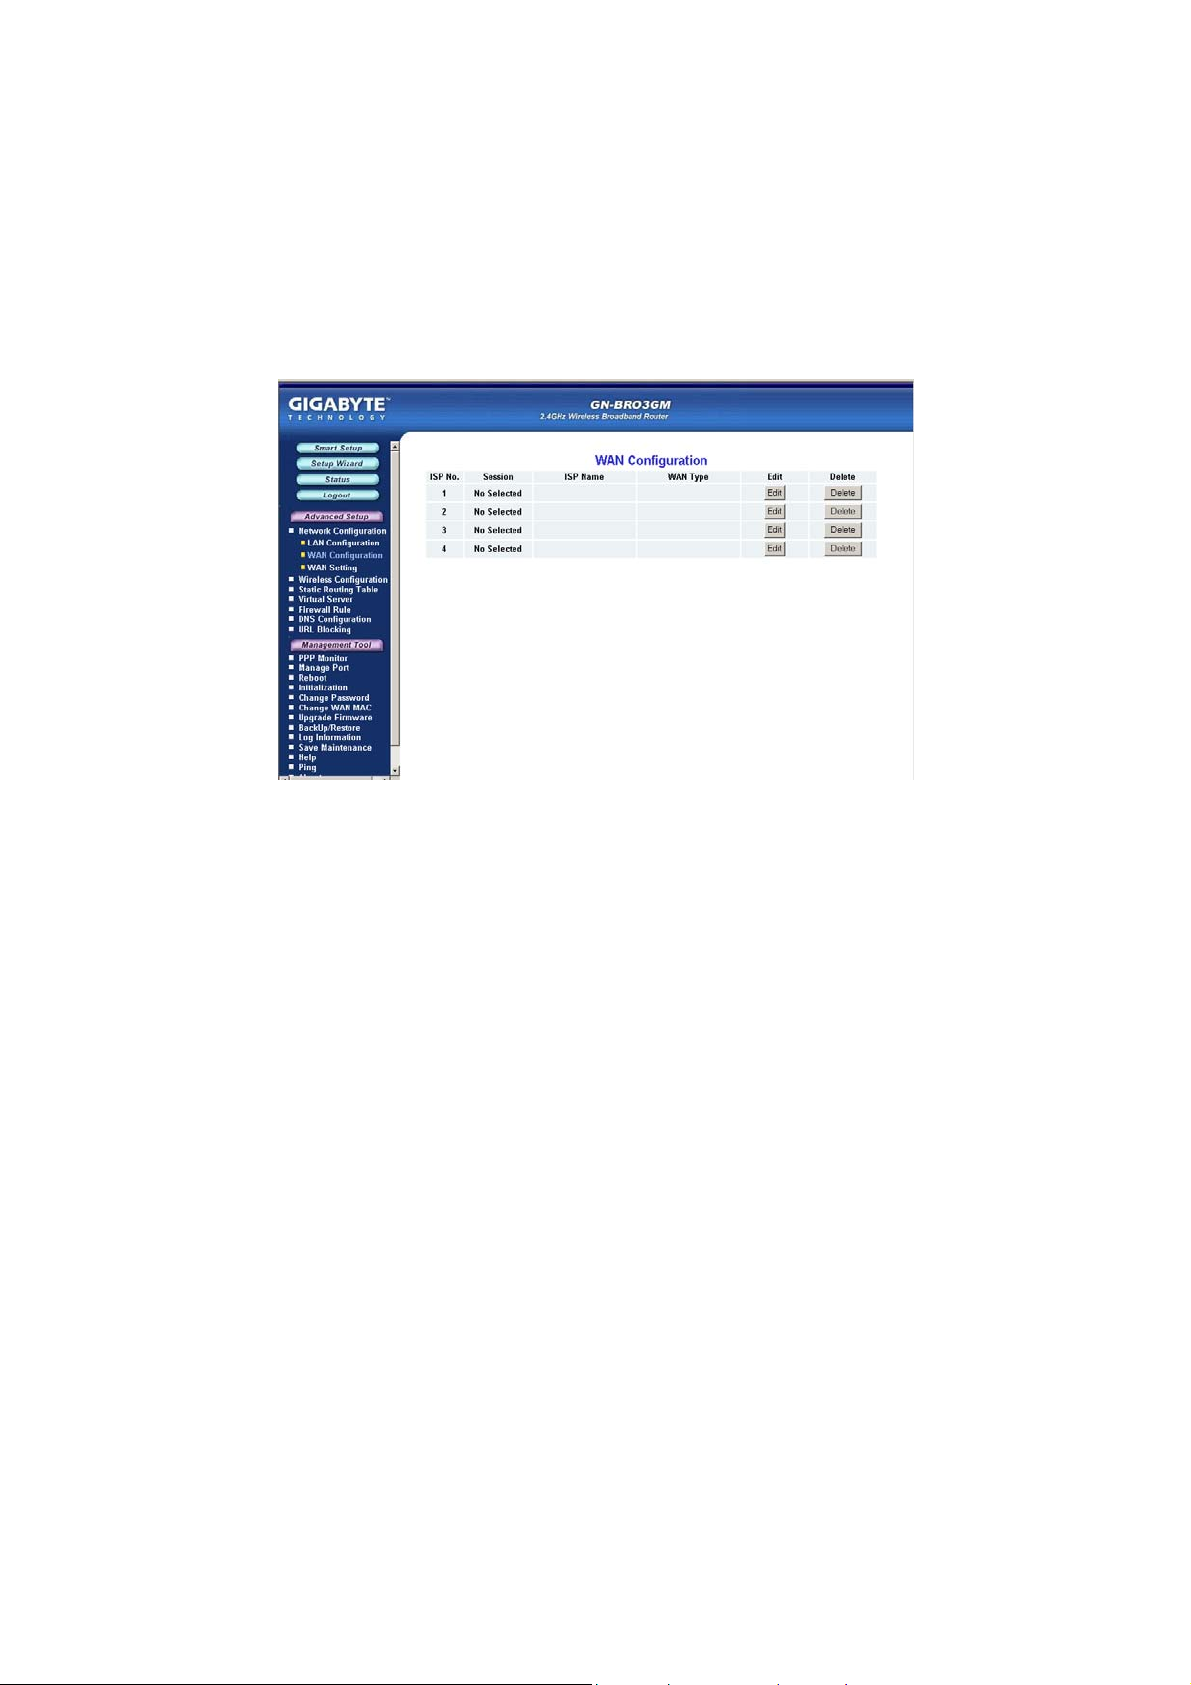
The WAN Configuration Tab
Figure 16: WAN Configuration
The BR03GM has many advanced WAN configuration features. As a special
redundant feature, you can configure up to 4 WAN connections and each ma y
have its own connection type (PPPoE, PPPoE Unnumber, Dynamic IP address,
Static IP address) and other properties. The device can automatically attempt
to connect to these in order if your primary connection fails.
Click the Edit button to the right of the ISP that you wish to modify. A screen
will appear allowing you to change the Internet connection type. (see below)
Click the Next button to continue with modifications.
18
Page 23

GN-BR03GM AirCruiser MIMO Router
Figure 17: WAN Type Select
Depending on the WAN type you select, the corresponding WAN setup screen
will appear next.
WAN Configuration Tab – Dynamic IP Address
Figure 18: Dynamic IP Address
Your Internet Service Provider will supply you with the following account
information you will need:
19
Page 24

GN-BR03GM AirCruiser MIMO Router
• ISP Name
• Host Name
• Gateway
• DNS1 and DS2 Address
• DNS Domain Name
Enter the information provided by your ISP in the spaces provided.
MTU (Maximum Transmission Unit)
The largest packet unit is sent from your computer to the network. Any
message larger than MTU will be divided into smaller packets before being sent.
You should keep the default setting (1500). Setting MTU size is largely a
process of trial-and-error: If you suspect your MTU setting is causing a
connection problem, start with the maximum value of 1500, and then
reduce the size down to 1400 until the problem goes away.
NAT Setup
The Network Address Translation (NAT) is a standard that allows multiple
computers on a private network to share a single IP address.
Universal Plug and Play (UPnP)
and technologies, such as TCP/IP, HTTP, and XML, that allows devices on a
network to automatically connect with other devices.
UPnP Delete Time
Select the duration that UPnP will be active. Since allowing this may present a
security risk, the default setting is 0.
If the WAN IP address and LAN IP address obtained from DHCP
server are from the same subnet, the LAN IP address will
automatically change to another subnet and reboot the router.
is a technology based on Internet standards
20
Page 25

WAN Configuration Tab – PPPoE
GN-BR03GM AirCruiser MIMO Router
Your Internet Service Provider will supply you with the following account
information you will need:
• ISP Name
• User ID/Password
• Service Name
• AC Name
• DNS1 and DNS2 Address
• DNS Domain Name
Enter the information provided by your ISP in the fields provided.
Authentication Type
Select one of the following authentication settings: Auto, CHAP or PAP. The
default setting is “Auto” (automatic authentication).
Challenge Handshake Authentication Protocol
authentication method using PPP dialup method. With CHAP, the server will
send a challenging signal to a remote Router, which will send back an
encryption key.
Password Authentication Protocol
protocol allowing a Router to send a simple user ID and password to another
Router for authentication. PAP has been defined in RFC1334.
Figure 19: PPPoE
(CHAP) is the most common
(PAP) is a simple PPP authentication
21
Page 26

GN-BR03GM AirCruiser MIMO Router
Connection
Automatic
Manual When you click “connection”, the system will establish a connection
Dial on Demand
Enable When there is no Internet activity for a period, the WAN connection
Disable
WAN Configuration Tab – Static IP Address
When the GN-BR03GM is powered on, it automatically establishes
a connection with the network. If the link becomes disconnected for
any reason, the GN-BR03GM will re-connect automatically.
to the network. If the link becomes disconnected for any reason,
the GN-BR03GM will not
will automatically end. If a browser is launched again, the
GN-BR03GM will automatically connect to Internet.
When there is no Internet activity for a period, the WAN connection
will automatically end. If a browser is launched again, the
GN-BR03GM will not automatically connect to Internet.
re-connect automatically.
Figure 20: Static IP Address
Your Internet Service Provider will supply you with the following account
information you will need:
• ISP Name
• WAN IP Address
• WAN Subnet Mask
• WAN Gateway
22
Page 27

GN-BR03GM AirCruiser MIMO Router
• DNS1 and DNS2
• DNS Domain Name
This information is all provided by your ISP. In the event that your ISP has
assigned you several Static IP addresses, you will only need to one.
WAN Configuration Tab - PPPoE Unnumber
PPPoE Unnumbered is a PPPoE service provided by some ISPs. The
BR03GM supports services that provide multiple global IP addresses. When
using PPPoE Unnumbered, you can have up to 16 Global IP address
depending upon your ISP’s service policy. Among these Global IP addresses,
one is used as Router’s WAN IP address and the others can be used by the
downstream clients of the Router.
Figure 21: PPPoE Unnumber
Your Internet Service Provider will supply you with the following account
information you will need:
• ISP Name
• User ID/Password
• Service Name
• AC Name
• DNS1 and DNS2
• DNS Domain Name
• WAN IP Address
23
Page 28
GN-BR03GM AirCruiser MIMO Router
• WAN Subnet Mask
Enter the information provided by your ISP for each of your Global IP’s, then
click next to proceed to enter additional IP’s.
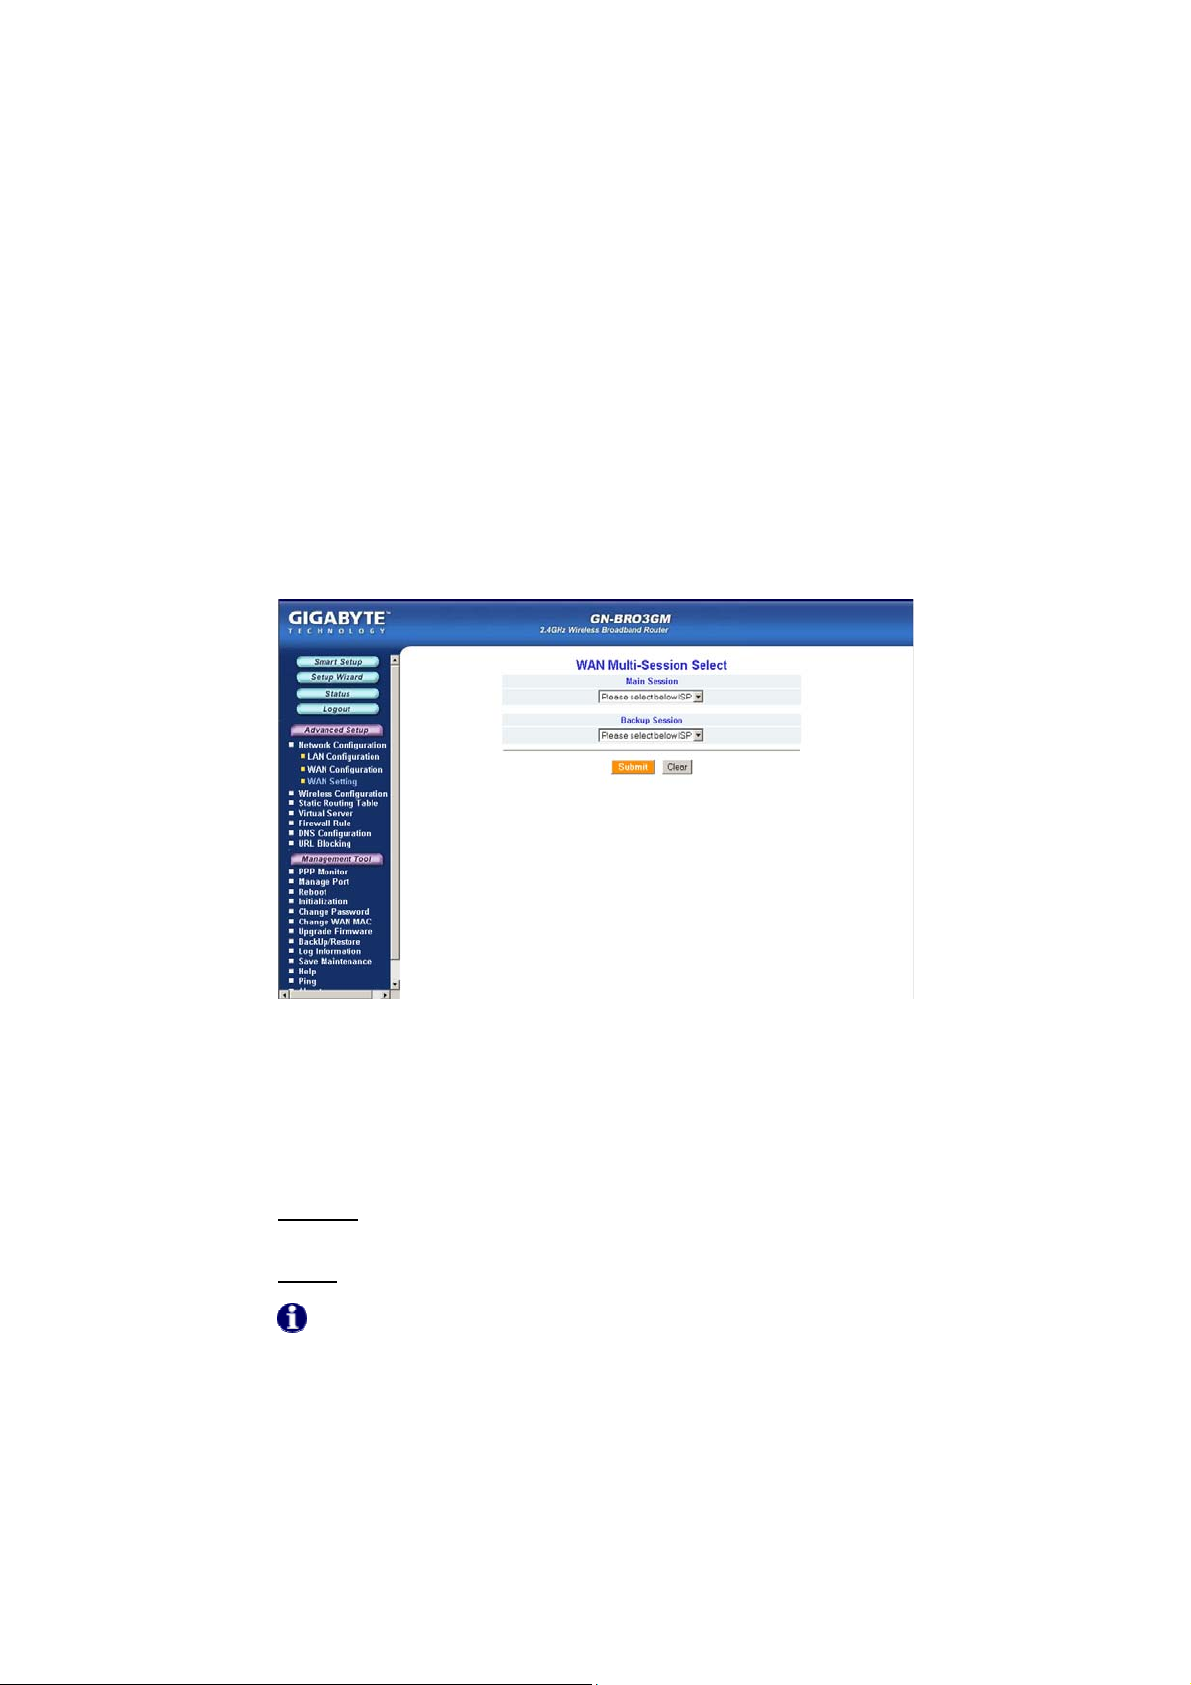
The WAN Settings Tab - WAN Multi-Session Select
The WAN Multi-Session Select Tab displays the settings of the Main Sessi o n
and Backup Session.
Select a WAN connection type for the Main Session from the drop-down menu
and select Backup Session type. The Backup Session will become active if the
Main Session fails to establish a connection to the Internet.
In the event that neither the Main Session nor the Backup Session can
successfully establish a connection with your ISP, the following process will
apply:
Automatic
connection is repeated until successful.
Manual
: Main -> Backup, Main -> Backup (repeat) Attempts to establish
: Main -> Backup (Backup Session attempts only once)
The Backup Session can have a specific LAN type connection assigned.
Figure 22: WAN Setting
24
Page 29
GN-BR03GM AirCruiser MIMO Router
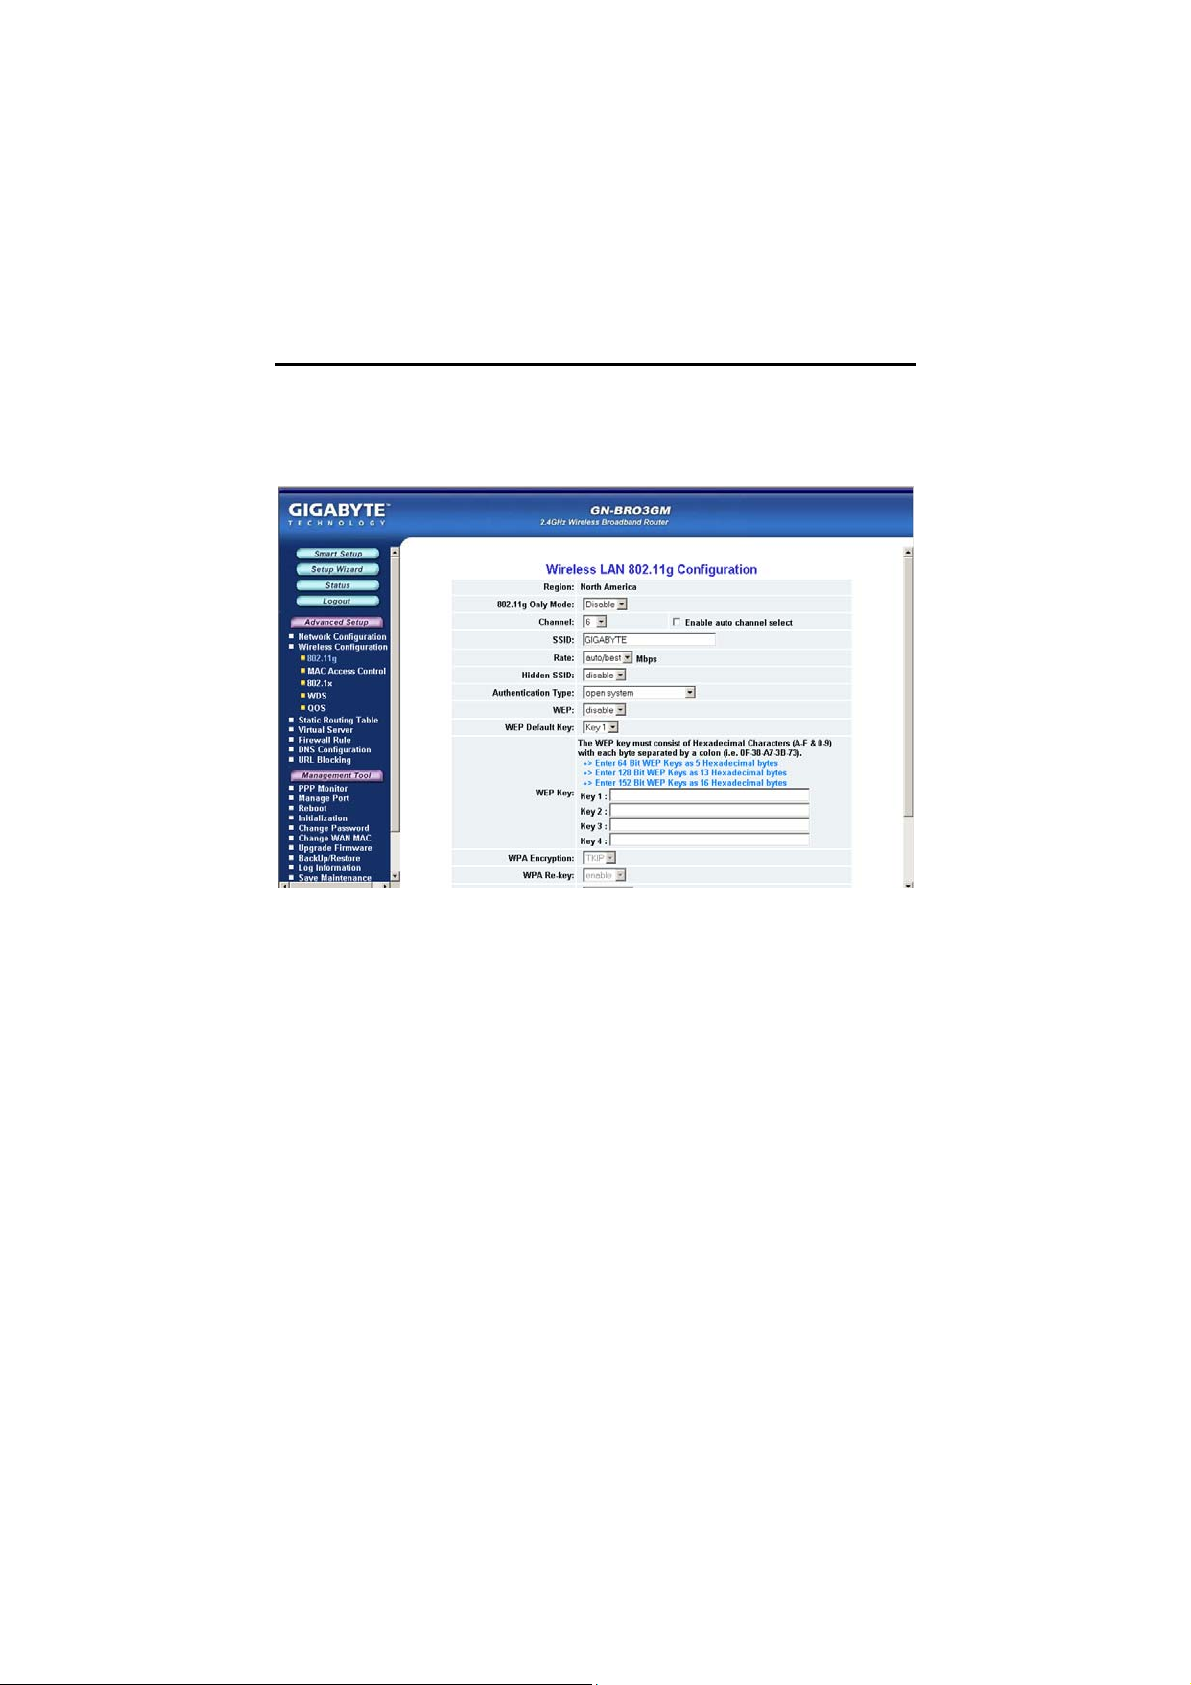
The Wireless Configuration Screen
The Wireless Configuration screen allows you to configure the Router’s
WLAN function.
The 802.11g Tab
Figure 23: 802.11g
Region
Indicates the geographical region you are in. Verify that the region indicated is
correct. If not, please contact your local distributor or dealer immediately.
RF Type
Select the radio frequency (RF) standard or ‘wireless mode’ from the
drop-down list. 802.11g Mixed: Supports both11b and 11g simultaneously,
also working with devices from different vendors.
802.11g Only Mode
The mixture of both 11b and 11g traffic on your wireless network results in the
former reducing the performance of the latter. For this reason, the BR03GM
802.11g Only Mode allows you to restrict all traffic to 11g (54Mbps) traffic only.
Keep in mind, however that enabling this feature comes at the expense of
eliminating all 11b based traffic will be received or transmitted by the BR03GM.
Enable will restrict all traffic to 802.11g traffic, while disable will allow a mixture
of both 11b and 11g. The default setting is disable.
Channel
The channel may be manually changed (if there are other wireless networks
25
Page 30

GN-BR03GM AirCruiser MIMO Router
operating in your area) by selecting a channel from the drop-down list.
SSID
The SSID (Service Set Identifier) is the name of your wireless network. The
SSID is up to 32 ASCII characters in length and case sensitive (i.e. Letters in
upper case “A~Z” and lower case “a~z” are unique). The default SSID is
“GIGABYTE”. To change the SSID, type in the SSID you want to use in the
SSID field and click Submit. If you make a change to the SSID, any wireless
devices on your network must also be reconfigured to connect to the new
network name.
Rate
Select a wireless data transmission rate from the drop- down list. The default
setting auto/best automatically detects and sets the optimum transmission rate.
Hidden SSID
For security purposes, you may choose to hide your network’s SSID by
selecting enable from the drop-down list. This will prevent computers scanning
for the presence of wireless networks to detect your network name. The default
setting is disable.
Authentication Type
Select an authentication type from the drop-down list. The default setting is
Open System.
Open System:
party generates its own key-pair and asks the receiver to accept a randomly
generated key. Once accepted, this key will only be used for a short period of
time. Afterwards, a new key will be generated and agreed upon.
Shared Key:
sender and the receiver. If Shared Key is selected, you cannot choose the
WEP disable option.
WPA Pre-shared key:, The WPA Pre-shared Key authentication standard uses
a password or “ key” between 8 and 32 characters. This encryption key is
changed after every dialog box using the Temporary Key Integrity Protocol
(TKIP), which allows users to change keys based on dialog box and
automatically synchronize keys between devices on the network. The TKIP
encryption algorithm is stricter than the one used by WEP but is based on the
same standard.
WPA: The 802.1x authentication protocol, allows users to authenticate wireless
network access through a RADIUS Server and is a required by WPA standard.
If no RADIUS Server exists in your network environment, you still can use WPA
through the use of WPA Pre-shared Key.
WEP Key
The GN-BR03GM supports two WEP standards: 64-bit and 128-bit. The 64-bits
The sender and the receiver do NOT share a secret key. Each
Authentication is based upon a secret key shared by both the
26
Page 31
GN-BR03GM AirCruiser MIMO Router
encryption uses 40 bits as a secret key, (user-defined) and the remaining 24
bits are reserved. The 128-bits encryption uses 104 bits as a secret key,
(user-defined) and the remaining 24 bits are reserved.
WPA Re-key
Enabling the requirement for WPA rekeying of a Passphrase for increased
security. Default is disable.
WPA Re-key Timer
Specify time (in minutes) for expiration of the current WPA Key.
WPA PSK Passphrase
The Passphrase must be between 8 and 64 characters.
WPA PSK Re-key
A user without a RADIUS server, may specify generating a new WPA PSK key
more frequently than each time he connects to the network.
WPA PSK Re-key Timer
Specify time (in minutes) for expiration of the current WPA PSK key
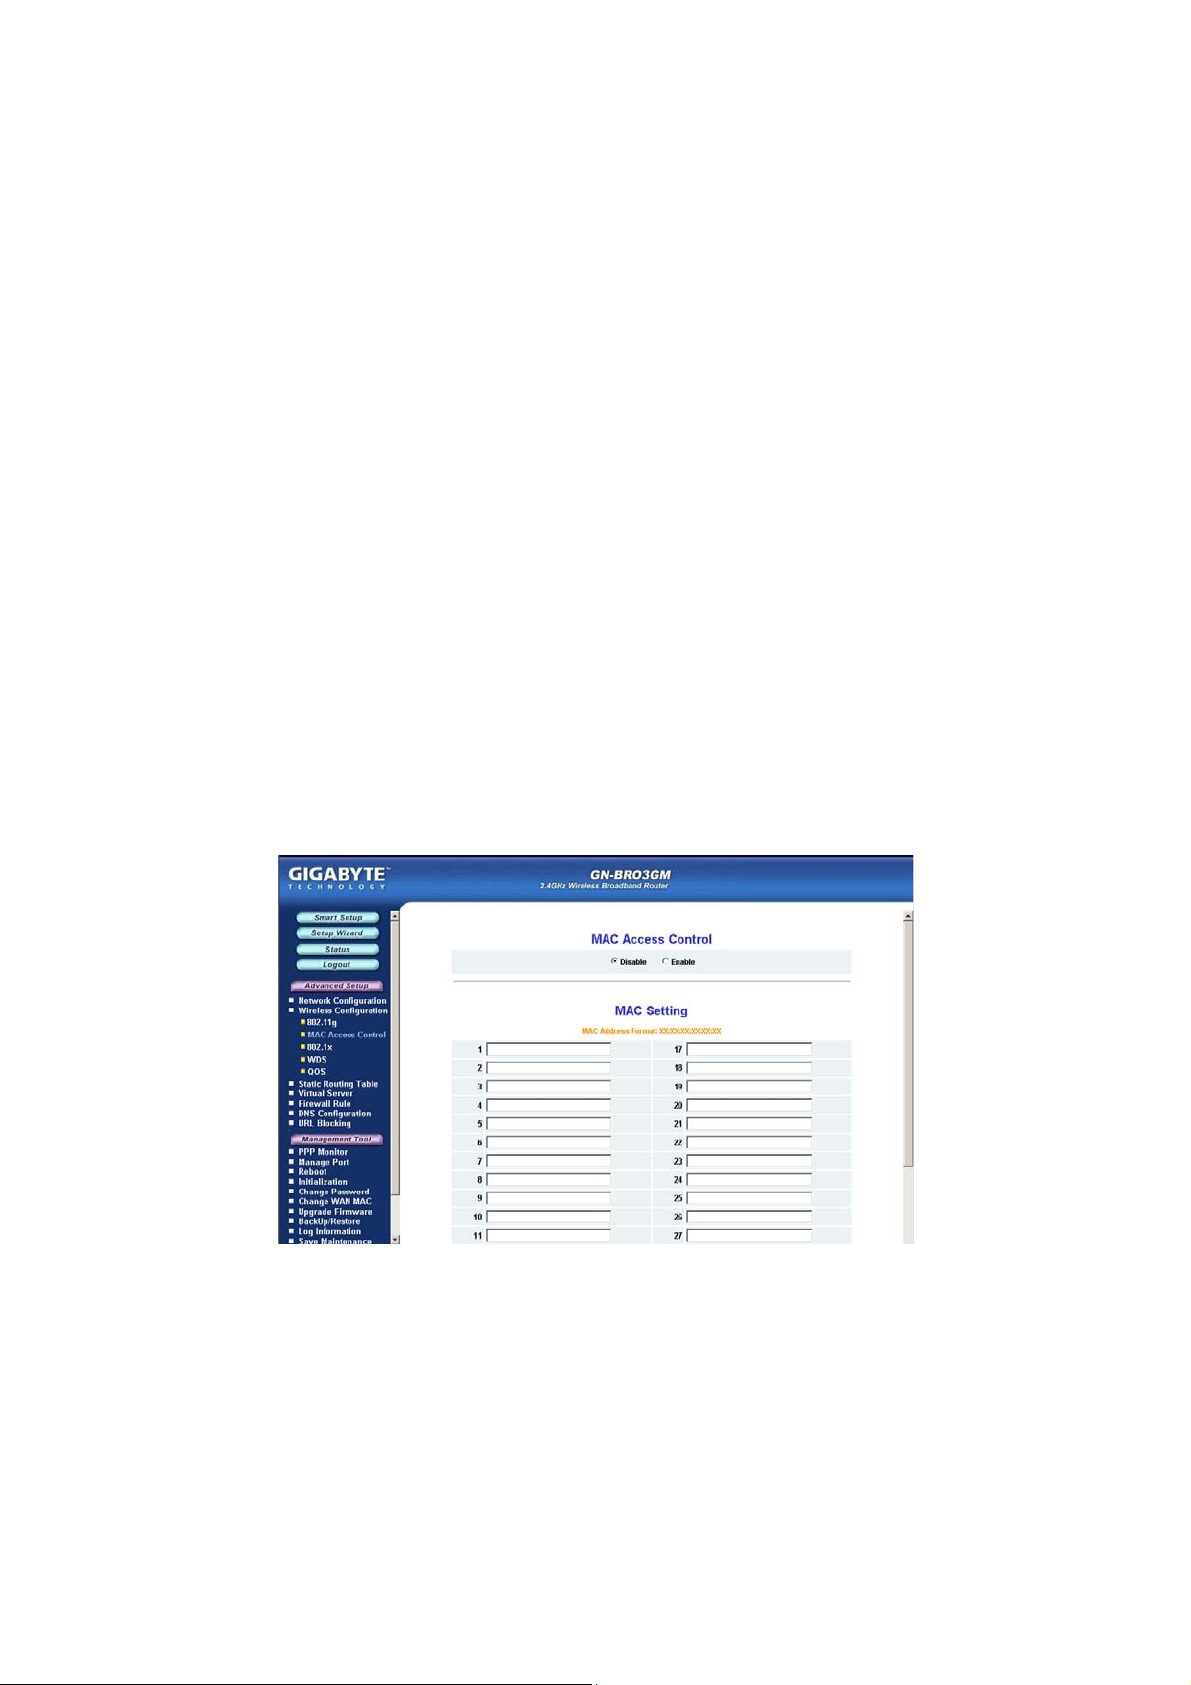
The MAC Access Control Tab
Figure 24: MAC Access Control
The MAC Access Control screen allows you to specify the Media Access
Controller (MAC) address of up to 32 devices on your network. Only those
devices listed in the table will have access to transmit data through the
27
Page 32

GN-BR03GM AirCruiser MIMO Router
28
Page 33

The WDS Tab
GN-BR03GM AirCruiser MIMO Router
Figure 26: WDS Configuration
Wireless Distribution System (WDS) technology enables several access points
to increase the coverage of a wireless network. Although enterprises or home
users can reduce most wiring problems by using access points that support
WDS, they still need cables to connect external ISP.
To use WDS, please make sure:
All routers/AP’s participating in the WDS must use the same RF Channel
DHCP (if used) must only be enabled on the bridge Router and not on
the node AP’s.
Example: Suppose Router1 is connected to the DSL modem, and uses DHCP
to dish out IP’s to your WLAN. To use Router1 to bridge to a remote AP, key
in AP’s Wireless MAC Address in Router1’s WDS configuration list and select
“enable” then press Submit. In AP’s LAN settings, disable DHCP and assure
the AP uses the same RF Channel as the Router1. You should now be able
to connect to Router1 through AP.
Note that bridging between different vendors wireless gear is not
guaranteed. Your GN-BR03GM may only create a WDS environment with other
Gigabyte Routers or GIGABYTE Access Points.
29
Page 34

GN-BR03GM AirCruiser MIMO Router
The Qos Tab
Quality of Service. Required to support wireless multimedia applications and
advanced traffic management. QoS enables Wi-Fi access points to prioritize
traffic and optimize the way shared network resources are allocated among
different applications.
WIth this feature, users can set the data frame transmission priority for Audio,
Video, Background information and Best-Effort to achieve the best performance
from your applications. Warning: The GN-BR03GM doesn’t support VLAN Tag
packet format and only support IPV4 DSCP (Differentiated Services
Codepoint).
AC TYPE A
CWMin Minimum of C
CWMax Maximum of C
AIFS A
TxopLimit Limit time of Transmission Opportunity
ACM A
Ack-policy Acknowledgment Policy (Normal ACK or No Ack)
Figure 27: QoS Parameters of Access Point
ccess Categories (VI,VO,BE and BK)
ontention Window
ontention Window
rbitration Inter Frame Spacing
dmission Control Mandatory
30
Page 35

GN-BR03GM AirCruiser MIMO Router
The Static Routing Table Screen
The Static Routing Table displays the GN-BR03GM routing settings. To add
or modify, enter a value into the field and click the Submit button.
Figure 28: Static Routing Table
Destination IP
Enter the Destination IP address that will be assigned to a specific network or
host.
Netmask
Enter the netmask associated with the Destination IP.
Gateway
Enter an IP address that will be assigned to the interface connecting to
subnets.
Metric
The “Metric” value is a number between 1and 15 that represents the number of
Routers between your network and the destination. Generally, setting the
Metric value as either 2 or 3 is sufficient for most applications. If this is a direct
connection, please set the value to 1. The default setting is 1.
31
Page 36

GN-BR03GM AirCruiser MIMO Router
The Virtual Server Screen
The Virtual Server screen allows you to manage the virtual server settings of
the GN-BR03GM. There are two virtual server options: 1. The router has
only one IP address or, 2. The router has multiple IP addresses (8 or 16 in most
instances). If you have only one IP address click on the PPPoE/DHCP/Static
tab. If you have multiple IP addresses, click on the PPPoE Unnumber tab. The
DMZ Support tab allows you to enable a Demilitarized Zone (Zone) on your
network.
The DMZ Setting Tab
Figure 29: DMZ Setup
With a firewall setup, it sometimes necessary to place some clients (e.g.
Internet games, video conferencing, or VPN connections) outside of the firewall
while leaving the others protected. You can do this using a Demilitarized Zone.
The DMZ feature allows you to specify the IP address of the computer that will
be placed outside the firewall of your network. Enter the IP Address of your
computer (e.g. 192.168.1.2) into the LAN IP Address field and click the Submit
button.
Note: DMZ servers pose a security risk. A computer
designated as the default DMZ server loses much of the
protection of the firewall, and is exposed to exploits from the
Internet. If compromised, the DMZ server can be used to
attack your network.
32
Page 37

GN-BR03GM AirCruiser MIMO Router
The Virtual Server PPPoE/DHCP/Static Configuration Tab
Figure 30: VS-PPPoE DHCP Static Configuraton
The BR03GM is configurable to behave as a Virtual Server, allowing remote
computers on the WAN (Internet) side of the network to be automatically
redirected to local server(s) on the LAN (your private network) side of the
network.
Protocol The protocol used for the virtual service
Port The port number of the service used by the PC on the LAN
side.
Virtual Server IP T he server computer in the LAN that will be providing the
virtual services
For example, if you have an FTP server on the LAN side you wanted Internet
users to access, suppose the PC has a local IP address of 192.168.1.1, you
would use the following virtual server settings:
Protocol: TCP
Port: 21 (FTP uses port 21)
Virtual Server IP: 192.168.1.1
Enable: enable
33
Page 38

GN-BR03GM AirCruiser MIMO Router
The PPPoE Unnumber Tab
Figure 31: VS-PPPoE Unnumber
Advanced feature of the BR03GM is that it supports services that offer multiple
global IP addresses, with each IP address requires its own setting. This
feature is normally only found on enterprise class routers. The BR03GM has
an IP allocation scheme capable of directly assigning global IP to LAN
clients.
You can only take advantage of this feature if your ISP service packages will
provide you with a range of valid “Global IP”. (For example 61.222.10.1 ~
61.222.10.7) These seven addresses can be individually configur ed.
Global IP An IP within the range of IP’s assigned to you by your ISP
Protocol The protocol used for the Unnumbered service
Port The port number of the service used by the LAN side
Virtual Server IP The computer on the LAN that will be providing the
Unnumbered virtual services
Example: Taking the IP address of 192.168.1.1 of a PC connected to the
BR03GM for example would use the following settings:
Global IP: 61.222.10.2
Protocol: TCP
Port: 21
34
Page 39

GN-BR03GM AirCruiser MIMO Router
Virtual Server IP: 192.168.1.1
Enable: enable
The Global IP 61.222.10.2 is now directly assigned to the FTP server at the IP
address 192.168.1.1 located within the BR03GM’s LAN.
The Firewall Rule Screen
The Firewall Rule screen displays your network security settings. Use this
screen to create network security policies to prevent unauthorized access to
your network.
The Security Configuration Tab
Select security configuration options from this page including Security
One-Touch Setting, Stealth Mode and Unlawful Computer Access
Detection. You can select with one click a ‘High” “Medium” or “Low (off)” level
of Security. You can fine tune your security level settings with the One-touch
Settings section. Just check /uncheck the boxes to include/remove that
particular setting.
Figure 32: Security
35
Page 40

GN-BR03GM AirCruiser MIMO Router
The VPN Pass Through Tab
Figure 33: VPN Pass Through
A Virtual Private Network (VPN) is a type of secured private network connection,
built upon publicly-accessible infrastructure such as the Internet. They usually
provide connectivity to various devices behind a gateway or firewall.
The GN-BR03GM supports Internet-industry standard technologies to provide
open and interoperable VPN solutions, including Internet Protocol Security
(IPSec), Layer 2 Tunneling Protocol (L2TP) and Point-to-Point Tunneling
Protocol (PPTP).
PPTP Pass Through setting
Point-to-Point Tunneling Protocol (PPTP) allows you to establish a connection
to an enterprise network. To allow PPTP tunnels to pass through the Router,
click Enable and key in the Router’s IP address.
IPSec Pass Through setting
IP Security (IPSec) provides authentication and encryption. Since it is mainly a
Layer 3 technology, it can secure all data on the network. To allow IPSec
tunnels to pass through the Router, click Enable and key in the Router’s IP
address.
L2TP Pass Through setting
Layer 2 Tunneling Protocol (L2TP) is an extension of the Point-to-Point
Tunneling Protocol and is also used to establish virtual private networks. To
allow L2TP tunnels to pass through the Router, click Enable, and key in the
Router’s IP address.
36
Page 41

The DNS Configuration Screen
GN-BR03GM AirCruiser MIMO Router
DNS Relay
DNS Relay will set your PC's DNS entries to point to the Router’s Gateway
address, which will then forward DNS queries to the DNS server used by the
Router. This is needed when using DHCP to assign IP address to the PC’s in
you LAN. The default value of DNS relay is Enable.
Dynamic DNS
The GN-BR03GM offers a Dynamic Domain Name Server (DDNS) service
that allows you to assign a fixed host and domain name to a dynamic Internet
IP address. This gives Internet users the ability to connect with a virtual sever
using a FQDN, rather than with an IP address. Before using this feature, you
must first register an account with the dynamic DNS service.
(http://www.dyndns.org
Service Provider From this pull down menu, enter the DDNS service with
Domain Name This is the DDNS URL assigned by the DDNS service.
Login Name Enter the User Name for your DDNS account.
Password Enter the Password for your DDNS account.
Wildcards If your dynamic DNS provider allows using wildcards in resolving
your URL, you may select Enable to activate this function.
Figure 34: DNS Configuration
)
which you have membership.
37
Page 42

GN-BR03GM AirCruiser MIMO Router
The URL Blocking Configuration Screen
The URL Blocking Configuration screen allows you to restrict access based
upon specific web addresses and/or keywords.
To activate the URL Blocking feature:
Disable/Enable Select the Enable option to enable.
Monitor Port Select port 80 to monitor the World Wide Web
Keyword Enter the keyword or domain in the Keyword field that you
All URL’s with those keywords in the DOMAIN name will now be blocked.
Figure 35: URL Blocking Configuration
wish to block.
38
Page 43

GN-BR03GM AirCruiser MIMO Router
Chapter 7
Using Management Tools
Overview
Management Tool Screens offer management of the Router itself, such as
Firmware Updates, Initialization, and Password administration etc.
The instructions in this chapter will help you how to use the management tools
of the web-based utility to effectively manage your GN-BR03GM AirCruiser
MIMO router.
The PPP Monitor Screen
The PPP Monitor screen displays the WAN (Internet) connection status. Click
the Disconnect button to end your current session. Click the Connect button
to re-connect to the ISP.
Figure 36: PPP Monitor
Manage Port Configuration Screen
The Manage Port Configuration screen allows you to change the port on
which the Router’s configuration utility runs. The default is Port 80 but users
can change this to any port they wish (like 8080, 8000 or else port). In this case,
to access the Router configuration utility, you would type
http://192.168.1.254:8080
39
Page 44

GN-BR03GM AirCruiser MIMO Router
Figure 37: Manage Port Configuration
The Reboot Screen
The Reboot screen allows you to reboot the GN-BR03GM. You are also
automatically brought to this screen after you confirm OK to any change of
Router settings.
Figure 38: Reboot Router
40
Page 45

GN-BR03GM AirCruiser MIMO Router
The Initialization Screen
The Initialization screen allows you to reset the GN-BR03GM back to its
original factory settings. To initialize the router, use the tip of a pencil or a
paperclip to press and hold the init button for 5 seconds. (The init button is
located on the side of the unit, next to the AC power input).
Figure 39: Router Initialization
The Change Password Screen
The Change Password screen allows the administrator to create a new
password for the GN-BR03GM. To change an existing password, enter your
account and new password and after re-typing the password to confirm, click
the Submit button.
41
Page 46

GN-BR03GM AirCruiser MIMO Router
Figure 40: Change Password
The Change WAN MAC Screen
The Change WAN MAC screen allows you to assign a new MAC address. If
your ISP requires MAC address authentication, chose the Assign WAN MAC
option and enter the ISP authorized MAC address in the New WAN MAC
Address field and click the Submit button. If you want to restore the factory
default MAC address, choose the Restore Default WAN MAC option and click
the Submit button.
Figure 41: Change WAN MAC
42
Page 47

GN-BR03GM AirCruiser MIMO Router
The Upgrade Firmware Screen
The Upgrade Firmware screen allows you to update the current GN-BR03GM
firmware to the latest version directly from the GIGABYTE website. Click the
Browse button to locate the firmware file which you just downloaded from the
GIGABYTE website, and then click Upgrade. Warning: Assure you are
installing the correct firmware version.
Figure 42: Upgrade Firmware
The Backup / Restore Screen
The Backup / Restore screen allows you to save the current configuration
settings of the GN-BR03GM as a temp file onto your computer. To revert the
GN-BR03GM to back to a previously saved configuration settings, click the
Browse to locate the saved configuration file. Then, click the Restore button.
43
Page 48

GN-BR03GM AirCruiser MIMO Router
Figure 43: BackUp Restore
The Log Information Screen
The GN-BR03GM has advanced firewall features, and can effectively prevent
intruders and unwanted attacks on your network, while keeping logs of all such
attempts including all legitimate WAN connections and UPnP logs. Click on
Firewall Log, WAN Connection or UPnP Log to view the list.
The Firewall Log Tab
Figure 44: Firewall Log
44
Page 49

GN-BR03GM AirCruiser MIMO Router
The WAN Connection Tab
In the WAN connection Log, all logins are chronologically ordered, with
indications of connection type and event type.
Figure 45: WAN Connection Log
The UPnP Log Tab
The Universal Plug and Play log screen records and displays UPnP packets
reaching your BR03GM. It logs details such as Source IP, time of connection,
connection status, external port and protocol for LAN port(s) that are UPnP
enabled. To refresh the list, press “Check Again”.
45
Page 50

GN-BR03GM AirCruiser MIMO Router
Figure 46: UPnP Log
The Save Maintenance Screen
The Save Maintenance screen allows you to save logs and status information
as a file which can then be sent to the Technical Support team at GIGABYTE.
Figure 47: Save Maintenance
46
Page 51

GN-BR03GM AirCruiser MIMO Router
The Ping Screen
‘Pinging' involves sending a packet of data to a site and recording how long it
takes for the site to acknowledge receipt. This is useful if you think that a web
site might be slow or unavailable. Type the IP Address and click the Ping to
start.
Figure 48: Ping
The Help Screen
The Help screen is where you can access online guide to assist in configuring
the GN-BR03GM.
47
Page 52

GN-BR03GM AirCruiser MIMO Router
Figure 49: Help
The About Screen
The About screen displays the Router model name and firmware version.
Figure 50: About
48
Page 53

GN-BR03GM AirCruiser MIMO Router
Appendix A
FAQ
This section provides solutions to common problems that may occur during
installation, configuration or use of the GN-BR03GM.
Q: What is the default IP address for the BR03GM?
A: 192.168.1.254
Q: I can’t remember the password or IP address of the router.
A: You can resolve this by pressi ng the “Init” button on the side of the router.
You can also reset the Router from the Web Utility <Initialization Page>.
The Router will reboot and all settings (including the default password) will
be restored to their default values.
Q: What is the default username and password for the BR03GM?
A: Username is “admin” and password is “admin”.
Q: Why do I have to setup ISP information into my Router?
A: ISPs require a special login protocol, in which you must enter a login
name and password in order to access the Internet. In order to share the
Internet connection among several computers, you must configure it with
the TCP/IP information that your one PC would normally use.
Q: Where in the network do I connect the router?
A: In a typical environment, the GN-BR03GM i s installed directly onto the
ADSL/Cable Modem. Plug the RJ45 Ethernet cable of the ADSL or Cable
Modem into the WAN port of the Router.
Q: Why should I use the GN-BR03GM to work as a DHCP server?
A: Using the BR03GM Router as a DHCP server By default, the router will
function as a DHCP (Dynamic Host Configuration Protocol) server,
allowing it to assign IP, DNS server, and default gateway addresses to all
computers connected to the router's LAN. The assigned default gateway
address is the LAN address of the router. IP addresses will be assigned to
the attached PCs from a pool of addresses specified in this menu. Each
pool address is tested before it is assigned to avoid duplicate addresses
on the LAN. DCHP helps prevent IP conflicts.
Q: What is the IEEE 802.11g standard?
A: The IEEE 802.11g standard specifies data rates of up to 54 Mbps in the
2.45-GHz band. It uses Orthogonal Frequency Division Multiplexing
(OFDM), which is provided by this standard and is compatible with
802.11b standard offering speeds of about 11 Mbps. This standard uses
Complementary Code Keying (CCK) modulation. Both 11g and 11 b can
operate at a range of up to 300 feet.
49
Page 54

GN-BR03GM AirCruiser MIMO Router
Q: When using BR03GM in Australia, you will use PPPoA protocol. How
to set up your configuration in BR03GM?
A: Suggestion 1, Using Static IP.
Suggestion 2, Using DHCP client to get IP from ADSL/ Cable modem.
50
Page 55

GN-BR03GM AirCruiser MIMO Router
Appendix B
Using Setup Wizard
In addition to Smart Setup, your BR03GM Router’s ISP settings may be
configured manually using Setup Wizard. Press the Setup Wizard menu button
to proceed. You will be presented with the screen shown below. Please
choose your Internet connection (WAN) type from the list and follow the steps
for instructions
PPPoE: Most common type for typical home users. If
your broadband ISP service PPPoE, please
select this item, click the Next button and then
Step 3 of this section
go to
Dynamic IP Address:
If your broadband ISP service is an ‘always-on connection’, but you
do not have a static IP, please select this item,
click the Next button and then go to Step 7 of
this section.
Static IP Address:
Common for Enterprise Internet connections. If your broadband ISP
service is a ‘fixed-connection’ and your IP
never changes, please select this item, click
51
Page 56

GN-BR03GM AirCruiser MIMO Router
the Next button and then go to Step 11 of this
section.
PPPoE Unnumber:
Common in Japan and some European Countries. If you use PPPoE
Unnumber, please select this item, click the
Next button and then go to Step 15 of this
section.
Connection Type - PPPoE
On the PPPoE screen, enter your User Name and Password as
provided by your ISP. Click the Finish button to continue with
setup.
The Setup Completed screen appears. Click the Reboot button to
restart your router so that the settings take effect.
While the router is rebooting, the Router Restarting Screen will
display the time remaining. Please be patient and let the router
restart itself.
52
Page 57

GN-BR03GM AirCruiser MIMO Router
Once your router has successfully rebooted, it will load Router
Welcome Screen. Setup is complete.
Connection Type - Dynamic IP Address
If you have selected Dynamic IP Address ISP Type, the Dynamic IP
Address Screen will display, prompting you for the ISP information.
Enter it and click the Finish button to continue with router setup.
The Setup Completed appears. Click the Reboot button to restart
your router so that the settings take effect
While the router is rebooting, the Router Restarting screen will
display the time remaining.
Once your router has successfully rebooted, it will load Router
Welcome Screen. Setup is complete.
53
Page 58
GN-BR03GM AirCruiser MIMO Router
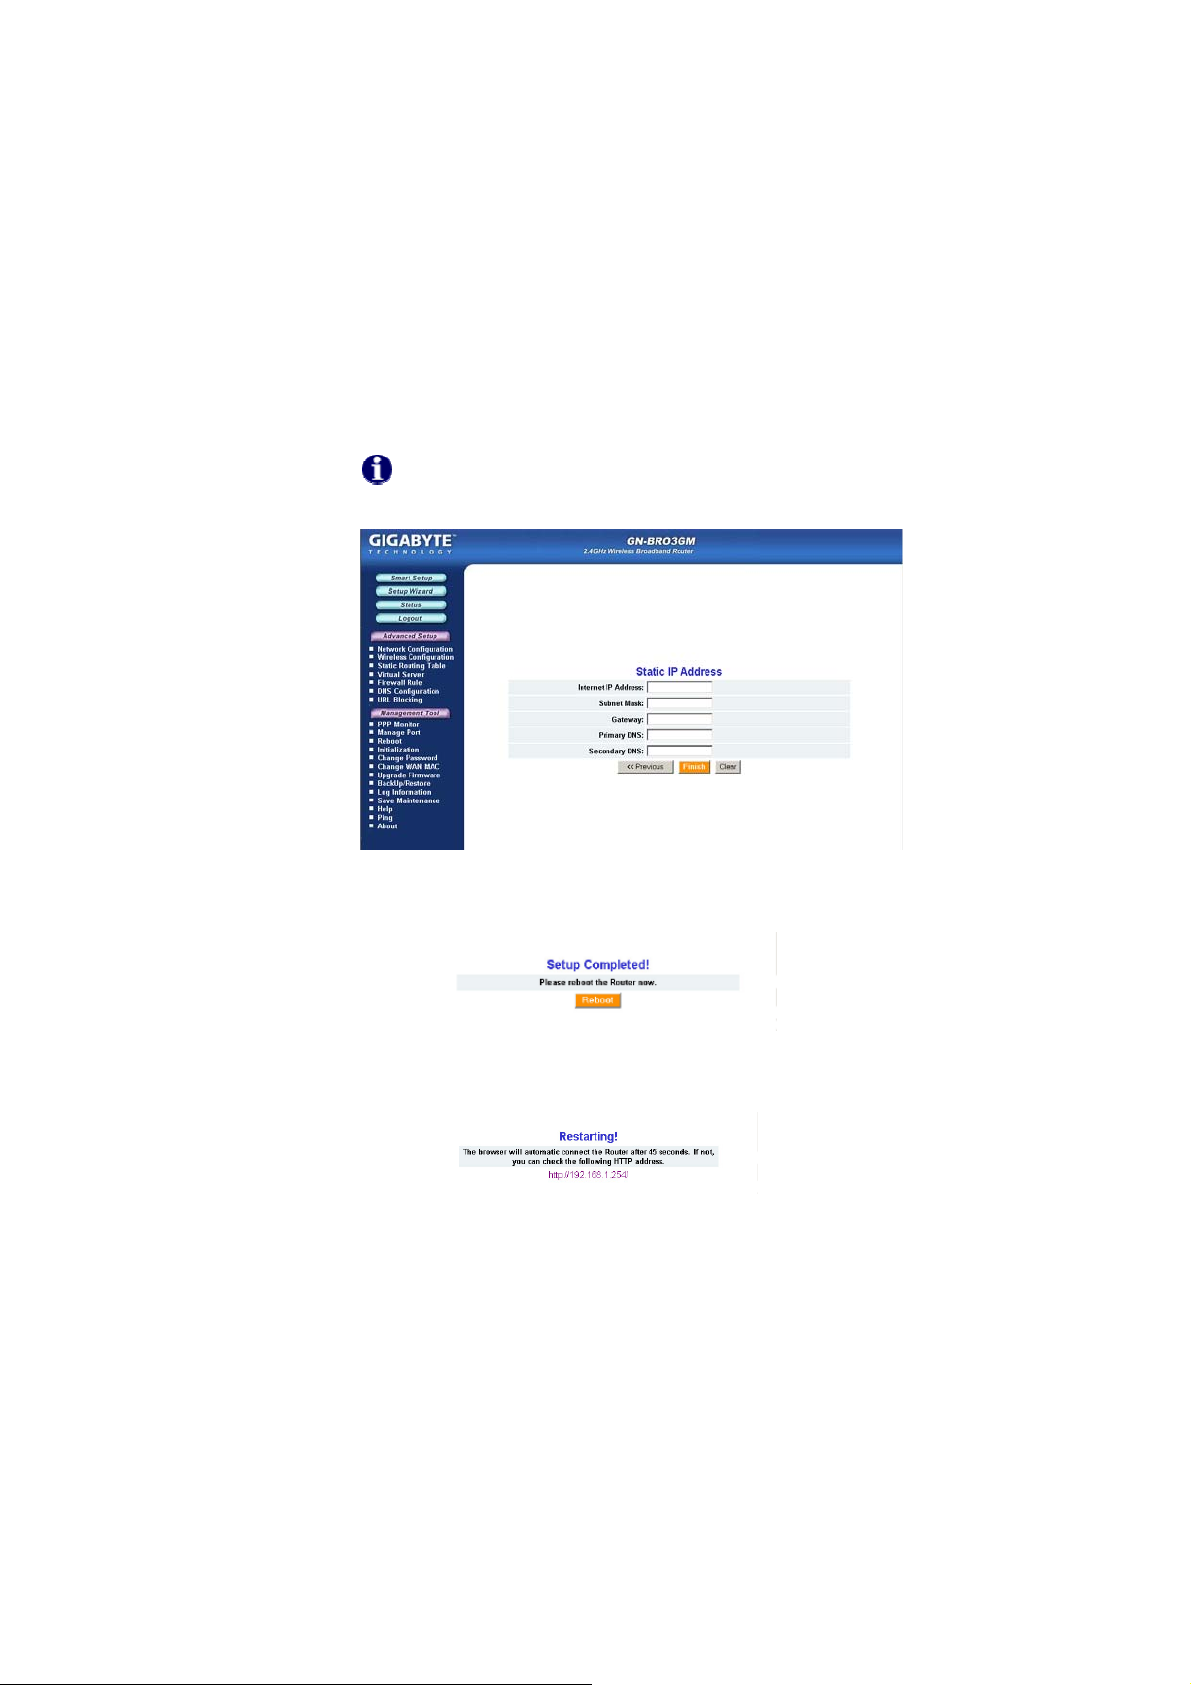
Connection Type - Static IP Addres s
On the Static IP Address screen, type in the information provided by
your ISP, and then click the Finish button to continue with router
setup.
If your ISP has assigned you several IP addresses, please enter
only one.
A screen with the message Setup Completed appears. Click the
Reboot button to restart your router so that the settings take effect
While the router is rebooting, the Router Restarting screen will
display the time remaining.
Once your router has successfully rebooted, it will load Router
Welcome Screen. Setup is complete.
54
Page 59

GN-BR03GM AirCruiser MIMO Router
Connection Type – PPPoE Unnumber
On the PPPoE Unnumber screen, type in the information provided
by your ISP, and then click the Finish button to continue with router
setup.
The Setup Completed screen appears. Click the Reboot button to
restart your router so that the settings take effect.
While the router is rebooting, the Router Restarting Screen will
display the time remaining. Please be patient and let the router
restart itself.
Once your router has successfully rebooted, it will load Router
Welcome Screen. Setup is complete.
55
Page 60

GN-BR03GM AirCruiser MIMO Router
Appendix C
Configuring TCP/IP Settings
Computers access the Internet using a protocol called TCP/IP (Transmission
Control Protocol/ Internet Protocol). Each computer on your network must have
TCP/IP installed and selected as its networking protocol. If a Network Interface
Card (NIC) is already installed in your PC, then TCP/ IP is probably already
installed as well. Please follow the steps in this chapter to assure the correct
TCP/IP settings. For advanced users who know the TCP/IP settings are
already correct, you may skip this section and proceed directly to Chapter 6
Advanced Setup.
Enabling DHCP to Automatically Configure TCP/IP Settings
Each PC using accessing the wireless router must be assigned specific
information about itself and resources that are available on its network. The
simplest way to configure this is to allow the PC to automatically assign the IP
by using a DHCP server. Follow the steps below to allow windows to
automatically assign IP numbers for you.
Step 1 Click the Start button. Select Settings and then click the Control
Panel icon.
Step 2 Double-click the Network and Dial-up Connection icon.
56
Page 61

GN-BR03GM AirCruiser MIMO Router
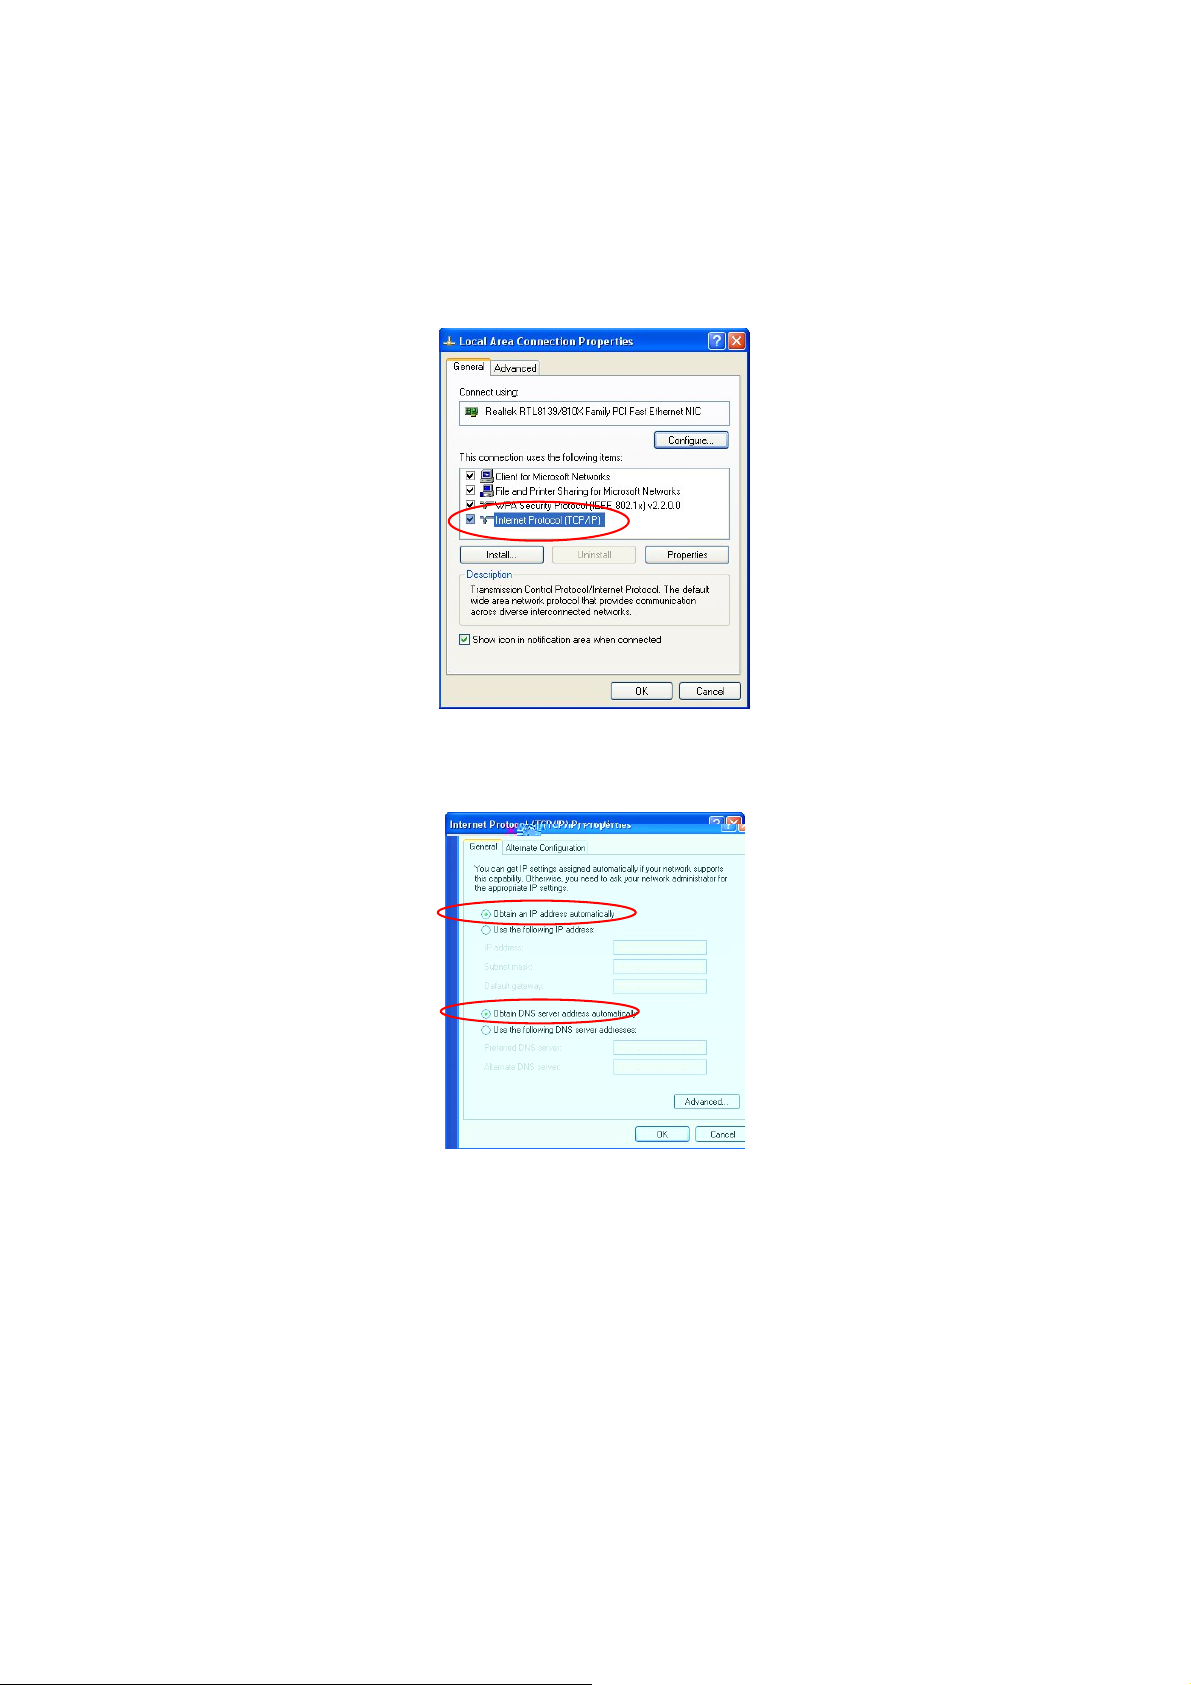
Step 3 Double-click the Local Area Connection icon, and then click the
Properties button.
Step 4 The Local Area Connection Properties window will appear. For the
applicable Ethernet / wireless adapter, make sure that there is a
check in the Internet Protocol (TCP/IP) checkbox, then double-click
on “Internet Protocol (TCP/IP)”
57
Page 62
GN-BR03GM AirCruiser MIMO Router
Step 5 Select both the Obtain IP address automatically and Obtain DNS
server address automatically, options and then click OK. Continue
clicking on the OK button to complete the PC configuration.
Windows will now automatically assign IP numbers to computers connecting to
your GN-BR03GM.
58
Page 63
GN-BR03GM AirCruiser MIMO Router
Appendix D
Troubleshooting
Problem 1: Cannot connect to the Router’s Web-based Utility.
Response:
• Make sure that your Router uses DHCP, and make sure your
PC’s IP address is on the same subnet as the router.
• Check to see if your web browser is automatically detecting
LAN settings.
• Try closing all web browsers and trying again.
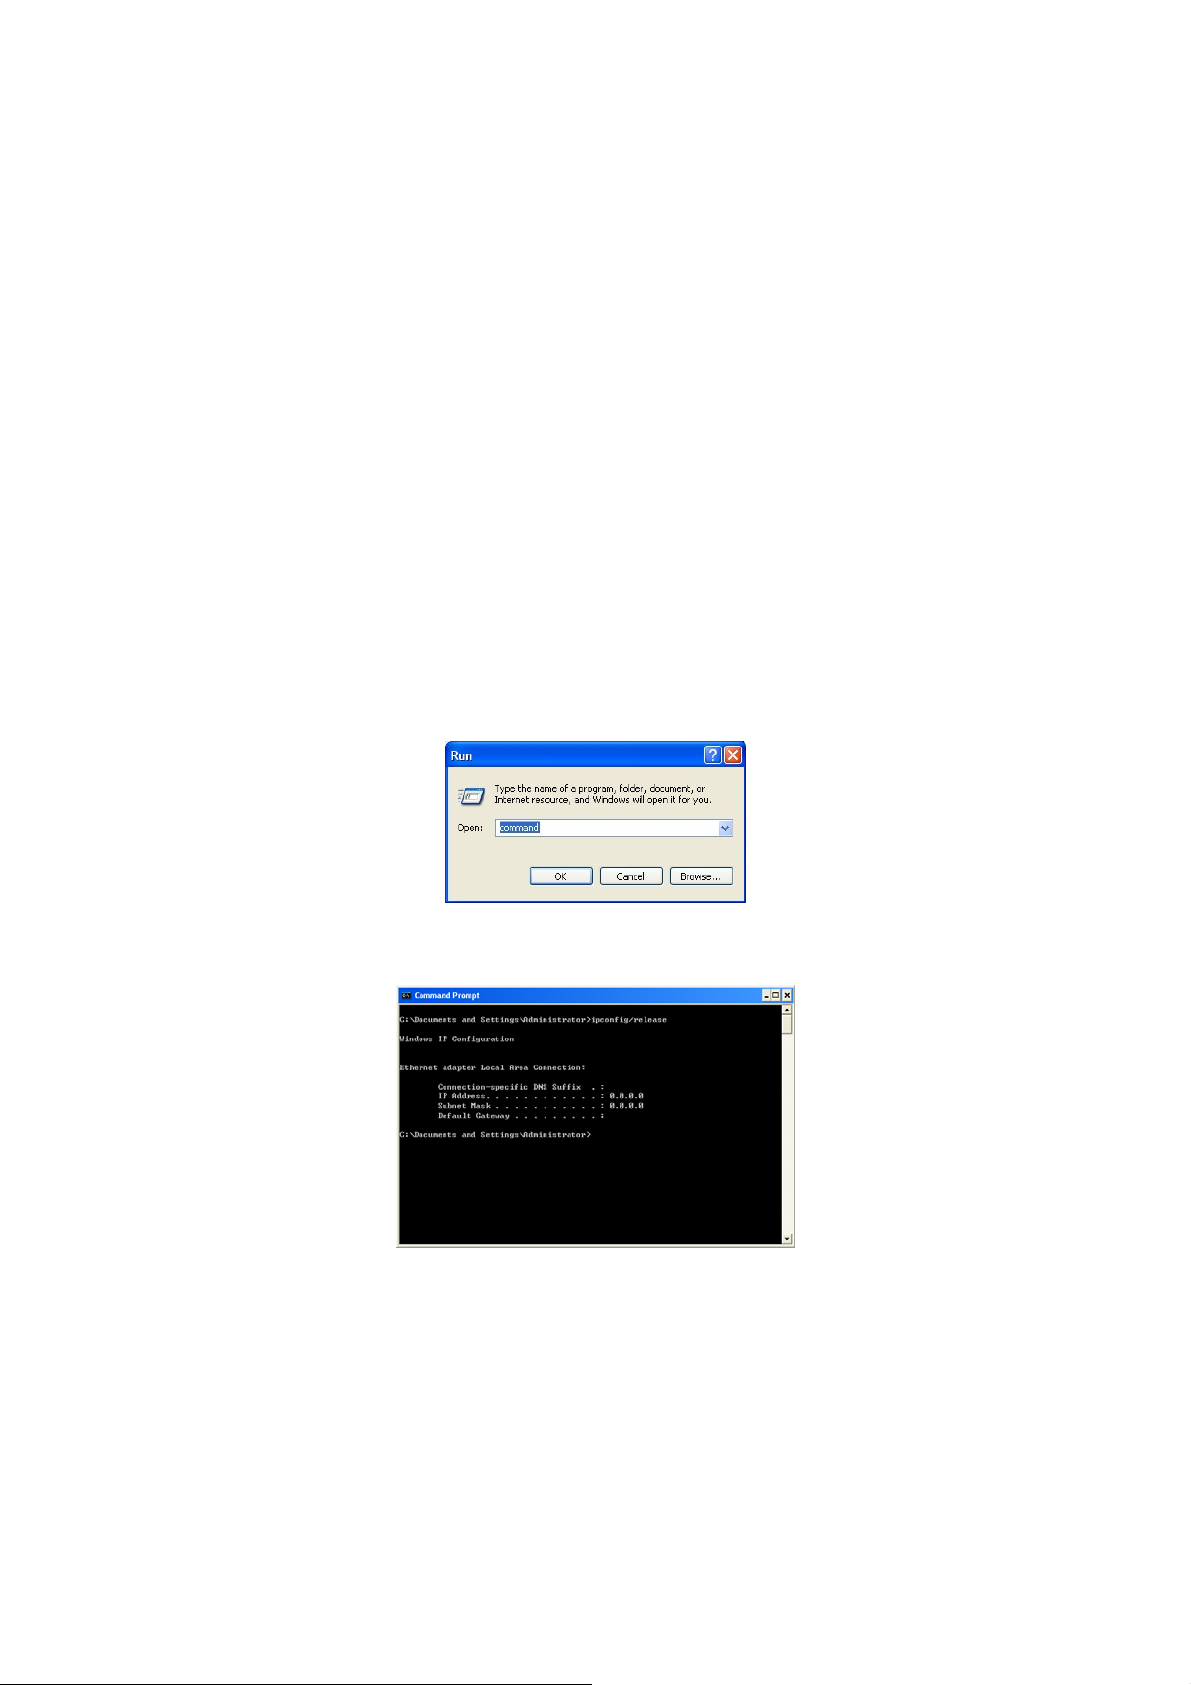
Make sure that your Router uses DHCP, and make sure your PC’s IP
address is on the same subnet as the router.
Step 1 Click the Start button. Select Run, then type “command”. Press OK.
Step 2 At the command prompt, type “ipconfig /release” and press the
ENTER key.
Step 3 At the next command prompt, type “ipconfig /renew” and press the
ENTER key.
59
Page 64

GN-BR03GM AirCruiser MIMO Router
The default gateway represents the IP address of your GN-BR03GM, that is:
192.168.1.254. All computers accessing this Router MUST be in the same
subnet (192.168.1.x, where x is anything between 1 and 253)
In the above example, the BR03GM gateway shown above is 192.168.1.254,
and the PC’s IP address is 192.168.1.2
Check to see if your web browser is automatically detecting LAN settings
Step 1 Open Internet Explorer. From the menu select Tools and then
click Internet Options.
60
Page 65

GN-BR03GM AirCruiser MIMO Router
Step 2 From the Internet Options window, click the Connections tab, and
then click the LAN Settings button (see figure below).
Step 3 Now verify that none of the checkboxes have been ticked, and click
on the OK button. Now you will be able to login to the Router and
configure or change network settings.
61
Page 66

GN-BR03GM AirCruiser MIMO Router
Problem 2: I can’t connect to the Internet
Response :
• Check that the power cord is connected properly, and the
router’s power LED is lit green.
• Verify that all the TCP/IP configuration settings are correct.
(Problem 1 above)
• Check that your ADSL/Cable Modem is operating normally,
and/or you have ISP service available.
• Check that all network cabling is properly connected.
62
Page 67

GN-BR03GM AirCruiser MIMO Router
Appendix E
Glossary
802.11e
An IEEE standard that adds Quality of Service (QoS) features and multimedia
support to the existing 802.11b, 802.11g, and 802.11a wireless networks.
ADSL
Asymmetric digital subscriber line (ADSL) is a new modem technology that
converts existing twisted-pair telephone lines into access paths for high-speed
communication of various sorts.
Auto-MDI/MDIX
On a network hub or switch, an auto-MDI/MDIX port automatically senses if it
needs to act as a MDI or MDIX port. The auto- MDI/MDIX capability eliminates
the need for crossover cables.
Auto-negotiate
To automatically det ermine the correct setting. The term is often used with
communications and networking
DHCP
The Dynamic Host Configuration Protocol (DHCP) is an Internet protocol for
automating the configuration of computers that use TCP/IP. DHCP can be used
to automatically assign IP addresses, to deliver TCP/IP stack configuration
parameters such as the subnet mask and default router, and to provide other
configuration information such as the addresses for printer, time and news
servers.
DMZ
In computer networks, a DMZ (demilitarized zone) is a computer host or small
network inserted as a "neutral zone" between a company's private net work and
the outside public network. It prevents outside users from getting direct access
to a server that stores company data. Typically, the DMZ contains devices
accessible to Internet traffic, such as Web (HTTP) servers, FTP servers, SMTP
(e-mail) servers and DNS servers.
DNS
The Domain Name System (DNS) is a distributed Internet directory service.
DNS is used mostly to translate between domain names and IP addresses, and
to control Internet email delivery. Most Internet services rely on DNS to work. If
DNS fails, web sites cannot be located and email delivery service will be
suspended.
Dynamic IP Address
An IP address is automatically assigned to a user’s AP in a TCP/IP network
typically by a DHCP server.
63
Page 68

GN-BR03GM AirCruiser MIMO Router
Firewall
A system designed to prevent unauthorized access to or from a private network.
Firewalls can be implemented in both hardware and software, or a combination
of both. Firewalls are frequently used to prevent unauthorized Internet users
from accessing private networks connected to the Internet, especially intranets.
All messages entering or leaving the intranet pass through the firewall, which
examines each message and blocks those that do not meet the specified
security criteria.
Gateway
A device, usually a Router, that connects hosts on a local network to other
networks.
IP Address
Every PC on the Internet has a unique identifying number, called an IP Address.
A typical IP address looks like this: 216.27.61.137
IPSec
IPSec stands for IP Security. It provides authentication and encryption over the
Internet. It functions at Layer 3 and thus secures everything on the network. It
has become a standard protocol used for virtual private networks (VPNs).
MAC Address
On a local area network (LAN) or other network, the MAC (Media Access
Control) address is your computer's unique hardware number. Usually written
as: 01:23:45:67:89:ab
MTU
The size in bytes of the largest packet that can be sent or received.
NAT
A technique by which several hosts share a single IP address for accessing to
the Internet.
Ping (Packet Internet Groper)
A utility to determine whether a specific IP address is accessible. It works by
sending a packet to the specified address and waiting for a reply. PING is used
primarily to troubleshoot Internet connections.
SSID
SSID is the name representing the Router in WLAN.
PPPoE
Point-to-Point over Ethernet is a protocol for connecting remote hosts to the
Internet over an always-on connection by simulating a dial-up connection.
QoS
Quality of Service. Required to support wireless multimedia applications and
64
Page 69

GN-BR03GM AirCruiser MIMO Router
advanced traffic management. QoS enables Wi-Fi access points to prioritize
traffic and optimize the way shared network resources are allocated among
different applications. Without QoS, all applications running on different devices
have equal opportunity to transmit data frames. That works well for data traffic
from applications such as web browsers, file transfers, or e-mail but it is
inadequate for multimedia applications. Voice over Internet Protocol (VoIP),
video streaming, and interactive gaming are highly sensitive to latency
increases and throughput reductions and require QoS. QoS extensions for
802.11 networks will be addressed in the upcoming IEEE 802.11e standard.
Router
A device that forwards data packets along networks. A router is connected to at
least two networks, commonly two LANs or WANs or a LAN and its ISP
network. Routers are located at gateways, the places where two or more
networks connect.
Subnet Mask
A mask used to determine which subnet an IP address belongs to. An IP
address has two components, the network address and the host address.
Subnetting enables the network administrator to further divide the host part of
the address into two or more subnets.
TCP/IP
TCP/IP (Transmission Control Protocol/Internet Protocol), the suite of
communications protocols used to connect hosts on the Internet.
VPN
Virtual private networks are secured private network connections, built on top of
publicly accessible infrastructure, such as the Internet or the public telephone
network. VPNs typically employ some combination of encryption, digital
certificates, strong user authentication and access control to provide security to
the traffic they carry. They usually provide connectivity to many machines
behind a gateway or firewall.
WAN
Wide Area Network, a communication network that covers a relatively broad
geographic area, consisting of two or more LANs. Broadband communication
over the WAN is often through public networks such as the ADSL or Cable
systems, or through leased lines or satellites. To simplify it, please image
network as a WAN.
WEP
WEP (Wired Equivalent Privacy) is a data privacy mechanism based on a
64/128-bit shared key algorithm, as described in the IEEE 802.11 standard.
WMM™
Wi-Fi Multimedia. A group of features for wireless networks that improve the
user experience for audio, video and voice applications. WMM is based on a
subset of the IEEE 802.11e WLAN QoS draft standard. WMM adds prioritized
65
Page 70

GN-BR03GM AirCruiser MIMO Router
capabilities to Wi-Fi networks and optimizes their performance when multiple
concurring applications, each with different latency and throughput
requirements, compete for network resources. By using WMM, end-user
satisfaction is maintained in a wider variety of environments and traffic
conditions. WMM makes it possible for home network users and enterprise
network managers to decide which data streams are most important and assign
them a higher traffic priority.
66
Page 71

GN-BR03GM AirCruiser MIMO Router
Appendix F
Specifications
System
CPU & Wireless
Standards
Operating Range
Power Consumption 1200mA @ Transmitting, 1150mA @ Receiving
RF – 802.11b
Frequency Band 2412 ~ 2484 MHz (subject to local regulation)
Modulation Technology DSSS (Direct Sequence S pread Spectrum)
Modulation Techniques DBPSK, DQPSK, CCK
Data Rates 11, 5.5, 2, 1 Mbps, auto fallback
Peak Output power 20 dBm @ Nominal Temp Range
Receive Sensitivity
Antenna
RF – 802.11g (backward compatible to 802.11b)
Realtek RTL8651B with Ralink RT2661(MAC) &
RT2529 (RF)
IEEE 802.3 (10BaseT), IEEE 802.3u (100BaseTX),
IEEE 802.11b/g (Wireless)
Wireless - Open space: 100 – 300m; Indoor: 30 100m
-85 dBm @ 11 Mbps date rate at nominal
temperature
2 external dipole antennas, 1 internal printed
antenna
Frequency Band 2412 ~ 2484 MHz (subject to local regulation)
Modulation Technology OFDM and DSSS
Modulation Techniques
Data Rates
Peak Output power 20 dBm @ Nominal Temp Range
Receive Sensitivity
Antenna
64QAM, 16QAM, QPSK, BPSK, DBPSK, DQPSK,
CCK
54, 48, 36, 24, 18, 12, 11, 9, 6, 5.5, 2, 1 Mbps, auto
fallback
-68 dBm @ 54 Mbps date rate at nominal
temperature
2 external dipole antennas, 1 internal printed
antenna
67
Page 72

GN-BR03GM AirCruiser MIMO Router
Regulatory and Environmental Compliance
EMC certification
Temperature Range
Humidity 10% ~ 85% Non-condensing
Software
Roaming Yes
Security
Management Utility WEB Configuration for network link
Mechanical
Packaging Generic, Gigabyte, private labeling optional
LED indicator
Gross Weight
Dimension
FCC part 15 (USA)
CE (Europe)
Operating: 0 ~ 40 degree C, Storage: -20 ~ 65
degree C
64/128 bit WEP; WPA-PSK, WPA, WPA2-PSK,
WPA2, WPA-Auto, WPA-PSK-Auto
Power/Status LED x 1
Wireless LED x 1
LAN Port LED x 4
WAN Port LED x 1
270 ± 1g
161 mm * 138 mm * 28 mm ± 0.5mm
68
Page 73

GN-BR03GM AirCruiser MIMO Router
Appendix G
Warranty
Limited Warranty Statement (1-Year Warranty)
Thank you for purchasing the GIGABYTE Product. This limited warranty statement will provide you
one year warranty starting from the purchase date. Of which if any defect is occurred due to accidents
or any man-made factors, or any unauthorized torn-off or damage to GIGABYTE’s sticker on the
product, GIGABYTE Technology will not provide after-sale services, such as:
• Products are damaged due to any violation of instructions on user manual.
• Hardware is damaged due to inappropriate assembling.
• Products are damaged due to the use of illegal accessory.
• Products are damaged due to parts disassembling without authorization.
• Products are damaged due to exceeding environment limits.
• Products are damaged due to unexpected external force.
• Products are damaged due to nature disasters.
• Products are copies or illegally smuggled goods.
69
Page 74

GN-BR03GM AirCruiser MIMO Router
Appendix H
Regulatory Information
CE Mark Warning: This is a Class B product. In a domestic environment, this product may cause
radio interference, in which case the user may be required to take adequate measures.
FCC Statement: This equipment has been tested and found to comply with the limits for a Class B
digital device, pursuant to Part 15 of the FCC Rules. These limits are designed to provide reasonable
protection against harmful interference in a residential installation. This equipment generates, uses
and can radiate radio frequency energy and, if not installed and used in accordance with the
instructions, may cause harmful interference to radio communications. However, there is no guarantee
that interference will not occur in a particular installation. If this equipment does cause harmful
interference to radio or television reception, which can be determined by turning the equipment off and
on, the user is encouraged to try to correct the interference by one of the following measures:
• Reorient or relocate the receiving antenna.
• Increase the separation between the equipment and receiver.
• Connect the equipment into an outlet on a circuit different from that to which the receiver is
connected.
• Consult the dealer or an experienced radio/TV technician for help.
FCC Caution: To assure continued compliance, any changes or modifications not expressly approved
by the party responsible for compliance could void the user authority to operate this equipment.
This device complies with Part 15 of the FCC Rules. Operation is subject to the following two
conditions: (1) This device may not cause harmful interference, and (2) this device must accept any
interference received, including interference that may cause undesired operation.
IMPORTANT NOTE:
FCC Radiation Exposure Statement:
This equipment complies with FCC radiation exposure limits set forth for an uncontrolled environment.
This equipment should be installed and operated with minimum distance 20cm between the radiator &
your body. The antenna(s) used for this transmitter must not be co-located or operating in conjunction
with any other antenna or transmitter.
Europe - Declaration of Conformity
This device is a 2.4 GHz low power RF device intended for home and office use in
EU and EFTA member states. In some EU / EFTA member states some restrictions
may apply. Please contact local spectrum management authorities for further
details before putting this device into operation.
GIGA-BYTE Technology, Inc. declares that the product: AirCruiser MIMO Router Model Number:
GN-BR03GM is in conformity with and in accordance with the European Directive of EMC, 89/336
EEC for the following sections:
EN 61000-3-2, EN 61000-3-3, EN 55024, and EN 55022 Disturbances and Immunities
GIGA-BYTE Technology, Inc. also declares the conformity of above mentioned product with the actual
required safety standards in accordance with LVD Directive 73/23 EEC:
EN 60950 Safety
In accordance with R&TTE Directive 1995/5/EC, Part 17: Requirements for Operatio n in the European
Community, GIGA-BYTE Technology, Inc declares the conformity of the above mentioned products
for:
70
Page 75

GN-BR03GM AirCruiser MIMO Router
EN 300 328-2 V1.2.1, ETSI EN 300 328-1:V1.3.1, EN 301 489-1, and EN 301 489-17 Technical
Requirements for Radio Equipment
Countries of Operation and Conditions of Use in the European Community
The user should run the configuration utility program provided with this product to check the current
channel of operation and confirm that the device is operating in conformance with the spectrum usage
rules for European Community countries as described in this section. European standards dictate a
maximum radiated transmit power of 100mW EIRP and a frequency range of 2.400 - 2.4835 Ghz.
Trademarks: GIGABYTE is a registered trademark of GIGA-BYTE Technology, Inc. Other trademarks
or registered trademarks are the property of their respective manufacturers or owners.
Copyright Statement: No part of this publication or documentation accompanying this Product may
be reproduced in any form or by any means or used to make any derivative such as translation,
transformation, or adaptation without permission from GIGABYTE/GIGA-BYTE Technology, Inc., as
stipulated by the United States Copyright Act of 1976. Contents are subject to change without prior
notice. Copyright© 2004 by GIGA-BYTE Technology, Inc. All rights reserved.
71
Page 76

GN-BR03GM AirCruiser MIMO Router
Appendix I
General Public License
Licensing Information
This product includes copyrighted software license owned by third-party under terms of the GNU
General Public License. Texts of the GPL are included with every CD shopped with our product. All
future firmware updates will also be accompanied with their related source code on our website.
Please refer to the following GNU General Public License for further details of this License.
Specially, the parts of this product listed below are subject to the GNU General Public License.
1. The Linux operating system kernel
2. The iptables packet filter and NAT software
3. The busybox swiss army knife of embedded linux
4. The udhcpd DHCP client/server implementation
5. The rp-pppoe PPPoE client implementation
6. The pppd PPP daemon implementation
7. The ez-ipupdate ddns implementation
The Copyright for All listed Software packages are owned by their respective authors, please refer to
the source code via our website for further details.
Availability of Source Code
Gigabyte Tech. has provided the full Source Code of the GPL Licensed Software on our website. All
future firmware updates will also be accompanied with their related source code.
GNU GENERAL PUBLIC LICENSE
Version 2, June 1991
Copyright (C) 1989, 1991 Free Software Foundation, Inc.
59 Temple Place - Suite 330, Boston, MA 02111-1307, USA
Everyone is permitted to copy and distribute verbatim copi es
of this license document, but changing it is not allowed.
Preamble
The licenses for most software are designed to take away your freedom to share and change it. By
contrast, the GNU General Public License is intended to guarantee your freedom to share and change
free software--to make sure the software is free for all its users. This General Public License applies to
most of the Free Software Foundation's software and to any other program whose authors commit to
using it. (Some other Free Software Foundation software is covered by the GNU Library General
Public License instead.) You can apply it to your programs, too.
When we speak of free software, we are referring to freedom, not price. Our General Public Licenses
are designed to make sure that you have the freedom to distribute copies of free software (and charge
for this service if you wish), that you receive source code or can get it if you want it, that you can
change the software or use pieces of it in new free programs; and that you know you can do these
things.
To protect your rights, we need to make restrictions that forbid anyone to deny you these rights or to
ask you to surrender the rights. These restrictions translate to certain responsibilities for you if you
distribute copies of the software, or if you modify it.
For example, if you distribute copies of such a program, whether gratis or for a fee, you must give the
recipients all the rights that you have. You must make sure that they, too, receive or can get the
source code. And you must show them these terms so they know their rights.
72
Page 77

GN-BR03GM AirCruiser MIMO Router
We protect your rights with two steps: (1) copyright the software, and (2) offer you this license which
gives you legal permission to copy, distribute and/or modify the software.
Also, for each author's protection and ours, we want to make certain that everyone understands that
there is no warranty for this free software. If the software is modified by someone else and passed on,
we want its recipients to know that what they have is not the original, so that any problems introduced
by others will not reflect on the original authors' reputations.
Finally, any free program is threatened constantly by software patents. We wish to avoid the danger
that redistributors of a free program will individually obtain patent licenses, in effect making the
program proprietary. To prevent this, we have made it clear that any patent must be licensed for
everyone's free use or not licensed at all.
The precise terms and conditions for copying, distribution and modification follow.
TERMS AND CONDITIONS FOR COPYING, DISTRIBUTION AND
MODIFICATION
0. This License applies to any program or other work which contains a notice placed by the copyright
holder saying it may be distributed under the terms of this General Public License. The "Program",
below, refers to any such program or work, and a "work based on the Program" means either the
Program or any derivative work under copyright law: that is to say, a work containing the Program or a
portion of it, either verbatim or with modifications and/or translated into another language. (Hereinafter,
translation is included without limitation in the term "modification".) Each licensee is addressed as
"you".
Activities other than copying, distribution and modification are not covered by this License; they are
outside its scope. The act of running the Program is not restricted, and the output from the Program is
covered only if its contents constitute a work based on the Program (independent of having been
made by running the Program). Whether that is true depends on what the Program does.
1. You may copy and distribute verbatim copies of the Program's source code as you receive it, in any
medium, provided that you conspicuously and appropriately publish on each copy an appropriate
copyright notice and disclaimer of warranty; keep intact all the notices that refer to this License and to
the absence of any warranty; and give any other recipients of the Program a copy of this License
along with the Program.
You may charge a fee for the physical act of transferring a copy, and you may at your option offer
warranty protection in exchange for a fee.
2. You may modify your copy or copies of the Program or any portion of it, thus forming a work based
on the Program, and copy and distribute such modifications or work under the terms of Section 1
above, provided that you also meet all of these conditions:
a) You must cause the modified files to carry prominent notices stating that you changed the files and
the date of any change.
b) You must cause any work that you distribute or publish, that in whole or in part contains or is
derived from the Program or any part thereof, to be licensed as a whole at no charge to all third parties
under the terms of this License.
c) If the modified program normally reads commands interactively when run, you must cause it, when
started running for such interactive use in the most ordinary way, to print or display an announcement
including an appropriate copyright notice and a notice that there is no warranty (or else, saying that
you provide a warranty) and that users may redistribute the program under these conditions, and
telling the user how to view a copy of this License. (Exception: if the Program itself is interactive but
does not normally print such an announcement, your work based on the Program is not required to
print an announcement.)
These requirements apply to the modified work as a whole. If identifiable sections of that work are not
derived from the Program, and can be reasonably considered independent and separate works in
themselves, then this License, and its terms, do not apply to those sections when you distribute them
as separate works. But when you distribute the same sections as part of a whole which is a work
based on the Program, the distribution of the whole must be on the terms of this License, whose
permissions for other licensees extend to the entire whole, and thus to each and every part regardless
of who wrote it.
Thus, it is not the intent of this section to claim rights or contest your rights to work written entirely by
you; rather, the intent is to exercise the right to control the distribution of derivative or collective works
based on the Program.
In addition, mere aggregation of another work not based on the Program with the Program (or with a
work based on the Program) on a volume of a storage or distribution medium does not bring the other
work under the scope of this License.
3. You may copy and distribute the Program (or a work based on it, under Section 2) in object code or
executable form under the terms of Sections 1 and 2 above provided that you also do one of the
73
Page 78

GN-BR03GM AirCruiser MIMO Router
following:
a) Accompany it with the complete corresponding machine-readable source code, which must be
distributed under the terms of Sections 1 and 2 above on a medium customarily used for software
interchange; or,
b) Accompany it with a written offer, valid for at least three years, to give any third party, for a charge
no more than your cost of physically performing source distribution, a complete machine-readable
copy of the corresponding source code, to be distributed under the terms of Sections 1 and 2 above
on a medium customarily used for software interchange; or,
c) Accompany it with the information you received as to the offer to distribute corresponding source
code. (This alternative is allowed only for noncommercial distribution and only if you received the
program in object code or executable form with such an offer, in accord with Subsec tion b above.)
The source code for a work means the preferred form of the work for making modifications to it. For an
executable work, complete source code means all the source code for all modules it contains, plus any
associated interface definition files, plus the scripts used to control compilation and installation of the
executable. However, as a special exception, the source code distributed need not include anything
that is normally distributed (in either source or binary form) with the major components (compiler,
kernel, and so on) of the operating system on which the executable runs, unless that component itself
accompanies the executable.
If distribution of executable or object code is made by offering access to copy from a designated place,
then offering equivalent access to copy the source code from the same place counts as distribution of
the source code, even though third parties are not compelled to copy the source along with the object
code.
4. You may not copy, modify, sublicense, or distribute the Program except as expressly provided
under this License. Any attempt otherwise to copy, modify, sublicense or distribute the Program is void,
and will automatically terminate your rights under this License. However, parties who have received
copies, or rights, from you under this License will not have their licenses terminated so long as such
parties remain in full compliance.
5. You are not required to accept this License, since you have not signed it. However, nothing else
grants you permission to modify or distribute the Program or its derivative works. These actions are
prohibited by law if you do not accept this License. Therefore, by modifying or distributing the Program
(or any work based on the Program), you indicate your acceptance of this License to do so, and all its
terms and conditions for copying, distributing or modifying the Program or works based on it.
6. Each time you redistribute the Program (or any work based on the Program), the recipient
automatically receives a license from the original licensor to copy, distribute or modify the Program
subject to these terms and conditions. You may not impose any further restrictions on the recipients'
exercise of the rights granted herein. You are not responsible for enforcing compliance by third parties
to this License.
7. If, as a consequence of a court judgment or allegation of patent infringement or for any other reason
(not limited to patent issues), conditions are imposed on you (whether by court order, agreement or
otherwise) that contradict the conditions of this License, they do not excuse you from the conditions of
this License. If you cannot distribute so as to satisfy simultaneously your obligations under this License
and any other pertinent obligations, then as a consequence you may not distribute the Program at all.
For example, if a patent license would not permit royalty-free redistribution of the Program by all those
who receive copies directly or indirectly through you, then the only way you could satisfy both it and
this License would be to refrain entirely from distribution of the Program.
If any portion of this section is held invalid or unenforceable under any particular circumstance, the
balance of the section is intended to apply and the section as a whole is intended to apply in other
circumstances.
It is not the purpose of this section to induce you to infringe any patents or other property right claims
or to contest validity of any such claims; this section has the sole purpose of protecting the integrity of
the free software distribution system, which is implemented by public license practices. Many people
have made generous contributions to the wide range of software distributed through that system in
reliance on consistent application of that system; it is up to the author/donor to decide if he or she is
willing to distribute software through any other system and a licensee cannot impose that choice.
This section is intended to make thoroughly clear what is believed to be a consequence of the rest of
this License.
8. If the distribution and/or use of the Program is restricted in certain countries either by patents or by
copyrighted interfaces, the original copyright holder who places the Program under this License may
add an explicit geographical distribution limitation excluding those countries, so that distribution is
permitted only in or among countries not thus excluded. In such case, this License incorporates the
limitation as if written in the body of this License.
9. The Free Software Foundation may publish revised and/or new versions of the General Public
License from time to time. Such new versions will be similar in spirit to the present version, but may
74
Page 79

GN-BR03GM AirCruiser MIMO Router
differ in detail to address new problems or concerns.
Each version is given a distinguishing version number. If the Program specifies a version number of
this License which applies to it and "any later version", you have the option of following the terms and
conditions either of that version or of any later version published by the Free Software Foundation. If
the Program does not specify a version number of this License, you may choose any version ever
published by the Free Software Foundation.
10. If you wish to incorporate parts of the Program into other free programs whose distribution
conditions are different, write to the author to ask for permission. For software which is copyrighted by
the Free Software Foundation, write to the Free Software Foundation; we sometimes make exceptions
for this. Our decision will be guided by the two goals of preserving the free status of all derivatives of
our free software and of promoting the sharing and reuse of software generally.
NO WARRANTY
11. BECAUSE THE PROGRAM IS LICENSED FREE OF CHARGE, THERE IS NO WARRANTY FOR
THE PROGRAM, TO THE EXTENT PERMITTED BY APPLICABLE LAW. EXCEPT WHEN
OTHERWISE STATED IN WRITING THE COPYRIGHT HOLDERS AND/OR OTHER PARTIES
PROVIDE THE PROGRAM "AS IS" WITHOUT WARRANTY OF ANY KIND, EITHER EXPRESSED
OR IMPLIED, INCLUDING, BUT NOT LIMITED TO, THE IMPLIED WARRANTIES OF
MERCHANTABILITY AND FITNESS FOR A PARTICULAR PURPOSE. THE ENTIRE RISK AS TO
THE QUALITY AND PERFORMANCE OF THE PROGRAM IS WITH YOU. SHOULD THE PROGRAM
PROVE DEFECTIVE, YOU ASSUME THE COST OF ALL NECESSARY SERVICING, REPAIR OR
CORRECTION.
12. IN NO EVENT UNLESS REQUIRED BY APPLICABLE LAW OR AGREED TO IN WRITING WILL
ANY COPYRIGHT HOLDER, OR ANY OTHER PARTY WHO MAY MODIFY AND/OR
REDISTRIBUTE THE PROGRAM AS PERMITTED ABOVE, BE LIABLE TO YOU FOR DAMAGES,
INCLUDING ANY GENERAL, SPECIAL, INCIDENTAL OR CONSEQUENTIAL DAMAGES ARISING
OUT OF THE USE OR INABILITY TO USE THE PROGRAM (INCLUDING BUT NOT LIMITED TO
LOSS OF DATA OR DATA BEING RENDERED INACCURATE OR LOSSES SUSTAINED BY YOU
OR THIRD PARTIES OR A FAILURE OF THE PROGRAM TO OPERATE WITH ANY OTHER
PROGRAMS), EVEN IF SUCH HOLDER OR OTHER PARTY HAS BEEN ADVISED OF THE
POSSIBILITY OF SUCH DAMAGES.
END OF TERMS AND CONDITIONS
How to Apply These Terms to Your New Programs
If you develop a new program, and you want it to be of the greatest possible use to the public, the best
way to achieve this is to make it free software which everyone can redistribute and change under
these terms.
To do so, attach the following notices to the program. It is safest to attach them to the start of each
source file to most effectively convey the exclusion of warranty; and each file should have at least the
"copyright" line and a pointer to where the full notice is found.
one line to give the program's name and an idea of what it does.
Copyright (C) yyyy name of author
This program is free software; you can redistribute it and/or
modify it under the terms of the GNU General Public License
as published by the Free Software Foundation; either version 2
of the License, or (at your option) any later version.
This program is distributed in the hope that it will be useful,
but WITHOUT ANY WARRANTY; without even the implied warranty of
MERCHANTABILITY or FITNESS FOR A PARTICULAR PURPOSE. See the
GNU General Public License for more details.
You should have received a copy of the GNU General Public License
along with this program; if not, write to the Free Software
Foundation, Inc., 59 Temple Place - Suite 330, Boston, MA 02111-1307, USA.
Also add information on how to contact you by electronic and paper mail.
If the program is interactive, make it output a short notice like this when it starts in an interactive mode:
Gnomovision version 69, Copyright (C) year name of author
Gnomovision comes with ABSOLUTELY NO WARRANTY; for details
type `show w'. This is free software, and you are welcome
to redistribute it under certain conditions; type `show c'
75
Page 80

GN-BR03GM AirCruiser MIMO Router
for details.
The hypothetical commands `show w' and `show c' should show the appropriate parts of the General
Public License. Of course, the commands you use may be called something other than `show w' and
`show c'; they could even be mouse-clicks or menu items--whatever suits your program.
You should also get your employer (if you work as a programmer) or your school, if any, to sign a
"copyright disclaimer" for the program, if necessary. Here is a sample; alter the names:
Yoyodyne, Inc., hereby disclaims all copyright
interest in the program `Gnomovision'
(which makes passes at compilers) written
by James Hacker.
signature of Ty Coon, 1 April 1989
Ty Coon, President of Vice
This General Public License does not permit incorporating your program into proprietary programs. If
your program is a subroutine library, you may consider it more useful to permit linking proprietary
applications with the library. If this is what you want to do, use the GNU Lesser General Public License
instead of this License.
PLEASE RECORD THE FOLLOWING INFORMATION
REGARDING YOUR WARRANTY
Name of Customer:
Phone No:
Address:
Email:
Model:
Serial:
Date of Purchase:
Place of Purchase:
From Whom:
Distributor:
Customer Service
GIGA-BYTE TECHNOLOGY CO., LTD.
No.6, Bau Chiang Road, Hsin-Tien,
Taipei Hsien, Taiwan.
Tel: 886-2-89124888 Fax:886-2-89124007
http://www.GIGABYTE.com.tw
76
 Loading...