

Page 1

GN-B41G
54Mbps Wireless
Broadband Router
User’s Manual
www.gigabyte.com.tw
Revision 1.1
Page 2

GN-B41G Wireless Broadband Router
Federal Communication Commission Interference Statement
This equipment has been tested and found to comply with the limits for a Class
B digital device, pursuant to Part 15 of the FCC Rules. These limits are
designed to provide reasonable protection against harmful interference in a
residential installation. This equipment generates, uses and can radiate radio
frequency energy and, if not installed and used in accordance with the
instructions, may cause harmful interference to radio communications. However,
there is no guarantee that interference will not occur in a particular installation.
If this equipment does cause harmful interference to radio or television
reception, which can be determined by turning the equipment off and on, the
user is encouraged to try to correct the interference by one of the following
measures:
- Reorient or relocate the receiving antenna.
- Increase the separation between the equipment and receiver.
- Connect the equipment into an outlet on a circuit different from that to which
the receiver is connected.
- Consult the dealer or an experienced radio/TV technician for help.
FCC Caution: To assure continued compliance, any changes or modifications
not expressly approved by the party responsible for compliance could void the
user authority to operate this equipment.
This device complies with Part 15 of the FCC Rules. Operation is subject to the
following two conditions: (1) This device may not cause harmful interference,
and (2) this device must accept any interference received, including
interference that may cause undesired operation.
IMPORTANT NOTE:
FCC Radiation Exposure Statement:
This equipment complies with FCC radiation exposure limits set forth for an
uncontrolled environment. This equipment should be installed and operated
with minimum distance 20cm between the radiator & your body.
The antenna(s) used for this transmitter must not be co-located or operating in
conjunction with any other antenna or transmitter
2
Page 3

GN-B41G Wireless Broadband Router
Contents
Chapter 1 Introduction.............................. 6
Overview ...........................................................................6
Features ............................................................................6
Accessories.....................................錯誤! 尚未定義書籤。
The Rear Panel ................................................................. 7
The Front Panel ............................................................... 8
Network Application Diagram ........ 錯誤! 尚未定義書籤。
Chapter 2 Quick Installation..................... 9
Chapter 3 GN-B41G Connection............ 11
Preparation ...................................... 錯誤! 尚未定義書籤。
Hardware Requirements.....................................................................11
System Requirements........................................................................11
Network Configuration ......................................................................11
PC connection (Physical Connection).......................... 12
PC connection (Wireless Connection)..........................12
Chapter 4 Computer Setting .................. 13
Overview ......................................................................... 13
Setting TCP/IP under Windows 2000............................ 13
Set TCP/IP under Windows XP......................................20
Chapter 5 Basic Setting of GN-B41G .... 28
Login GN-B41G............................................................... 28
Smart Setup.................................................................... 30
3
Page 4

GN-B41G Wireless Broadband Router
Setup Wizard................................................................... 33
Status .............................................................................. 43
Logout............................................................................. 47
Chapter 6 Advanced Setting.................. 46
Network Configuration...................................................46
Wireless Configuration.................................................. 53
Static Routing Table....................................................... 59
Virtual Server.................................................................. 60
Firewall Rule................................................................... 63
DNS Configuration ......................................................... 67
URL Blocking Configuration ......................................... 68
Chapter 7 Management Tool.................. 69
PPP Monitor.................................................................... 69
Reboot............................................................................. 69
Initialization.....................................................................70
Change Password .......................................................... 70
Change WAN MAC ......................................................... 71
Upgrade Firmware..........................................................71
Backup Restore.............................................................. 72
Log Information.............................................................. 72
Save Maintenance .......................................................... 74
Ping ................................................................................. 74
Help ................................................................................. 75
About............................................................................... 75
Chapter 8 Troubleshooting.................... 76
4
Page 5

GN-B41G Wireless Broadband Router
Appendix A: Glossary............................. 78
Appendix B: Specification...................... 81
Physical Interface............................錯誤! 尚未定義書籤。
System Specification ...................... 錯誤! 尚未定義書籤。
5
Page 6

GN-B41G Wireless Broadband Router
Chapter 1 Introduction
Overview
Thank you for purchasing the GN-B41G 54Mbps Wireless Router. With the
advantages of 54 Mbps high-speed wireless data rates and 4-ports 10/100
wired Ethernet, the GN-B41G is the ideal networking device for you to share a
broadband connection in your home or office. The GN-B41G gives you a simple,
cost-effective wireless networking solution.
Providing transmission speeds of up to 54Mbps, the GN-B41G allows users to
share network resources, retrieve emails, download large files, conduct a video
conference, and distribute or display digital photos, videos or MP3 files.
Furthermore, the router supports up to 128-bit WEP encryption to safeguard
your privacy on-line. To get the most from your GN-B41G Wireless Broadband
Router, please read through this manual completely
Features
Compliant with 802.11g and 802.11b standards.
Supports WPA, 64/128 bit WEP data encryption.
Enhanced firewall protection to prevent network intrusion.
High speed data rates of up to 54Mbps.
Built-in router configuration software - Smart Setup II.
Built-in DHCP software eliminates IP conflicts - Smart DHCP
Supports MSN Messenger and UPnP.
Web-based router configuration and management utility
6
Page 7
GN-B41G Wireless Broadband Router
Package Contents
Please check that the GN-B41G package contents include:
- GN-B41G 54Mbps Wireless Broadband Router
- Power adapter (5V DC, 2.0A)
- GN-B41G Resource CD
- GN-B41G Quick Installation Guide
- Smart Setup II Installation Guide
- Cat. 5 Ethernet cable – 6ft (1.8m)
If there is any missing or damaged accessory, please contact your local
distributor or dealer immediately. If a replacement unit is needed, please return
the device with the original packing material, otherwise the warranty will be
voided.
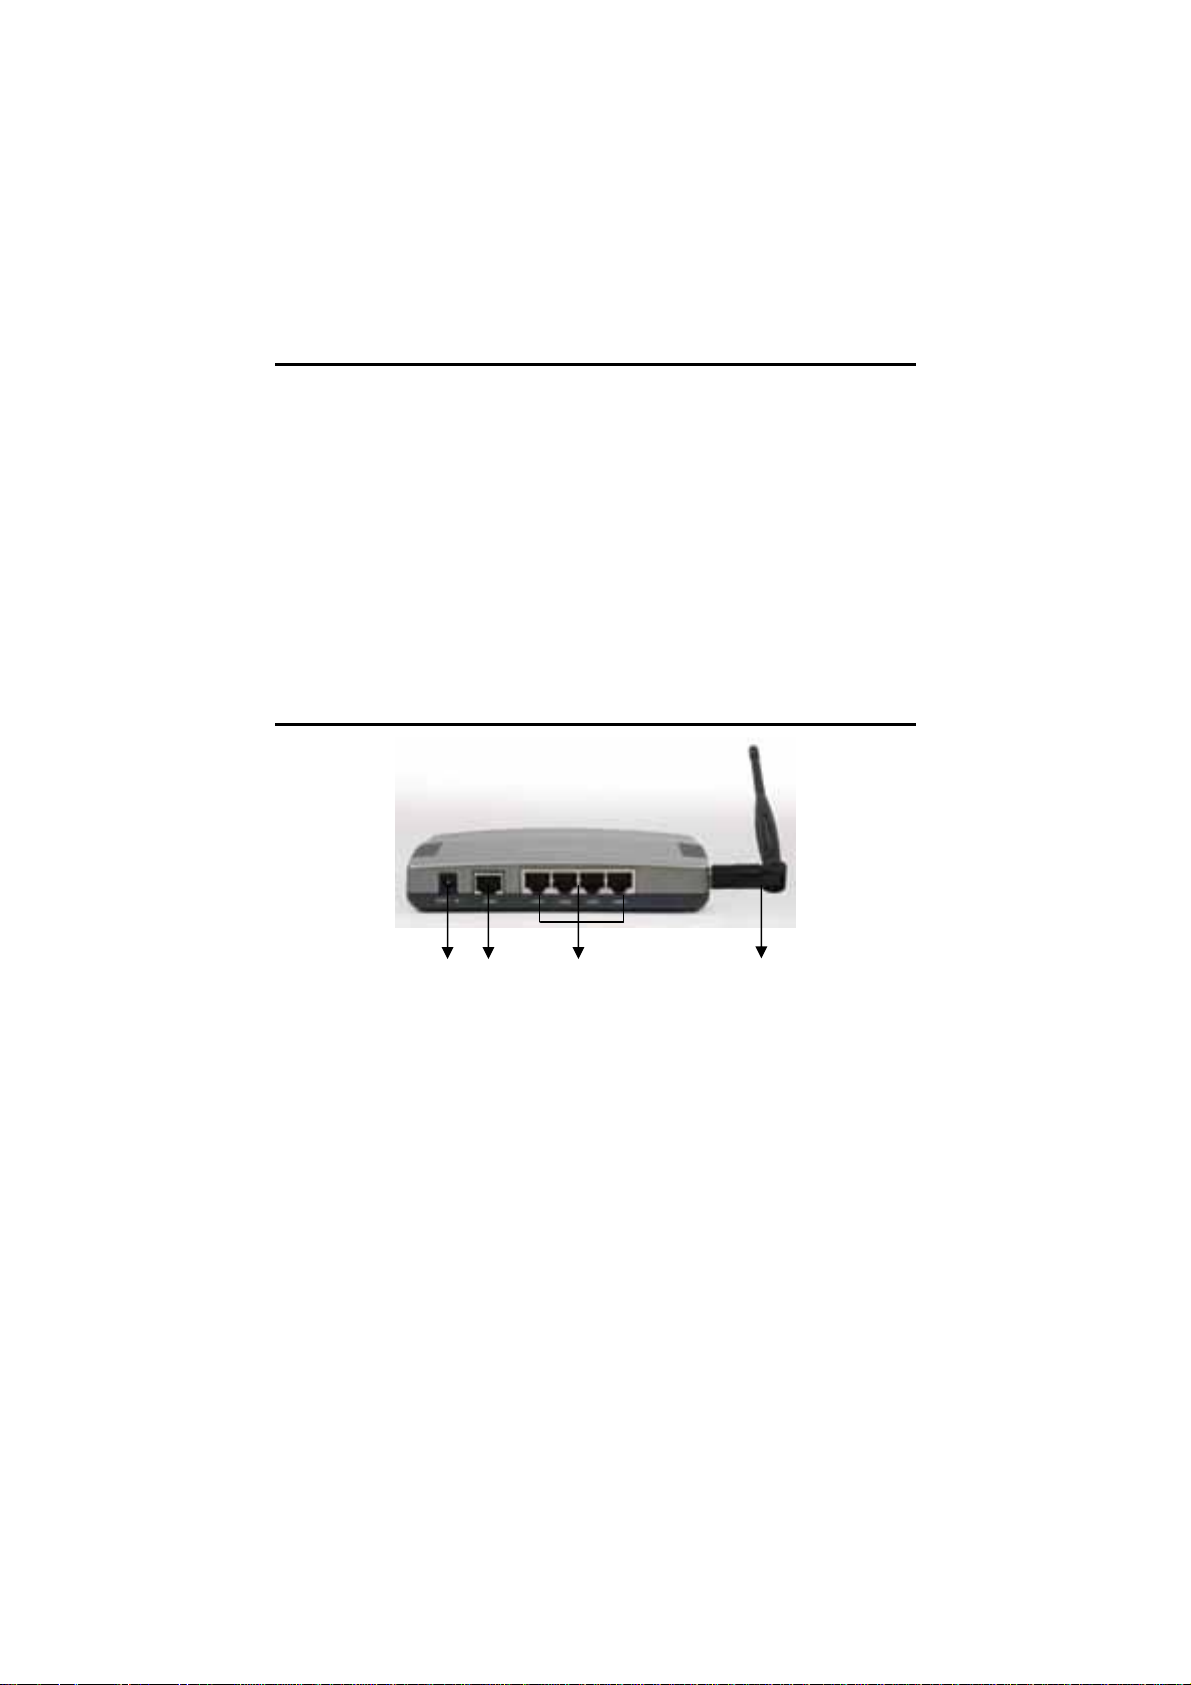
GN-B41G Rear Panel
X Power Socket
This sockets connects to the GN-B41G power adapter.
Y One Ethernet WAN Port
Connect your DSL or cable modem to the router through this Internet port.
Z Four 10/100Mbps LAN Ports
Use these Ethernet LAN ports to connect the router to local PCs.
[ Antenna
The dipole-type antenna is removable
X Y Z [
7
Page 8
GN-B41G Wireless Broadband Router
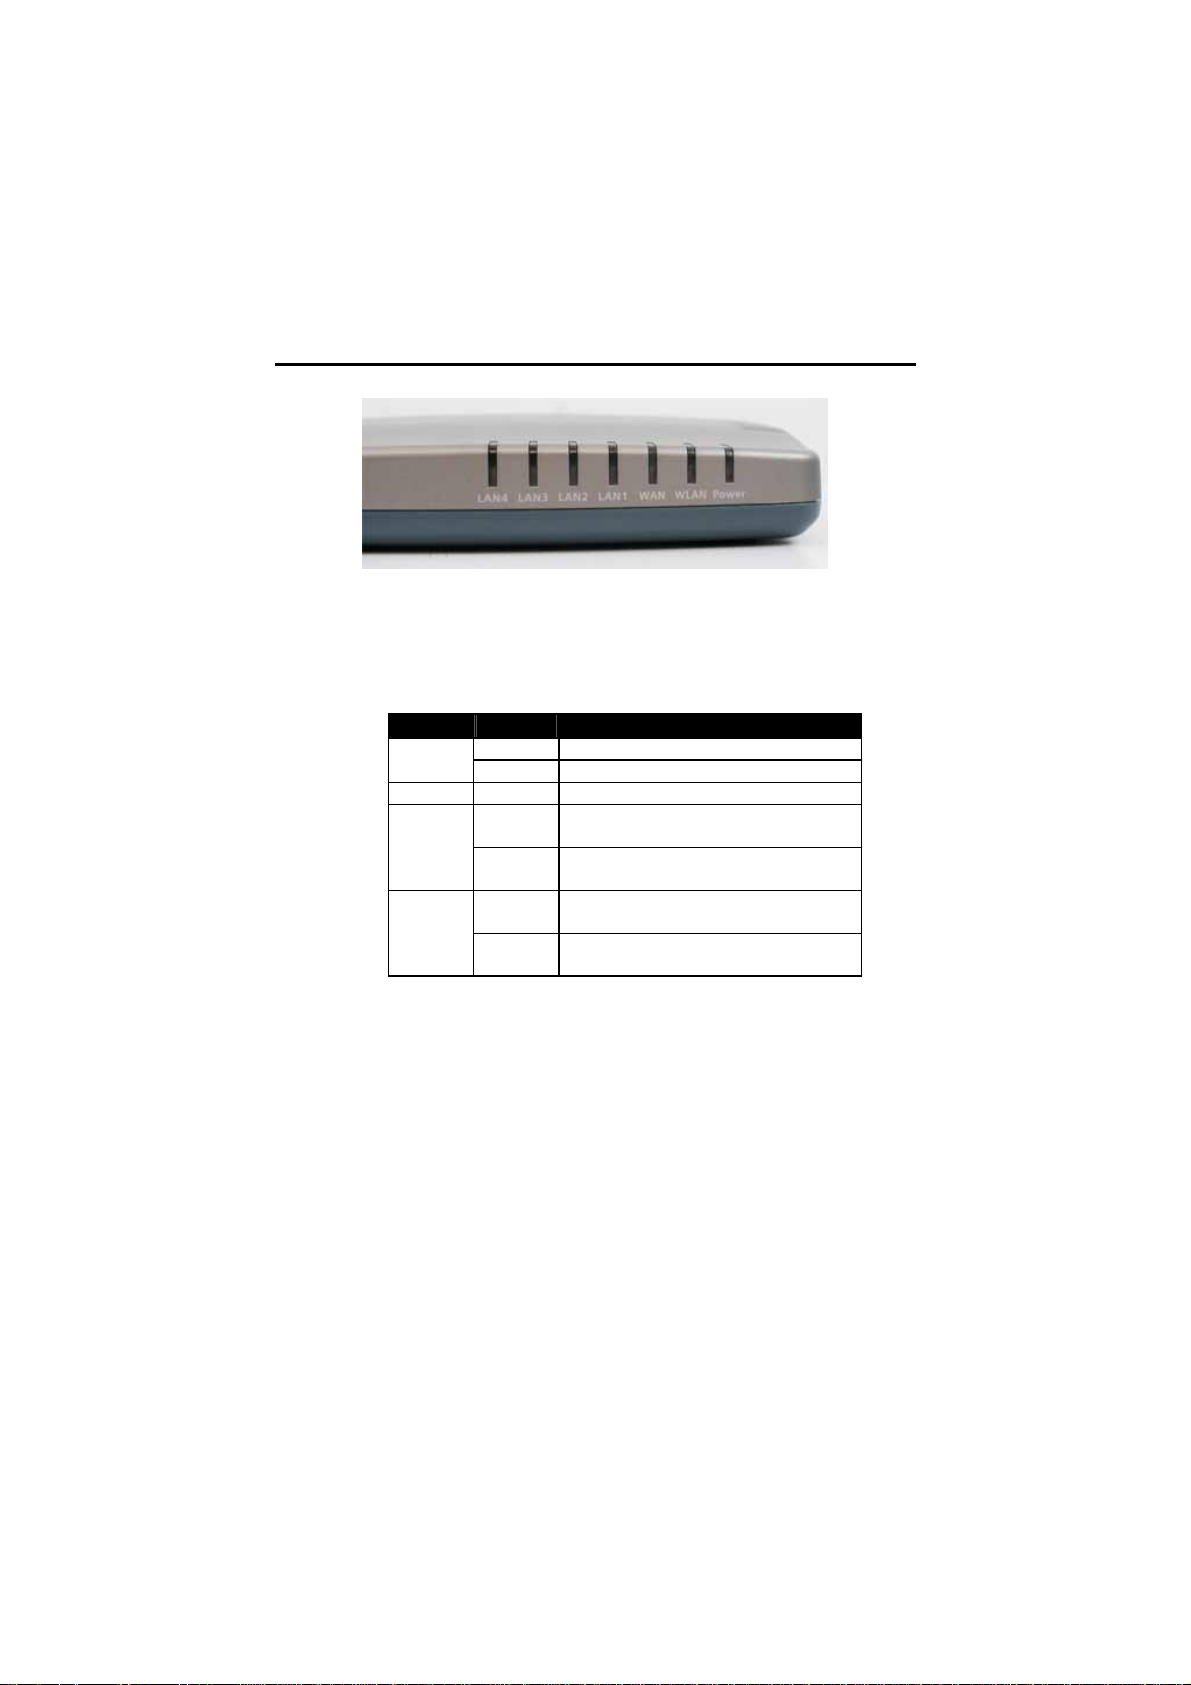
GN-B41G Front Panel
Viewed from right to left, the table below describes the LEDs
on the front panel of the GN-B41G. All LEDs are green
when lit.
LED STATUS DESCRIPTION
Power
WLAN Flashing Data is being transmitted wirelessly.
WAN
LAN
On Power is supplied to router
Off Power is NOT supplied to router
On WAN port has detected a link with a
DSL / Cable modem.
Flashing Data is being transmitted / received
through WAN port.
On LAN port has detected a link with a
10/100Mbps device
Flashing Data is being transmitted / received
through LAN port.
8
Page 9
GN-B41G Wireless Broadband Router
Chapter 2 Quick Installation
Your Gigabyte GN-B41G Wireless Broadband Router has a built-in software
application called Smart Setup II that will auto-configure your router for Internet
access.
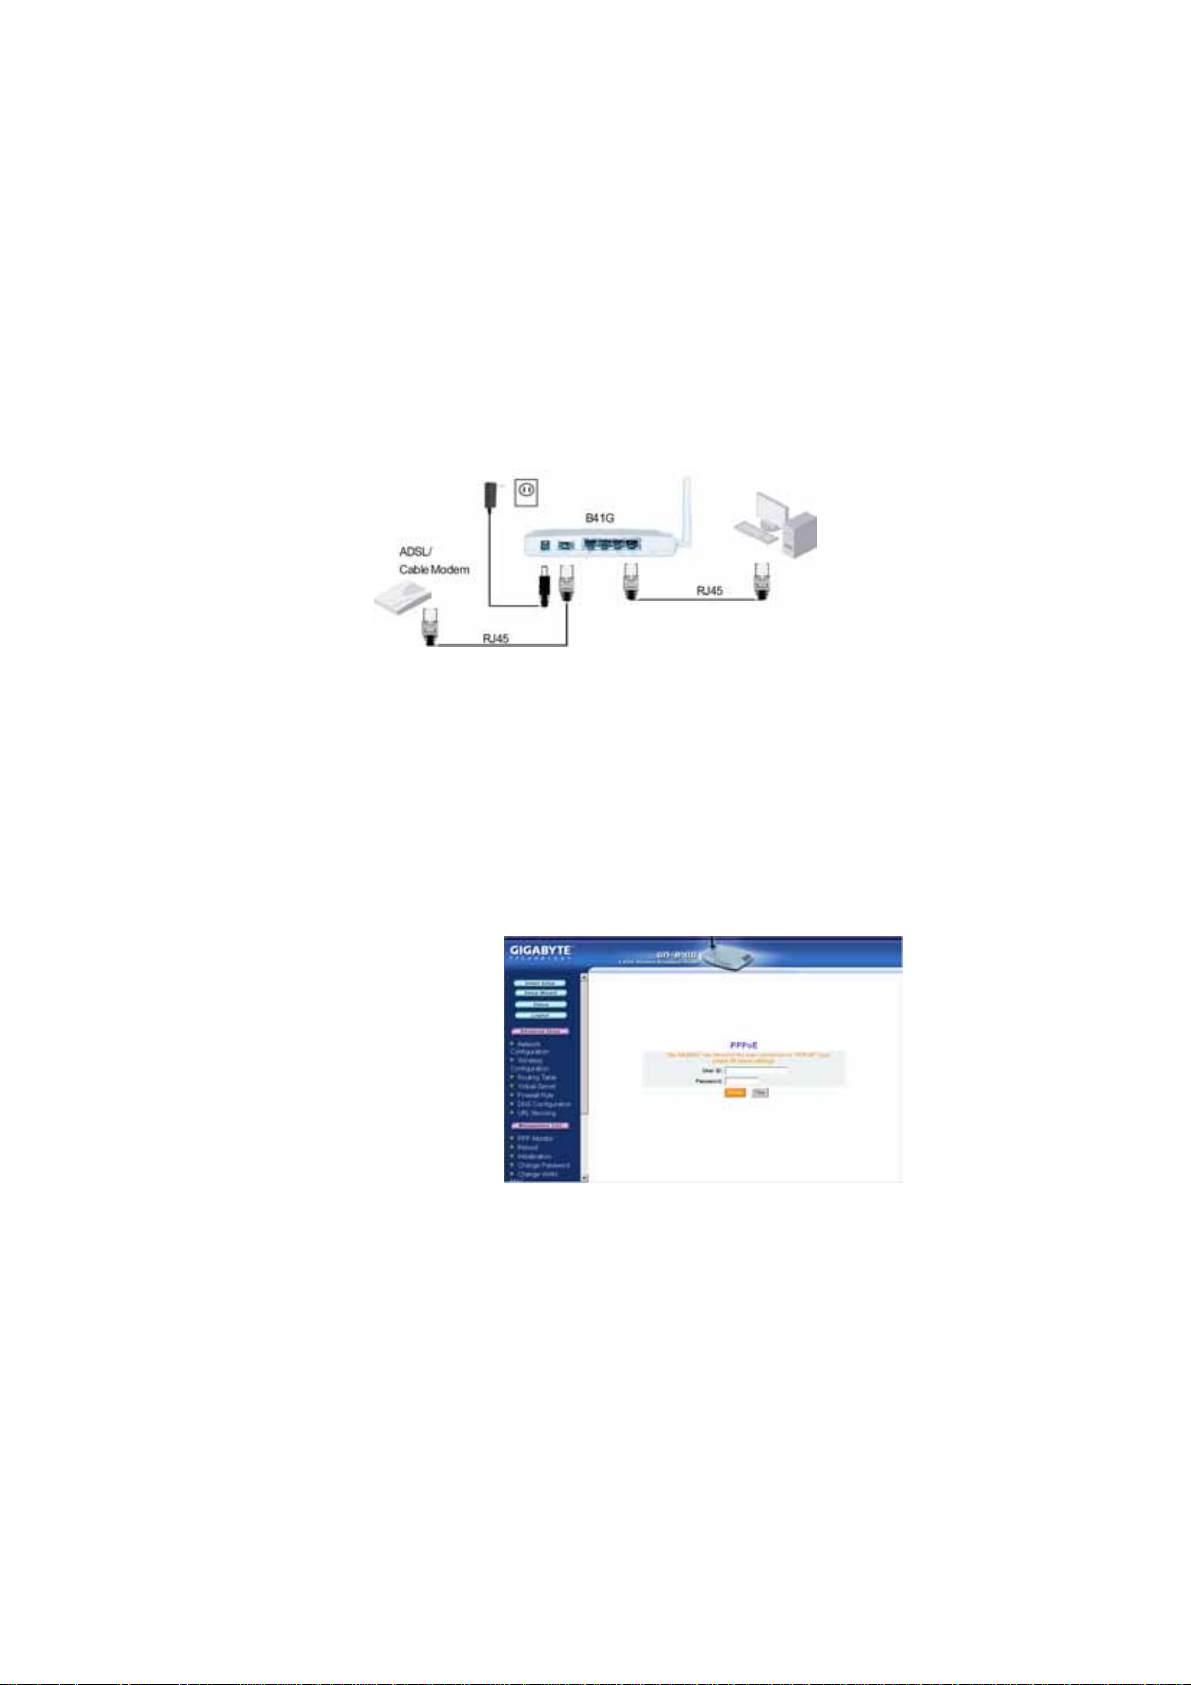
1. Please refer to diagram above to connect your router to your network.
2. Power on your computer and launch either Internet Explorer or Netscape
Navigator.
3. Based on your Internet service, you may be required to enter your ISP
account’s username and password or other additional information as
prompted. See below for screenshots.
Dynamic IP Address If you use a dynamic IP address, you can directly
connect to Internet without extra configuration.
PPPoE If you use a PPPoE connection, please enter your
ISP user ID and password.
9
Page 10
GN-B41G Wireless Broadband Router
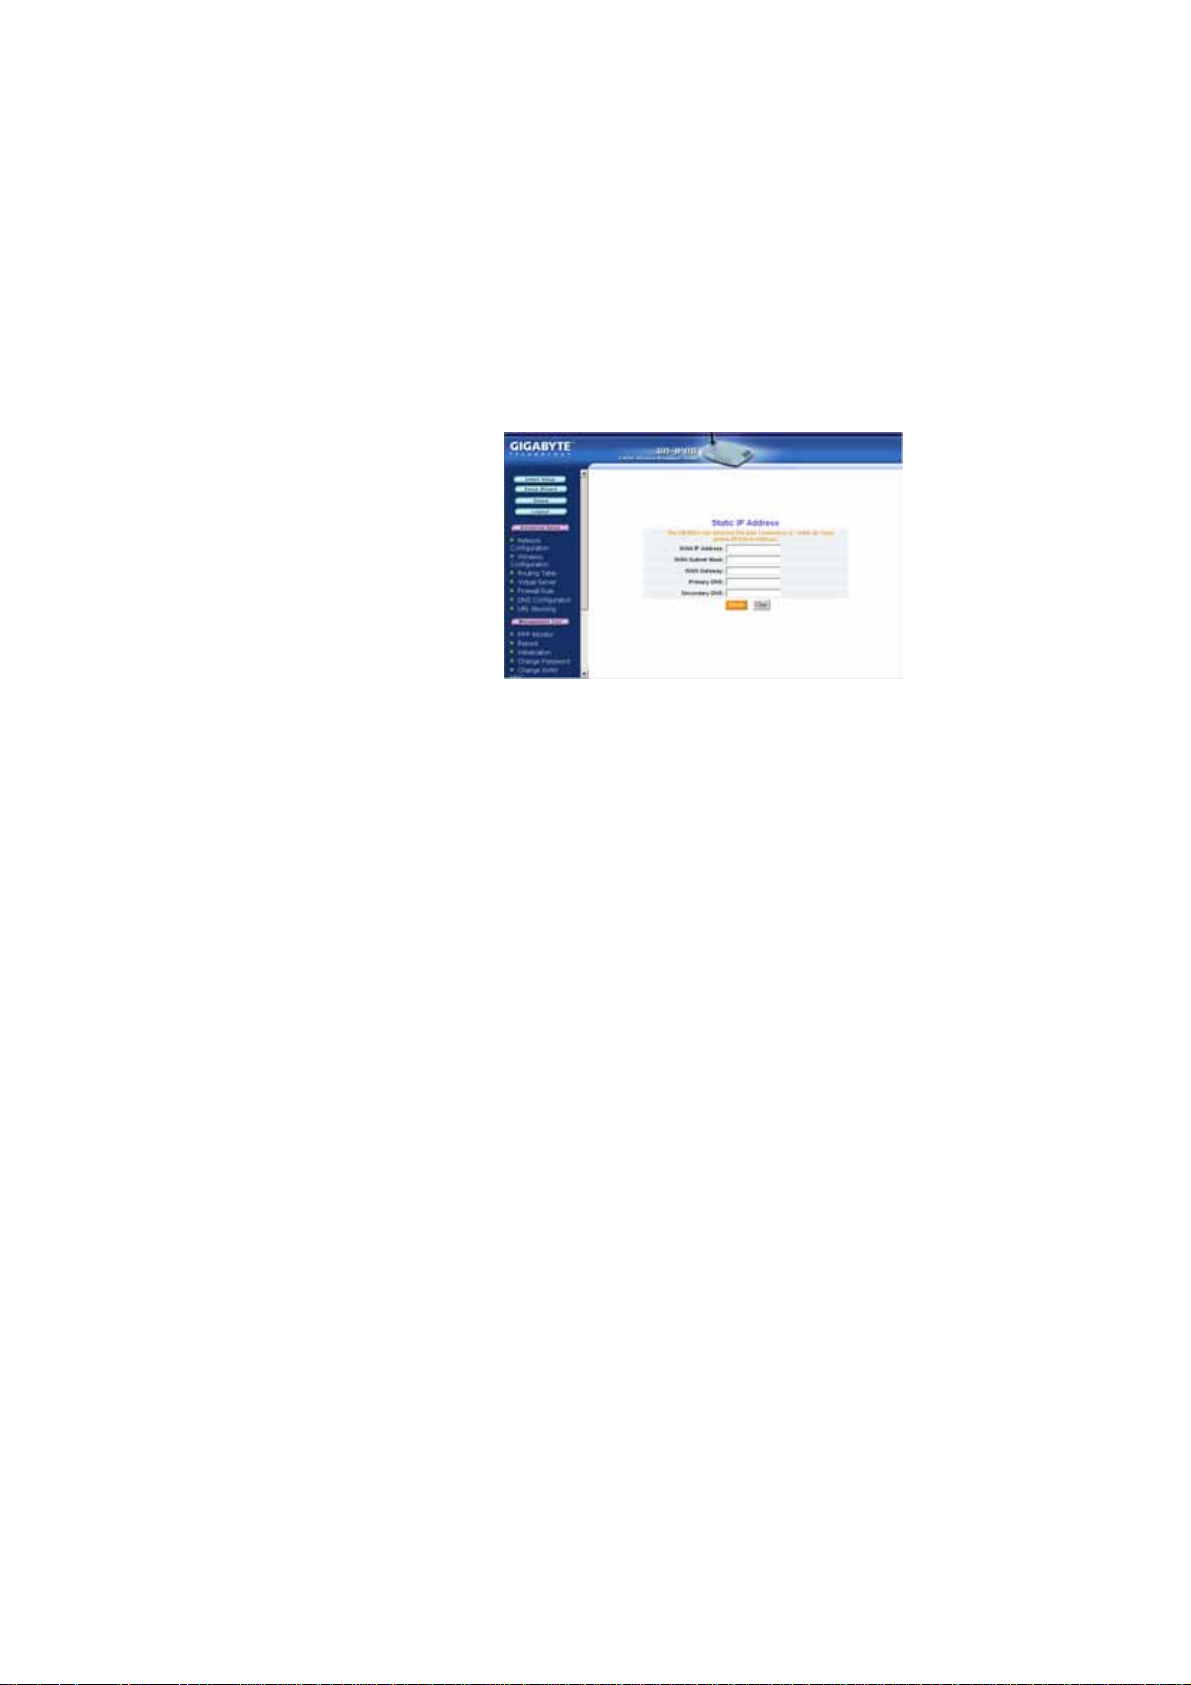
Static IP address If you use a static IP address, please enter your
WAN IP address, WAN subnet Mask, WAN
Gateway, and DNS information provided by your
ISP.
4. Once you have entered your information, click the Finish button to
automatically complete router setup and close the web browser window.
You are now connected to the Internet and may re-launch your browser..
Note: Gigabyte’s Smart Setup II wireless router configuration software is
designed to automatically detect your ISP connection type. However, to
configure your router manually, please refer to Chapter 5 – GN-B41G
Basic Configuration in this manual..
10
Page 11

GN-B41G Wireless Broadband Router
Chapter 3 Connecting the GN-B41G
What You Will Need
Please prepare the following before you begin connecting your GN-B41G:
1. Have active Internet service p r ovide d throu gh either ADSL or cable
Modem.
2. Valid ISP user account and password.
Hardware Requirements
Before setting up the GN-B41G, each computer on your network must have an
installed Ethernet network card and an Ethernet cable. If you want to connect
wirelessly each desktop computer or laptop requires a wireless network adapter
installed.
System Requirements
Windows, Macintosh or Linux Operating System
Support HTTP standard Javascript-enabled browser, for examples,
Microsoft Internet Explorer or Netscape Navigator 4.0 or above.
Internet Configuration
To successfully connect your GN-B41G to the Internet, you may need one or
more of the following configuration parameters associated with your ISP
account:
Host and Domain Names
ISP User ID and password
ISP Domain Name Server (DNS)
Fixed IP address or known as Static IP address
Subnet Mask
Default Gateway
11
Page 12

GN-B41G Wireless Broadband Router
Making a Wired Connection
Step 1. Turn off all the hardware devices in your network, including the
ADSL/Cable modem by unplugging their power supply.
Step 2. Connect the Ethernet cable of your ADSL/Cable modem to the WAN
port of the GN-B41G.
Step 3. Connect one end of a new Ethernet cable to a LAN port in the rear
panel of the GN-B41G to the 10/100 Ethernet port of your computer..
(NOTE: It does not matter which numbered LAN port is selected).
Step 4. Plug the power adapter cord into the router’s power jack and then
plug the power adapter into a power outlet.
Step 5. Turn on your ADSL/Cable modem. After verifying all the connections,
proceed to Chapter 4 – Configuring the PCs.
Making a Wireless Connection
Step 1. Turn off all the hardware devices in your network, including the
ADSL/Cable modem by unplugging their power supply.
Step 2. Connect the Ethernet cable of your ADSL/Cable modem to the WAN
port of the GN-B41G.
Step 3. Plug the power adapter cord into the router’s power jack and then
plug the power adapter into a power outlet.
Step 4. Turn on your ADSL/Cable modem. After verifying all the connections,
proceed to Chapter 4 – Configuring the PCs
Note: If using a wireless connection, please refer to the user manual of the
wireless adapter to install. The SSID of the wireless adapter and the
GN-B41G should be identical. The default SSID assigned to the
GN-B41G is GIGABYTE . (WARNING: The SSID field is case
sensitive, so for example “a” is different from “A”).
12
Page 13
GN-B41G Wireless Broadband Router
Chapter 4 Configuring the PCs
Overview
Before your GN-B41G Wireless Broadband Router can communicate with a
computer, the PC’s network settings must be configured. The instructions set
forth in this chapter will guide you on setting-up the necessary PC network
settings based on the type of Windows operating system installed .In general,
Windows
pre-installed Make sure that an Ethernet or wireless adapter has been
successfully installed in the PC before proceeding with configuration.
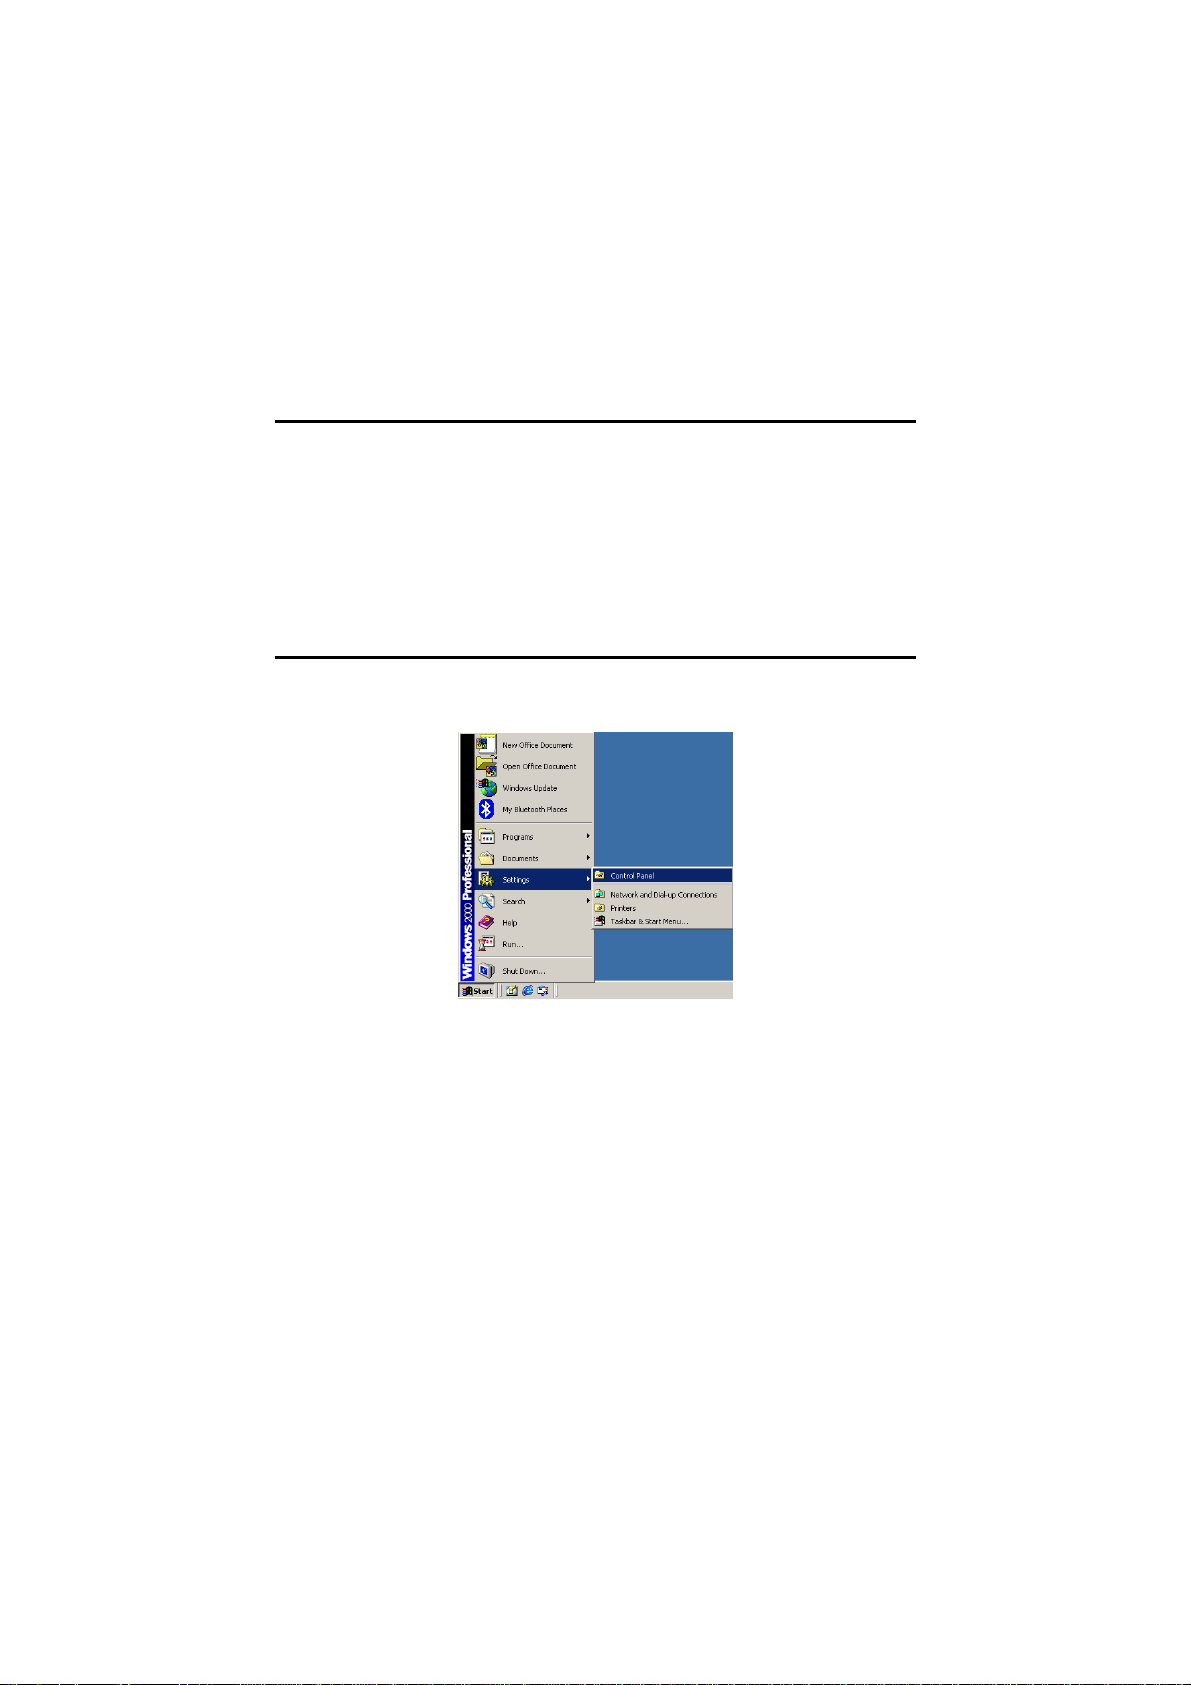
Configuring Settings Under Windows 2000
Step 1. Click the Start button. Select Settings and then click the Control
®
98/Me/2000/XP comes with the necessary TCP/IP protocol support
Panel icon.
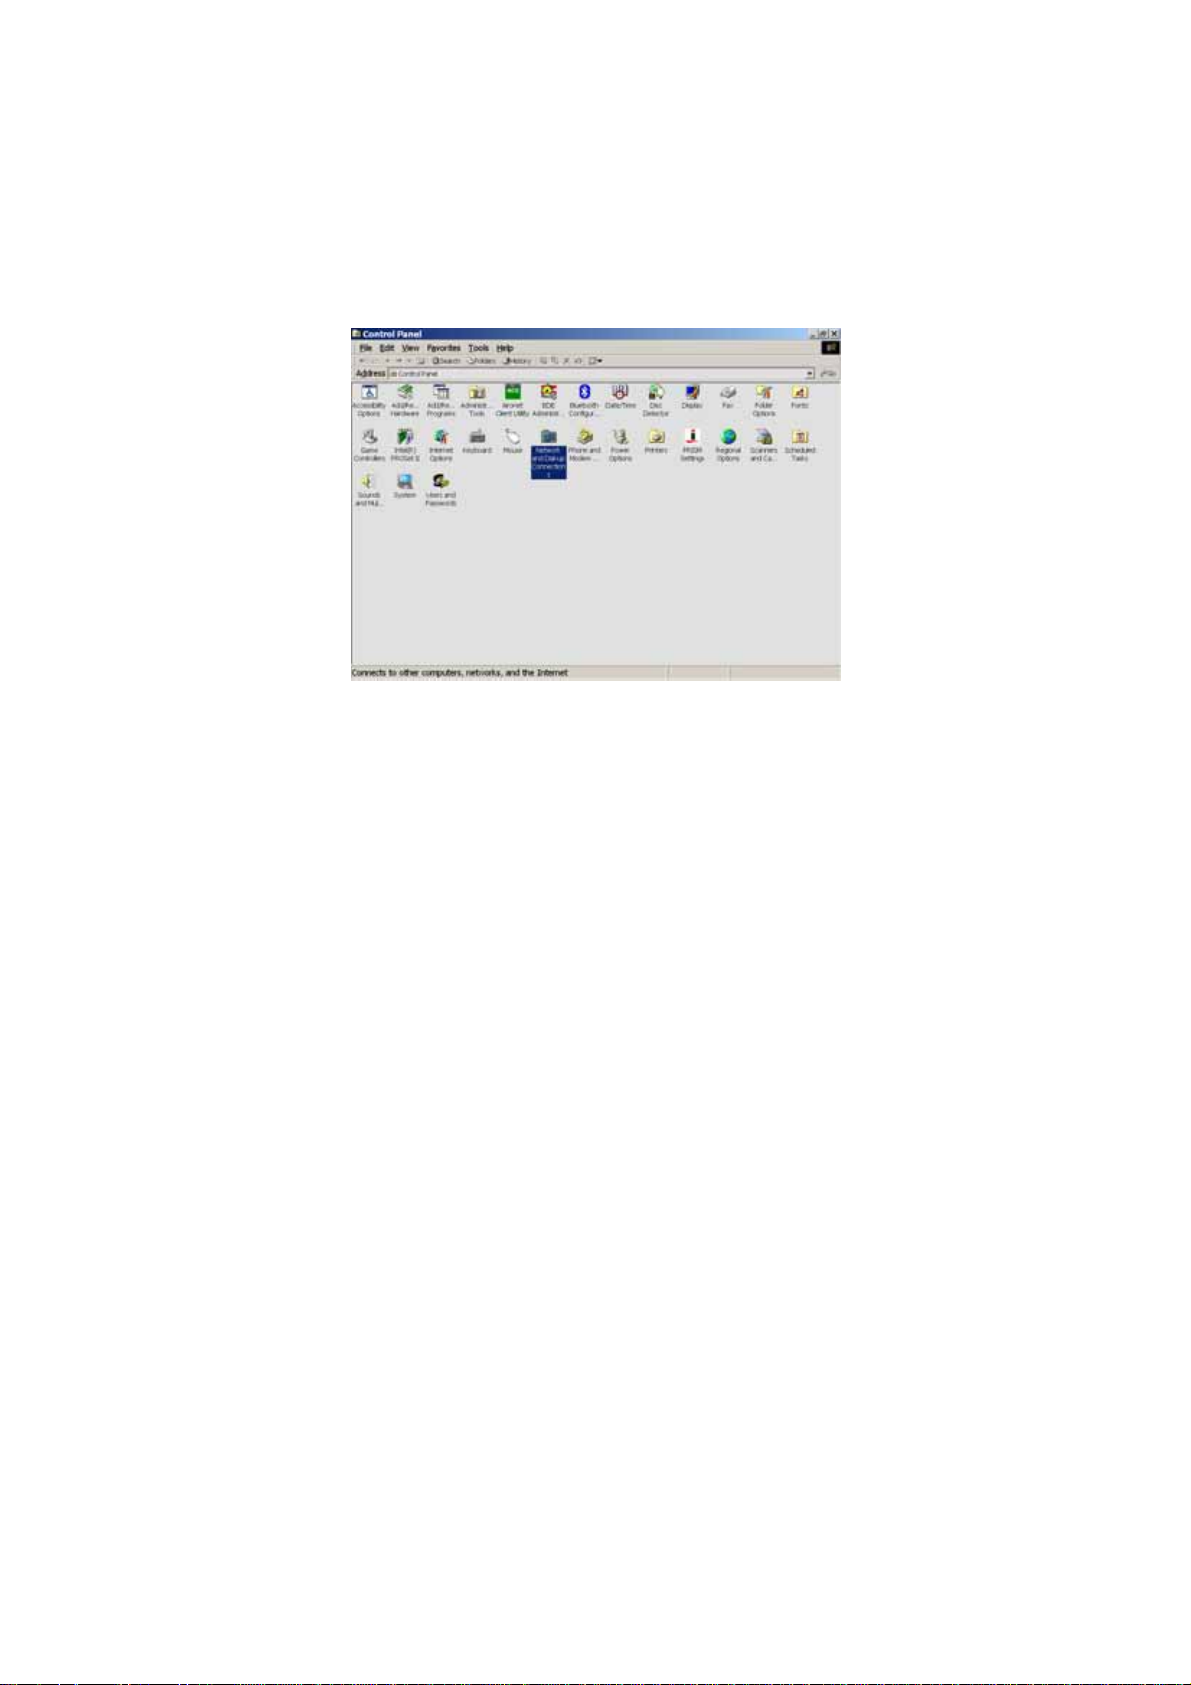
Step 2. Double-click the Network and Dial-up Connection icon.
13
Page 14
GN-B41G Wireless Broadband Router
14
Page 15
GN-B41G Wireless Broadband Router
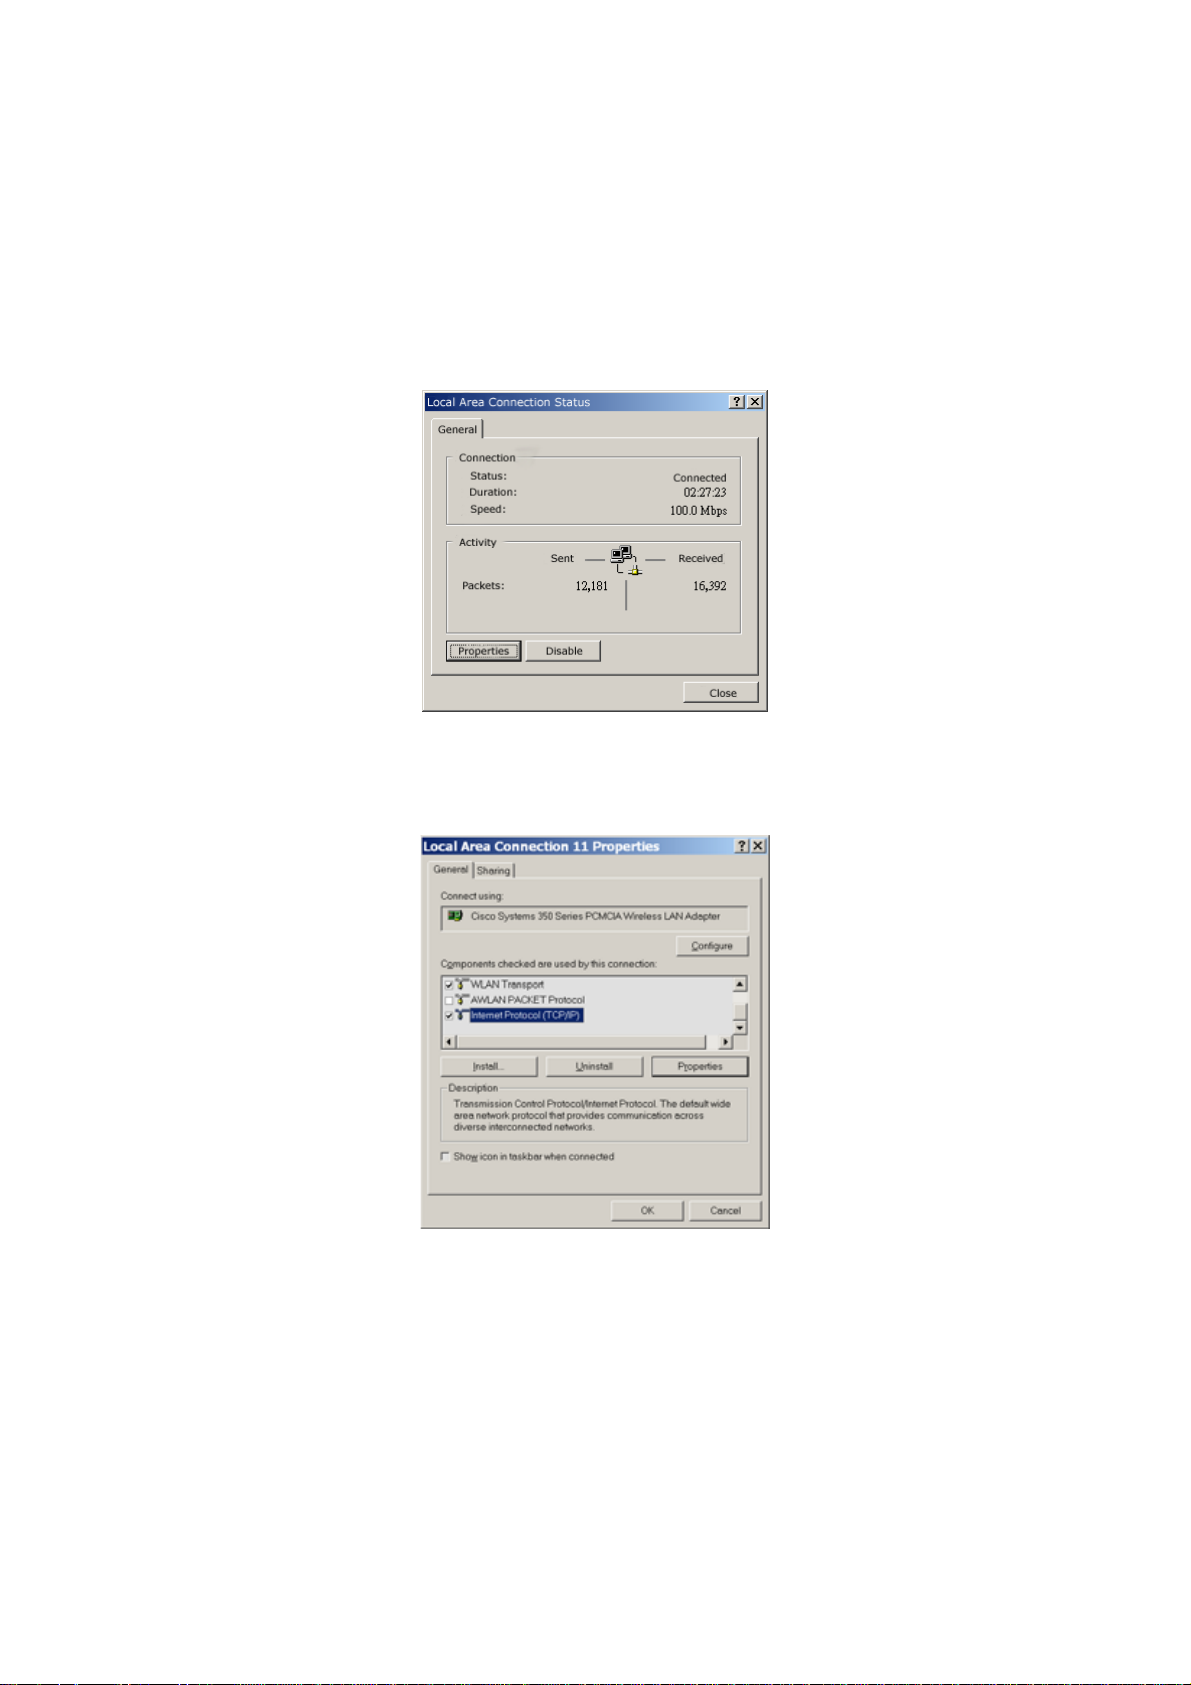
Step 3. Double-click the Local Area Connection icon, and then the
Properties button.
Step 4. The Local A rea Connection Properties window will appear. For the
applicable Ethernet / wireless adapter, make sure that there is a
check in the Internet Protocol (TCP/IP) checkbox, then double-click
on Internet Protocol (TCP/IP)..
15
Page 16
GN-B41G Wireless Broadband Router
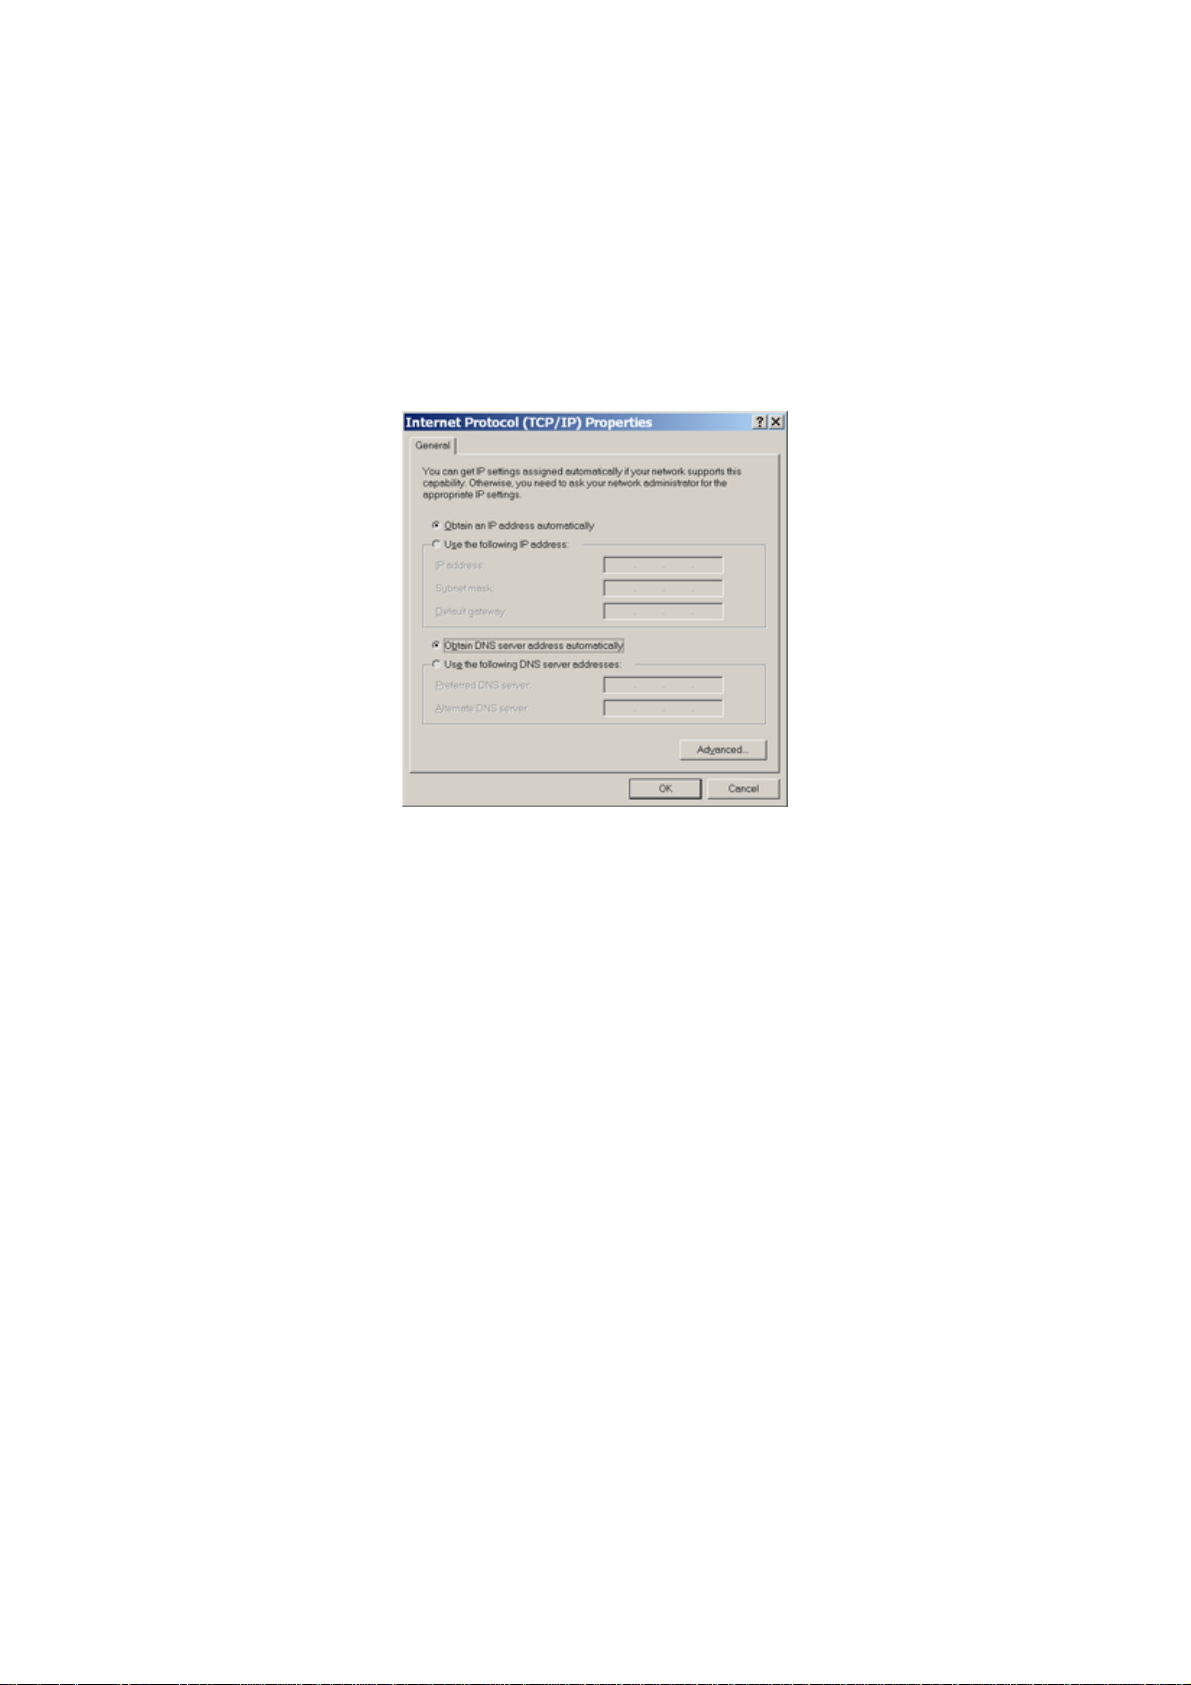
Step 5. Select both the Obtain IP address automatically and Obtain DNS
server address automatically,options and then click OK. Continue
clicking on the OK button to complete the PC configuration.
Your computer has been configured to obtain an IP address automatically from
the GN-B41G. To configure an IP address manually, continue to Step 6,
otherwise you may now skip ahead to Step 10.
16
Page 17
GN-B41G Wireless Broadband Router
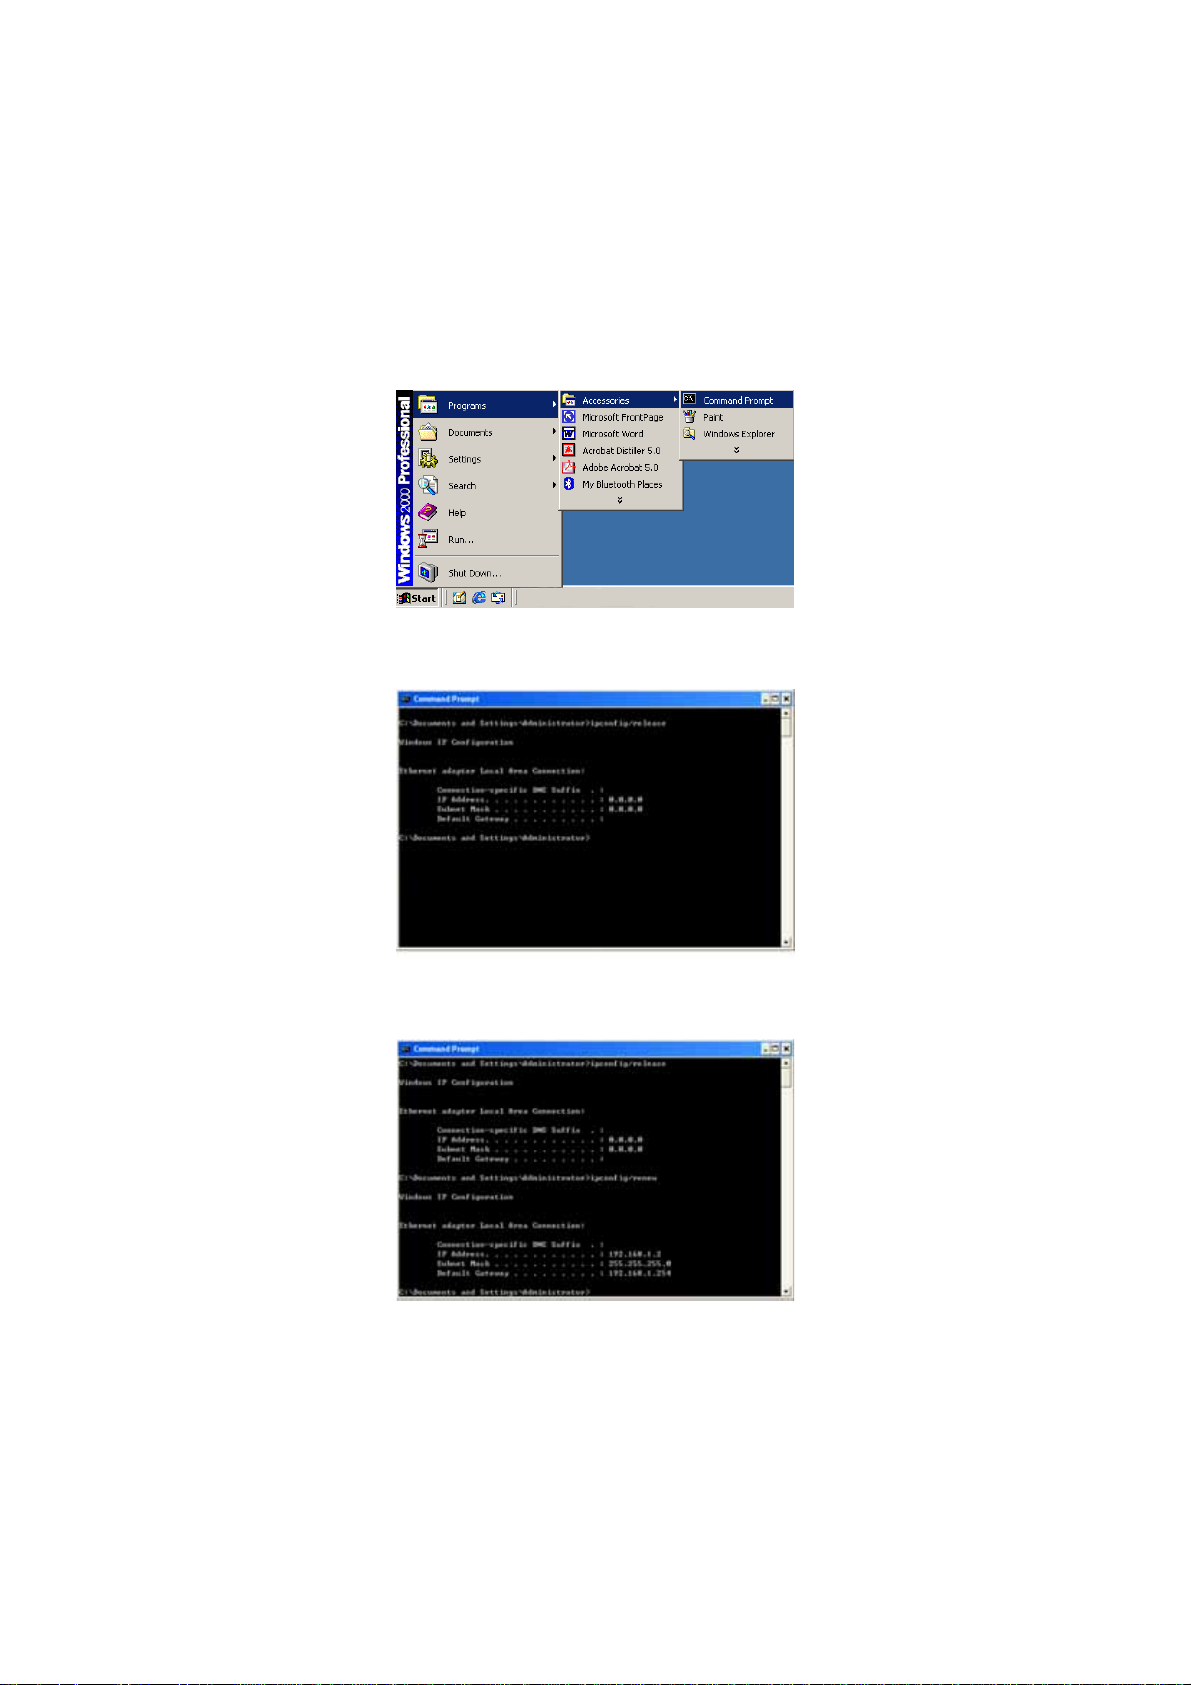
Step 6. Click the Start button. Select Programs , then Accessories and
then click Command Prompt.
Step 7. At the command prompt, type “ipconfig/release” and press the
ENTER key..
Step 8. At the next command prompt, type “ipconfig/renew” and press the
ENTER key..
17
Page 18
GN-B41G Wireless Broadband Router
Note: If the IP address of your GN-B41G, for example, is 192.168.1.254, your
computer’s IP address must be 192.168.1.x, where x is anything
between 1 and 253. (Note: Each computer in a network has one unique
IP located within this range. The default gateway must be
192.168.1.254).
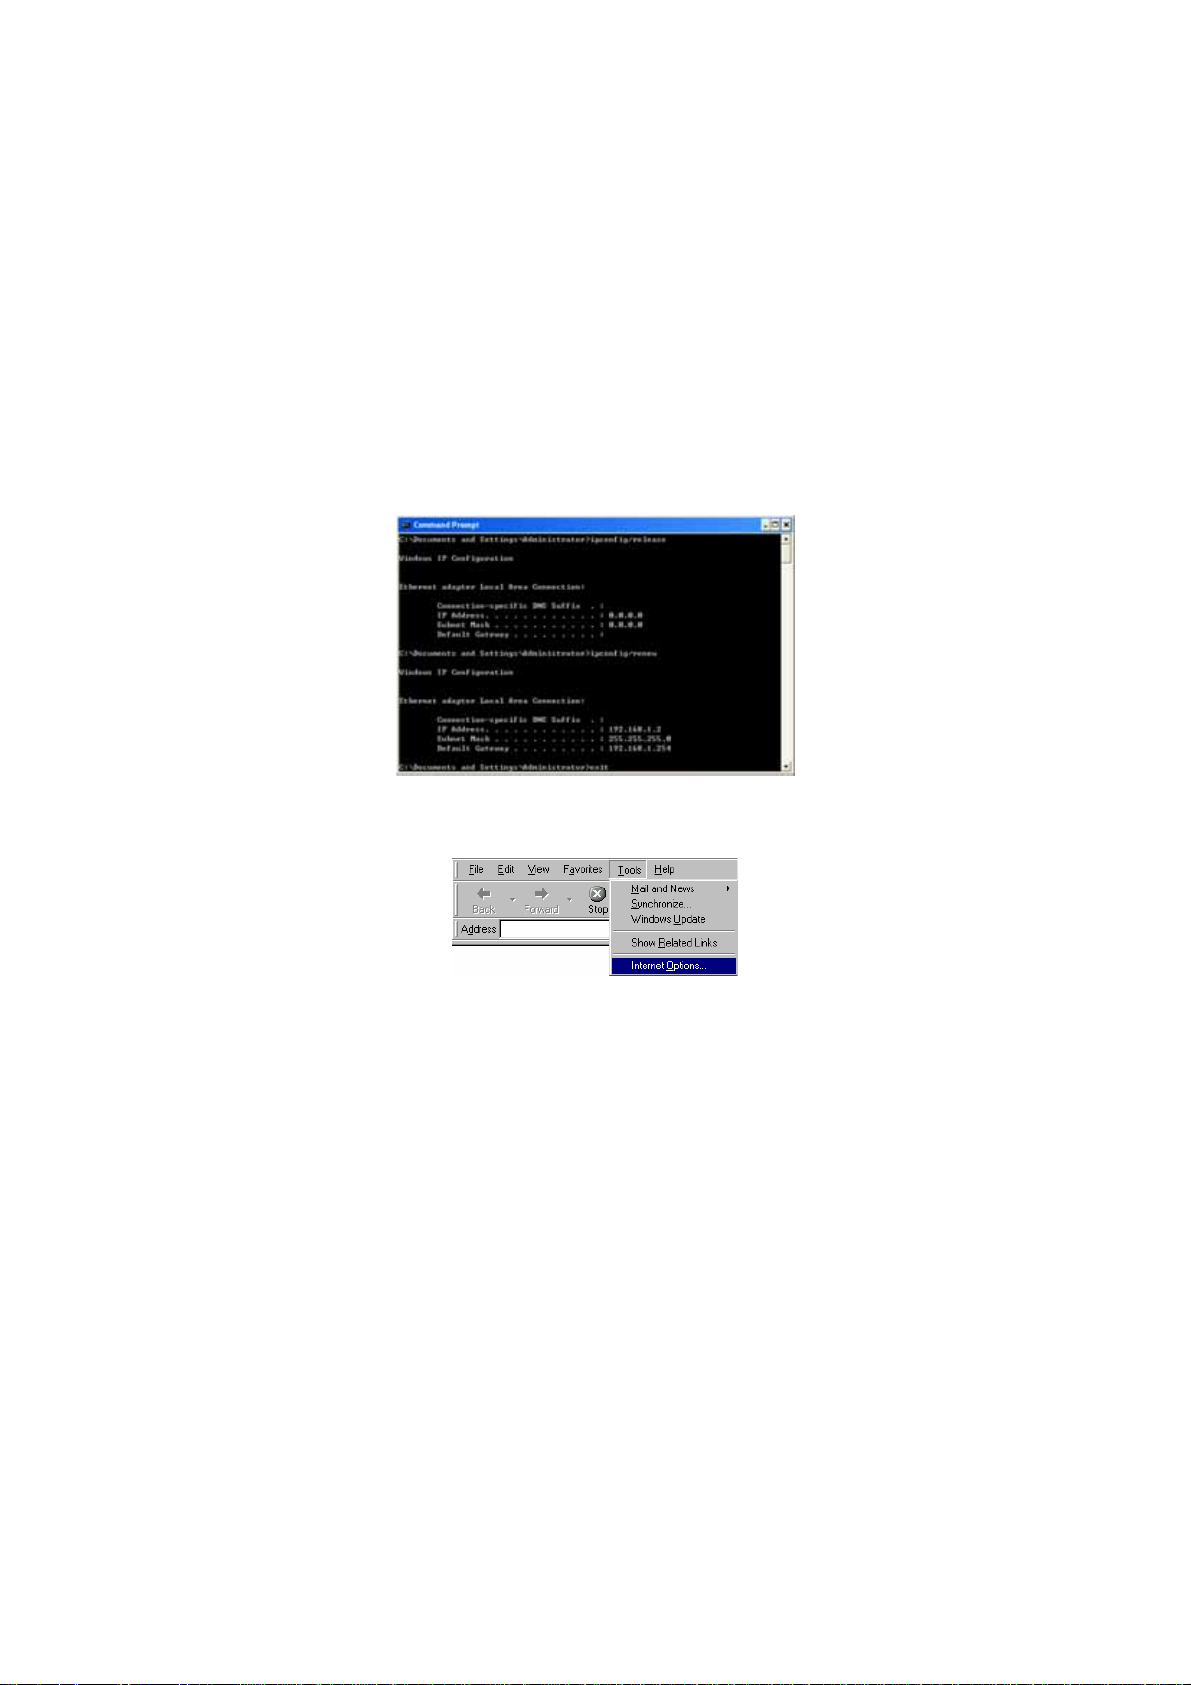
Step 9. At the command prompt, type in “exit” and then press the ENTER
key to exit and close the window.
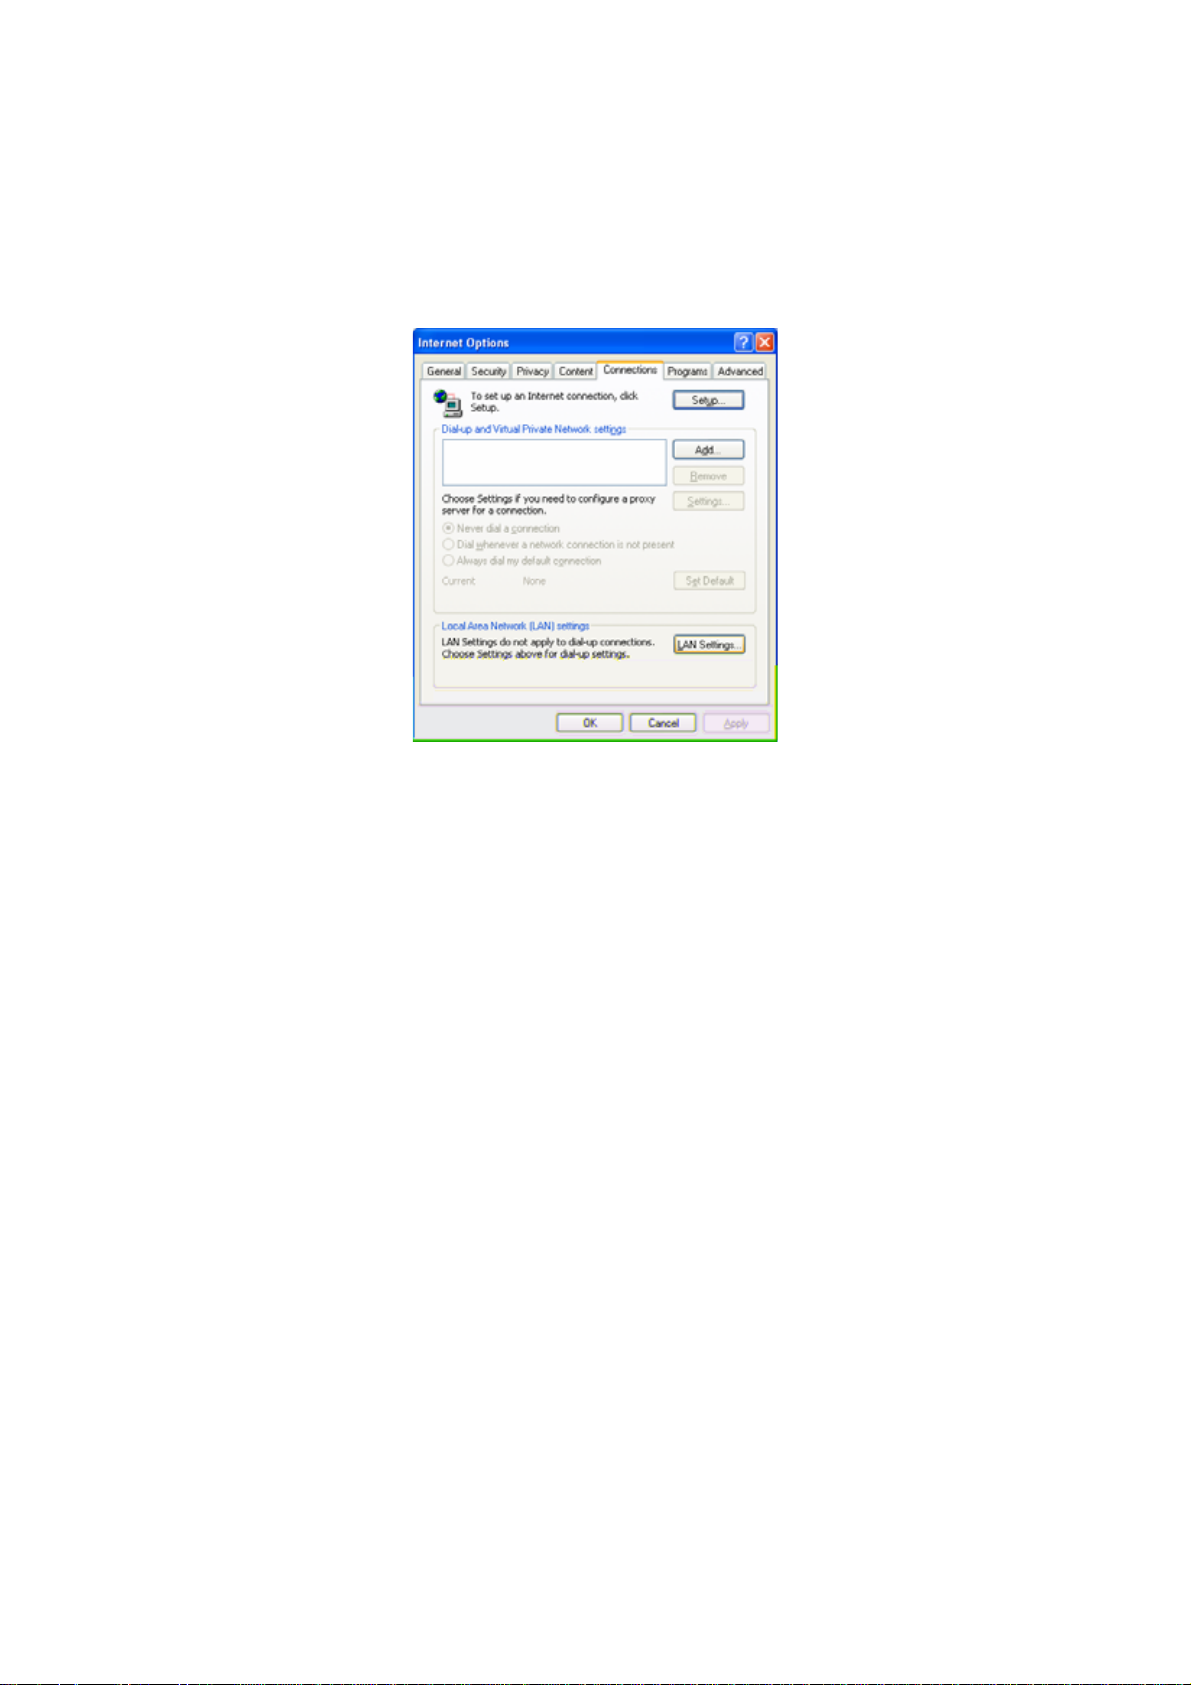
Step 10. Open Internet Explorer. From the menu select Tools and then
click Internet Options. A dialog box appears.
18
Page 19
GN-B41G Wireless Broadband Router
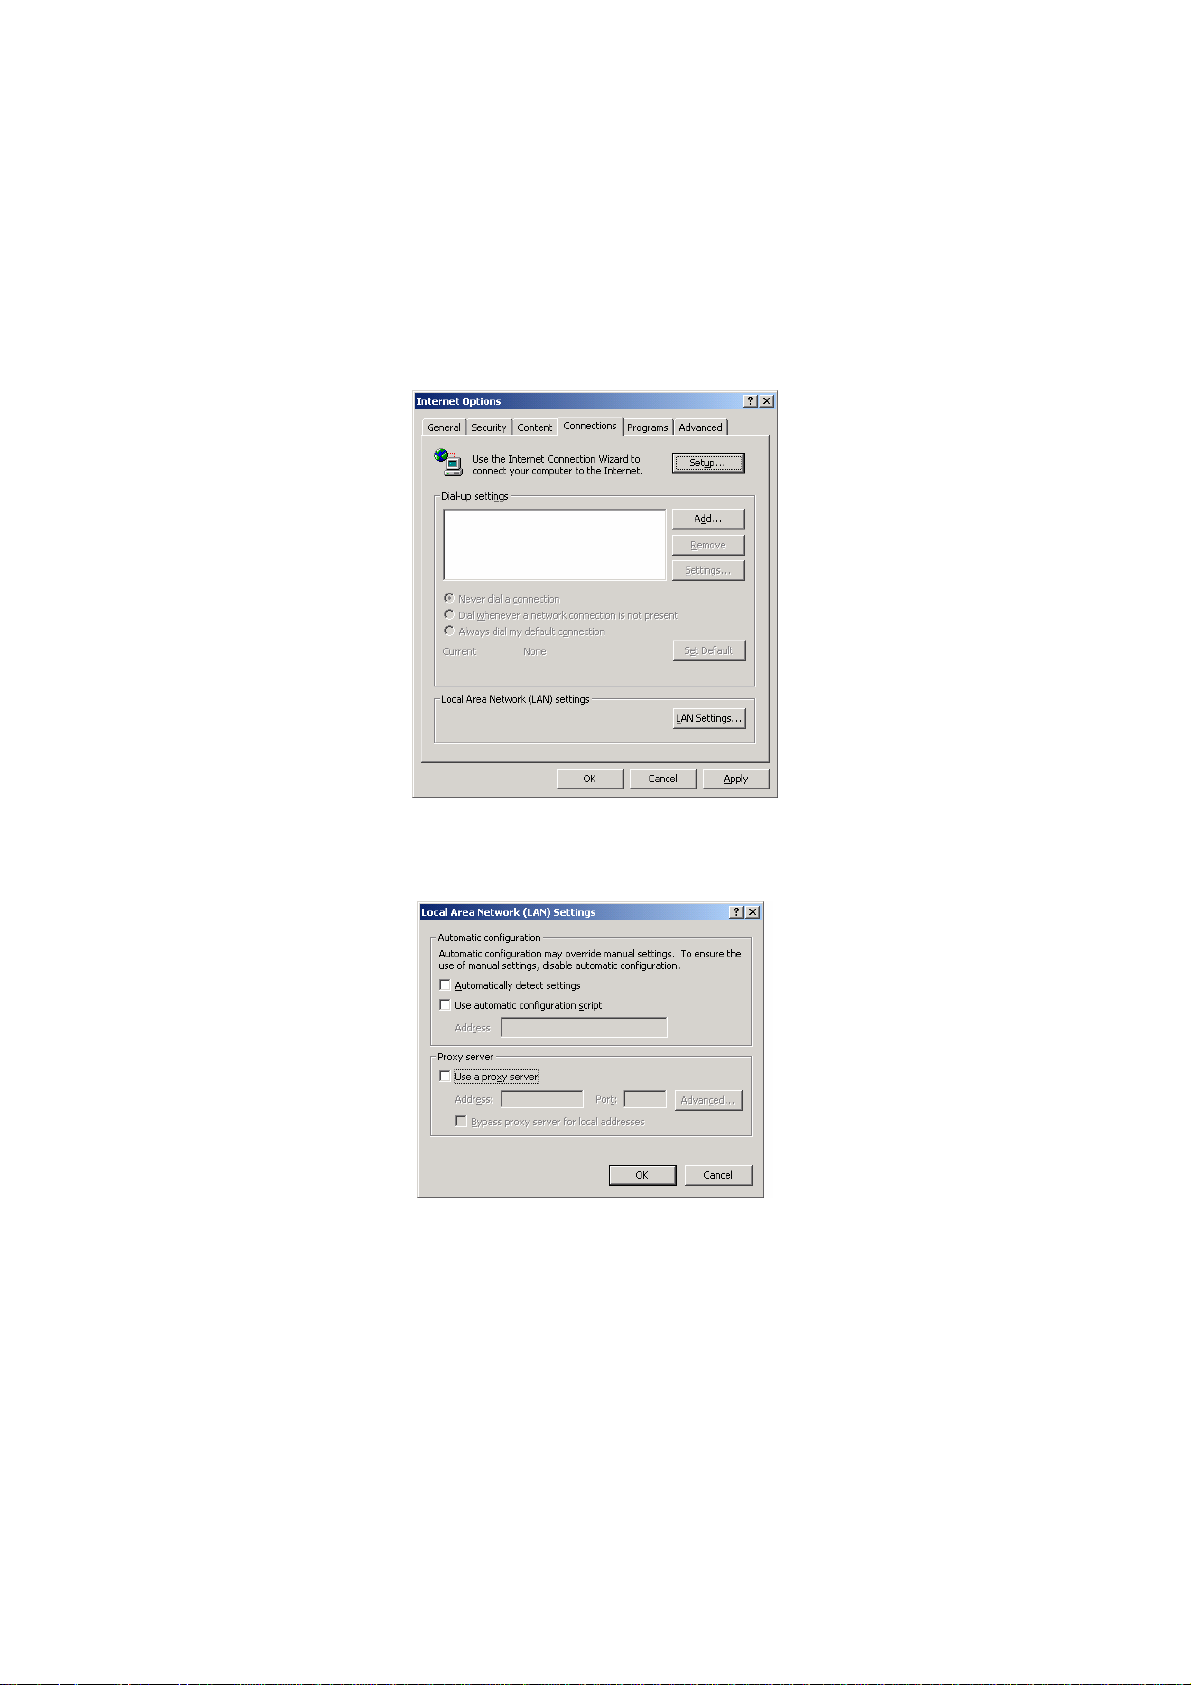
Step 11. From the Internet Options window, click the Connections tab, and
then click the LAN Settings button (see figure below).
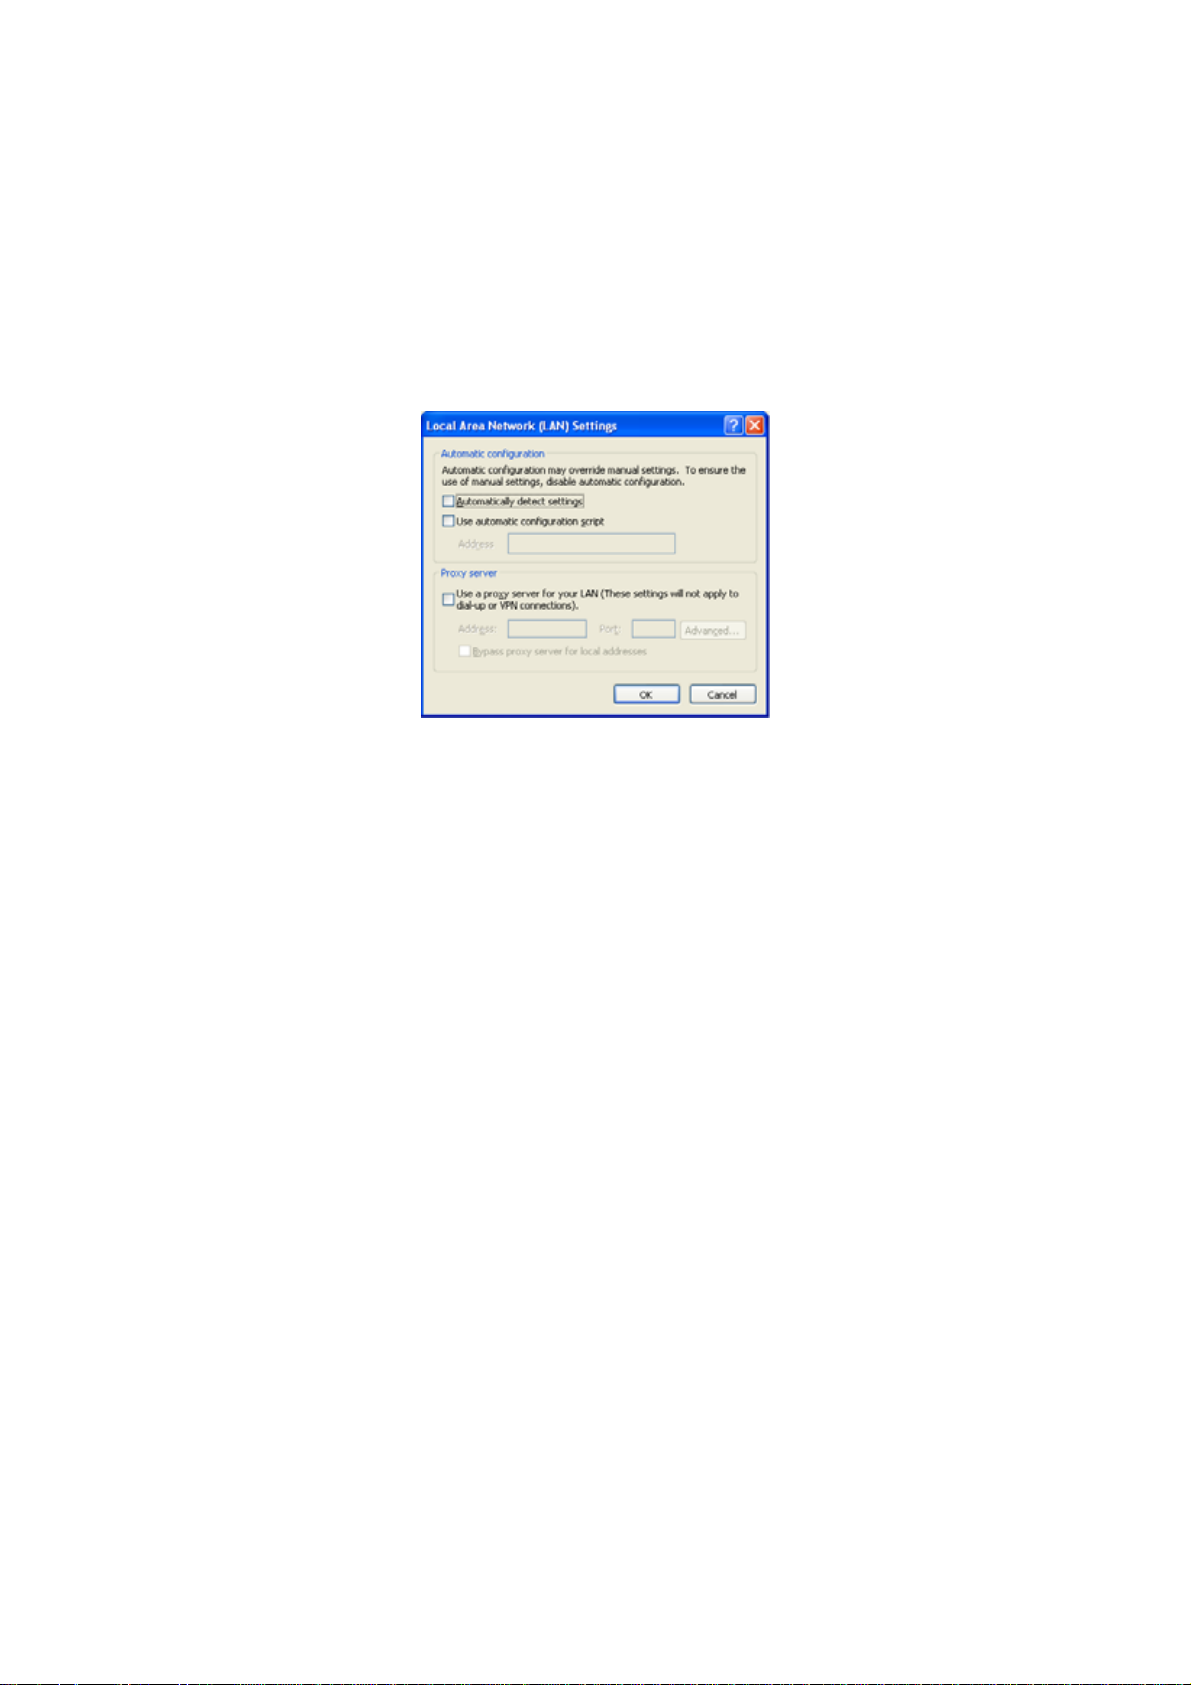
Step 12. Now verify that none of the checkboxes have been ticked, and click
on the OK button. Go to Chapter 5 – Basic GN-B41G
Configuration Settings.
.
19
Page 20
GN-B41G Wireless Broadband Router
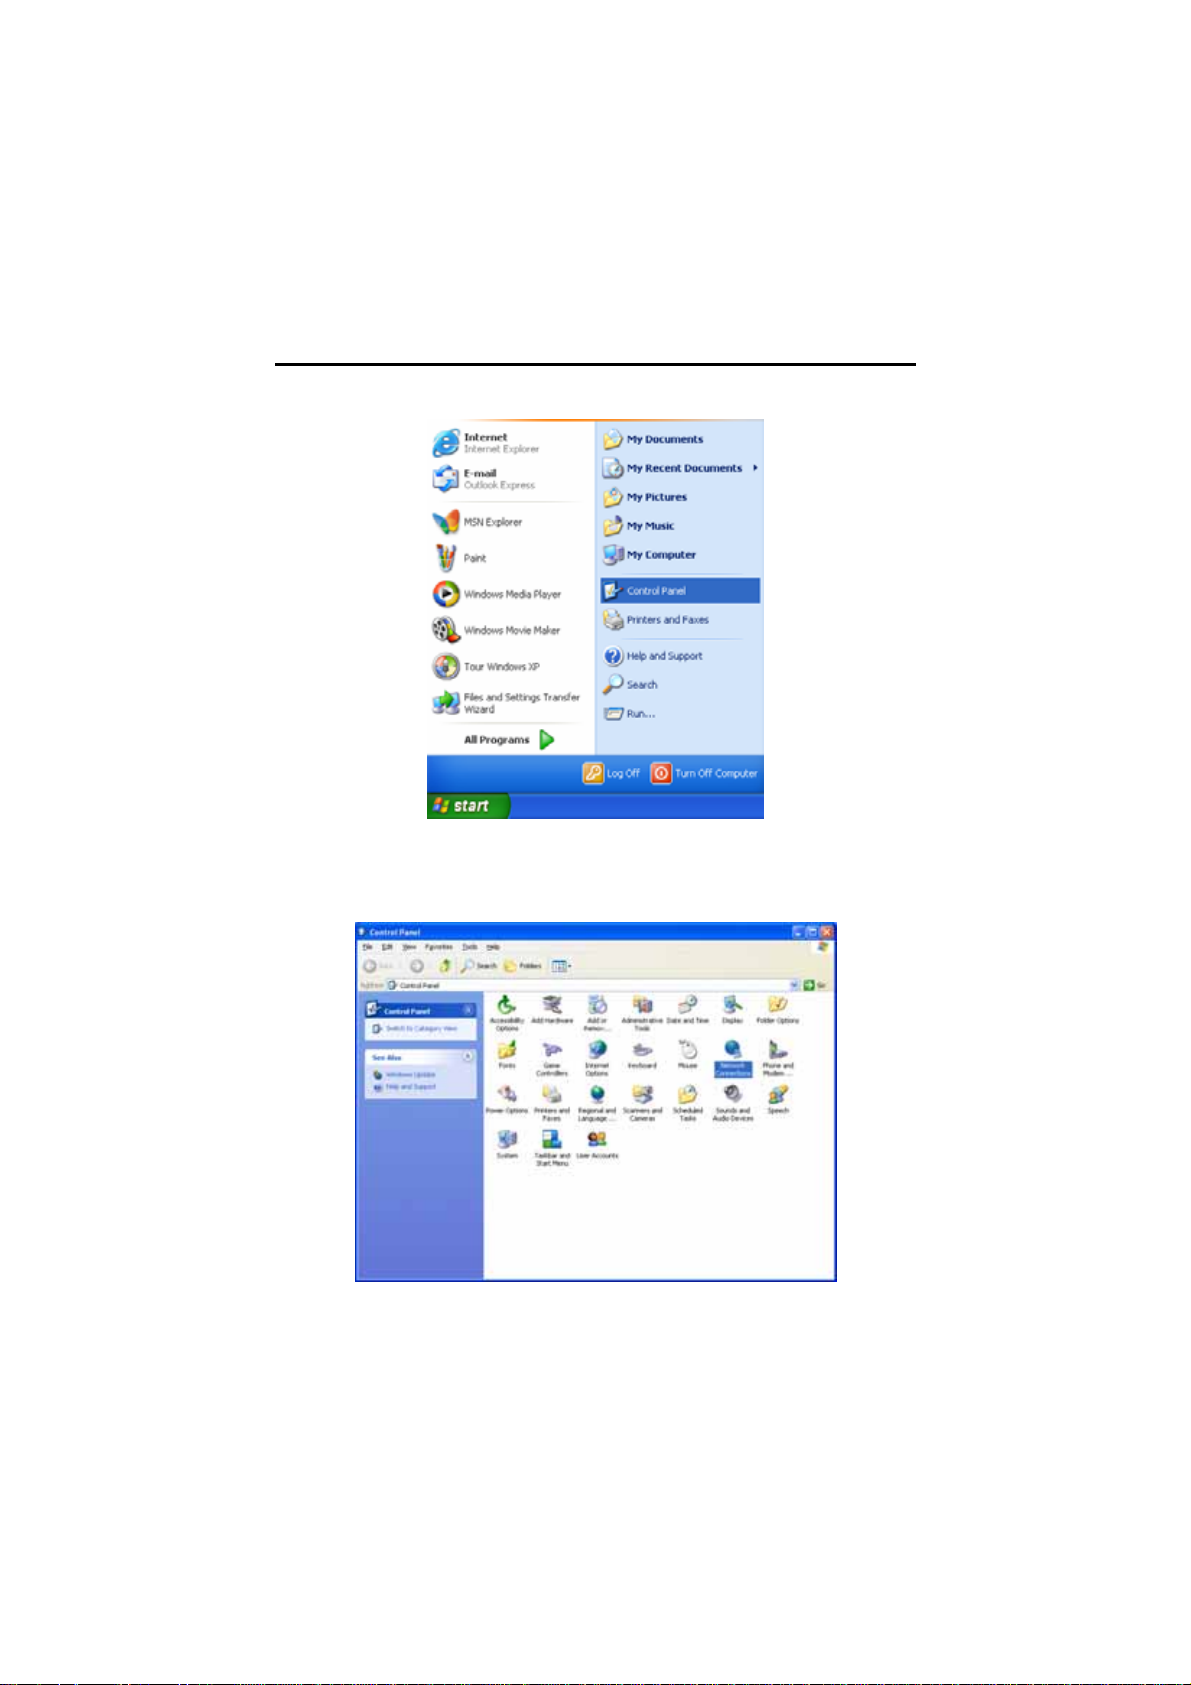
Configuring Settings Under Windows XP
Step 1. Click the Start button and then the Control Panel icon.
Step 2. Double-click the Network Connections icon.
20
Page 21
GN-B41G Wireless Broadband Router
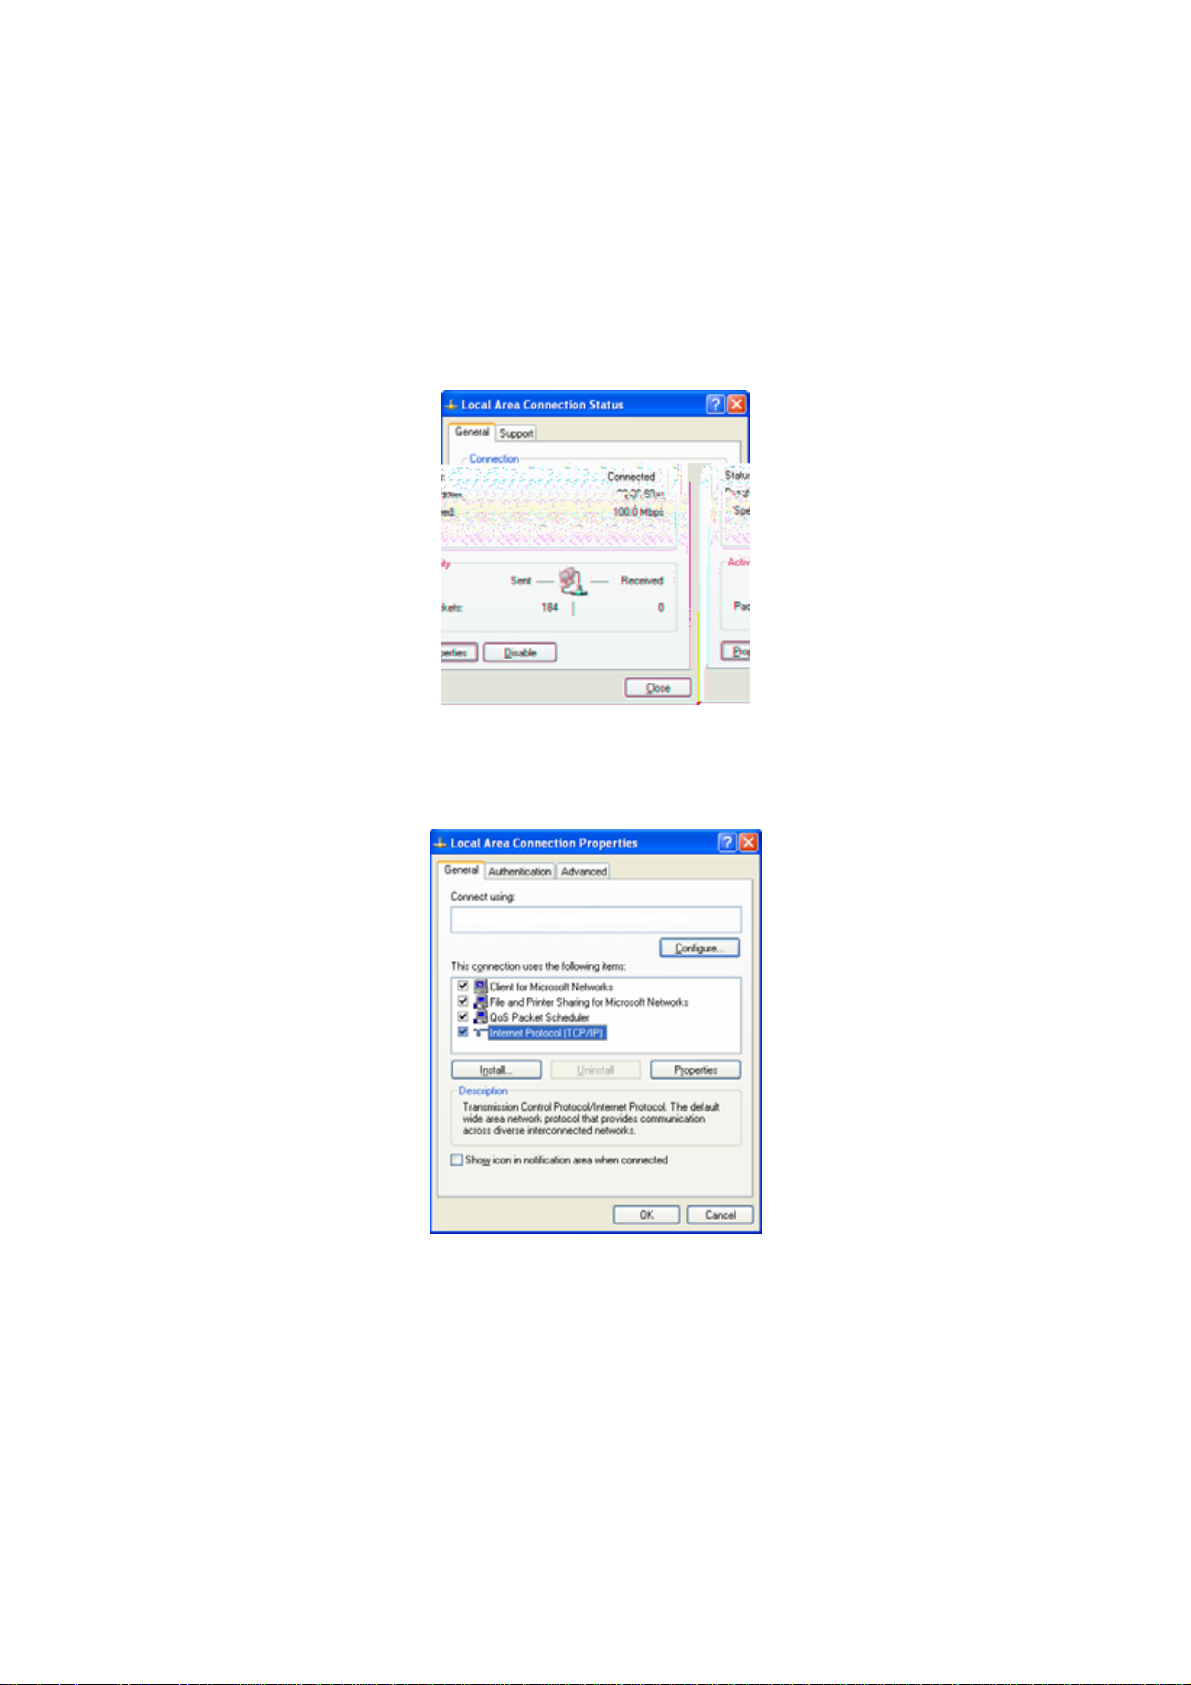
Step 3. Double-click the Local Connections icon, and then click on the
Properties button.
Step 4. The Local A rea Connection Properties window will appear. For the
applicable Ethernet / wireless adapter, make sure that there is a
check in the Internet Protocol (TCP/IP) checkbox, then double-click
on Internet Protocol (TCP/IP)..
21
Page 22
GN-B41G Wireless Broadband Router
Step 5. Select both the Obtain IP address automatically and Obtain DNS
server address automatically,options and then click OK. Continue
clicking on the OK button to complete the PC configuration.
Your computer has been configured to obtain an IP address automatically from
the GN-B41G. To configure an IP address manually, continue to Step 6,
otherwise you may now skip ahead to Step 10.
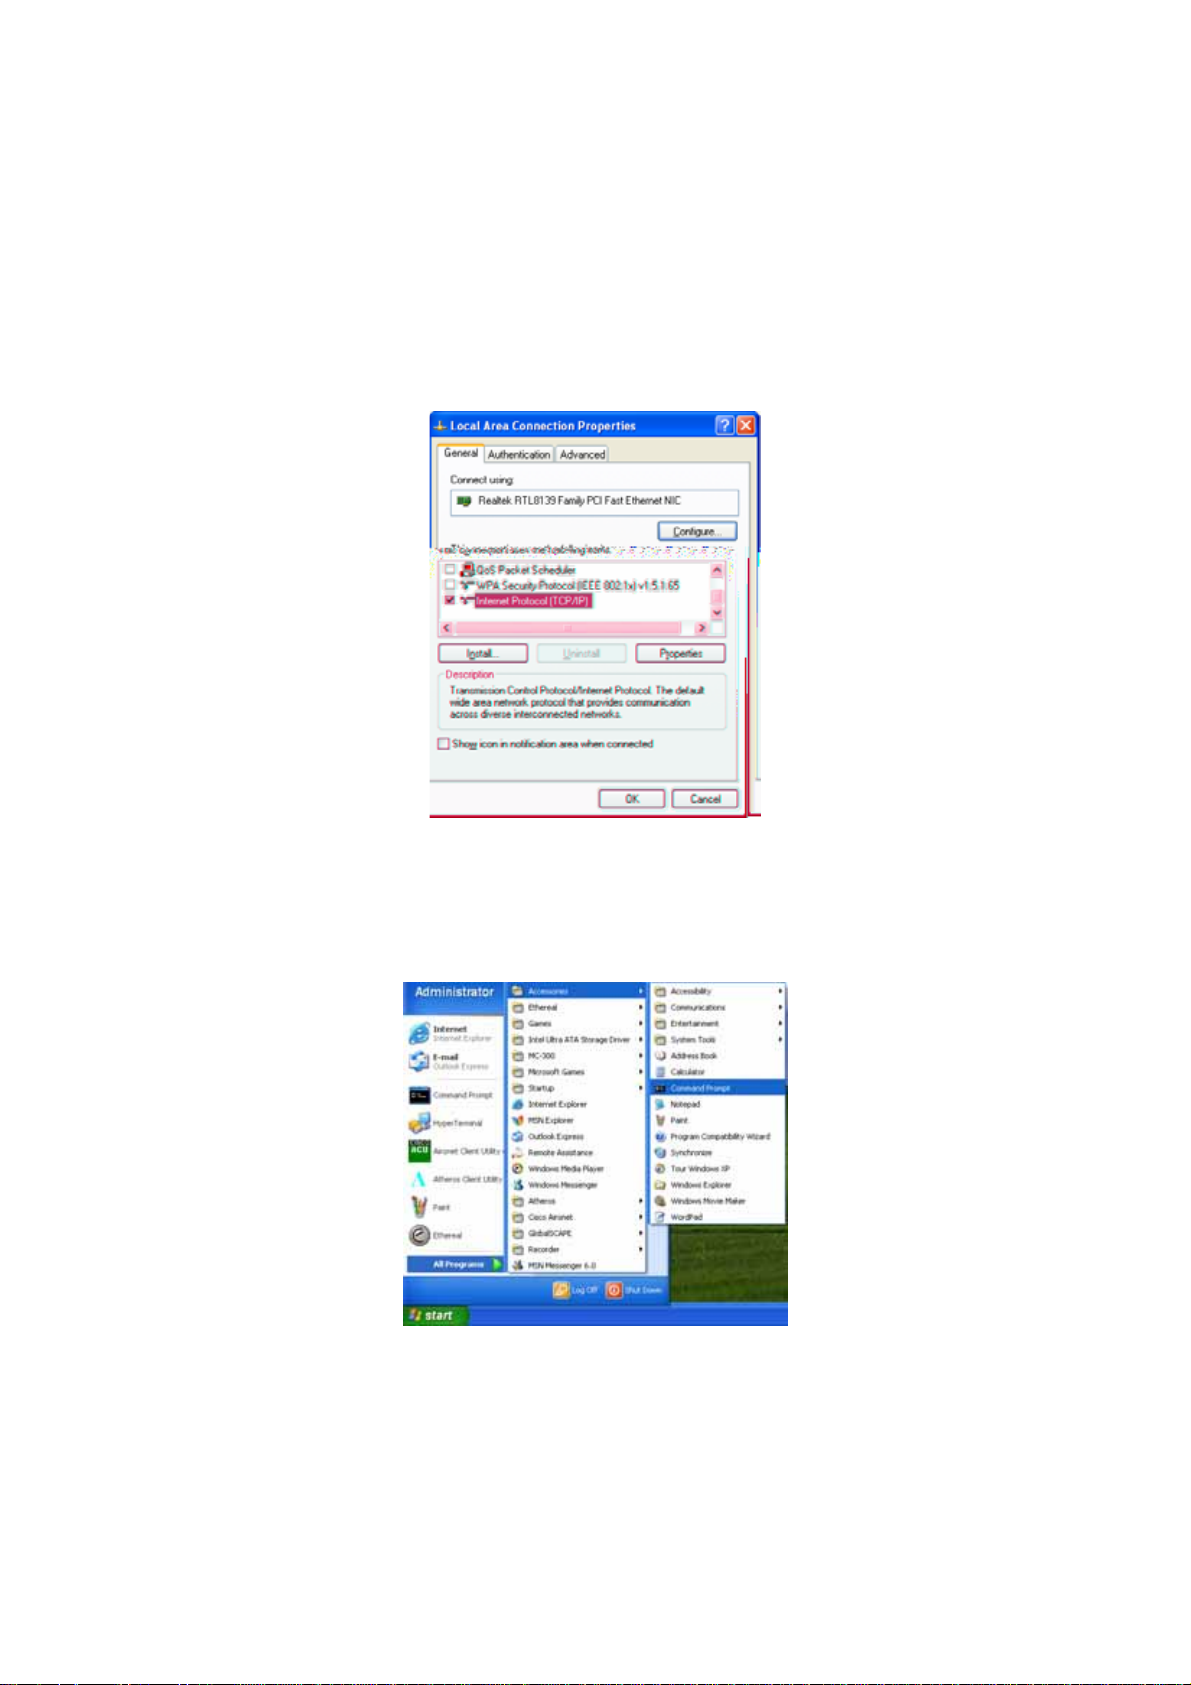
Step 6. Click the Start button. Select Programs , then Accessories and
then click Command Prompt.
22
Page 23

GN-B41G Wireless Broadband Router
23
Page 24
GN-B41G Wireless Broadband Router
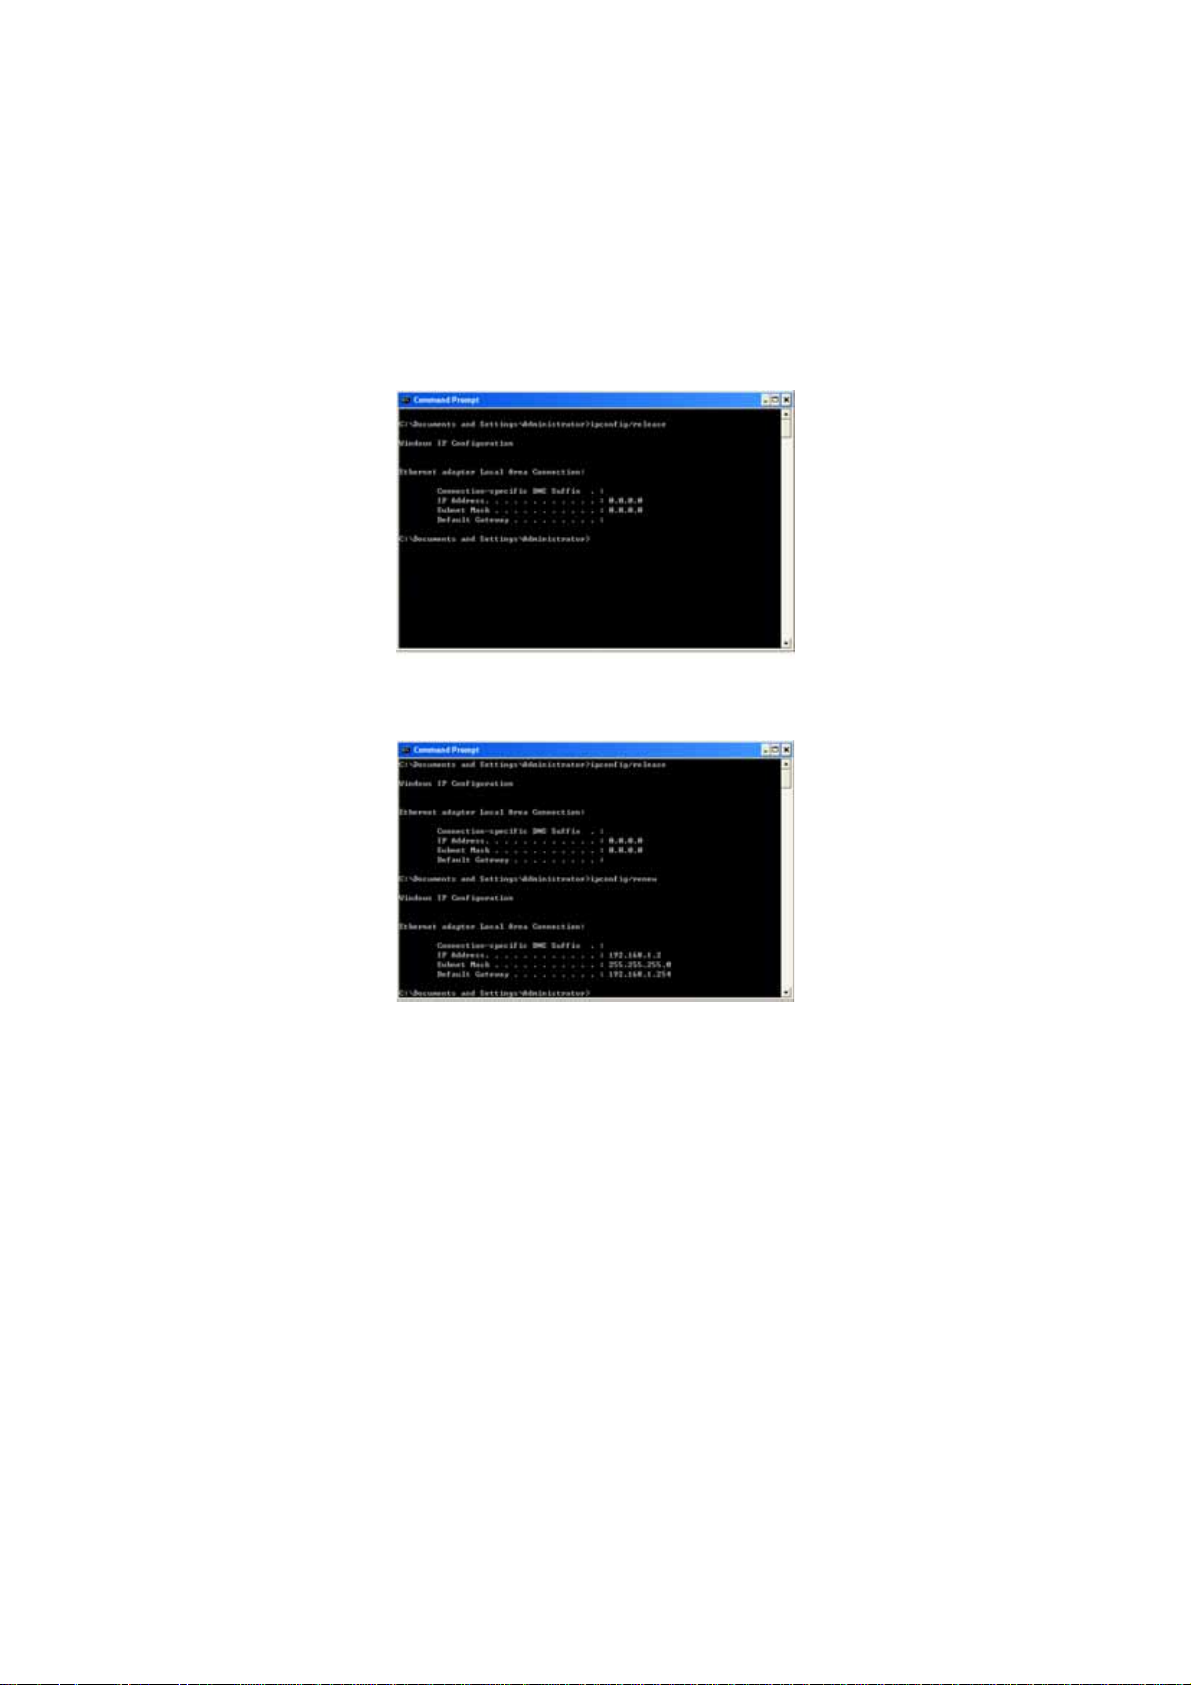
Step 7. At the command prompt, type “ipconfig/release” and press the
ENTER key..
Step 8. At the next command prompt, type “ipconfig/renew” and press the
ENTER key..
Note: If the IP address of your GN-B41G, for example, is 192.168.1.254, your
computer’s IP address must be 192.168.1.x, where x is anything
between 1 and 253. (Note: Each computer in a network has one unique
IP located within this range. The default gateway must be
192.168.1.254).
24
Page 25
GN-B41G Wireless Broadband Router
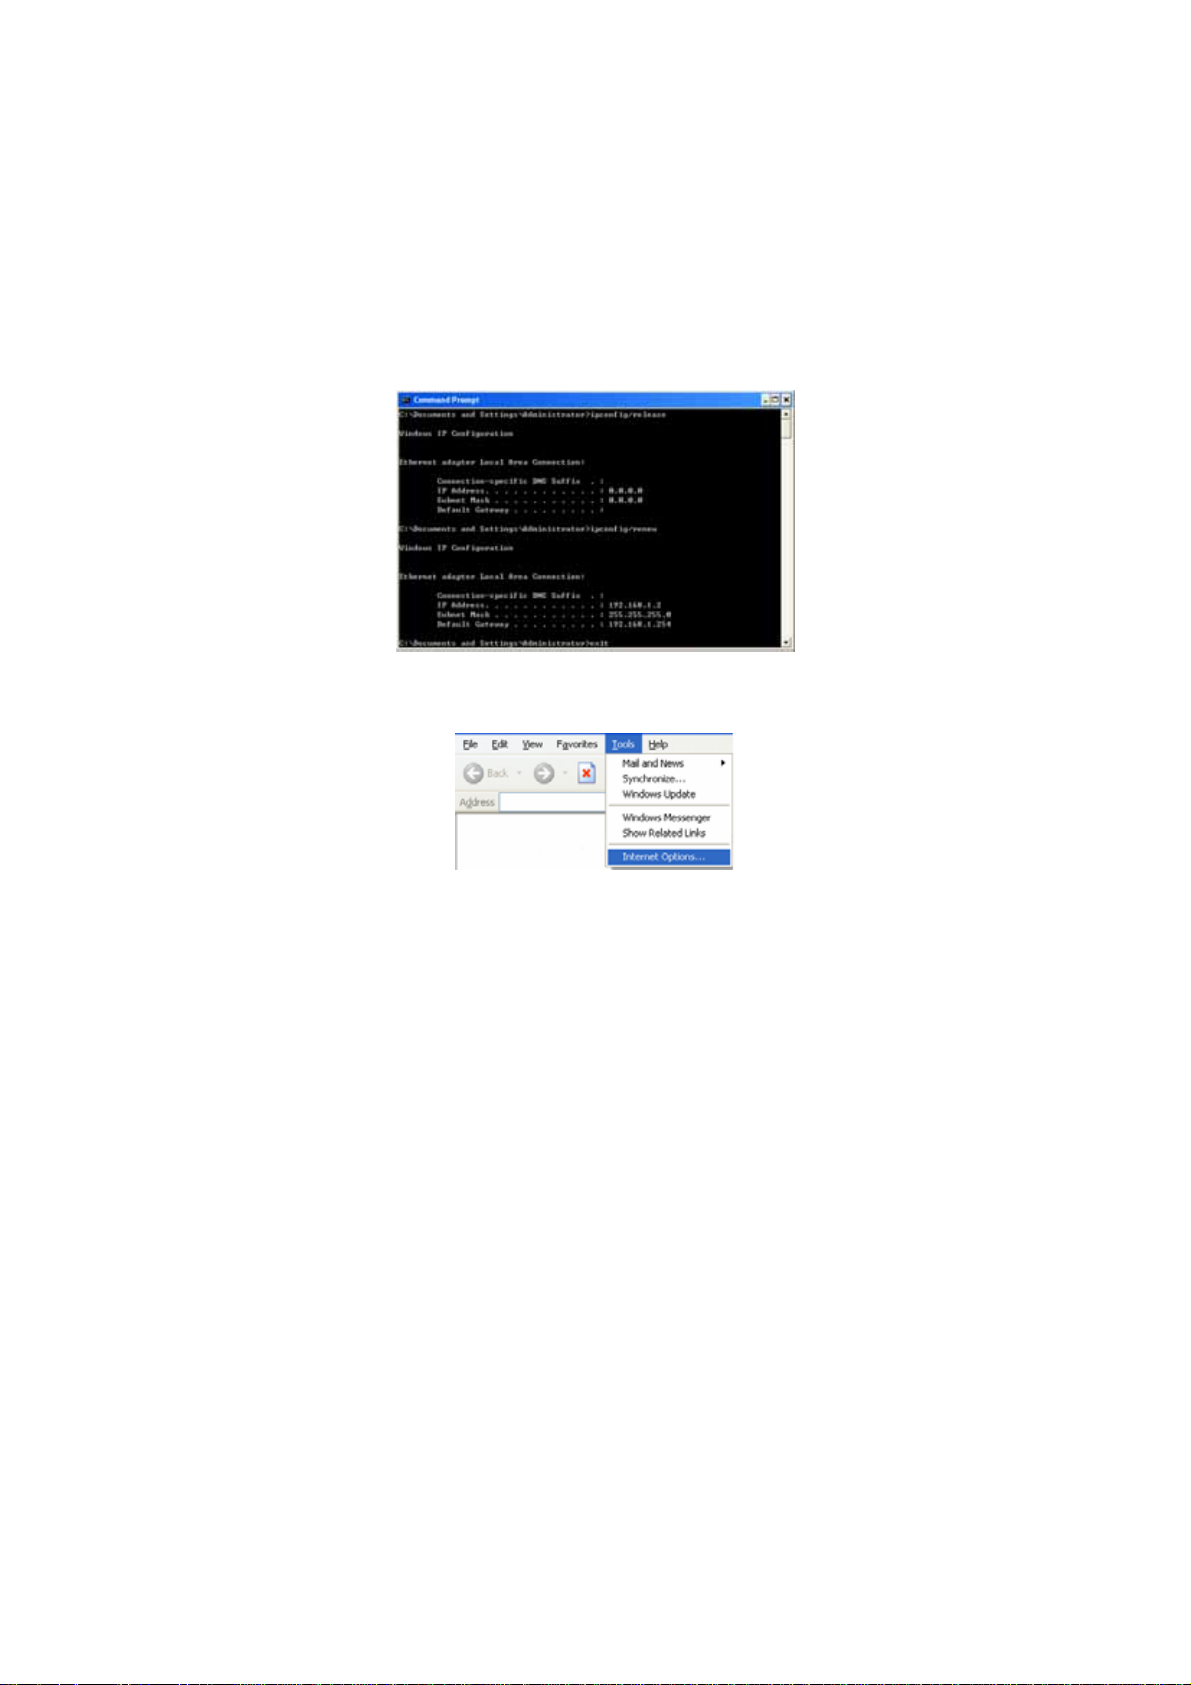
Step 9. At the command prompt, type in “exit” and then press the ENTER
key to exit and close the window.
Step 10. Open Internet Explorer. From the menu select Tools and then
click Internet Options. A dialog box appears.
Step 11. From the Internet Options window, click the Connections tab, and
then click the LAN Settings button (see figure below).
25
Page 26
GN-B41G Wireless Broadband Router
26
Page 27
GN-B41G Wireless Broadband Router
Step 12. Now verify that none of the checkboxes have been ticked, and click
on the OK button. Go to Chapter 5 - Basic GN-B41G
Configuration Settings.
27
Page 28

GN-B41G Wireless Broadband Router
Chapter 5 Basic GN-B41G Settings
You can change the settings of your GN-B41G wireless router using an Internet
browser (Internet Explorer or Netscape Navigator) to access the web-based
utility .
Login GN-B41G
Step 1. In the address bar of your browser, type “192.168.1.254” and then
press the ENTER key.
Note: If you have more than one Router or the IP is duplicated on the same
subnet, please refer to the following priority table to change your IP in
order.
Priority 1 “192.168.1.254”, “255.255.255.0”, “192.168.1.1”, “192.168.1.33”
Priority 2 “192.168.2.254”, “255.255.255.0”, “192.168.2.1”, “192.168.2.33”
Priority 3 “172.16.1.254”, “255.255.255.0”, “172.16.1.1”, “172.16.1.33”
Priority 4 “172.17.1.254”, “255.255.255.0”, “172.17.1.1”, “172.17.1.33”
Priority 5 “10.1.1.254”, “255.255.255.0”, “10.1.1.1”, “10.1.1.33”
Priority 6 “10.2.1.254”, “255.255.255.0”, “10.2.1.1”, “10.2.1.33”
Step 2. When the password page appears, use admin as the default User
Name and default Password. Then click the OK button.
28
Page 29

GN-B41G Wireless Broadband Router
Step 3. Once you have logged in successfully, you will see the GN-B41G
homepage in your browser window. If this is the first time configuring
your router, click the Smart Setup button from the side menu. This
will launch GIGABYTE’s unique router setup utility Smart Setup
which will automatically detect your Internet connection type. (Refer
to the Using Smart Setup section in Chapter 5 of this manual).
If you wish to configure your router’s Internet setup manually, click
the Setup Wizard button from the side menu. This Wizard will guide
you through setting the necessary parameters .
29
Page 30
GN-B41G Wireless Broadband Router
Using Smart Setup
Your GN-B41G Wireless Router has built-in software – Smart Setup – that can
automatically detect your Internet connection type. Either a PPoE, Dynamic IP
or Static IP will be detected, and the appropriate screen will appear prompting
you to enter basic ISP account information.
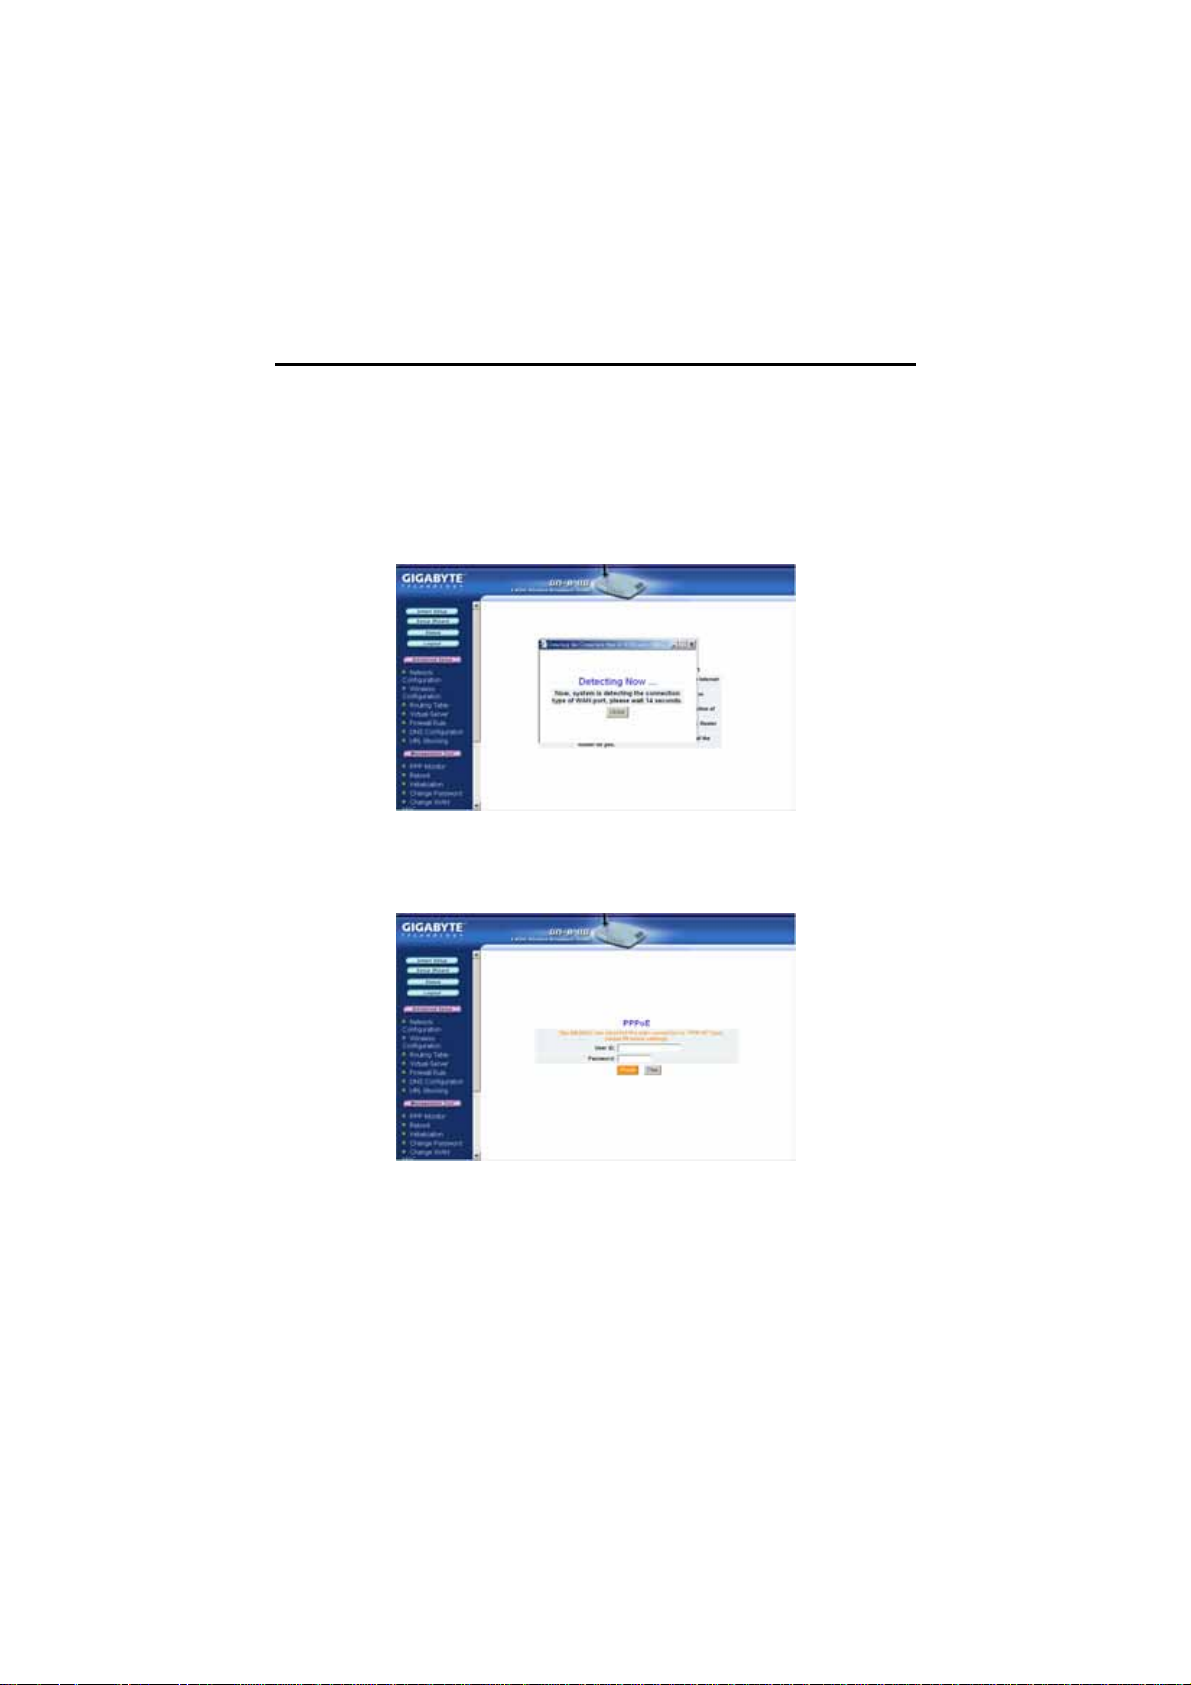
Step 1. From the menu on the left, click on the Smart Setup button to begin
detecting your Internet connection type.
Step 2. If you have a PPPoE type connection, a screen will appear
prompting you to enter the User Name and Password provided by
your ISP.
30
Page 31

GN-B41G Wireless Broadband Router
Step 3. If you are connecting through a Dynamic IP address, no further
action is required. Please click the OK button on the warning
window.
Step 4. If you have a Static IP address, a screen will appear prompting yo u
to enter your WAN IP address, WAN subnet mask, WAN gateway,
and DSN infor
Page 32

GN-B41G Wireless Broadband Router
Note: An error message will appear if Smart Setup cannot detect your
Internect connection type. Please verify that the cable from your
ADSL/Cable modem to your router is properly connected.
32
Page 33

GN-B41G Wireless Broadband Router
Using Setup Wizard
To manually configure your router’s Internet connection, click on the Setup
Wizard button.
The LAN Setup Screen
Step 1. Each field on the LAN Setup screen is set to a default value, so it is
not necessary to make any modifications. If you wish to change any
of the default values, simply highlight and enter the new setting.
LAN IP Address & Subnet Mask Fields
The values in these fields are the router’s IP address and Subnet
Mask respectively. The default values are 192.168.1.254 for the IP
address, and 255.255.255.0 for the Subnet Mask.
DHCP Setup Field
Enable Select this option to activate the DHCP function of
your GN-B41G, automatically assigning IP addresses
to all the computers in your network.
Disable Select this opti on to de-activate the DHCP function of
your GN-B41G. (ie. you have to manually assign
different IP addresses to all the computers in your
network.
DHCP Start Address/End Address Fields
When the DHCP feature is enabled, your GN-B41G will assign IP
addresses to computers on your network that are between the Start
Address value and the End Address value.
For example: Assuming that the start address is 192.168.1.1 and
end address is 192.168.1.50, the assigned IP address
will be between 192.168.1.1 and 192.168.1.50.
33
Page 34

GN-B41G Wireless Broadband Router
Note: The default IP address of your Router is 192.168.1.254.
Click the Next button to continue GN-B41G configuration.
Step 2. Please choose your Internet connection (WAN) type from the list.
PPPoE: If your broadband ISP service is charged by the hour,
please select this item, click the Next button and then go to
Step 3 of this section
Dynamic IP Address: If your broadband ISP service is a
‘fixed-connection’, but you do not have a static IP, please
select this item, click the Next button and then go to Step 7
of this section.
Static IP Address: If your broadband ISP service is a
‘fixed-connection’ and a static IP has been assigned, please
select this item, click the Next button and then go to Step 11
of this section.
PPPoE Unnumber: If you use PPPoE Unnumber, please
select this item, click the Next button and then go to Step 15
of this section.
34
Page 35

GN-B41G Wireless Broadband Router
Connection Type - PPPoE
Step 3. On the PPPoE screen, enter your User Name and Password as
provided by your ISP. Click the Finish button to continue with
setup.
Step 4. A screen with the message Setup Completed appears. Click the
Reboot button to restart your router so that the settings take effect.
35
Page 36

GN-B41G Wireless Broadband Router
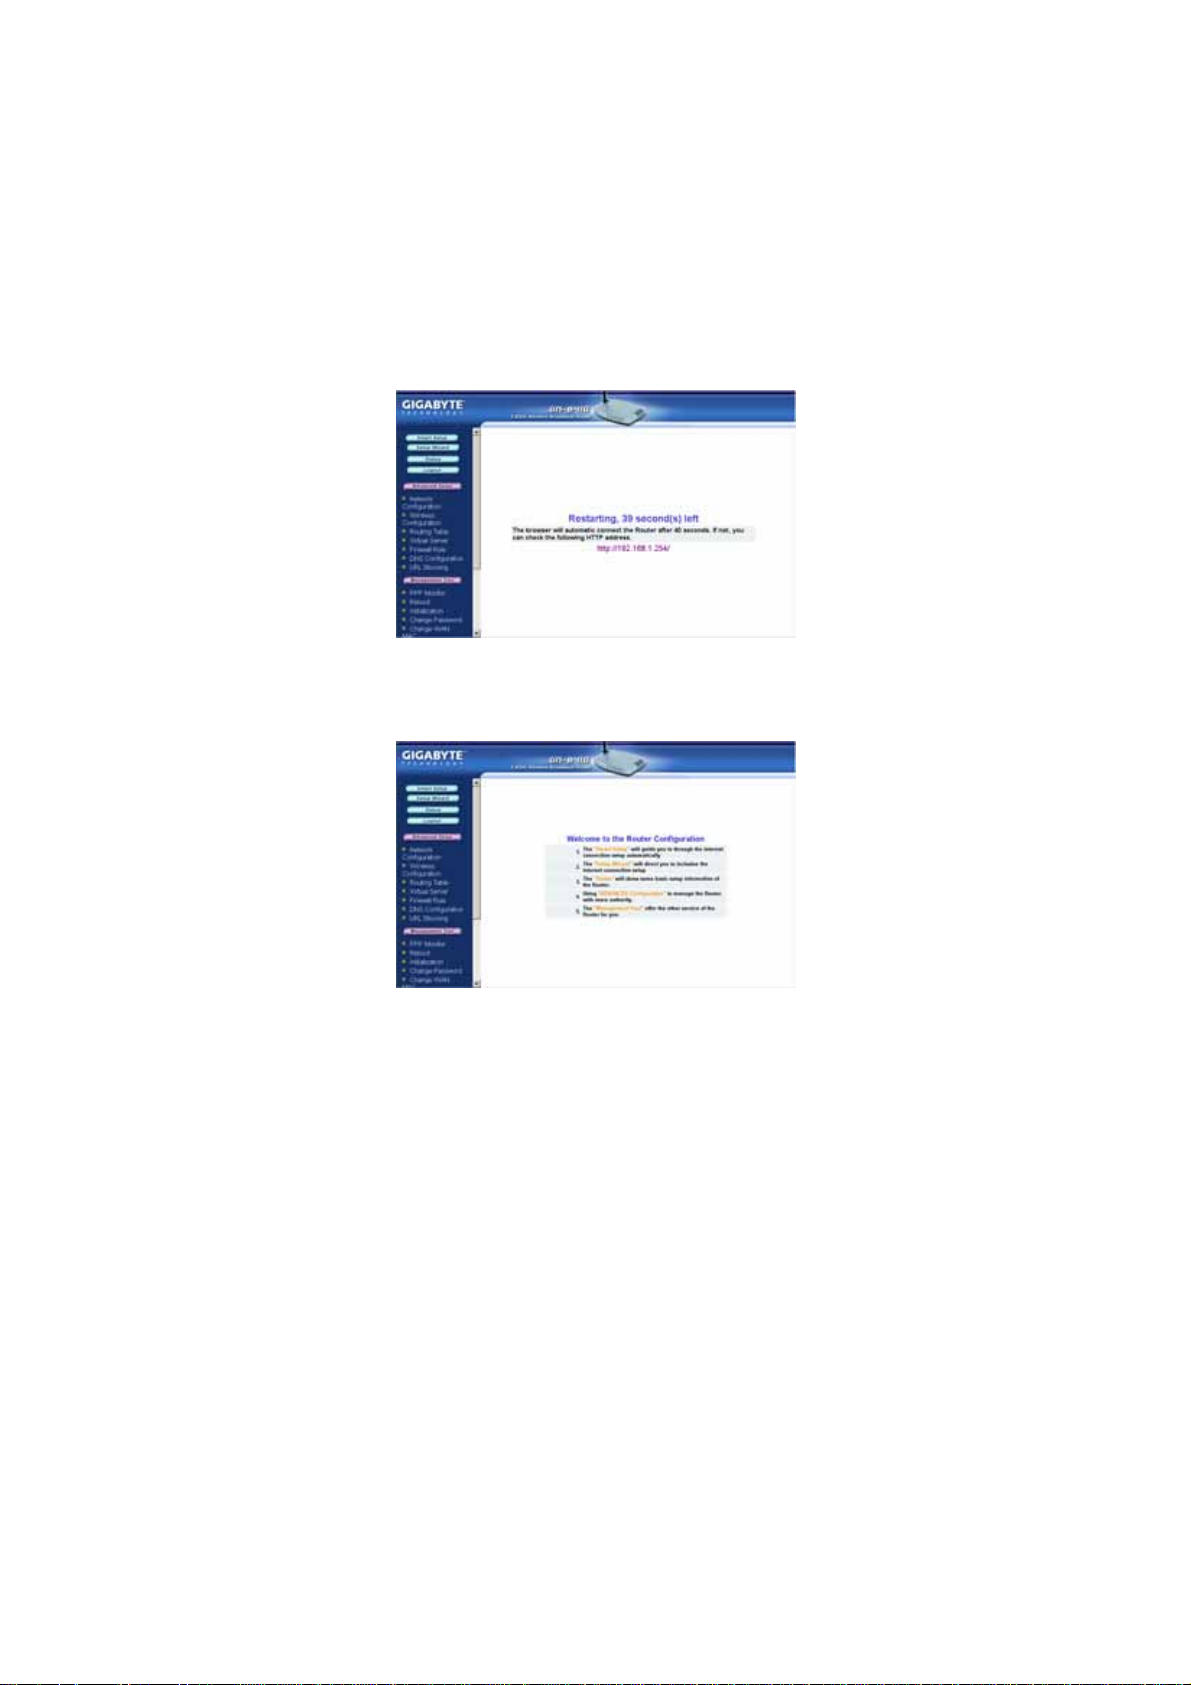
Step 5. While the router is rebooting, the screen will display the time
remaining.
Step 6. Once your router has successfully rebooted, it will load the main
page of the GN-B41G configuration utility. You are now able to
browse the Internet!
Note: If you are configuring the GN-B41G using a wireless
connection (ie. wireless adapter), further steps to complete
the setup may be required Please refer to Chapter 6
Advanced Setup for details.
36
Page 37

GN-B41G Wireless Broadband Router
Connection Type - Dynamic IP Address
Step 7. On the Dynamic IP Address screen, type in the information
provided by your ISP, and then click the Finish button to continue
with router setup.
Step 8. A screen with the message Setup Completed appears. Click the
Reboot button to restart your router so that the settings take effect
37
Page 38

GN-B41G Wireless Broadband Router
Step 9. While the router is rebooting, the screen will display the time
remaining.
Step 10. Once your router has successfully rebooted, it will load the main
page of the GN-B41G configuration utility. You are now able to
browse the Internet!
Note: If you are configuring the GN-B41G using a wireless
connection (ie. wireless adapter), further steps to complete
the setup may be required Please refer to Chapter 6
Advanced Setup for details.
38
Page 39

GN-B41G Wireless Broadband Router
Connection Type - Static IP Address
Step 11. On the Static IP Address screen,type in the information provided by
your ISP, and then click the Finish button to continue with router
setup.
Note: If your ISP has assigned you several IP addresses, please
select and enter only one.
Step 12. A screen with the message Setup Completed appears. Click the
Reboot button to restart your router so that the settings take effect
39
Page 40

GN-B41G Wireless Broadband Router
Step 13. While the router is rebooting, the screen will display the time
remaining.
Step 14. Once your router has successfully rebooted, it will load the main
page of the GN-B41G configuration utility. You are now able to
browse the Internet!
Note: If you are configuring the GN-B41G using a wireless
connection (ie. wireless adapter), further steps to complete
the setup may be required Please refer to Chapter 6
Advanced Setup for details
40
Page 41

GN-B41G Wireless Broadband Router
Connection Type - PPPoE Unnumber
Step 15. On the PPPoE Unnumber screen, type in the information provided
by your ISP, and then click the Finish button to continue with router
setup.
Note: If your ISP has assigned you several IP addresses, please
select and enter only one
Step 16. A screen with the message Setup Completed appears. Click the
Reboot button to restart your router so that the settings take effect
41
Page 42
GN-B41G Wireless Broadband Router
Step 17. While the router is rebooting, the screen will display the time
remaining.
Step 18. Once your router has successfully rebooted, it will load the main
page of the GN-B41G configuration utility. You are now able to
browse the Internet!
Note: If you are configuring the GN-B41G using a wireless
connection (ie. wireless adapter), further steps to complete
the setup may be required Please refer to Chapter 6
Advanced Setup for details
42
Page 43
GN-B41G Wireless Broadband Router
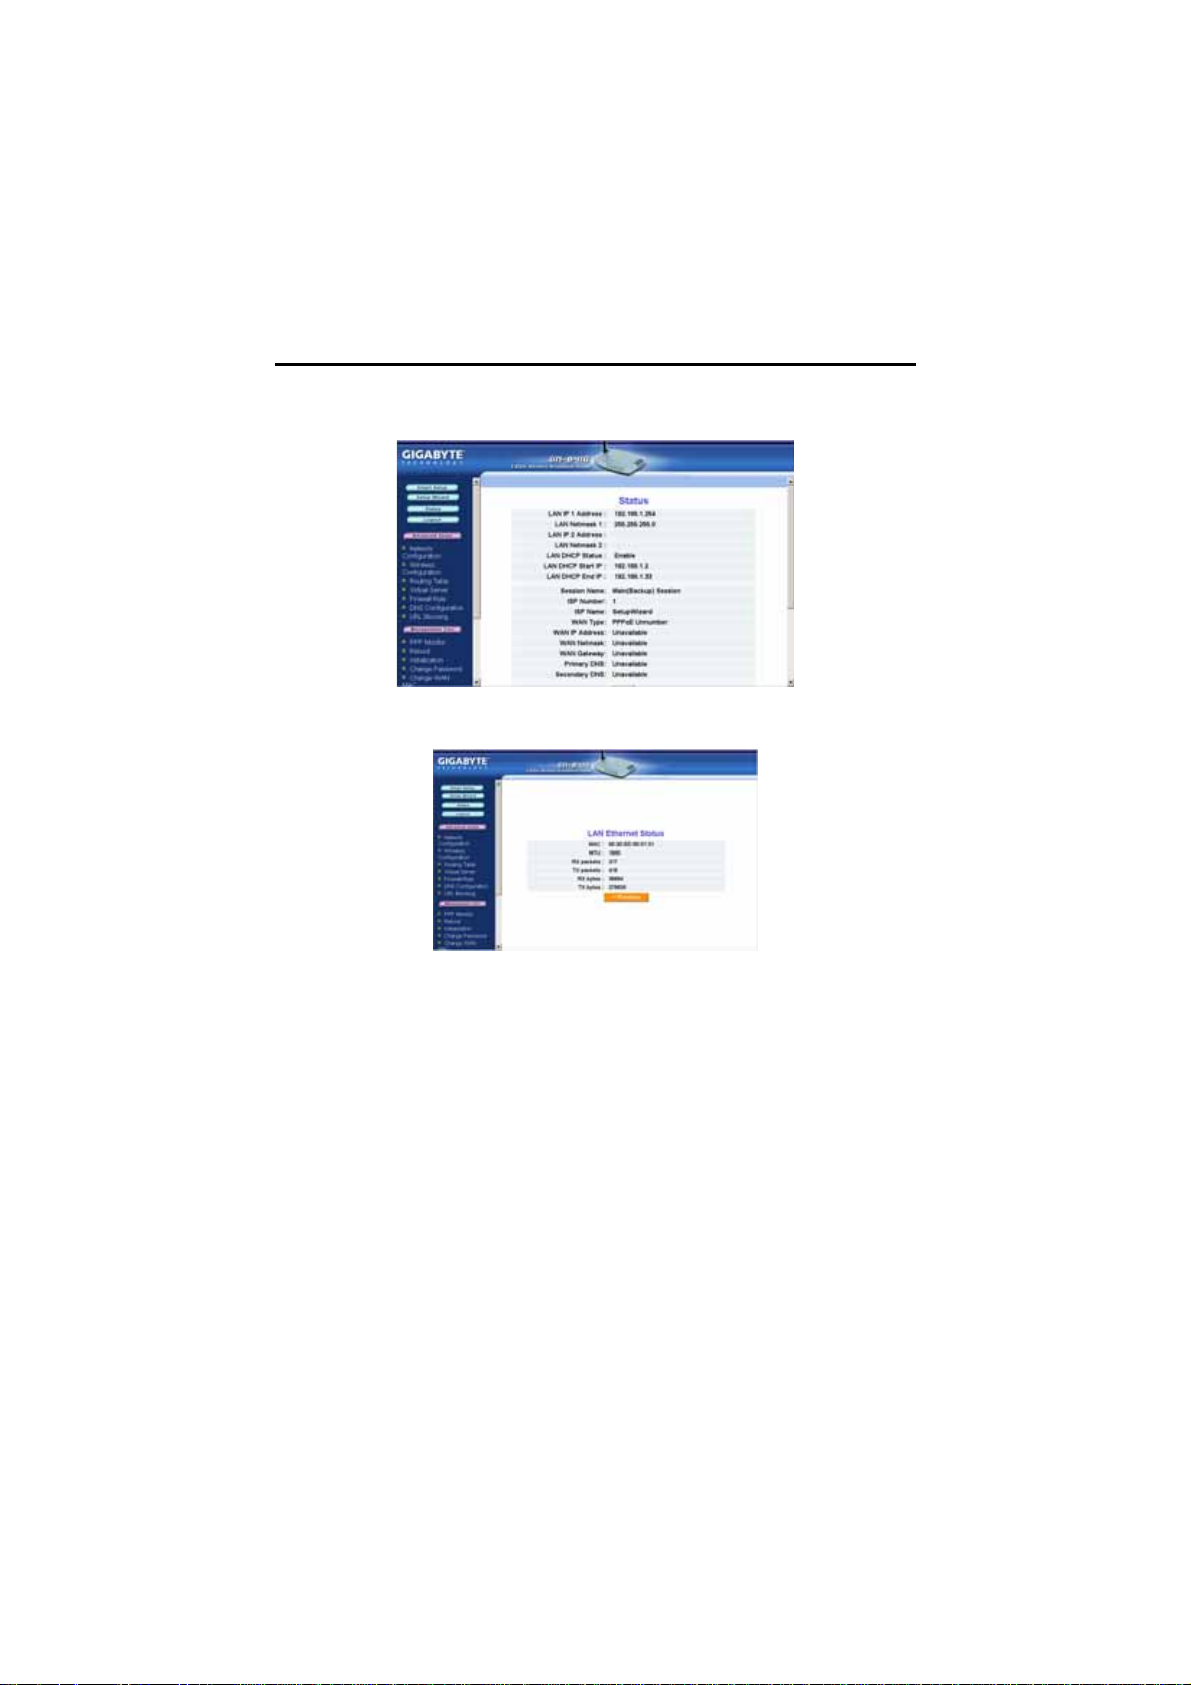
The Status Page
On the Status page the router’s current connection and configuration
information is displayed.
LAN Ethernet Status
MAC This field displays the MAC address of the
MTU This specifies the maximum size of the packet
Rx packets The number of data packets received by the router.
Tx packets The number of data packets transmitted by the
Rx bytes The current bandwidth (receive) on the LAN port.
Rx bytes The current bandwidth (transmit on the LAN port.
GN-B41G as seen on your wireless network.
permitted for Internet transmission.
router.
43
Page 44

GN-B41G Wireless Broadband Router
WAN Ethernet Status
MAC The field displays the MAC address used by the
MTU The maximum size of the packet sent from your
Rx packets The number of received packets of this port after
Tx packets The number of transmitted packets of this port after
Rx bytes The current bandwidth (receive) on the WAN port.
Rx bytes The current bandwidth (transmit) on the WAN port.
Wireless Status
MAC The field displays the MAC address used by the
Rx packets The number of received packets of this wireless
WAN port of the router.
computer to the Internet.
resetting or manually initial.
resetting or manually initial.
router when wireless.
port after resetting or manually initial.
44
Page 45

Tx packets The number of transmitted packets of this wireless
Rx bytes The current reception bandwidth on the Wireless
Rx bytes The current transmission bandwidth on the
ARP Table
The ARP Table displays the associated MAC address and IP
address.
GN-B41G Wireless Broadband Router
port after resetting or manually initial.
LAN.
Wireless LAN.
DHCP Lease Table
The DHCP Lease Table displays the associated IP assignment .
45
Page 46

GN-B41G Wireless Broadband Router
Routing Table
The Routing Table displays the GN-B41G routing details.
UpnP Port Mapping Table
The UPnP Port Mapping Table displays the GN-B41G port
mapping and UPnP details.
46
Page 47

GN-B41G Wireless Broadband Router
The Logout Page
When you have completed making modifications to the configuration settings of
your GN-B41G, please click the Logout button to end your session.
Note: You will be automatically logged out of the GN-B41G Configuration
Utility if your system remains idle for more than 5 minutes.
47
Page 48

GN-B41G Wireless Broadband Router
Chapter 6 Advanced GN-B41G Settings
In this chapter, you will find descriptions for configuring the advanced settings
of the GN-B41G wireless broadband router.
The Network Configuration Screen
The Network Configuration screen consists of three areas: LAN
Configuration, WAN Configuration and Session Configuration.
The LAN Configuration Tab
LAN Configuration
Allows you to modify the LAN parameters.
Force IP-MAC Mapping
Allows you to assign a specific IP address to a specific
computer on the network.
Verify the settings, then to apply these to your router, click the Submit button..
46
Page 49

The WAN Configuration Tab
GN-B41G Wireless Broadband Router
This window displays the settings of WAN connections that are available.
Page 50

GN-B41G Wireless Broadband Router
A screen based on the Internet (WAN) connection type you selected will appear
and provide parameter fields.
WAN Configuration Tab – Dynamic IP Address
ISP Name, Host Name, Gateway, DNS1 and NS2
Address, DNS Domain Name
Enter the information provided by your ISP.
MTU (Maximum Transmission Unit)
The largest packet unit is sent from your computer to the
network. Any message larger than MTU will be divided
into smaller packets before being sent. Please keep the
default setting (1500), except for special occasion.
NAT Setup
The Network Address Translation (NAT) is a standard that
allows multiple computers on a private network to share a
single IP address.
Universal Plug and Play (UPnP) is a technology based on
Internet standards and technologies, such as TCP/IP,
HTTP, and XML, that allows devices on a network to
automatically connect with other devices.
48
Page 51

GN-B41G Wireless Broadband Router
UPnP Delete Time
Select the duration that UPnP will be active. Default
setting is 0.
Note: If the WAN IP address and LAN IP address obtained from
DHCP server are from the same subnet, the LAN IP
address will automatically change to another subnet and
reboot the router.
Verify the settings. Then to apply these to your router, click the Finish button
WAN Configuration Tab - PPPoE
ISP Name, User ID, Password, Service Name, AC
Name, DNS1 and DNS2 Address, DNS Domain Name
Enter the information provided by your ISP.
Authentication Type
Select one of the following authentication settings: Auto,
CHAP or PAP. The default setting is “Auto” (automatic
authentication).
Challenge Handshake Authentication Protocol(CHAP) is
the most common authentication method using PPP
dialup method. With CHAP, the server will send a
challenging signal to a remote Router, which will send
back an encryption key.
49
Page 52

GN-B41G Wireless Broadband Router
Password Authentication Protocol (PAP) is a simple PPP
authentication protocol allowing a Router to send a simple
user ID and password to another Router for authentication.
PAP has been defined in RFC1334.
Connection
Automatic When the GN-B41G is powered on, it
automatically establishes a connection with
the network. If the link becomes
disconnected for any reason, the GN-B41G
will re-connect automatically.
Manual When you click “connection”, the system
will establish a connection to the network. If
the link becomes disconnected for any
reason, the GN-B41G will
automatically.
Dial on Demand
Enable When there is no Internet activity for a
period, the WAN connection will
automatically end. If a browser is launched
again, the GN-B41G will automatically
connect to Internet.
Disable When there is no Internet activity for a
period, the WAN connection will
automatically end. If a browser is launched
again, the GN-B41G will
connect to Internet.
WAN Configuration Tab - Static IP Address
not re-connect
not automatically
Page 53

GN-B41G Wireless Broadband Router
WAN Configuration Tab - PPPoE Unnumber
PPPoE Unnumbered is a PPPoE service provided by an ISP. When
using PPPoE Unnumbered, you can have more than one Global IP
address, of which the number can be 8 or 16 addresses according to the
ISP service policy. Among these Global IP addresses, one is used as
Router’s WAN IP address and the others can be used by the
downstream of the Router.
ISP Name, User ID, Password, Service Name, AC
Name, DNS1 and DNS2, DNS Domain Name, WAN IP
Address, WAN Subnet Mask
Enter the information provided by your ISP.
51
Page 54

GN-B41G Wireless Broadband Router
The Session Configuration Tab
The Session Configuration screen displays the settings of the Main Session
and Backup Session.
Select a WAN connection type for the Main Session from the drop-down menu
and select Backup Session type. The Backup Session will become active if the
Main Session fails to establish a connection to the Internet.
In the event that neither the Main Session nor the Backup Session can
successfully establish a connection with your ISP, the following process will
apply:
Automatic: Main -> Backup -> Main -> Backup .... (attempts to establish
connection are repeated until successful)
Manual: Main -> Backup (Backup Session attempts only once)
Note: The Backup Session can have a specific LAN t ype conn ection assigned.
52
Page 55

GN-B41G Wireless Broadband Router
The Wireless Configuration Screen
The Wireless Configuration screen allows you how to configure the Router’s
WLAN function.
The 802.11g Tab
Region
Indicates the geographical region you are in. Verify that
the region indicated is correct. If not, please contact your
local distributor or dealer immediately.
HW Info
Displays the wireless chipset.
RF Type
Select the radio frequency (RF) standard or ‘wireless
mode’ from the drop-down list.
Channel
The router has channel 6 as the default channel. The
channel can be be changed (if there are other wireless
networks operating in your area) by selecting a channel
from the drop-down list.
SSID
The SSID (Service Set Identifier) is the name of your
wireless network. The SSID is up to 32 ASCII characters
in length and case sensitive (ie. Letters in upper case
“A~Z” and lower case “a~z” are unique). The default SSID
is “GIGABYTE”. To change the SSID, type in the SSID
53
Page 56

GN-B41G Wireless Broadband Router
you want to use in the SSID field and click Submit. If you
make a change to the SSID, any wireless devices on your
network must also be reconfigured to connect to the new
network name.
Rate
Select a wireless data transmission rate from the dropdown list. The default setting auto/best automatically
detects and sets the optimum transmission rate.
Hidden SSID
For security purposes, you may choose to hide your
network’s SSID by selecting enable from the drop-down
list. This will prevent computers scanning for the presence
of wireless networks to detect your network name.The
default setting is disable.
Authentication Type
Select an authentication type from the drop-down list. The
default setting is Open System.
Open System: The sender and the receiver do NOT share
a secret key. Each party generates its own key-pair and
asks the receiver to accept a randomly generated key.
Once accepted, this key will only be used for a short
period of time. Afterwards, a new key will be generated
and agreed upon.
Shared Key: Authentication is based upon a secret key
shared by both the sender and the receiver. If Shared
Key is selected, you cannot choose the WEP disable
option.
WPA Pre-shared key:, The WPA Pre-shared Key
authentication standard uses a password or “ key”
between 8 and 32 characters. This encryption key is
changed after every dialog box using the Temporary Key
Integrity Protocol (TKIP), which allows users to change
keys based on dialog box and automatically synchronize
keys between devices on the network. The TKIP
encryption algorithm is stricter than the one used by WEP
but is based on the same standard.
WPA: The 802.1X authentication protocol,allows users to
authenticate wireless network access through a RADIUS
Server and is a required by WPA standard. If no RADIUS
Server exists in your network environment, you still can
54
Page 57

GN-B41G Wireless Broadband Router
use WPA through the use of WPA Pre-shared Key.
WEP Key
The GN-B41G supports two WEP standards:
64-bit,128-bit. Select either 64-bits or 128-bits from the
drop-down list activate WEP encryption. The 64-bits
encryption uses 40 bits as a secret key, (user-defined)
and the remaining 24 bits are reserved. The 128-bits
encryption uses 104 bits as a secret key, (user-defined)
and the remaining 24 bits are reserved.
55
Page 58

GN-B41G Wireless Broadband Router
The MAC Access Control Tab
The MAC Access Control screen allows you to specify the Media Access
Controller (MAC) address of up to 32 devices on your network. Only those
devices listed in the table will have access to transmit data through the
GN-B41G. The default setting is Disable.
56
Page 59
GN-B41G Wireless Broadband Router
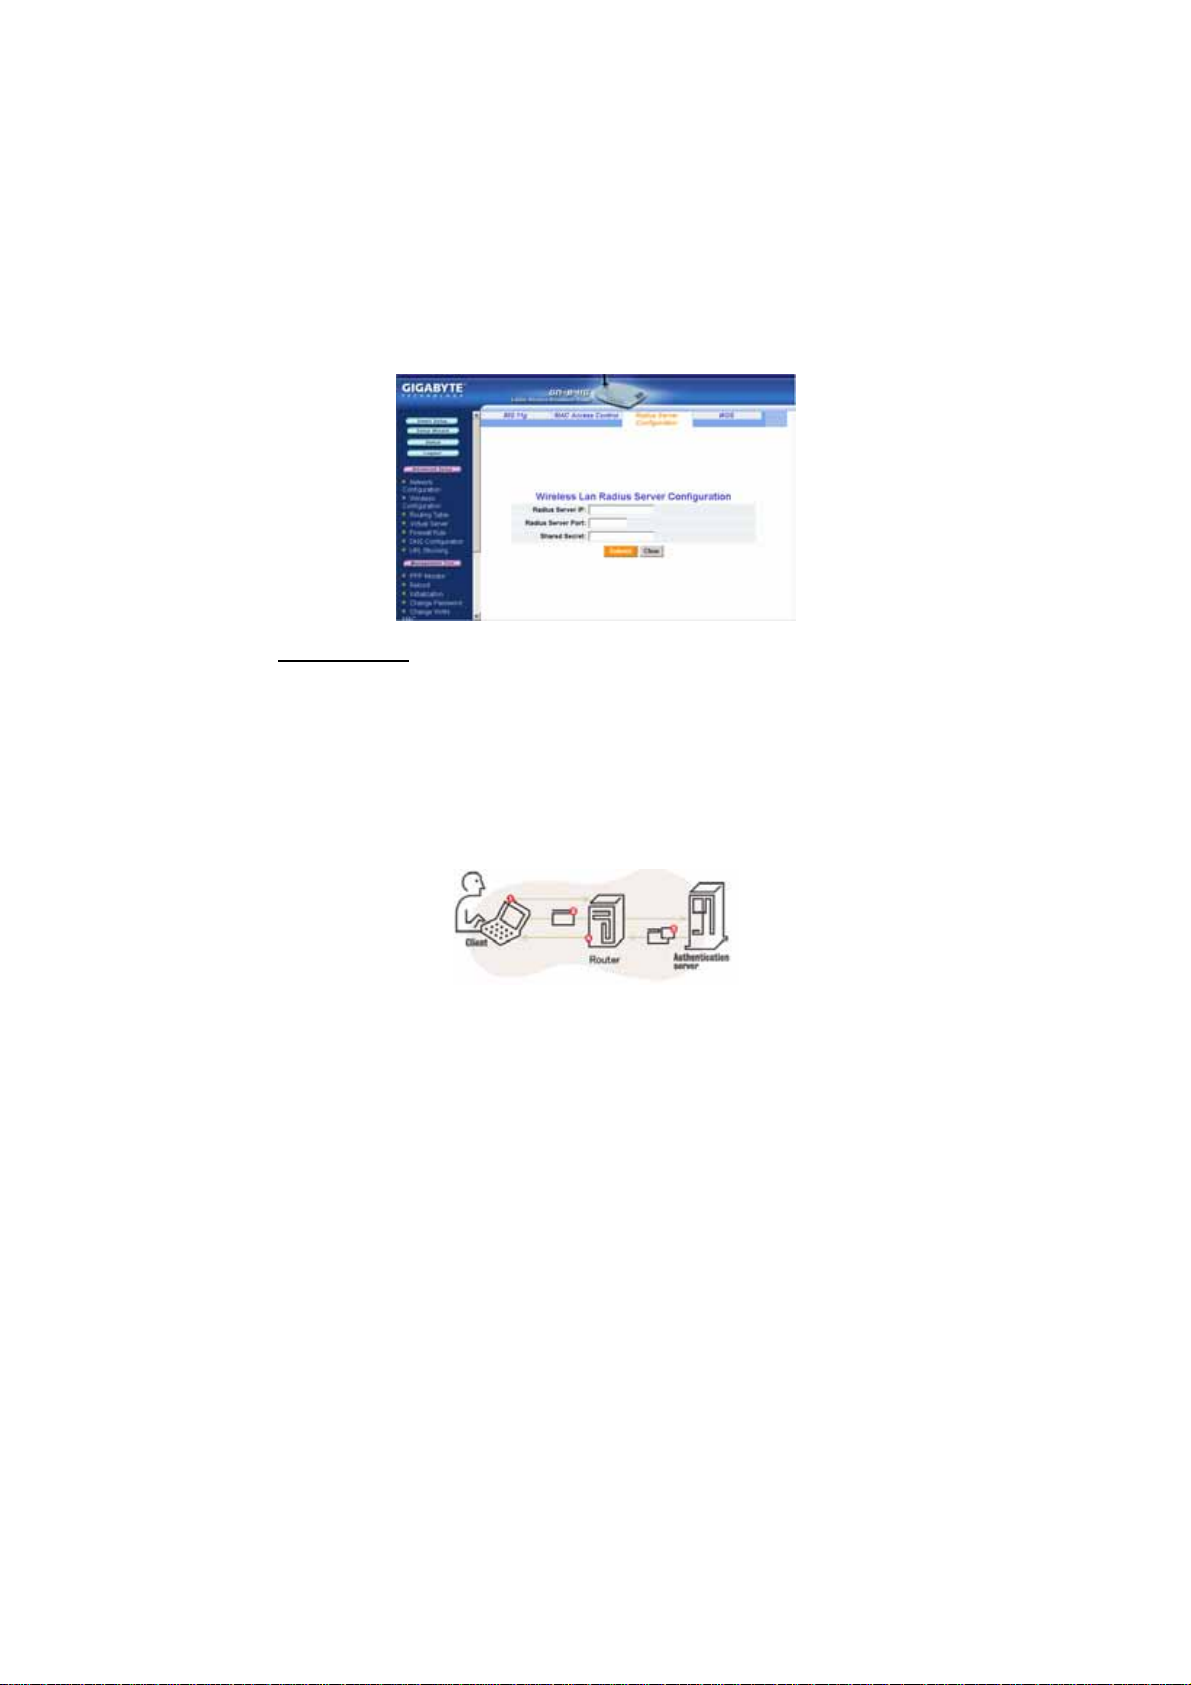
The Radius Server Configuration Tab
A Radius Server provides a centralized, server-based authentication of client
access to the network.
1) A user will send a “start” message to a Router, which requests the identity
of the user.
2) The user transmits a packet with identity information, and the Router
forwards this packet to an authentication server.
3) The authentication server sends an “accept” packet to the Router.
4) Router will put the user port in authorized status and allows data
transmission.
RADIUS Server IP
Assign an IP address for the RADIUS Server.
RADIUS Server Port
Enter a value within the range 1~65536 for the port.
Shared Secret
Enter a password up to 256 characters (uppercase “A~Z”,
lowercase “a~z” or numeric “0~9”) in length.
Verify the settings, then to apply these to your network, click the Submit button.
57
Page 60

GN-B41G Wireless Broadband Router
The WDS Tab
Wireless Distribution System (WDS) technology enables several access points
to increase the coverage of a wireless network. Although enterprises or home
users can reduce most wiring problems by using access points that support
WDS, they still need cables to connect external ISP.
Advantages of WDS:
1. Greater Convenience: It eliminates wiring headaches and connects all
devices wirelessly except for the connection
between ISP and the Router in the networking
environment.
2. Extended Range: It can increase the network coverage through the
deployment of additional access points directly
where they are needed.
Note: Your GN-B41G can only create a WDS environment with a GIGABYTE
Access Point (models: GN-A17GU, GN-A11G).
58
Page 61
GN-B41G Wireless Broadband Router
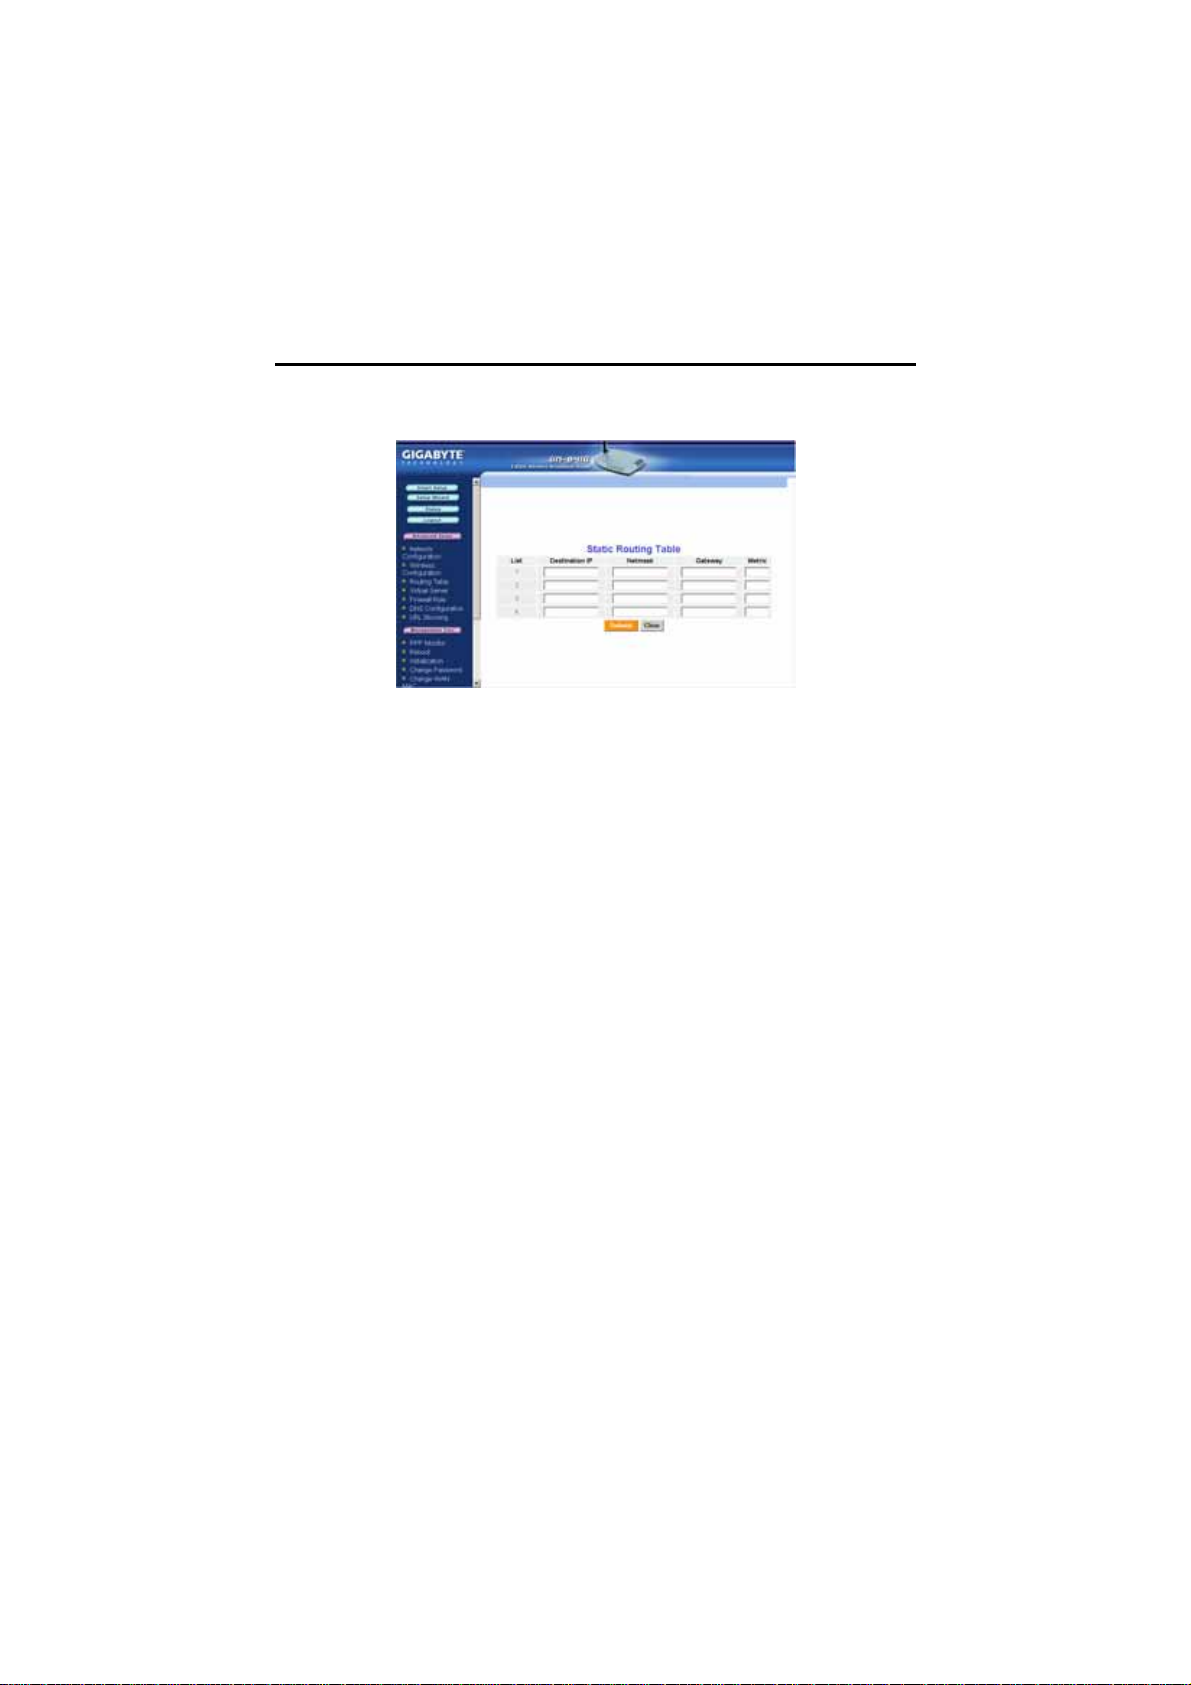
The Static Routing Table Screen
The Static Routing Table displays the GN-B41G routing settings.To add or
modify, enter a value into the field and click the Submit button.
Destination IP
Enter the Destination IP address that will be assigned to a
specific network or host.
Netmask
Enter the netmask associated with the Destination IP.
Gateway
Enter an IP address that will be assigned to the interface
connecting to subnets.
Metric
The “Metric” value is a number between 1and 15 that
represents the number of Routers between your network
and the destination. Generally, setting the Metric value as
either 2 or 3 is sufficient for most applications. If this is a
direct connection, please set the value to 1. The default
setting is 1.
59
Page 62
GN-B41G Wireless Broadband Router
The Virtual Server Screen
The Virtual Server screen allows you to manage the virtual server settings of
the GN-B41G. There are two virtual server options: router has only one IP
address or router has multiple IP addresses (8 or 16 in most instances). If you
have only one IP address click on the PPPoE/DHCP/Static tab. If you have
multiple IP addresses, click on the PPPoE Unnumber tab. The DMZ Support
tab allows you to enable a Demilitarized Zone (Zone) on your network.
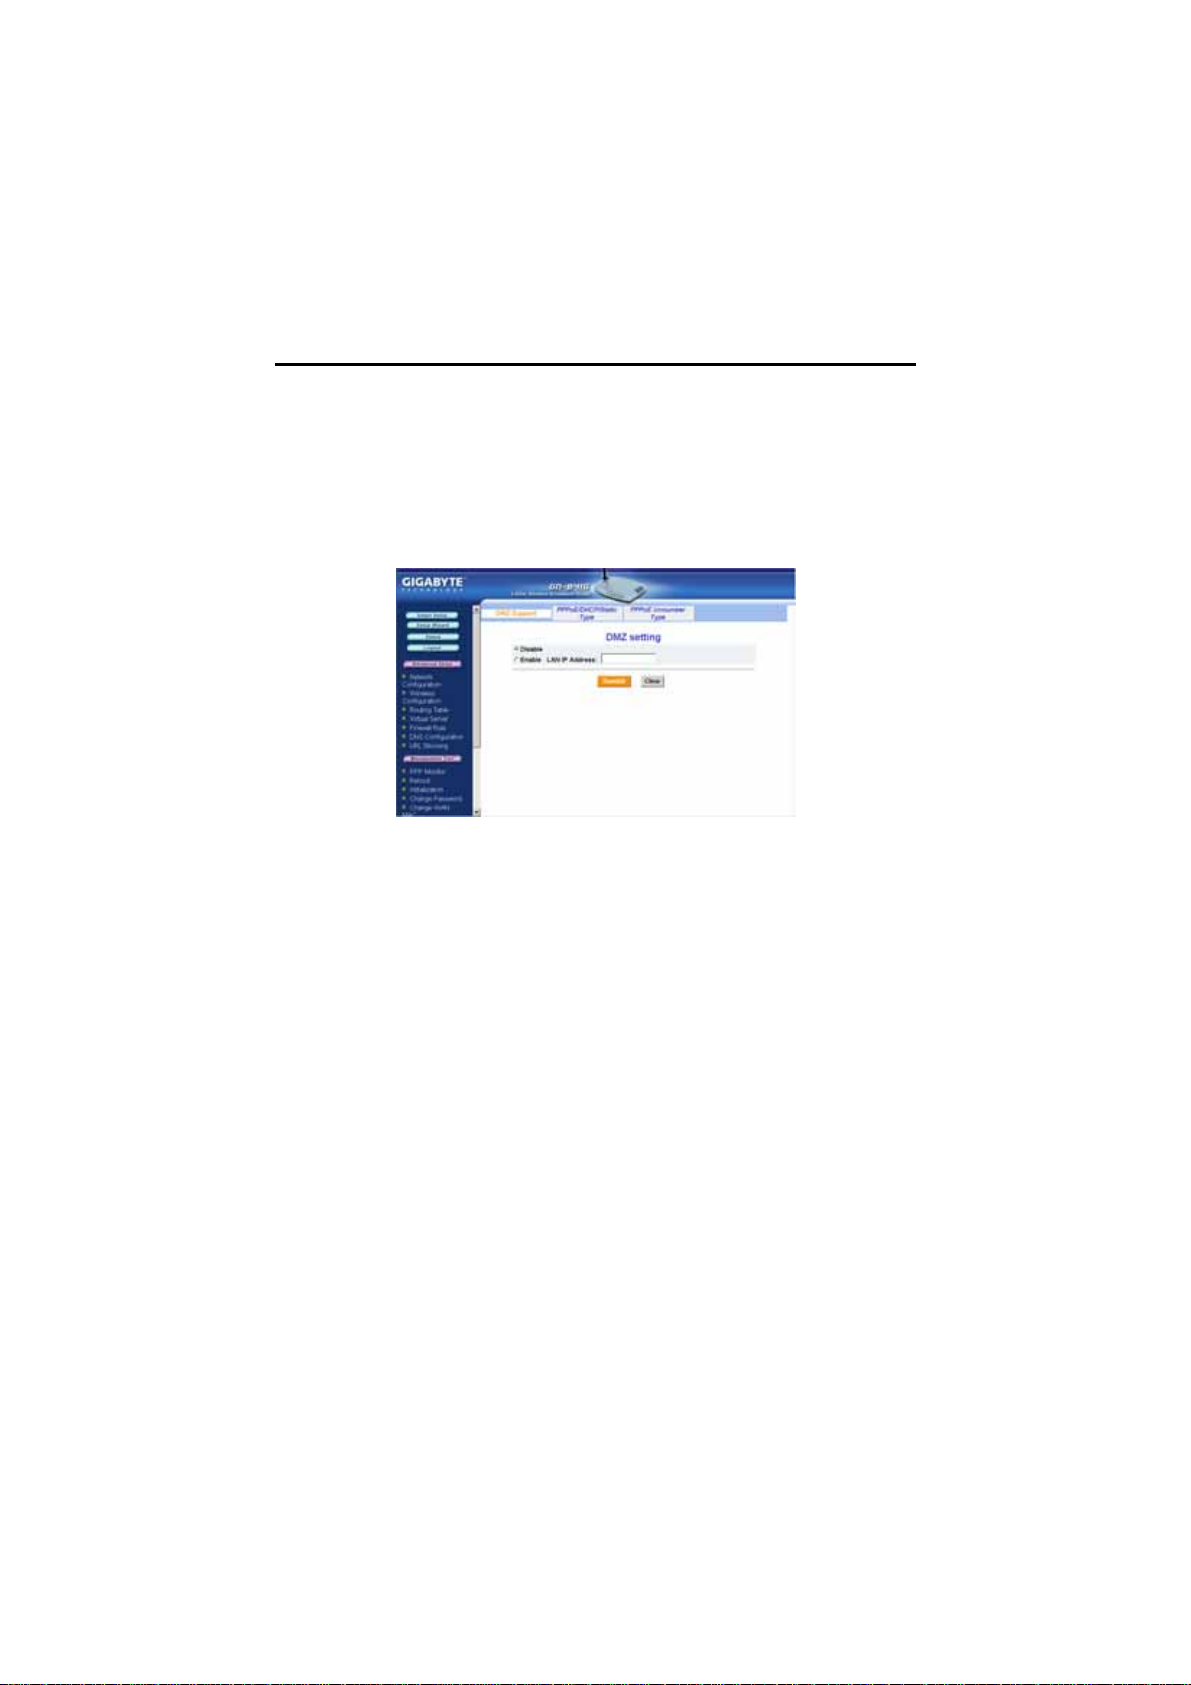
The DMZ Tab
With a firewall setup, it is necessary to configure a Demilitarized Zone (DMZ)
when you want to execute some Internet applications (e.g. Internet games,
video conferencing, or VPN connections) or create a server connecting to the
Internet through the Intranet. The DMZ feature allows you to specify the IP
address of the computer that will be placed outside the firewall of your network.
Enter the IP Address of your computer (eg. 192.168.1.2) into the LAN IP
Address field and click the Submit button.
60
Page 63
GN-B41G Wireless Broadband Router
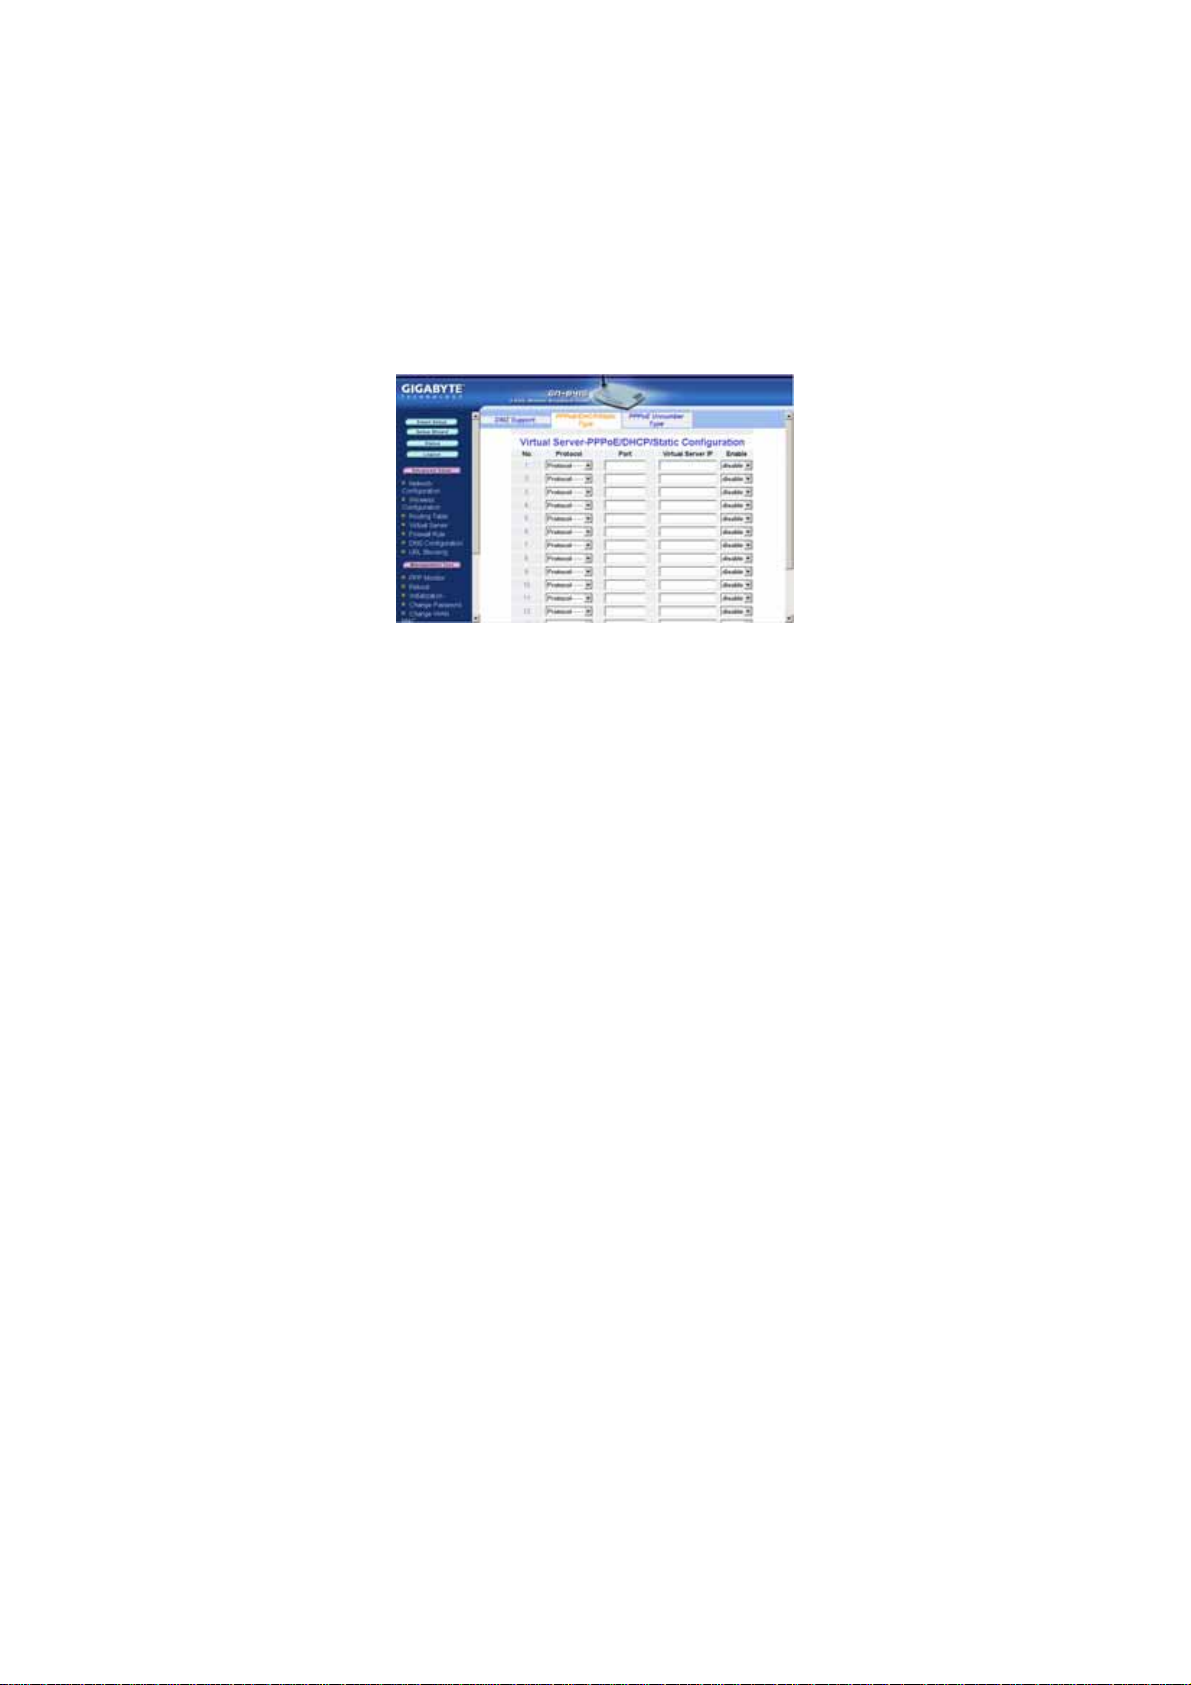
The PPPoE/DHCP/Static Tab
A Virtual Server allows computers on the WAN side of the network to connect
with a PC server on the LAN side of the network. For example, a PC on the
LAN side with an IP address of 192.168.1.1 and the following virtual server
settings:
Protocol: TCP
Port: 21
Virtual Server IP: 192.168.1.1
Enable: enable
Now, any PC on the WAN side of the network can connect to the internal FTP
server (192.168.1.1) using the IP address on the WAN end of the GN-B41G.
61
Page 64

GN-B41G Wireless Broadband Router
The PPPoE Unnumber Tab
In instances where multiple global IP addresses exist each IP address requires
its own setting.
Note: Your ISP may provide you a with a list of “Global IP”, for example
61.222.10.1 ~ 61.222.10.7
For example, a PC on the LAN side with an IP address 192.168.1.1 and the
following settings:
Global IP: 61.222.10.2
Protocol: TCP
Port: 21
Virtual Server IP: 192.168.1.1
Enable: enable
Now, the PC with the Global IP 61.222.10.2 is able to connect to the internal
FTP server (192.168.1.1) using the IP address at the WAN end of FTP
GN-B41G.
62
Page 65

GN-B41G Wireless Broadband Router
The Firewall Rule Screen
The Firewall Rule screen displays your network security settings. Use this
screen to create network security policies to prevent unauthorized access to
your network.
The Security Configuration Tab
Select security configuration options from this page including Security
One-Touch Setting, Stealth Mode and Unlawful Computer Access
Detection.
Note: When any item in Security One-touch setting combined with “The full
state packet inspection is used” under the Unlawful Computer
Access Detection group are checked, the URL Blocking feature
becomes unavailable.
63
Page 66

GN-B41G Wireless Broadband Router
The VPN Pass Through Tab
A Virtual Private Network (VPN) is a type of secured private network connection,
built upon publicly-accessible infrastructure such as the Internet. Typically,
VPNs employ a certain combination of encryption, digital certificates, strict user
authentication and access control to provide security to the data they deliver.
They usually provide connectivity to various devices behind a gateway or
firewall.
The GN-B41G supports Internet-industry standard technologies to provide open
and interoperable VPN solutions, including Internet Protocol Security (IPSec),
Layer 2 Tunneling Protocol (L2TP) and Point-to-Point Tunneling Protocol
(PPTP).
PPTP Pass Through setting
Point-to-Point Tunneling Protocol (PPTP) allows you to establish a
connection to an enterprise network. With PPTP, if your device is
located within a local network, you can share files and other data.
IPSec Pass Through setting
IP Security (IPSec) provides authentication and encryption. Since it is
mainly a Layer 3 technology, it can secure all data on the network. It has
become a standard protocol used with Virtual Private Networks (VPNs).
L2TP Pass Through setting
Layer 2 Tunneling Protocol (L2TP) is an extension of the Point-to-Point
Tunneling Protocol and is also used to establish virtual private networks.
64
Page 67

GN-B41G Wireless Broadband Router
If administrators allow a host to enable VPN pass through in the configuration,
the Router will automatically set up a virtual server and firewall for this host. All
VPN packets will be transparent and redirected to this host. Even if a VPN
server is located on the LAN or at WAN side of the network, a VPN pass
through functions normally. For different VPN pass through settings, only one
host can be configured as a “pass through”.
The Static Rule Tab
The Static Rule screen allows you to manually edit the firewall rule table,
thereby helping to protect your network from external attacks as well as provide
a method to restrict Internet access to users on your network. Additionally, it
can filter out specific packets to trigger the Router to place an outgoing
connection.
To edit the current settings, click the Add button. The following screen will
appear.
65
Page 68

GN-B41G Wireless Broadband Router
Rule Number (No.)
Enter a number for the rule between 1 and 64. Rules are ranked in
priority based on their number in descending order, so that rule 1 is
given the highest priority and rule 64 the lowest priority.
Policy
Select the accept or drop policy option.
Direction
Specify the packet flow direction according to data filtering rule.
a. W->L: WAN to LAN, filtering incoming packets
b. L->W: LAN to WAN, filtering outgoing packets
Protocol
Select a setting from the drop-down list to specify the protocol (s) for the
static rule.
Log
Enable or disable the log feature.
66
Page 69

The DNS Configuration Screen
GN-B41G Wireless Broadband Router
DNS Relay
When DNS query packets are received by the GN-B41G a response
signal is sent to the host that sends the DNS query packet. Then, users
have to set the IP address of the Router as the IP address of DNS. The
default value of DNS relay is Enable.
Dynamic DNS
The GN-B41G offers a Dynamic Domain Name Server service that
allows you to assign a fixed host and domain name to a dynamic Internet
IP address. This gives Internet users the ability to connect with a virtual
sever using a URL, rather than with an IP address. Before using this
feature, please register an account with the dynamic DNS service.
http://www.dyndns.org)
(
1. Select either to Disable or Enable the Dynamic DNS service.
2. Select the name of your dynamic DNS servi ce provider.
3. Enter the Domain Name (or Host Name) provided by your dynamic
DNS provider.
4. Enter the Login Name (or User Name) and Password for your
dynamic DNS account.
5. If your dynamic DNS provider allows using wildcards in resolving
your URL, you may select Enable to activate this function.
67
Page 70

GN-B41G Wireless Broadband Router
The URL Blocking Configuration Screen
The URL Blocking Configuration screen allows you to restrict access based
upon specific web addresses and/or keywords.
1. To activate the URL Blocking feature, select the Enable option.
2. Then enter the keyword or domain in the Keyword field that you wish to
block.
Verify the settings and click the Submit button to accept these settings. To
apply these settings, it is necessary to reboot the GN-B41G.
Note: The URL Blocking feature will not be enabled if an y item in Securit y
One-touch setting and “The full state packet inspection is used”
under the Unlawful Computer Access Detection group are checked.
68
Page 71

GN-B41G Wireless Broadband Router
Chapter 7 Using Management Tools
The instructions in this chapter will help you how to use the management tools
of the web-based utility to effectively manage your GN-B41G wireless
broadband router.
The PPP Monitor Screen
The PPP Monitor screen displays the WAN (Internet) connection status. Click
the Disconnect button to end your current session Click the Connect button
to re-connect to an ISP.
The Reboot Screen
The Reboot screen allows you to reboot the GN-B41G.
69
Page 72

GN-B41G Wireless Broadband Router
The Initialization Screen
The Initialization screen allows you to reset the GN-B41G back to its original
factory settings. To initialize the router, use the tip of a pencil or a paperclip to
press the init button (located on the bottom of the unit).
The Change Password Screen
The Change Password screen allows the administrator to create a new
password for the GN-B41G. To change an existing password, enter your
account and new password and after re-typing the password to confirm, click
the Submit button.
Note: Remember to enter this new password when logging into the GN-B41G.
70
Page 73

GN-B41G Wireless Broadband Router
The Change WAN MAC Screen
The Change WAN MAC screen allows you to assign a new MAC address. If
your ISP asks you to use the original MAC address, chose the Assign WAN
MAC option and enter a new WAN MAC address in the New WAN MAC
Address field and click the Submit button. If you want to restore the factory
default MAC address, choose the Restore Default WAN MAC option and click
the Submit button.
The Upgrade Firmware Screen
The Upgrade Firmware screen allows you to update the current GN-B41G
firmware to the latest version directly from the Gigabyte website. Click the
Browse button to locate the firmware file that you wish to update and then click
Upgrade.
71
Page 74
GN-B41G Wireless Broadband Router
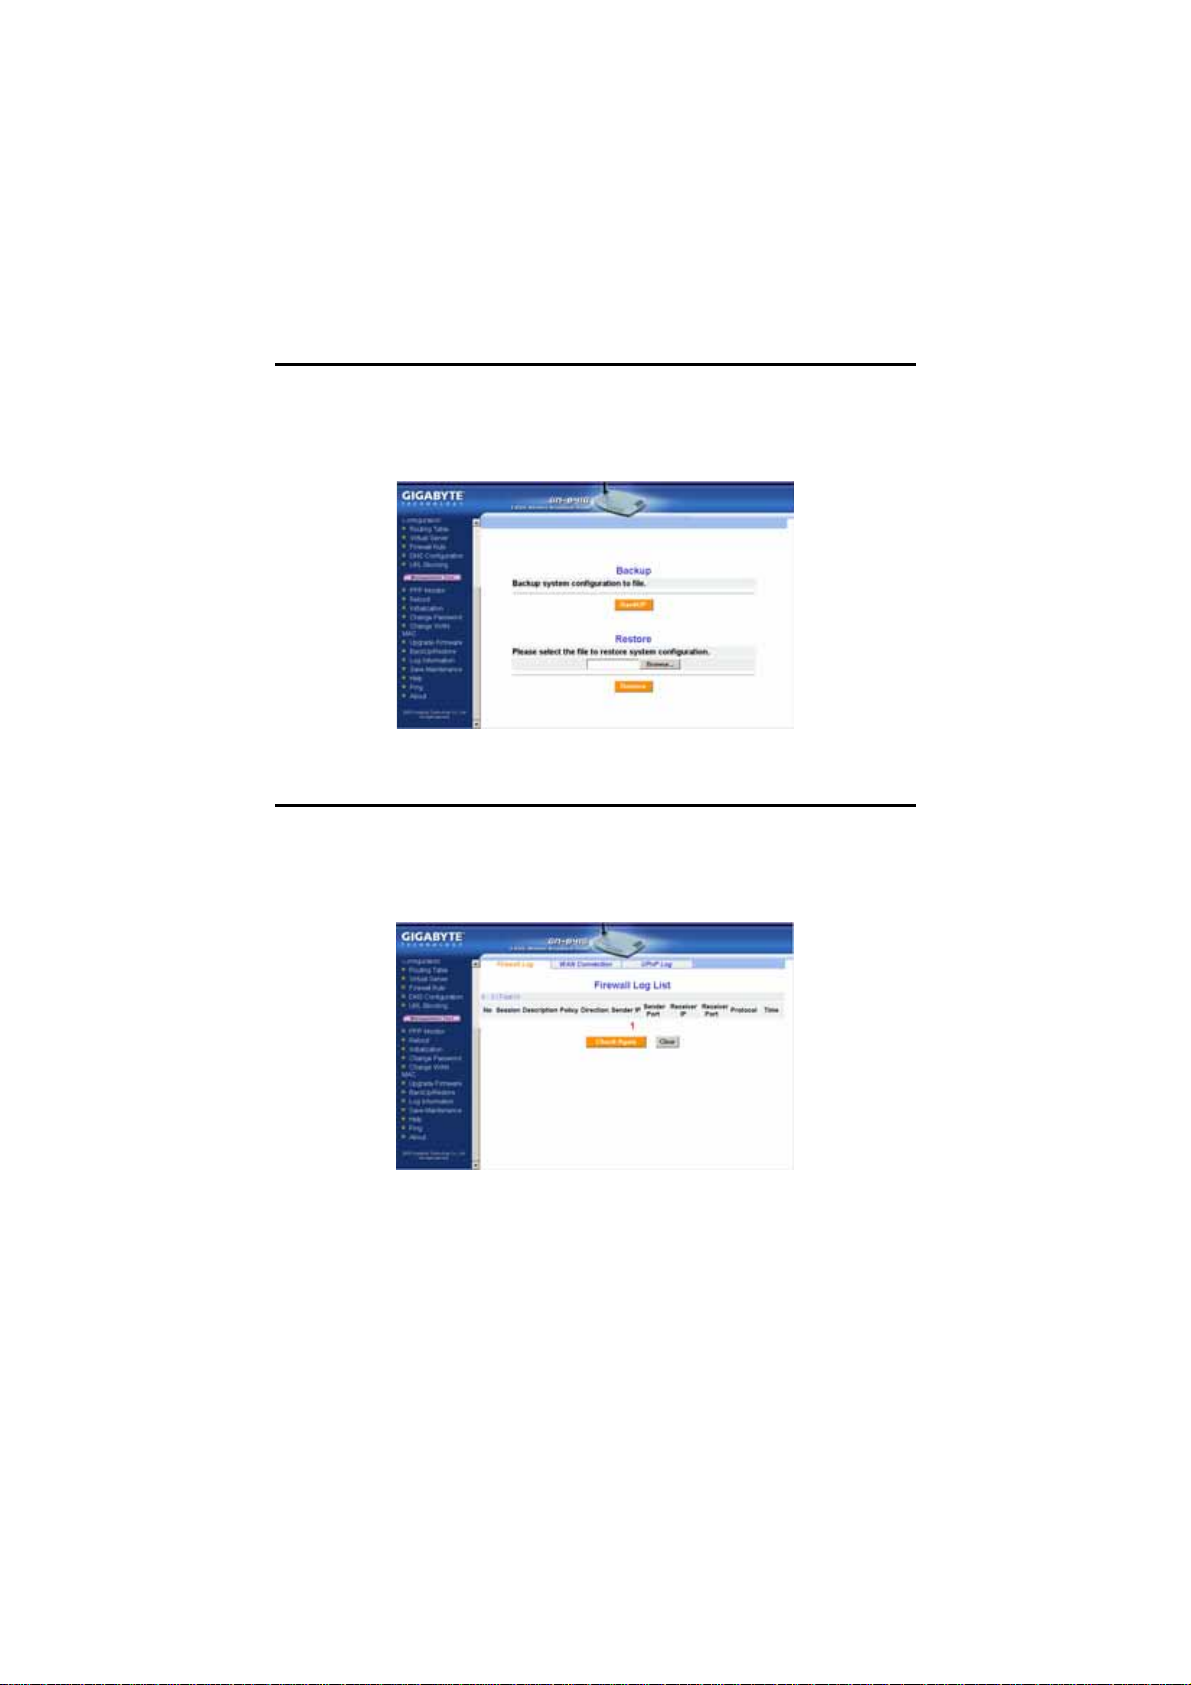
The Backup / Restore Screen
The Backup / Restore screen allows you to save the current configuration
settings of the GN-B41G as a temp file onto your computer. To revert the
GN-B41G to previously saved configuration settings, click the Browse to locate
the saved file. Then, click the Restore button.
The Log Information Screen
The GN-B41G can keep logs of firewall activity, WAN connections and UPnP
logs. Click on Firewall Log, WAN Connection or UPnP Log to view the list.
The Firewall Log Tab
72
Page 75
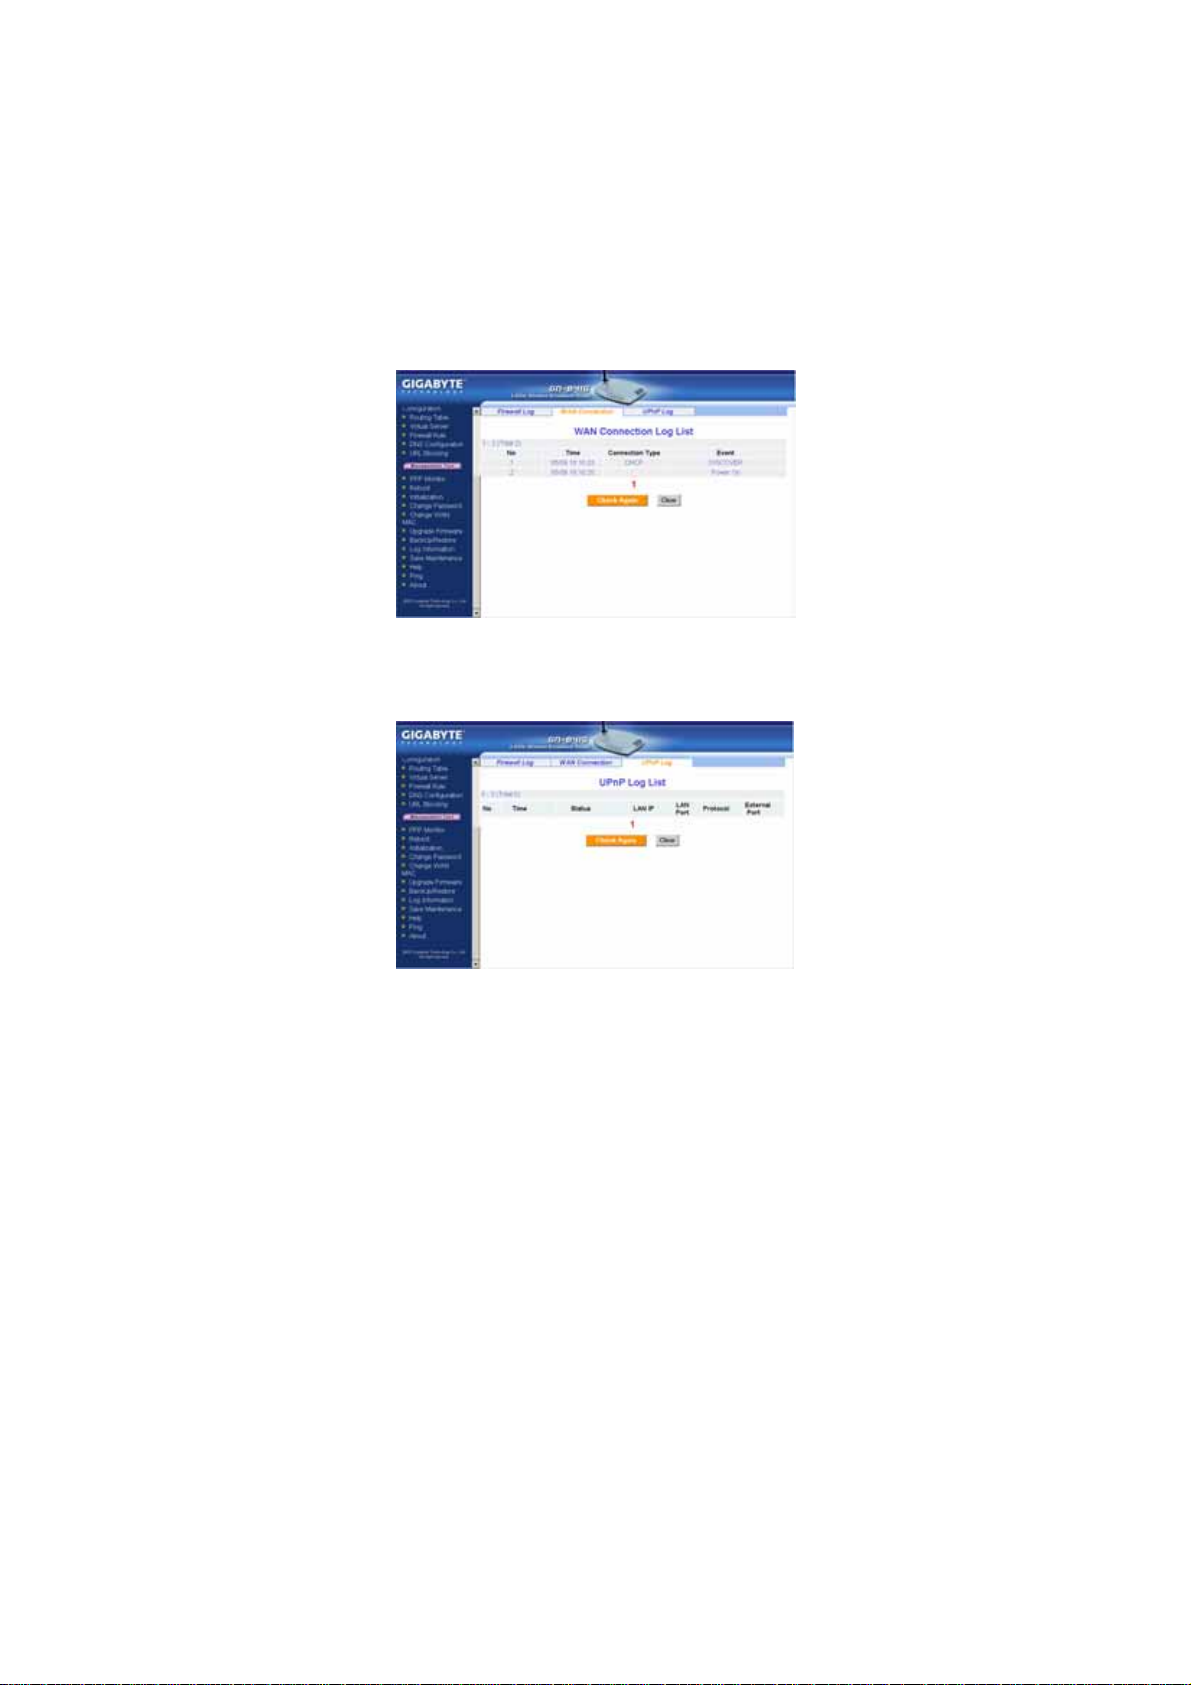
The WAN Connection Tab
GN-B41G Wireless Broadband Router
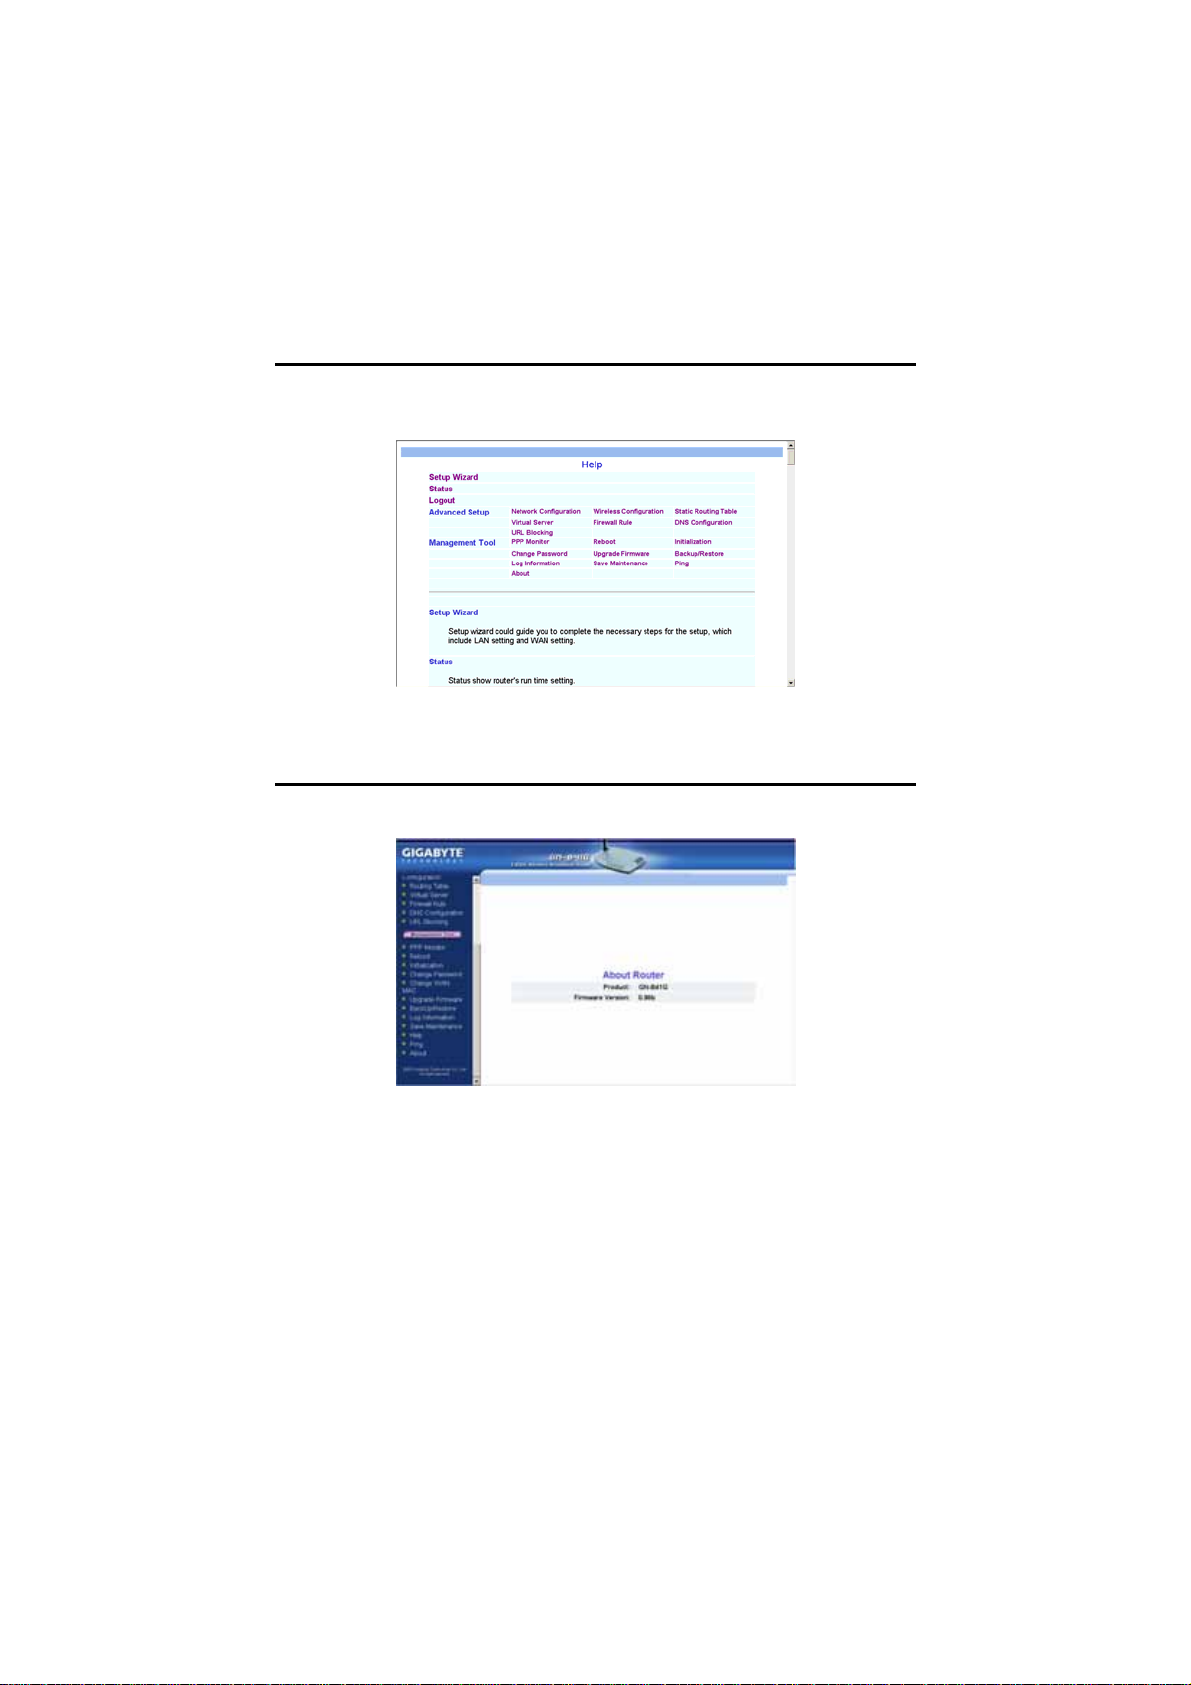
The UPnP Log Tab
73
Page 76

GN-B41G Wireless Broadband Router
The Save Maintenance Screen
The Save Maintenance screen allows you to save logs and status information
as a file which can then be sent to the Technical Support team at GIGABYTE.
The Ping Screen
The Ping screen allows you to perform a test to determine whether a particular
IP address is online.
74
Page 77
GN-B41G Wireless Broadband Router
The Help Screen
The Help screen is where you can access online guide to assist in configuring
the GN-B41G.
The About Screen
The About screen displays the model name and firmware version of the router.
75
Page 78

GN-B41G Wireless Broadband Router
Chapter 8 Troubleshooting
This sections provides solutions to common problems that may occur during
installation, configuration or use of the GN-B41G.
Q: I can’t remember the password or IP address of the router.
A: You can create a new new password by pressing the “Init” button on the
bottom of the router. The Router will reboot and all settings will be
restored to their default values.
Q: I can’t connect to the Internet
A: 1. Check that the power cord is connected properly, and the router’s
power LED is lit green.
2. Verify that all the configuration settings are correct.
3. Check that your ADSL/Cable Modem is operating normally, and/or
you have ISP service available.
4. Check that all network cabling is properly connected.
Q: I can’t access the GN-B41G Web Configuration Utility.
A: 1. Please check the Ethernet between the PC and the Router is
properly connected.
2. Make sure your computer’s IP address is on the subnet where the
Router locates.
3. Make sure you are using the correct login information.
Q: Where in the network do I connect the router?
A: In a typical environment, the GN-B41G is installed between ADSL/Cable
Modem and LAN. Plug the Router into the Ethernet port of ADSL or Cable
Modem.
Q: Can the GN-B41G work as a DHCP server?
A: Yes. GN-B41G has a built-in DHCP server function so that apart from all
the standard DHCP functions, it helps prevent IP conflicts.
Q: What is WEP?
A: Wired Equivalent Privacy (WEP) is a security mechanism defined within
the 802.11 standard. It is designed to make the link integrity of the
wireless medium equal to wired cable. Data privacy mechanism based on
a 40 bits (128 bit optional) shared key algorithm, as described in the IEEE
802.11 standard.
76
Page 79

GN-B41G Wireless Broadband Router
Q: What is the IEEE802.11g standard?
A: The IEEE 802.11g standard specifies data rates of up to 54 Mbits/s in the
2.45-GHz band. It uses Orthogonal Frequency Division Multiplexing
(OFDM), which is provided by this standard and is compatible with
802.11b standard offering speeds of about 11 Mbits/s. This standard uses
Complementary Code Keying (CCK) modulation. Both 11g and 11b can
operate at a range of up to 300 feet.
77
Page 80

GN-B41G Wireless Broadband Router
Appendix A: Glossary
ADSL
Asymmetric digital subscriber line (ADSL) is a new modem technology that
converts existing twisted-pair telephone lines into access paths for high-speed
communication of various sorts.
Auto-MDI/MDIX
On a network hub or switch, an auto-MDI/MDIX port automatically senses if it
needs to act as a MDI or MDIX port. The auto- MDI/MDIX capability eliminates
the need for crossover cables.
Auto-negotiate
To automatically determine the correct setting. The term is often used with
communications and networking
DHCP
The Dynamic Host Configuration Protocol (DHCP) is an Internet protocol for
automating the configuration of computers that use TCP/IP. DHCP can be used
to automatically assign IP addresses, to deliver TCP/IP stack configuration
parameters such as the subnet mask and default router, and to provide other
configuration information such as the addresses for printer, time and news
servers.
DMZ
In computer networks, a DMZ (demilitarized zone) is a computer host or small
network inserted as a "neutral zone" between a company's private net work and
the outside public network. It prevents outside users from getting direct access
to a server that stores company data. Typically, the DMZ contains devices
accessible to Internet traffic, such as Web (HTTP) servers, FTP servers, SMTP
(e-mail) servers and DNS servers.
DNS
The Domain Name System (DNS) is a distributed Internet directory service.
DNS is used mostly to translate between domain names and IP addresses, and
to control Internet email delivery. Most Internet services rely on DNS to work. If
DNS fails, web sites cannot be located and email delivery service will be
suspended.
Dynamic IP Address
An IP address is automatically assigned to a user’s AP in a TCP/IP network
typically by a DHCP server.
78
Page 81

GN-B41G Wireless Broadband Router
Firewall
A system designed to prevent unauthorized access to or from a private network.
Firewalls can be implemented in both hardware and software, or a combination
of both. Firewalls are frequently used to prevent unauthorized Internet users
from accessing private networks connected to the Internet, especially intranets.
All messages entering or leaving the intranet pass through the firewall, which
examines each message and blocks those that do not meet the specified
security criteria.
Gateway
A device, usually a Router, that connects hosts on a local network to other
networks.
IP Address
Every PC on the Internet has a unique identifying number, called an IP Address.
A typical IP address looks like this: 216.27.61.137
IPSec
IPSec stands for IP Security. It provides authentication and encryption over the
Internet. It functions at Layer 3 and thus secures everything on the network. It
has become a standard protocol used for virtual private networks (VPNs).
MAC Address
On a local area network (LAN) or other network, the MAC (Media Access
Control) address is your computer's unique hardware number. Usually written
as: 01:23:45:67:89:ab
MTU
The size in bytes of the largest packet that can be sent or received.
NAT
A technique by which several hosts share a single IP address for accessing to
the Internet.
Ping (Packet Internet Groper)
A utility to determine whether a specific IP address is accessible. It works by
sending a packet to the specified address and waiting for a reply. PING is used
primarily to troubleshoot Internet connections.
SSID
SSID is the name representing the Router in WLAN.
79
Page 82

GN-B41G Wireless Broadband Router
PPPoE
Point-to-Point over Ethernet is a protocol for connecting remote hosts to the
Internet over an always-on connection by simulating a dial-up connection.
Router
A device that forwards data packets along networks. A router is connected to at
least two networks, commonly two LANs or WANs or a LAN and its ISP
network. Routers are located at gateways, the places where two or more
networks connect.
Subnet Mask
A mask used to determine which subnet an IP address belongs to. An IP
address has two components, the network address and the host address.
Subnetting enables the network administrator to further divide the host part of
the address into two or more subnets.
TCP/IP
TCP/IP (Transmission Control Protocol/Internet Protocol), the suite of
communications protocols used to connect hosts on the Internet.
VPN
Virtual private networks are secured private network connections, built on top of
publicly accessible infrastructure, such as the Internet or the public telephone
network. VPNs typically employ some combination of encryption, digital
certificates, strong user authentication and access control to provide security to
the traffic they carry. They usually provide connectivity to many machines
behind a gateway or firewall.
WAN
Wide Area Network, a communication network that covers a relatively broad
geographic area, consisting of two or more LANs. Broadband communication
over the WAN is often through public networks such as the ADSL or Cable
systems, or through leased lines or satellites. To simplify it, please image
network as a WAN.
WEP
WEP (Wired Equivalent Privacy) is a data privacy mechanism based on a
64/128-bit shared key algorithm, as described in the IEEE 802.11 standard.
80
Page 83

GN-B41G Wireless Broadband Router
Appendix B: Specifications
General
Standards IEEE802.3(10Base-T), IEEE802.3u(100Base-TX),
Ports / Buttons LAN – 4 ports 10/100 Ethernet (auto-MDIX), RJ-45
Power External; 5V DC, 2A
Wireless
Frequency Band 2412 ~ 2483 MHz (subject to local regulation)
Modulation Technology OFDM and DSSS
Modulation Techniques 64QAM, 16QAM, QPSK, BPSK, DBPSK, DQPSK, CCK
Data Rates 54, 48, 36, 18, 12, 11, 9, 6, 5.5, 2, 1 Mbps (auto fallback)
Output power 20 dBm @ Nominal Temp Range
Receive Sensitivity -68 dBm @ 54Mbps date rate at nominal temperature
Antenna One external antenna
Wireless Range Outdoor: 100 to 300m Indoor: 30 to 100m
Regulatory and Environmental Compliance
EMC certification FCC part (USA)
Temperature Range Operating: 0 to 40 °C,
Humidity 10% ~ 85% Non-condensing
Protocols
Routing Protocols Dynamic, Static Routing with TCP/IP
Security 64/128 bit WEP; WPA-PSK; WPA
Mechanical
LEDs Power/Status; WLAN; LAN (1-4); WAN
Gross Weight 240± 5g
Dimensions 110mm x 160mm x 25mm
IEEE802.11b/g(Wireless)
WAN - 10/100 Ethernet (auto-MDIX), RJ-45
One Init (Reset) button
CE(Europe)
Storage: -20 to 65 °C
NAT, PPTP, PPPoE
VPN Pass-Through (IPSec, L2TP)
DHCP (Client & Server)
81
Page 84

GN-B41G Wireless Broadband Router
Limited Warranty Statement (1-Year Warranty)
Thank you for purchasing the Gigabyte Product. This limited warranty
statement will provide you one year warranty starting from the purchase date.
Of which if any defect is occurred due to accidents or any man-made factors, or
any unauthorized torn-off or damage to Gigabyte’s sticker on the product,
Gigabyte Technology will not provide after-sale services, such as:
* Products are damaged du e to any violation of instructions on user manual.
* Hardware is da m aged due to inappropriate assembling.
* Products are damaged du e to the use of illegal accessory.
* Products are damaged du e to parts disassembling without authorization
* Products are damaged du e to exceeding environment limits.
* Products are damaged du e to unexpected external force.
* Products are damaged du e to nature disasters.
* Products are copies or illegal smuggled goods.
* When purc hasing products, there are no warranty statement provided.
PLEASE FILL OUT THIS FORM TO
ASSURE YOUR WARRANTY
Name of Customer:
Phone No:
Address:
Email:
Model:
Serial:
Date of Purchase:
Place of Purchase:
From Whom:
Distributor:
Customer Service
GIGA-BYTE TECHNOLOGY CO., LTD.
No.6, Bau Chiang Road, Hsin-Tien,
Taipei Hsien, Taiwan, R.O.C.
Tel: 886-2-89124888 Fax:886-2-89124007
http://www.gigabyte.com.tw
Technical Support
E-mail: networksupport@gigabyte.com.tw
82
 Loading...