

Page 1
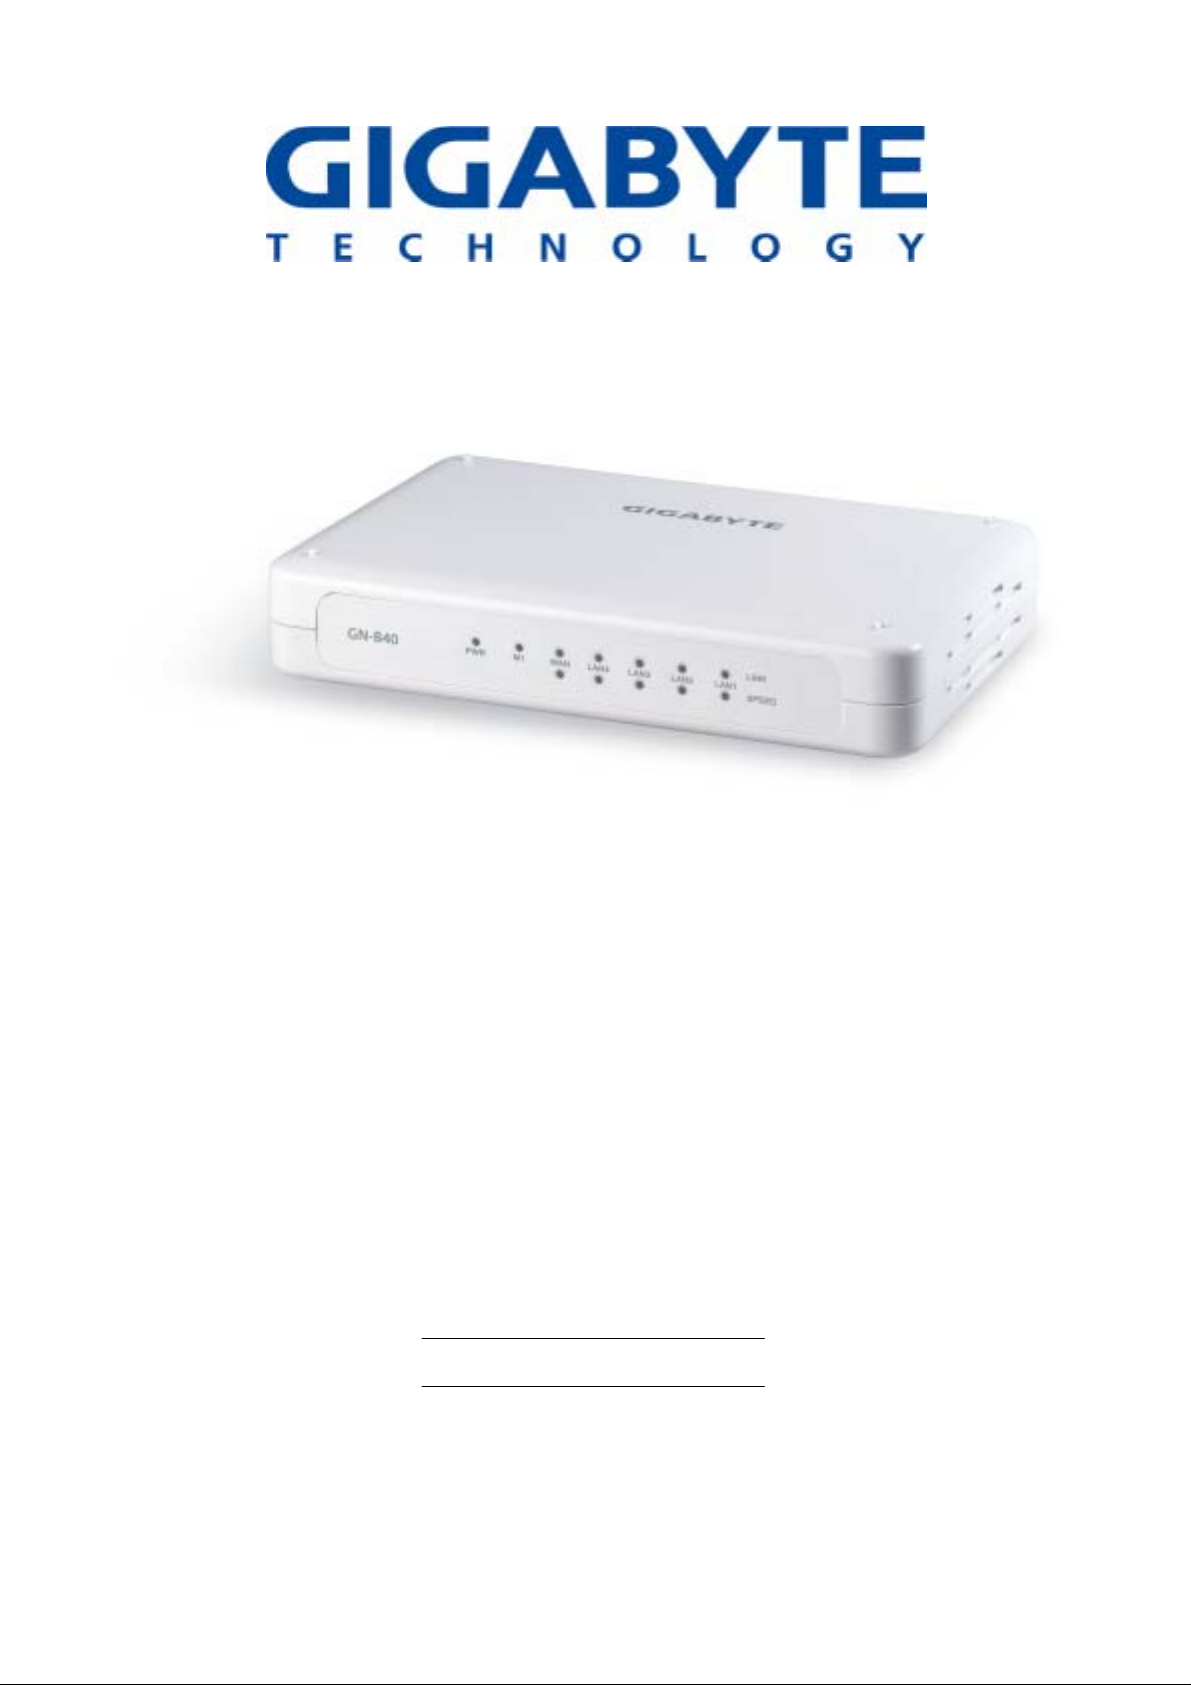
Cable/DSL Router
with 4-Port Switch
GN-B40
User’s Manual
http://www.gigabyte.com.tw
Version 1.0
Page 2

Copyright
The contents of this publication may not be reproduced in any part or as a whole, stored,
transcribed in an information retrieval system, translated into any language, or transmitted
in any form or by any means, mechanical, magnetic, electronic, optical, photocopying,
manual, or otherwise, without the prior written permission.
Trademarks
All product, company, brand names are trademarks or registered trademarks of their
respective companies. They are used for identification purpose only. Specifications are
subject to be changed without prior noti ce.
FCC Interference Statement
This equipment has been tested and found to comply with the limits for a Class B digital
device pursuant to Part 15 of the FCC Rules. These limits are designed to provide
reasonable protection against radio interference in a commercial environment. This
equipment can generate, use and radiate radio frequency energy and, if not installed and
used in accordance with the instructions in this manual, may cause harmful interference to
radio communications. Operation of this equipment in a residential area is likely to cause
interference, in which case the user, at his own expense, will be required to take whatever
measures are necessary to correct the interference.
CE Declaration of Conformity
This equipment complies with the requirements relating to electromagnetic compatibility,
EN 55022/A1 Class B
Page 3

Contents
CHAPTER 1 PRODUCT OVERVIEW ........................................................ 1
1.1 INTRODUCTION TO THE GN-B40 CABLE/DSL ROUTER WITH 4-PORT SWITCH...........................................1
1.2 F
1.3 P
1.4 LED
1.5 R
CHAPTER 2 INSTALLATION.................................................................... 4
2.1. INSTALLING THE ADAPTER (HARDWARE INSTALLATION)............................................................................ 4
2.2
CHAPTER 3 CONFIGURING BROADBAND ROUTER ............................... 7
3.1. START-UP AND LOG IN........................................................................................................................... 7
3.2. S
3.3. W
3.4. B
3.4.1. P
3.4.2. DHCP
3.4.3. C
3.4.4. F
3.5. F
3.5.1. V
3.5.2. S
3.5.3. M
3.6. S
3.6.1. P
3.6.2. D
3.6.3. URL
3.6.4. MAC
3.6.5. M
3.7. A
3.7.1. S
3.7.2. S
3.7.3. D
3.7.4. SNMP
3.7.5. R
3.7.6. S
3.8. T
3.8.1. S
3.8.2. F
3.8.3. B
3.8.4. R
3.8.5. R
3.8.6. M
EATURES.............................................................................................................................................1
HYSICAL DIMENSIONS & PACKAGING .................................................................................................... 2
INDICATOR.....................................................................................................................................3
EAR PANEL......................................................................................................................................... 3
NETWORK SETTING & SOFTWARE INSTALLATION ..........................................................................................6
TATUS ................................................................................................................................................8
IZARD ................................................................................................................................................9
ASIC SETTING ...................................................................................................................................10
RIMARY SETUP – WAN TYPE, VIRTUAL COMPUTERS........................................................................... 10
SERVER................................................................................................................................... 15
HANGE PASSWORD ...........................................................................................................................16
ORWARDING RULES........................................................................................................................... 17
ORWARDING RULES........................................................................................................................... 18
IRTUAL SERVER.................................................................................................................................19
PECIAL AP........................................................................................................................................20
ISCELLANEOUS ITEMS ....................................................................................................................... 21
ECURITY SETTINGS............................................................................................................................ 22
ACKET FILTER................................................................................................................................... 23
OMAIN FILTER...................................................................................................................................28
BLOCKING...................................................................................................................................30
ADDRESS CONTROL....................................................................................................................32
ISCELLANEOUS ITEMS ....................................................................................................................... 33
DVANCED SETTINGS.......................................................................................................................... 35
YSTEM TIME......................................................................................................................................35
YSTEM LOG....................................................................................................................................... 36
YNAMIC DNS....................................................................................................................................37
SETTING..................................................................................................................................38
OUTING TABLE..................................................................................................................................39
CHEDULE RULE ................................................................................................................................. 42
OOLBOX............................................................................................................................................ 45
YSTEM LOG....................................................................................................................................... 46
IRMWARE UPGRADE........................................................................................................................... 46
ACKUP SETTING................................................................................................................................47
ESET TO DEFAULT ............................................................................................................................. 47
EBOOT.............................................................................................................................................. 47
ISCELLANEOUS ITEMS ....................................................................................................................... 48
APPENDIX A TCP/IP CONFIGURATION FOR WINDOWS 95/98.............. 49
APPENDIX B FAQ AND TROUBLESHOOTING..................................... 54
APPENDIX C SPECIFICATIONS............................................................... 55
APPENDIX D WARRANTY........................................................................56
Page 4

Chapter 1 Product Overview
1.1 Introduction to the GN-B40 Cable/DSL Router with 4-Port
Switch
Congratulations on your purchase of this outstanding Broadband Router. This product is specifically
designed for Small Office and Home Office needs. It provides a complete SOHO solution for Internet
surfing, and is easy to configure and operate even for non-technical users. Instructions for installing and
configuring this product can be found in this manual. Before you install and use this product, please read
this manual carefully for fully exploiting the functions of this product.
1.2 Features
Router Basic functions
z Broadband modem and NAT Router
Connects multiple com puter s to a broadban d (cable or DSL) m odem or an Ether net router t o surf
the Internet.
z Auto-sensing Ethernet Switch
Equipped with a 4-port auto-sensing Ethernet switch.
z Wan type supported
The router supports some wan types, Static ,D ynamic, PPPOE ,PPTP , D ynamic IP with Road
Runner.
z Firewall
All unwanted packets from outside intruders are blocked to protect your Intranet.
z DHCP server supported
All of the networked computers can retrieve TCP/IP settings automatically from this product.
z Web-based configuring
Configurable through any networked computer’s web browser using Netscape or Internet
Explorer.
z Virtual Server supported
Enables you to expos e WWW, FTP and other s ervices on your LAN to be ac cessible to Interne t
users.
z User-Definable Application Sensing Tunnel
User can define the attr ibutes to support the special app lications requiring m ultiple connections,
like Internet gaming, video conferencing, Internet telephony and so on, then this product can
sense the application type and open multi-port tunnel for it.
z DMZ Host supported
Lets a networked com puter be fully exposed to the Internet; this function is us ed when special
application sensing tunnel feature is insufficient to allow an application to function correctly.
z Statistics of WAN Supported
Enables you to monitor inbound and outbound packets
Security functions
z Packet filter supported
Packet Filter allo ws you to control access to a network by analyzing t he incoming and outgoin g
packets and letting them pass or halting them based on the IP address of the source and
destination.
z Domain Filter Supported
Let you prevent users under this device from accessing specific URLs.
z URL Blocking Supported
URL Blocking can block hundreds of websites connection by simply a keyword.
z VPN Pass-through
1
Page 5

The router also support vpn pass-through.
z SPI Mode Supported
When SPI Mode is enabled, the router will check every incoming packet to detect if this
packet is valid.
z DoS Attack Detection Supported
When this feature is enabled, the router will detect and log the DoS attack comes from
The Internet.
Advanced functions
z System time Supported
Allow you to synchronize system time with network time server.
z E-mail Alert Supported
The router can send its info by mail.
z Dynamic dns Supported
At present,the router has 3 ddns.dyndns,TZO.com and dhs.org.
z SNMP Supported
The router supports basic snmp function.
z Routing Table Supported
Now, the router supports static routing.
z Schedule Rule supported
Customers can control some functions, like virtual server and packet filters when to
Access or when to block.
Other functions
z UPNP (Universal Plug and Play)Supported
The router also supports this function. The applications: X-box, Msn Messenger.
1.3 Physical Dimens ions & Packaging
Dimensions: 134mm × 81mm × 22mm
Before beginning the installation procedures, please inspect the components to assure
that they have not been damaged during shipping. The components include:
Package Contents
z Broadband router unit
z Installation CD-ROM
z Power adapter
CAT-5 UTP Fast Ethernet cable
z
In case of any missing or damaged accessories, please contact your local distributor or
authorized reseller immediately. If you require returning the damaged product, you must
pack it in the original packing material or the warranty will be voided.
2
Page 6
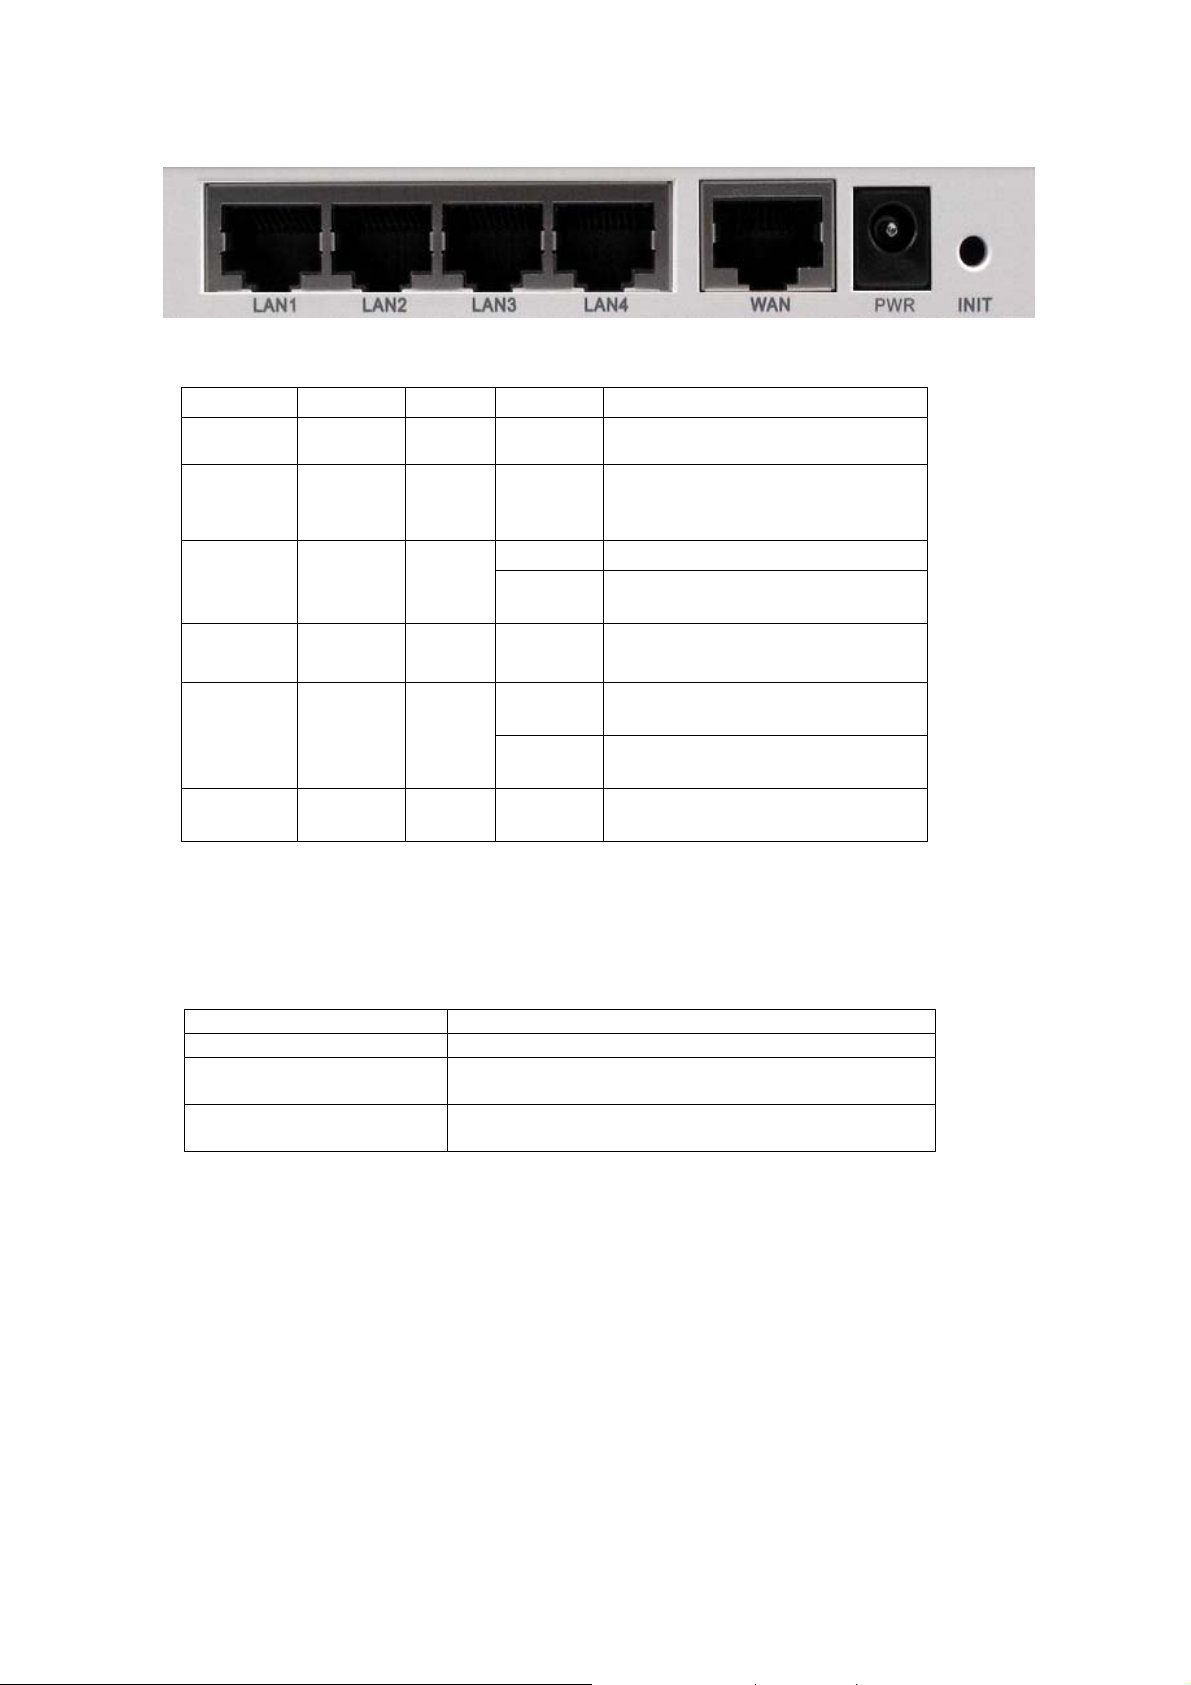
1.4 LED Indicator
A
LED Function Color Status Description
POWER
Status
WAN
Reset M1 Green Flashing
Link/Act.
1~4
10/100 Data Rate Green On
Power
indication
System
status
indicators
WAN port
activity
Link status Green
※For details, please refer to Appendix D FAQ and Troubleshooting.
Green On
Orange Blinking
On The WAN port is linked.
Green
Blinking
On
Blinking
Power is being applied to this
product.
M1 is flashed onc e per second to
indicate system is alive. When
system is busy, M2 is lighted.
The WAN port is sending or
receiving data.
To reset system settings to factory
defaults
n active station is connected to
the corresponding LAN port.
The corresponding LAN port is
sending or receiving data.
Data is transmitting in 100Mbps
on the corresponding LAN port.
1.5 Rear Panel
Port Description
9VAC
WAN
Port 1-4
Power inlet: AC9V, 1A
the port where you will connect your cable (or DSL)
modem or Ethernet router.
the ports where you will connect networked computers
and other devices.
3
Page 7
Chapter 2 Installation
This chapter covers the installation of the WPMG Adapter for your desktop PC. The
following sections will assist you with proper installation of the PCI Adapter, and also with
installing the necessary drivers and utilities. For specific information regarding your
Version of Windows, please refer to the appropriate sections as indicated
2.1. Installing the Adapter (Hardware Installation)
Step 1: Decide where to place your Broadband Router
You can place your Broadband Router on a desk or other flat surface, or you can mount
it on a wall. For optimal performance, place your Broadband Router in the center of your
office (or your home) in a location that is away from any potential source of interference,
such as a metal wall or microwave oven. This location must be close to power and
network connection.
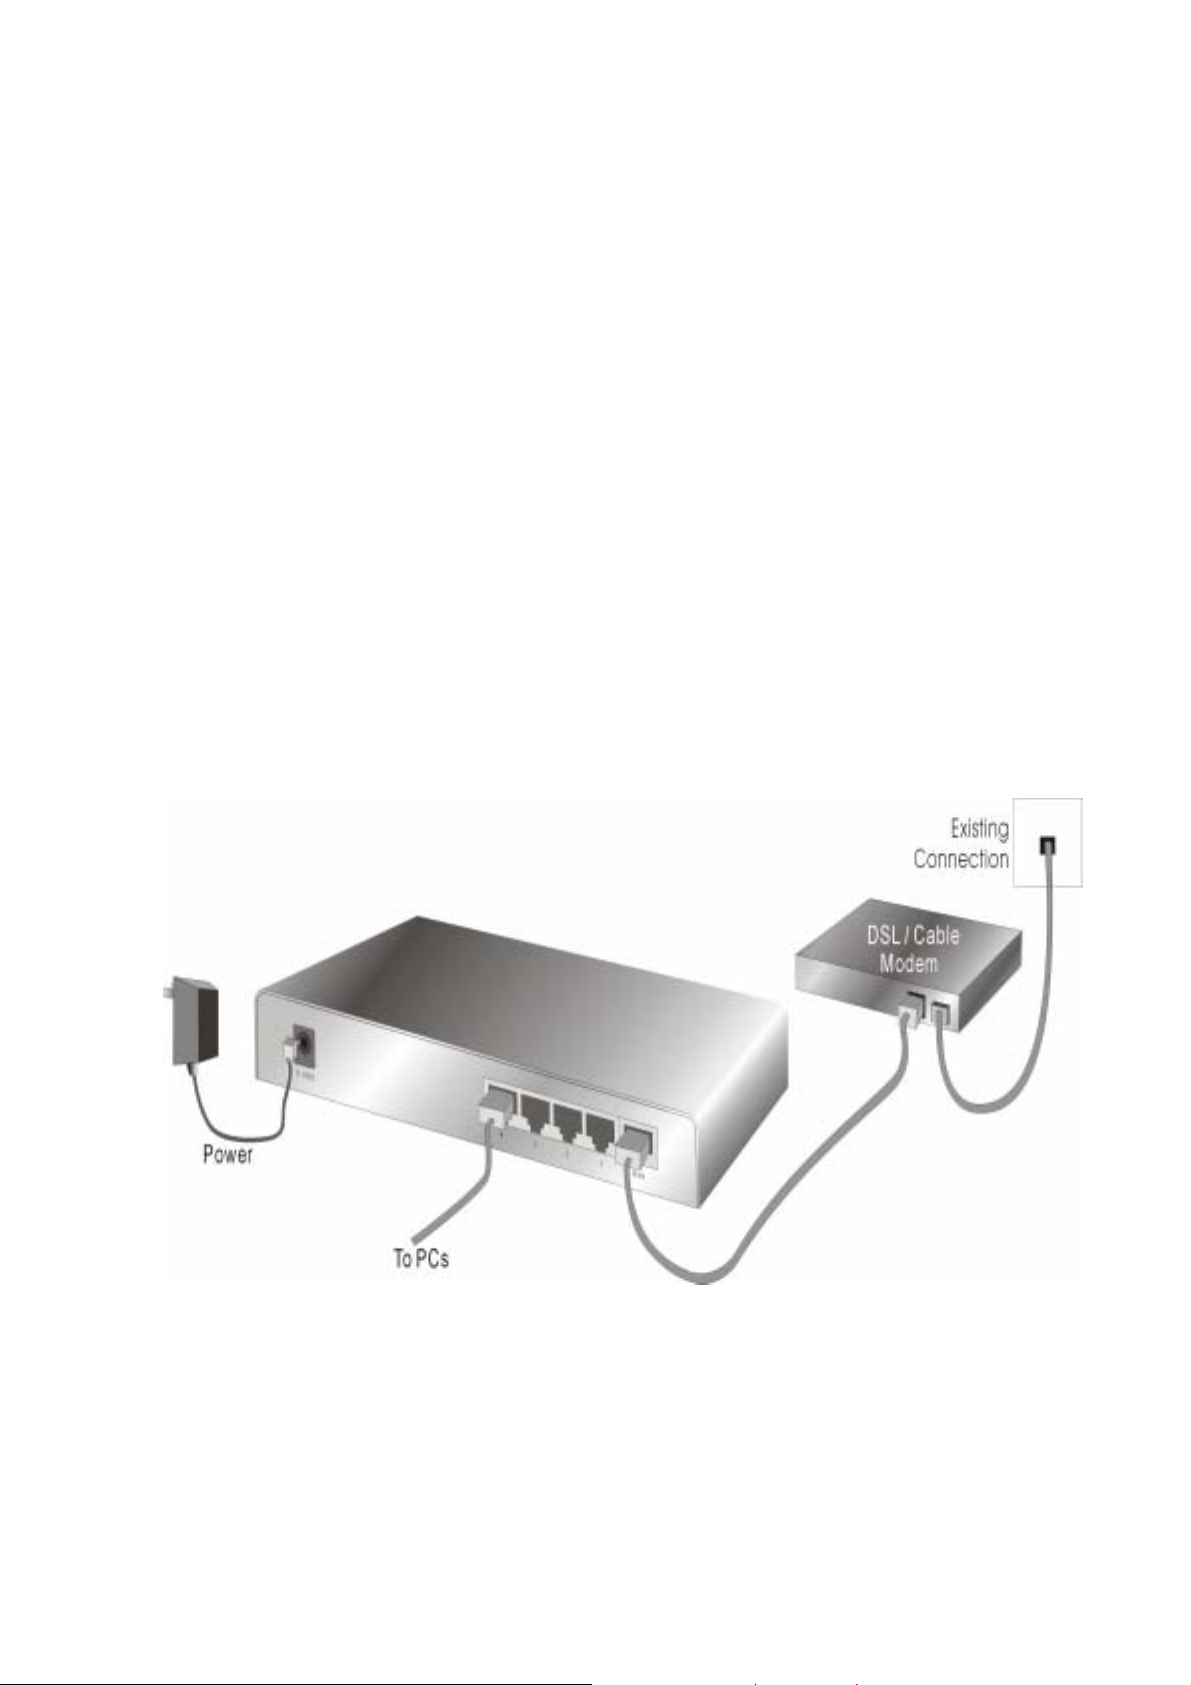
Step 2: Setup LAN connection
Wired LAN connection: connects an Ethernet cable from your computer’s Ethernet port to
one of the LAN ports of this product.
Figure 2-3 Setup of LAN and WAN connections for this product.
Step 3: Setup WAN connection
Prepare an Ethernet cable for connecting this product to your cable/xDSL modem or
Ethernet backbone. Figure 2-3 illustrates the WAN connection.
4
Page 8

Step 4: Power on your PC.
Connecting the power cord to power inlet and turning the power switch on, this product
will automatically enter the self-test phase. When it is in the self-test phase, the indicators
M1 will be lighted ON for about 10 second s, and then M1&M2 will be flashed 3 times to
indicate that the self-test operation has finished. Finally, the M1 will be continuously
flashed once per second to indicate that this product is in normal operation.
5
Page 9

2.2 Network setting & Software Installation
To use this product correctly, you have to properly configure the network settings of your
computers and install the attached setup program into your MS Windows platform
(Windows 95/98/NT/2000).
Step 1: Make Correct Network Settings of Your Computer
The default IP address of this product is 192.168.123.254, an d the de fault subn et mask is
255.255.255.0. These addresses can be changed on your need, but the default values
are used in this manual. If the TCP/IP environment of your computer has not yet been
configured, you can refer to Appendix A to configure it.
For example
1. configure IP as 192.168.123.1, subnet mask as 255.255.255.0 and gateway as
192.168.123.254, or more easier,
2. configure your computers to load TCP/IP setting automatically, that is, via DHCP
server of this product.
After installing the TCP/IP communication protocol, you can use the ping command
to check if your computer has successfully connected to this product. The following
example shows the ping procedure for Windows 95 platforms. First, execute the ping
command
ping 192.168.123.254
If the following messages appear:
Pinging 192.168.123.254 with 32 bytes of data:
Reply from 192.168.123.254: bytes=32 time=2ms TTL=64
Then a communication link between your computer and this product has been
successfully established. Otherwise, if you get the following messages,
Pinging 192.168.123.254 with 32 bytes of data:
Request timed out.
There must be something wrong in your installation procedure. You have to check the
following items in sequence:
1. Is the Ethernet cable correctly connected between this product and your
computer?
Tip: The LAN LED of this product and the link LED of network card on your
computer must be lighted.
2. Is the TCP/IP environment of your computers properly configured?
Tip: If the IP address of this product is 192.168.123.254, the IP address of your
computer must be 192.168.123.X and default gateway must be 192.168.123.254.
6
Page 10
Chapter 3 Configuring Broadband Router
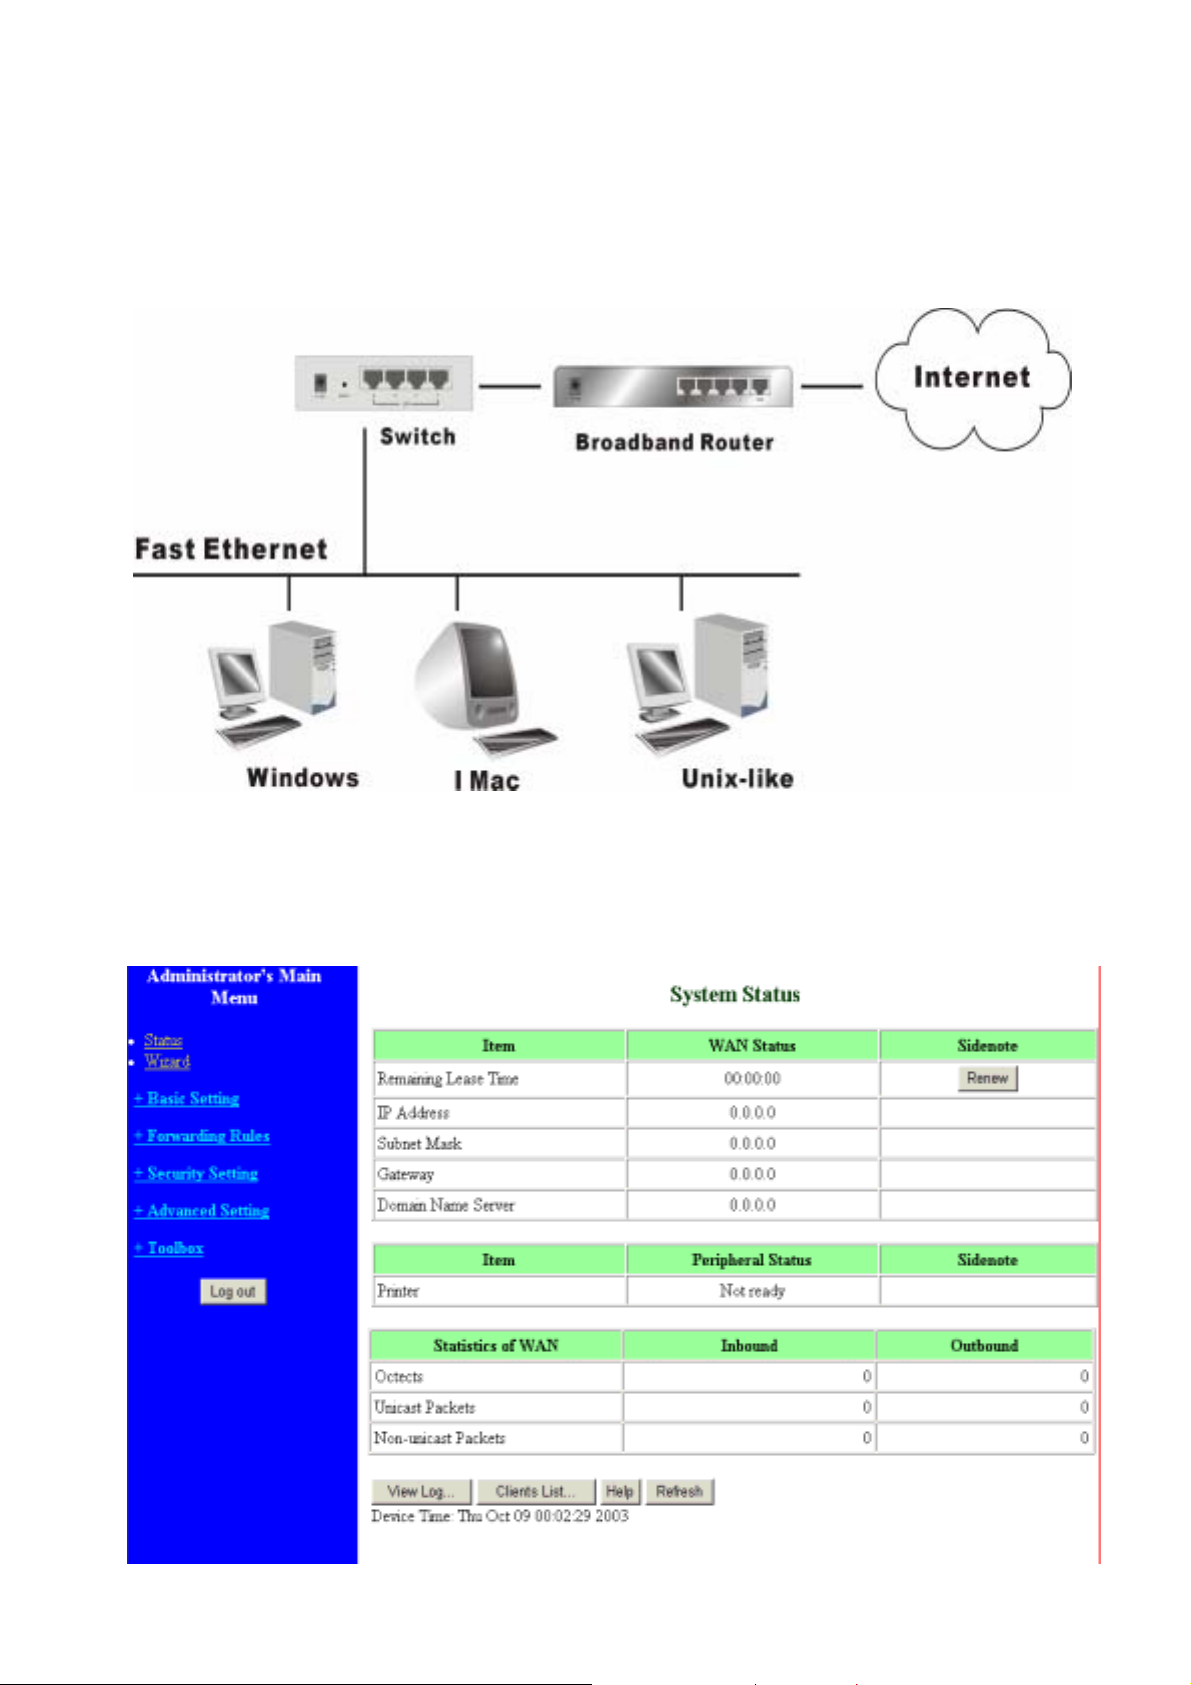
This product provides Web based configuration scheme, which is, configuring by your
Web browser, such as Netscape Communicator or Internet Explorer. This approach can
be adopted in any MS Windows, Macintosh or UNIX based platforms.
Figure 3-1. Layout Diagram
3.1. Start-up and Log in
7
Page 11
Activate your browser, and disable the proxy or add the IP address of this product
into the exceptions. Then, type this product’s IP address in the Location (for Netscape)
or Address (for IE) field and press ENTER. For example: http://192.168.123.254.
After the connection is established, you will see the web user interface of this product.
There are two appearances of web user interface: for general users and for system
administrator.
To log in as an administrator, enter the system password (the factory setting is ”admin”)
in the System Password field and click on the Log in button. If the password is correct,
the web appearance will be changed into administrator configure mode. As listed in its
main menu, there are several options for system administration.
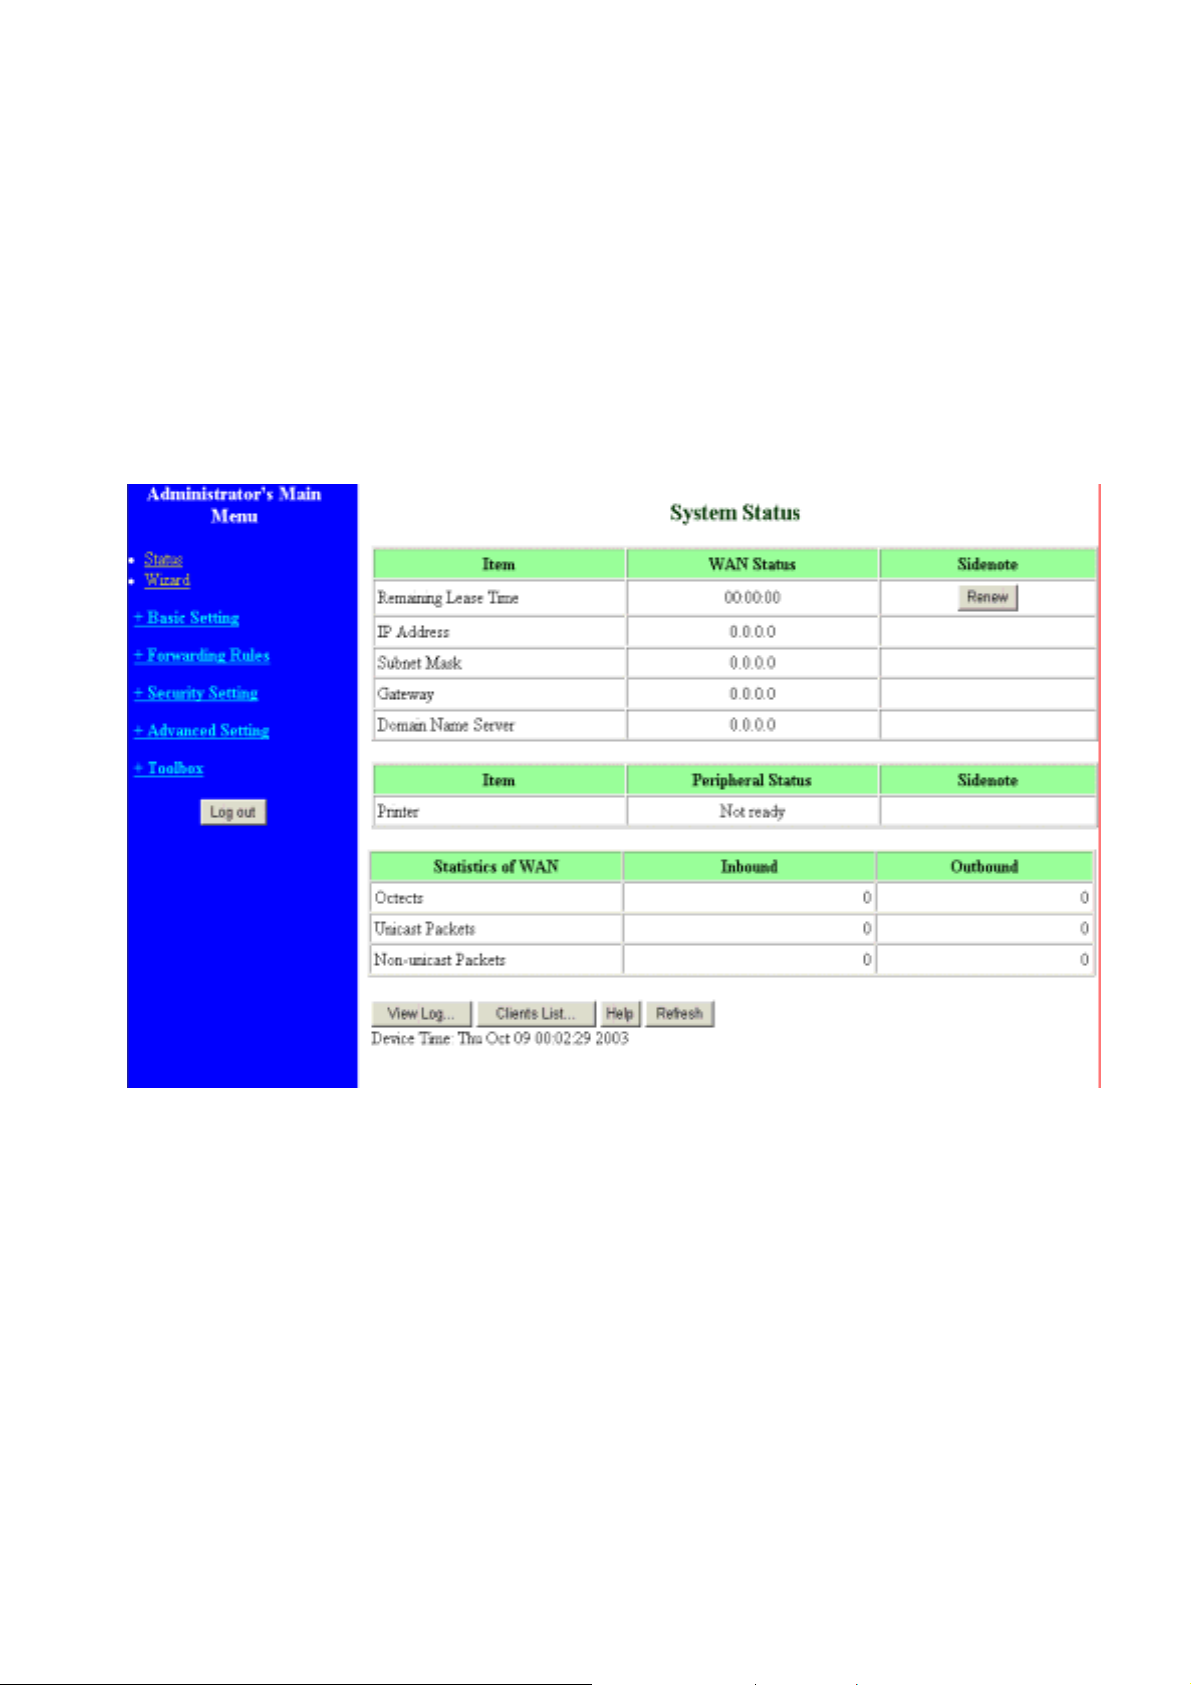
3.2. Status
This option provides the function for observing this product’s working status:
A. WAN Port Status.
If the WAN port is assigned a dynamic IP, there may appear a “Renew” or
“Release” button on the Sidenote column. You can click this button to renew or
release IP manually.
B. Statistics of WAN: enables you to monitor inbound and outbound packets
8
Page 12
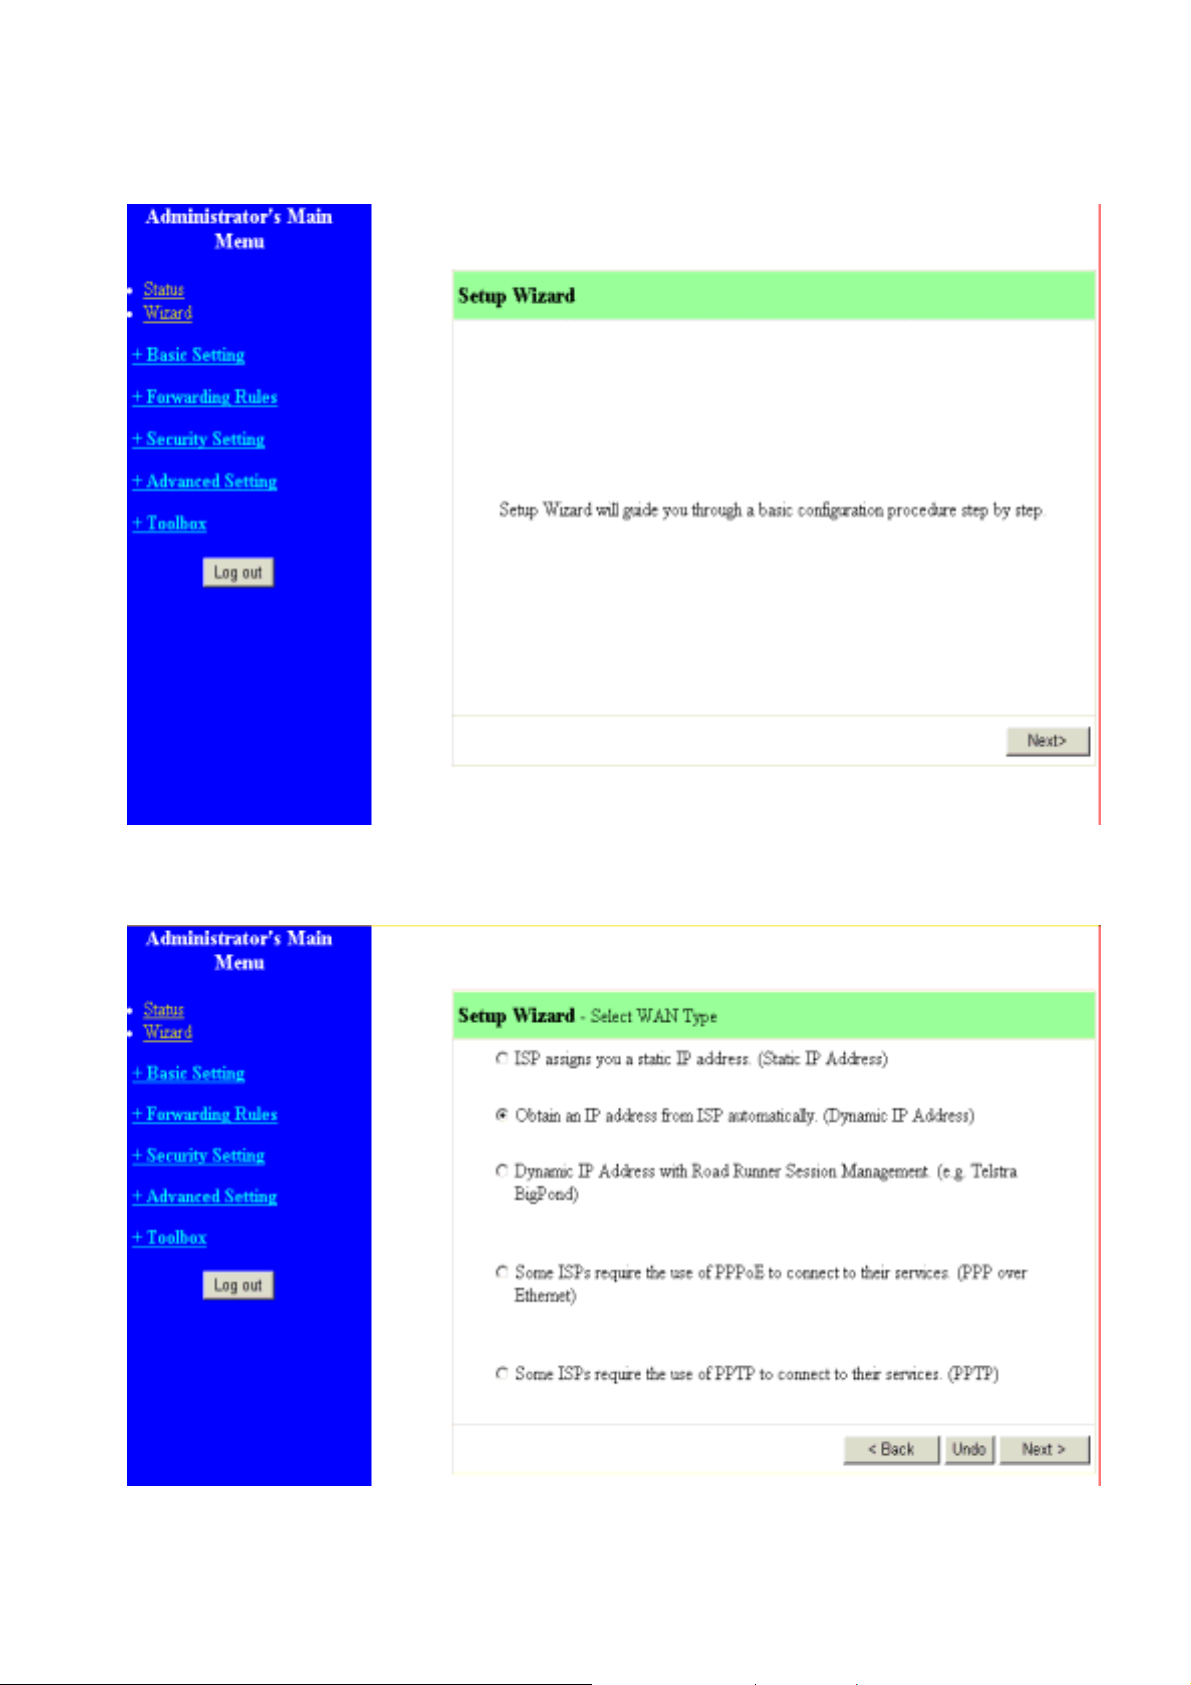
3.3. Wizard
Setup Wizard will guide you through a basic configuration procedure step by step.
Press ”Next >”
Setup Wizard - Select WAN Type: For detail settings, please refer to 3.4.1 primary
setup.
9
Page 13
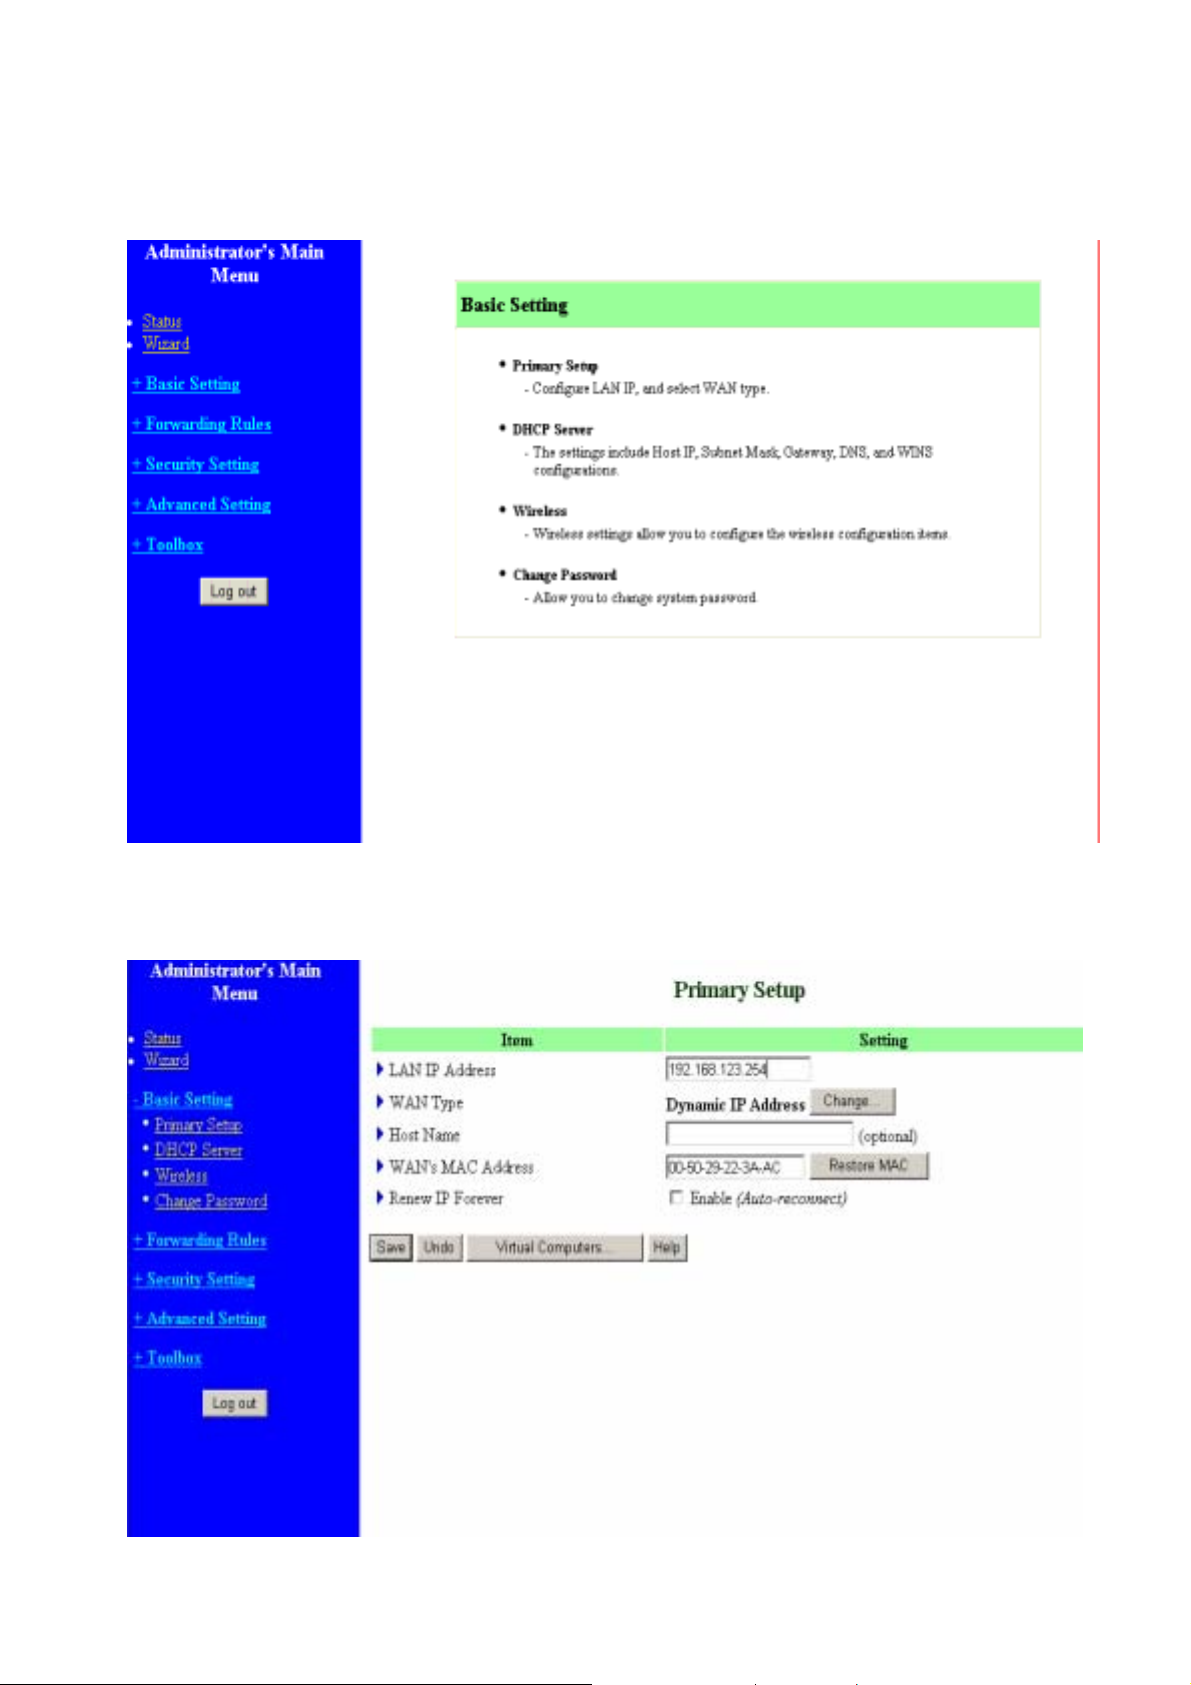
3.4. Basic Setting
3.4.1. Primary Setup – WAN Type, Virtual Computers
10
Page 14
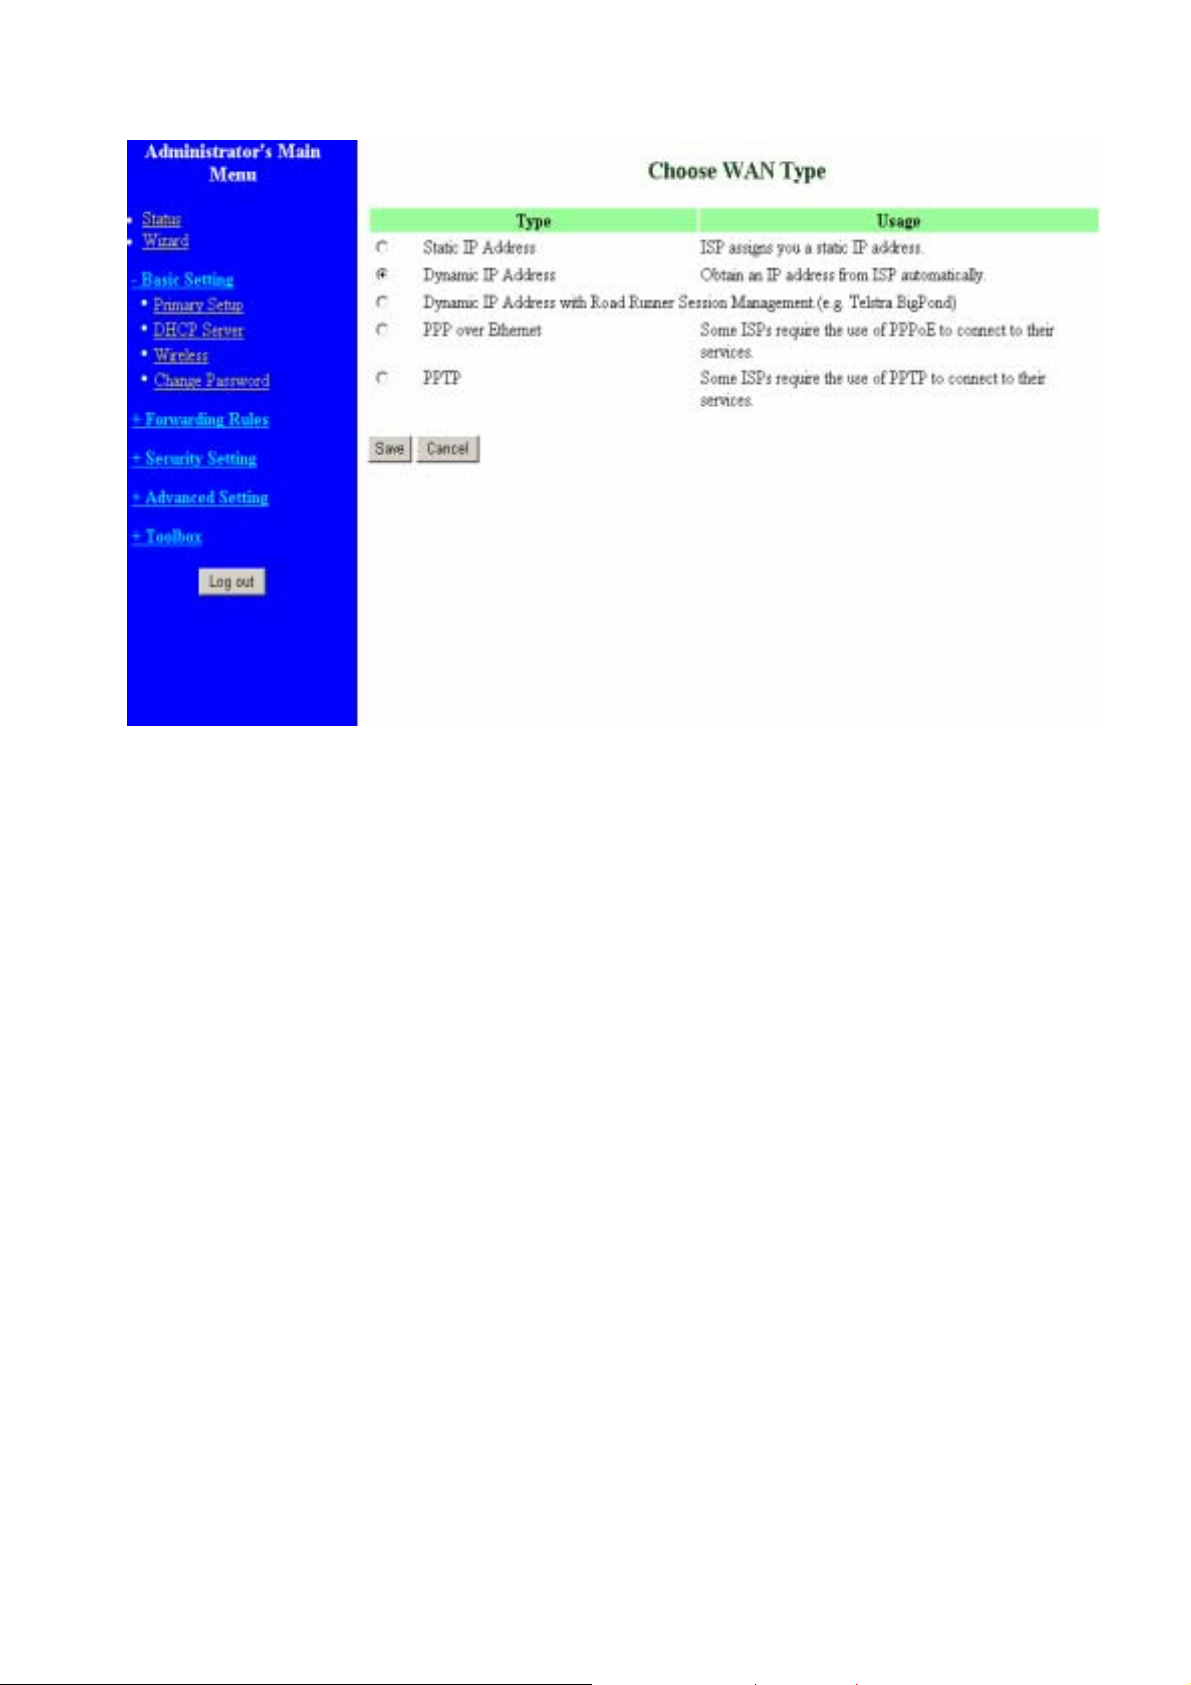
Press “Change”
Note: This option is required to enable this product to work properly. The setting items
and the web appearance depend on the WAN type. Choose correct WAN type before
you start.
1. LAN IP Address: the local IP address of this device. The computers on your network
must use the LAN IP address of your product as their Default Gateway. You can
change it if necessary.
2. WAN Type: WAN connection type of your ISP. You can click Change button to
choose a correct one from the following four options:
A. Static IP Address: ISP assigns you a static IP address.
B. Dynamic IP Address: Obtain an IP address from ISP automatically.
C. Dynamic IP Address with Road Runner Session Management.(e.g. Telstra
BigPond)
D. PPP over Ethernet: Some ISPs require the use of PPPoE to connect to their
services.
E. PPTP: Some ISPs require the use of PPTP to connect to their services.
3.6.1.1 Static IP Address
WAN IP Address, Subnet Mask, Gateway, Primary and Secondary DNS: enter the proper
setting provided by your ISP.
3.6.1.2 Dynamic IP Address
1. Host Name: optional. Required by some ISPs, for example, @Home.
2. Renew IP Forever: this feature enables this product to renew your IP address
automatically when the lease time is expiring-- even when the system is idle.
11
Page 15

3.6.1.3 Dynamic IP Address with Road Runner Session Management.
(e.g. Telstra BigPond)
1. LAN IP Address is the IP address of this product. It must be the default gateway of
your computers.
2. WAN Type is Dynamic IP Address. If the WAN type is not correct, change it!
3. Host Name: optional. Required by some ISPs, e.g. @Home.
4. Renew IP Forever: this feature enable this product renew IP address automatically
when the lease time is being expired even the system is in idle state.
3.6.1.4 PPP over Ethernet
1. PPPoE Account and Password: the account and password your ISP assigned to you.
For security, this field appears blank. If you don't want to change the password, leave
it empty.
2. PPPoE Service Name: optional. Input the service name if your ISP requires it.
Otherwise, leave it blank.
3. Maximum Idle Time: the amount of time of inactivity before disconnecting your PPPoE
session. Set it to zero or enable Auto-reconnect to disable this feature.
4. Maximum Transmission Unit (MTU): Most ISP offers MTU value to users. The most
common MTU value is 1492.
12
Page 16
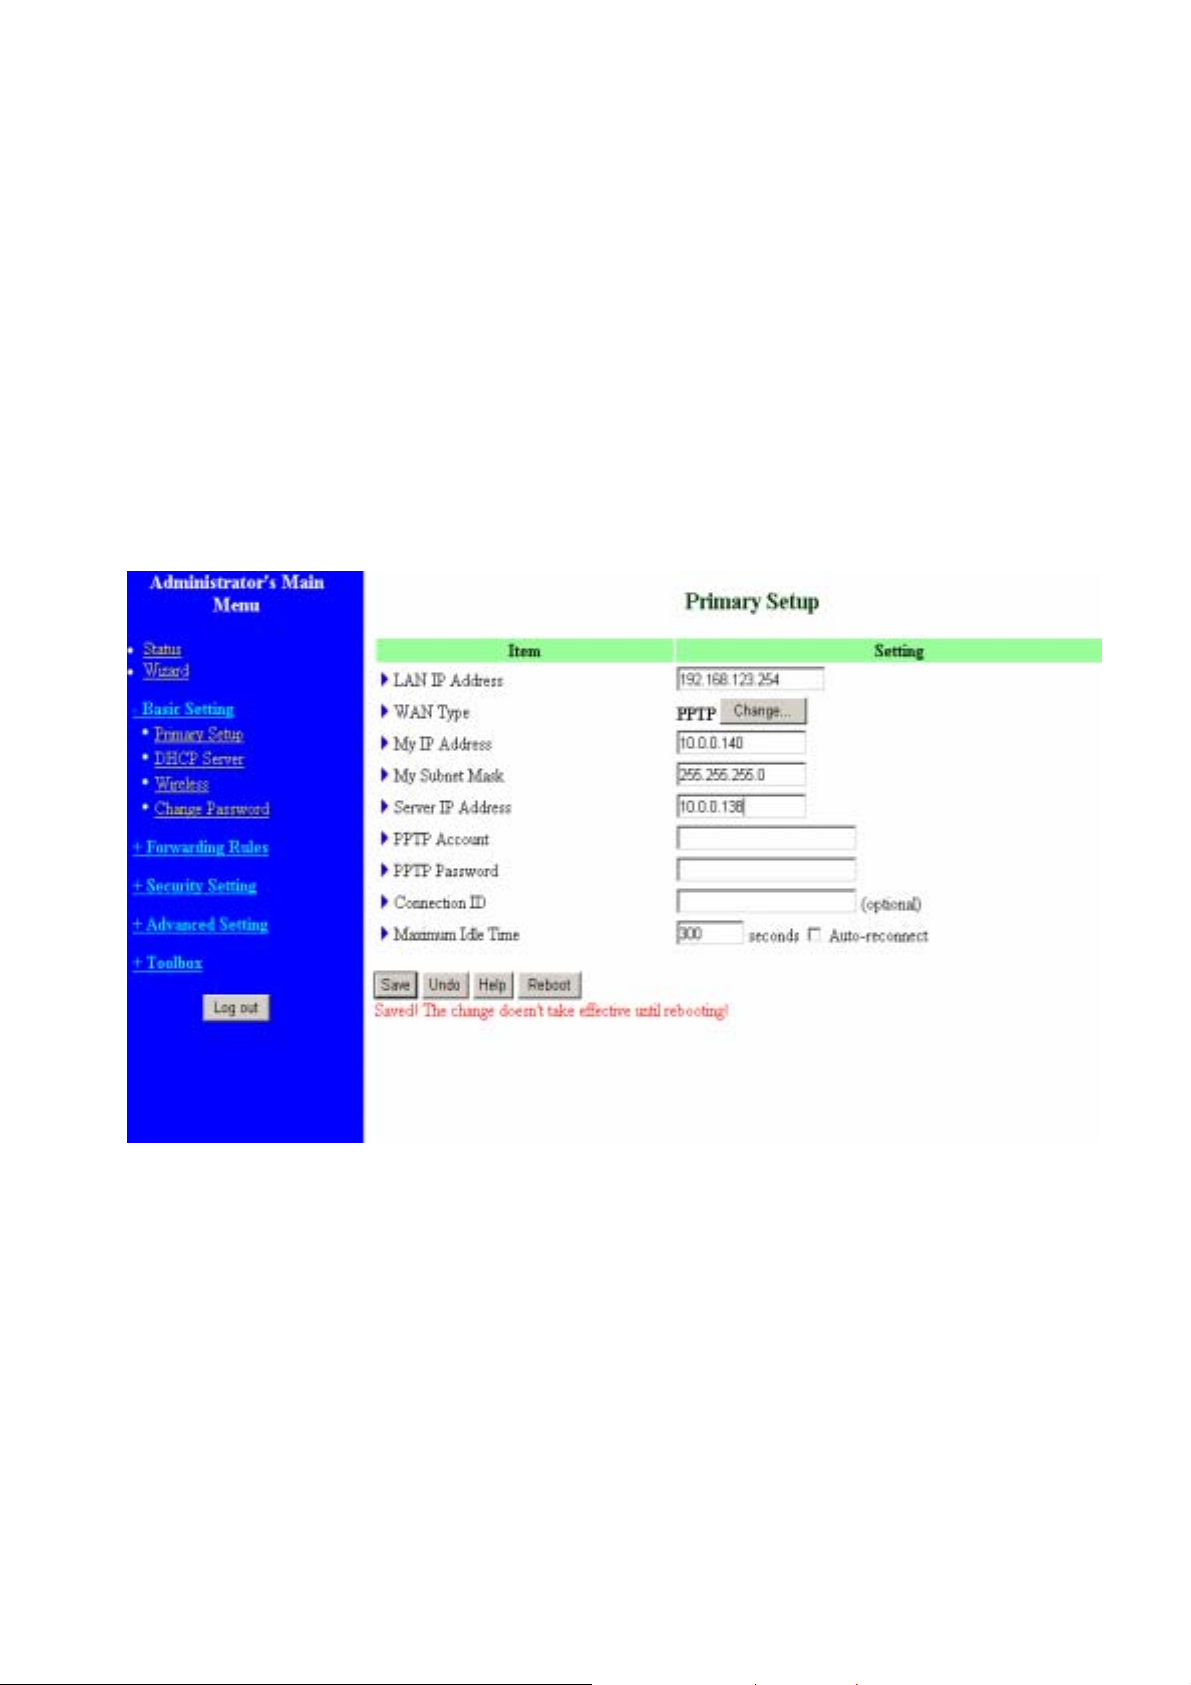
3.6.1.5 PPTP
1. My IP Address and My Subnet Mask: the private IP address and subnet mask your
ISP assigned to you .
2. Server IP Address: the IP address of the PPTP server.
3. PPTP Account and Password: the account and password your ISP assigned to you. If
you don't want to change the password, keep it empty.
3. Connection ID: optional. Input the connection ID if your ISP requires it.
4. Maximum Idle Time: the time of no activity to disconnect your PPTP session. Set it to
zero or enable Auto-reconnect to disable this feature. If Auto-reconnect is enabled,
this product will automatically connect to ISP after system is restarted or connection is
dropped.
13
Page 17
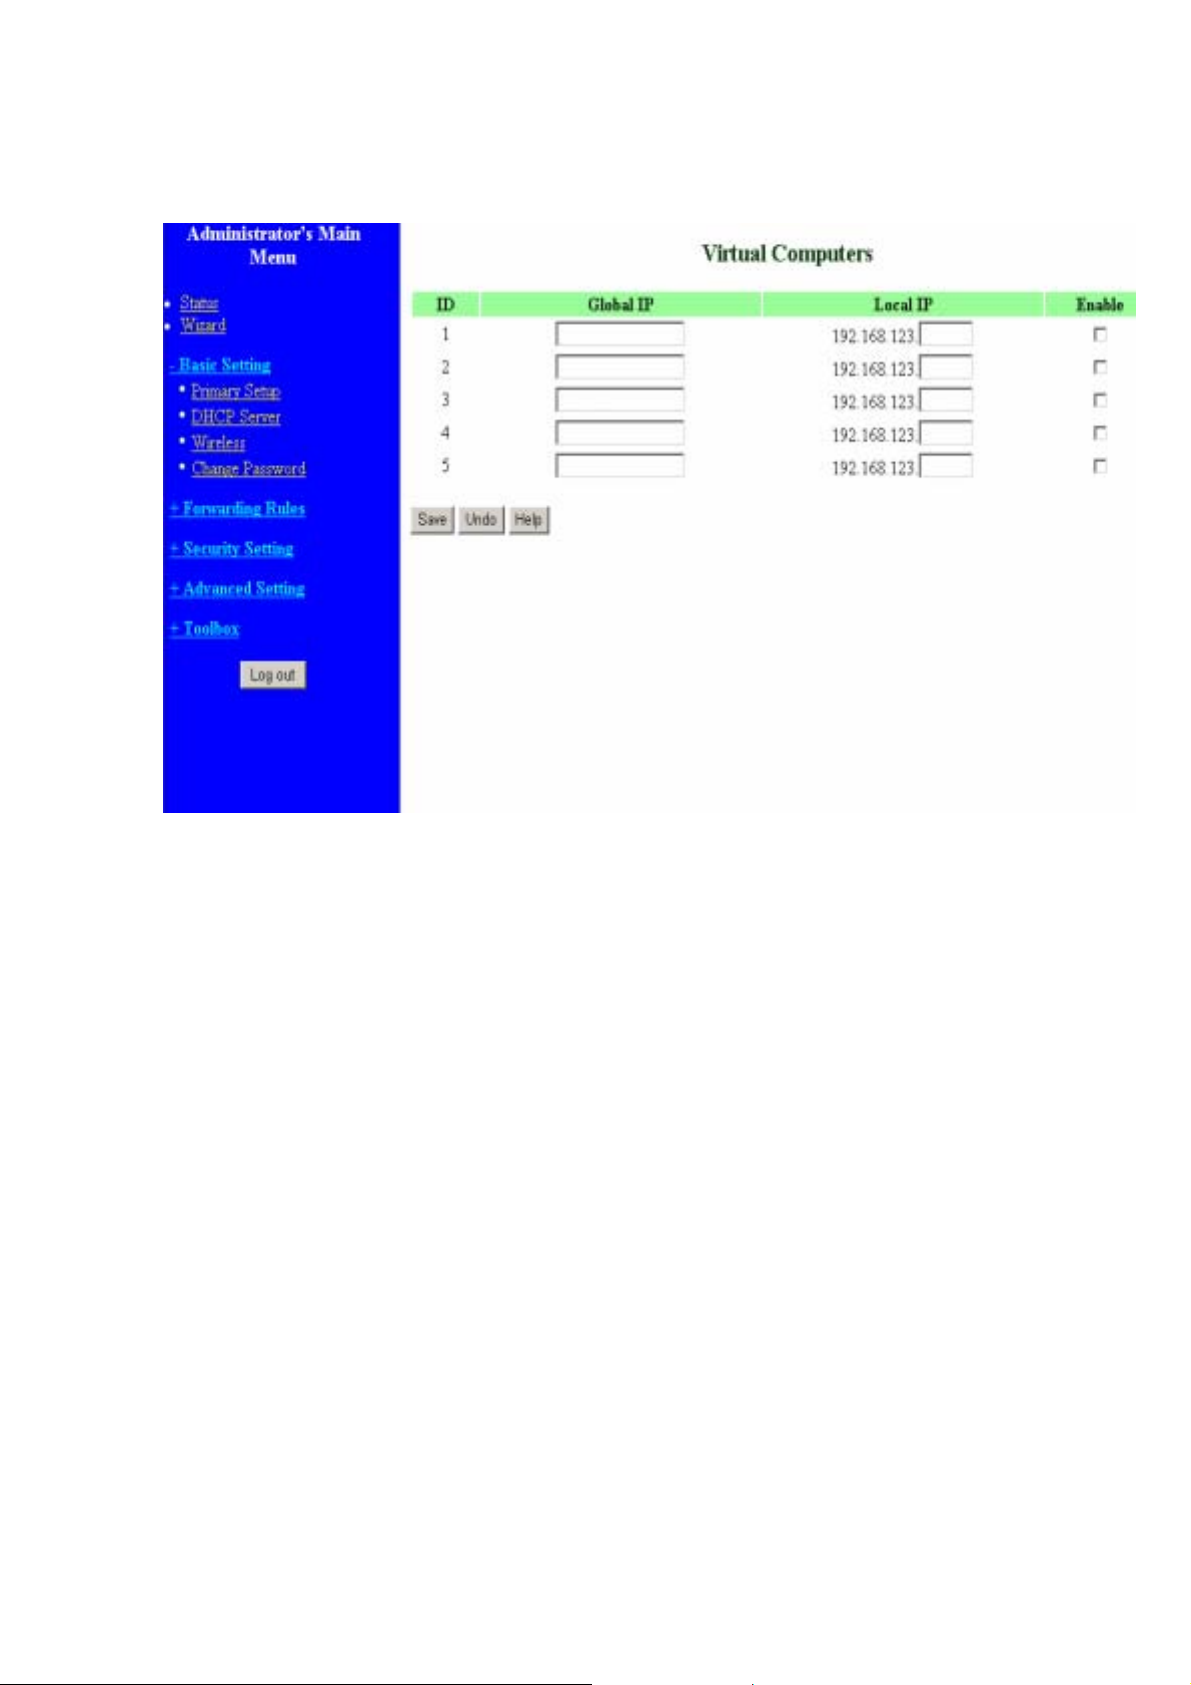
3.6.1.6 Virtual Computers
Virtual Computer enables you to use the original NAT feature, and allows you to setup
the one-to-one mapping of multipl e global IP addr ess an d local IP a ddr ess.
• Global IP: Enter the global IP address assigned by your ISP.
• Local IP: Enter the local IP address of your LAN PC corresponding to the
global IP address.
• Enable: Check this item to enable the Virtual Computer feature.
14
Page 18
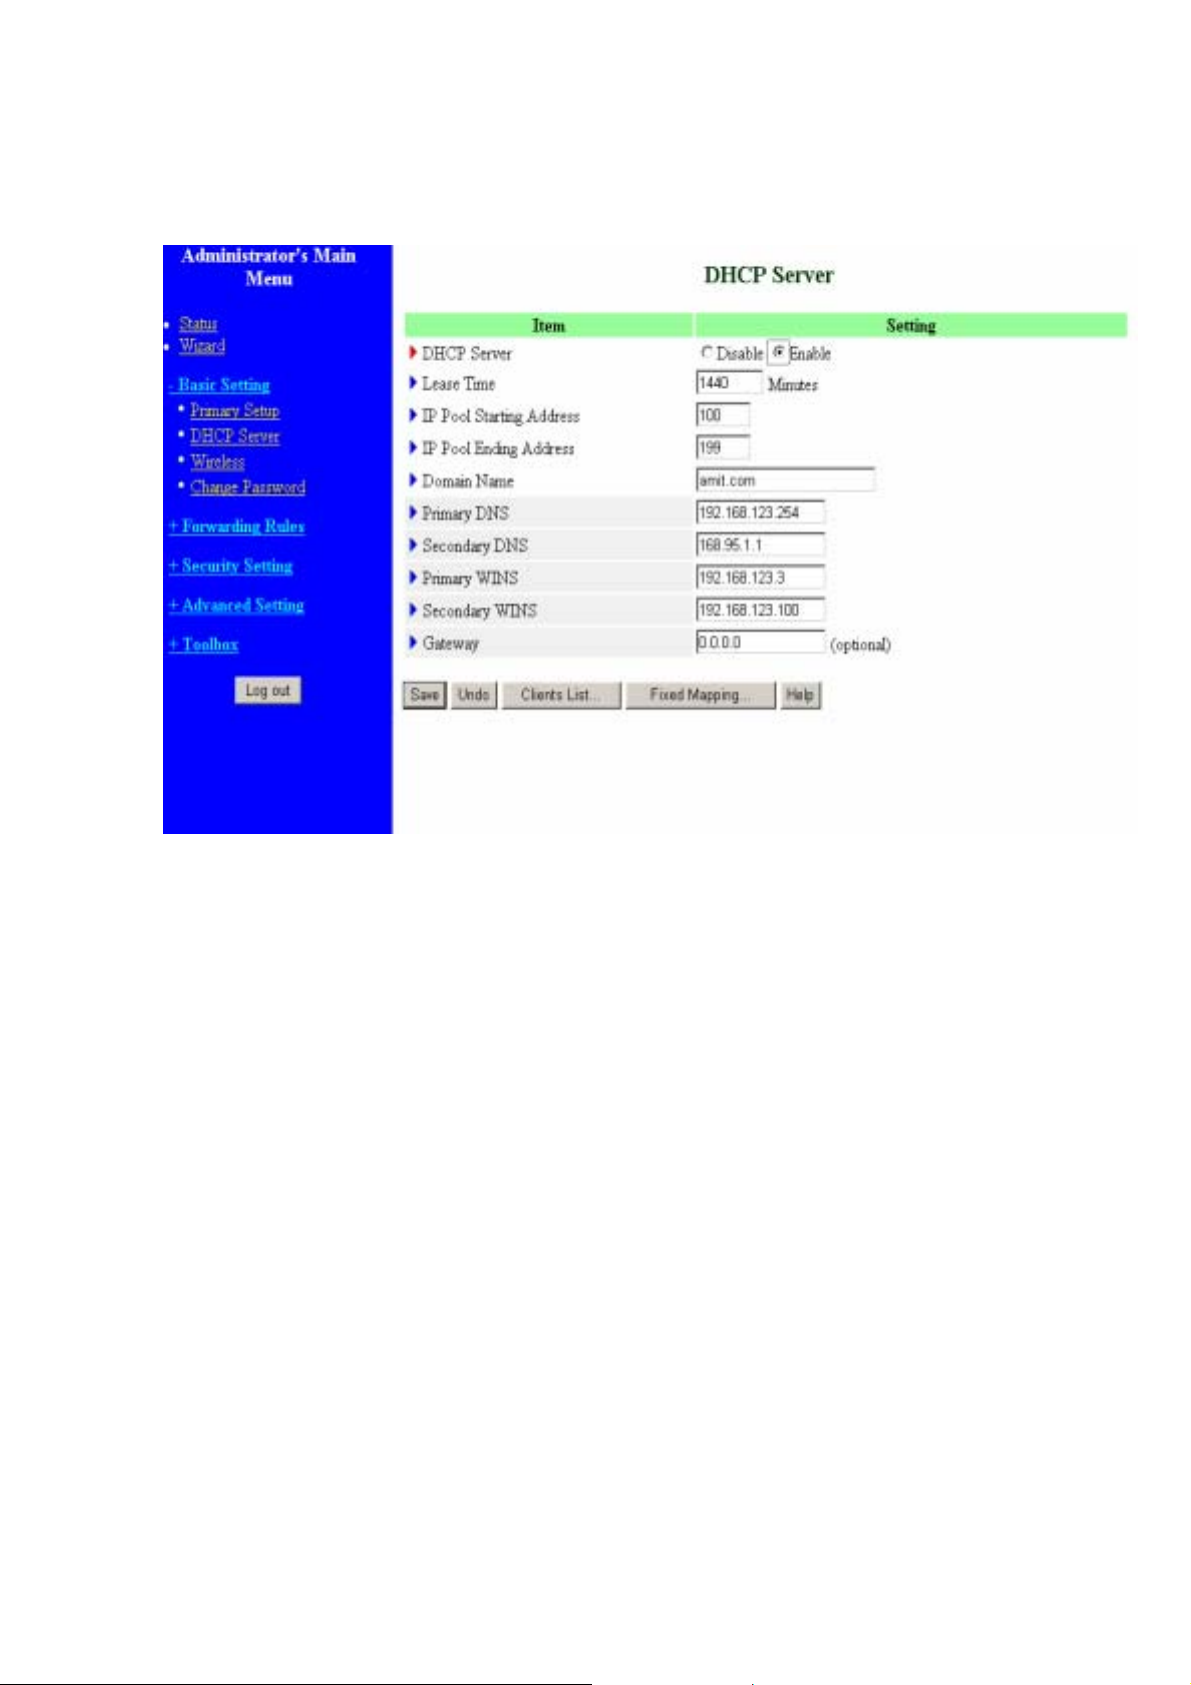
3.4.2. DHCP Server
Press “More>>”
The settings of a TCP/IP environment include host IP, Subnet Mask, Gateway, and DNS
configurations. It is not easy to manually configure all the computers and devices in your
network. Fortunately, DHCP Server provides a rather simple approach to handle all these
settings. This product supports the function of DHCP server. If you enable this product’s
DHCP server and configure your computers as “automatic IP allocation” mode, then
when your computer is powered on, it will automatically load the proper TCP/IP settings
from this product. The settings of DHCP server includ e the f ollowing items:
1. DHCP Server: Choose “Disable” or “Enable.”
2. Lease Time: this feature allows you to configure IP’s lease time (DHCP client).
3. IP pool starting Address/ IP pool starting Address: Whenever there is a request,
the DHCP server will automatically allocate an unused IP address from the IP
address pool to the requesting computer. You must specify the starting and ending
address of the IP address pool.
4. Domain Name: Optional, this information will be passed to the client.
5. Primary DNS/Secondary DNS: This feature allows you to assign DNS Servers
6. Primary WINS/Secondary WINS: This feature allows you to assign WINS Servers
7. Gateway: The Gateway Address would be the IP address of an alternate Gateway.
This function enables you to assign another gateway to your PC, when DHCP
server offers an IP to your PC.
15
Page 19
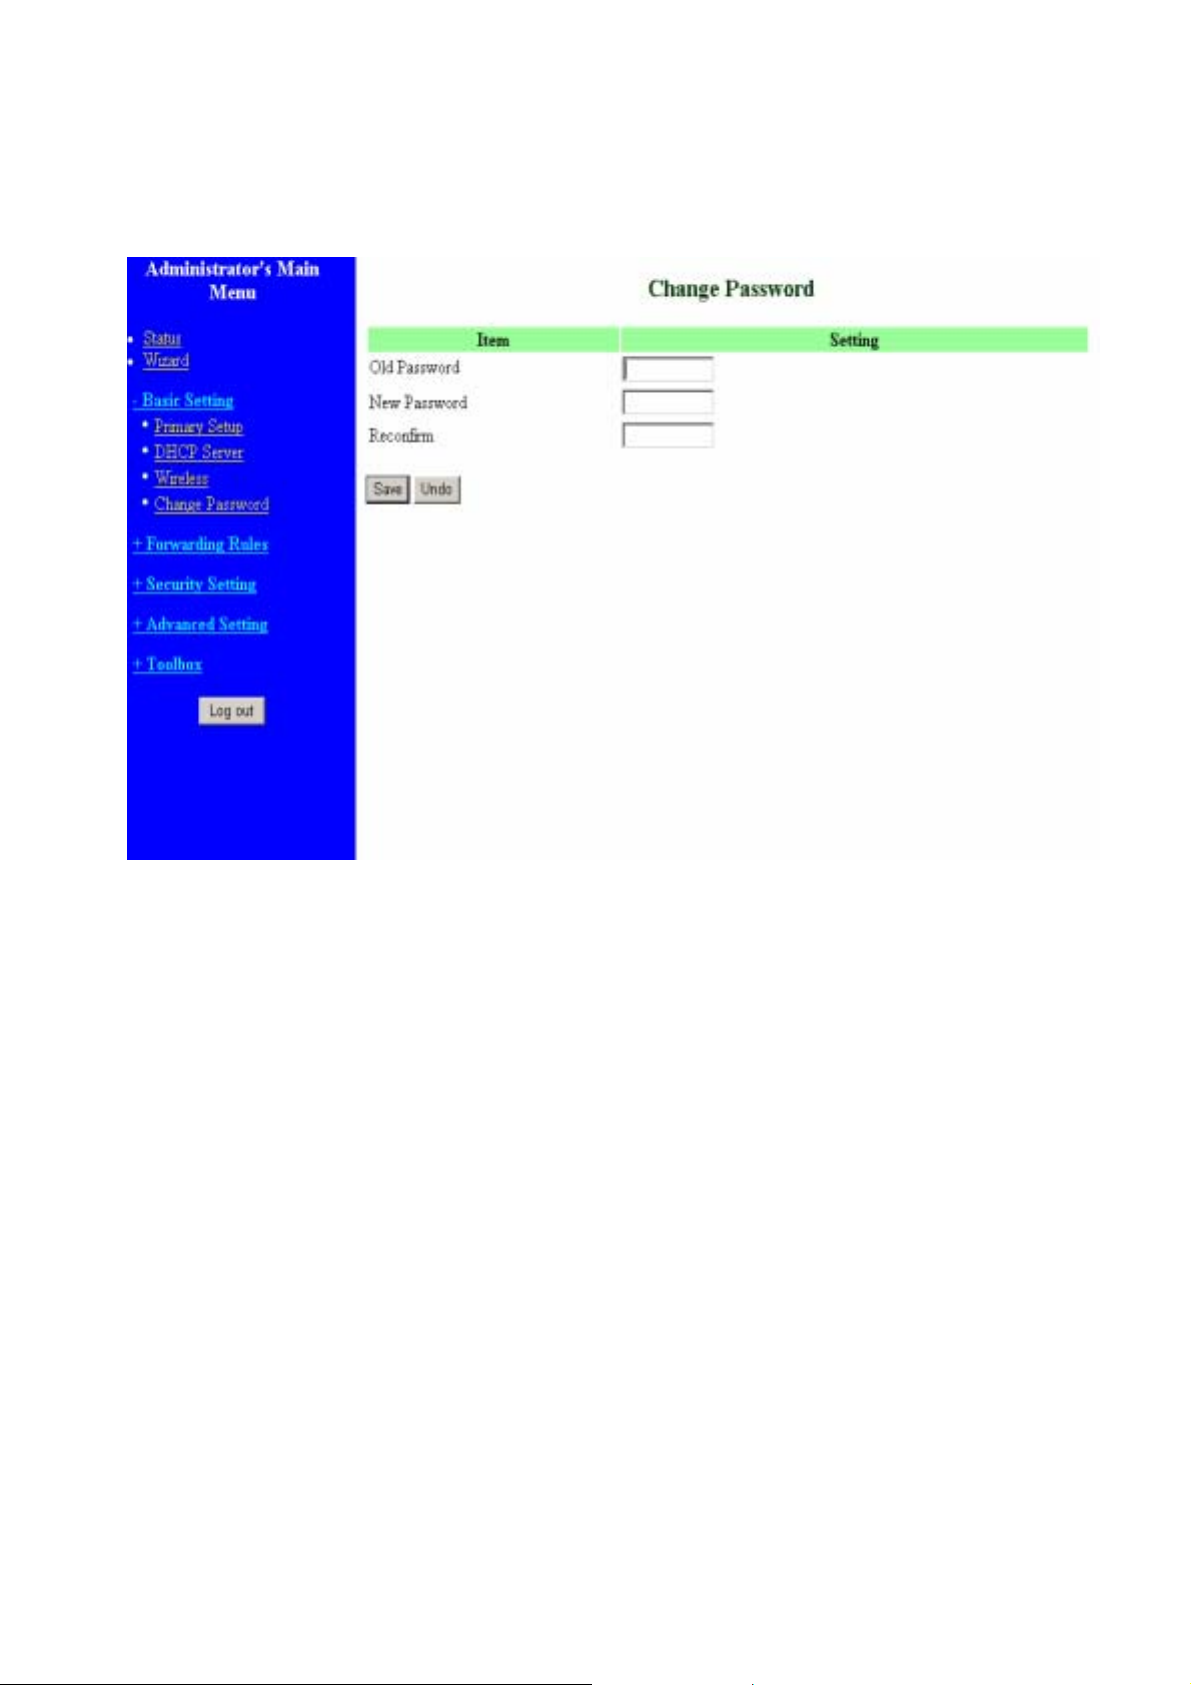
3.4.3. Change Password
You can change Password here. We strongly recommend you to change the system
password for security reason.
16
Page 20
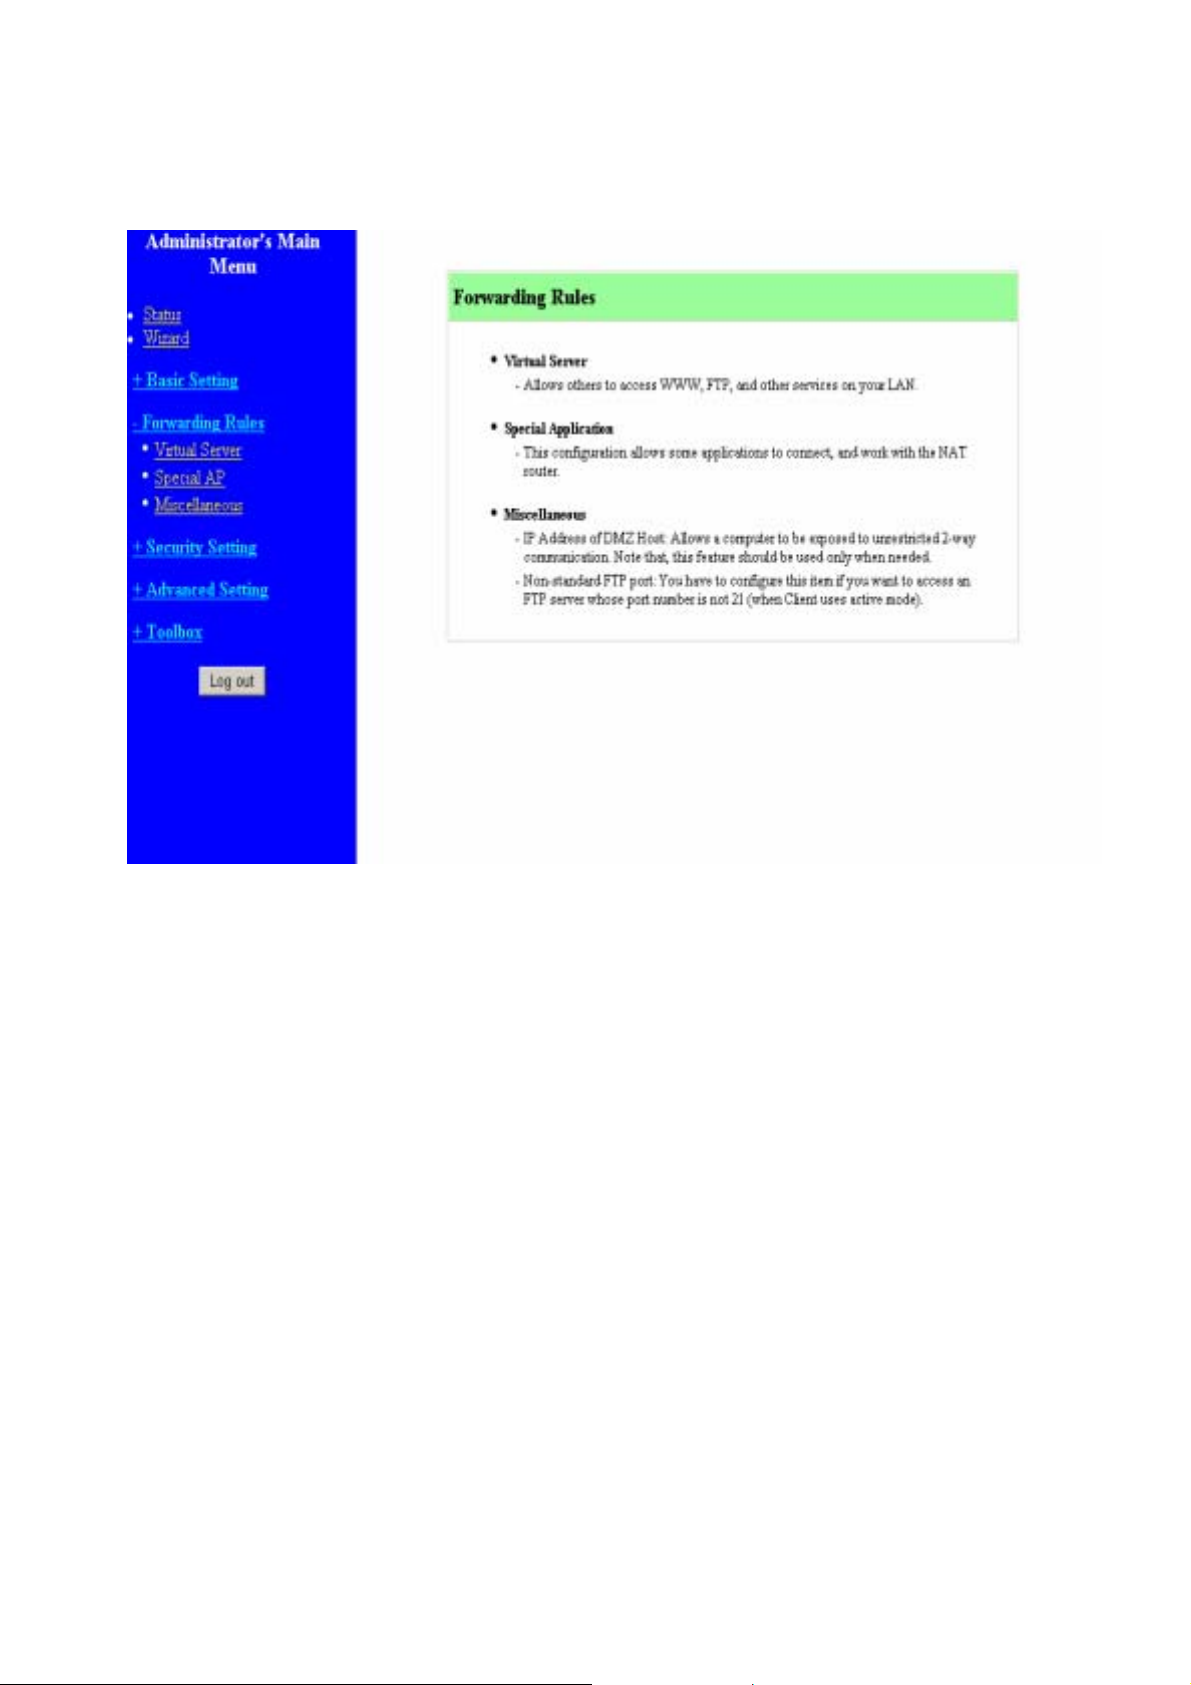
3.4.4. Forwarding Rules
17
Page 21
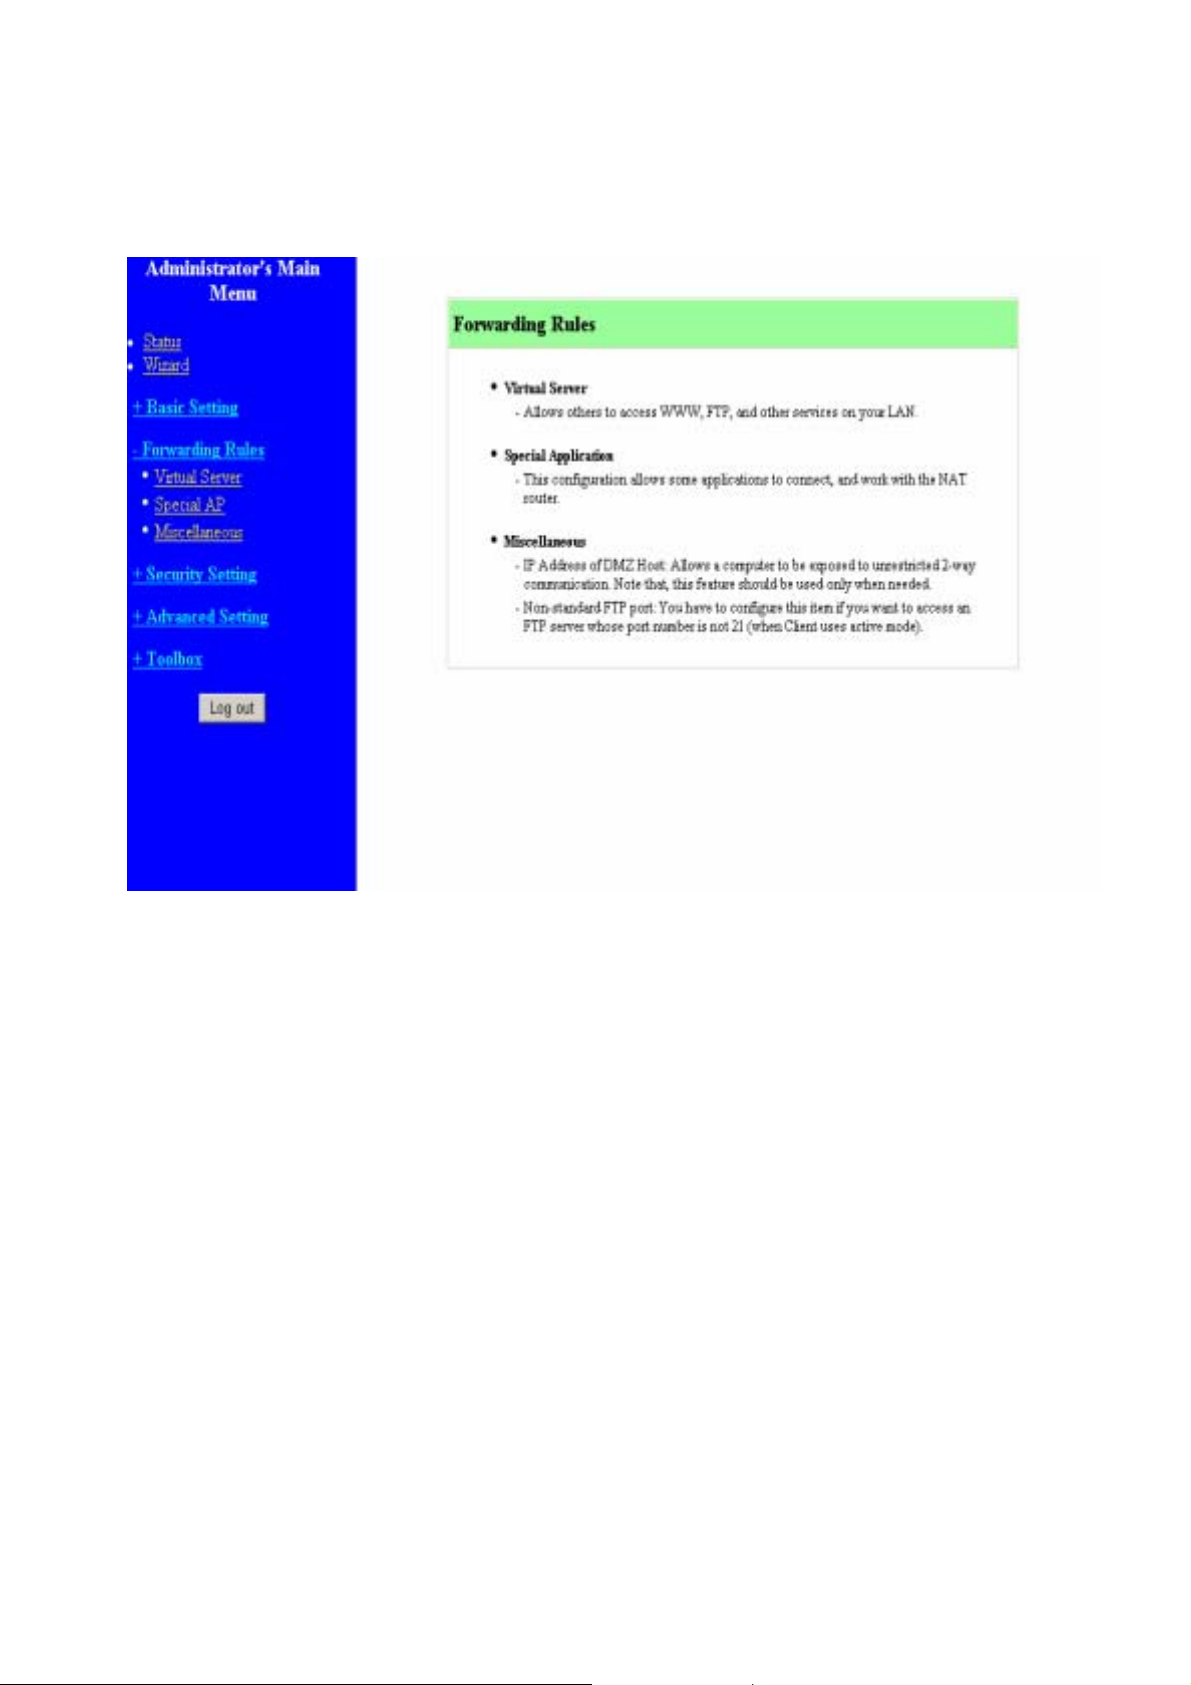
3.5. Forwarding Rules
18
Page 22
3.5.1. Virtual Server
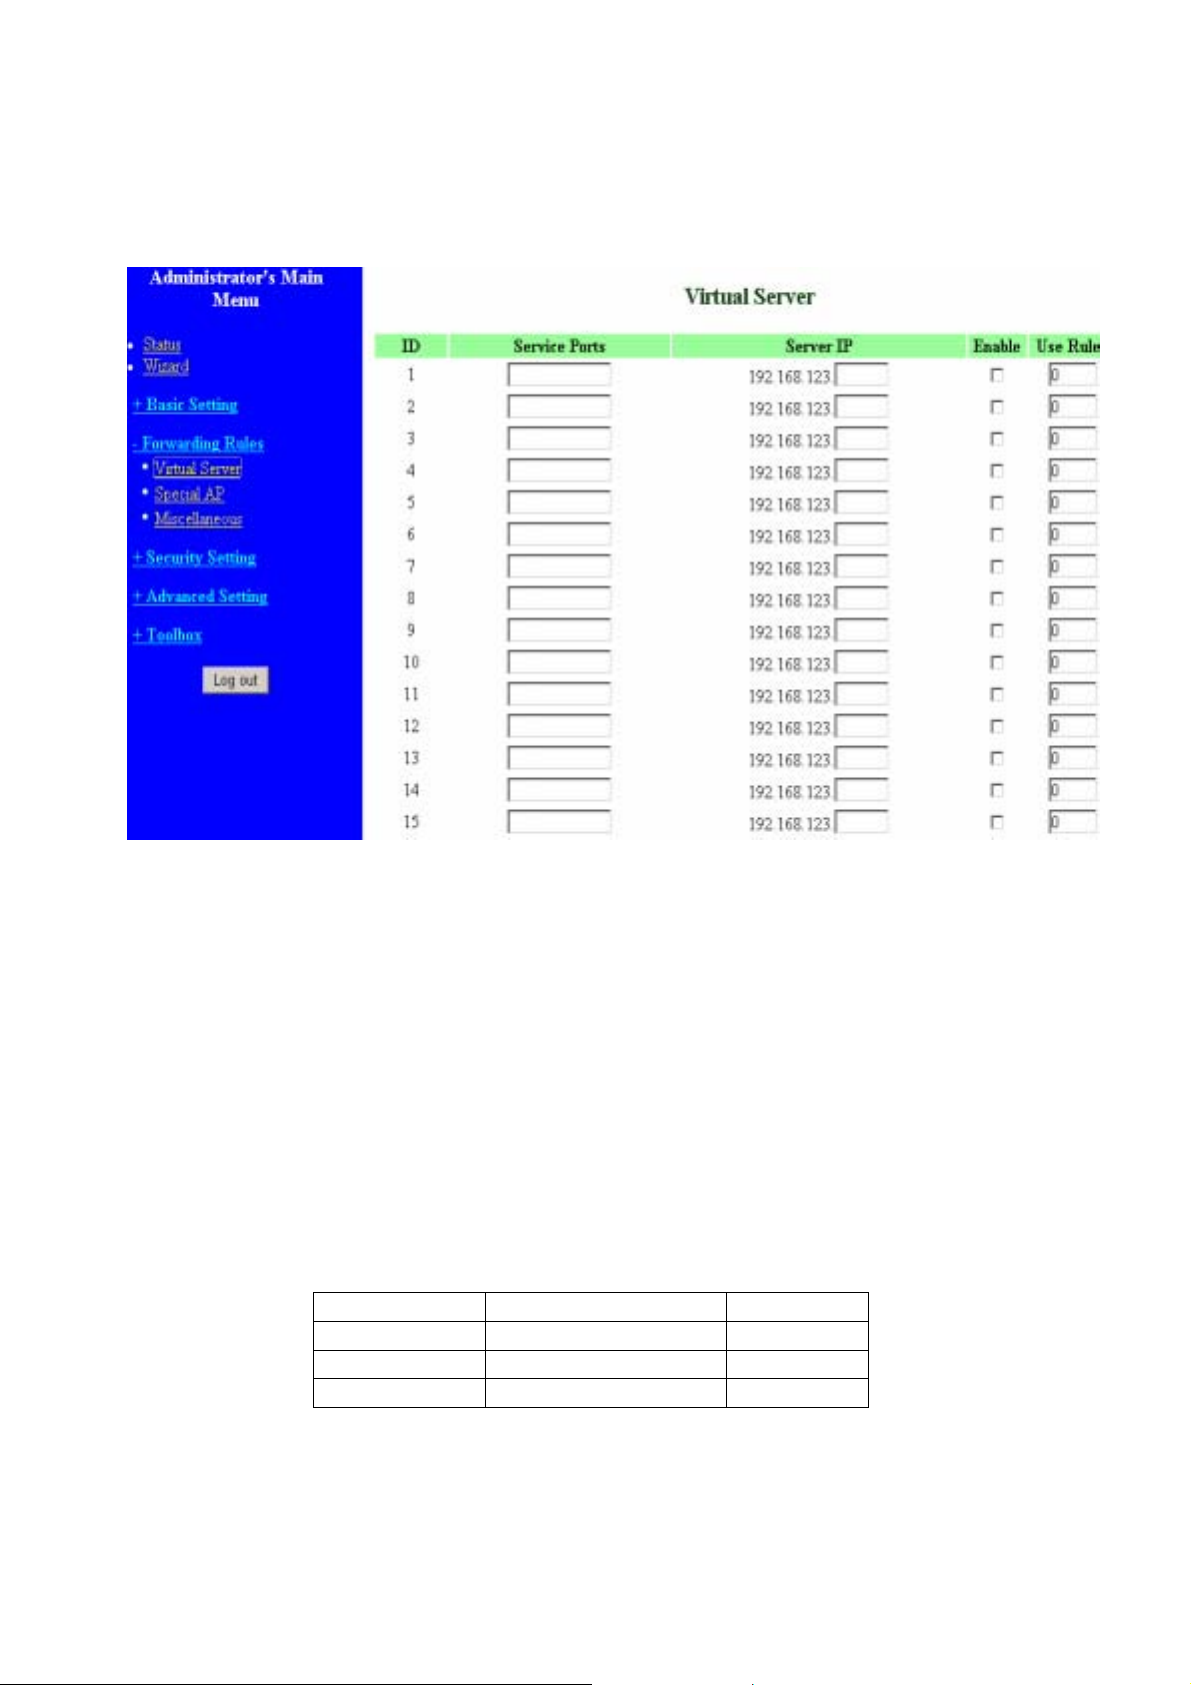
This product’s NAT firewall filters out unrecognized packets to protect your Intranet, so all
hosts behind this product are invisible to the outside world. If you wish, you can make
some of them accessible by enabling the Virtual Server Mapping.
A virtual server is defined as a Service Port, and all requests to this port will be
redirected to the computer specified by the Server IP. Virtual Serv er can work with
Scheduling Rules, and give user more flexibility on Access control. For Detail, please
refer to Scheduling Rule.
For example, if you have an FTP server (port 21) at 192.168.123.1, a Web server (port
80) at 192.168.123.2, and a VPN server at 192.168.123.6, then you need to specify the
following virtual server mapping table:
Service Port Server IP Enable
21 192.168.123.1 V
80 192.168.123.2 V
1723 192.168.123.6 V
19
Page 23
3.5.2. Special AP
Some applications require multiple connections, like Internet games, Video conferencing,
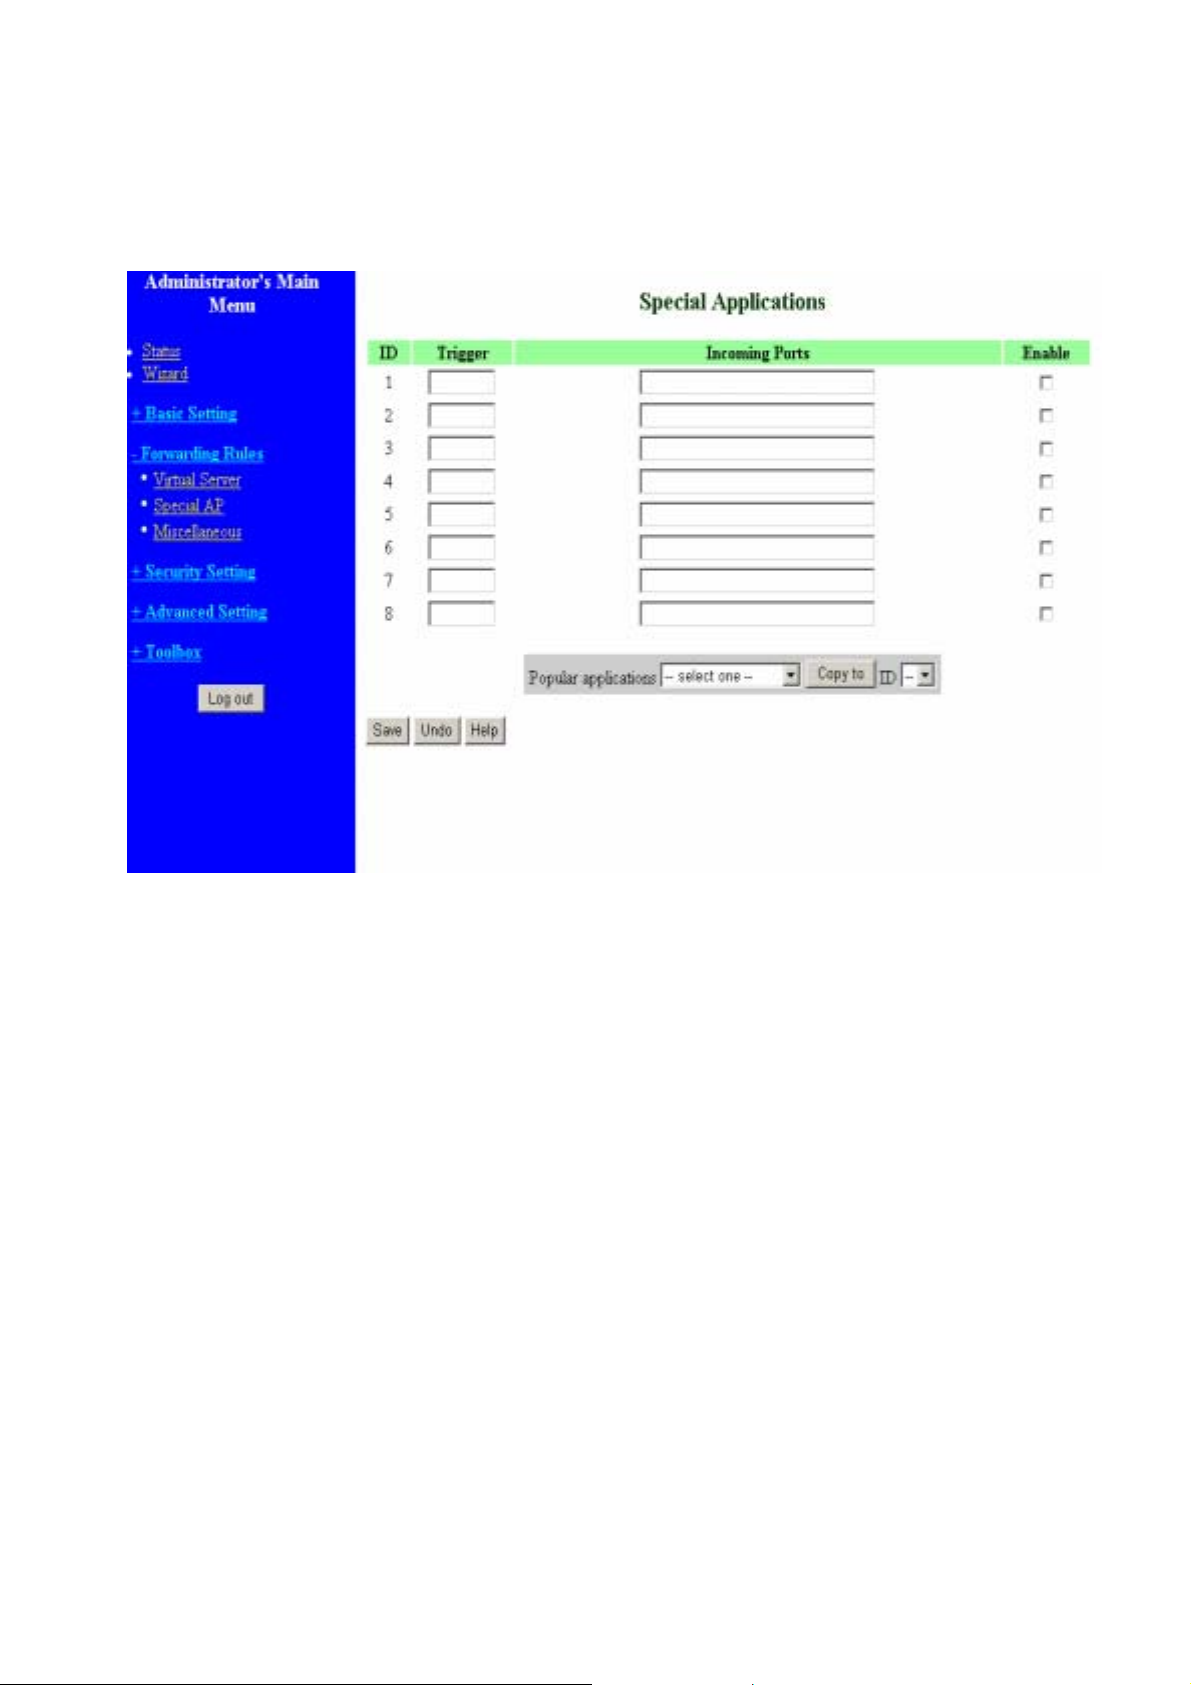
Internet telephony, etc. Because of the firewall function, these applications cannot work
with a pure NAT router. The Special Applications feature allows some of these
applications to work with this product. If the mechanism of Special Applications fails to
make an application work, try setting your computer as the DMZ host instead.
1. Trigger: the outbound port number issued by the application..
2. Incoming Ports : when the trigger packet is detected, the inbound packets sent to
the specified port numbers are allowed to pass through the firewall.
This product provides some predefined settings Select your application and click Copy to
to add the predefined setting to your list.
Note! At any given time, only one PC can use each Special Application tunnel.
20
Page 24
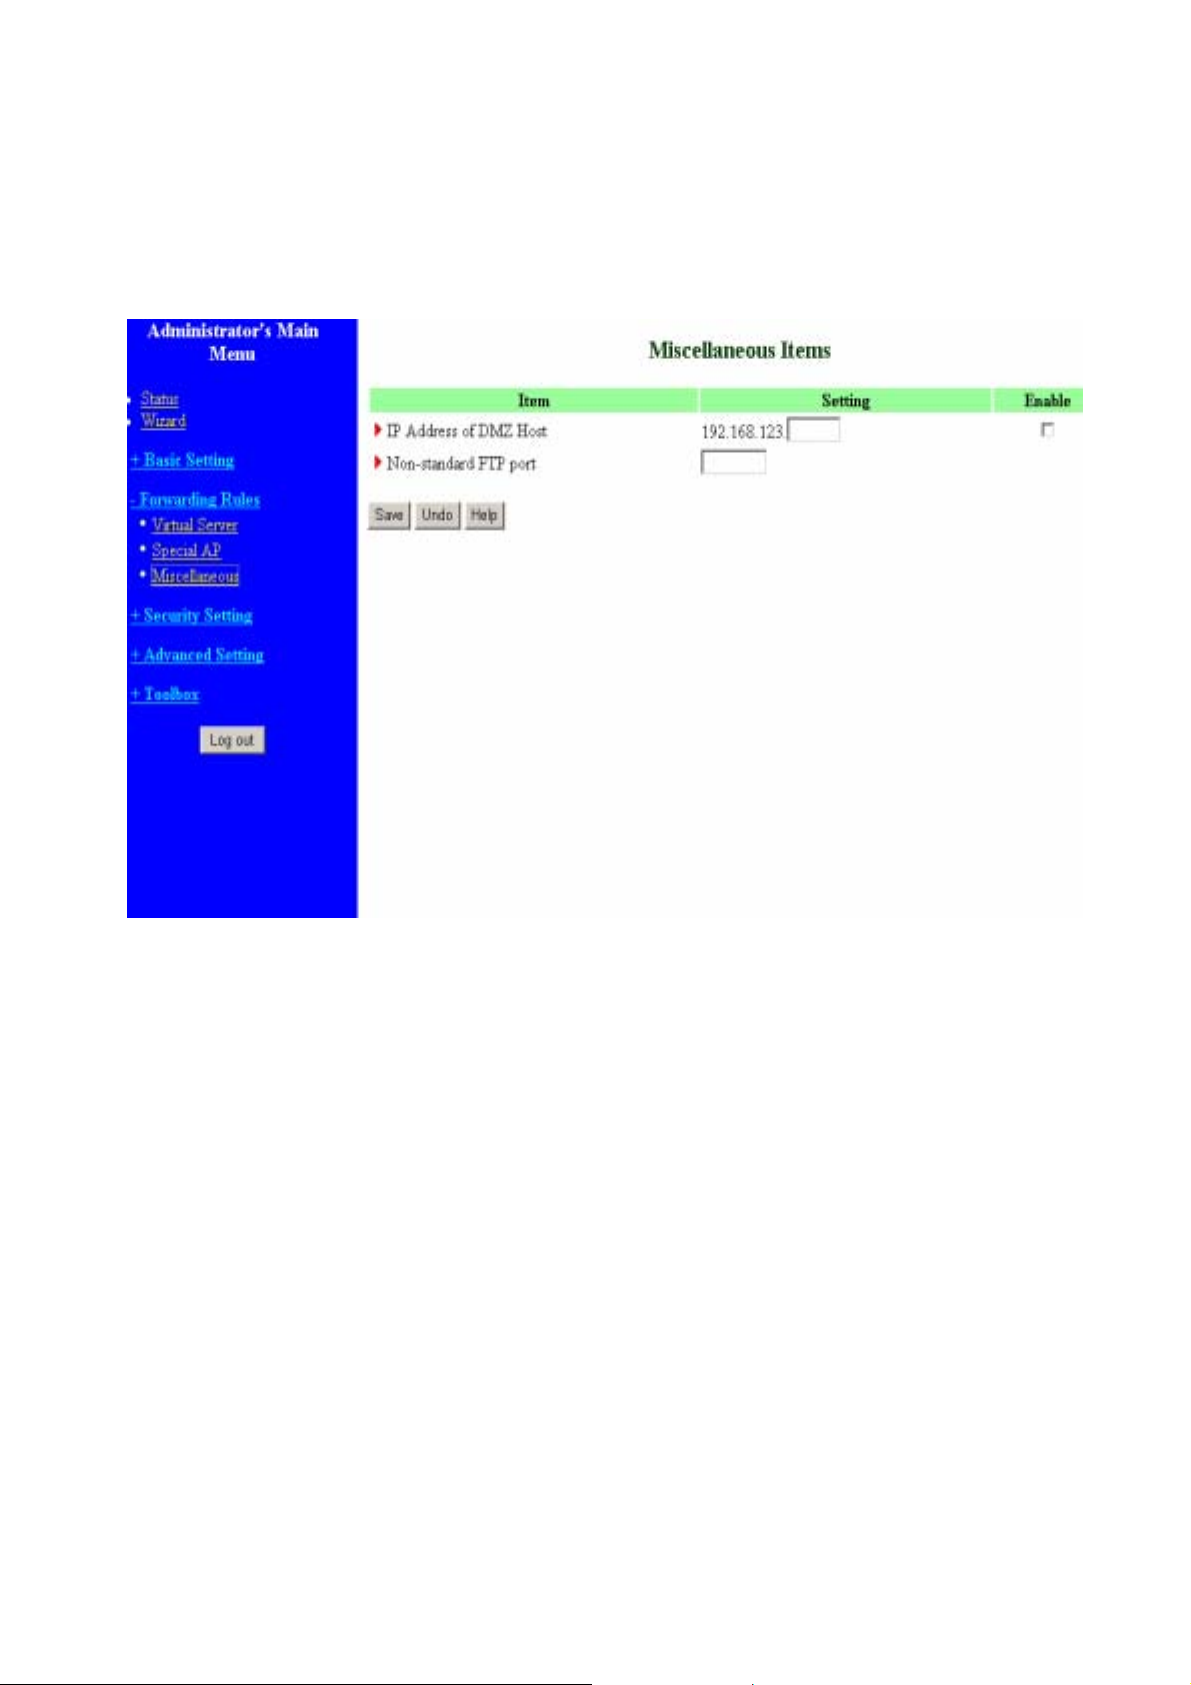
3.5.3. Miscellaneous Items
IP Address of DMZ Host
DMZ (DeMilitarized Zone) Host is a host without the protection of firewall. It allows a
computer to be exposed to unrestrict ed 2- way communication for Internet games, Video
conferencing, Internet telephony and other special applications.
NOTE: This feature should be used only when needed.
Non-standard FTP port
You have to configure this item if you want to access an FTP server whose port number
is not 21. This setting will be lost after rebooting.
21
Page 25
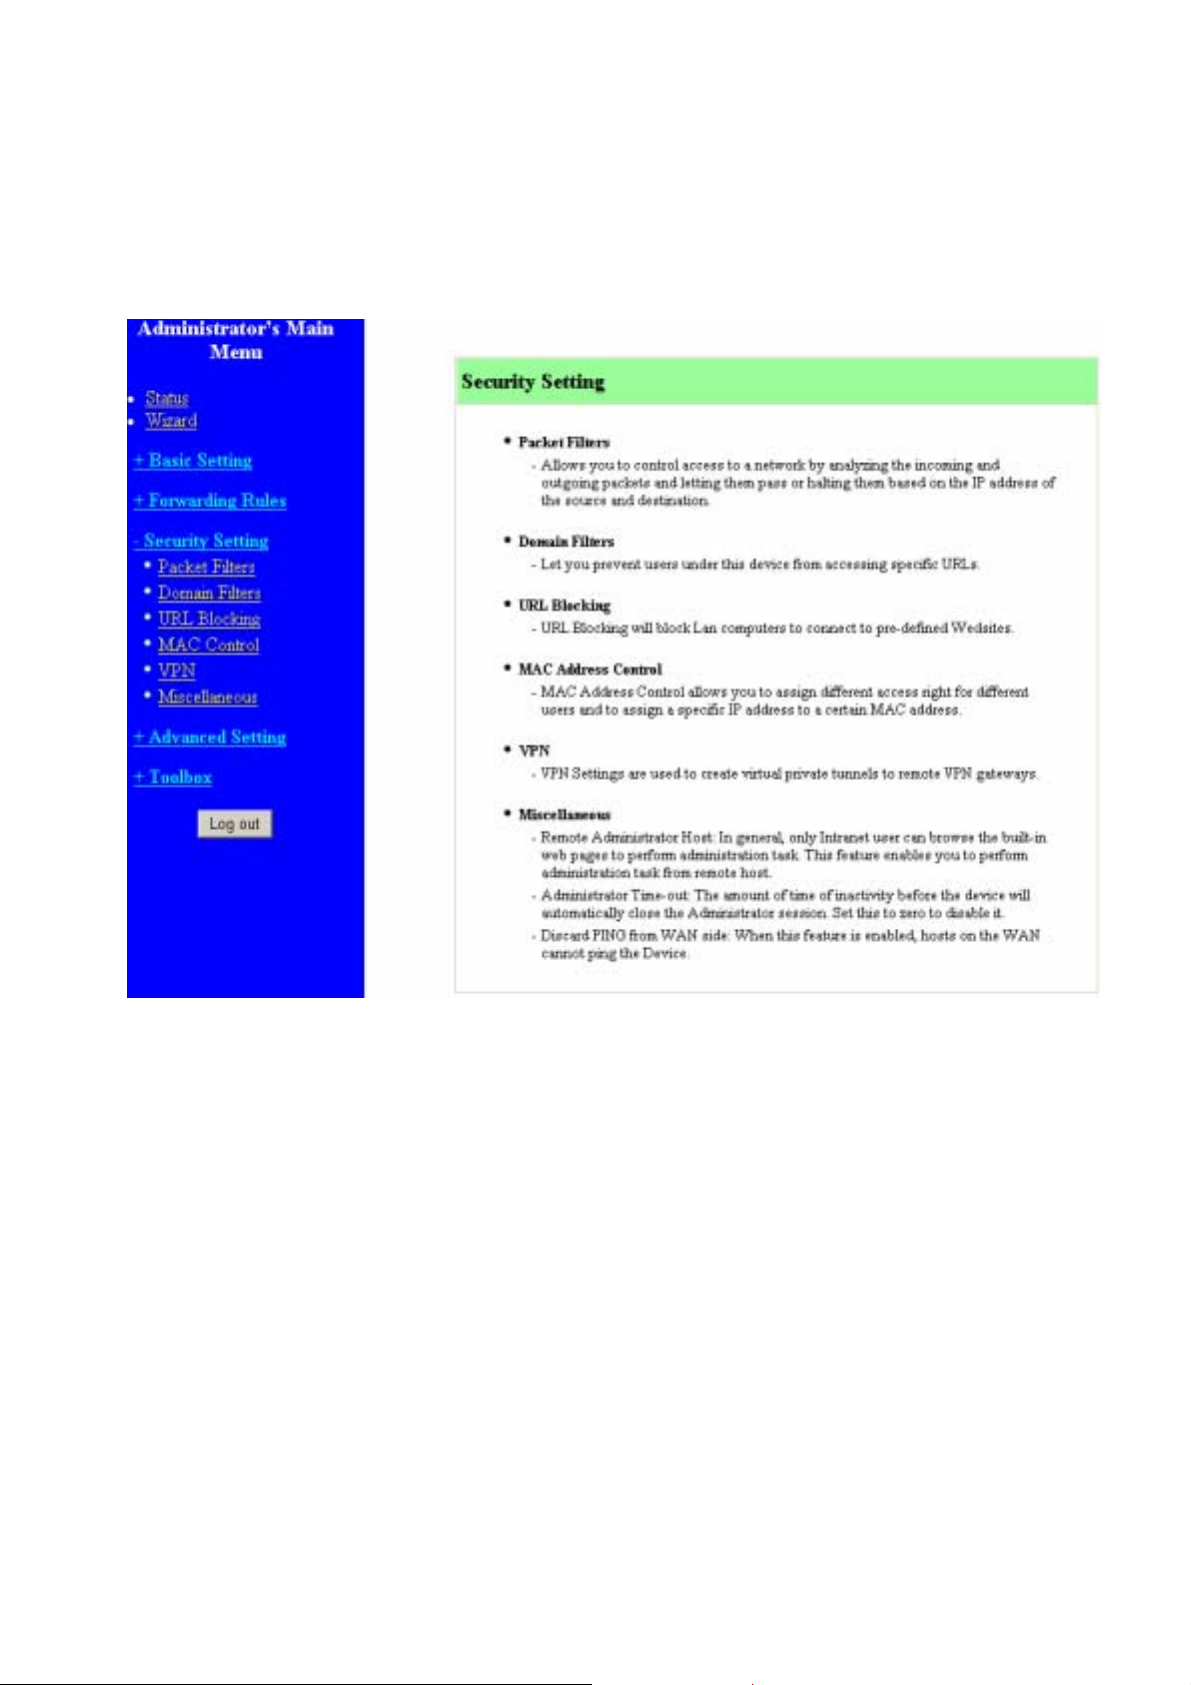
3.6. Security Settings
22
Page 26
3.6.1. Packet Filter
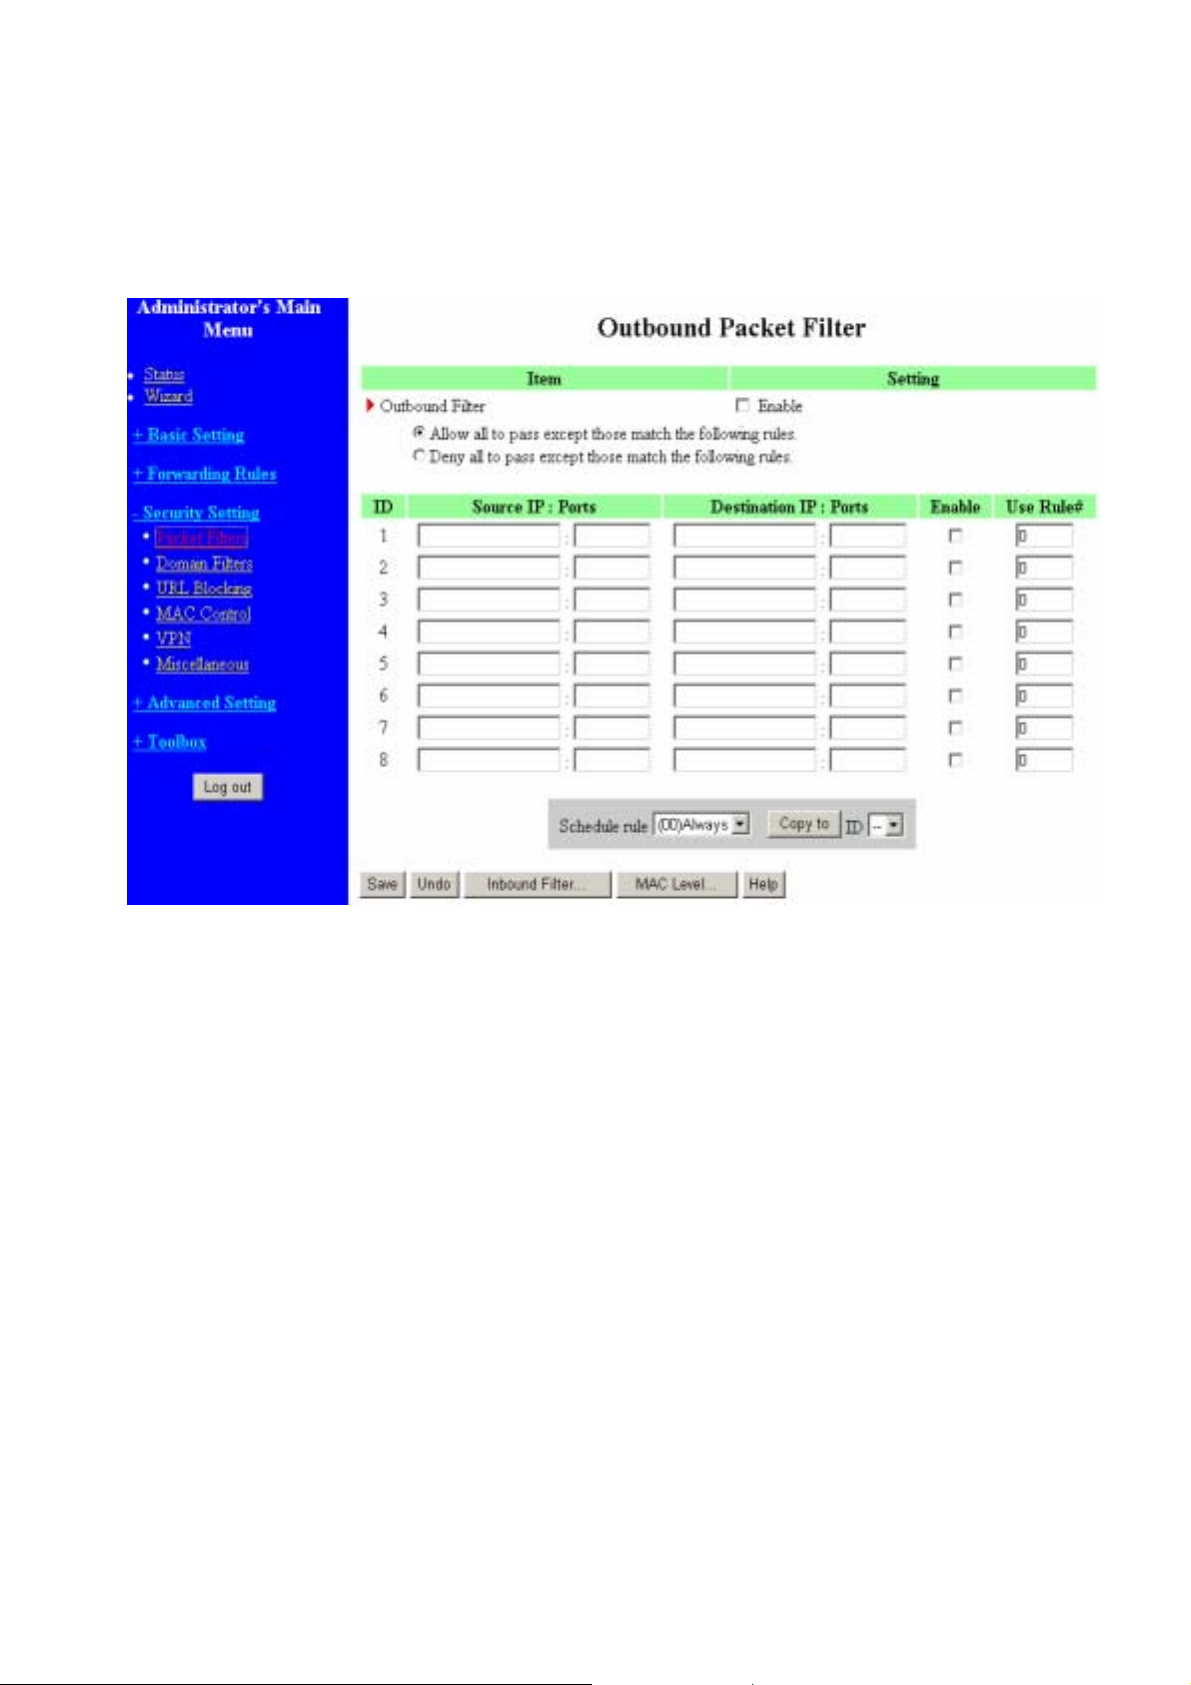
Packet Filter enables you to control what packets are allowed to pass the router.
Outbound filter applies on all outbound packets. However, Inbound filter applies on
packets that destined to Virtual Servers or DMZ host only. You can select one of the two
filtering policies:
1. Allow all to pass except those match the specified rules
2. Deny all to pass except those match the specified rules
You can specify 8 rules for each direction: inbound or outbound. For each rule, you can
define the following:
• Source IP address
• Source port address
• Destination IP address
• Destination port address
• Protocol: TCP or UDP or both.
• Use Rule#
For source or destination IP address, you can define a single IP address (4.3.2.1) or a
range of IP addresses (4.3.2.1-4.3.2.254). An empty implies all IP addresses.
For source or destination port, you can define a single port (80) or a range of ports
23
Page 27
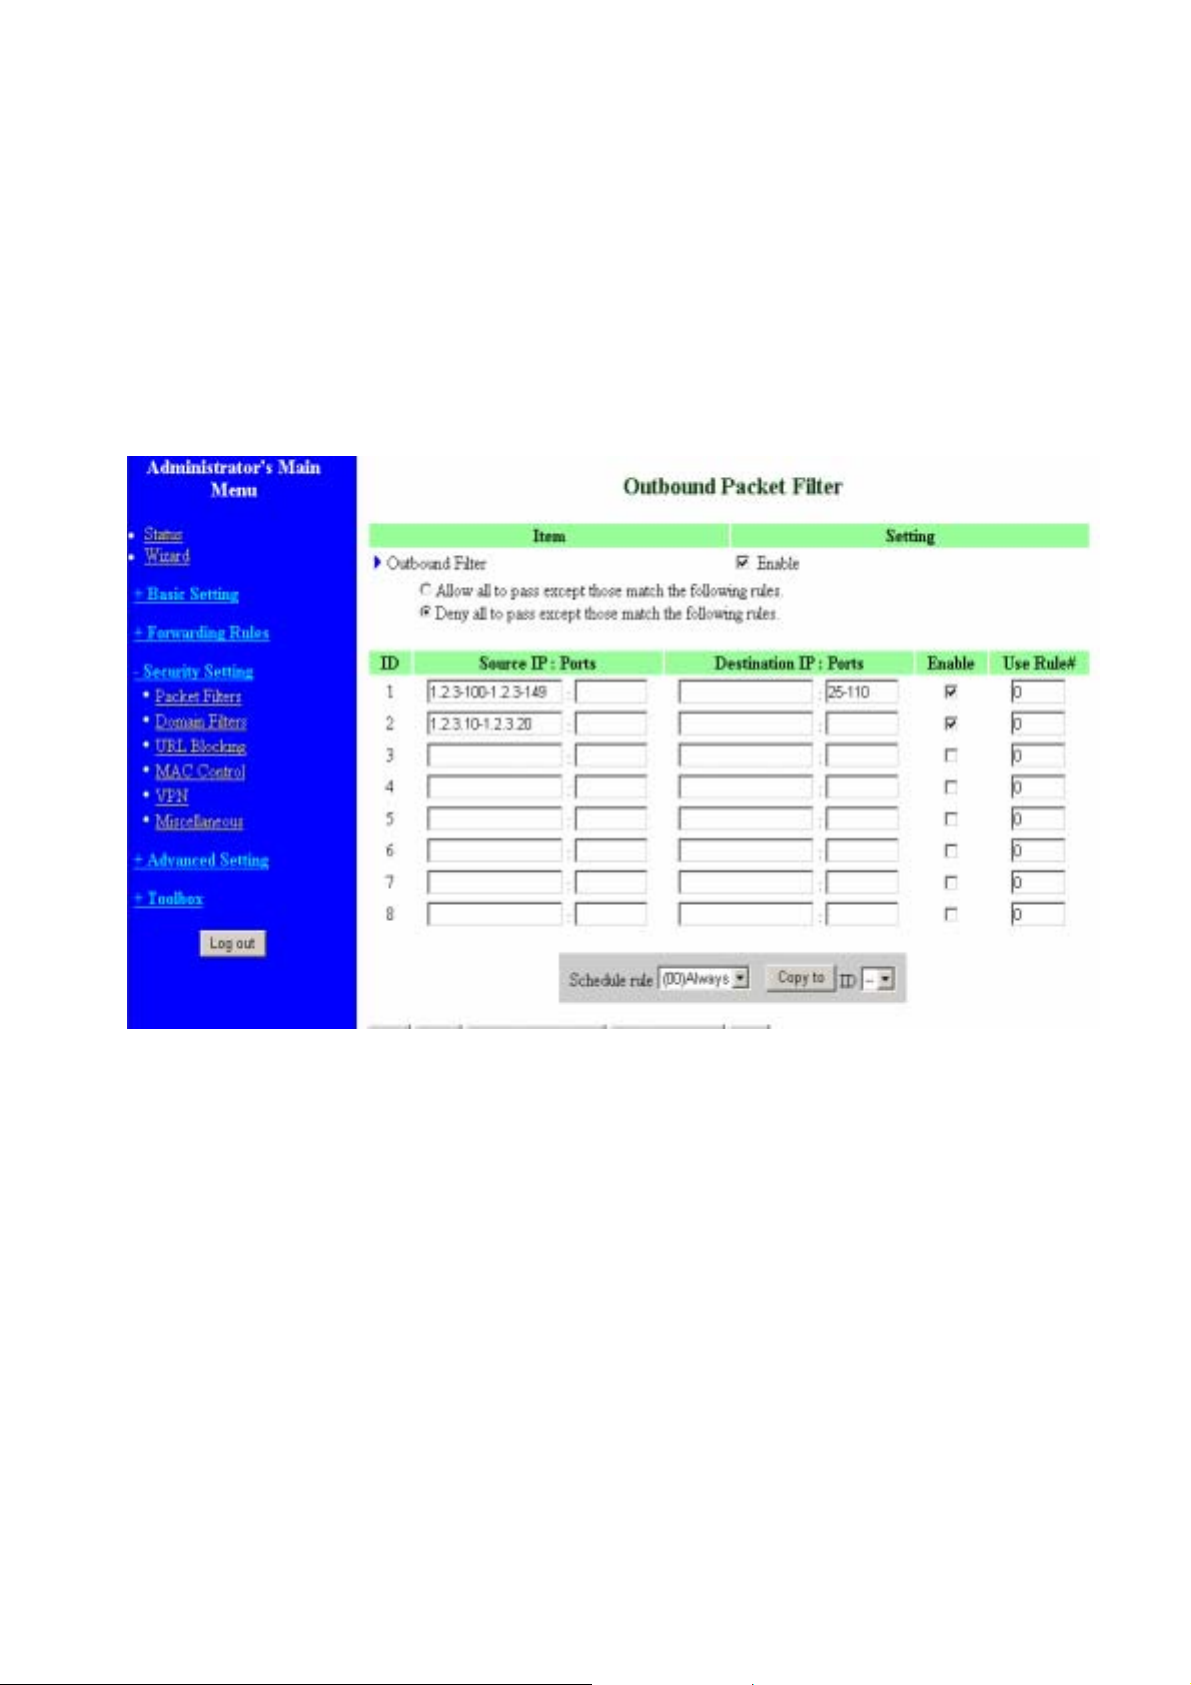
(1000-1999). Add prefix "T" or "U" to specify TCP or UDP protocol. For example, T80,
U53, U2000-2999. No prefix indicates both TCP and UDP are defined. An empty implies
all port addresses. Packet Filter can work with Scheduling Rules, and give user more
flexibility on Access control. For Detail, please refer to Scheduling Rule.
Each rule can be enabled or disabled individually.
Inbound Filter:
To enable Inbound Packet Filter click the check box next to Enable in the Inbound
Packet Filter field.
Suppose you have SMTP Server (25), POP Server (110), Web Server (80), FTP Server
(21), and News Server (119) defined in Virtual Server or DMZ Host.
Example 1:
(1.2.3.100-1.2.3.149) They are allow to send mail (port 25), receive mail (port 110), and
browse the Internet (port 80)
(1.2.3.10-1.2.3.20) They can do everything (block nothing)
Others are all blocked.
24
Page 28
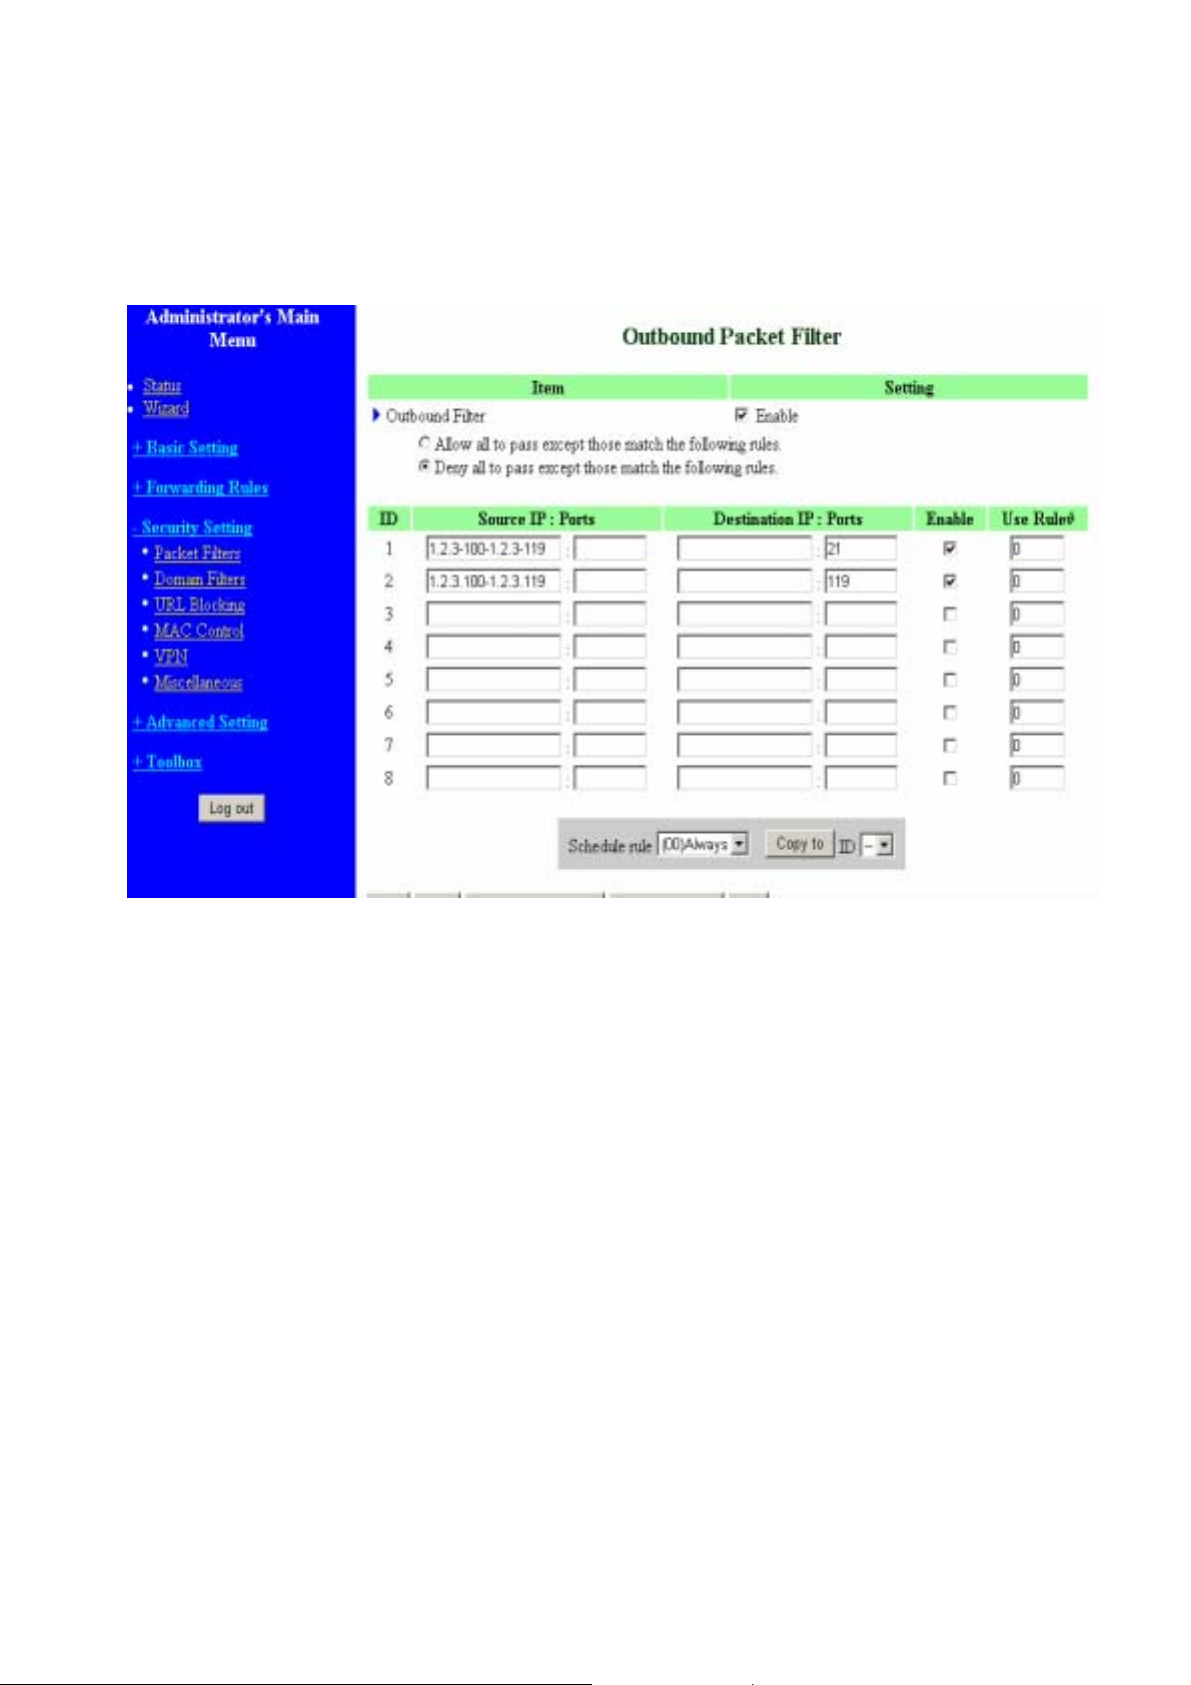
Example 2:
(1.2.3.100-1.2.3.119) They can do everything except read net news (port 119) and
transfer files via FTP (port 21)
Others are all allowed.
After Inbound Packet Filter setting is configured, click the save button.
Outbound Filter:
To enable Outbound Packet Filter click the check box next to Enable in the Outbound
Packet Filter field.
25
Page 29
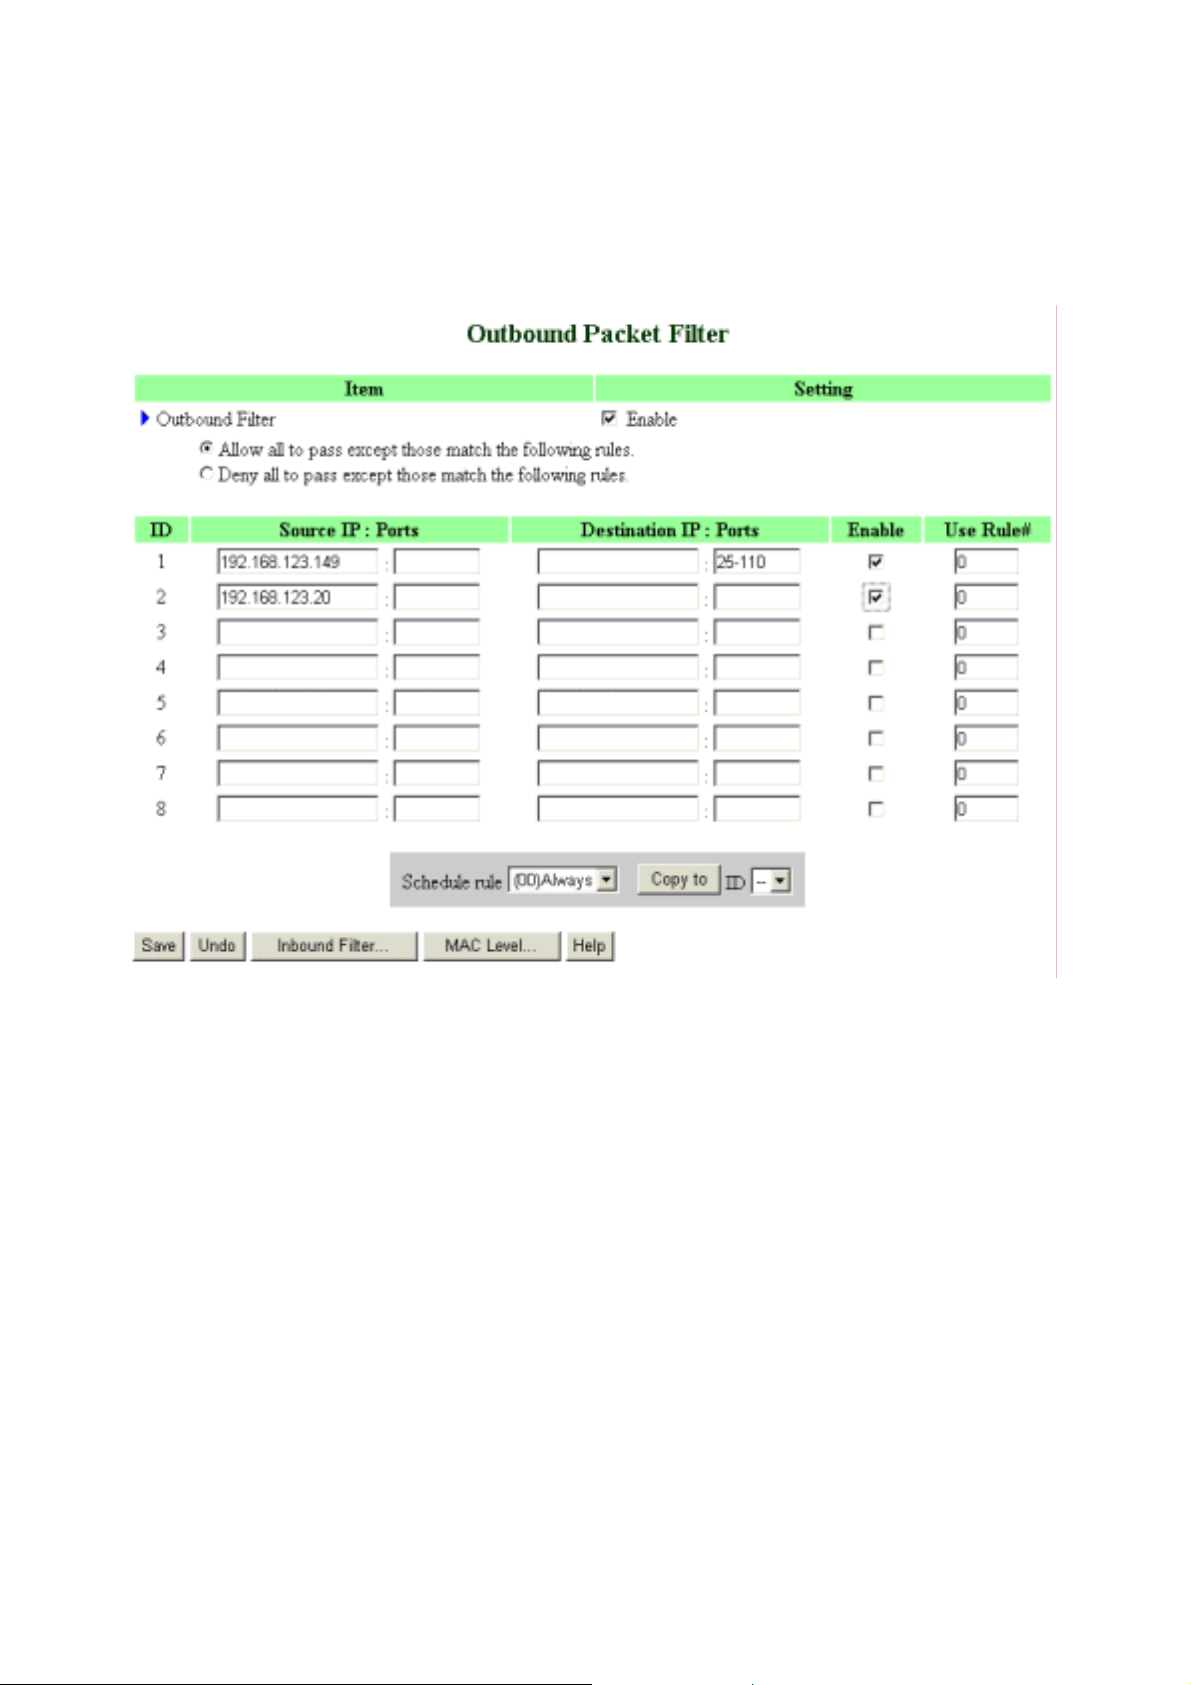
Example 1:
(192.168.123.100-192.168.123.149) They are allowed to send mail (port 25), receive mail
(port 110), and browse Internet (port 80); port 53 (DNS) is necessary to resolve the
domain name.
(192.168.123.10-192.168.123.20) They can do everything (block nothing)
Others are all blocked.
26
Page 30
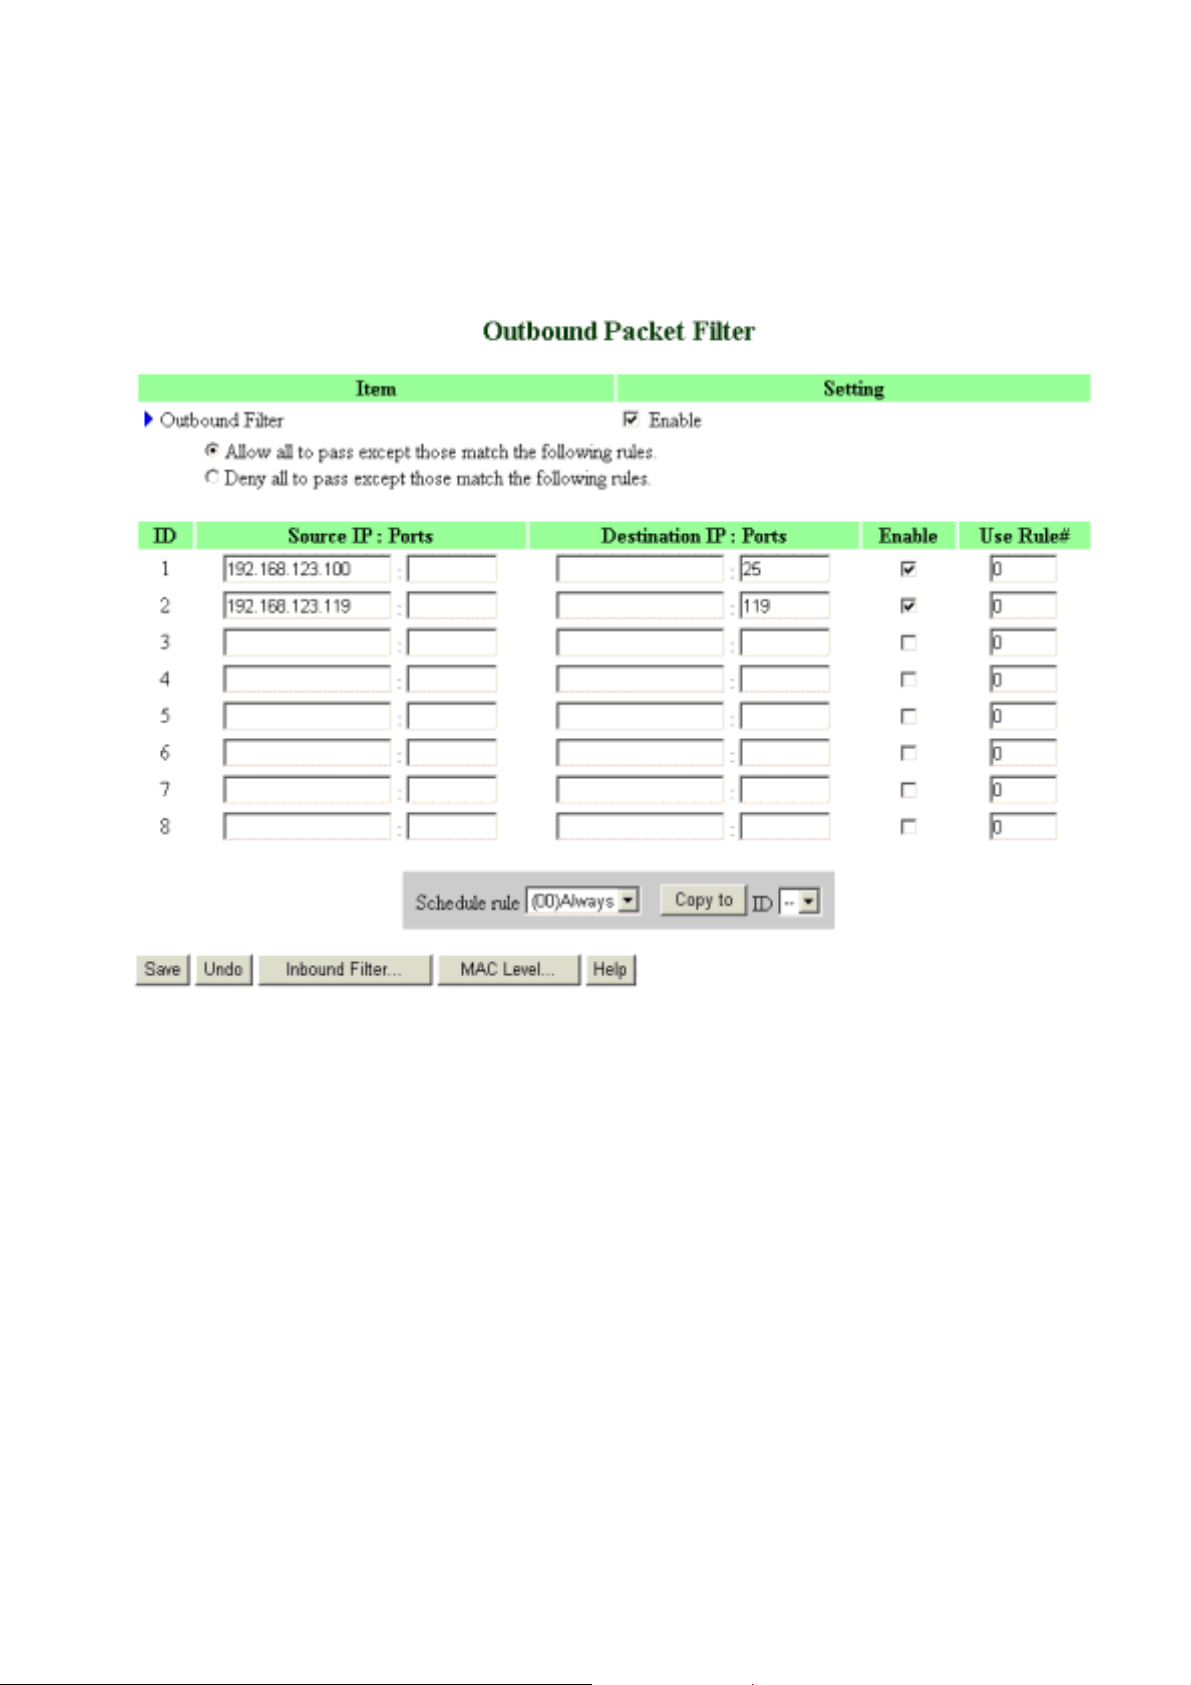
Example 2:
(192.168.123.100-192.168.123.119) They can do everything except read net news (port
119) and transfer files via FTP (port 21)
Others are allowed
After Outbound Packet Filter setting is configured, click the save button.
27
Page 31
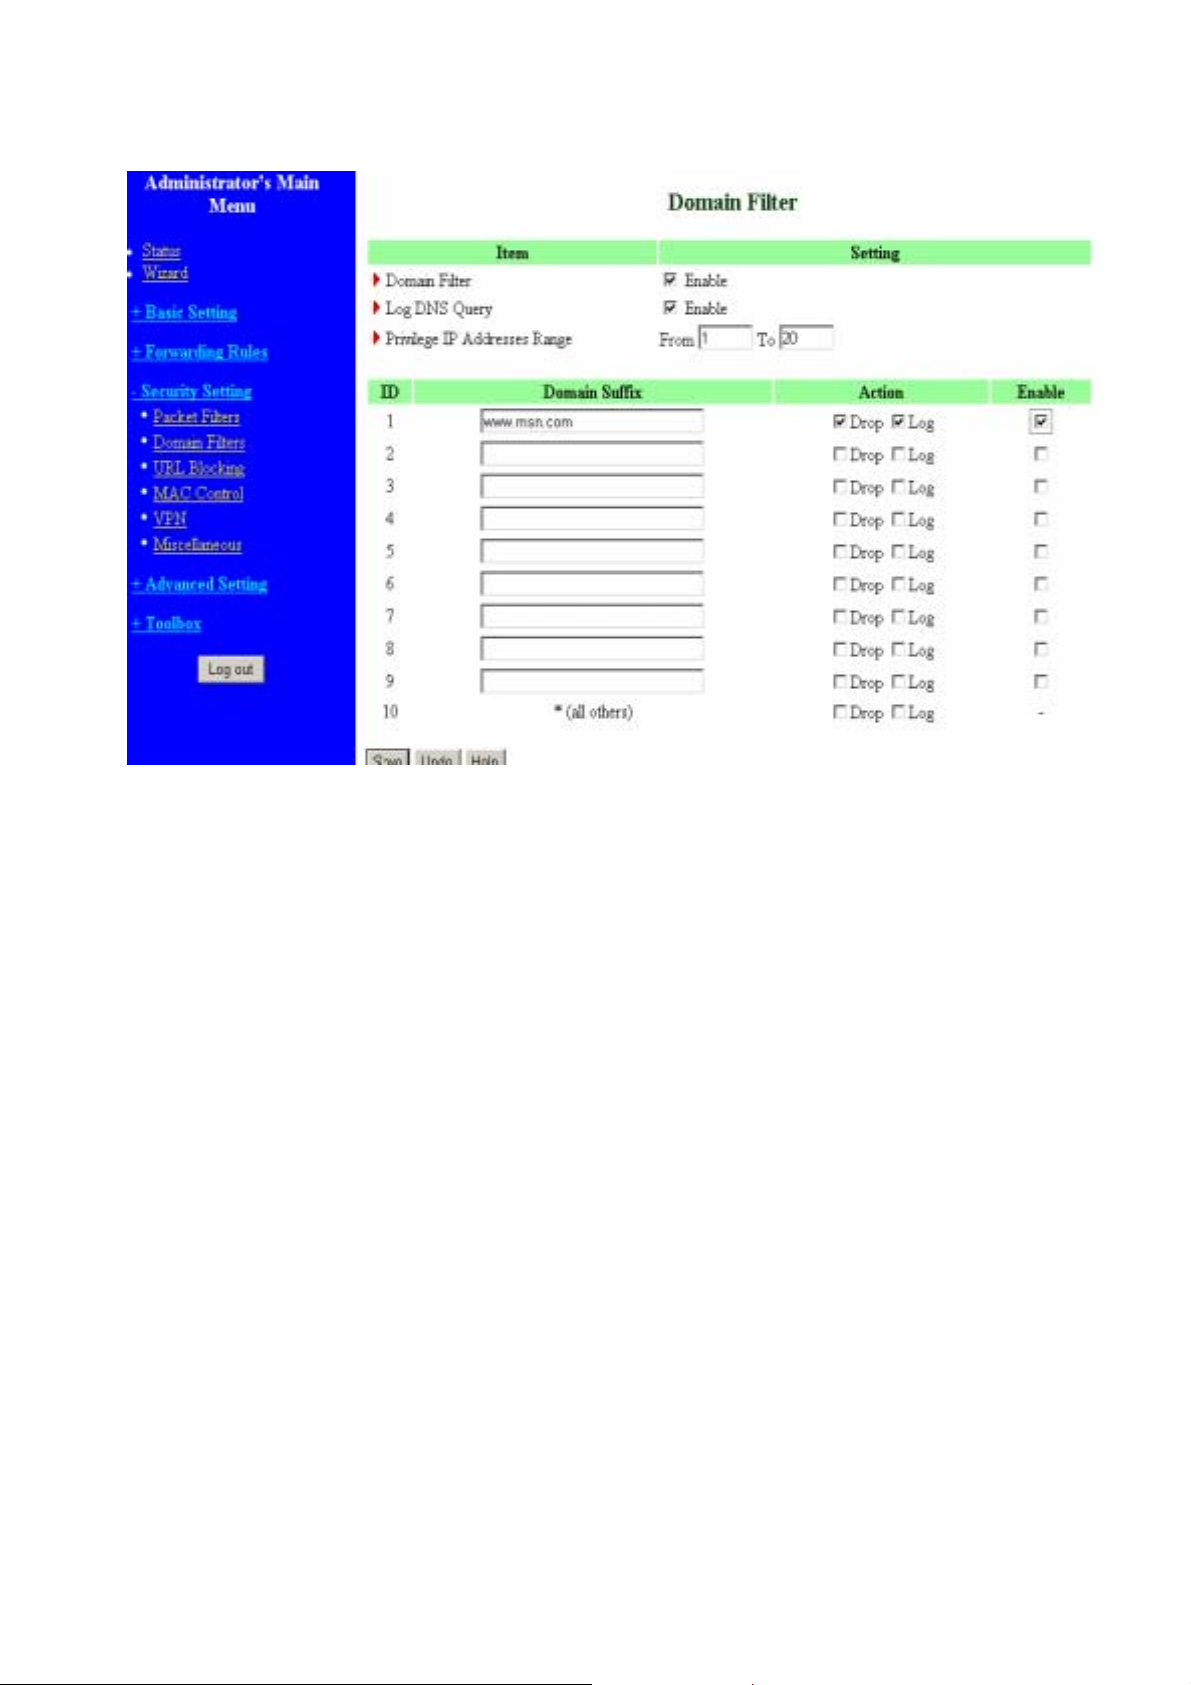
3.6.2. Domain Filter
Domain Filter
Lets you prevent users under this device from accessing specific URLs.
Domain Filter Enable
Check if you want to enable Domain Filter.
Log DNS Query
Check if you want to log the action when someone accesses the specific URLs.
Privilege IP Addresses Range
Setting a group of hosts and privilege these hosts to access network without restriction.
Domain Suffix
A suffix of URL to be restricted. For example, ".com", "xxx.com".
Action
When someone is accessi ng the URL met the domain-suffix, what kind of action you
want.
Check drop to block the access. Check log to log these access.
Enable
Check to enable each rule.
28
Page 32
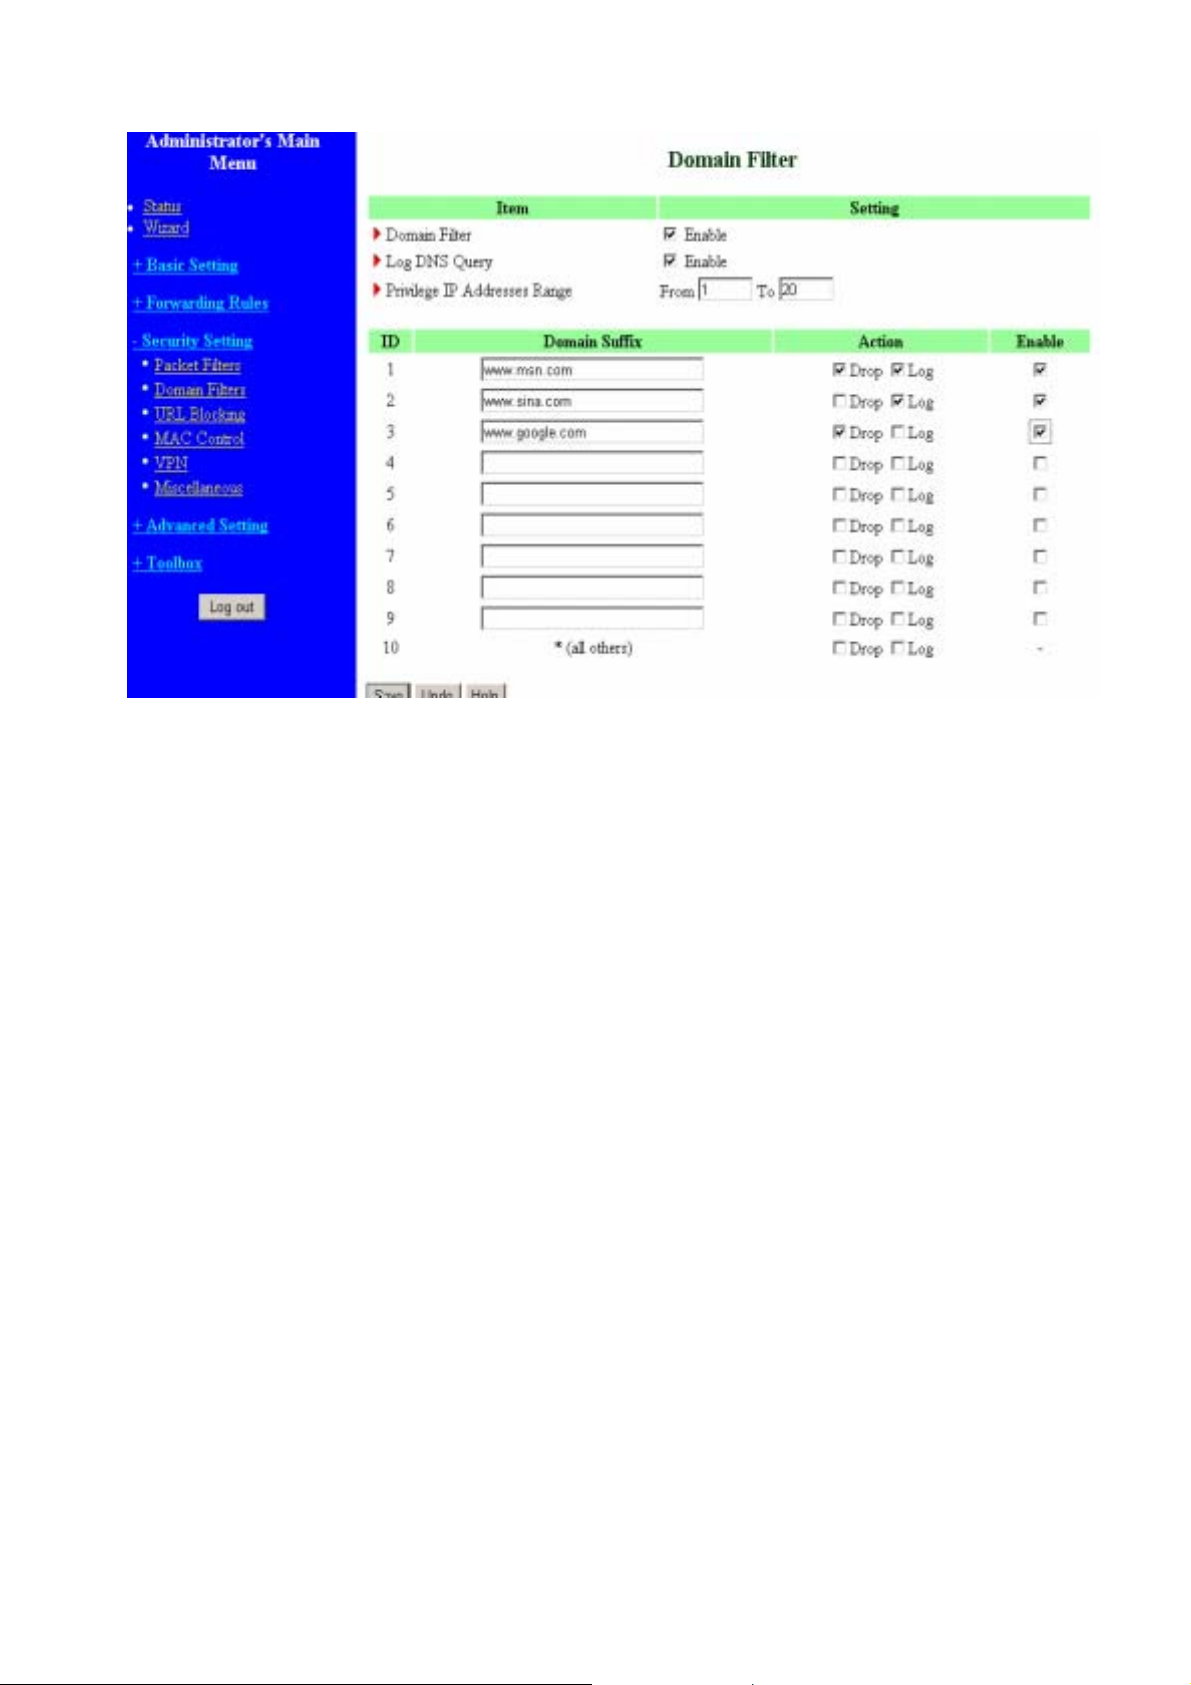
Example:
In this example:
1. URL include “www.msn.com” will be blocked, and the action will be reco rd in log-file.
2. URL include “www.sina.com” will not be blocked, but the ac tion will be record in
log-file.
3. URL include “www.google.com” will be blocked, but the action will not be record in
log-file.
4. IP address X.X.X.1~ X.X.X.20 can access network without restriction.
29
Page 33
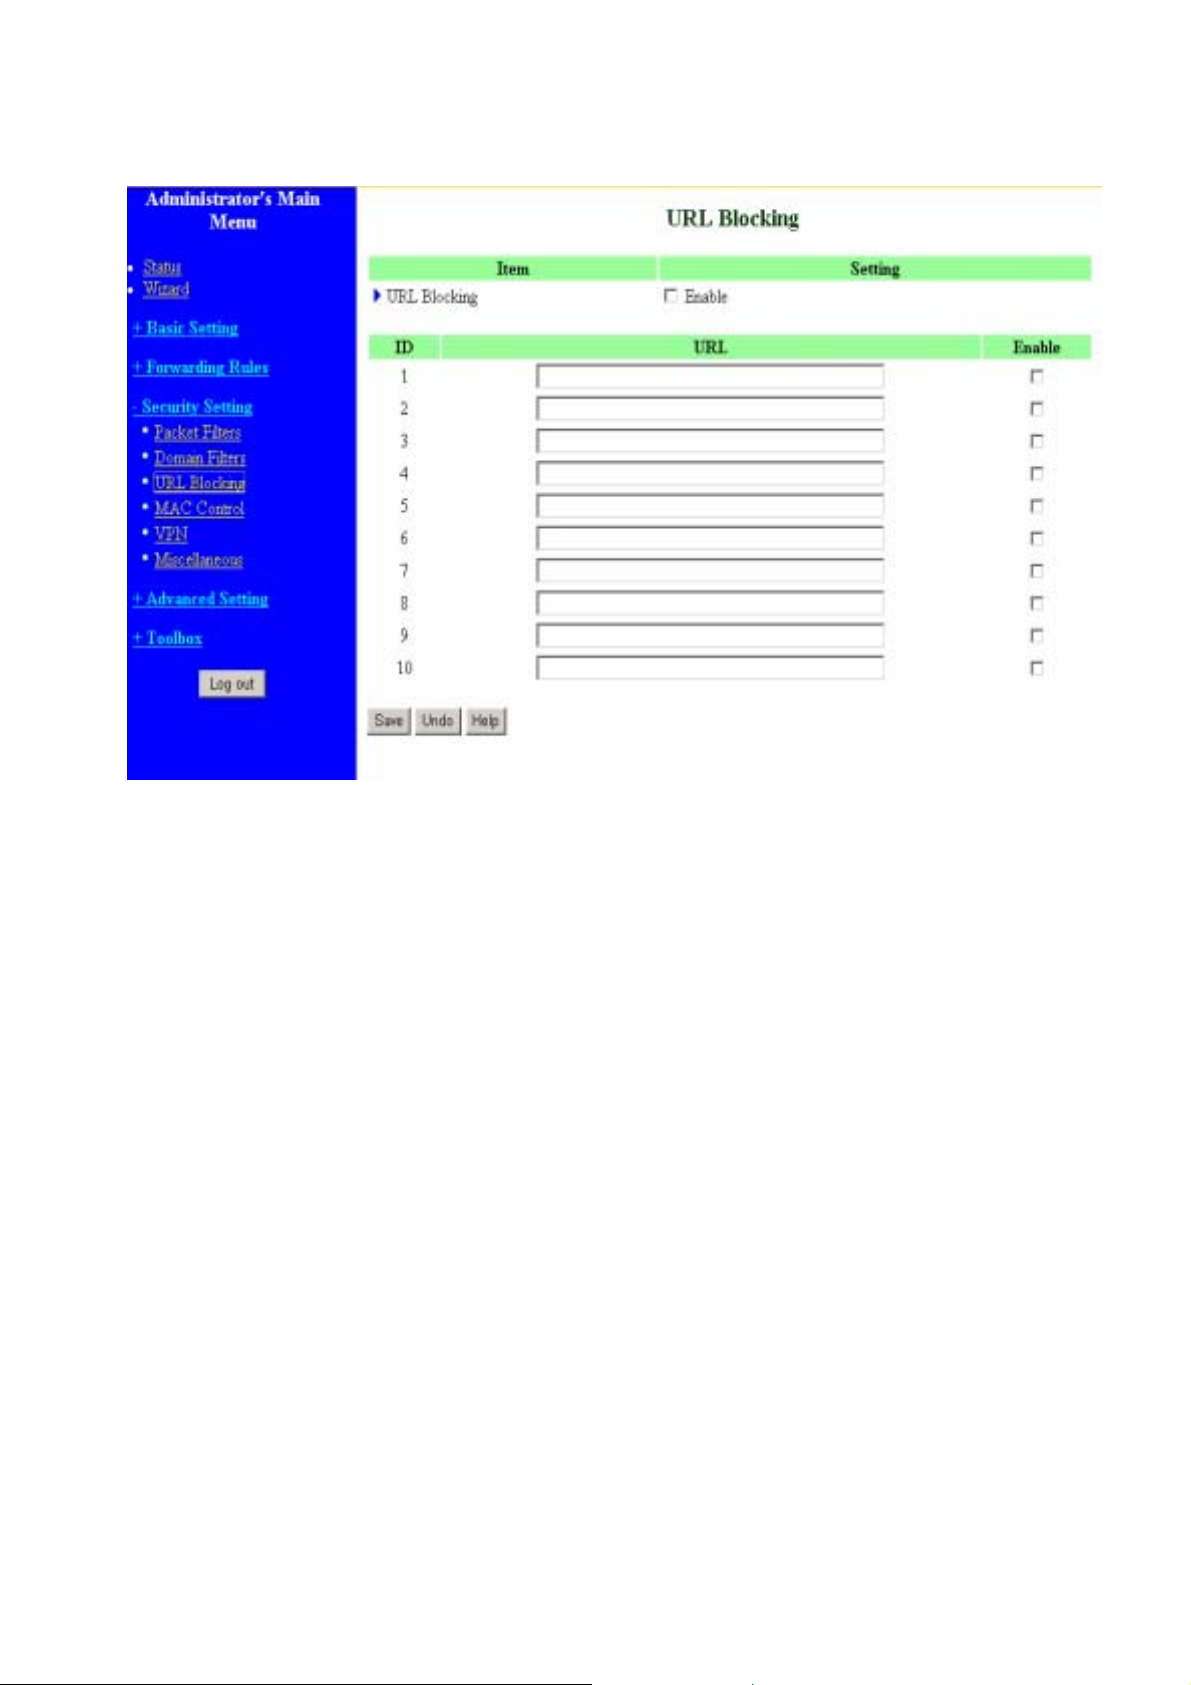
3.6.3. URL Blocking
URL Blocking will block LAN computers to connect to pre-defined websites.
The major difference between “Domain filter” and “URL Blocking” is Domain filter require
user to input suffix (like .com or .org, etc), while URL Blocking require user to input a
keyword only. In other words, Domain filter can block specific website, while URL
Blocking can block hundreds of websites by simply a keyword.
URL Blocking Enable
Checked if you want to enable URL Blocking.
URL
If any part of the Website's URL matches the pre-defined word, the connection will be
blocked.
For example, you can use pre-defined word "sex" to block all websites if their URLs
contain pre-defined word "sex".
Enable
Checked to enable each rule.
30
Page 34
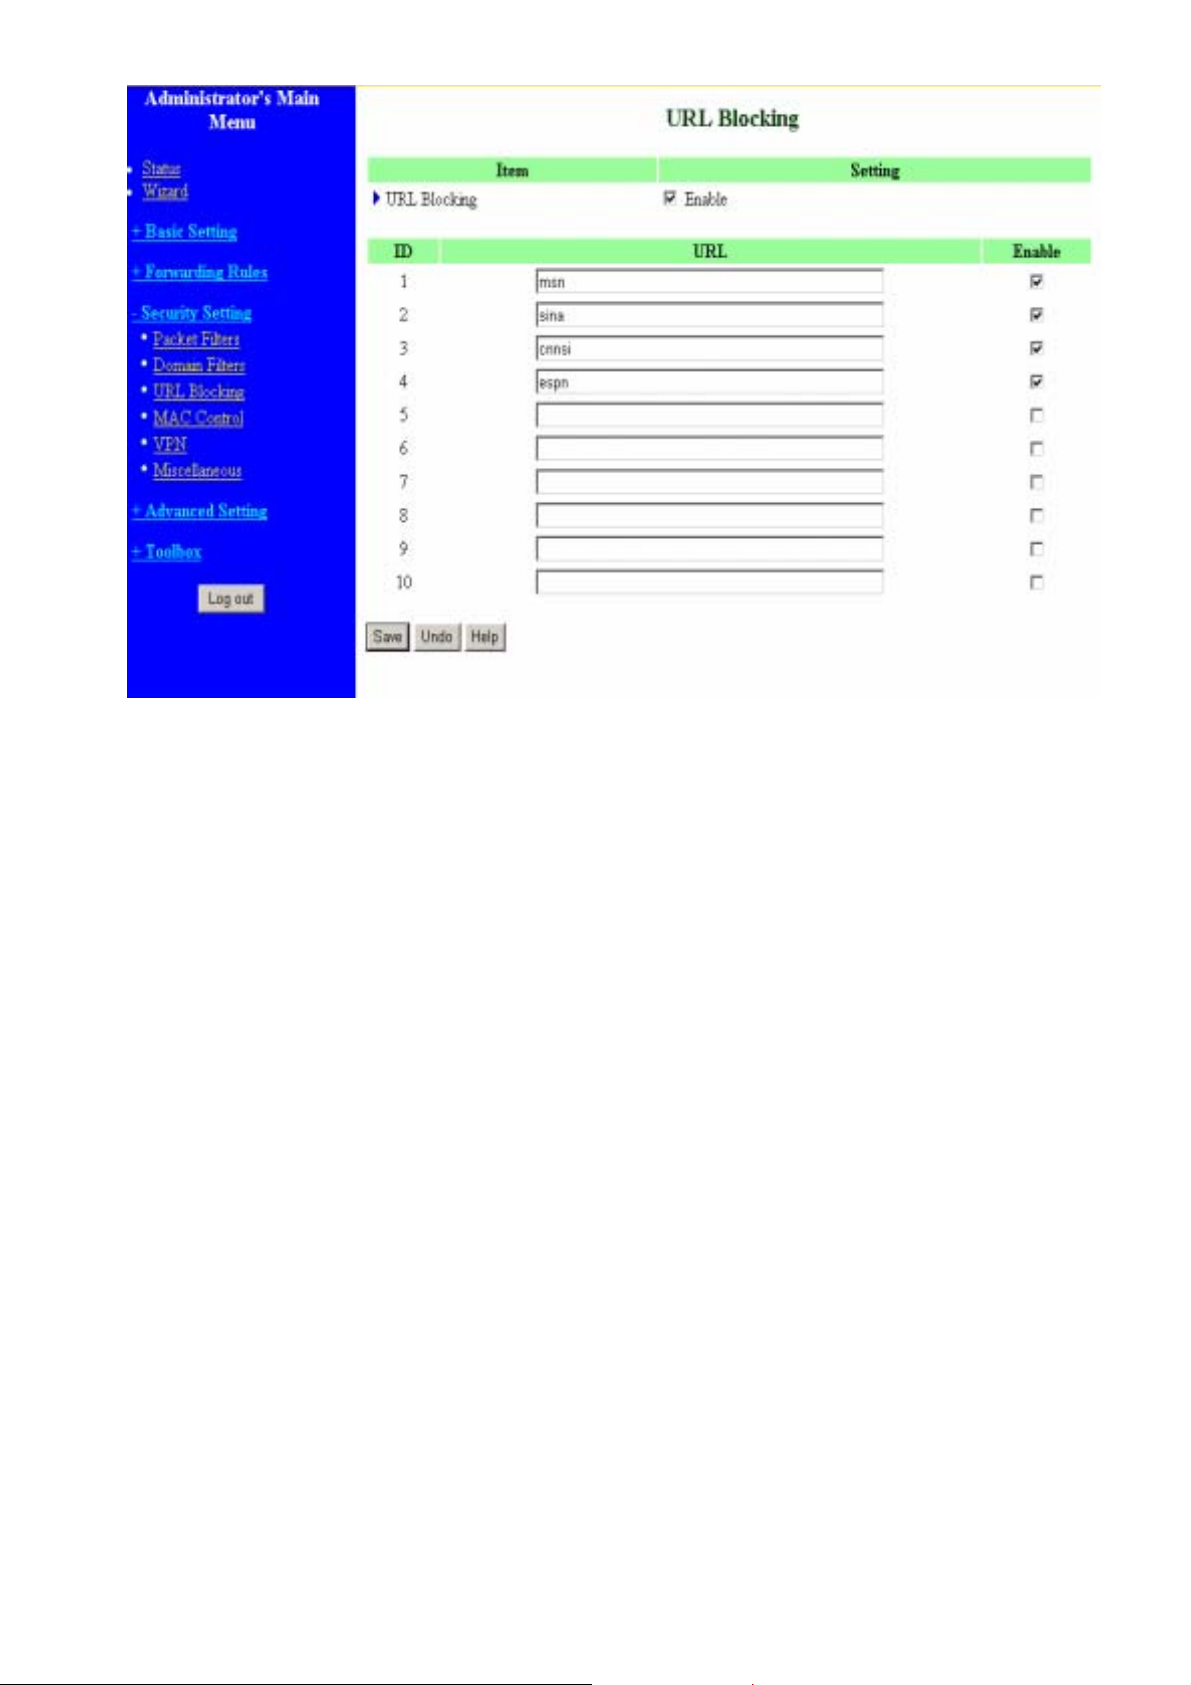
In this example:
1.URL include “msn” will be blocked, and the actio n will be record in log-file.
2.URL include “sina” will be blocked, but the action will be record in log-file
3.URL include “cnnsi” will not b e blocked, but the action will be record in log-file.
4. URL include “espn” will be blocked , but the action will be record in log-file
31
Page 35
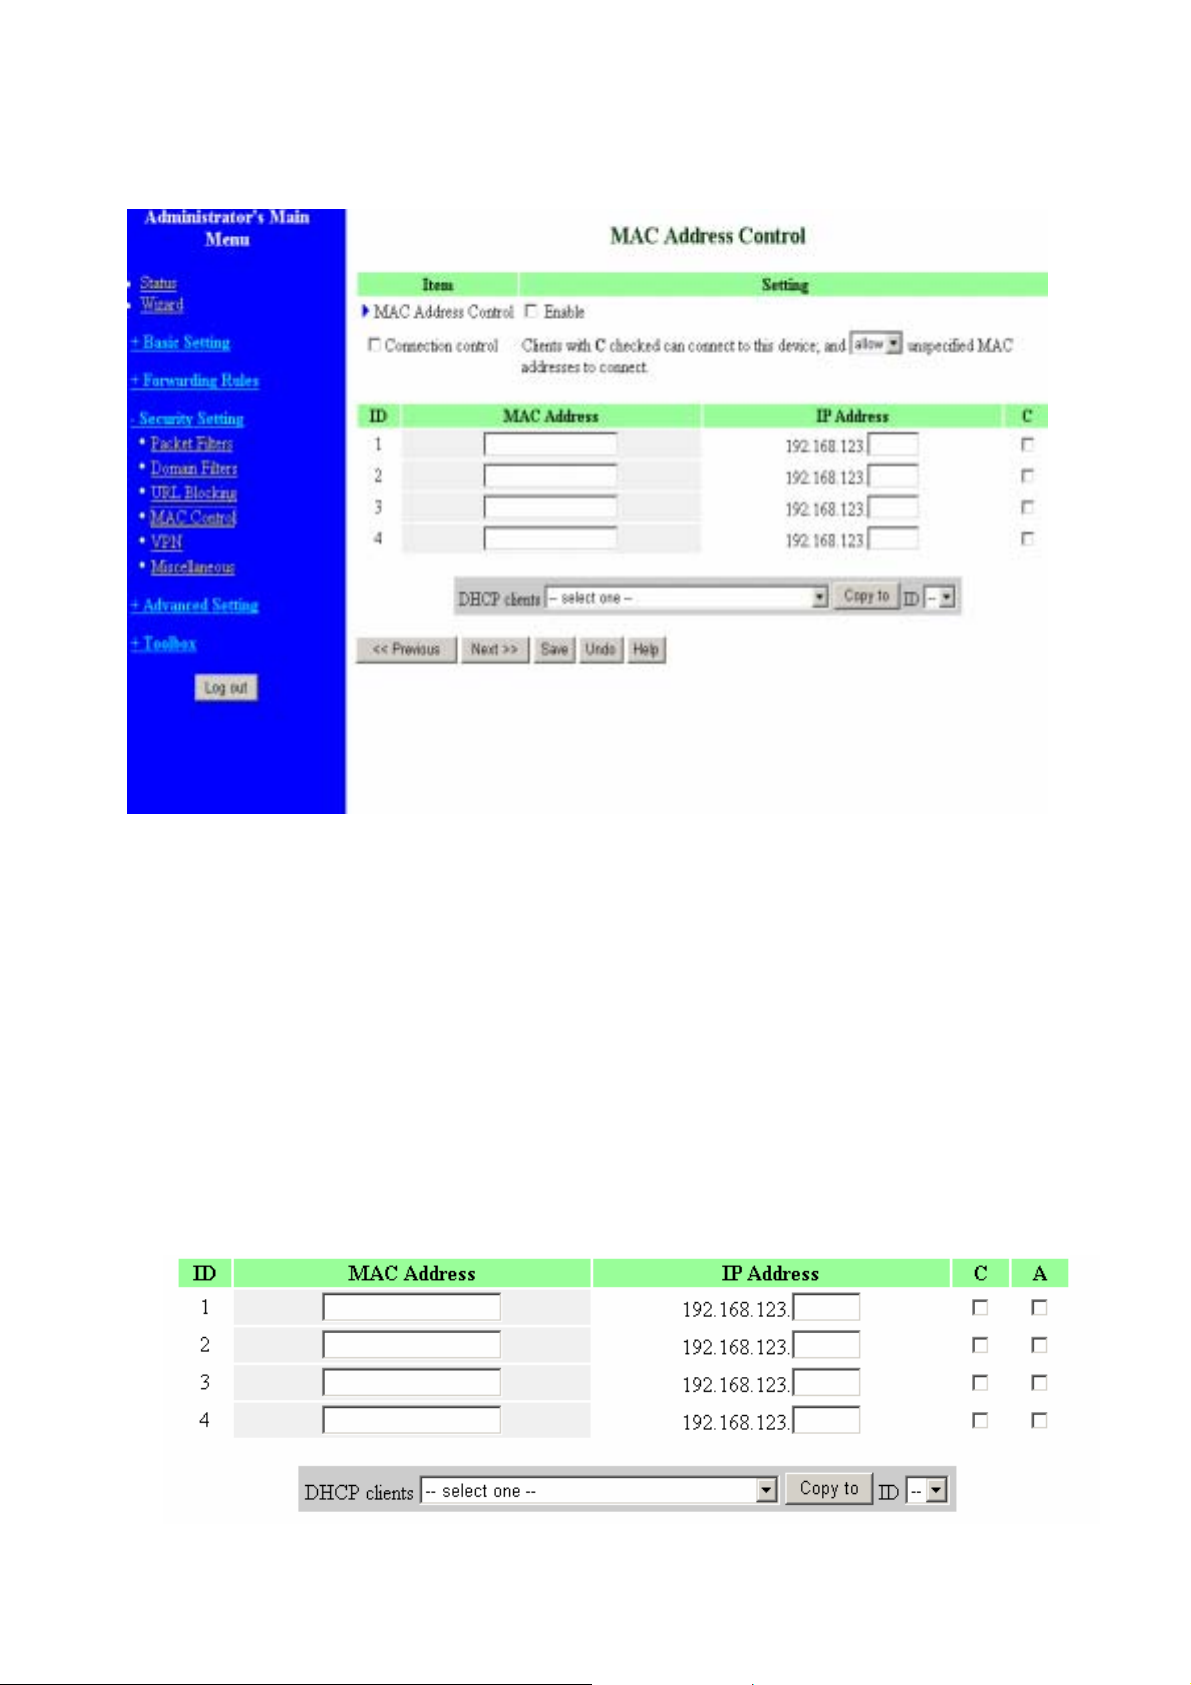
3.6.4. MAC Address Control
MAC Address Control allows you to assign different access right for different users
and to assign a specific IP address to a certain MAC address.
MAC Address Control
Check “Enable” to enable the “MAC Address Control”. All of the settings in this
page will take effect only when “Enable” is checked.
Connection control
Check "Connection control" to enable the controllin g of which wired can connect
to this device. If a client is denied to connect to this device, it means the client
can't access to the Internet either. Choose "allow" or "deny" to allow or deny the
clients, whose MAC addresses are not in the "Control table" (please see below),
to connect to this device.
Control table
32
Page 36
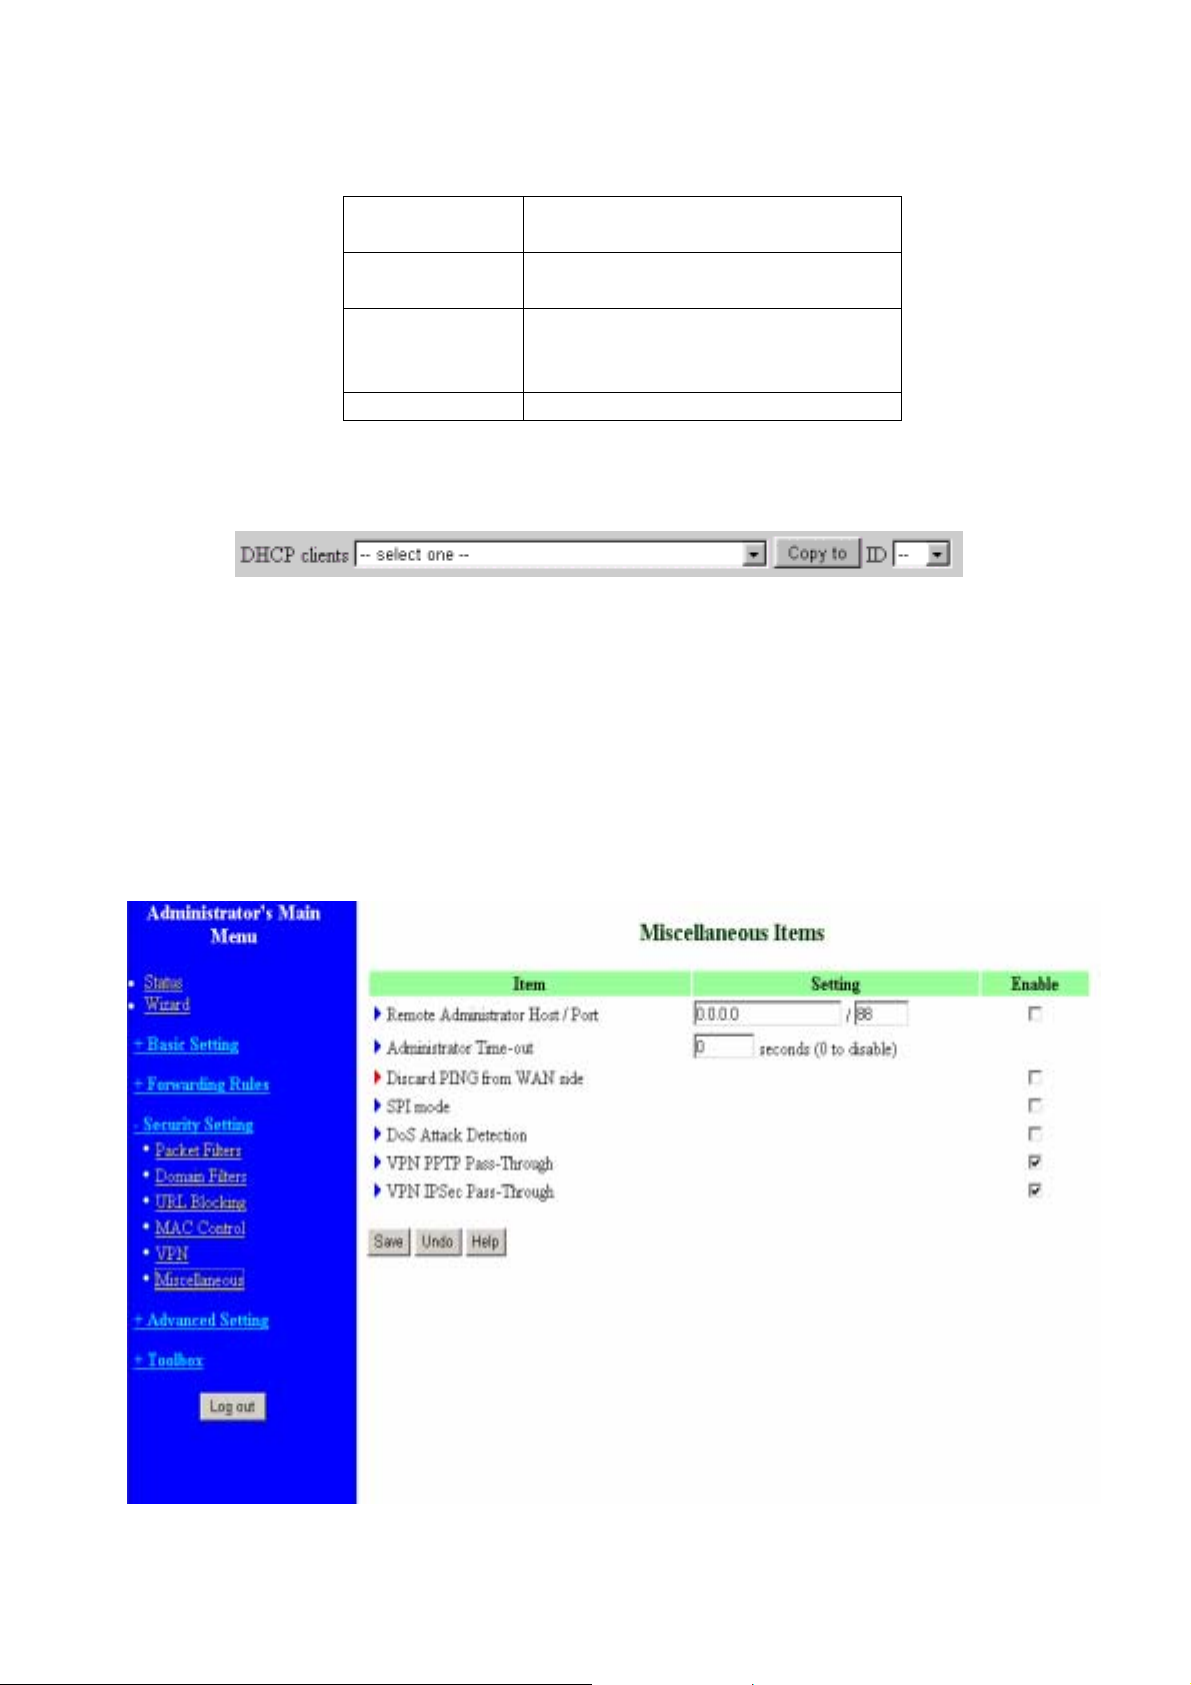
"Control table" is the table at the bottom of the "MAC Address Control"
page. Each row of this table indicates the MAC address and the expected
IP address mapping of a client. There are four columns in this table:
MAC
Address
MAC address indicates a
specific client.
IP Address Expected IP address of the
corresponding client.
C Connection control. Checking
"C" will allow the corresponding
client to connect to this device.
A asdfasdfasdfasdf
In this page, we provide the following Combo box and button to help you to input the
MAC address.
You can select a specific client in the “DHCP clients” Combo box, and then click on
the “Copy to” button to copy the MAC address of the client you select to the ID
selected in the “ID” Combo box.
Previous Page and Next Page
To make this setup page simple and clear, we have divided the “Control table”
into several pages. You can use these buttons to navigate to different pages.
3.6.5. Miscellaneous Items
Remote Administrator Host/Port
33
Page 37

In general, only Intranet user can browse the built-in web pages to perform administration
task. This feature enables you to perform administration task from remote host. If this
feature is enabled, only the specified IP address can perform remote administration. If
the specified IP address is 0.0.0.0, any host can connect to this product to perform
administration task. You can use subnet mask bits "/nn" notation to specified a group of
trusted IP addresses. For example, "10. 1.2. 0/24".
NOTE: When Remote Administration is enabled, the web server port will be shifted to 88.
You can also change web server ports.
Administrator Time-out
The time of no activity to logout automatically. Set it to zero to disable this feature.
Discard PING from WAN side
When this feature is enabled, any host on the WAN cannot ping this product.
SPI Mode
When this feature is enabled, the router will record the packet info rmat ion pass through
the router like IP address, port address, ACK, SEQ number and so on. And the router will
check every incoming packet to detect if this packet is valid.
DoS Att ack Detection
When this feature is enabled, the router will detect and log the DoS attack comes from
the Internet. Currently, the router can detect the following DoS attack: SYN Attack,
WinNuke, Port Scan, Ping of Death, Land Attack etc.
VPN PPTP/IPSec Pass-Through
Please enable this feature, if you need to establish a PPTP or IPSEC connection that will
pass through this device.
34
Page 38
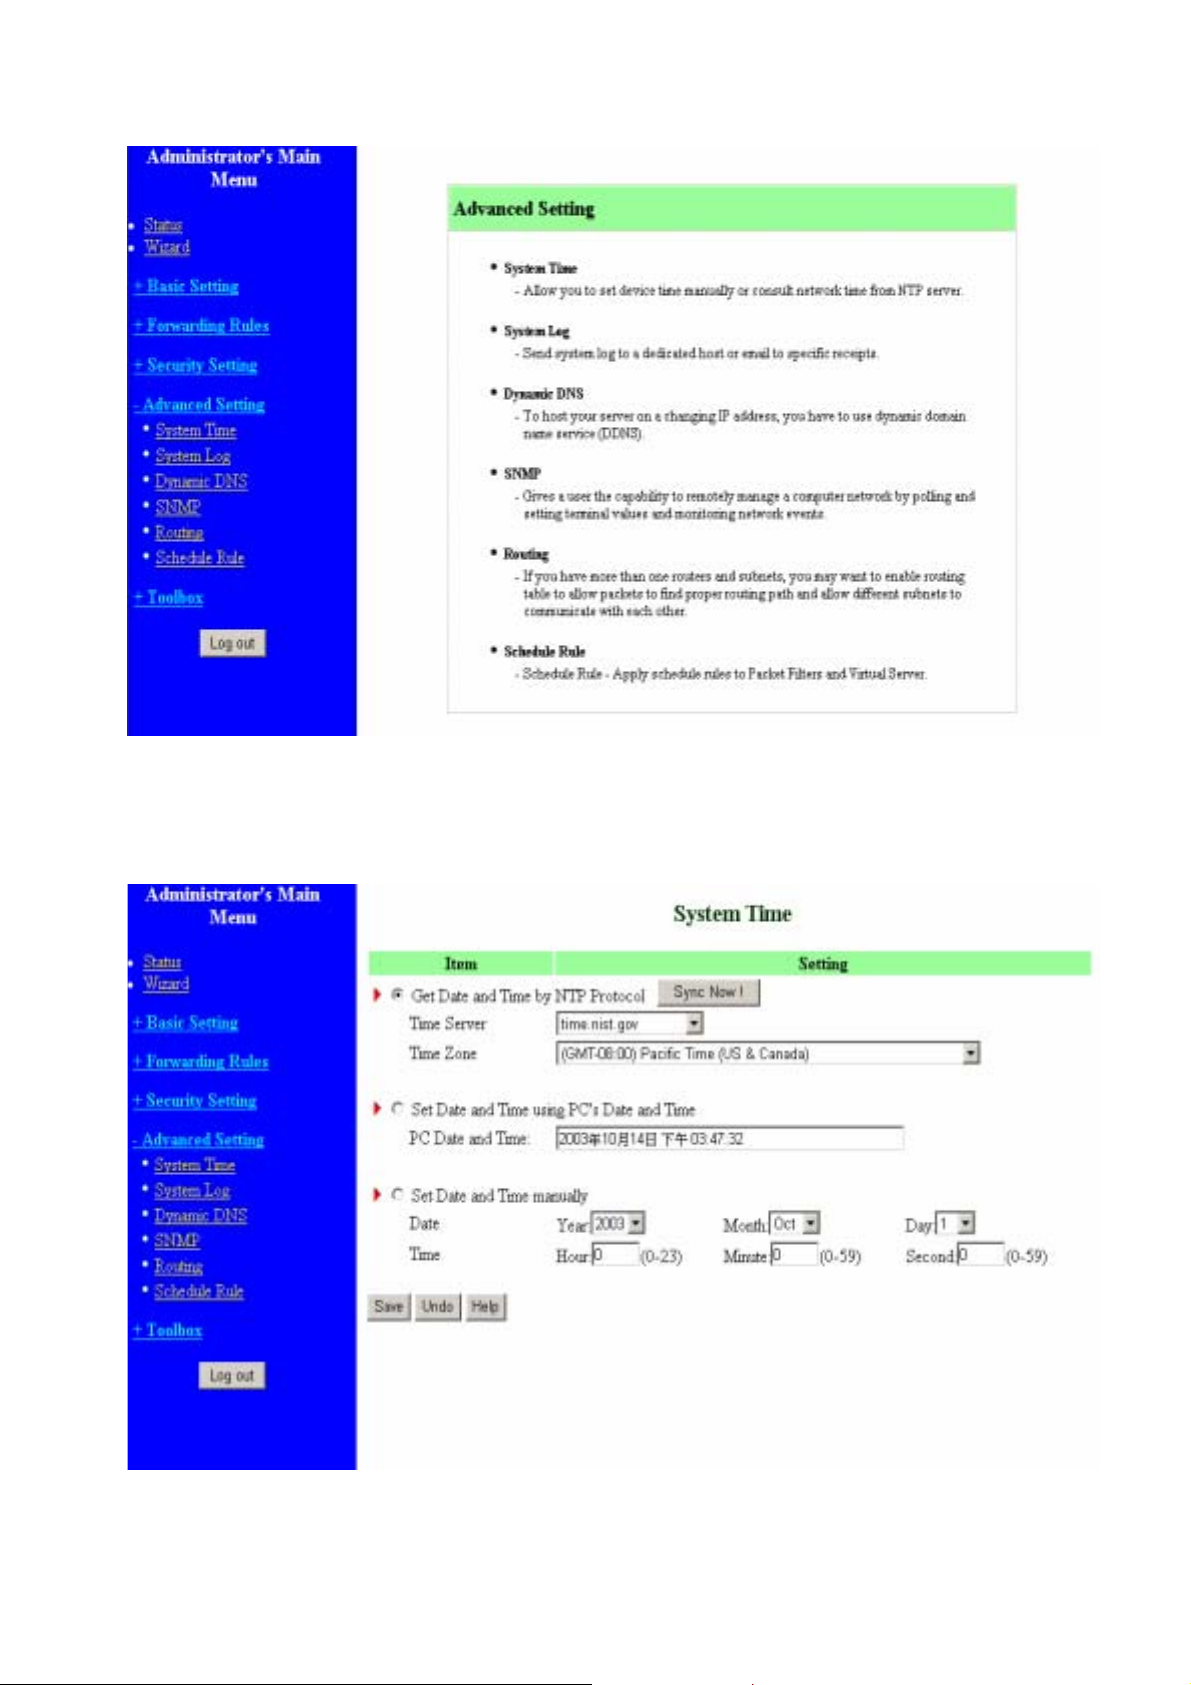
3.7. Advanced Settings
3.7.1. S ystem Time
35
Page 39
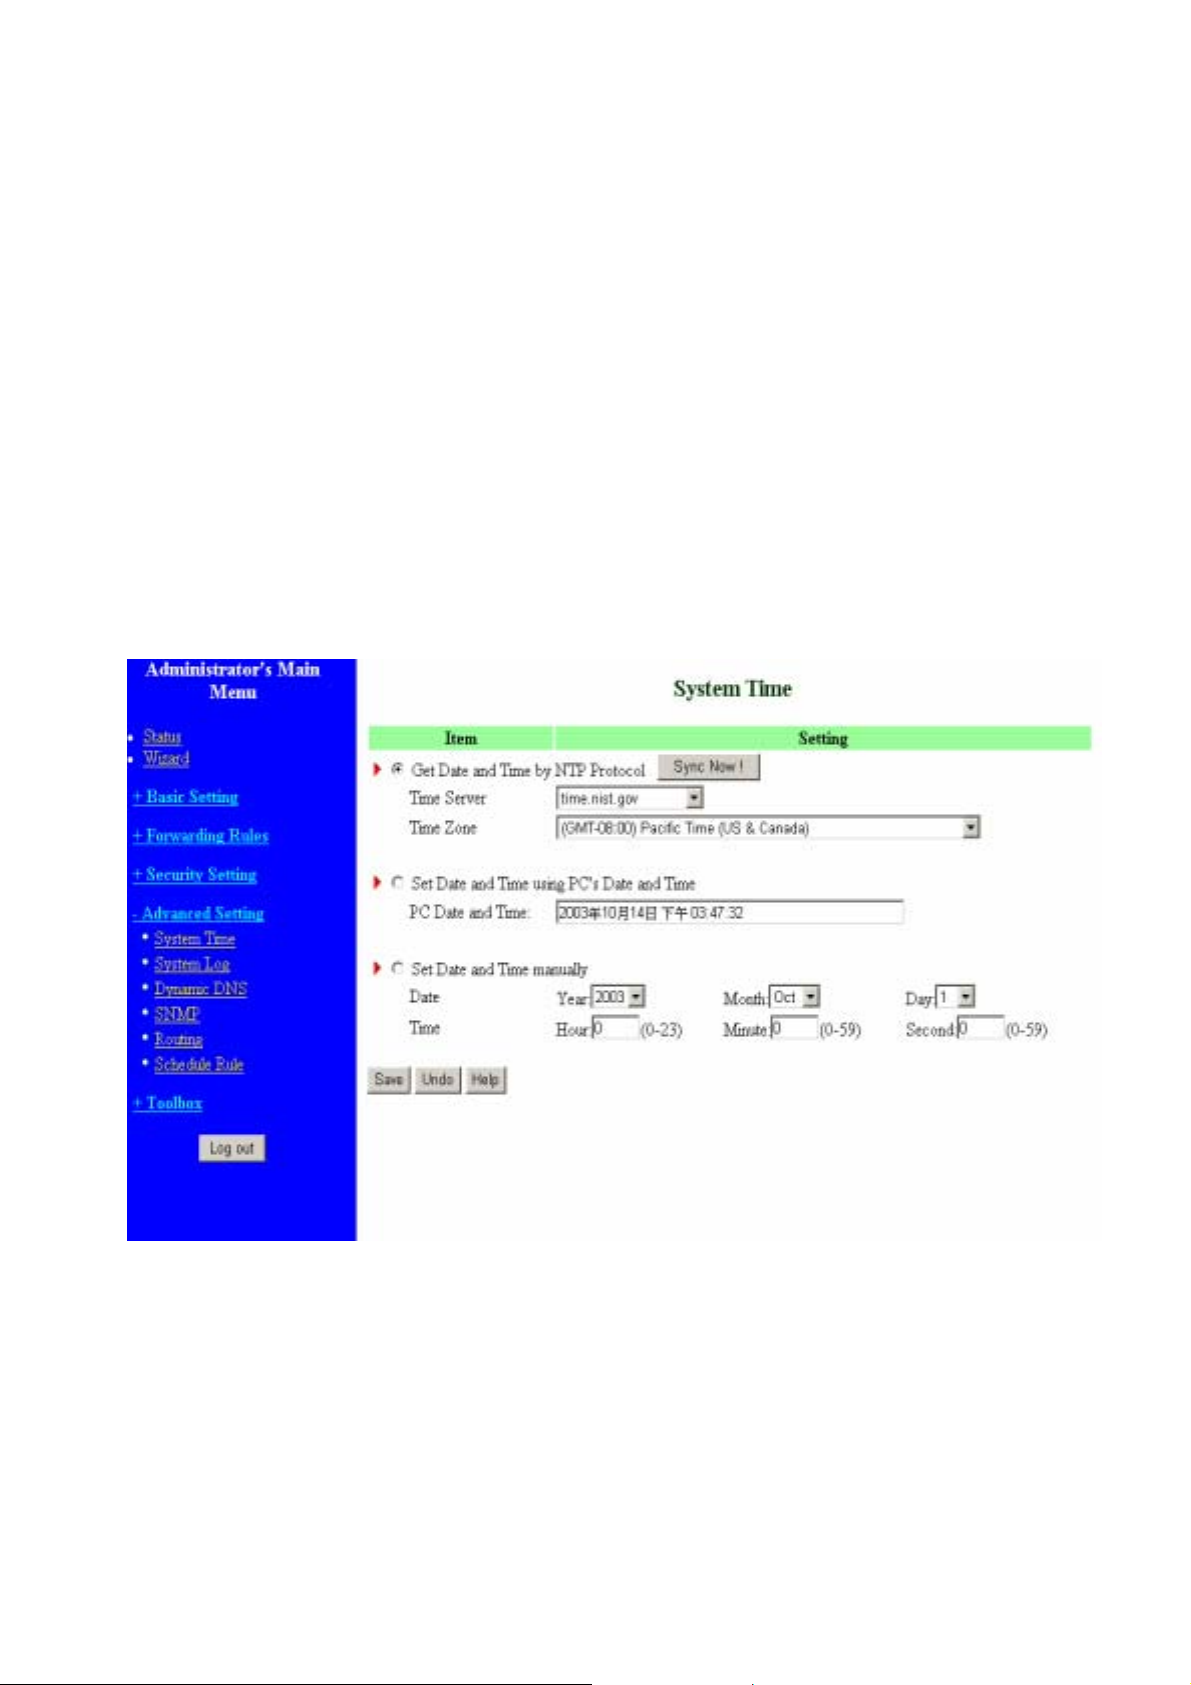
Get Date and Time by NTP Protocol
Selected if you want to Get Date and Time by NTP Protocol.
Time Server
Select a NTP time server to consult UTC time
Time Zone
Select a time zone where this device locates.
Set Date and Time manually
Selected if you want to Set Date and Time manually.
Function of Buttons
Sync Now: Synchronize system time with network time server
3.7.2. System Log
This page support two methods to export system logs to specific destination by means of
syslog(UDP) and SMTP(TCP). The items you have to setup including:
IP Address for Syslogs
Host IP of destination where syslogs will be sent to.
Check Enable to enable this function.
E-mail Alert Enable
Check if you want to enable Email alert(send syslog via email).
36
Page 40
SMTP Server IP and Port
Input the SMTP server IP and port, which are concated with ':'. If you do not specify port
number, the default value is 25.
For example, "mail.your_url.com" or "192.168.1.100:26".
Send E-mail alert to
The recipients who will receive these logs. You can assign more than 1 recipient, using ';'
or ',' to separate these email addresses.
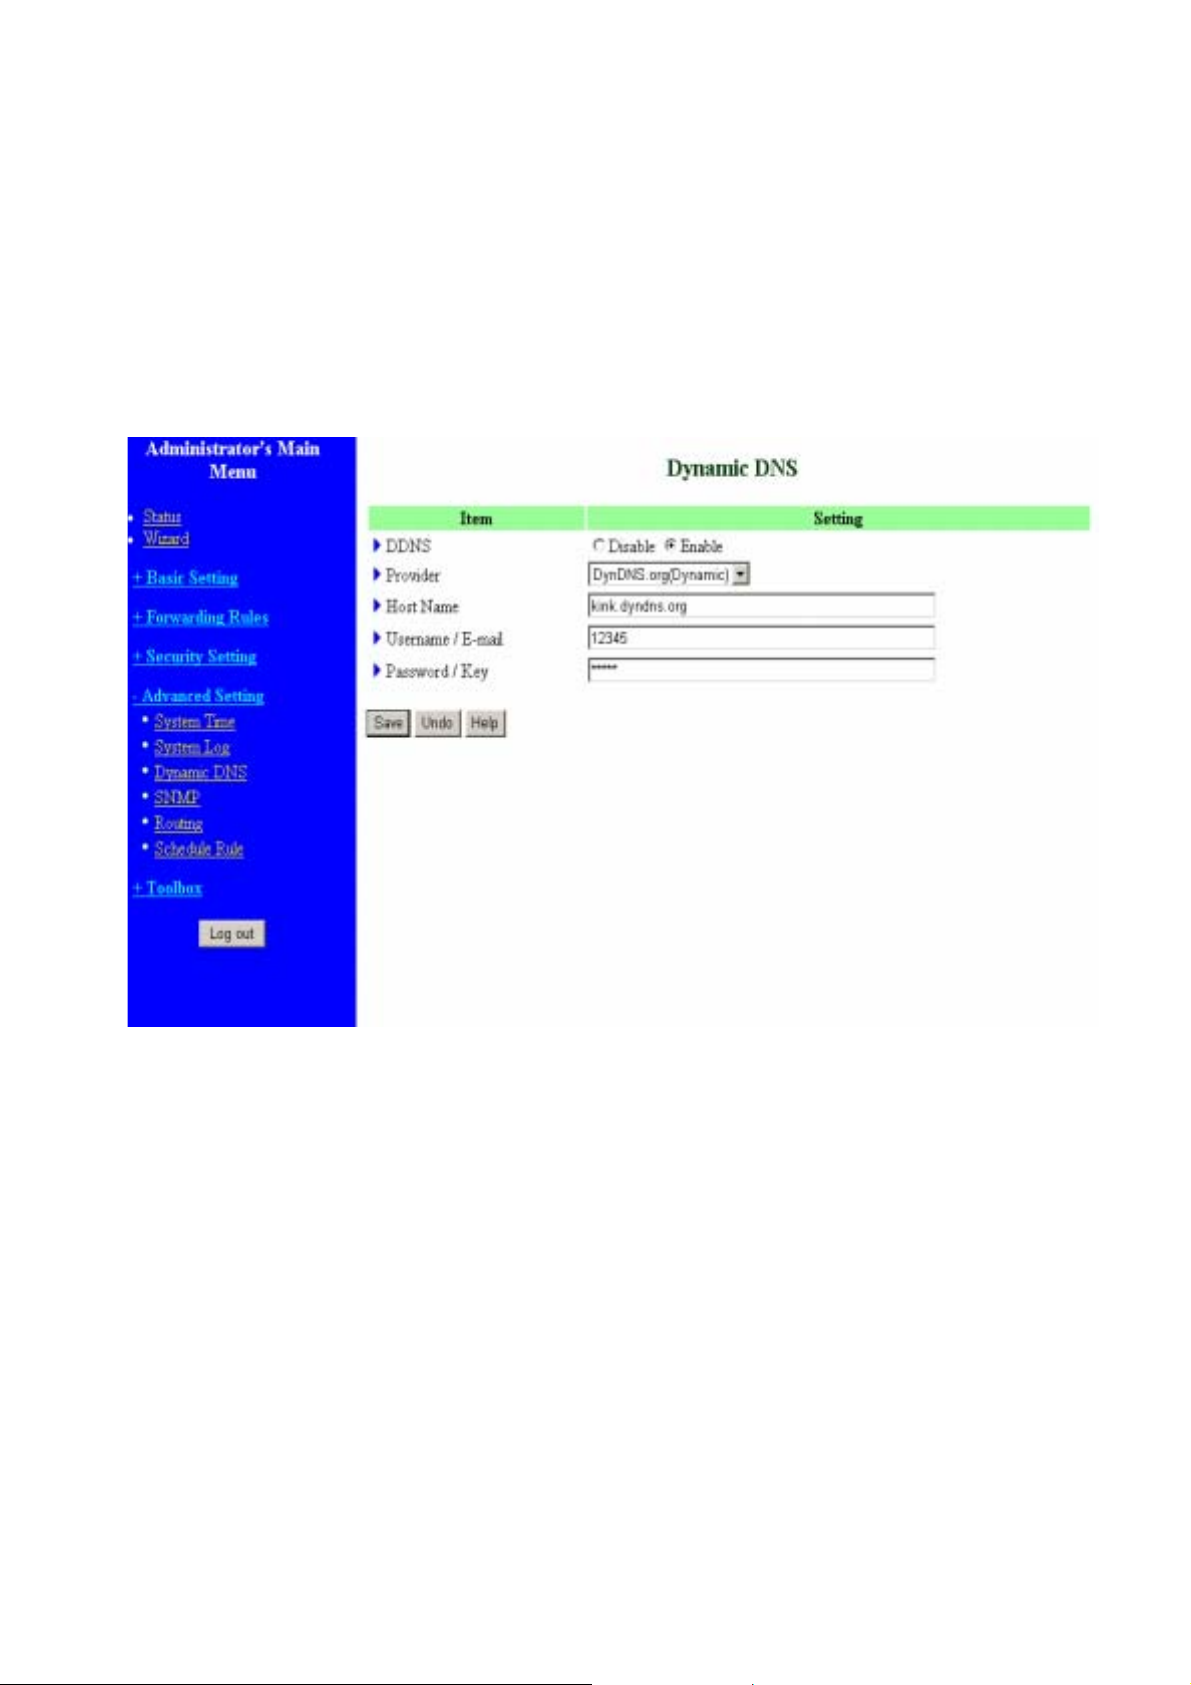
3.7.3. Dynamic DNS
To host your server on a changing IP address, you have to use dynamic domain name
service (DDNS).
So that anyone wishing to reach your host only needs to know the name of it. Dynamic
DNS will map the name of your host to your current IP address, which changes each time
you connect your Internet service provider.
Before you enable Dynamic DNS, you need to register an account on one of these
Dynamic DNS servers that we list in provider field.
To enable Dynamic DNS click the check box next to Enable in the DDNS field.
Next you can enter the appropriate information about your Dynamic DNS Server.
You must define: Provider, Host Name, Username/E-mail, and Password/Key.
You can get this information from the DNS service provider when you register an
account.
37
Page 41
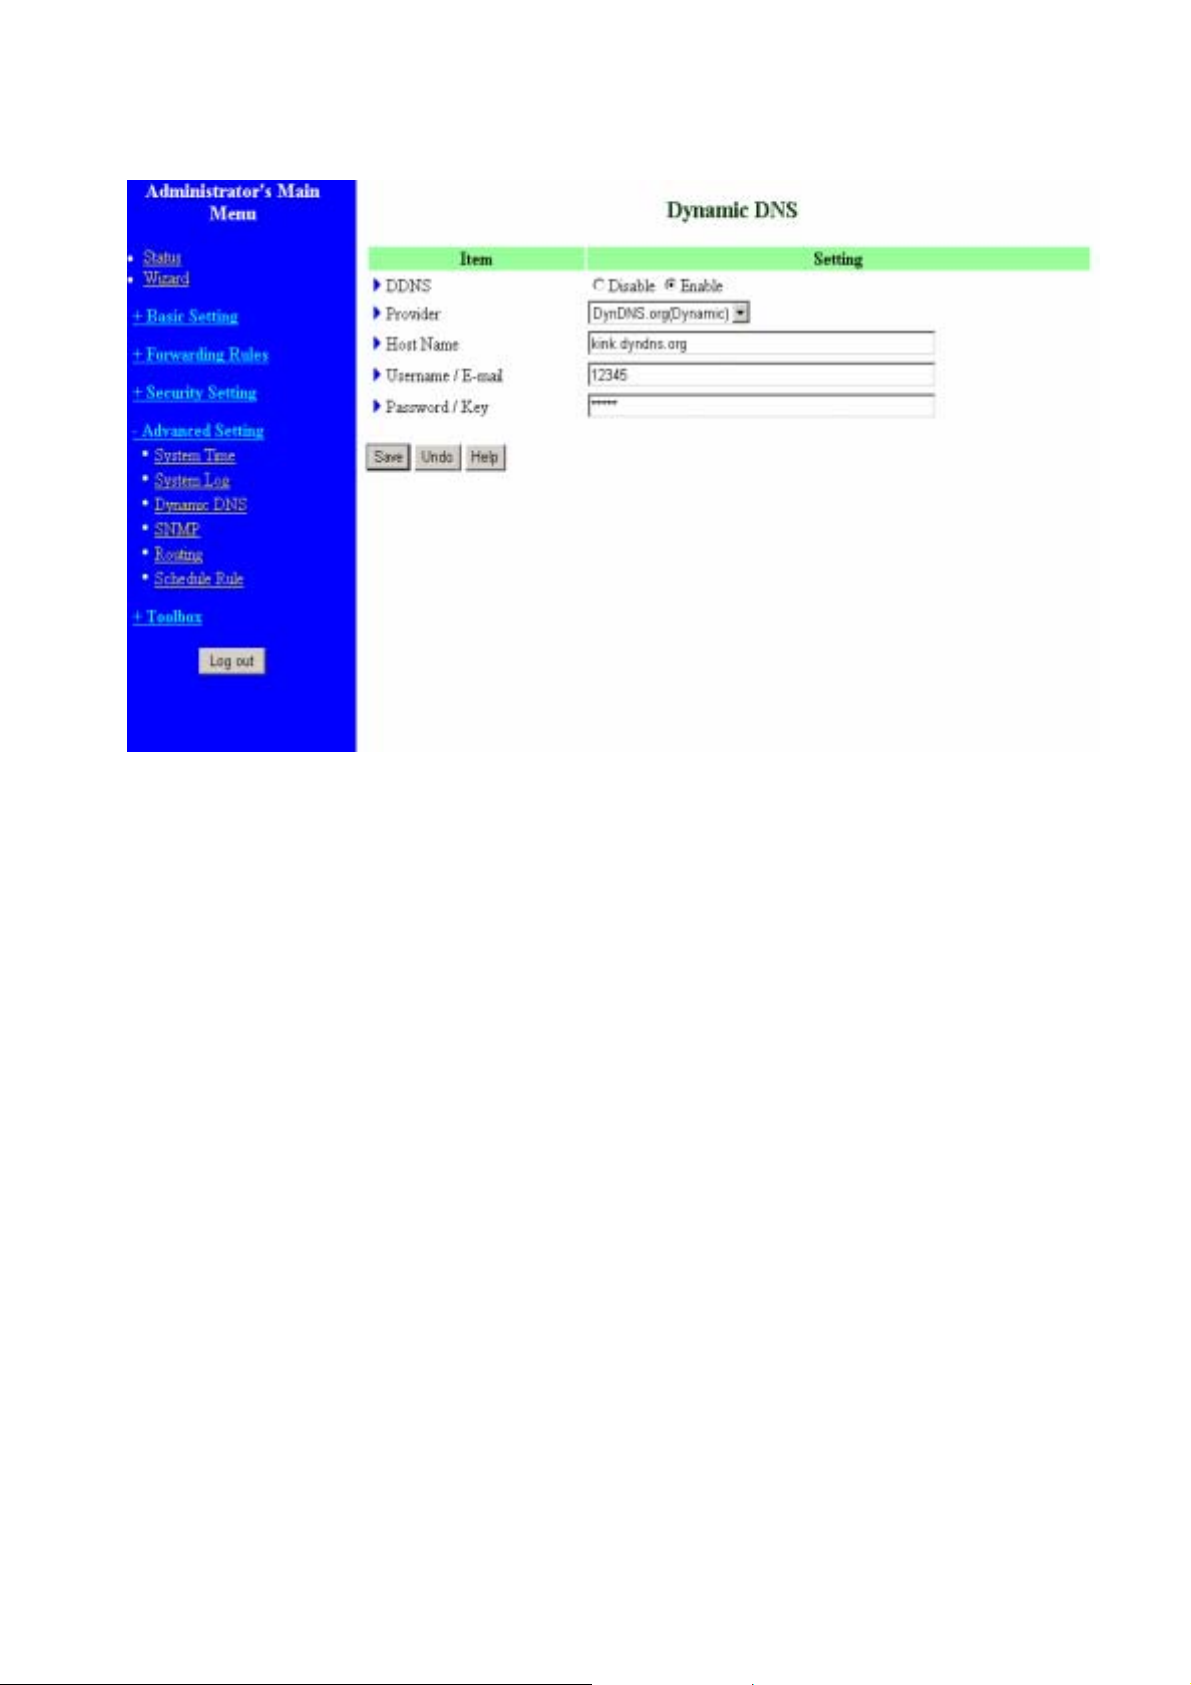
Example:
After Dynamic DNS setting is configured, click the save button.
3.7.4. SNMP Setting
38
Page 42
In brief, SNMP, the Simple Network Management Protocol, is a protocol designed to give
a user the capability to remotely manage a computer network by polling and setting
terminal values and monitoring network events.
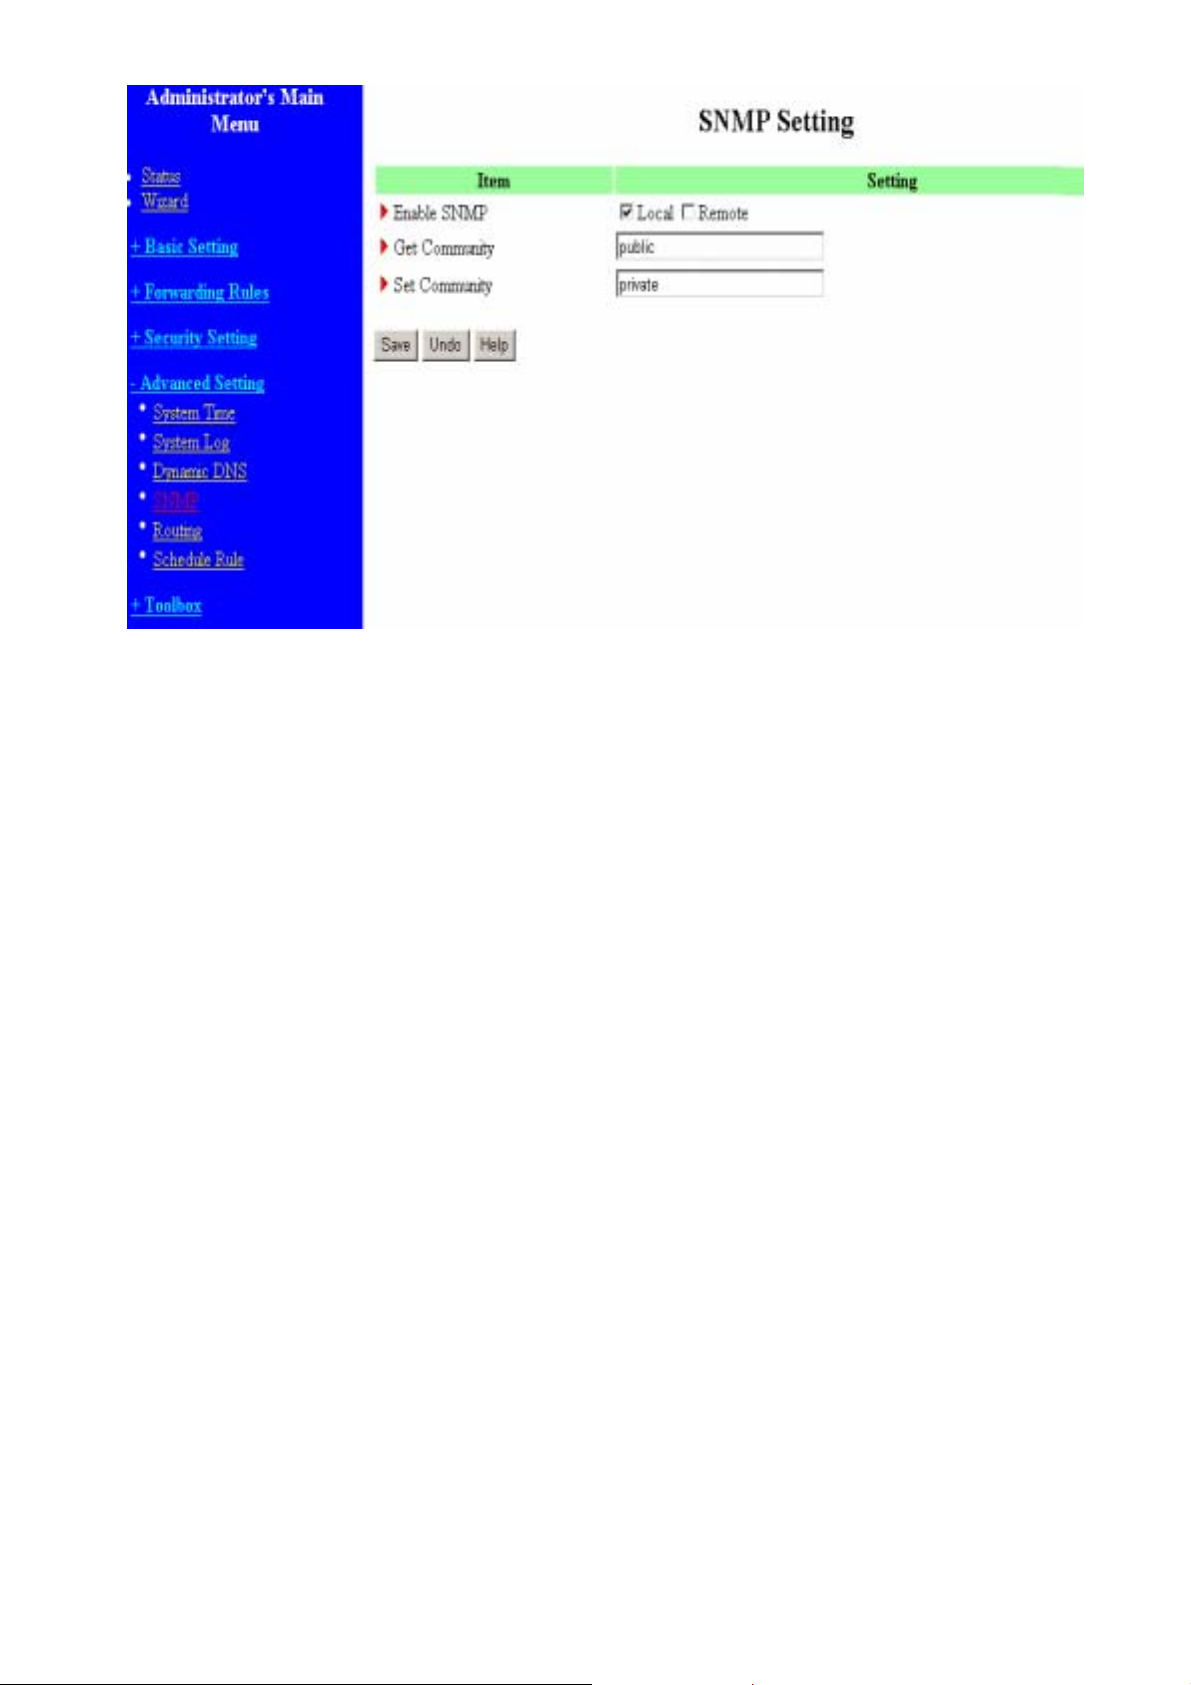
Enable SNMP
You must check either Local or Remote or both to enable SNMP function. If Local is
checked, this device will response request from LAN. If Remote is checked, this device
will response request from WAN.
Get Community
Setting the community of GetRequest your device will response.
Set Community
Setting the community of SetRequest your device will accept.
3.7.5. Routing Table
39
Page 43
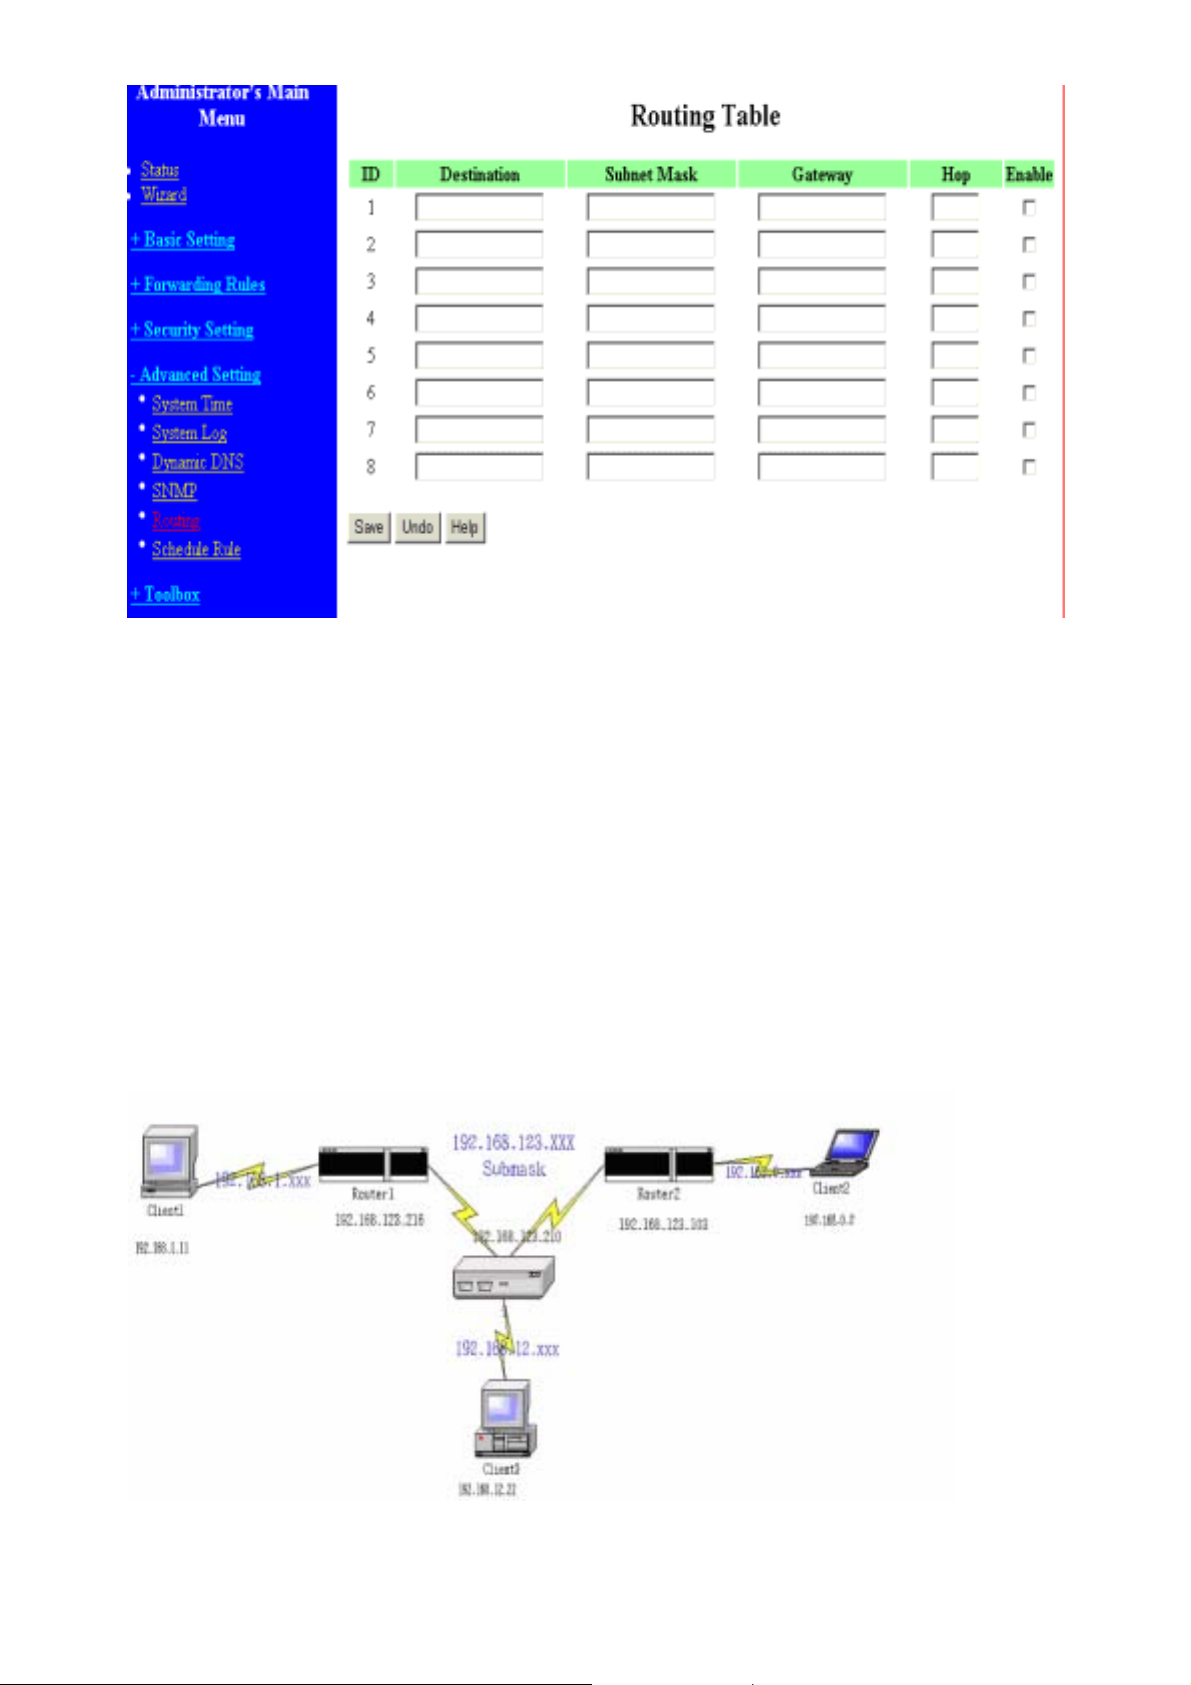
Routing Tables allow you to determine which physical interface address to use for
outgoing IP data grams. If you have more than one routers and subnets, you will need to
enable routing table to allow packets to find proper routing path and allow different
subnets to communicate with each other.
Routing Table settings are settings used to setup the functions of static.
Static Routing: For static routing, you can specify up to 8 routing rules. You can enter
the destination IP address, subnet mask, gateway, hop for each routing rule, and then
enable or disable the rule by checking or unchecking the Enable checkbox.
Example:
40
Page 44

Configuration on NAT Router
Destination SubnetMask Gateway Hop Enabled
192.168.1.0 255.255.255.0 192.168.123.216 1 ˇ
192.168.0.0 255.255.255.0 192.168.123.103 1 ˇ
So if, for example, the client3 wanted to send an IP datagram to 192.168.0.2, it would
use the above table to determine that it had to go via 192.168.123.103 (a gateway),
And if it sends Packets to 192.168.1.11 will go via 192.168.123.216
Each rule can be enabled or disabled individually.
After routing table setting is configured, click the save button.
41
Page 45
3.7.6. Schedule Rule
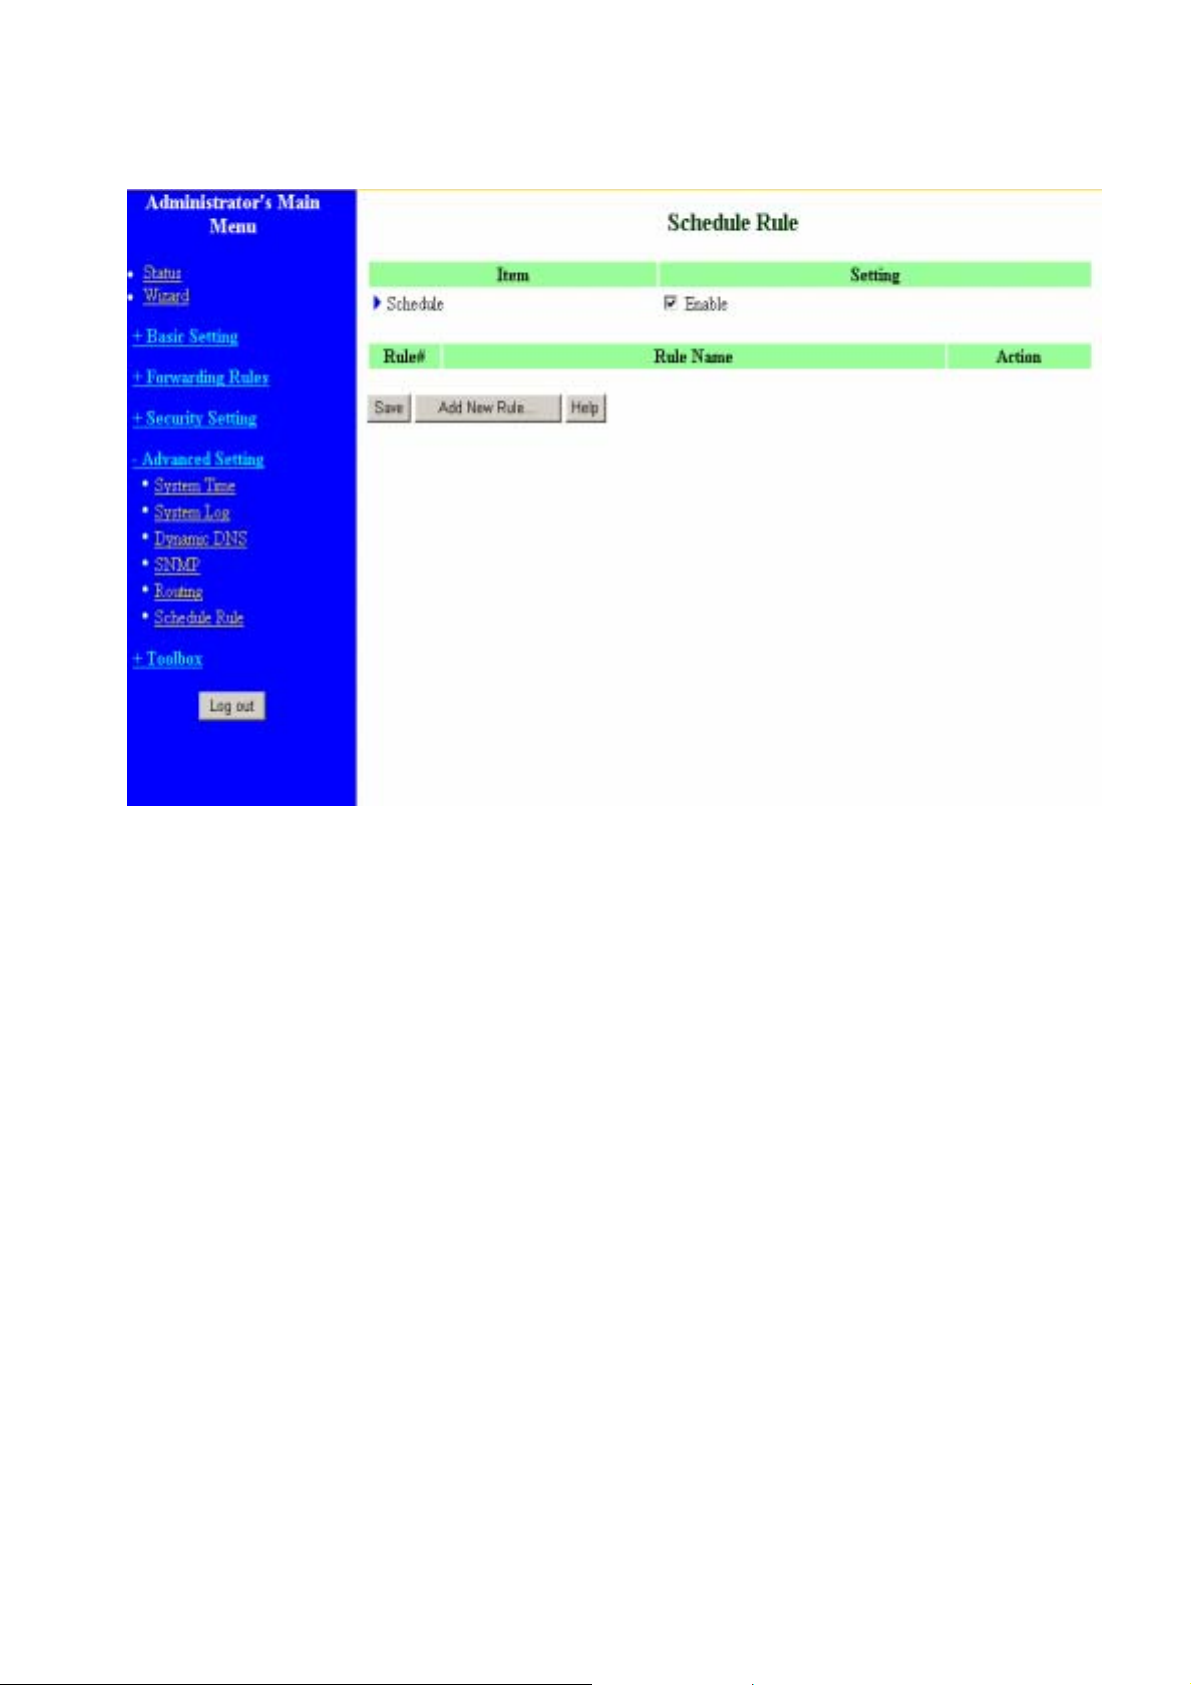
You can set the schedule time to decide which service will be turned on or off. Select the
“enable” item.
Press “Add New Rule”
You can write a rule name and set which day and what time to schedule from “Start
Time” to “End Time”. The following example configure “ftp time” as everyday 14:10 to
16:20
42
Page 46
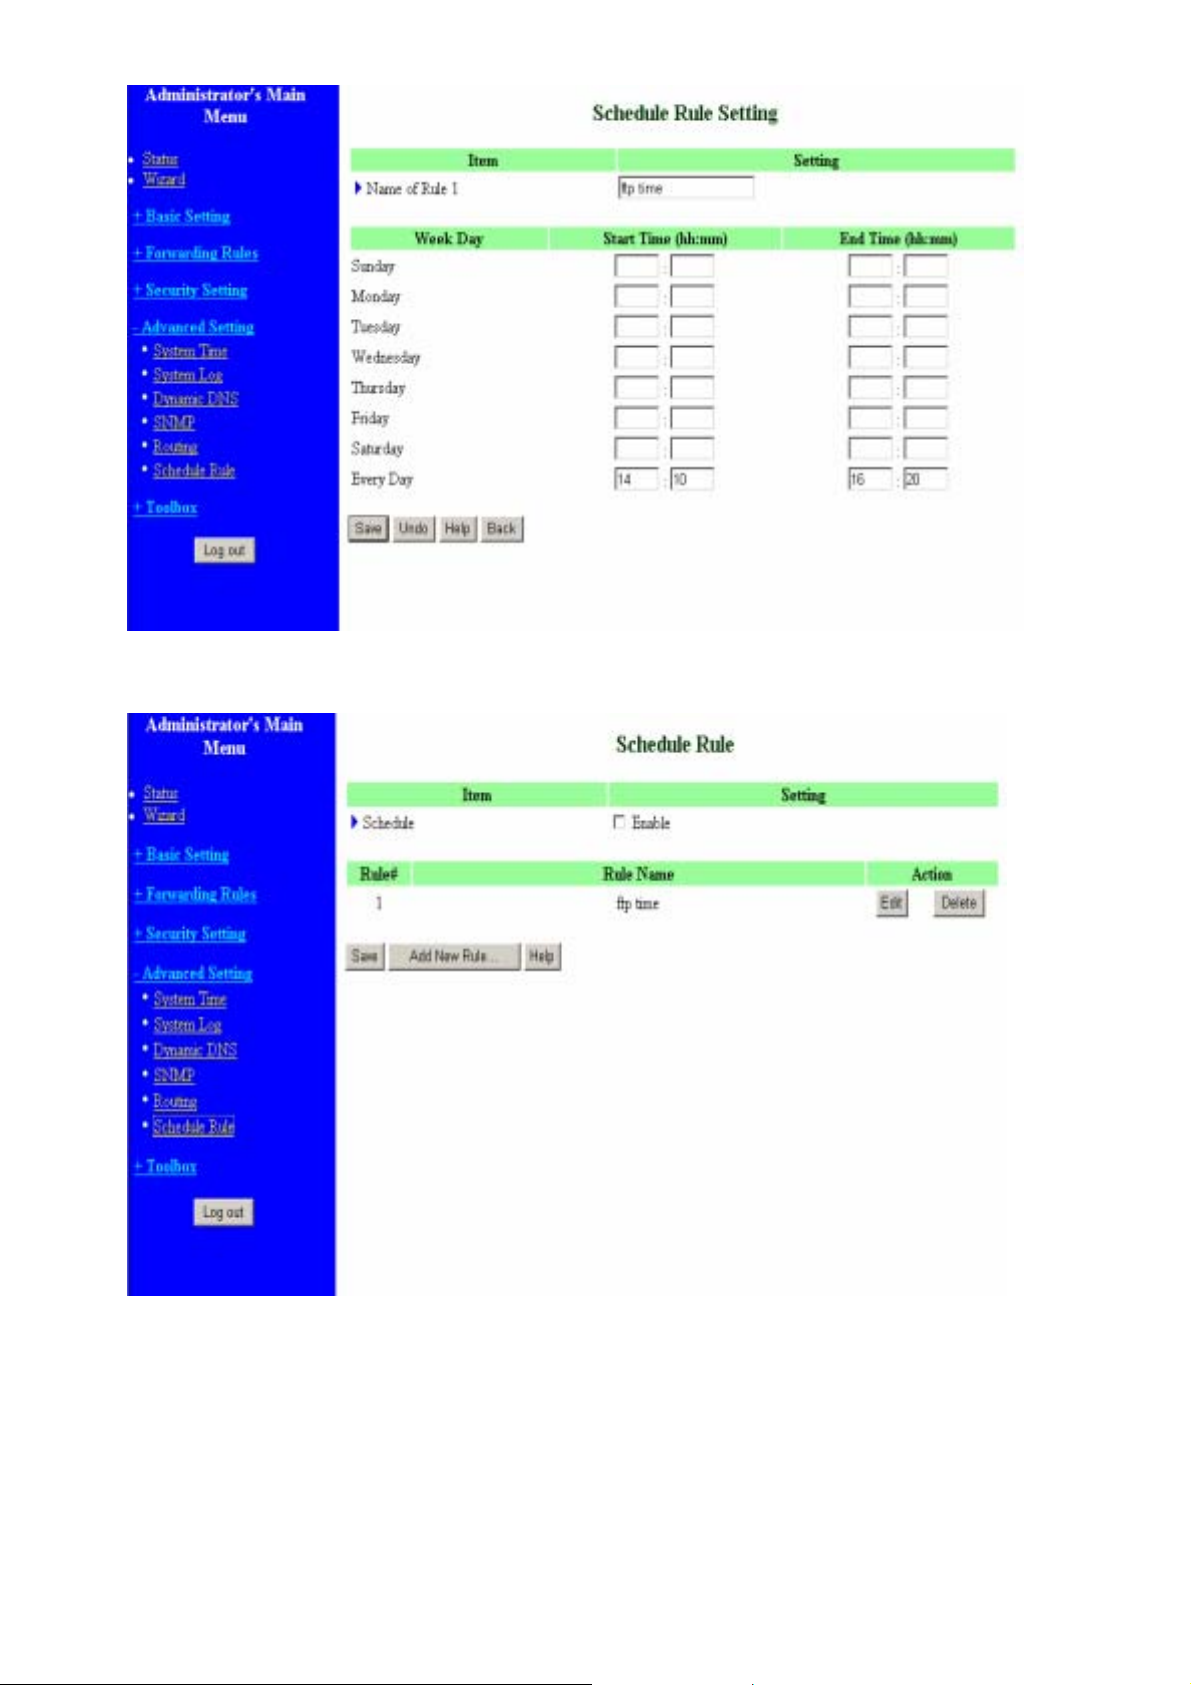
After configure Rule 1Æ
Schedule Enable
Selected if you want to Enable the Scheduler.
Edit
To edit the schedule rule.
Delete
To delete the schedule rule, and the rule# of the rules behind the deleted one will
decrease one automatically.
Schedule Rule can be apply to Virtual server and Packet Filter, for example:
43
Page 47
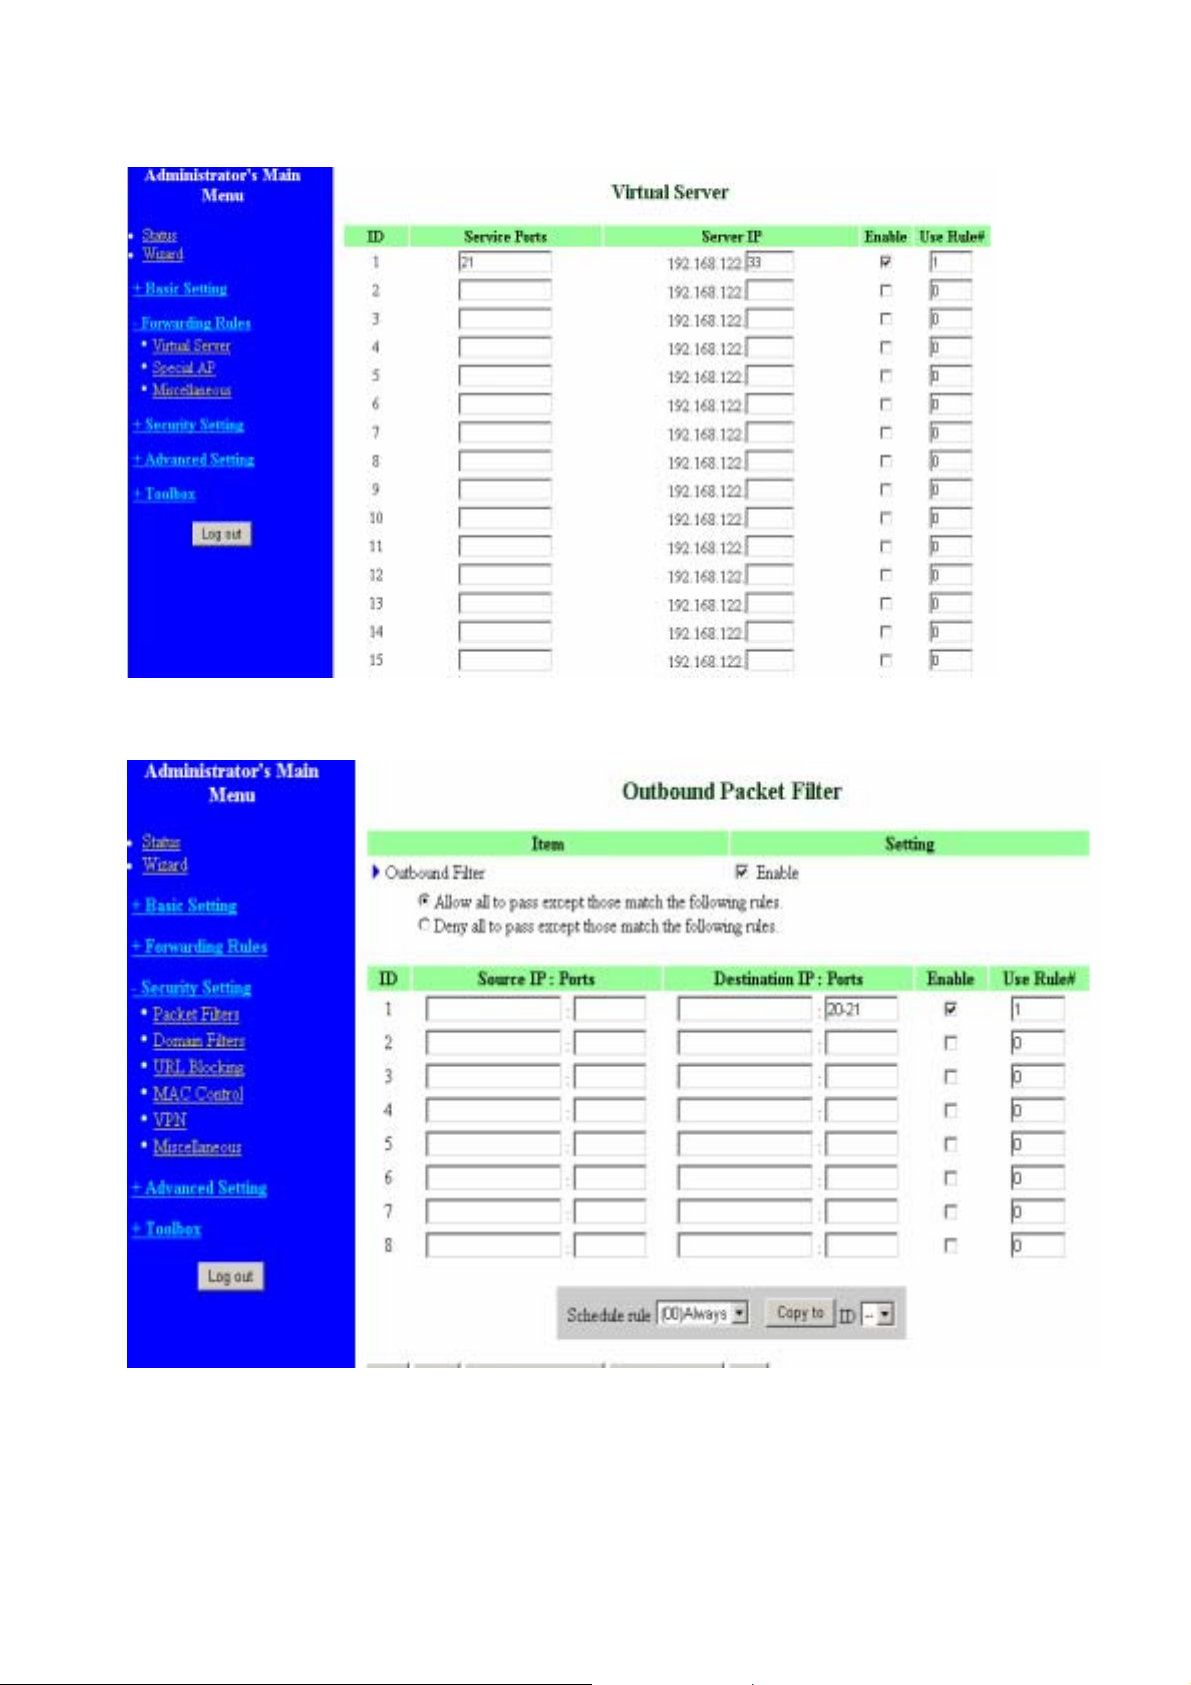
Exanple1: Virtual Server – Apply Rule#1 (ftp time: everyday 14:10 to 16:20)
Exanple2: Packet Filter – Apply Rule#1 (ftp time: everyday 14:10 to 16:20).
44
Page 48
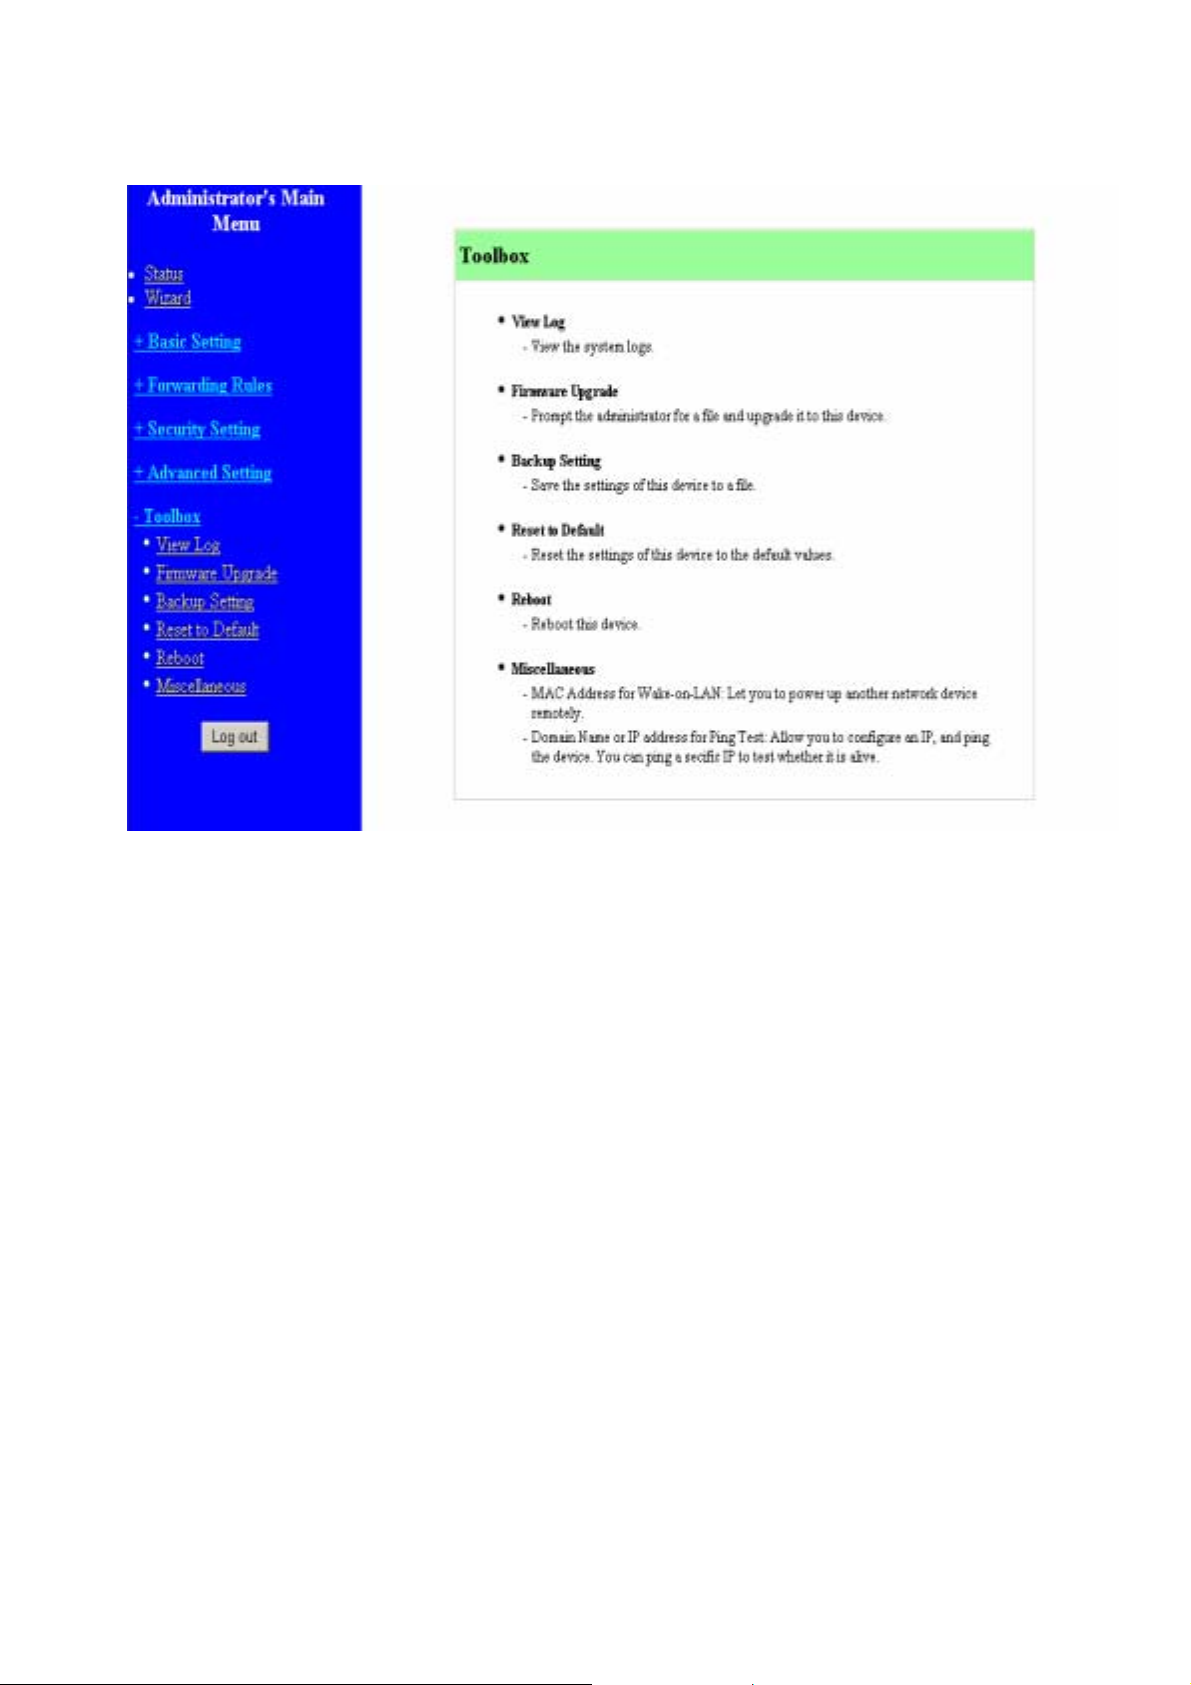
3.8. Toolbox
45
Page 49
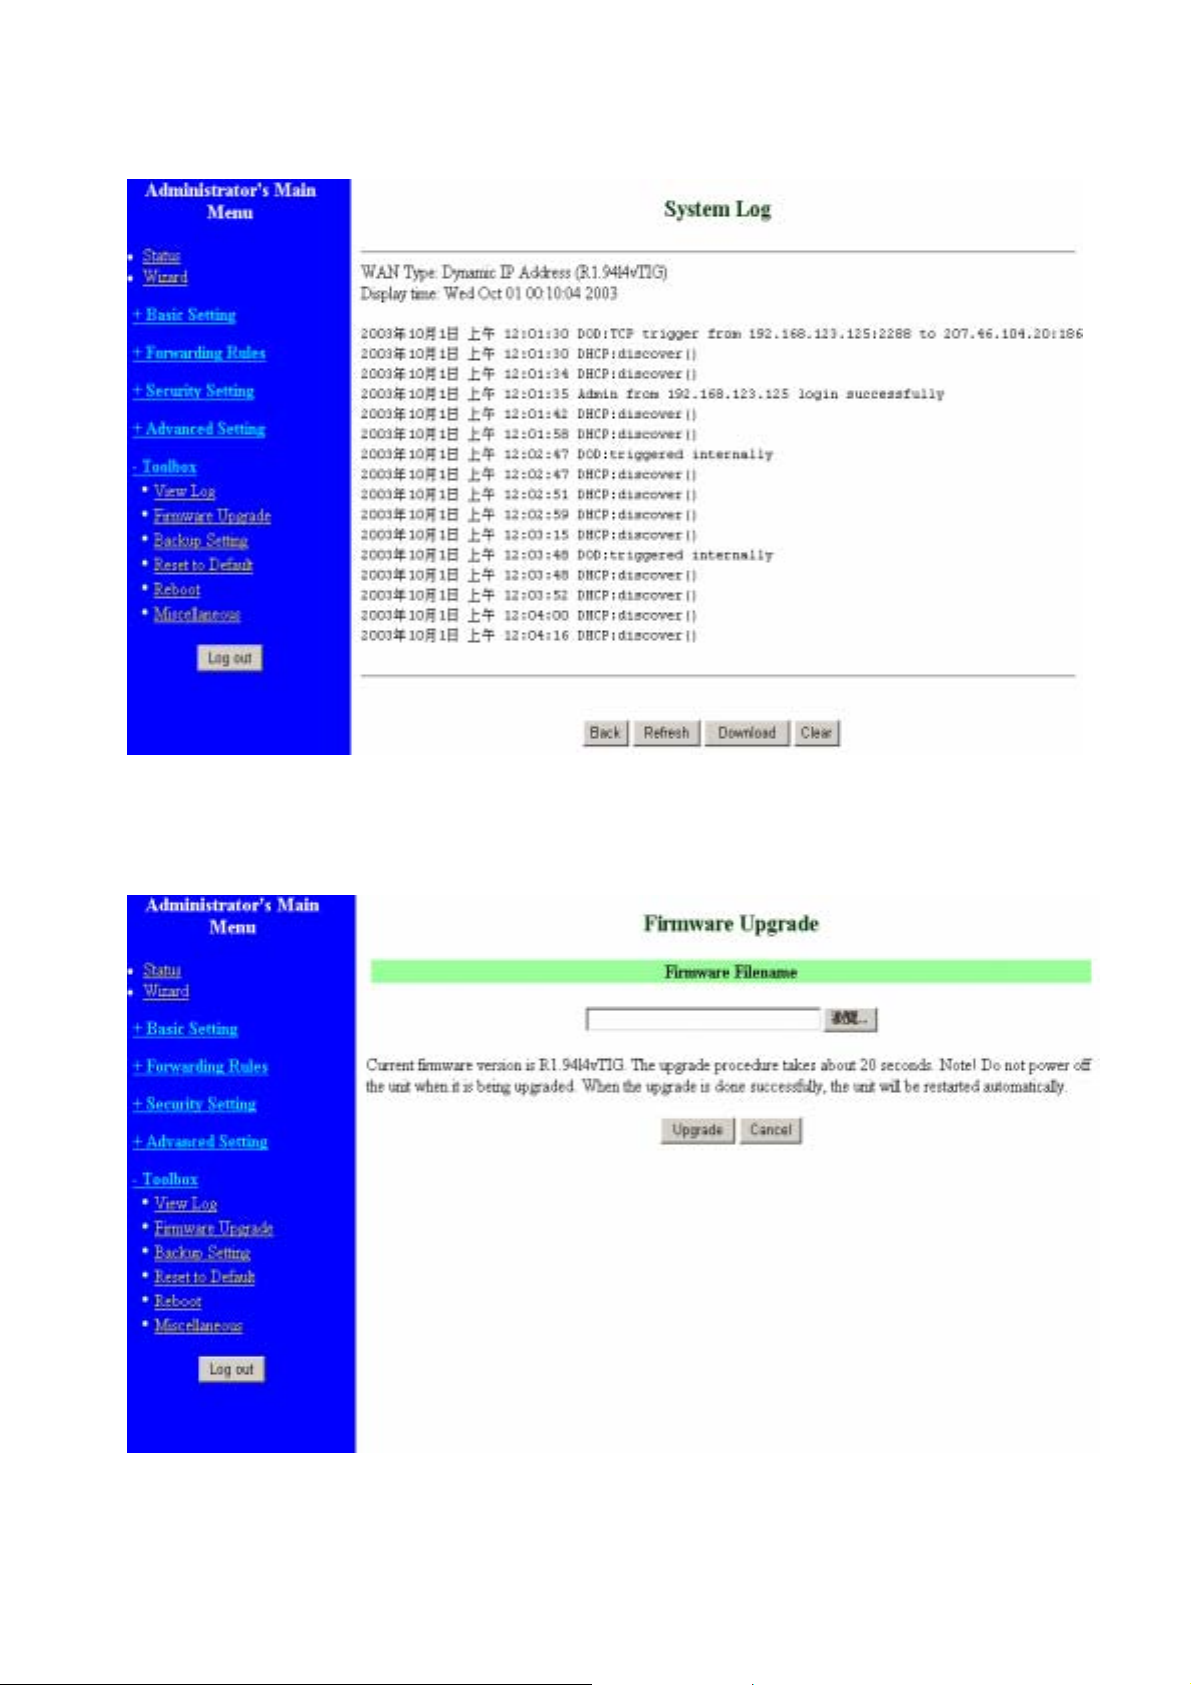
3.8.1. System Log
You can View system log by clicking the View Log button
3.8.2. Firmware Upgrade
You can upgrade firmware by clicking Firmware Upgrade button.
46
Page 50
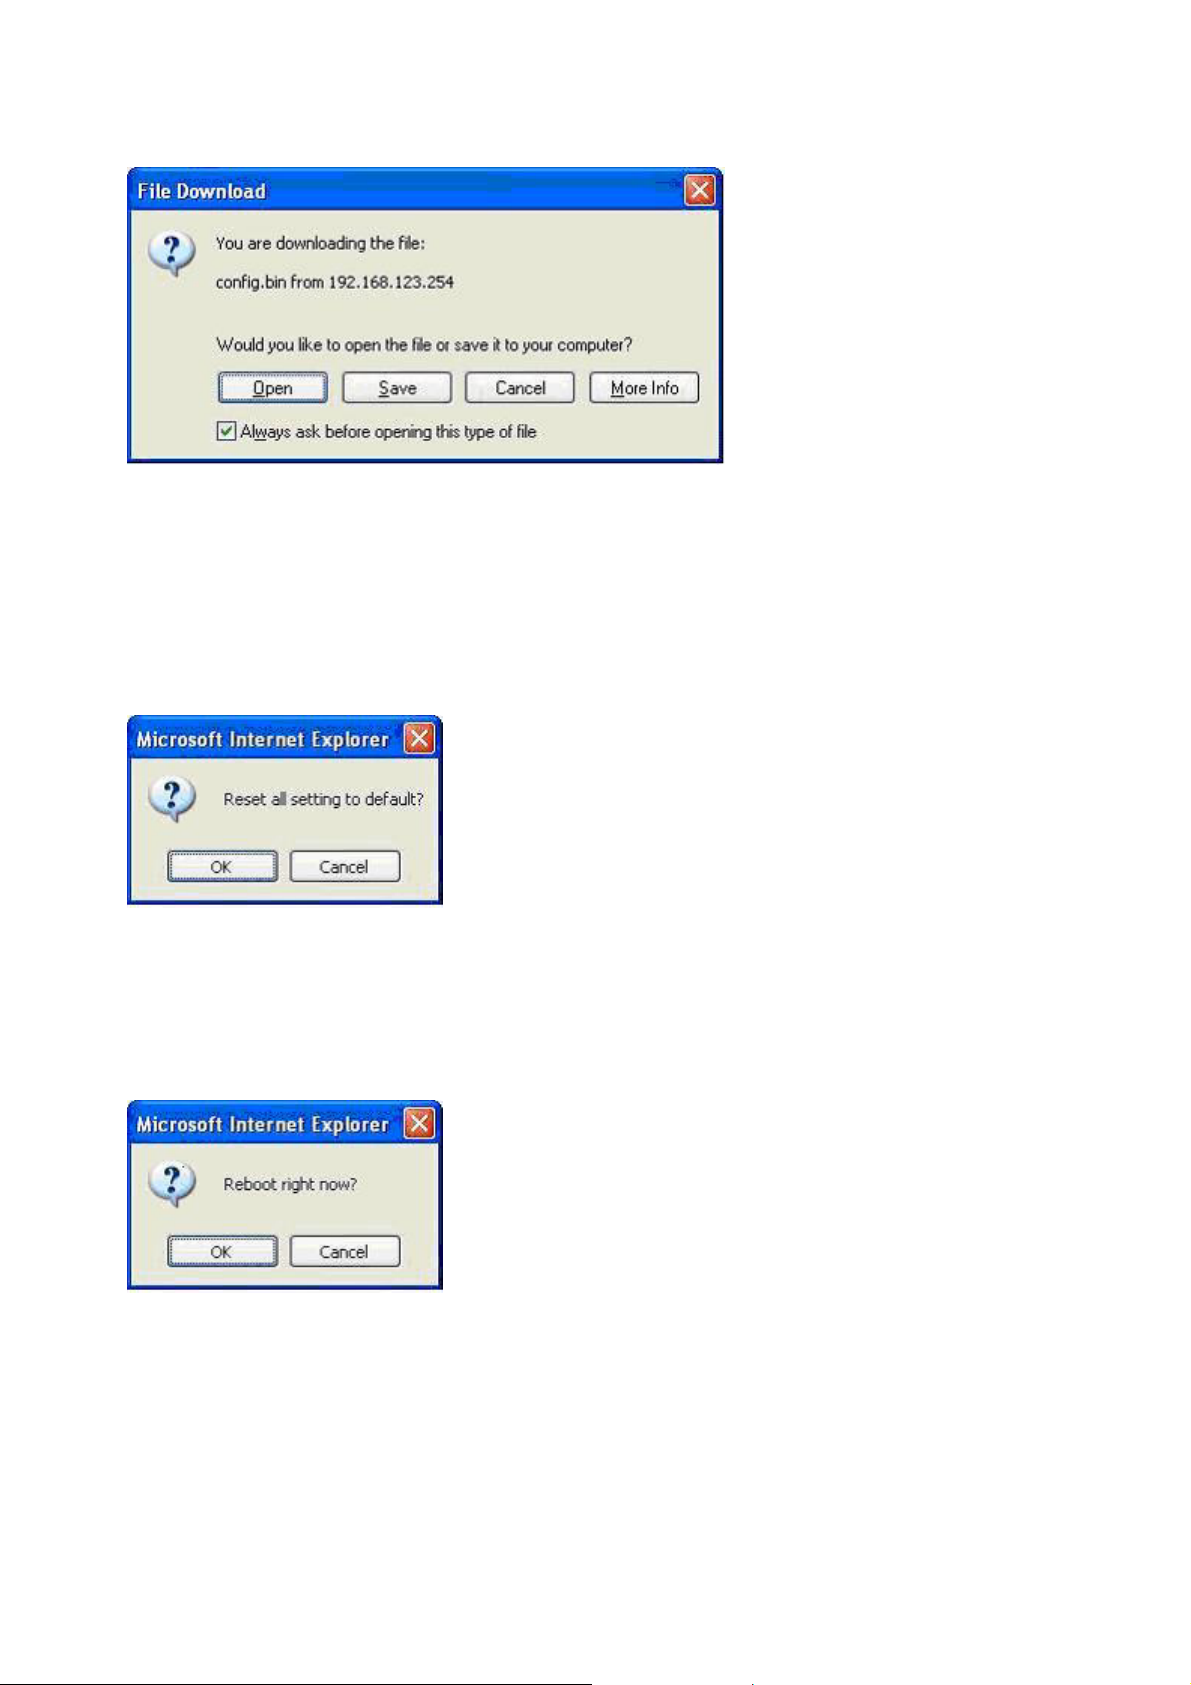
3.8.3. Backup Setting
You can backup your settings by clicking the Backup Setting button and save it as a bin
file. Once you want to restore these settings, please click Firmware Upgrade button and
use the bin file you saved.
3.8.4. Reset to default
You can also reset this product to factory default by clicking the Reset to default button.
3.8.5. Reboot
You can also reboot this product by clicking the Reboot button.
47
Page 51
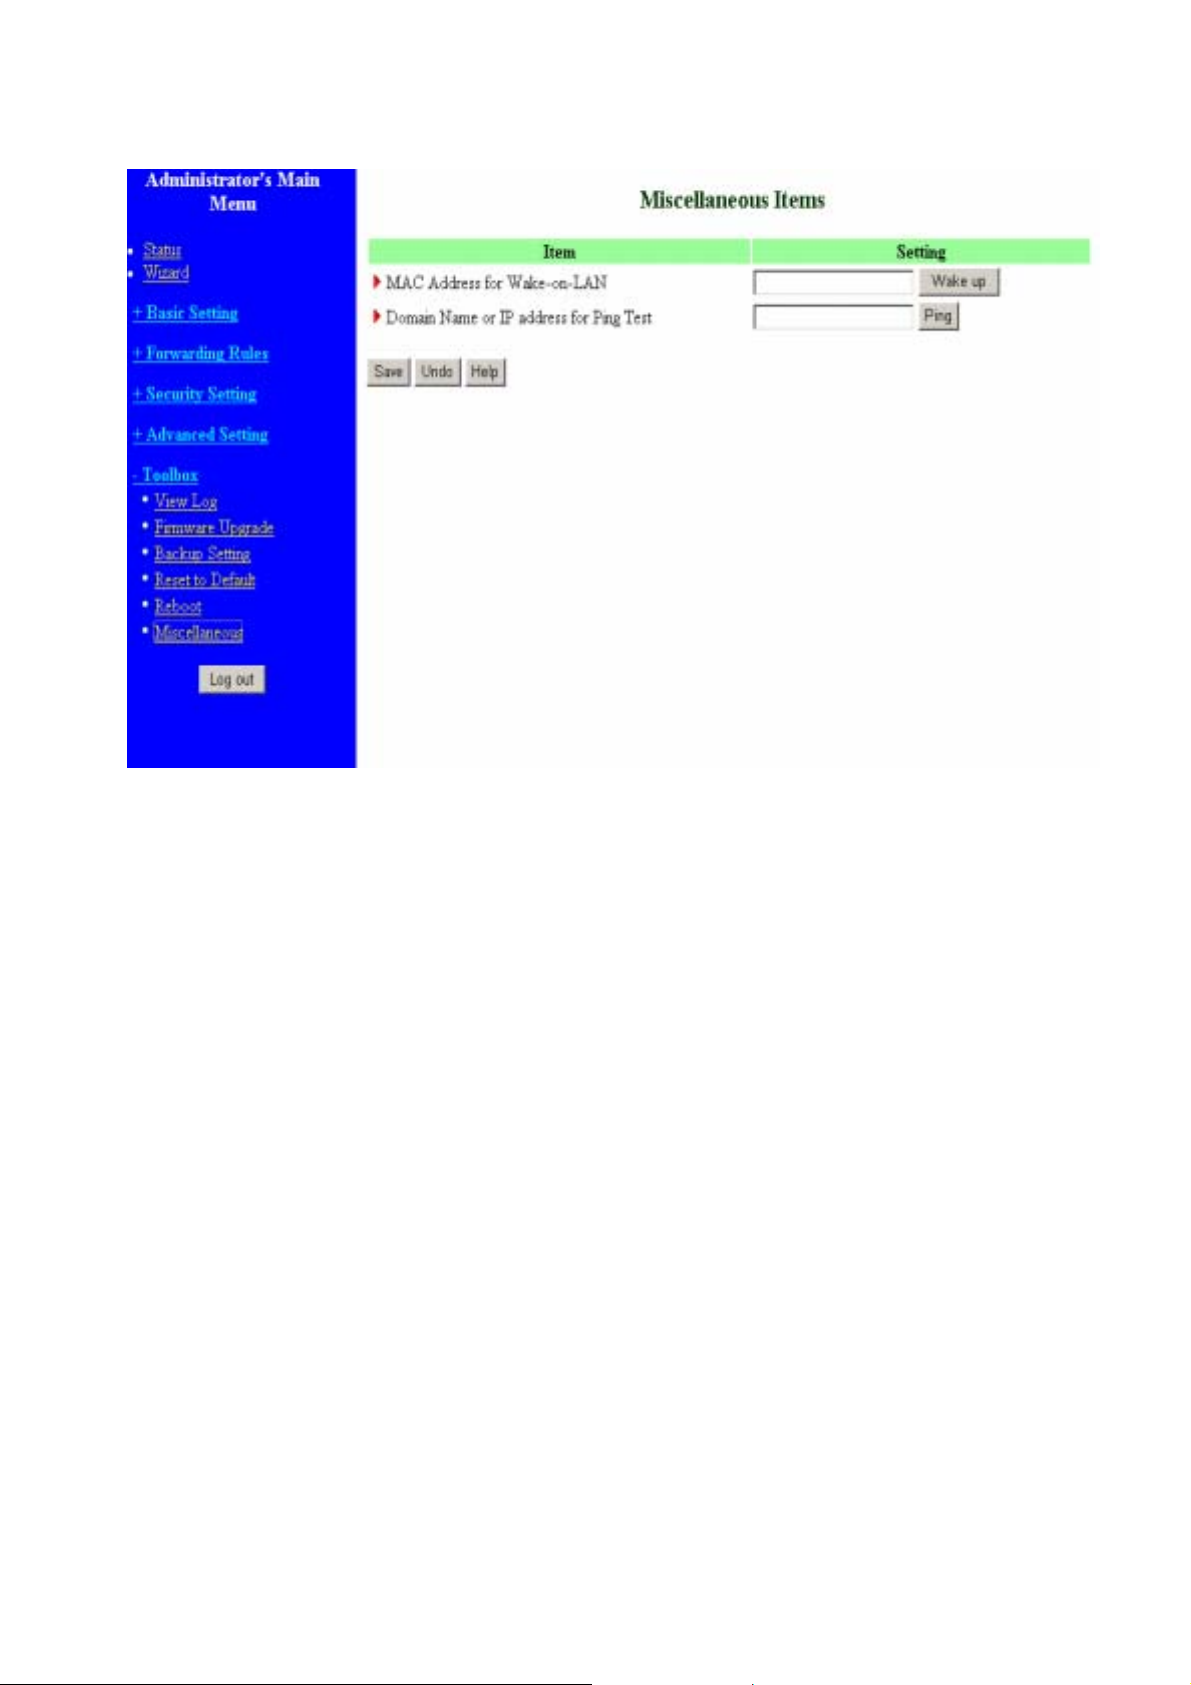
3.8.6. Miscellaneous Items
MAC Address for Wake-on-LAN
Wake-on-LAN is a technology that enables you to power up a networked device remotely.
In order to enjoy this feature, the target device must be Wake-on-LAN enabled and you
have to know the MAC address of this device, say 00-11-22-33-44-55. Clicking "Wake
up" button will make the router to send the wake-up frame to the target device
immediately.
Domain Name or IP address for Ping Test
Allow you to configure an IP, and ping the device. You can ping a specific IP to test
whether it is alive.
48
Page 52
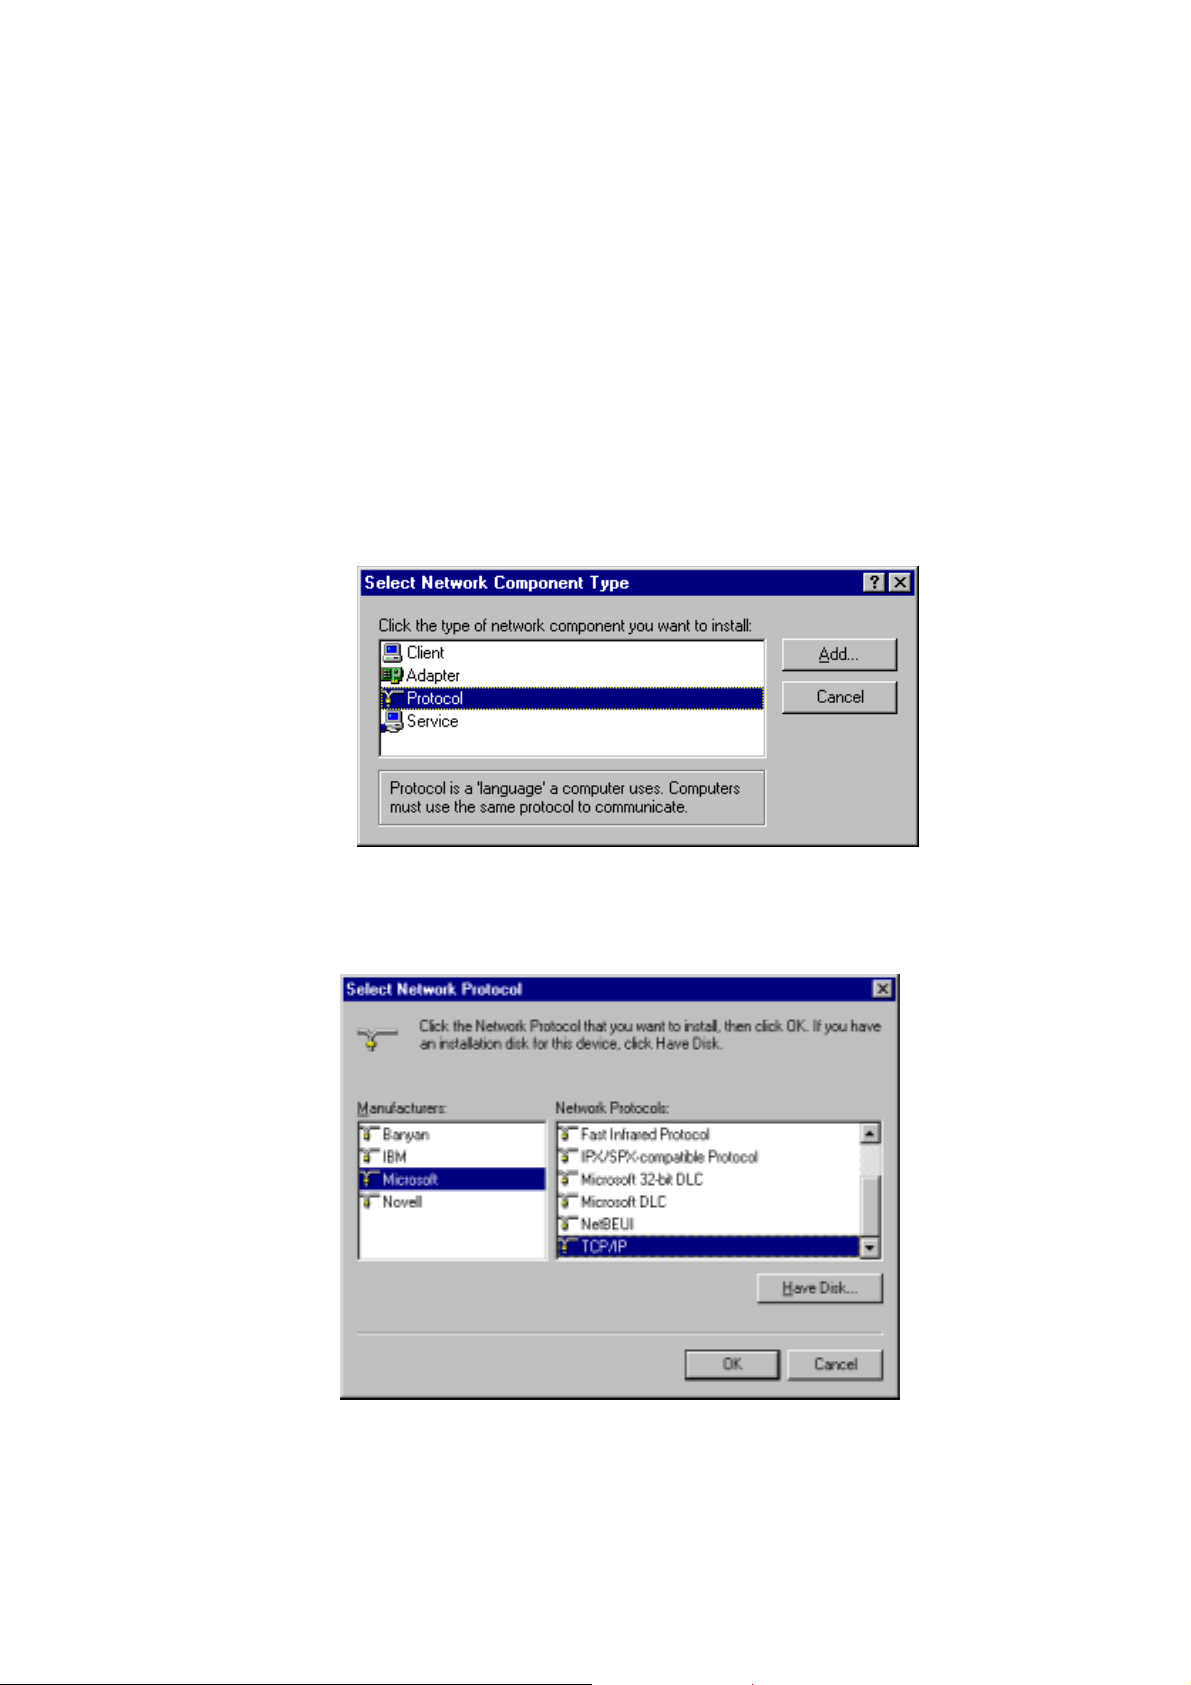
Appendix A TCP/IP Configuration for Windows 95/98
This section introduces you how to install TCP/IP protocol into your personal computer.
And suppose you have been successfully installed one network card on your personal
computer. If not, please refer to your network card manual. Moreover, the Section B.2
tells you how to set TCP/IP values for working with this NAT Router correctly.
A.1 Install TCP/IP Protocol into Your PC
1. Click Start button and choose Settings, then click Control Panel.
2. Double click Network icon and select Configuration tab in the Network window.
3. Click Add button to add network component into your PC.
4. Double click Protocol to add TCP/IP pr otoc ol .
5. Select Microsoft item in the manufactures list. And choose TCP/IP in the Network
Protocols. Click OK button to return to Network window.
6. The TCP/IP protocol shall be listed in the Network window. Click OK to complete the
install procedure and restart your PC to enable the TCP/IP protocol.
49
Page 53
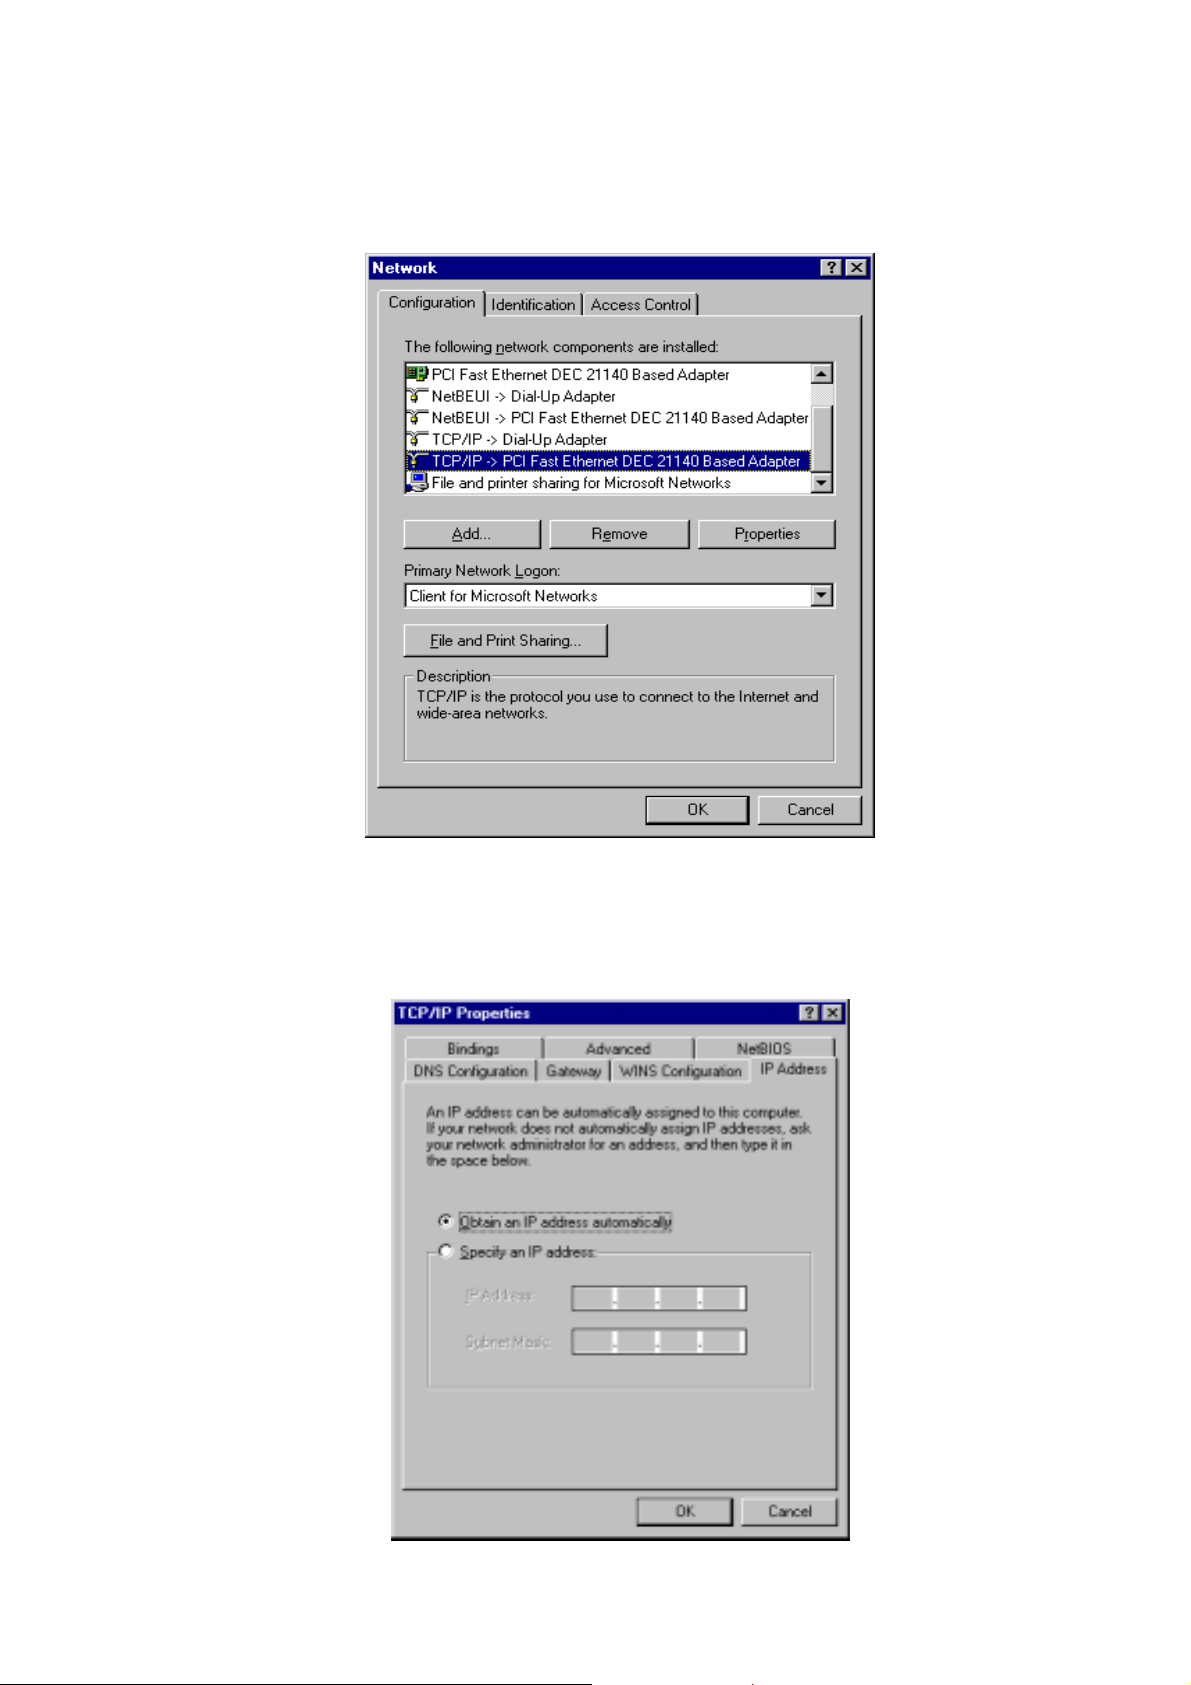
A.2 Set TCP/IP Protocol for Working with NAT Router
1. Click Start button and choose Settings, then click Control Panel.
2. Double click Network icon. Select the TCP/IP line that has been associated to your
network card in the Configuration tab of the Network window.
3. Click Properties button to set the TCP/IP protocol for this NAT Router.
4. Now, you have two setting methods:
a. Select Obtain an IP address automatically in the IP Address tab.
50
Page 54
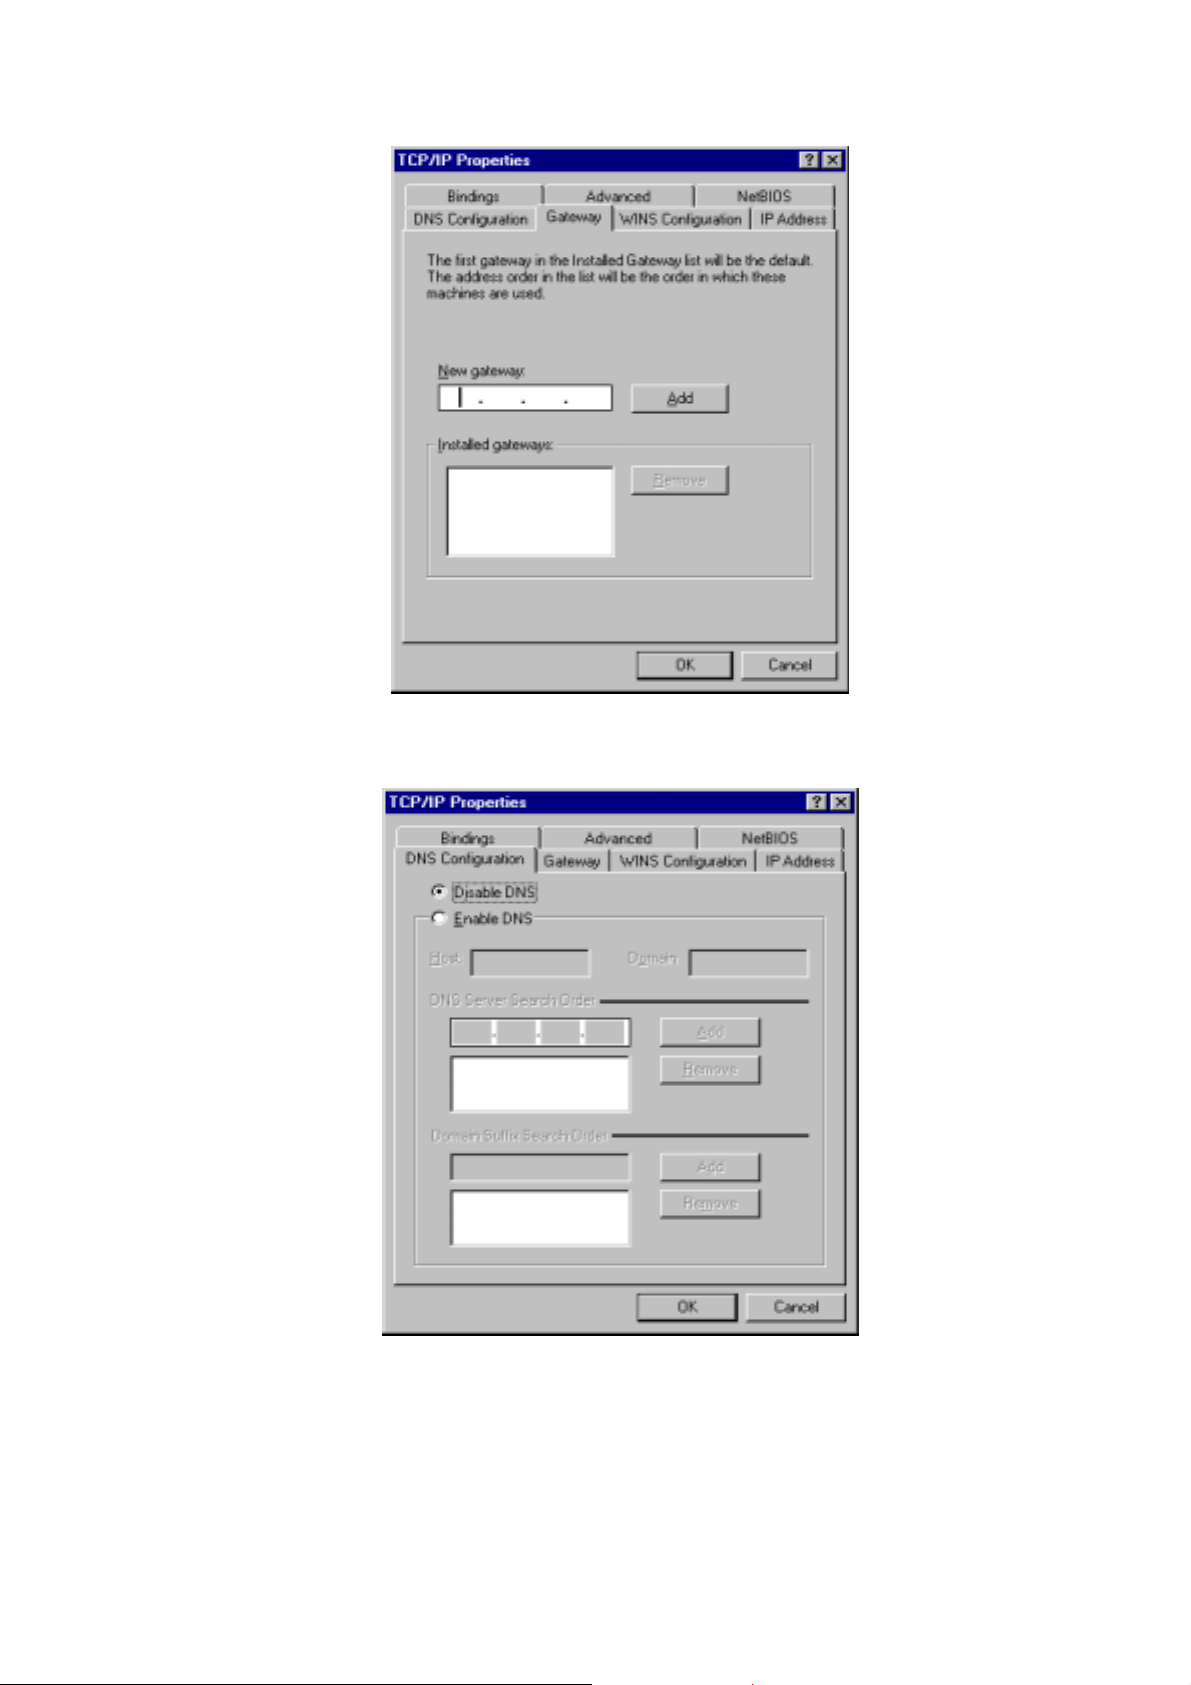
b. Don’t input any value in the Gateway tab.
c. Choose Disable DNS in the DNS Configuration tab.
51
Page 55
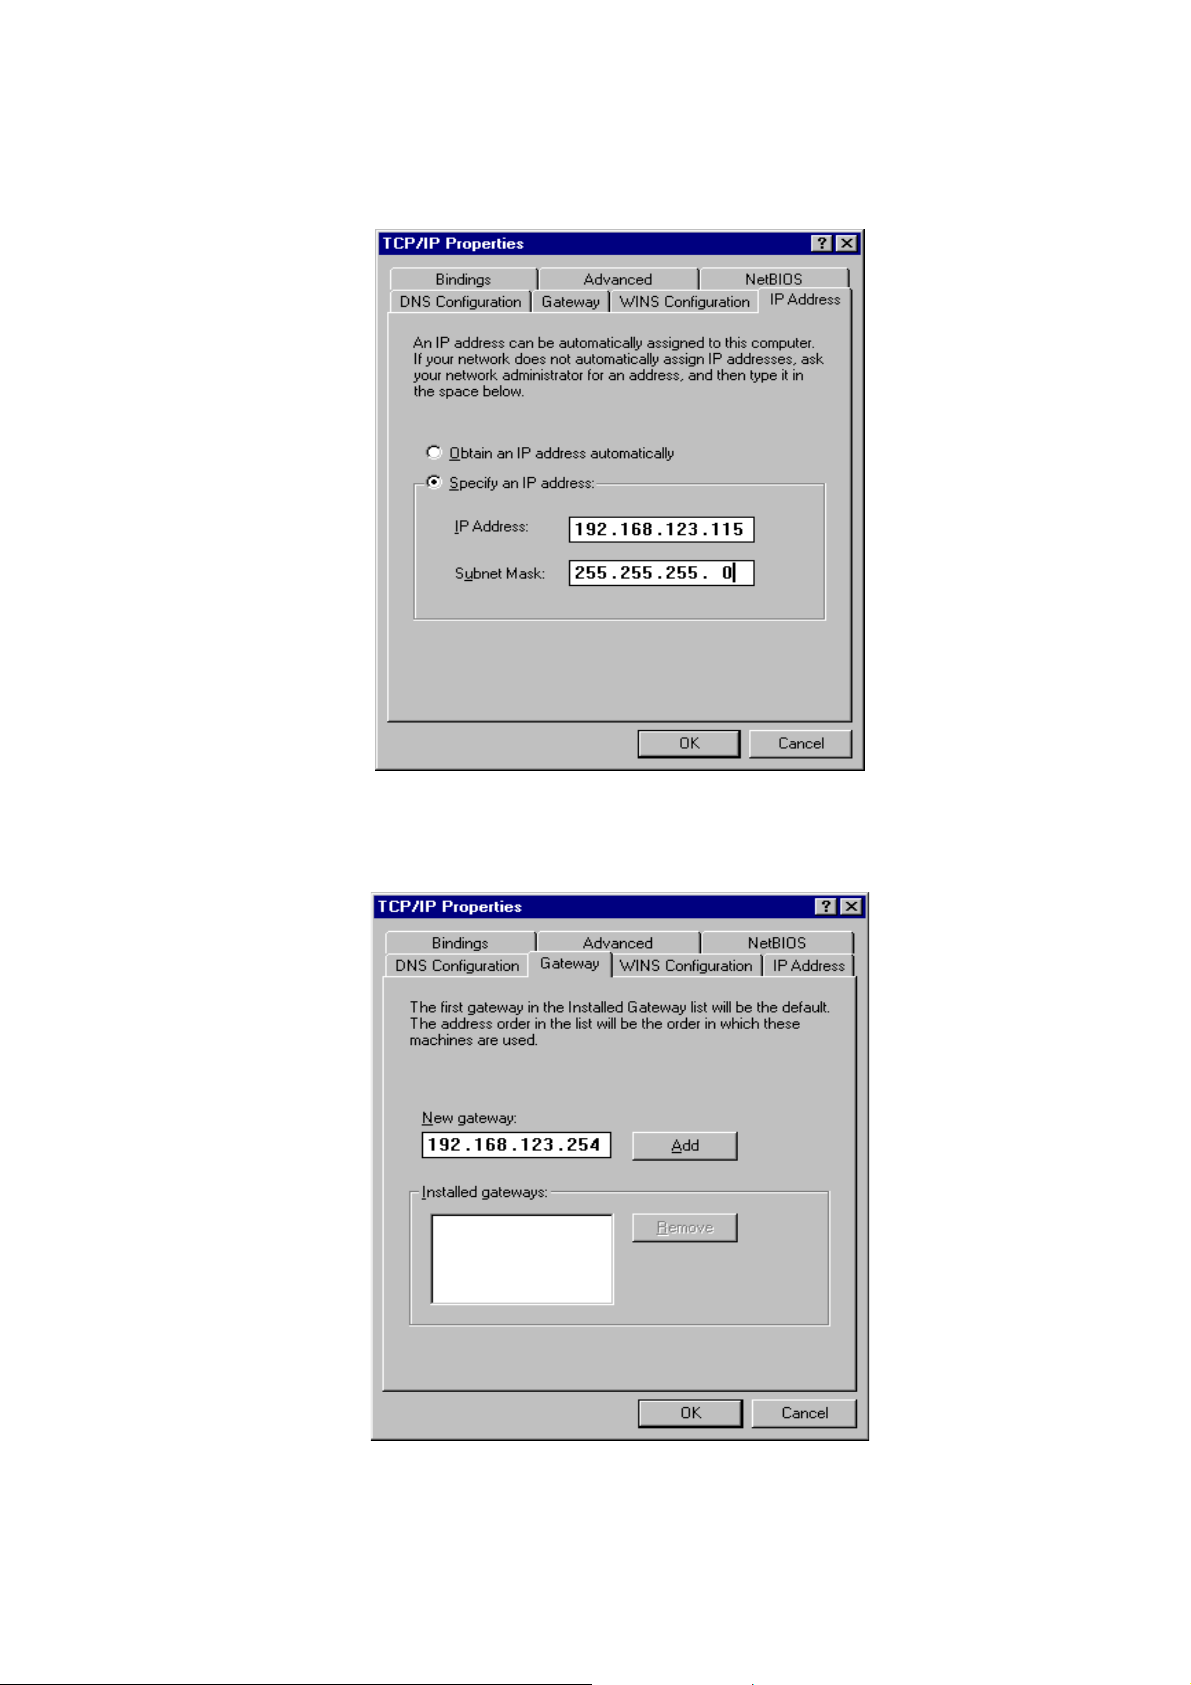
B. Configure IP manually
a. Select Specify an IP address in the IP Address tab. The default IP address
of this product is 192.168.123.254. So please use 192.168.123.xxx (xxx is
between 1 and 253) for IP Address field and 255.255.255.0 for Subnet Mask
field.
b. In the Gateway tab, add the IP address of this product (default IP is
192.168.123.254) in the New gateway field and click Add button.
52
Page 56
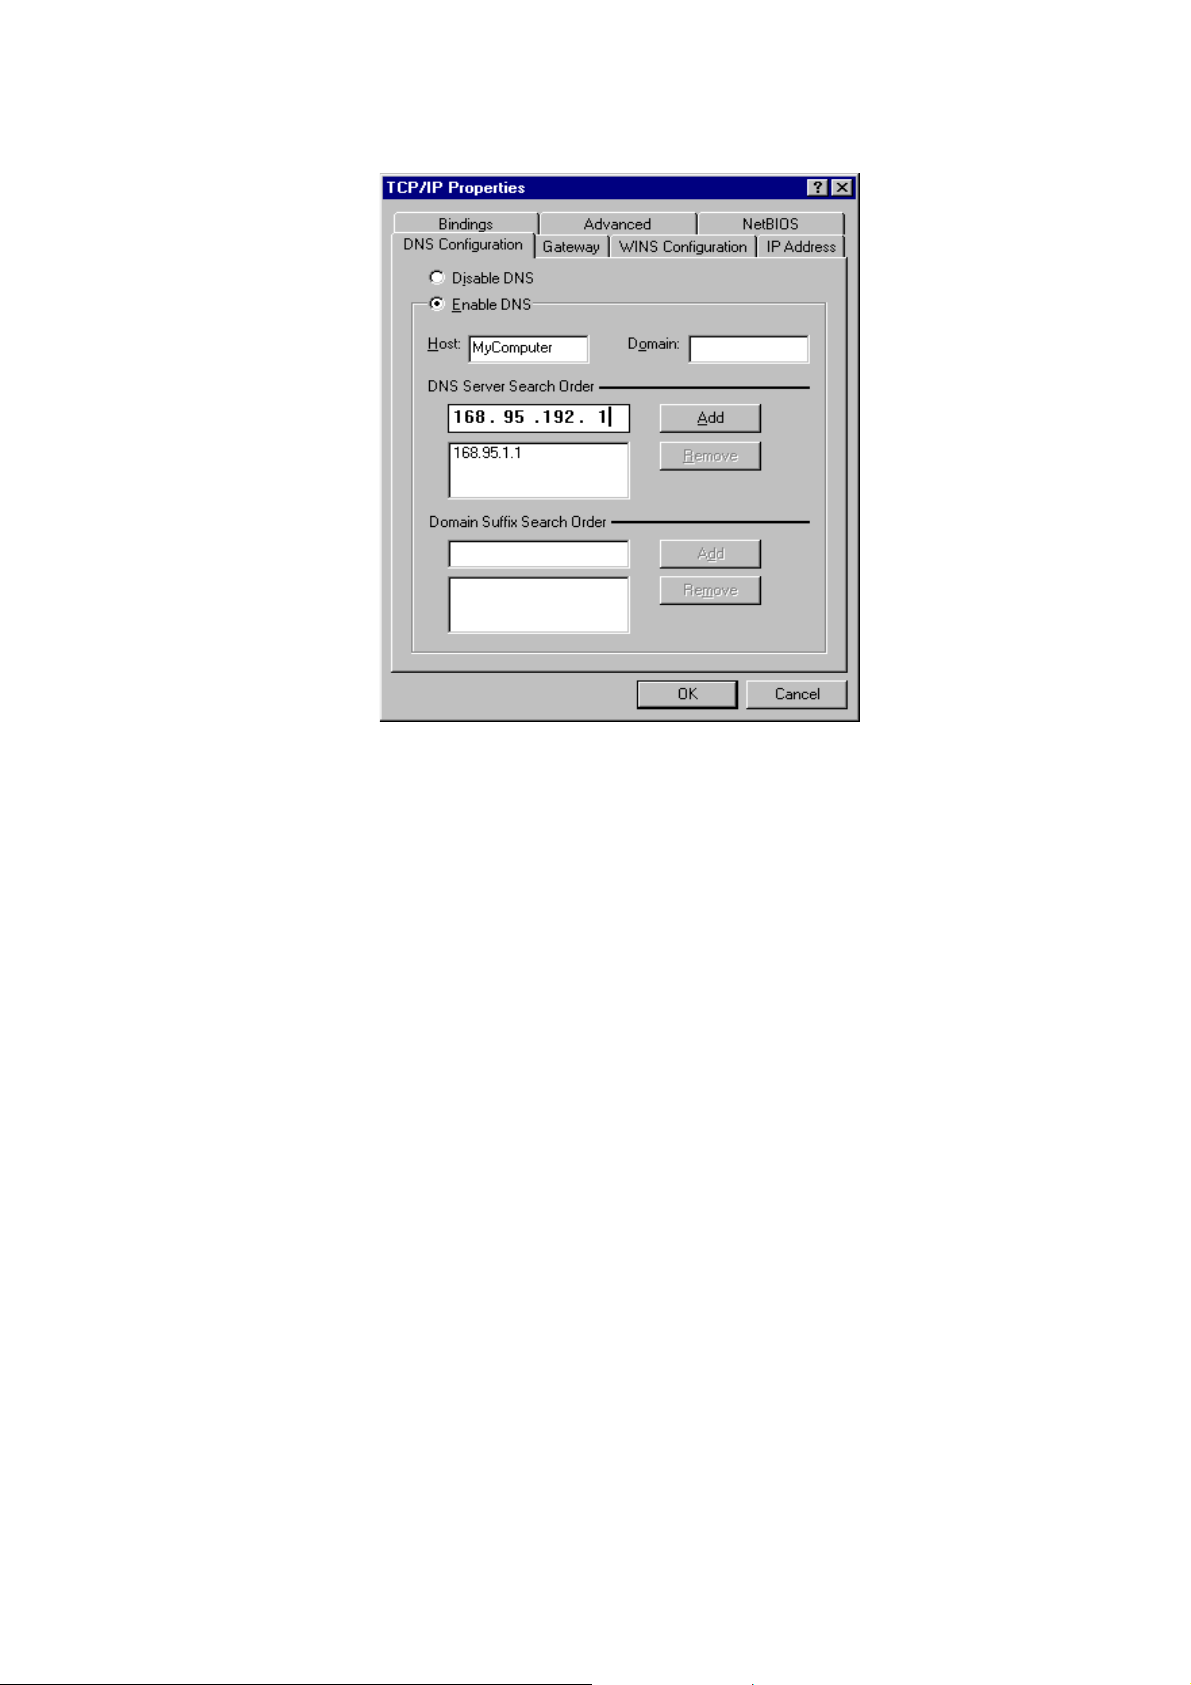
c. In the DNS Configuration tab, add the DNS values which are provided by the
ISP into DNS Server Search Order field and click Add button.
53
Page 57

Appendix B FAQ and Troubleshooting
z Reset to factory Default
1. Restore directly when the router power on
First, hold the RESET button about 5 seconds(M1 will start flashing about 5
times),move away the
hand. The RESTORE process is completed.
54
Page 58

Appendix C
Specifications
General
Standards IEEE 802.3(10Base-T), IEEE 802.3u(100Base-TX)
Ports / Buttons LAN – 4 ports 10/100 Ethernet (auto-MDIX), RJ-45
WAN - 10/100 Ethernet (auto-MDIX), RJ-45
One Init (Reset) button
Power External; 9V AC, 1A
Regulatory and Environmental Compliance
EMC
certification
Temperature
Range
Humidity 10% ~ 90% Non-condensing
Protocols
Routing
Protocols
Mechanical
LEDs Power/Status; WLAN; LAN (1-4); WAN
Gross Weight 240± 5g
Dimensions 153mm x 112mm x 27mm
* Subject to change without notice.
MIC
Operating: 0 to 40 °C,
Storage: -20 to 70 °C
Dynamic, Static Routing with TCP/IP
PPTP, PPPoE, NAT(Virtual Server),
VPN Pass-Through (IPSec, PPTP, L2TP Pass-Through)
DHCP (Client )
55
Page 59

Appendix D
Warranty
Limited Warranty Statement (1-Year Warranty)
Thank you for purchasing the GIGABYTE Product. This limited warranty statement will provide you one year warranty starting from the purchase date. Of
which if any defect is occurred due to accidents or any man-made factors, or any unauthorized torn-off or damage to GIGABYTE’s sticker on the product,
GIGABYTE Technology will not provide after-sale services, such as:
• Products are damaged due to any violation of instructions on user manual.
• Hardware is damaged due to inappropriate assembling.
• Products are damaged due to the use of illegal accessory.
• Products are damaged due to parts disassembling without authorization.
• Products are damaged due to exceeding environment limits.
• Products are damaged due to unexpected external force.
• Products are damaged due to nature disasters.
• Products are copies or illegally smuggled goods.
PLEASE RECORD THE FOLLOWING INFORMATION REGARDING YOUR WARRANTY
Name of Customer:
Phone No:
Address:
Email:
Model:
Serial:
Date of Purchase:
Place of Purchase:
From Whom:
Distributor:
Customer Service
GIGA-BYTE TECHNOLOGY CO., LTD.
No.6, Bau Chiang Road, Hsin-Tien,
Taipei Hsien, Taiwan
Tel: 886-2-8665-2665 Fax:886-2-89124007
http://www.gigabyte.com.tw
Technical Support
E-mail: [email protected]
56
 Loading...