

Page 1

GN-A11G
Wireless LAN
Access Point
User’s Manual
Page 2

GN-A11G Wireless LAN Access Point
Federal Communication Commission Interference Statement
This equipment has been tested and found to comply with the limits for a Class B
digital device, pursuant to Part 15 of the FCC Rules. These limits are designed
to provide reasonable protection against harmful interference in a residential
installation. This equipment generates, uses and can radiate radio frequency
energy and, if not installed and used in accordance with the instructions, may
cause harmful interference to radio communications. However, there is no
guarantee that interference will not occur in a particular installation. If this
equipment does cause harmful interference to radio or television reception,
which can be determined by turning the equipment off and on, the user is
encouraged to try to correct the interference by one of the following measures:
- Change direction or location of antenna.
- Increase the distance between the equipment and the antenna.
- Connect this equipment with a socket different from the one connected with
antenna
- Ask help from experienced audio/video technicians.
FCC Caution: To assure continued compliance, any changes or modifications
not expressly approved by the party responsible for compliance could void the
user’s authority to operate this equipment.
This device complies with Part 15 of the FCC Rules. Operation is subject to the
following two conditions: (1) This device may not cause harmful interference,
and (2) this device must accept any interference received, including interference
that may cause undesired operation.
IMPORTANT NOTE:
FCC Radiation Exposure Statement:
This equipment complies with FCC radiation exposure limits set forth for an
uncontrolled environment. This equipment should be install and operated with
minimum distance 20cm between the radiator & your body.
This transmitter must not be co-located or operating in conjunction with any
other antenna or transmitter.
The antenna(s) used for this transmitter must not be co-located or operating in
conjunction with any other antenna or transmitter.
2
Page 3

GN-A11G Wireless LAN Access Point
Contents
Chapter 1 Introduction...................................................................4
Overview ............................................................................................................4
Features.............................................................................................................4
Package Contents..............................................................................................5
Rear and side panel........................................................................................... 5
Front Panel.........................................................................................................6
Chapter 2 QUICK INSTALLATION.................................................. 7
Hardware Requirements.....................................................................................7
System Requirements........................................................................................7
Internet Configuration Requirements.................................................................. 7
Hardware installation.......................................................................................... 8
Connecting AP.................................................................................................... 8
Chapter 3 Access Point Manager (AP Manager)........................ 11
Install Access Point Manager ............................................................................11
Using Access Point Manager............................................................................15
Firmware upgrade............................................................................................ 34
Uninstall AP Manager Utility............................................................................. 35
Chapter 4 Web-based configuration........................................... 37
Chapter 5 Troubleshooting.......................................................... 46
Appendix A: Glossary .................................................................. 47
Appendix B: Specifications ......................................................... 50
Physical Interface.............................................................................................50
Specifications................................................................................................... 50
Appendix C: Configuration of the PCs ....................................... 51
The TCP/IP Settings under Windows 2000......................................................51
The TCP/IP Settings underWindows XP.......................................................... 54
3
Page 4

GN-A11G Wireless LAN Access Point
Chapter 1 Introduction
Overview
Thank you for purchasing Gigabyte GN-A11G Wireless LAN Access Point,
which uses standard IEEE 802.11g with 54M bit/sec bandwidth instead of
standard 802.11b or standard Wi-Fi with 11M bit/sec bandwidth. GN-A11G
Wireless LAN Access Point supports 802.11b and 802.11g clients.
GN-A11G Wireless LAN Access Point is able to connect IEEE 802.11g or
IEEE802.11b devices to networks. Providing transmission speeds of up to
54Mbps, the GN-B41G allows users to share network resources, retrieve emails,
download large files, conduct a video conference, and distribute or display digital
photos, videos or MP3 files.
Furthermore, the router supports up to 128-bit WEP encryption to safeguard
your privacy on-line. GNA11G not only enables simple and easy installation and
usage, but also provides you useful AP Manager Configuration Utility and
Web-based configuration.
Features
Conforms to IEEE 802.11b/g specification and is compatible to Wi-Fi
Supports convenient SNMP management
Supports advanced wireless security
Supports 64/128-bit WEP encryption
Supports Access Control List (ACL)
Supports EDWS
Supports WDS (point-to-multi-points and point-to-point)
Synchronization process between Wireless LAN Access Point and WDS
function
Built-in DHCP software provides IP address
As for IEEE 802.11g, it provides transmission speeds of up to 54Mbps.
Dynamically adjust transmission speeds of 54, 48, 36, 24, 18, 12, 9 and
6Mbps for IEEE 802.11g
4
Page 5
GN-A11G Wireless LAN Access Point
Package Contents
Before the installation procedures, please ensure the components are not
damaged during the shipping. The package contents of the GN-A11G shall
include:
- One GN-A11GWireless LAN Access Point
- One Power Adapter
- One installation CD contains AP Manager and User’s Guide
- User’s Guide
- One RJ-45 cable
- One base
- wall-hung parts bag
If there is any missing or damaged accessory, please contact your local
distributor or dealer immediately.If a replacement unit is needed, please return
the device with the original packing material, otherwise the warranty will be
voided.
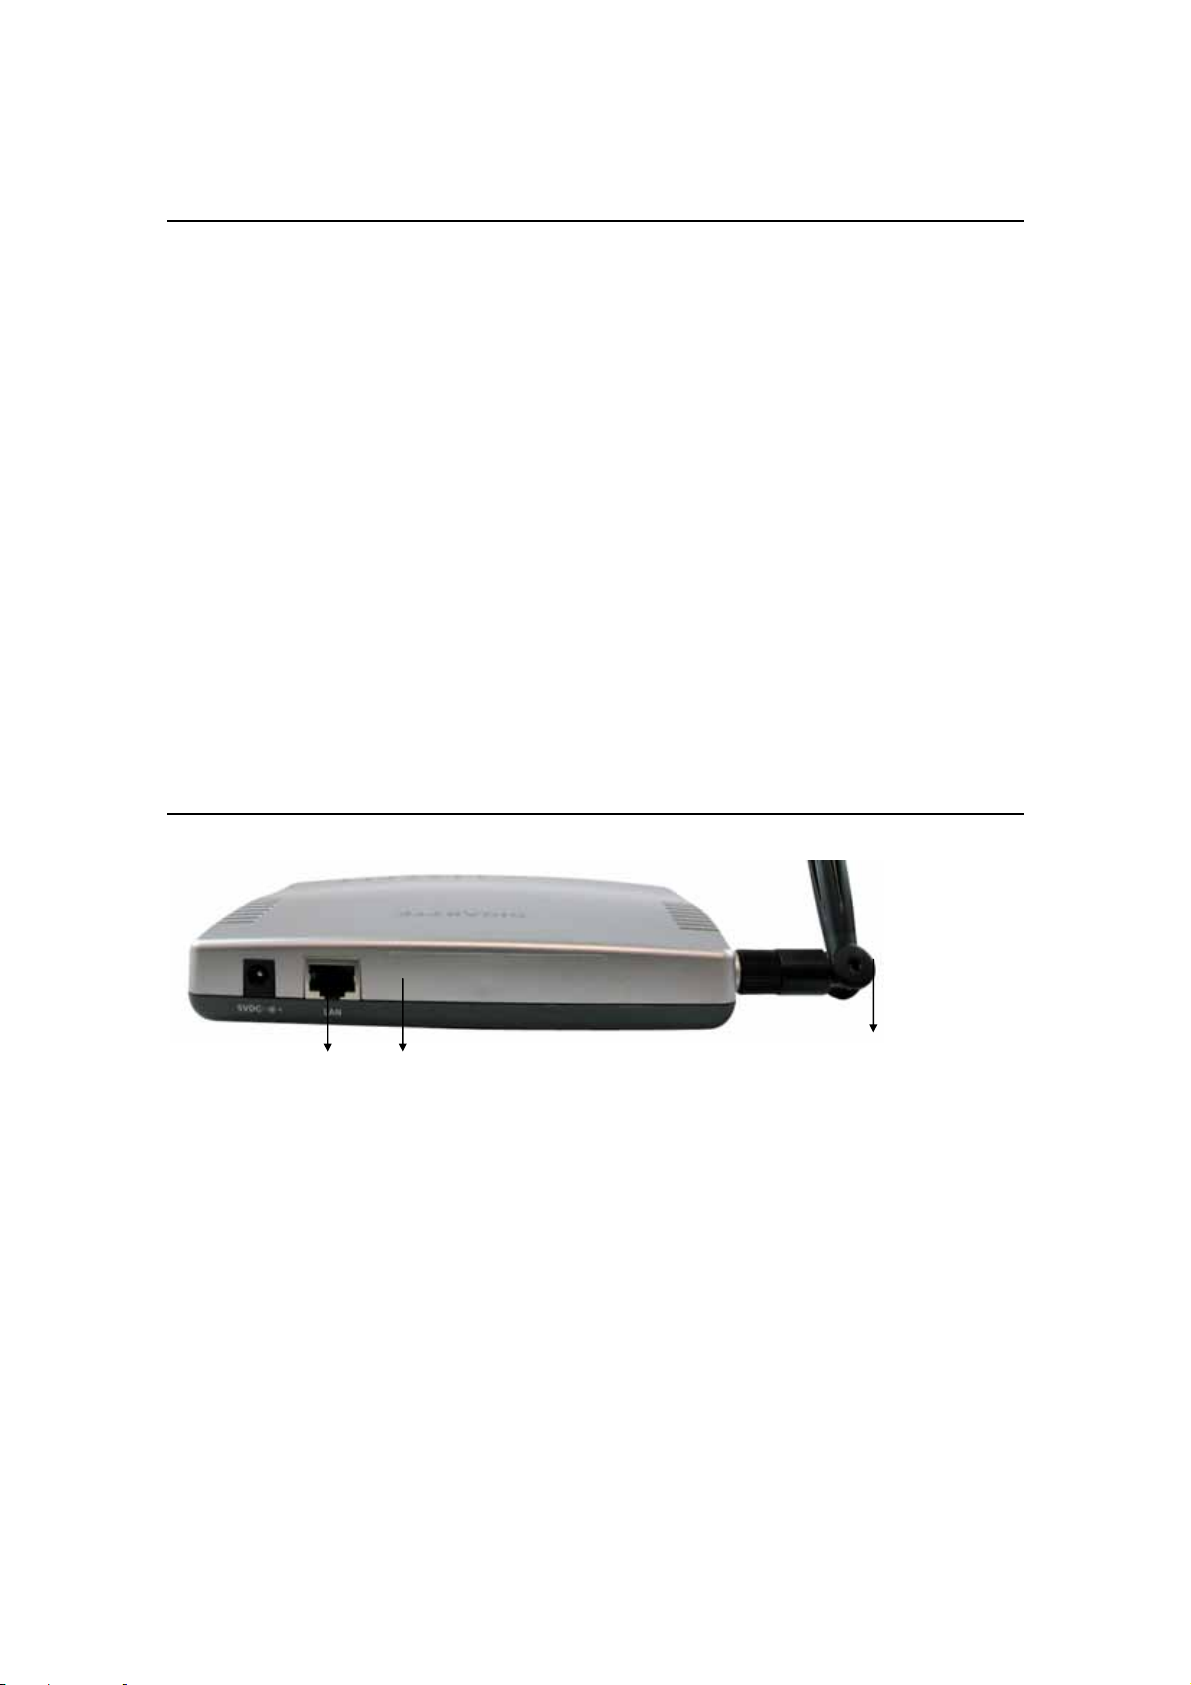
Rear and side panel
The Wireless LAN Access Point’s ports are located on the router’s rear panel
and the antenna is located on the side panel.
X Power Socket
The power port is where you connect the power adapter.
Y Ethernet LAN Port
RJ-45, Auto-sensing and Auto-MDI/MDIX for 10/100M Ethernet LAN
connection.
Z Antenna
2.4 GHz antenna
Y X
Z
5
Page 6
GN-A11G Wireless LAN Access Point
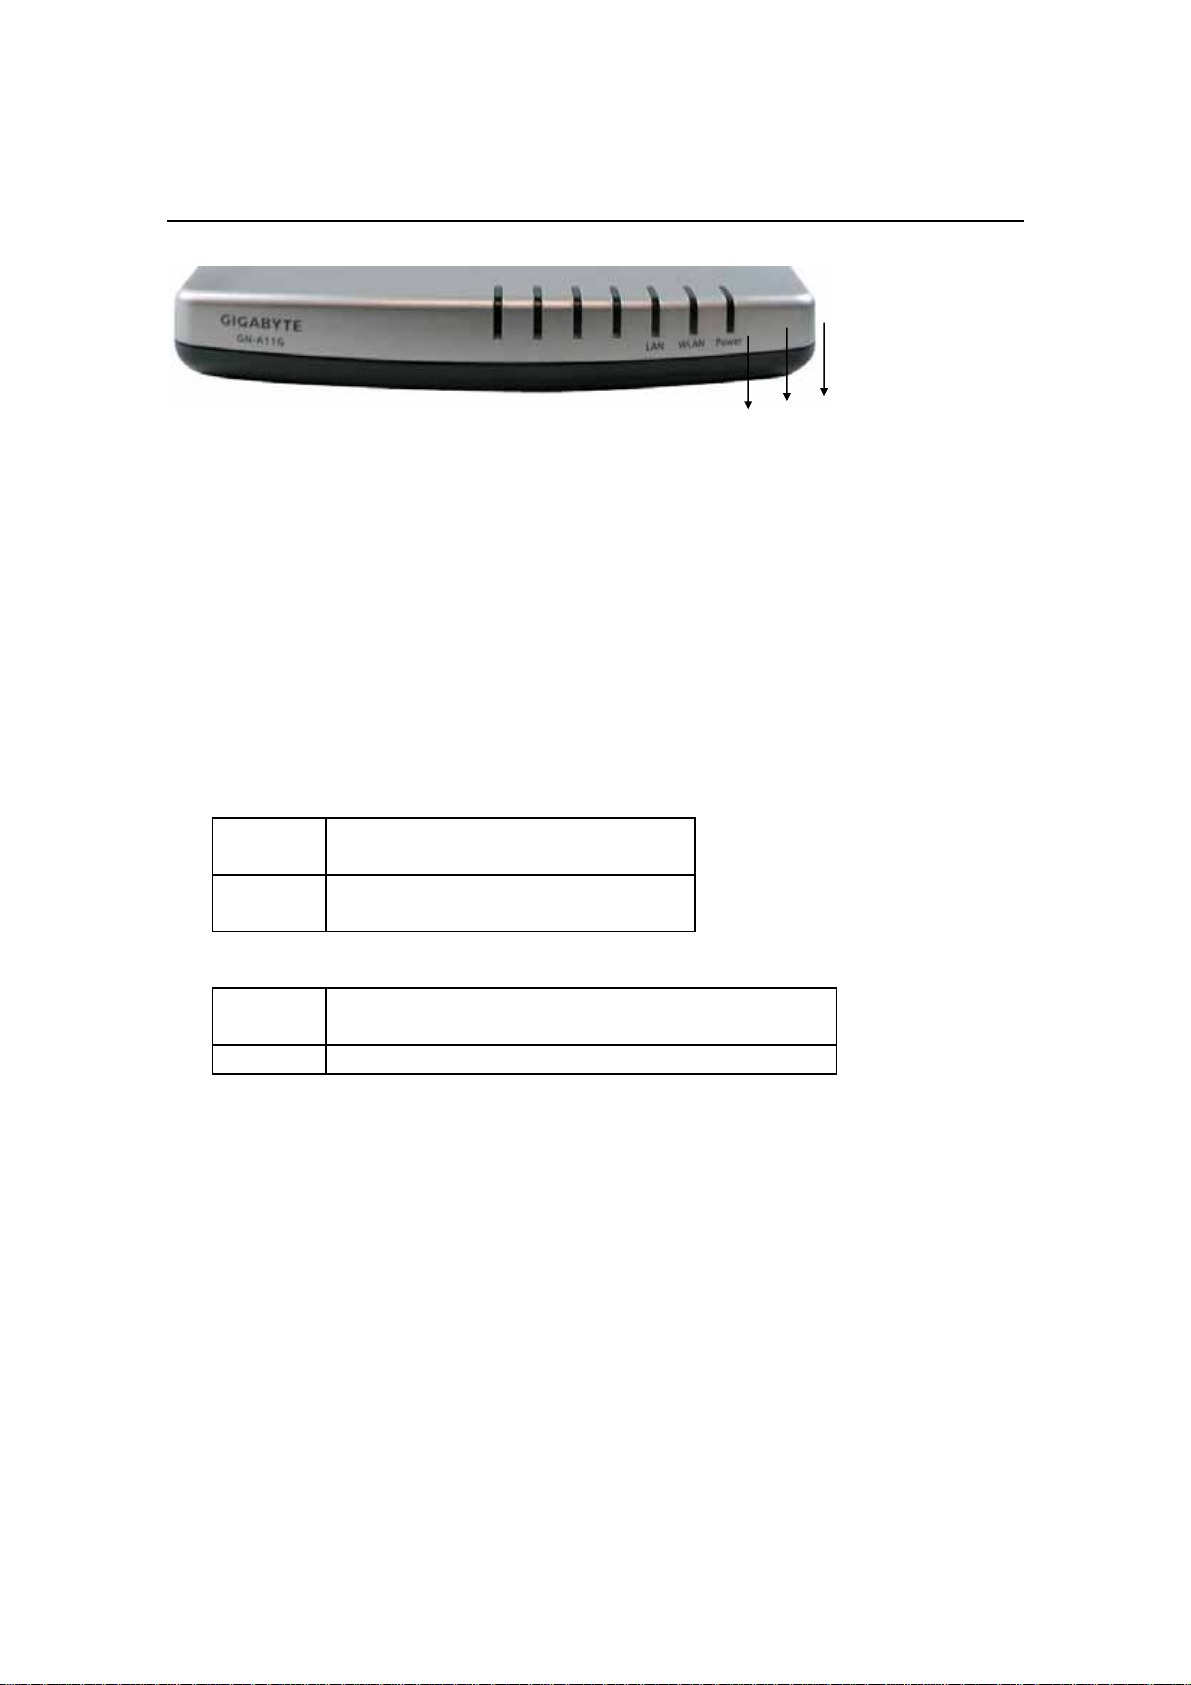
Front Panel
X
LED
The Wireless LAN Access Point’s LEDs display information about the AP’s
status.
X Power on (Green LED)
When the LED is on, the power is supplied to GN-A11G.
Note: When you change the settings and save them, the power LED will be
temporarily off.
Y WLAN (Green)
On
Flashing
Z LAN (Green)
On
Flashing Data is being transmitted wirelessly.
ADSL/Cable Modem is
connected to WAN port.
Data is being transmitted
wirelessly.
LAN port has detected a link with a 10/100
Mbps device.
Z
Y
6
Page 7

GN-A11G Wireless LAN Access Point
Chapter 2 QUICK INSTALLATION
Hardware Requirements
Computer specification for Wireless LAN Access Point:
One installed 802.11b/g wireless LAN adaptor
Ethernet converter or hub
RJ-45 Ethernet cable
System Requirements
One computer works under Windows, Macintosh or Linux
If wants to activate AP Manager, it is suggested to use a computer with
Windows OS.
Internet Configuration Requirements
To connect AP Manager with Wireless LAN Access Point, please set up the
following parameters for TCP/IP configuration:
Static IP Address: 192.168.1.x (e.g, 2~253)
Subnet Mask: 255.255.255.0
Default Gateway: 192.168.1.254
7
Page 8

GN-A11G Wireless LAN Access Point
Hardware installation
Use the following steps to install Access Points (hereafter called APs).
1. Please select an appropriate location to install AP. Generally, a center
covering radio signals from all radio equipment is the best location. Please
eliminate all metal objects within the coverage and prevent direct sunlight.
2. Please locate the AP appropriately. Generally, the higher the antenna is
located, the better the efficiency of AP is. The location of antenna influences
the sensitiveness of signal reception.
3. Connect one end of RJ-45 Ethernet cable to AP and the other end to a hub,
converter, router or wiring panel (normally fixed on the wall).
4. Connect one end of power adapter to AP and the other end to a socket.
(Note: please only use the power adapter provided in the Gigabyte’s
package; the device may be damaged if a different adapter is used.)
As for normal households, the range of signal receiption should not be an issue.
In case of non- or weak signals where the wireless LAN is used, please consider
to place the AP directly between the computer and wireless adaptor. An external
AP can be connected for rooms out of the coverage to build up a better
environment of reception.
Connecting AP
Linking wired Ethernet
You can directly connect built-in adaptor to AP with a cable instead of a
converter or hub.
8
Page 9

GN-A11G Wireless LAN Access Point
There are two installation methods for reference:
Method 1: Static IP address
If DHCP is not used on the network, the AP can be set up via a direct
connection to the computer.
PC (AP Manager) 192.168.1.x
192.168.1.1 (Default)
Access Point
1. You must assign a static IP address to the computer. The Subnet must be
the same for the computers and AP. For example, the default IP address of
the AP is 192.168.1.1 and the Subnet Mask is 255.255.255.0. You can enter
an IP address of 192.168.1.20 (if not assigned to other network equipments)
and an Subnet Mask of 255.255.255.0.
Note: For further instructions regarding to this step, please refer to
Appendix C, Computer Configuration.
2. Please connect APs in turns and assign a static IPs to each AP. For
example, 192.168.1.2 or 192.168.1.y. (If the IP address is 10.1.5.x, 10.1.5.y
can be assigned to your AP.)
3. Please make sure an exclusive IP for each AP.
4. After setting all APs successfully, you can use AP manager to control /
monitor all APs.
9
Page 10
GN-A11G Wireless LAN Access Point
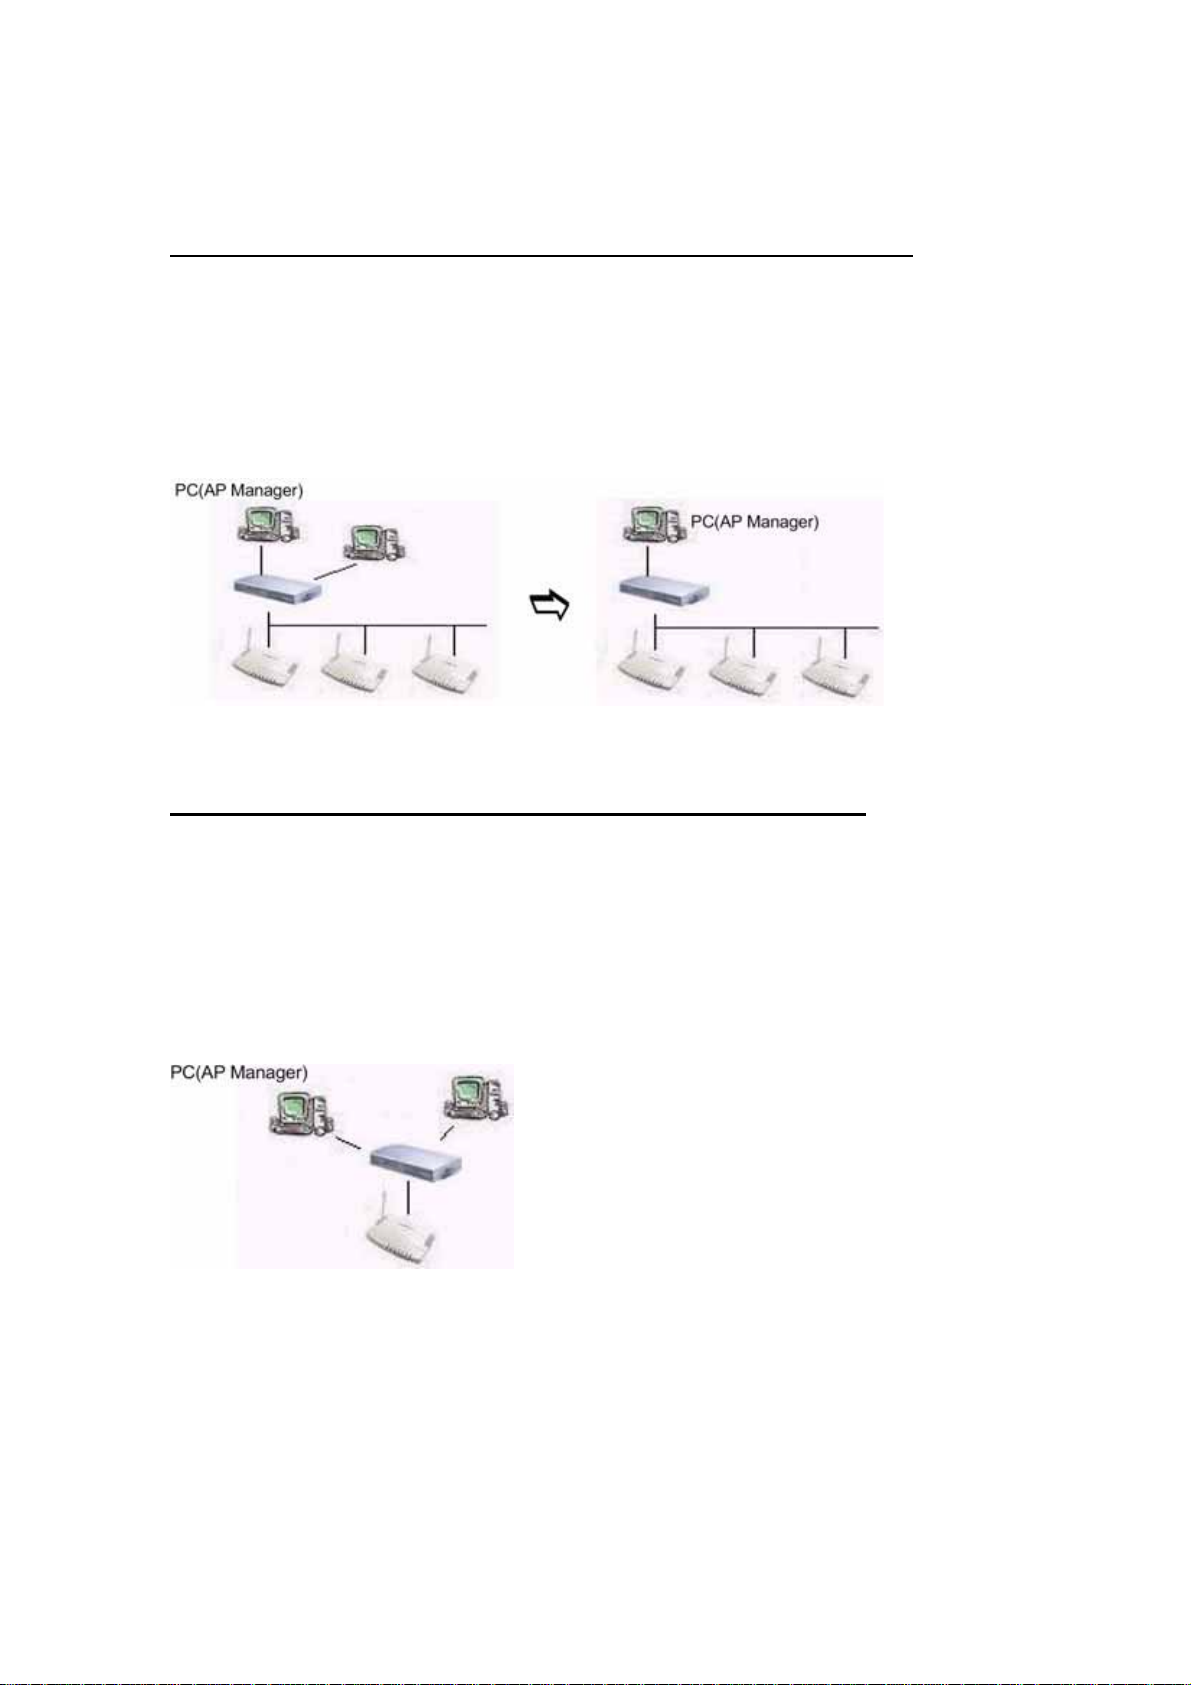
Method 2: Multi-AP configuration
Use a DHCP server to set IP address and then remove the server.
To set up multi APs at one time, a DHCP server can be set up to assign IPs for
all APs. Therefore, each AP has its exclusive IP address. After setting, please
remove or disable the DHCP server. Now, you can search all APs with AP
Manager and assign a static IP address for the Nth AP. Note: after assigning a
static IP address for each AP, please set the AP Manager in the same Subnet.
DHCP Server
Converter/Hub Converter/Hub
Obtain an IP address automatically – DHCP server is enabled
If a DHCP server is used on the network, it can connect to APs and AP Manager
through converters /hubs. You should set the IP address of AP as “Obtain an IP
address automatically”. DHCP will assign an IP address to the AP. The Subnet
must be the same for the PC(AP Manager) and AP. Or, you can set the PC (AP
Manager) as “Obtain an IP address automatically” and assign IPs with the same
DHCP.
DHCP Server
Converter/Hub
Access Point
Note: You can use Gigabyte AP Manager to connect APs through Wireless LAN
adaptor instead of wired Ethernet.
10
Page 11
GN-A11G Wireless LAN Access Point
Chapter 3 Access Point Manager (AP
Manager)
Two methods to set up APs: Web-based configuration or AP Manager Utility.
Gigabyte AP Manager Utility is only used for Gigabyte AP. This Chapter will
introduce how to set up APs through AP Manager.
Note: 1. The efficiency of wired connection is better than that of wireless
connections among APs. It is suggested to use wired connections to
manage APs.
2. It is suggested to disable firewall while setting Wireless LAN Access
Point with AP Manager utility.
Install Access Point Manager
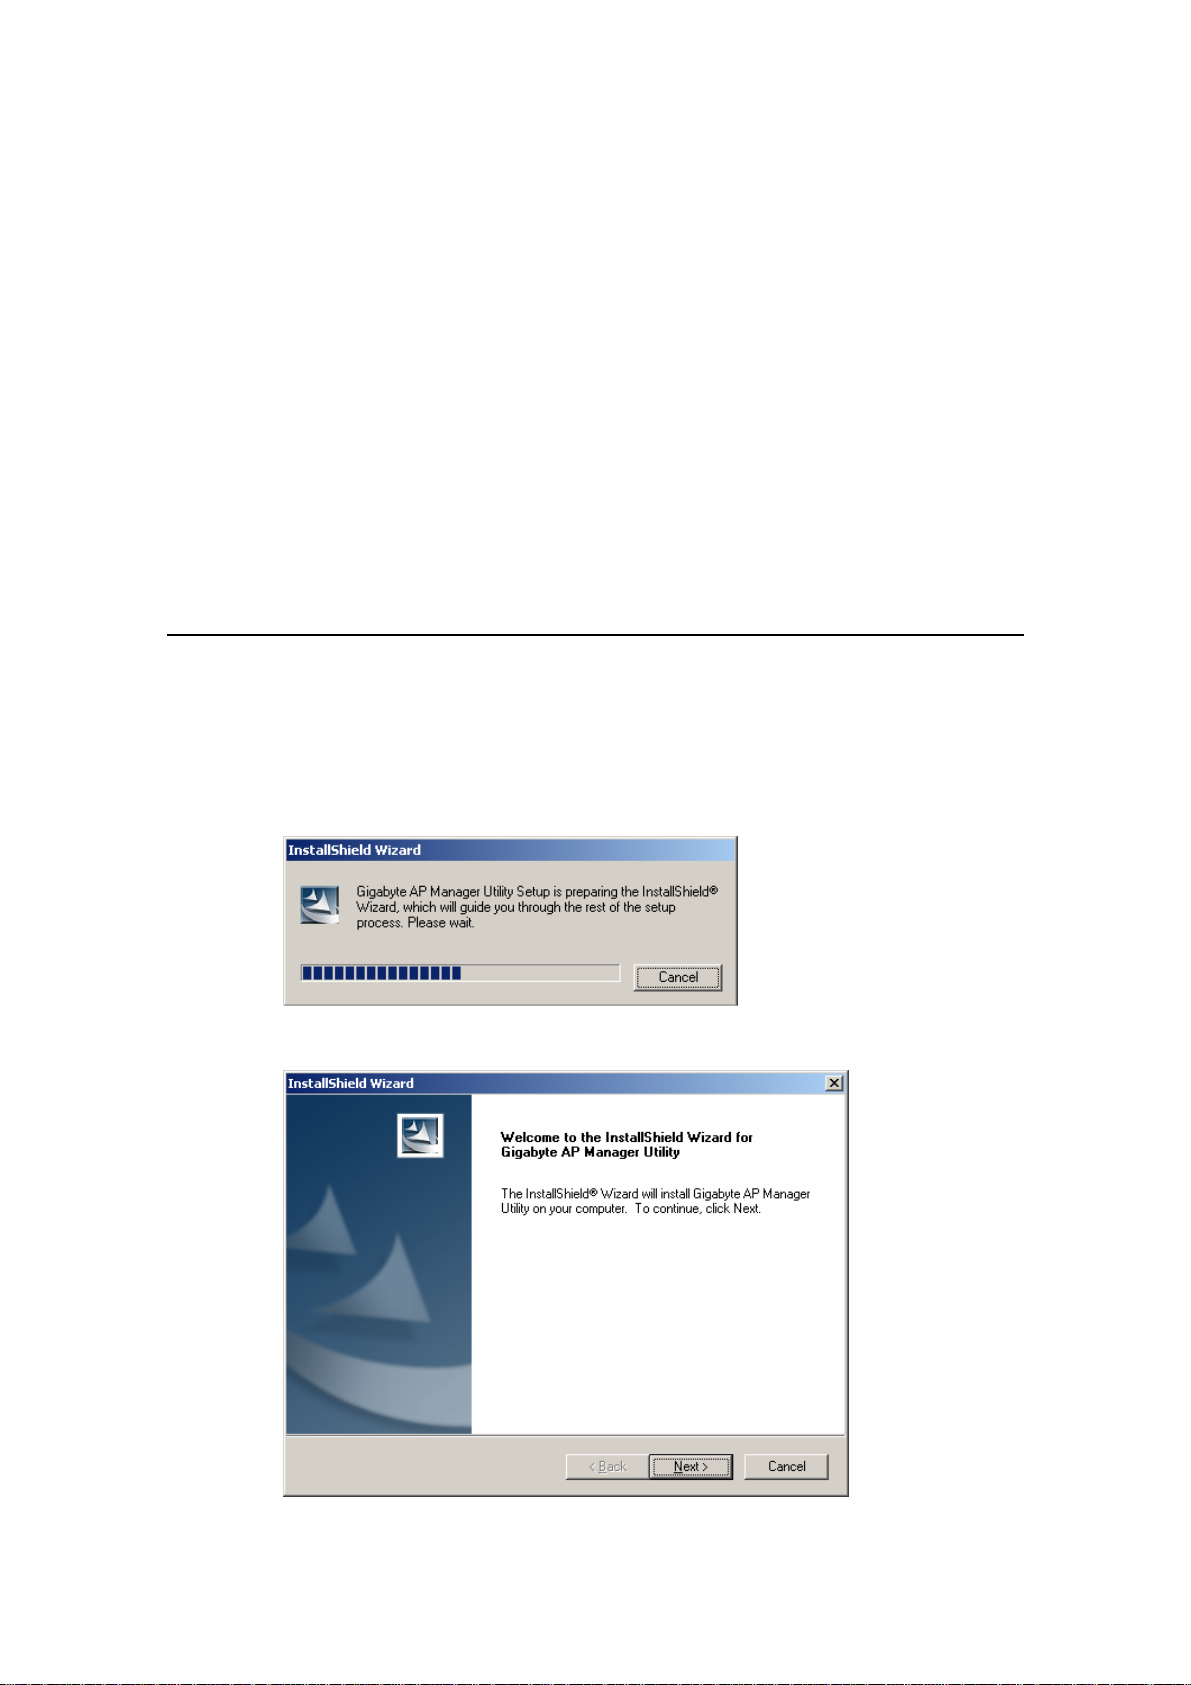
Install “Gigabyte AP Manager” in Windows with the following steps.
Step 1: Insert the Installation CD into your CD-ROM drive and click “Install
Gigabyte AP Manager” on the screen.
Step 2: Wait for a while.
Step 3: Click “Next”.
11
Page 12
GN-A11G Wireless LAN Access Point
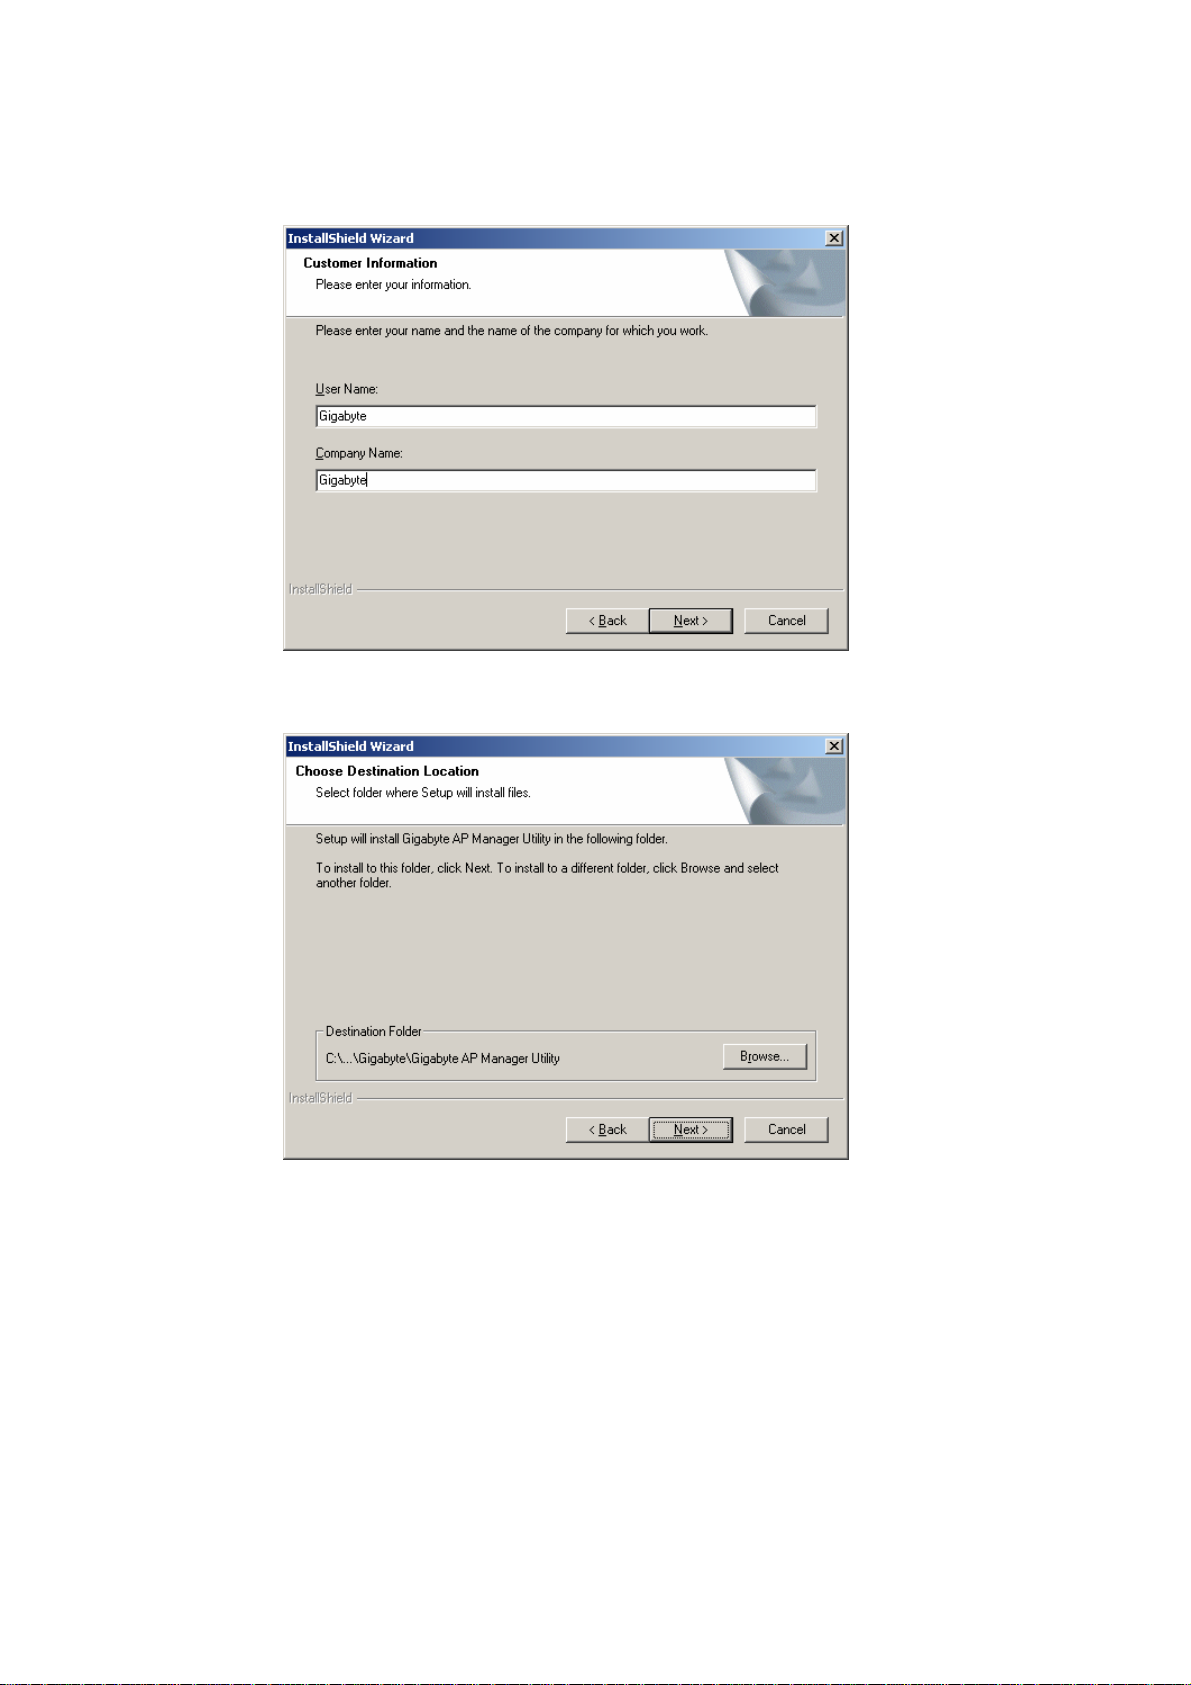
Step 4: Enter users’ data and then click “Next”.
Step 5: Click “Next” to accept default directory or “Browse” other locations.
12
Page 13
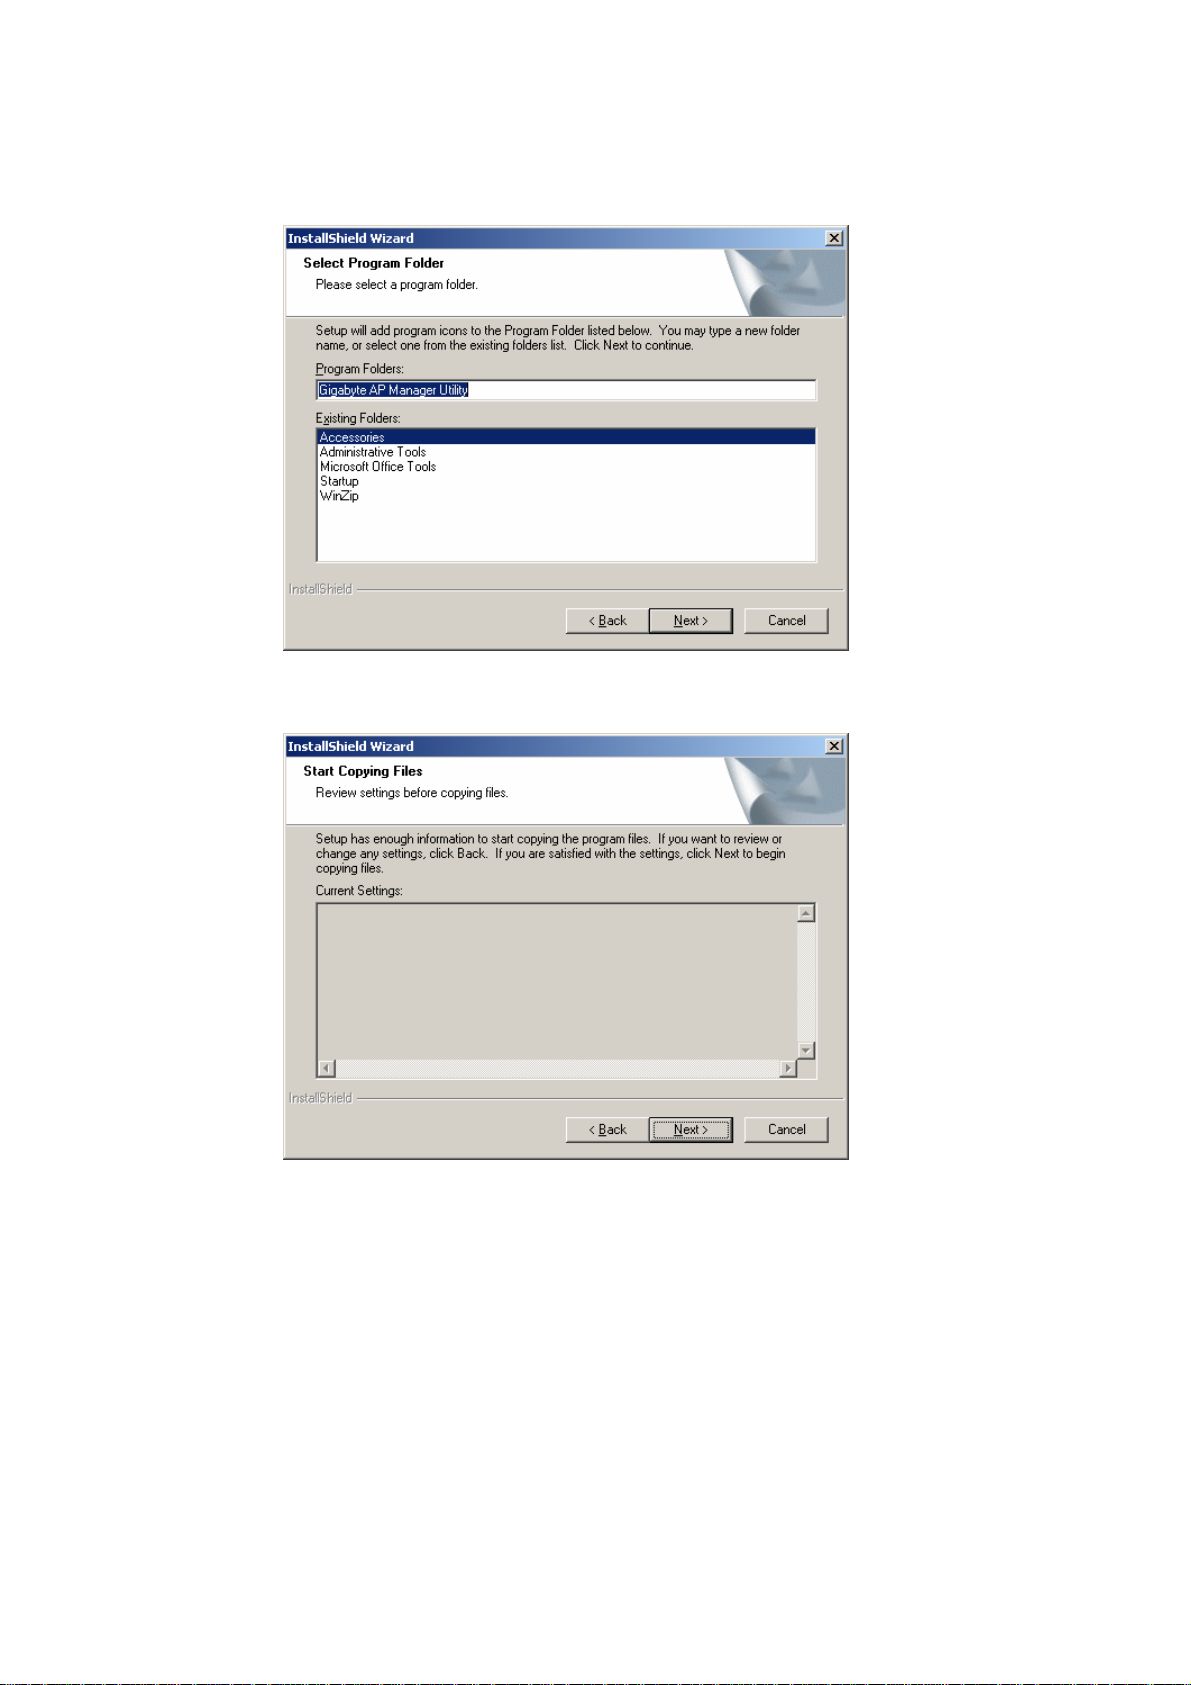
Step 6: Click “Next”.
Step 7: Click “Next”.
GN-A11G Wireless LAN Access Point
13
Page 14
GN-A11G Wireless LAN Access Point
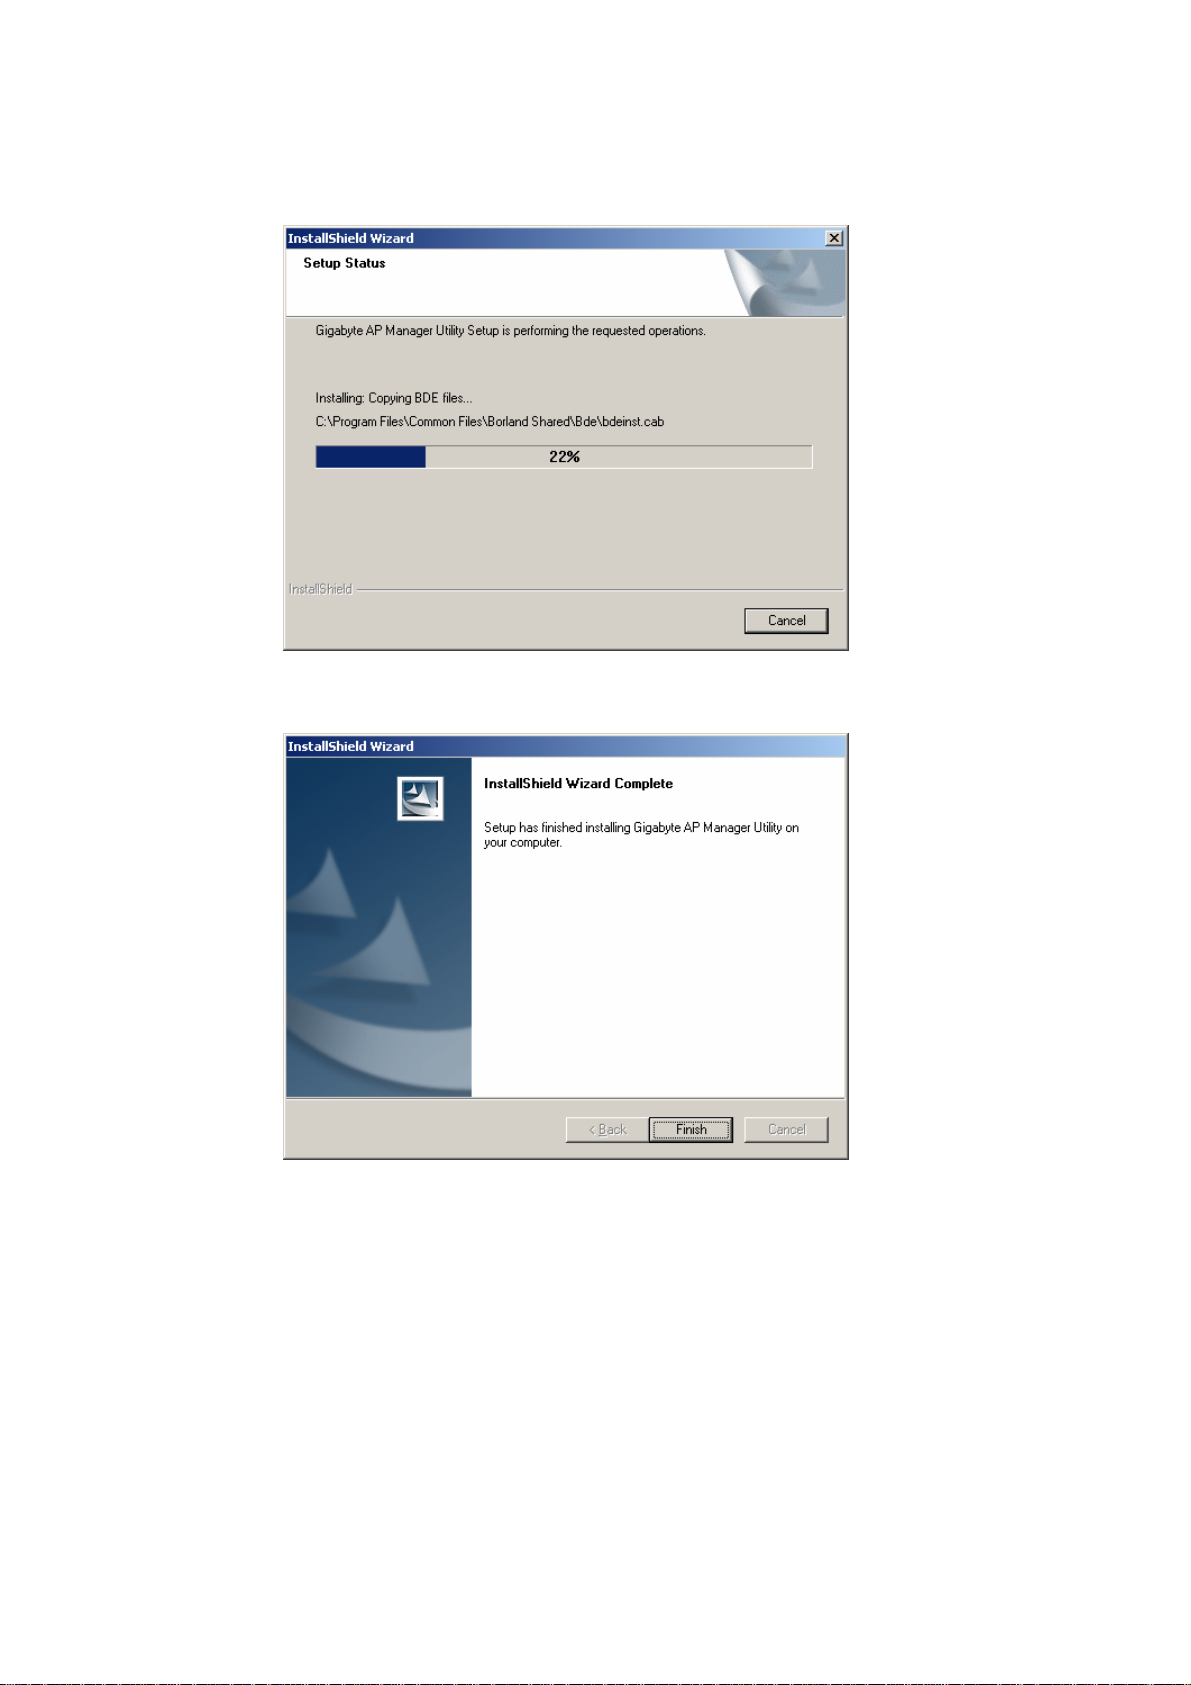
Step 8: Wait for a while.
Step 9: Click “Finish” to complete the installation.
14
Page 15
GN-A11G Wireless LAN Access Point
Using Access Point Manager
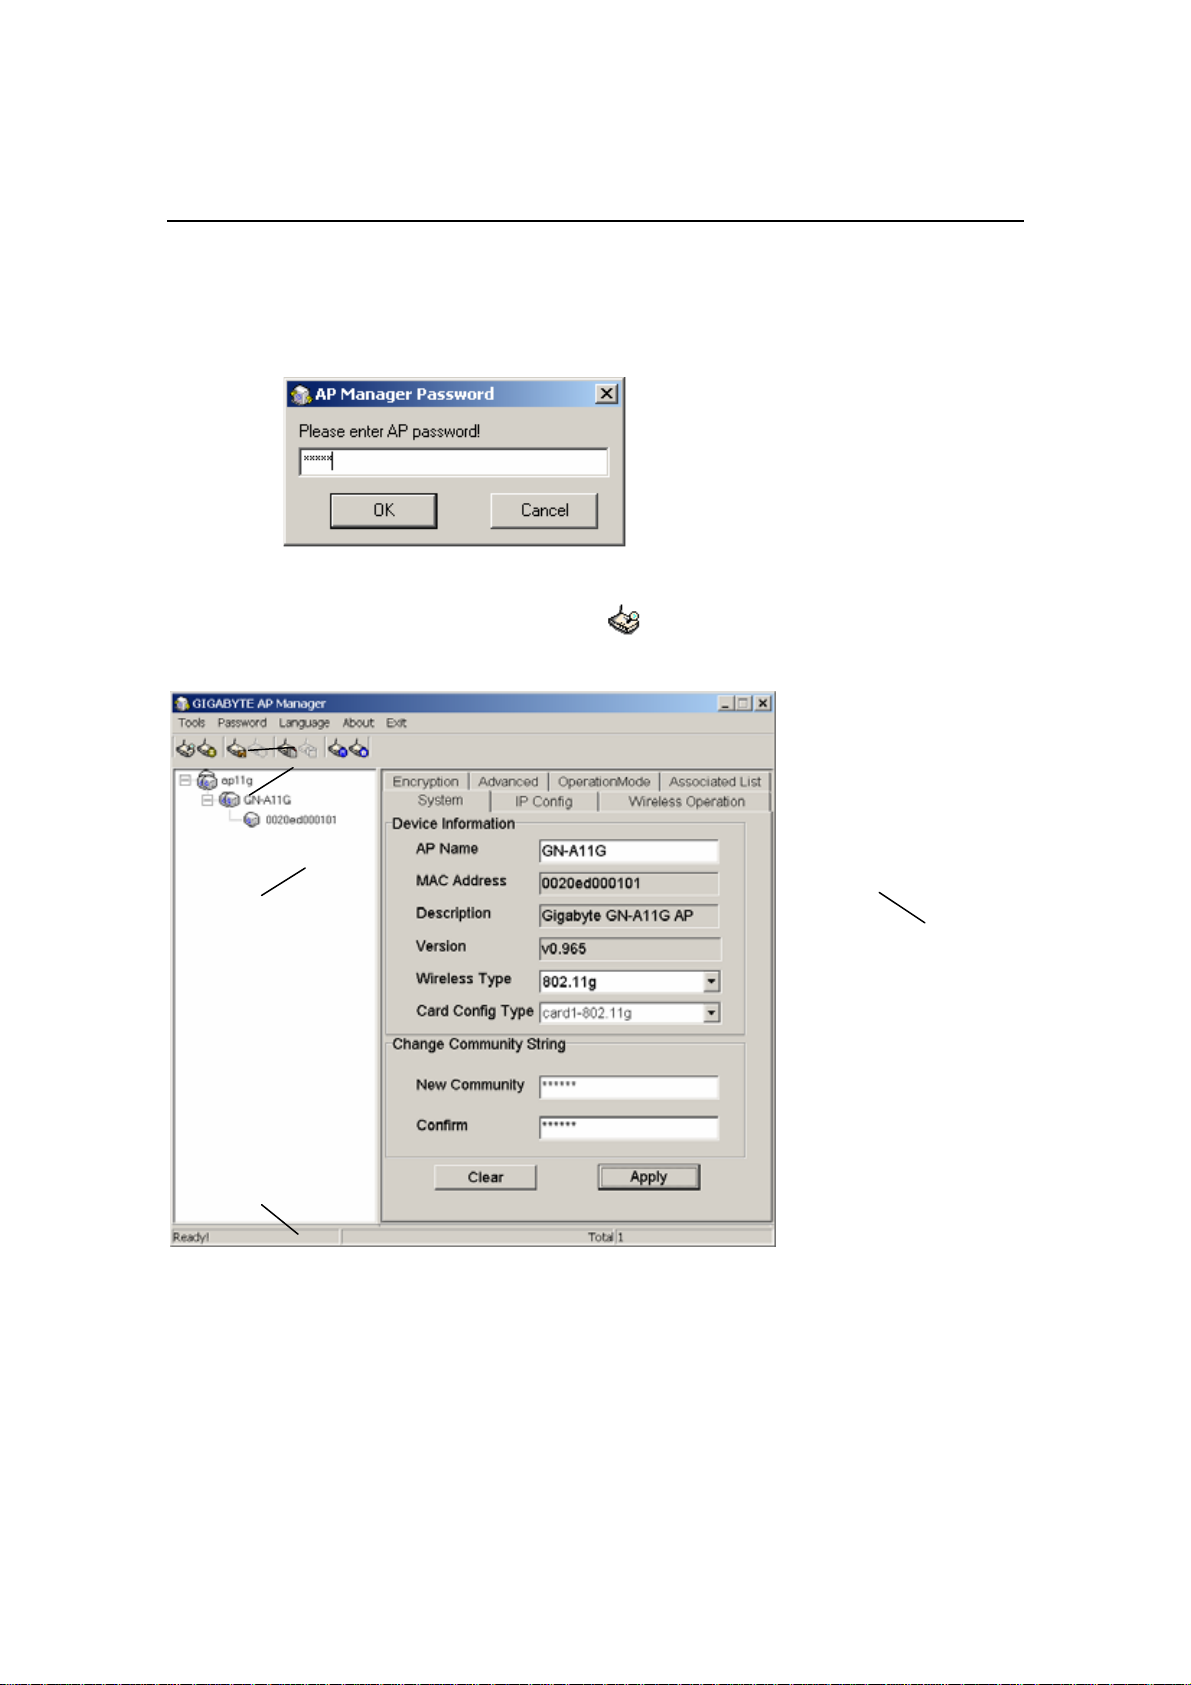
You can click Start > Program > Gigabyte AP Manager Utility\Gigabyte AP
Manager to launch Gigabyte AP Manager.
Enter password “admin” and click “OK” button.
When you open Gigabyte AP Manager, it will automatically search for AP in the
same Subnet. You can also double click
icon to manually search for AP.
Task bar
Tool bar
Tree
Structured
review
Status bar
Page control
15
Page 16
GN-A11G Wireless LAN Access Point
Tree structure
ESSID (GIGABYTE)
Name of wireless LAN Access Point (GN-A11G)
MAC address (0020ED001700)
Task bar
Tool: Allows you to “Search” AP and “Connect to AP by IP”
through ESSID, AP name, MAC address and IP address. I t
also allows you to “Save” and “Load” configurations of AP
and to “Copy” and “Paste” configurations on the current
page. Other functions include “System Reboot” and “Load
Default”.
Password: Allows you to change password for AP Manager and set
SNMP strip.
Help: On-line help and AP Manager version.
Exit: Exit AP Manager.
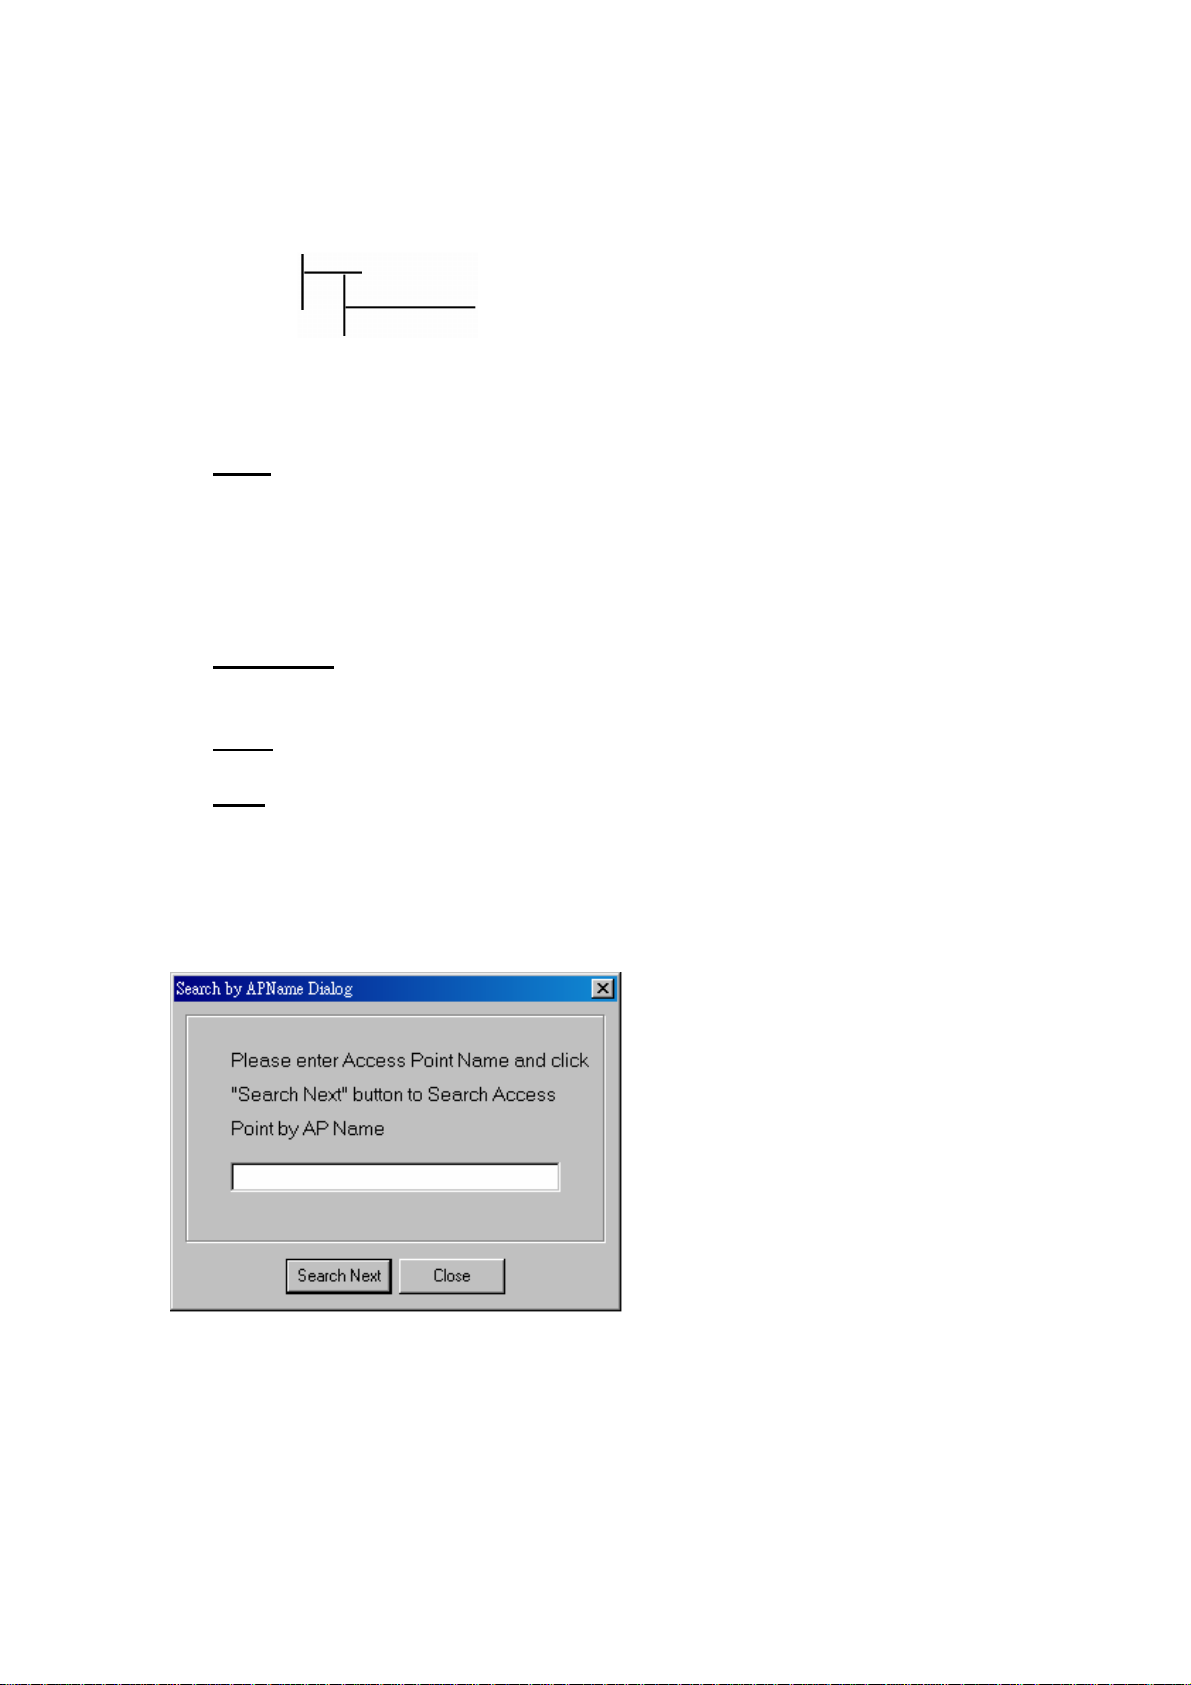
Note: When you search an AP via a AP name (Tools->Search->By AP
Name), you may click “Search Next” to find APs with the same
name.
16
Page 17

GN-A11G Wireless LAN Access Point
Tool bar
Find Access Point
Find all APs in the same Subnet.
Save AP Configuration
Save AP configurations in a temporary file.
Load AP Configuration
Load AP configuration saved in a temporary file.
Page Copy
Copy configuration for current page.
Page Paste
Paste copied content to the current page. (You may paste the
settings from AP1 to AP2 on the same bar tab.)
System Reboot
Reboot AP.
Load Default
Load default values for AP.
Connect to AP by IP
If you want to manage APs on different Subnets, use this function and
enter IP.
17
Page 18
GN-A11G Wireless LAN Access Point
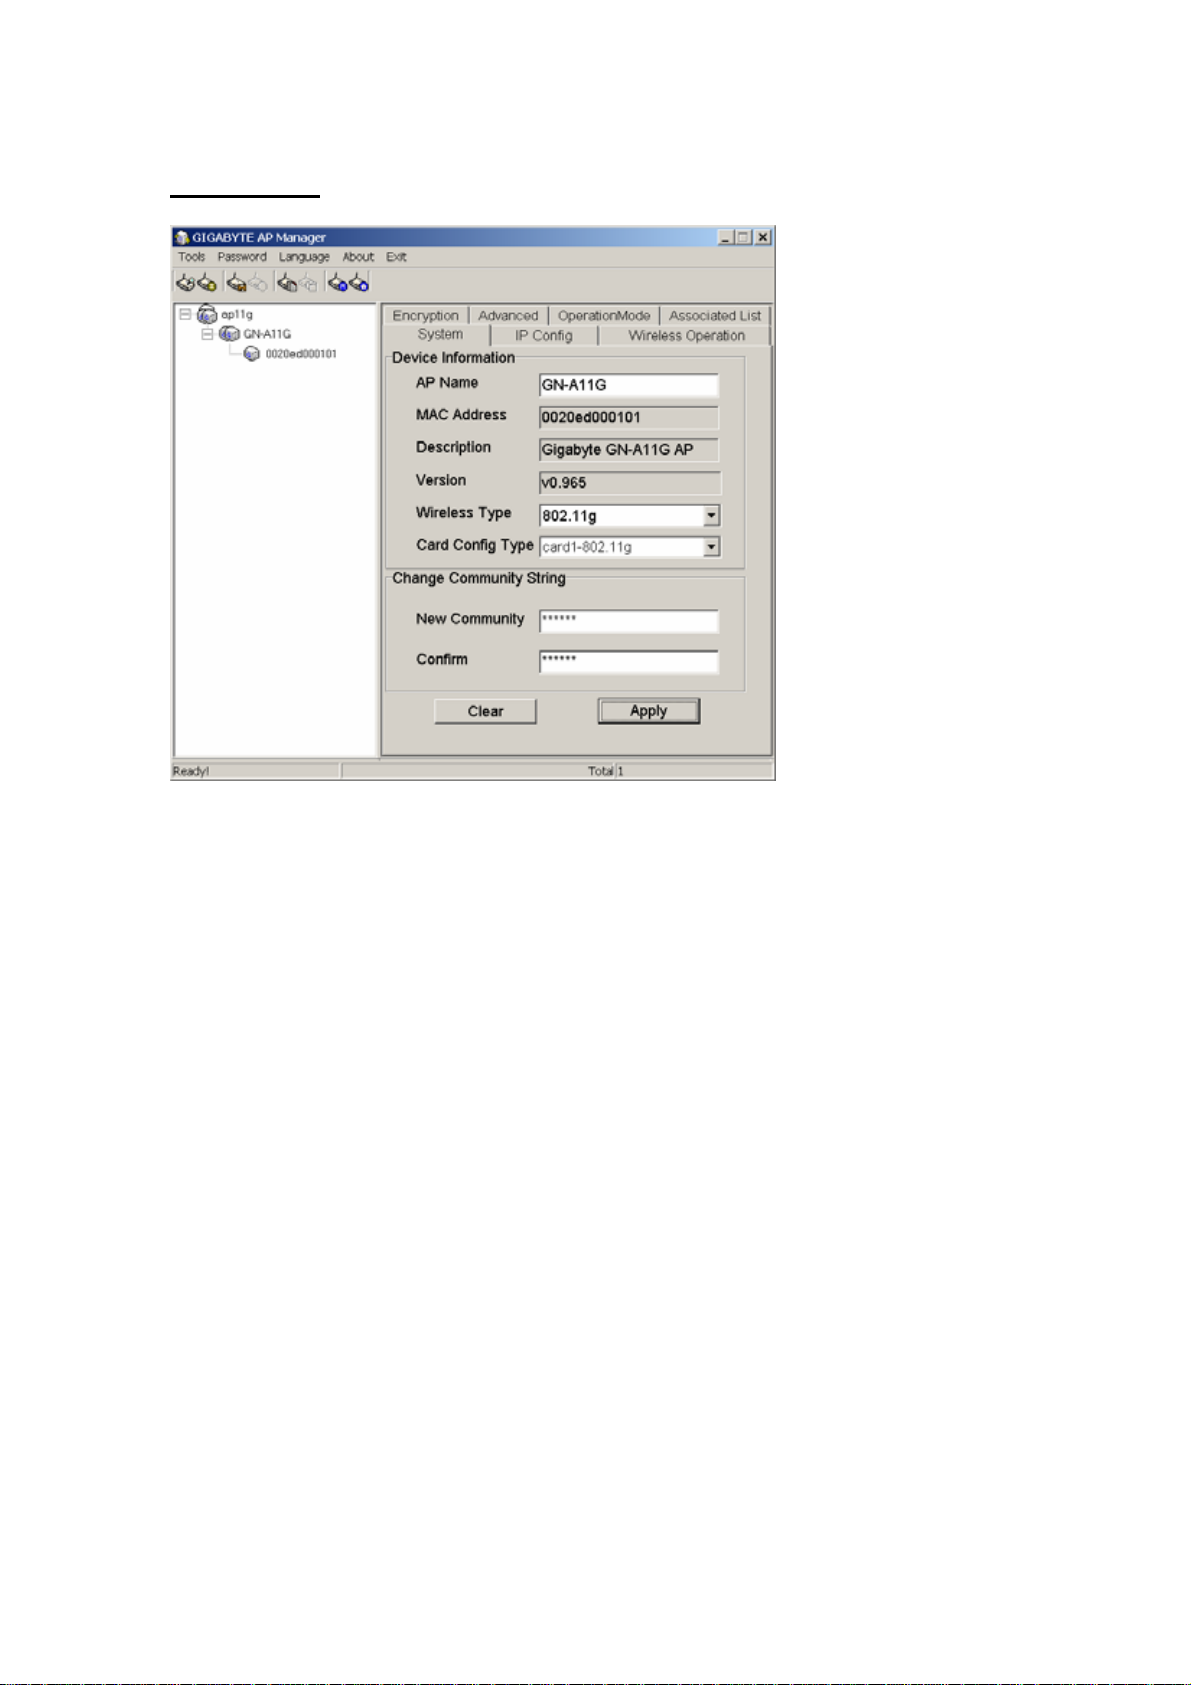
System Page
The system page displays “Device Information” and “Change Community
String”.
Device Information
“Device Information” includes AP names, MAC addresses, description,
version, wireless type and card configuration type.
1. You may change “AP name” to any name exclusive for the AP.
2. You may select desired wireless type from “Wireless Type”.
3. You may select desired wireless LAN card from “Card Config Type”.
18
Page 19

GN-A11G Wireless LAN Access Point
Change Community String
The community string must be the same for AP Manager and APs. Or, AP
Manager only monitors AP with the same community string. This function
enables you to change community strings for APs to prevent other AP
Mangers from accessing and managing your APs. After changing strings,
you have to complete the following steps for the consistency of community
strings.
1. Go to “Task Bar” -> “Password” -> “Set Commuinity String” and set the
community string for AP Manager.
2. Remember or write down the community string.
When you forget the community string, just press the “Reset” button to reset the
AP settings (including community string) to default values.
Note:
SNMP community string defines the relationship between SNMP AP
Manager and agent systems (all APs) and controls the access of AP
Manager to APs with password. The default value is “public”. Go to “Task
Bar” -> “Password” -> “Set Commuinity String” and change the community
string for AP Manager.
19
Page 20

GN-A11G Wireless LAN Access Point
IP Config Page
Set the IP parameters for APs in “IP Configure” tab.
IP Address
Assign an IP address to the AP with this option. The default IP address is
192.168.1.1. Please make sure the assigned IP address is exclusive for the
AP.
Subnet Mask
Please assign a Subnet Mask for an AP. The default Subnet Mask is
255.255.255.0.
Gateway
Please enter the IP address for the default router. The default gateway is
192.168.1.254.
After changing the IP address for AP, please change the PC’s IP address (AP
Manager) so that both have the same Subnet Mask. Then, click “Find Access
Point” icon; AP Manager willl find APs on the network.
20
Page 21

GN-A11G Wireless LAN Access Point
DHCP Mode
4 options are available: “Disabled”, “Client Enabled” , “Server Enabled” and
“Auto”. The default setting is Auto.
If you want to obtain IP addresses from a DHCP server, select “Client
Enabled”. To use an AP as a DHCP server and assign a dynamic IP
address automatically on the network, select “Server Enabled”. If you are
not sure DHCP server is available on the network and wish to use an AP as
DHCP server, please select “Auto”.
DHCP Client Range & DNS
When “Server Enabled” is selected, please enter the range of your IP
addresses and DNS. DNS information is provided by your ISP.
802.1d Spanning Tree
When the 802.1d Spanning Tree function is enabled, the circuit problem
among multi APs or routers in the network can be avoided. The default value
is “Disable”.
Confirm your desired settings and press “Apply” button to save the settings in
the AP.
21
Page 22
GN-A11G Wireless LAN Access Point
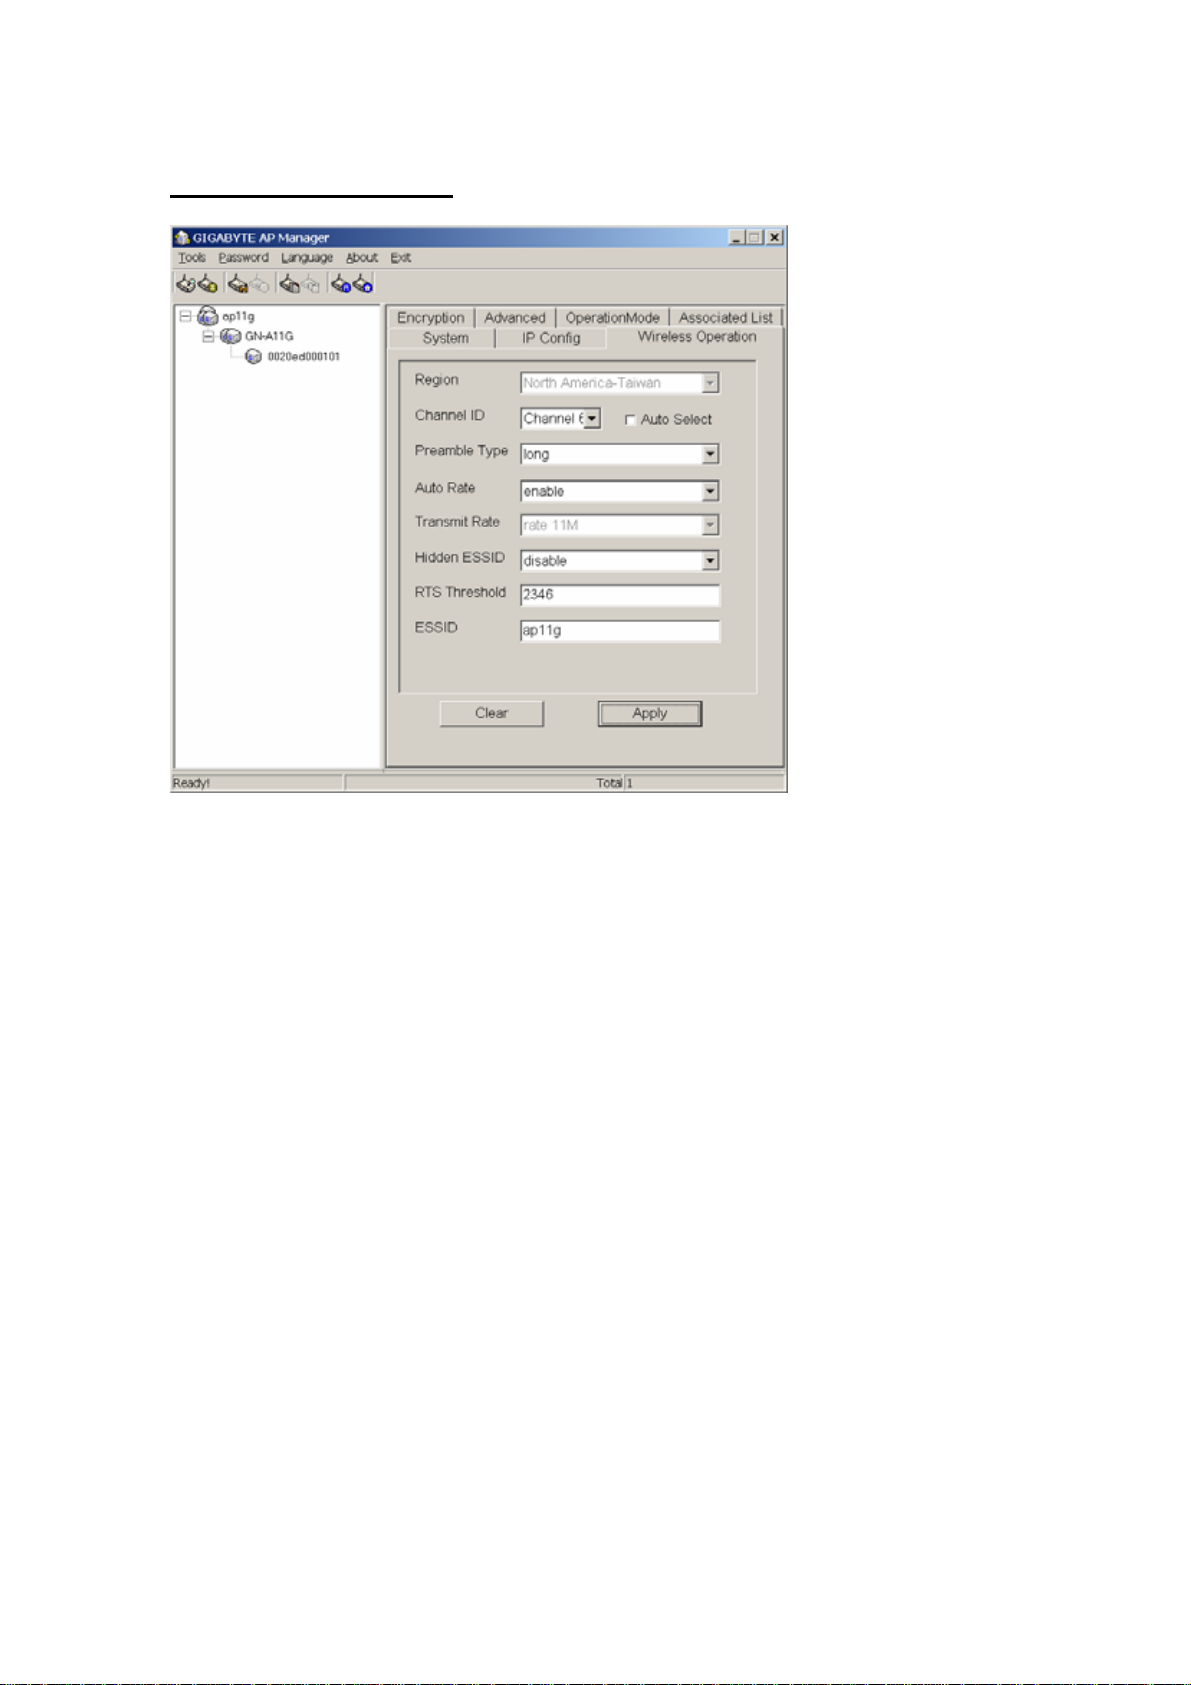
Wireless Operation Page
The wireless equipment still can operate smoothly with no changes made for any
options on this page.
Region
Due to different regions have different open channel regulations, please
check whether the default value for the region is the value for your local area.
In case of inconsistency, please contact your local distributor or authorized
reseller immediately.
Channel ID
Please choose the channel for best performance. Normally, no change is
needed. The default value is “Auto” and will be detected automatically by the
system.
Preamble Type
Preamble is provided for the receiving end to synchronize necessary
operations. Two settings are available: “Long” or “Short”. The default
value is “Long”. Users can configure in accordance with their needs.
Transmit Rate
You can select the transmission speeds of 6M, 9M, 12M, 18M, 24M, 36M,
48M and 54M based on your needs. The default setting is “54 M”. The
“Transmit Rate” function is disabled while “Auto Rate” is enabled.
22
Page 23

GN-A11G Wireless LAN Access Point
Note: The standard transmission speeds of 802.11b are are 11M, 5.5M, 2M
and 1M.
Auto Rate
You can select “Enable” or “Disable” in this option. The default setting is
Enable.
Enable When “Enable” is selected, the transmit rate will
automatically change to the highest rate available. The range
of automatic change is based on the “Transmit Rate”.
Transmit rate:
54M: range from 6M, 9M, 12M, 18M, 24M, 36M, 48M to 54M
48M: range from 6M, 9M, 12M, 18M, 24M, 36M to 48M
36M: range from 6M, 9M, 12M, 18M, 24M to 36M
24M: range from 6M, 9M, 12M, 18M to 24M
18M: range from 6M, 9M, 12M to 18M
12M: range from 6M, 9M to 12M
6M: No automatic change is available and the transmission speed is fixed to
6M.
Disable The transmission speed does not change automatically and is
defined by “Transmit Rate”.
Hidden ESSID
This setting enables you to hide ESSID, which is needed by the users to
connect to AP. The default setting is Disable.
RTS Threshold
The default value of 2347 shall be retained. In case of inconsist data flow, it
is suggested to make some modifications. Enter a value within the range
0~2347 for the port. RTS (Request To Send) is a function,
permission to transmit signals. RTS is a collision avoidance method used by all 802.11b
wireless networking devices. In most cases you will not need to activate or administer RTS.
Only if you find yourself in an Infrastructure environment where all nodes are in range of the
Access Point but may be out of range of each other.
requesting
ESSID
ESSID or SSID means AP names in the wireless network. You should set
the same ESSID of all APs for dynamic clients to roam among APs. The
SSID is up to 32 ASCII characters in length and case sensitive (ie. Letters in
upper case “A~Z” and lower case “a~z” are unique).
Confirm your setting and click “Apply” button to save the settings in APs.
23
Page 24
GN-A11G Wireless LAN Access Point
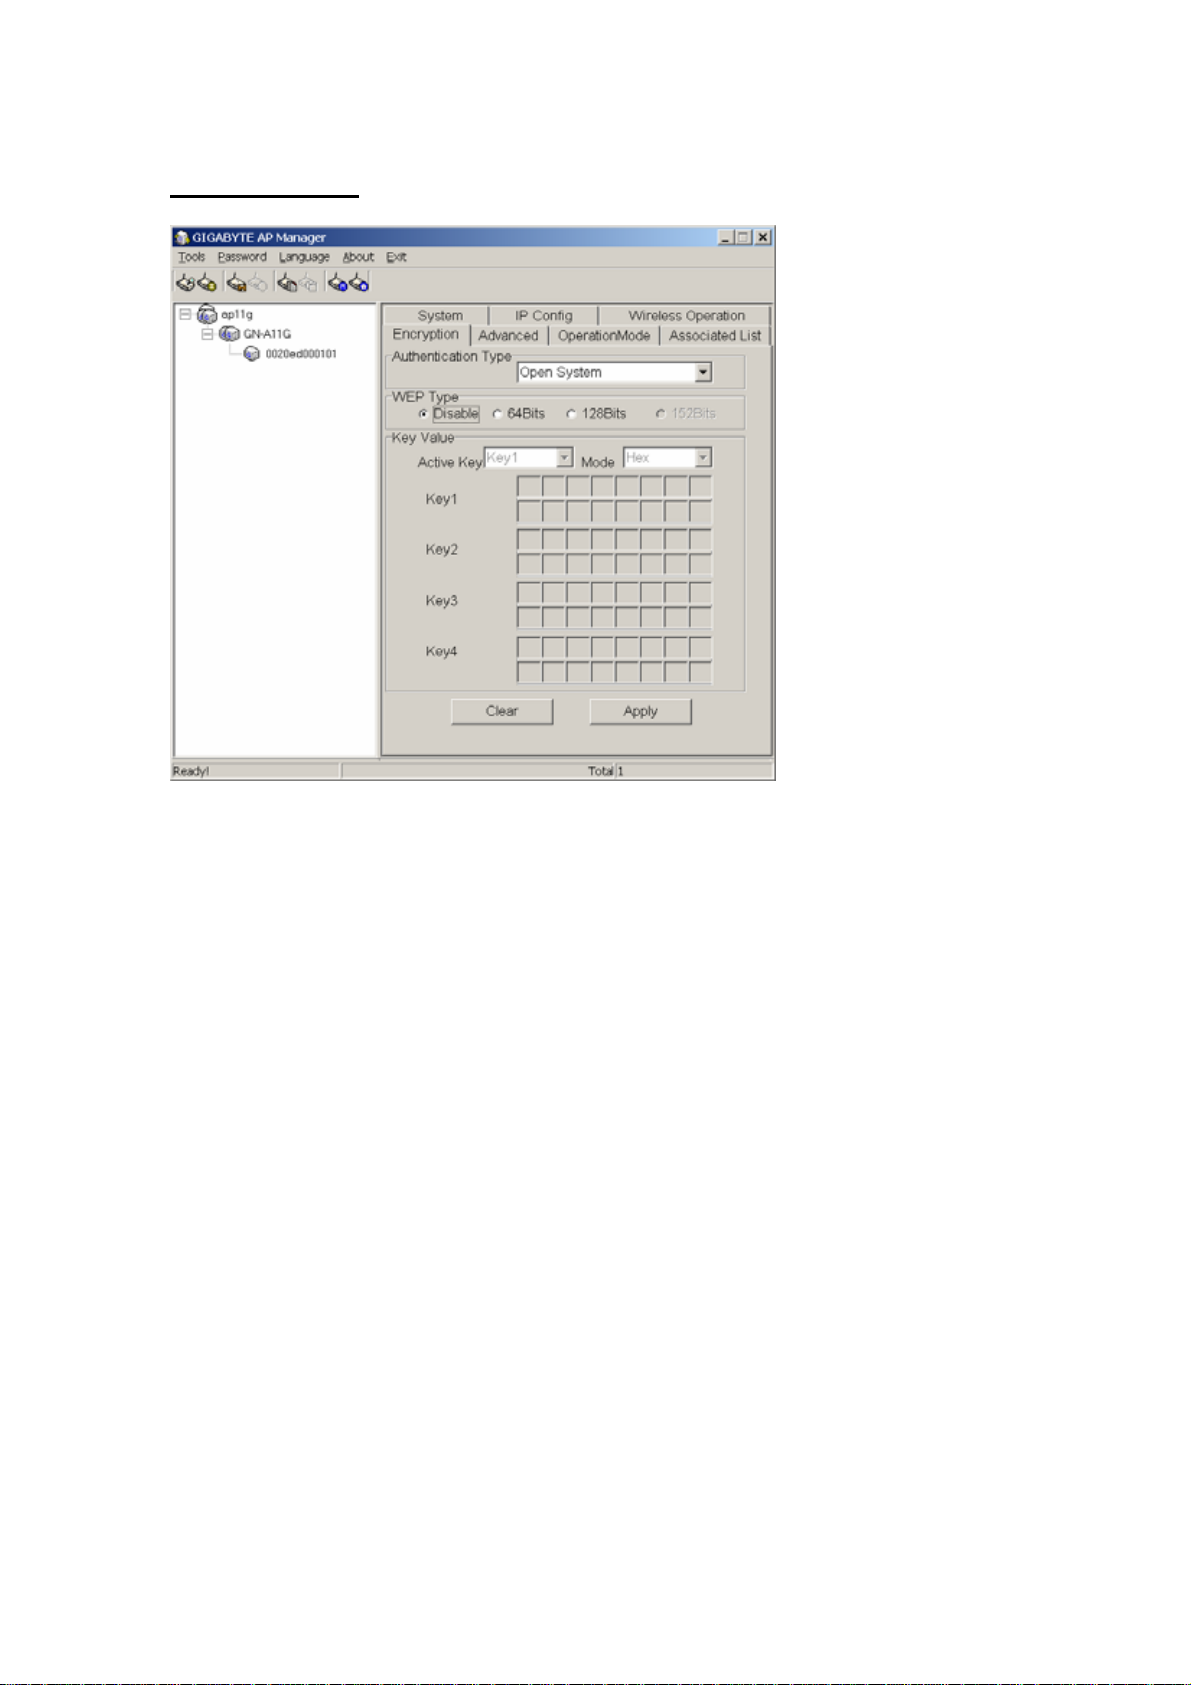
Encryption Page
In this page you may secure your network by using WEP (Wired Equivalent Privacy)
“
802.11b/g standard of 64/128 bytes”. Select Disable to disable WEP encryption. When
“64bits” or “128bits” is selected, the data transmitted will be encrypted and unauthorized users
will be prevented from accessing the wireless network.
Authentication Type
You may select from “Open System”, “Shared Key”, “Both”, “WPA” and
“WPA-PSK”. The default value of authentication type is “Shared Key”.
Open System The sender and the recipient do not share a key. Each
party generates its own shared key and asks the
receiver to accept the (usually randomly) key. Once
accepted, this key is used for a short time only, then a
new key is generated.
Shared Key The sender and the recipient share a key.
If you select “Shared Key” or “Both”, the WEP option, “Disable”, will not be
avaiable.
24
Page 25

GN-A11G Wireless LAN Access Point
WPA If you have used Wi-Fi for a while, you may be familiar with
802.1X
wireless network via RASIUS server.
option in standard
Authentication Protocol, which allows users to authenticate the
802.1X Authentication Protocol is an
Wi-Fi but a must for WPA. If a RADIUS server is
not avaiable in your environment, regardless of the needs of
802.1X, you can use WPA. As another option for RADIUS
server, WPA supports pre-shared key.
WPA-PSK As for the security of traditional WEP, it is very inconvenient to
change encrypted keys. Even you change encrypted keys any
time; you still can not select all APs and wireless LAN adapter
while changing encrypted keys.
Instead, rekeying is a tedious manual process and is completely
impractical for large organizations. After all, the instant you
rekey an
it until they are also
access point, none of the clients will be able to access
rekeyed.
But with WPA, the rekeying of global encryption keys is required.
In the case of unicast traffic, the encryption key is changed after
every frame using Temporary Key Integrity Protocol (TKIP). This
protocol allows key changes to occur on a frame-by-frame basis
and to be automatically synchronized between the access point
and the wireless client. Global rekeying works by advertising the
new keys to wireless clients.
When you select WPA authentication type, a window for Radius setting will
display as followed. Please note IP configure shall be set as fixed IP address
and DHCP mode as “disabled” when WPA authentication type is selected.
25
Page 26

GN-A11G Wireless LAN Access Point
WPA Algorithm Three setting are possible: TKIP, AES or Auto.
RADIUS server IP Please assign an IP address to the primary RADIUS
server (authentication server).
RADIUS Port The setting range is 1~65536 and the default value is
1812.
RADIUS sercet The field can key in up to 256 character.
WPA Re-Key Under this option two setting are possible: “enable” or
“disable”. The default value is “enable”.
WPA Re-Key Interval Enter a value for re-key interval (unit: sec).
Verify the desire setting and then click “Apply” button to set the value into
access point.
When you select WPA authentication type, a window for Radius setting will
display as followed.
26
Page 27

GN-A11G Wireless LAN Access Point
Primary RADIUS server Please assign an IP address to the primary RADIUS
server (authentication server).
Authentication Port The setting range is 1~65536 and the default value is
1812.
Authentication sercet This field can key in up to 256 character.
Re-Keying Under this option two setting are possible: “enable” or
“disable”. Under this option two setting are possible:
“enable” or “disable”. The default value is “enable”.
Verify the desire setting and then click the “Apply” button to set the value into
access point.
64 (40) Bits / 128 (104) Bits
There are two levels of encryption 64 bits and 128 bits. The 64 bits
encryption is referenced as a lower level encryption. The 128 bits encryption
is referenced as a higher level encryption.
The 64 bits WEP encryptions use 40 bits as a secret key, which can
controlled by user, and 24 bits as the initialize vector. These two portions
plus together is 64 bits encryption. Some other vendor’s product might refer
as 40 bits encryption. It is the same thing.
The 128 bits encryption uses 104 bits as a secret key, which can be
controlled by user, and 24 bits as the initial vector.
27
Page 28

GN-A11G Wireless LAN Access Point
Advanced Page
For enhance the security of wireless network, this AP provides the MAC address
filtering mechanism to prevent the unauthorized users access. Check “Enable
MAC filter” and key in MAC address table, then only those MAC address in the
table are allowed to connect to this AP.
Enable MAC filter
Choose the “Enable MAC filter” option, which only allows NICs of MAC
addresses listed to access the AP. Click the “Add” button to add more MAC
addresses or “Remove” to delete MAC addresses from the authorized MAC
addresses table. Besides, you can click “Edit” button to edit the MAC
address.
Disable MAC filter
The default setting is Disable MAC filter. All NICs can be connected to APs
when MAC filter is disabled.
Verify the desired setting and then click the “Apply” button to set the value into
access point.
28
Page 29

GN-A11G Wireless LAN Access Point
A
WDS Operation Mode
The Access Point supports three operation modes: “Access Point”, “Point to
Point” and “Point to MultiPoint”. The default operation mode is “Access Point”.
Access Point
The operation
mode is set to
“Access Point”
by default. This
connected your
wireless PC to a
wired network. In
most cases, no
change is
necessary.
Point to Point
Only one Access
Point can be
assigned to
connect with
WDS in the
“Point to Point”
mode.
In this WDS
supported mode,
the Access Point
can communicate
with other
GIGA-BYTE
ccess Point that
is also set to
“Point to Point”
mode. You have
to enter MAC
address of the
host AP.
29
Page 30

GN-A11G Wireless LAN Access Point
A
A
Point to MultiPoint Mode
Up to 8 Access
Point can be set
to connect
through WDS
list in the “Point
to MultiPoint”.
In this supported
WDS mode, the
ccess Point
can
communicate
with other
Giga-Byte
ccess Point
that is also set
to “Point to
MultiPoint”
mode.
Click the “WDS
List” button, it
will go to the
“WDS List”
page.
Note: The maximum number of “connectable Access Point” is 8.
30
Page 31

GN-A11G Wireless LAN Access Point
Click “Scan” button
to display “Scan
Window”. You can
select which Access
Point you want or
choose “Select All”
check box, and then
click “OK” to add
those MAC address
into the WDS list.
Besides, you can
click “Edit” button
to modify MAC
address that you
select on the WDS
list click “Remove”
button to delete the
MAC address that
you select on the
WDS list. Or, you
can click “Cancel”
button to reserve the
original values.
Finally, please click
“OK” button to
return to the
“Operation Mode”
page and click
“Apply” button to set
value into the AP.
31
Page 32

GN-A11G Wireless LAN Access Point
Associated List Page
Form this page, you will get the information of the workstation which can connect
to the Access Point. The form list includes the MAC address, Signal level and
description of the workstation.
32
Page 33
GN-A11G Wireless LAN Access Point
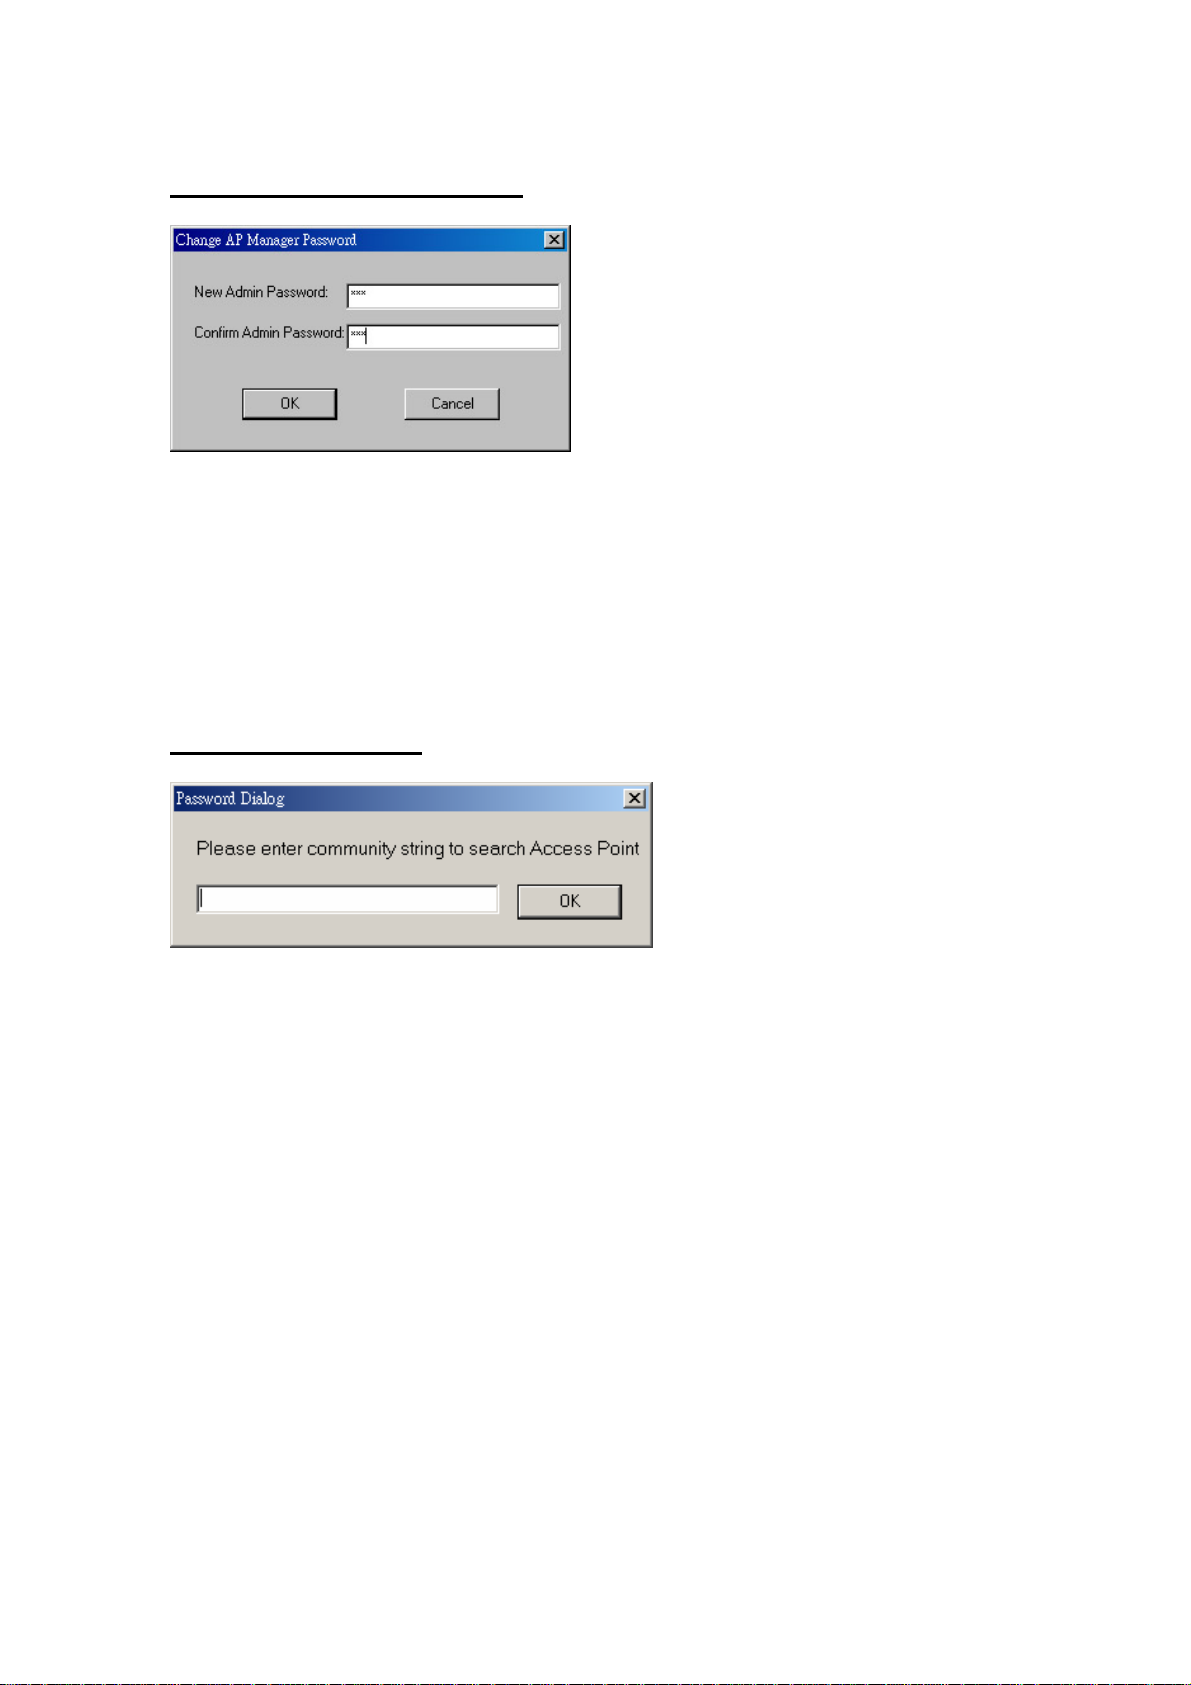
Change AP Manager Password
Users can change the administration password of the AP Manager to prevent
other user access to the AP Manager. On the menu bar (Password->AP
Manager Password) you can invoke the password change dialogue. Please
enter a new administration password and confirm it then press “OK” button to
confirm. You have to enter this new password to log in when you want to use the
AP Manager next time.
Set Community String
The community string defines the relationship between AP Manager and the AP.
This string acts like a password to control the AP Manager to access the AP. For
detail description, please refer to System section’s page 18 on Chapter Three.
33
Page 34

GN-A11G Wireless LAN Access Point
Firmware upgrade
You can download the upgraded firmware version from Gigabyte website.
Execute TFTP program
Step 1: You can find the “Upgrade Tool” through Start\Programs\Gigabyte
AP Manager Utility\Gigabyte AP Upgrade.
Step 2: The “Gigabyte Firmware Upgrade Tool” screen will appear. Please
enter the “AP IP Address” which you want to upgrade the firmware.
You can press “Ping” button to verify whether the AP is online.
Step 3: Press “Open” button to choose the firmware then press “Upgrade”
button to start the firmware upgrade process.
Note: During the firmware upgrade process, please DO NOT turn off the PC or
AP and DO NOT unplug the Ethernet cable.
34
Page 35
GN-A11G Wireless LAN Access Point
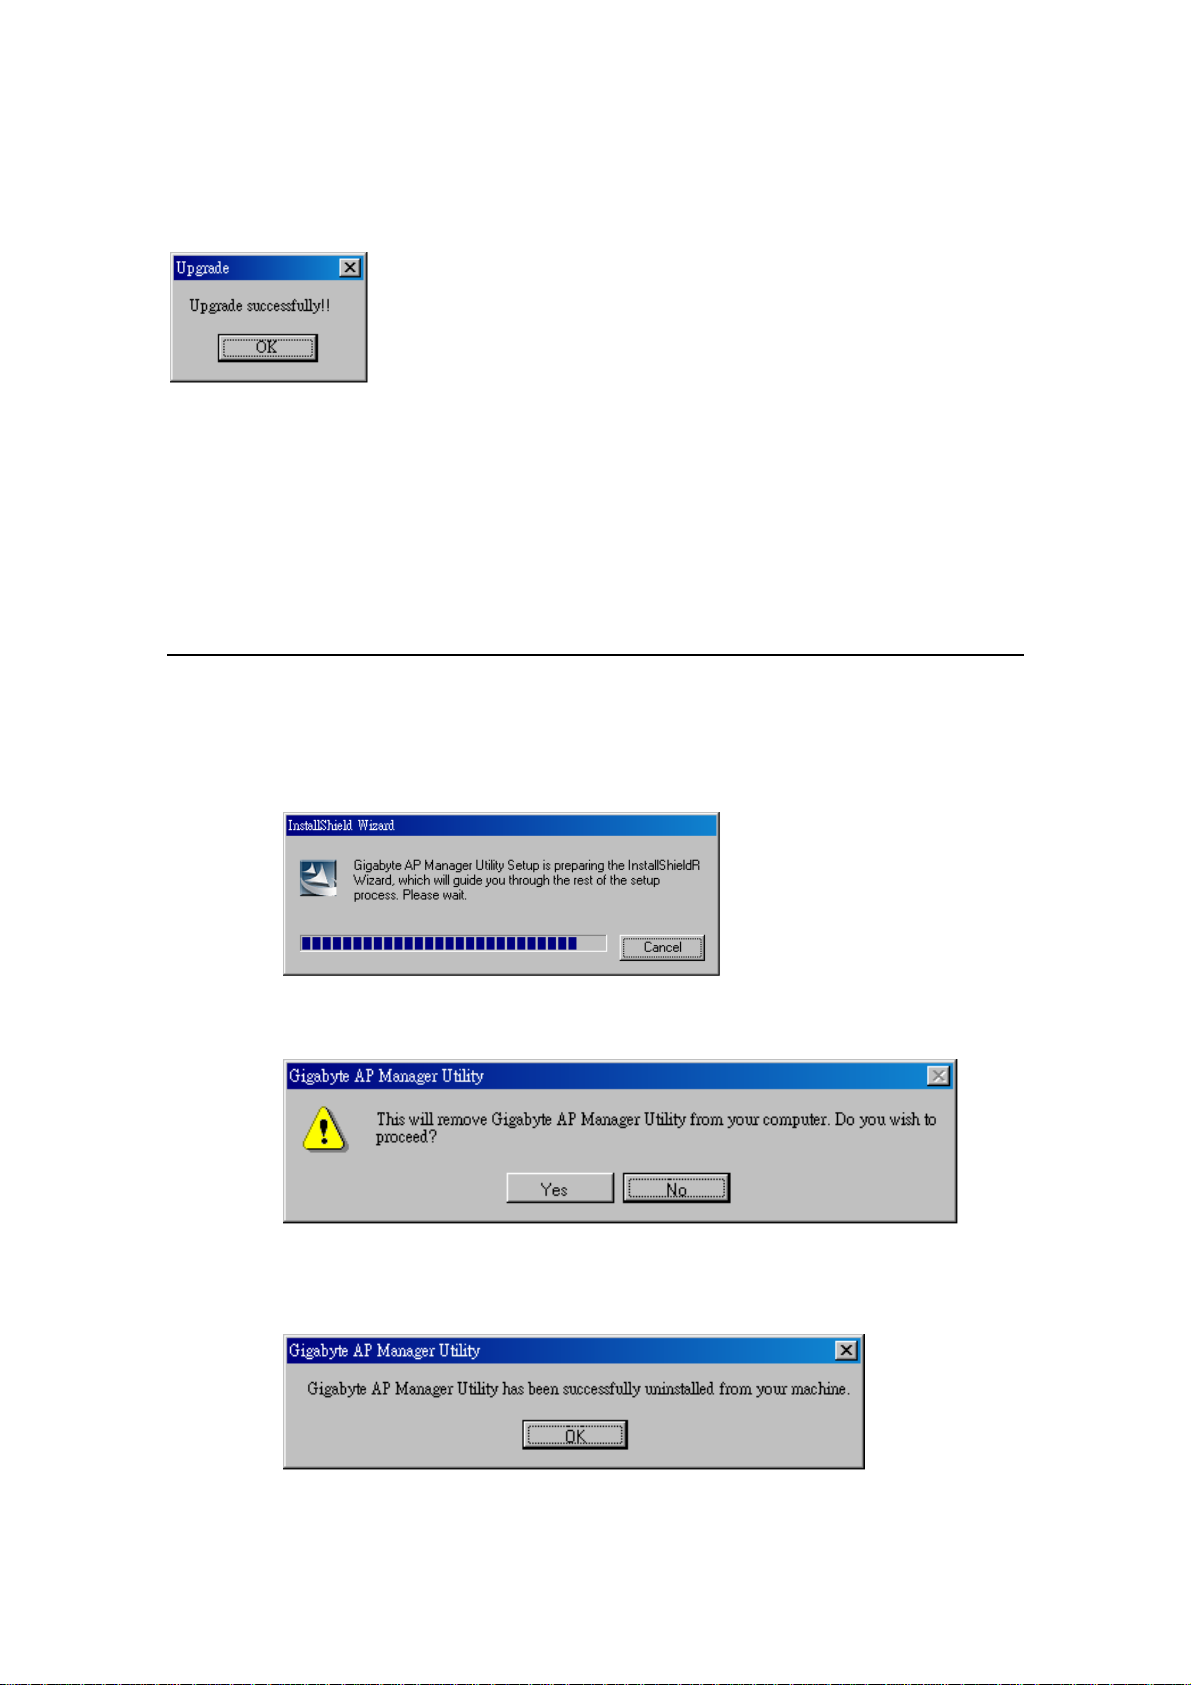
Step 4: After the AP devices rebooting successful, the AP firmware upgrade
is completed.
Note: Right click on the screen, the content menu will be displayed. You can
find then on-line help and the version information of firmware upgrade
utility.
Uninstall AP Manager Utility
You can find the Uninstall program through Start\Programs\Gigabyte AP
Manager Utility\Uninstall.
Step 1: InstallShield Wizard will appear then please wait.
Step 2: Click “Yes”.
Step 3: Click “OK” and then the Gigabyte AP Manager Utility has been
uninstalled successfully.
35
Page 36
GN-A11G Wireless LAN Access Point
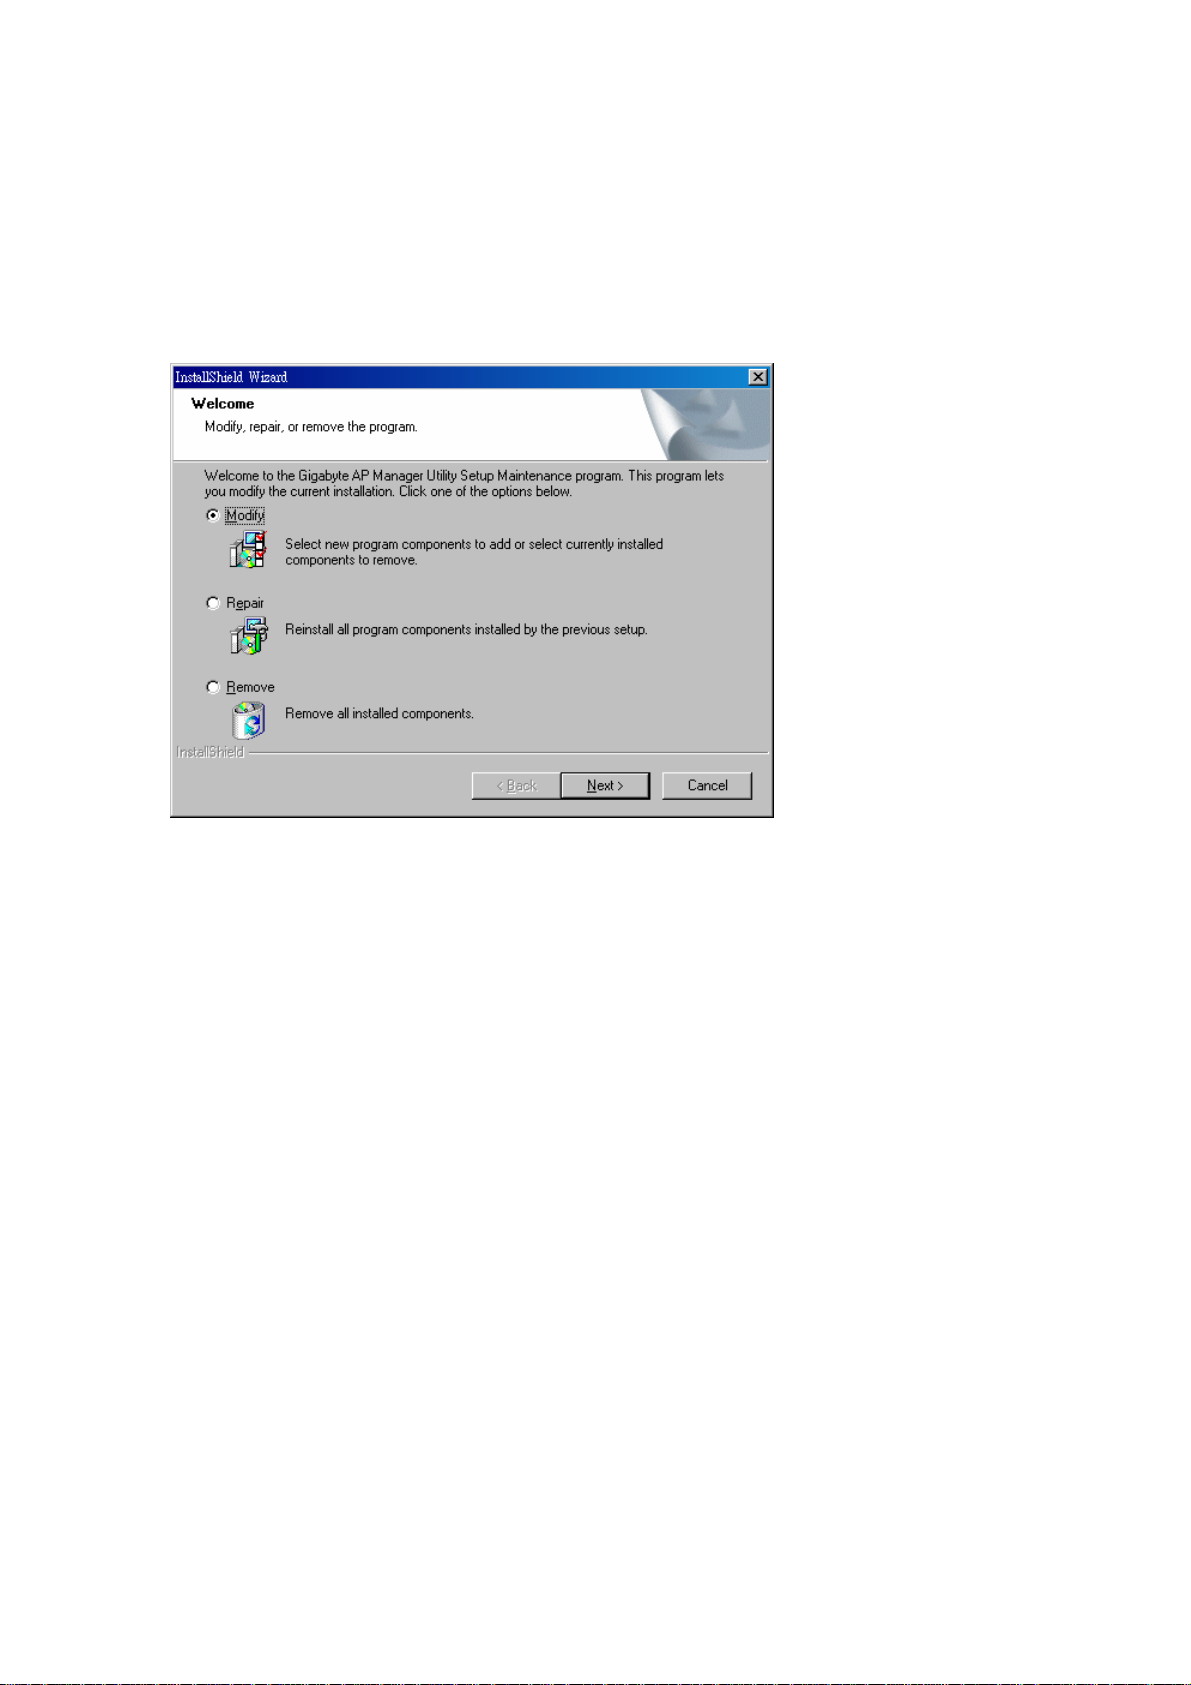
If you want to modify some program components or reinstall all program
components, you can run the installation programs directly. And then the
InstallShield Wizard will appear on the screen.
Please choose one of the options what you want then click “Next” to modify,
repair or remove the Gigabyte AP Manager Utility.
36
Page 37
GN-A11G Wireless LAN Access Point
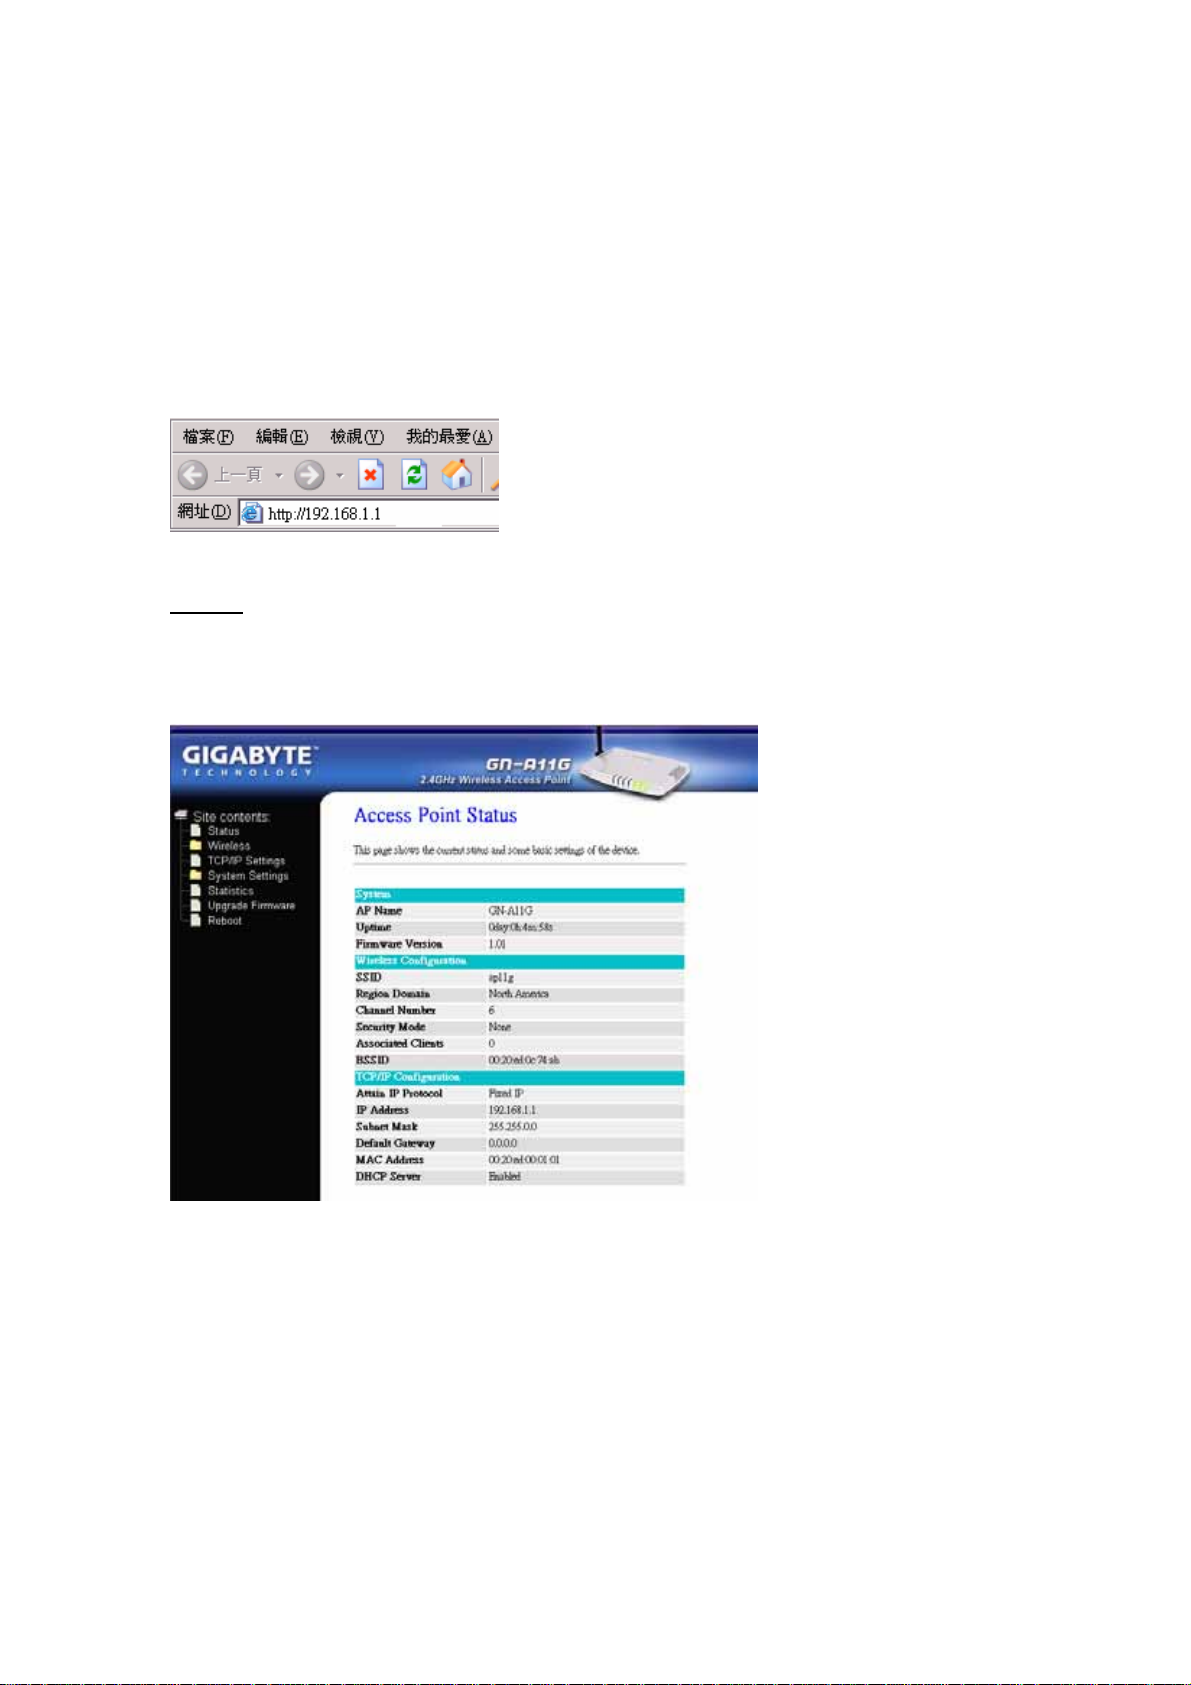
Chapter 4 Web-based configuration
Two methods are available to set up AP: Web-based configuration or AP
Manager Utility. This section introduces web-based configuration to set up AP
with RJ45 Ethernet cables and computers connected to AP.
Please enter the IP address of AP into the address line of browser.
Status
You can use this status screen to view the AP’s system information, current
connection status and configuration.
37
Page 38
GN-A11G Wireless LAN Access Point
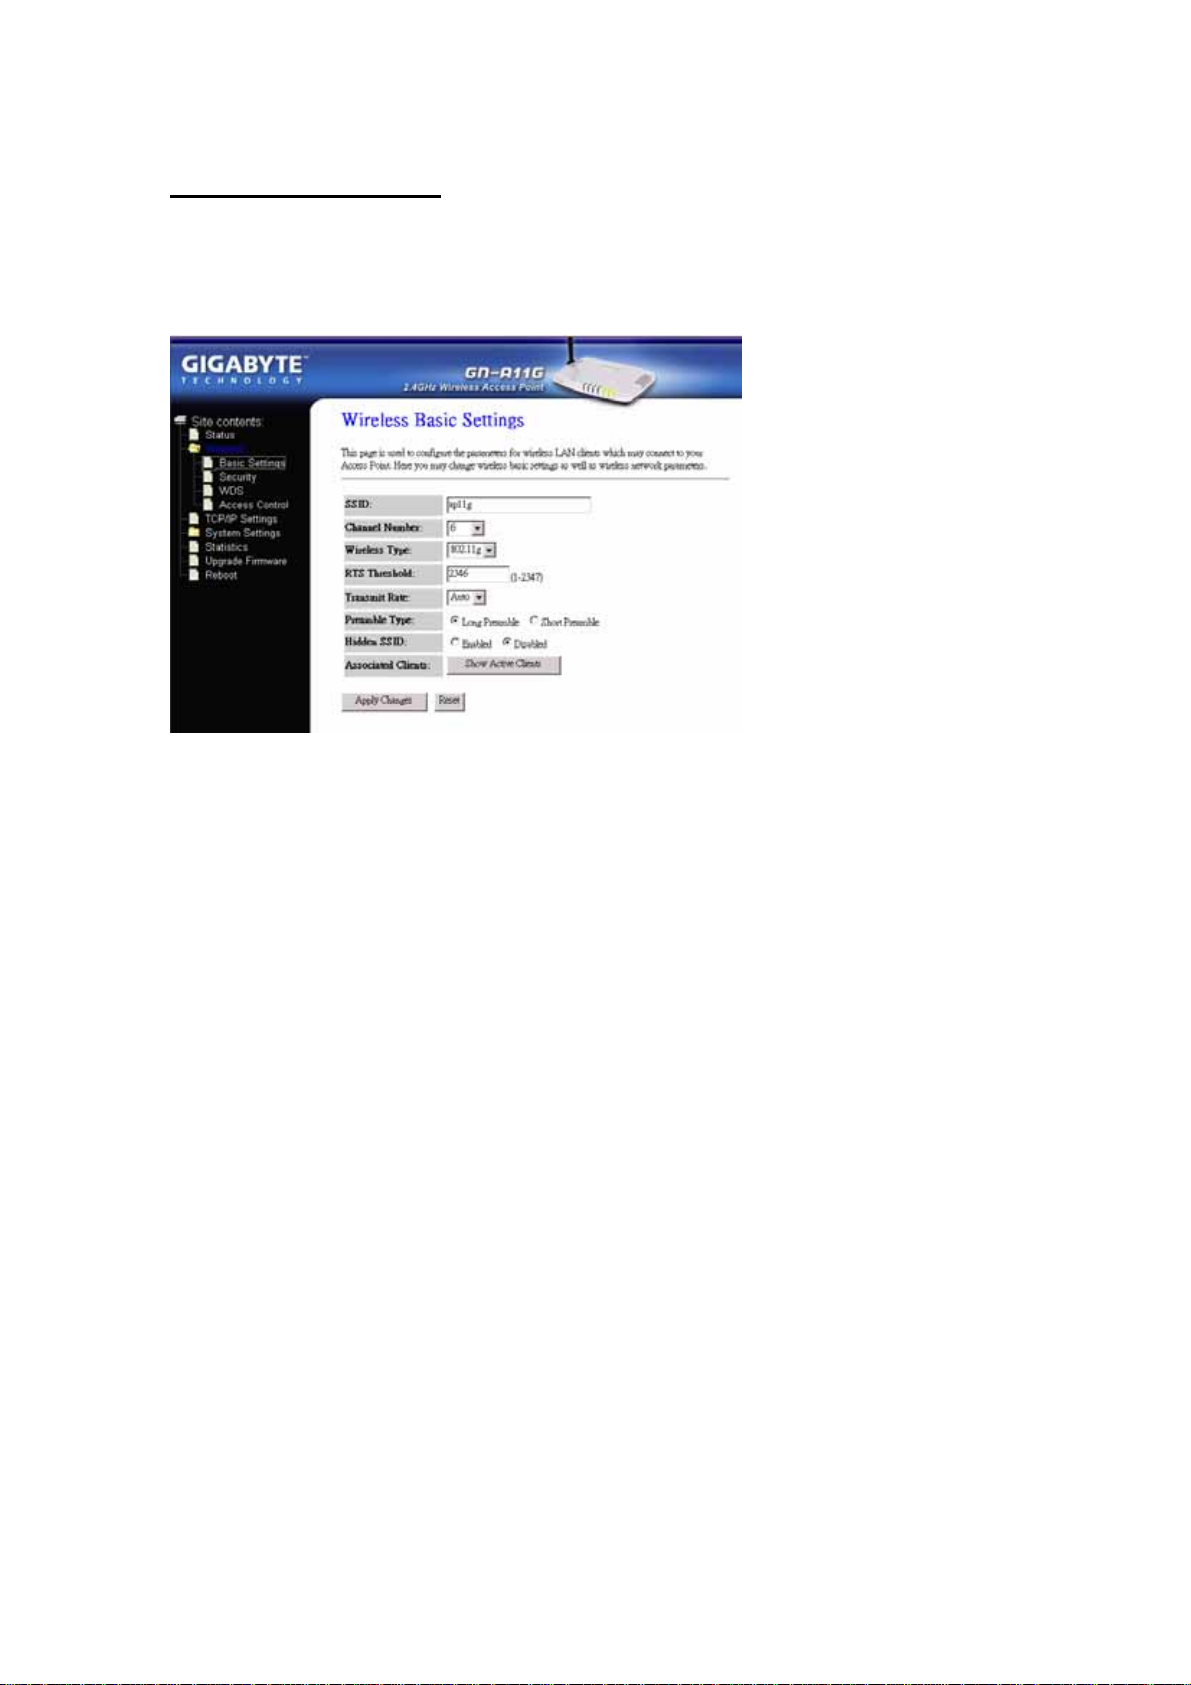
Wireless Basic Settings
The AP will automatically detect your wireless setting. Basically, no more
modification is required. Changes on these setting will influence your wireless
configuration.
SSID
ESSID or SSID means AP names in the wireless network. You should set
the same ESSID of all APs for dynamic clients to roam among APs. The
SSID is up to 32 ASCII characters in length and case sensitive (ie. Letters in
upper case “A~Z” and lower case “a~z” are unique).
Channel Number
Please choose the channel for best performance. Normally, no change is
needed. The default value is “Auto” and will be detected automatically by the
system.
Wireless Type
Please select your desired wireless type.
RTS Threshold
The default value of 2347 shall be retained. In case of inconsist data flow, it
is suggested to make some modifications. Enter a value within the range
0~2347 for the port. RTS (Request To Send) is a function, requesting
permission to transmit signals. RTS is a collision avoidance method used by
all 802.11b wireless networking devices. In most cases you will not need to
activate or administer RTS. Only if you find yourself in an Infrastructure
environment where all nodes are in range of the Access Point but may be
out of range of each other.
Preamble Type
Preamble is provided for the receiving end to synchronize necessary
operations. Two settings are available: “Long” or “Short”. The default
value is “Long”. Users can configure in accordance with their needs.
38
Page 39

GN-A11G Wireless LAN Access Point
Hidden ESSID
This setting enables you to hide ESSID, which is needed by the users to
connect to AP. The default value is “Disable”. All users are able to read AP
names.
Associated Clients
Click “Show Active Clients” button to obtain the connecting users’
information.
Wireless Security Setting
We can use this function to set up the security types for AP. Three security types
are available: WEP, WPA and WPA Pre-Shared Key. If you don’t want to set up
security mode, please select “None”.
WEP (Wired Equivalent Privacy)
WEP (Wired Equivalent Privacy) is a data privacy mechanism based on a
64/128-bit shared key algorithm. The 64 bits encryption is referenced as a
lower level encryption. The 128 bits encryption is referenced as a higher
level encryption.
WPA
If you have used Wi-Fi for a while, you may be familiar with 802.1X
Authentication Protocol, which allows users to authenticate the wireless
network via RASIUS server. 802.1X Authentication Protocol is an option in
standard Wi-Fi but a must for WPA. If a RADIUS server is not avaiable in
your environment, regardless of the needs of 802.1X, you can use WPA. As
another option for RADIUS server, WPA supports pre-shared key.
39
Page 40
GN-A11G Wireless LAN Access Point
WPA Pre-Shared Key
One of the biggest drawbacks to traditional WEP security is changing the
encryption key. Even you change encrypted keys any time; you still can not
select all APs and wireless LAN adapter while changing encrypted keys.
Instead, rekeying is a tedious manual process and is completely
for large organizations. After all, the instant you rekey an
of the clients will be able to access it until they are also
access point, none
rekeyed.
impractical
But with WPA, the rekeying of global encryption keys is required. In the case
of unicast traffic, the encryption key is changed after every frame using
Temporary Key Integrity Protocol (TKIP). This protocol allows key changes
to occur on a frame-by-frame basis and to be automatically synchronized
between the access point and the wireless client. Global rekeying works by
advertising the new keys to wireless clients.
WDS Settings
The WDS function allows several of the access points to compose a wide
Wireless LAN network. Please note all APs shall be set on the same channel
and the BSSID of APs connected to the network shall be set in the list.
WDS technologies of all AP varies so may not be executed among APs of
different brand names.
40
Page 41

GN-A11G Wireless LAN Access Point
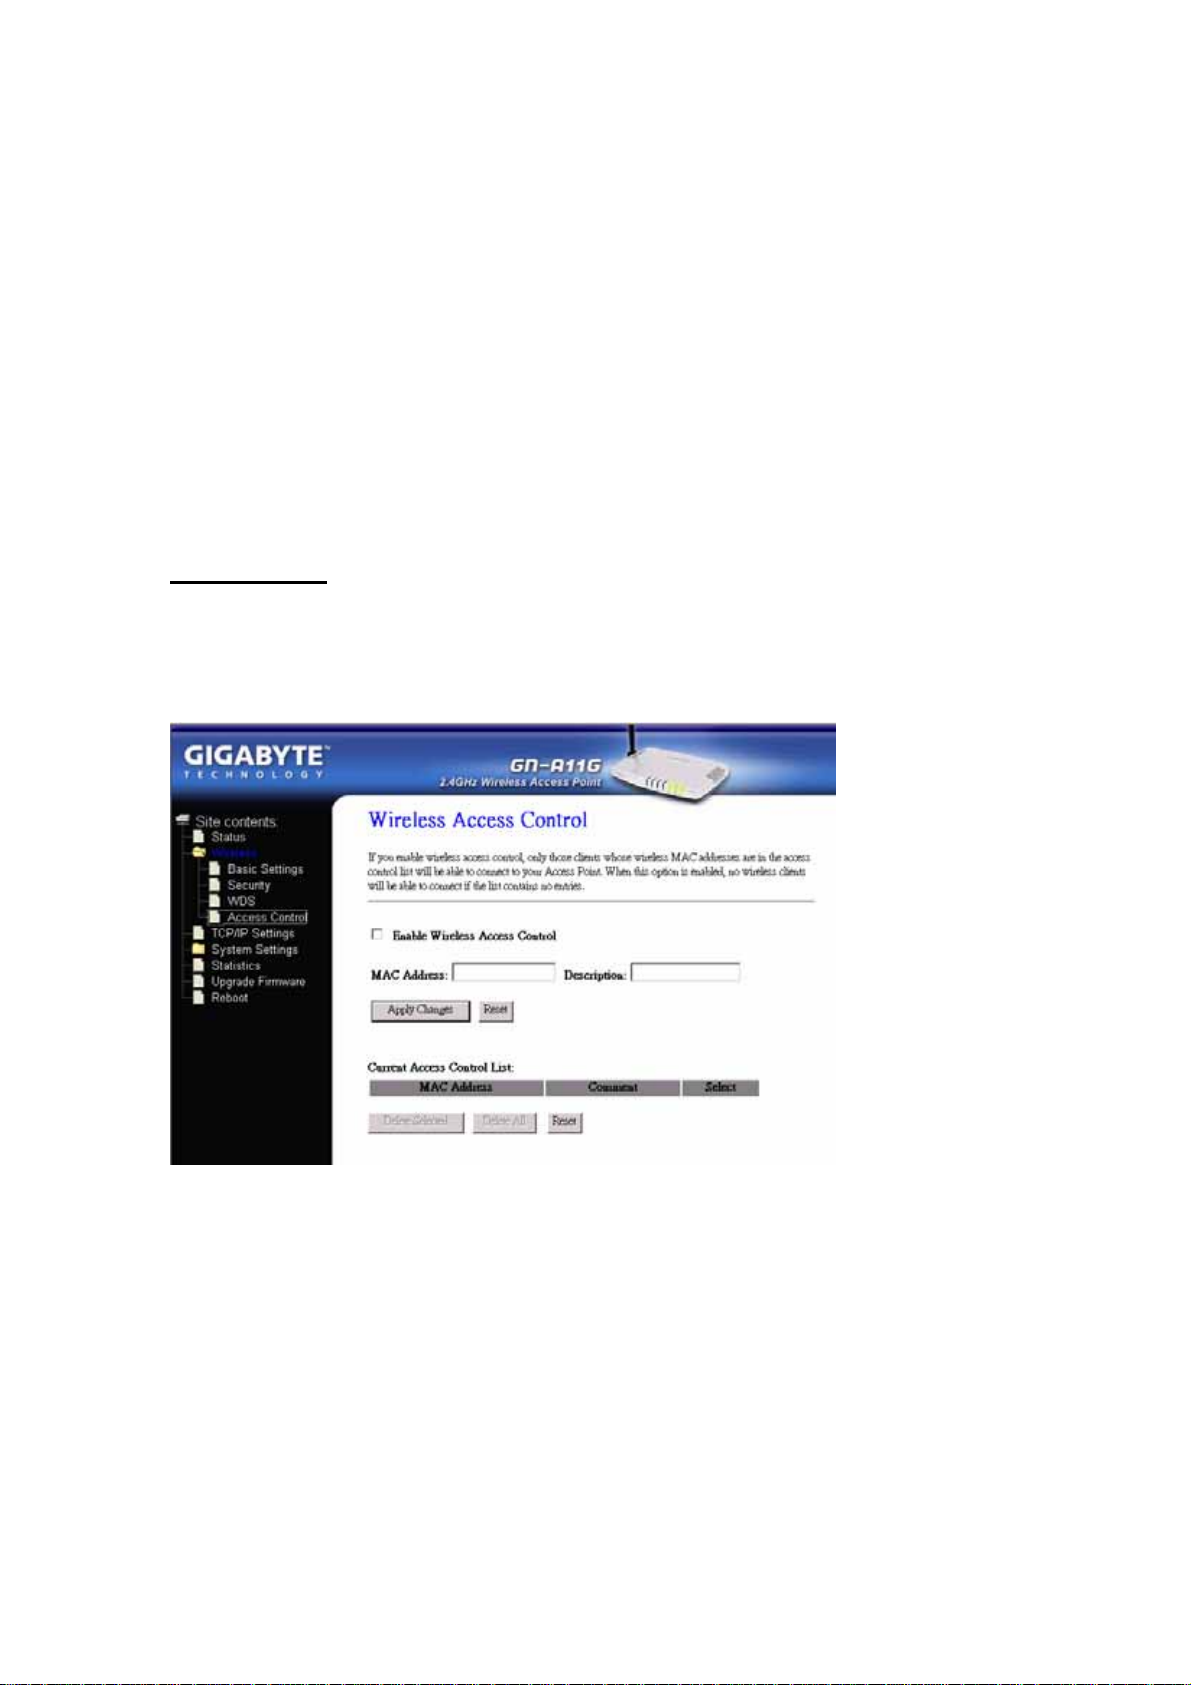
Wireless Access Control
You may set up users that are allowed to connect to AP via MAC. Only
computers listed in the table can connect to AP when this function is enabled.
TCP/IP Settings
You may set up IP parameters for APs through TCP/IP setting screen.
41
Page 42

GN-A11G Wireless LAN Access Point
IP Address
Assign an IP address to the AP with this option. The default IP address is
192.168.1.1. Please make sure the assigned IP address is exclusive for the
AP.
Subnet Mask
Please assign a Subnet Mask for an AP. The default Subnet Mask is
255.255.255.0.
Gateway
Please enter the IP address for the default router. The default gateway is
192.168.1.254.
After changing the IP address for AP, please change the PC’s IP address (AP
Manager) so that both have the same Subnet Mask. Then, click “Find Access
Point” icon; AP Manager willl find APs on the network.
DHCP Mode
4 options are available: “Disabled”, “Client Enabled” , “Server Enabled” and
“Auto”. The default value is “Disable”.
If you want to obtain IP addresses from a DHCP server, select “Client
Enabled”. To use an AP as a DHCP server and assign a dynamic IP
address automatically on the network, select “Server Enabled”. If you are
not sure DHCP server is available on the network and wish to use an AP as
DHCP server, please select “Auto”.
DHCP Client Range & DNS
When “Server Enabled” is selected, please enter the range of your IP
addresses and DNS. DNS information is provided by your ISP.
802.1d Spanning Tree
When the 802.1d Spanning Tree function is enabled, the circuit problem
among multi APs or routers in the network can be avoided. The default value
is “Disable”.
42
Page 43

GN-A11G Wireless LAN Access Point
System Settings-Password Setup
You may set up administrator’s user name and password to prevent other users
from accessing to AP and changing settings. If the field on the screen is blank,
no protection is provided for security.
System Settings-AP Manager Settings
You may change the Community String of AP through AP Manager Settings to
prevent other users of AP Manager from accessing and managing the AP.
43
Page 44

GN-A11G Wireless LAN Access Point
System Settings-Save/Reload Settings
You may save the current configuration as a file for restoring configuration in the
future. You may press “Reset” to restore to factory default.
Statistics
Statistics shows you the packets flow status on the wireless LAN and Ethernet.
44
Page 45

GN-A11G Wireless LAN Access Point
Upgrade Firmware
You can upgrade the firmware for AP with this tool. The latest firmware version
can be downloaded from Gigabyte website.
Reboot
Reboot GN-A11G.
45
Page 46

GN-A11G Wireless LAN Access Point
Chapter 5 Troubleshooting
This chapter gives information about troubleshooting your wireless Access Point.
Read the descriptions below to help you diagnose and solve the problem.
Q: What to do if you forget your password or forget the IP address of the
Access Point?
A: Please press the “init” bottom on the Access Point for 5 seconds. The
Access Point will be restart and the system setting will restore to the default
value.
Q: Unable to connect to the Internet?
A: 1. Please confirm that the power cord is connected properly, and the
Access Point’s power LED is correctly lit.
2. Please confirm whether all of the settings described in this manual are
correctly set.
3. Please confirm that your ADSL/Cable Modem is operating normally,
and/or you have ISP service available.
4. Please confirm if your network cable is connected correctly, and the LED
status is normal.
Q: Unable to access the Access Point’s Web Configuration Interface?
A: 1. Please check the Ethernet connection between the PC and the Access
Point is properly connected.
2. Make sure your computer’s IP address is on the same subnet as the
Access Point.
3. Make sure you are using the correct login information.
Q: What is the IEEE802.11b standard?
A: It also referred to as 802.11 High Rate or Wi-Fi. It is an expansion to 802.11
that applies to wireless LAN and provides 11 Mbps transmission (with a
fallback to 5.5, 2 and 1 Mbps) in the 2.4 GHz band. The 802.11b uses only
Direct Sequence Spread Spectrum (DSSS). The 802.11b was a 1999
ratification to the origianl 802.11 standard, allowing wireless functionality
comparable to Ethernet.
Q: What is WEP?
A: Wired Equivalent Privacy (WEP). A security mechanism defined within the
802.11 standard. Designed to make the link integrity of the wireless medium
equal to wired cable.
Q: What is the IEEE802.11g standard?
A: IEEE 802.11g standard specifies data rates of up to 54 Mbits/s in the
2.45-GHz band. It uses Orthogonal Frequency Division Multiplexing (OFDM),
which is the mandatory provisions have been made within the standard to
make it inherently compatible with the well-established 802.11b standard at
11 Mbits/s, which uses Complementary Code Keying (CCK) modulation.
Both .11g and .11b can operate at ranges of up to 300 feet.
46
Page 47

GN-A11G Wireless LAN Access Point
Appendix A: Glossary
Access Point
An Access Point is a wired controller that sends data to the wireless NIC’s
installed in your network computers, and received data back from them. An
Access Point is often connected to the network computer that has Internet
access, or is directly connected to an ADSL or cable modem.
ADSL
Asymmetric digital subscriber line (ADSL) is a new modem technology that
converts existing twisted-pair telephone lines into access paths for high-speed
communication of various sorts.
Auto-MDI/MDIX
On a network hub or switch, an auto-MDI/MDIX port automatically senses if it
needs to act as a MDI or MDIX port. The auto- MDI/MDIX capability eliminates
the need for crossover cables.
Auto-negotiate
To automatically determine the correct setting. The term is often used with
communications and networking.
DHCP
The Dynamic Host Configuration Protocol (DHCP) is an Internet protocol for
automating the configuration of computers that use TCP/IP. DHCP can be used
to automatically assign IP addresses, to deliver TCP/IP stack configuration
parameters such as the subnet mask and default router, and to provide other
configuration information such as the addresses for printer, time and news
servers.
DSSS
Also known as “Direct Sequence Spread Spectrum,” this is a variety of radio
transmission methods that continuously change frequenciesy or signal patterns.
Direct Sequence Spread Spectrum (DSSS), which is used in CDMA technology,.
multiplied the data bits by a very fast, pseudo-random bet pattern (PN sequence) that “spreads”
the data into a large coded stream that takes the full bandwidth of the channel.
47
Page 48

GN-A11G Wireless LAN Access Point
DNS
The Domain Name System (DNS) is a distributed Internet directory service.DNS
is used mostly to translate between domain names and IP addresses, and to
control Internet email delivery. Most Internet services rely on DNS to work, and if
DNS fails, web sites cannot be located and email delivery stalls.
Dynamic IP Address
A IP address is automatically assigned to a user’s AP in a TCP/IP network
typically by a DHCP server.
Firewall
A system designed to prevent unauthorized access to or from a private network.
Firewalls can be implemented in both hardware and software, or a combination
of both.Firewalls are frequently used to prevent unauthorized Internet users from
accessing private networks connected to the Internet, especially intranets.All
messages entering or leaving the intranet pass through the firewall, which
examines each message and blocks those that do not meet the specified
security criteria.
Gateway
A device, usually a Router, that connects hosts on a local network to other
networks.
IP Address
Every PC on the Internet has a fixed identifying number, called a IP Address. A
typical IP address looks like this: 216.27.61.137
MAC Address
On a local area network (LAN) or other network, the MAC (Media Access Control)
address is your computer’s fixed hardware number.Usually written as:
01:23:45:67:89:ab
Ping (Packet Internet Groper)
A utility to determine whether a specific IP address is accessible. It works by
sending a packet to the specified address and waiting for a reply. PING is used
primarily to troubleshoot Internet connections.
Router
A device that forwards data packets along networks. A router is connected to at
least two networks, commonly two LANs or WANs or a LAN and its ISP network.
Routers are located at gateways, the places where two or more networks
connect.
48
Page 49

GN-A11G Wireless LAN Access Point
SSID
The SSID is the name represents the routers and Access Point in wireless
network.
Subnet Mask
A mask used to determine which subnet a IP address belongs to. A IP address
has two components, the network address and the host address. Subnetting
enables the network administrator to further divide the host part of the address
into two or more subnets.
TCP/IP
TCP/IP (Transmission Control Protocol/Internet Protocol), the suite of
communications protocols used to connect hosts on the Internet.
WAN
Wide Area Network, a communication network that covers a relatively broad
geographic area, consisting of two or more LANs. Broadband communication
over the WAN is often through public networks such as the ADSL or Cable
systems, or through leased lines or satellites. To simplify it, please image
network as a WAN.
WEP
WEP (Wired Equivalent Privacy) is a data privacy mechanism based on a
64/128-bit shared key algorithm, as described in the IEEE 802.11 standard.
49
Page 50

GN-A11G Wireless LAN Access Point
Appendix B: Specifications
Physical Interface
The Wireless Access Point includes one RJ-45 Ethernet LAN ports, one init
button and one antenna.
Item Contents Description
1. LAN Port x 1 RJ-45, Auto-sensing for 10/100M Ethernet LAN
connection.
2. Reset Button Initial reset
3. Antenna One external antenna and one internal antenna supporting
different applications.
Specifications
System Specification
Data Rates Data Rates: 11/5.5/2/1 Mbps for IEEE 802.11b and
54/48/36/24/18/12/9/6 Mbps for IEEE 802.11g
LAN Interface 10/100 Mbps LAN port,with Auto-sensing function
Protocol Support TCP/IP, DHCP, UDP, ICMP, ARP, TFTP, SNMP
Frequency Range 2.4000~2.4835 GHz (subject to local regulation)
Operating Range Indoor: 30M~100M (100ft.~300ft.)
Open space: 100-300m (300ft.~900ft)
subject to local environment
LED Power/Status; Wireless; LAN port
OS Support Win95/98/2000/ME/XP/NT 4.0, Linux, Unix, Mac
AP Manager Win95/98/2000/ME/XP
Dimension
Power Supply 5V DC 2A
Temperature Range Operating: 0~40 degree C
Storage: -20~65 degree C
Humidity 10% ~ 85% Non-condensing
Dimension 178 mm x 132 mm x 43 mm
Gross Weight 320±5g
50
Page 51

GN-A11G Wireless LAN Access Point
Appendix C: Configuration of the
PCs
To connect to the AP, your computer needs to be located in the same Subnet
where the AP locates. Please follow the instructure to perform the setup under
the TCP/IP network environment. By default Windows 98, Me, 2000 and XP has
TCP/IP installed. If you have not installed the TCP/IP communication Protocol,
please install it now, and then select your operating system for the setup.
The TCP/IP Settings under Windows 2000
Step 1. Click the Start button, select Settings and then click the Control
Panel icon.
51
Page 52
GN-A11G Wireless LAN Access Point
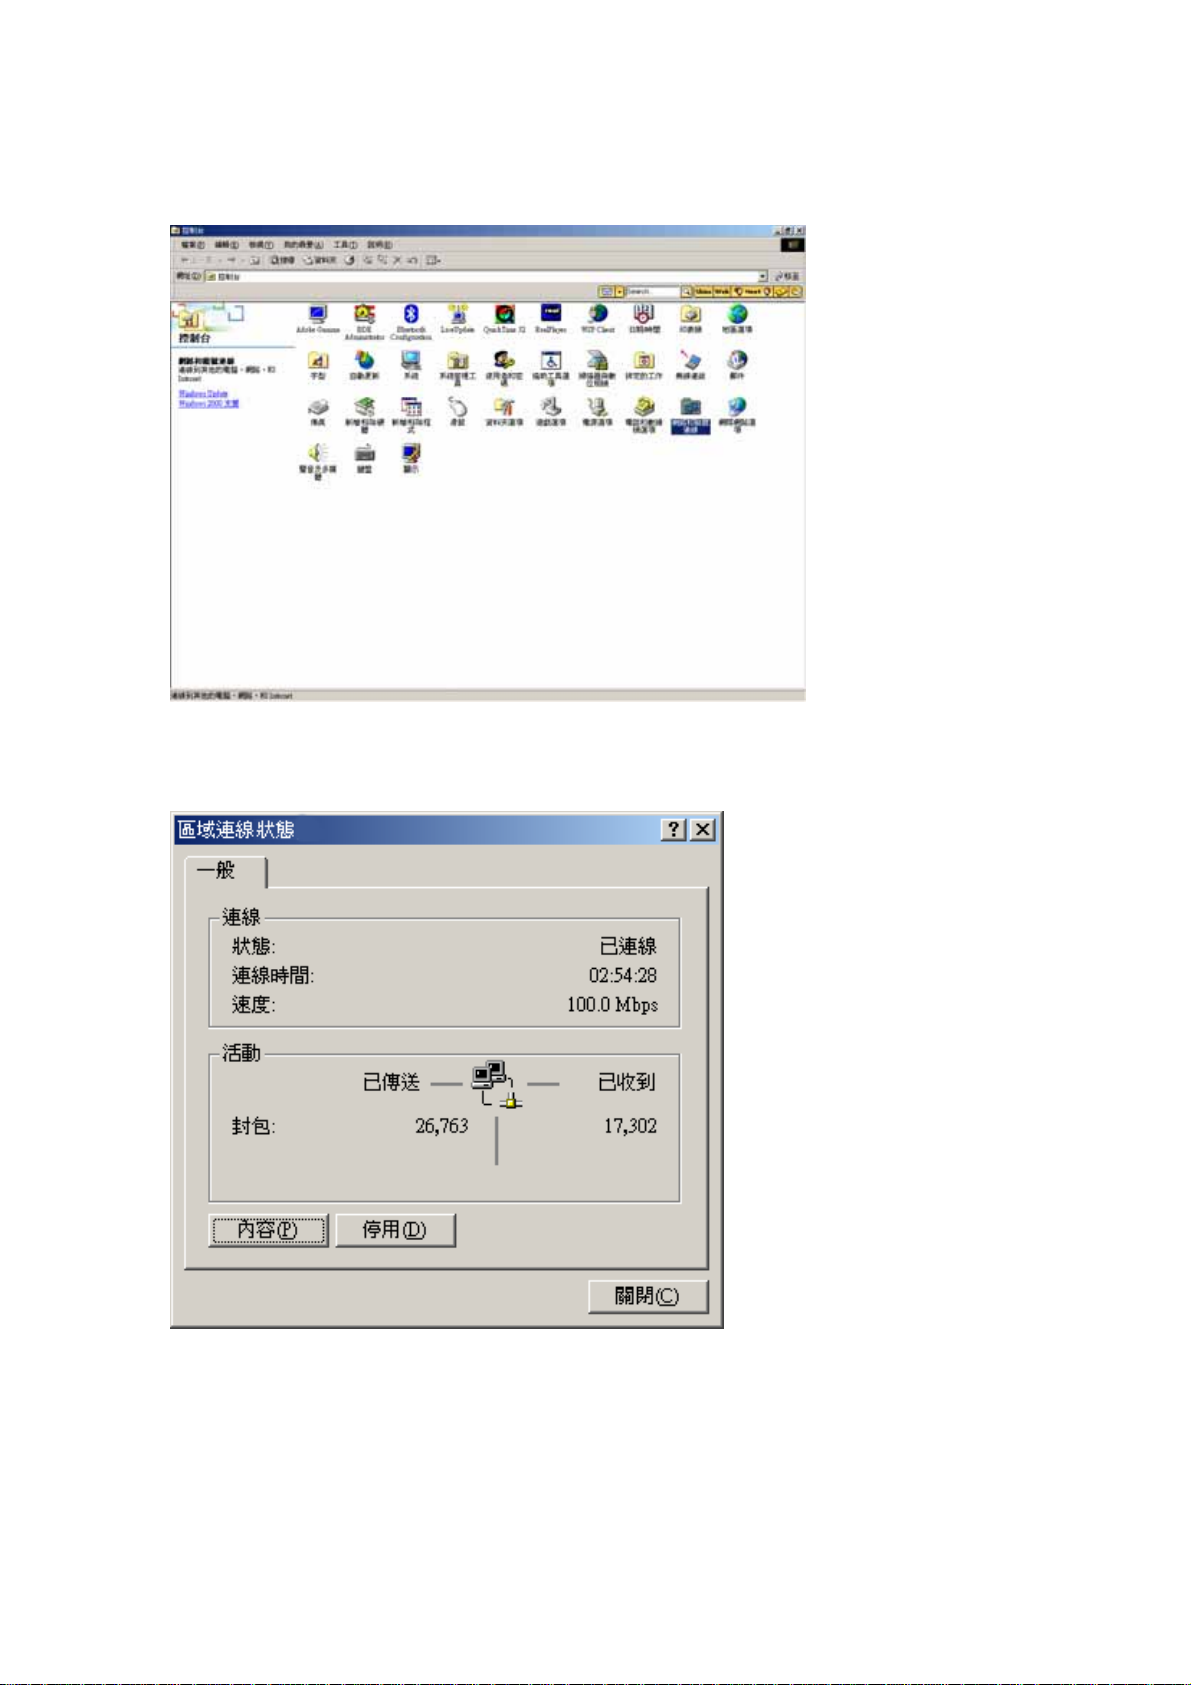
Step 2. Double-click the Network and Dial-up Connection icon.
Step 3. Double-click the “LAN CONNECTION” and click the “Properties”
button.
52
Page 53
GN-A11G Wireless LAN Access Point
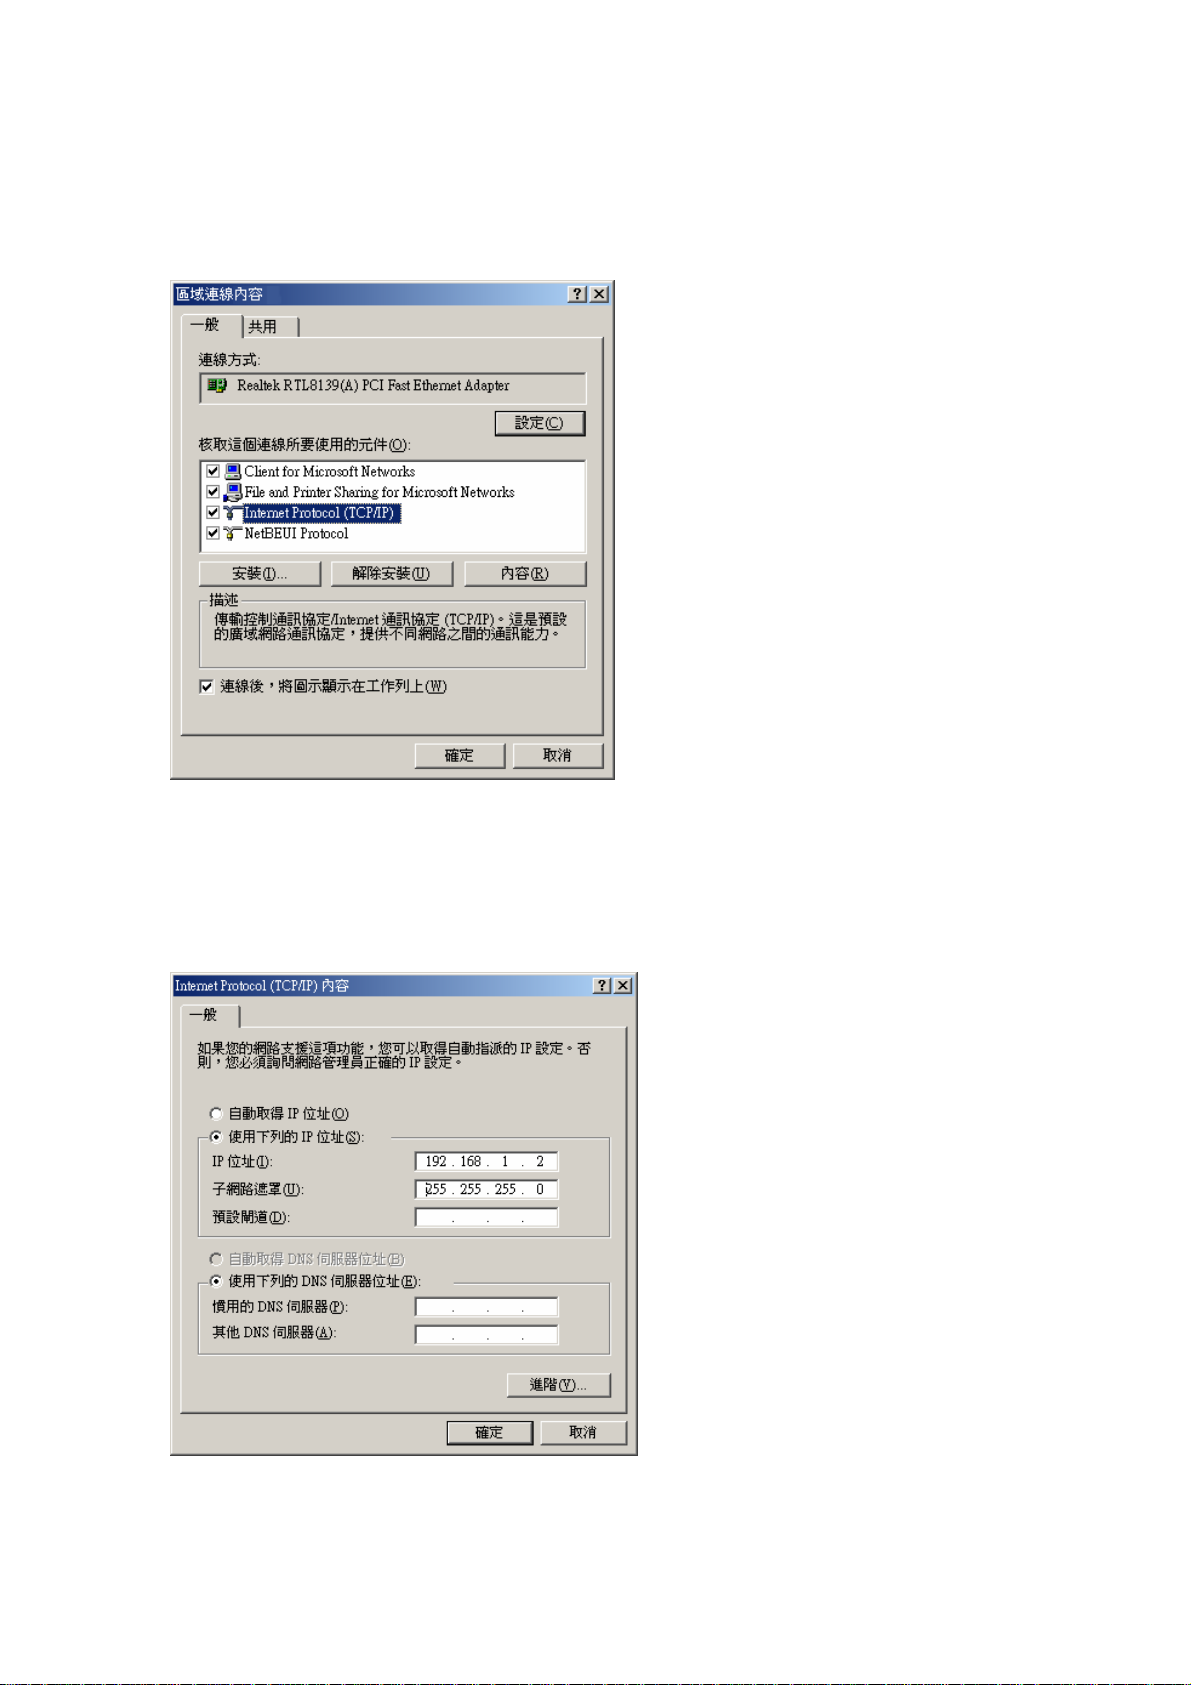
Step 4. The “Local Area Connection Properties” dialog box will appear.
Verfiy that the Internet Protocol (TCP/IP) item is checked. Then
double-click on Internet Protocol (TCP/IP).
Step 5. Assign the static IP address used by the AP and the same Subnet
Mask to the computer (For example, IP address is192.168.1.2 and
Subnet Mask is 255.255.255.0), click the “OK” button to return to
Local Area Connection Properties. Click the “OK” button again to
complete the PC configuration.
53
Page 54
GN-A11G Wireless LAN Access Point
The TCP/IP Settings underWindows XP
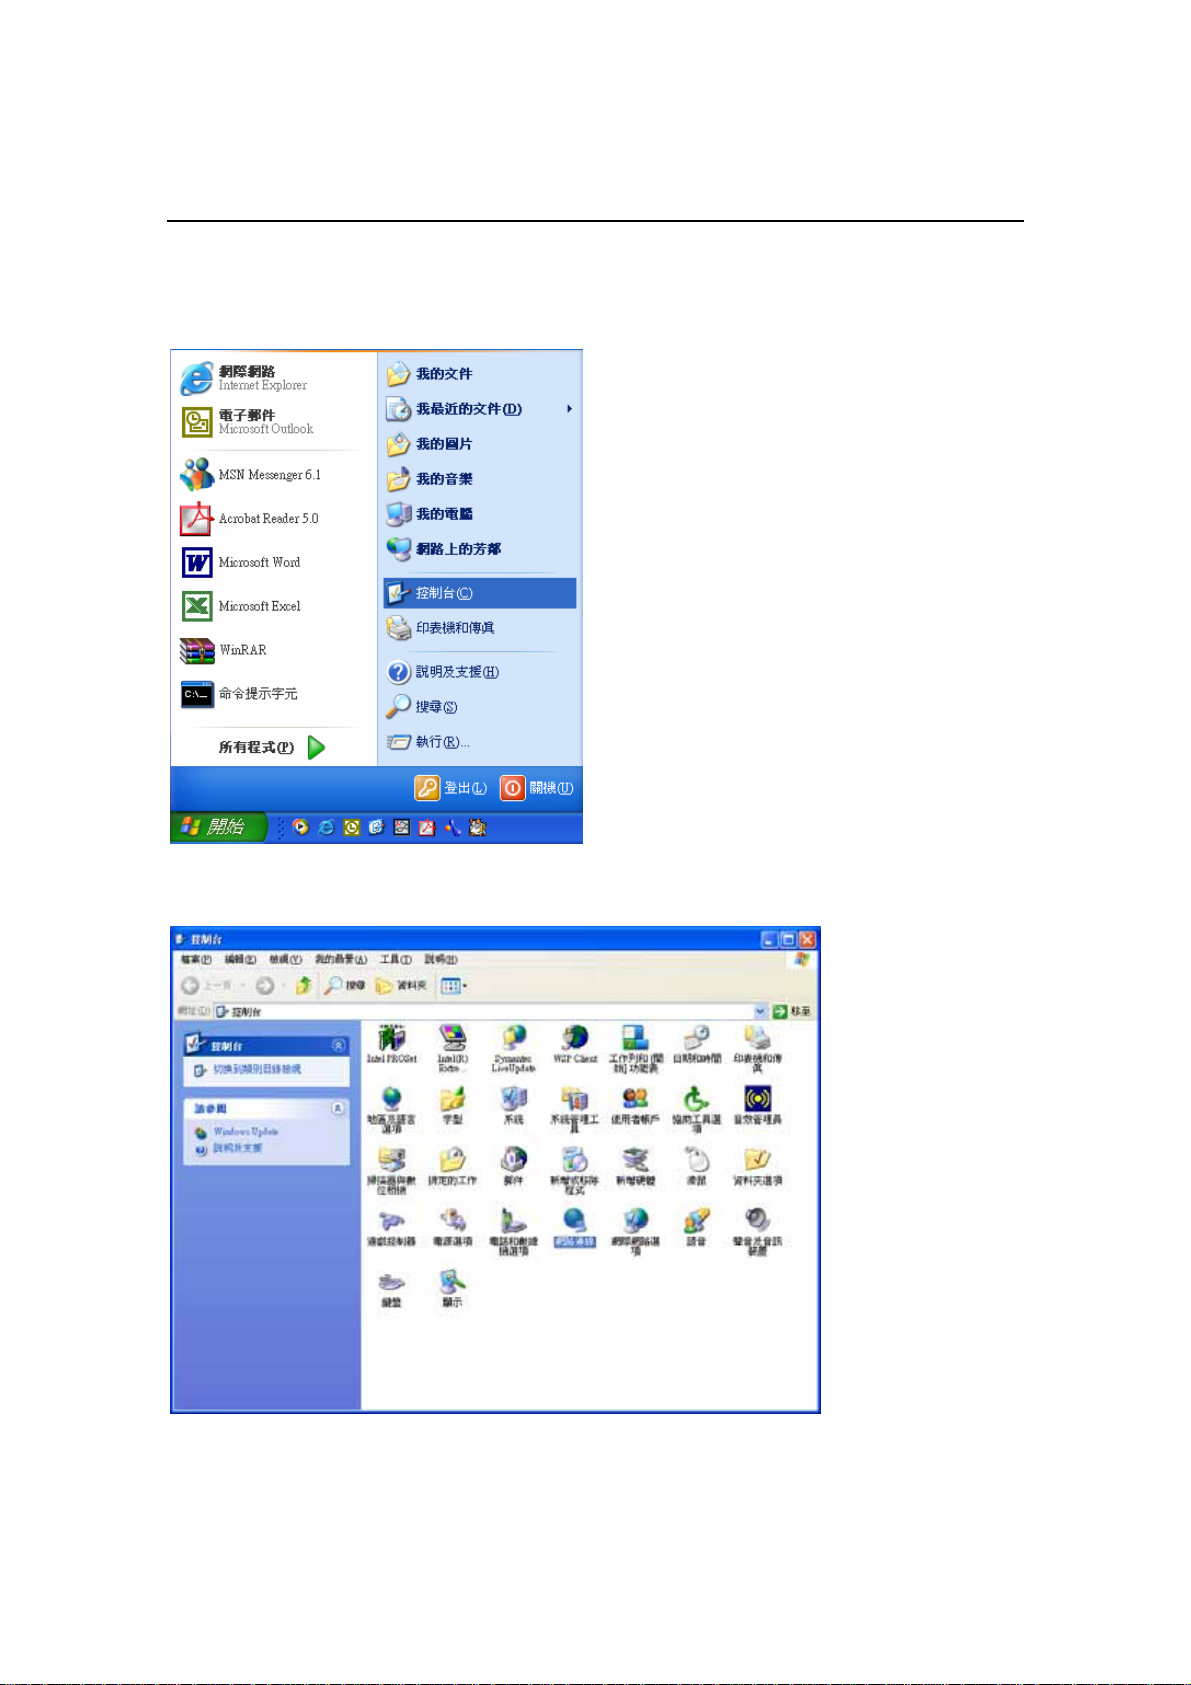
Step 1. Click the “Start” in the desktop of the Windows to select “Settings”,
and then select the “Control Panel”.
Step 2. Double-click the “Network Connections” icon.
54
Page 55

GN-A11G Wireless LAN Access Point
Step 3. Double-click the “LAN CONNECTION” and click the “Properties”
button.
Step 4. The “Local Area Connection Properties” dialog box will appear.
Verfiy that the Internet Protocol (TCP/IP) item is checked. And then
double-click on “Internet Protocol (TCP/IP)” item.
55
Page 56

GN-A11G Wireless LAN Access Point
Step 5. Assign the static IP address used by the AP and the same Subnet
Mask to the computer (For example, IP address is192.168.1.2 and
Subnet Mask is 255.255.255.0), click the “OK” button to return to
“Local Area Connection Properties”. Click the “OK” button again to
complete the PC configuration.
56
Page 57

GN-A11G Wireless LAN Access Point
Limited Warranty Statement
1-Year Warranty
Gigabyte warrants to the original consumer/purchaser that the product free from
defects in material and workmanship for no limited time from the original
manufactory shipment date. This warranty does not cover the product if it is
damaged in the process of being installed or improperly used.
Gigabyte may replace or repair the product with either new or reconditioned
parts. Repaired or replaced products will be returned to you at the same revision
level as received or higher at Gigabyte’s option. Gigabyte reserves the right to
replace discounted products with an equivalent generation product.
KEEP THIS STUB FOR YOUR PURCHASING RECORD
Customer:
Phone No:
Address:
Email:
Model:
Serial:
Date of Purchase:
Place of Purchase:
Distributor:
Distributor:
Customer Satisfaction
GIGA-BYTE TECHNOLOGY CO., LTD.
No.6, Bau Chiang Road, Hsin-Tien, Taipei Hsien, Taiwan, R.O.C.
Phone No: 886-2-89124888
Fax: 886-2-89124007
http://www.gigabyte.com.tw
Technical Support
E-Mail: networksupport@gigabyte.com.tw
57
 Loading...