

gie - tec
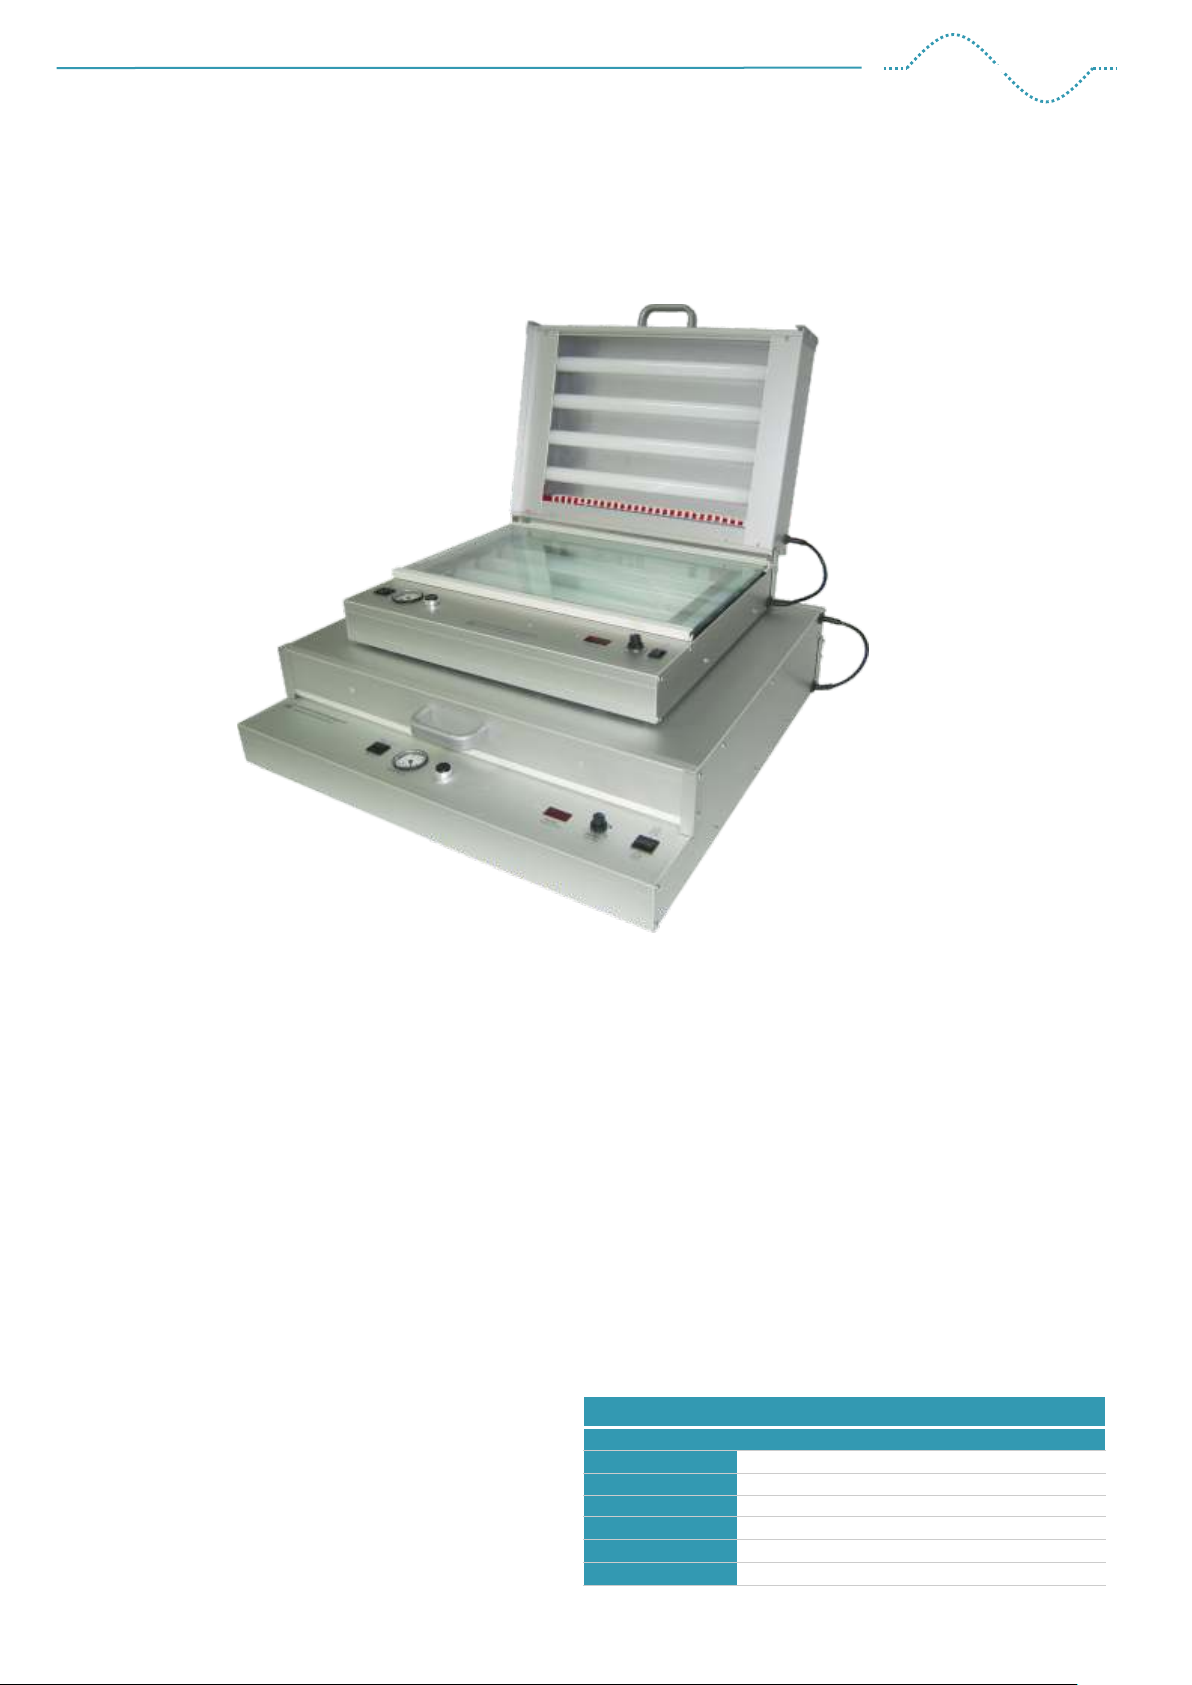
Vacuum UV-Exposure Box
...for expose UV-ligth sensitive foils and plates
Vaccum UV Exposure Boxes shall used for exposure foto sensitive materials such as base
materials, printed plates, front plates or foto sensitive films.
Using the devices is very easy and user-friendly. The oscillator-based electronic timer allows the
precise adjustment of the exposure time, only with 1-knob operation (mode, time, Start/Stop). The
seven-segment LED display is showing the adjusted time and while the device is active the
remaining time.
The device integrates high intensive lamps (ACTINIC) and ensures by this short exposure time and
good contrast.
Vaccum UV Exposure Boxes are designed for using in dry rooms, schools, living rooms, office, as
well in laboratory and small factories
Fully metal housing out of anodised aluminum Electronic ballast according EN60929, EN-EC 03, EI=A2,
¢ ¢
profiles and plates. no stroboscopic effect, no flicker, power factor >0,92
Grindet glass plate with high UV transparency for
¢
UV-A wave length
Special flourescent lamps (ACTINIC), wave length
¢
350 - 400nm (UV-A)
Evenly illumination all of the exposure area
¢
Constant contact pressure between 22mm cellular
¢
material in lid and glass plate.
Electronic timer with selectable time ranges
¢
1-600seconds, or 1-100minutes, 1-knob operation,
seven-segment LED display
Subject to technical modifications without prior notice.
Technical Data
Item no.:
Dimension (LxBxH)
Mounting area
Power consumption
Number of UV tubes
UV wave length
Timer
140001 140002 140010 140020
475 x 425 x 140 625 x 605 x 140
360 x 230 520 x 390
135 W 260 W 225 W 440 W
4x 15 W 8x 15 W 6x 20W 12x 20 W
365 nm
1 ... 600 s / 1 ... 100 min
www.gie-tec.de
Gie-Tec GmbH An der Schlierbach 18 D-36132 Eiterfeld Tel.: +49 (0)6672/919-910 E-Mail:info@gie-tec.de
l
l
l
l
gie - tec
ATTENTION!
l
The UV Exposure Box is suited for ligth
exposure of fotosensitiv coated
materials, such as fotopositive coated
base material, Cobritherm, front plates
and films for making printed plates.
Other usings are not allowed.
l
The device is designed for power
supply 230V (50- 60Hz) and may used
only in perfect technical condition.
Using the Exposure Box it´s not
allowed by children and people which
are not instructed.
l
All operations with the exposure box
have to be done by professionals.
Thereby they have to consider all
instructions of the electronic industrie
and the accident preventation.
l
Don´t use the device without
connecting earth line.
l
Before opening the housing (e. g. to
change the lamps) the device must be
free of voltage. Please disconnect the
power cord from mains voltage.
Please note: Not all wires inside the
device, which may have contact to
high voltage, are covered
l
Assembly and using of the device has
to be done only according the
declaration of conformity.
l
Ambient temperature 0 bis +40°C
Storage temperature -10° bis +60°C
l
The device must not exposed to high
humidity, strong vibrations or
explosive gas.
l
Keep this manual careful and
undertake every user to consider.
If you don´t provide this manual, loss
of property, risk of injury up to loss of
life may can happen.
DANGER!
1. Starting up
1.1 Placement
The device ought to be placed onto a horizontal, stable base (e. g. workbench,
table) with the control elements pointing to the front.
The room must to be darkned.
1.2 Mounting lamps
In some device we demount the lamps
after function test and VDE check. This
is because of problems while shipping
the goods. In this cases the lamps a
laying inside the bottom of the device
and the glass plate is fixed inside PEfoam plastic at the top of the device.
So, before using the Exposure Box you
have to mount the lamps and the glass
plate.
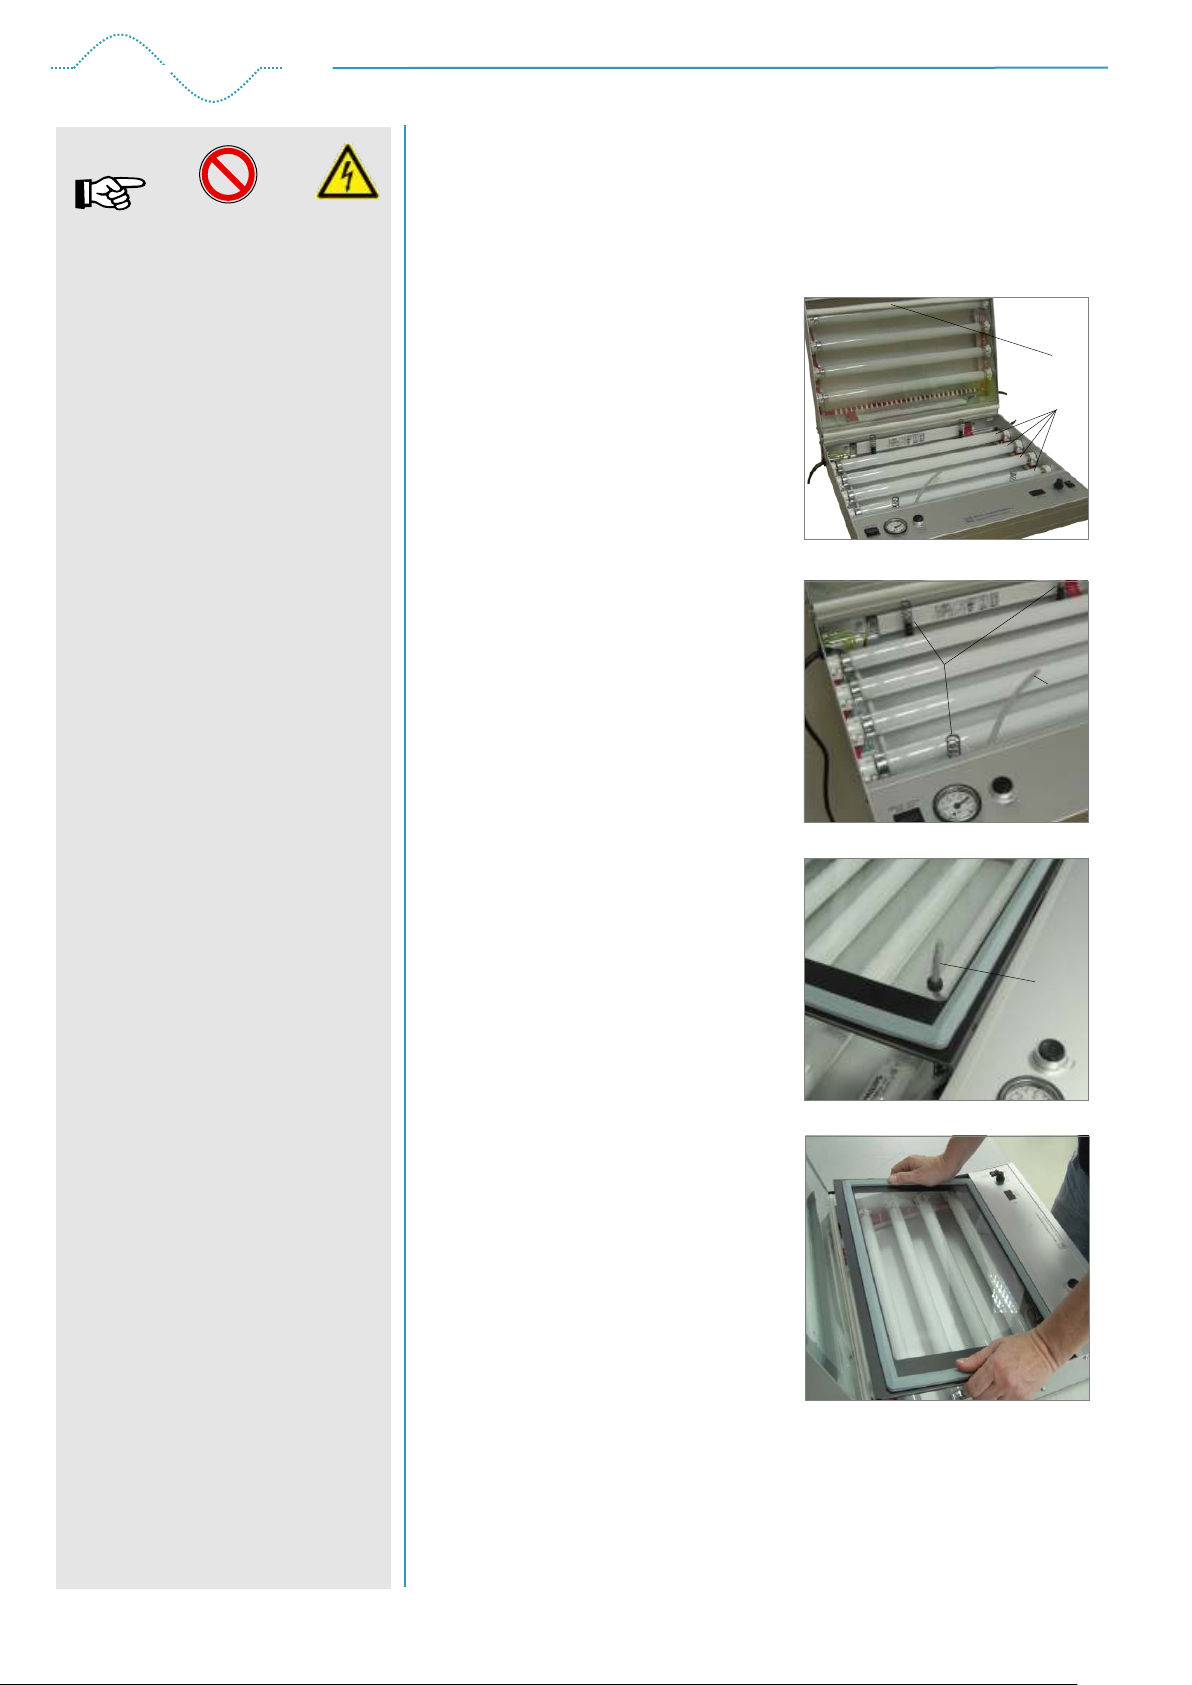
Instruction for mounting / changing
the lamps
1. Open upper cover of the device and
turn glass plate (1) to upper point. Fix
the position and make sure, that the
glass plate can´t drop down.
If you want to change the lamps,
please remove the old one by turning
them inside the socket (2) about 90°
(2x click)
2. Take the new lamps out of the
transport package. For mounting the
lamps, you must plug in the lamps at
the same time in the left and the right
socket and turn the lamp inside the
socket 90° (2x click). Please make
sure, that after mounting the lamps,
the label is showing to the bottom of
the device.
3. Mount the spiral springs at the thread
bolt (3). Please check, that no spiral
springs are in contact with wires!
4. Before mounting the glass plate in the
exposure box again, you have to
insert the air tube of the vaccum
pump into the rubber ring of the glass
plate (4).
Note: If you take some water for lube,
mounting the air tube will be easier.
Move the tube approx. 5cm out of the
rubber ring. Take a blade and cut the
tube above the ring.
5. After this place the glass plate on the
frontside spiral spring and press the
plate carefully down. Now you can
move the glass plate below the
aluminum profile.
Abb.1
3
Abb.2
Abb.3
1
2
4
4
www.gie-tec.de
Gie-Tec GmbH An der Schlierbach 18 D-36132 Eiterfeld Tel.: +49 (0)6672/919-910 E-Mail:info@gie-tec.de
l
Abb.4
1.3 Maintenance
The exposure box is free of service.
Only the ACITINIC lamps lose intensity during operation (approx.:. 15% after
1000 h).
The vacuum frame is built out of a glass plate with a thin PVC foil on top.
Please pay attention to the PVC-foil and the rubber frame mounted on the
base plate. If something is damaged, you won´t get the vacuum.
l
l
l

List of spare parts:
Part no.: 140904 0625 PVC-foil
Part no.: 140901 0001 Rubber frame (450x270mm)
Part no.: 410017 UV lamp (ACTINIC), 230V/15W
1.4 Operating instruction for electronic timer
The built-in electronic timer, is used for adjust the exposure time of the device.
Time setting is possible in SecondMode or MinuteMode.
Switching on the device, the timer is working in “SecondMode”. Thereby the
ON-time can be adjusted between 1 sec and 9min50sec.
3-digit, 7-Segment LED Display
(remaining time)
These dots are shining
only in MinuteMode
Display 1
Adjustment of exposure time
After switch-on the device or plug in the power cord to mains voltage, all three
displays are flashing. Turning the rotating knob counterwise (cw) or
counterclockwise (ccw), display 3 will change the value of the digit . If the
desired value is visible, you can store them by pushing the knob.
Turning the knob again the value of display 2 will be changed and by pushing
the knob the desired value will be stored.
After you have stored the value of display 1 in the same way, the complete
display is flashing.
Now you can start the count-down timer by pushing the knob once again.
While the timer decrement, the power relay is on and by this the lamps of the
Exposure Box are shining. The display now is showing the remaining time,
until exposure unit will be switched OFF.
Seven-segment display
Display 1 minutes
Display 2 seconds (ten`s digits)
Display 3 seconds (one`s digits)
Display 2
Display 3
This dot is shining when
lid is open
(only in device #140007 1000)
Range
{0, 1, 2, 3, 4, 5, 6, 7, 8, 9}
{0, 1, 2, 3, 4, 5}
{0, 1, 2, 3, 4, 5, 6, 7, 8, 9}
Rotating knob and key combination
to adjust mode, time and Start/stop
gie - tec
If you push the knob while switching
ON the Exposure Box, operation
mode “MinuteMode” will be selected.
Now Display 3 indicates the time in
seconds (10 seconds each count)
and Display 1 / 2 are showing the
time units minutes. Therefore, you
can enter times up to 99 minutes and
50 seconds.
Excample:
> 2.3.4 < = 23 minutes, 40 seconds
> 7.5.5 < = 75 minutes, 50 seconds
> 0.4.3 < = 4 minutes, 30 seconds
In this operation mode, the decimal
point of Display 1 and 2 lights up.
It is not possible to start the timer, if
the display is showing >000<.
You can interrupt the count-down at
any time by pushing the rotary knob.
The display flashes again and the
flourescent lamps are switched off.
The display is showing the remaining
time now.
For continue the exposure press the
rotary knob once again.
Example: Display Value
2 3 4 corresponds to 2 minutes, 34 seconds
7 5 9 corresponds to 7 minutes, 59 seconds
0 4 5 corresponds to 0 minutes, 45 seconds
1.5 Replacement of lamps
The UV-lamps (low pressure mercury-vapor lamp) will loose UV-A intensity
while using (approx.: 15% after 1000 h).
If intensity of UV-A is to less to exposure the fotosensitive plates and films, you
have to replace them. Therefore you have to remove the glass plate.
Procedure::
- Unplug the power cord from mains voltage.
- Remove screws (M3x6mm) out of the small aluminum strips, which are used
for holding-down and clamp the glass plate.
- Remove the glass plate carefully.
- Replace the lamps. Therefore you have to turn the tubes 90° (1x click). After
this you can take them upward out of the socket .
- After replacement the lamps and mounting all metal strips you have removed
before, the device is ready for operation again.
Please decontaminate “old” lamps only in special container and
consider the national rules for this!
Subject to technical modifications without prior notice.
DANGER!
Before opening the metal housing of
the exposure box (for example to
change the lamps), the device must
be free of voltage. Please unplug the
power cord from mains voltage.
Please note: Not all components
inside the device, which may have
contact to high voltage, are covered.
UV
UV-lamps are customary in industry,
without any special safety
requirements. In spite of this, we
emphasize the following pre-caution:
Switch the UV-lamps ON only when
the lid is closed!
www.gie-tec.de
Gie-Tec GmbH An der Schlierbach 18 D-36132 Eiterfeld Tel.: +49 (0)6672/919-910 E-Mail:info@gie-tec.de
l
l
l
l

gie - tec
Information of Safety and Risc:
Safety:
UV
Don´t start exposure before lid of
exposure box is closed.
Radiation from UV lamps is harmful to
eyes and skin
2. Declaration of Conformity
Declaration of Conformity
Manufacturer:
Description and
Identification of Device:
These device is produced in accordance to following directives
Low Voltage Directive (2006/95/EG)
of Exposure Boxes
according EC-Directive 2006/95/EG
Gie-Tec GmbH
An der Schlierbach 18
36132 Eiterfeld
Vakuum UV Exposure Box
Art. Nr. 140010
EMI-Directive (2004/108/EG)
Quality Safety System
Eiterfeld, 09.Sept.2010
..................................................... ..........................................................................
Place, Date Rainer Giebel, Managing Director Gie-Tec GmbH
ISO 9001:2008
Zertifikat Nr. A1888GER
www.gie-tec.de
Gie-Tec GmbH An der Schlierbach 18 D-36132 Eiterfeld Tel.: +49 (0)6672/919-910 E-Mail:info@gie-tec.de
l
l
l
Subject to technical modifications without prior notice.
l
 Loading...