


Always there to help you
Register your product and get support at
www.philips.com/support
Question?
Contact
Philips
User manual

Contents
7 Wall mount your SoundBar 21
Wall mount 21
1 Important 2
Important safety instructions 2
Care for your product 3
Care of the environment 3
Help and support 4
2 Your SoundBar 5
Main unit 5
Remote control 5
Wireless portable speakers 6
Wireless subwoofer 7
Connectors 7
3 Connect and set up 9
Charge portable speakers 9
Pair up with subwoofer/speakers 9
Place speakers 10
Connect audio from TV 10
Connect audio from other devices 12
Connect digital devices through HDMI 13
4 Spatial calibration 14
Step 1: calibrate the listening zone 14
Step 2: calibrate the surround speaker
position 14
3URGXFWVSHFLÀFDWLRQV 22
9 Troubleshooting 23
10 Notice 25
Notice of compliance 25
Trademarks 25
5 Use your SoundBar 16
Adjust the volume 16
Choose your sound 16
MP3 player 17
Play music via Bluetooth 17
Connect Bluetooth via NFC 18
Auto standby 19
Set display brightness 19
Apply factory settings 19
6 Update software 20
Check software version 20
Update software via USB 20
1EN
1 Important
Read and understand all instructions before you
use your product. If damage is caused by failure
to follow instructions, the warranty does not
apply.
Important safety instructions
• Read these instructions.
• Keep these instructions.
• Heed all warnings.
• Follow all instructions.
• Do not use this apparatus near water.
• Clean only with dry cloth.
• Do not block any ventilation openings.
Install in accordance with the
manufacturer's instructions.
• Do not install near any heat sources
such as radiators, heat registers, stoves, or
RWKHUDSSDUDWXVLQFOXGLQJDPSOLÀHUVWKDW
produce heat.
• Do not defeat the safety purpose of
the polarized or grounding-type plug. A
polarized plug has two blades with one
wider than the other. A grounding type
plug has two blades and a third grounding
prong. The wide blade or the third prong
are provided for your safety. If the provided
SOXJGRHVQRWÀWLQWR\RXURXWOHWFRQVXOW
an electrician for replacement of the
obsolete outlet.
• Protect the power cord from being
walked on or pinched, particularly at plugs,
convenience receptacles, and the point
where they exit from the apparatus.
• Only use attachments/accessories
VSHFLÀHGE\WKHPDQXIDFWXUHU
• Use only with the cart, stand, tripod,
EUDFNHWRUWDEOHVSHFLÀHGE\WKH
manufacturer or sold with the apparatus.
When a cart is used, use caution when
moving the cart/apparatus combination to
avoid injury from tip-over.
• Unplug this apparatus during lightning
storm or when unused for long periods of
time.
• Refer all servicing WRTXDOLÀHGVHUYLFH
personnel. Servicing is required when
the apparatus has been damaged in any
way, such as power-supply cord or plug
is damaged, liquid has been spilled or
objects have fallen into the apparatus, the
apparatus has been exposed to rain or
moisture, does not operate normally, or
has been dropped.
• Battery usage CAUTION - To prevent
battery leakage which may result in bodily
injury, property damage, or damage to the
unit:
• Install all batteries correctly, + and - as
marked on the unit.
• Do not mix batteries (old and new or
carbon and alkaline, etc.).
• Remove batteries when the unit is not
used for a long time.
• The batteries shall not be exposed to
H[FHVVLYHKHDWVXFKDVVXQVKLQHÀUHRU
the like.
• Perchlorate Material - special handling
may apply. See www.dtsc.ca.gov/
hazardouswaste/perchlorate.
• The product/remote control may contain
a coin/button type battery, which can be
swallowed. Keep the battery out of reach
of children at all times! If swallowed, the
battery can cause serious injury or death.
Severe internal burns can occur within two
hours of ingestion.
• If you suspect that a battery has been
swallowed or placed inside any part of the
body, seek immediate medical attention.
• When you change the batteries, always
keep all new and used batteries out of
reach of children. Ensure that the battery
compartment is completely secure after
you replace the battery.
• If the battery compar tment cannot be
completely secured, discontinue use of the
product. Keep out of reach of children and
contact the manufacturer.
• Apparatus shall not be exposed to
dripping or splashing.
• Do not place any sources of danger on
the apparatus IRUH[DPSOHOLTXLGÀOOHG
objects, lighted candles).
• This apparatus may contain lead and
mercury. Dispose according to local, State
or Federal laws. For disposal or recycling
information, please contact your local
authorities. For additional assistance on
recycling options, please contact www.
mygreenelectronics.com or www.eiae.org
or www.recycle.philips.com.
• Where the MAINS plug or an appliance
coupler is used as the disconnect device,
the disconnect device shall remain readily
operable.
• Do not place this apparatus on the
furniture that is capable of being tilted by a
child and an adult leaning, pulling, standing
or climbing on it. A falling apparatus can
cause serious injury or even death.
• This apparatus should not be placed in a
built-in installation such as a bookcase or
rack unless proper ventilation is provided.
Make sure to leave a space of 7.8 inches
(20cm) or more around this apparatus.
Class II equipment symbol
This symbol indicates that the unit has a double
insulation system.
This 'bolt of lightning' indicates uninsulated
material within your unit may cause an electrical
shock. For the safety of everyone in your
household, please do not remove product
covering.
The 'exclamation point' calls attention to
features for which you should read the enclosed
literature closely to prevent operating and
maintenance problems.
WARNING:7RUHGXFHWKHULVNRIÀUHRU
electric shock, this apparatus should not be
H[SRVHGWRUDLQRUPRLVWXUHDQGREMHFWVÀOOHG
with liquids, such as vases, should not be placed
on this apparatus.
CAUTION: To prevent electric shock, match
wide blade of plug to wide slot, fully insert.
Care for your product
8VHRQO\PLFURÀEHUFORWKWRFOHDQWKHSURGXFW
Care of the environment
Disposal of your old product and battery
Your product is designed and manufactured
with high quality materials and components,
which can be recycled and reused.
This product may contain lead and mercury.
Disposal of these materials may be regulated
due to environmental considerations. For
disposal or recycling information, please contact
2 3ENEN
p
n
o
m
your local authorities or visit www.recycle.
philips.com.
This product contains non-removable batteries:
• Do not incinerate. Batteries may explode if
overheated.
• For disposal or recycling information,
please contact your local authorities or visit
www.recycle.philips.com.
Help and support
For extensive online support, visit www.philips.
com/support to:
•
download the user manual and the quick
start guide
• watch video tutorials (available only for
selected models)
• ÀQGDQVZHUVWRIUHTXHQWO\DQVZHUHG
questions (FAQs)
• email us a question
• chat with our support representative.
Follow the instructions on the website to select
your language, and then enter your product
model number.
Alternatively, you can contact Consumer Care
in your country. Before you contact, note down
the model number and serial number of your
SURGXFW<RXFDQÀQGWKLVLQIRUPDWLRQRQWKH
back or bottom of your product.
2 Your SoundBar
Congratulations on your purchase, and
ZHOFRPHWR3KLOLSV7RIXOO\EHQHÀWIURP
the support that Philips offers, register your
SoundBar at www.philips.com/welcome.
Main unit
This section includes an overview of the main
unit.
ab c
a Display panel
b
(Standby-On/Standby indicator)
When the SoundBar is in standby, the
standby indicator turns red.
c NFC tag
T
ap the NFC-enabled device on the tag for
Bluetooth connection.
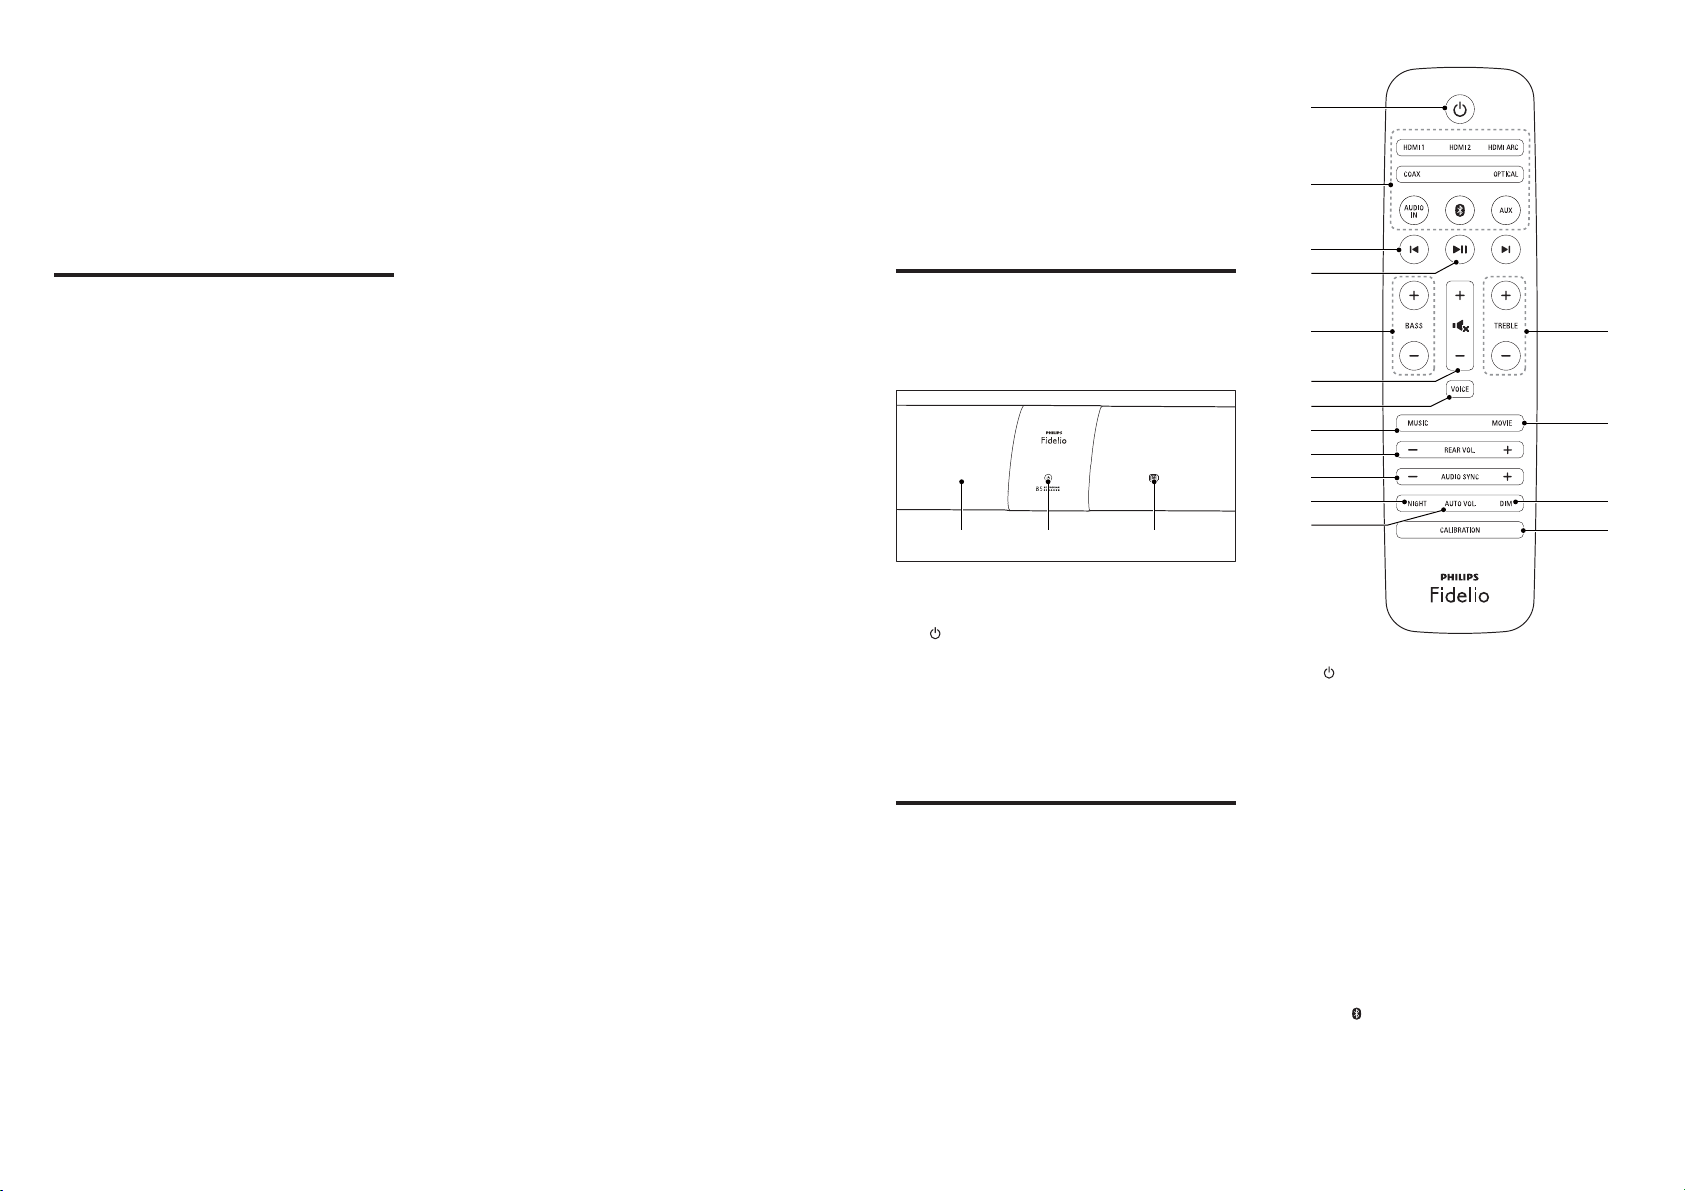
Remote control
This section includes an overview of the
remote control.
a
b
c
d
e
f
g
h
i
j
k
l
a
Switch the SoundBar on or to standby.
b Source buttons
• HDMI ARC: Switch your source to
HDMI ARC connection.
• HDMI 1: Switch your source to the
HDMI IN 1 connection.
• HDMI 2: Switch your source to the
HDMI IN 2 connection.
• COAX: Switch your audio source to
the coaxial connection.
• OPTICAL: Switch your audio source
to the optical connection.
• AUDIO IN: Switch your audio source
to the MP3 connection (3.5mm jack).
•
: For Bluetooth on the main unit only:
Switch to Bluetooth mode.
• AUX: Switch your audio source to the
AUX connection.
4 5ENEN
c /
For Bluetooth on the main unit only: skip
to the previous or next track.
d
For Bluetooth on the main unit only: play,
pause or resume.
e BASS +/-
Increase or decrease bass on the main unit.
f Volume control
• +/-: Increase or decrease volume.
•
: Mute or restore volume.
g VOICE
• Press to select voice clarity sound
mode.
• Press and hold to toggle on or off
CLOSE TO ME (close to me) sound
mode.
h MUSIC
Select stereo sound mode.
i REAR VOL.+/-
Press to increase or decrease volume of
the portable left and right speakers (only
applicable when the portable left and
right speakers are wirelessly connected
to the main unit (or SURROUND ON
DEMAND mode switches on)).
j AUDIO SYNC +/-
Increase or decrease audio delay.
k NIGHT
Turn night mode on or off.
l AUTO VOL.
Turn auto volume on or off.
m CALIBRATION
• Press and hold to trigger calibration for
listening zone.
• Press three times to trigger calibration
for the portable left and right speakers
position.
n DIM
Set the brightness of SoundBar display
panel.
o MOVIE
Select surround sound mode.
p TREBLE +/-
Increase or decrease treble on the main
unit.
Wireless portable speakers
The SoundBar comes with two wireless
portable speakers (left and right).
b ea dc
* The illustration above is for overview of the
portable left speaker.
a Reset key
Press with a pin to reset the portable
speaker to the default settings.
b ON
• Press to turn on the portable speaker
if it automatically goes to standby.
• Press and hold to switch the portable
speaker to standby.
c Speaker LED
• Blinks in red and orange alternatively
if the portable speaker is not wirelessly
connected to the main unit.
• Lights up white when the portable
speaker is wirelessly connected to the
main unit, or when the battery capacity
is full or more than 30% remaining.
• Lights up red when the battery
capacity is less than 30% remaining .
• Blinks red when the battery capacity is
less than 10% remaining.
• Lights up orange when the portable
speaker is being charged (only for the
portable speakers docked into the
main unit).
d SURROUND ON DEMAND button/LED
• Press to switch the portable speaker
to SURROUND ON DEMAND
mode.
• The LED lights up white when the
portable speaker is switched to
SURROUND ON DEMAND mode.
e
button/LED
• Press to switch the portable speaker
to Bluetooth mode.
• The LED blinks when you switch the
portable speaker to Bluetooth and no
Bluetooth devices are connected.
•
The LED lights up when you switch
the portable speaker to Bluetooth and
Bluetooth devices are connected.
Note
• If you press the button on the portable speaker,
the portable speaker disconnects the main unit (or
SURROUND ON DEMAND mode switches off).
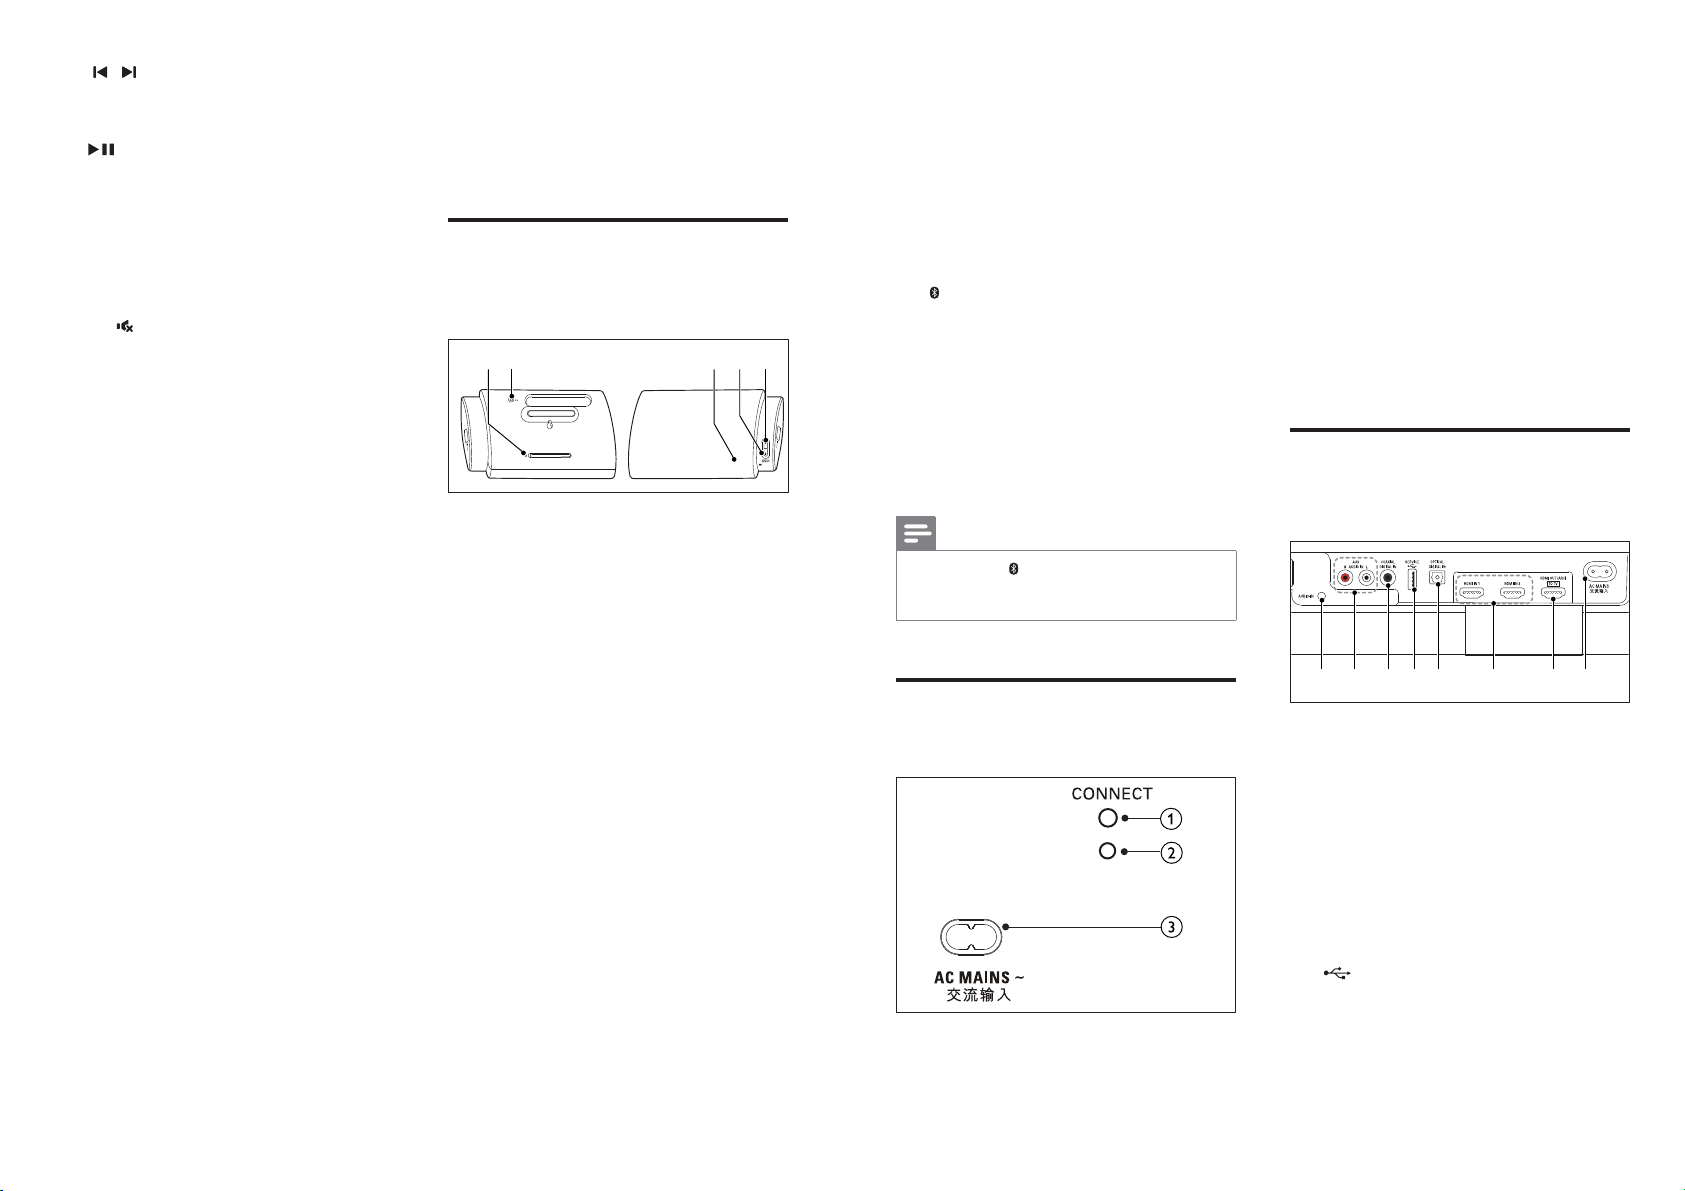
Wireless subwoofer
The SoundBar comes with a wireless subwoofer.
a CONNECT (connect)
Press to to enter the pairing mode for the
subwoofer.
b Subwoofer indicator
• When the power is turned on, the
indicator lights up.
• During wireless pairing between the
subwoofer and the main unit, the
indicator blinks white quickly.
• When the pairing succeeds, the
indicator lights up white.
• When the pairing fails, the indicator
blinks white slowly.
c AC MAINS~
Connect to the power supply.
Connectors
This section includes an overview of the
connectors available on your SoundBar.
a c de g hb f
a AUDIO-IN
Audio input from, for example, an MP3
player (3.5mm jack).
b AUX-AUDIO IN L/R
Connect to an analog audio output on the
TV or an analog device.
c DIGITAL IN-COAXIAL
Connect to a coaxial audio output on the
TV or a digital device.
d
e DIGITAL IN-OPTICAL
(SERVICE)
&RQQHFWD86%ÁDVKGULYHWRXSJUDGH
software of this product (not for media
play).
6 7ENEN
Connect to an optical audio output on the
TV or a digital device.
f HDMI IN1 / HDMI IN2
Connect to the HDMI output on a digital
device.
g TO TV-HDMI OUT (ARC)
Connect to the HDMI (ARC) input on the
TV.
h AC MAINS~
Connect to the power supply.
3 Connect and set
up
This section helps you connect your SoundBar
to a TV and other devices, and then set it up.
For information about the basic connections of
your SoundBar and accessories, see the quick
start guide.
» When fully charged, the LED on the
portable speaker lights up white for 10
seconds.
Note
It may take around two hours to fully charge the
•
portable speakers.
• Battery performance varies due to many factors
including volume, sound setting and media played.
Note
)RULGHQWLÀFDWLRQDQGVXSSO\UDWLQJVVHHWKHW\SHSODWH
•
at the back or bottom of the product.
• Before you make or change any connections, make sure
that all devices are disconnected from the power outlet.
Charge portable speakers
If the portable left/right speaker is undocked
from the main unit, its battery level is indicated
by the LED on the speaker.
• Light up white: full battery or more than
30% capacity remaining
• Light up red: low battery level, less than
30% remaining
• Flash red: near empty, less than 10%
remaining
1 Dock your portable speakers into the main
unit to charge.
2 Turn on the main unit.
» During charging, the LED on the
portable speaker lights up orange.
Pair up with subwoofer/
speakers
The wireless speakers and subwoofer
automatically pair up with the SoundBar for
wireless connection when you turn on the
SoundBar, the portable speakers and the
subwoofer.
If no audio from the wireless speakers and
subwoofer can be heard, manually pair up the
portable speakers and the subwoofer.
Pair up with the subwoofer
1 Turn on the SoundBar and the subwoofer.
» If the connection to the SoundBar is
lost, the indicator on the subwoofer
blinks white slowly.
2 Press the CONNECT (connect) button
on the subwoofer to enter the pairing
mode.
» The indicator on the subwoofer blinks
white quickly.
3 In OPTICAL mode (press OPTICAL) ,
within six seconds, on the remote control,
press
twice then Volume + once, and
then hold down BASS +.
» If the pairing succeeds, the indicator on
the subwoofer lights up white.
» If the pairing fails, the indicator on the
subwoofer blinks white slowly.
8 9ENEN

4 If the pairing fails, repeat the steps above.
Pair up with the speakers
1 Turn on the SoundBar and the por table
speakers.
» If the connection to the SoundBar is
lost, the LED on the portable blinks in
red and orange alternatively.
2 Dock the portable left and right speakers
into the main unit to pair up automatically.
3 If the pairing fails, re-dock the portable
speakers into the main unit.
Place speakers
For best sound effect, position all the speakers
towards the seating position and place them
close to your ear level (seated).
SUB
WOOFER
REAR L
REAR R
Note
Surround sound depends on factors such as room
•
shape and size, type of wall and ceiling, windows nd
UHÁHFWLYHVXUIDFHVDQGVSHDNHUDFRXVWLFV([SHULPHQW
ZLWKWKHVSHDNHUSRVLWLRQVWRÀQGWKHRSWLPXPVHWWLQJ
for you.
Follow these general guidelines for speakers
placement.
1 Seating position:
This is the center of your listening area.
2 Place the SoundBar in front of the seating
position.
3 REAR L (rear left) and REAR R (rear right):
Place the portable speakers (surround)
to the left and right side of your seating
position, either in line with it or slightly
behind it.
4 SUBWOOFER (subwoofer):
Place the subwoofer at least one meter
to the left or right of the TV. Leave about
10-centimeter clearance from the wall.
Dock the portable speakers
You can also dock the por table left and right
speakers into the main unit to listen to audio,
for example, watching TV shows and news.
Connect audio from TV
Connect this product to a TV. You can listen to
audio from TV programs through the speakers
of this product.
Option 1: Connect to TV through
HDMI (ARC)
Best quality audio
This product supports HDMI with Audio
Return Channel (ARC). With the ARC feature,
you can hear the TV audio through this product
by using a single HDMI cable.
What you need
• A High Speed HDMI Cable.
• Your TV supports both HDMI ARC and
HDMI-CEC (see the TV user manual for
details).
• For some TV models, enable the external
speaker output from the TV setting menu
(see the TV user manual for details).
TV
1 Using a High Speed HDMI cable, connect
the HDMI OUT (ARC) connector on this
product to the HDMI ARC connector on
the TV.
• The HDMI ARC connector on the TV
might be labeled differently. For details,
see the TV user manual.
2 On your TV, turn on HDMI-CEC
operations.
• For HDMI-CEC issues on your TV, see
the TV user manual to make sure that
the HDMI-CEC setup is correct, or
contact the TV manufacturer if needed.
3 Press HDMI ARC on the remote control
of this product to enable the HDMI ARC
connection.
Note
100% interoperability with all HDMI-CEC devices is not
•
guaranteed.
• If your TV is not HDMI ARC compliant, connect an
audio cable to hear the TV audio through this product.
Option 2: Connect to TV through
optical cable
Best quality audio
TV
1 Using an optical cable, connect the
OPTICAL connector on this product to
the optical output on the TV.
• The digital optical output on the TV
might be labeled OPTICAL OUT,
SPDIF or SPDIF OUT.
2 Press OPTICAL on the remote control
of this product to enable the optical
connection.
Option 3: Connect to TV through
coaxial cable
Best quality audio
1 Using a coaxial cable, connect the
COAXIAL connector on this product to
the coaxial output on the TV.
• The digital coaxial output on the TV
might be labeled COAXIAL/DIGITAL
OUT or DIGITAL AUDIO OUT.
2 Press COAX on the remote control of this
product to enable the coaxial connection.
Option 4: Connect to TV through
analog audio cables
Basic quality audio
10 11ENEN

DVD
1 Using an analog audio cable, connect the
AUX connectors on this product to the
analog audio output on the TV.
• The analog audio output on the TV
might be labeled AUDIO OUT.
2 Press AUX on the remote control of
this product to enable the analog audio
connection.
Connect audio from other
devices
You may also play audio from other devices
through the speakers of this product.
Option 1: Connect to other device
through optical cable
Best quality audio
1 Using an optical cable, connect the
OPTICAL connector on this product to
the optical output on the external device.
• The digital optical output on the
external device might be labeled
OPTICAL OUT, SPDIF or SPDIF
OUT.
2 Press OPTICAL on the remote control
of this product to enable the optical
connection.
Option 2: Connect to other device
through coaxial cable
Best quality audio
1 Using a coaxial cable, connect the
COAXIAL connector on this product to
the coaxial output on the external device.
• The digital coaxial output on the
external device might be labeled
COAXIAL/DIGITAL OUT or
DIGITAL AUDIO OUT.
2 Press COAX on the remote control of this
product to enable the coaxial connection.
Option 3: Connect to other device
through analog audio cables
Basic quality audio
1 Using an analog audio cable, connect
the AUX connector on this product to
the analog audio output on the external
device.
• The analog audio output on the
external device might be labeled
AUDIO OUT.
2 Press AUX on the remote control of
this product to enable the analog audio
connection.
Connect digital devices
through HDMI
Connect a digital device such as a set-top box,
DVD/Blu-ray player, or games console to this
product through a single HDMI connection.
When you connect the devices in this way and
SOD\DÀOHRUJDPHWKH
• video is automatically displayed on your
TV, and
• audio is automatically played on this
product.
1 Using a High Speed HDMI cable, connect
the HDMI OUT connector on your digital
device to the HDMI IN on this product.
2 Connect this product to TV through HDMI
OUT (ARC).
• If the TV is not HDMI CEC compliant,
select the correct video input on your
TV.
3 On the connected device, turn on HDMI-
CEC operations.
• For HDMI-CEC issues on your TV, see
the TV user manual and ensure the
HDMI-CEC setup is correct, or contact
the TV manufacturer if needed.
4 Press HDMI IN on the remote control
of this product to enable the HDMI IN
connection.
12 13ENEN

4 Spatial
calibration
Spatial calibration is used to achieve the
following convenience, and simultaneously
optimizes surround sound experience for it.
• Have freedom to place the portable left
and right speakers (surround) according to
your need.
• Automatically balance the portable
speakers (surround) with respect to your
seating position.
The spatial calibration involves two steps.
• Step 1: calibrate the listening zone
• Step 2: calibrate the surround speaker
position
When to calibrate
• If you perform spatial calibration for the
ÀUVWWLPHSHUIRUPStep 1 and Step 2 in
sequence.
• If you re-design your seating layout,
perform Step 1 and Step 2 in sequence.
• If you re-locate the portable left and right
speakers (surround), perform Step 2
independently (Step 1 can be skipped).
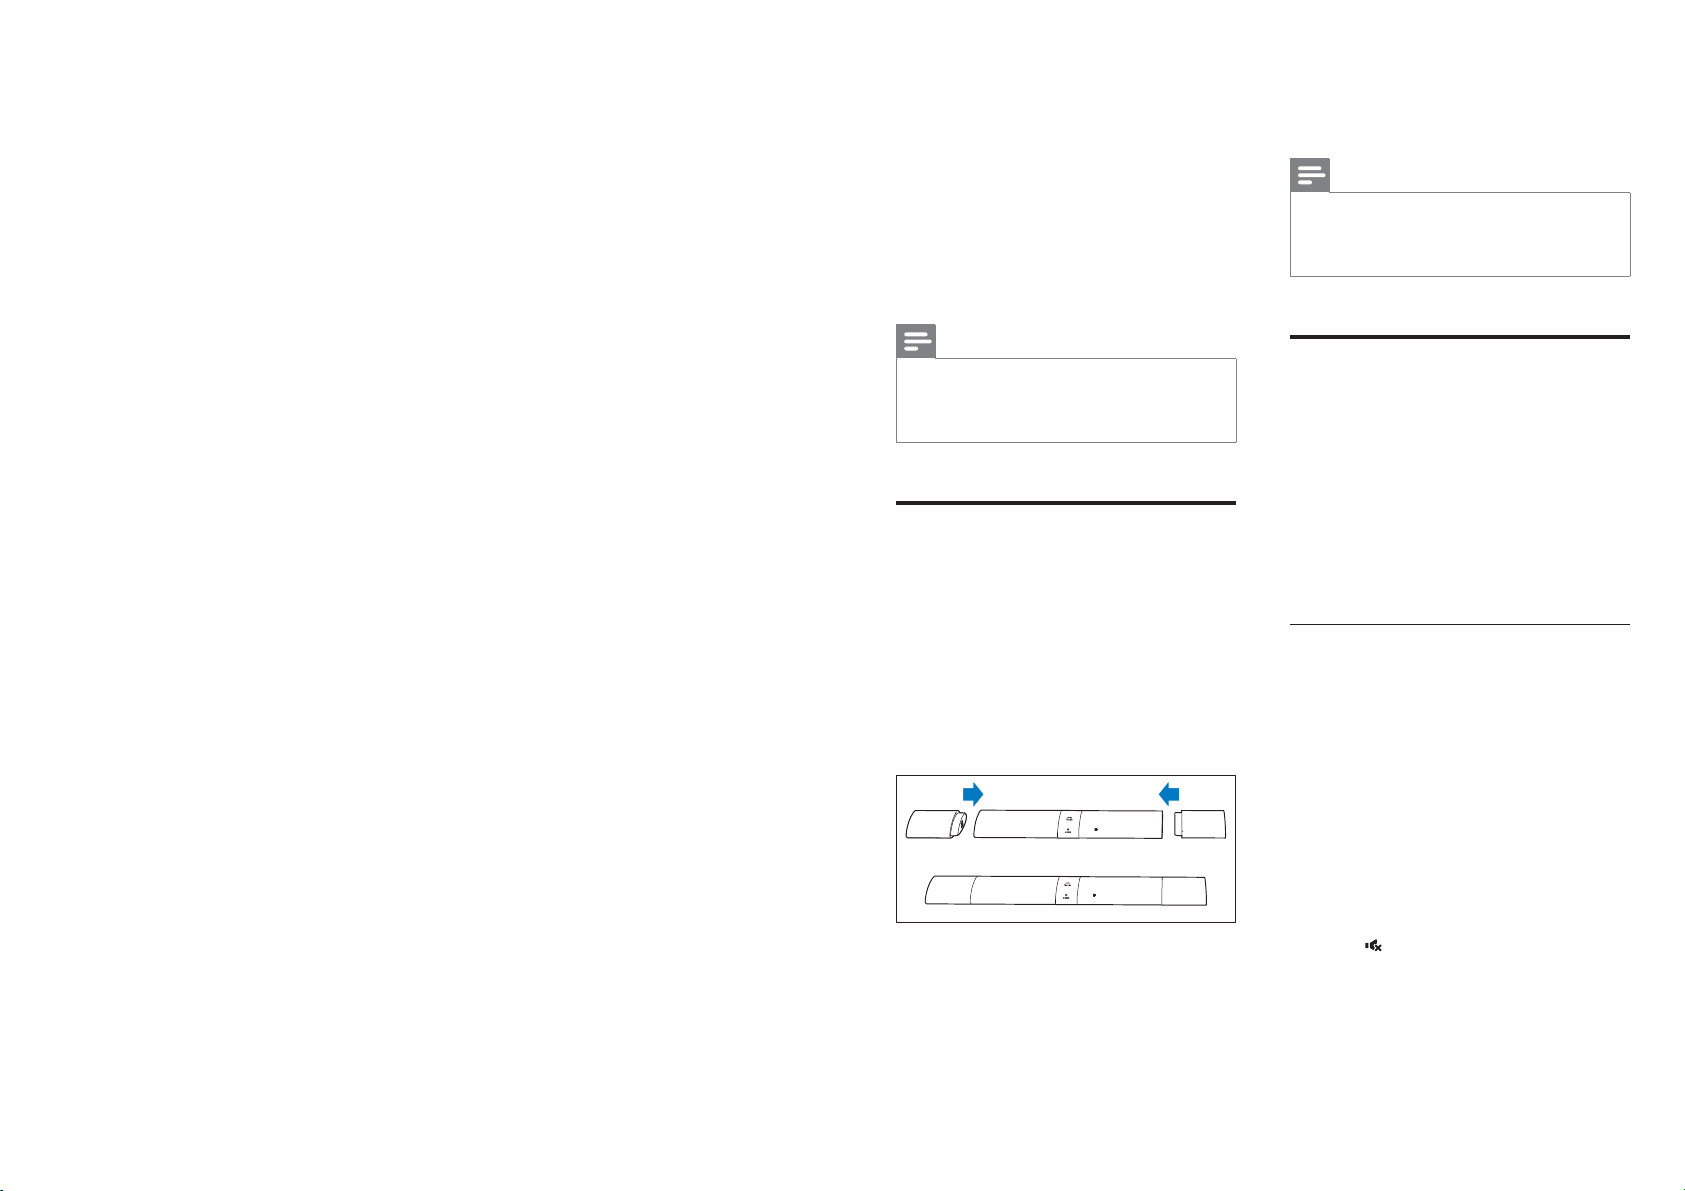
Before you start
• Make sure that the room is fairly quiet.
• Place the portable left and right speakers
angled towards the main unit.
• Make sure that the main unit, the portable
left and right speakers can fully "see" each
other, no obstacle between them blocking
such view. Stand the por table speakers
upright if needed.
• The minimum distance between the
portable speakers and the main unit is
0.8m (2.6'), the maximum distance 6m
(20').
Step 1: calibrate the listening
zone
1
Place the portable left and right speakers
on two seating positions you prefer most
(such as on a sofa).
• Make sure that the portable left and
right speakers are wirelessly connected
to the main unit (press SURROUND
ON DEMAND on the speaker).
2 Press and hold CALIBRATION on the
remote control for three seconds to
trigger calibration.
» ZONE (zone) is displayed on the
display panel.
» You can hear the calibration tones
from the portable speakers.
3 Wait until the calibration tones end.
» ->SPKR (speaker) is displayed on the
display panel.
4 Then perform the following Step 2
(calibrate the surround speaker position)
to complete and store the new settings.
Step 2: calibrate the surround
speaker position
1
Place the portable left and right speakers
(surround) on the position you prefer.
• Make sure that the portable left and
right speakers are wirelessly connected
to the main unit (press SURROUND
ON DEMAND on the speaker).
2 Press CALIBRATION once to trigger
calibration.
• Press CALIBRATIONthree times to
trigger calibration if you re-locate the
portable left and right speakers and
skip Step 1 (calibrate the listening
zone) after you completed a round of
spatial calibration previously.
» You can hear the calibration tones
from the portable speakers.
3 Wait until the calibration tones end.
» If the calibration succeeds, DONE
(done) is displayed on the display
panel. And the new settings are stored.
Note
Spatial calibration takes around three minutes.
•
• Surround sound improvement is only noticeable if
the portable left and right speakers (surround) were
improperly placed, or if there is strong surround effect
in the music you play.
• If the portable left and right speakers are swapped in
placement, during calibration L<->R is displayed for few
seconds, then the calibration completes.
• During calibration, you may press CALIBRATION
to cancel calibration, and the settings returns to the
default.
• If the spatial calibration fails, an error message is
displayed on the display panel, such as FAIL (fail), and
the settings returns to the default.
• If the spatial calibration fails, try the spatial calibration
again, and make sure that the calibration points
described at the beginning of this chapter are fully met.
14 15ENEN

5 Use your
SoundBar
This section helps you use the SoundBar to play
audio from connected devices.
Before you start
• Make the necessary connections described
in the quick start guide and the user
manual.
• Switch the SoundBar to the correct source
for other devices.
Adjust the volume
1
Press +/- (Volume) to increase or decrease
a volume level.
• To mute sound, press
• To restore the sound, press
press +/- (Volume).
For the portable left and right speakers only
1 When the portable left and right speakers
are wirelessly connected to the main
unit (in SURROUND ON DEMAND
mode), press REAR VOL.+/- to increase or
decrease a volume level.
Choose your sound
This section helps you choose the ideal sound
for your video or music.
Surround sound mode
Experience an immersive audio experience with
surround sound modes.
• Press MOVIE to create a surround listening
experience. Ideal for watching movie.
• Press MUSIC to create stereo sound. Ideal
for listening to music.
.
again or
Voice clarity
It makes human voice more clear and
outstanding for listening.
1 Press VOICE to switch to voice clarity.
» When voice clarity is turned on,
VOICE is displayed.
2 To exit this sound mode, press MOVIE or
MUSIC to select other sound mode.
CLOSE TO ME (close to me)
For ultimate clear sound without disturbing
your neighbors, place both the portable left and
right speakers close to you, and activate this
feature (to mute the main unit).
Note
It is applicable only when the portable left and right
•
speakers are wirelessly connected to the main unit (or
SURROUND ON DEMAND mode switches on).
• If CLOSE TO ME (close to me) is turned on, the
functions for MOVIE and MUSIC buttons are disabled.
1 Press and hold VOICE for three seconds
to activate the feature.
» CLOSE TO ME (close to me) scrolls
once on the display panel.
» The main unit is muted.
2 To exit this sound mode, press and hold
VOICE again for three seconds.
» The previous sound mode switches in.
Equalizer
Change the high frequency (treble) and low
frequency (bass) settings of the SoundBar.
1 Press TREBLE +/- or BASS +/- to change
the frequency.
Auto volume
Turn the auto volume on to keep the volume
constant when you switch to a different source.
It also compresses the sound dynamics,
increasing the volume for quiet scenes and
decreasing the volume for loud scenes.
1 Press AUTO VOL. to turn auto volume on
or off.
» When auto volume is turned on, ON
AUTO scrolls once on the display
panel.
» When auto volume is turned off, OFF
AUTO scrolls once on the display
panel.
Synchronize video and sound
If the audio and video are not synchronized,
delay the audio to match the video.
1 Press AUDIO SYNC +/- to synchronize
the audio with the video.
• AUDIO SYNC + increases the sound
delay, and AUDIO SYNC - decreases
the sound delay.
Night mode
For quiet listening, night mode decreases the
volume of loud sounds when audio is played.
Night mode is only available for Dolby Digital
soundtracks.
1 Press NIGHT to turn night mode on or
off.
» When night mode is turned on, ON
NIGHT scrolls once on the display
panel.
» When night mode is turned off, OFF
NIGHT scrolls once on the display
panel.
Note
If auto volume is set to turned on, you cannot enable
•
the night mode.
MP3 player
Connect your MP3 player to play your audio
ÀOHVRUPXVLF
What you need
• An MP3 player.
• A 3.5mm stereo audio cable.
1 Using the 3.5mm stereo audio cable,
connect the MP3 player to the AUDIO IN
connector on your SoundBar.
2 Press AUDIO IN.
3 Press the buttons on the MP3 player to
VHOHFWDQGSOD\DXGLRÀOHVRUPXVLF
• On the MP3 player, it is recommended
to set the volume in the range of 80%
maximum volume.
Play music via Bluetooth
Through Bluetooth, connect the SoundBar with
your Bluetooth device (such as an iPad, iPhone,
iPod touch, Android phone, or laptop), and then
\RXFDQOLVWHQWRWKHDXGLRÀOHVVWRUHGRQWKH
device through your SoundBar speakers.
What you need
• A Bluetooth device which supports
%OXHWRRWKSURÀOH$'3DQGZLWK%OXHWRRWK
version as 2.1 + EDR.
• The maximum operational range between
the SoundBar and a Bluetooth device is
approximately 10 meters (30 feet).
Note
The music streaming may be interrupted by obstacles
•
between the device and this product, such as wall,
metallic casing that covers the device, or other devices
nearby that operate in the same frequency.
• If you want to connect this product with another
Bluetooth device, break the current Bluetooth
connection.
16 17ENEN

Bluetooth on the main unit
1 Press on the remote control to switch
the main unit to Bluetooth mode.
» BT on the display blinks.
2 On the Bluetooth device, switch on
Bluetooth, search for and select Fidelio B5
to start connection (see the user manual
of the Bluetooth device on how to enable
Bluetooth).
» During connection, BT on the display
blinks.
3 Wait until BT on the display lights up.
» If the connection succeeds, BT on the
display lights up.
» If the connection fails, BT on the
display blinks.
4 6HOHFWDQGSOD\DXGLRÀOHVRUPXVLFRQ
your Bluetooth device.
• During play, if a call is coming, music
play is paused.
• If music streaming is interrupted, place
the Bluetooth device closer to the
main unit.
5 To exit Bluetooth, select other source.
» When you switch back to Bluetooth
mode, Bluetooth connection resumes.
• To break the current Bluetooth
connection, press and hold
remote control.
on the
Bluetooth on a single speaker
You can use the por table left or the portable
right speaker as a standalone Bluetooth speaker,
independently from the main unit.
1 Press the button on the left or right
speaker to switch to Bluetooth mode.
» The
LED on the left or right speaker
blinks.
2 On the Bluetooth device, switch on
Bluetooth, search for and select the
name of the left or right speaker to start
connection (see the user manual of the
Bluetooth device on how to enable
Bluetooth).
• B5 -L portable stands for the portable
left speaker, B5 -R portable for the
portable right speaker.
» During connection, the
left or right speaker blinks.
LED on the
3 Wait until the LED on the portable
speaker lights up.
» If the connection succeeds, connection
tone is heard, and the
portable speaker lights up.
» If the connection fails, the
the portable speaker blinks.
LED on the
LED on
4 6HOHFWDQGSOD\DXGLRÀOHVRUPXVLFRQ
your Bluetooth device.
• During play, if a call is coming, music
play is paused.
• If music streaming is interrupted, place
the Bluetooth device closer to the
main unit.
5 To exit Bluetooth, press the SURROUND
ON DEMAND button on the speaker.
» When you switch back to Bluetooth
mode, Bluetooth connection resumes.
• To break the current Bluetooth
connection, press and hold the
button on the speaker.
Note
The function of the remote control is not available to
•
a standalone Bluetooth speaker (the portable left or
right speaker).
Connect Bluetooth via NFC
NFC (Near Field Communication) is a
technology that enables short-range wireless
communication between NFC-enabled devices,
such as mobile phones.
What you need
• A Bluetooth device with NFC function.
• For pairing, tap the NFC device on the
NFC tag of the main unit.
Note
NFC feature is only available to the main unit, not
•
available to the portable left and right speakers.
1 Enable NFC on the Bluetooth device (see
the device' s user manual for details).
2 Tap the NFC device onto the NFC tag of
the main unit until the SoundBar beeps.
• )RUÀUVWWLPHFRQQHFWLRQRQVRPH
mobile devices prompt for pair-up
appears, select "YES" for connection.
» When the Bluetooth connection
succeeds, BT is displayed on the display
panel.
» If the connection fails, BT on the
display panel blinks continuously.
3 6HOHFWDQGSOD\DXGLRÀOHVRUPXVLFRQ
your NFC device.
•
To break the connection, tap again the
NFC device onto the NFC tag on the
main unit.
Auto standby
When playing media from a connected device,
the SoundBar automatically switches to standby
if:
• no source button is pressed for 15
minutes, and
• no audio/video playback is detected from a
connected device.
Set display brightness
You can press DIM repeatedly to select a
different brightness level of the display panel on
this product.
• If you select DIM O (dim) on the display,
the display turns off after 10 seconds each
time you press a button on the remote
control.
Apply factory settings
You can reset this product to the default
settings programmed at the factory.
1 In AUX mode, on the remote control
press Volume -, BASS -, and TREBLE - in
sequence within three seconds.
» When the factory settings restore is
complete, the product automatically
switches off and restarts.
18 19ENEN

6 Update software
To get the best features and support, update
your product with the latest software.
What you need
• $86%ÁDVKGULYHWKDWLV)$7IRUPDWWHG
Do not use a USB hard drive.
• A computer with Internet access.
•
$QDUFKLYHXWLOLW\WKDWVXSSRUWVWKH=,3ÀOH
format.
Check software version
In HDMI ARC source, on the remote control
press TREBLE -, BASS -, and Volume - in
sequence within three seconds.
» The software version number is
displayed on the display panel.
» Then "UPG" (upgrade) is displayed on
the display panel.
6 Wait until the upgrade is completed.
» If the upgrade is complete, this product
automatically turns off and on again.
Caution
'RQRWWXUQRIIWKHSRZHURUUHPRYHWKH86%ÁDVK
•
drive when the software update is in progress because
you might damage this product.
• The upgrade time may take around eight minutes.
7 Wall mount
your SoundBar
Before you mount your SoundBar on the wall,
read all safety precautions.
Wall mount
Note
You must detach the portable speakers from the main
•
unit before wall mounting or un-mounting.
• Improper wall mounting may result in accident, injury or
damage. If you have any query, contact Consumer Care
in your country.
• Secure the wall mount to a wall that can support the
combined weight of the product and the wall mount.
• Before wall mount, you need not remove the four
rubber feet at the bottom of the soundbar, otherwise
WKHUXEEHUIHHWFDQQRWEHÀ[HGEDFN
Update software via USB
1
Check the latest software version on www.
philips.com/support.
• Search for your model and click on
"Software and drivers".
2 'RZQORDGWKHVRIWZDUHLQWRD86%ÁDVK
drive.
a Unzip the download if zipped, and
make sure that the unzipped folder is
named "UPG".
b Put the "UPG" folder in the root
directory.
3 &RQQHFWWKH86%ÁDVKGULYHWRWKH
(SERVICE) connector on this product.
4 Switch this product to HDMI ARC source
(press HDMI ARC).
5 On the remote control, within 6 seconds
press
twice then Volume + once, and
then hold down MOVIE.
20 21ENEN
Screw length/diameter
Depend on the type of wall mounting this wall
mount bracket, make sure that you use screws
of a suitable length and diameter.
3 - 3.5mm
See the illustration on the separate wall mount
sheet on how to wall mount the SoundBar.
1) Drill holes on the wall.
2) Secure the wall bracket on the wall with the
dowels and screws.
3) Hang the SoundBar on the wall bracket.
> 25mm

8 Product
specifications
Note
6SHFLÀFDWLRQVDQGGHVLJQDUHVXEMHFWWRFKDQJHZLWKRXW
•
notice.
$PSOLÀHU
• FTC total output power: 66W
• Front Left + Right: 16W (1%THD,
8ohm, 150Hz-20kHz)
• Surround Left + Right: 20W (1%THD,
8ohm, 150Hz-20kHz)
•
• Total output power: 210W RMS (+/- 0.5
dB, 30% THD) / 168W RMS (+/- 0.5 dB,
10% THD)
• Frequency response: 20 Hz-20 kHz / ±3
dB
• Signal-to-noise ratio: > 65 dB (CCIR) /
(A-weighted)
• Input sensitivity:
• AUX: 750 mV
• AUDIO IN: 400 mV
Audio
• S/PDIF Digital audio input:
• Coaxial: IEC 60958-3
• Optical: TOSLINK
Bluetooth
• %OXHWRRWKSURÀOHV$'3
• Bluetooth version: 2.1 + EDR
Main unit
• Power supply: 110-240 V~, 50-60 Hz
oofer: 30W (1%THD, 4ohm,
Subw
30Hz-140Hz)
• Power consumption: 50 W
• 6WDQGE\SRZHUFRQVXPSWLRQ:
• Dimensions (WxHxD): 1035 x 73 x 156
mm (with portable left and right speakers
attached)
• Weight: 4.4 kg
• Built-in speakers
• 2 x woofer (76 mm/3", 8 ohm)
• 2 x tweeter (25.4 mm/1", 8 ohm)
Portable speakers
• Speaker impedance: 8 ohm
• Speaker drivers: 2 x 76 mm (3") full range
• Dimensions (WxHxD): 191 x 73 x 156
mm
• Weight: 0.86 kg/each
Subwoofer
• Power supply: 110-240 V~, 50-60 Hz
• Power consumption: 30 W
• 6WDQGE\SRZHUFRQVXPSWLRQ:
• Impedance: 4 ohm
• Speaker drivers: 1 x 165 mm (6.5") woofer
• Dimensions (WxHxD): 200 x 510 x 201
mm
• Weight: 4.9 kg
Wall mount
• Dimensions (WxHxD): 40 x 100 x 26.5
mm
• Weight: 0.1 kg/each
Remote control batteries
• 2 x AAA-R03-1.5 V
9 Troubleshooting
Warning
•
Risk of electric shock. Never remove the casing of the
product.
To keep the warranty valid, never try to repair
the product yourself.
If you have problems using this product, check
the following points before you request service.
If you still have a problem, get support at www.
philips.com/support.
Sound
No sound from the speakers of this product.
• Connect the audio cable from this product
to your TV or other devices. However, you
do not need a separate audio connection
when:
•
This product and
through HDMI ARC connection, or
• a device is connected to the HDMI IN
connector on this product.
• Make sure that you connect the audio
input on this product to the audio output
on your TV or other devices.
• On the remote control, select the correct
audio input.
• Reset this product to its factory settings.
• Make sure that this product is not muted.
No sound from the wireless portable
speakers.
• Make sure that the wireless portable
speaker is turned on. Press ON on the
bottom of the wireless portable speaker.
• Dock the wireless portable speakers into
the main unit to charge the battery.
• If you intend the wireless portable speaker
to wirelessly connect to the main unit,
make sure that you press the SURROUND
ON DEMAND button on the wireless
portable speaker.
TV are connected
• If you intend the wireless portable speaker
to be a standalone Bluetooth speaker,
make sure that you connect the portable
left or right speaker to a Bluetooth device
(see 'Bluetooth on a single speaker' on
page 18).
No sound from the wireless subwoofer.
• Wirelessly connect the subwoofer to the
main unit.
Distorted sound or echo.
• If you play audio from the TV through the
SoundBar, make sure that the TV is muted.
Audio and video are not synchronized.
• Press AUDIO SYNC +/- to synchronize
the audio with the video.
Bluetooth
A device cannot connect with the SoundBar.
• The device does not support the
FRPSDWLEOHSURÀOHVUHTXLUHGIRUWKH
SoundBar.
• You have not enabled the Bluetooth
function of the device. See the user manual
of the device on how to enable the
function.
• The device is not correctly connected.
Connect the device correctly.
• The SoundBar is already connected with
another Bluetooth device. Disconnect the
connected device, then try again.
Quality of audio play from a connected
Bluetooth device is poor.
• The Bluetooth reception is poor. Move the
device closer to the SoundBar, or remove
any obstacle between the device and the
SoundBar.
The connected Bluetooth device connects and
disconnects constantly.
• The Bluetooth reception is poor. Move the
device closer to the SoundBar, or remove
any obstacle between the device and the
SoundBar.
• Turn off Wi-Fi function on the Bluetooth
device to avoid interference.
• For some Bluetooth, the Bluetooth
connection can be deactivated
22 23ENEN

automatically to sa
indicate any malfunction of the SoundBar.
ve power. This does not
Spatial calibration
Why spatial calibration is needed?
Spatial calibration optimizes surround
•
sound experience if your portable left and
right speakers (surround) are not properly
placed.
Improvement in surround sound is not
noticeable after successful spatial calibration.
• Surround sound improvement is only
noticeable if the portable left and right
speakers (surround) were improperly
placed, or if there is strong surround effect
in the music you play.
Error message is displayed on the display
panel.
• If spatial calibration fails, one of the
following error message is displayed. Refer
to the fourth chapter (Spatial calibration)
for details to re-calibrate.
• FAIL (fail): indicates that the
portable left/right speaker is not in
SURROUND ON DEMAND mode
or out of calibration range, or there is
some obstacle by which the main unit,
the portable left and right speakers
cannot completely "see" each other.
• BATT LOW (battery low): indicates
that the portable left/right speaker has
low battery.
• ERR1 (error): indicates that the
portable left and right speakers are not
detached from the main unit.
10 Notice
This section contains the legal and trademar
notices.
Notice of compliance
The device complies with the FCC rules,
15. Operation is subject to the following two
conditions:
a This device may not cause harmful
interference, and
b This device must accept any interference
received, including interference that may
cause undesired operation.
FCC rules
This equipment has been tested and found
to comply with the limits for a Class B digital
device, pursuant to part 15 of the FCC Rules.
These limits are designed to provide reasonable
protection against harmful interference in a
residential installation. This equipment generates,
uses and can radiate radio frequency energy
and, if not installed and used in accordance
with the instruction manual, may cause harmful
interference to radio communications.
However, there is no guarantee that
interference will not occur in a particular
installation. If this equipment does cause harmful
interference to radio or television reception,
which can be determined by turning the
equipment off and on, the user is encouraged
to try to correct the interference by one or
more of the following measures:
• Relocate the receiving antenna.
• Increase the separation between
equipment and receiver.
• Connect the equipment into an outlet on
a circuit different from that to which the
receiver is connected.
• Consult the dealer or an experienced
radio/TV technician for help.
k
Part
FCC Radiation Exposure Statement:
equipment complies with FCC radiation
exposure limits set forth for an uncontrolled
environment. This equipment should be installed
and operated with a minimum distance of
20cm between the radiator and your body.
This transmitter must not be co-located or
operated in conjunction with any other antenna
or transmitter.
Warning:$Q\FKDQJHVRUPRGLÀFDWLRQVPDGH
to this device that are not expressly approved
by Gibson Innovations may void the user’s
authority to operate the equipment.
Trade Name: Philips
Model number: B5/37
Wireless Speaker Model number: WSB5
Responsible Party:P&F USA, Inc. PO Box 2248
Alpharetta, GA 30023-2248; 1-866-226-6074
Canada:
CAN ICES-3(B)/NMB-3(B)
This device complies with Industry Canada
licence-exempt RSS standard(s). Operation is
subject to the following Two conditions: (1) this
device may not cause harmful interference, and
(2) this device must accept any interference
received, including interference that may cause
undesired operation.
This
Trademarks
For DTS patents, see http://patents.dts.com.
Manufactured under license from DTS Licensing
Limited. DTS, the Symbol, & DTS and the
Symbol together are registered trademarks, and
DTS Digital Surround is a trademark of DTS,
Inc. © DTS, Inc. All Rights Reserved.
Manufactured under license from Dolby
Laboratories. Dolby, Pro Logic, and the
double-D symbol are trademarks of Dolby
Laboratories.
24 25ENEN

7KHWHUPV+'0,DQG+'0,+LJK'HÀQLWLRQ
Multimedia Interface, and the HDMI Logo are
trademarks or registered trademarks of HDMI
Licensing LLC in the United States and other
countries.
The Bluetooth
word mark and logos are
registered trademarks owned by Bluetooth
SIG, Inc. and any use of such marks by Gibson
Innovations Limited is under license. Other
trademarks and trade names are those of their
respective owners.
The N Mark is a trademark or registered
trademar
k of NFC Forum, Inc. in the United
States and in other countries.
© 2013 CSR plc and its group companies.
The aptX® mark and the aptX logo are
ade marks of CSR plc or one of its group
tr
companies and may be registered in one or
more jurisdictions.
26 EN

2015 © WOOX Innovations Limited. All rights reserved.
Philips and the Philips’ Shield Emblem are registered
trademarks of Koninklijke Philips N.V. and are used
by WOOX Innovations Limited under license from
Koninklijke Philips N.V.
000000000000

English
Important
Read and understand all instructions before you use your product. If damage is caused by failure to
follow instructions, the warranty does not apply.
Help and support
For extensive online support, visit www.philips.com/support to:
• download the user manual and the quick start guide
watch video tutorials (available only for selected models)
•
Ànd answers to frequently answered questions (F$4s)
•
•
email us a question
•
chat with our support representative.
Follow the instructions on the website to select your language, and then enter your product model number.
$lternatively, you can contact &onsumer &are in your country. %efore you contact, note down the
model number and serial number of your product. <ou can Ànd this information on the back or
bottom of your product.
Important safety instructions
• Read these instructions.
• Keep these instructions.
• Heed all warnings.
• Follow all instructions.
• Do not use this apparatus near water.
• Clean only with dry cloth.
• Do not block any ventilation openings. Install in accordance with the manufacturer’s instructions.
• Do not install near any heat sources such as radiators, heat registers, stoves, or other apparatus
(including ampliÀers) that produce heat.
• Do not defeat the safety purpose of the polarized or grounding-type
plug. $ polarized plug has two blades with one wider than the other. $
grounding type plug has two blades and a third grounding prong. The wide
blade or the third prong are provided for your safety. If the provided plug
does not Àt into your outlet, consult an electrician for replacement of the obsolete outlet.
• Protect the power cord from being walked on or pinched, particularly at plugs, convenience
receptacles, and the point where they exit from the apparatus.
• Only use attachments/accessories speciÀed by the manufacturer.
•
Use only with the cart, stand, tripod, bracket or table speciÀed by the
manufacturer or sold with the apparatus. When a cart is used, use caution when
moving the cart/apparatus combination to avoid injury from tip-over.
• Unplug this apparatus during lightning storm or when unused for long periods of time.
• Refer all servicing to qualiÀed service personnel. 6ervicing is required when the
apparatus has been damaged in any way, such as power-supply cord or plug is damaged, liquid
has been spilled or objects have fallen into the apparatus, the apparatus has been exposed to
rain or moisture, does not operate normally, or has been dropped.
• Battery usage CAUTION - To prevent battery leakage which may result in bodily injury,
property damage, or damage to the unit:
• Install all batteries correctly, + and - as marked on the unit.
• Do not mix batteries (old and new or carbon and alkaline, etc.).
• Remove batteries when the unit is not used for a long time.
The batteries shall not be exposed to excessive heat such as sunshine, Àre or the like.
•
• 3erchlorate 0aterial - special handling may apply. 6ee www.dtsc.ca.gov/hazardouswaste/
perchlorate.
The product/remote control may contain a coin/button type battery, which can be swallowed.
•
Keep the battery out of reach of children at all times! If swallowed, the battery can cause
serious injury or death. 6evere internal burns can occur within two hours of ingestion.
If you suspect that a battery has been swallowed or placed inside any part of the body, seek
•
immediate medical attention.
•
When you change the batteries, always keep all new and used batteries out of reach of children.
Ensure that the battery compar tment is completely secure after you replace the battery.
• If the battery compar tment cannot be completely secured, discontinue use of the product.
Keep out of reach of children and contact the manufacturer.
• Apparatus shall not be exposed to dripping or splashing.
• Do not place any sources of danger on the apparatus (for example. liquid Àlled objects, lighted
candles).
• This apparatus may contain lead and mercury. Dispose according to local, 6tate or Federal
laws. For disposal or recycling information, please contact your local authorities. For additional
assistance on recycling options, please contact www.mygreenelectronics.com or www.eiae.org
or www.recycle.philips.com.
• Where the 0$I16 plug or an appliance coupler is used as the disconnect device, the
disconnect device shall remain readily operable.
• Do not place this apparatus on the furniture that is capable of being tilted by a child and an adult
leaning, pulling, standing or climbing on it. $ falling apparatus can cause serious injury or even death.
•
This apparatus should not be placed in a built-in installation such as a bookcase or rack unless proper
ventilation is provided. Make sure to leave a space of 7.8 inches (20cm) or more around this apparatus.
Class II equipment symbol
This symbol indicates that the unit has a double insulation system.
This ‘bolt of lightning’ indicates uninsulated material within your unit may cause an
electrical shock. For the safety of everyone in your household, please do not remove
product covering.
The ‘exclamation point’ calls attention to features for which you should read the
enclosed literature closely to prevent operating and maintenance problems.
WARNING: To reduce the risk of Àre or electric shock, this apparatus should not be exposed to rain
or moisture and objects Àlled with liquids, such as vases, should not be placed on this apparatus.
CAUTION: To prevent electric shock, match wide blade of plug to wide slot, fully insert.
Care for your product
8se only microÀber cloth to clean the product.
Care of the environment
Disposal of your old product and battery
Your product is designed and manufactured with high quality materials and components, which can be
recycled and reused.
This product may contain lead and mercury. Disposal of these materials may be regulated due to
environmental considerations. For disposal or recycling information, please contact your local authorities.
This product contains batteries:
Dispose of batteries properly. Do not incinerate. %atteries may explode if overheated.
•
•
Do not wrap in metal or aluminum foil. Wrap in newspaper before discarding.
•
It is suggested that you contact your local town or city to determine proper battery redemption
site(s) in your area.
•
Please visit www.call2recycle.org for additional information on a recycling center in your area for
rechargeable batteries.
Notice of compliance
The device complies with the F&& rules, Part . 2peration is subject to the following two conditions:
a This device may not cause harmful interference, and
b This device must accept any interference received, including interference that may cause
undesired operation.
FCC rules
This equipment has been tested and found to comply with the limits for a &lass % digital device,
pursuant to part of the F&& Rules. These limits are designed to provide reasonable protection
against harmful interference in a residential installation. This equipment generates, uses and can radiate
radio frequency energy and, if not installed and used in accordance with the instruction manual, may
cause harmful interference to radio communications.
However, there is no guarantee that interference will not occur in a particular installation. If this
equipment does cause harmful interference to radio or television reception, which can be determined
by turning the equipment off and on, the user is encouraged to try to correct the interference by one
or more of the following measures:
• Relocate the receiving antenna.
• Increase the separation between equipment and receiver.
•
&onnect the equipment into an outlet on a circuit different from that to which the receiver is connected.
• &onsult the dealer or an experienced radio/T9 technician for help.
FCC Radiation Exposure Statement:This equipment complies with F&& radiation exposure limits
set forth for an uncontrolled environment. This equipment should be installed and operated with a
minimum distance of 20cm between the radiator and your body. This transmitter must not be colocated or operated in conjunction with any other antenna or transmitter.
Warning: $ny changes or modiÀcations made to this device that are not expressly approved by
Gibson Innovations may void the user’s authority to operate the equipment.
Model 1umber : #
Trade 1ame: Philips
Responsible Party:PF 86$, Inc. P2 %ox 228 $lpharetta, G$ 002-228 (8) 22-07
Canada:
&$1 I&E6-(%)/1M%-(%)
This device complies with Industry &anada licence-exempt R66s. 2peration is subject to the
following Two conditions: () this device may not cause harmful interference, and (2) this device
must accept any interference received, including interference that may cause undesired operation.
ONE (1) YEAR LIMITED WARRANTY
WARRANTY COVERAGE:
This warranty obligation is limited to the terms set forth
below.
WHO IS COVERED:
This product is warranted to the original purchaser or the person receiving the product as a gift against defects in materials and
workmanship as based on the date of original purchase
(“Warranty Period”) from an Authorized Dealer. The original
sales receipt showing the product name and the purchase date
from an authorized retailer is considered such proof.
WHAT IS COVERED:
This warranty covers new products if a defect in material
or workmanship occurs and a valid claim is received within
the Warranty Period. At its option, the company will either (1)
repair the product at no charge, using new or refurbished
replacement parts, or (2) exchange the product with a product
that is new or which has been manufactured from new, or serviceable used parts and is at least functionally equivalent or most
comparable to the original product in current inventory,
or (3) refund the original purchase price of the product.
The company warrants replacement products or parts provided
under this warranty against defects in materials and workmanship
from the date of the replacement or repair for ninety (90) days
or for the remaining portion of the original product’s warranty,
whichever provides longer coverage for you. When a product or
part is exchanged, any replacement item becomes your property
and the replaced item becomes the company property. When a
refund is given, your product becomes the company property.
Note: Any product sold and identified as refurbished or
renewed carries a ninety (90) day limited warranty.
Replacement product can only be sent if all warranty
requirements are met. Failure to follow all requirements
can result in delay.
WHAT IS NOT COVERED - EXCLUSIONS AND LIMITATIONS:
This Limited Warranty applies only to the new products that
can be identified by the trademark, trade name, or logo affixed
to it. This Limited Warranty does not apply to any non-Philips
hardware product or any software, even if packaged or sold
with the product. Non-Philips manufacturers, suppliers, or
publishers may provide a separate warranty for their own
products packaged with the bundled product.
The company is not liable for any damage to or loss of any ,
programs data, or other information stored on any media
contained within the product, or any non-Philips product or part
not covered by this warranty. Recovery or reinstallation of
programs, data or other information is not covered under this
Limited Warranty.
This warranty does not apply (a) to damage caused by accident,
abuse, misuse, neglect, misapplication, or non-Philips product, (b)
to damage caused by service performed by anyone other than
an Authorized Service Location, (c) to a product or
a part that has been modified without written permission,
This warranty gives you specific legal rights. You may have other rights which vary from state/province to state/province.
P&F USA Inc. PO Box 2248 Alpharetta, GA 30023-2248
or (d) if any serial number has been removed or defaced,
or (e) product, accessories or consumables sold “AS IS”
without warranty of any kind by including refurbished Philips
product sold “AS IS” by some retailers.
This Limited Warranty does not cover:
s Shipping charges to return defective product.
s Labor charges for installation or setup of the product, adjust-
ment of customer controls on the product, and installation or
repair of antenna/signal source systems outside of the product.
s Product repair and/or part replacement because of improper
installation or maintenance, connections to improper voltage
supply, power line surge, lightning damage, retained images or
screen markings resulting from viewing fixed stationary content for extended periods, product cosmetic appearance items
due to normal wear and tear, unauthorized repair or other
cause not within the control of the company.
s Damage or claims for products not being available for use, or
for lost data or lost software.
s Damage from mishandled shipments or transit accidents when
returning product.
s A product that requires modification or adaptation to enable
it to operate in any country other than the country for which
it was designed, manufactured, approved and/or authorized, or
repair of products damaged by these modifications.
s A product used for commercial or institutional purposes
(including but not limited to rental purposes).
s Product lost in shipment and no signature verification receipt
can be provided.
s Failure to operate per Owner’s Manual.
TO OBTAIN ASSISTANCE IN THE U.S.A., CANADA,
PUERTO RICO, OR U.S. VIRGIN ISLANDS…
Contact Customer Care Center at:
1 (866) 226-6074
REPAIR OR REPLACEMENT AS PROVIDED UNDER THIS
WARRANTY IS THE EXCLUSIVE REMEDY FOR THE CONSUMER. PHILIPS SHALL NOT BE LIABLE FOR ANY INCIDENTAL OR CONSEQUENTIAL DAMAGES FOR BREACH OF
ANY EXPRESS OR IMPLIED WARRANTY ON THIS PRODUCT. EXCEPT TO THE EXTENT PROHIBITED BY APPLICABLE
LAW, ANY IMPLIED WARRANTY OF MERCHANTABILITY OR
FITNESS FOR A PARTICULAR PURPOSE ON THIS PRODUCT
IS LIMITED IN DURATION TO THE DURATION OF THIS
WARRANTY.
Some states do not allow the exclusions or limitation of incidental or consequential damages, or allow limitations on how long an
implied warranty lasts, so the above limitations or exclusions may
not apply to you.
The device meets the exemption from the routine evaluation
limits in section 2.5 of RSS 102 and compliance with RSS-102
RF exposure, users can obtain Canadian information on RF
exposure and compliance.
Español
Importante
Lea y asegúrese de comprender todas las instrucciones antes de usar el producto. La garantía no
cubre los daños producidos por no haber seguido las instrucciones.
Ayuda y asistencia técnica
Para obtener una amplia asistencia en línea, visite www.philips.com/support para:
descargar el manual de usuario y la guía de inicio rápido
•
ver tutoriales de video (solo disponible para modelos seleccionados)
•
•
buscar respuestas a preguntas frecuentes (F$4)
• enviarnos un correo electrónico con una pregunta
chatear con nuestro representante de soporte.
•
6iga las instrucciones del sitio web para seleccionar su idioma e ingrese el número de modelo de su
producto.
Tam b i pn puede ponerse en contacto con el ser vicio de atención al cliente de su país. $ntes
de ponerse en contacto, anote el modelo y número de serie del producto. Puede buscar esta
información en la parte posterior o inferior del producto.
Instrucciones de seguridad importantes
• Lea estas instrucciones.
• Conserve estas instrucciones.
• Preste atención a todas las advertencias.
• Siga todas las instrucciones.
• No utilice este aparato cerca del agua.
• Utilice únicamente un paño seco para la limpieza.
• No bloquee las aperturas de ventilación. Realice la instalación de acuerdo con las
indicaciones del fabricante.
• No realice la instalación cerca de fuentes de calor como radiadores, rejillas de calefacción,
estufas u otros equipos que produzcan calor (incluso ampliÀcadores).
• Utilice el conector polarizado o con conexión a tierra de conformidad
con las normas de seguridad. Un enchufe polarizado cuenta con dos
álabes, uno más ancho que el otro. Los conectores a tierra tienen dos
conductores y una tercera terminal de contacto para la conexión a tierra.
El conductor ancho o la tercera terminal de contacto con conexión a tierra se proveen para
mayor seguridad. 6i el enchufe suministrado no encaja correctamente en el tomacorriente,
consulte a un electricista para reemplazar la toma.
• Proteja el cable de alimentación. Evite pisar o doblar el cable, en particular a la altura del
conector y las terminales de contacto del aparato.
• Utilice sólo los accesorios que especiÀca el fabricante.
• Utilice sólo el carrito, el soporte, el trípode y la mesa que indica el fabricante y
los que incluye el equipo. Tenga cuidado cuando transporte el equipo en el carrito
para evitar caídas y posibles lesiones.
• Desenchufe el equipo durante tormentas eléctricas o cuando no se utilice por un
período prolongado.
• Todos los trabajos de servicio técnico deben ser realizados por personal de ser vicio
caliÀcado. 6olicite el servicio de asistencia técnica cuando, por ejemplo, el cable de alimentación
o el conector están dañados, si se derramó líquido o cayeron objetos dentro del aparato, si el
equipo estuvo expuesto a la lluvia o humedad, si no funciona normalmente o si se cayó.
• PRECAUCIÓN: para evitar que las baterías se sulfaten y puedan ocasionar lesiones, daños
materiales o en la unidad:
•
Instale todas las baterías de forma correcta, de acuerdo con los signos + y - marcados en
la unidad.
• 1o utilice baterías de distintas clases (nuevas y usadas o de carbono y alcalinas, etc.).
•
Extraiga las pilas cuando no utilice la unidad durante un período prolongado.
1o exponga las baterías a temperaturas altas como las que emiten la luz solar, el fuego u
•
otros elementos similares.
• Este producto contiene perclorato y puede requerir un método de manipulación especial.
9isite www.dtsc.ca.gov/hazardouswaste/perchlorate.
• El producto/control remoto puede contener una batería tipo botón o moneda fácil de tragar.
6iempre mantenga las baterías lejos del alcance de los niños. En caso de ingestión la batería
podría causar lesiones graves o la muerte. Puede haber quemaduras internas graves en un plazo
de dos horas tras la ingestión.
• 6i sospecha que una batería se ha ingerido o introducido en cualquier parte del cuerpo,
consulte inmediatamente a un médico.
•
$l cambiar las baterías, mantenga siempre las baterías nuevas y usadas lejos del alcance de los niños.
9eriÀque que el compartimiento de la batería esté bien cerrado luego de reemplazar la batería.
• 6i el compartimiento de la batería no puede cerrar se, discontinúe el uso del producto.
Manténgalo lejos del alcance de los niños y comuníquese con el fabricante.
• No exponga el equipo a goteos ni salpicaduras.
• No coloque el aparato cerca de fuentes de peligro (por ejemplo, objetos que contengan
líquidos o velas encendidas).
• Este aparato puede contener plomo y mercurio. &umpla con la normativa local, estatal o
nacional sobre eliminación de productos. &omuníquese con las autoridades locales para solicitar
información sobre la eliminación o el reciclaje de productos. Para obtener más información
sobre las opciones de reciclaje disponibles, ingrese en cualquiera de los siguientes sitios web:
www.mygreenelectronics.com, www.eiae.org, www.recycle.philips.com.
• 6i el conector de alimentación u otro conector se utilizan como dispositivos de desconexión,
deben estar accesible y fáciles de operar.
• 1o coloque este aparato sobre muebles que adultos o niños puedan tirar, inclinar o utilizar para
subirse sobre ellos. 6i el aparato se cae, puede causar heridas graves o incluso la muerte.
• Este aparato no debe ubicarse en una instalación cerrada como una estantería o un r ack, a
menos que esté adecuadamente ventilada. 9eriÀque que haya un espacio mínimo de 20 cm
(7,8 pulg) alrededor del aparato.
Símbolo de equipo de Clase II
Este símbolo indica que la unidad tiene un sistema de doble aislamiento.
Conozca estos símbolos de seguridad
El símbolo del rayo indica que los componentes sin aislamiento dentro de la unidad
pueden generar descargas eléctricas. Para la seguridad de todas las personas de su
hogar, no retire la cubierta del producto.
El signo de exclamación indica las características del producto que pueden provocar
problemas de funcionamiento y mantenimiento. Por eso, se recomienda leer el manual
de instrucciones.
ADVERTENCIA: Para reducir el riesgo de incendios o descargas eléctricas, no exponga el aparato a la
lluvia ni a la humedad, ni coloque sobre él objetos que contengan líquidos (por ejemplo, jarrones).
PRECAUCIÓN: Para evitar descargas eléctricas, el conductor ancho debe introducirse por completo
en la ranura adecuada.
Protección del producto
Utilice únicamente un paño de microÀbra para limpiar el producto.
Cuidado del medio ambiente
Desecho del producto y de las pilas usadas
El producto ha sido diseñado y fabricado con materiales y componentes de alta calidad que pueden
reciclarse y reutilizarse.
Este producto puede contener plomo y mercurio. Es posible que la eliminación de estos materiales
se encuentre bajo regulación debido a causas medioambientales. Para obtener información sobre la
eliminación o el reciclaje, póngase en contacto con las autoridades locales.
Este producto contiene pilas:
• Deseche las pilas correctamente. 1o las arroje al fuego. Las pilas pueden explotar si se
sobrecalientan.
• 1o la envuelva en papel de aluminio o metal. Envuélvala en papel de periódico antes de
deshacerse de ella.
• Le sugerimos que se informe acerca de los puntos de recogida de pilas de su ciudad.
• 9isite www.call2recycle.org para obtener más información sobre centros de reciclaje para pilas
recargables de su zona.
Aviso de cumplimiento
El dispositivo cumple con los reglamentos de la F&&, apartado . El funcionamiento está sujeto a las
siguientes condiciones:
a El dispositivo no debe causar interferencias nocivas y
b debe recibir todo tipo de interferencias, incluso las que originan un funcionamiento
indeseado.
Normas de la Comisión Federal de Comunicaciones (FCC)
Este equipo se ha probado y se ha determinado que cumple con los límites para un dispositivo digital
clase %, de acuerdo con el apartado de las normativas de la F&&. Estos límites están destinados a
ofrecer una protección razonable contra interferencias dañinas dentro de una instalación residencial.
Este equipo genera, utiliza y puede emitir energía de radiofrecuencia. 6i no se instala y utiliza de
conformidad con el manual de instrucciones, puede ocasionar interferencias perjudiciales en las
comunicaciones de radio.
6in embargo, no existe garantía de que no se producirá interferencia en una instalación en particular.
6i este equipo provoca interferencias perjudiciales en la recepción de radio o televisión, lo que
puede determinarse al encender y apagar el equipo, se recomienda al usuario intentar corregir la
interferencia mediante una o varias de las siguientes medidas:
• &ambie la posición de la antena receptora.
• $umente la distancia entre el equipo y el receptor.
• &onecte el equipo a un tomacorriente de un circuito diferente al que está conectado el
receptor.
• Para obtener ayuda, comuníquese con el distribuidor o con un técnico de radio o televisión
caliÀcado.
Normas sobre la exposición a campos de radiación de la FCC: este equipo cumple con la normativa
que regula los límites de exposición a la radiación de F&& para ambientes no controlados. Este
equipo debe instalarse y utilizarse con una distancia mínima de 20 cm entre el radiador y el cuerpo.
1o coloque este aparato cerca de otros transmisores o antenas, ni lo utilice con este tipo de
dispositivos.
Advertencia: &ualquier alteración o modiÀcación a este dispositivo, que no cuente con la autorización
expresa de Gibson Innovations, puede anular el derecho del usuario para utilizar el equipo.
1umero de modelo: %/7
1ombre comercial: Philips
Parte responsable: PF U6$, Inc. P2 %ox 228 $lpharetta, G$ 002-228 (8) 22-07
Canadá:
&$1 I&E6-(%)/1M%-(%)
Este dispositivo cumple con los estándares R66 exentos de licencia de Industry &anada. El
funcionamiento queda sujeto a las siguientes condiciones: () este dispositivo no debe producir
interferencias dañinas, y (2) debe soportar cualquier interferencia, incluso aquéllas que pueden causar
un funcionamiento no deseado.
Le dispositif rencontre l'exemption des limites courantes d'evaluation dans la section
la conformite a l'exposition de rf, utilisateurs peut obtenir l'information canadienne sur l'exposition
la conformite de rf.
México:
La operación de este equipo está sujeta a las siguientes dos condiciones: () es posible que este
equipo o dispositivo no cause interferencia perjudicial y (2) este equipo o dispositivo debe aceptar
cualquier interferencia, incluyendo la que pueda causar su operación no deseada.
RSS-102
2.5 de RSS 102 et
B5/37_Safety_V1.0.indd 1 6/17/2015 5:46:41 PM

GARANTÍA LIMITADA DE UN (1) AÑO
C
COBERTURA DE GARANTÍA:
La obligación de esta garantía se limita a los términos establecidos a
continuación.
QUIÉNES ESTÁN CUBIERTOS:
Este producto está garantizado al comprador original o a lapersonaque lo
recibe como regalo contra defectos en los materiales y en la mano de
obra, a partir de la fecha de la compra original ("períododegarantía")en el
distribuidor autorizado.El recibo de ventas,donde aparecen el nombre del
producto y la fecha de la compra en un distribuidor autorizado, se
considerará comprobante de esta fecha.
LOQUEESTÁCUBIERTO
Esta garantía cubre productos nuevos si se produce algún defecto enel
material o la mano de obra y se recibe un reclamo válido dentrodel
período de garantía. A su propia discreción, la compañía dentrodel
período de garantía. A su propia discreción, la compañía nuevas o
reacondicionadas;(2)cambiará el producto por uno nuevo o que se ha
fabricado con piezas nuevas o usadas utilizables, y que sea al menos
funcionalmente equivalente o lo más parecido al producto original del
inventario actual; o (3) reembolsará el precio de compra original del
producto. La compañía garantiza productos o piezas de repuesto
proporcionados bajo esta garantía contra defectos en los materiales y en
la mano de obra durante noventa (90) días o por el resto de la garantía
del producto original, lo que le promocione más cobertura. Cuando se
cambia un producto o una pieza, el artículo que usted recibe pasa a ser
de su propiedad y el que se le entrega pasa a ser propiedad de la
compañía.Cuando se proporcione un reembolso, su producto pasa a ser
propiedad la compañía.
Nota: Cualquier producto que se venda y que esté identi
como reacondicionado o renovado tiene una garantía limitada
de noventa (90) días.
El producto de reemplazo sólo se puede enviar si se cumplen
todos los requisitos de la garantía. El incumplimiento de tales
requisitos puede ocasionar un retardo.
LO QUE NO SE CUBRE: EXCLUSIONES Y LIMITACIONES:
Esta garantía limitada se aplica sólo a los productos nuevos que se pueden
identificar por la marca registrada, el nombre comercial o por tener el
logotipo correspondiente. Esta garantía limitada no se aplica a ningún
producto de hardware ni de software que no sea Philips, incluso si viene
empacado con el producto o si se vende junto con éste. Los fabricantes,
proveedores o editores que no sean Philips pueden proporcionar una
garantía por separado para sus propios productos empacados con el
producto Philips.
La compañía no es responsable por ningún daño o pérdida de programas,
datos u otra información almacenados en algún medio contenido en el
producto, ni por ningún producto o pieza que no sea Philips que no esté
cubierta por esta garantía. La recuperación o la reinstalación de
programas, datos u otra información no está cubierta por esta garantía
limitada.
Esta garantía no se aplica (a) a daños causados por accidente, abuso, mal
uso, negligencia, mala aplicación o a productos que no sean Philips;
(b) a daño provocado por servicio realizado por
:
Esta garantía le otorga derechos legales específicos. Usted puede tener otros derechos que varían entre los diferentes estados y provincias.
P&F USA Inc. PO Box 2248 Alpharetta, GA 30023-2248
cualquier persona distinta de un establecimiento de servicio autorizado;
(c) a productos o piezasque se hayan modificado sin la authorizaciónpor
escrito; (d) si se ha retirado o desfigurado cualquier número de serie; y
tampoco se aplica la garantía a (e)productos, accesorios o insumos
vendidos TAL COMO ESTÁN sin garantía de ningún tipo, lo que incluye
productos Philips vendidos TAL COMO ESTÁN por algunos
distribuidores.
Esta garantía limitada no cubre:
s Los costos de envío al devolver el producto defectuoso.
s Los costos de mano de obra por la instalacion o configuración del
producto, el ajuste de controles del cliente en el producto y la
instalación o reparación de sistemas de antena o fuente de señal
externos al producto.
s La reparación del producto o el reemplazo de piezas debido a
instalación o mantenimiento inadecuada, a conexiones hechas a un
suministro de voltaje inadecuado, sobrevoltaje de la línea de
alimentación, daño causado por relámpagos, imágenes retenidas o
marcas en la pantalla producto de la visualización de contenido fijo
durante periodos prolongados, reparaciones cosméticas debido al
desgaste normal, reparaciones no autorizadas u otras causas que no
se encuentren bajo el control de la compañía.
s Daños o reclamos por productos que no están disponibles para su
uso, por datos perdidos o por pérdida de software.
s Daños debido a mala manipulación en el transporte o accidentes de
envío al devolver el producto.
s Un producto que requiera modificacion o adaptacion para permitir su
funcionamiento enalgún país que no sea el país para el quese diseñó,
fabricó, aprobó y/o autorizó o la reparación de productos dañados
por estas modificaciones.
oducto que se use para propósitos comerciales oinstitucionales
s Un pr
(lo que incluye, entre otros, los de alquiler).
s La pérdida del producto en el envío y cuando no se pueda
proporcionar una firma que verifique el recibo.
s No operar según el Manual del propietario.
PARA OBTENER AYUDA EN LOS EE.UU., EN CANADÁ,
PUERTO RICO O EN LAS ISLAS VIRGENES DE LOS EE.UU...
Comuníquese con el Centro de Atención al Cliente al:
1 (866) 226-6074
LA REPARACIÓN O EL REEMPLAZO, SEGÚN LO DISPONE
ESTA GARANTÍA, ES LA SOLUCIÓN EXCLUSIVA PARA EL
CLIENTE. PHILIPS NO SERÁ RESPONSABLE DE LOS DAÑOS
INCIDENTALES O INDIRECTOS QUE INFRINJAN ALGUNA
GARANTÍA EXPRESA O IMPLÍCITA SOBRE ESTE PRODUCTO.
CON EXCEPCIÓN DE LO QUE PROHÍBA LA LEY VIGENTE,
TODA GARANTÍA IMPLÍCITA DE COMERCIABILIDAD Y
ADECUACIÓN PARA UN PROPÓSITO PARTICULAR EN ESTE
PRODUCTO ESTÁ LIMITADA EN DURACIÓN A LO QUE
ESPECIFIQUE ESTA GARANTÍA.
Algunos estados no permiten las exclusiones ni la limitación de
los daños incidentales o indirectos, ni permiten limitaciones sobre
la
duración de la garantía implícita, de modo que las limitaciones
o exclusiones anteriores pueden no aplicarse a usted.
Français
1 Important
Lisez attentivement toutes les instructions avant d’utiliser le téléviseur. 6i des dommages sont causés
par le non-respect des instructions, la garantie ne sera pas applicable.
Aide et soutien
Pour un service complet à la clientèle en ligne, visitez le site www.philips.com/support pour effectuer
les opérations suivantes :
• télécharger le manuel d’utilisation et le guide de démarrage rapide
• regarder des didacticiels vidéo (pour certains modèles seulement)
• trouver des réponses aux questions les plus fréquentes (F$4)
• nous envoyer une question par courriel
• clavarder avec un de nos représentants du service à la clientèle
6uivez les instructions sur le site Web pour sélectionner votre langue, ensuite entrez le numéro de
modèle de votre produit.
9ous pouvez également communiquer avec le service à la clientèle dans votre pays. 1otez auparavant
le numéro de modèle et le numéro de série de votre produit. 9ous pouvez trouver cette information
à l’arrière de votre appareil.
Consignes de sécurité importantes
• Lisez ces instructions.
• Conservez ces instructions.
• Tenez compte de tous les avertissements.
• Suivez toutes les instructions.
• N’utilisez pas cet appareil près de l’eau.
• Nettoyez l’appareil avec un chiffon sec seulement.
• N’obstruez aucune prise de ventilation. Installez l’appareil en conformité avec les instructions
du fabricant.
• N’installez pas l’appareil près d’une source de chaleur comme un radiateur, un registre de
chaleur ou un autre appareil (incluant les ampliÀcateurs) qui produit de la chaleur.
• Ne passez pas outre les instructions de sécurité concernant la Àche
polarisée ou la Àche de mise à la terre. Une Àche polarisée est composée
de deux broches dont l’une est plus large que l’autre. Une Àche de mise
à la terre est composée de deux broches et d’une broche de masse. La
broche plus large et la broche de masse visent à assurer votre sécurité. 6i la Àche fournie ne
peut être insérée dans la prise, consultez un électricien pour qu’il remplace votre prise désuète.
• Protégez le cordon d’alimentation de faoon à ce qu’il ne puisse pas être écrasé ou pincé
vériÀez particulièrement les Àches, les prises et la sortie du Àl dans l’appareil.
• Utilisez seulement les accessoires spéciÀés par le fabricant.
• Utilisez seulement le chariot, le support, le trépied ou la table spéciÀés par
le fabricant ou vendu avec l’appareil. 6i vous utilisez un chariot, faites attention
lorsque vous le déplacez aÀn d’éviter de vous blesser en cas de renversement de
l’appareil.
• Débranchez cet appareil pendant les orages avec éclairs ou s’il n’est pas utilisé
pendant de longues périodes.
• Toute réparation doit être faite par un technicien qualiÀé. Une réparation est nécessaire quand
l’appareil a été endommagé, par exemple, quand le cordon ou la Àche d’alimentation ont été
endommagés, quand un objet a été introduit dans l’appareil ou quand l’appareil a été mouillé,
exposé à la pluie ou à l’humidité, qu’il ne fonctionne pas correctement ou qu’il a été échappé.
• AVERTISSEMENT relatif à l’utilisation de piles ² $Àn d’éviter une fuite des piles pouvant
entraîner des blessures ou des dommages matériels :
Installez toutes les piles correctement en alignant les pôles + et - tel qu’indiqué sur
•
l’appareil.
• 1e combinez pas des piles différentes (neuves et usagées, au carbone et alcalines, etc.).
Retirez les piles lorsque l’appareil n’est pas utilisé pendant une longue période.
•
•
Les piles intégrées ne doivent pas être exposées à une chaleur excessive, comme les
rayons du soleil ou le feu.
Produits contenant du perchlorate : une manipulation particulière peut être requise.
•
&onsulter www.dtsc.ca.gov/hazardouswaste/perchlorate.
• L’appareil ou sa télécommande peuvent contenir une pile bouton qu’un enfant pourrait avaler.
Gardez ce type de pile hors de portée des enfants à tout moment! En cas d’ingestion, la pile
peut provoquer des blessures sérieuses voire la mort. De graves brûlures internes peuvent
survenir dans les deux heures suivant l’ingestion.
• 6i vous croyez qu’une pile a été ingérée ou introduite dans le corps de quelqu’un, consultez
immédiatement votre médecin.
• Lorsque vous changez les piles, assurez-vous que les piles neuves et usagées sont hors
de portée des enfants. Une fois le changement de pile effectué, assurez-vous que son
compartiment est bien fermé et sécurisé.
• 6i vous ne parvenez pas à sécuriser le compar timent de la pile, cessez d’utiliser l’appareil.
Gardez l’appareil hors de portée des enfants et communiquez avec le fabricant.
• N’exposez pas l’appareil aux éclaboussures, ni aux déversements.
• Ne placez aucune source de danger sur l’appareil (par exemple des objets remplis de liquide
ou des bougies allumées).
• &et appareil peut contenir du plomb et du mercure. Mettez l’appareil au rebut conformément
aux lois municipales, provinciales ou fédérales. Pour en savoir plus sur la mise au rebut ou sur le
recyclage, veuillez communiquer avec les autorités locales. Pour de plus amples renseignements
sur les diverses possibilités de recyclage, visitez les sites www.mygreenelectronics.com, www.
eiae.org ou www.recycle.philips.com.
• 6i la Àche d’alimentation ou un coupleur d’appareil est utilisé comme dispositif de découplage,
celui-ci doit rester facilement accessible.
• 1e placez pas cet appareil sur un meuble qu’un enfant pourrait faire basculer ou qu’un adulte
pourrait renverser involontairement en s’appuyant ou en grimpant dessus ou encore en le
tirant. La chute d’un appareil peut provoquer des blessures graves, voire la mort.
• &et appareil ne doit pas être placé dans un meuble encastré comme une bibliothèque ou une
étagère, à moins que l’emplacement offre une ventilation sufÀsante. 9eillez à garder un espace
dégagé d’au moins 20 cm (7,8») autour de cet appareil.
Symbole d’équipement de classe II
&e symbole signiÀe que l’appareil sur lequel il est apposé est doté d’une doub
econnaîtr
Sachez r
AVERTISSEMENT : aÀn de réduire les risques d’incendie ou de choc électrique, n’exposez pas cet
appareil à la pluie ou à l’humidité. 1e posez pas dessus d’objets remplis de liquides, tels que des vases.
ATTENTION : pour éviter les chocs électriques, introduisez la broche la plus large de la Àche dans la
borne correspondante de la prise et poussez à fond.
Précautions d’utilisation de votre appareil
Utilisez seulement un chiffon en microÀbre pour nettoyer l’appareil.
Respect de l’environnement
0LVHDXUHEXWGHYRWUHSURGXLWHWGHODSLOHHQÀQGHYLH
&et appareil a été conou et fabriqué av
être recyclés et réutilisés.
&e produit peut contenir du plomb et du mercure. La mise au rebut de ces substances peut
être réglementée aÀn de préserver l’environnement. &ontactez les autorités locales pour toute
information concernant la mise au rebut ou le recyclage.
&e produit est doté de piles :
•
• 1e les enroulez pas dans une feuille métallique ou d’aluminium. Enroulez-les dans du papier
• 1ous vous recommandons de contacter l’administration de votre ville pour connaître le(s)
• Rendez-vous sur www.call2recycle.org pour plus d’informations sur les centres de recyclage
e ces symboles de sécurité
&e symbole ©d’éclair» signale des matériaux non isolés présents dans votre appareil
et pouvant causer un choc électrique. Pour assurer la sécurité des membres de votre
famille, veuillez ne pas enlever le couvercle du produit.
Les ©points d’exclamation» ont pour but d’attirer votre attention sur des
caractéristiques à propos desquelles vous devez lire attentivement la documentation
accompagnant l’appareil aÀn d’éviter tout problème de fonctionnement et d’entretien.
Mettez les piles au rebut de manière adéquate. 1e les incinérez pas. Les piles peuvent exploser
en cas de surchauffe.
journal avant de les jeter.
site(s) de recyclage de piles de votre zone.
dans votre région pour les piles rechargeables.
ec des matériaux et des composants de haute qualité pouvant
le isolation.
Avis de conformité
&e dispositif est conforme aux règlements de la F&&, partie . Le fonctionnement est assujetti aux
deux conditions suivantes :
a Cet appareil ne doit pas causer d’interférence préjudiciable et
b l’appareil doit accepter toute interférence reçue, y compris les interférences qui peuvent
causer un fonctionnement non désiré.
Règlement de la FCC
&et équipement a été testé et jugé compatible avec les limites s’appliquant aux appareils numériques
de la classe %, conformément à l’article du règlement de la F&&. &es limites ont été déÀnies pour
fournir une protection raisonnable contre les interférences nuisibles dans le cadre d’une installation
résidentielle. &et équipement génère, utilise et peut émettre de l’énergie radiofréquence et, s’il n’est
pas installé ni utilisé conformément aux instructions, peut causer des interférences gênantes pour les
communications radio.
Rien ne garantit toutefois que des interférences ne surviendront pas dans une installation par ticulière.
6i cet équipement cause des interférences nuisibles pour la réception de la radio ou de la télévision,
ce qui peut être déterminé en mettant l’équipement hors tension puis sous tension, l’utilisateur devra
essayer de corriger ces interférences en effectuant une ou plusieurs des opérations suivantes :
Déplacez l’antenne de réception.
•
• $ugmentez la distance entre l’équipement et le récepteur.
• %ranchez l’équipement à une prise d’un circuit autre que celui sur lequel le récepteur est
branché.
• &onsultez le détaillant ou un technicien de radiotélévision expérimenté.
Énoncé de la FCC sur l’exposition aux rayonnements radioélectriques : cet appareil est conforme
aux limites d’exposition aux rayonnements radioélectriques de la F&& pour un environnement
non contrôlé. &et appareil doit être installé et utilisé en conservant une distance minimale de
20 centimètres entre le radiateur et votre corps. &et émetteur ne doit pas être installé au même
endroit qu’une autre antenne ou un autre émetteur, ni utilisé avec un tel dispositif.
Avertissement : Tout changement ou toute modiÀcation appor té à cet appareil sans l’autorisation
expresse de Gibson Innovations peut annuler le droit de l’utilisateur à utiliser l’équipement.
1uméro de modèle
Marque : Philips
Partie responsable : PF U6$, Inc. P2 %ox 228 $lpharetta, G$ 002-228 (8) 22-07
Canada :
&$1 I&E6-(%)/1M%-(%)
&et appareil est conforme aux normes R66 sans licence d’Industrie &anada. 6on fonctionnement
est assujetti aux deux conditions suivantes : () l’appareil ne doit pas causer d’interférences nuisibles
(2) l’appareil doit accepter toute interférence reçue, y compris les interférences qui peuvent causer un
fonctionnement non désiré.
OGARANTIE LIMITÉE DE UN (1) AN
COUVERTURE DE GARANTIE:
Cette provision pour garantie est limitée aux conditions établies
ci-dessous.
QUI EST COUVERT?
La garantie du présent produit couvre l’acheteur original ou toute
personne recevant le produit en cadeau contre tout défaut de matière ou
de main d’œuvre conformément à la date originale d’achat (« Période de
garantie ») auprès d’un distributeur agréé. Le reçu de vente original
indiquant le nom du produit ainsi que la date d’achat d’un détaillant
agréé est considéré comme une preuve d’achat.
QU'EST-CE QUI EST COUVERT?
Cette garantie couvre les nouveaux produits dans le cas où un défaut
œ
de matière ou de main d’ uvre se présenterait et une réclamation valide
était présentée dans la période de garantie.La société pourra, à sa seule
discrétion: (1)réparer le produit gratuitement avecdes pièces de rechange
neuves ou remises à neuf; ou (2) échanger le produit pour un produit
neuf ou ayant été fabriqué à partir de pièces neuvesou usagées en bon
état et au moins fonctionnellement équivalentou comparable au produit
d’origine actuellement en inventaire; ou (3) rembourser le prix d’achat
initial du produit. La société garantit les produits ou pièces de
remplacement prévus sous cette garantie contre tout défaut de matière
ou de mai d’œuvre à n partir de la date de remplacement ou de
réparation, pourune période de quatre-vingt-dix (90) jours ou pour la
portion restante de la garantie du produit
couvertures étant à retenir. Lorsqu’un produit ou une pièce est échangé,
tout article de rechanged evient votre propriété et l’article remplacé
devient la propriété de la société. Lorsqu’un remboursement est effectué,
votre produit devient la propriété de la société.
Remarque : tout produit vendu et identifié comme étant remis
à neuf ou rénové porte une garantie limitée de quatre-vingt-dix
(90) jours.
Un produit de remplacement ne pourra être envoyé que si
toutes les exigences de la garantie ont été respectées. Tout
manquement de répondre à toutes les exigences pourra
entraîner un délai.
CE QUI N’EST PAS COUVERT - EXCLUSIONS ET
LIMITATIONS:
Cette garantie limitée ne s’applique qu’aux nouveaux produits pouvant
être identifiés par la marque de commerce, le nom commercial ou le logo
qui y sont apposés.Cette garantielimitée ne s’applique à aucun produit
matérielou logiciel non Philips,même si celui-ci est incorporé au produit ou
venduavec celui-ci.Les fabricants, fournisseurs ou éditeurs non-Philips
peuvent fournir une garantie séparée pour leurs propres produits intégrés
au produit fourni.
La société ne saurait être tenue pour responsable de tout dommage ou
perte de programmes, données ou autres informations mis en mémoire
dans tous les médias contenus dans le produit ou de tout produit ou pièce
non-Philips non couvert par cette garantie. La récupération ou réinstallation
des programmes, données ou autres informations n’est pas couverte par
cette garantie limitée. Cette garantie ne s’applique pas (a) aux dommages
causés par un accident, un abus, un mauvais usage une négligence, une
mauvaise application ou à un produit non-Philips, (b) aux dommages causés
par un service réalisé par quiconque autre qu’un centre de service agréé,
(c)à un produit ou pièce ayant été modifié sans permissionécrite, ou
(d) si tout numéro de série a été supprimé ou défiguré, ou (e) à un
ette garantie vous donne des droits légaux spécifiques. Il est possible que vous bénéficiiez de droits supplémentaires variant d'un État/Province à l'autre.
d’origine, la plus longue de ces
P&F USA Inc. PO Box 2248 Alpharetta, GA 30023-2248
produit, accessoire ou produit non durable vendu « TEL QUEL » sans
garantie de quelque description que ce soit par l’inclusion de produits
remis à neuf Philips vendu « TEL QUEL » par certains détaillants.
Cette garantie limitée ne couvre pas:
s les frais d’expédition pour le renvoi du produit défectueux.
s les frais de main-d’œuvre pour l’installation ou la configuration du
produit, le réglage des commandes sur le produit du client ainsi que
l’installation ou la réparation du système d’antenne/source sonor
externe au produit.
s la réparation du produit et/ou le remplacement des pièces à cause
d’une mauvaise installation ou d’un mauvais entretien, d’un raccorde ment à une alimentation électrique incorrecte,d’une surtension
temporaire, de dommages occasionnés par la foudre, d’une
rémanence de l’image ou de marques à l’écran résultant de l’affichage
d’un contenu stationnairefixe pour une période de temps prolongée,
de l’aspect esthétique du produit causé par une usure normale, d’une
réparation nonautorisée ou de toute autre cause non contrôlable par
la société.
s tout dommage ou réclamation pour des produits non disponibles
à l’utilisation ou pour des données perdues ou logiciel perdu.
s tout dommage causé par un mauvais acheminement du produit
ou par un accident encouru lors du renvoi du produit.
s un produit nécessitant une modification ou adaptation afin de
permettre l’utilisation dans tout pays autre que celui pour lequel il
était désigné, fabriqué, approuvé et/ou autorisé ou toute réparation
du produit endommagé par ces modifications.
s un produit utilisé à des fins commerciales ou institutionnelles (y
compris mais non de façon limitative les fins de location).
s un produit perdu lors de l’expédition sans preuve signée de la
réception.
s tout manquement d’exploiter le produit selon le manuel de
l’utilisateur.
POUR OBTENIR DE L’AIDE AUX ÉTATS-UNIS, AU
CANADA,
À PUERTO RICO OU AUX ÎLES VIERGES
AMÈRICAINES …
Communiquez avec le centre de service à la clientèle au:
1 (866) 226-6074
LA RÉPARATION OU LE REMPLACEMENT CONFORMÉMENT À
CETTE GARANTIE CONSTITUE LE SEUL REMÈDE POUR LE
CONSOMMATEUR. PHILIPS N’EST AUCUNEMENT RESPONSABLE
DE TOUT DOMMAGE ACCESSOIRE OU INDIRECT RÉSULTANT DE
LA VIOLATION DE TOUTE GARANTIE EXPRESSE OU IMPLICITE
SUR CE PRODUIT. SAUF DANS LAMESURE INTERDITE PAR LES
LOIS APPLICABLES, TOUTEGARANTIE IMPLICITE DE QUALITÉ
LOYALE ET MARCHANDEOU D’UTILITÉ PARTICULIÈRE DU
PRODUIT EST LIMITÉE DANSLE TEMPS À LA DURÉE DE CETTE
GARANTIE.
Certains états ne reconnaissent pas l’exclusion ou la limitation de la
responsabilité pour dommages indirects ou accessoires, ou autorisent
des limitations sur la durée d’une garantie implicite, il est donc possible
que les limitations ou exclusions mentionnées cidessus soient sans effet
dans votre cas.
12 meses.- Televisores con y sin reproductor de video digital DVD, reproductores de discos de video digital DVD, reproductores de disco de video digital
BLUE-RAY, grabadores reproductores de discos de video digital DVD, sistemas de cine en casa, radiograbadoras con y sin reproductor de disco compacto, video
proyector (excepto la lámpara), mini sistemas de audio, equipos modulares, antenas de recepción de satélite, teléfonos, teléfonos inalámbricos, auto estéreos,
tabletas electrónicas, Base para Ipod y bocinas inalámbricas (bluetooth).
6 meses.- Radio relojes, radios A.M. /F.M, batería recargables y reproductores de audio digital MP3 (internet).
24 meses.- Televisores Hoteleros LCD y ITV.
90 días.- Accesorios, controles remotos, bocinas, micrófonos, audífonos y aparatos reconstruidos de LCD TV, DVD, Blue-Ray, Barras de audio y Sistemas
Specifications are subject to change without notice
2015 © Gibson Innovations Limited.All rights reserved.
This product has been manufactured by, and is sold under the responsibility of
Gibson Innovations Ltd., and Gibson Innovations Ltd. is the warrantor in relation
to this product. Philips and the Philips Shield Emblem are registered trademarks of
Koninklijke Philips N.V. and are used under license from Koninklijke Philips N.V.
HTL2140B_F7_Safety_V1.0
2015.6.17
de Teatro en casa.
B5/37_Safety_V1.0.indd 2 6/17/2015 5:46:43 PM
 Loading...