

Page 1
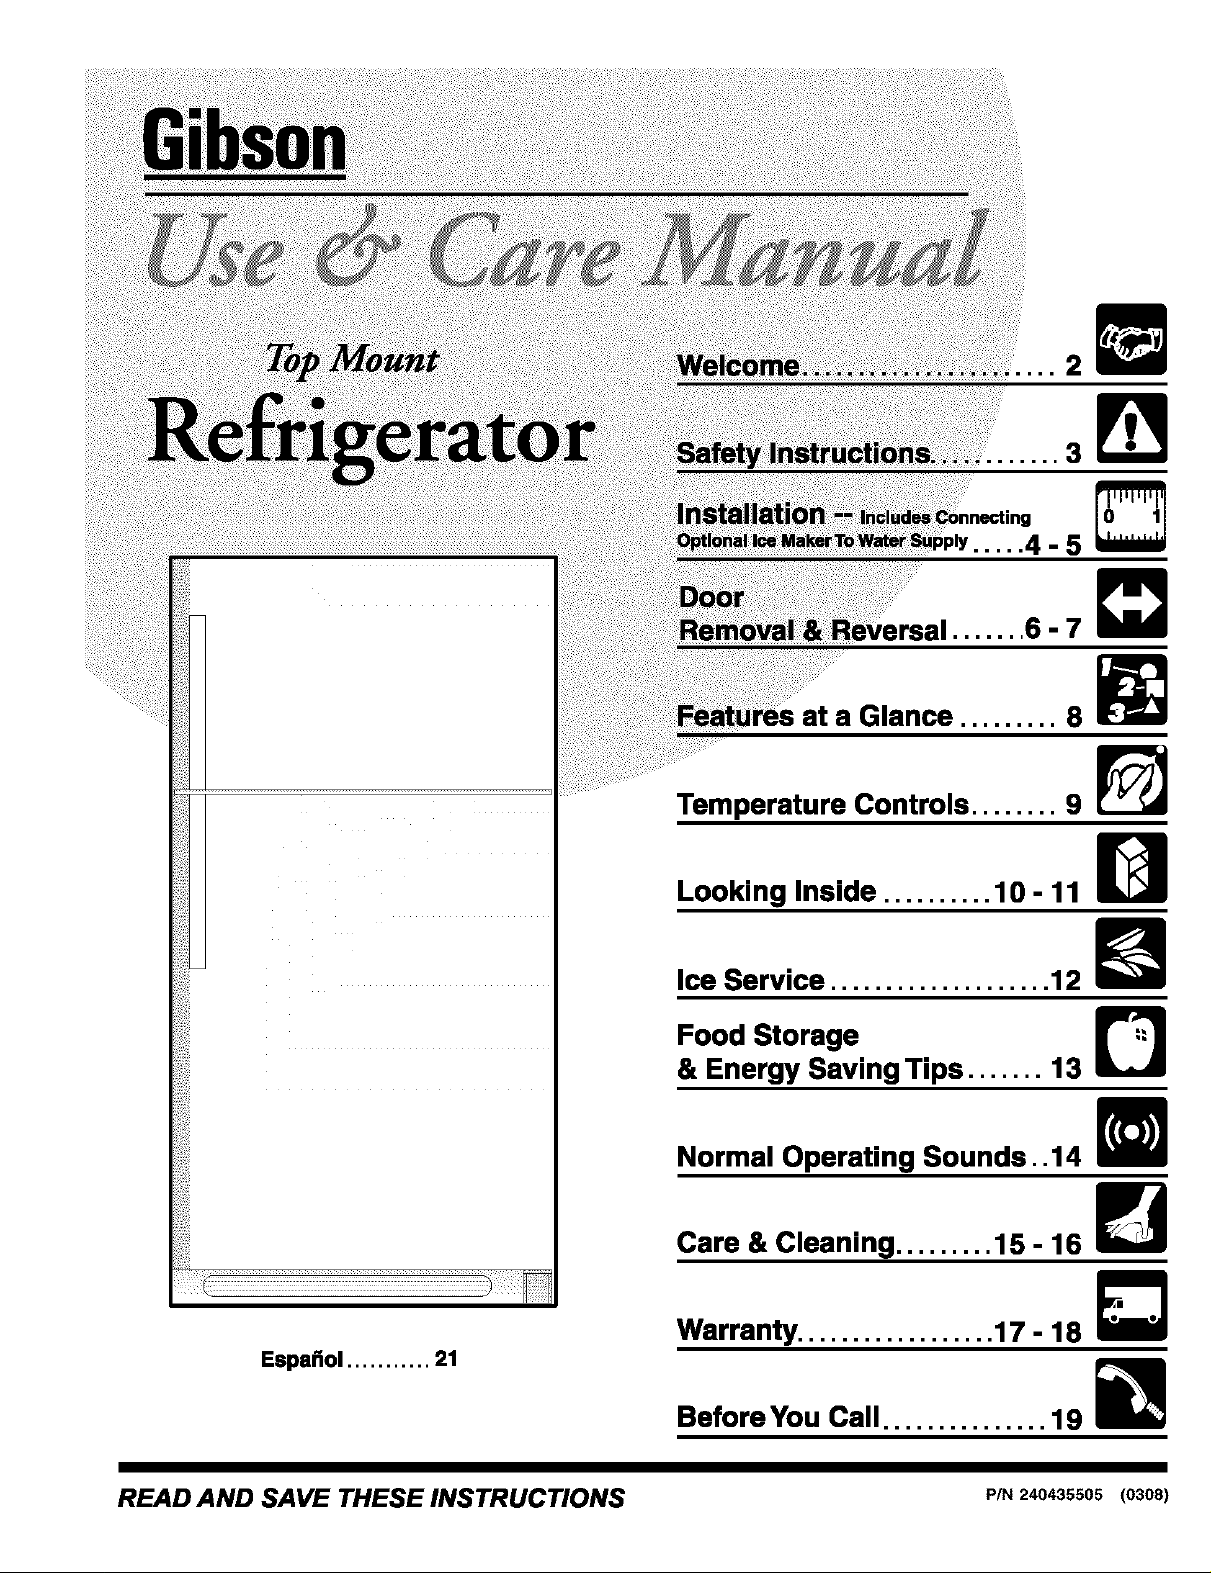
... 2
...... 3_
..... 4-5
...... 6-7 _
at a Glance ......... 8
Temperature Controls ........ 9
n
Looking Inside .......... 10 - 11 U
Ice Service .................... 12 U
Food Storage D
& Energy Saving Tips ....... 13
Normal Operating Sounds..14
Care & Cleaning ......... 15- 16
m
Warranty .................. 17 - 18 _"
Espa_ol ........... 21
Before You Call ............... 19
READ AND SAVE THESE INSTRUCTIONS p/N24043ssos(0308)
Page 2

Congratulations on your purchase of a new refrigerator! We
here at Electrolux Home Products, Inc. are very proud of
our product and we are completty committed to providing
you with the best service possible. Your satisfaction is our
#1 priority.
Please read this Use &Care Manual very carefully. Itcontains
valuable information on how to properly maintain your new
refrigerator.
We know you'll enjoy your new refrigerator and Thank You
for choosing our product. We hope you consider us for future
purchases.
Questions?
1-800-944-9044
(United States)
1-866-213-9397
(Canada)
Extend Your Warranty Protection
With An
PLEASE READ AND SAVE THESE INSTRUCTIONS
This Use & Care Manual provides specific operating
instructions for your model. Use your refrigerator only as
instructed in this manual. These instructions are not meant
to cover every possible condition and situation that may
occur. Common sense and caution must be practiced when
installing, operating and maintaining any appliance.
Please record your model and serial numbers below for
future reference. This information is found on your serial
plate located inside the refrigerator compartment.
Model Number:
Serial Number:
Purchase Date:
Extended Service Contract
CALL 1-800-944-9044
To Enjoy These Benefits:
Total freedom from repair bills so
unexpected repairs won't upset your
budget.
Fast, convenient toll-free service isjust
a phone call away.
Top-quality repairs by factory-trained
experts.
Quick access to genuine replacement
parts so you can rest assured your
refrigerator is repaired with the proper
components.
Please attach sales receipt
here for futu re reference.
Please complete and mail in the Product
Registration Card included with your
refrigerator.
2
Page 3
FORYOURSAFETY
• Donotstoreorusegasoline,orotherflammableliquids
inthevicinityofthisoranyotherappliance.Readpro-
ductlabelsforwarningsregardingflammabilityandother
hazards.
• Donotoperatetherefrigeratorinthepresenseof
explosivefumes.
• Avoidcontactwithanymovingpartsofautomaticice
maker.
• Removeallstablesfromthecarton.Staplescancause
severecuts,andalsodestroyfinishesiftheycomein
contactwithotherappliancesorfurniture.
CHILD SAFETY
Destroyorrecyclethecarton,plasticbags,andanyexterior
wrappingmaterialimmediatelyafterthe refrigeratoris
unpacked.ChildrenshouldNEVERusetheseitemstoplay.
Cartonscoveredwithrugs,bedspreads,plasticsheetsor
stretchwrapmaybecomeairtightchambers,andcanquickly
causesuffocation.
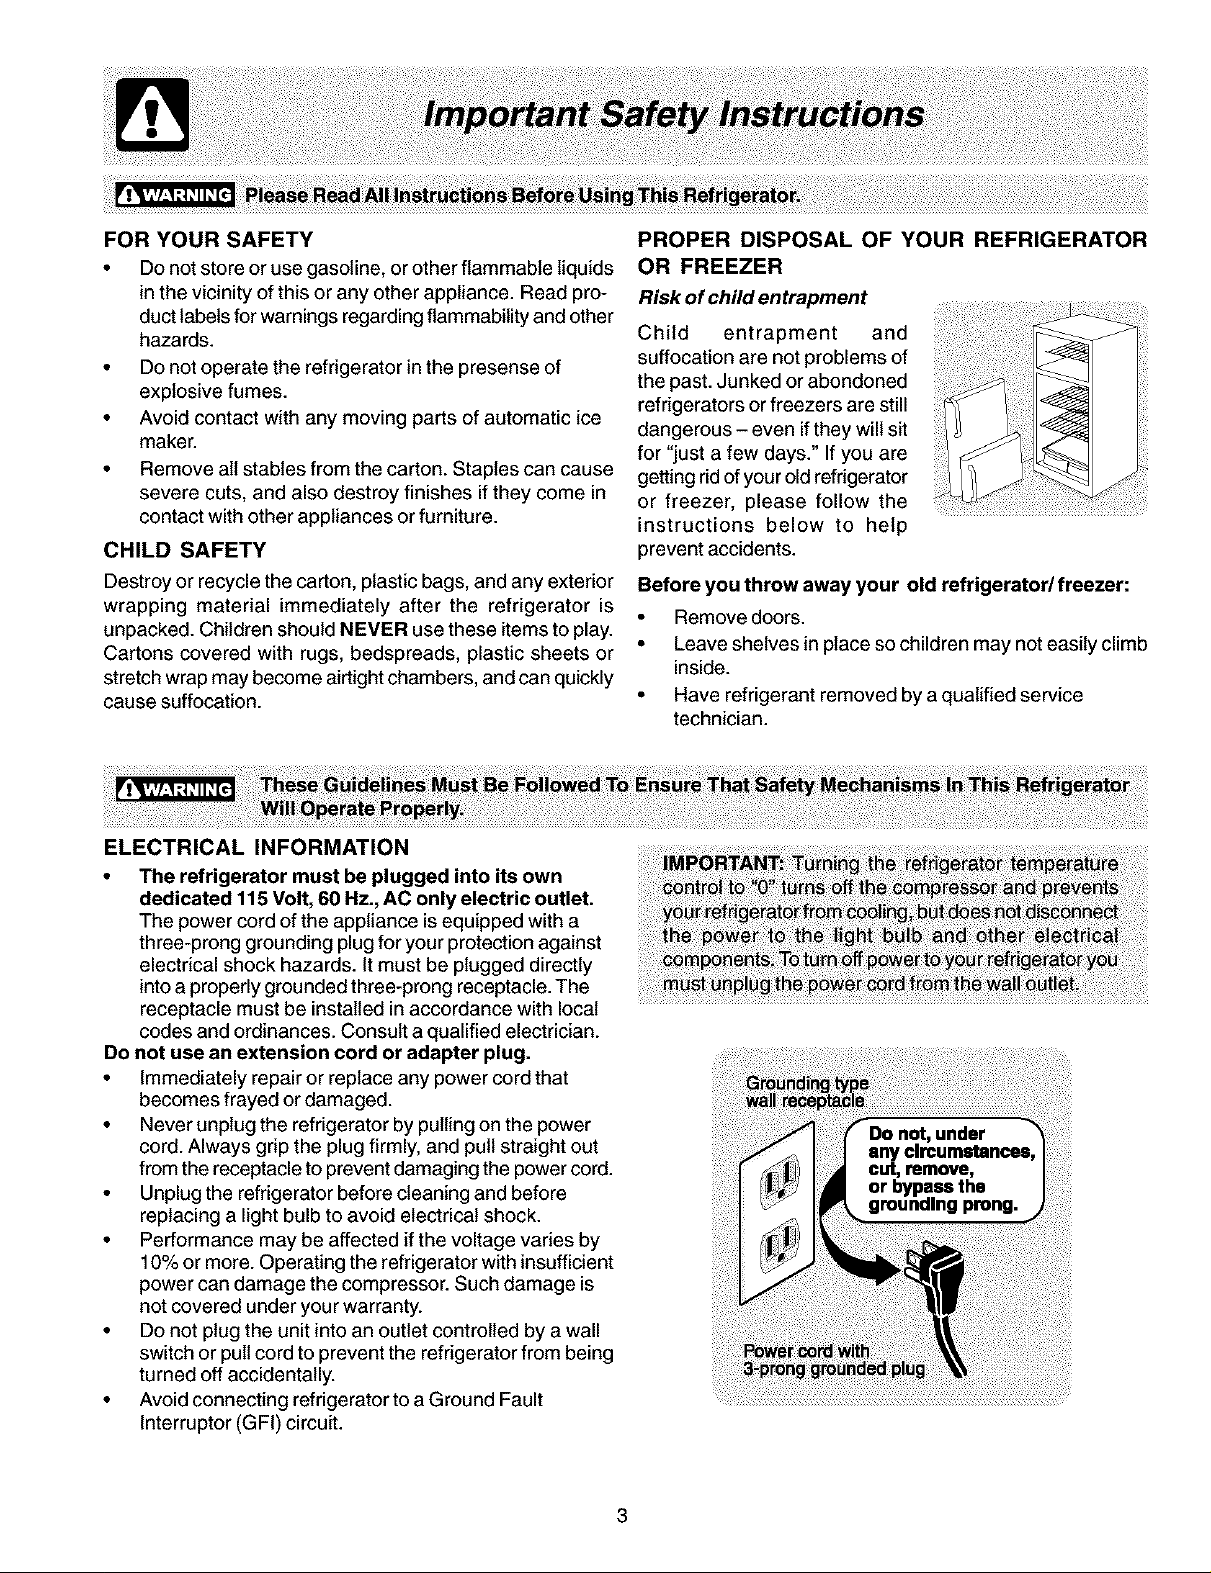
PROPER DISPOSAL OF YOUR REFRIGERATOR
OR FREEZER
Risk of child entrapment
Child entrapment and
suffocation are not problems of
the past. Junked or abondoned
refrigerators orfreezers are still
dangerous - even if they will sit
for "just a few days." If you are
getting rid of your old refrigerator
or freezer, please follow the
instructions below to help
prevent accidents.
Before you throw away your old refrigerator/freezer:
• Remove doors.
• Leave shelves inplace so children may not easily climb
inside.
• Have refrigerant removed by a qualified service
technician.
ELECTRICAL INFORMATION
• The refrigerator must be plugged into its own
dedicated 115 Volt, 60 Hz., AC only electric outlet.
The power cord ofthe appliance is equipped with a
three-prong grounding plug for yourprotection against
electrical shock hazards. It must be plugged directly
into a properly grounded three-prong receptacle. The
receptacle must be installed in accordance with local
codes and ordinances. Consult a qualified electrician.
Do not use an extension cord or adapter plug.
• Immediately repair or replace any power cord that
becomes frayed or damaged.
• Never unplug the refrigeratorby pulling on the power
cord. Always grip the plug firmly, and pull straight out
from the receptacle to prevent damaging the power cord.
• Unplug the refrigerator before cleaning and before
replacing a light bulb to avoid electrical shock.
• Performance may be affected if the voltage varies by
10% or more. Operating the refrigerator with insufficient
power can damage the compressor. Such damage is
not covered under your warranty.
• Do not plug the unit into an outlet controlled by a wall
switch or pull cord to prevent the refrigerator from being
turned off accidentally.
• Avoid connecting refrigerator to a Ground Fault
Interruptor (GFI) circuit.
Page 4
ThisUse& CareManualprovidesspecificoperating
instructionsforyourmodel.Usetherefrigeratoronlyas
instructedinthisUse&CareManual.Beforestartingthe
refrigerator, follow these important first steps.
LOCATION
• Choose a place that is near a grounded electrical outlet.
Do Not use an extension cord or an adapter plug.
• If possible, place the refrigerator out of direct sunlight
and away from the range, dishwasher or other heat
sources.
• The refrigerator must be installed on a floor that is level
and strong enough to support a fully loaded refrigerator.
• Consider water supply availability for models equipped
with an automatic ice maker.
INSTALLATION
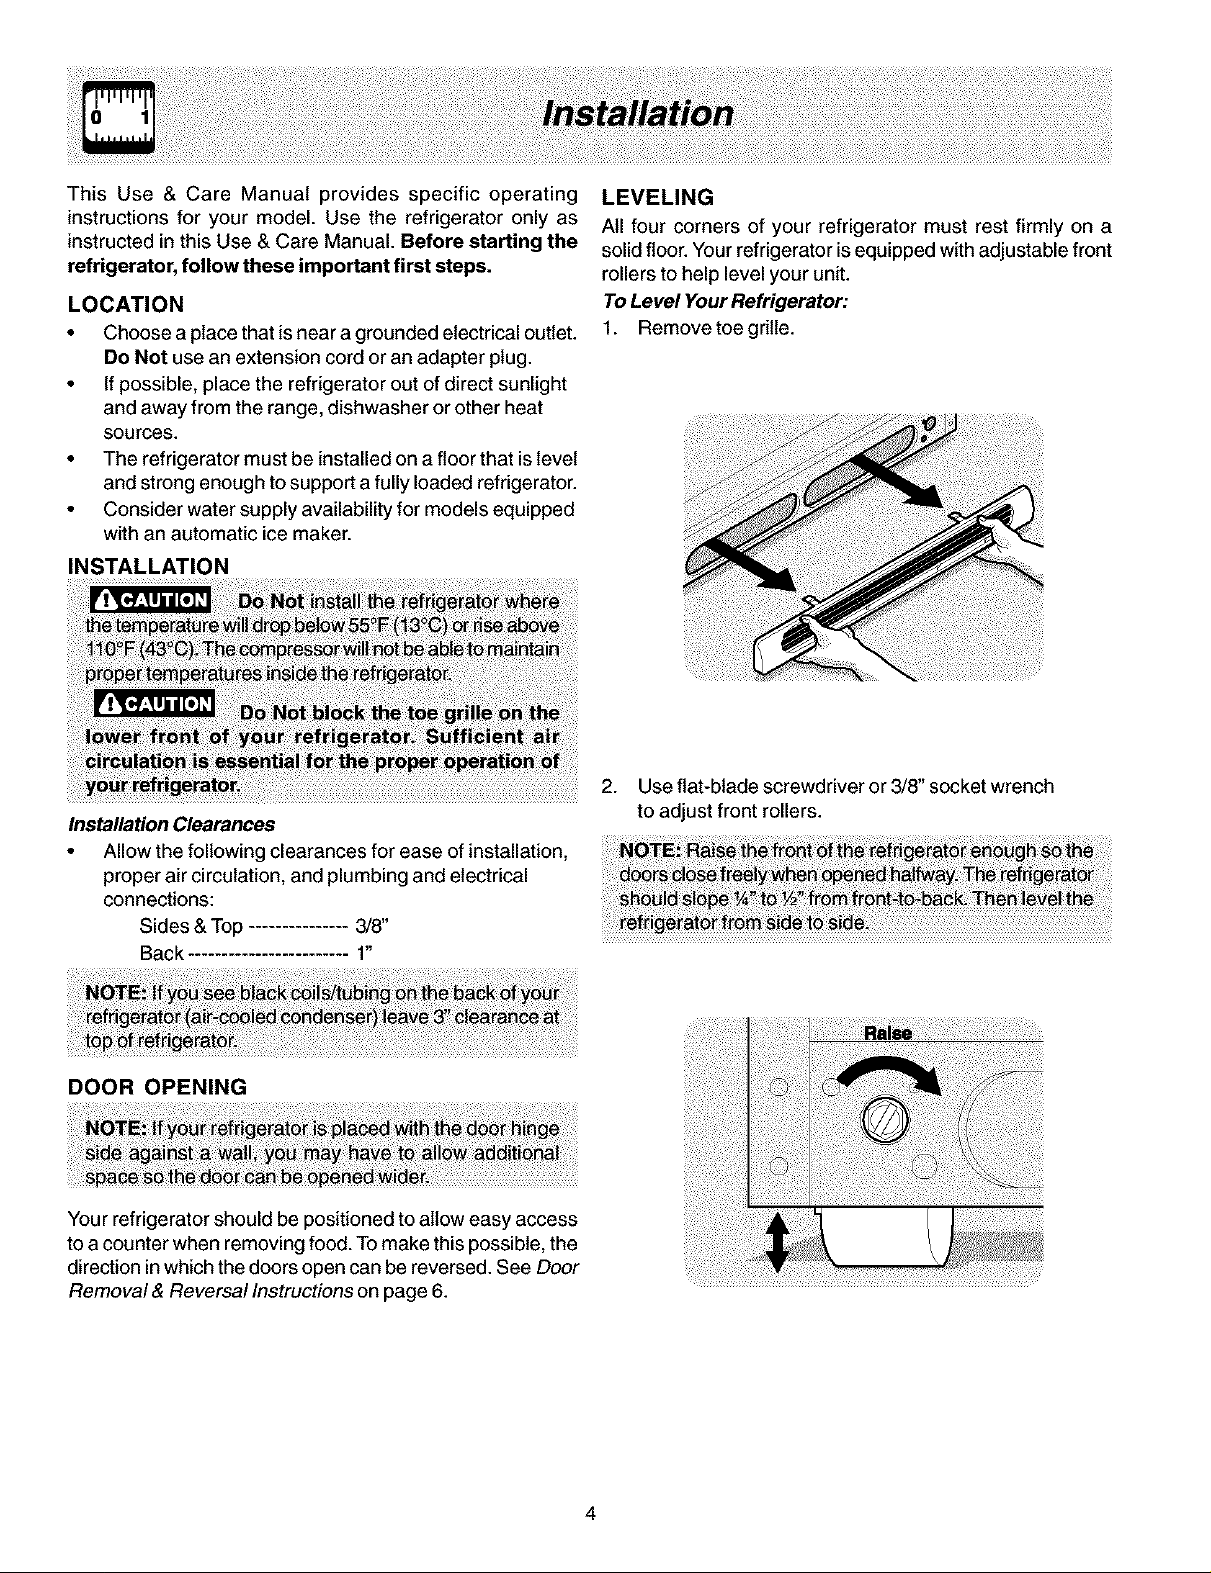
LEVELING
All four corners of your refrigerator must rest firmly on a
solid floor. Your refrigerator isequipped with adjustable front
rollers to help level your unit.
To Level Your Refrigerator:
1. Remove toe grille.
Installation Clearances
• Allow the following clearances for ease of installation,
proper air circulation, and plumbing and electrical
connections:
Sides & Top 3/8"
Back 1"
DOOR OPENING
Your refrigerator should be positioned to allow easy access
to a counter when removing food. To make this possible, the
direction in which the doors open can be reversed. See Door
Removal & Reversal Instructions on page 6.
2. Use flat-blade screwdriver or 3/8" socket wrench
to adjust front rollers.
4
Page 5
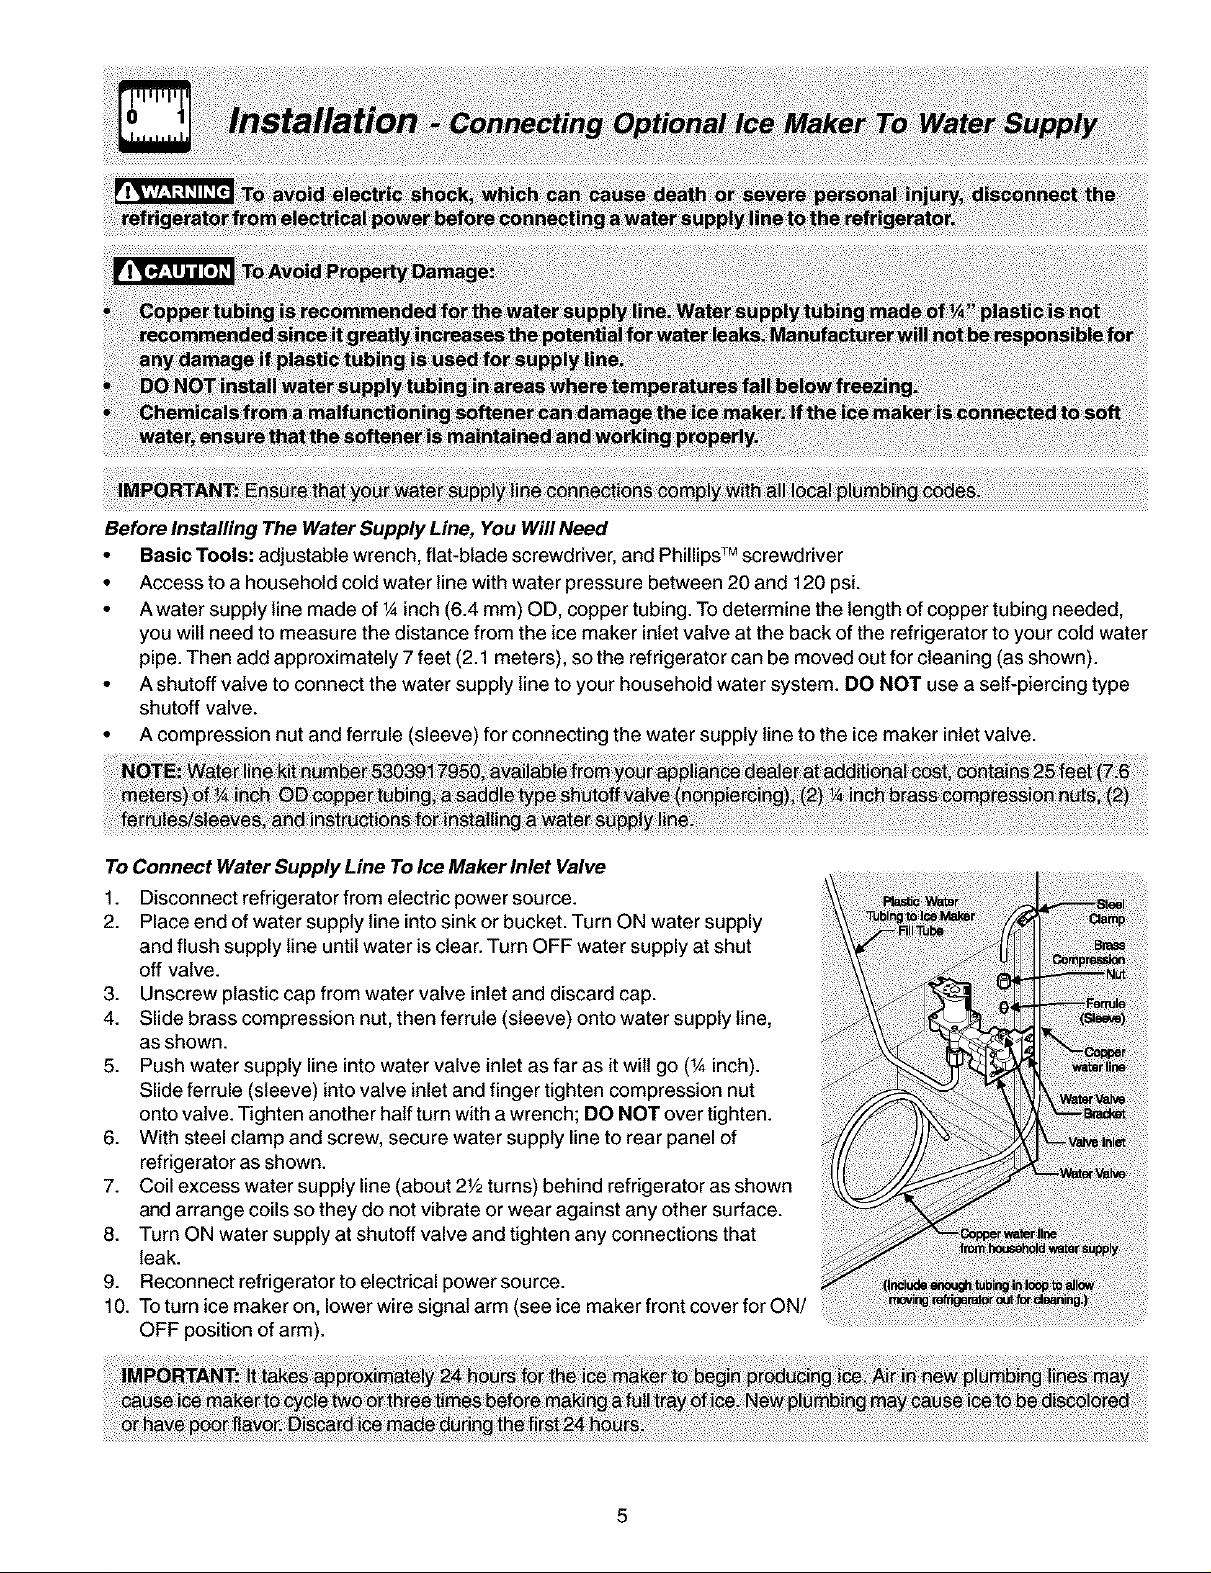
Before Installing The Water Supply Line, You Will Need
• Basic Tools: adjustable wrench, flat-blade screwdriver, and Phillips TM screwdriver
• Access to a household cold water line with water pressure between 20 and 120 psi.
• A water supply line made of 1Ainch (6.4 mm) OD, copper tubing. To determine the length of copper tubing needed,
you will need to measure the distance from the ice maker inlet valve at the back of the refrigerator to your cold water
pipe. Then add approximately 7feet (2.1 meters), so the refrigerator can be moved out for cleaning (as shown).
• A shutoff valve to connect the water supply line to your household water system. DO NOT use a self-piercing type
shutoff valve.
• A compression nut and ferrule (sleeve) for connecting the water supply line to the ice maker inlet valve.
To Connect Water Supply Line To Ice Maker inlet Valve
1. Disconnect refrigerator from electric power source.
2. Place end of water supply line into sink or bucket. Turn ON water supply
and flush supply line until water is clear. Turn OFF water supply at shut
off valve.
3. Unscrew plastic cap from water valve inlet and discard cap.
4. Slide brass compression nut, then ferrule (sleeve) onto water supply line,
as shown.
5. Push water supply line into water valve inlet as far as it wilt go (_Ainch).
Slide ferrule (sleeve) into valve inlet and finger tighten compression nut
onto valve. Tighten another half turn with a wrench; DO NOT over tighten.
6. With steel clamp and screw, secure water supply line to rear panel of
refrigerator as shown.
7. Coil excess water supply line (about 2Y2turns) behind refrigerator as shown
and arrange coils so they do not vibrate or wear against any other surface.
8. Turn ON water supply at shutoff valve and tighten any connections that
leak.
9. Reconnect refrigerator to electrical power source.
10. To turn ice maker on, lower wire signal arm (see ice maker front cover for ON/
OFF position of arm).
Page 6

Cabinet Hole
i!ii i!iill.u,.
ToolsNecessary:
DOOR REMOVAL AND REVERSAL INSTRUCTIONS:
1. Remove toe grille and top hinge cover.
2. Remove top hinge with 3/8" hex driver and lift freezer door off of
center hinge pin. Set door aside.
3. Unscrew center hinge pin using adjustable wrench and save for
reassembly. Ensure plastic washer stays on hinge pin.
4. Lift refrigerator door off of bottom hinge and set aside.
5. Remove center hinge and shim by removing inside screw and
loosening two outside screws enough to allow hinge and shim to
slide out. Tighten screws.
6. Loosen two outside screws on opposite side of refrigerator, remove
inside screw and install center hinge.
7. Remove two screws on bottom hinge with 3/8" socket wrench.
8. Install bottom hinge on opposite side with the two screws removed
from step 7.
9. Unscrew bottom hinge pin using adjustable wrench. Move hinge pin
to other hole in hinge and tighten with adjustable wrench.
10. Reverse door handles (see instructions on next page).
11. Move freezer and refrigerator door stops to opposite side.
12. Position refrigerator door onto lower hinge pin and screw center hinge
pin through center hinge into top of door. Close refrigerator door to
help align hinge hole.
13. Tighten center hinge pin with adjustable wrench.
14. Remove cabinet and hinge hole plugs and move to opposite side.
15. Lower freezer door onto center hinge pin.
16. Close freezer door. Have an assistant lift up on opposite side of door
while tightening screws to install top hinge.
17. Replace toe gritle and top hinge cover.
18. Plug in electrical power cord and turn refrigerator temperature control
to center position. Adjust setting as necessary.
6
Page 7

TO REMOVE FREEZER HANDLE:
(Handles may be easier to reverse while doors are off.)
1. Remove two screws attaching handle to bottom of freezer door.
2. Swing bottom of handle away from the door and slide handle straight up
and off of dovetail button.
.
Remove screw and dovetail button and install on other side, using the same
holes as nameplate.
4.
Magnetic Nameplate Models: Use putty knifeto gently pry magnetic nameplate
frame from door. Remove nameplate from its frame, turn frame upside down
and install in old handle holes. Insert magnetic nameplate into frame.
Self-Adhesive Nameplate Models: Use putty knife to gently peel off name
plate from door and reapply over old handle holes.
TO ATTACH FREEZER HANDLE:
1. Start with handle offset away from door. Place top of handle over dovetail
button, swing handle into an upright position and pull downward, locking it
into place.
2. Secure bottom of handle with two screws removed earlier.
TRIM REMOVAL (FULL-LENGTH TRIM MODELS ONLY)
In some models, the refrigerator door has a full length trim piece which continues from the bottom of the handle to the
bottom of the door. The top of the trim fits around the base of the handle. An adhesive "trim lock" is positioned about
halfway down. The bottom of the trim is held in place by either an adhesive trim lock, or a trim lock with two prongs inserted
into a hole on the face of the door.
TO REMOVE TRIM:
1. Remove trim by gently pulling trim lock areas out and away from door.
2. When trim isfree from door, slide the trim straight down and away from base of handle.
TO REMOVE REFRIGERATOR HANDLE:
(Handles may be easier to reverse while doors are off.)
1. Remove two screws attaching handle to top of refrigerator door.
2. Swing top of handle away from door and slide handle down and off of
dovetail button.
3. Remove screw and dovetail button and install on other side, moving
hole plugs from corresponding holes to opposite side.
TO ATTACH REFRIGERATOR HANDLE:
1. Start with handle offset away from door. Place bottom of handle over
dovetail button, swing handle into an upright position and pull upward,
locking it into place.
2. Secure top of handle with screws.
TO ATTACH TRIM:
1. Slide both trim locks out of trim.
2. Insert new adhesive trim locks contained in your literature pack.
3. Install trim to handle by sliding under base of handle. Carefully align
trim and press down at trim lock locations.
4. Use rubbing alcohol to remove any adhesive residue from old trim
lock locations.
Page 8

Freezer Light
Ice Bucket
Freezer
Control
Refrigerator
Control
Deli Drawer
Covel
Deli Drawl),
Half Shelf
Wine Rack
Full Shelf
Crisper
Drawers
Fixed Door Bin
Rack
Dairy Door
Tall Bottle
Retainer
Snugger
Door Bin
Fixed Door Bin
Door Rack
J
_ToeGrille
Features may vary according to model
8
Page 9

COOL DOWN PERIOD
To ensure safe food storage, allow the refrigerator to operate with the doors closed for at least 8 to 12 hours before loading
it with food.
REFRIGERATOR & FREEZER CONTROLS
TEMPERATURE ADJUSTMENT
Recommended
settin8
Cold
• Adjust temperature gradually: move the knob in small
increments, allowing the temperature to stabilize.
• For colder temperatures, turnthe knobtowards Colder.
• For warmer temperatures, turn the knob towards Cold.
Turning the refrigerator control will change temperatures in both
compartments. For example, ifthe refrigerator control isturned
to acolder setting, the freezer control may have to be adjusted
to a warmer setting. Turning the freezer control will change
only the freezer temperature.
To maintain temperatures, a fan circulates air inthe refrigerator
and freezer compartments. For good circulation, do not block
cold air vents with food items.
Refrigerator Control (some models)
Freezer
0
Refrigerator & Freezer Control (some models)
TEMPERATURE ADJUSTMENT GUIDE
If RefrigeratorcompartmentIs Too Warm TurnRefrigeratorControl SlightlyTowardsColder.
If RefrigeratorcompartmentIs Too Cold TurnRefrigeratorControl SlightlyTowardsCold.
If Freezer compartment Is Too Warm Turn Freezer Control Slightly Towards Colder.
If Freezer compartment Is Too Cold Turn Freezer Control Slightly Towards Cold.
* To Turn Refrigerator Off Turn Refrigerator Control To 0.
Page 10

SHELFADJUSTMENT
Refrigerator shelves are easily adjusted to suit individual
needs. Before adjusting the shelves, remove all food.
TO adjust sliding shelves:
Remove shelf by pulling forward to stop position.
Lift front edge up and pull out.
Replace the shelf on any pair of rails by reversing this
procedure.
Sliding Wire Shelf
SpillFree TM glass shelves (some models) catch and hold
accidental spills. In some models, the SpillFree TM shelves
slide out for easy access to food and for fast cleaning. The
shelves slide out independently of the cantilever brackets.
Just pull the front of the shelf forward. The shelf can be
extended as far as the stopper will allow but it isnot removable
from the cantilever bracket.
Cantilever Fixed Glass Shelf
DOOR STORAGE
Door bins, shelves, and racks are provided for convenient
storage of jars, bottles, and cans. Frequently used items
can be quickly selected.
Some models have door racks or bins that can accommodate
gallon-sized plastic drink containers and economy-sized jars
and containers. Some racks are adjustable for maximum
storage capacity.
The dairy compartment, which is warmer than the general
food storage section, is intended for short term storage of
cheese, spreads, or butter.
Sliding Glass Shelf
To adjust cantilever shelves:
O Lift front edge up.
O Pull shelf out.
Replace the shelf by inserting the hooks at rear of the shelf
into the wall bracket. Lower the shelf into the desired slots
and lock into position.
Door Rack
10
Page 11

ADJUSTABLE DOOR BINS
Some models have adjustable door bins that can be moved
to suit individual needs.
Tomove door bins
1. Lift bin straight up.
2. Remove bin.
3. Place bin in desired position.
4. Lower bin onto supports until locked in place.
CRISPERS (SOME MODELS)
The crispers, located under the bottom refrigerator shelf,
are designed for storing fruits, vegetables, and other fresh
produce. Wash items in clear water and remove excess water
before placing them in the crispers. Items with strong odors
or high moisture content should be wrapped before storing.
Crisper Drawer
Adjustable Door Bin
DELl DRAWER (SOME MODELS)
Some models are equipped with a Deft Drawer for storage of
luncheon meats, spreads, cheeses, and other dell items.
Dell Drawer
HUMIDITY CONTROL (SOME MODELS)
The Humidity Control, present on some models with crisper
drawers, allowsyoutoadjustthe humidity withinthe crisper.
This can extend the life of fresh vegetables that keep best
in high humidit
Low
Humidity_
11
Crisper Humidity Control
Page 12

If your refrigerator has an automatic ice maker, it will provide a sufficient
supply of ice for normal use. During the initial startup of your refrigerator,
however, no ice will beproduced during the first24 hours ofoperation. Automatic
ice makers are also optional accessories that may be installed in most models
at any time. Call your local dealer for information.
TURNING YOUR ICE MAKER ON
After the plumbing connections have been completed, the water supply valve
must be opened. Place the ice container under the ice maker, pushing itas far
back as possible. Lower the wire signal arm to its "down" or ON position. New
plumbing connections may cause the first production of ice cubes to be
discolored or have an odd flavor. These first cubes should be discarded until
the cubes produced are free of discoloration and taste.
TURNING YOUR ICE MAKER OFF
To stop the ice maker, lift the wire signal arm until it clicks and locks in the
"up" or OFF position. The ice maker also turns off automatically when the ice
container is full. Ifyour model has an adjustable freezer shelf, place the shelf
in the lower position, so that the wire signal arm will hit the ice when the
container is full.
Ice Maker
ICE MAKER TIPS
• Ice cubes stored too long may develop an odd flavor. Empty the ice container and ensure that the wire signal arm is
in its "down" or ON position. The ice maker will then produce more ice.
• Occasionally shake the ice container to keep ice separated.
• Keep the wire signal arm in its "up" or OFF position until the refrigerator is connected to the water supply or whenever
the water supply is turned off.
• The following sounds are normal when the ice maker is operating:
• Motor running
• Ice loosening from tray
• Ice dropping into ice container
• Running water
• Water valve opening or closing
• Wash the ice container in warm water with mild detergent. Rinse well and dry.
• Stop the ice maker when cleaning the freezer and during vacations.
• If the ice maker will be turned off for a long period of time, turn the water supply valve to the closed position.
12
Page 13

FOOD STORAGE IDEAS
Fresh Food Storage
• The fresh food compartment should be kept between 34° F and 40° F with an optimum temperature of 37° F.
• Avoid overcrowding the refrigerator shelves. This reduces the circulation of air around the food and results in uneven
cooling.
Fruits and Vegetables
• Storage in the crisper drawers traps moisture to help preserve the fruit and vegetable quality for longer time periods.
Meat
• Raw meat and poultry should be wrapped securely so leakage and contamination of other foods or surfaces does not
occur.
Frozen Food Storage
• The freezer compartment should be kept at 0° F or lower.
• A freezer operates most efficiently when it is at least 2/3 full.
Packaging Foods for Freezing
• To minimize dehydration and quality deterioration, use aluminum foil, freezer wrap, freezer bags or airtight containers.
Force as much air out of the packages as possible and seal them tightly. Trapped air can cause food to dry out,
change color, and develop an off-flavor (freezer burn).
• Wrap fresh meats and poultry with suitable freezer wrap prior to freezing.
• Do not refreeze meat that has completely thawed.
Loading the Freezer
• Avoid adding too much warm food to the freezer at one time. This overloads the freezer, slows the rate of freezing,
and can raise the temperature of frozen foods.
• Leave a space between the packages, so cold air can circulate freely, allowing food to freeze as quickly as possible.
• Avoid storing hard-to-freeze foods such as ice cream and orange juice on the freezer door shelves. These foods are
best stored in the freezer interior where the temperature varies less.
ENERGY SAVING IDEAS
• Locate the refrigerator inthe coolest part of the room, out of direct sunlight,
and away from heating ducts or registers. Do not place the refrigerator
MI
next to heat-producing appliances such as a range, oven, or dishwasher.
If this is not possible, a section of cabinetry or an added layer of insulation
between the two appliances will help the refrigerator operate more
efficiently.
• Level the refrigerator so that the doors close tightly.
• Refer to this Use & Care Manual for the suggested temperature control
settings.
• Periodic cleaning of the condenser will help the refrigerator run more
efficiently. See the Care and Cleaning Charton page 15.
• Do not overcrowd the refrigerator or block cold air vents. Doing so causes
the refrigerator to run longer and use more energy.
• Cover foods and wipe containers dry before placing them inthe
refrigerator. This cuts down on moisture build-up inside the unit.
• Organize the refrigerator to reduce door openings. Remove as many
items as needed at one time and close the door as soon as possible.
13
Page 14

UNDERSTANDING THE SOUNDS YOU MAY HEAR
Your new high-efficiency refrigerator may make unfamiliar
sounds. These are all normal sounds and soon will become
familiar toyou. They also indicate your refrigerator is operating
as designed. Hard surfaces, such as vinyl or wood floors,
walls, and kitchen cabinets may make sounds more
noticeable. Listed below are descriptions of some of the most
common sounds you may hear, and what is causing them.
A. Evaporator
The flow of refrigerant through the evaporator may
create a boiling or gurgling sound.
B. Evaporator Fan
You may hear air being forced through the refrigerator
by the evaporator fan.
C. Defrost Heater
During defrost cycles, water dripping onto the defrost
heater may cause a hissing or sizzling sound. After
defrosting, a popping sound may occur.
D. Automatic Ice Maker
If your refrigerator isequipped with an automatic ice
maker, you wilt hear ice cubes falling into the ice bin.
E. Cold Control & Defrost Timer or Automatic
Defrost Control
These parts can produce a snapping or clicking sound
when turning the refrigerator on and off. The timer also
produces sounds similar to an electric clock.
F. Condenser Fan
If condenser coils are located underneath your
refrigerator as shown in the drawing at the left, you
have a condenser fan. You may hear air being forced
through the condenser by the condenser fan.
G. Compressor
Modern, high-efficiency compressors operate much
faster than older models. The compressor may have a
high-pitched hum or pulsating sound.
H. Water Valve
If your refrigerator is equipped with an automatic ice
maker, you will hear a buzzing sound as the water valve
opens to fill the ice maker during each cycle.
L Drain Pan (Nonremovable)
You may hear water running into the drain pan during
the defrost cycle. The drain pan will be located on top
of the compressor for air-cooled condensers (black coils
on back of refrigerator).
J. Condenser Coils (Fan-cooled models only)
14
Page 15

Keepyourrefrigeratorandfreezercleantopreventodorbuild-up.Wipeupanyspillsimmediatelyandcleanbothsectionsat
leasttwicea year.Neverusemetallicscouringpads,brushes,abrasivecleanersorstrongalkalinesolutionsonany
surface.Do not wash any removable parts in a dishwasher. Always unplug the electrical power cord from the wall
outlet before cleaning.
Care & Cleaning Chart
Part
Interior/Door
Liner
Door Gaskets
Drawers/Bins
Glass Shelves
Toe Grille
Exterior and
Handles
Exterior and
Handles
(Stainless Steel
Models Only)
Condenser
Coils
(Fan-cooled
models only)
Condenser
Coils
(Air-cooled
models only)
Defrost Water Soap and water Some models have defrost water pan located on top ofcompressor at bottom
Pan cloth. NOTE: The defrost water pan is NOT removable.
What To Use
Soap and water
Baking soda and water
Soap and water
Soap and water
Soap and water
Glass cleaner
Mild liquid sprays
Soap and water
Mild liquid sprays
Vacuum attachment
Soap and water
Soap and water
Ammonia
Stainless Steel Cleaners
Condenser Cleaning
Brush isavailable from
your dealer.
Vacuum Cleaner
Vacuum Cleaner
Tips and Precautions
Use 2 tablespoons of baking soda in 1 quart of warm water. Be sure to wring
excess water out of sponge or cloth before cleaning around controls,
light bulb or any electrical part.
Wipe gaskets with a clean soft cloth
Do not wash any removable items (bins, drawers, etc.) in dishwasher.
Allow glass to warm to room temperature before immersing in warm water.
Vacuum dust from front of toe grille Remove toe grille (See illustration on
page 4). Vacuum backside and wipe with sudsy cloth or sponge. Rinse and
dry.
Do not use commercial household cleaners, ammonia, or alcohol to clean
handles.
Clean stainless steel front and handles with non-abrasive soapy water and a
dishcloth. Rinse with clean water and a soft cloth. Wipe stubborn spots with an
ammonia-soaked paper towel, and rinse. Use a non-abrasive stainless steel
cleaner. These cleaners can be purchased at most home improvement or
major department stores. Always follow manufacturer's instructions.
NOTE: Always clean, wipe and dry with the grain to prevent cross-grain
scratching. Wash the rest of the cabinet with warm water and mild liquid
detergent. Rinse well, and wipe dry with a clean soft cloth.
No need to clean unless operating refrigerator under particularly dusty or
greasy conditions, or if there is significant pet traffic in your home. If cleaning
is necessary, remove toe grille and use extended vacuum attachment and
condenser cleaning brush to remove dust build-up from condenser coils (see
item "J" in illustration on page 17 for location).
Use the dusting tool attachment on your vacuum to remove dust build-up on
the condenser coils (black tubes and wires) attached to the back of air-cooled
refrigerators only.
rear of refrigerator (see illustrationon next page). Wipe water pan with damp
15
Page 16

NEVER CLEAN CONDENSER (SOME MODELS)
Ifyour refrigeratorisequipped with a Never Clean condenser,
there'snoneedtocleanthecondenserundernormaloperating
conditions. If the refrigerator is operated under particularly
dusty or greasy conditions,or ifthere is significant pet traffic
in your home, it may be necessary to periodically clean the
condenser for maximum efficiency.
REPLACING THE FREEZER LIGHT BULB
(SOMEMODELS)
1. Unplugrefrigerator.
2. Wear gloves as protectionagainst possible broken
glass.
3. Unsnap light shield as shown.
4. Unscrew and replace old bulb with an appliance bulb
of the same wattage.
5. Replace light shield.
6. Remember to plug the refrigerator back in.
Defrost Water Pan (some models)
Vacation and Moving Tips
Short
Vacations
Long • Turn off automatic ice maker and turn water supply valve to closed position.
Vacations • Clean interior thoroughly.
Moving
• Leave refrigerator operating during vacations of 3 weeks or less.
• Use all perishable items from refrigerator compartment.
• Turn automatic ice maker off, even if you will only be gone for a few days.
• Remove all food and ice if you will be gone one month or more.
• Turn controls to "0" (the OFF position) and disconnect power.
• Leave both doors open to prevent odors and mold build-up. Block doors open if
necessary.
• Remove all food and ice.
• If using handcart, load from side.
• Adjust rollers all the way up to protect them during sliding or moving.
• Pad cabinet to avoid scratching surface.
16
Page 17

GIBSON REFRIGERATOR PLATINUMADVANTAGE WARRANTY
Your Gibson product is 3rotected by this warranty (U n]ted States)
WARRANTY THROUGH OUR AUTHORIZED SERVICERS, THE CONSUMER WiLL BE RESPONSIBLE FOR:
PERIOD WE WILL:
FULL TWO-YEAR Twoyears from Pay all costs for repairing or replacing any pars of this COSts of service calls that are listed under NORMAL
WARRANTY edginal purch_e date appliance which prove to be defective in materials or RESPONSIBILITIES OF THE CONSUMER. *
LIMITED 3"%5TM Third through fifth Repairor replace any parts inthe Sealed Travelcostsof thetechnician, diagnostic costsand anyremoval.
YEARWARRANTY yearsfromedginal RefrigerationSystem(compressor.condenser, transportationand reinstallat_oncostswhichare required
(Sealed System) purchasedate evaporator,drierand tubing)whichproveto be becauseofsel_dce.Costsforlabor,partsand transportation
LIMITED 6_-10 TM Sixth through tenth Providea replacement foranycompressorwhich Diagnostic COstsand anyremoval,transportationand
YEARWARRANTY yearsfromo_ginal provestobe defectiveinmatehalsor workmanship, reinstalledoncostswhichare required becauseofservice.Costs
(Compressor only) purchasedate for labor,partsandtransportation otherthanthe costofthe
LIMITED Time pe_ods _isted All ofthe provisionsofthefulland limitedwarranties COStsof theteednician'straveltothe homeand anycostsfor
WARRANTY above, aboveandt_leexclusionslistedbelowapply, pick upand delivery of theappliance required becauseof
(Applicable tothe service.
StateofAlaska)
Your appliance is warranted by Electmlux Home Products Jnc. We authorize no person to change or add to any of our obligations under this
warranty. Our obligations for service and parts under this warranty must be performed by us or an authorized Electrolux Home Products Jnc. servicer.
workmanship. Excludes odginPJ and replacement Ice
& Water filter cartridges (it equipped). Originaland
replacement cartridgesare warranted for S0 days
(padsonly).
defectiveinmaterialsor workmanship, otherthanwith respect to thesealed Refrigeration System.
redlacement compressoritself.
*NORMAL
RESPONSIBILITIES
OF THE CONSUMER
This warranty applies only to products in ordinary household use, and the consumer is responsible for the
items listed below:
1. Proper use of the appliance in accordance with instructions provided with the product.
2. Proper installation by an authorized servicer in accordance with instructions provided with the appliance and in
accordance with all local plumbing, electrical and/or gas codes.
3. Proper connection to a grounded power supply of sufficient voltage, replacement of blown fuses, repair of loose
connections or defects in house wiring.
4. Expenses for making the appliance accessible for servicing, such as removal of trim, cupboards, shelves,etc.,
which are not a part of the appliance when it was shipped from the factory.
8. Damages to finish after installation.
6. Replacement of light bulbs and/or fluorescent tubes (on models with these features).
EXCLUSIONS
This warranty does not cover the following:
1. CONSEQUENTIAL OR INCIDENTAL DAMAGES SUCH AS PROPERTY DAMAGE AND INCIDENTAL
EXPENSES RESULTING FROM ANY BREACH OF THIS WRITTEN OR ANY IMPLIED WARRANTY.
NOTE: Some states do not allow the exclusion or limitation of incidental or consequential damages, so this
limitation or exclusion may not apply to you.
2. Service calls which do not involve malfunction or defects in workmanship or material, or for appliances not in
ordinary household use. The consumer shall pay for such service calls.
3. Damages caused by services performed by servicers other than Electrolux Home Products, Inc. or its authorized
servicers; use of parts other than genuine Electrolux Home Products, Inc. parts; obtained from persons other
than such servicers; or external causes such as abuse, misuse, inadequate power supply or acts of God.
4. Products with original serial numbers that have been removed or altered and cannot be readily determined.
IF YOU NEED
SERVICE
Keep your bill of sale, delivery slip, or some other appropriate payment record. The date on the bill establishes the
warranty period should service be required. If service is performed, it is in your best interest to obtain and keep BH
receipts. This written warranty gives you specific legal rights. You may also have other rights that vary from state to
state. Service under this warranty must be obtained by contacting Electrolux Home Products, Inc.:
This warranty only applies in the 80 states of the U.S.A., and Puerto Rico. Product features or specifications as described or illustrated are subject
to change without notice. All warranties are made by Electrolux Home, Inc.
01-G-RE-02 (Rev. 01/2002)
USA
800o944o9044
Electrolux Home Products, Inc.
P.O. Box 212378
Augusta, GA 30917
17
Page 18

REFRIGERATOR WARRANTY (CANADA)
Your refrigerator is protected by this warranty
WARRANTY THROUGHOURAUTHORIZEDSERVICERS, THECONSUMERWILLBE RESPONSIBLEFOR:
PERIOD WEWILL:
FULLONE=YEAR Oneyearfromedginal Payallcostsfor repairingorreplacingany partsofthis Costs of service calls that are listed under NORMAL
WARRANTY purchasedate appliancewhich proveto be defectivein materialsor RESPONSIBILITIESOF THECONSUMER.*
LIMITED2"%5TM Secondthroughfdth Repairor replaceanypartsinthecabinetlineror Costsfor pickup anddetiveryoftheappliancerequiredbecause
YEARWARRANTY yearsfromoriginal SealedRefr_geredonSystem(compressor,condenser, of service.Costsfor_aedr,partsandtransportationotherthan
(Cabinet Linerand purchasedate evaporator,drierand tubing)whichproveto be with respectto thecabinet_leeror SealedRefrigerationSystem.
SealedSystem) defectiveinmaterialsorworkmanship.
Your appliance is warranted by Electrolux Home Products, inc., a division of Electrolux Canada Inc. We authorize no person to change or add to any
of our obligations under this warranty. Our obligations for service and parts under this warranty must be performed by us or an authorized Electrolux
Home Products, Inc. servicer.
workmanship.Excludesodginaland replacement_ce
& Water fitter cartridges(if equipped). OriginaJand
replacement cartridgesare warranted for 30 days
(partsonly).
*NORMAL
RESPONSIBILITIES
OF THE CONSUMER
EXCLUSIONS
IF YOU NEED
SERVICE
Your appliance is warranted by Electrolux Home Products, Inc., a division of Electrolux Canada Inc. Product features or specifications as described
or illustrated are subject to change without notice.
This warranty applies only to products in ordinary household use, and the consumer is responsible for the
items listed below:
1. Proper use of the appliance in accordance with instructions provided with the product.
2. Proper installation by an authorized servicer in accordance with instructions provided with the appliance and in
accordance with all local plumbing, electdcal aed/or gas codes.
3. Proper connection to a grounded power supply of sufficient voltage, replacement of blown fuses, repair of loose
connections or defects in house wiring.
4. Expenses for making the appliance accessible for servicing, such as removal of trim, cupboards, shelves,etc.,
which are not a part of the appliance when it was shipped from the factory.
5. Damages to finish after installation.
6. Replacement of light bulbs and/or fluorescent tubes (on models with these features).
This warranty does not cover the following:
1. CONSEQUENTIAL OR INCIDENTAL DAMAGES SUCH AS PROPERTY DAMAGE AND iNCiDENTAL
EXPENSES RESULTING FROM ANY BREACH OF THIS WRITTEN OR ANY IMPLIED WARRANTY.
NOTE: Some states do not allow the exclusion or limitation of incidental or consequential damages, so this
limitation or exclusion may net apply to you.
2. Service calls which do not involve malfunction or defects in workmanship or material, or for appliances not in
ordinary household use. The consumer shall pay for such service calls.
3. Damages caused by services performed by servicers other than Electrolux Home Products, Inc. or its authorized
servicers; use of parts other than genuine Electrolux Home Products, Inc. parts; obtained from persons other
than such servicers; or external causes such as abuse, misuse, inadequate power supply or acts of God.
4. Products with odginal serial numbers that have been removed or altered and cannot be readily determined.
Keep your bill of sale, delivery slip, or some other appropdate payment record. The date on the bill establishes the
warranty period should service be required. If service is performed, it is in your best interest to obtain and keep all
Canada
866,213,,9397
Electrolux Home Products, Inc.
6150 McLaaghlin Road
Mississauga, Ontario
L5R 4C2
18
Page 19

ATTENTION
To Properly Install Your Refrigerator
See "Installation" Section On Pages 4-5
OR
To Reverse The Doors
See "'Door Removal & Reversal" Section On Pages 6-7
Common Before calling for service, review this list. It may save you time and
Occurrences defective workmanship or materials in this appliance.
Refrigerator does not run. breaker.
Freezer temperature too cold. • Set freezer control to a warmer setting until freezer temperature is
Refrigerator temperature is satisfactory. Allow 24 hours for the temperature to stabilize.
satisfactory.
Refrigerator temperaturetoo cold. • Set refrigerator control to a warmer setting. Allow 24 hours for
Freezer temperature is temperature to stabilize. Then check freezer temperatures and adjust
satisfactory, as needed.
• Refrigerator is noisy or vibrates.
Odors in refrigerator.
Cabinet light not working.
expense. This list includes common occurrences that are not the result of
• Ensure plug is tightly pushed into electrical outlet.
• Check/replace fuse with a 15 amp time-delay fuse. Reset circuit
• The temperature control is turned to "O".
• Refrigerator may be in defrost cycle. Wait 20 minutes and check again.
• The cabinet is not level.
• Floor is weak.
• Interior needs to be cleaned.
• Foods that produce odors should be covered or wrapped.
• Replace light bulb.
• Ensure plug is tightly pushed into electrical outlet.
• Light switch may be stuck. Push in light switch, located on the
refrigerator control box, to release.
• Ensure the Wire Signal Arm is not in UP position.
Automatic ice maker not working.
(some models)
•See Normal Operating Sounds and Sights section on page 14.
• Ice maker should produce 4 to 5 pounds of ice in a 24 hour period.
• Water supply isturned off.
• Water pressure is too low.
• The freezer is not cold enough.
19
 Loading...