

Giblartar Industries Company Air Vent NPSP8WW Installation Instructions Manual
Part No. 18365
Installation Instructions
Use this unit only in the manner intended by the manufacturer.
If you have any questions, contact the manufacturer.
Utilice esta unidad solamente de la manera indicada por el
fabricante. Si tiene alguna duda, contacte al fabricante.
Roof-Mounted Solar Attic Ventilator
Ventilador de ático a energía solar, de montaje en techo
Model NPSP8WW
Modelo NPSP8WW
Important Safety Information
Información importante de seguridad
IMPORTANT: Read all warning messages and instructions
before starting installation of this fan. Failure to follow these
safety instructions can result in injury or even death. If you need
assistance in understanding these instructions or have questions
or comments, please call 309-692-6969.
ELECTRICAL HAZARD
DANGER: Watch out for existing electrical wiring and other utility
wires or pipes when selecting a location for the fan. Do not install
the fan where there is electrical wiring in the way. Select another
location or have a qualified electrician move the wiring to a
different location.
LACERATION HAZARDS
DANGER: This fan has an unguarded fan blade. Do not use in
locations which are readily accessible to people or animals. Do
not let children play in an attic where this fan has been installed.
Contact with this fan while in operation can result in injury or even
death.
DANGER: Keep the solar panel covered by its protective
packing until the fan is mounted or at anytime the motor or fan
blade are being serviced. This fan is controlled by a solar panel
– it may start at any time the solar panel is exposed to sunlight.
Contact with the fan blades while the fan is operating can result
in serious injury.
WARNING: This product has sharp metal edges that can cut
your hands. Wear canvas work gloves while handling the fan
during installation.
CARBON MONOXIDE HAZARDS
DANGER: Carbon monoxide is a colorless, odorless gas that
can kill. Carbon monoxide may be drawn into the house by the
operation of this fan if your fuel-burning equipment is not properly
maintained and vented or if you lack adequate attic venting.
You should check the flue of your hot water heater and furnace to
see that the pipes are intact and sealed. Request an inspection
from your fuel supplier (gas company or heating oil company) or
from a municipal building inspector if you have any questions
about the safety of your fuel-burning equipment.
OTHER HAZARDS
DANGER: For general ventilating use only. Do not use to
exhaust hazardous or explosive materials or vapors. Use of this
fan to exhaust hazardous, explosive or flammable materials may
result in a fire or explosion, causing injury or death.
You must also check the number and size of your intake vents. A
total of at least 2.7 square feet of unobstructed intake venting in
the soffit or under-eaves must be available for safe operation of
this ventilator. If you have less than the amount specified above,
STOP and install additional vents before proceeding.
IMPORTANTE: Antes de comenzar a instalar este ventilador, lea todos los
mensajes de advertencia y las instrucciones. El no seguir estas
instrucciones de seguridad puede causar lesiones o incluso la muerte. Si
necesita asistencia para comprender estas instrucciones o desea hacer
preguntas o comentarios, llame al 309-692-6969.
RIESGO ELÉCTRICO
PELIGRO: Cuando elija un lugar para el ventilador, preste atención a la
existencia de cableado eléctrico y otros cables o tubos de servicio. No
instale el ventilador donde exista cableado eléctrico. Seleccione otro lugar
o solicite a un electricista especializado que traslade el cableado a otra
ubicación.
RIESGO DE LACERACIONES
PELIGRO: Este ventilador tiene aspas no protegidas. No lo utilice en
lugares fácilmente accesibles a personas o animales. No permita que los
niños jueguen en un ático donde se haya instalado este ventilador. El
contacto con este producto en funcionamiento puede ocasionar lesiones o
incluso la muerte.
PELIGRO: Mantenga el panel solar cubierto con su envase protector hasta
que se instale el ventilador o cada vez que el motor o el aspa del ventilador
reciban servicio. Este ventilador es controlado por un panel solar, por lo
que puede ponerse en funcionamiento toda vez que el panel solar esté
expuesto a la luz solar. El contacto con las aspas del ventilador mientras
este está en funcionamiento puede ocasionar graves lesiones.
ADVERTENCIA: Este producto tiene bordes metálicos filosos que pueden
cortarle las manos. Mientras manipula el ventilador durante la instalación,
utilice guantes de trabajo de lona.
RIESGO DE MONÓXIDO DE CARBONO
PELIGRO: El monóxido de carbono es un gas incoloro y sin olor que puede
provocar la muerte. El funcionamiento del ventilador puede llevar este gas
al interior de la casa si el equipo que consume combustible no se mantiene
y ventila correctamente, o si no se dispone de una ventilación adecuada en
el ático.
Es aconsejable verificar el cañón de la chimenea del calentador de agua y
el horno para garantizar que la tubería esté intacta y sellada. Si tiene
alguna pregunta sobre la seguridad del sistema de escape de sus equipos
que consumen combustible, solicite una inspección a su proveedor de
combustible (compañía de gas o de aceite combustible), o bien a un
inspector municipal de construcción.
OTROS RIESGOS
PELIGRO: Para ventilación general únicamente. No utilice el producto
para expeler materiales o vapores peligrosos o explosivos. El uso de este
ventilador para expeler materiales peligrosos, explosivos o inflamables
puede dar lugar a un incendio o una explosión y causar lesiones o la
muerte.
También debe verificar la cantidad y el tamaño de los respiraderos de
entrada. Para que este ventilador funcione en forma segura, se requiere un
total de al menos 2.7 pies cuadrados de entrada de ventilación sin
obstrucciones en el sofito o debajo del alero. Si usted no dispone del
espacio especificado, SUSPENDA la instalación del ventilador e instale
respiraderos adicionales antes de continuar.
Page 2 of 6
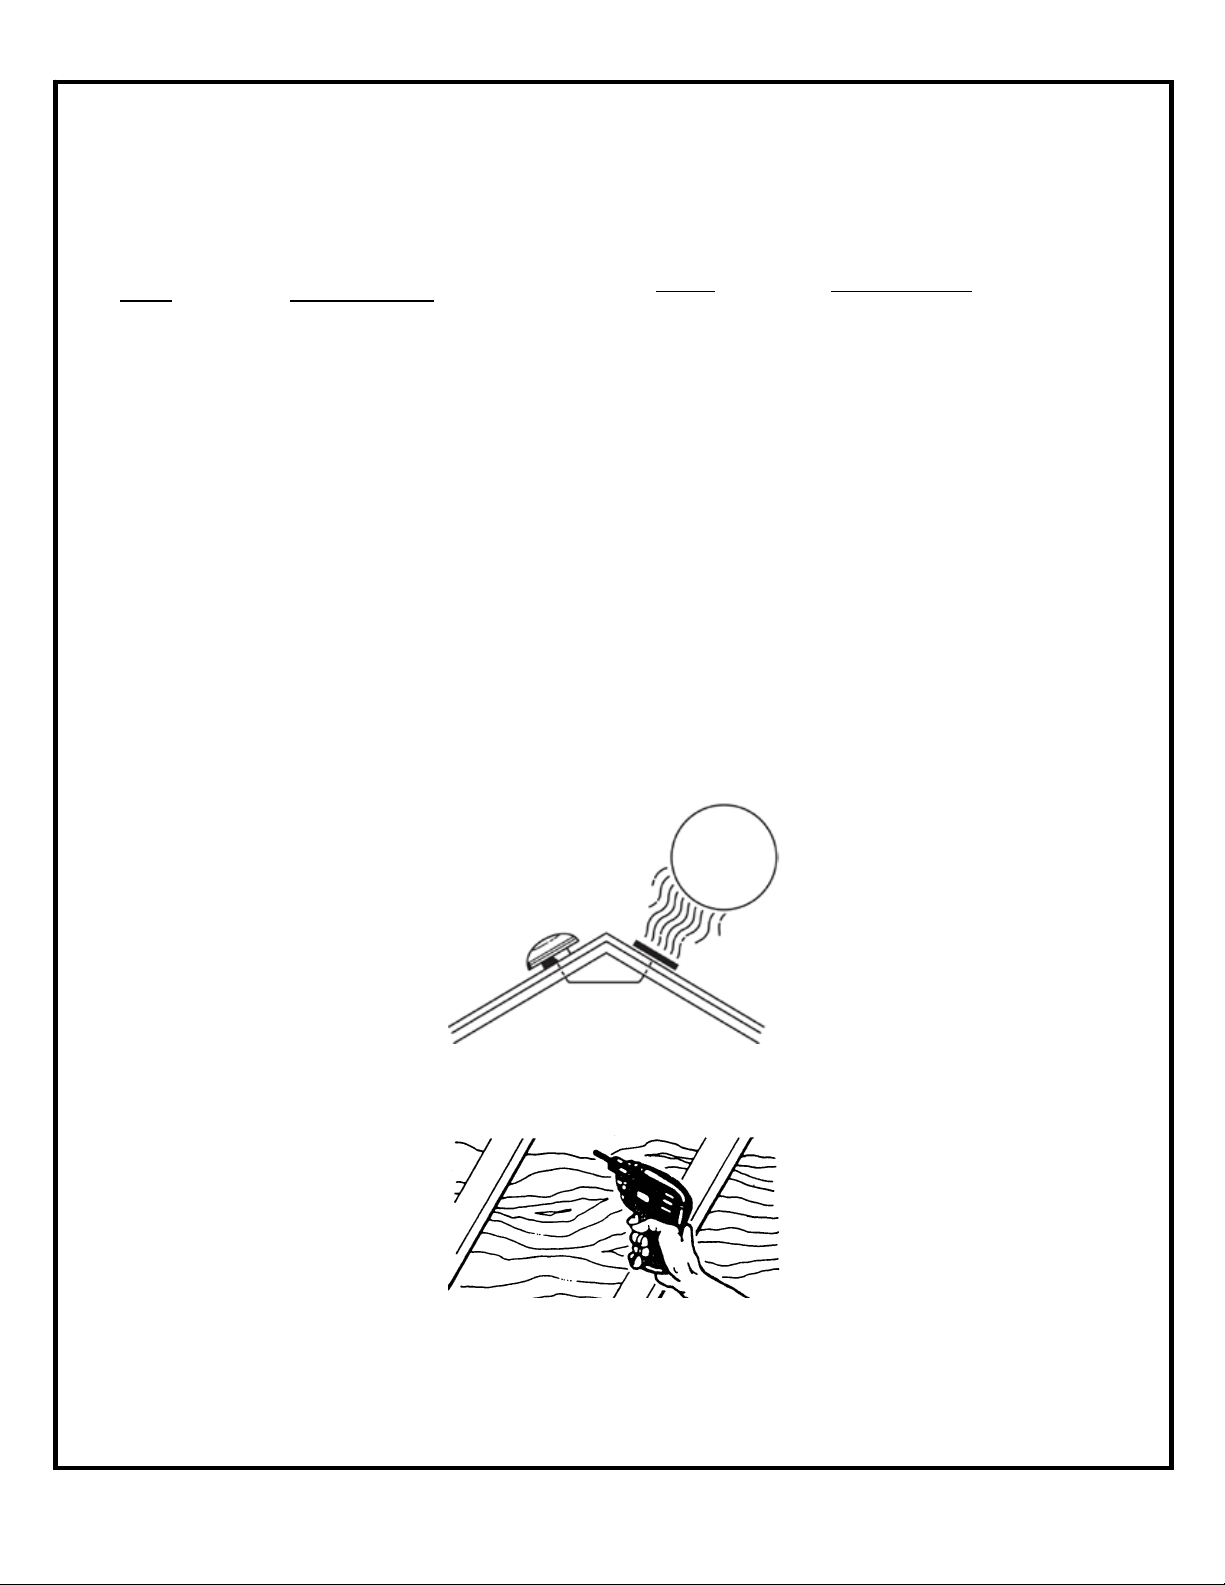
Illustration – 1 Ventilator Location
Ilustración
–
1 Ubicación del ventilador
Illustration – 2 Drilling Guide Hole
Ilustración – 2 Taladrado del orificio de
guía
ROOF-MOUNT SOLAR POWER VENTILATOR
INSTALLATION INSTRUCTIONS
NOTE: Air intake openings must be installed for proper
exhaust operation. Best results will be obtained if these
openings are located around the eaves. Rectangular soffit
vents or continuous soffit vents are suggested.
Sq. Ft. of Air Intake
Model
Opening Needed
NPSP8WW 2.7
TOOLS NEEDED:
x electric drill x phillips screw driver
x 1/2” drill bit x utility knife
x jig or sabre saw x 1/4” nut driver
x tape measure x caulk gun
x pencil or marker x work gloves
x hammer x safety glasses
MATERIALS NEEDED:
x roofing nails (ring shank recommended)
x caulk and/or roofing cement
WHAT COMES IN THE CARTON:
x roof-mount fan and motor assembly
x pre-wired solar panel
x four (4) solar panel mounting brackets
x eight (8) #8 x 1/2” sheet metal screws
x four (4) #10 x 1” hex head screws with rubber washer
1. SELECT VENTILATOR LOCATION
Select a location close to the ridgeline
on the backside of the house. The
ventilator should be installed near the
center of the roof for optimum airflow.
Refer to Illustration – 1. If installing
multiple fans, space them evenly across
the roof. From the roof, measure the
distance to the ridgeline and to one end
of the roof. Note these dimensions for
use in Step 2.
2. DETERMINE EXACT VENTILATOR
POSITION
Using the dimensions obtained on the
roof in Step 1, locate the same position
inside the attic. Select the closest
centered location between two rafters to
establish the center of the roof mount
powered attic ventilator. From the attic,
drill a guide hole through the roof at the
location centered between rafters.
Refer to Illustration – 2. Place an object
through the hole for quick identification
from the roof.
INSTRUCCIONES DE INSTALACIÓN DEL VENTILADOR A
ENERGÍA SOLAR DE MONTAJE EN EL TECHO
NOTA: Deben instalarse aberturas de toma de aire para el
correcto funcionamiento del ventilador. Los mejores resultados se
logran si estas aberturas se encuentran alrededor del alero. Se
sugieren respiraderos rectangulares o continuos en el sofito.
Pies cuadrados de abertura necesaria
Modelo
para toma de aire
NPSP8WW 2.7
HERRAMIENTAS NECESARIAS:
x taladro eléctrico x destornillador Phillips
x broca de taladro de 1/2 pulg. x cuchillo utilitario
x sierra de vaivén o caladora x llave para tuercas de 1/4 pulg.
x cinta métrica x pistola calafateadora
x lápiz o marcador x guantes de trabajo
x martillo x anteojos de protección
MATERIALES NECESARIOS:
x clavos para techo (se recomienda de cuerpo estriado)
x calafate o cemento para techar
CONTENIDO DE LA CAJA:
x ventilador de techo y conjunto del motor
x panel solar precableado
x cuatro (4) ménsulas de montaje para el panel solar
x ocho (8) tornillos para chapa n.° 8 x 1/2 pulg.
x cuatro (4) tornillos hexagonales n.°10 x 1 pulg. con arandela
de goma
1. SELECCIONE EL LUGAR DEL
VENTILADOR
Seleccione un lugar cerca de la cumbrera
en la parte de atrás de la casa. El
ventilador debe instalarse cerca del centro
del techo para lograr un flujo de aire
óptimo. Vea la ilustración – 1. Si va a
instalar varios ventiladores, distribúyalos
de manera uniforme a lo ancho del techo.
Desde el techo, mida la distancia hasta la
cumbrera y hasta un extremo del techo.
Anote estas dimensiones para usarlas en
el Paso 2.
2. DETERMINE LA POSICIÓN EXACTA
DEL VENTILADOR
Usando las dimensiones obtenidas en el
techo en el Paso 1, ubique la misma
posición dentro del ático. Seleccione el
lugar más cerca del centro entre dos vigas
para establecer el centro del ventilador de
ático a energía solar de montaje en el
techo. Desde el ático, taladre un orificio
de guía a través del techo en el lugar
centrado entre dos vigas. Vea la
ilustración – 2. Pase algún objeto por el
orificio para poder ubicarlo fácilmente
desde el techo.
 Loading...