

Page 1

TVB103C Thin Client
User Guide
Version 1.5
ShenZhen Giayee Technology Co., Ltd. (www.giayee.com
)
Updated at 2013-08-08
Copyright @ 2013 Giayee Technology Co., Ltd. All rights reserved.
Please do not copy, extract or publish any content of this document without the owner’s permission.
The copy rights of the third party logo mentioned in this document belong to their owners.
Page 2

Formatting
【X
X〈XX
Convention
X】—— M
X〉——
W
——
W
s:
enu or Butto
indow or Di
s
arning
n
play UI
Page 3

Page 3 of 19
Contents
1 INTRODUCTION.........................................................................................................................................................4
2 INTERFACES AND MOUNTING OPTIONS............................................................................................................4
3 SPECIFICATIONS............................................................................................................................... ........................4
4 CONNECTION DIAGRAM..........................................................................................................................................5
5 SYSTEM GUIDE..........................................................................................................................................................6
5.1 BOOT SCREEN......................................................................................................................错误!未定义书签。
5.2 NETWORK INITIALIZATION............................................................................................................................... ........6
5.3 AUTO CONNECTING................................................................................................................................................6
5.4 CONTROL CENTRE.................................................................................................................................................7
5.5 CONNECTION SETTINGS.........................................................................................................................................8
5.6 ADD DESKPOOL CONNECTION............................................................................................................................... 9
5.7 ADD MICROSOFT RDP CONNECTION.................................................................................................................10
5.8 ADD SPICE CONNECTION...................................................................................................................................12
5.9 DISPLAY PROPERTIES............................................................................................................................... ...........13
5.10 NETWORK SETTINGS............................................................................................................................................14
5.11 NETWORK DIAGNOSIS............................................................................................................................... ...........15
5.12 SYSTEM............................................................................................................................... .................................16
6 RESTORE FACTORY DEFAULT SETTINGS.......................................................................................................18
7 FAQ............................................................................................................................... ...............................................19
Page 4
Page 4 of 19
1 Introduction
J60 thin client is based-on ARM cortex A9 5-cores 1.6GHz CPU and 1GB DDR3
memory. In additional, it is powered by deeply-optimized linux OS. The main features include:
Up to 1080p resolution and 32bpp color depth.
Small and exquisite without fan.
Very low power consumption.
Support multiple enhanced protocols, such as RDP, RemoteFX and SPICE.
Delivering smoothly on-line video.
Easy firmware upgrade.
Support USB redirection.
2 Interfaces and mounting options
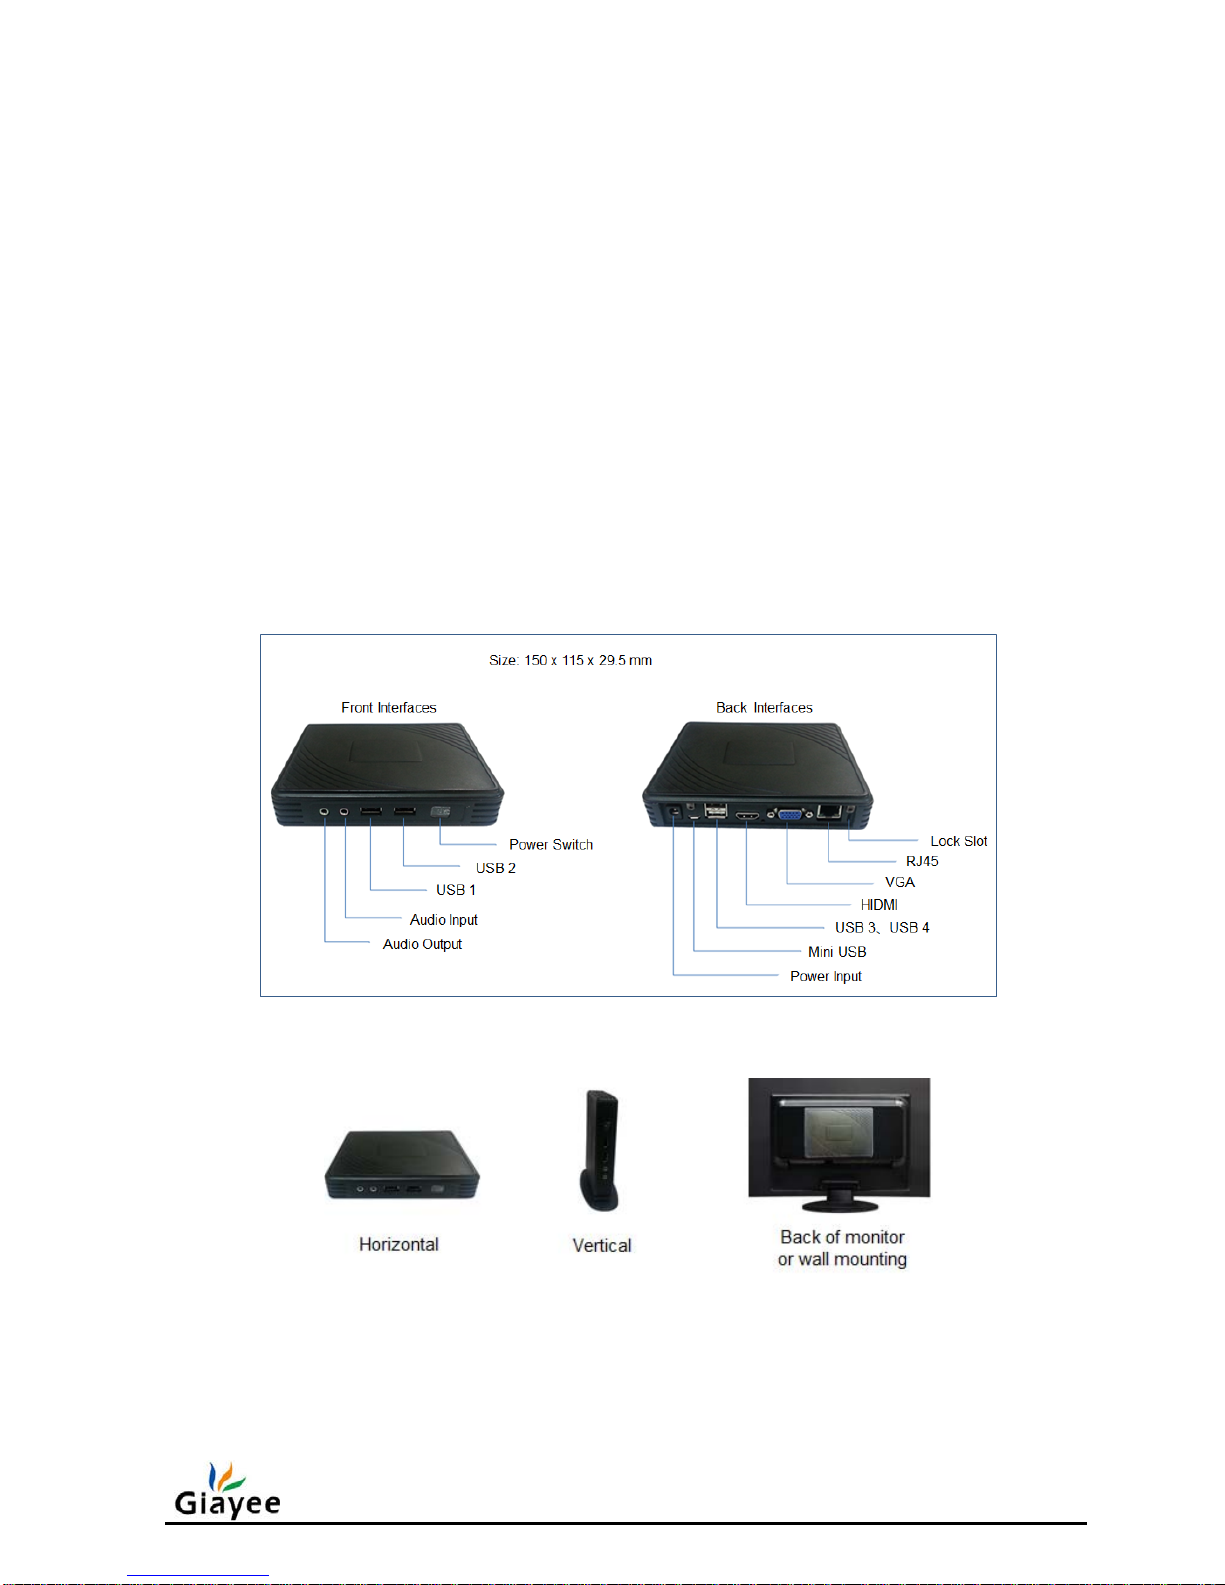
FIG.2-1 Interfaces
FIG.2-2 Mounting Options
3 Specifications
Page 5

Page 5 of 19
System Description
CPU ARM Cortex A9 1.6GHz, 4 Cores
Memory
DDR3:1GB
Flash
NAND Flash: 8GB
Network 10/100M based-T RJ45 ethernet port
WiFi (Optional) WIFI 802.11B/G/N (optional)
Audio Input MIC input, 3.5mm mini jack
Audio Output Audio output, 3.5mm mini jack
USB 4x USB ports
Mini USB 1x OTG port
VGA
Up to 1920 x 1080,60Hz, 32bpp color depth
HDMI
Up to 1920 x 1080,60Hz, 32bpp color depth
Power Input DC, 5V, 2000mA
Power Switch Light push power switch
Power Adapter
Input: AC, 100-240V, 50/60Hz
Output: DC, 5V, 2000mA
Lock Slot Kensington lock slot
Size Height: 29.5mm, Width: 150mm, Depth: 115 mm
Power Consumption < 7W
Cooling None fan
Noise 0db
Temperature range 0~45 °C
Humidity
20 % to 80 % condensing
10% to 95% non-condensing
Feet Feet for vertical use
Bracket VESA standard mounting
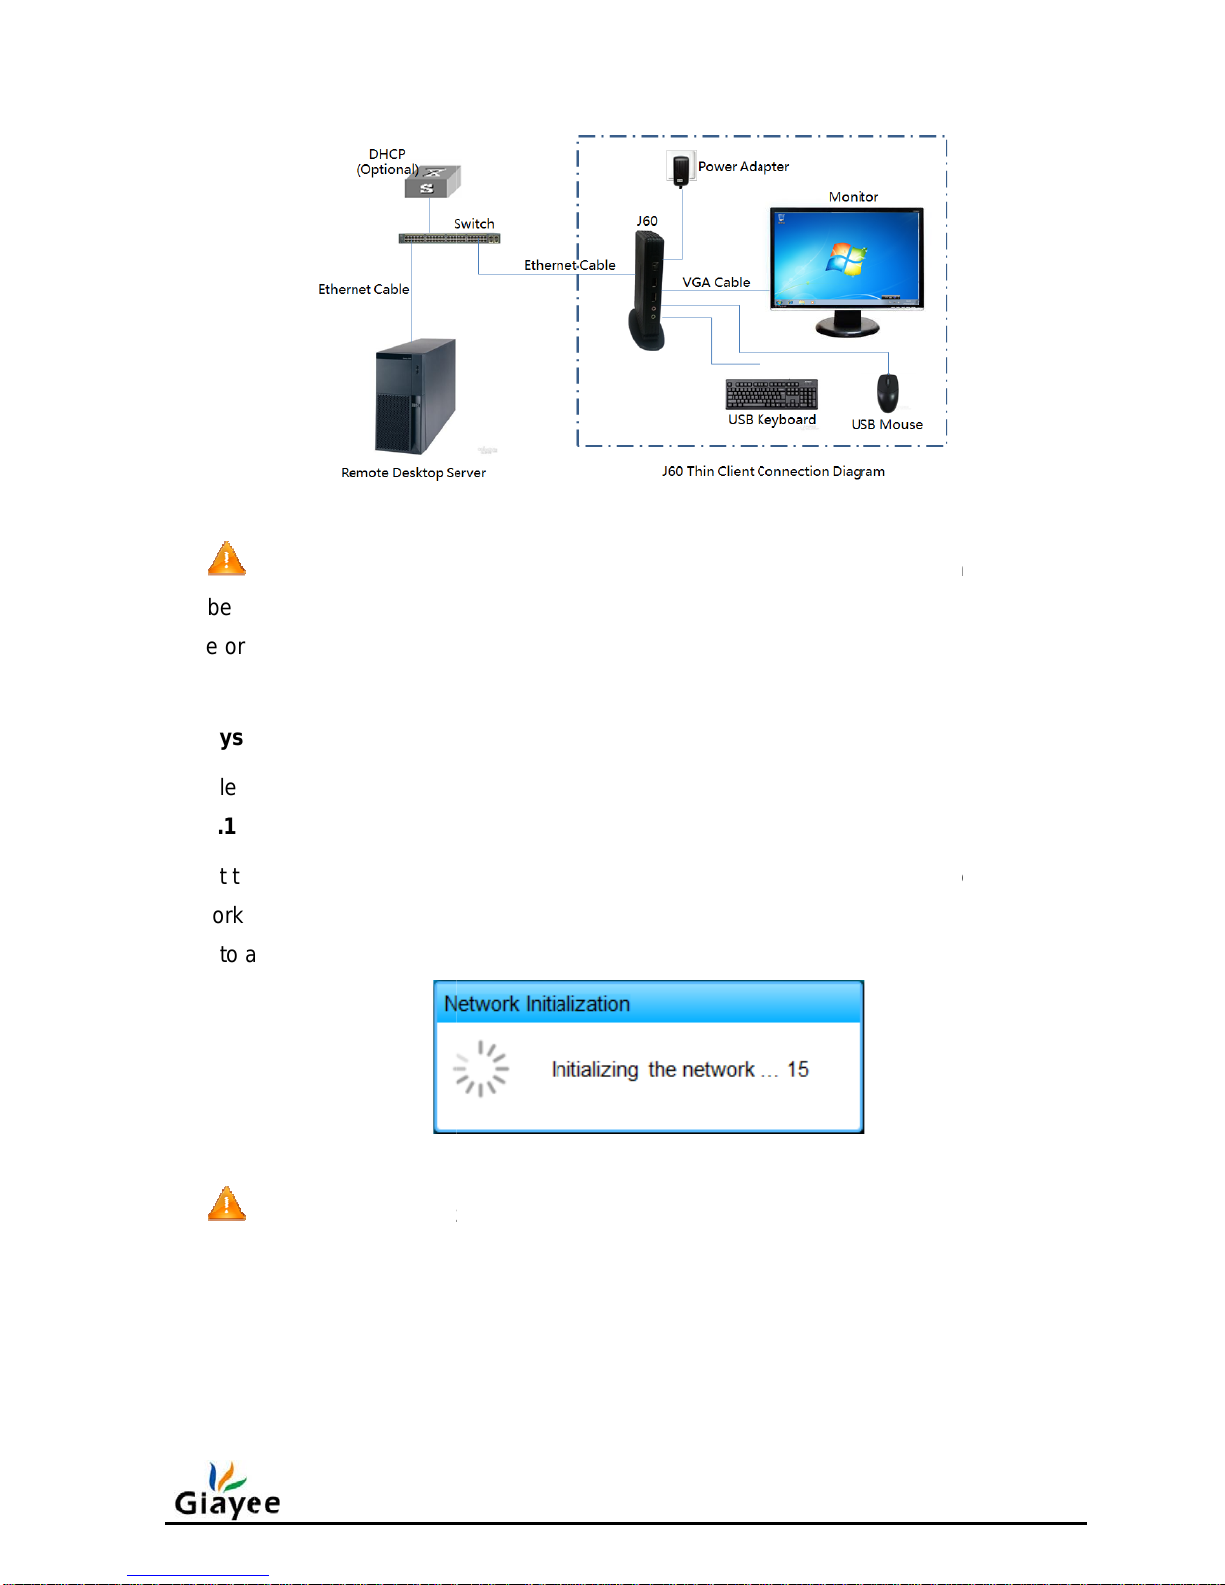
4 Connection Diagram
Page 6
N
maybe d
e
cable or
H
5 Syst
e
Plea
s
5.1
At th
e
network
c
goes to
a
N
1)
2)
5.2
FIG
otice, pl
e
stroy the
DMI to D
m Guide
e install t
h
Network
I
network
onnectio
n
uto conn
e
otice, if f
a
No avail
a
If the de
v
DHCP s
e
Auto Co
n
.4-1 Con
n
ase make
device. A
n
VI conver
t
e J60 thi
n
nitializati
initializati
o
and the I
P
cting pha
s
il to initiali
z
ble cable
ice is set
rver, ple
a
necting
ecting J6
0
sure to u
s
d if the m
o
er could t
a
client de
v
on
n phase,
s
settings.
e.
FIG.5
-
z
e the net
w
connecti
o
to use dy
n
se check
t
thin clien
t
e the mat
c
nitor pro
v
ke the pl
a
ice as FI
G
how as F
I
After the
s
2 Netwo
r
ork, plea
s
n.
amic IP a
d
he DHCP
to a rem
o
hed pow
e
ides a HD
ce of VG
A
.4-1 sho
w
G.5-2, th
e
uccessfu
l
k Initializa
t
e check t
dress an
d
services.
te deskto
p
r adapter,
MI or DVI
cable.
s.
device wi
network i
n
ion
he followi
n
fail to ac
q
server
any mis
m
interface,
t
ll check th
e
itializatio
n
g possibl
e
uire IP s
e
Page 6 of
atching
he HDMI
local
, the devi
c
reason:
ttings fro
m
19
e
Page 7
Page 7 of 19
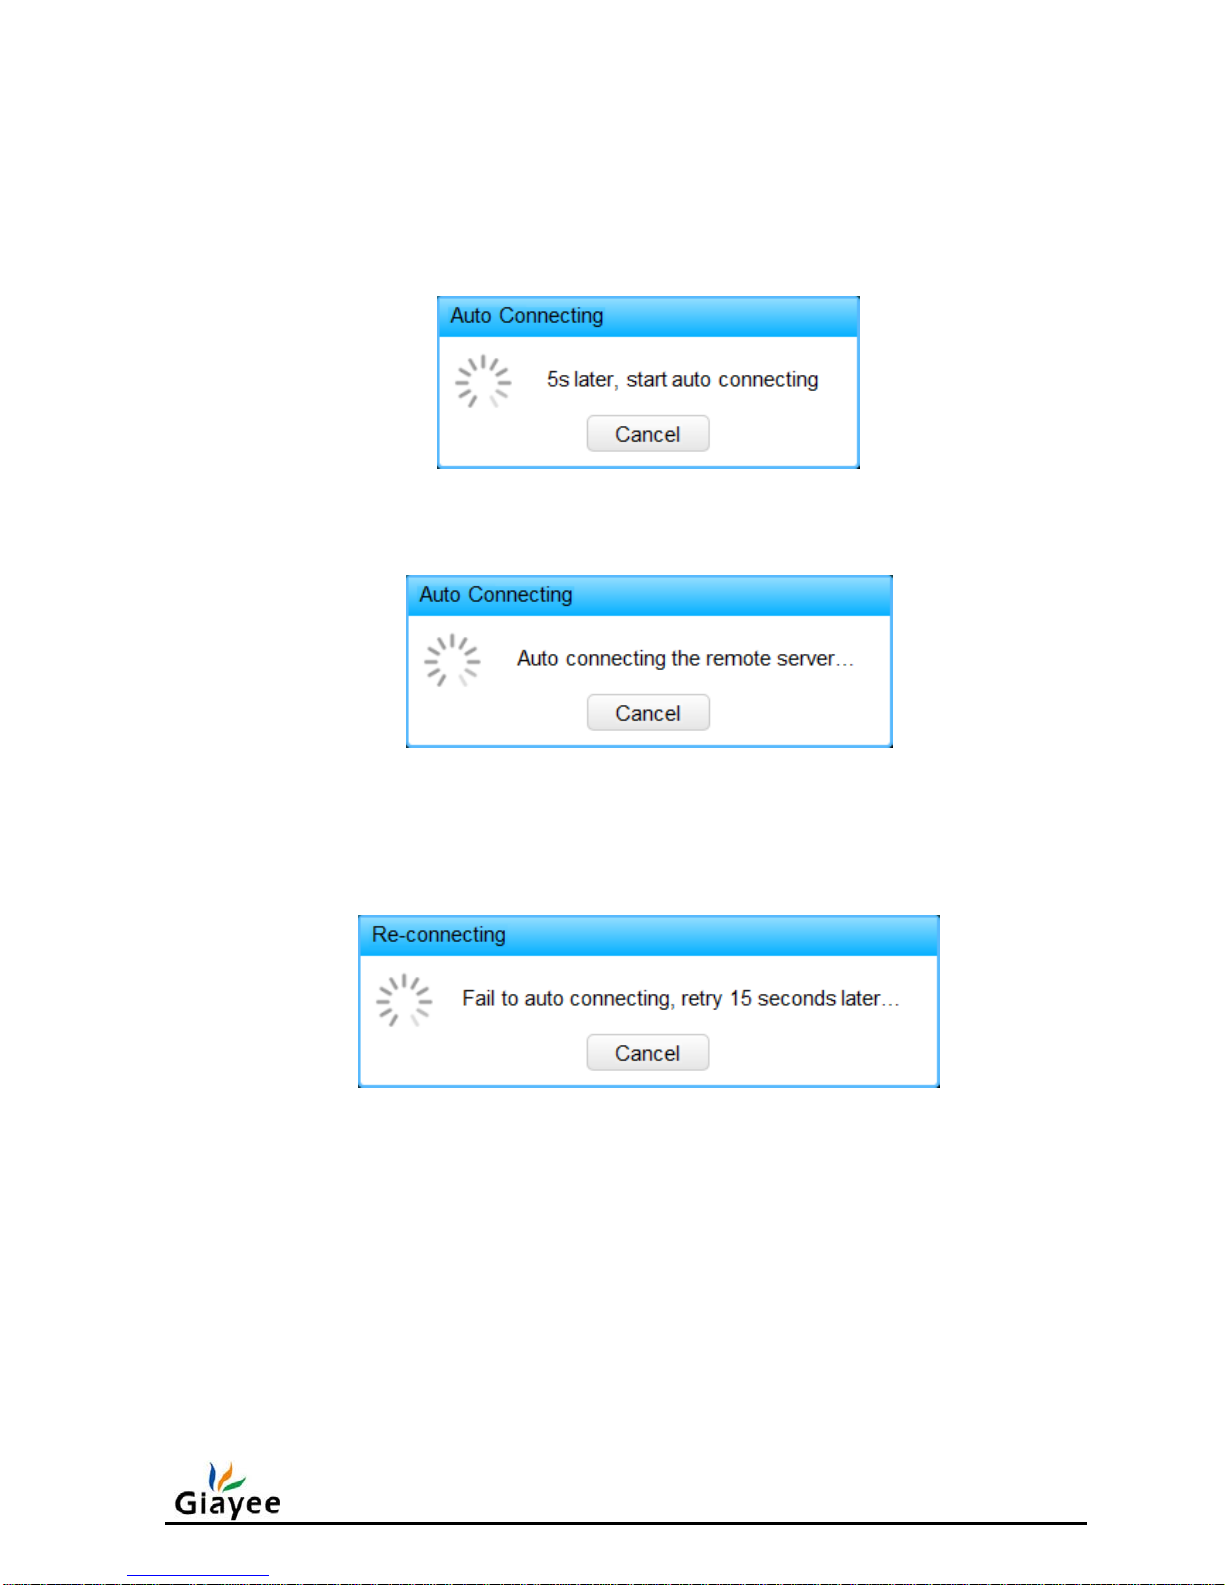
If there is none automatic connection setting, the device will skip the auto connecting
phase. Otherwise, the device starts the auto connecting after 5 seconds countdown. You
can cancel the auto connect with 【Cancel】 button or “Esc” key, show as FIG.5-3a and
FIG.5-3b.
FIG.5-3a 5-second Countdown
FIG.5-3b Starting Auto Connecting
When the auto connecting is failed, the device will retry after 15-second countdown,
unless you cancel it, show as FIG.5-3c.
图 5-3c Auto Connecting Retry
5.3 Control Centre
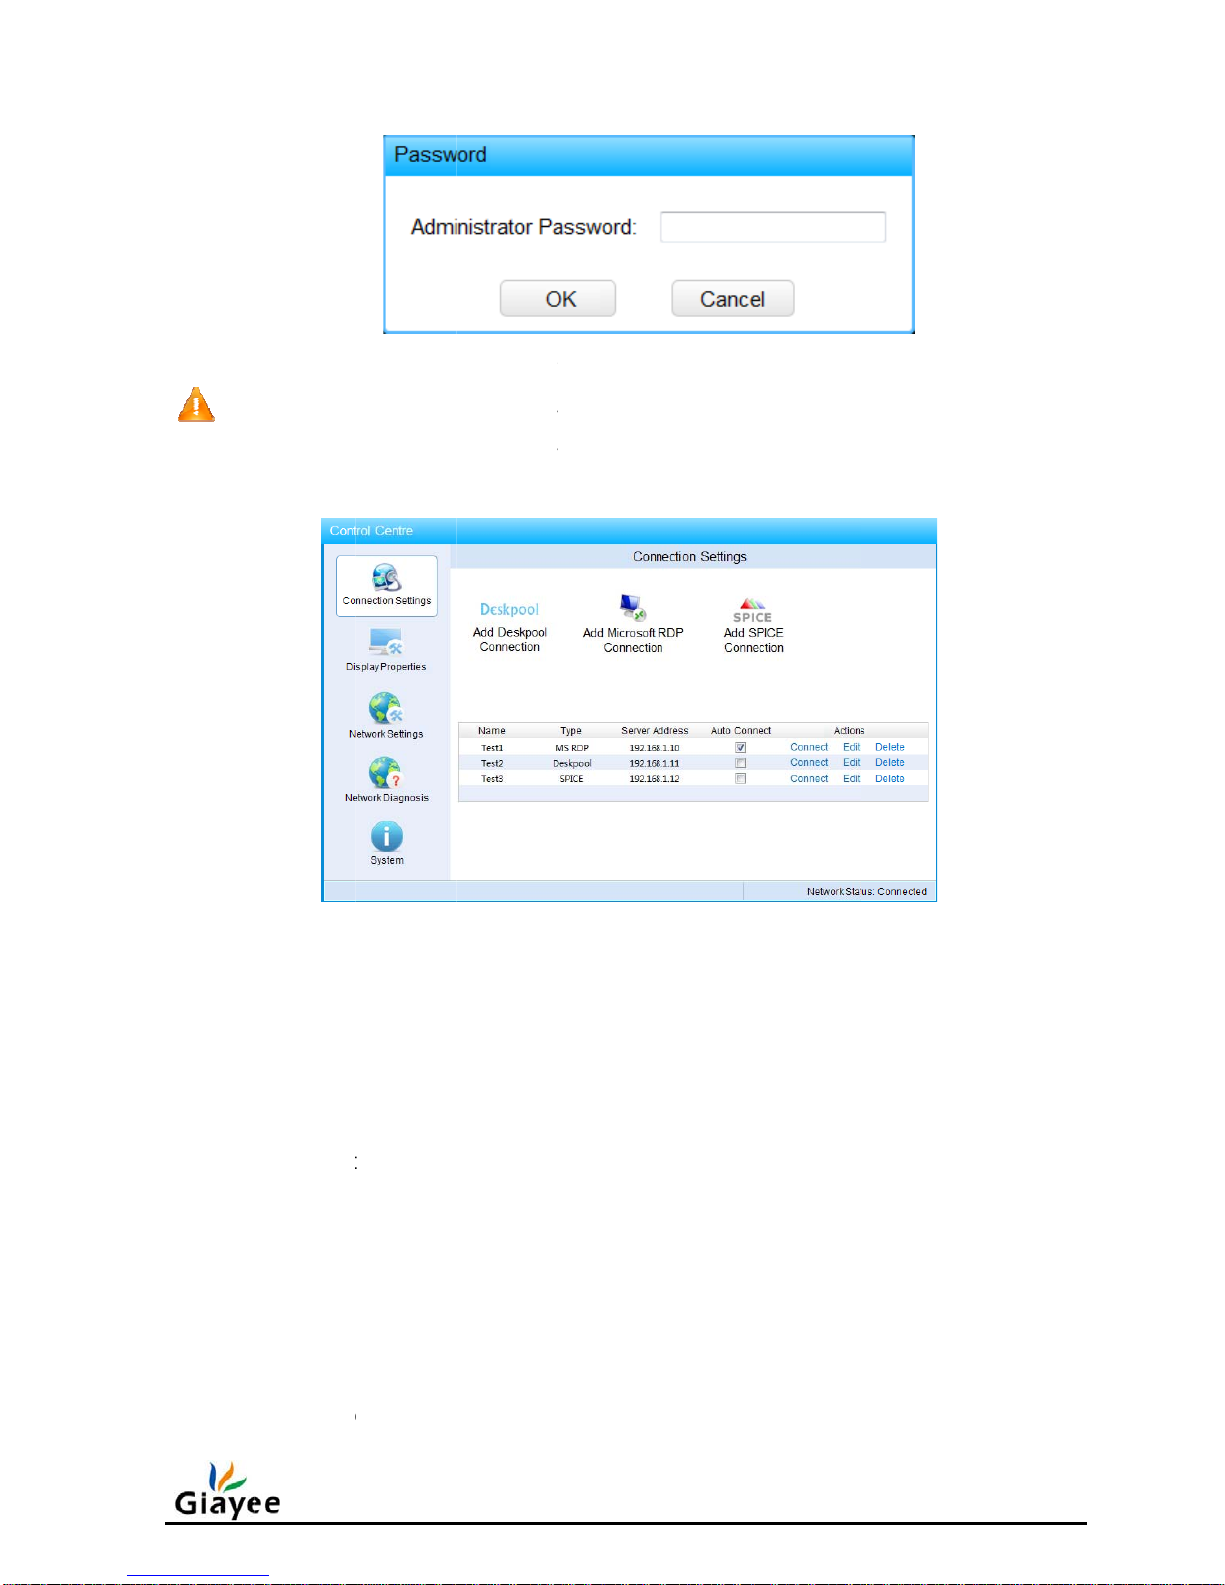
As FIG.5-4a shows, administrator password should be provided before enter the control
centre.
Page 8
No
t
dialog
a
passw
o
A
s F
I
Main
5.4
ice, If ther
nd enter
c
rd.
G.5-4b sh
Main M
e
Setting
W
Status
B
menu incl
Connec
t
Display
P
Network
Network
System:
Connecti
o
e is none
a
ontrol ce
n
ows, cont
r
nu List
indow
ar
ude the fo
ion Settin
g
roperties
Settings:
Diagnosi
s
Show th
e
n Settin
g
FIG.5-4
a
dministra
t
tre directl
y
FI
G
ol centre i
llowing m
e
s: Mana
g
:Resoluti
Network
p
:Diagno
s
system i
n
s
Login t
o
or passw
o
. Please
r
.5-4b Co
n
s divided i
nus:
ement th
e
on and la
n
arameter
s
e the net
w
formation
Control
C
rd setting
efer to ch
a
trol Centr
e
nto three f
remote d
e
guage se
t
ork with
p
and syst
e
entre
, the devi
c
pter 5.12
unction zo
sktop co
n
tings
ing
m level fu
n
e will skip
to set ad
m
nes:
nections
ctions
Page 8 of
FIG.5-4a
inistrator
19
Page 9
Page 9 of 19
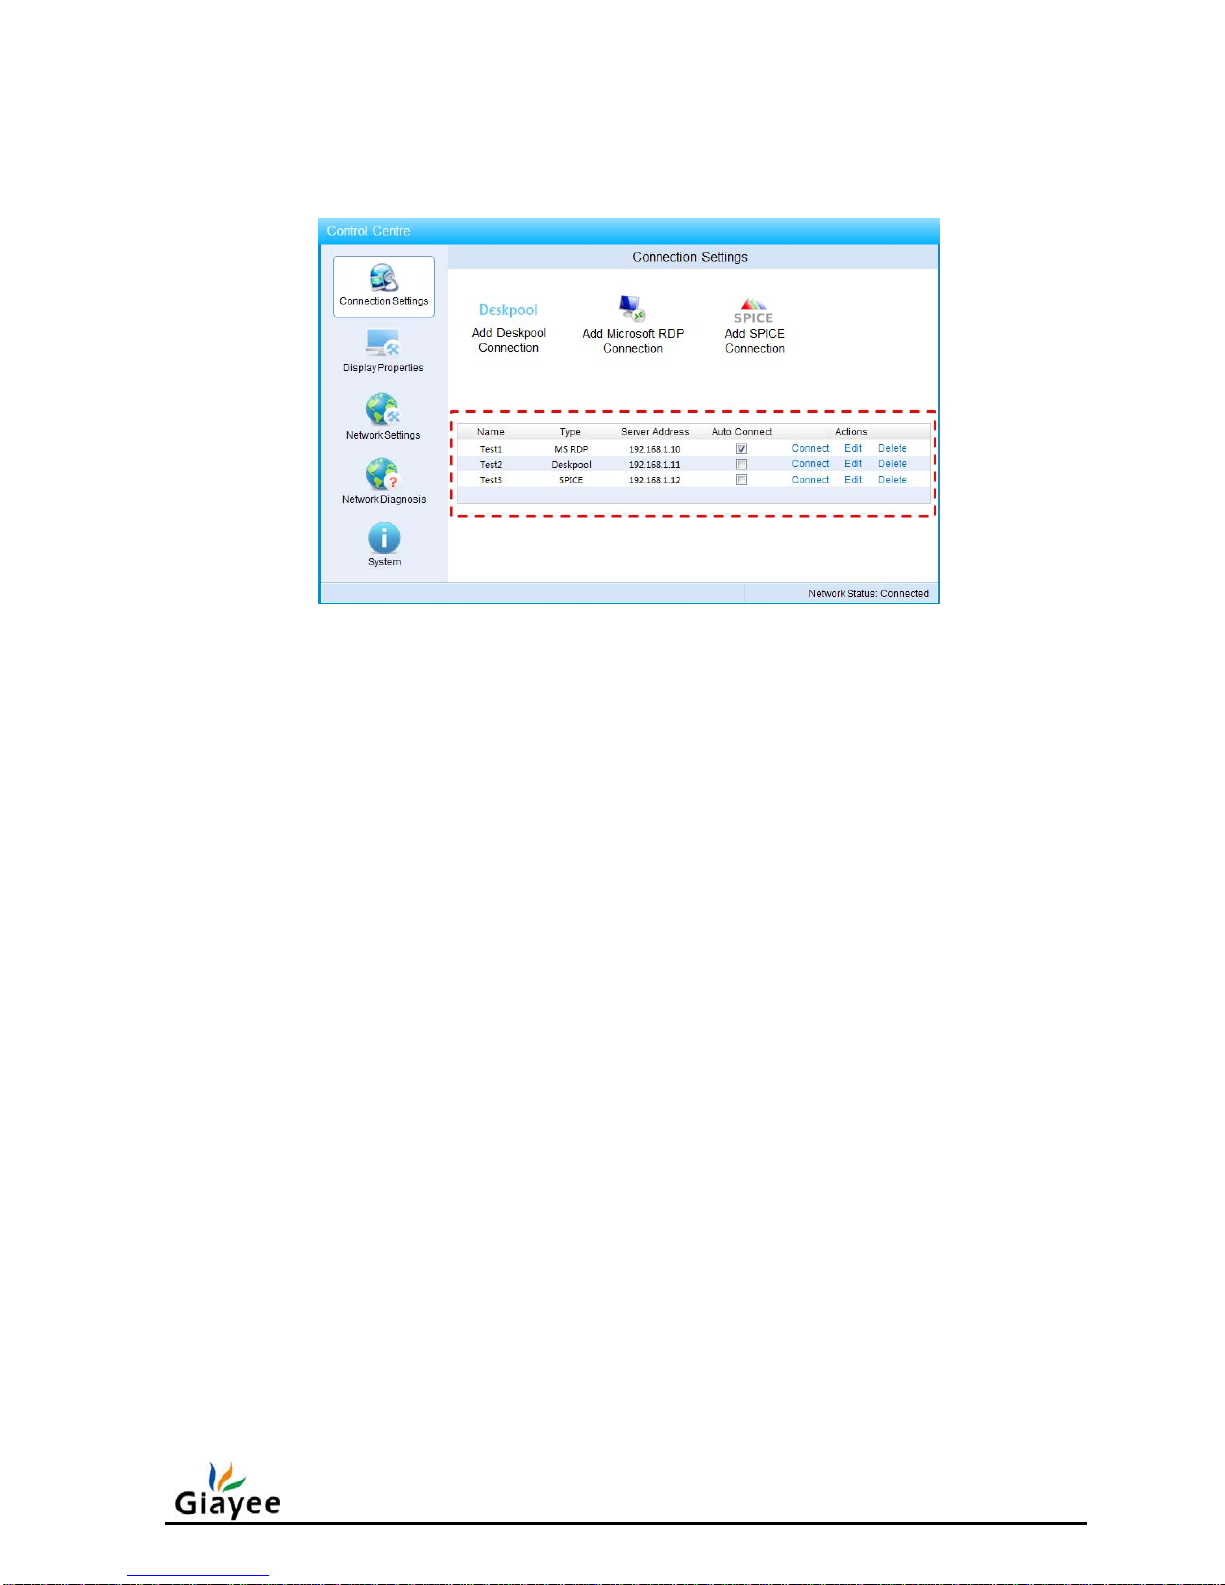
Click 【Connection Settings】menu, enter the connection setting window shown as
FIG.5-5a, the table surrounded by red dotted line is connection record table.
FIG.5-5a Connection Settings Window
Connection Type
J60 thin client supports three kinds of connection and two kinds of desktop protocol:
Deskpool Connection: Deskpool login-in connection configuration, adopt
Microsoft RDP 7.1 version with remotefx enabled.
Microsoft RDP Connection:Microsoft remote desktop server accessing
configuration,adopt Microsoft RDP 7.1 version with remotefx enabled.
SPICE Connection:Remote SPICE server connection configuration, make
use of RedHat SPICE protocol.
Connection List
The connection table includes the following items:
Name:Connection name.
Type:Deskpool、Microsoft RDP or SPICE.
Server Address:Remote desktop server address.
Auto Connect:Enable or disable the auto connecting setting.
Actions:【Connect】, 【Edit】, 【Delete】operation buttons
5.5 Add Deskpool Connection
Page 10
Page 10 of 19
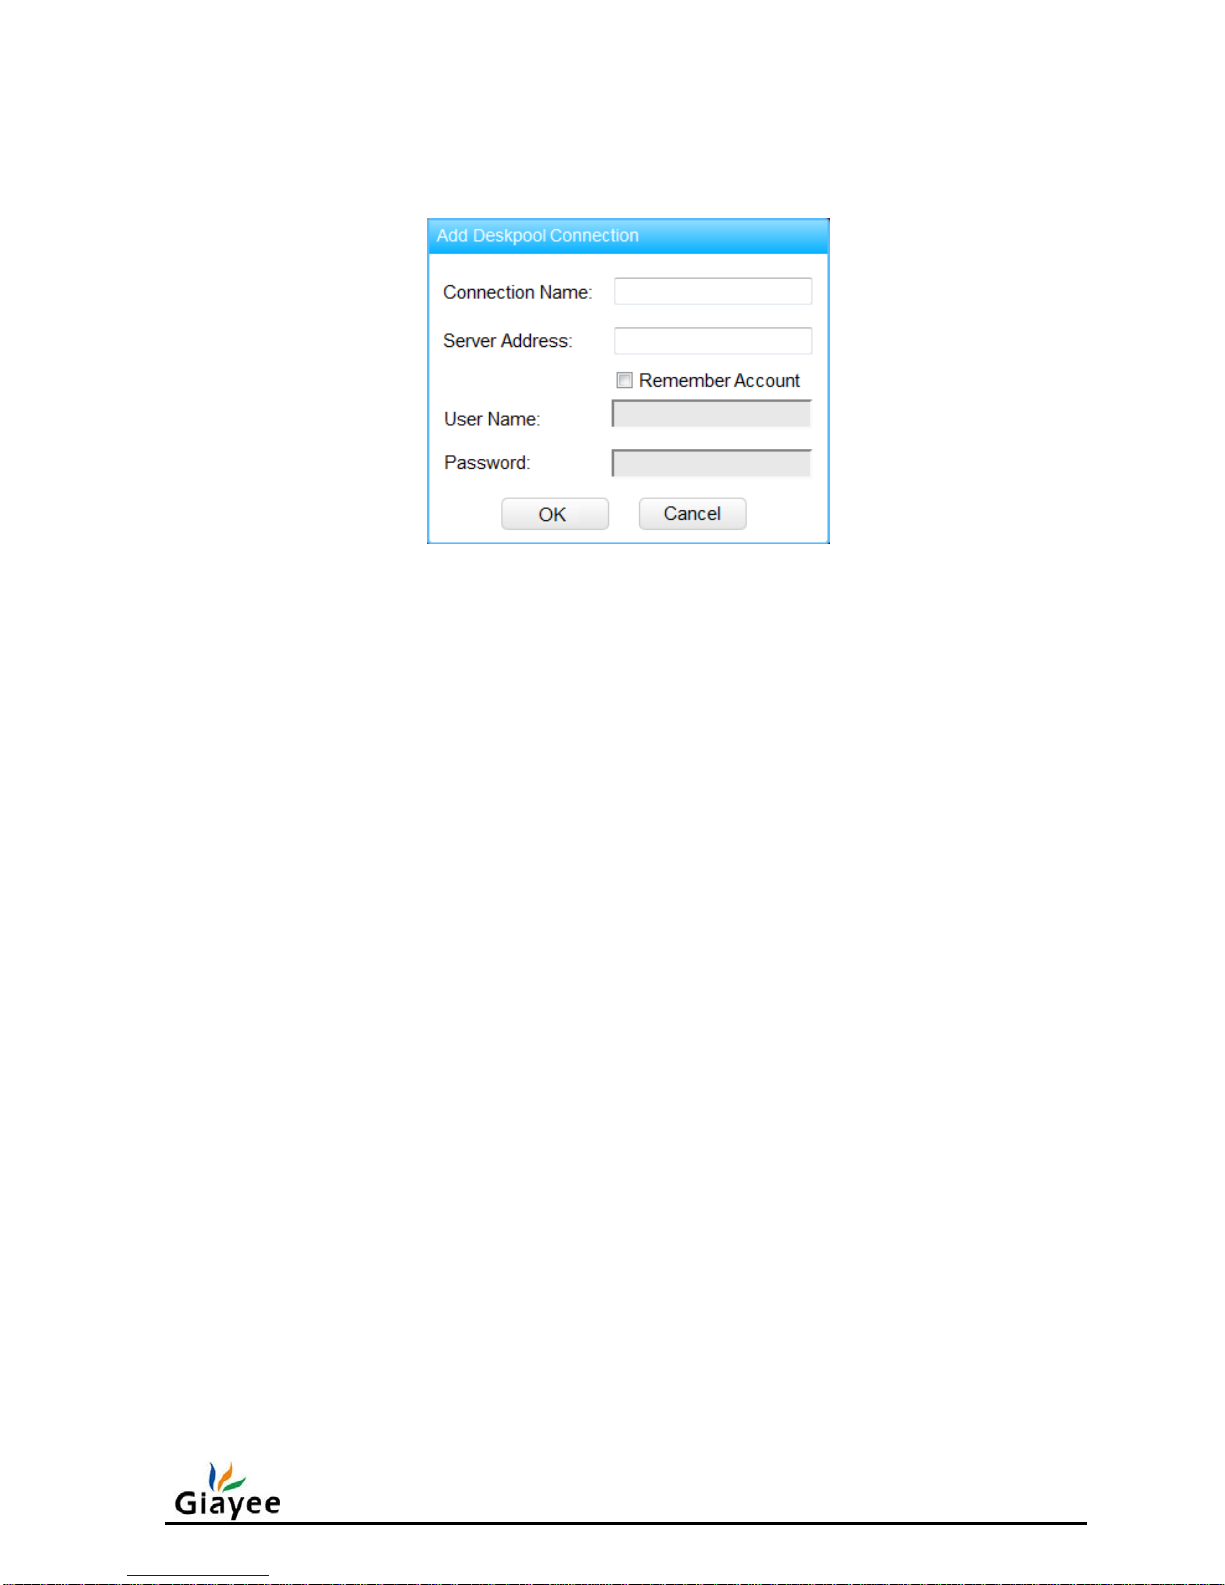
Click【Add Deskpool Connection】, popup the “Add Deskpool Connection” dialog as
FIG.5-6 shows:
FIG.5-6 Add Deskpool Connection
Input the following information before click 【Add】 button:
【Connection Name】: Name of this connection
【Server Address】: Address of remote deskpool server
If you check the 【Remember Account】 check box, please fill the deskpool login
account information:
【User Name】: A deskpool user name.
【Password】 : Password of the deskpool user.
5.6 Add Microsoft RDP Connection
Click【Add Microsoft RDP Connection】, popup the “Add MS RDP Connection” dialog
as FIG.5-7a shows:
Input the following information before click 【Add】 button:
【Connection Name】: Name of this connection.
【Server Address】: Address of remote desktop server.
If you check the 【Remember Account】 check box, please fill the remote desktop login
account information:
【User Name】: A remote desktop user name.
【Password】 : Password of the remote desktop user.
【Domain】:Domain name. If no domain server, keep empty.
Page 11
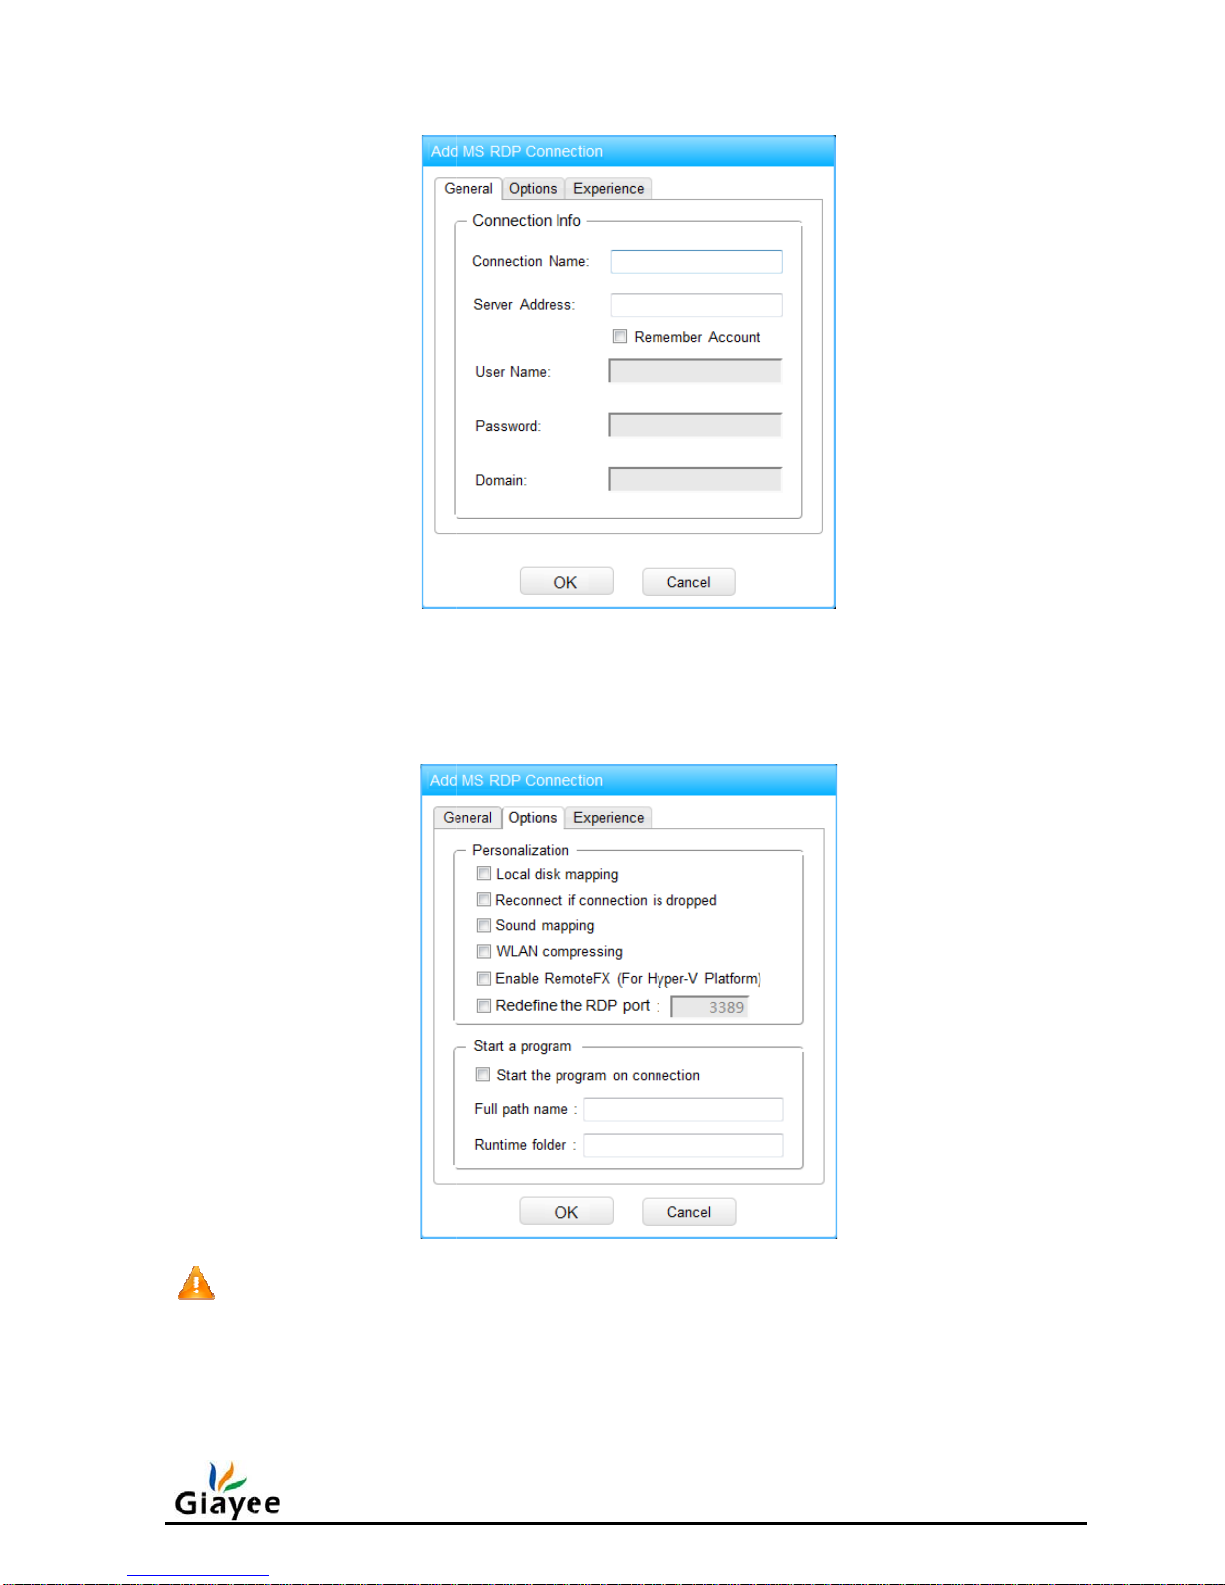
FIG.
5
options
a
No
t
and th
e
invalid.
depth
a
-7b show
nd the au
t
ice, the R
e
windows
In additio
n
utomatic
a
FI
G
the option
o-run pro
g
moteFX
o
guest OS
, when th
lly.
.5-7a Add
s for Micr
o
ram.
FIG.5-7b
ption can
must be
W
e Remote
F
Microsoft
soft RDP
Microsoft
only be e
n
indows 7
X succe
s
RDP Con
connectio
n
RDP Opti
o
abled for
H
SP1 or la
t
sfully ena
b
nection
, include
t
ns
yper-V r
e
er, other
w
led, it will
he perso
n
mote des
k
ise, the o
p
adopt the
Page 11 of
alized
top platfo
tion will b
e
32bpp col
19
rm
or
Page 12
Page 12 of 19
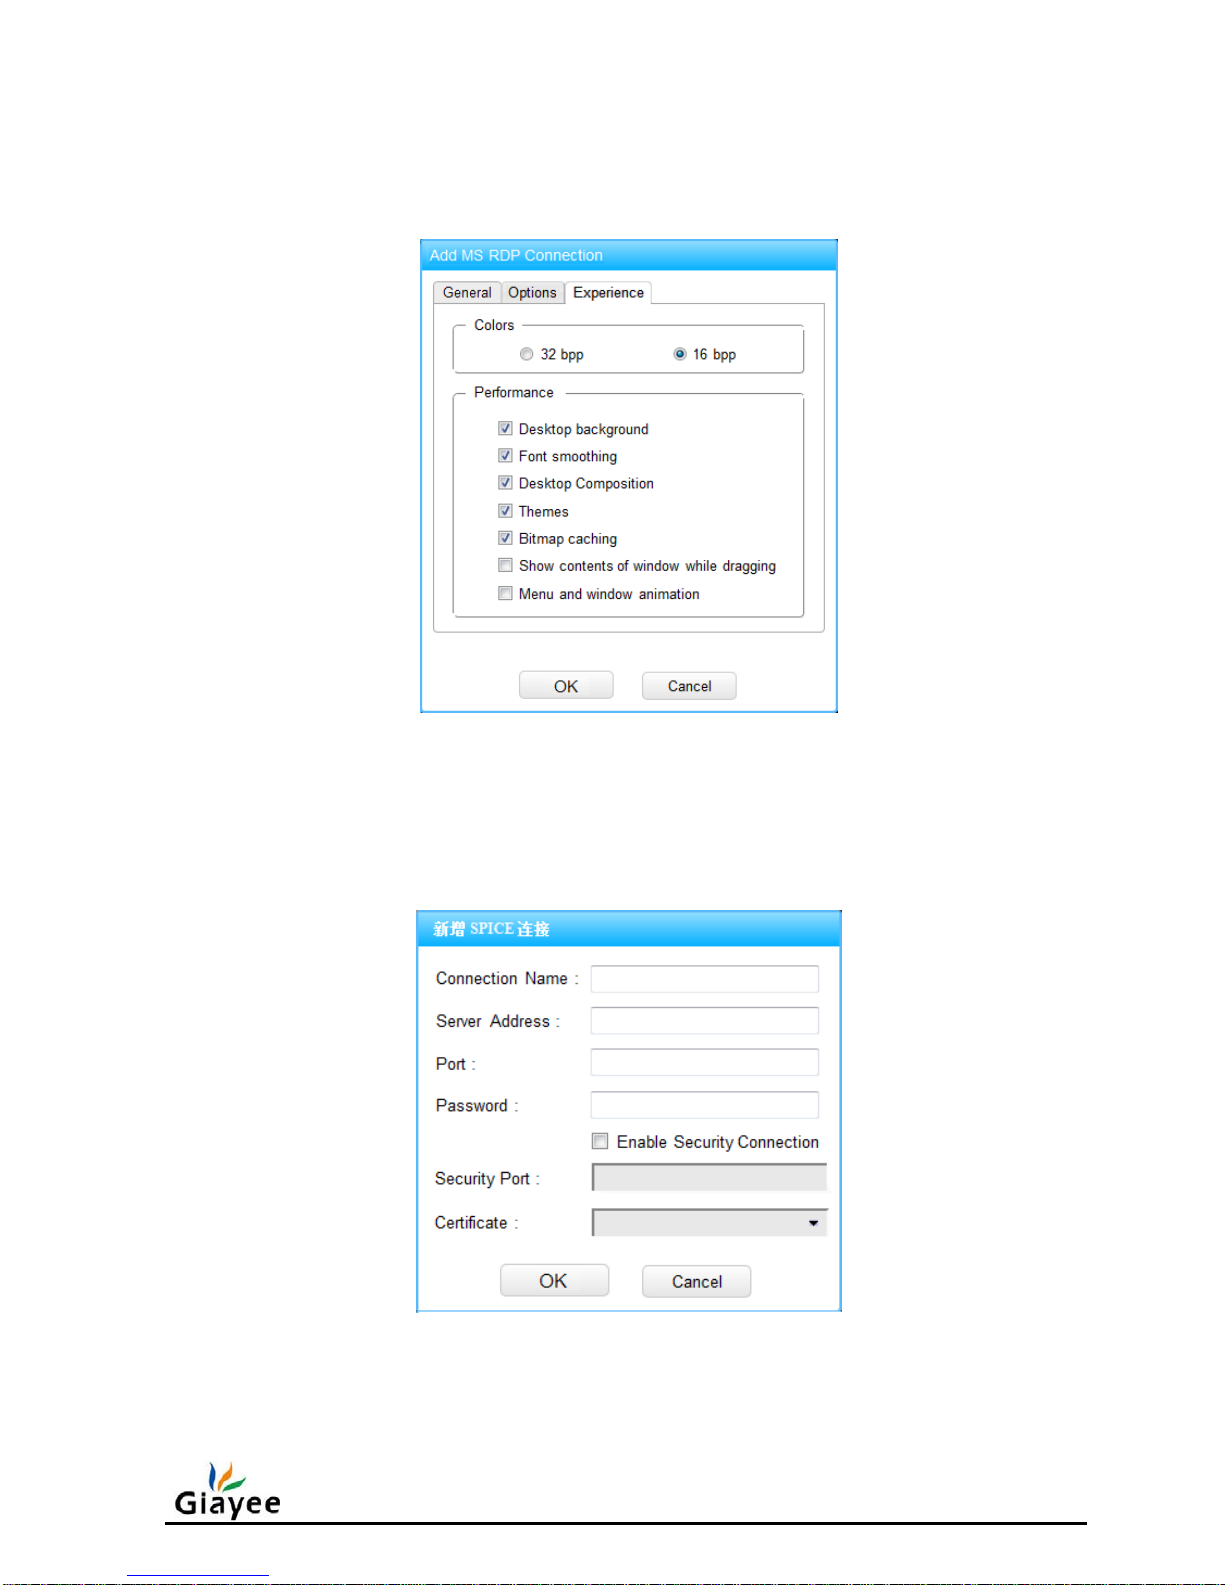
FIG.5-7c show the experience settings for Microsoft RDP connection and the default
selections.
FIG.5-7c Microsoft RDP Settings
5.7 Add SPICE Connection
Click【Add SPICE Connection】, popup the “Add SPICE Connection” dialog as FIG.5-8
shows:
FIG.5-8 Add SPICE Connection
Input the following information before click 【Add】 button:
【Connection Name】: Name of this connection.
Page 13
Page 13 of 19
【Server Address】: Address of remote SPICE server.
【Port】: Port of the SPICE connection, it will be discarded as the security
connection enabled.
【Password】: Password to login into SPICE server.
If you check the 【Enable Security Connection】 check box, please fill the security
information:
【Security Port】: Security port for the security connection.
【Certificate】 : Certificate for the security connection.
You can manage the certificates at <System> setting window.
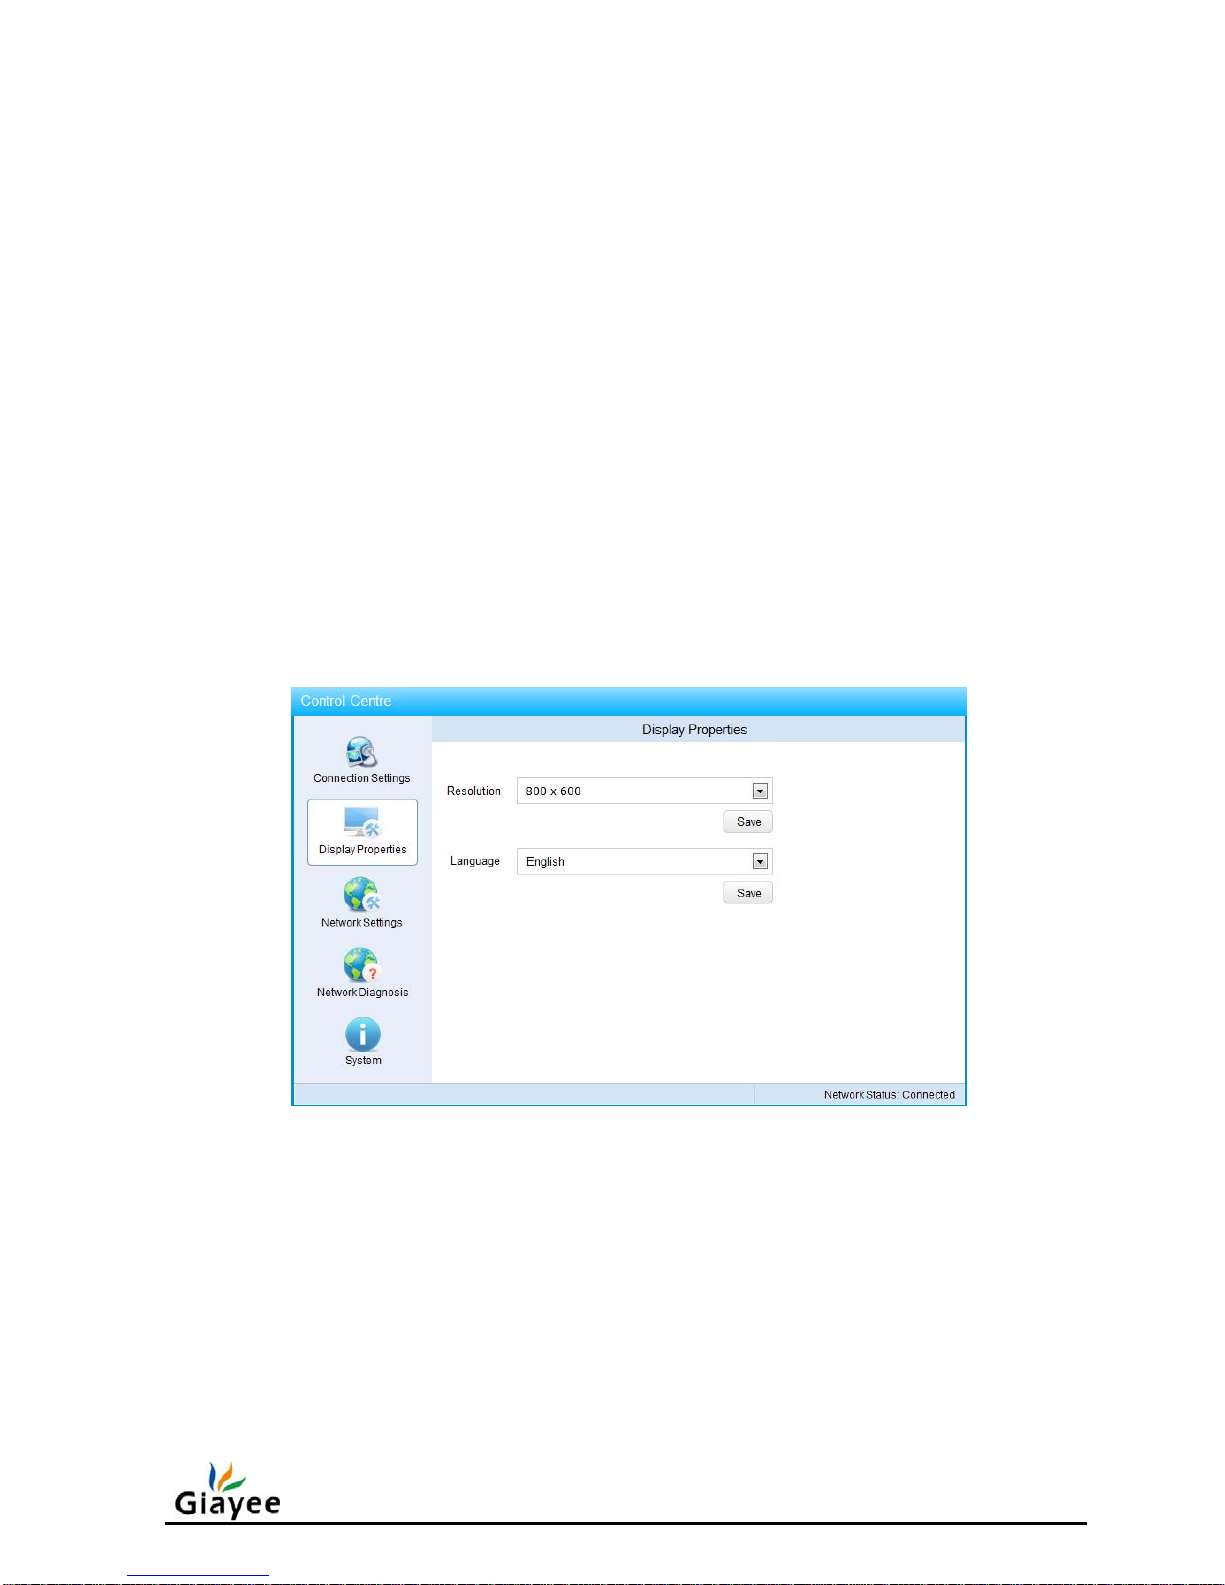
5.8 Display Properties
Click 【Display Properties】menu, enter the display properties window shown as FIG.5-
9a.
FIG.5-9a Display Properties
Resolution Setting
Select a resolution at 【Resolution】list box, and click 【Save】 button, a notification
dialog will be popped up shown as FIG.5-9b to confirm the change.
Page 14
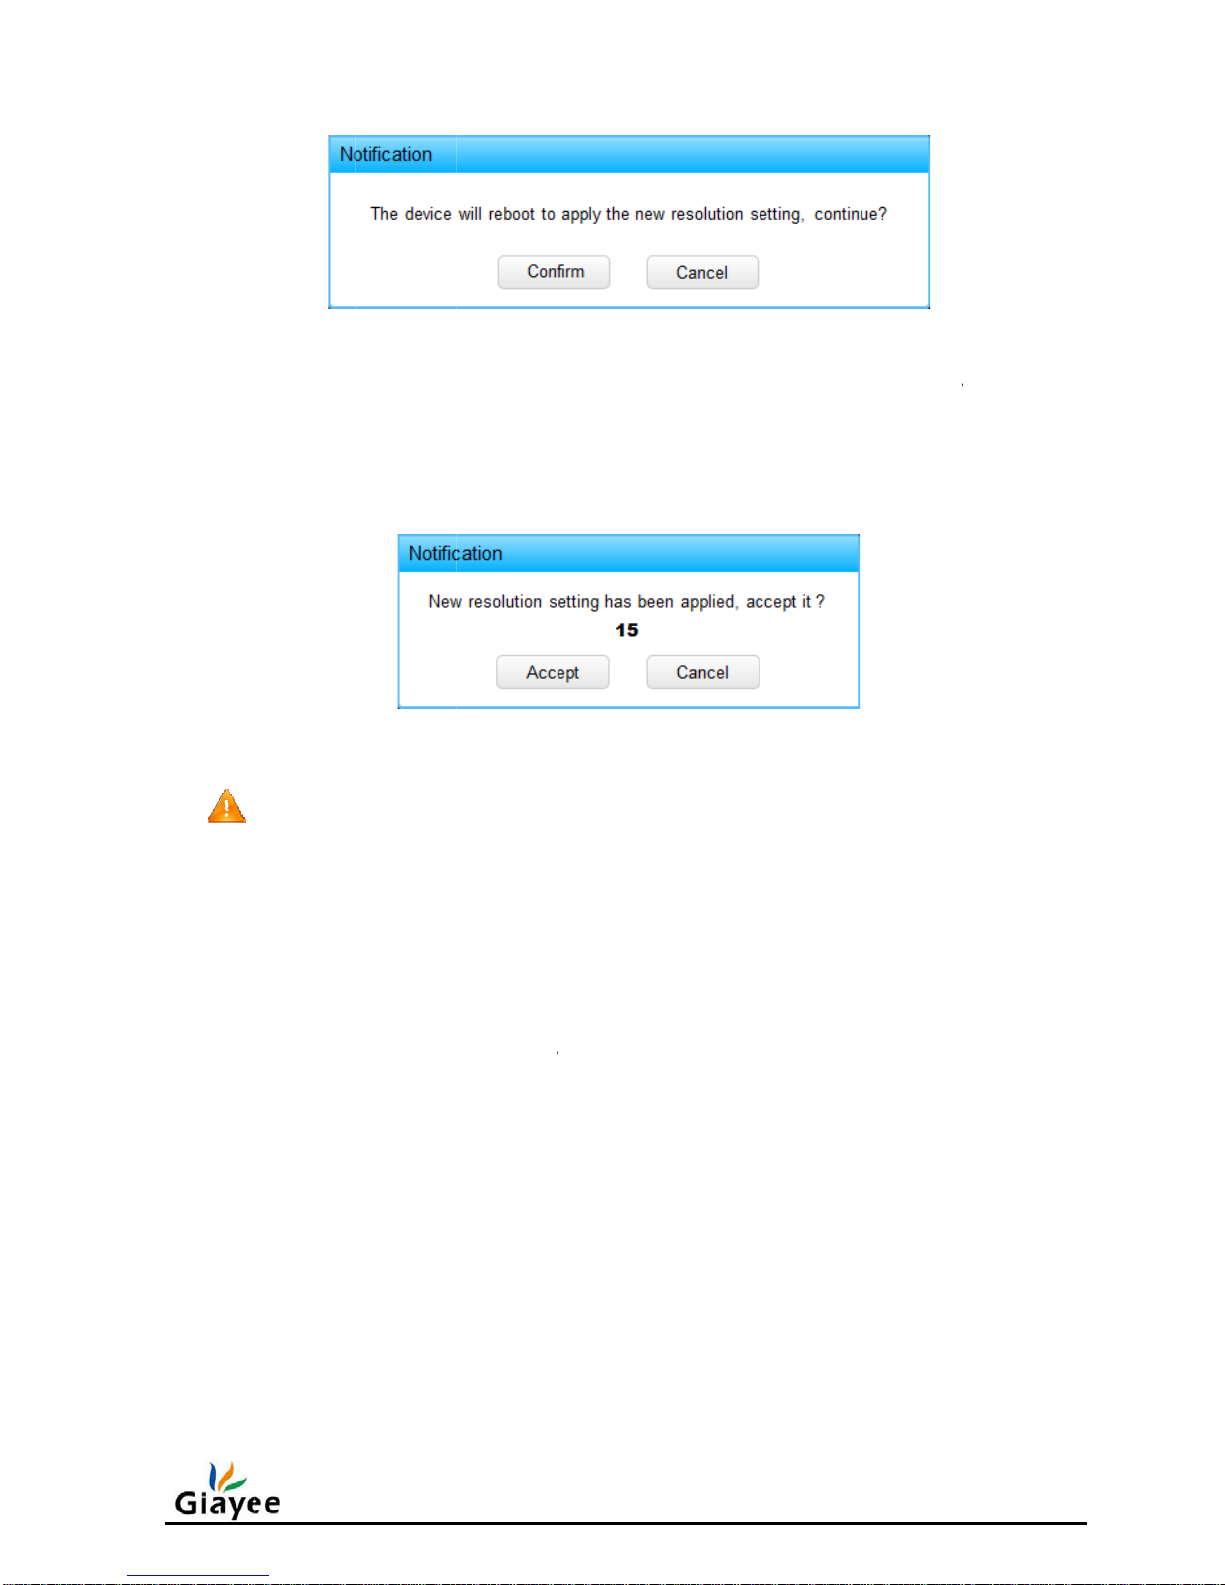
Click
reboot to
resolutio
n
up the n
e
T
changin
g
automati
c
L
You
c
languag
e
languag
e
5.9
Click
the 【Co
n
apply it.
W
must be
w resoluti
o
he monit
o
, please d
o
ally.
anguage
an chang
list box,
a
mode.
Network
S
【Networ
k
FIG.
firm】 bu
t
hen it re
b
accepted
b
n setting
FIG.5-9
r maybe s
nothing,
Setting
e the lang
u
nd then
c
ettings
Settings
】
5-9b Notif
i
ton at FI
G
oot up, a
c
efore the
and rebo
o
c Notificat
i
how black
just wait f
o
age setti
n
lick 【Sa
v
menu, e
cation to
C
.5-9b to a
p
onfirm di
a
15-secon
d
t to restor
e
on to Acc
e
screen w
h
r the devi
g by sele
c
e】 butto
n
nter the n
e
hange R
e
ply the n
e
log will b
e
timeout,
the origi
n
pt Resol
u
en it is n
o
ce restore
ting 【简
体
, the cont
r
twork set
t
solution
w resoluti
shown a
s
Otherwise
al setting
.
tion Setti
n
t compar
a
to the ori
g
中文】
o
ol centre
w
ing windo
w
on, the de
v
FIG.5-9c
,
, the syst
e
g
ble with t
h
inal resol
u
r 【Englis
ill switch
shown
a
Page 14 of
ice will a
u
the new
m will giv
e
e resoluti
o
tion
h】 at
to the ne
w
s FIG.5-1
0
19
to
n
.
Page 15
W
Two
1
)
In
server,
y
2
)
In
and DN
S
N
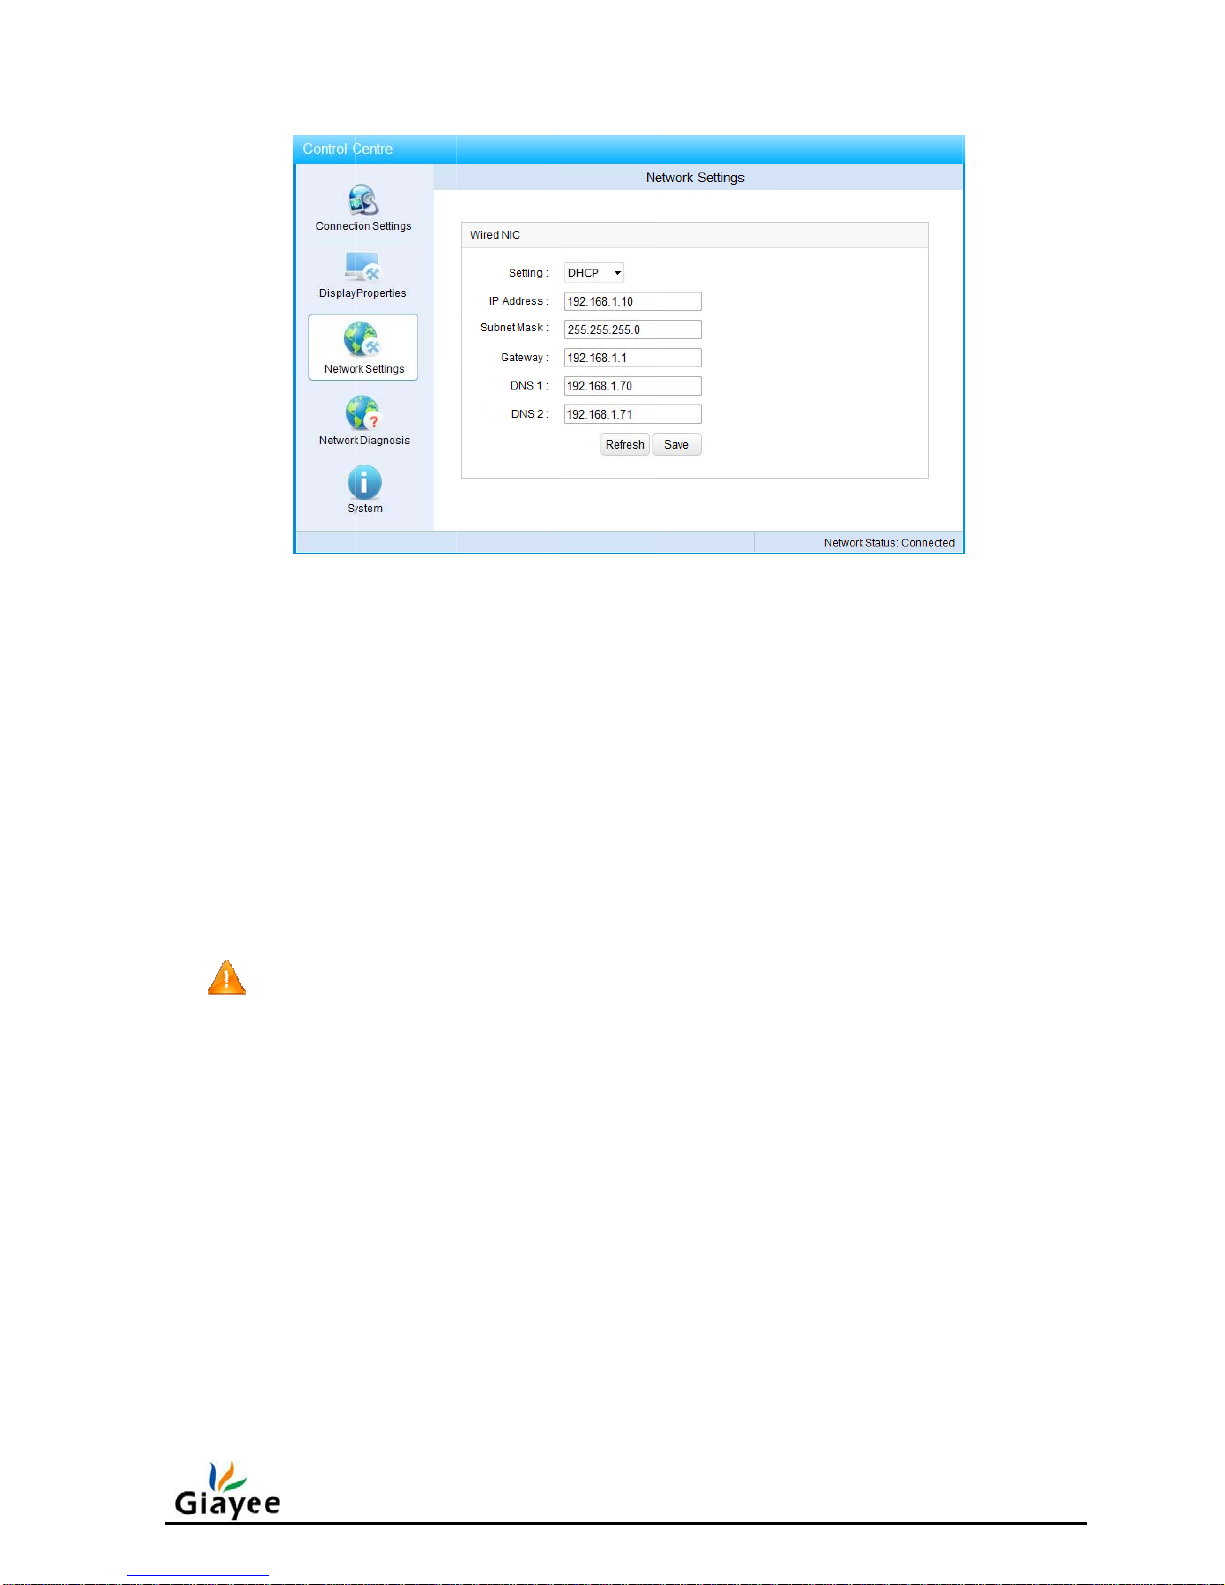
5.10
Click
FIG.5-11
ired net
w
kings of s
e
DHCP m
DHCP m
o
ou can cli
c
Static IP
static IP
m
2 IP.
otice, in
t
Network
D
【Networ
k
.
ork setti
n
ttings for
w
ode
de, the n
e
k 【Refr
e
mode
ode, you
he static I
P
iagnosi
s
Diagnos
i
FIG.5
-
gs
ired net
w
twork par
a
sh】 butt
o
have to in
p
mode, y
o
s 】menu
,
10 Netwo
r
ork para
m
meters w
i
n to refre
s
ut the IP
a
u must
m
enter the
k Settings
eters
ll be dyna
m
h them.
ddress, s
ake sure
n
network d
ically ac
q
ubnet ma
s
one IP a
d
iagnosis
w
uired fro
m
k, gatewa
dress con
f
indow sh
o
Page 15 of
DHCP
y IP, DNS
lict.
wn as
19
1
Page 16
Page 16 of 19
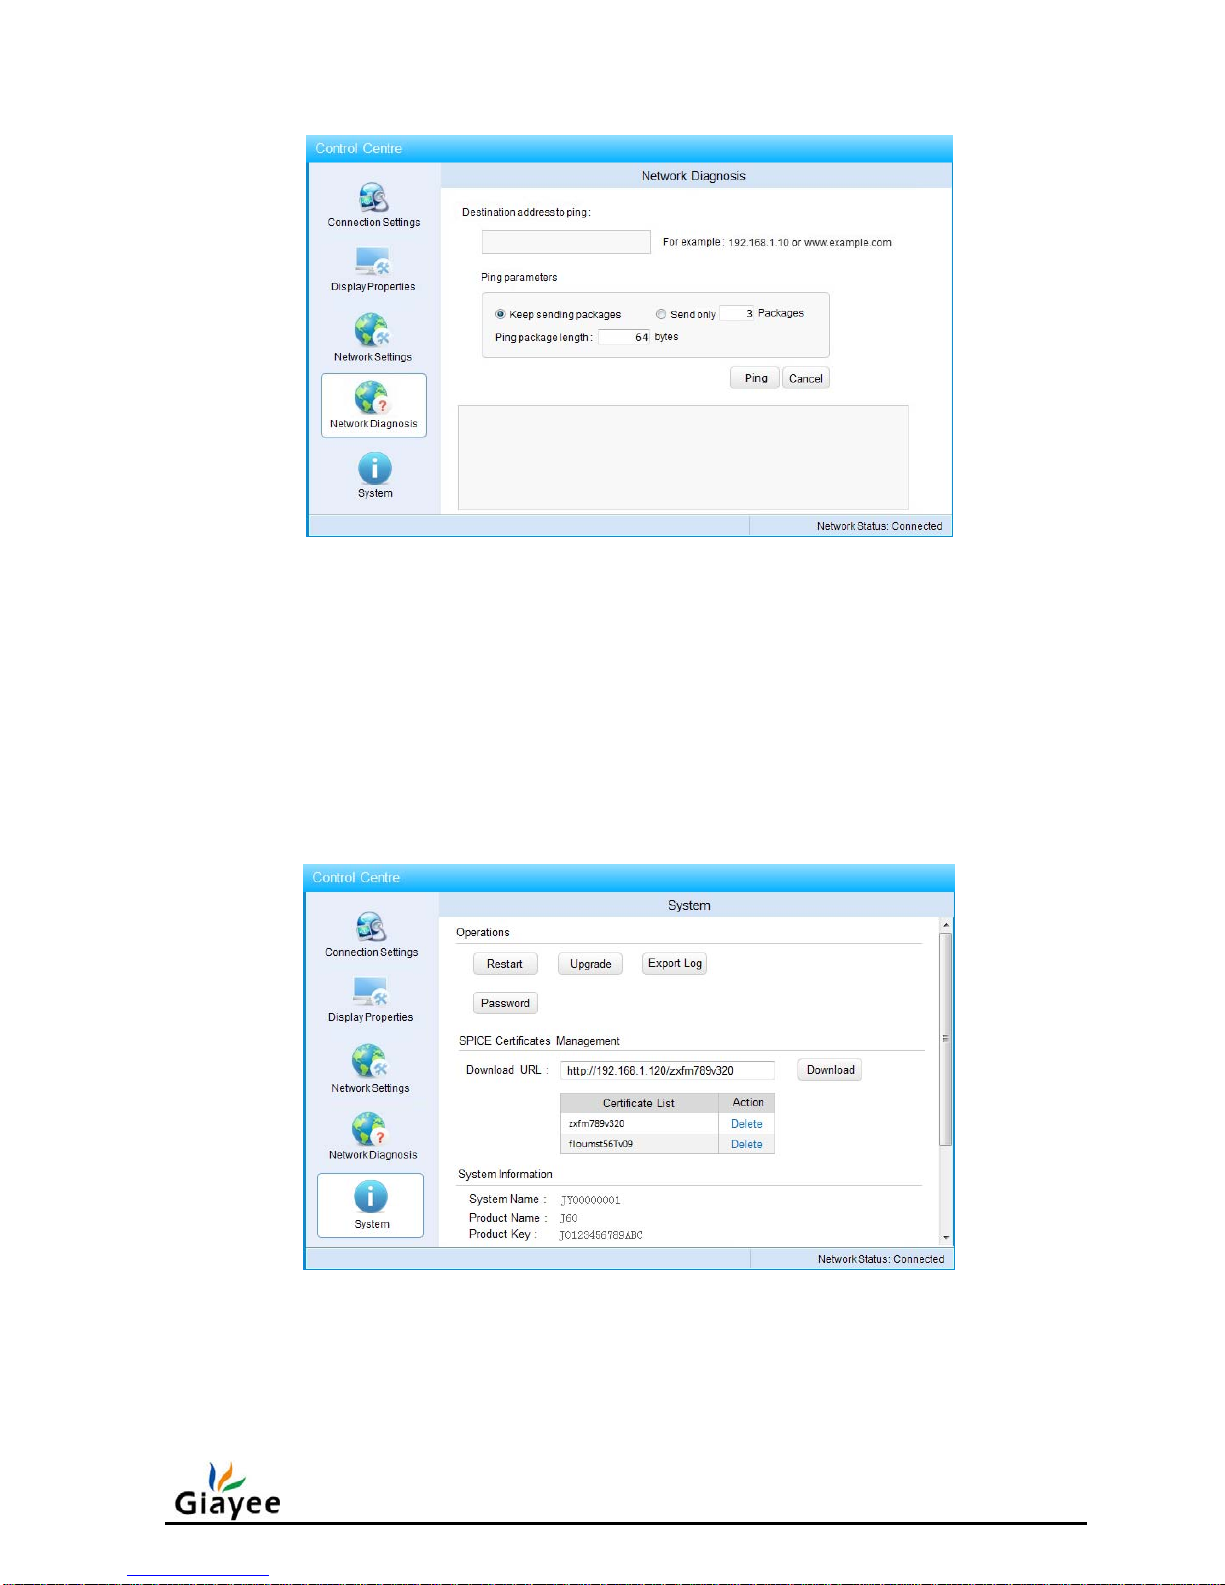
FIG.5-11 Network Diagnosis
In the <Network Diagnosis> window, You can check whether the network connection or
destination server is available with ping operation, in additional, the parameters of ping
command could be adjusted.
5.11 System
Click 【System】menu, enter the system window shown as FIG.5-12a.
FIG.5-12a System
Restart System
Click【Restart】 button and confirm this operation, the device will reboot automatically.
Page 17

S
The
p
Pha
s
1)
2)
3)
Pha
s
4)
5)
6)
7)
8)
N
E
Click
1
2
3
C
Click
12c.
ystem U
p
rocedure
e I, prepa
r
Downlo
a
Prepare
Copy th
e
e II, upgr
a
Power o
<Syste
m
Insert th
e
A
t <Sys
t
System
p
device
w
If there i
s
success
f
otice: Ple
a
xport Lo
g
【Export
) Insert
a
) In <Sy
s
) Unplug
system
hange P
a
【Passw
o
grade
to upgrad
e
es to upg
r
d upgrad
e
a USB st
o
update.j
y
de the fir
m
n the thin
c
> window
USB sto
r
em> wind
o
rompt: “
S
ill reboot
a
a new【
F
ul.
se do no
t
Log】 to
e
FAT for
m
tem> win
d
the USB
s
.tar.gz.
ssword
rd】 butt
o
the syst
e
ade:
package
rage with
tc file to r
o
ware:
lient and
;
age to th
e
w, click
【
ystem is
u
utomatic
a
irmware
V
power of
f
xport the
atted US
B
ow, click
torage, th
n to set o
r
m firmwa
r
from ww
w
FAT form
a
ot directo
r
remembe
r
device;
Upgrade
】
pgrading,
lly;
ersion】
the devi
c
system lo
g
storage t
o
【Export
L
ere will b
e
change t
h
e:
.giayee.c
o
t;
y of the U
the value
button,
a
please w
a
in system
e at the s
t
with the
f
a USB p
o
og】 butt
o
a latest l
o
e admini
s
m;
SB storag
e
of【Firm
w
nd confir
m
it…”, Afte
r
window, t
h
ep 7 of up
ollowing s
rt.
n and co
n
g file at ro
trator pas
s
e ;
are Versi
o
the ope
r
about 2
m
e upgrad
e
grade pha
teps:
firm to ex
p
ot directo
r
word sho
w
Page 17 of
n】 at
ation;
inutes, th
e
is
se II.
ort the lo
g
y named
n as FIG
19
;
5-
Page 18
N
1)
2)
S
SPI
C
downloa
d
could be
S
The
s
Name】,
NIC】,【
F
The
f
Protocol
】
6 Rest
otice:
None ad
If lost th
e
default
s
PICE Ce
r
E certifica
SPICE c
e
deleted b
y
ystem In
f
ystem inf
o
【Product
Wireless
N
irmware
I
irmware i
n
,【SPIC
E
ore Facto
ministrato
r
administ
r
ettings.
tificate M
a
te is used
rtificate t
o
the 【De
ormation
rmation i
n
Key】,【
D
IC】,【Fi
nformati
o
formation
】,【De
s
ry Defaul
t
FIG.5-1
2
passwor
d
ator pass
w
nageme
n
for SPIC
E
the local
lete】 but
t
FIG.5-1
2
cludes th
e
isk Capa
c
rmware V
e
n
includes t
h
kpool VDI
Settings
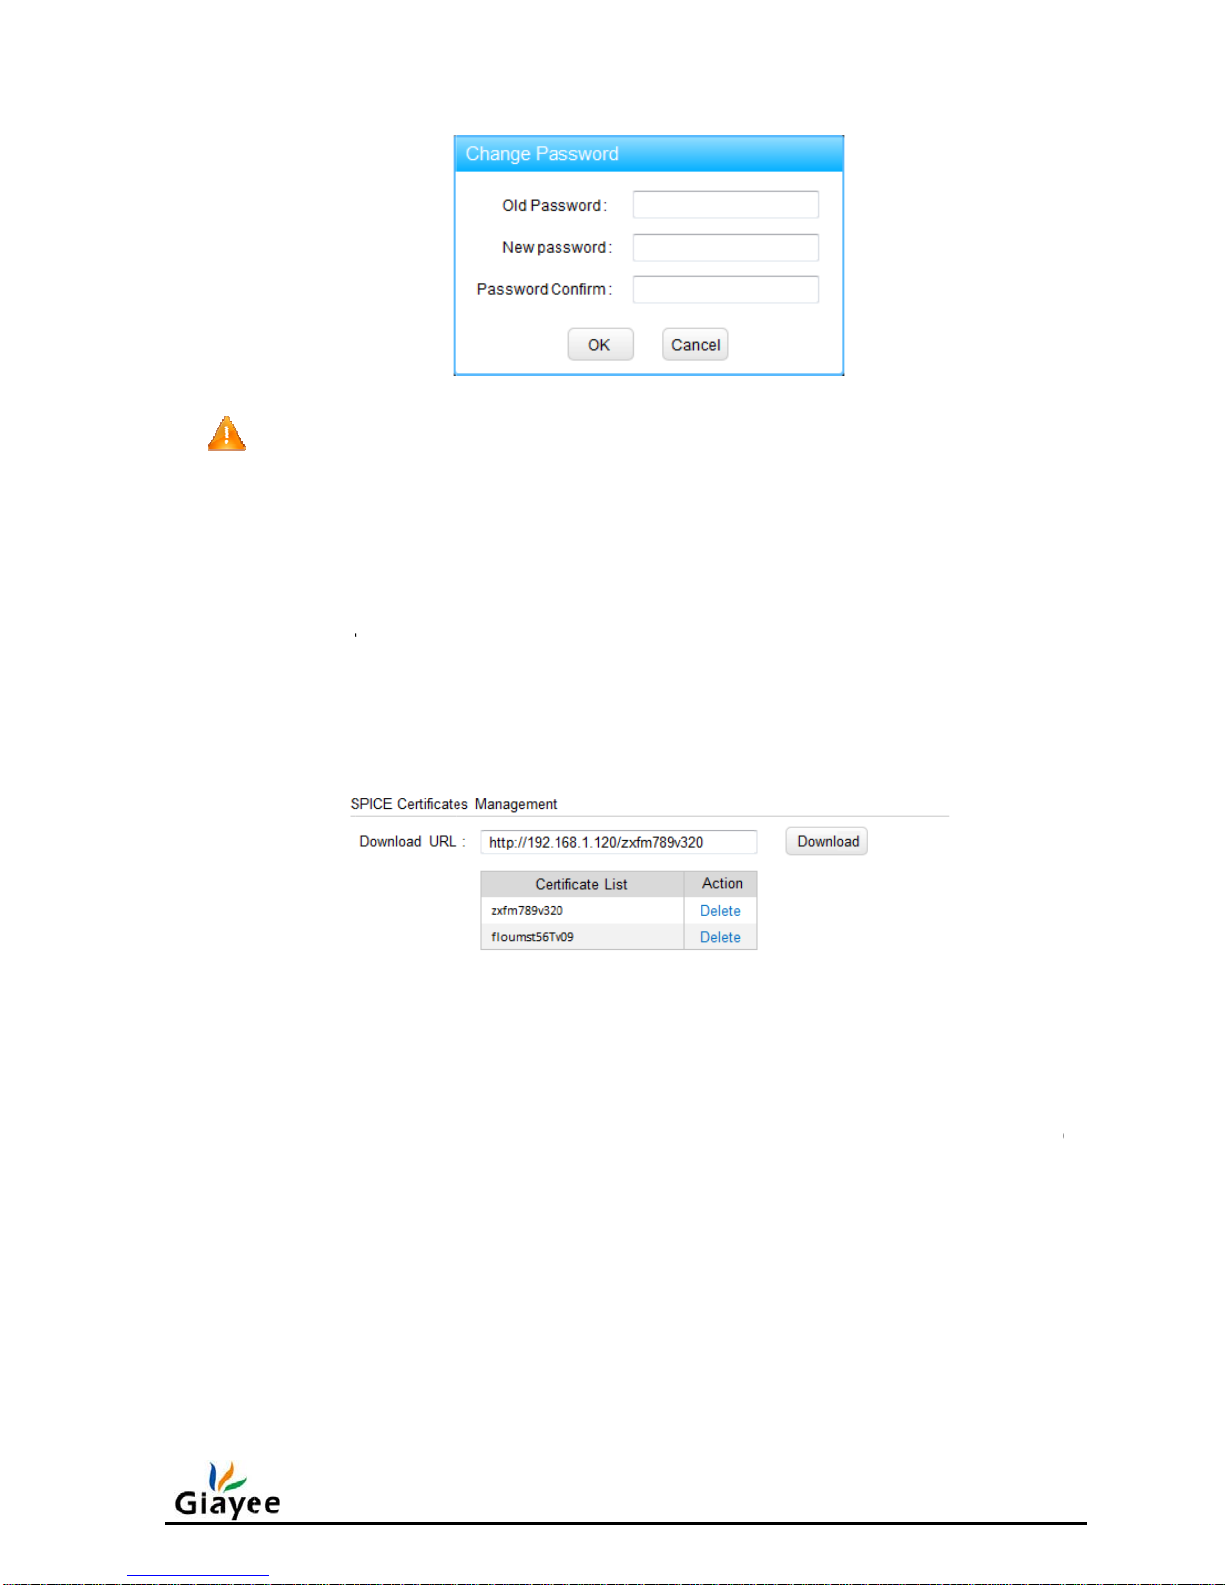
c Chang
with the
f
ord, plea
t
security
c
device. T
h
on.
d SPICE
following
ity】,【M
rsion】.
e followi
n
Agent】.
e Passwo
r
actory de
f
e refer to
onnection
e downlo
a
Certificat
e
entries:【
emory Ca
p
g entries:
d
ault settin
g
chapter 5
. Shown a
s
ded certif
s
System N
acity】,
【
【Operati
o
s.
to restore
FIG.5-1
2
icate will
b
ame】,【
P
CPU Inf
o
n System
】
Page 18 of
the factor
y
d, you ca
n
e listed a
n
roduct
】,【Wire
d
,【RDP
19
d
Page 19
Page 19 of 19
To restore the factory default settings will clear user configuration and system log, There
are three steps to restore factory default setting:
Step 1: Power on the device and cancel auto connecting;
Step 2: Press【Ctrl+Alt+Shift+F2】;
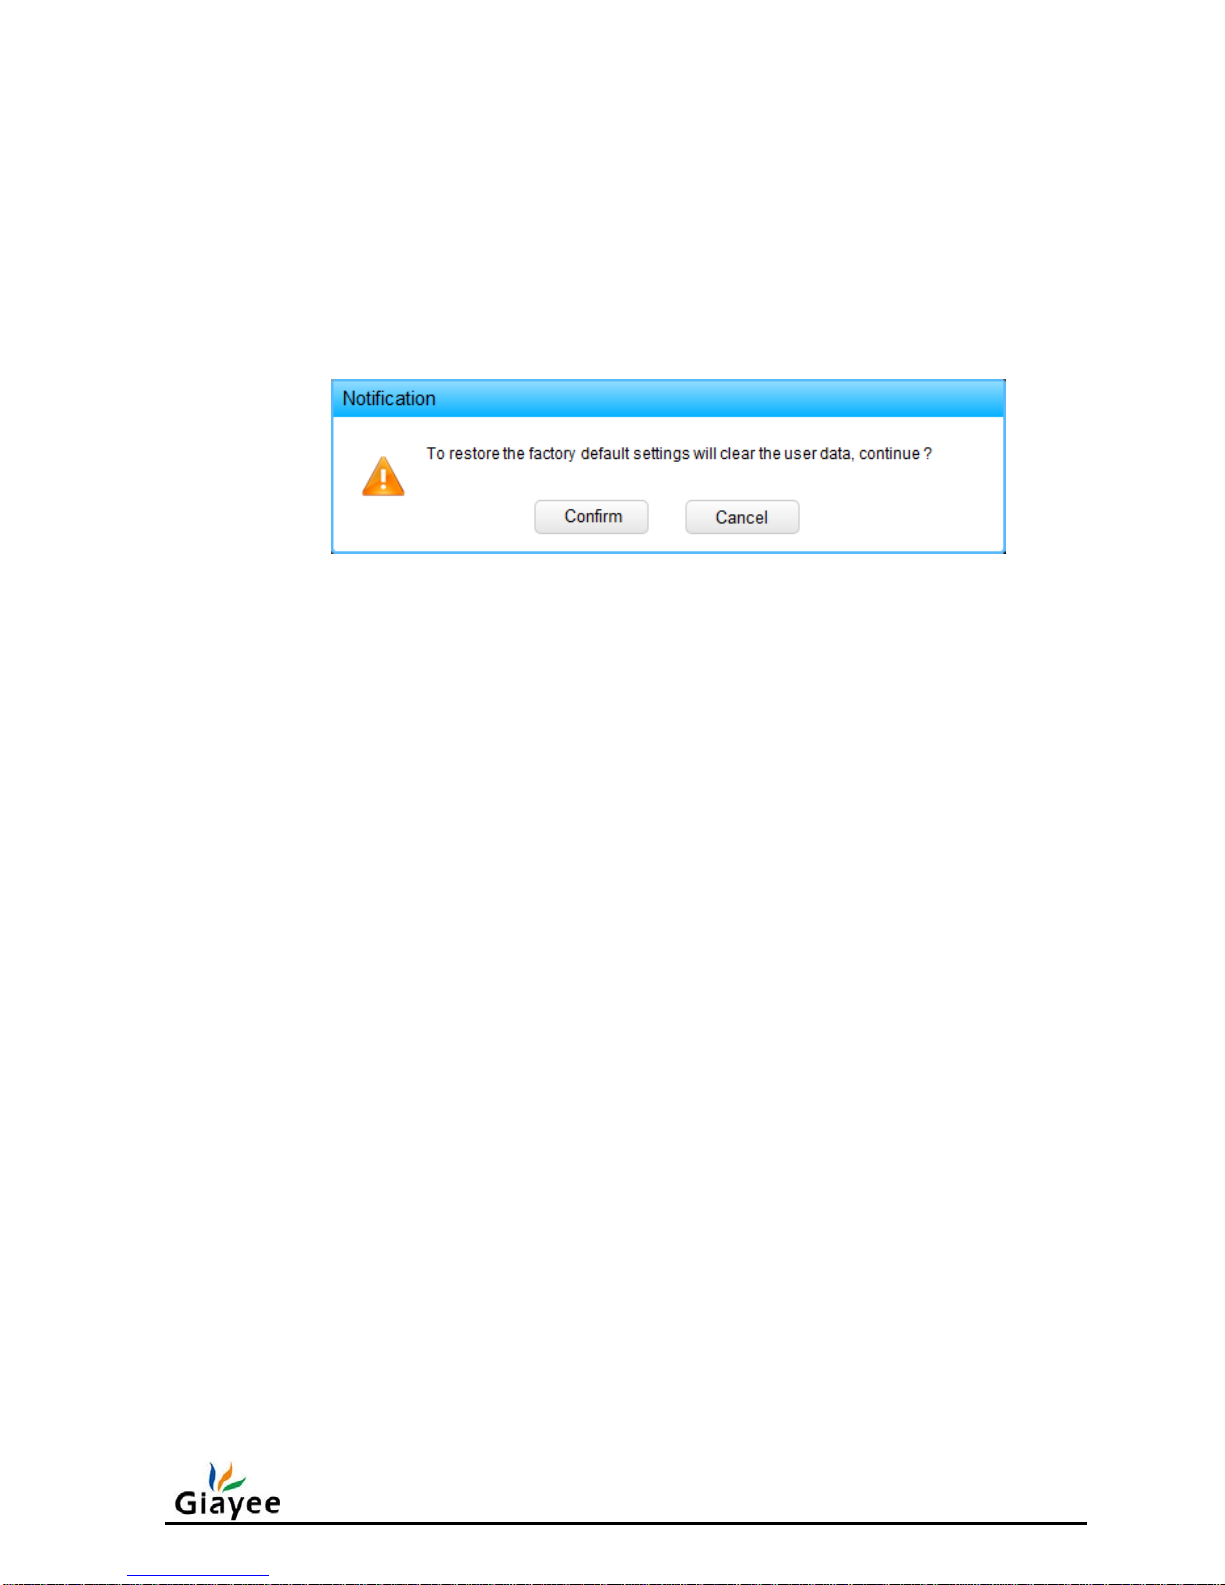
Step 3: Click 【Confirm】 button in the notification dialog shown as FIG.6-1. The
device will reboot to restore the factory default setting.
FIG.6-1 Confirm Dialog to Reset System
7 FAQ
1) How to restore default resolution?
Three steps to restore the device output resolution to default setting with 800x600:
Step 1: Power on and waiting for the end of boot screen (Shown as FIG.5-1);
Step 2: Keep pressing 【Ctrl+Alt+Shift+s】keys for 5~10 seconds;
Step 3: Waiting for reboot and check the new resolution.
 Loading...