

Page 1

1
Table of Contents
Table of Contents ............................................................................................................................ 1
1 Out Look Desciption .................................................................................................................... 2
2 Power Button Usage ..................................................................................................................... 3
3 Touch-Screen Navigation ............................................................................................................ 3
4 Using microSD Card .................................................................................................................... 3
5 Getting Started ............................................................................................................................. 3
7 Screen Lock .................................................................................................................................. 5
8 Pre-loaded Applications .............................................................................................................. 6
9 Desktop menu functions .............................................................................................................. 8
10 Application Management ........................................................................................................ 10
11 Phone ......................................................................................................................................... 12
12 Message ..................................................................................................................................... 12
13 Contacts .................................................................................................................................... 13
14 Qianxun Player ......................................................................................................................... 13
15 CLOCK ..................................................................................................................................... 14
16 MARKET .................................................................................................................................. 16
17 BROWSER ............................................................................................................................... 17
18 CALENDAR ............................................................................................................................. 19
19 CAMERA .................................................................................................................................. 21
20 CALCULATOR ....................................................................................................................... 22
21 EMAIL ...................................................................................................................................... 23
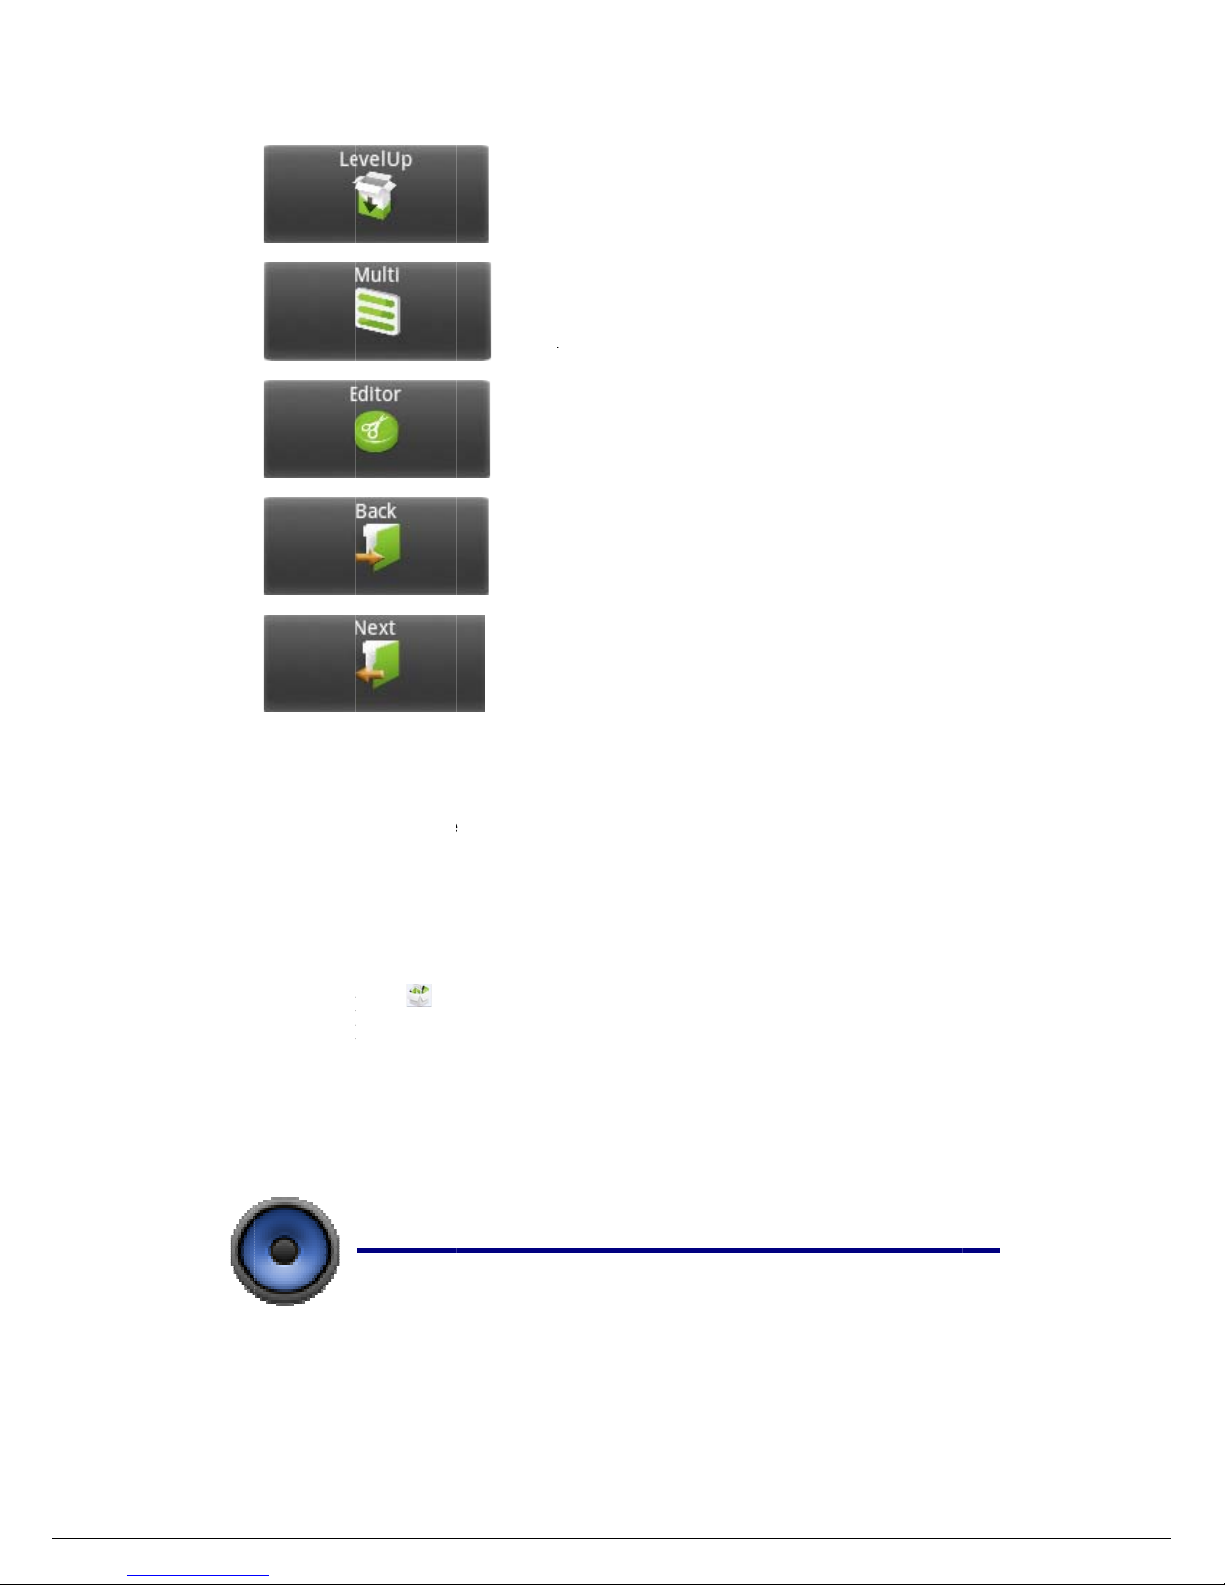
22 EXPLORER ............................................................................................................................. 25
23 MY MUSIC ............................................................................................................................... 26
24 Vedio.......................................................................................................................................... 28
25 GALLERY ................................................................................................................................ 29
26 ACCOUNTS ............................................................................................................................. 31
27 Gmail ......................................................................................................................................... 32
28 Wi-Fi
.......................................................................................................................................... 34
29 HDMI ........................................................................................................................................ 36
30 Settings ...................................................................................................................................... 37
Page 2
1
O
①
②
③
④
ut Lo
o
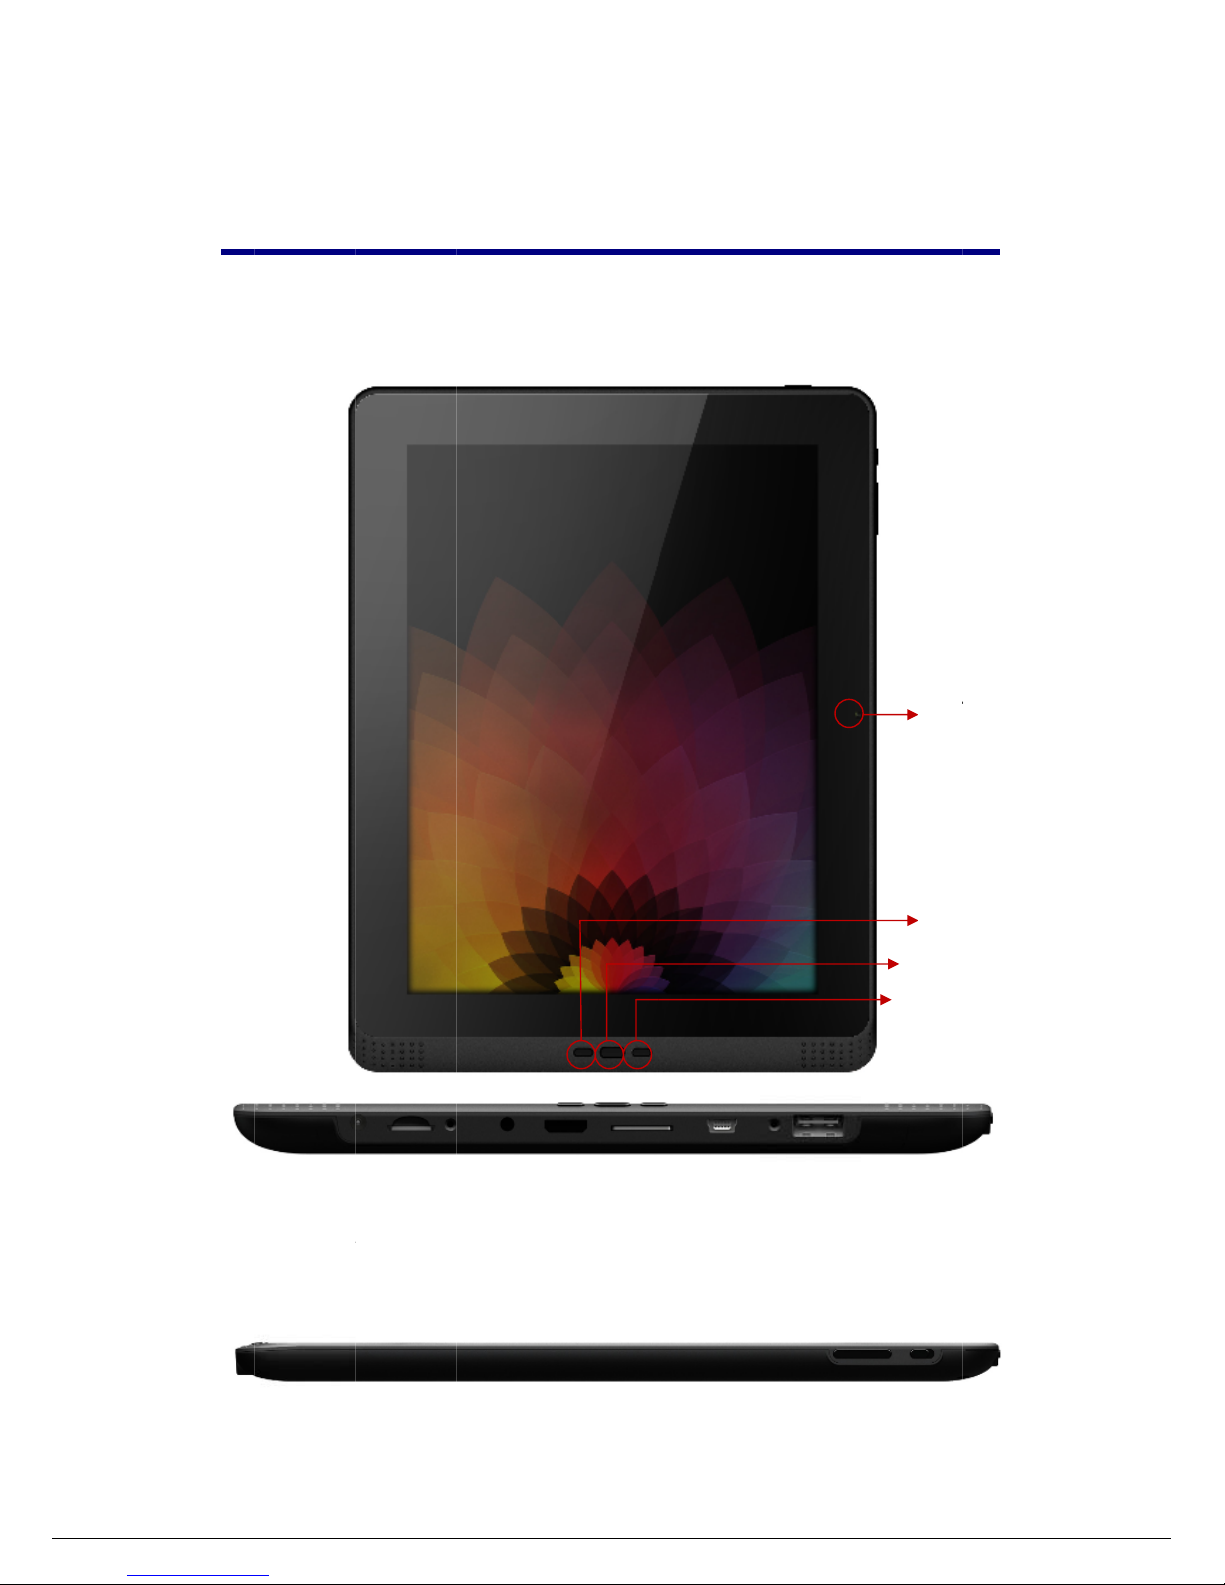
①
DC port
SD Card por
t
Head Phone
HDMI port
k Des
c
②
t
port
iption
③
2
④ ⑤
⑤
⑥
⑦
⑥
SIM Card p
o
USB port
USB port 2
⑦
rt
①
② ③
Me
n
Bac
k
Ho
m
F
r
u
space
e
ont-facing
Camera
Page 3

3
① Volume Plus
② Volume Minus
③ Power Key
2 Power Button Usage
Turn On: Press the power button and hold for 2 seconds. Before doing this, you should make sure
that On/off button is on.
Turn Off: Press the power button and hold for 2 seconds →tap Power off → tap OK
Sleep Mode On/Off: Press & release the power button quickly to turn sleep mode on and off.
3 Touch-Screen Navigation
The touch-screen allows for quick, easy and convenient navigation for all applications.
Throughout the User Guide, you are instructed to use the following tap or touch navigation
methods:
Tap: quick tap & release on an item on the screen.
Finger slide: touch & slide your finger across the screen and then release.
Touch & hold: touch and hold in place approx 2 seconds, and then release to display an options
window.
Note:
To avoid scratching or crushing, do not pla ce ob jec ts on the touch screen surface.
4 Using microSD Card
· Insert your card into the microSD slot until it clicks into place. When ready for use, it’s OK.
· Remove microSD Card
· Close all applications or documents which have been opened on the card. Press Menu →
Settings → Storage → Unmount SD card → OK.
Note:
Don’t insert and remove the SD card repeatedly in a short time, as this may cause damage to the
card.
5 Getting Started
Page 4

4
Charge the device
Note:
You cannot charge the battery using the USB cable.
You can use the device while the battery is charging, although the charging time is longer when
operating and charging at the same time.
· Plug the power adapter into an electrical wall outlet named DC, and then connect to the
device to fully charge the battery before use (approx. 4hour).
· While charging, the battery indicator light is red. When fully charged, the battery indicator
light is off
Turn the device on
Press the power button and hold for 2 seconds.
Start Wi-Fi Network
· Turn on Wi-Fi
Since many features require a Wi-Fi connection, we recommend you set up your Wi-Fi network
now.
Press Menu → Settings, → Wireless & network.
Check Wi-Fi to turn on.
· Connect to Wi-Fi
The device automatically scans and lists all local Wi-Fi Network found. A indicates secure
networks that require login name/password to connect.
1、Tap the desired network to which you want to connect, → enter the Network Password if
applicable, → tap Connect.
2、Tap back key to return to the Home screen.
Note:
If your Wi-Fi network is set as hidden, it won’t be found by the auto scan. Tap Add Wi-Fi network
and follow the prompts to ad d your net work
6 Launcher
Page 5

5
① ② ③ ④ ⑤⑥⑦ ⑧
① Backspace
② Home
③ Display the program is running
④ Menu
⑤ 3G icon
⑥ Signal icon
⑦ Battery
⑧ Time
7 Screen Lock
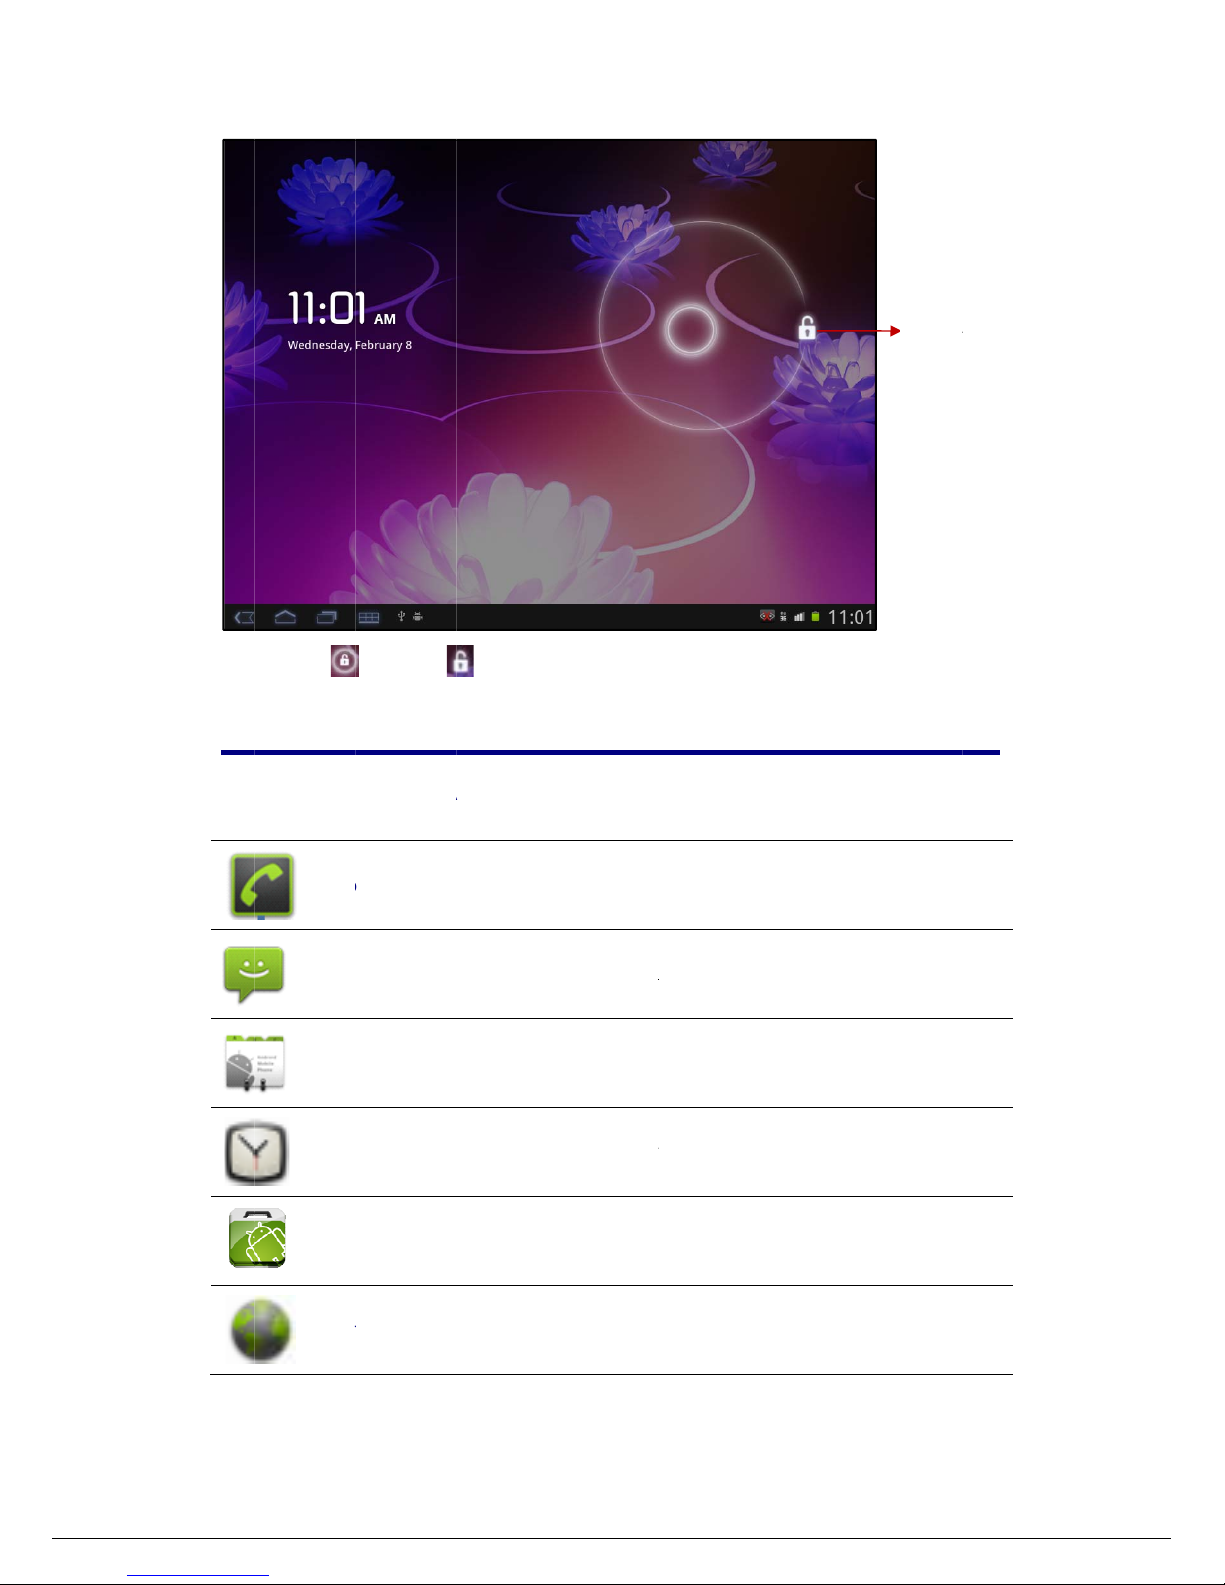
Can be set to automatically lock screen or quickly press the power button to manual l y lock screen.
Lock screen displays the following:
Page 6
1.
P
8
ressing
Pre-lo
Ph
o
Me
s
Co
n
Clo
c
Ma
r
Bro
w
,drag to
aded
A
ne
sage
tacts
k
ket
w
ser
,the releas
i
pplicat
Dialing
t
Sending
,
Searchi
n
Use as a
l
Downlo
a
Access t
h
6
ng it . As th
e
ions
o voice call
Reading, a
n
g contact
arm clock
w
ded applicat
e Internet a
n
picture diap
d T e xting M
e
ith schedule
d
ions quickly
d “surf the
w
lay
ssage
alarms.
& easily.
eb” whenev er desired.
Drag
t
t
o here with pressing
Page 7

Cal
e
Sou
Ca
m
Cal
c
Em
a
Ex
p
Mu
s
Vid
e
Gal
l
Go
o
Gm
Ma
p
Na
v
Pla
c
ndar
nd recorder
era
ulator
il
lorer
ic
o Player
ery
gle Search
ail
s
igation
es
Calenda
r
For reco
r
Capture
Do calc
u
Send/Re
Explore
r
Use to i
n
Play an
d
Play an
d
View an
d
For sear
c
For sen
d
For disc
o
Google
E
For getti
A shortc
u
7
with ability
ding your v
o
image of the
lation.
ceive email
u
application
stall Androi
d
manage aud
manage vid
e
manage ph
o
hing inform
a
ing and rece
i
vering the
w
arth
ng direction
s
u
t for findin
g
to set events
ices
screen.
sing your ex
for viewing
apps, and t
o
io files.
o files.
to files.
tion on web
ving mails b
y
orld with st
r
, finding yo
u
places usin
g
.
isting email
a
and managi
n
backup file
s
quickly
Gmail serv
eet and sate
l
r location
Navigation
ddresses.
g files and
to your SD
c
er
lite data fro
m
service
apps.
ard.
the
Page 8
☆
T
a☆ T
s
。
9
D
Lat
i
Set
t
Ap
k
Qia
n
o move
a
nd then
ouch, ho
l
creen.
eskto
p
On the des
k
tude
ings
Installer
xun Player
n icon t
o
release
i
d and sl
i
men
u
top , tap the
Sharing
y
service
Multiple
Used fo
Nandfla
s
You can
the Des
k
t when i
de icons
functi
o
to d is
p
8
our locatio
n
settings for
p
r installatio
n
h the andro
watch the
v
top scr
e
t appear
s
onto
t
ns
lay menu.
through the
ersonalizin
g
the andro
i
id applicatio
n
ideo source
en, touc
h
on the
o remove
Google Lati
t
and enhanc
i
d applicatio
online
& hold
Desktop
s
them fro
m
t
ude user lo
c
ng your Dev
i
n in SD ca
r
on the i
c
creen.
the Des
k
ation
ce.
d or
on,
top
Page 9

9
Add
In desktop screen visible part that allowed only 16 icons ,In order
to add more items , Around with your fingers sliding screen can
see more space available, and then click add icon
. If the screen
desktop has shown that full, then increase icon will show for gray,
do not use.
shortcut
Add in the desktop shortcut application, setting,
and bookmark.
☆
If you choose to have shortcut on the desktop
is in the item, so they will be reproduced, that have
the same multiple icon produce
Widgets
Analog clock: Add a circular analog clock.
Calendar:Adding a calendar small tools, show the
current date and time.
Folders
New folder
create a new folder
Menu
Page 10
M
L
1
0
anage
Wallp
a
Sear
c
auncher
S
Setti
n
Appli
c
Install An
d
Purcha
b
e inst
a
1. C
oins
2. Ta
p
3. Ta
papp
4. Ta
pThscr
5. Ta
p
apps
per
h
ettin
g
ation
M
roid Appl
i
sed or free
A
lled quickly
py the .apk
ert or conne
c
p
the Ap
k
p
Install an
d
lication file
s
p
on a .apk
f
e applicatio
n
een.
p
Open to l
a
Wallpapers
Manage
apps
anage
cations
ndroid appli
c
& easily on
y
files that y
o
t to your De
v
Installer ap
p
locate the f
o
were saved
.
ile → Inst
a
is installed
unch the ap
p
10
Set Wallp
a
Used to c
h
device, cli
c
installatio
n
Select W
a
Wallpaper
Do search
Tap input
tap
Set the L
a
See behin
d
ment
ations that
y
our T able t
u
u want to i
n
ice.
lication ico
n
lder (Intern
ll.
and the app
lication now
pe
r
eck all the
a
k a progra
m
position, e
t
llpaper from
s
item→ inp
u
。
uncher
"Settings"
ou have do
w
sing the
A
stall onto
a
.
al Memory
o
lication icon
, or tap Don
e
pplication o
can be unl
o
c
Gallery,Liv
e
t what you
w
section
nloaded to
y
pkInstaller
SD card o
r
r TF Card)
is added to
to return to
n the curren
aded, mobi
r Wallpape
r
ant to seat
c
our comput
e
application.
USB devic
e
in which th
e
the Applica
the ApkIns
t
t
le
s or
h→
r can
, →
.apk
tions
aller
Page 11

sc
r
Download
You c
a
easily
i
1. Ta
p
2. E
nwa
3. A
ft
D
o
Download
Please
Uninstalli
n
You c
a
install
e
1. Pr
e
2. Ta
p
3. Ta
p
You c
a
1. Ta
p
2. Ta
p
3. Ta
p
4. Ta
p
een.
Android
A
n download
nstall them
o
p
the
W
ter the desir
e
nt to install
o
er the dow
n
wnload hist
o
Android
A
refer to Cha
p
Androi
d
n also qui
c
d.
ss Menu
→
p
the applica
t
p
OK to con
f
n also use A
p
p
the A
p
Manage
p
one .apk f
r
p
OK to con
f
pplication
s
Android ap
p
n your devic
eb applicat
i
d website
U
n your devi
c
n
load is co
m
ry screen),
pplication
s
ter 14 “APP
Applicati
o
kly and ea
s
Settings
→
ion you wa
n
irm the Uni
n
kInstaller t
pkInstaller
a
om the appli
c
irm to unins
t
11
direct fr
o
lications di
r
e.
on icon to la
u
RL, and tap
e.
plete, touc
h
→ tap Ope
n
direct fr
o
Market”
ns
ily uninstall
Applicati
o
t to uninstall
stall.
o uninstall t
h
pplication i
c
ation list an
d
all the .apk
m a Websi
ectly from
w
nch the inte
r
the downlo
a
& hold
o
→ Install
m APP M
a
the Androi
d
ns → Ma
n
, → Uninst
a
e Android a
p
on.
tap Uninst
a
te
ebsites, and
net browser
.
d link for t
h
n the dow
n
.
rket
applicatio
n
age applica
t
ll.
plications
ll
then quickl
y
e applicatio
n
load file (i
n
s that you
ions.
and
you
the
have
Page 12
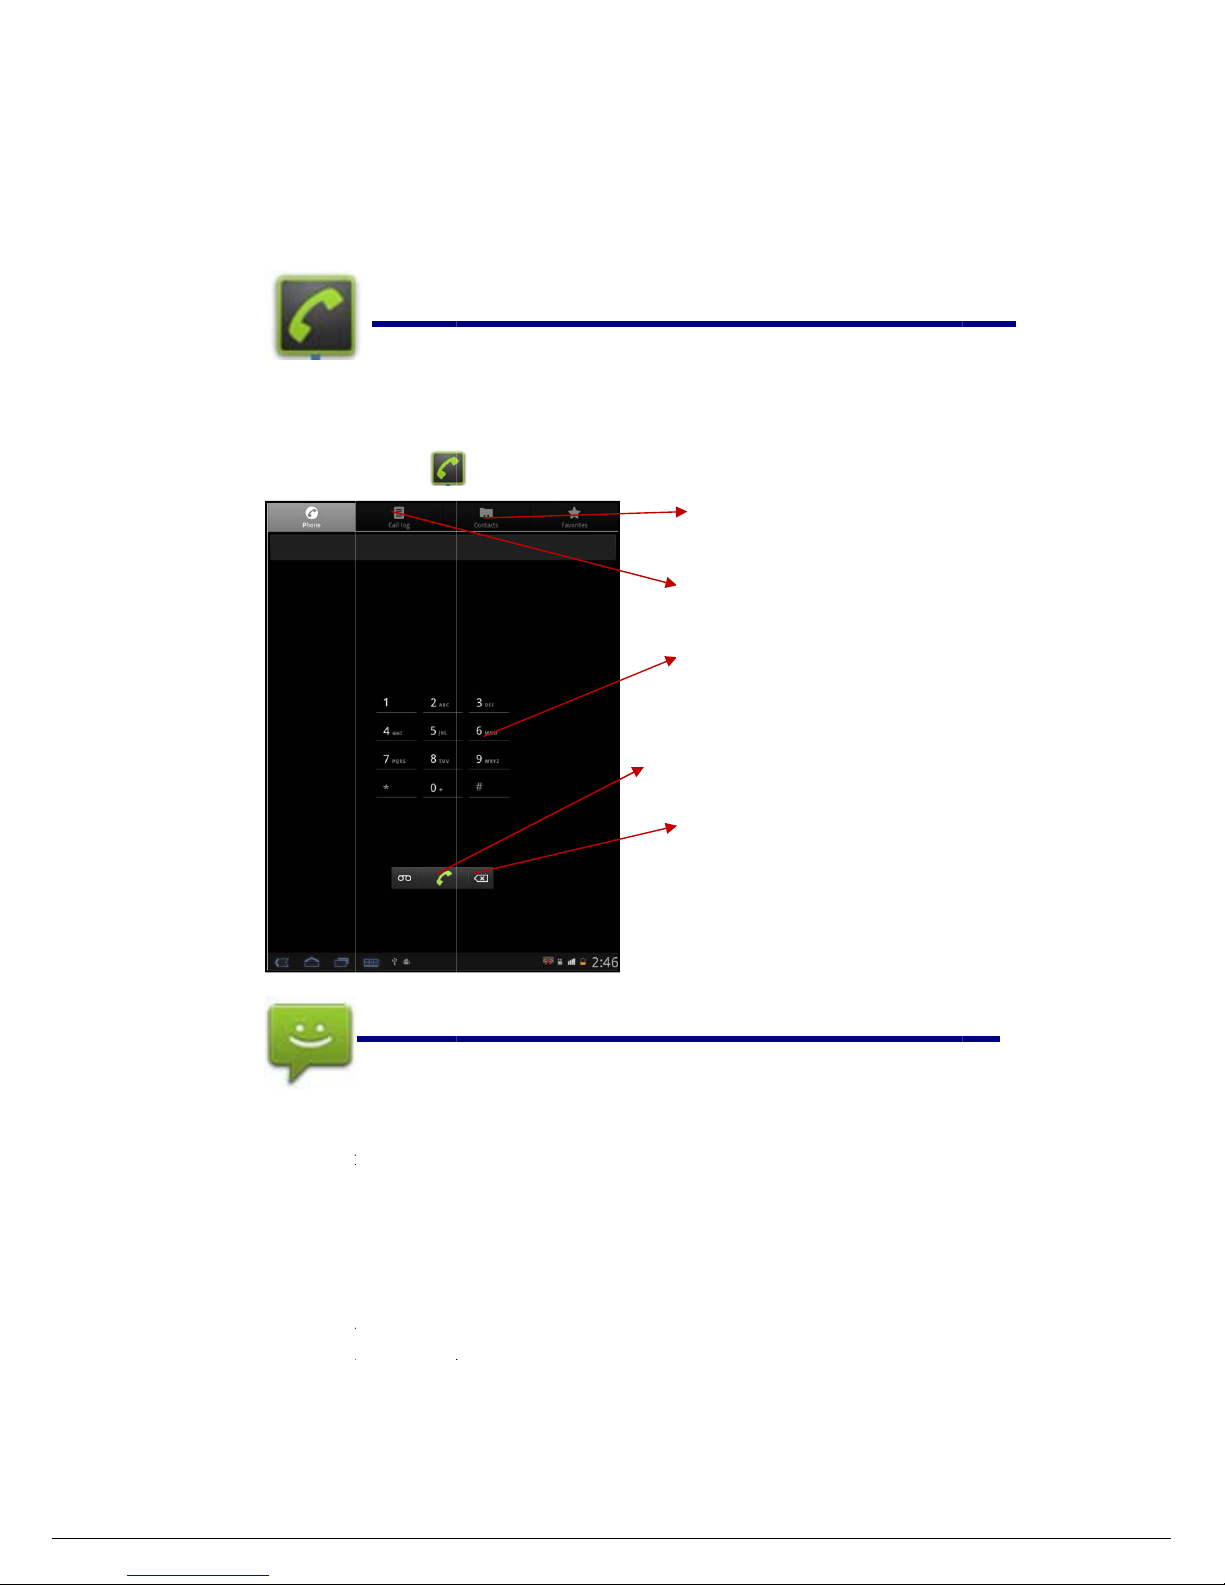
1
1 12
Phon
e
Press the p
h
Mess
a
1 Open my
m
Press the
T
his oper
a
which is
o
2 Send mes
s
Pressing
“
Input the
When yo
u
time, yo
u
You can
a
Touch in
p
one icon
e
essage
message ico
n
tion will op
e
ngoing.
age
New massa
g
phone numb
e
enter mob
i
can touch t
h
lso enter alr
e
ut box to st
a
,as。
on the scre
e
n "message
e” to comp
o
rs in the col
u
le phone nu
m
e right advic
e
ady entities
rt writing te
x
12
n.
" window,y
o
se new mass
a
mn.
ber on the
s
, also can c
o
of the mobil
e
t messages
u can creat
e
ge.
creen to ma
t
ntinue to in
p
phone num
b
Dialing
p
Get throu
g
Delete
n
Check c
a
Make
t
contact
s
new messa
g
ch that of t
h
ut cell phon
e
er the conta
c
hone numb
e
h
umber
ll records
he phone
c
e or open th
e
e contact. A
number.
t's name.
rs
alls by
chat
t this
Page 13
1
314
Conta
c
1 Open the
a
Touch scre
e
You can als
o
All your c
o
b
ehind atta
c
The default
If you are n
o
Interest rate
2 check of
c
Open the "c
You want t
o
The contact
3 add conta
c
You can ad
d
ActiveSync
synchroniz
a
If you giv
e
forwarding
m
the system
address and
Existing co
n
Qianx
u
Press
The first ti
m
ts
ddress boo
k
n or Lord of
use "fast c
o
ntacts in th
e
hed
telephone n
u
t add any c
o
s, hints you
h
ontacts
ontact".
see the deta
of all kinds
o
ts
contacts on
account or
s
tion.
not in the
ail.
will this e
m
tact merged
n Pla
y
icon.
e you open
N
to add, chec
k
the starter a
d
ntact" open
"
alphabetic
a
mber.
ntact, then t
h
ow to start t
o
ils of the tou
c
f contact wi
l
mobile pho
n
upport the a
"contact" lis
ail address
a
into one ent
r
er
ews and W
e
13
and contac
t
dress book i
c
contact".
l order will
e "contact"
w
their own
m
h of the con
t
l show the a
p
es, and with
ccounts in o
t
ted in some
dd contact.
y. You can a
l
ather, the be
your friend
s
on.
be displaye
d
ill show a l
e
obile phone
act.
propriate d
e
Google acco
u
her contact
s
email addr
e
The "conta
c
so manually
low page is
d
and acquai
n
in rolling
l
tter
add contact
tails behind.
nt, Microso
f
ynchronizat
i
sses to sen
d
t" will atte
m
managemen
t
isplayed
tances
ist. Contact
t Exchange
on correspo
n
reply E-m
a
pt to put a
of the proc
e
each
dent
il or
new
ss.
Page 14
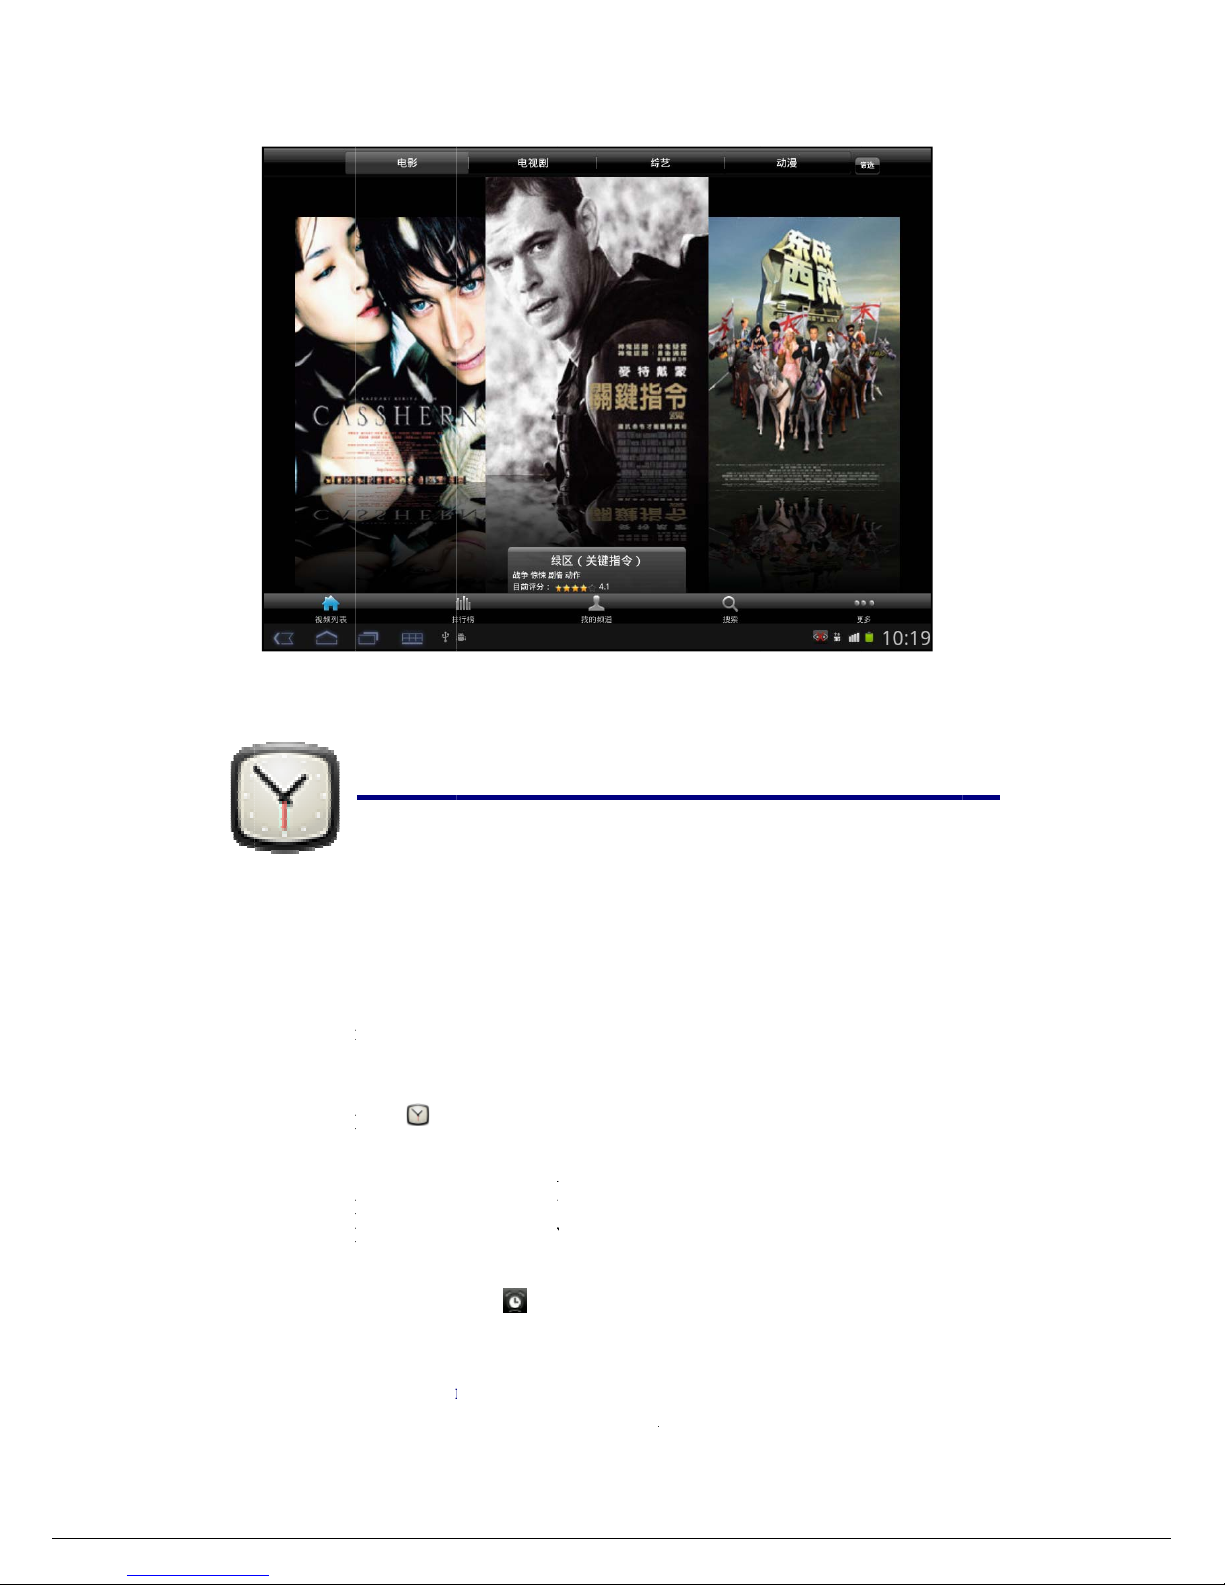
1
5
Search the
v
CLOC
K
Alarm
You ca
n
z A
d
1. Ta
p
2. Pr
e
3. Se
t
4. Ta
p
5. Ta
p
Note:
-
z S
h
When
a
ideo you lik
e
use your d
e
d Alarm
the C
l
ss Menu ke
y
up your ala
r
Turn on a
l
Done or ta
p
This clock
alarms hav
ut Off Alar
m
scheduled
a
.
vice as an al
ock applicat
i
→ Add al
a
m as desire
d
arm to acti
v
Revert to
r
icon di
sp
e been set a
n
Alert
larm is activ
a
14
arm clock b
y
on icon.
rm.
.
ate the alar
m
eset your ala
r
layed at th
e
d are active.
ted, a pop-
u
setting mult
.
m again.
top of scre
e
p window w
i
iple alarms.
ns indicates
th the alarm
that one or
title appears.
more
Page 15
15
1. Tap Snooze if you want to be reminded again in 10 minutes.
2. Tap Dismiss to cancel the alert.
z T urn Alarm on
On alarms that you have set to repeat, you may want to temporarily turn on alarms
rather than delete them.
1. In the Alarm screen, tap
on the alarm(s) you want to turn on.
2. Tap to turn on again.
z Edit Alarm
1. Tap the Clock application icon.
2. Press Menu key → Alarms
3. Tap on the alarm you want to edit, → make desired edits.
z Delete Alarm
1. Tap the Clock application icon.
2. Press Menu key → Alarms
3. Tap on the alarm you want to delete.
4. Tap Delete to delete the clock.
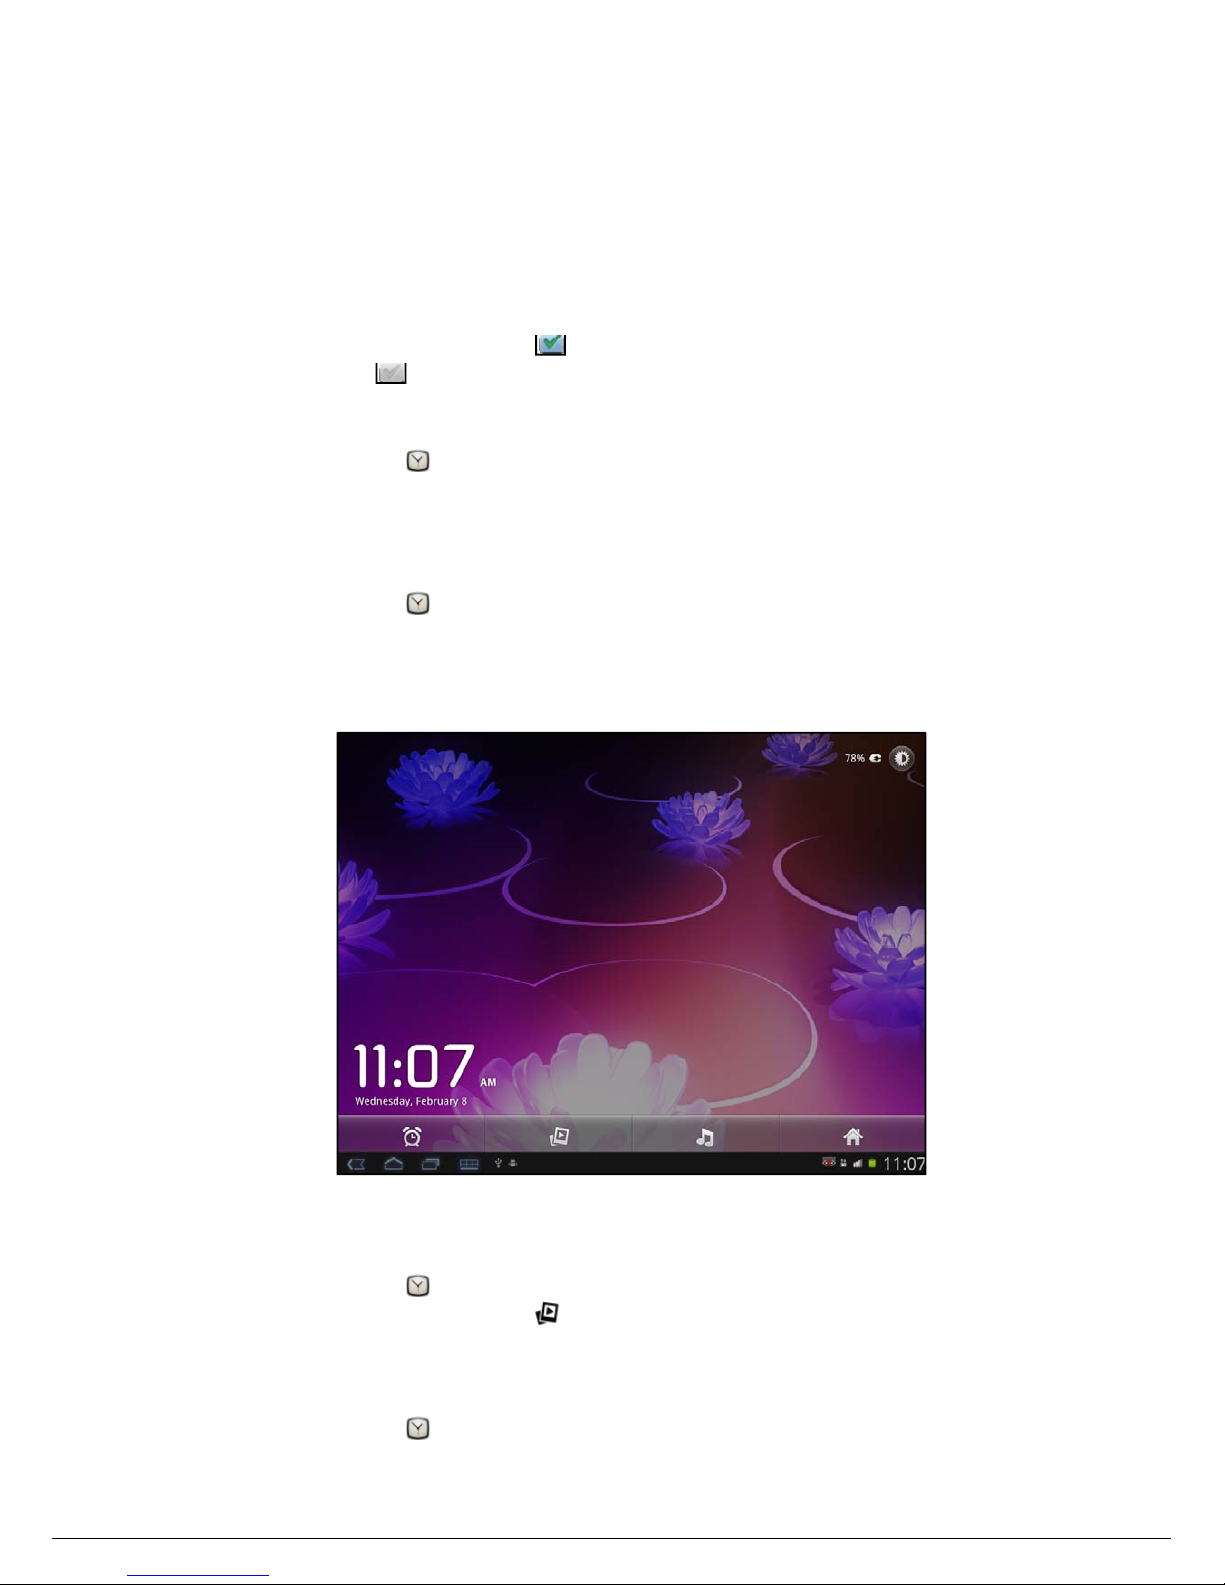
View slide show
You can view your pictures which are stored in your SD card by slide
1. Tap the Clock application icon.
2. Tap the slide show icon on the bottom of the screen.
3. Press Back key to end the slide show.
Play music
1. Tap the Clock application icon.
Page 16
1
6
2. Ta
p
Syste
m
MAR
K
The A
p
your
M
interne
t
Download
1. Ta
pscr
Note:
-
2. Y
o
on
or
3. Ta
pWhWhsuc
4. Sl
ilau
5. Pr
e
App Mar
k
Press
M
z S
e
T
a
z
M
p
the “Music
can open th
e
ET
p Market h
a
ID. Before
t
connection
Applicati
o
the
A
een.
The first ti
m
have not y
e
Otherwise,
again.
u can select
bottom of t
h
you can also
p
any applic
a
en downloa
d
en the ico
n
cessfully.
de down th
e
nch it now o
r
ss Back key
et Functio
n
enu key to
d
arch
p to enter th
e
y Apps
” icon
o
music appl
i
s many ap
p
using APP
(Please refer
ns
pp Market
e, you are
p
t registered
a
tap Login
a
applications
e screen on
t
search appli
c
tion you wa
n
process sta
r
is d
i
status bar
a
r
tap Uninst
a
to return to
t
Menu
isplay the A
p
keys of the
16
n the botto
m
cation, Cho
o
lications tha
t
Market, y
o
to Chapter
2
application
i
romp t ed f or
n account, t
a
nd enter y
o
from the de
f
he left to ch
o
ations by na
m
t to downlo
a
ted, the ico
n
splayed on
nd tap the
ll.
he market sc
r
p Market F
u
application
y
of the cloc
k
se the music
t
you can q
u
u have to
m
5 Wi-Fi )
con and tap
your App
Ma
p Register.
ur login in
fo
ault Featur
e
ose from th
e
e by tappi
n
d, → FRE
E
will b
e
the status
b
“Successful
l
een to dow
n
nction Me
n
ou want to s
.
you want to
ickly and e
a
ake sure y
o
Accept on
t
rket login i
n
rmation an
d
d group, or
application
g the icon
→ OK.
displayed o
n
ar, the ap
p
y installed”
load other a
p
u.
earch.
play.
sily downlo
a
u device h
a
he bottom
o
formation.
If
then tap
L
tab Apps/G
a
list by categ
o
.
the status b
a
is downl
o
→ tap Op
e
plications
d to
ve a
f the
you
ogin
mes
ries,
r.
aded
n to
Page 17

。
1
7
This p
a
Marke
t
Unins
t
1. Ta
p
2. Ta
p
3. Ta
p
Updat
e
1. Ta
p
2. Ta
p
z S
e
You c
a
Filteri
n
Notifi
c
z H
If you
h
BRO
W
Using
B
Opening
B
Tap th
e
ge displays
all apps (W
i
p
the app yo
u
p
Uninstall.
p
“OK” whe
n
apps (For
F
p
the app yo
u
FREE →
ttings
n see some s
g level
S
ations
S
elp
ave some d
o
SER
rowser to s
u
rowser
browser ico
the apps ins
t
th Installed
d
want to uni
n
display a d
i
REE displa
y
want to up
d
OK
ettings, such
et the filteri
n
et whether a
ubts, please
rf the web.
n on the Ho
m
17
alled on you
r
isplayed on
stall.
alog.
ed on right
o
ate
as: Filterin
g
g rules as de
notification
p
refer to this
p
e screen
,
device that
right of the i
t
f the item)
level and N
o
sired
rompt whe
n
art.
and then yo
u
can be also
t
em)
tifications
s
application
i
can open t
h
found in the
ettings.
s download
e
e W eb brow
s
APP
d.
er.
Page 18
18
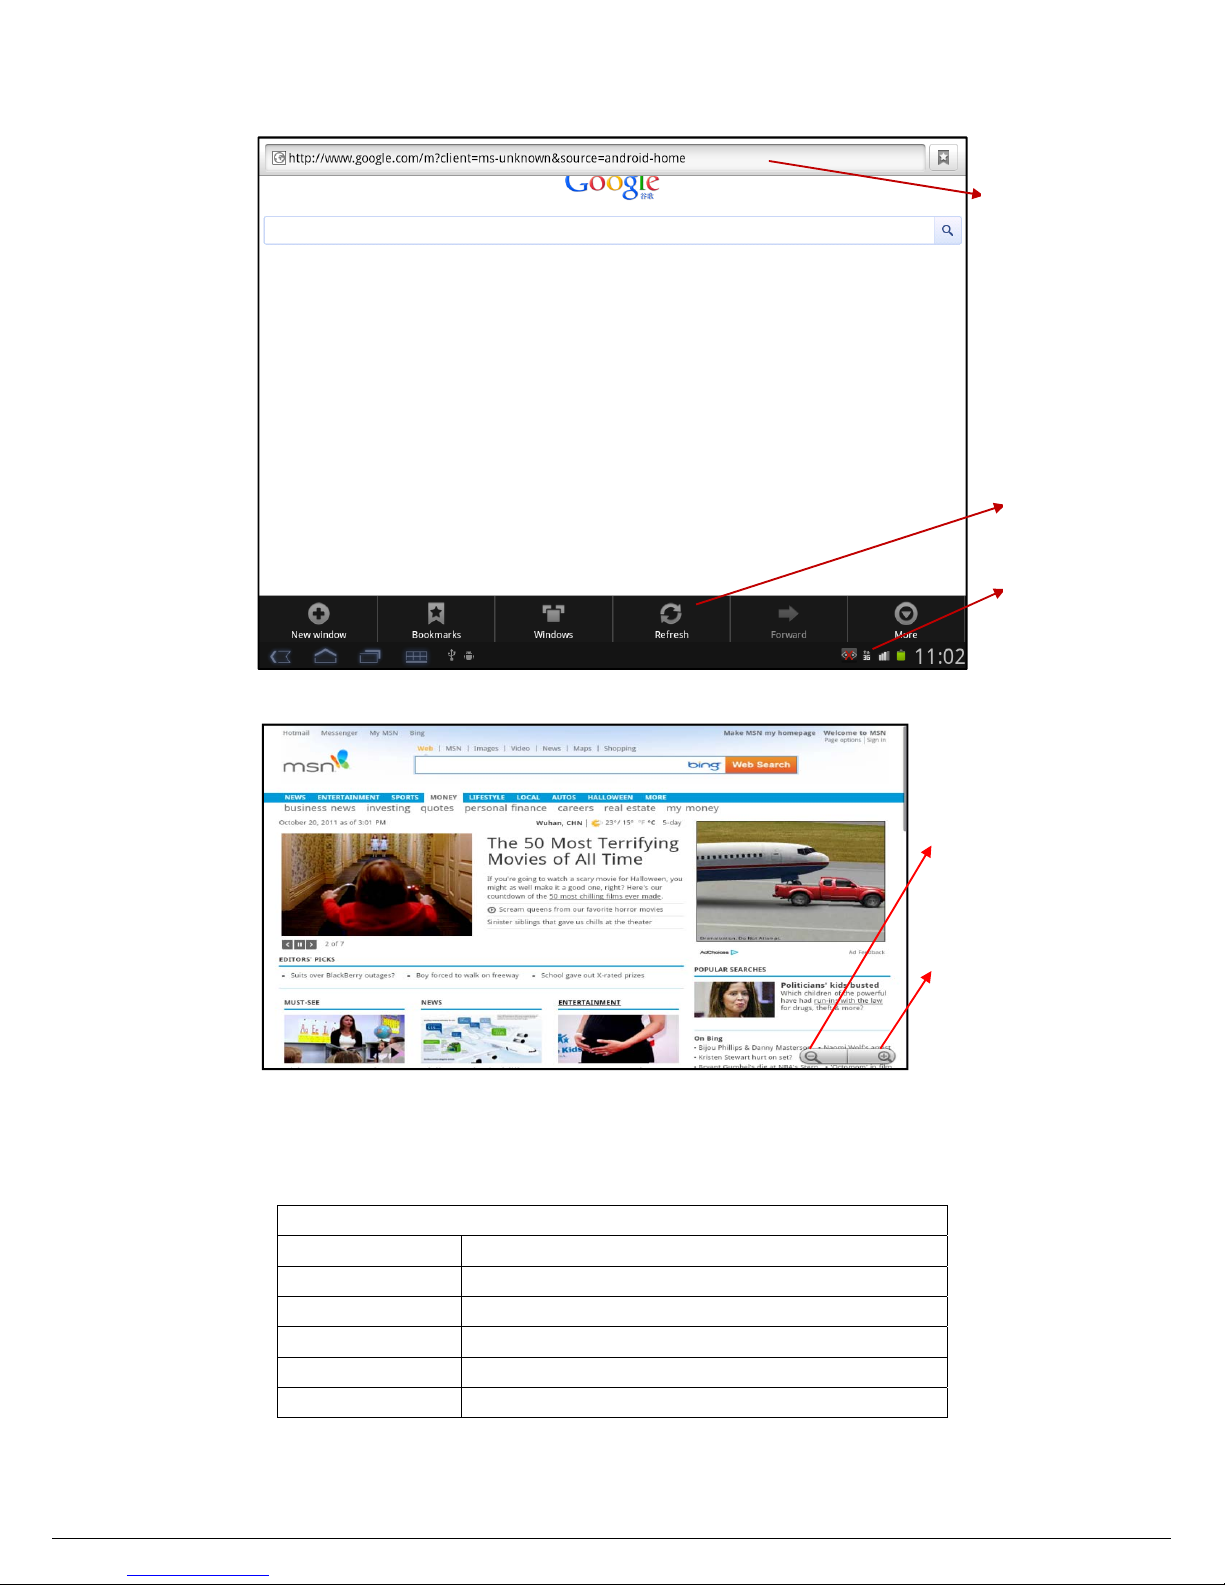
You can browse the web by 3G Wi-Fi or Ethernet.
Web touch tips Zoom & magnify
Browser options
Press Menu key to see browser options:
Options
Open
Open a new browser window.
Bookmarks
See your bookmarks.
Windows
View the browser windows that are currently open.
Refresh
Refresh the current page.
Back/Forward
Navigate to previously viewed pages.
More
Shows additional browser options.
Magnify the size of the
page
Zoom to the page
Website of
current page
Menu
Network Status
Page 19
1
8
CALE
N
Tap th
e
For th
e
Gmail
follow
Calen
d
Open Cal
e
Events
f
calendar
b
y press
i
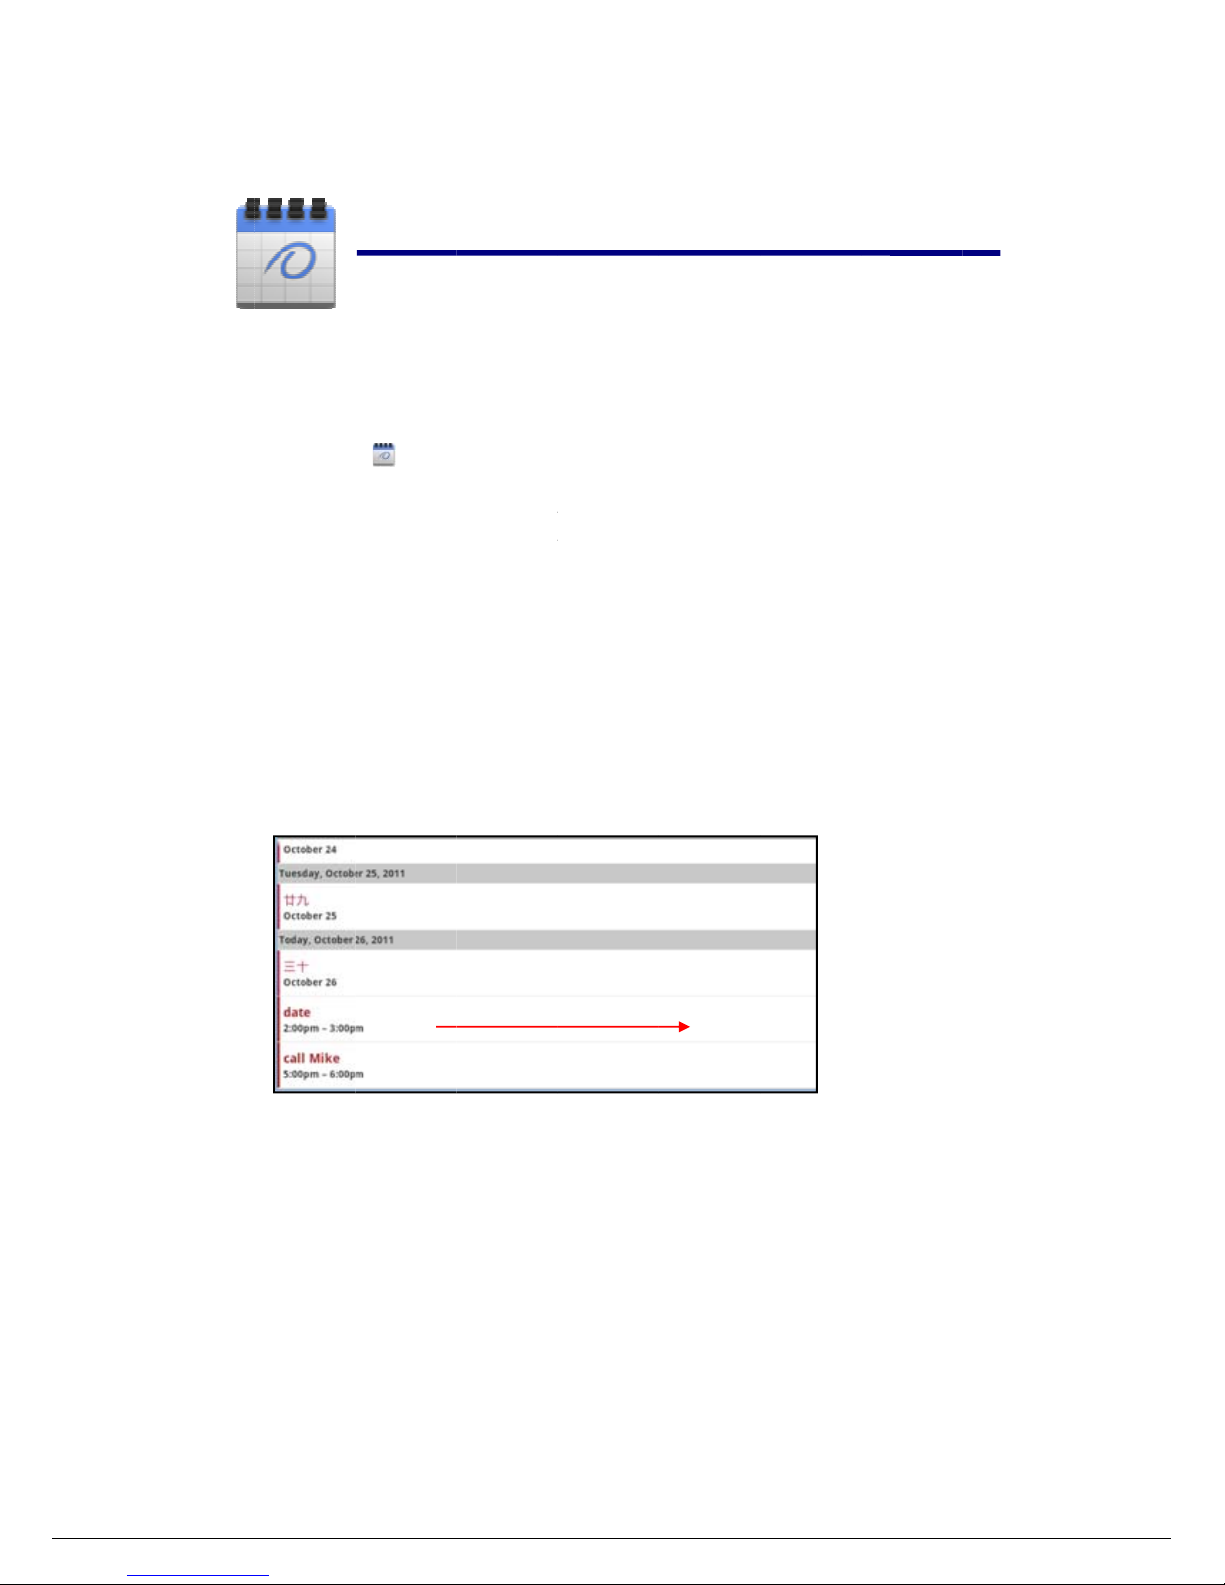
Agenda Vi
Day View
DAR
Calen
d
first time
u
account. E
n
the prompt
s
ar.
ndar
rom each a
c
s is displaye
d
ng Menu ke
y
ew
ar applicati
sing the C
a
ter the acco
u
to comple
t
count you’v
e
in Calenda
r
and touch
A
19
on icon.
lendar, yo
u
u
nt address
a
t
e the acco
u
added to
y
. There are
d
genda Vie
w
need to ad
d
nd passwor
d
nt configur
a
our device
a
ifferent vie
w
, Day View,
Touc
h
an Excha
n
informatio
n
tion. Then
nd configur
e
s you can c
h
Month Vie
w
an event to
v
ge account
, click Nex
t
you can us
e
d to synchr
o
oose in Cal
e
, Week Vie
w
iew
its de
tai
l
or a
and
the
nize
ndar
.
s
Page 20
20
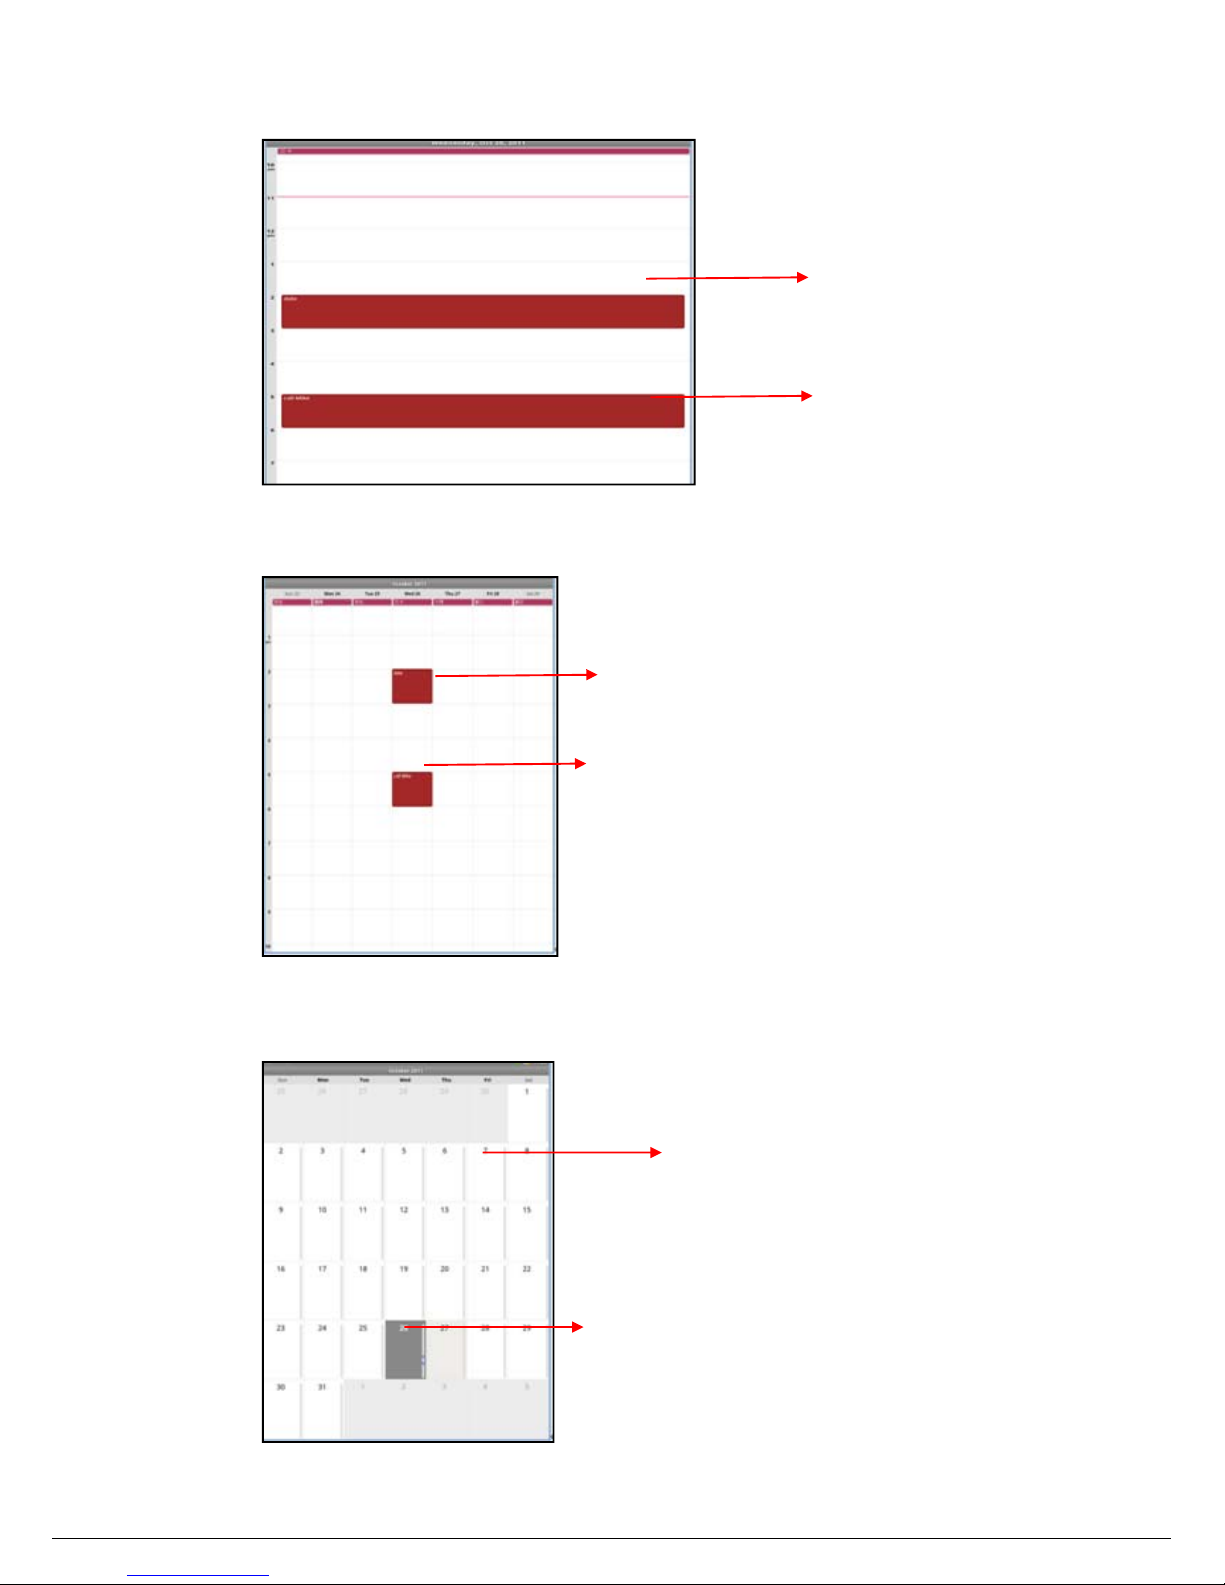
Week View
Month View
Swipe
left or right to
view earlier
or late
r
days
Touch an event to view its details
Touch & hold a time slot or event to create a
new event at that time
Touch an event to view its details
Drag up or down to view earlier or later months
Touch an event to view its details
Page 21
1
9
Creating
a
1. In
2.
A
d
3. Pr
e
4. Sc
r
Edit /Dele
t
To edit
a
when yo
To delet
e
To view
CAM
E
Tap th
e
Take Pict
u
1. In
2.
T
h
3. Ta
ppic
4. Pr
e
5. Pr
e
Take Vide
o
1. T
a
2. T
a
3. T
h
4. T
a
5. P
r
6. T
a
7. P
r
n Event
any view of
C
d details ab
o
ss Menu an
d
oll to the bo
t
e/View an
n event, tou
c
u’re done, to
u
an event, t
o
an event, to
u
RA
Came
r
res
Camera →
e picture wil
l
the pictur
e
ture.
ss
Back
to t
h
ss
Back
to
e
s
p sw
i
p to b
e
e video will
p the video
t
ess
Back
to
t
p swit
c
ess
Back
to
e
alendar
, p
r
ut the event
touch
Sho
w
tom of the e
v
Event
h and hold t
h
ch
Done
.
uch and hol
d
ch and hold
t
a applicatio
n
tap
to
t
be saved au
t
thumbnail
o
e
Camera
.
xit the
Cam
e
tch to video,
gin and tap
be saved.
humbnail
he
Camera
.
h back to c
a
xit the
Ca
m
21
r
ess Menu k
e
extra optio
n
ent details s
e event, the
n
the event, t
h
he event, th
e
icon.
ake the pict
u
omatically.
n the up rig
h
ra
and back
and you can
to stop.
to play th
e
mera.
era
and bac
k
y ->
More
-
>
s
to add det
a
creen and ta
p
touch
Edit
en touch
De
l
n touch
Vie
w
re.
t corner
to the
Hom
e
take videos.
video.
to the
Hom
e
New event
ils about th
e
Done
.
event
. Edit
e
ete event
.
event
.
to enter
G
a
screen
.
screen
.
.
event
vent details,
llery
to sca
n
then
the
Page 22
2
0
Photo o
p
On th
e
such a
s
Options
Scene mod
e
Picture qu
a
Color effec
t
Camera se
t
Store locat
i
White bala
n
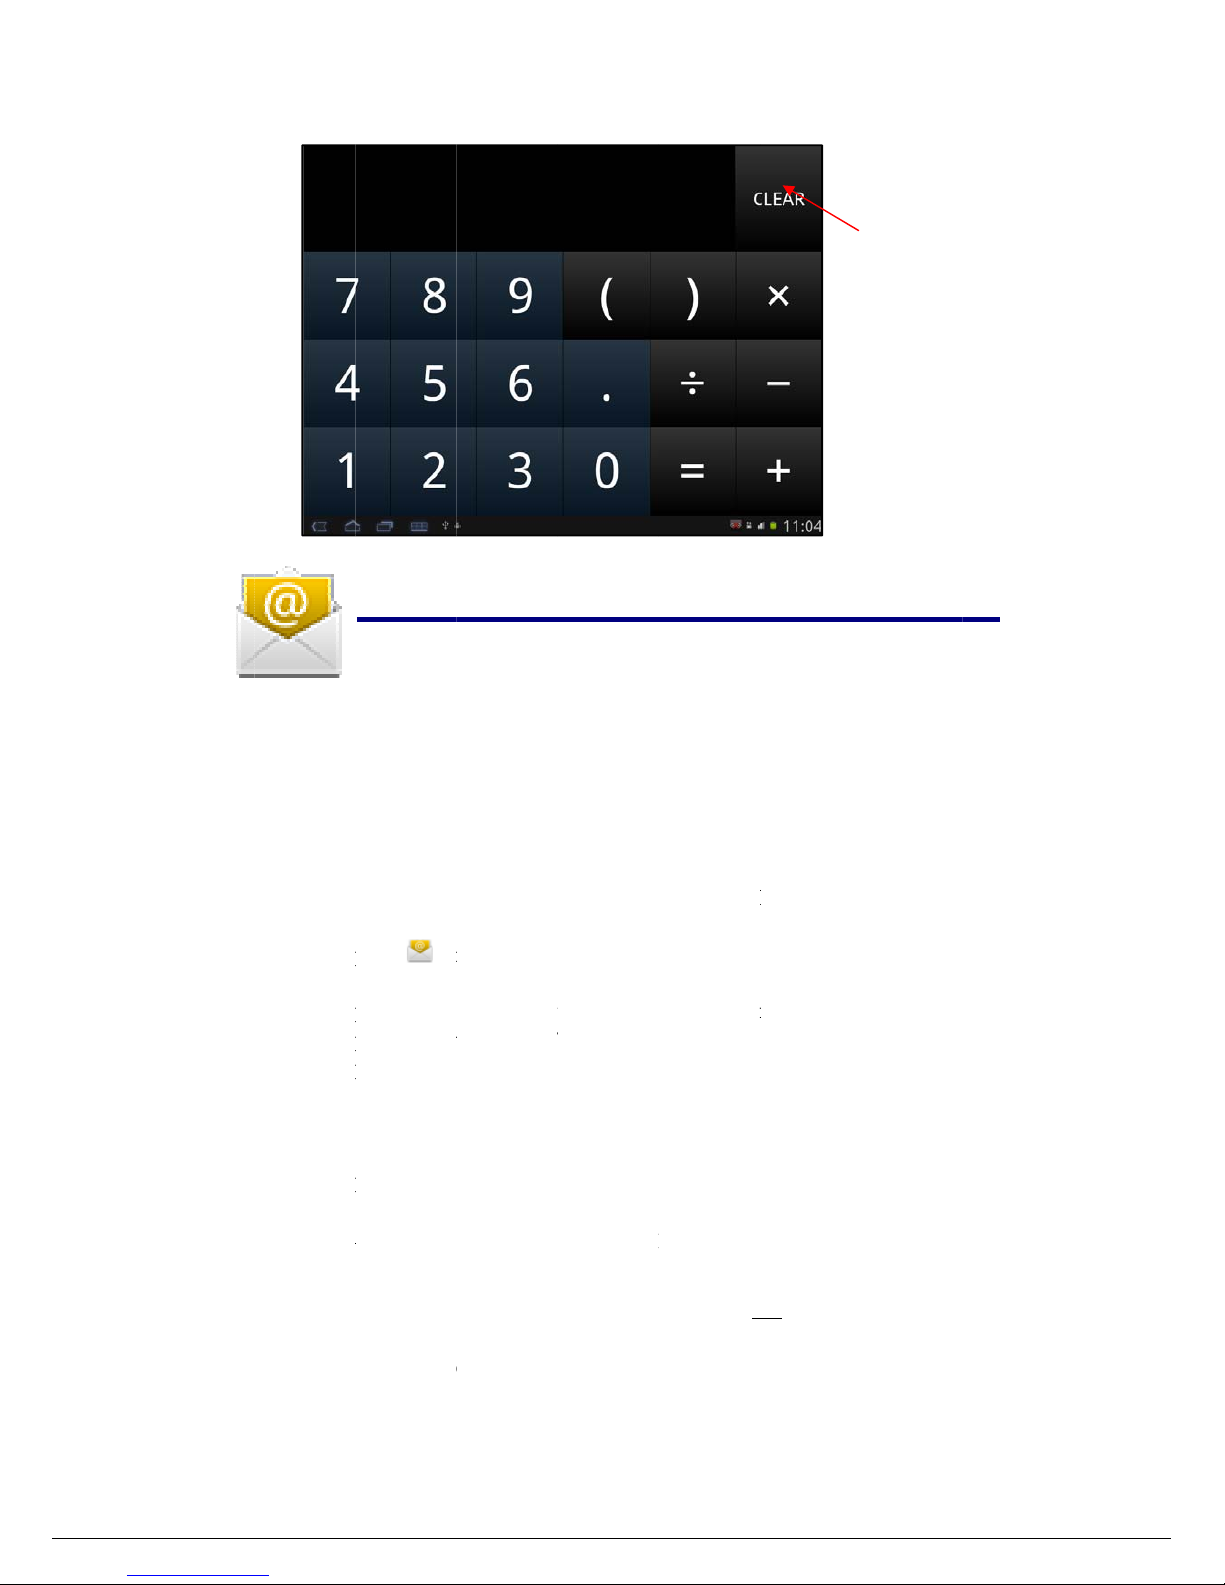
CAL
C
1. Ta
p
2. Ta
p
3. Ta
p
tions
preview
o
S
l
lity
C AMa
tings
C
on
Stu
ce
C
ULAT
O
p
the C
a
p
the numbe
r
CLEAR
t
o
f the camer
a
, touch it y
o
elect a set
t
ighting envi
r
hoose from
pply diffe
r
ono, Neg
a
pply tints to
hoose it ca
n
ave the lat
i
aken so the
sed in other
ompensate
R
lculator app
l
s and sign o
f
clear the re
s
22
, you can s
e
u can open
t
ing for bett
e
onments: A
u
Fine, Super
f
ent color e
f
tive, Red T
i
the image.
restore def
a
tude and lo
n
photo can
b
applications
.
for color dif
f
ication icon
operation t
o
ult one by o
n
e some ico
n
he settings.
r image ca
p
to, Night.
ine, and No
r
fects on i
m
nt, Blue Ti
n
ults.
gitude of
w
e displayed
erences in di
f
on home scr
e
do the calcu
e, tap and h
o
s on the rig
h
ture under
mal.
age. Choos
t, or Gree
n
here the de
v
on Google
ferent lighti
n
en to launch
lation.
ld
CLEAR
t
t of the pr
e
different
e Sepia,
Tint to
ice was
Maps or
g.
it.
o clear all.
view
Page 23
2
1
EMA
I
POP3
a
Add Emai
l
You c
a
throug
h
1. Ta
p
2. O
n
3. Ta
p
4. Ta
p
5. Ta
p
6.
M
a
yo
uthe
7. Ta
p
8. O
p
9. E
n
Note:
-
L
nd SMTP a
c
accounts
n enter one
your Table
t
the
E
m
the
Your A
c
in the
Em
a
in the
Pass
w
Done
.
nual Setup
r email acc
o
server setti
n
Next
.
tional: Enter
ter name for
A
fter setup
your email
Office Prot
o
counts are s
u
or more p
e
.
ail
applica
t
counts
scre
e
il
address en
t
w
ord
entry
f
(optional)
:
T
unt provide
r
gs tap
Man
u
a name for t
h
outgoing me
s
, if you are
provider to
col (POP)
o
23
pported.
rsonal emai
l
ion icon.
n, tap
Next
.
t
ry field,
→
ield, → ent
e
he server se
t
(i.e., gmail.
al Setup
an
d
e account.
sage, → ta
p
unable to c
o
make sure t
h
r Simple Ma
addresses t
h
enter your e
m
your emai
l
tings are aut
com, etc)
. H
o
make neces
Done
.
nnect to a
fr
eir servers
s
il Transfer P
r
at you wo
u
ail address
.
password.
omatically p
o
wever, if y
o
sary changes
ee email ac
c
upport free
otocol (SM
T
ta
p
th
ld like to a
c
pulated bas
e
u need to c
h
.
ount, check
accounts on
P).
and hold
at is entered.
cess
d on
ange
with
Post
to clear all
Page 24

24
Email Inbox
1. Tap the Email application icon.
2. If you set up only one email account, it opens immediately. If you set up multiple
accounts, they are listed in the Accounts screen.
3. Tap on the desired email account, → tap Inbox.
z Open Email Message
1. On the Inbox screen, tap on an email to open it.
2. For attachments, tap Open to launch appropriate application, or tap Save to save
attachment to a SD card.
3. To replay, tap Reply or Reply all.
a. Tap in the Compose Mail entry field to enter your reply message.
b. Tap Send to send immediately, Save as draft to save without send or Discard to
discard without saving or sending.
4. To delete the email immediately, tap Delete.
z Compose New Email Message
1. On the Inbox screen, press Menu key→ Compose.
2. Tap in the To entry field and then enter the recipient’s email address.
3. Optionally, if you want to add Cc or Bcc recipients, press Menu key → Add
Cc/Bcc, and then enter the recipient’s email address.
4. Tap in the Subject entry field to enter your desired subject title.
5. Tap in the Compose Mail area to enter your personal message.
6. If desired, press Menu key → Add Attachment to attach a file.
7.
When ready to send the email, tap Send button or press Menu key→ Send.
Edit Email Account
1. Tap the Email application icon.
2. On the Inbox screen, press Menu key → Account settings.
3. Set your desired preferences to customize your email account.
4. press Back key to return to the Inbox screen.
Delete Email Accounts
If you have multiple accounts, and you delete the account designated as the default
account, the next email listed is automatically set as the default.
1. Tap the Email application icon.
2. On the Inbox screen, press Menu key → Accounts.
3. Touch & hold on the account you want to delete.
4. In the pop-up Account options window, tap Remove account.
5. Tap OK to confirm the deletion.
Set Default Email Account
Page 25
25
You must always have one account designated as the default account, so if you have
multiple email accounts, you can select any one as the default.
1. Tap the Email application icon.
2. On the Inbox screen, press Menu key → Account Settings.
3. Tap Default Account to select it.
If you delete the account that was designated as the default account, the next email
listed is automatically designated as the default.
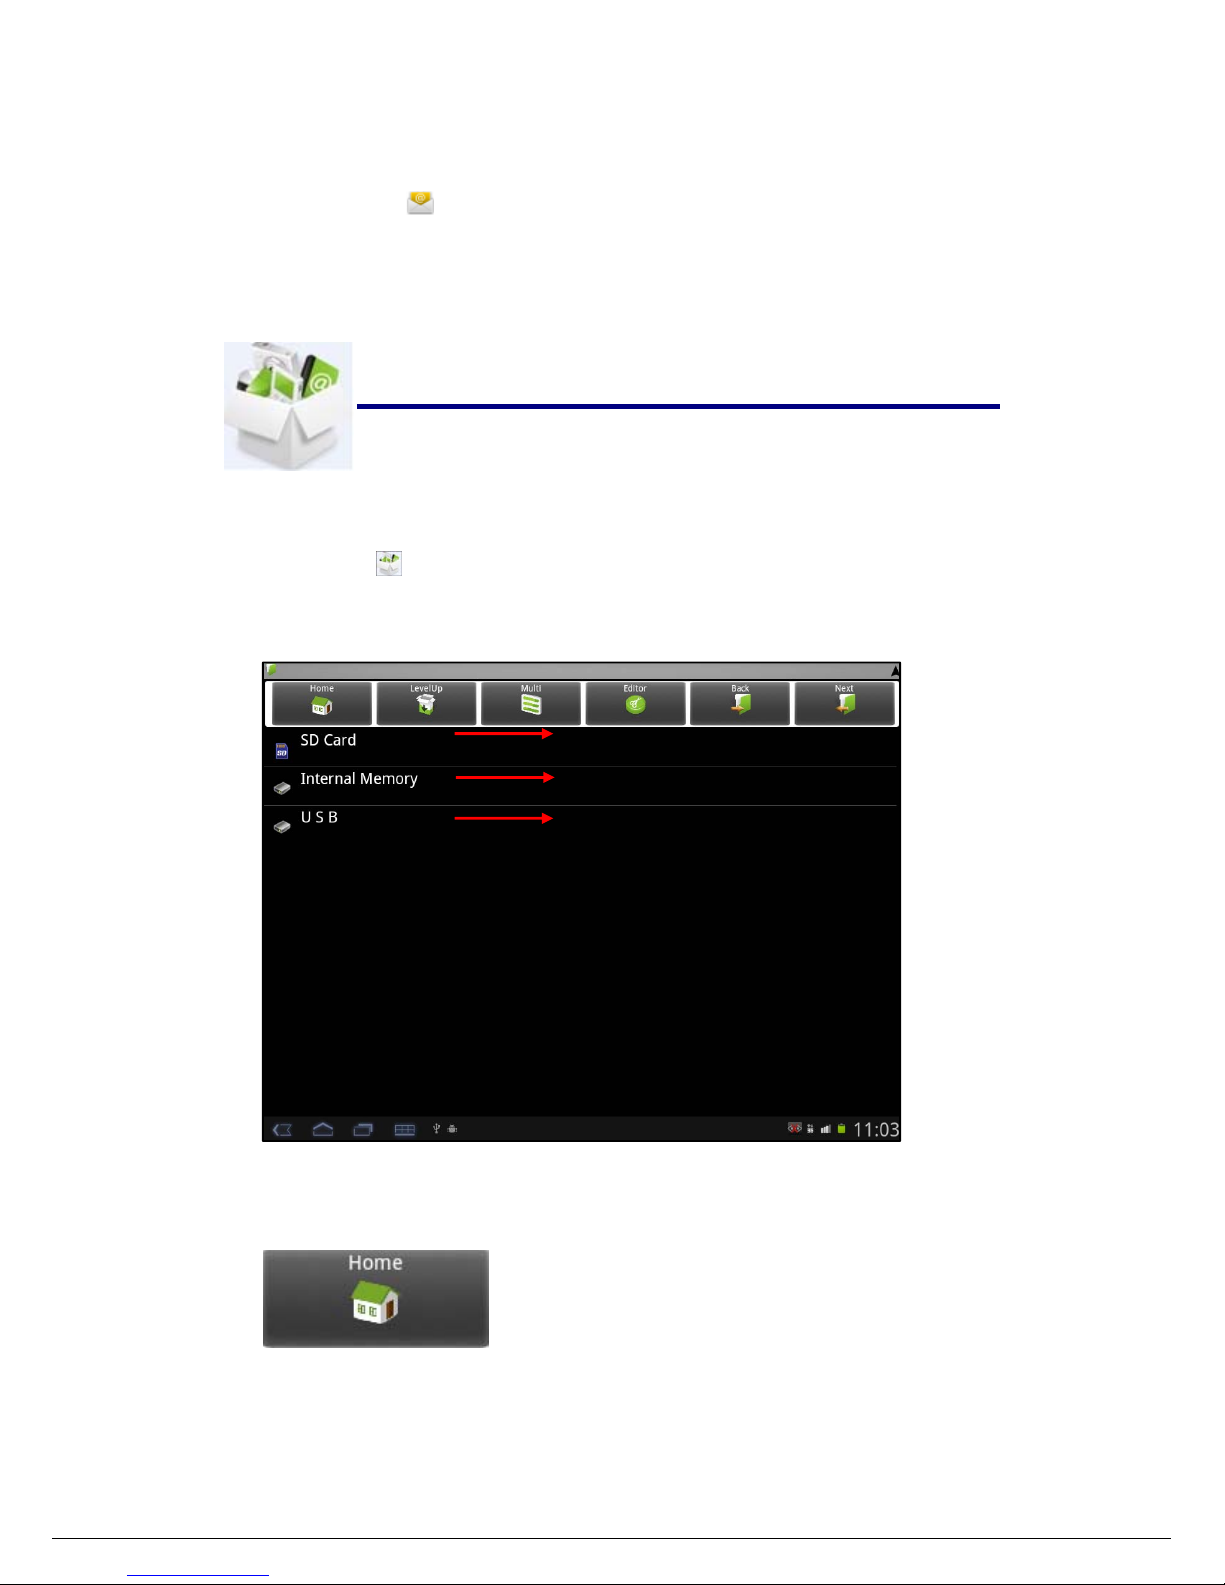
22 EXPLORER
Tap the File Browser application icon to view the files on all storage devices
(Internal memory, SD card, USB), and to quickly & easily install Android application on
your Tablet.
Functions of icons introduction
Check the file in SD Card
Check the file in internal memory
Check the file in USB device
Display the root directory of Explorer
Page 26
2
3
Delete file
s
Tap an
d
Install an
d
Using
files in
t
1. Ta
p
2. Ta
p
MY M
U
hold on th
e
roid appli
c
Explorer to
i
o SD card o
r
p
the
F
i
p
one
.apk
t
h
SIC
folder/file y
o
ation
nstall andro
i
your intern
a
le Browser
a
at you want
GTd
TsuTT
26
u want to d
e
d applicatio
n
l memory.
pplication i
c
to install on
y
o the parent
ap it once
,
isplayed
ap it to do
s
ch as copy,
ap it to go t
o
ap it to go t
o
lete, → tap
. Before d
o
on to view t
h
our devices
directory of
t
you can
ome operati
o
delete, move
the previou
s
the next pa
g
Delete
ing this ple
a
e files
he current f
o
multi selec
t
n for the s
e
, paste, rena
m
page
e
se copy the
lder
the items
lected item,
e.
.
apk
Page 27
27
Get music
z Transfer music using USB
Transfer music files from a computer to your memory card.
1. With a memory card inserted, and your tablet showing the home screen, connect a
USB data cable from you tablet micro USB port to a USB port on you computer.
Your tablet should show in the status bar.
2. Your tablet shows a USB connection dialog, at the top of the screen, Flik down,
then touch USB connection, You can’t use the files on you memory card while it is
connected.
3. Touch Turn on USB storage.
4. Tap “OK” to confirm the dialog.
5. Drag and drop you music to a folder on the memory card.
6. When you’re done, select the “Turn off USB storage”.
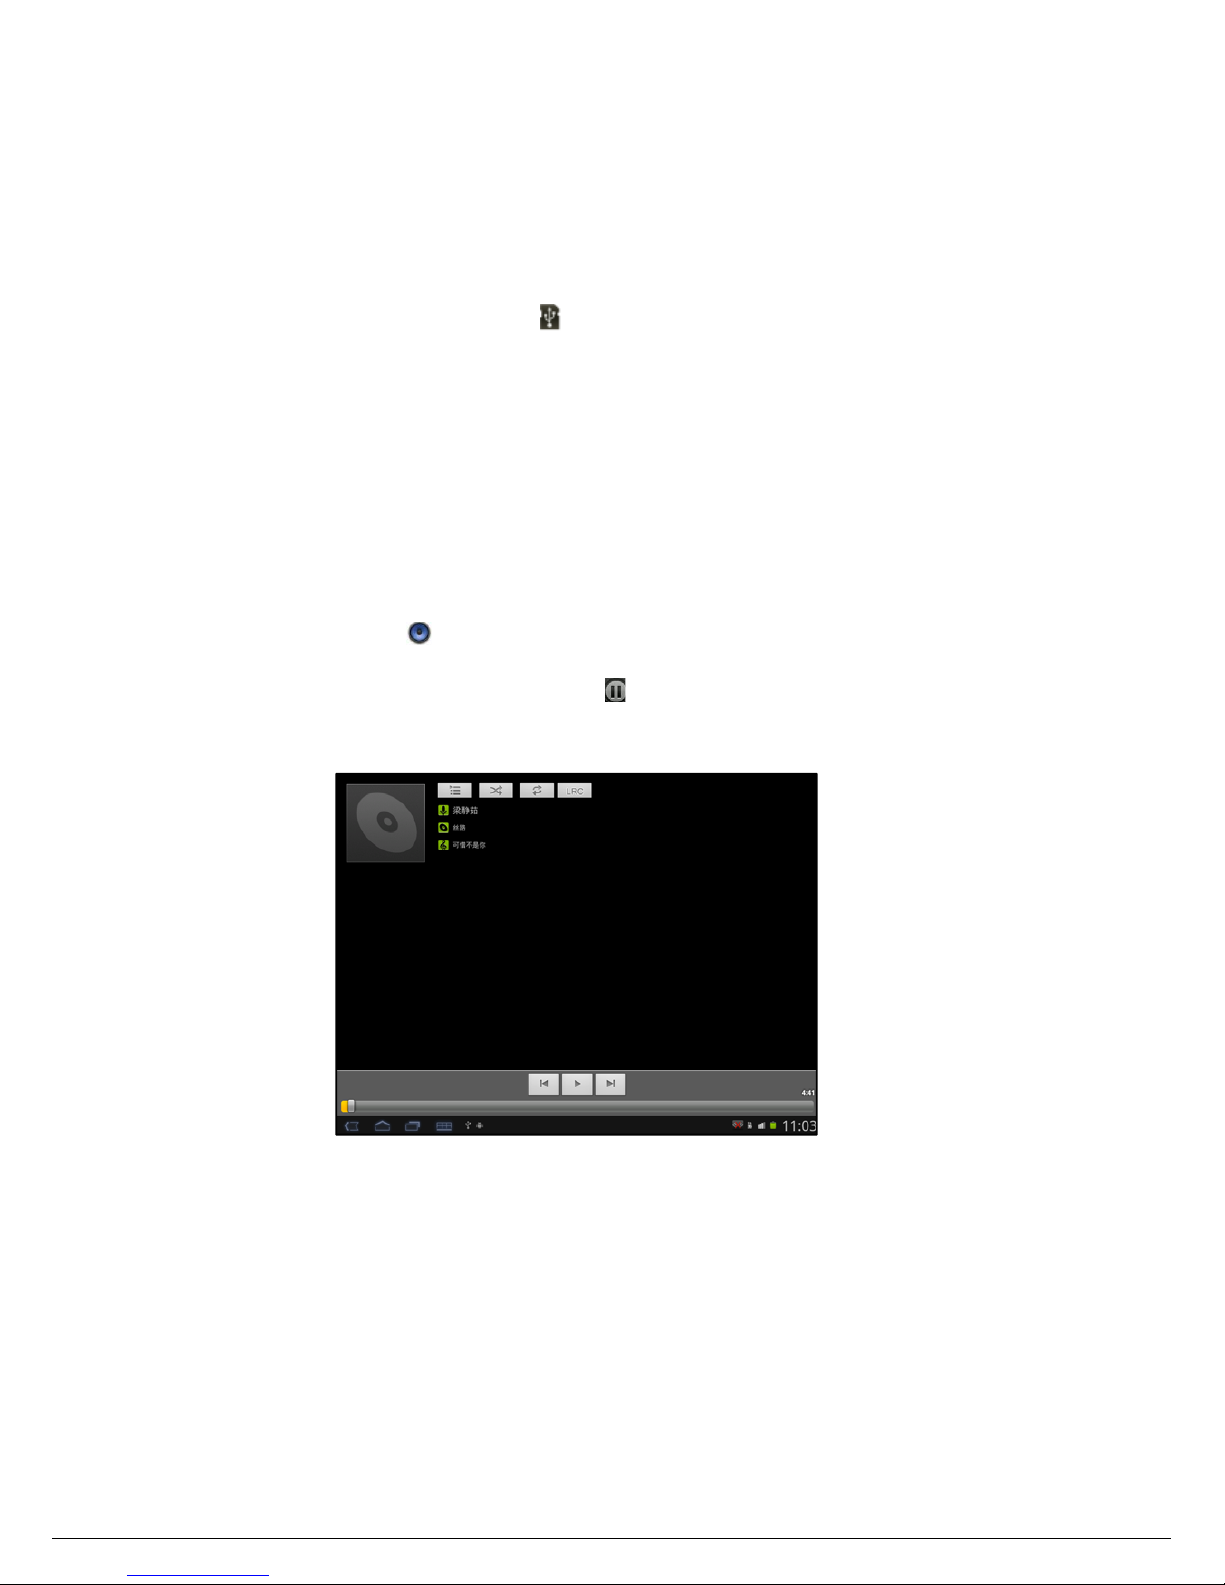
Play Music
1. Tap the My Music application icon.
2. Tap any audio file from Albums/Artists/Songs/Playlists/ to play it.
3. To stop the music, tap the Pause icon.
4. To leave the music playing and return to previous screens, press Back key to return
to the Home screen.
At this interface, you can do:
view the lyrics, play
/
pause, switch to the previous /
next song, loop play, random play
etc.
The Operation with Music and Playlist
z Add to playlist
You can add it to a playlist. Following the steps below:
Page 28
2
4
1. O
n
2. O
n
z R
e
Tap an
d
z D
e
When
a
我的视
频
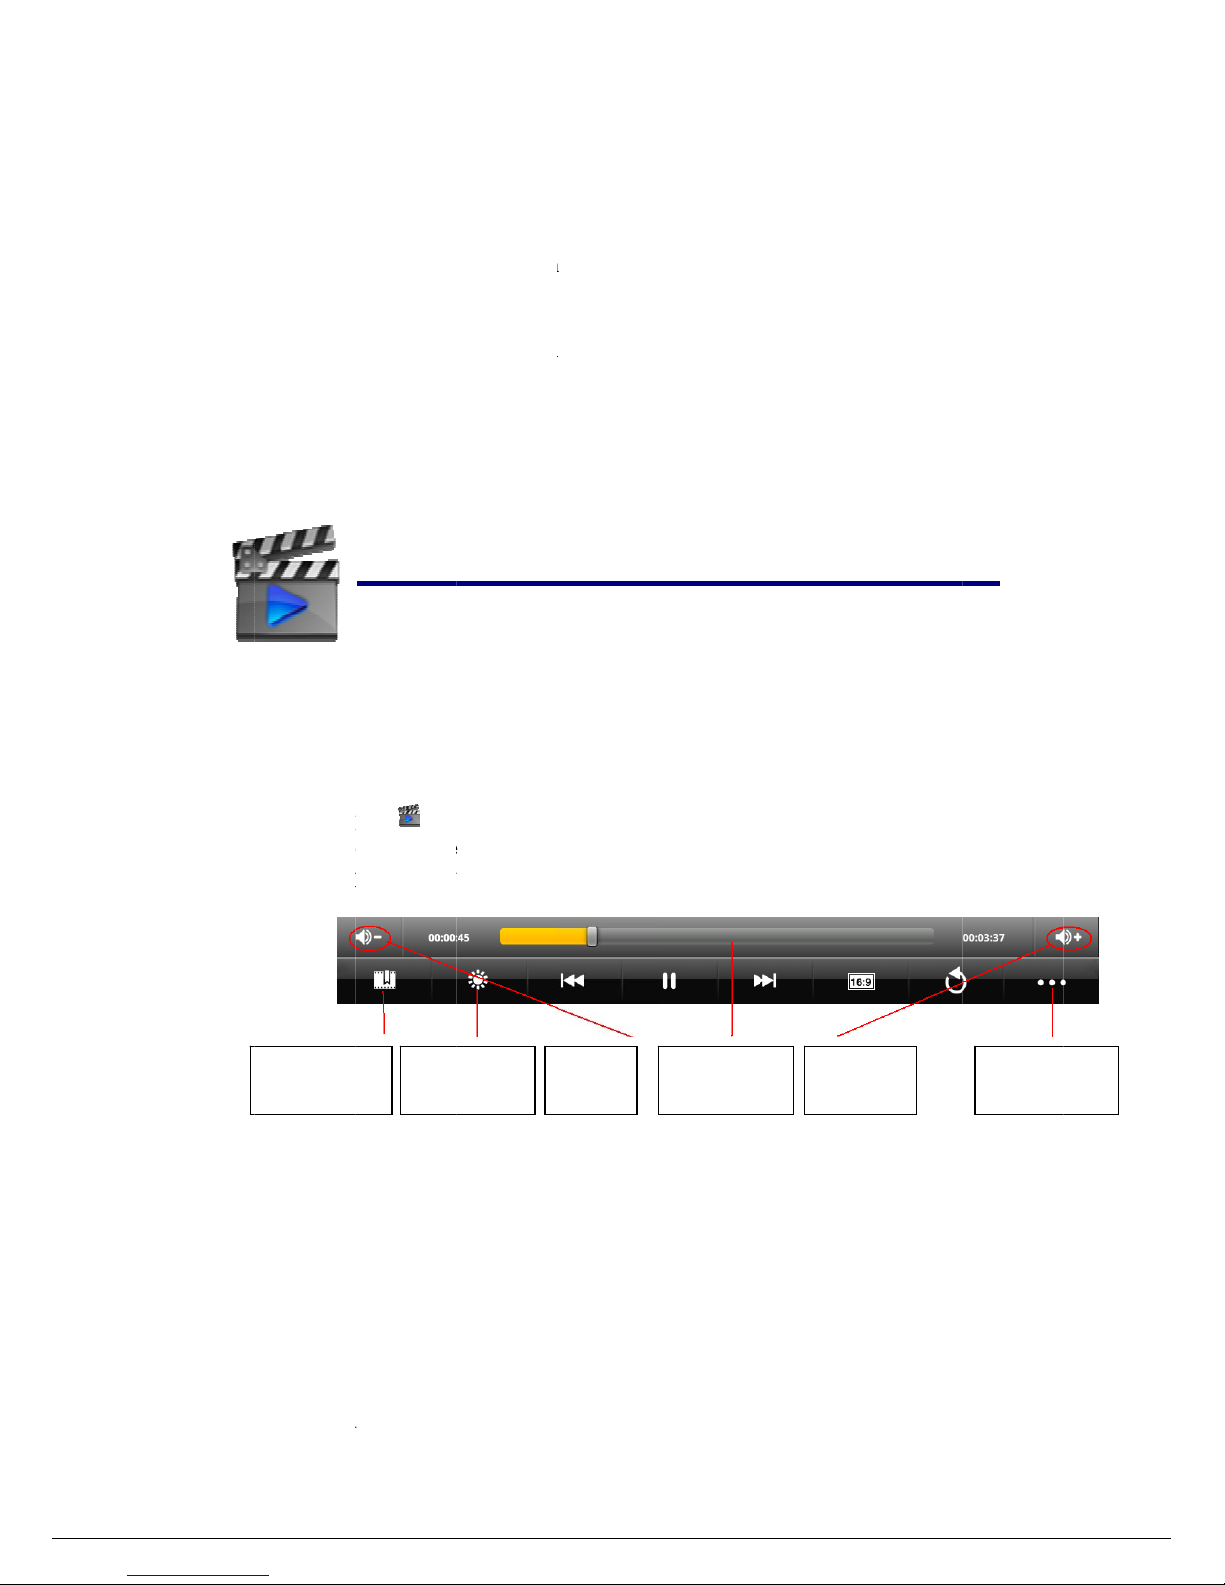
Play Vide
o
1. Ta
p
2. T
o
3. Ta
p
Add to bo
o
Touch
this vi
d
Other opti
z D
e
Durin
g
Add
b
ookmark
the media f
i
playing mu
s
name or D
e
hold in the
lete music
song is pla
y
p
the
M
y
uch any vid
e
on the pla
y
kmark
to record th
e
eo, you can
c
ons
lete Book
M
playing a v
i
to Mod
i
b
ack
l
le list view t
a
ic view pres
s
lete playlist
playlist(suc
h
ing, you ca
n
Video
appl
i
o from the v
i
ing video sc
r
current pla
y
hoose to pl
a
ark And Pl
a
deo which
h
fy the
ight
28
p and hold
o
Menu key
as: New pla
y
deleted by p
cation icon.
deo list.
een, the opti
o
course dur
i
y from the b
o
y from begi
as been add
e
Vol ume
-
n any file an
→ Add to
p
list 1).
→
t
ressing Men
u
ns displaye
d
ng a video i
s
okmark or
fr
ning
d a bookm
a
Quick me
d
play
cours
e
d tap
Add to
laylist
.
ap
Rename
o
key >
Delet
e
on the scre
e
playing. N
e
om the very
rk touch it
a
Vol u
m
ia
playlist
r
Delete
.
n below.
xt time you
beginning.
nd the vide
o
e +
open
will
Other op
t
ions
Page 29

2
5
play fr
o
z D
e
Durin
g
added
t
z P
l
Durin
g
Single
Repea
t
Repea
t
z H
z R
e
GALL
E
Opening
G
1. T
o
O
R
2. O
p
O
R
3. O
p
Note:
Working
w
z O
Album
ordere
d
picture
z S
h
m the begin
n
lete bookm
a
playing a v
i
o it will be
d
ay mode
playing a vi
d
After
one
The
c
all
All t
h
elp
Sho
w
turn
Bac
k
RY
allery an
d
uch the Gall
e
en Gallery f
r
en Gallery f
r
-
If yo
u
s
tora
g
and
o
ith album
s
pen Gallery
s open disp
l
grid. The n
a
or video to
v
are an albu
m
ing.
rk
deo which
h
eleted.
eo, touch
p
l
the current v
urrent video
e videos wil
l
some help
i
to the playi
n
viewing
yo
ry icon
om Camera
b
om
Camera
have a gr
e
e, it may ta
k
rganize the
m
and touch t
h
aying the
p
me of the a
l
iew it
29
as been add
ay mode
yo
u
ideo is over,
will be play
e
be played i
n
nformation
a
g video vie
w
ur album
s
in the Laun
c
y touching
t
by pressing
M
at many pic
e Gallery a
.
e album w
h
ictures and
bum is sho
w
d a bookm
a
can choose:
the playing i
s
d in repetiti
o
repetition.
bout the vid
e
her or on th
e
he thumbnai
l
enu and
tures or vid
e
few minutes
ose content
s
videos they
n at the top
o
rk touch it
a
stopped.
n.
o player
Home scre
e
image at th
e
touching
G
os on your
when you o
p
you want t
o
contain in
a
f the screen
nd the book
m
n
top right
allery..
SD card or
en it to dis
c
view
chronolog
i
. You can to
u
m
ark
USB
over
cally
ch a
Page 30

30
You can share the entire contents of one or more albums. You can also share
individual images or videos from an album
1. Open the main Gallery Window
2. Press Menu twice
3. Check or uncheck the albums you want to share
4. Touch Share at the bottom of the screen.
z Get the details of an album
1. Open the main Gallery window
2. Press Menu twice
3. Check or uncheck the albums you want details about
4. Touch More at the bottom of the screen
z Delete an album
1. Open the main Gallery window
2. Press Menu twice
3. Check or uncheck the albums you want details about
4. Touch Delete at the bottom of the screen
Working with pictures
z View and browse pictures
Open Gallery album and touch a picture
z Watch a slideshow of your pictures
1. Open Gallery album and touch a picture
2. Touch on the picture to see the controls of the picture. You can see “Slideshow” on
the bottom of the screen. Touch it to see pictures in a slideshow
z Rotate/Crop/Share/Delete a picture
1. Open Gallery album and touch a picture
2. Press Menu and you will see Share/Delete/More on the bottom of the screen.
Touch More->Crop to crop the picture
Touch More->Rotate left/Rotate right to rotate the picture
z Get details about a picture
1. Open Gallery album and touch a picture
2. Press Menu and you will see Share/Delete/More on the bottom of the screen.
3. Touch More->Details to get more information about the picture
z Set the picture as wallpaper
1. Open Gallery album and touch a picture
2. Press Menu and you will see Share/Delete/More on the bottom of the screen.
3. Touch More->Set as
4. Touch the yellow line to drag large or small as you want and then press Save.
Page 31

31
Working with videos
Use gallery to play videos
z Play videos
Open a Gallery album and touch a video. In the dialog press Movies to play the video.
z Share/Delete/Detail videos
1. Open Gallery album and touch a video
2. Press Menu and you will see Share/Delete/More on the bottom of the screen.
Touch More->Details to get the details of the video
26 ACCOUNTS
Adding and removing accounts
z Add an account
1. Open the Accounts & Sync Settings screen:
Press Menu-> Settings -> Accounts & Sync
2. Touch Add account on the bottom of the screen.
3. Touch the kind of account you want to add
4. Follow the steps displayed on the screen to enter the required and optional
information about the account.
z Remove an account
1. Open the Accounts & Sync Settings screen:
Press Menu -> Settings -> Accounts & Sync
2. Touch the account to delete
3. Touch Remove account on the bottom of the screen.
4. Confirm that you want to remove the account
Configuring account sync and display options
z Configure general sync settings
1. Open the Accounts & Sync Settings screen:
Press Menu -> Settings -> Accounts & Sync
2. Check or uncheck Auto-sync to control whether changes you make to information
on the device or on the web are automatically synced with each other.
z Sync information manually
1. Open the Accounts & Sync Settings screen:
Press Menu -> Settings -> Accounts & Sync
2. Touch the account whose data you want to sync.
Page 32

2
7
3. Pr
e
z C
h
1. O
pPre
2. T
o
3. C
h
Gma
i
Opening
G
z
O
Touch
G
When
y
If you
h
z O
1. Pr
e
O
R
2. W
h
O
R
3. W
h
In
b
z S
w
Gail di
If you
many
u
1. Fr
o
M
e
Ea
c
ss
Menu
an
d
ange an ac
c
en the Acco
u
ss
Menu ->
uch the acco
u
eck or unch
e
l
mail and
y
pen Gmail
mail icon
ou open G
m
ave more th
pen your In
b
ss Back unt
i
en reading
a
en viewing
ox
itching acc
o
splays conv
e
have more
t
nread messa
m your Inb
o
nu
and touc
h
h account is
touch
Syn
c
ount’s sync
nts & Sync
S
Settings ->
A
nt whose s
y
ck the kinds
our Inbox
on the
H
ail, the curr
e
an one acco
u
ox when G
m
l you return
t
message pr
e
a list of lab
e
unts
rsations, me
s
han one acc
ges you hav
e
x, touch the
Accounts
listed, alon
g
32
now
on the
b
settings
ettings scre
e
ccounts &
S
nc settings y
o
of informati
o
ome screen
o
nt Google
A
nt, you touc
h
ail is runn
i
o your Inbo
x
ss Menu an
d
led convers
a
sages, and s
e
ount, you c
a
in each acc
o
current acc
o
with the nu
m
ottom of th
e
n:
ync
u want to c
h
n you want
t
r in the Lau
n
ccount is di
s
the current
a
ng
touch
Go t
o
tions press
M
ttings from
o
n open the
A
unt and to s
w
unt at the to
ber of unre
a
screen.
ange
o sync to th
e
cher.
played at th
e
ccount to s
w
Inbox.
enu
and to
u
ne Google
A
ccounts sc
r
itch accoun
t
p right of th
e
d messages
i
device.
top of the I
n
itch accoun
t
ch
More->
G
ccount at a
een to view
s.
screen. Or
p
n your Inbo
x
box.
s
o to
time.
how
p
ress
Page 33
33
2. Touch the account that contains the email you want to read.
Note: Here we only have one accounts.
z Read a message
Touch a conversation that contains the messages you want to read.
The message header shows who sent the message, when, who it was sent to, and other
information. Icons indicate whether the message has an attachment and the sender’s
Google
When reading messages in a conversation, you can use the buttons at the bottom of the
screen to archive the entire conversation
Use the left and right arrow buttons at the bottom of a message to open the next or
previous conversation in the Inbox.
z Work with an attachment
Gmail can display some kinds of attached images ( .png, jpeg, depending on your device)
in a message. Others have a Preview or Download button you can use. Depending on the
applications installed on your device, you may also be able to download and read a
variety of kinds of files, including spreadsheets (.xls), word-processing documents
(.doc), or PDF files (.pdf). Other applications may add support for opening other kinds
of file.
Attachments you download are stored on your device’s USB storage or SD card. Image
files are added to albums in Gallery.
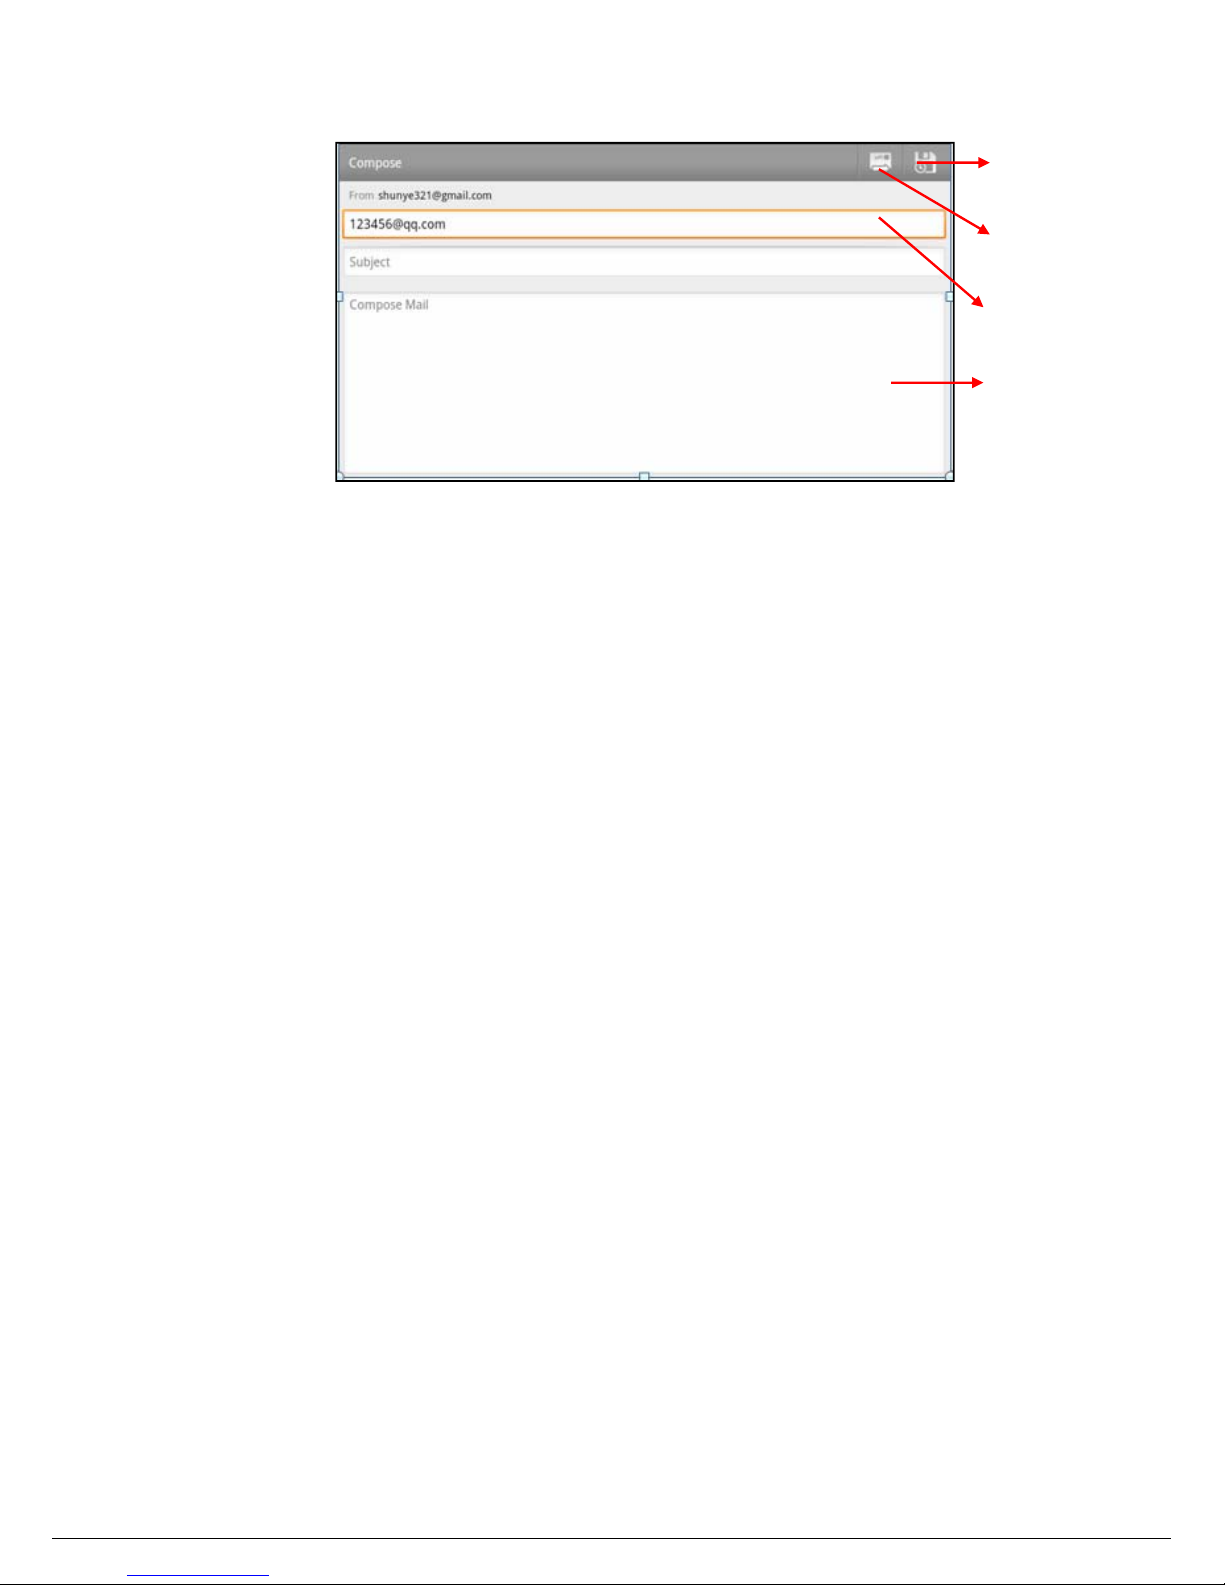
Composing and sending a message
z Compose and send a message
1.
When viewing the Inbox, press Menu and touch Compose
Touch to save as a
draft
Touch to send the
message
Enter the message
Address the message
Page 34
34
2. Enter all the information that is needed for a message and touch
to send the message.
z Attach a photo to a message
1. Press Menu key on the view of composing message and touch Attach on bottom of
the screen
2. Touch to choose a picture to attach as an attachment for the message
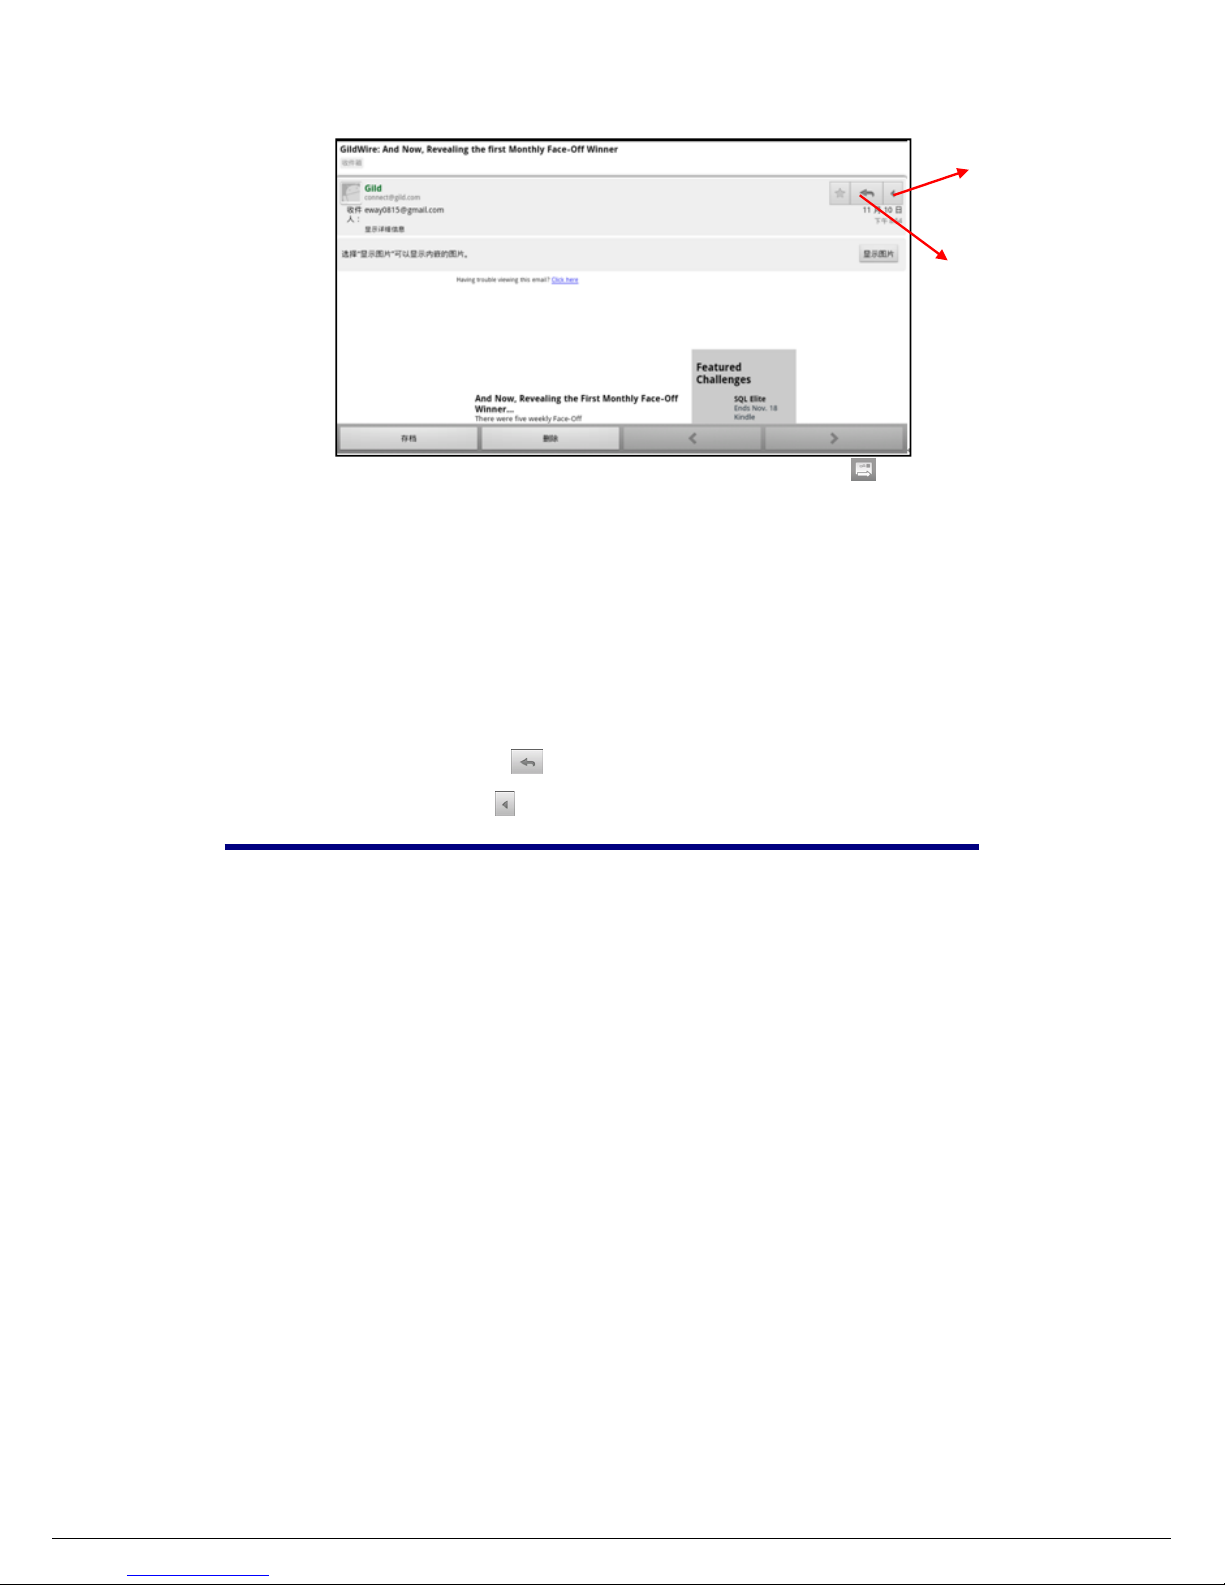
Replying to or forwarding a message
1. Touch the reply icon on the view of the conversation that you want to reply.
Or touch the arrow to display the Forward icon for forwarding a message.
28 Wi-Fi
Connecting to Wi-Fi networks
1. Press Menu -> Settings -> Wireless & network settings on any screen.
2. Check Wi-Fi item on the top of the screen to turn it on
3. Touch a network to connect to it
Note:
- If the network is open, you are prompted to confirm that you want to
connect to that network by touching Connect.
- If the network is secured, you’re prompted to enter a password or
other credentials. (Ask your network administrator for details.)
Receive notifications when open networks are in range
By default, when Wi-Fi is on, you receive notifications in the Status bar when your
device detects an open Wi-Fi network.
1. Turn on Wi-Fi, if it’s not already on
display the Forward icon
Touch to reply to the message
Page 35

35
2. In the Wi-Fi settings screen, check Network notification.
You can uncheck this option to stop receiving notification.
Add a Wi-Fi network
1. Turn on Wi-Fi, if it’s not already on.
If you’re adding a Wi-Fi network when first setting up your device, Wi-Fi is
turned on automatically.
2. In the Wi-Fi settings screen, touch Add Wi-Fi network (at the bottom of the list of
discovered networks).
3. Enter the SSID (name) of the network. If the network is secured, touch the Security
menu and then touch the type of security deployed on the network.
4. Enter any required security credentials.
5. Touch Save.
The device connects to the wireless network. Any credentials that you entered
are saved, so you are connected automatically the next time you come within range
of this network.
Forget a Wi-Fi network
You can make the device forget about the details of a Wi-Fi network that you added—
for example, if you don’t want the device to connect to it automatically or if it is a
network that you no longer use.
1. Turn on Wi-Fi, if it’s not already on.
2. In the Wi-Fi settings screen, touch & hold the name of the network.
3. Touch Forget network in the dialog that opens.
Wi-Fi Settings screen
In addition to the settings described in this section, you can press Menu and Advanced
Wi-Fi settings as described in “Advanced Wi-Fi Settings screen”
z Wi-Fi
Check to turn on Wi-Fi so you can connect to Wi-Fi networks. When connected to a
network, displays the network’s name.
z Network notification
Check to receive a notification when an open Wi-Fi network becomes available.
z Wi-Fi networks
Displays a list of Wi-Fi networks you’ve previously configured and those detected when
the device last scanned for Wi-Fi networks.
z Add Wi-Fi network
Opens a dialog where you can add a Wi-Fi network by entering its SSID (the name it
Page 36

36
broadcasts) and security type.
Advanced Wi-Fi settings screen
z Wi-Fi sleep policy
Opens a dialog where you can set whether and when the Wi-Fi radio disconnects.
Disabling sleep uses more battery power.
z MAC address
The Media Access Control (MAC) address of your device when connecting to Wi-Fi
networks.
z IP address
The Internet Protocol (IP) address assigned to the device by the Wi-Fi network you are
connected to (unless you used the IP settings to assign it a static IP address).
z IP settings
If you check Use static IP, you can use the IP settings to enter an IP address and other
network settings for you device manually, rather than using the DHCP protocol to obtain
network settings from the Wi-Fi network itself.
29 HDMI
Turn HDMI Function
In default, the HDMI function is turned on. Press Menu->Settings->HDMI
Settings->Turn on HDMI.
Use HDMI
1. Tap Video Player icon to open Video Player application
2. Tap any video file you want to watch by HDMI
3. Connect the device and TV with HDMI plug
Note:
- Before using HDMI, you should make sure that HDMI function is turned
on.
Page 37
37
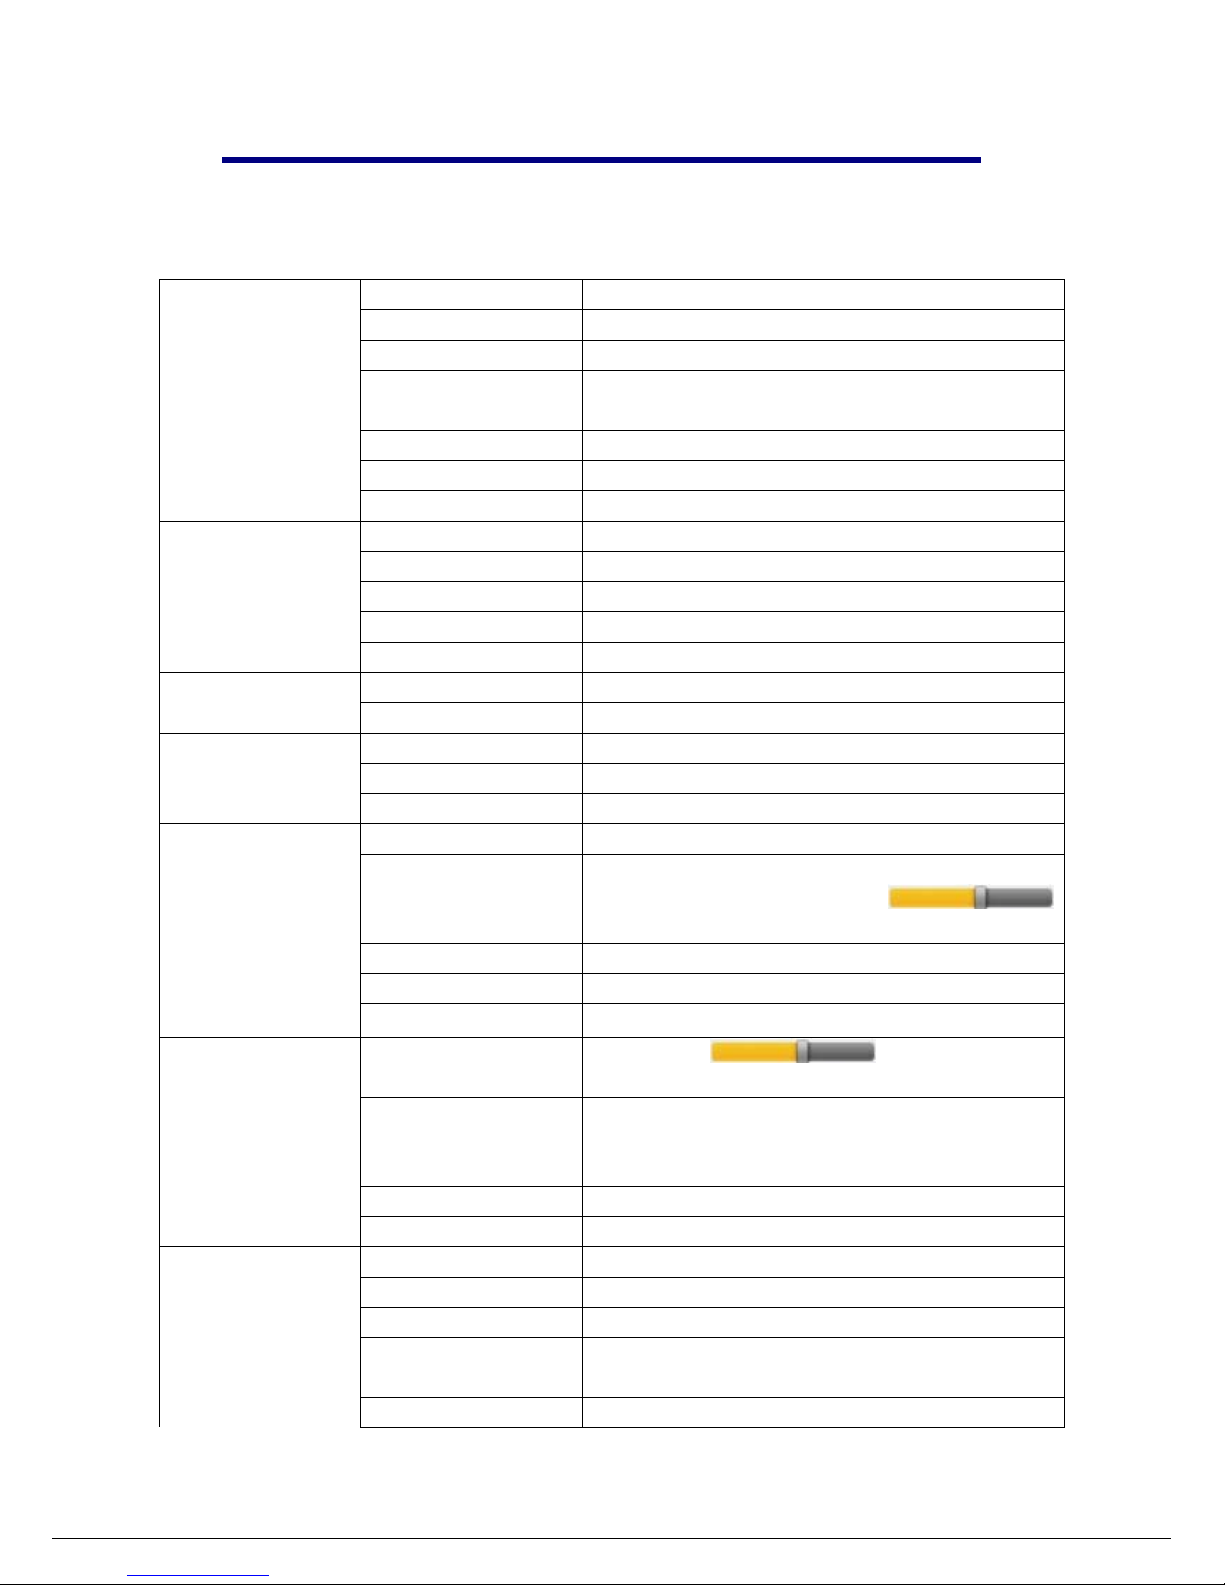
30 Settings
Wireless & networks
Airplane mode
Disable all wireless connection
Wi-Fi
Turn on Wi-Fi.
Wi-Fi Settings
Set up & manage wireless access points.
Tethering&portable
hostspot
Share your mid’s mobile data connection via USB or a
portable Wi-Fi hotspot
VPN setting
Set up & manage Virtual Private Networks
Mobile networks
Set options for roaming, networks, APNs
Ethernet settings
Set up & manage wired Ethernet connection
Call setting
Fixed Dialing Number Manage Fixed Dialing Numbers
Voicemail service My carrier
Voicemail settings Setting for my carrier
Call forwarding Setting call forwarding
Additional setting Setting caller waiting & call waiting
Accounts & sync
General sync settings
Sync accounts settings
Manage accounts
Accounts management
HDMI Setting
Turn on HDMI
Turn on/off HDMI function
HDMI Resolution
Set the resolution before using HDMI
Screen Zoom
Zoom in/out the display of MID on TV
Sound
Silent mode
Silence all sounds except media & alarms.
volume
To adjust the Media volume, Alarm volume and
Notification volume. Tap & slide
and then tap OK.
Notification ringtone
Select desired ringtone sound.
Audible selection
Select to enable a sound when making a screen selection.
Screen lock sounds
Play sounds when locking and unlocking the screen.
Display
Brightness
Tap & slide to adjust the screen
brightness as desired, and then tap OK.
Auto-rotate screen
When selected, the orientation of the screen switches
between Portrait and Landscape automatically when you
rotate the device.
Animation
Set animations on/off for windows display
Screen timeout
Adjust the delay before the screen automatically turns off.
Use wireless networks
Set using wireless network to locate
Location & Security
Set up screen lock
Lock screen with a pattern, PIN, or password.
Visible passwords
Show password as you type.
Select device
administrators
Add or remove device administrators.
Use secure
Allow applications to access secure certificates and other
Page 38
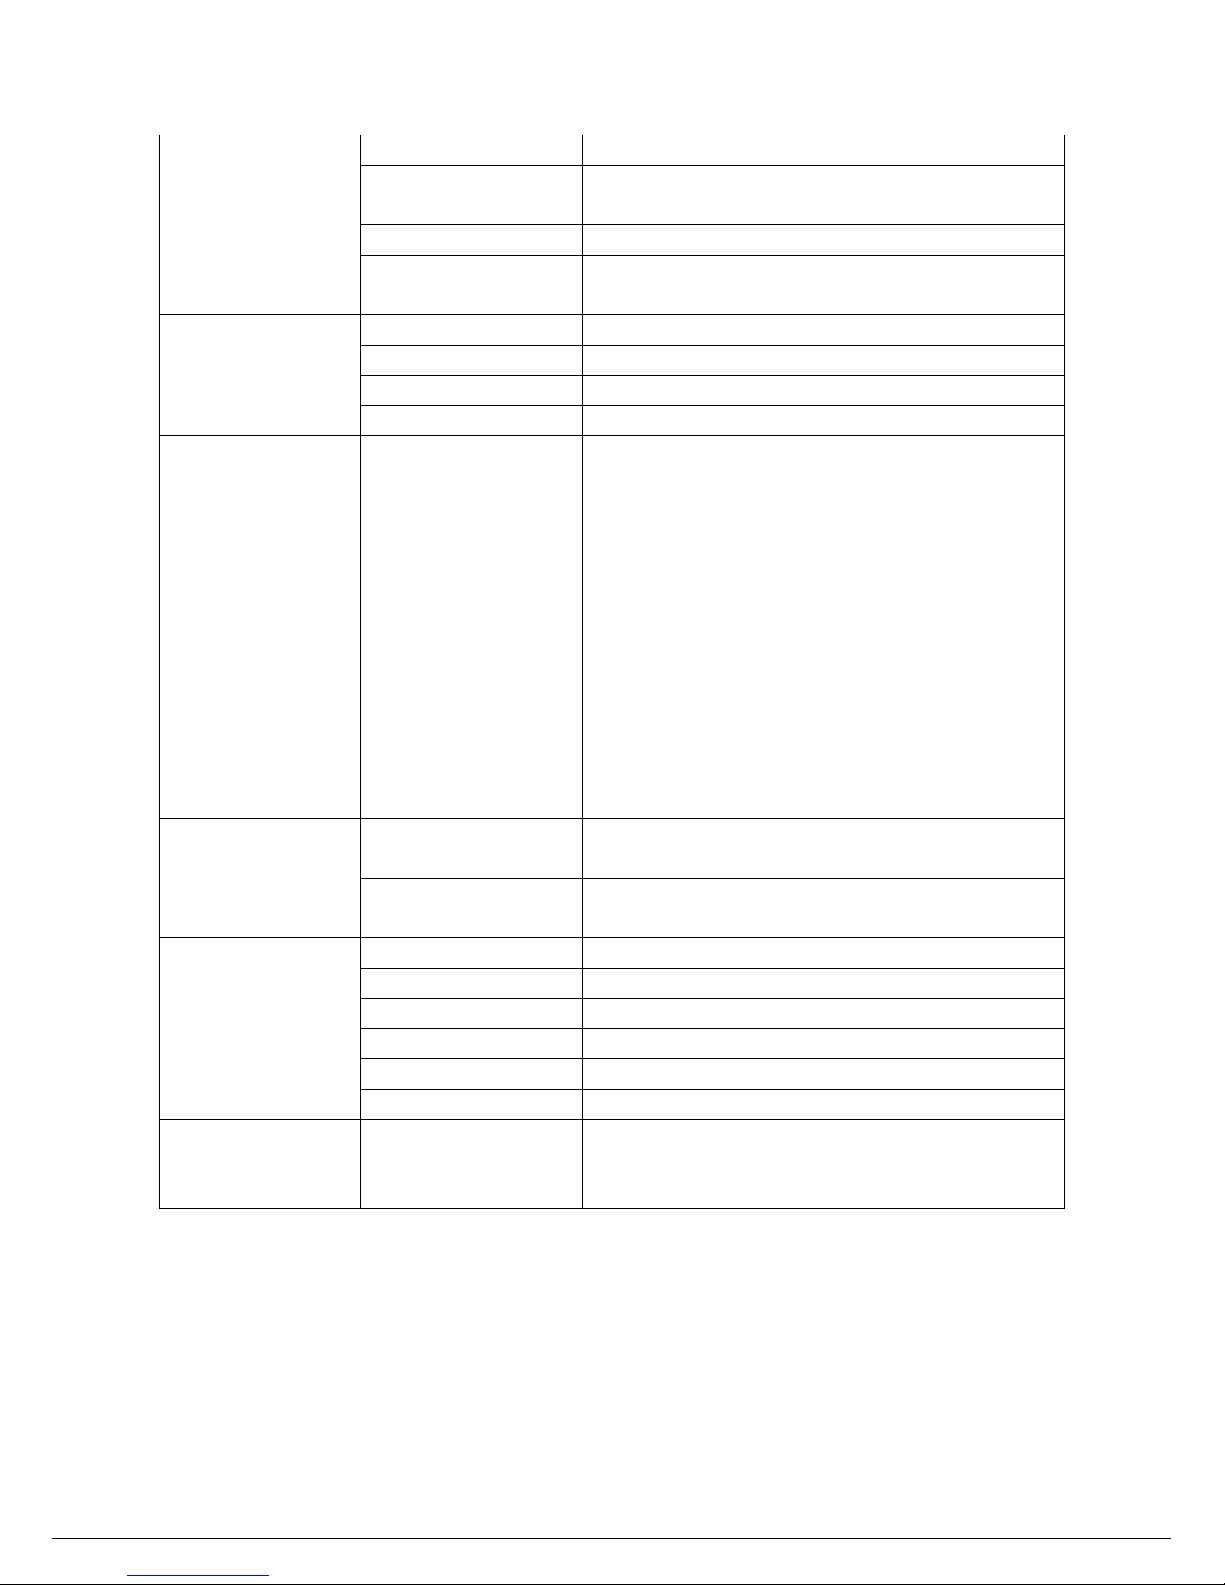
38
credential
credentials.
Install from
SD card
Install encrypted certificates from SD card.
Set password
Set or change the credential storage password.
Clear storage
Clear credential storage of all contents and rest its
password.
Applications
Unknown sources
Allow installation of non-Market applications.
Manage applications
Manage and remove installed applications.
Running services
View and control currently running services.
Development
Set options for application development.
Privacy Factory data reset
Tap to reset the device to its initial factory state, erasing
all data and downloaded applications. Tap Reset Mid to
proceed with reset, or press Back key to cancel and return
to previous screen.
WARNING! The following will be erased during the
factory reset:
~ Google account
~ System and application data and settings
~ Downloaded applications
The factory reset will NOT erased:
~ Current system software and bundled applications
~ SD card files, such as music or photos
Language &
keyboard
Select language
Select t6he language and region according to your
location.
User dictionary
You can add words to a personal dictionary, words that
may not be included in the default dictionary.
Automatic
Use network-provided values
Date & time
Set date
Set the date manually when Automatic is not checked
Select time zone
Select the time zone when Automatic is not checked
Set time
Set the time when Automatic is not checked
Use 24-hour format
You can choose to use 24-hour format or 12-hour format.
Select date format
You can select the date format.
About Mid
View Status (Battery, Wi-Fi, etc), Battery use, Legal
information, Model number, Android version, Kernel
version and Build number.
 Loading...