


Giant Electronics ltd. Service manual for DECT phone rev.: 01
SERVICE MANUAL
(FOR MBO Alpha 26xx / 27xx / 28xx)
PAGE: 1 / 42

Giant Electronics ltd. Service manual for DECT phone rev.: 01
CONTENTS
z MODEL SPECIFICATION -------------------------------------------------- P3
z FEATURES LIST ------------------------------------------------------------- P4
z PRODUCTION TECHNICAL SPECIFICATION -------------- P05 ~ P12
z OPERATION MANUAL ------------------------------------------- P13 ~ P34
z MAIN PARTS DESCRIPTIONS ------------------------------------------ P35
z BASE RF CIRCUIT DIAGRAM ------------------------------------------ P36
z HANDSET RF CIRCUIT DIAGRAM ------------------------------------ P36
z HANDSET PROCESSOR CIRCUIT DIAGRAM ---------------------- P37
z BASE PROCESSOR CIRCUIT DIAGRAM ---------------------------- P38
z BASE LINE INTERFACE CIRCUIT DIAGRAM --------------------- P38
z BASE POWER & LEDS CIRCUIT DIAGRAM ----------------------- P39
z BASE MAIN ASSEMBLY LAYOUT DRAWING -------------------- P40
z HANDSET MAIN ASSEMBLY LAYOUT DRAWING ------------- P41
z BASE & HANDSET RF ASSEMBLY LAYOUT DRAWING ------ P42
PAGE: 2 / 42

Giant Electronics ltd. Service manual for DECT phone rev.: 01
MODEL SPECIFICATION
GENERAL DESCRIPTION
DECT TDMA: Time Division multiple Access
z
DECT uses 10 frequency bands and time division multiplexing. Each channel
z
has a frame structure. A DECT frame of 10 milliseconds is divided into 2 X 12
timeslots. Therefore one cell can handle up to 120 slots.
LCD display and Hands-free in handset (portable part)
z
SUPPLY POWER
HANDSET : 2X1.2V AAA 600mAhr Ni-MH rechargeable batteries
z
BASE : AC230V DC7V 300mA / AC7V 150mA adaptor
z
POSSIBLE RANGE
OPEN SPACE : UP TO 300 METERS
z
IN BUILDING : UP TO 50 METERS
z
WEIGHT
HANDSET : Less than 120g (with batteries)
z
BASE : 180g
z
SIZE (L x W x H)
HANDSET : 135x50x26
z
BASESET : 115x80x115
z
LIST OF STANDARD ITEMS
Cordless handset (portable part) ------------------------------------- 1 pc
z
Base station (fixed part) ---------------------------------------------- 1 pc
z
Battery pack ……………………………………………………. 1 pc
z
AC adaptor -------------------------------------------------------------- 1 pc
z
Telephone line cord --------------------------------------------------- 1 pc
z
Belt chip for handset …………………………………………… 1 pc
z
Instruction manual, single color ……………………………….. 1 pc
z
Gift box with inner box ………………………………………. 1 pc
z
PAGE: 3 / 42

Giant Electronics ltd. Service manual for DECT phone rev.: 01
FEATURES LIST
z Digital, cordless, easy to use telephone complying to DECT/GAP standards.
z CID function with caller list for 20 numbers or names from phonebook (network-
dependent).
z Alphanumeric LC display.
z Exchangeable top covers.
z Telephone directory (phonebook) for 40 entries with names and telephone numbers.
z Extended redialing for 10 numbers.
z Microphone muting function.
z Acoustic battery and range warning signals.
z 10 incoming call ringing melodies.
z Headset connection.
z Can be expanded for use with up to 5 mobile handsets.
z Operation of a handset on up to 4 base stations.
z Paging function from base station to handset.
z Programmable call barring.
z Key lock.
z DTMF, Flash.
z Up to 150 hours standby.
z Up to 12 hours continuous call time.
z Operation via 2 standard batteries, AAA type. ( micro, Ni-MH)
z Hands-free calling using the handset.
ANSWERING MACHINE PART
z Fully digital answering machine
z Adjustable call acceptance, 2-7 rings
z Date and time display for each message ( network-dependent)
z Answering machine operati0on via the handset
z Remote control option
z Security code
PAGE: 4 / 42

Giant Electronics ltd. Service manual for DECT phone rev.: 01
PRODUCTION TECHNICAL SPECIFICATION
1. 8GHz DECT Telephone
PAGE: 5 / 42
Giant Electronics ltd. Service manual for DECT phone rev.: 01
TECHNICAL SPECIFICATION
ELECTRICAL
PRODUCTION LIMIT
FIX PART PORTABLE PART REMARK
TESTING CONDITIONS
Supply
Temperature
Humidity
RADIO SECTION
Frequency Range 1880 MHz ~ 1900 MHz 1880 MHz ~ 1900 MHz
Number Of Channels 10 10
Channel Frequency RX TX RX TX
Channel 0 1881.792 MHz
Channel 1 1883.520 MHz
Channel 2 1885.248 MHz
Channel 3 1886.976 MHz
Channel 4 1888.704 MHz
Channel 5 1890.432 MHz
Channel 6 1892.160 MHz
Channel 7 1893.888 MHz
Channel 8 1895.616 MHz
Channel 9 1897.344 MHz
Frequency Stability
Modulation Method GFSK GFSK
Frequency Deviation
Maximum positive B-Field part 3
Maximum negative B-Field part 3
NTP Power 20 +6/ -2 dBm 20 +6/ -2 dBm 50 ohm Termination
Receiver Sensitivity
BER ≤ 0.0001
Jitter
Radio Regulation EN 301 406 EN 301 406
230VAC ± 10%, 50Hz 2.6V ± 0.1V
25 ± 10°C 25 ± 10°C
65 ± 20% 65 ± 20%
fc ± 65kHz fc ± 65kHz @20 ± 10°C
+203 / +403 KHz +203 / +403 KHz @CMD60
-403 / -203 KHz -403 / -203 KHz @CMD60
≤
-88 dBm
0 ± 1µs0
0 ± 100ns 0 ± 100 ns
≤
-88 dBm
±
1 µs
unless otherwise stated
unless otherwise stated
unless otherwise stated
Slot - Slot
Bit - Bit
LINE INTERFACE
DTMF SIGNALING
DTMF Freq. Tolerance:
697Hz
770Hz
852Hz
941Hz
1209Hz
1336Hz
1477Hz
Tone Level: Low Group
High Group
Twist (HG > LG)
< ± 1.5%
< ± 1.5%
< ± 1.5%
< ± 1.5%
< ± 1.5%
< ± 1.5%
< ± 1.5%
-13.0 ∼ -8.5 dBV
-11.0 ∼ -6.5 dBV
1 ∼ 4.5 dB
PAGE: 6 / 42
X Low Group, Row 1,2,3
X Low Group, Row 4,5,6
X Low Group, Row 7,8,9
X
X
X High Group, Col 2,5,8,0
X High Group, Col 3,6,9,#
X
X
X
Low Group, Row ∗,0,#
High Group, Col 1,4,7,
∗
Giant Electronics ltd. Service manual for DECT phone rev.: 01
S
PRODUCTION LIMIT
FIX PART PORTABLE PART REMARK
Tone Dial Digit Period, Td
Inter-digit Period, Tid
Mute Level
Unwanted Freq. Component
Pulse Dial Signaling See Table 1 Country specific
Flash Duration See Table 1 X Country specific
Maximum Ringer Stop Voltage X
Minimum Ringer Start Voltage X
Ringer Impedance @25Hz / 50Hz
On Hook DC Resistance
@100Vdc T/R-Earth
On Hook DC Resistance
@100Vdc T-R
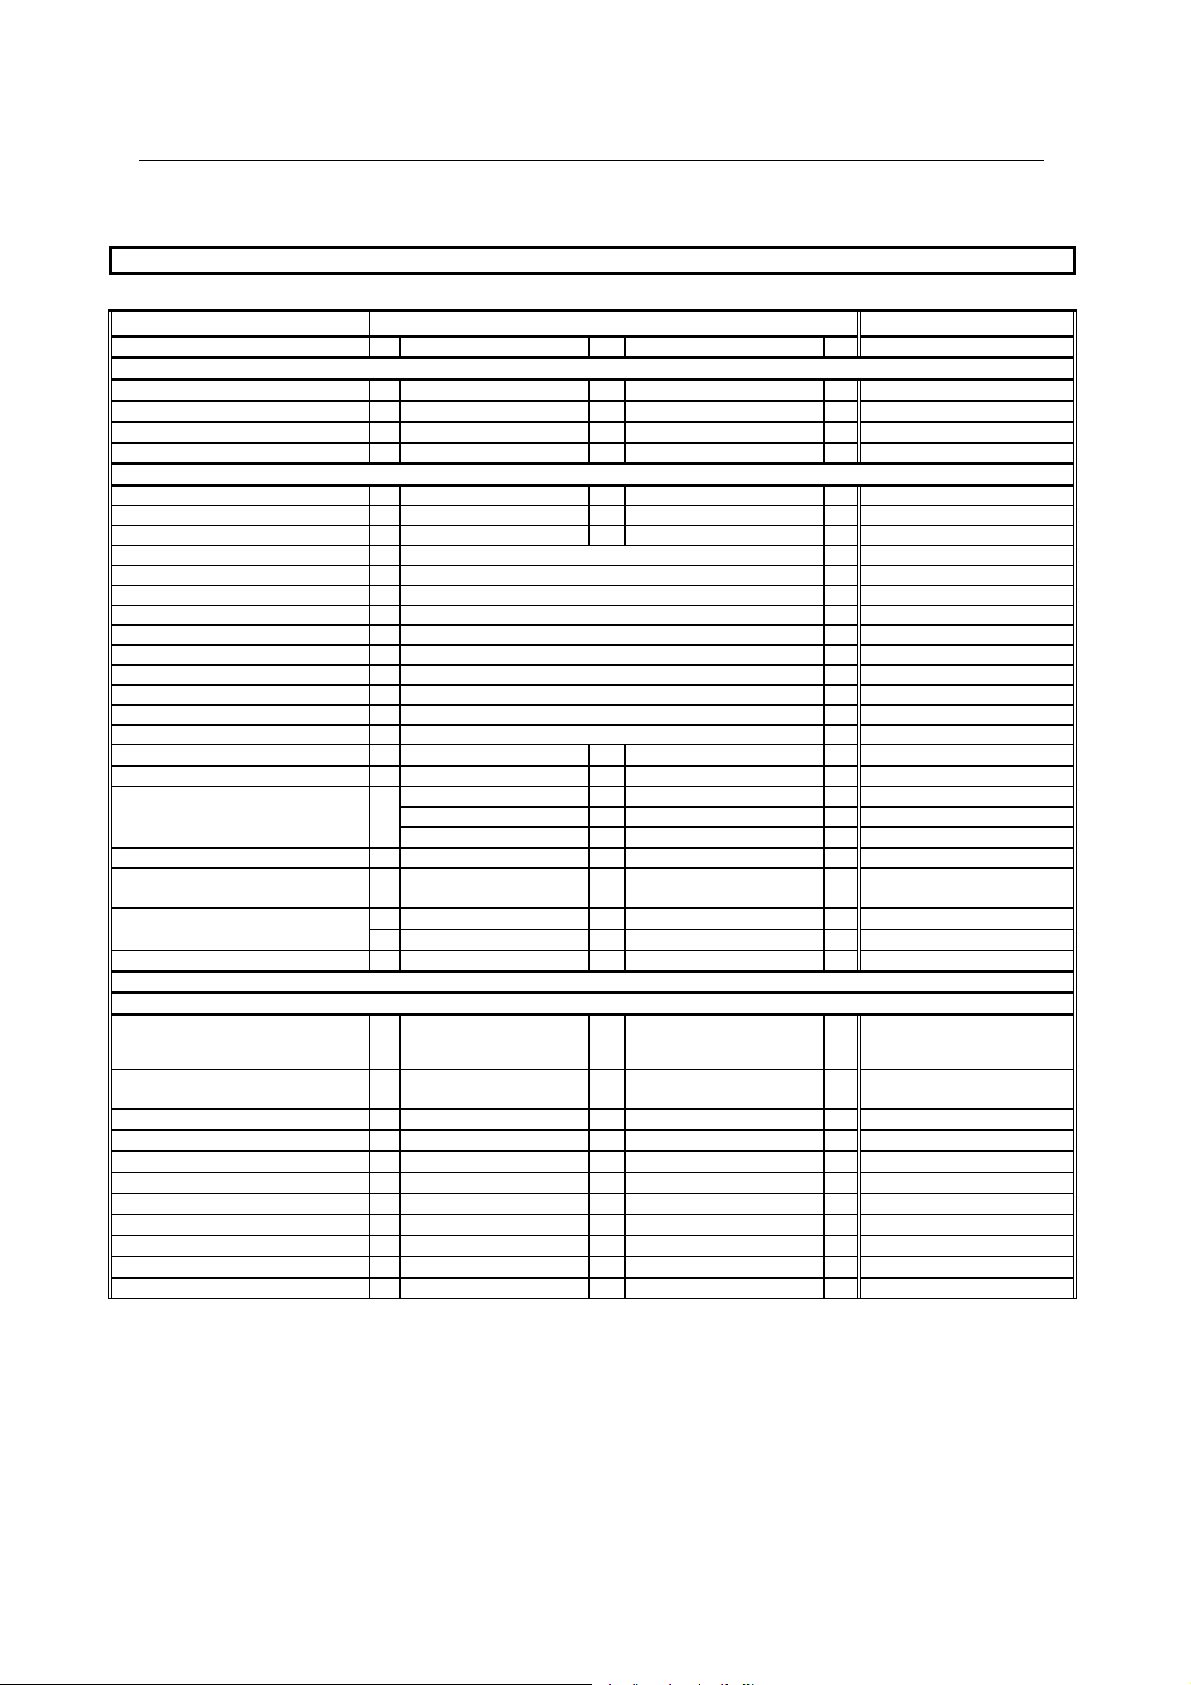
Off Hook DC Characteristics See Table 2 and Figure1 X I-CTR 37
On Hook AC Impedance
@ 300~3400Hz, 20mA, 50Vdc
Off Hook AC Impedance
Leakage Current between
Simplexed Tips & Ring to Charge
Contacts
Line Interface Regulation EN 300 001, I-CTR 37,
65 ∼ 90 ms
≥
65 ms
≥
20 dB
<
20 dB
>
4 k ohm
≥
Ω
10M
≥
Ω
1M
>
Ω
10k
270 + (750 ⁄⁄ 150nF)
≤
3.5mA @1kVrms
for 1sec.
CTR 38
X
X
XI-CTR 37
X
XI-CTR 37
XI-CTR 37
X EN 300 001 4.1.1
XI-CTR 37
X
PULSE DIAL SIGNALING
Flash(Address 0X1CF)
Table 1- Country Specific: Pulse Dial Signaling and Flash Duration
C180x
peed
Make
Break
Pre-pulse 20ms
Post-pulse 20ms
Break Duration
10±1pps
60±4ms
PAGE: 7 / 42
Giant Electronics ltd. Service manual for DECT phone rev.: 01
Point Voltage (V) Current (mA)
A9,0 0
B 9,0 20,0
C 14,5 42,0
D 40,0 50,0
E 40,0 60,0
F 0 60,0
NOTE: Limits for intermediate currents can be found
by drawing a straight line between the break points on a
linear voltage/current scale.
G0 0
Table 2 - TE Voltage/Current Characteristics
U(V)
40
14,5
D
C
9,0
A B
G
0
0204260
F
50
Figure 1: TE voltage/current characteristics
E
Not to scale
I (mA)
PAGE: 8 / 42
Giant Electronics ltd. Service manual for DECT phone rev.: 01
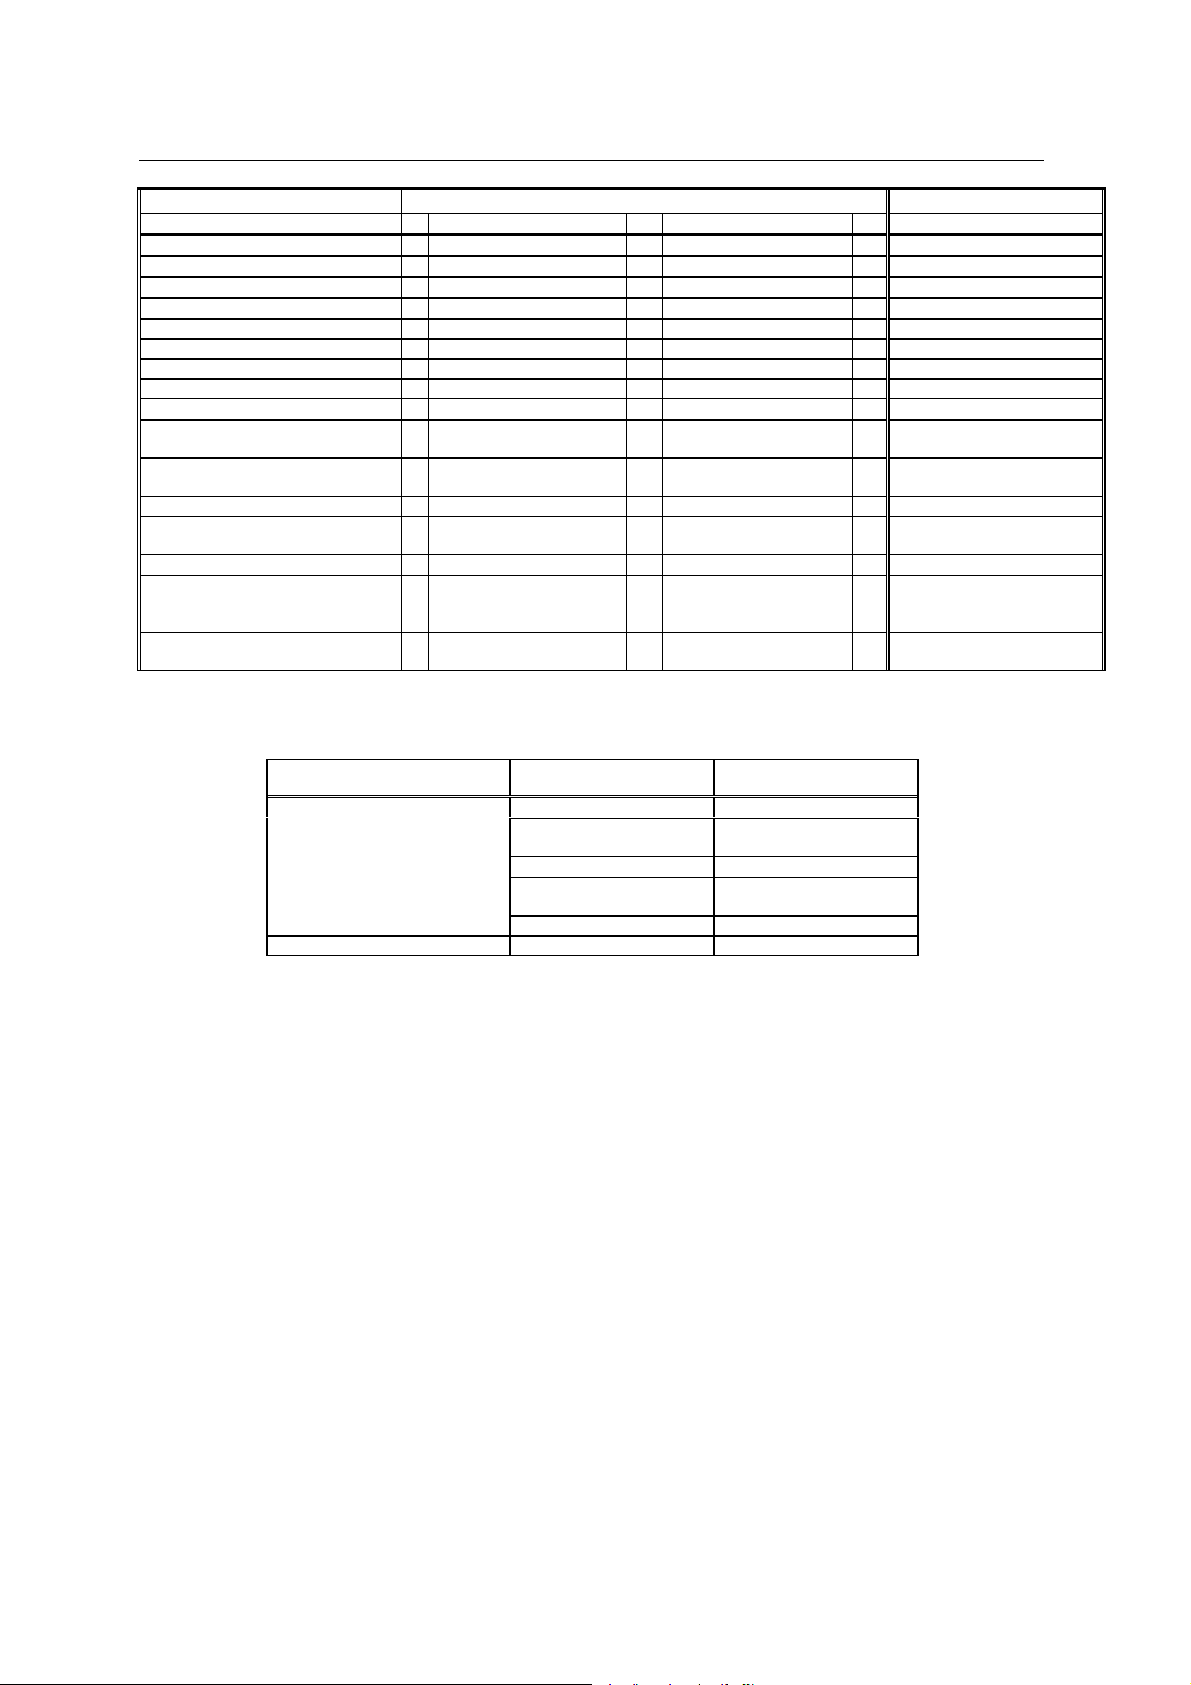
PRODUCTION LIMIT
FIX PART PORTABLE PART REMARK
ACOUSTIC RESPONSE
SLR (Sending Loudness Rating) TBR10
@ 2800 ~ 1000 ohm +/- 4dB X Refer to acoustic sample
@ 500 ohm +/- 4dB X Refer to acoustic sample
Sending Response See Figure 2 and Table 3 X CTR 38
Sending Distortion CTR 38
@1KHz,-4.7dBPa < 7% X
@500Hz,-4.7dBPa < 7% X
@1KHz, +5dBPa < 10% X
RLR
(Receiving Loudness Rating)
@ 2800 ~ 1000 ohm X +/- 4dB PP@volume 3 Refer to acoustic sample
@ 500 ohm X +/- 4dB PP@volume 3 Refer to acoustic sample
Receiving Response See Figure 3 and Table 4 X CTR 38
Receiving Distortion CTR 38
@1KHz,-12dBV X < 7%
@500Hz,-12dBV X < 7%
@1KHz, 0dBV X < 7%
STMR X > 10 dB
Sending Noise X
Receiving Noise X
Return Loss – Impedance
@200∼300 Hz
@300∼4000 Hz
Echo Return Loss
@300∼3400Hz
Receiver Volume: Hi/Normal X
Acoustic Reference CTR 38
>
6 dB
>
8 dB
>
14 dB
XI-CTR 37
X
XCTR 38
X 500 ~ 2500 Hz
≥
6 dB
Ω
2×1400
Ω
2×1400
Ω
2×800
CTR 38
Ω
2×1400
Ω
2×1400
Ω
2×800
2×500Ω, Zr
PAGE: 9 / 42
Giant Electronics ltd. Service manual for DECT phone rev.: 01
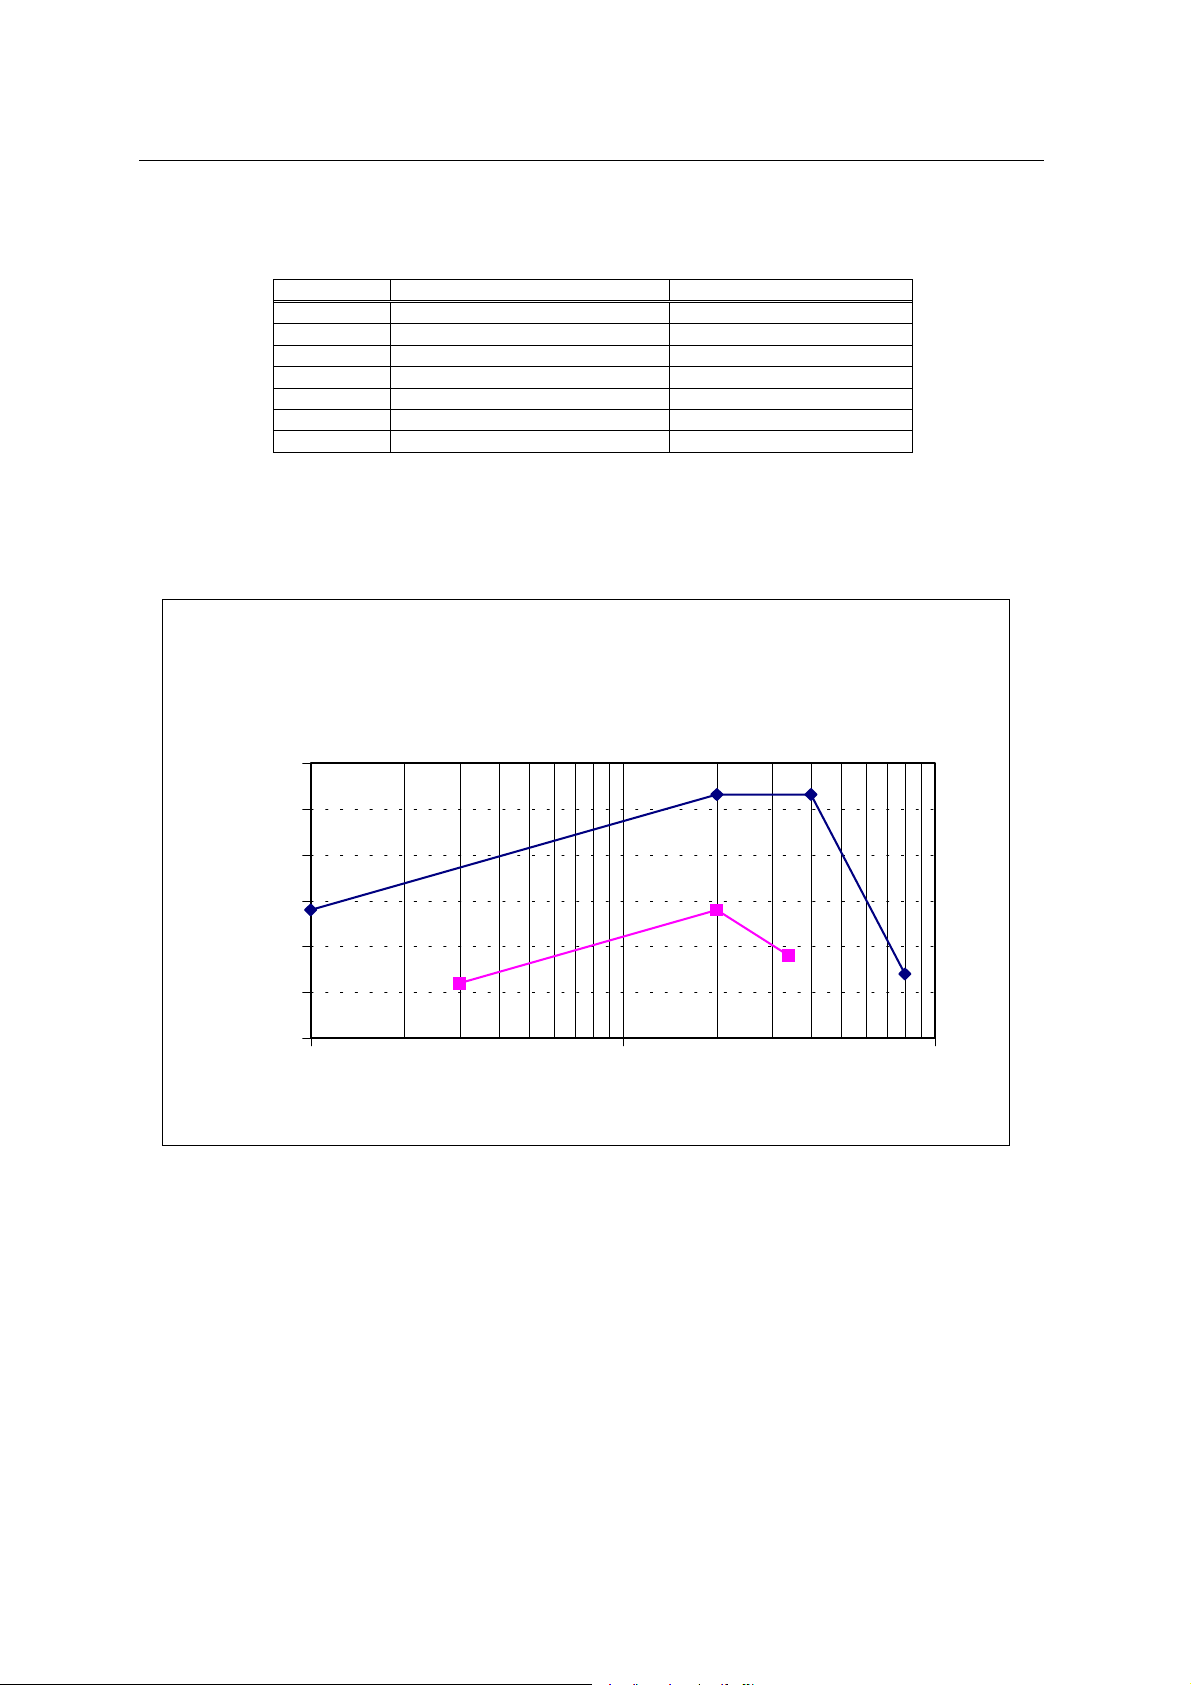
Frequency (Hz) dB relative to arbitrary level
Upper limit 100 -6
2000 +7
4000 +7
8000 -13
Lower limit 300 -14
2000 -6
3400 -11
Table 3 - Co-ordinates of Sending Sensitivity Limit Curves
Co-ordination of Sending Sensitivity
Limit Curves
10
5
0
-5
zero
-10
-15
-20
Sensitivity dB relative arbitrary
100 1000 10000
Figure 2: Co-ordination of Sending Sensitivity Limit Curves
Frequency (Hz)
PAGE: 10 / 42
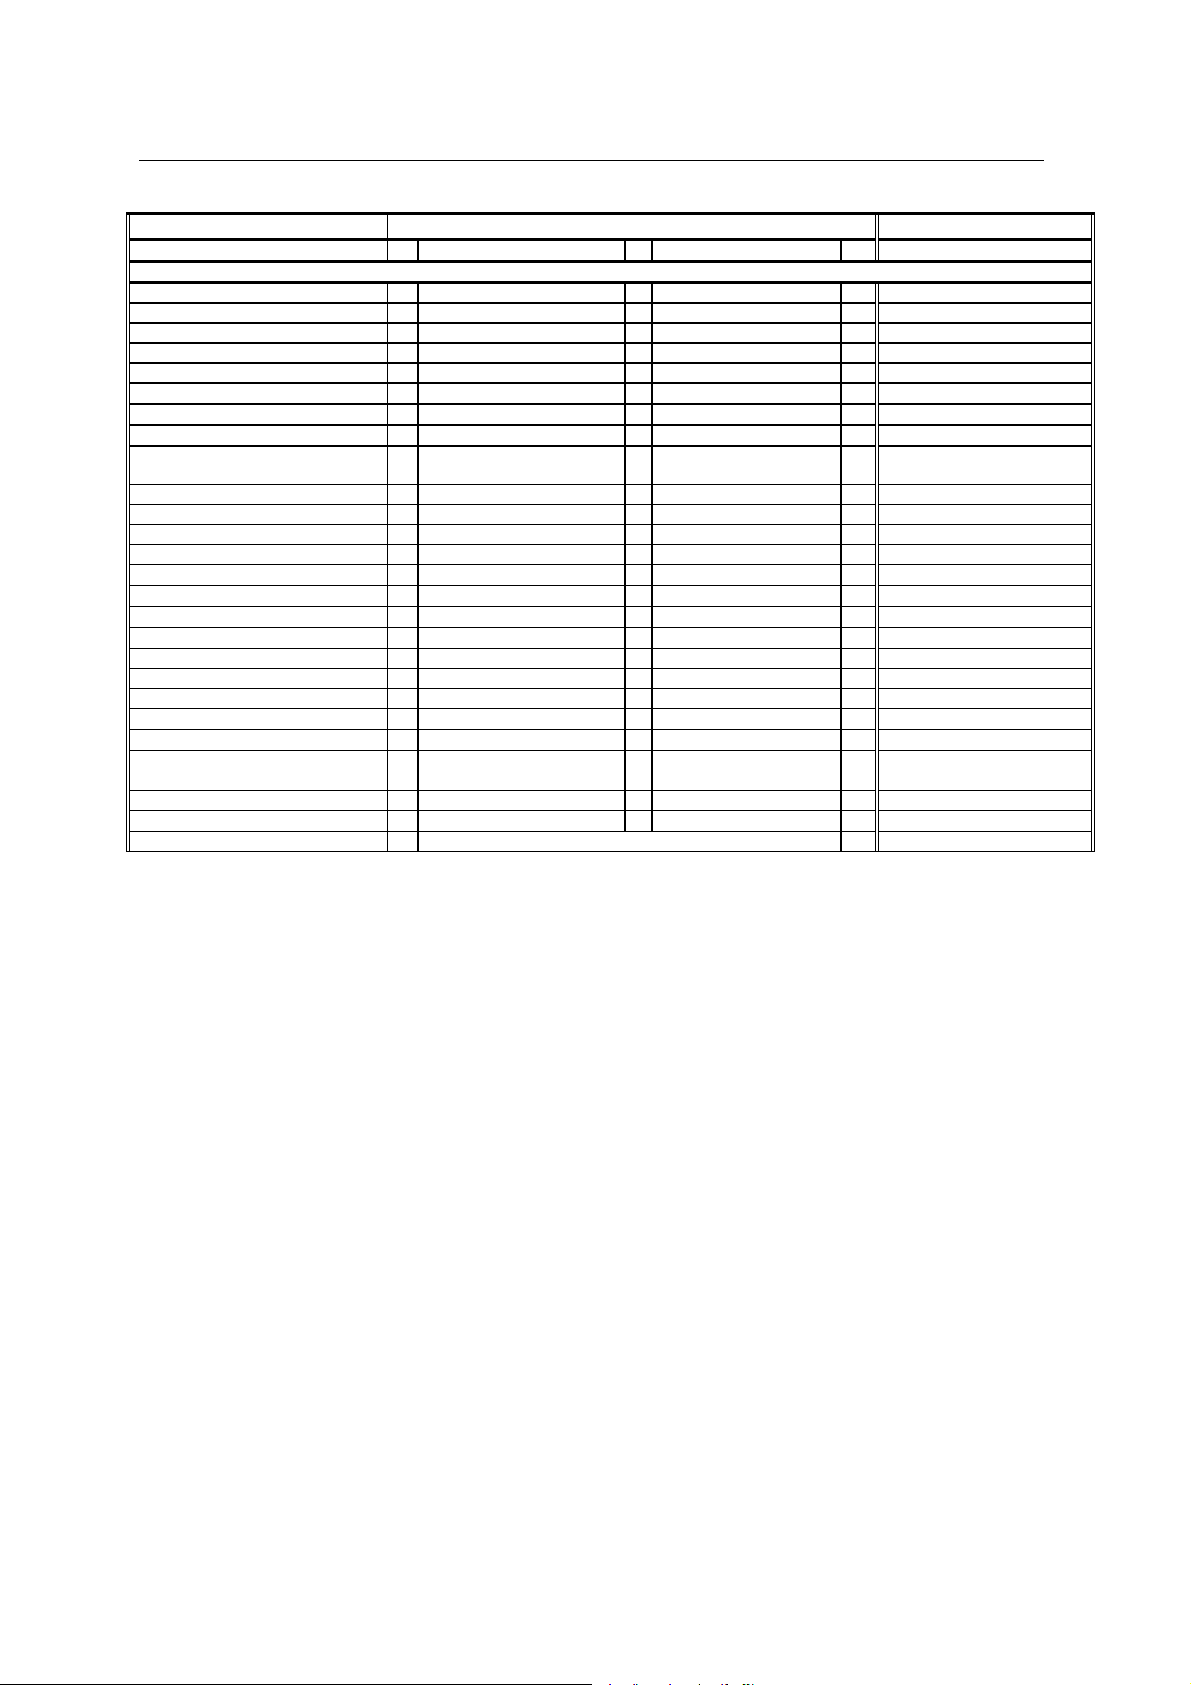
Giant Electronics ltd. Service manual for DECT phone rev.: 01
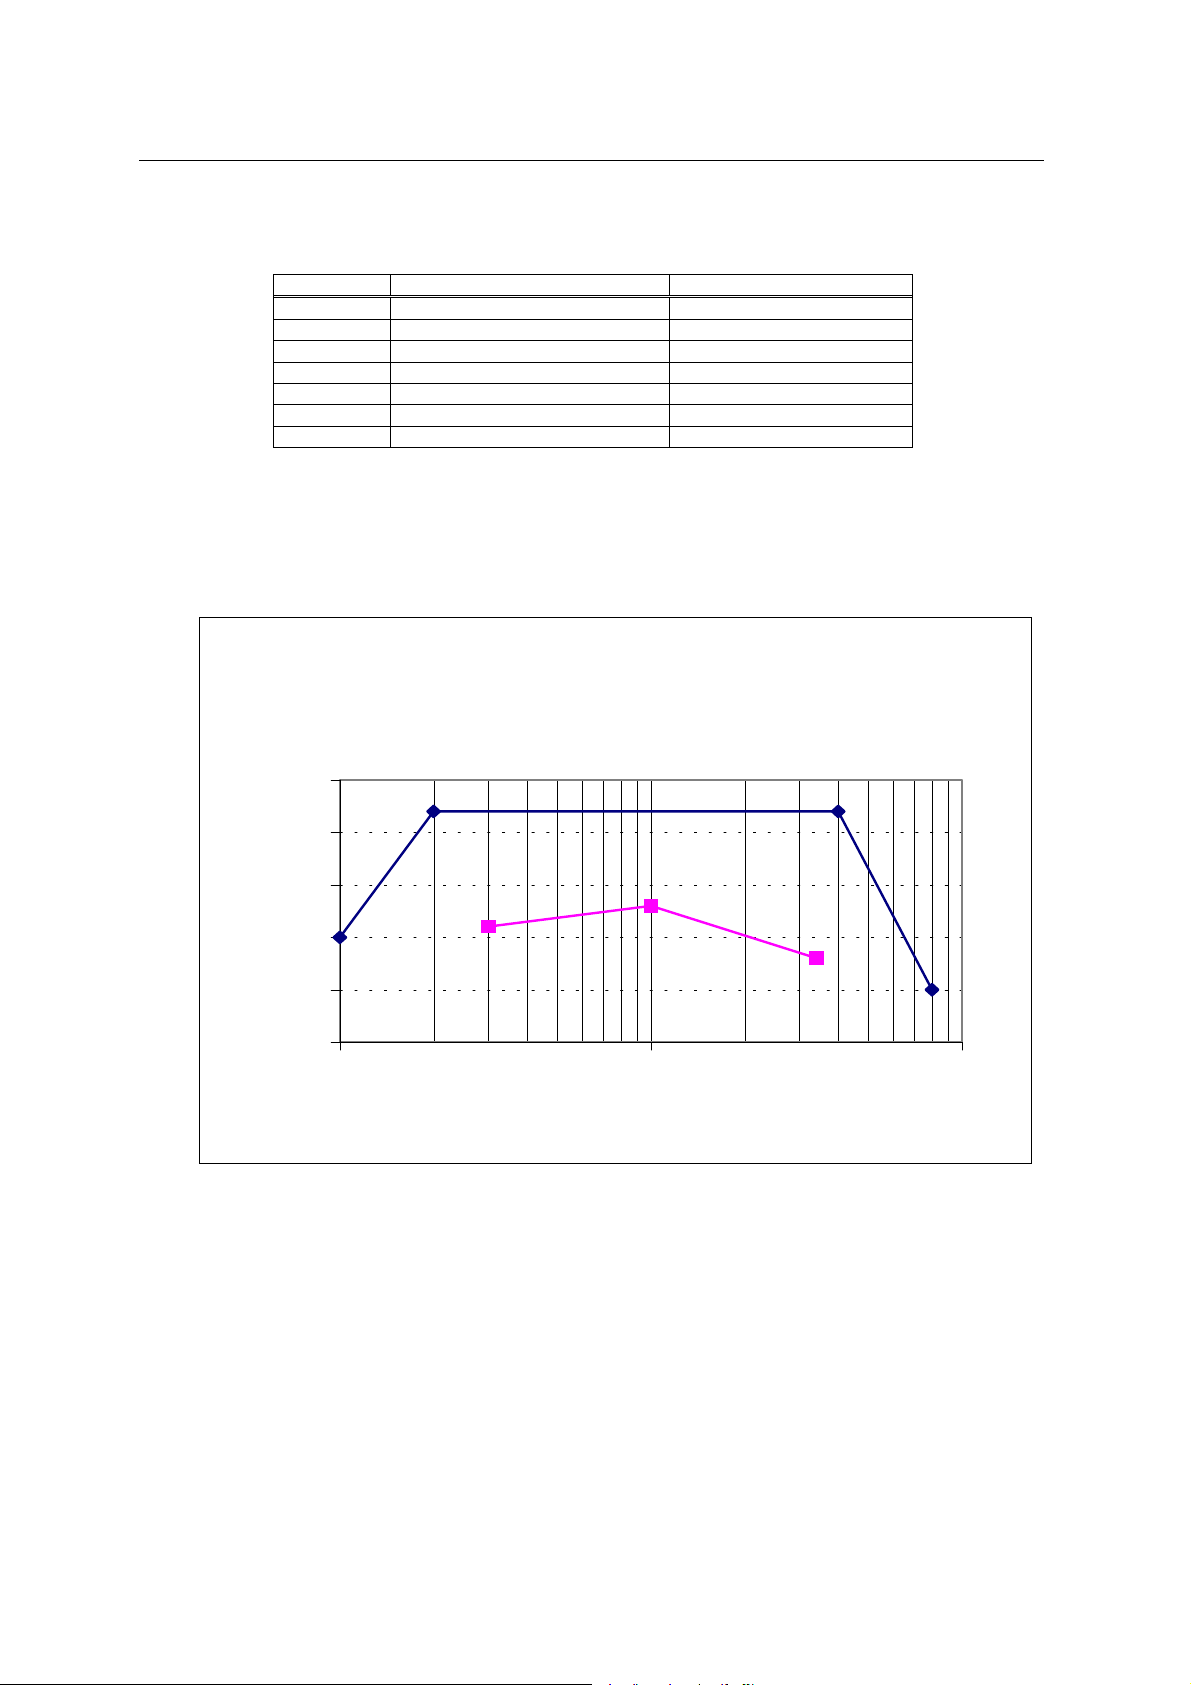
Frequency (Hz) dB relative to arbitrary level
Upper limit 100 -10
200 +2
4000 +2
8000 -15
Lower limit 300 -9
1000 -7
3400 -12
Table 4 - Co-ordinates of Receiving Sensitivity Limit Curves
C o -or d inate s of Rec eiv ing
S e n sitiv it y L imit C urve s
5
0
-5
zero
-10
-15
Sensitivity dB relative aebitrary
-20
100 1000 10000
Figure 3: Co-ordinates of Receiving Sensitivity Limit Curves
Frequency (Hz)
PAGE: 11 / 42
Giant Electronics ltd. Service manual for DECT phone rev.: 01
–
PRODUCTION LIMIT
FIX PART PORTABLE PART REMARK
OFF-LINE CID DATA TRANSMISSION (ETS 300 778-1)
Freq. and Baud Rate
Space Freq.
Mark Freq.
Baud Rate
Mark Level Detection Range -8 dBV ~ –36 dBV X
Space Level Detection range -8 dBV ~ –36 dBV
SNR Immunity @300~3400Hz 25 dB X
Transmission Prior to ringing
– TE Alerting Signals
DT-AS: Nom. Frequency
Signal Frequency
Twist
Duration
Unwanted Signal Immunity
(300 ∼ 3400 Hz)
RP-AS: Ringing Voltage
Nom. Frequency 25 Hz and/or 50 Hz X
Duration
Transmission During Ringing
First Ring Pattern
Ringing Voltage
Nom. Frequency 25 Hz and/or 50 Hz
Duration
Channel Seizure Detection
Length
Mark Signal Detection
Range
2100 ± 32 Hz
1300 ± 20 Hz
1200 ± 12 baud
2130 ± 11 Hz
2750 ± 14 Hz
-9 ∼ -40 dBV / tone
± 6 dBV
100 ± 10 ms
25 dB X
30 V ∼ 90 VRms
200 ∼ 450 ms
30 V ∼ 90 VRms
350 ∼ 1200 ms
96 ~ 300 bits X
180 ± 25 bits and / or
80 ± 25 bits
X
X
X
ETS 300778-1 4.2.1.1 &
4.2.3
X
X
X
X
X
X Extended
Recommendation
ETS 300778-1 4.2.1.2
X
ON-LINE CID DATA TRANSMISSION (ETS 300 778-2)
Freq. and Baud Rate
Space
Mark
Baud Rate
Mark Level Detection Range
Space Level Detection range
SNR Immunity @ Frequency
300 ∼ 3400 Hz
DT-AS Nom. Frequency
DT-AS Detection Level
DT-AS Detection Duration
DT-AS Twist
DTMF Acknowledge
TE-ACK)
Freq. Tolerance: 941 Hz 1.5% X
1163Hz 1.5% X
Tone Level: Low
Grp@20mA
Tone Level: High
Grp@20mA
Duration
Response Time
Mark Signal Detection
Length
2100 ± 32 Hz
1300 ± 20 Hz
1200 ± 12 baud
-10 ∼ -33 dBV
-10 ∼ -33 dBV
25 dB X
2130 ± 11 Hz
2750 ± 14 Hz
-10 ∼ -35 dBV / tone
80 ± 5 ms
± 6 dB
DTMF-D X
-8.5 ∼ -13 dBV
-6.5 ∼ -11.0 dBV
65 ms ∼ 90 ms
< 85 ms
80 bits ± 25 bits
X
X
X
X
X
X
X
XI-CTR 37
XI-CTR 37
X
X Between end of DT-AS
and start of TE-ACK
X
PAGE: 12 / 42

Giant Electronics ltd. Service manual for DECT phone rev.: 01
OPERATION MANUAL
1. Making External Calls
Charge the battery:
• Before you can use your new phone, you need to charge the battery.
• Put the supplied rechargeable batteries into the handset battery compartment and make sure
it is in the right polarity.
• Place the handset on the charge cradle of the base unit.
• The charge indicator
• The charge strength icon
• Charge the battery overnight for the first time.
To make a call:
on the base unit will light.
on the handset display will scroll.
• Press
• The base in-use indicator
• Dial the number you require.
To end a call:
• Press
Pre-dialing:
To make a call:
• Dial the number you require.
• To delete an incorrectly entered digit by pressing
• Press
• The phone will connect the line and dial the number you required.
To end a call:
• Press
To insert Pause for PBX system:
and wait for dialing tone.
will be turned on.
.
.
.
.
When you press and hold the digit, a Pause of 3 seconds will be added after the digit. A “P” will be
shown on the display.
2. Making Internal Calls
There should be more than one handset registered to a single base in order to make internal calls.
To make a call:
• Press
• Press the registered handset number you wish to dial.
.
PAGE: 13 / 42

Giant Electronics ltd. Service manual for DECT phone rev.: 01
To end a call:
• Press
Or Pre-Dialing:
To make a call:
• Enter the number of the handset you wish to call.
• Press
• The call will be connected.
To end the call:
• Press
NOTE: During an internal call, if an external call comes through, you will hear short beeps.
.
.
.
3. Receiving Calls
When receiving an external call, all handsets including the base unit will ring. The EXT icon on the
handset display and the
icon of the called handset will flash.
indicator on the base will flash. When receiving an internal call, the INT
When the handset is on the base unit:
• Lift the handset and the line will be connected automatically (when AUTO ANS is on).
• User has the option to turn off AUTO ANS feature where he/she has to press
the call.
When the handset is not on the base unit:
• Press
1.1.1 Ringing Volume:
During the ringing, user can press
to connect the call.
to increase or decrease the loudness of the ring.
4. Handsfree Mode
• Press
• Press
• You call use either
for handsfree operation during a call.
again will return to non-handsfree Mode.
or to make or answer an external or internal call.
to connect
• To end the call, press
.
PAGE: 14 / 42

Giant Electronics ltd. Service manual for DECT phone rev.: 01
5. Microphone Mute
During a call, you can mute the microphone by pressing and the icon will turn on. To un-mute,
press
again.
6. Phonebook Dialing
To make a call:
• Press
• Scroll through the phonebook by using
• This phonebook provides a search by letter function where the phonebook will jump to the
names starting with the letter keyed in. For example, when it is in the phonebook mode, user
can reach RON’s phone number by pressing
• Press
• The phone will connect the line and dial the number you required.
To end the call:
• Press
, the icon will be on.
until you find the number you wish to dial.
three times.
.
.
7. Storing Numbers
• Press
until the handset reads PHONEBK.
• Press
• The handset reads STORE.
• Press
• The display will read NAME?
• Use the alphanumeric keypad to enter the name of the person (maximum 8 characters) whose
telephone number you wish to enter.
• Press
• The display will read NUMBER?
• Enter the telephone number (maximum 18 digits), the
than 11 digits.
• Press
To exit STORE mode:
• Press
to enter the menu mode and then scroll through the menu by using
.
.
.
icon will show when the number is more
to complete the storing of the number.
.
PAGE: 15 / 42

Giant Electronics ltd. Service manual for DECT phone rev.: 01
8. Editing Numbers
• Press
until the handset reads PHONEBK.
• Press
• Press
• Press
• The display will show the first name from the phonebook.
• Press
• Press
• The display will show the name of the entry with a cursor next to it.
• Press
• Use the alphanumeric keypad to make the changes.
• Press
• Press
• Press
• The handset will return to EDIT menu.
• To exit EDIT mode, press
to enter the menu mode and then scroll through the menu by using
.
until the handset reads EDIT.
.
to select the entry you wish to edit.
.
to delete any characters you wish to alter.
. The number will be displayed.
to delete any digits you wish to alter and re-enter the number.
.
.
9. Deleting Numbers
Deleting a single telephone number:
• Under PHONEBK menu, press
• Press
• The display will show the first entry of the phonebook.
• Press
• When entry is found, press
• The number of the entry will be displayed.
• Press
• The handset will read CONFIRM.
• Press
• The handset will read DELETE.
• Press
• To exit DELETE mode, press
.
to search the entry to be deleted.
.
.
.
to delete another entry.
.
until the handset reads DELETE.
PAGE: 16 / 42

Giant Electronics ltd. Service manual for DECT phone rev.: 01
10. VIP Ringing (Melody)
The phone will give you a distinctive ringing tone if the call comes from one of your favorite callers.
• Under PHONEBK menu, press
• Select the name to attach a melody to and press
• Use
• To exit MELODY mode, press
to select the desired melody from 10 different melodies and press .
until the handset reads MELODY. Press .
.
11. Handset Ringing Volume
• Press
until the handset reads HANDSET.
• Press
• Press
• Press
• To exit VOLUME mode, press
When Ringing Volume is set to OFF, the
to enter the menu mode and then scroll through the menu by using
to read VOLUME.
to select the desired volume level, 5 levels plus VOL OFF.
to confirm the setting.
.
icon on the display will be on.
.
12. Changing the Ringing Tone
The Handset has 10 ringing tones to choose from. User can select a different ringing tone to
differentiate internal and external calls.
Changing the Handset External Ringing Tone:
• Under HANDSET menu, press
• Press
• Press
• To exit EXT RING mode, press
Changing the Handset Internal Ringing Tone:
• Under HANDSET menu, press
• Press
• Press
• To exit INT RING mode, press
and then press to select the desired tone MELODY 1 to MELODY 10.
to confirm the setting.
and then press to select the desired tone MELODY 1 to MELODY 10.
to confirm the setting.
until it reads EXT RING.
.
until it reads INT RING.
.
PAGE: 17 / 42

Giant Electronics ltd. Service manual for DECT phone rev.: 01
13. Warning Tones
The handset can provide the following warning tones:
Key: Sound a tone each time a key is pressed.
Low Battery: When all the bars inside the battery icon
user that the battery needs recharging.
Confirmation: Sound a tone when a setting or choice is confirmed.
Range: Sound a tone when the handset is out of range with the base, when the antenna
icon
All warning tones’ default settings are ON.
To modify the warning tones:
blinks; it signals that the handset has already lost the link with the base unit.
go off, it will sound a tone to remind the
• Under HANDSET menu, press
• Press
then press
• Press
• Press
• To exit TONE mode, press
and then press to select from KEY, LOW BATT, RANGE or CONFIRM,
.
to select ON or OFF.
to confirm the setting.
.
until it reads TONES.
14. Timer
The length of the call can be timed and displayed on the handset after the call started for 10 seconds.
Pressing and hold the
To activate the Timer function:
• Under HANDSET menu, press
• Press
.
key for 2 seconds will display the call number again for 5 seconds.
until it reads TIMER.
• Press
• Press
• To exit TIMER mode, press
to select ON or OFF.
to confirm the setting.
.
15. Changing Handset Label
To name the handset:
• Under HANDSET menu, press
• Press
.
until it reads LABEL.
PAGE: 18 / 42

Giant Electronics ltd. Service manual for DECT phone rev.: 01
• Use the alphanumeric keypad to enter the handset name (maximum 8 characters).
• Press
• To exit LABEL mode, press
to confirm the setting.
.
16. Auto Answer
• Under HANDSET menu, press
• Press
• Press
• Press
• To exit AUTO ANS mode, press
.
to select ON or OFF.
to confirm the setting.
until it reads AUTO ANS.
.
17. Base Menu
The base has two modes, Unprotected and PIN Protected.
Unprotected: Setting base ringing volume
Setting base melody
PIN Protected: Setting Call Barring
Changing the PIN code
Deleting handset
Factory default
LCR On / Off
18. Base Ringing Volume
• Press
until the handset reads BASE.
• Press
• Press
• Press
• Press
• Press
• To exit VOLUME mode, press
to enter the menu mode and then scroll through the menu by using
and it reads UNPROTEC.
again and it reads VOLUME (first option within UNPROTEC mode).
once more and it display the last value set.
to select the desired volume level, 5 levels plus VOL OFF.
to confirm the setting.
.
PAGE: 19 / 42

Giant Electronics ltd. Service manual for DECT phone rev.: 01
19. Base Melody
• Under BASE and UNPROTEC menu, press
• Press
• Press
• To exit MELODIES mode, press
and then press to select the desired tone MELODY 1 to MELODY 10.
to confirm the setting.
.
until the handset reads MELODIES.
20. Call Barring
The following call barring options can be selected:
OFF: All calls allowed
INTERNAL: All external calls are barred
LOCAL: International and National calls are barred except local calls, user can define prefix for local
numbers.
NATIONAL: International calls are barred (starting with 00).
CUSTOM: Pre-defined number is barred.
To select:
• Under BASE menu, press
• Press
• Enter the 4-digit PIN number (default is 0000).
and it reads PIN.
to select PIN PROT mode.
• Press
• Press
• Press
• Press
• Press
• For OFF, INTERNAL, LOCAL and NATIONAL, press
• For LOCAL, press
to confirm setting.
• For CUSTOM, press
be barred. Press
YOU CAN BAR THE EMERGENCY NUMBER.
• To exit CALL BAR mode, press
to read CALL BAR (first option within PIN Protected mode).
to select barring handset.
to select the desired handset to bar.
to confirm.
to select OFF, INTERNAL, LOCAL, NATIONAL or CUSTOM.
to read PREFIX. Enter the prefix used for local numbers. Press
to read BAR. Enter the desired phone number (maximum 5 digits) to
to confirm setting. WARNING: USE WITH SPECIAL CARE SINCE
.
21. PIN Code
To change the PIN code:
to confirm setting.
PAGE: 20 / 42

Giant Electronics ltd. Service manual for DECT phone rev.: 01
• Under BASE & PIN PROT mode, after entering the PIN code and enters the PIN PROT mode,
press
• Press
• Enter new PIN to replace the old PIN (maximum 4 digits)
• Press
• Re-enter the same new PIN as before and press
• To exit PIN CODE mode, press
Note: Service personnel can use the pre-defined Super-PIN code to enter into PIN protected mode in
case of the PIN code is lost or forgotten.
until it read PIN CODE.
to read NEW PIN.
to read REPEAT.
to confirm.
.
22. Delete Handset
• Under BASE & PIN PROT mode, after entering the PIN code and enters the PIN PROT mode,
press
• Press
• Press to select another handset within 1 to 5.
• Press
until it read DEL HS.
to read HANDSET 1.
to read CONFIRM.
• Press
• To exit DEL HS mode, press
once more to confirm.
.
23. Factory Default
• Under BASE & PIN PROT mode, after entering the PIN code and enters the PIN PROT mode,
press
• Press
• Press
The handset will be restored to factory default setting. Display will return to standby mode. (Please
refer to the appendix for factory setting detail)
until it read DEFAULT.
to read CONFIRM.
once more to confirm.
24. Recall
This key is often used for a number of services available from the telephone network, and for
use when connected to certain telephone switches. Details on when to use this button will be
explained by the network service provider. Many people will use this as flash key.
PAGE: 21 / 42

Giant Electronics ltd. Service manual for DECT phone rev.: 01
25. Redialing
The phone stores the last 10 external numbers dialed. You can select any number to redial within the
redial buffer in Pre-dialing mode. However, in dialing mode, you can only select the last number for
redial.
To redial the last number:
• Press
• Press
• To end the call, press
To redial in Pre-dialing mode:
• Press
• Press
• Press
• To end the call, press
and wait for dialing tone.
, the last number dialed will be displayed and dialed out automatically.
.
, the last number dialed will be displayed.
to scroll through the remaining dialed numbers.
, the phone will connect the line and dial out the number.
.
26. Caller ID
If you subscribe to the Caller ID service (please consult your telephone service provider for details
about the service), your phone automatically stores the last 30 incoming calls. When the phone rings,
the display will show either:
• The name, if any, as transmitted by the network, (only the first 8 characters will be displayed).
• Or the number only (last 12 digits).
• Or the name as stored in the phonebook if the identified number is stored in phonebook.
• If the CID is an unavailable call, it will display NOT AVAI.
• If the CID is a private call, it will display PRIVATE.
• If the CID does not contain number information, it will display 12 dashes in the number field.
When you have new calls, the handset display shows a blinking
will blink as well.
icon and the base IN USE indicator
27. Call Waiting Caller ID
If you subscribe to the Call Waiting Caller ID service (please consult your telephone service provider
for details about the service), your phone will display and store the Caller ID information even while
you are on the phone.
When you hear the Call Waiting signal, you can see the Caller ID information displayed for around 5
seconds.
PAGE: 22 / 42

Giant Electronics ltd. Service manual for DECT phone rev.: 01
28. Reviewing the Call Log
To review the Call log:
• Press
• The last call will be displayed.
• Use
• You can choose to display the next available information for any record by pressing
The sequence is Name, Number, Date & Time.
• If you press
Press
• At other times, press
• To call back the number, press
while on-hook (standby mode).
to scroll through the log.
again after the Date & Time display, you will be prompted to delete this entry.
again to delete. To keep this entry, press to go back to the standby mode.
also returns the phone to standby mode.
while reviewing that record.
29. Delete all CID Records
• Press
until the handset reads HANDSET
• Press
to enter the menu mode and then scroll through the menu by using
and then until it reads DEL CID.
.
• Press
• The handset reads CONFIRM.
• Press
• To exit DEL CID mode, press
.
to confirm deletion.
.
30. Page
In the event of misplacing the handset, press the page button on the base unit will page all
handsets. The handsets will ring for 10 rings or until the user press any key, which will stop the ring.
31. Low Power Mode
You can put the handset in idle (low power mode) to conserve the battery power. The display and
ringer will be off. Any incoming calls will ring at the base and other non-idle handsets.
To activate Low Power Mode, press and hold
.
for longer than 2 seconds. To de-activate, press
PAGE: 23 / 42

Giant Electronics ltd. Service manual for DECT phone rev.: 01
32. Transferring Calls
You can transfer phone calls to other handsets registered to the same base unit by pressing
followed by the handset number that you wish the call to be transferred to. The caller from the
external call will be put on hold. Once the other handset picks up the call, you can press
any time to transfer the call. If the second handset doesn’t answer, press
second handset and return to the phone call.
to end the call to the
at
33. Conference Call
While on an external call, you can invite another handset to join the conversation and have a 3-way
conference call. Press
conference call. The caller from the external call will be put on hold. Once the other handset answers
the call, press
conference and the other handset can continue with the external call.
to activate the conference call. Either handset can press to leave the
followed by the handset number that you wish to invite to join the
34. Base Selection
Base selection defines how handset links to the base. There are three choices a s follows:
AUTO: Choose the best base.
FIXED: Choose a particular base only.
PREFER: Starts with a particular base then the other.
To select the options:
• Press
until the handset reads B SELECT.
• Press
• Press
• Press
with the handset will blink.
• Key in the desired base number to register. For example, if option FIXED and base number 2 is
chosen, the display will show FIXED 2.
to enter the menu mode and then scroll through the menu by using
and the display will show the previously selected option FIXED, AUTO or PREFER.
to select the option you want.
and the display will show BS 1 2 3 4. The base number that has been registered
35. Room Monitoring
When more than one handset are registered, one of the handsets can be used as a (baby) Monitor
device.
To activate Monitor function:
• Press
the handset reads MONITOR.
• Press
to enter the menu mode and then scroll through the menu using until
.
PAGE: 24 / 42

Giant Electronics ltd. Service manual for DECT phone rev.: 01
• Press
• Press
to select ON.
.
The handset will display MONITOR (blinking) to indicate the handset is in monitor mode. Another
handset can call this handset over the internal call, which will activate the microphone on this handset
(being in monitor mode) so that the voice can be listened.
NOTE: The handset under monitor mode will not ring when an external call comes in.
To stop the Monitor function:
• Press
• Press
• Press
• Press
will take you to the MONITOR menu directly.
and the display read ON.
to select OFF.
and the handset will exit to standby mode.
36. Handset Lock/Unlock
To prevent accidental touching the keypad, you can lock the keypad.
To lock:
• Press
to enter the menu mode and then scroll through the menu by using
until the handset reads KEY LOCK.
• Press
• Press
• Press
.
to select ON.
.
• The handset will return to standby mode and the
To unlock:
• Press
• Press
• Press
• Press
and the handset will go to KEY LOCK menu directly.
.
to select OFF.
.
• The handset will return to standby mode and the
icon will be shown.
icon will go off.
PAGE: 25 / 42

Giant Electronics ltd. Service manual for DECT phone rev.: 01
Emergency Call during Key Locked:
You can still make an emergency call while the handset keypad is locked. Dial the emergency number
and then press
will connect the line and dial the emergency number.
37. Registration – Using Additional Handsets
Each additional GAP compatible handset must go through the registration process with the base. It is
up to 5 handsets to each base and each handset can be registered up to 4 base units.
To register:
• Press
until the handset reads REGISTER.
• Press
• Enter the number of the base unit you wish to register.
• The handset will read PIN.
• Enter the PIN number (default is 0000).
• The handset will read SEARCH while it searches for the base unit.
• Press and hold the PAGE button
• Once a connection has been made, the handset name and number (the next available number if
the number of handsets already registered with the base is less than 5) will be shown on the
display.
to enter the menu mode and then scroll through the menu by using
, the handset will read BS 1 2 3 4.
on the base unit until you hear 2 beeps.
Modify Handset Names:
Each handset comes with a default handset name. You can modify the handset name to whatever
you like with a maximum of 8 characters.
• Press
until the handset reads HANDSET.
• Press
• Press
• Press
• Press
to enter the menu mode and then scroll through the menu by using
, the handset will enter the HANDSET sub-menu.
until the handset reads LABEL.
and then enters the handset name (8 characters maximum).
again to confirm the entry.
38. Language Selection
Each handset comes with 2 different languages. You can select the language you want by:
• Press
until the handset reads LANGUAGE.
to enter the menu mode and then scroll through the menu by using
• Press
• Press
, the handset will enter the LANGUAGE sub-menu.
to select the language you want.
PAGE: 26 / 42

Giant Electronics ltd. Service manual for DECT phone rev.: 01
• Press
• To exit LANGUAGE mode, press
to confirm the selection.
.
39. Answering Machine
The answering machine is operable from the handset in the answering machine mode (AM) by
pressing
The answering machine operates in two different modes:
Answer-Record Plays an OGM (OGM1) and records a incoming message (ICM with maximum
Answer-Only Plays an OGM (OGM2) and hangs up. This mode will be automatically activated if
If no OGM is recorded, the answering machine will not be activated. The AM indicator on the base will
flash if there are new messages and the handset
go off if the messages have been heard.
To exit answering machine mode, press
during standby.
duration of around 2 minutes). The machine can hold 20 ICM with a total recording
time of 9 minutes.
the memory is full.
icon will go on. The new message indication will
again.
40. Record and Play OGM1 (Answer-Record Mode)
To Record OGM1 (maximum duration 30 seconds):
• In AM mode, press
• Wait for a beep, which indicates the beginning of the recording.
• The display will show REC_OGM1.
• Press
• The recorded OGM1 will be played back after the recording.
• If you didn’t stopped the recording within 30 seconds, the recording will be stopped
automatically after 30 seconds and under this condition, the OGM will not be played back
automatically.
To Play OGM1:
• In AM mode, press
• You can stop the playback by pressing at any time.
to stop the recording.
and then .
and then .
41. Record and Play OGM2 (Answer-Only Mode)
To Record OGM1 (maximum duration 60 seconds):
• In AM mode, press
• Wait for a beep, which indicates the beginning of the recording.
• The display will show REC_OGM2.
and then .
PAGE: 27 / 42

Giant Electronics ltd. Service manual for DECT phone rev.: 01
• Press
• The recorded OGM2 will be played back after the recording.
• If you didn’t stopped the recording within 60 seconds, the recording will be stopped
automatically after 60 seconds and under this condition, the OGM will not be played back
automatically.
To Play OGM2:
• In AM mode, press
• You can stop the playback by pressing at any time.
to stop the recording.
and then .
42. Answering Machine On / Off
To turn on or off the Answering Machine:
• In AM mode, press
• The display will show TAD_ON for on and TAD_OFF for off.
Note: Answering machine cannot be activated if no OGM is recorded.
will toggle the answering machine on and off.
43. Answering Machine Mode Setting
To set Answer-Record Mode:
• In AM mode, press
• The handset displays AR_MODE1.
To set Answer-Only Mode:
• In AM mode, press
• The handset displays AO_MODE2.
and then to set answer-record mode.
and then to set answer-only mode.
44. Ring Delay
Ring delay is used to set the number of rings after which the AM will seize the line. It can be set to 2
rings to 7 rings or Economy mode (2 rings if new messages recorded, 4 rings if no new messages).
To set Ring Delay:
• Press
until the handset reads TAD MENU.
to enter the menu mode and then scroll through the menu by using
• Press
• Press until it reads RG DELAY.
to enter the TAD MENU sub-menu.
PAGE: 28 / 42

Giant Electronics ltd. Service manual for DECT phone rev.: 01
• Press
• Press
• Press
• To exit to TAD MENU, press
to enter the RG DELAY sub-menu.
to select among ECONOMY, RING2 to RING7.
to confirm the selection.
.
45. Record and Playback a Memo
You can record a memo message to the answering machine for later review.
To record a Memo (maximum duration 2 minutes):
• In AM mode, press
• Wait for a beep, which indicates the beginning of the recording.
• The display will show REC_MEMO.
• Press
• If you didn’t stop the recording within 2 minutes, the recording will be stopped automatically
after 2 minutes or when the memory is full.
• The memo will be stored to the AM in the ICM memory. Hence recording a memo will reduce
the amount of time available for taking ICM.
to stop the recording.
and then .
You can playback the memo directly by:
• In AM mode, press
• The display will show PLAYMEMO.
• Press
Note: Only one memo message can be stored in the machine. You have to delete the old memo
before you can record a new memo.
to stop memo playing.
and then .
46. Play Messages
In AM mode, you can use the following shortcuts to playback the messages recorded in the AM
including memo:
: Plays the previous message, stops when beginning of message is reached.
: Play / Repeat the current message.
: Plays the next message, stops when end of message is reached.
: Stop playing
: Delete the message currently played.
During playback, the display will show MESSAGE and the # count or PLAYMEMO when it reach the
memo message. You can use
to adjust the playback volume.
PAGE: 29 / 42

Giant Electronics ltd. Service manual for DECT phone rev.: 01
47. Delete all Messages
You can delete all recorded messages (even new messages) at once by:
• In AM mode, press
• The handset displays CONFIRM.
• Press
to confirm and all messages will be deleted at once.
and then .
48. SOS Code and Filtering
There SOS Code is used to specify break through the filtering and ring the base for 8 seconds. You
can set your phone to one of the following filtering options:
OFF: No filtering
SPK FILT: Speaker filtering is to allow all calls to be listened on the speaker of handset #1. The
handset #1 speaker will be turned on when the OGM is played. When speaker filtering is
activated, all other handsets cannot answer any call.
FUL FILT: Full filtering is used to direct all the calls to the AM without ringing. Caller can enter
the SOS code (begins with *) to stop this function and have the base ring for 8
seconds.
CID FILT1: CID Filtering1 is used to filter all the calls (direct them to AM) except one number
(from the phonebook) that is allowed to pass. Caller can enter the SOS code
(begins with *) to stop this function and have the base ring for 8 seconds.
CID FILT2: CID Filtering2 is used to allow all the calls to ring except one number (direct it to AM)
from the phonebook that is not allowed to pass. Caller can enter the SOS code
(begins with *) to stop this function and have the base ring for 8 seconds.
To Set SOS Code:
• Press
until the handset reads TAD MENU.
• Press
• Press until it reads SOS CODE.
• Press
• Enter the SOS PIN number (default is 111) and press
• Display will show NEW PIN.
• Enter New PIN (e.g. 333) and press
• Display will show REPEAT.
• Re-enter New PIN 333 again and press
• Display will show SOS CODE.
• To exit to TAD MENU, press
To Set Filtering Option:
to enter the menu mode and then scroll through the menu by using
to enter the TAD MENU sub-menu.
, the handset displays PIN.
.
to confirm.
.
.
PAGE: 30 / 42

Giant Electronics ltd. Service manual for DECT phone rev.: 01
• Press
to enter the menu mode and then scroll through the menu using until
the handset reads TAD MENU.
• Press
• Press
• Press
• Press
• Press
to enter the TAD MENU sub-menu.
until it reads FILTERIN.
to enter the FILTERIN sub-menu.
to select either OFF, SPK FILT, FUL FILT, CID FILT1 and CID FILT2.
to confirm the selection.
Note: In all circumstances, the activation of monitor mode will override the activation of speaker
filtering. It means that when speaker filtering is enabled after the monitor function, the monitor function
will still be in effect. To activate the speaker filtering, the monitor function must be se to off first.
49. PIN Code and Remote Access the Answering Machine
This 3-digits PIN code is used to remote access the answering machine (AM) while you are away from
home.
To change the PIN Code:
• Press
to enter the menu mode and then scroll through the menu by using
until the handset reads TAD MENU.
• Press
• Press
• Press
• Enter the PIN number (default is 000) and press
to enter the TAD MENU sub-menu.
until it reads PIN CODE.
, the handset displays PIN.
.
• Display will show NEW PIN.
• Enter New PIN (e.g. 222) and press
.
• Display will show REPEAT.
• Re-enter New PIN 222 again and press
to confirm.
• Display will show PIN CODE.
• To exit to TAD MENU, press
.
Note: The remote PIN code and SOS code cannot be set as the same number because user can
enter either code while OGM is played.
To Remote Access AM (when AM is On):
• Call the phone from outside using a touch-tone phone.
• During the OGM is being played, key in * then the 3-digit PIN Code.
• If the PIN Code is correct, it gives 2 beeps. If not, user can try 2 more times.
PAGE: 31 / 42

Giant Electronics ltd. Service manual for DECT phone rev.: 01
• If the PIN code is still incorrect after three attempts, the line will be dropped.
• There is an 8-seconds timeout between key inputs before the line is dropped.
• After the 2 beeps, you can access the answering machine in the same way as the handset by
entering the AM shortcuts.
To Remote Access AM (when AM is Off):
• Call the phone from outside using a touch-tone phone.
• Let it ring for 10 times, the AM will answer and give 2 beeps.
• Key in the 3-digit PIN Code.
• If the PIN Code is correct, the AM will be turned ON automatically and the recorded OGM will
be played.
• The AM can take all the AM shortcuts. The first shortcut must be entered during the OGM
play, otherwise the line will be cut off after OGM stops.
• If the PIN code is incorrect, the line will be dropped after three attempts.
• There is an 8-seconds timeout between key inputs before the line is dropped.
50. Prefix Dialing Option
If your phone comes with the Prefix Dialing (LCR) option, when the phone goes off-hook, the handset will display LCR for 2
seconds to remind you that the LCR option is enabled.
You can Enable / Disable the LCR Option by:
• Press
to enter the menu mode and then scroll through the menu by using
until the handset reads BASE.
• Press
• Press
and then press to select PIN PROT sub-menu.
and it reads PIN.
• Enter the 4-digit PIN number (default is 0000).
• Press
• Press
• Press
to enter PIN PROT sub-menu.
to select LCR.
to enter LCR sub-menu.
• Press to select ON to enable or OFF to disable LCR.
• Press
• To exit LCR setting mode, press
to confirm the selection.
.
PAGE: 32 / 42

Giant Electronics ltd. Service manual for DECT phone rev.: 01
Answering Machine Shortcuts Summary:
The available shortcuts for ANS MAC mode and remote access are:
Feature Shortcut for ANS MAC mode and remote
access control
Play messages
Repeat current message
Jump to previous message
Jump to next message
Stop
Delete the current message while the message
is being played
Delete all Messages
Record OGM1
Record OGM2
Play OGM1
Play OGM2
Record a memo
Play a memo
+
+
+
+
+
+
+
Answer Machine On / Off
Set Answer-record mode
Set Answer-only mode
+
+
1.1.2 Memory Full
If the memory is full, then the AM hangs up after the OGM2 was played.
PAGE: 33 / 42

Giant Electronics ltd. Service manual for DECT phone rev.: 01
Appendix: Base and Handset Default Setting
Default settings for Base and Handset is as follow:
Base default setting: Volume: 5
Melody: 1
Call Barring: Off for all Handset
Custom and Local Barring: No Prefix
LCR: On
PIN Code: 0000 (for base menu)
AM: Off
ICM: Reset
OGM: No Change
SOS Code: 111
PIN Code 000 (for remote and TAD MENU)
Filtering: Off
TAD Message Volume: 3
Handset default setting: Volume: 5
Ext. Melody: 1
Int. Melody: 5
Monitor: Off
Timer: On
Tones: All On
Auto Answer: On
Base Selection: Auto
Keypad Lock: Off
Phonebook: No Change
CID: Reset
Redial: Reset
Handset Volume: 3
Handset Name: No Change
PAGE: 34 / 42

Giant Electronics ltd. Service manual for DECT phone rev.: 01
MAIN PARTS DESCRIPTIONS
z MCU ---- Philips
The MCU PCD509xy family is designed for low power GAP compatible DECT handset
(pp) and base station (FP) applications. The circuit includes the audio interface, the DSP,
the micro controller and the burst mode logic, and contains all functionality to convert
speech and data signals from/to the analog side (microphone and earpiece or line
interface circuit) to /from the radio side (1.152Mb/s data).
z POWER AMPLIFIER --- UAA3590TW --- Philips
The UAA3590TW is a silicon Monolithic Microwave Integrated Circuit (MMIC) power
amplifier specifically designed to operate from a 2.4V to 3.2V supply voltage. The
voltages applied on pins Vcc and Von control the power of the PA and permit it to be
switched off.
For the 1.88 to 1.9 GHz transceivers for DECT and the 2GHz radios applications.
FEATURES:
1. Power Amplifier (PA) overall efficiency 45%
2. 27.5 dBm saturated output power at 3.2V
3. 3 dBm input power
4. 35dB linear gain
5. Wide operating temperature range from –30 to +85 °C
6. HTSSOP20 package
z Fully Integrated DECT Transceiver – UAA3545HL – Philips
The UAA3545HL BICMOS device is a low power, highly integrated circuit, for Digital
Enhanced Cordless Telecommunication (DECT) applications.
For the 1880 to 1930 MHz cordless telephones applications.
FEATURES:
1. Economical solution for a radio in DECT cordless telephones
2. Integrated low phase noise VCO with no production tuning required
3. Fully integrated receiver with high sensitivity
4. Dedicated DECT PLL synthesizer
5. 3 dBm output preamplifier with an integrated switch
6. 3-line serial interface bus
7. Low current consumption from 3.2V supply
8. Compatible with Philips Semiconductors’baseband ship
9. Reduction of control signals
z 2-Wire Serial EEPROM --- AT24C08/32 --- ATMEL
The AT24C08/32 provides 8192/32,768 bits of serial electrically erasable and programmable read only memory (EEPROM) organized as 1024/4096 words of 8 bits each.
z Dual Low Voltage Power Amplifier --- NJM2073M
The NJM2073 is a monolithic integrated circuit in 8 lead dual-in-line package, which is
designed for dual audio power amplifier in portable radio and handy cassette player.
PAGE: 35 / 42

Giant Electronics ltd. Service manual for DECT phone rev.: 01
BASE RF CIRCUIT DIAGRAM
HANDSET RF CIRCUIT DIAGRAM
PAGE: 36 / 42

Giant Electronics ltd. Service manual for DECT phone rev.: 01
HANDSET PROCESSOR CIRCUIT DIAGRAM
PAGE: 37 / 42

Giant Electronics ltd. Service manual for DECT phone rev.: 01
BASE PROCESSOR CIRCUIT DIAGRAM
BASE LINE INTERFACE CIRCUIT DIAGRAM
PAGE: 38 / 42

Giant Electronics ltd. Service manual for DECT phone rev.: 01
BASE POWER & LEDS CIRCUIT DIAGRAM
HANDSET LCD CIRCUIT DIAGRAM
PAGE: 39 / 42

Giant Electronics ltd. Service manual for DECT phone rev.: 01
BASE MAIN ASSEMBLY LAYOUT DRAWING
PAGE: 40 / 42

Giant Electronics ltd. Service manual for DECT phone rev.: 01
HANDSET MAIN ASSEMBLY LAYOUT DRAWING
PAGE: 41 / 42

Giant Electronics ltd. Service manual for DECT phone rev.: 01
BASE & HANDSET RF ASSEMBLY LAYOUT DRAWING
PAGE: 42 / 42
 Loading...